


SSIHusetSSIHusetSSIHuset
Svane ElectronicSvane Electronic
Arildsvej 27, Gråmose, 7442 Engesvang
kunde@svane-el.com Tlf.: 70253010 www.svane-el.dkkunde@svane-el.com Tlf.: 70253010 www.svane-el.dk
User Manual
Wireless Audio Intercom Door Phone
Product number: 50000652
1

Contents
Product Diagram ----------------------------- 3-5
Handset
Outdoor Unit
Basic Operations ------------------------------- 6
Unlocking Operations ---------------------- 7-8
From the Handset
From the Outdoor Unit
Pairing Operations ------------------------- 9-13
Pairing the Handset to the Outdoor Unit
Pairing to an extra Handset
Adding an Extra Outdoor Unit
Installation Guide ------------------------------14
Door Lock Wiring guide ---------------------15
2

Product Diagram
Up arrow - increase
volume
Left arrow – change
ringtone and pairing
Answer and call key
Unlocking Key
Down arrow -
decrease volume
Hang-up key
Right arrow -
screen brightness
Handset
3

Outdoor Unit
Speaker
LED
Display
Unlock
Key
Call button Mic
Confirm
key
Product Diagram
4

Outdoor Unit
External DC
power slot
Lock control
slot
Pairing and
password
remove
button
Wire
connection
diagram
Battery box
4 x AAA 1.5V
5

Basic Operation
Select Ringing tone and volume adjust
1)Press right arrow to wake up screen.
2)Switch tones with left right arrows.
3)Adjust volume with up and down arrows.
Calling between outdoor unit and handset
1.Press call key on outdoor unit.
2.All handsets will ring and turn off when answered by one
phone.
3.In the case of multiple handsets, one handset can be called
by pressing the number of the applicable handset before
pressing the call button (number for the handset can be
found on the upper right hand side of the display).
4.Intercom can be done between handsets. For example by
pressing ”2” and the green telephone button on the handset,
intercom is available to handset number 2.
5.In the intercom mode, volume can be adjusted using the up
down arrows
6

Unlocking operation
In the intercom state press
the red lock button on the
handset.
Both the handset and the
outdoor unit will display an
unlock symbol.
From the handset
7

Unlocking from the outdoor unit
Touch the keypad to wake up the screen
Press the unlock key until you see _ _ _ _ _ _ at the bottom
of the display.
Type in the password (default 123456) and press the confirm key
. The unlock symbol will appear on the top of the screen.
Changing the unlock password
Press the unlock key until you see _ _ _ _ _ _ at the bottom
of the display.
Touch the keypad to wake up the screen
Type in the password 999999 and press the confirm key . The
R symbol will appear on the bottom left of the screen.
Type in the new password and press the confirm key .
8
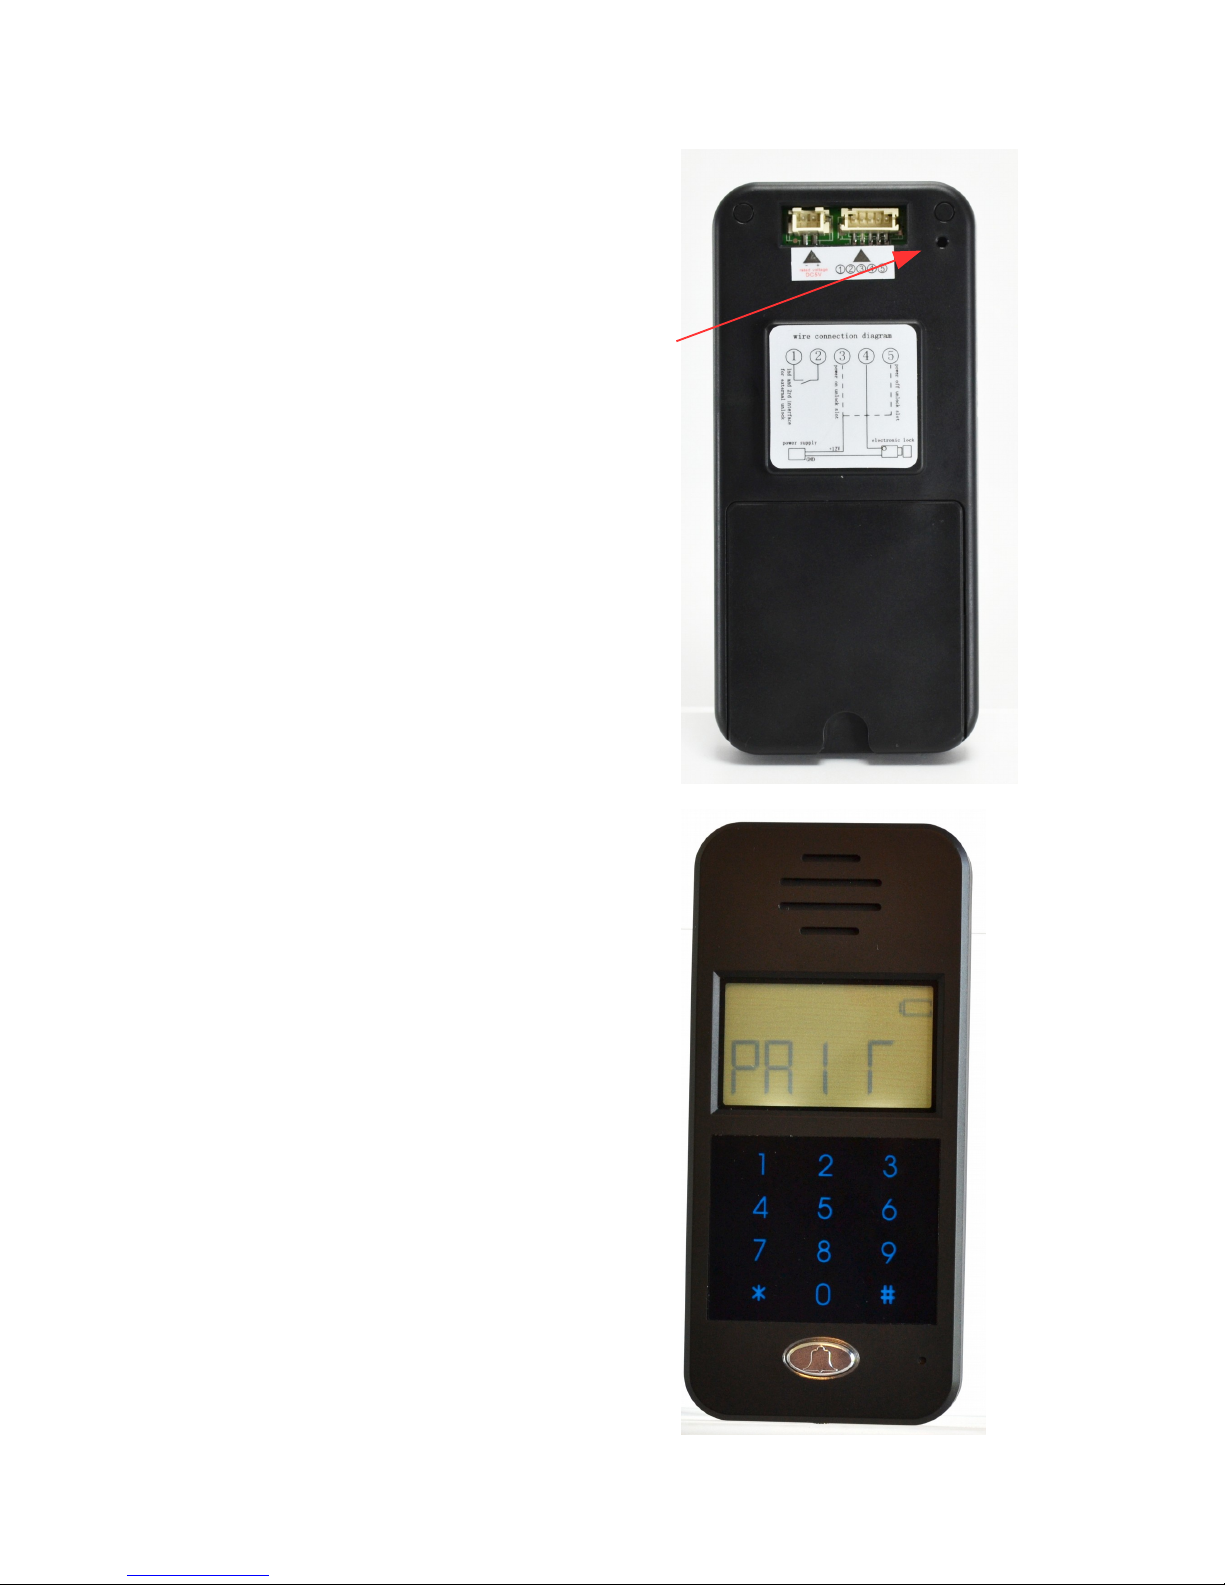
Pairing between the outdoor unit and the handset
Press the pairing button located
on the back side upper right
hand corner of the outdoor unit.
”PAIR” will appear on the
screen and is now in
pairing mode.
9

On the handset press the right
arrow button to activate the
screen.
Press ”*” then press and hold
the left arrow until ”pair”
appears on the display.
After 1 second the handset will
give a beep tone and ”OH” will
appear shortly on the outdoor
unit.
Pairing is now successful.
Press the left arrow again on
the handset to exit pairing
status.
10

Pairing between handsets
On the existing handset press
any number except 1 then
press the left arrow until ”pair”
appears on the display.
On the new handset press the
left arrow until pairing is
displayed . It will disappear
shortly.
Now the new handset is
paired. The pressed number
will be the handsets id.
On the existing handset press
the left arrow to exit pairing
11

Adding an extra outdoor unit
Press the pairing button located
on the back side upper right
hand corner of the outdoor unit.
”PAIR” will appear on the
screen and is now in
pairing mode.
12

On the handset press any
number except 1 then press
the left arrow until ”pair ”
appears on the display.
The outdoor unit wil give a
beep tone and then the screen
will turn off.
Pairing is complete.
Note
99 is the maximum number of
pairings. By pressing * and
then the left arrow , a new
pairing will be started and all
previous pairings will be void
Re-pairing will be necessary.
13

Installation
The outdoor unit should be installed 1,4 to 1,7 meters above the
ground surface. Avoid direct sunlight
Mount the raincover to the wall with appropriate fastening
screws. Place the batteries in the back of the outdoor unit and
manouver the unit into the cover. Secure the unit with the
provided screw.
14

Examples for wire connections
15
 Loading...