

Page 1

Instruction Manual
PLACA VITRO
Model:SVI639
placa de inducción
Manual de
Instrucciones de la
Modelo:SVI639
Page 2

Placa de cocción
Zonas de cocción
Suministro de voltaje
Potencia Electrica
Instalada (W)
Dimensiones producto
D×W×H
(mm)
Dimensiones interiores
A×B (mm)
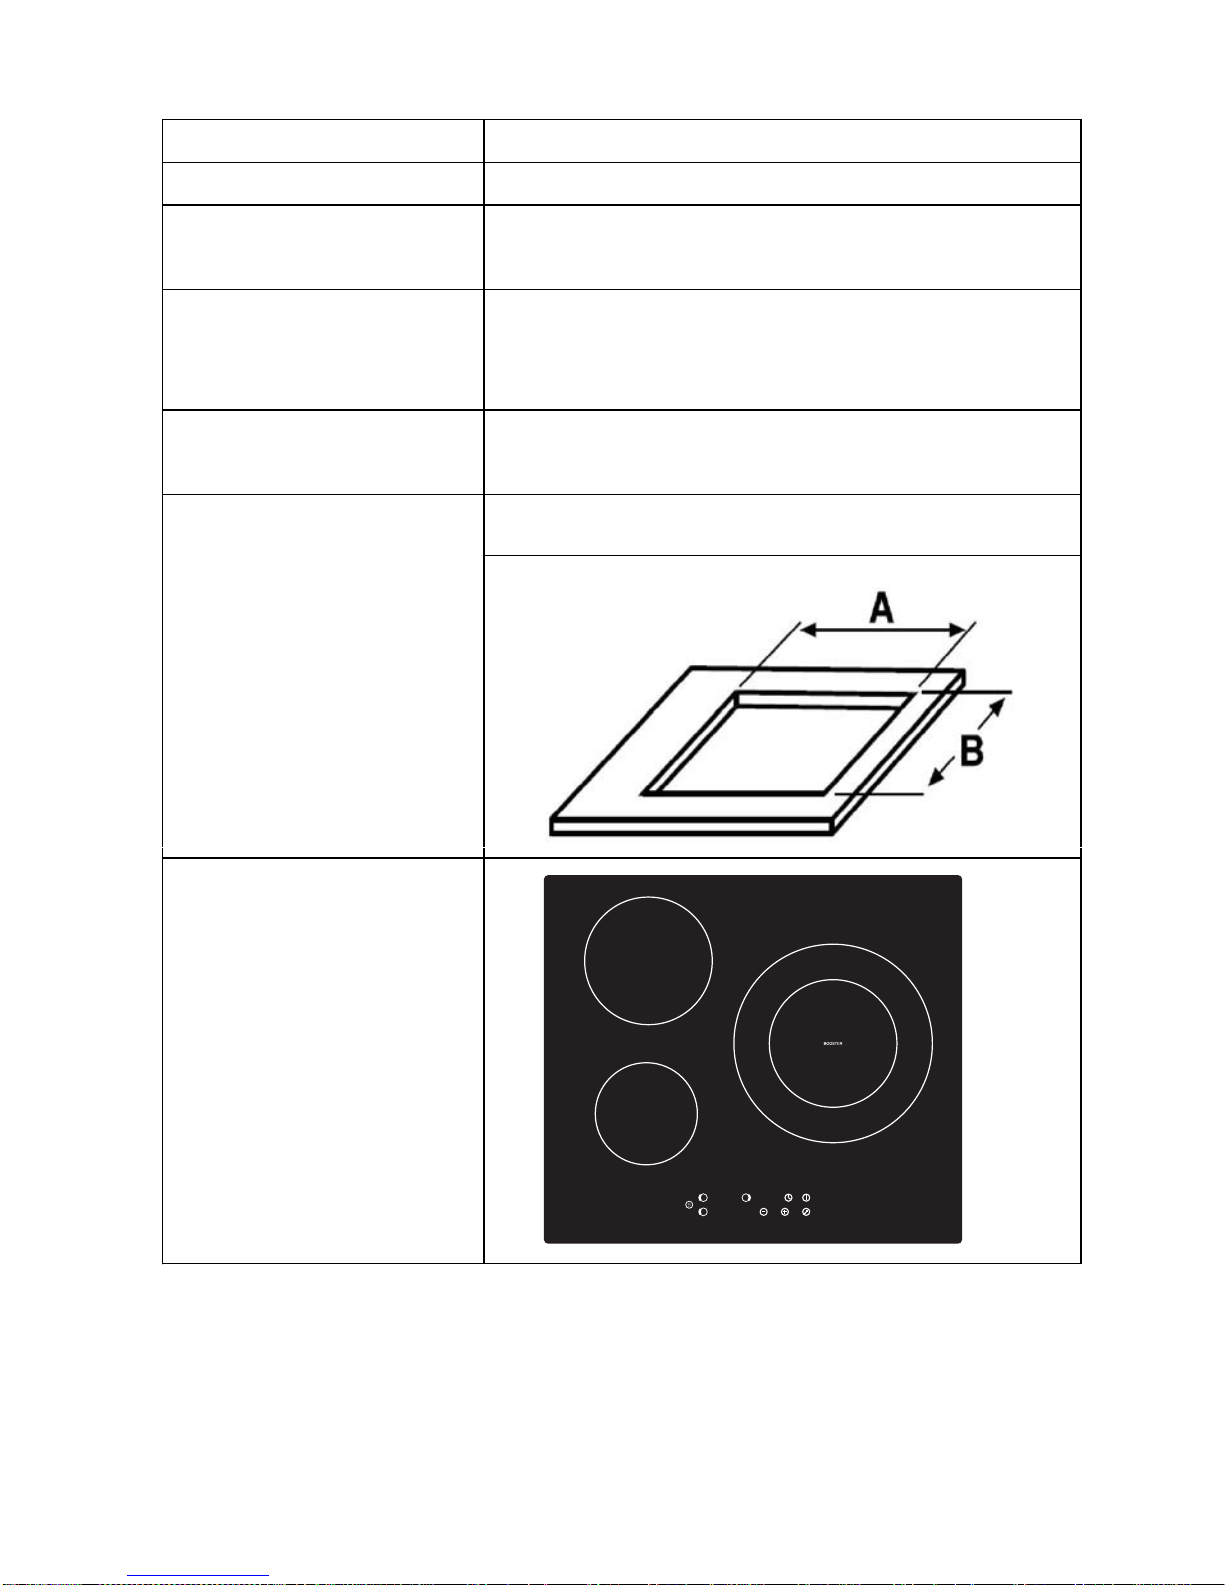
Apariencia de la
Placa de inducción
3 INDUCCIÓN
220-240V~ 50/60 Hz
400 V 3N~
590×520×60
560×490
00
SVI639
1
Page 3
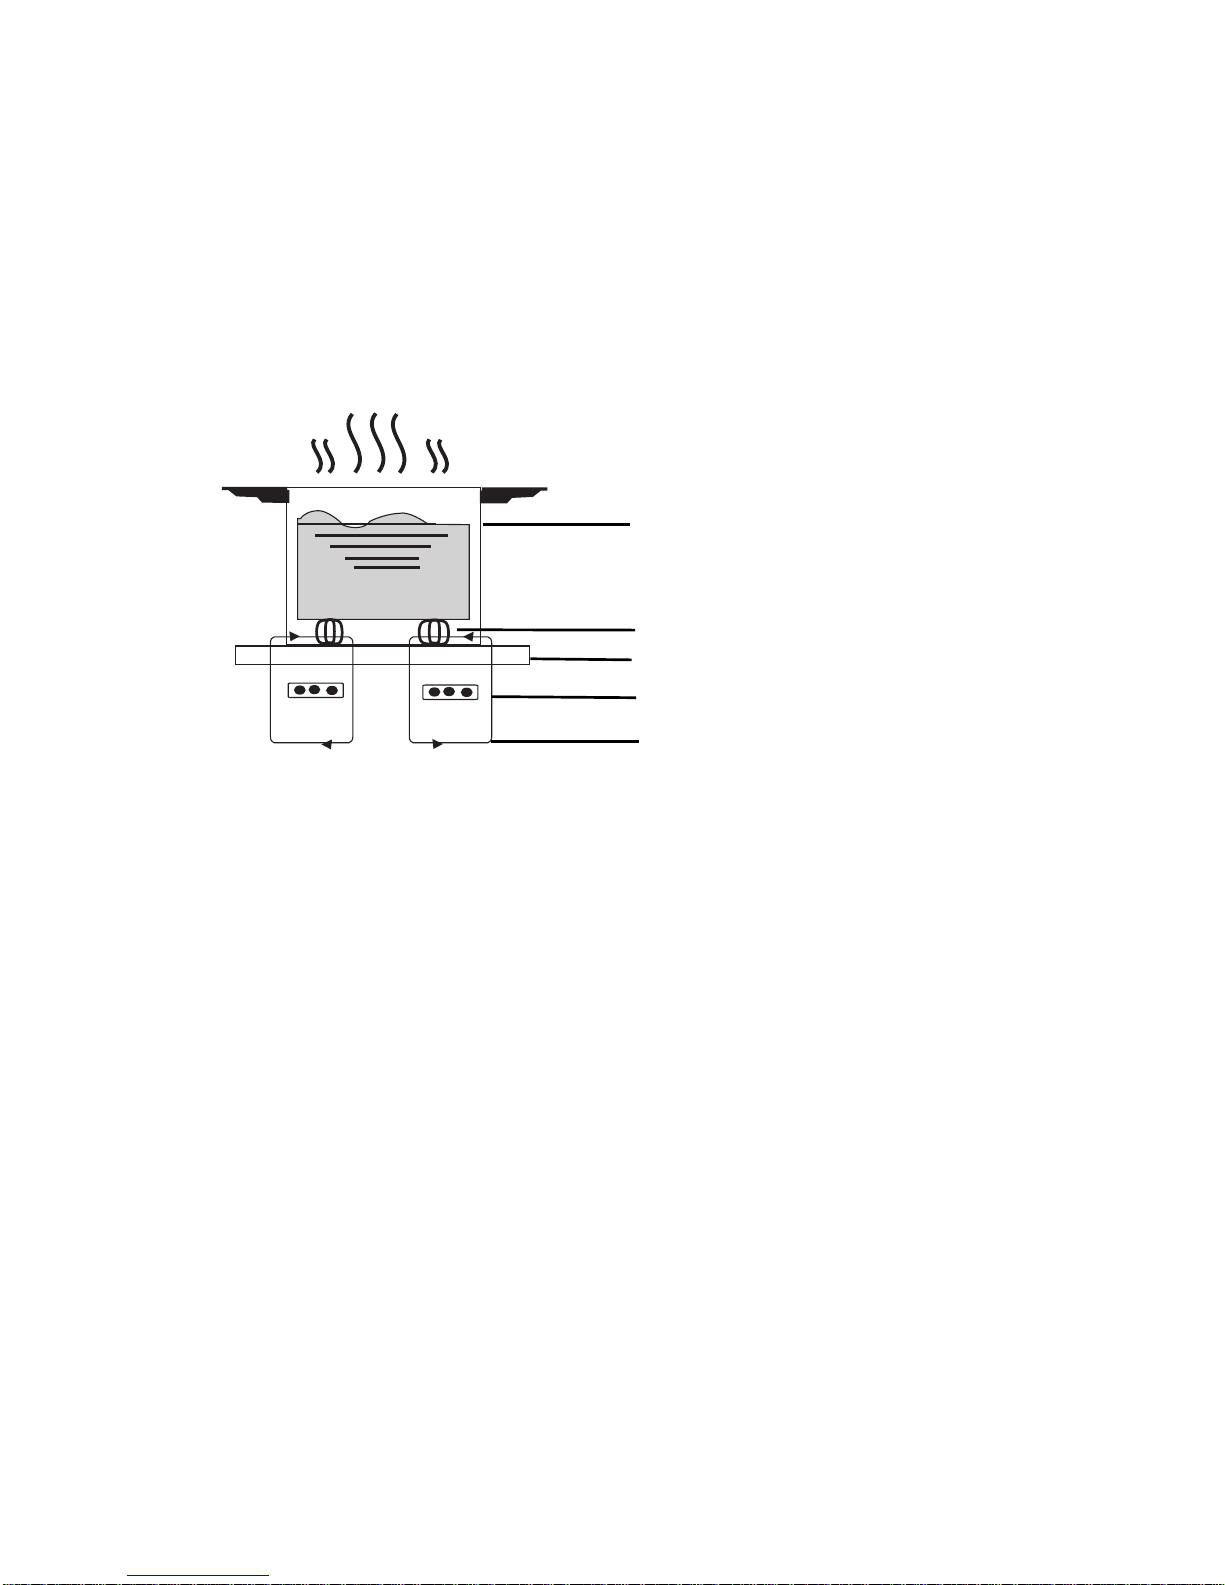
Estimado cliente:
2
Protección del sobre calentamiento
(1)
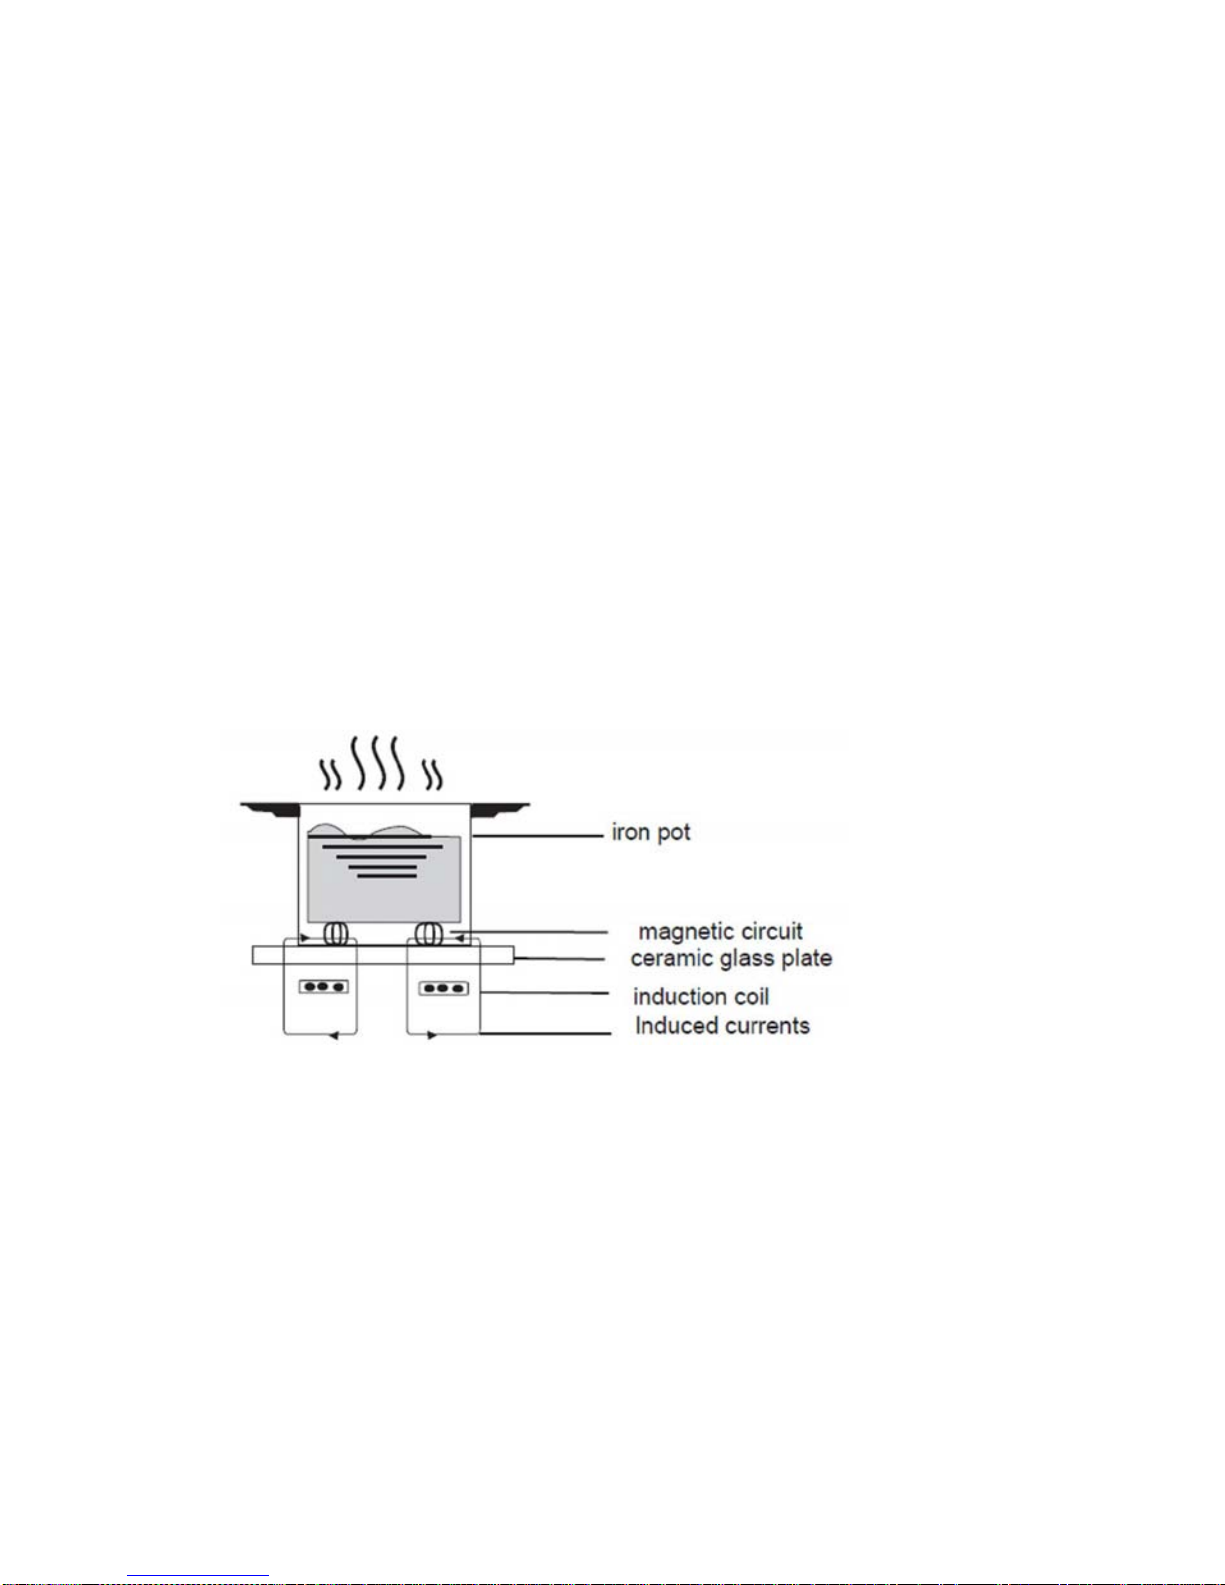
Recipiente de Hierro
Circuito Magnético
Placa Vitrocerámica
Bobina de Inducción
Corrientes Inducidas
Cuando la temperatura es excesiva , la
placa de inducción
el funcionamiento.
Cuando la olla es de un tamaño inapropiado o no es magnética (por
ejemplo Aluminio), u otros pequeños artículos (por ejemplo
cuchillos,tenedores,llaves) se dejan
cacerola adecuada puesta en el quemador correcto en un minuto, el
quenador se pondrá automáticamente en el estado de espera, y sonará
una alarma para advertirlo en el mismo tiempo.
Detección de ollas
en el quemador,
el quemador puede parar el calor inmediatamente. Si no hay una
Lea por favor este manual de instrucciones con cuidado antes de su instalación
y utilización, y consérvelo después de haberlo leído para su futura referencia.
Cierre Automático
El cierre automático es una función de la protección de la seguridad
para su placa de inducción. Se cerrará automáticamente si usted se
olvida de apagar su cocina. Los tiempos de trabajo predefinidos para
varios niveles de potencia se muestran en la siguiente tabla:
parará
automáticamente
Indicación de calor
Cuando la placa es utilizada durante mucho tiempo, el calor permanece en
la zona de cocción durante unos minutos.Aparece el código "H" ,
advirtiendo que nos alejemos de la zona de cocción.
Figura
Page 4
Nivel de potencia
1~3
4~6
7~9
*Recuerde:
La zona de cocción se apagará automática-
mente despué s de
8 horas
4 horas
2 horas
Los pacientes con un marcapasos de corazón utilizarán este producto bajo
supervisión médica.
3
Selección del equipo de instalación
superficie del tablero según los
tamaños mostrados en el dibujo. Para su instalación y uso, se debe dejar
un mínimo de 50 mm deespacio alrededor del agujero.
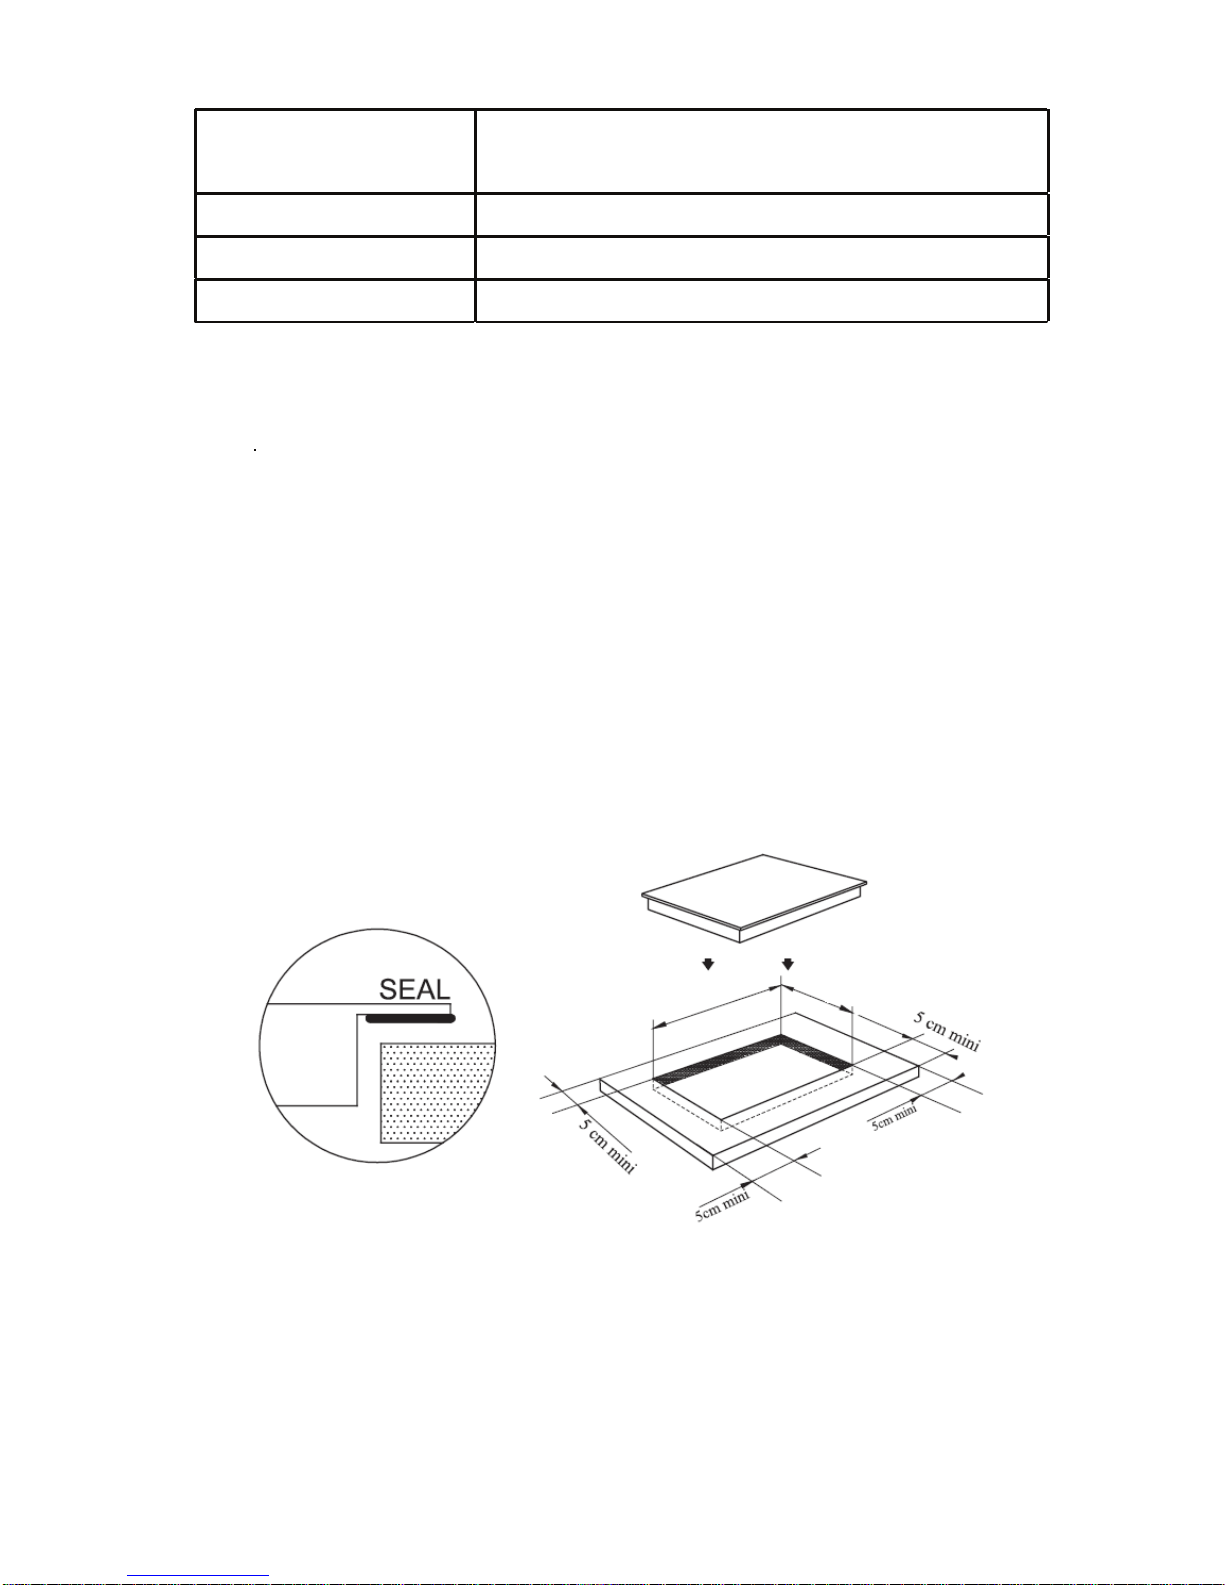
Asegúrese que el espesor de la superficie de mesa es por lo menos 30
muestra en la Figura (2)
la
Haga huecos
con el taladro en
mm.
Como se
Figura (2)
56 cm
+0.4
+0.1
49 cm
+0.4
+0.1
Page 5
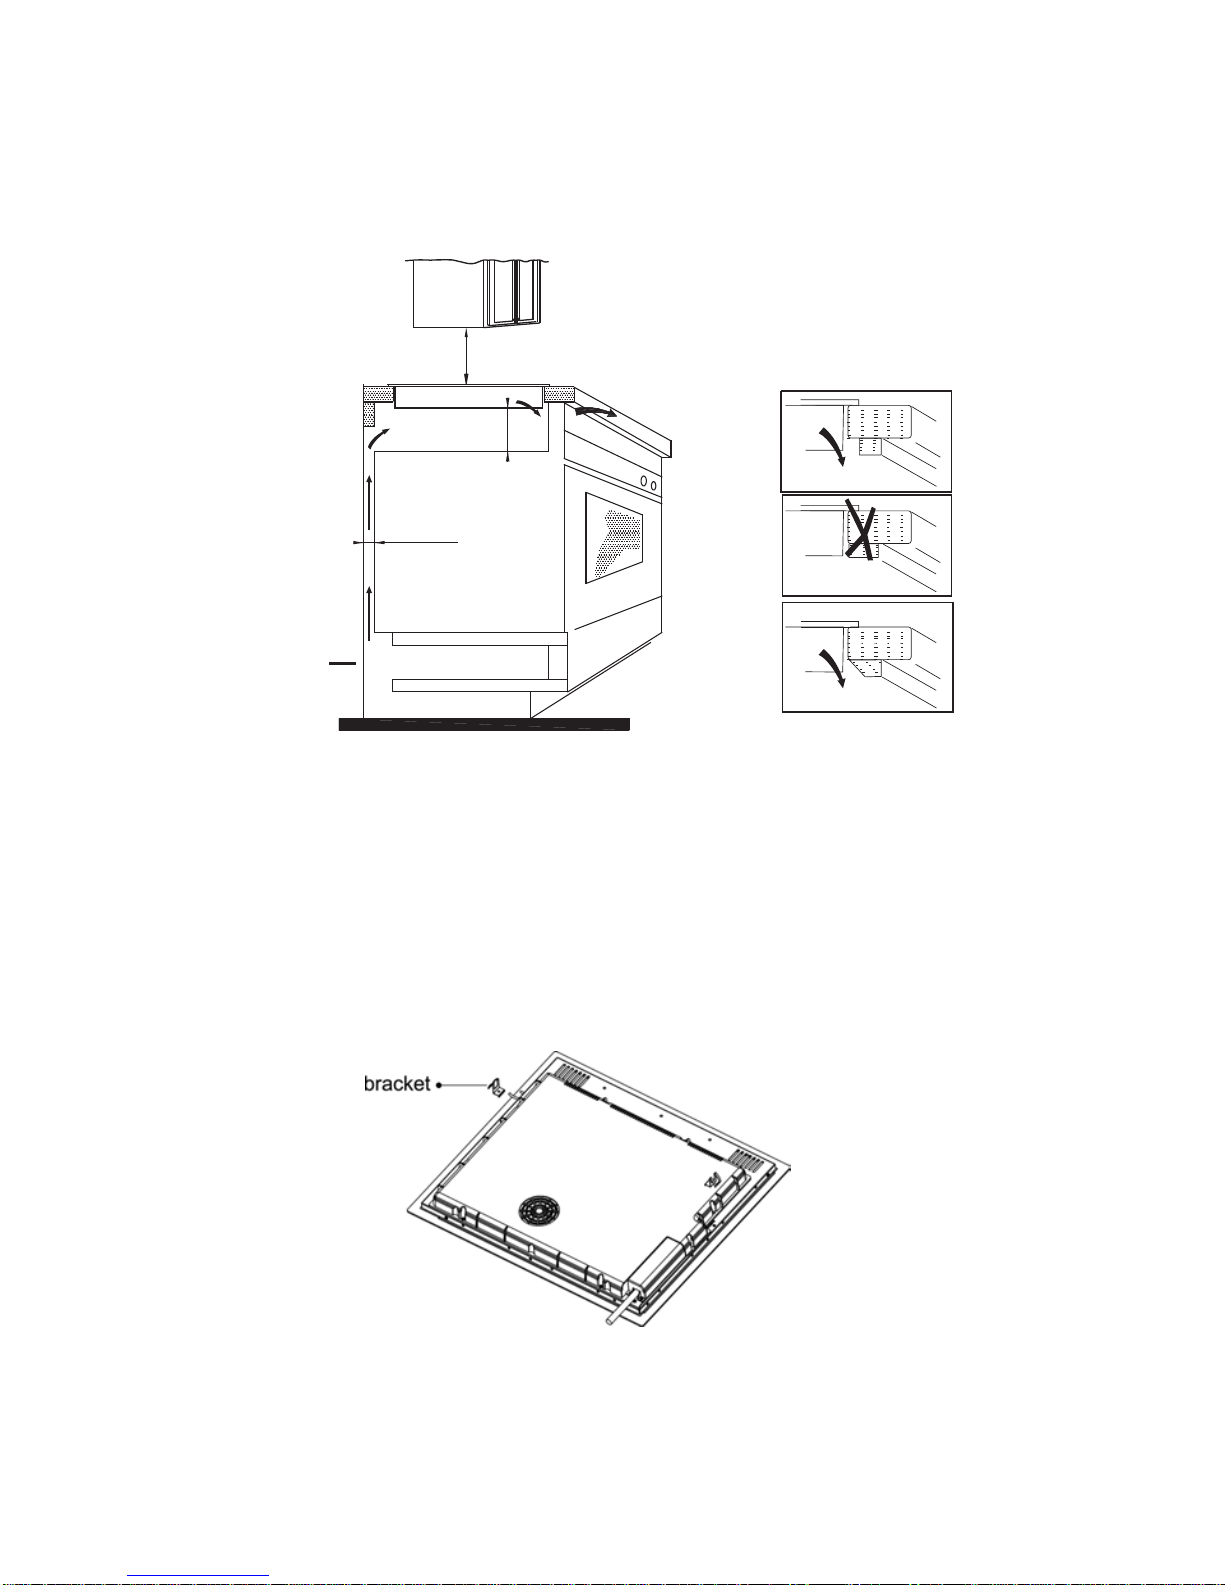
En cualquier caso, asegúrese que la placa de inducción está bien ventilada bien
y
que la entrada y salida del aire no están bloqueadas. Asegúrese que la placade
inducción esté en buen estado de trabajo. Como se muestra en la Figura (3)
Figura (3)
4
mini 5 cm
mini 760mm
mini 2 cm
mini 5 mm
Toma de aire
Salida de aire
Nota: La distancia de la seguridad entre la placa y la alacena de encima de la placa
debe ser por lo menos de 760 mm. Fije el quemador sobre la mesa atornillando
cuatro corchetes en el fondo de quemador (como se muestra en la figura (4)
despué s de la instalación. Ajuste la posición del corchete para ajustar con los
diferentes grosores de los tableros.
Figura (4)
Page 6

Precauciones:
1. La placa de inducción debe ser instalada por personal o técnicos calificados.
Tenemos a profesionales a su servicio. Por favor nunca realice la operación usted
mismo.
2. La placa de inducción se instalará de manera que se asegure la mejor radiación
posible para aumentar su fiabilidad.
3. La pared y la zona de cocción de la inducción de encima del tablero deben ser
esistentes al calor.
4. Para evitar cualquier daño, la capa y el adhesivo deben ser resistentes al calor.
CONEXION ELECTRICA
"La instalación debe ser conforme a las directrices estándar". El
fabricante declina toda responsabilidad para cualquier daño ocasionado
que pueda ser causado por el uso inapropiado o poco razonable.
5
Advertencia
• La conexión eléctrica de la instalación debe hacerse a través de un enchufe
con una toma de tierra, o a través de un interruptor de múltiples polos con un
Si el aparato tiene una salida de enchufe, debe ser instalado para que la salida
de enchufe sea accesible.
• El alambre amarillo/verde del ca b le de a limenta ción deb e ser cone ctado a la tierr a
de la toma de alimentación y las te rminale s del apa rato .
• El fabricante no será responsable de ningún accidente causado por el uso de un
aparato que no esté conectado a la toma de tierra, ni a una conexión defectuosa de
la toma de tierra.
• Cualquier pregunta con respecto a la toma de alimentación ha de dirigirle al Servicio
Técnico de Post venta o a un técnico calificado.
• Si el cable está dañado o tiene que reemplazarse, la operación debe ser llevada a
cabo el por agente de venta con la s herra mie ntas adecuada s par a evita r cua lquier
accidente.
Siempre compruebe antes de cualquier operación eléctrica,
que el suministro de electricidad que se muestra en el contador de electricidad,
instalación y que el plomo es adecuado.
•
es adecuado , la continuidad de la conexión a la tierra a la
espacio de apertura de por lo menos 3 mm
Page 7
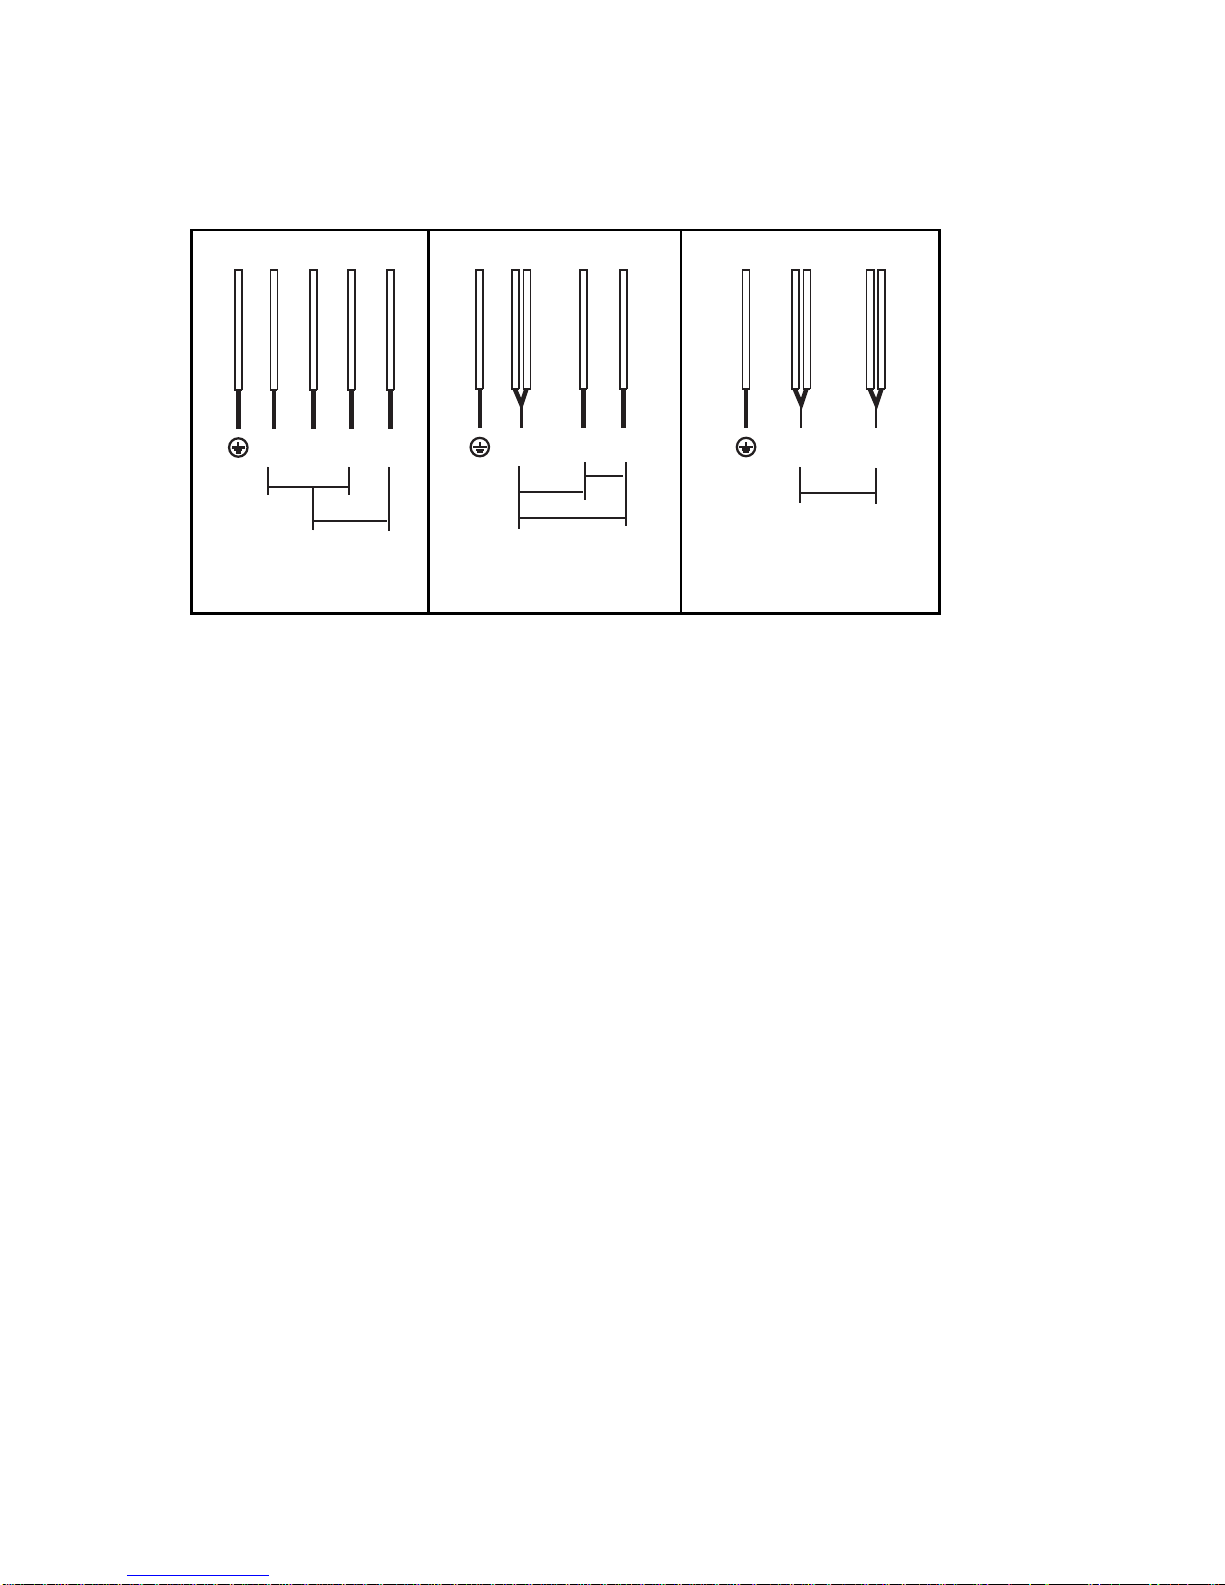
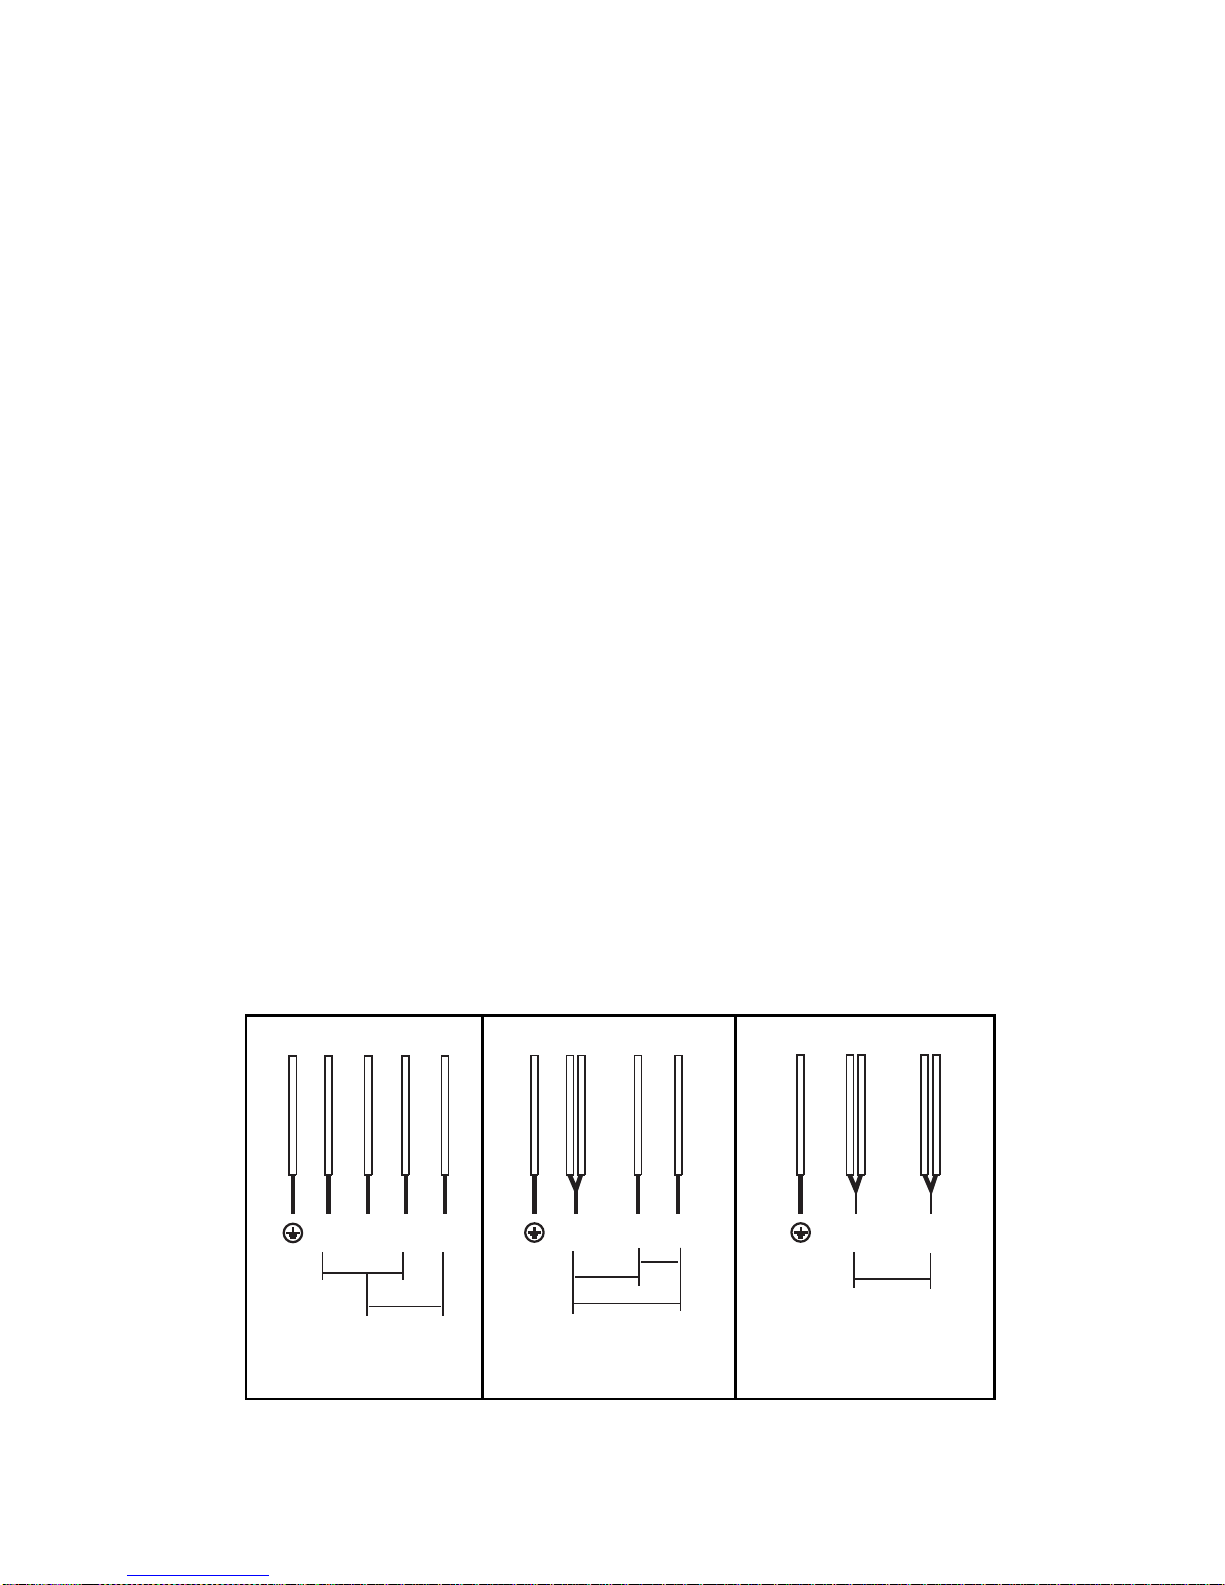
Conexión de la línea de alimentación
El enchufe será conectado según el estándar pertinente o conectado a un
diferencial de una asta. El método de la conexión se muestra en la Figura
(5) :
N2 N1 L2 L1
220-240V
220-240V
N L2 L1
400V
220-240V
220-240V
PE
N L
220-240V
PE
PE
220-240V 2+2N~
220-240V~
400V~ 2-N
Conecte a la fuente principal de alimentación.
Conecte a la fuente principal de alimentación. Conecte a la fuente principal de alimentación.
Figura (5)
6
Verde-amarillo
azul
gris
marón
negro
Verde-amarillo
azul
gris
marón
negro
Verde-amarillo
azul
gris
marón
negro
Si el cable es dañado o necesita reemplazarse, la operación debe ser llevada a
cabo por el té cnico de servicio de post venta con las herramientas indicadas para
evitar cualquier accidente.
Si el aparato está conectado directamente a la red de un cortacircuitos OmniPolar debe ser instalado con una apertura mínima de 3 mm entre contactos.
El instalador debe asegurar que se ha hecho correctamente la conexión eléctrica y
que es conforme a las normas de seguridad. El cable no debe ser doblado ni debe
ser comprimido. El cable debe ser verificado regularmente y debe ser reemplazado
sólo por té cnicos autorizados.
Page 8
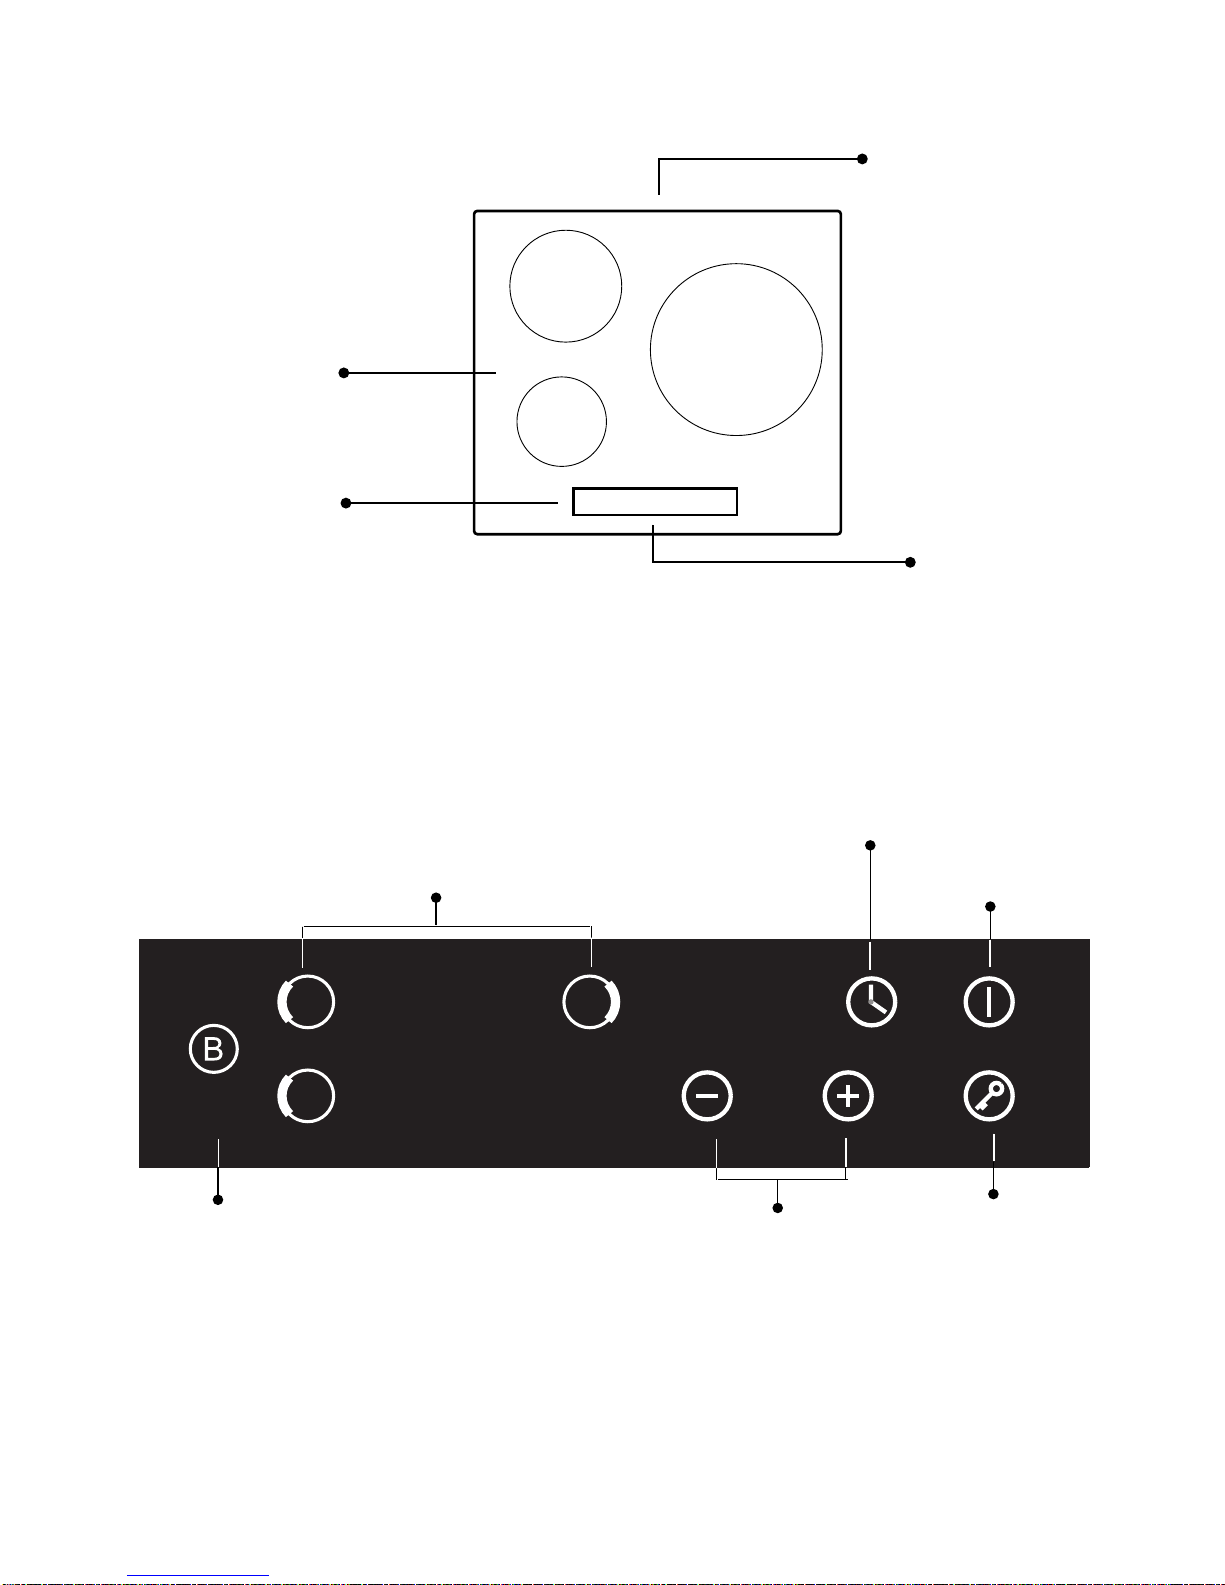
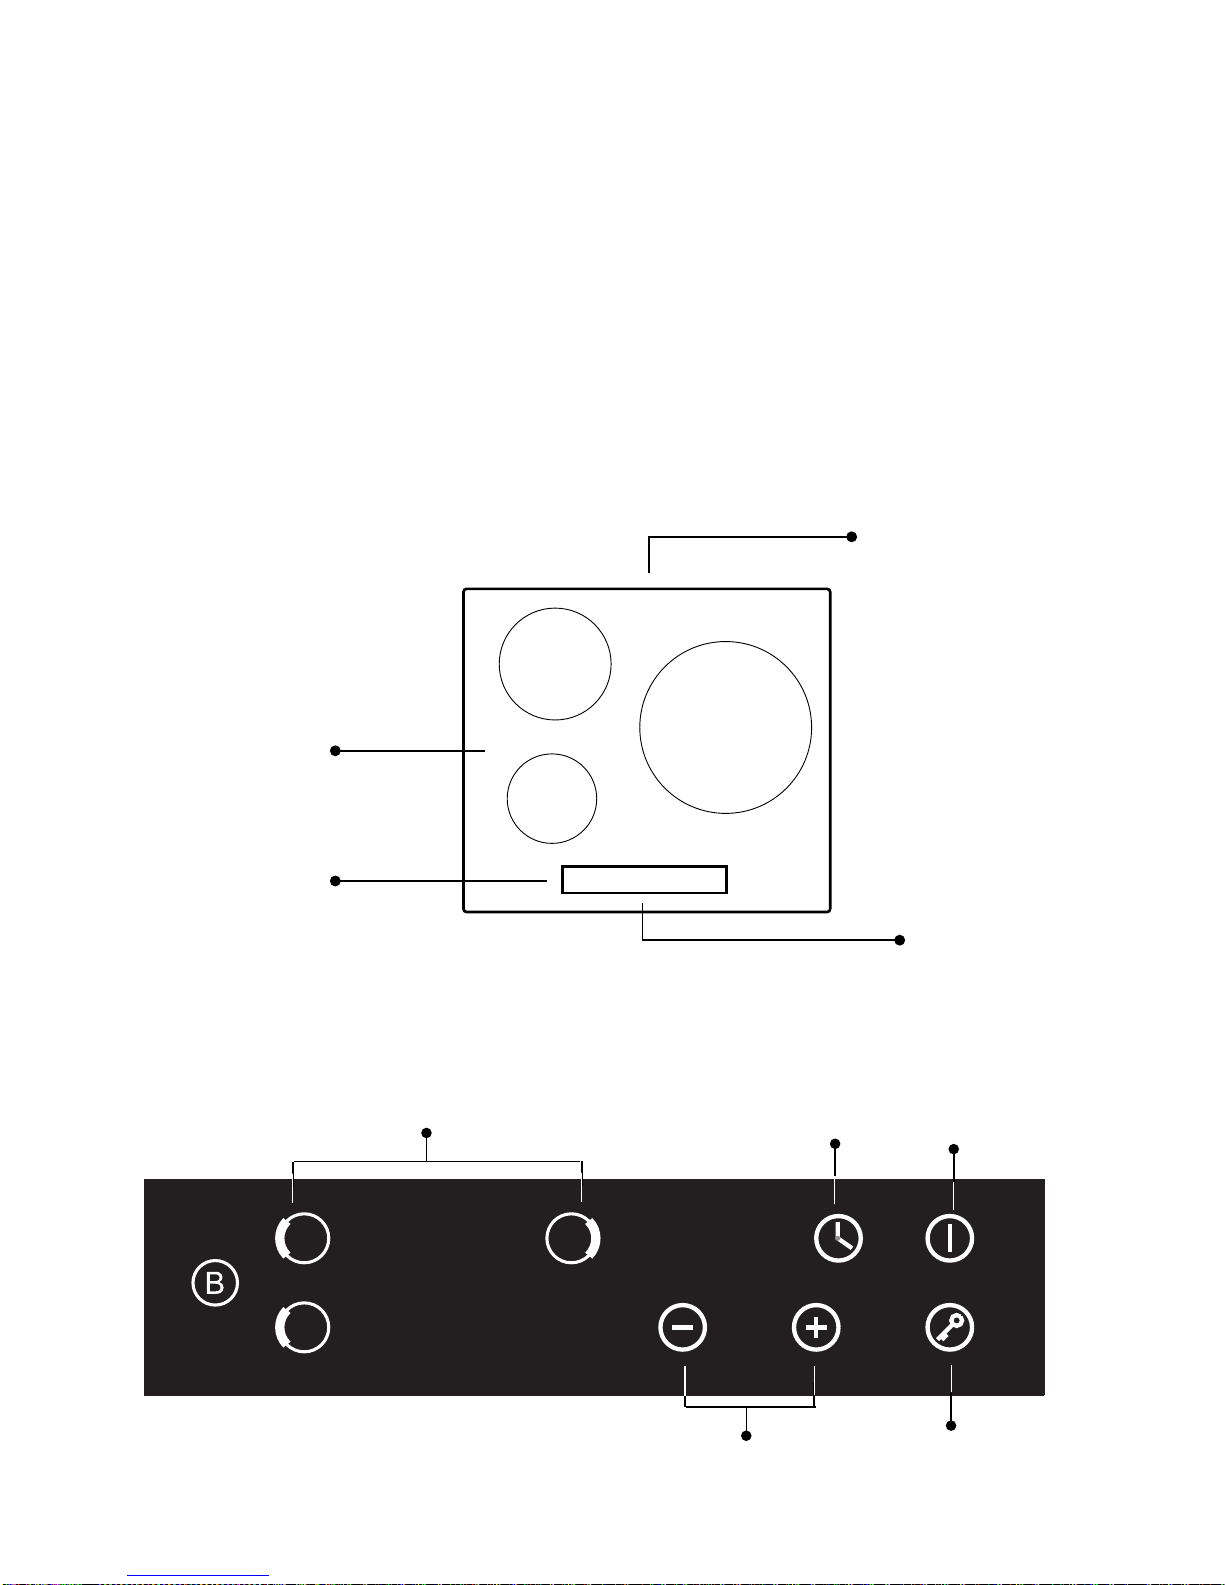
Apariencia de la placa de inducción
Entrada de
2
Plato de cerámica
1
Panel de control
Salida de Aire
Diagrama del Panel de Control
B
Figura (7)
3
B
Aire
Figura (6)
7
Booster
Potencia / Temporizadorr
Regulador Potencia
Bloqueo
Encendido/Apagado
Temporizador
Mando de selección de Zona de Cocción
Page 9
Instrucciones de Uso
o
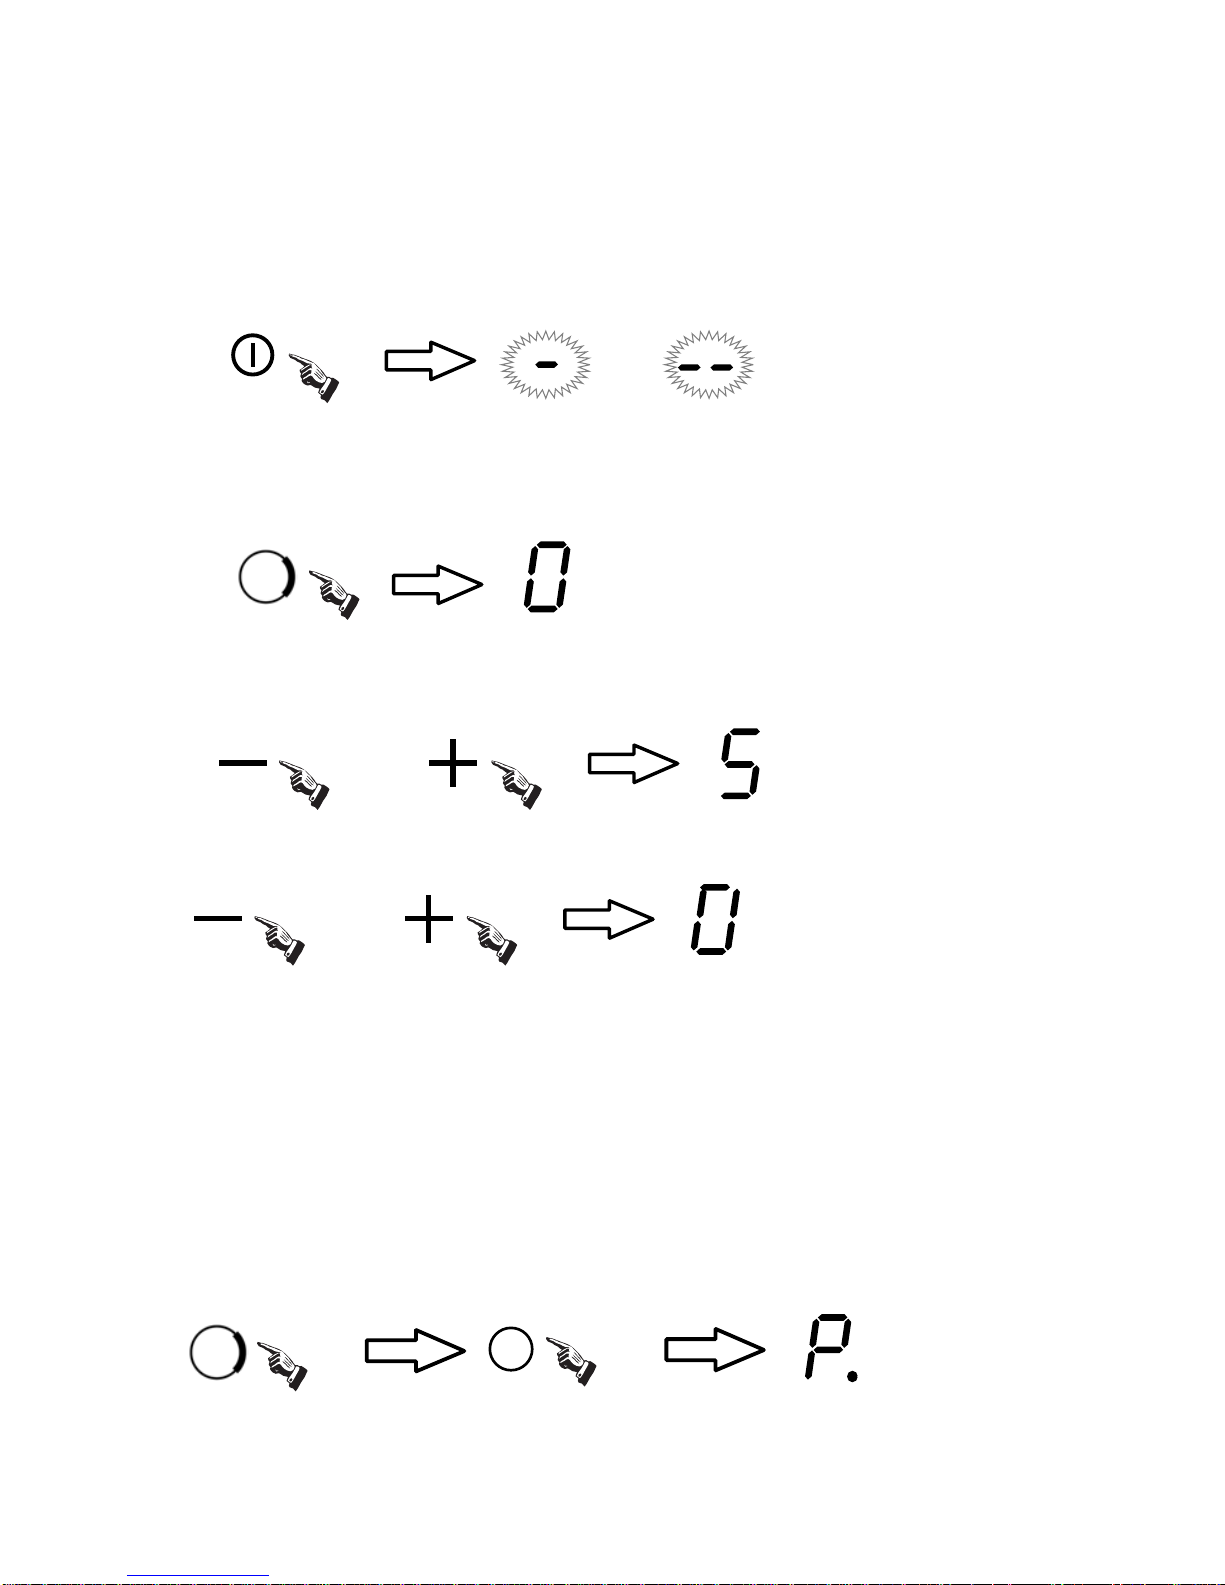
Según la zona de la cocción donde se ha colocado la olla, elija una selección
adecuada de la zona (por ejemplo selección zona), con el correspondiente nivel de
potencia parpadeando.
En ese momento, apriete el botón "+" o "-" , el indicador muestra 5, entonces ajuste
los niveles del potencia que usando el botón "+" o "-".
O
O apriete los botones "+" y "-" simultáneamente, e inmediatamente cambia el estado
de la potencia a 0, y todas las zonas de cocción se apagan.
Y
Vea la tabla que se adjunta
"la potencia principal de cada zona de la
cocción"
Nota 1. Despué s de que el botón "Encendido O " se apriete, la placa de inducción
se restaurará a su estado de la espera si no se lleva a cabo ninguna operación en
un minuto.
Función Booster
Para conseguir una velocidad más rápida de la cocción, hay una función
denominada "Boost" que satisfará su necesidad. Apriete directamente el botón
"Booster" despué s de seleccionar la zona de la cocción, con el indicador del nivel de
potencia mostrando "P. ", Y la potencia de cocción puede alcanzar hasta el max. .
Preparación Antes del Uso:
Después del encendido, la alarma suena una vez, todos los indicadores
se iluminan durante 1 segundo y entonces se apagan, lo cual indica que
la placa de inducción entra en el estado de espera. Ponga la olla en el
centro de la zona de la cocción. Instrucciones de funcionamiento: Cuando
el botón "Encendido/Apagado" se pulsa, todos los indicadores muestran
"-".
B
8
Page 10
Nota: 1. La función del booster sólo opera durante 5 minutos, despué s de lo cual que
la zona de cocción vuelve a su estado orginal.
2. La función del booster sólo trabaja en la tercera zona de cocción.
Cancelación de la Función del "Booster"
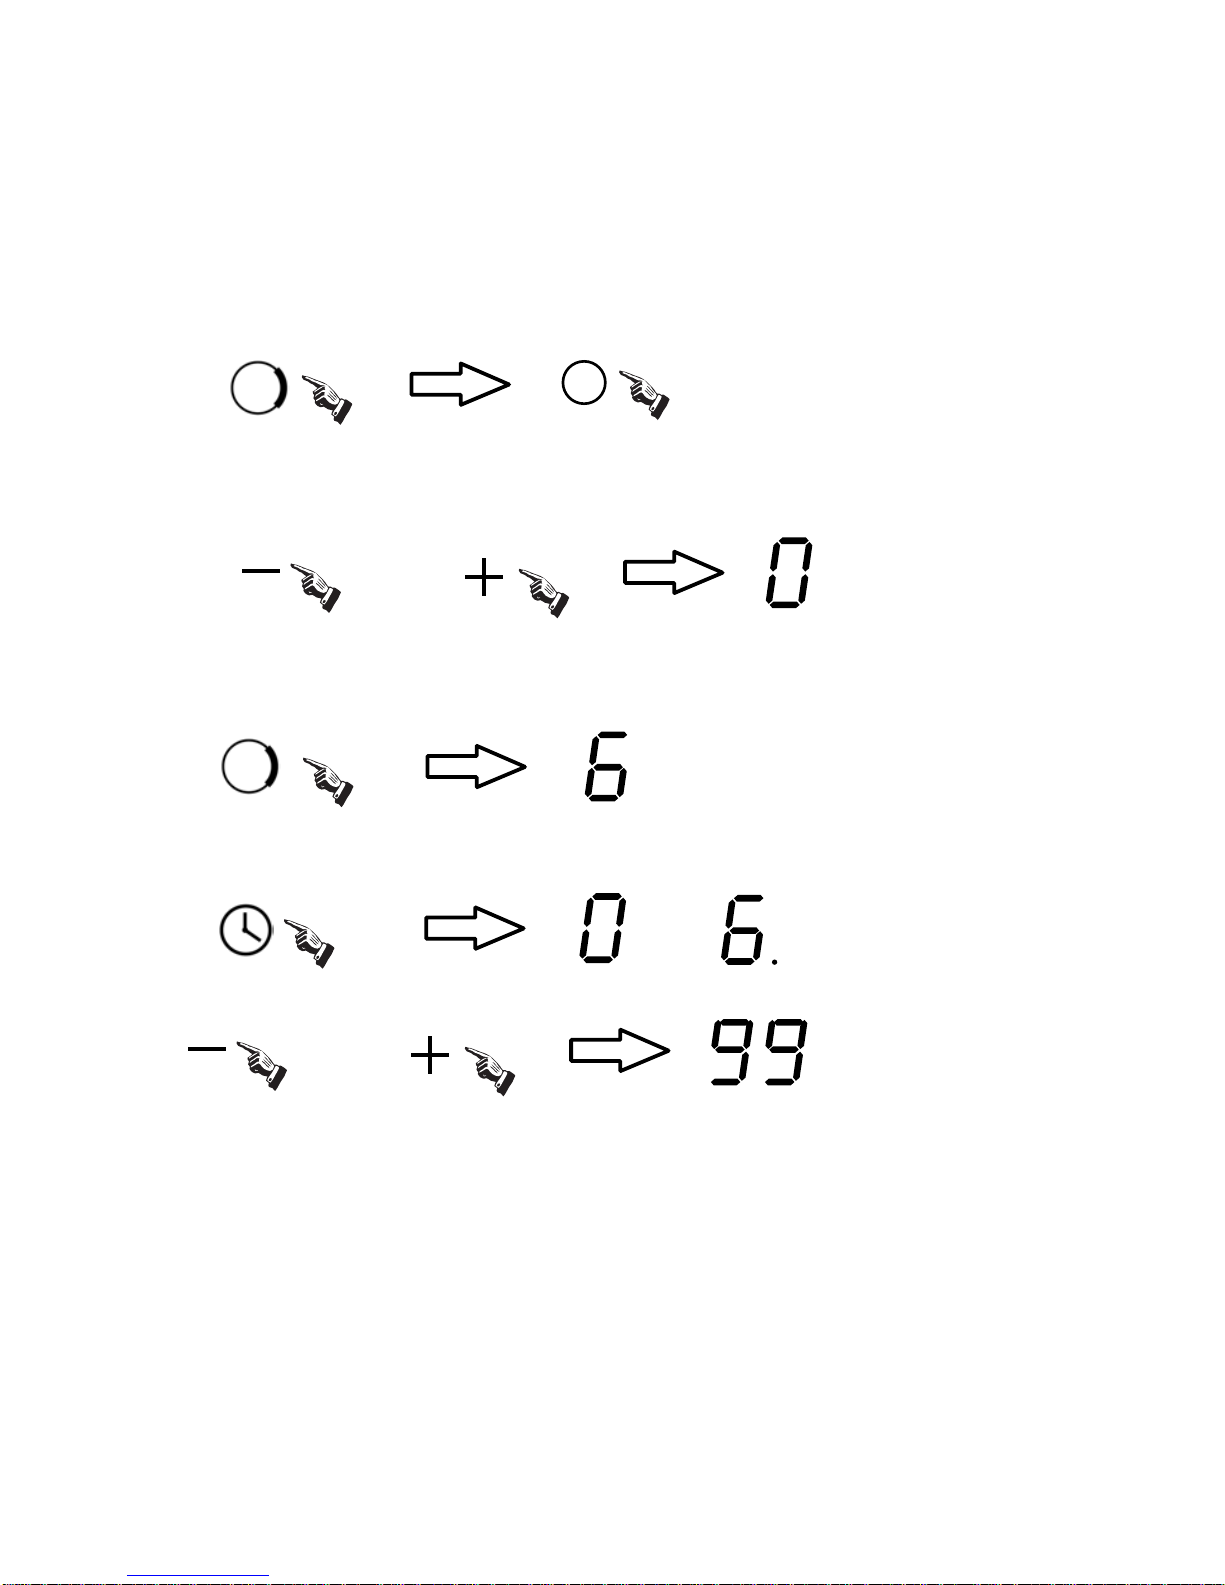
Cuando está la función de "Booster", seleccione la zona pertinente de la cocción con
la función de "Booster", y apriete el botón de "Booster" o el botón "-" para cancelar la
función, entonces la zona de cocción volverá a su situación inicial.
O apriete los botones "+" y "-" simultáneamente cuando la zona pertinente de la
cocción se ha seleccionado, la función de "Booster" será cancelada automáticamente
La colocación de la potencia inmediatamente cambiará a 0, y se apagará el
interruptor de la zona de cocción lejos al mismo tiempo.
O
Función del tiempo
Seleccione la zona de cocción pertinente, y ponga el nivel de potencia con el botón
"+" o "-". (por ejemplo la zona de cocción 3 con nivel de potencia 6)
Apriete el botón "temporizador", el indicador de tiempo destellará, y usted podrá
poner el reloj.
Y
Utilizando los botones "+" y "-" , puede poner el tiempo de 1 a 99 minutos.
O
Cuando el botón"+" del temporizador se aprieta, el establecimiento de tiempo aumentará
con1 minuto; Y aumentará 10 minutos cuando el botón "+" del temporizador se aprieta
durante mucho tiempo. Cuando el botón "-" del temporizador se aprieta, el tiempo
disminuirá por 1 minuto; Y disminuirá por 10 minutos cuando el botón "-" se aprieta
durante mucho tiempo.
Tiempo de confirmación:
Despué s de seleccionar un tiempo fijo, una vez que el indicador del tiempo destella
durante 5 segundos, o se presione el botón "temporizador", el tiempo fijado se confirmará
para ser válido automáticamente.
Cancelación del temporizador:
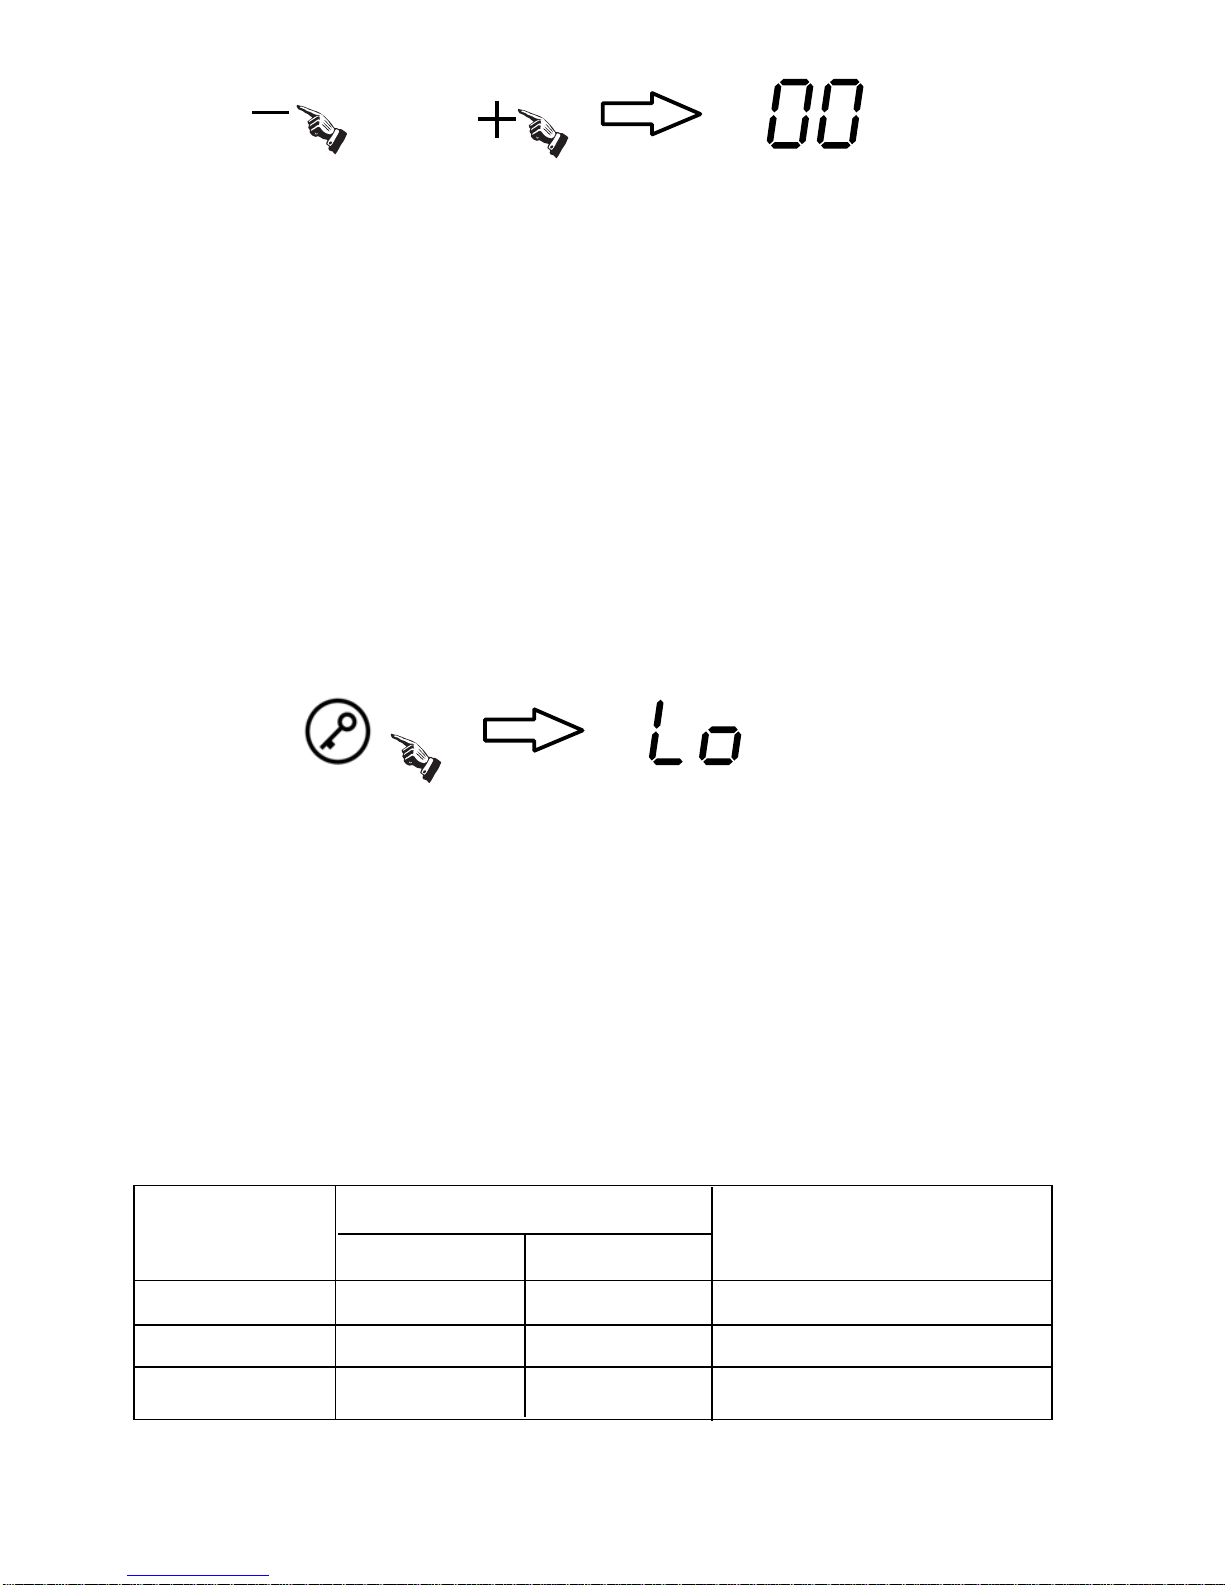
Si aprieta los botones + y - simultáneamente, el tiempo se cancelará automáticamente, y
el indicador de tiempo muestra "00".
B
9
Page 11
Y
Nota:
1. En el estado de temporizador, el nivel de potencia de la zona de cocción puede
ser cambiado, y el tiempo marcado es todavía válido.
2. Apriete el botón del reloj "+" o "- " sin seleccionar una zona de cocción cuando
la placa de inducción está trabajando, la función tiempo-advertencia estará operativa.
Y el tiempo de advertencia puede ser ajustado igual que la función de tiempo. La
alarma pitará durante 30 segundos cuando se alcance el tiempo. La función se
cancelará cuando el tiempo llegue a 0.
3. La función de advertencia del tiempo será cancelada cuando la placa de inducción
se apaga.
Función Inter bloqueo
de bloqueo.
Inter bloqueo:
Apriete el botón "Bloqueo", entonces la placa de inducción entra en el estado de
bloqueo, y el indicador de tiempo muestra "Lo".
Desbloqueo:
Manteniendo el botón"Bloqueo" presionado durante aproximadamente 3 segundos, el
estado de bloqueo se quitará.
Nota:
1. Los demás botones quedarán sin funcionamiento menos el Encendido/Apagado y
el de "Bloqueo" cuando la placa de inducción está en el estado de bloqueo.
Solamente desbloqueando la placa de inducción volverá a funcionar.
2. Si la placa de inducción entra en el estado de bloqueo en modo apagado, el
indicador de tiempo mostrará "Lo" durante un minuto. Y se mostrará durante un
minuto otra vez cuando se presione el Encendido/Apagado o el "Bloqueo".
La potencia máxima de cada zona de cocción es la siguiente:
Potencia(W)
Zona cocción
Normal Booster
Diametro Zona Cocción
1
1500
160mm
2
La potencia indicada arriba puede variar dependiendo del material de las ollas o
cazuelas.
20
3000
00 180mm
3
20mm
3600
------
------
10
con la función
Para la seguridad de los niños,la placa de inducción esta provista
Page 12
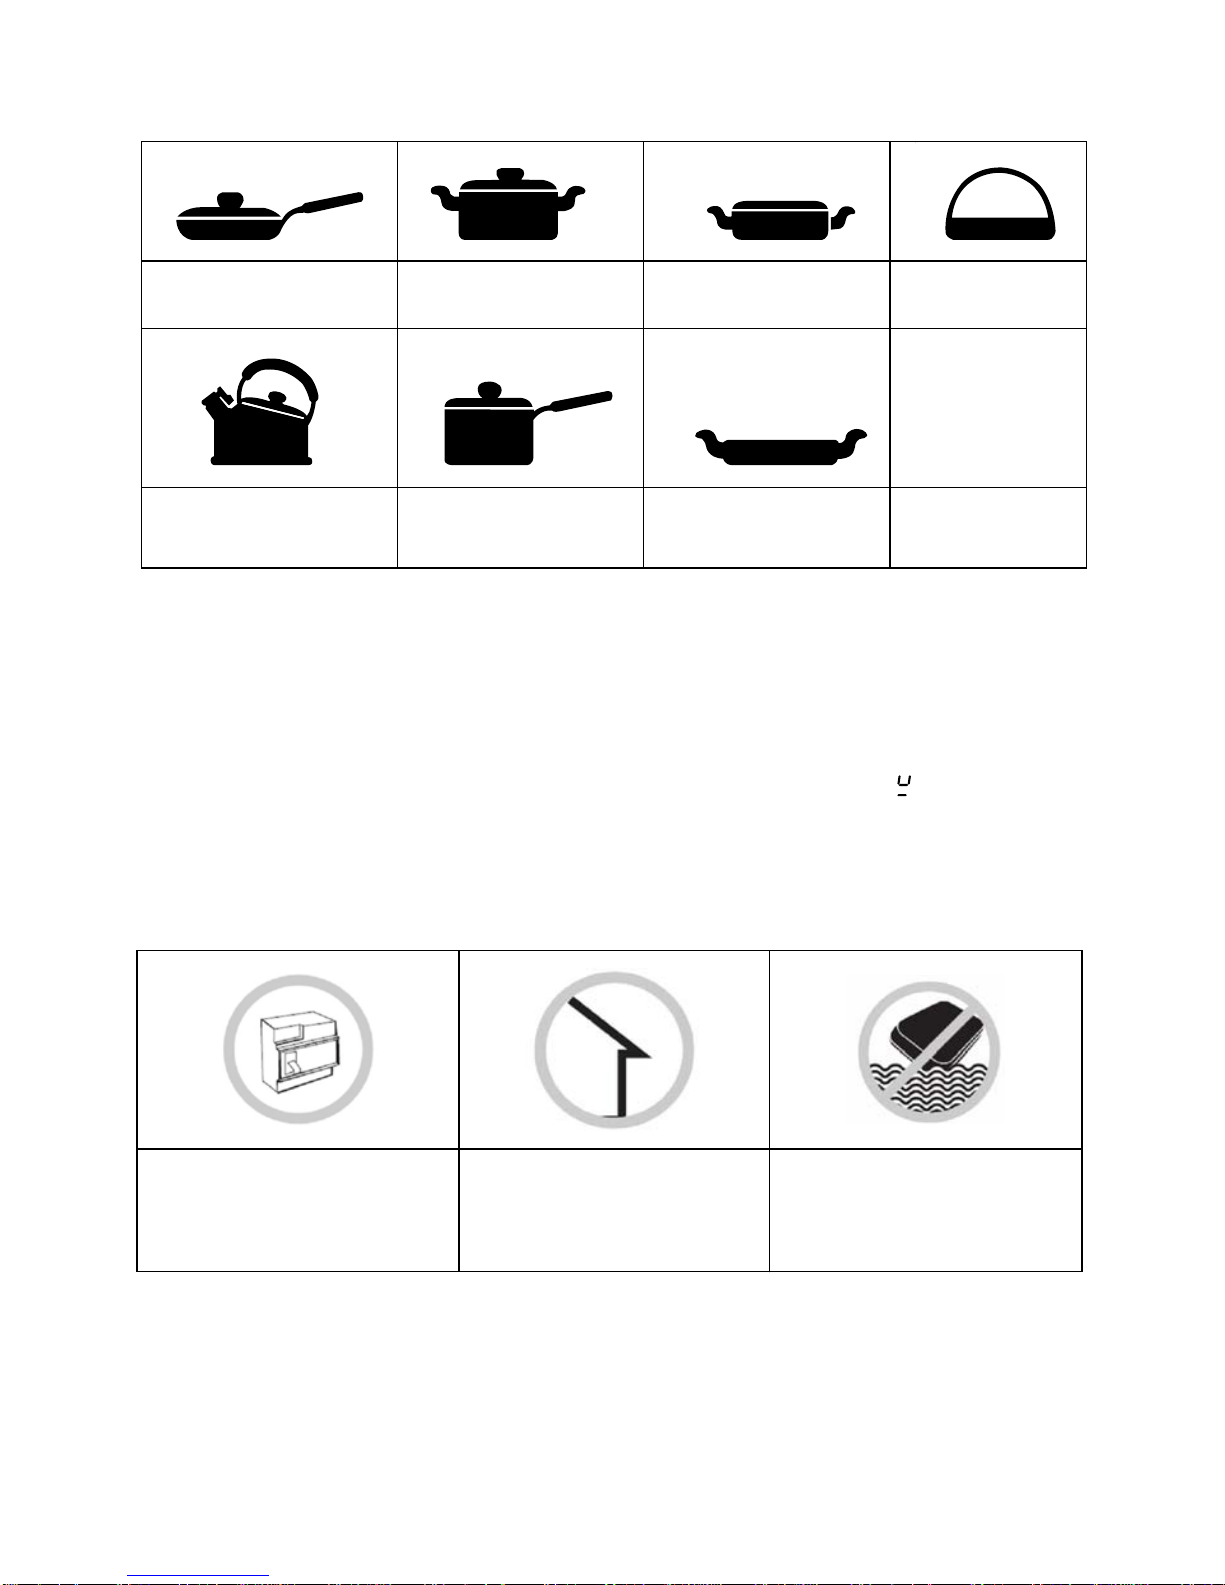
Selección de las aplicaciones de cocción
Sarté n de hierro Olla Inox Cazuela hierro Tetera hierro
Tetera Inox
Util de cocina
esmaltada esmaltado
Plancha
Esta placa de inducción puede admitir múltiples aparatos de cocción , y
usted los puede probar seguiendo los mé todos siguientes:
1. Coloque el aparato en la zona de cocción. Si la zona correspondiente
muestra un nivel de potencia, entonces es adecuada; si hace
destellos, el aparato no es apto para la cocina de inducción.
Consejos de Mantenimiento y Seguridad:
Por favor use una protecc
Solo uso domé stico.
No lave directamente la
Ión de potencia de toma placa con agua para
Del aire evitar peligros
11
" "
Page 13
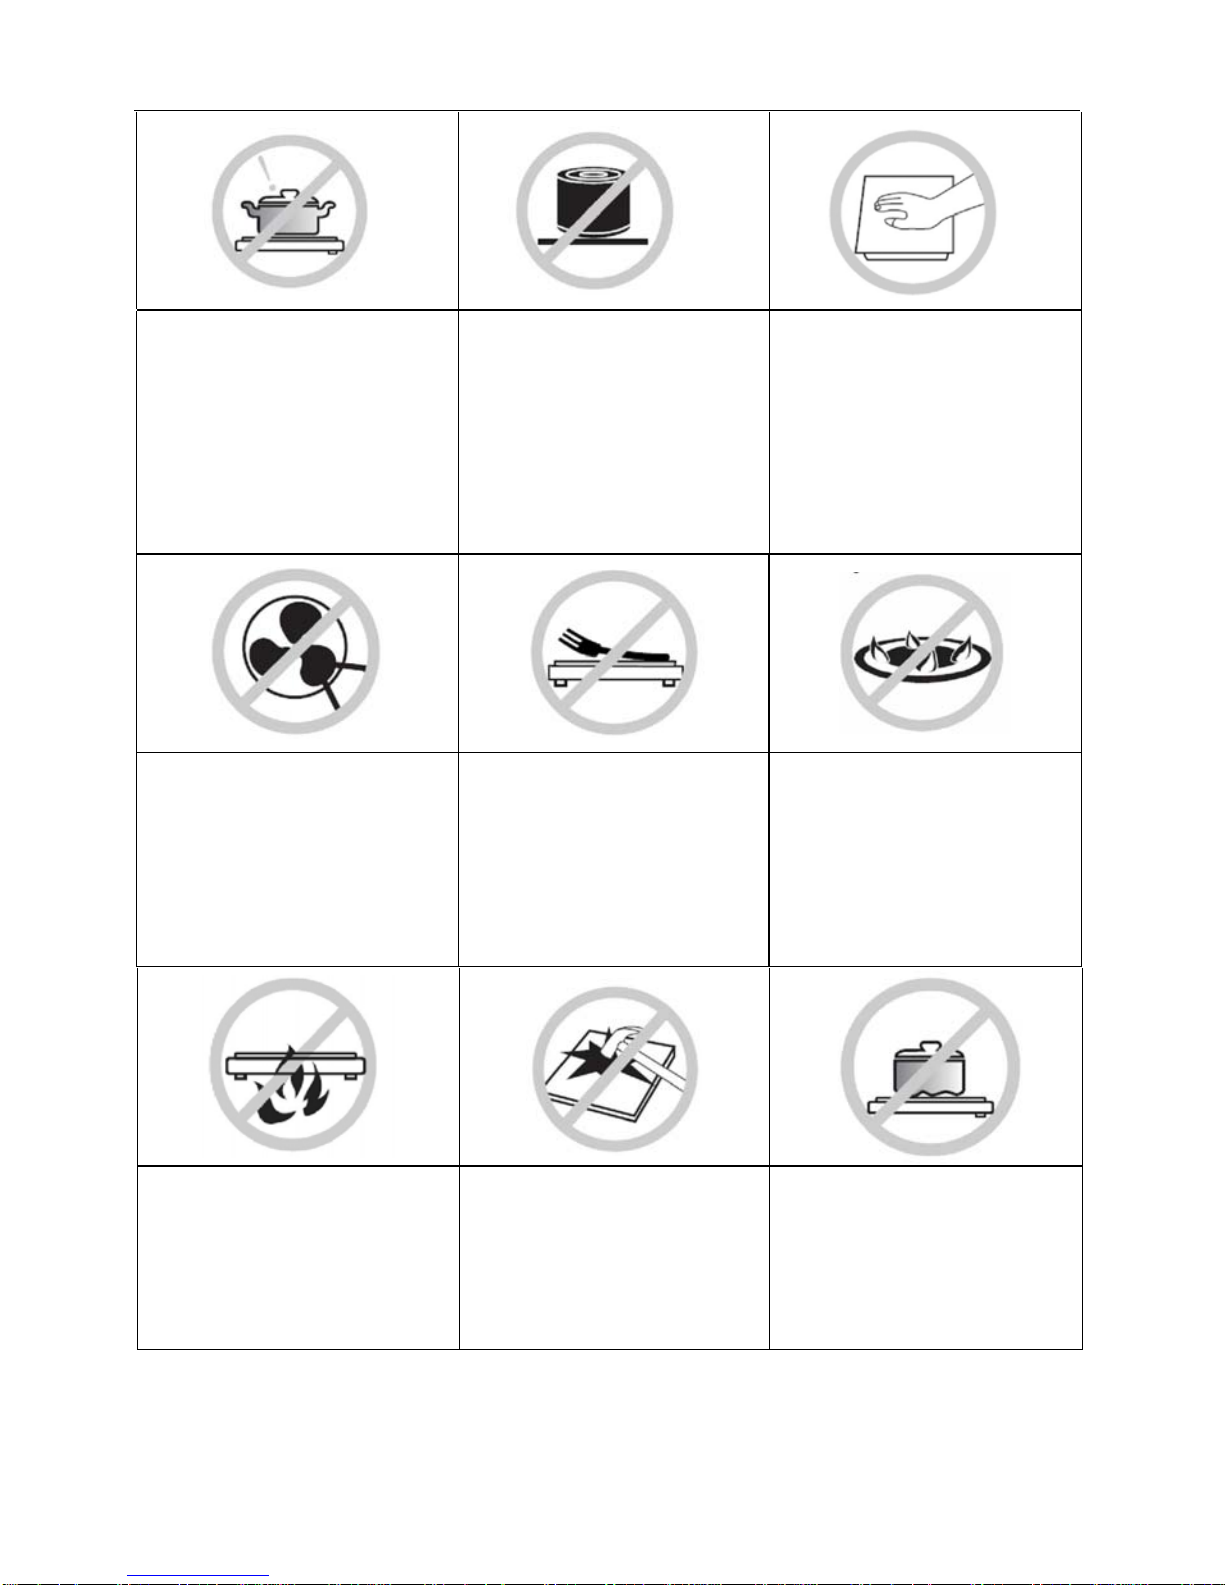
12
No tenga la olla de
inducción funcionando sin
alimentos, si no puede
afectar al funcionamiento
y puede ser peligroso.
Para alimentos
envasados como las
latas, no los caliente
antes de abrir las tapas
para evitar daños o la
explosión por
expansión
.
Despué s de ser utilizada
durante mucho tiempo, la
correspondiente zona de
cocción de la placa de
inducción todavía
está caliente. Nunca toque la
superficie cerámica para
evitar quemaduras.
Sugerimos que debe
verificar periódicamente
que no haya ningún
objeto (cristal,papel, etc)
que pueda obstruir la
entrada bajo su placa de
inducción.
Los objetos metálicos
como cuchillos,
tenedores,cucharas y
tapas no deben ser
colocados en la placa
desde que ellos pueden
calentarse.
Nunca utilice ls placa de
inducción en ambientes con
temperaturas altas como
cerca de una cocina de
cocina de gas ni queroseno.
No ponga ningún
detergente ni materias
inflamables en el
equipo instalado bajo
el la placa de inducción.
Si la superficie se
agrieta, desenchufe el
aparato para evitar la
posibilidad de una
descarga eléctrica.
No coloque aparatos
ásperos ni desiguales, que
pueden dañar la superficie
cerámica.
Page 14
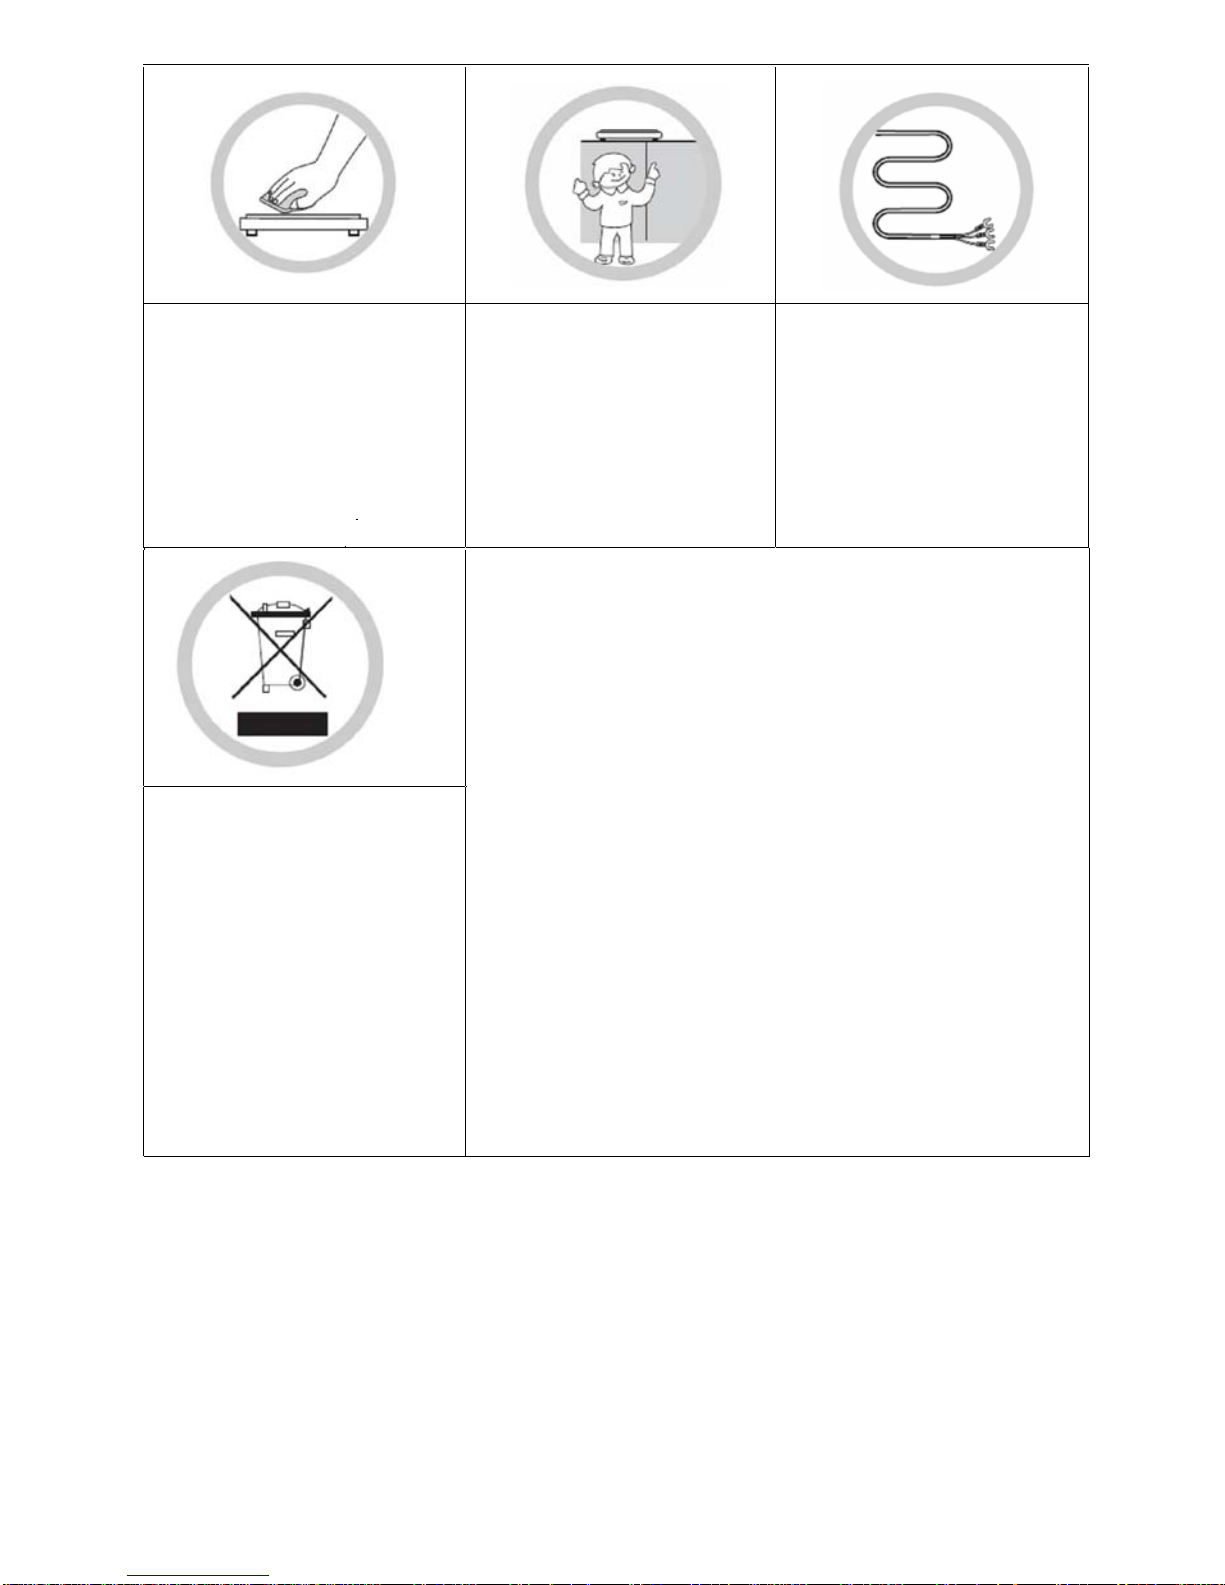
Limpie la placa de
inducción siguiendo las
normas para evitar que
aparezcan problemas
exteriores por la
entrada del ventilador
quye influyan a la
operación
normal del
Mantenga el
electrodomé stico fuera
de alcance de niños o
informe a la persona
responsable. No les
permita usar los aparatos
sin supervisión.
Si se daña el cable de
suministro, debe ser
reemplazado por el
fabricante,
servicio té cnico o
personas calificadas para
evitar un peligro.
Este aparato es conforme a la Directiva Europa 2002/96/EC
para el Desecho Elé ctrico y Equipo
Electrónico (WEEE). Asegurando que este aparato se
deshecha correctamente, ayudará a prevenir algún posible
daño
al medio ambiente y a la salud de las personas, que de otro
modo quizás se causaría si fuera deshechado de manera
equivocada.
El símbolo en el producto indica que no puede ser
DISPOSICION: No
disponga este
producto como
desecho municipal no
clasificado. La
recolección debe
hacerse
separadamente para
su tratamiento
especial.
t
ratado como desecho normal de la casa. Debe ser
llevado a un punto de recolección para el reciclaje de
bienes elé ctricos y electrónicos. Este aparato requiere
la eliminación de desechos por un especialista. Para la
información adicional con respecto a su tratamiento,
recuperación y reciclado de este producto contacte por
favor con su ayuntamiento, su servicio recogida de
residuos, o con la tienda donde usted lo compró. Para
información más detallada sobre el tratamiento, la
recuperación y el reciclaje de este producto, contacte
con su ayuntamiento, su servicio de recogida de
residuos o con la tienda donde usted compró el
producto.
aparato
13
1. Este aparato no está pensado para ser usado por personas (inclusive niños) con
capacidades reducidas, ni con deficiencias, físicas, sensoriales o mentales o con
falta de experiencia y conocimiento, a menos que hayan sido supervisadas o
instruidas con respecto al uso del aparato por una persona responsable de su
seguridad. Los niños deben ser supervisados para asegurar que no jueguen con
el aparato.
2. Si lel calble de suministro es dañado, debe ser reemplazado por el fabricante, el
agente del servicio técnico o por personas calificadas para evitar un peligro.
Page 15

3. No utilice un limpiador de vapor.
4. Después del uso, apague la placa con el interruptor de control y no se apoye en
el detector de cazuelas
5. El aparato no está pensado ser utilizada por medio de un reloj externo o con
unsistema de mando a distancia.
Limpieza y Mantenimiento
Usted puede limpiar fácilmente la superficie de la placa de
inducción siguiendo los métodos indicados en la tabla.
Tipo de
contaminación
Artíclos
usados para
la limpieza
Metodo de limpieza
Ligero
Limpie con agua caliente y
sé quelo despué s
Esponja
Accumulación de Limpie con agua caliente y seque
polvo con esponja abrasiva
Esponja especial para
cerámica
Trozos deAros A plique vinagre en la zona sucia
y cal , despué s sé quela con un trapo Adhesivo especial para
suave especial disponible en super cristal cerá
mico
Comida dulce,
aluminio fundido,
plásticos
mercados locales.
Use un raspador especial para
Cristal ceramico (para protejer
cristales, preferiblemente un
producto de silicona) para
eliminar los residuos
Adhesivo especial
para cristal
ceramica
14
Consejo:Por favor desconecte el aparato antes de su limpiezar.
discapacidades mentales o con poca experiencia en el manejo de estos
aparatos al menos que tengan la instrucion adecuada de cómo hacerlo. Todo
esto para evitar accidentes.
aplica si se usa con objeto comercial o en un ambiente externo. Por ejemplo:
Restaurantes, Café, Escuelas, Jardin entre otros.
Un adulto debe asegurar que los ninos no jueguen con e l aparato.
Este aparato no debe ser utilizado por personas (incluyendo ninos) con
Este aparato esta disenado solamente para uso domestico. La garantia no
6 .
7 .
8 .
Page 16
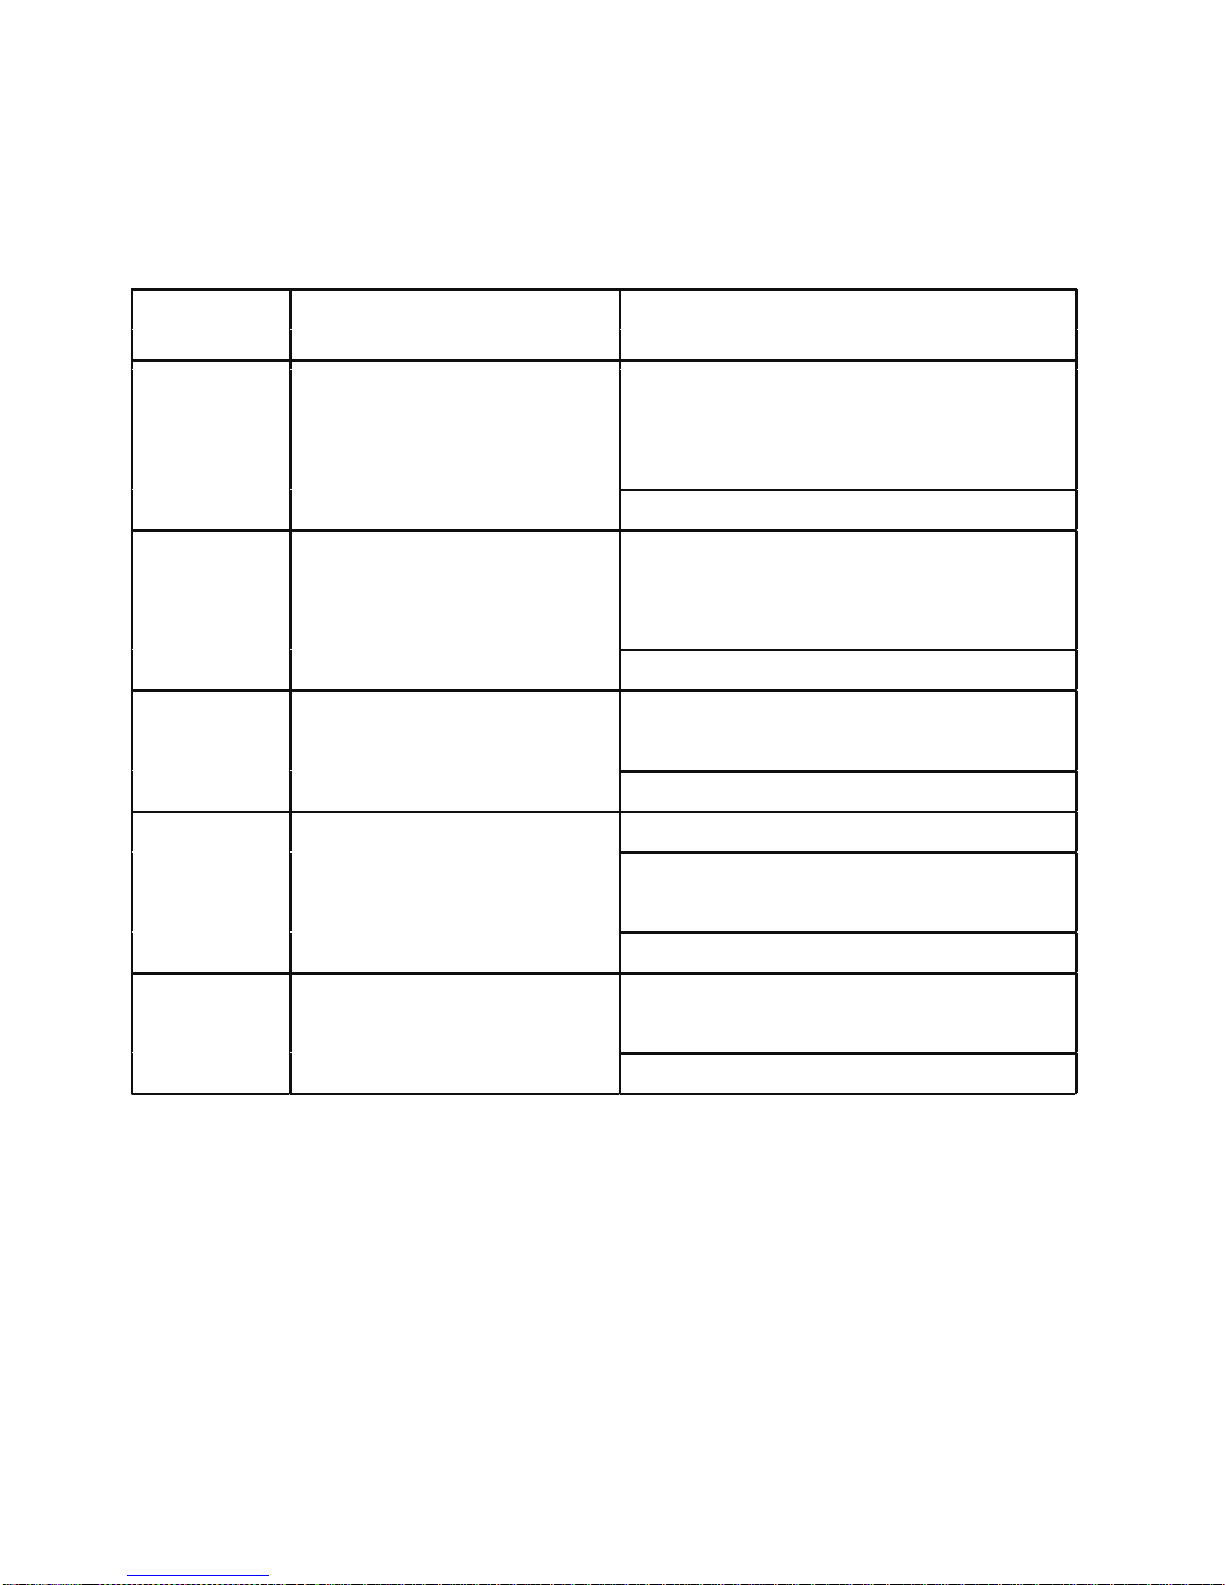
Problemas
Posibles causas
Soluciones
Encié ndala,, y reinicie una vez la
F3-F8
Fallo de un componente
del termostato.
Temperature llegue al estado
normal.
Contacte con el proveedor.
Encié ndala, y reinicie una vez la
F9-FE
Temperatura sensor del
fallo de IGBT.
Temperatura llegue al estado normal.
Contacte con el proveedor.
Compruebe si la potencia
E1-E2 Potencia anormal. es normal.
Contacte con el proveedor.
Compruebe la olla
E3-E4 Temperatura anormal.
Reinicie despué s que el quemador
Se enfríe.
Contacte con el proveedor.
E5-E6
Mala radiación del
quemador
Reinicie despué s que el quemador
se enfríe
Contacte con el proveedor.
Las indicaciones de arriba son cuasas de fallos comunes. Por favor no desmonte
la
unidad usted mismo para evitar peligro y daños a la placa de inducción.
Presentación de fallos e Inspección
Si una ocurre anormalidad , la placa de inducción entrará el estado
protector automáticamente y demostrará correspondientes
códigos
protectores
15
Page 17

Servicio de Atención al Cliente
Antes de llamar al ServicioTécnico de Postventa en el caso de que el aparato no
funcionecorrectamente sugerimos que:
-Verifique si el enchufe está insertado correctamente
-Lea los Fallos comunes en la tabla de arriba, y en caso de que no sea posible establecer la
razón para el mal funcionamiento del aparato, apáguelo, no trate de quitarlo y llame al Servicio
técnico.
Declaración especial
Todo el contenido en este material está sujeto una cuidadosa comprobación. Para cualquier
error u omisión al imprimir o malentendido del contenido, la compañía mantiene el derecho de
interpretación. Con vistas a mejorar constantemente nuestros productos, nosotros reservamos
el derecho de hacer cualquier cambio al técnico, de programa o de características estéticas
conectadas con la evolución técnica. Adición: cualquier mejora técnica se colocará en el
manual revisado sin notificación; La apariencia del producto y el color serán según el modelo
actual.
16
Page 18
Cooking Hob
Cooking Zones INDUCTION
Supply Voltage
50/60 Hz
Installed Electric Power
(W)
00
Product Size
D×W×H(mm)
590×520×60
560×490
Building-in Dimensions
A×B (mm)
Induction Hotplate
Ap
pearance
SVI639
17
Thank you for purchasing the induction hotplate, please read this instructions
manual carefully before using, and keep it cautiously for your future reference.
Booster
220-240V~
400 V 3N~
Page 19
Dear customer:
Thank you for purchasing the induction hotplate.
Please read this instructions manual carefully before installation and using,
keep it cautiously after reading for future reference.
Thank you for your purchase of the induction hotplate again, and wish you to
enjoy the pleasure by it.
18
Working Principle
The induction hotplate is mainly composed of an induced heating coil, hotplate
made of ferromagnetic materials and control system.
In principle, current generates a powerful magnetic field via the coil. Large
numbers of vortexes are produced in the way that the magnetic lines in the
field contact the bottom containing iron or stainless steel substances. The
tremendous energy generated by the vortexes can heat the food directly by
converting efficiency heat energy penetrating through the bottom.
Figure (1)
Over- Temperature Protection
A temperature sensor equipped can monitor the temperature inside the
hotplate. When an excessive temperature is monitored, the induction hotplate
will stop operation automatically.
Page 20

Protection of Shutting Down Automatic
Shutting down Automatic is a safety protection function for your induction
hotplate. It will shut down automatically if you forget to turn off your cooker.
The default working times for various power levels are shown in the
following table:
Power level
The heating zone shut down automatically
after
1~3 8 hours
4~6 4 hours
7~9 2 hours
*Remind:
The patient with a heart pacemaker shall use this product under the guidance
of the doctor.
19
Selection of installation equipment
Drill holes on the table surface according to the sizes shown in the drawing.
For the purpose of installation and use, a minimum of 50 mm space shall be
preserved around the hole.
Be sure the thickness of the table surface is at least 30mm. Please select
heat-resistant table material to avoid larger deformation caused by the heat
radiation from the hotplate.
As shown in Figure (2)
Pot Detection
When an unsuitable size or non-magnetic pot (e.g. Aluminum), or some other
small item (e.g. knife, fork, key) has been left on the hob, or the pot has been
removed, the hob can stop heating immediately. If there is no suitable pan put
on the right hob in one minute, the hob will go automatically into the standby
state, and the buzzer will sound for warning at one time.
Heat Indication
When the hotplate is used for a long time, waste heat remains in the heating
zone in a few minutes. The code “H” appears, warning to be away from the
heating zone.
Page 21
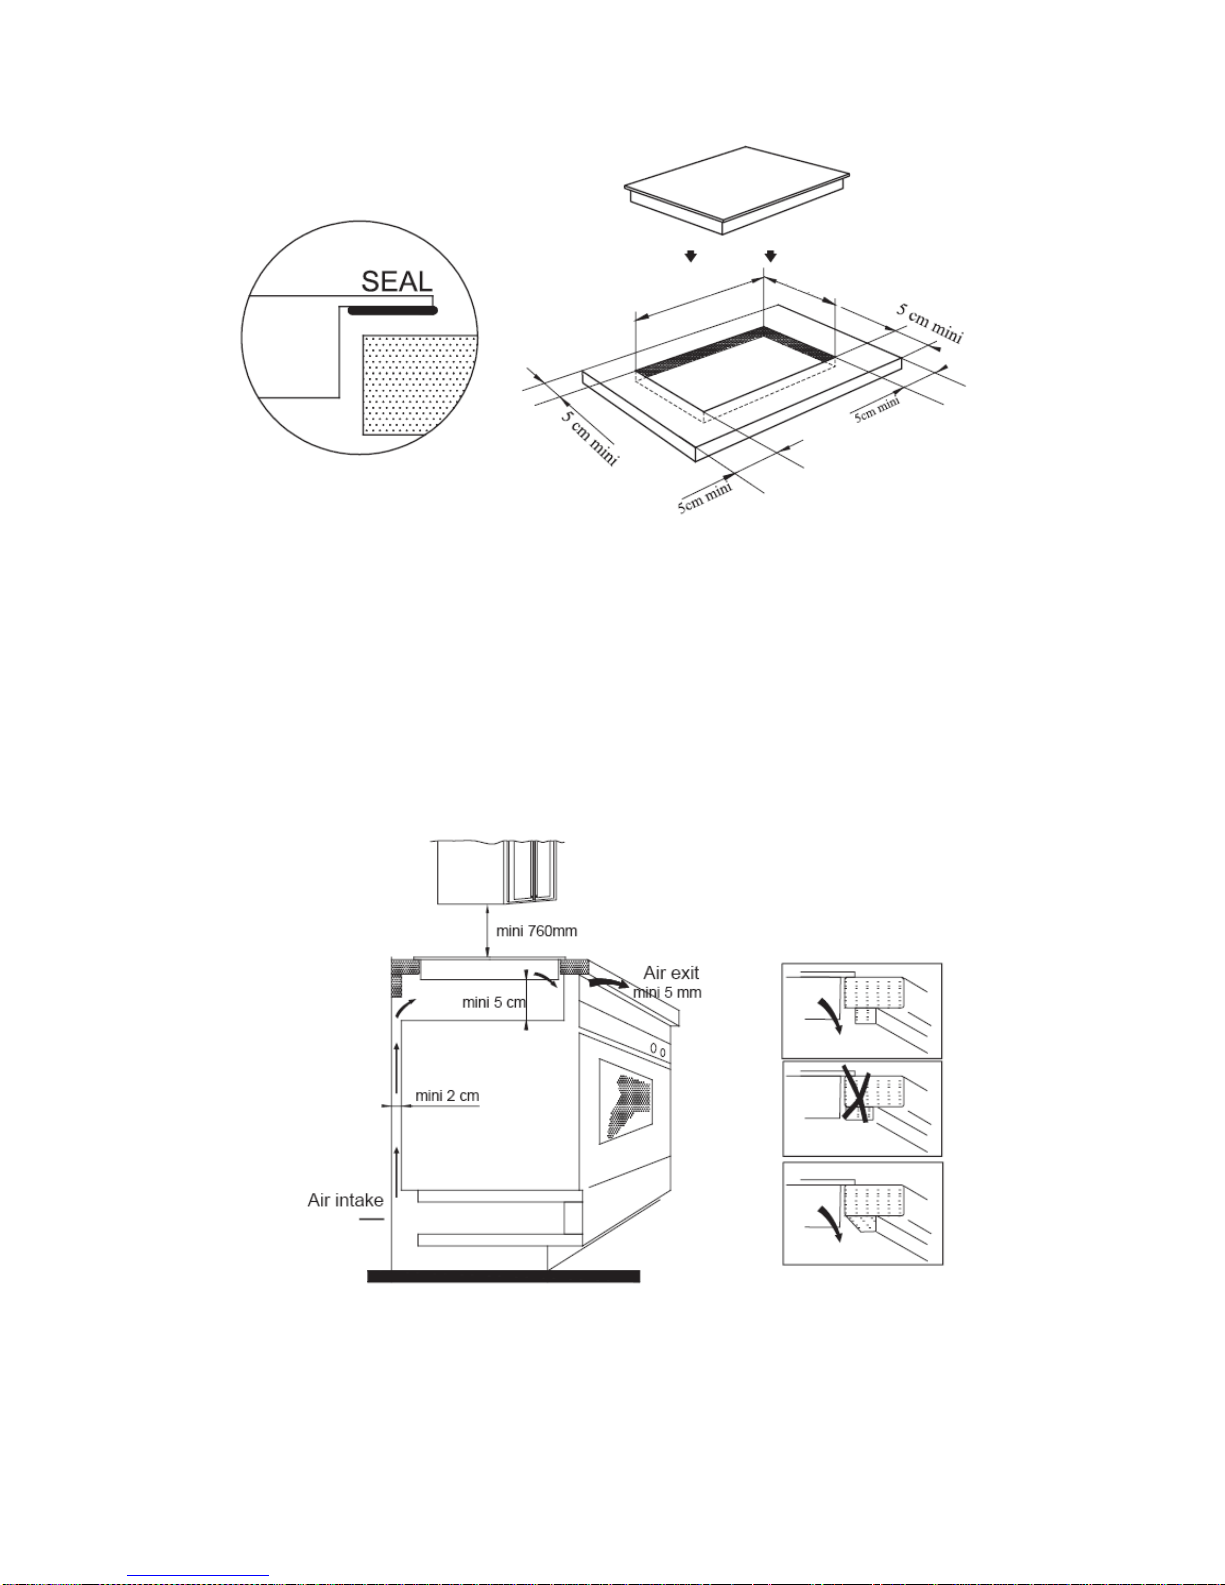
Under any circumstances, make sure the induction hotplate is well ventilated
and the air inlet and outlet are not blocked.
Ensure the induction hotplate is in good work state.
As shown in Figure (3)
Figure (3)
20
Figure (2)
56 cm
+0.4
+0.1
49 cm
+0.4
+0.1
Page 22
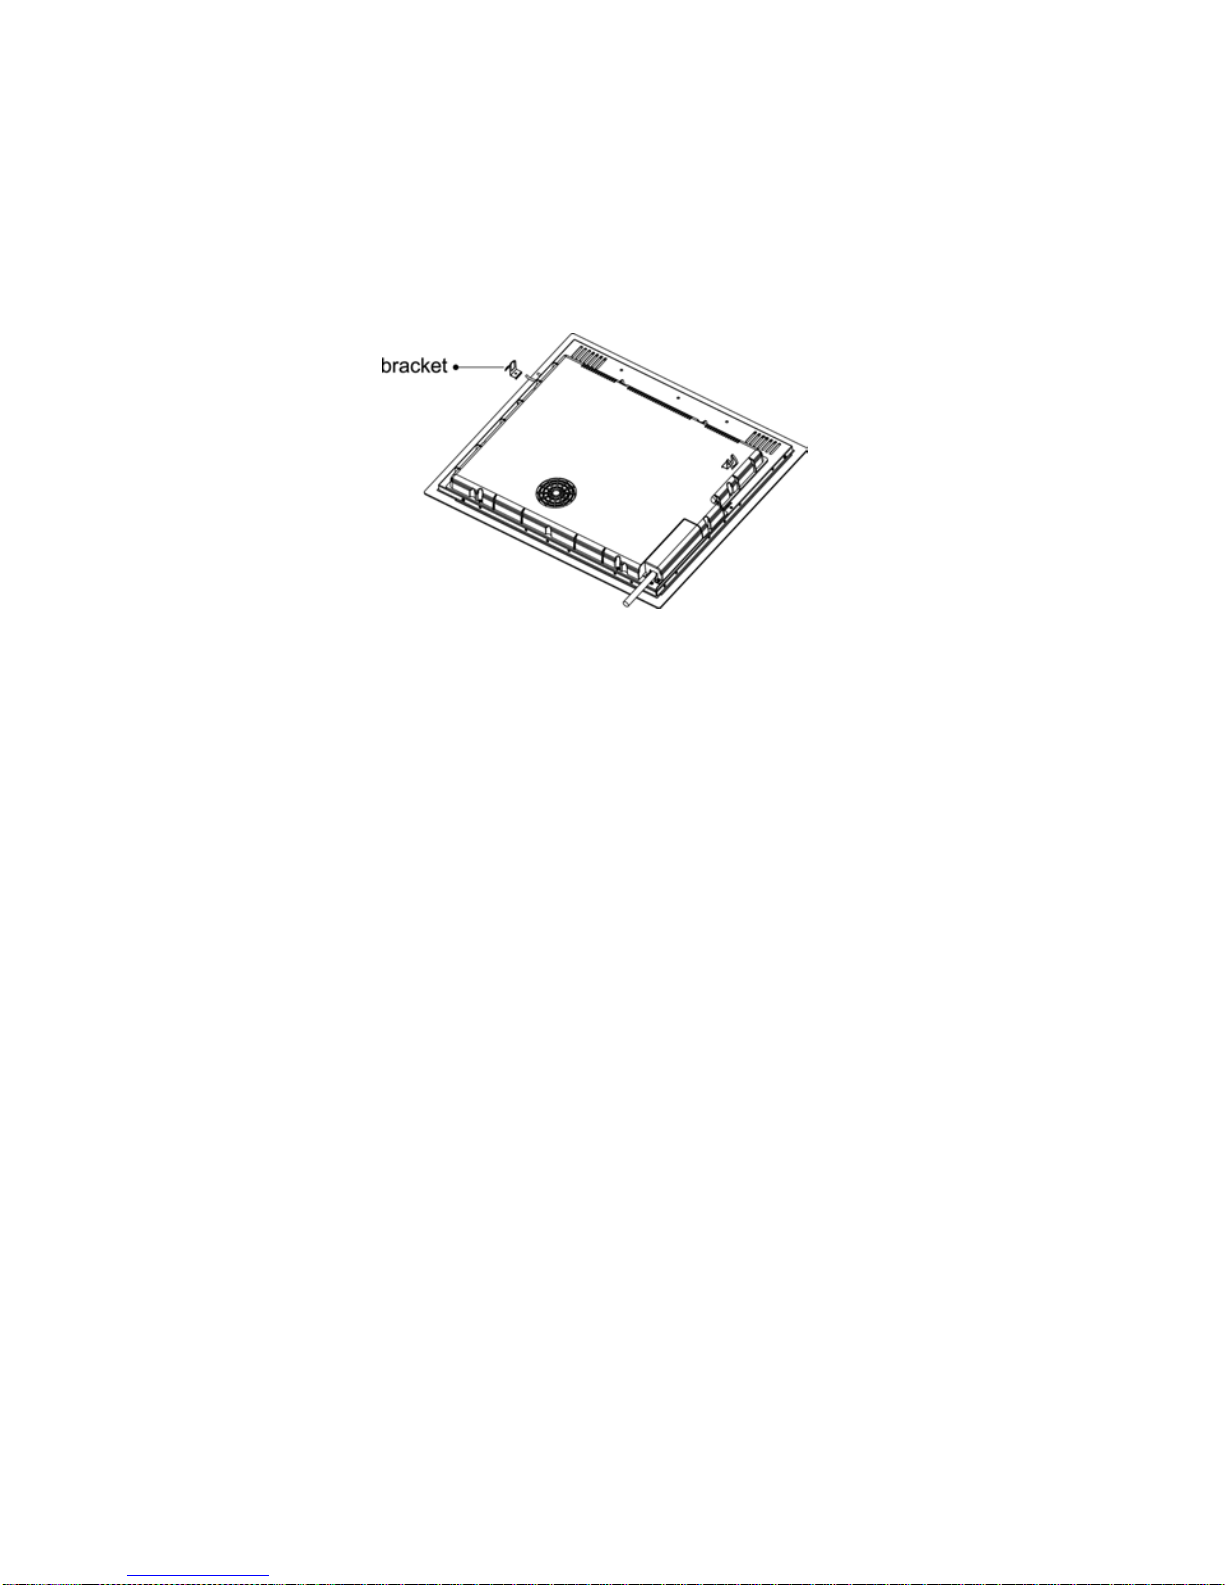
Note: The safety distance between the hotplate and the cupboard above the
hotplate should be at least 760mm.
Fix the hob on the table by screw four brackets on the bottom of hob (as
shown in figure (4)) after installation. Adjust the bracket position to suit for
different table top thickness.
Figure (4)
Cautions:
1. The induction hotplate must be installed by qualified personnel or
technicians. We have professionals at your service. Please never conduct
the operation by yourself.
ELECTRICAL CONNECTION
"The installation must conform to the standard directives."
The manufacturer declines all responsibility for any damage that may be
caused by unsuitable or unreasonable use.
2. The induction hotplate shall be installed such that better heat radiation can
be ensured to enhance its reliability.
3. The wall and induced heating zone above the table surface shall withstand
heat.
4. To avoid any damage, the sandwich layer and adhesive must be resistant to
heat.
21
Page 23
Warning
• Always check before any electrical operation, the supply tension shown on
the electricity meter, the adjustment of the circuit breaker, the continuity of the
connection to earth to the installation and that the fuse is suitable.
• The electrical connection to the installation should be made via a socket with
a plug with earth, or via an Omni-pole cut-out switch with an opening gap of at
least 3 mm.
If the appliance has a socket outlet, it must be installed so that the socket
outlet is accessible.
• The yellow/green wire of the power supply cable must be connected to the
earth of both power supply and appliance terminals.
• The manufacturer cannot be held responsible for any accidents resulting
from the use of an appliance which is not connected to earth, or with faulty
earth connection continuity.
• Any queries regarding the power supply cord should be referred to After
Sales Service or a qualified technician.
• I f the cable is damaged or to be replaced, the operation must be carried out
the by sale agent with dedicated tools to avoid any accident.
Power line connection
The socket shall be connected according to the relevant standard or
connected to a single-pole breaker.
The method of connection is shown in Figure (5):
Figure (5)
blue
green-yellow
N2 N1 L2 L1
grey
brown
black
220-240V
220-240V
blue
green-yellow
N L2 L1
grey
brown
black
400V
220-240V
220-240V
PE
blue
green-yellow
N L
grey
brown
black
220-240V
PE
PE
connet to the main power supply
connet to the main power supply connet to the main power supply
220-240V 2+2N~
220-240V~
400V~ 2-N
22
Page 24
If the cable is damaged or needed to be replaced, the operation must be
carried out by the after-sale agent with dedicated tools to avoid any accidents.
If the appliance is being connected directly to the mains an Omni-polar
ci
rcuit-breaker must be installed with a minimum opening of 3mm between
co
ntacts.
The installer must ensure that the correct electrical connection has been made
and that it is compliant with safety regulations.
The cable must not be bent or compressed.
The cable must be checked regularly and replaced by authorized technicians
only.
Induction Hotplate Appearance
Figure (6)
Air entry
Air vent
Ceramic plate
Control panel
1
2
3
Schematic Diagram of The Control Pane
l
Boost
23
Fi
gure (7)
Lock
ON/OFF
Timer key
Power / Timer Regulating key
ooking zone selection key
Page 25
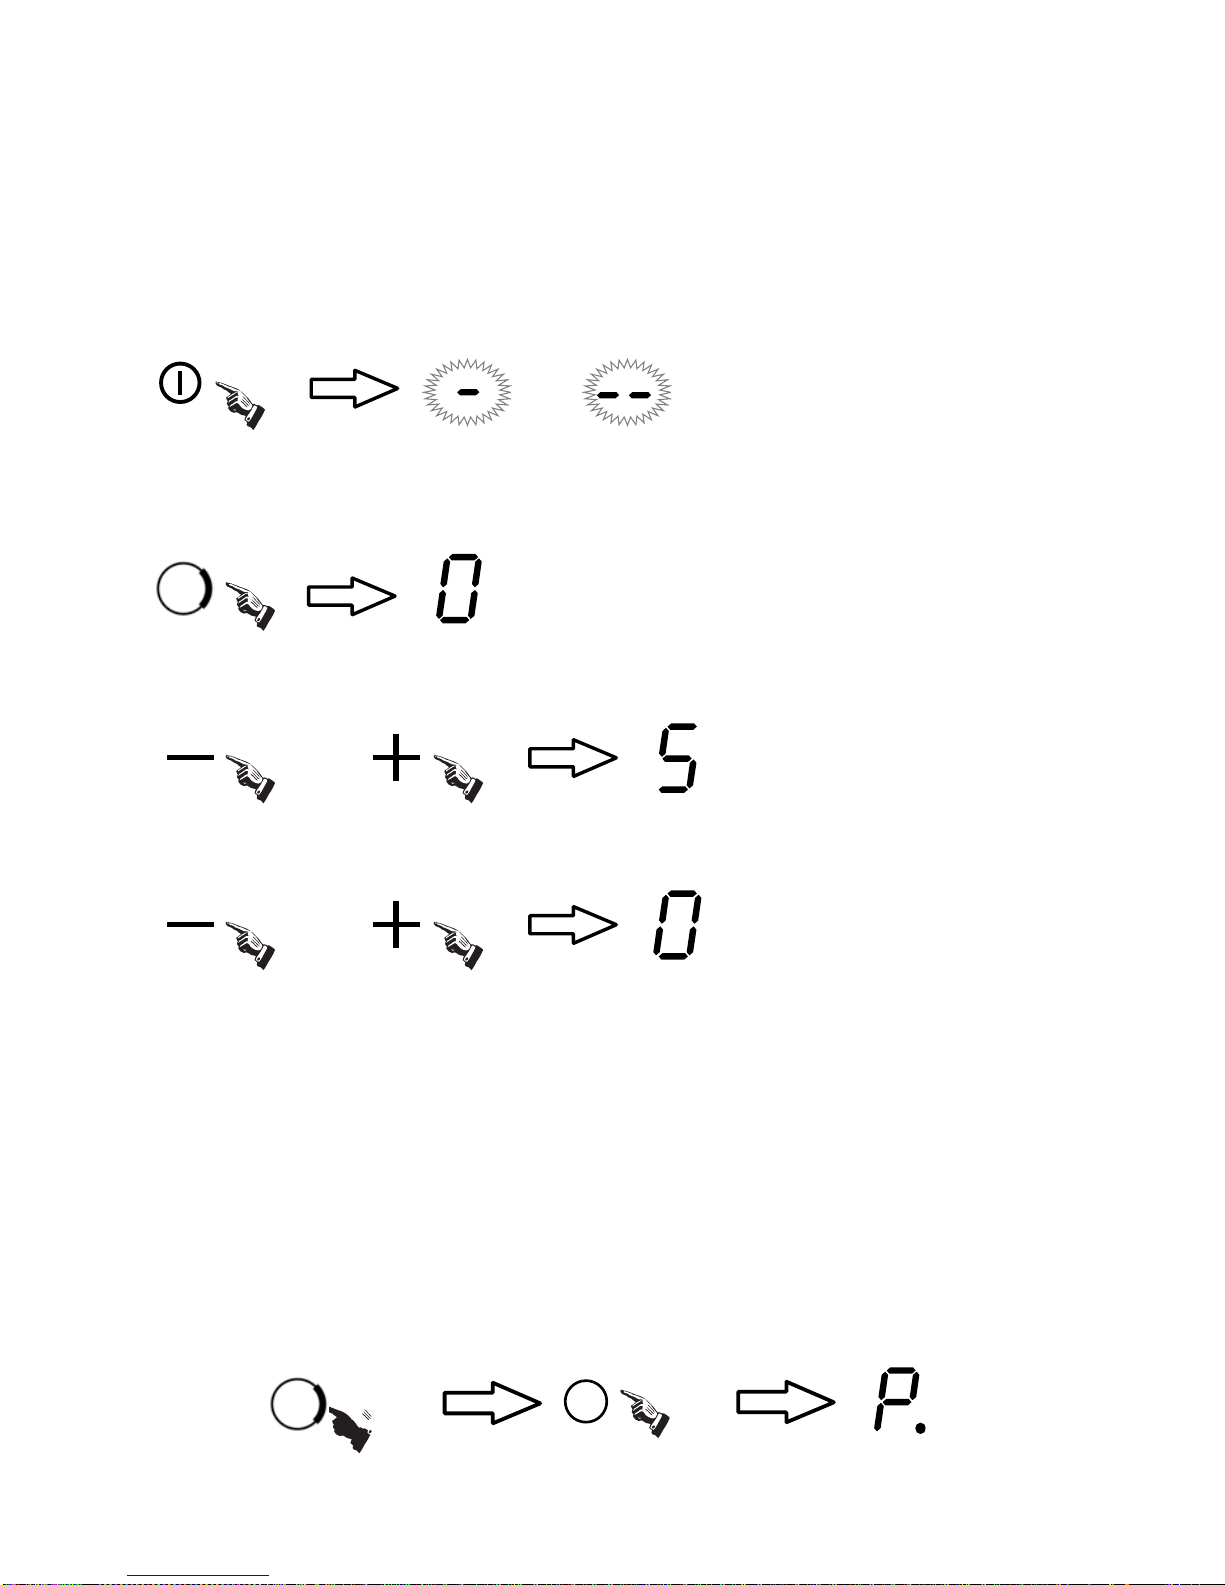
Instructions For Use
OR
Preparation Before Using:
After power on, the buzzer beep once, all the indicators light up for 1 second and
then go out, which indicates the induction hotplate enters the state of standby.
Put the pot in the center of the heating zone.
Operation Instructions:
When the “ON / OFF” button is pressed, all the indicators show "-" .
OR
According to the heating zone where the pot is placed, select a relevant zone
selection (e.g. select zone ), with a corresponding power level indicator
flashing.
At the moment, press the "+" or "-" button, the indicator displays 5, then adjust
the power levels using the "+" or "-" button.
AND
oost function
To get a quicker heating speed, there is a function named "Boost" will satisfy
your requirement.
Directly press the " Boost" button after selecting the heating zone, with the
power level indicator showing "P. " , and the heating power can reach up to
the max. .
B
Or press the "+" and "-" buttons simultaneously, the power setting immediately
change to 0, and all the cooking zone switch off.
See the attached table "the ma. power of each heating zone" for the power
specific to each heating zone.
Note 1. After the "ONO" button is pressed, the induction hotplate will
restore to its standby state if no any operation is carried out within one
minute.
24
Page 26
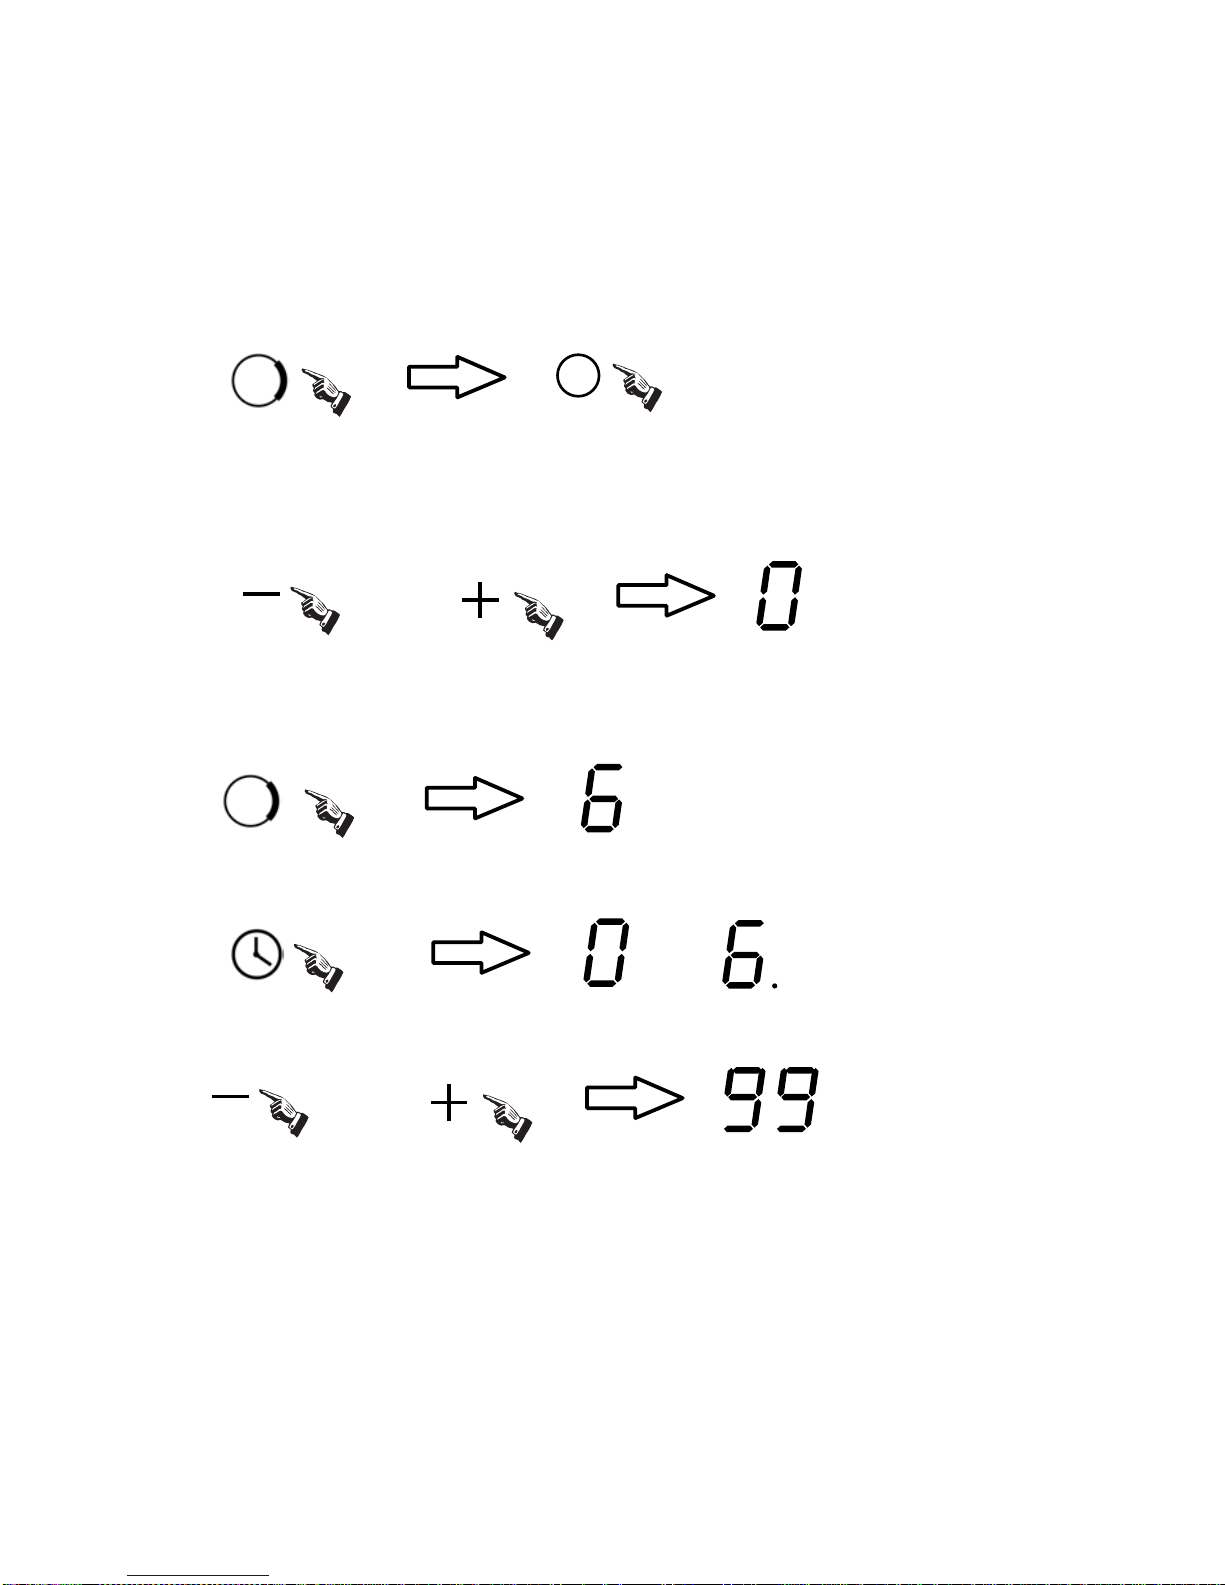
Timing function
AND
OR
When the “+”of timing button is pressed, the time setting will increase by 1 minute;
And it will increase by 10 minutes when the “+”of timing button is long pressed.
When the “-”of timing button is pressed, the time setting will decrease by 1 minute;
And it will decrease by 10 minutes when the “-”of timing button is long pressed.
Timing confirmation:
Press the "iming" button, the timing indicator flashes, and you can set the
timer at this point.
Using the "+" and "-"buttons, you can realize the setting of timing from 1 to 99
minutes.
2. The boost function only works on the third cooking zone.
Cancellation of "Boost" function
Note:1. The boost function only operates for 5 minutes, after which the cooking
zone returns to its orginal setting.
When in the "Boost" function, select the relevant heating zone with the "Boost"
function, and press the "Boost" button or the "-" button to cancel the Boost
function, then the cooking zone will revert to its original setting.
B
Or press the "+" and "-" buttons simultaneously when the relevant heating zone
has been selected, the "Boost" function will be cancelled automatically. The
power setting immediately chang to 0, and this heating zone switch off at the
same time.
OR
Select the relevant cooking zone, and set the power level with the "+" or "-"
button. (e.g. the cooking zone 3 with power level 6)
Timing cancellation:
After selecting a set time, once the timing indicator flashes for 5 seconds, or press the
"iming" button, the set time will be confirmed to be valid automatically.
If press the + and - simultaneously, the timing can be cancelled automatically, with
the timing indicator showing 0.
25
Page 27
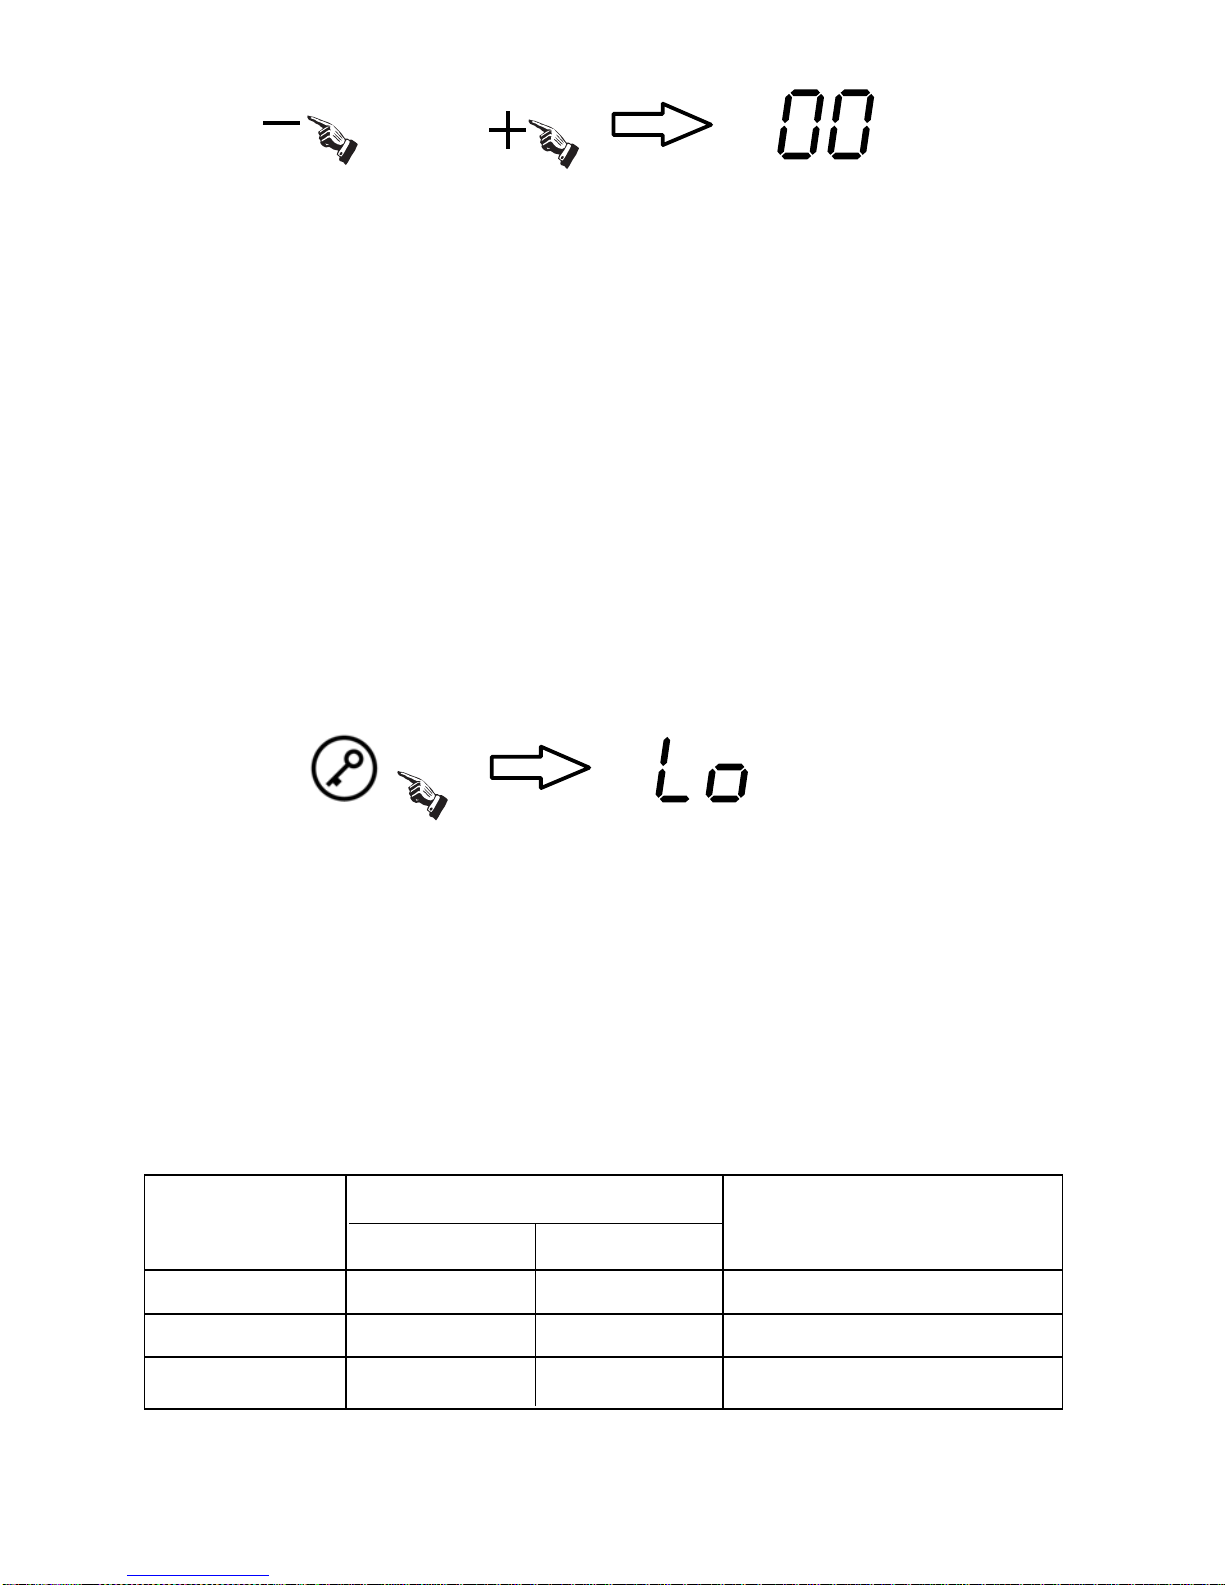
2. Press the “+” or “-“of timing button without select one cooking zone when the
induction hotplate is working, the time-warning function will operate. And the
warning time can be set just like the timing function. The buzzer will be beeping
for 30 seconds when the time is reached. The function will be cancelled when
the time is set to 0.
3. the time-warning function will be cancelled when the induction hotplate is
switched off.
Interlock Function:
To ensure the safety of children, the induction hotplate is provided with the function
of interlock.
Interlock:
Press the “Interlock” button, then the induction hotplate enters the locking state,
with the timing indicator showing “Lo”.
Unlock:
Holding the “Interlock” button for about 3 seconds, the locking state will be removed.
Note:
1. The rest buttons disabled except the “ON/OFF” and “Interlock” button when the
induction hotplate is in the locking state. Only unlocking the buttons or else the
induction hotplate won’t be operated.
2. If the induction hotplate enters the locking state in the off mode, the timing
indicator showing “Lo” for one minute. And it will be shown for one minute again
when the “ON/OFF” or “Interlock” button is pressed.
The max. power of each heating zone are as follows
Power(W)
Heating Zone
Dia. Of the Heating Zone
1 1500 160mm
2
20
3000
00 180mm
3
The above power may vary if the material or the size of pot is differet.
20mm
Note:
1. In the timing state, the power level of the relevant cooking zone can be changed,
and the time set is still valid.
AND
Normal
Boost
3600
------
------
26
Page 28
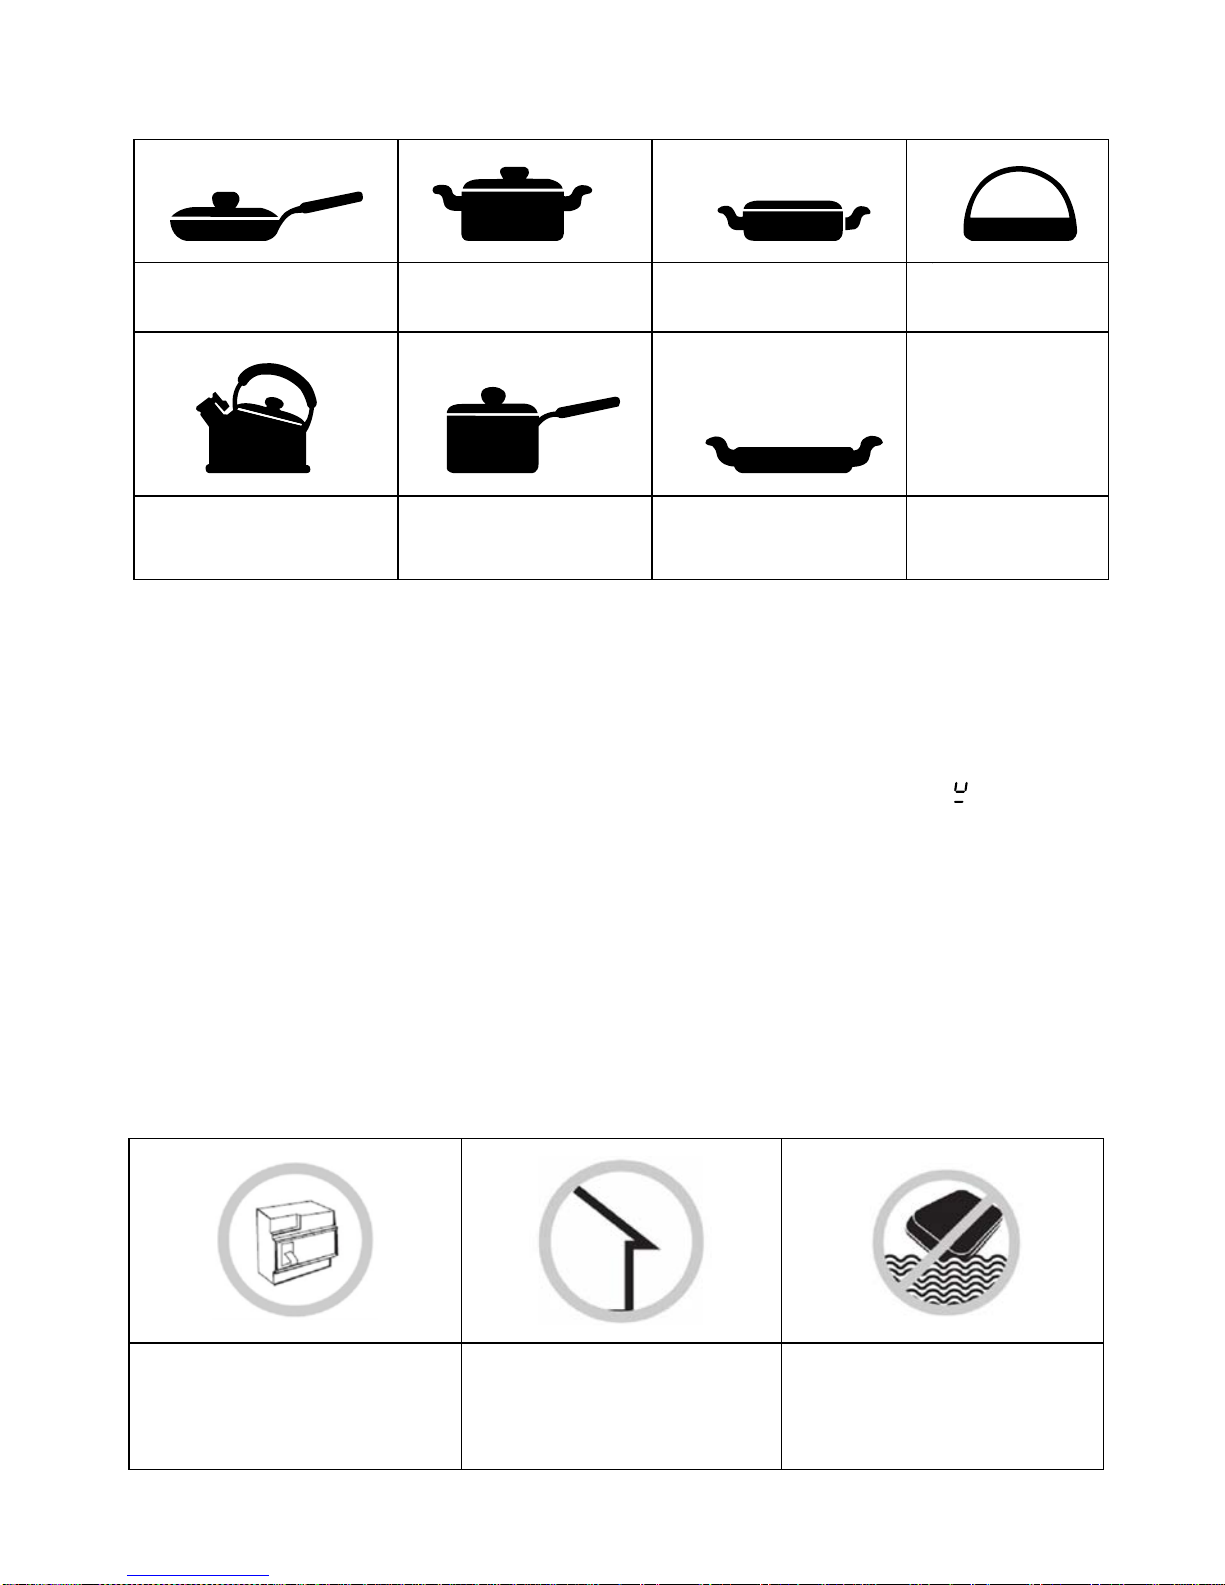
Selection of heating appliances
Iron oil frying pan Stainless steel pot Iron pan Iron kettle
Enamel stainless
st
eel kettle
Enamel cooking
utensil
Iro
n plate
You may have multiple appliances suitable for heating.
This induction hotplate is able to identify multiple heating appliances, and you
ca
n test them according to one of the following methods:
1. Place the appliance in the heating zone. If the corresponding heating zone
disp
lays a power level, it shows the suitability of the appliance; if “
” flashes, it
shows the appliance does not fit in the induction cooking.
2. Have a magnet to contact the appliance. If there is attraction between them,
it shows the appliance also fits in the induction cooking.
● Requirement for pot material: the bottom contains materials of magnetic
conductivity.
● Requirement for shape: flat bottom.
Safety Reminding and Maintenance:
Please use a dedicated
power protection air
switch;
Indoor use only. Never directly wash the
in
duction hotplate with
water so as to avoid
dangers.
27
Page 29
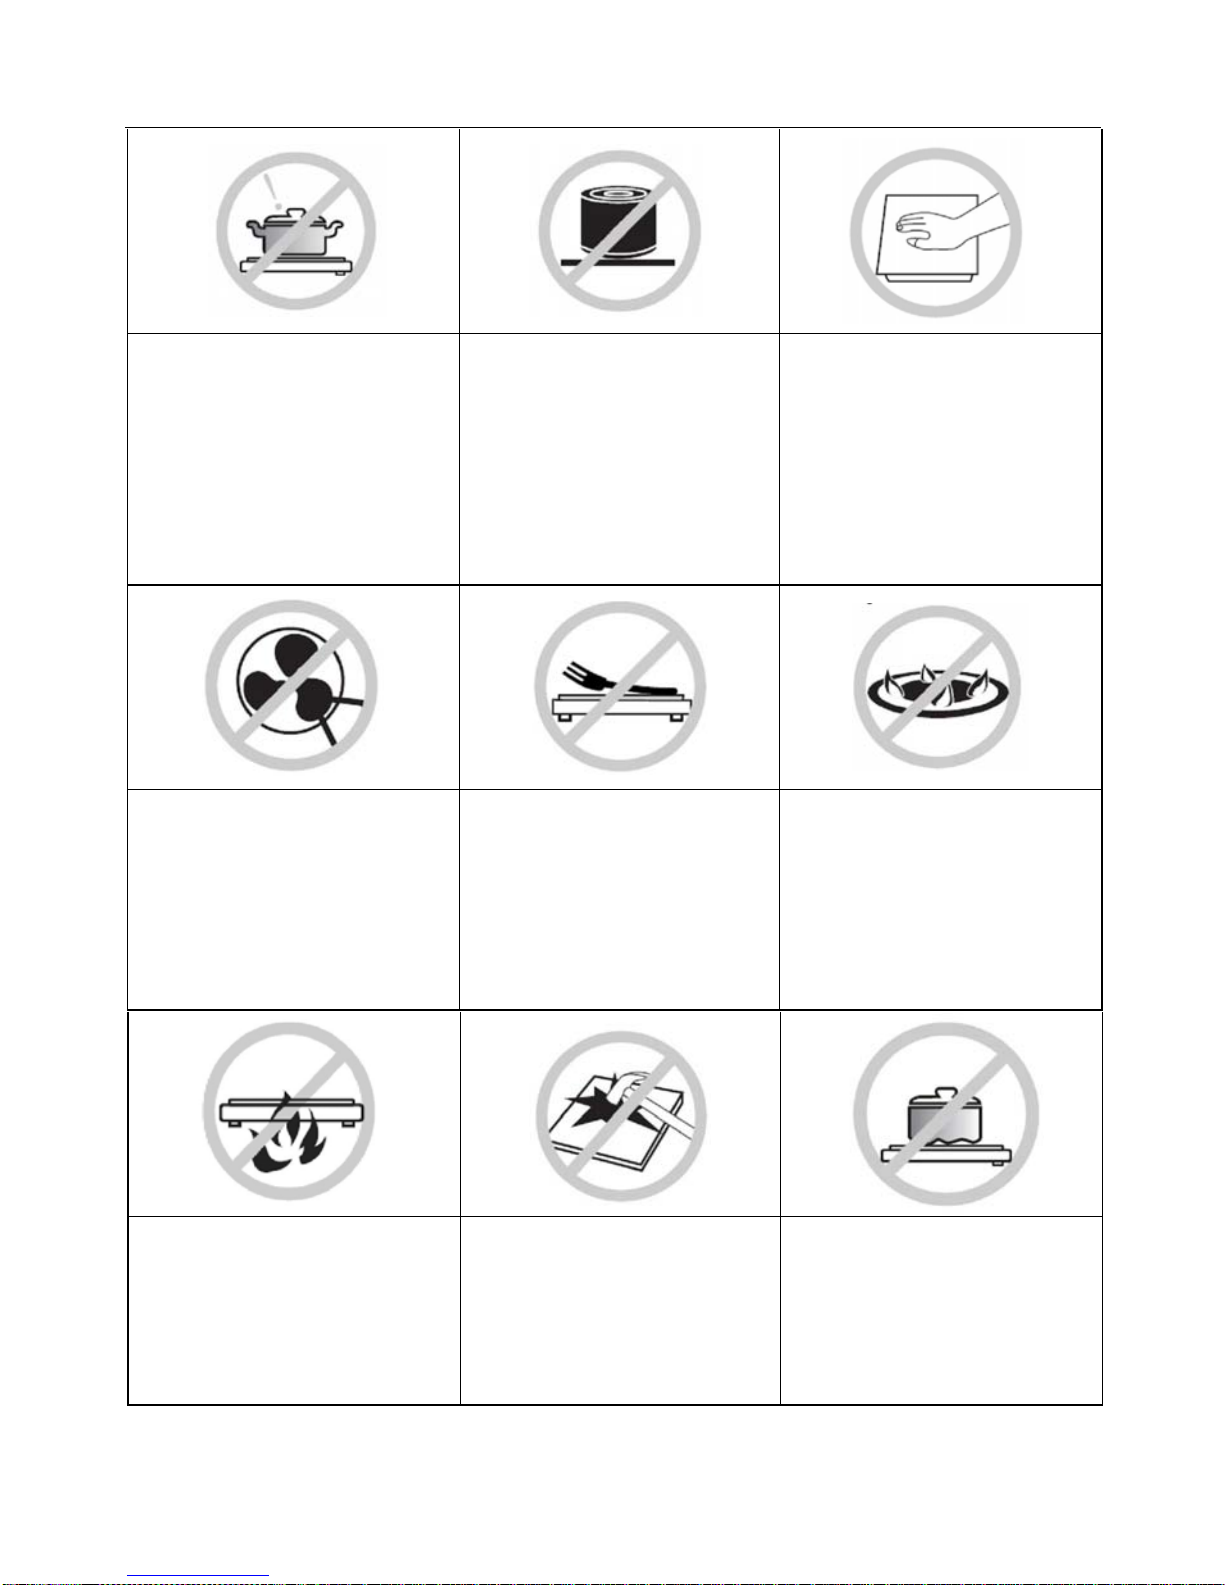
Never have the induction
hotplate to work without
food inside, otherwise its
operational performance
may be affected and
danger may happen.
For sealed food such as
canned goods, please
do not heat them before
opening their covers so
as to avoid any dangers
of explosion due to
heating expansion.
After being used for a
long time, the
corresponding heating
zone of the induction
hotplate is till hot. Never
touch the ceramic
surface to avoid
burning.
We suggest that you
should periodically check
that there are no object
(glass, paper, etc) that
could obstruct the inlet
under your induction
hotplate.
Metallic objects such as
knives, forks,spoons
and lids should not be
placed on the hotplate
since they can get hot.
Never use the induction
hotplate in high
temperature
environments such as
near a gas stove or
kerosene stove.
Do not put any
detergents or flammable
materials in the
equipment installed
under the induction
hotplate.
If the surface is
cracked, swith off the
appliance to avoid the
possibility of electric
shock.
Do not place rough or
uneven appliances,
which may damage the
ceramic surface.
28
Page 30
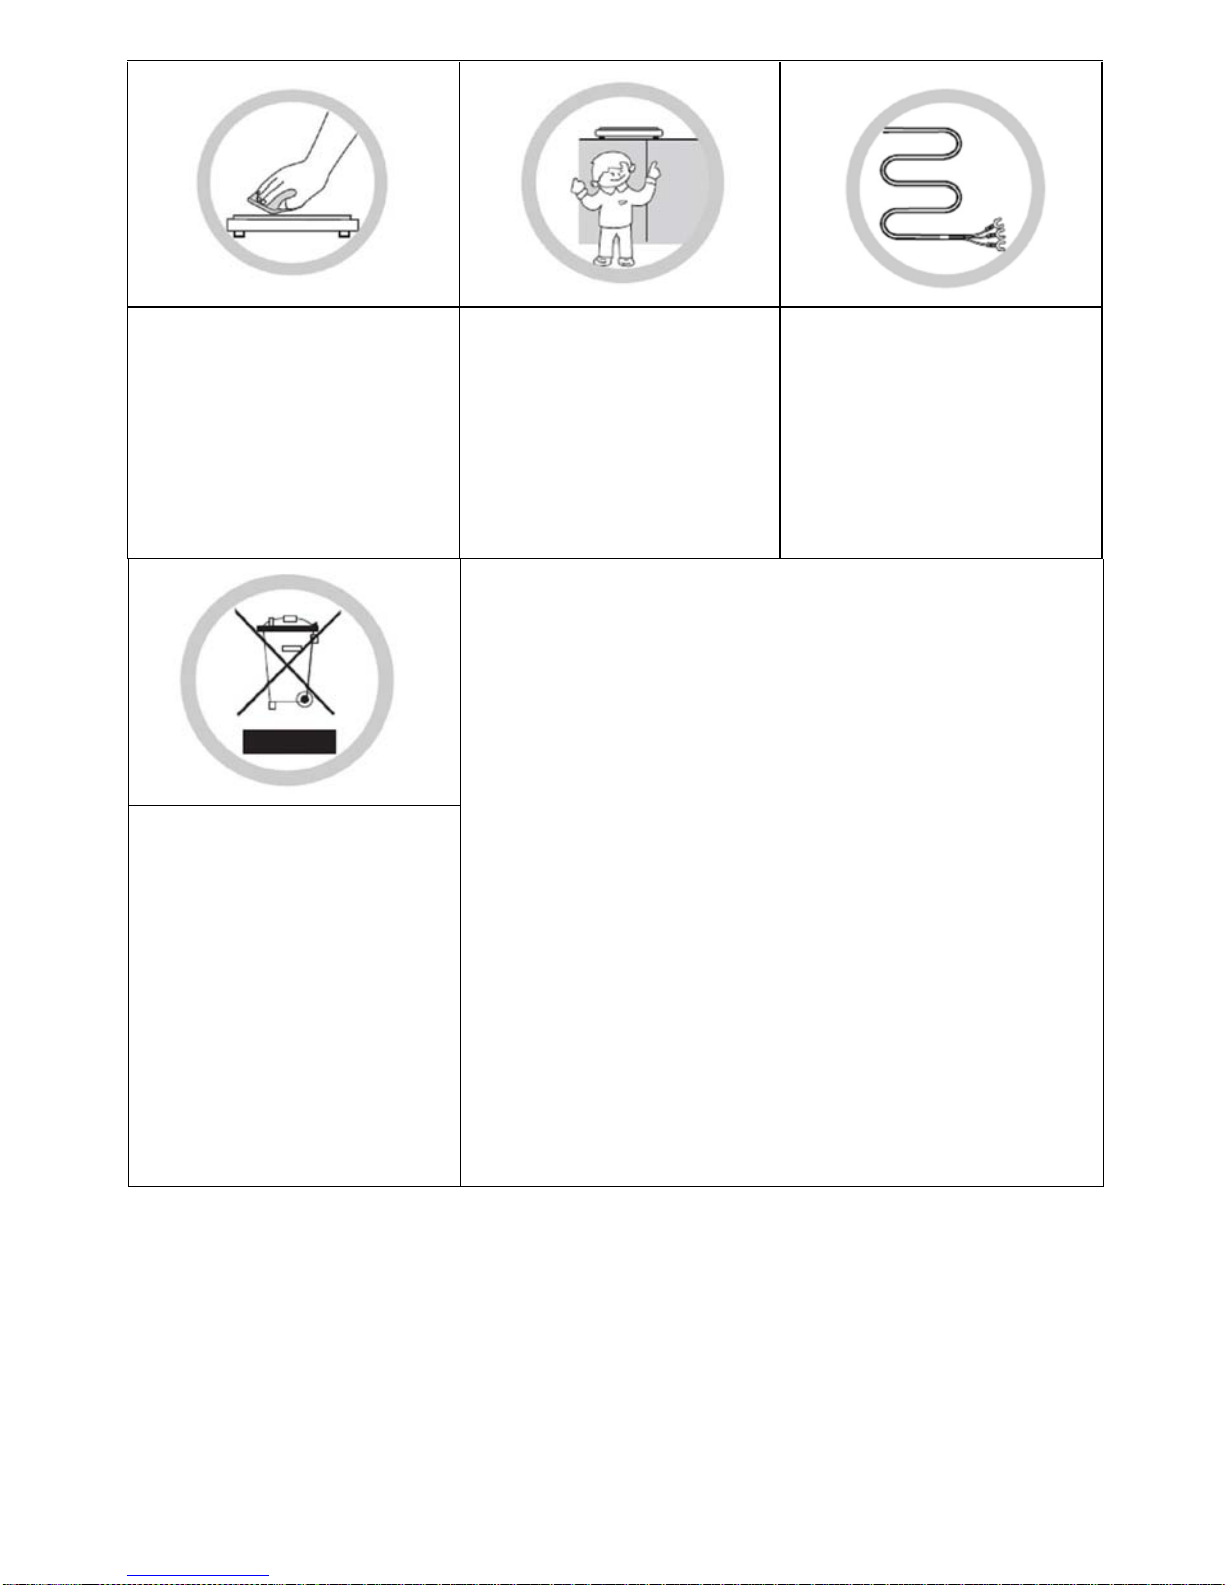
Clean the induction
hotplate on a regular
basis to prevent foreign
matters from entering the
fan thus influencing the
normal operation.
Keep electrical
appliance out of reach
from children or inform
person. Do not let them
use the appliances
without supervision.
If the supply cord is
damaged , it must be
replaced by the
manufacturer, its
service agent or
similarly qualified
persons in order to
avoid a hazard.
DISPOSAL: Do not
dispose this product
as unsorted municipal
waste. Collection of
such waste separately
for special treatment is
necessary.
This appliance is labeled in compliance with European
directive 2002/96/EC for Waste Electrical and Electronic
Equipment (WEEE). By ensuring that this appliance is
disposed of correctly, you will help prevent any possible
damage to the environment and to human health, which
might otherwise be caused if it were disposed of in the
wrong way.
The symbol on the product indicates that it may not be
treated as normal household waste. It should be taken to a
collection point for the recycling of electrical and electronic
goods.
This appliance requires specialist waste disposal. For
further information regarding the treatment, recover and
recycling of this product please contact your local council,
your household waste disposal service, or the shop where
you purchased it.
For more detailed information about treatment, recovery
and recycling of this product, please contact your local city
office, your household waste disposal service or the shop
where you purchased the product.
29
Children should be supervised to ensure that they do not play with the appliance.
3. A steam cleaner is not to be used.
1. This appliance is not intended for use by persons (including children) with reduced
physical, sensory or mental capabilities, or lack of experience and knowledge,
unless they have been given supervision or instruction concerning use of the
appliance by a person responsible for their safety.
2. If the supply cord is damaged, it must be replaced by the manufacturer, its service
agent or similarly qualified persons in order to avoid a hazard.
Page 31

Cleanness and Maintenance
You can easily clean the surface of the induction hotplate if following
the methods given in the table.
Type of
contamination
Method of cleaning
Articles used
forcleaning
Light
Immerse in hot water then wipe it
dry
Cleaning sponge
Accumulation of
dirt
Immerse in hot water then wipe it
dry with abrasive sponge
Special cleaning
sponge for ceramic
glass
Rings and lime
crumbles
Apply white vinegar to the
polluted zone, then wipe it dry
with soft cloth or a special article
available in local markets
Special adhesive for
ceramic glass
Sweetmeat, melt
aluminum or
plastics
Use a scraper suitable for
ceramic glass (to protect glass, a
silicon product is preferred) to
remove residuals
Special adhesive for
ceramic glass
Hint: please disconnect power before the cleaning.
5. The appliance is not intended to be operated by means of an external timer or
separate remote-control system.
4. After use, switch off the hob element by its control and do not rely on the pan
detector.
30
This appliance is not intended for use by persons (including
a person responsible for their safety.
physical, sensory or mental capabilities, or
they have been given
play with
the appliance.
children) with
reduced
unless
lack of experience and
knowledge,
supervision or instruction, concerning
the use of the appliance by
6.
7.
8.
not The adult should supervise children to make sure children can
This appliance is designed for domestic or household use only. The warranty
outdoor and commercial uses include restaurants, cafes, schools, clubs,
alfresco areas with open walls or hoods used above barbeq ues.
does not apply for outdoor and commercial purposes. S ome examples of
Page 32
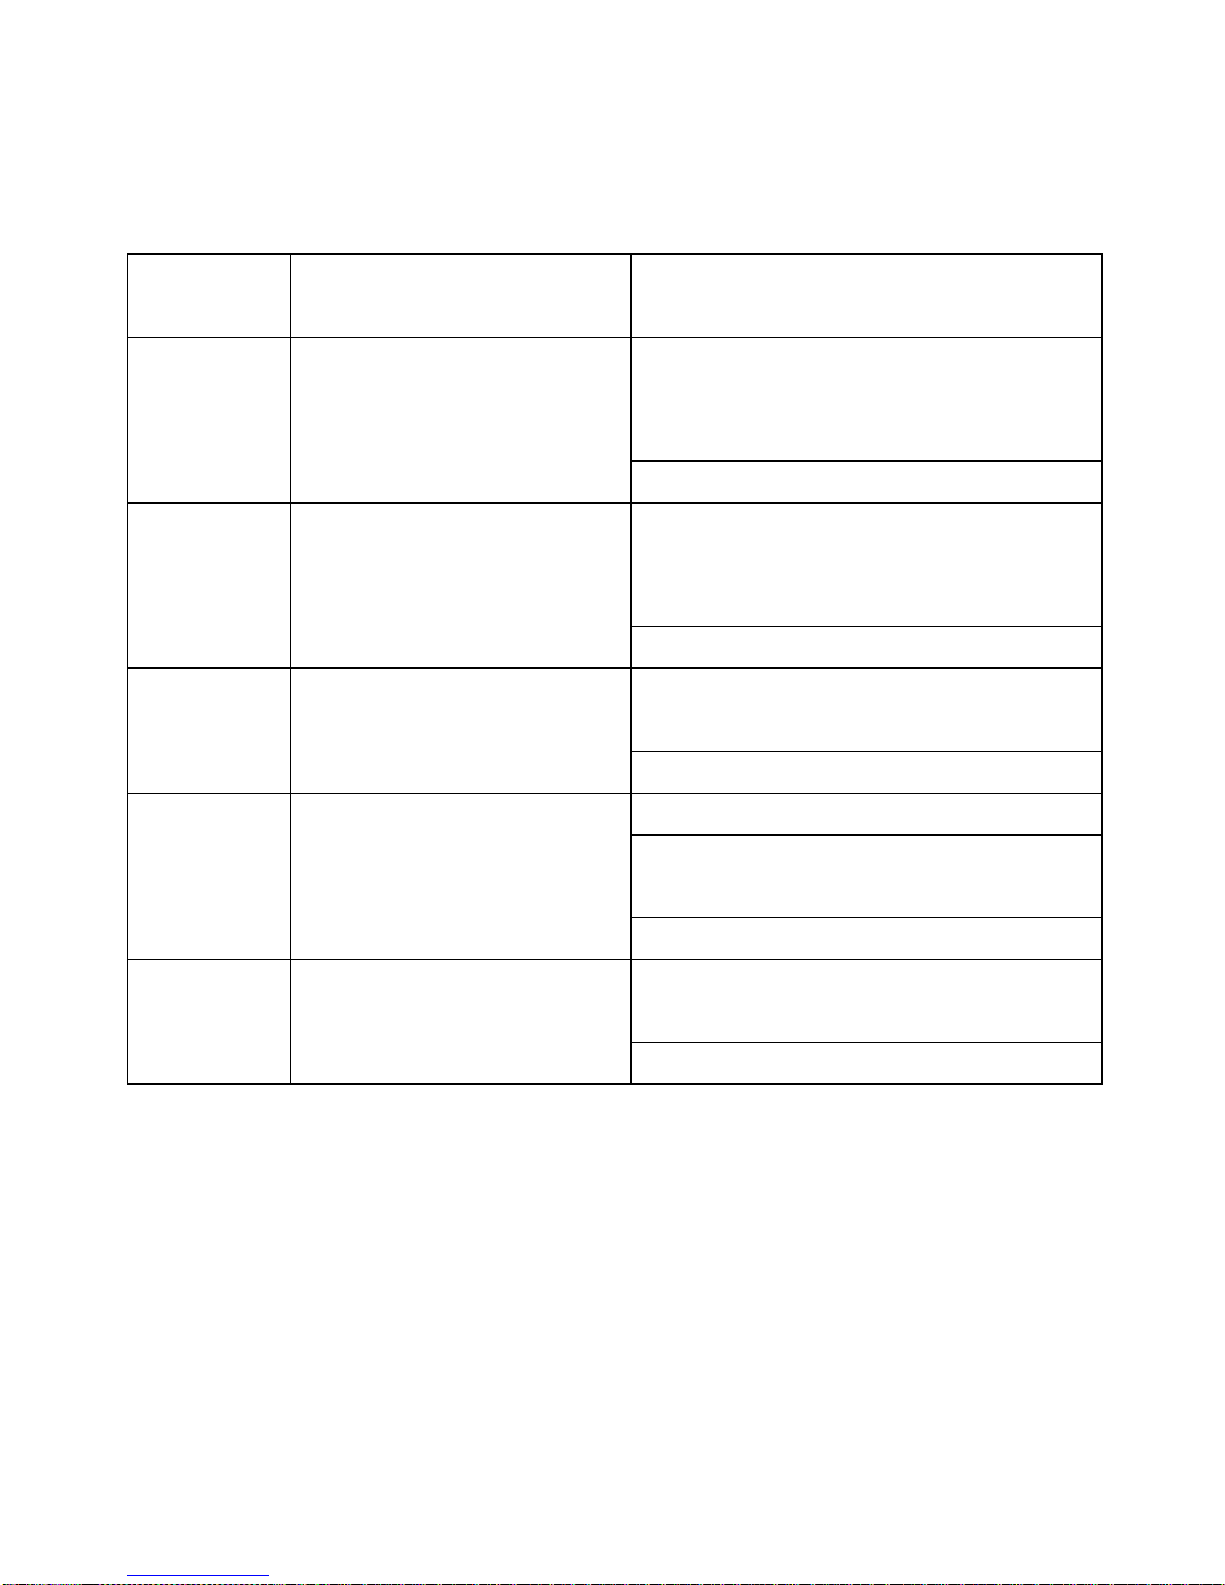
Failure Display and Inspection
If an abnormality comes up, the induction hotplate will enter the protective
state automatically and display corresponding protective codes:
Troubles Possible reasons Solutions
Power on, and then restart after the
temperature around returns to be
normal.
F3-F8
Thermistor component
failure.
Please contact the supplier.
Power on, and then restart after the
temperature around returns to be
normal.
F9-FE
Temperature sensor of
the IGBT failure.
Please contact the supplier.
Please inspect whether power
supply is normal. E1-E2 Abnormal supply voltage.
Please contact the supplier.
Please inspect the pot.
Please restart after the hotplate
cools down.
E3-E4 Abnormal temperature.
Please contact the supplier.
Please restart after the hotplate
cools down. E5-E6
Bad hotplate heat
radiation.
Please contact the supplier.
The above are the judgment and inspection of common failures.
Please do not disassemble the unit by yourself to avoid any dangers and
damages to the induction hotplate.
31
Page 33

Customer Care Service
Before calling the After Sales Service
In case the appliance should not work correctly we suggest to:
-verify if the plug is correctly inserted in the socket
-read the Failure and Display table above
In case it is not possible to establish the reason for the bad functioning of the
appliance, switch it off, do not try to manumit it and call the After Sales Service.
Special DecIaration
All the contents in this material have been subjected to careful check. For any
mistake and omission in printing or misunderstanding of the contents,the
company keeps the right of interpretation.
With a view to constantly improving our products, we reserve the right to make
any changes to the technical, program or aesthetic features connected with
the technical evolution.
Addition:any technical improvement will be placed in the revised manual
without notice;for product appearance and color is according to the actual one.
32
 Loading...