

Page 1

Page 2
These 2 pictures show you what your Flute will look
Cleaning Rod
Cleaning Cloth
Tenon Grease
Polishing Cloth
STOP!
Did You Know This?
Together, you’ll both have a really great time!
This Is A Precise And Delicate Instrument . . .
Be Careful With It!
The Flute, as with all musical
Wanna Get Good On Your Instrument Real Fast?
www.suzukibandinstruments.com
Do Not Return Your Flute To The Store!
1-800-854-1594
Page 3
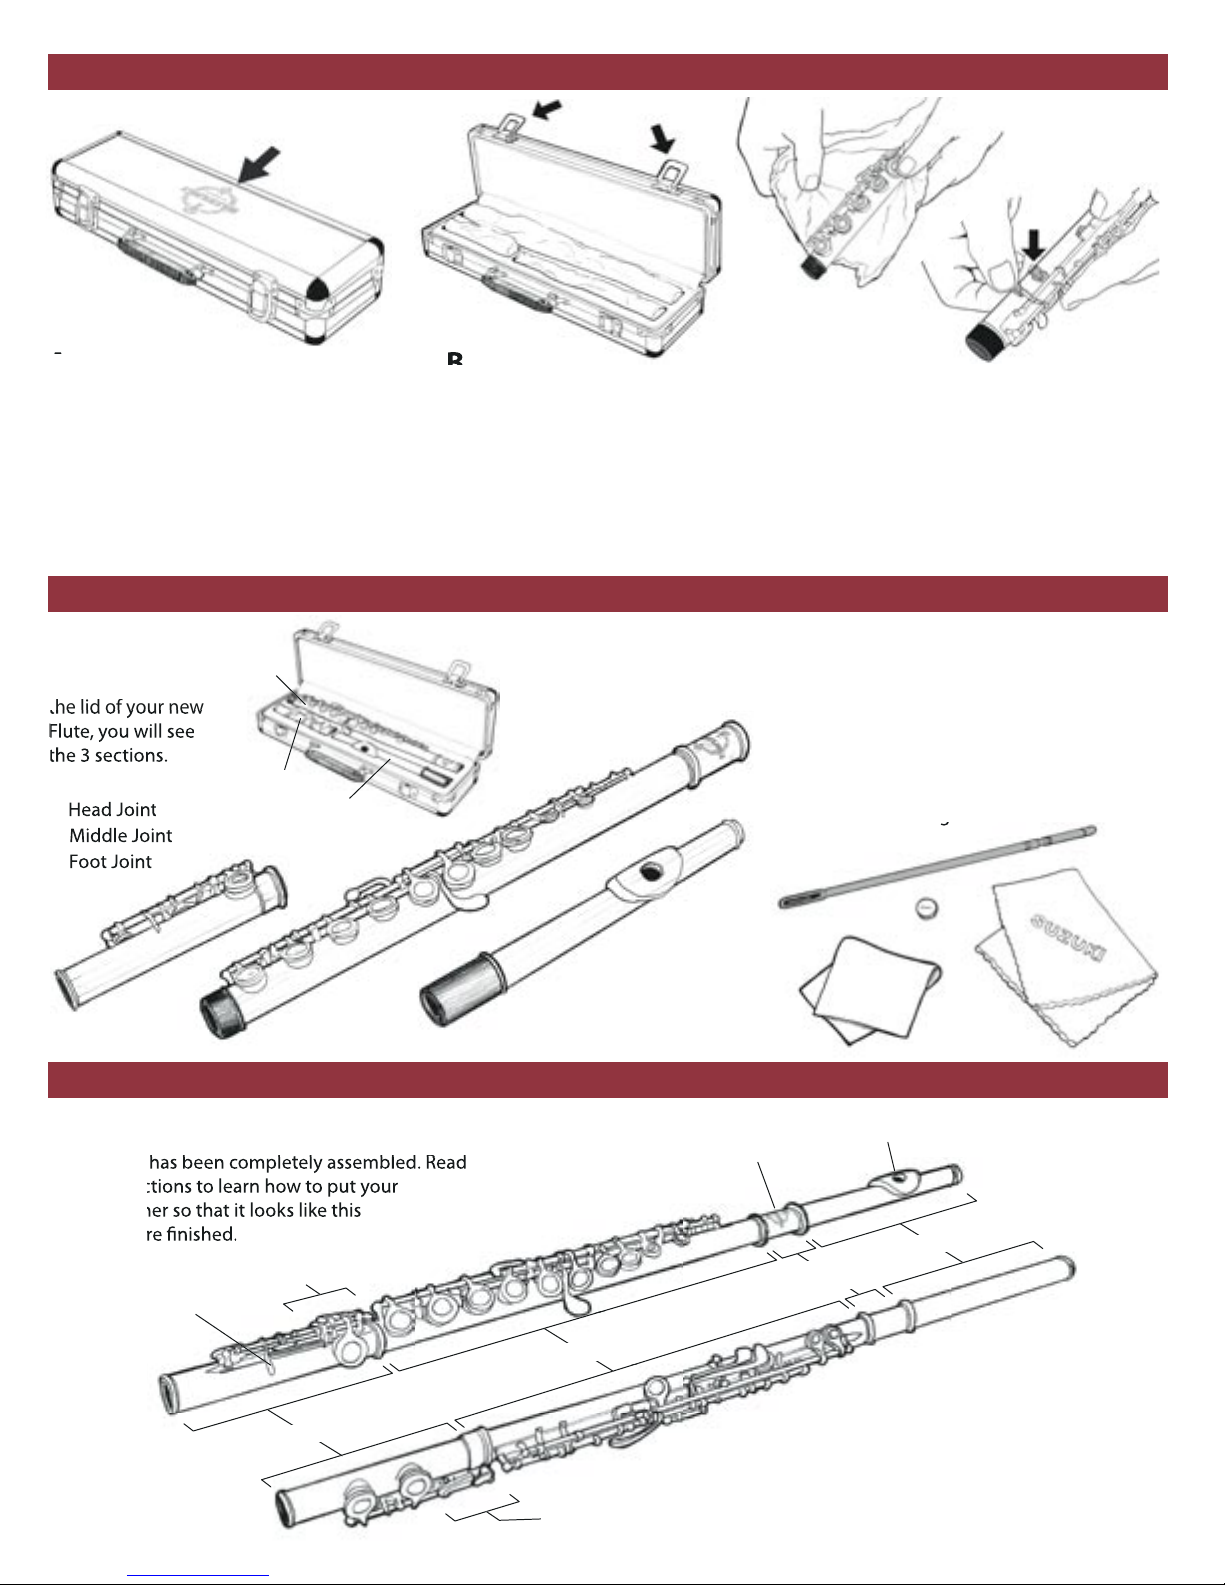
1. UNPACKING YOUR NEW FLUTE
These 2 pictures show you what your Flute will look
Cleaning Rod
Cleaning Cloth
Tenon Grease
Polishing Cloth
Logo
w
q
Position The Case
Open The Case
2. HERE ARE THE NAMES OF YOUR FLUTE PARTS
Carrying Case
1.
2.
3.
w
e
q
Unwrap Your Flute
q
w
Carefully put the sections back in the case in
their proper compartments!
Accessories
1.
2.
3.
4.
q
e
r
we
3. THIS IS WHAT YOUR FLUTE WILL LOOK LIKE WHEN ASSEMBLED
Foot Joint
Keys
Key Post
Foot Joint
q
Middle Joint
Foot Joint
Keys
Logo
w
Head Joint
Receiver
Emboucher Hole
Head Joint
Page 4
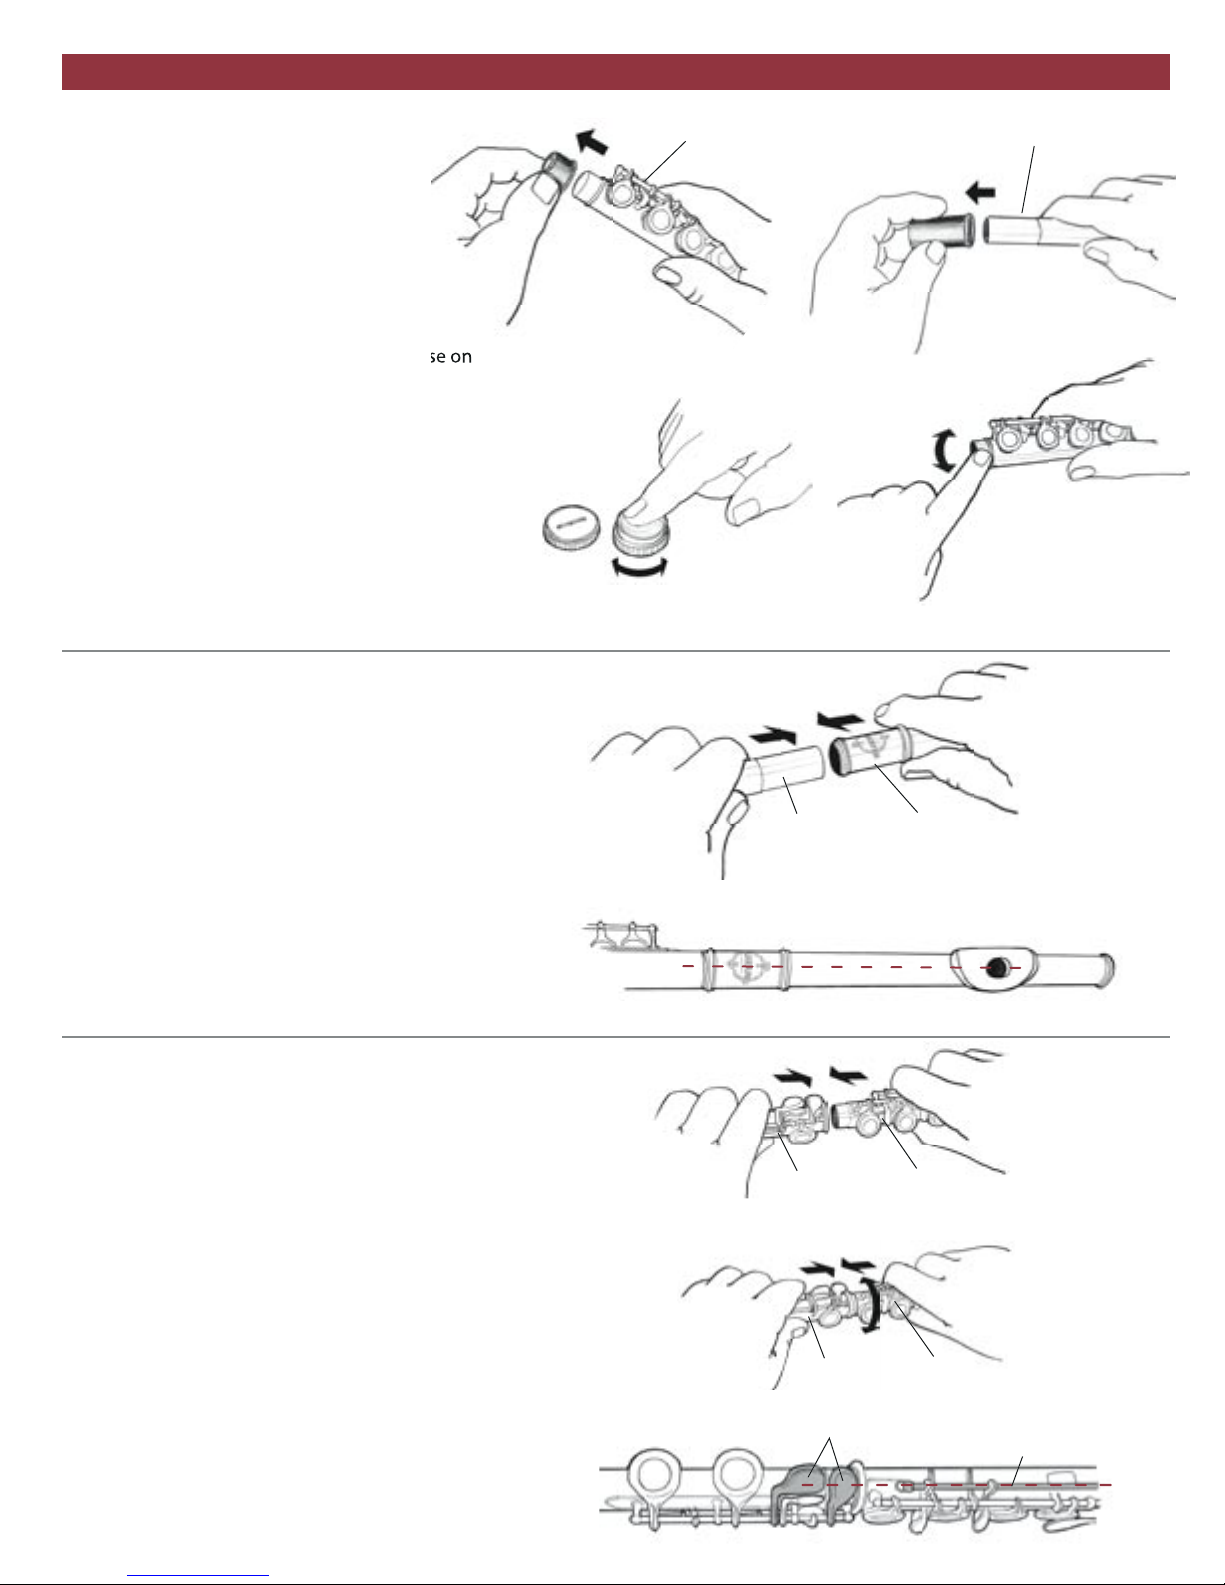
4. HOW TO PUT YOUR NEW FLUTE TOGETHER
Protective Caps and Tenon Grease
q
w
e
r
BE CAREFUL!
Hold the Flute sections gently! Do not put a lot of
pressure on the keys and rods. If you bend these,
your Flute will become very diffi cult to play.
Do not throw away the 2 Protective Caps. You will
use them again and again.
Use Tenon Grease ONLY about once per week, not
every time you play your fl ute.
Attach the Head Joint to the Middle Joint
q
e
Middle Joint
Head Joint
w
r
q
w
BE CAREFUL!
Push the 2 sections together carefully. Use a back
and forth motion. Do not turn the parts around
and around.
Now Attach the Foot Joint
q
w
e
BE CAREFUL!
If the sections do not fi t together easily, wipe the
Tenons with a dry cloth.
w
q
q
w
Middle JointHead Joint
Proper alignment of the Embouchure Hole
and Suzuki logo on Middle Joint
Foot Joint
Foot Joint
Head Joint and
Middle Joint
Head Joint and
Middle Joint
e
Foot Joint Keys
Long Rod
Page 5
q
q
w
q
w
w
e
r
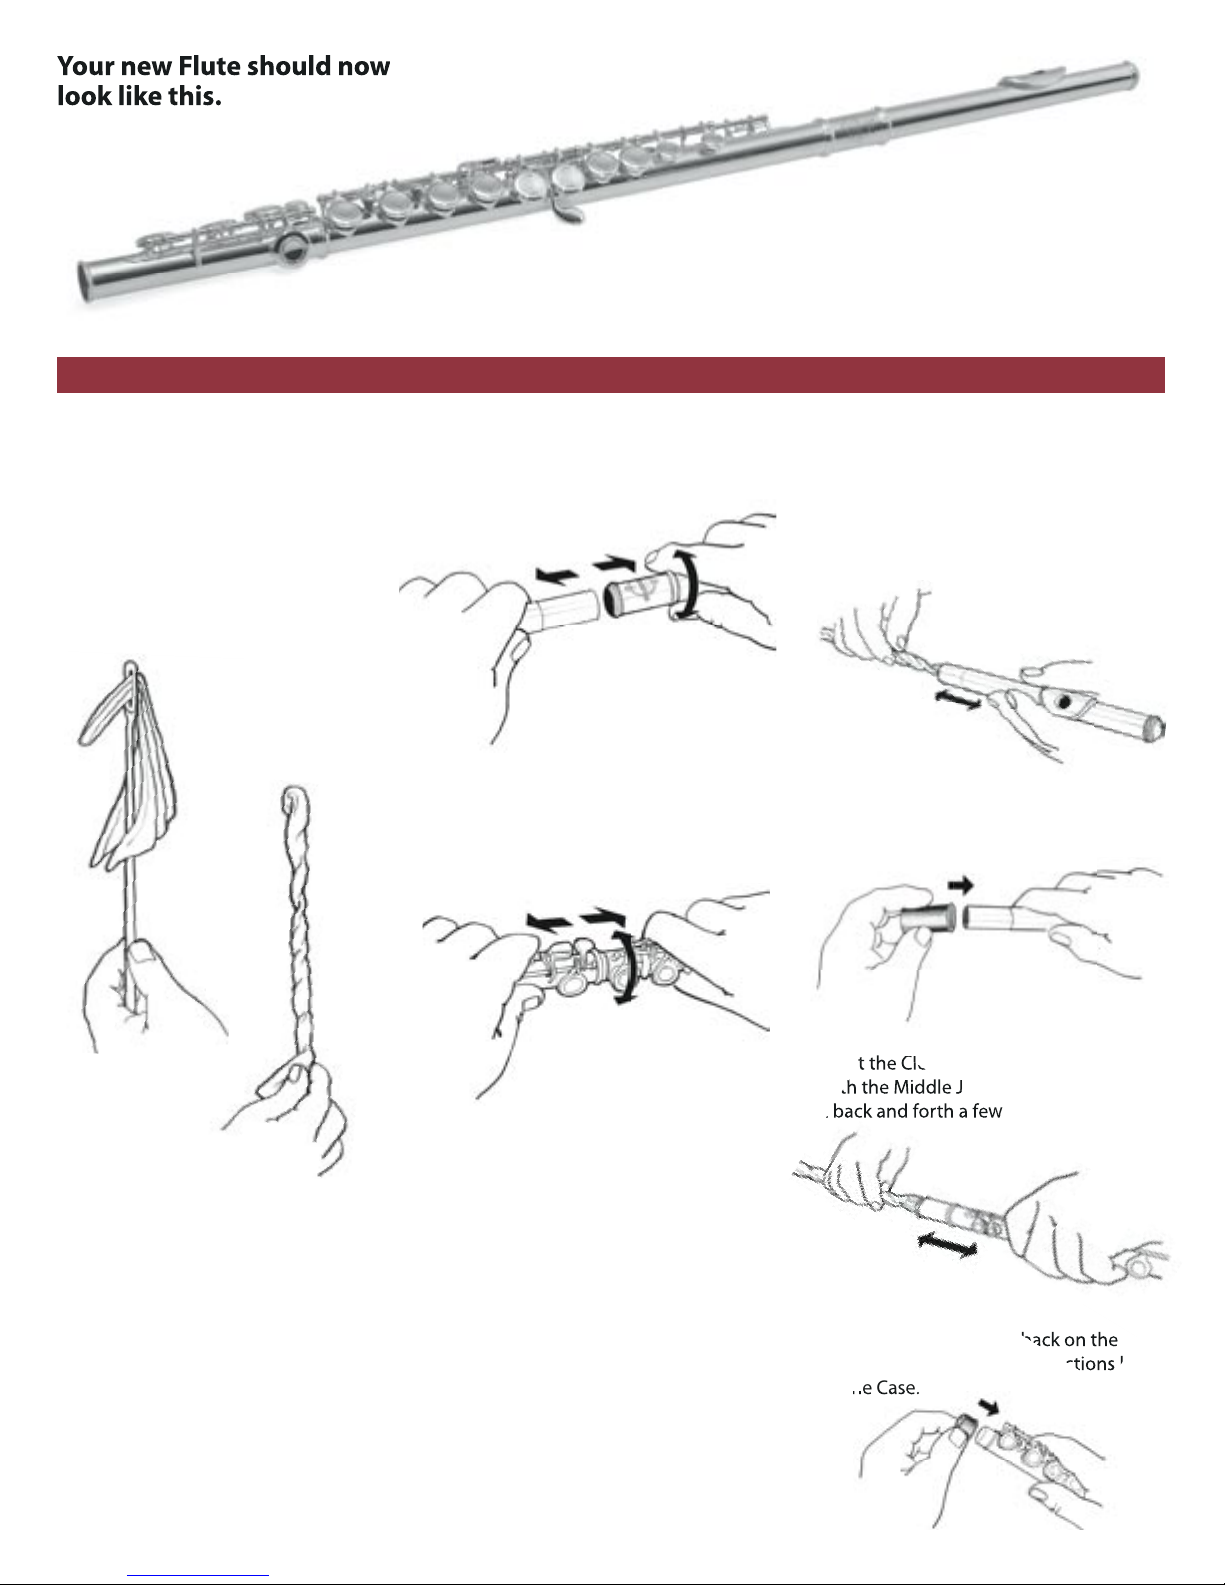
5. WHEN YOU HAVE FINISHED PLAYING YOUR FLUTE
Prepare the Cleaning Rod
q
w
BE CAREFUL!
Gently handle the Flute sections.
Do NOT put a lot of pressure on the Keys.
Do NOT push the Cleaning Rod into the Head Joint Cap.
All the parts of your Flute should fi t easily into the Case.
Do NOT close the lid if you feel any pressure.
Have fun!
Taking apart the sections
q
Cleaning your Flute
Joint. It is not open on the far end.
q
Joint using a a gentle back and forth
w
w
e
r
Be careful when handling your Flute. It is a delicate
Use a SMALL amount of Tenon Grease, but only once
Carefully clean each Flute section each time you play
Use a gentle back and forth motion when putting
Replace the 2 plastic End Caps back on the Middle and
Put each section back in the correct compartment in
Force the sections into the Case.
Close the lid if it seems diffi cult.
Eat while playing.
Turn the Flute sections around and around.
Press hard on the Keys or Rods when handling them.
Maintenance
Page 6
DO
Be careful when handling your Flute. It is a delicate
DO
Use a SMALL amount of Tenon Grease, but only once
DO
Carefully clean each Flute section each time you play
DO
Use a gentle back and forth motion when putting
DO
Replace the 2 plastic End Caps back on the Middle and
DO
Put each section back in the correct compartment in
DO’S DON’TS
DON’T
Force the sections into the Case.
DON’T
Close the lid if it seems diffi cult.
DON’T
Eat while playing.
DON’T
Turn the Flute sections around and around.
DON’T
Press hard on the Keys or Rods when handling them.
DON’T
Maintenance
d
d
 Loading...