

Suzuki Digital piano, M-22, C-11, HDP Owner's Manual

SUZUKI PIANOS
SUZUKI DIGITAL PIANO
OWNER’S MANUAL
SUZUKI
1

2

WELCOME!
We would like to express our appreciation and congratulate you for purchasing this Suzuki Digital Piano.
This piano has been designed to provide you with years of musical enjoyment. State of the art electronics are
combined with an elegant cabinet that will add beauty and sophistication to any home environment.
For further information please visit our web site at www.suzukipianos.com
or call toll free 800-854-1594.
Listed below are just a few of the functions that your new piano is equipped with:
• a Weighted Action Keyboard for an authentic acoustic piano feel
• a Dynamic Sound Delivery System with EQ controls
• a large 4 MB stereo Grand Piano Voice
• a Lesson Function with 58 Play Along Songs
• a Duet Function to split the keyboard in two 44 note pianos
• Digital Reverb and Chorus to further enhance the keyboard voices
• a built in Metronome with range from 40 to 240 BPM
• a T ranspose function that allows play in an y piano key
• complete MIDI controls that allow for computer hook up
(which enables you to update your piano’s functions so that it never becomes obsolete)
You will find man y more functions listed within this owners manual. In order to fully appreciate all the impressive
functions of this digital piano, please take a few minutes to read the following pages of instruction. We will cover
general precautions, assembly , the function of each control button, and w arranty information.
Thank you and congratulations again, for choosing this Digital Piano from the Suzuki Corporation’s piano product
line of portable pianos, home digital pianos, home composer ensembles pianos, elegant digital grand ensembles,
and the acoustic upright and grand piano line.
SUZUKI
3
GENERAL PRECAUTIONS
CAUTION
RISK OF ELECTRIC SHOCK
DO NOT OPEN
CAUTION: TO REDUCE THE RISK OF ELECTRIC SHOCK,
DO NOT REMOVE COVER OR BACK
NO USER-SERVICEABLE PARTS INSIDE
REFER SERVICING TO QUALIFIED SERVICE PERSONNEL
INSTRUCTIONS PERTAINING TO A RISK OF FIRE, ELECTRIC SHOCK OR INJURY:
The lightning flash with arrowhead symbol, within an equilateral triangle, is intended to alert the user to the
presence of noninsulated or “dangerous voltage” within the product’s enclosure that may be of sufficient
magnitude to constitute a risk of electric shock to persons.
!
The exclamation point within an equilateral triangle is intended to alert the user to the presence of important
operation and maintenance or servicing instructions.
!
CAUTION - Any changes or modifications in construction of this device which are not expressly approved by
the party responsible for compliance could void the user’s authority to operate the equipment.
NOTE - This equipment has been tested and found to comply with the limit for a Class A digital device,
pursuant to part 15 of the FCC rules. These limits are designed to provide reasonable protection
against harmful interference when the equipment is operated in a noncommercial environment.
This equipment generates, uses, and can radiate radio frequency energy and if not installed and
used in accordance with the instruction manual, may cause harmful interference to radio communications. Operation of this equipment in a residential area is likely to cause harmful interference in
which case the user will be required to correct the interference at his own expense.
4

TAKING CARE OF YOUR DIGITAL PIANO
This Suzuki digital piano will supply you with years of musical enjoyment if you follow the simple rules listed below .
IMPORTANT SAFETY INSTRUCTIONS
WARNING - When using electrical products, basic
safety precautions should always be followed.
SAFETY - The product should always be con-
nected to a power supply only of the type
described in the operating instructions or as
marked on the product.
• Carefully check the amplifier volume control
before starting to play . Excessive v olume can
cause permanent hearing loss.
POWER - The power-supply cord of the product
should be unplugged from the outlet when left
unused for a long period of time.
• T urn the power switch off when the instrument
is not in use.
• T o avoid damage to the instrument and other
devices to which it is connected, turn the power
switches of all related devices off prior to
connection or disconnection of MIDI cables.
• T urn the power off if the main cable is damaged or the instrument is spattered with liquid.
• Do not switch the unit on and off in quick
succession, this places an undue load on the
electronic components.
• Unplug the AC power cord during an electrical
storm.
• Avoid plugging the AC power cord into the
same AC outlet as appliances with high power
consumption, such as electric heaters or
refrigerators.
HANDLING AND TRANSPORT
• Never apply excessive force to the controls,
connectors or other parts of the instrument.
• Always unplug cables by gripping the plug
firmly , not by pulling on the cable.
• Disconnect all cables before moving the instrument.
• Physical shocks caused by dropping, bumping,
or placing heavy objects on the instrument can
result in scratches and/or more serious damage.
• Avoid placing vinyl objects on top of the instrument, vinyl can stick to and discolor the surface.
LOCATION - Do not expose the instrument to the
following conditions to avoid deformation,
discoloration, or more serious damage:
• Direct sunlight (near a window)
• High temperatures (near a heat source, outside, or near a window)
• Excessive humidity
• Excessive dust
• Strong vibration
• Leave enough space around the piano for it to
be properly ventilated.
• This instrument contains digital circuitry and
may cause interference if placed too close to
radio or television receivers. If interference
occurs, move the instrument further away from
the affected equipment.
SERVICE AND MODIFICATION - This product
should be serviced by qualified service personnel when,
• the power supply cord or the plug has been
damaged,
• liquid has been spattered into the unit or it has
been exposed to rain,
• the instrument does not appear to operate
normally or exhibits a marked change in
performance, or
• the instrument has been dropped or the cabinet
has been damaged.
• Do not attempt to open the piano or make any
change in the circuits or parts of the unit.
CLEANING
• Clean the cabinet and panel with a soft nonabrasive dry cloth.
High Gloss Lacquer Finish Furniture. A wax
based polish specifically for High Gloss Lacquer
Finish Furniture may be used on the cabinet.
Do not use paint thinner or petrochemical
based polishes.
• T o maintain the luster of the keys and buttons
wipe with a clean, slightly damp cloth, and then
polish with a soft dry cloth.
This cloth should be for
5

TABLE OF CONTENTS
EASY SET UP AND QUICK PLAY GUIDE .................... 7
Check the Package Contents...................................7
Assemble the Stand ..............................................8
Place the Piano on the Stand & Plug In ....................9
T urn the Power On, Adjust the V olume & Play! ....... 10
KEYBLOCK CONTROL PANEL ................................. 11
DEMONSTRATION SONGS ...................................... 12
REVERB AND EFFECT ............................................ 13
METRONOME ........................................................ 14
VOICE SELECT ...................................................... 15
Scroll Through Voice Select.................................. 15
Piano Key V oice Select......................................... 15
Dual Voice Select ................................................ 16
Dual Voice V olume Adjustment ............................. 16
Voice Reset........................................................ 16
RECORD ............................................................... 17
Record a Song.................................................... 17
Play a Song........................................................ 17
Erasing a Song ................................................... 17
FUNCTION PIANO KEY CONTROLS .......................... 21
Function Mode.................................................... 21
Resetting to Default Settings ................................ 21
Touch ................................................................ 22
Transpose.......................................................... 23
Tune ................................................................. 24
Duet .................................................................. 25
MIDI .................................................................. 26
MIDI T erminals ............................................. 26
Basic MIDI Modes.......................................... 26
MIDI Output Channel Select............................ 27
MIDI Input Channel Select .............................. 27
MIDI Local Control On/Off .............................. 28
T urning Multi- Timbral Mode On/Off ................. 28
T ransmit MIDI Programs Change..................... 29
MIDI IMPLEMENTATION CHART ............................ 30
CONNECTOR PANEL .............................................. 31
Connector Panel ................................................. 31
Headphones ....................................................... 31
PEDALS ............................................................... 32
Soft Pedal .......................................................... 32
Sustain Pedal ..................................................... 32
PLAY ALONG SONGS ............................................ 18
Selecting a Song................................................. 1 8
Listen to the Song ............................................... 18
Right Hand T est .................................................. 19
Left Hand T est .................................................... 19
Right and Left Hand Test...................................... 20
Vocal Grading ..................................................... 20
Stopping the Song Mode...................................... 20
SPECIFICATIONS .................................................. 33
WARRANTY ......................................................... 34
6
EASY SET UP AND QUICK PLAY
EASY SET UP AND QUICK PLAY IN FOUR SIMPLE STEPS
1. Check the Package Contents
2. Assemble the Piano Stand
3. Place the Piano on the stand and Plug the cord in.
4. Turn the Power on, adjust the Volume and begin to Play!
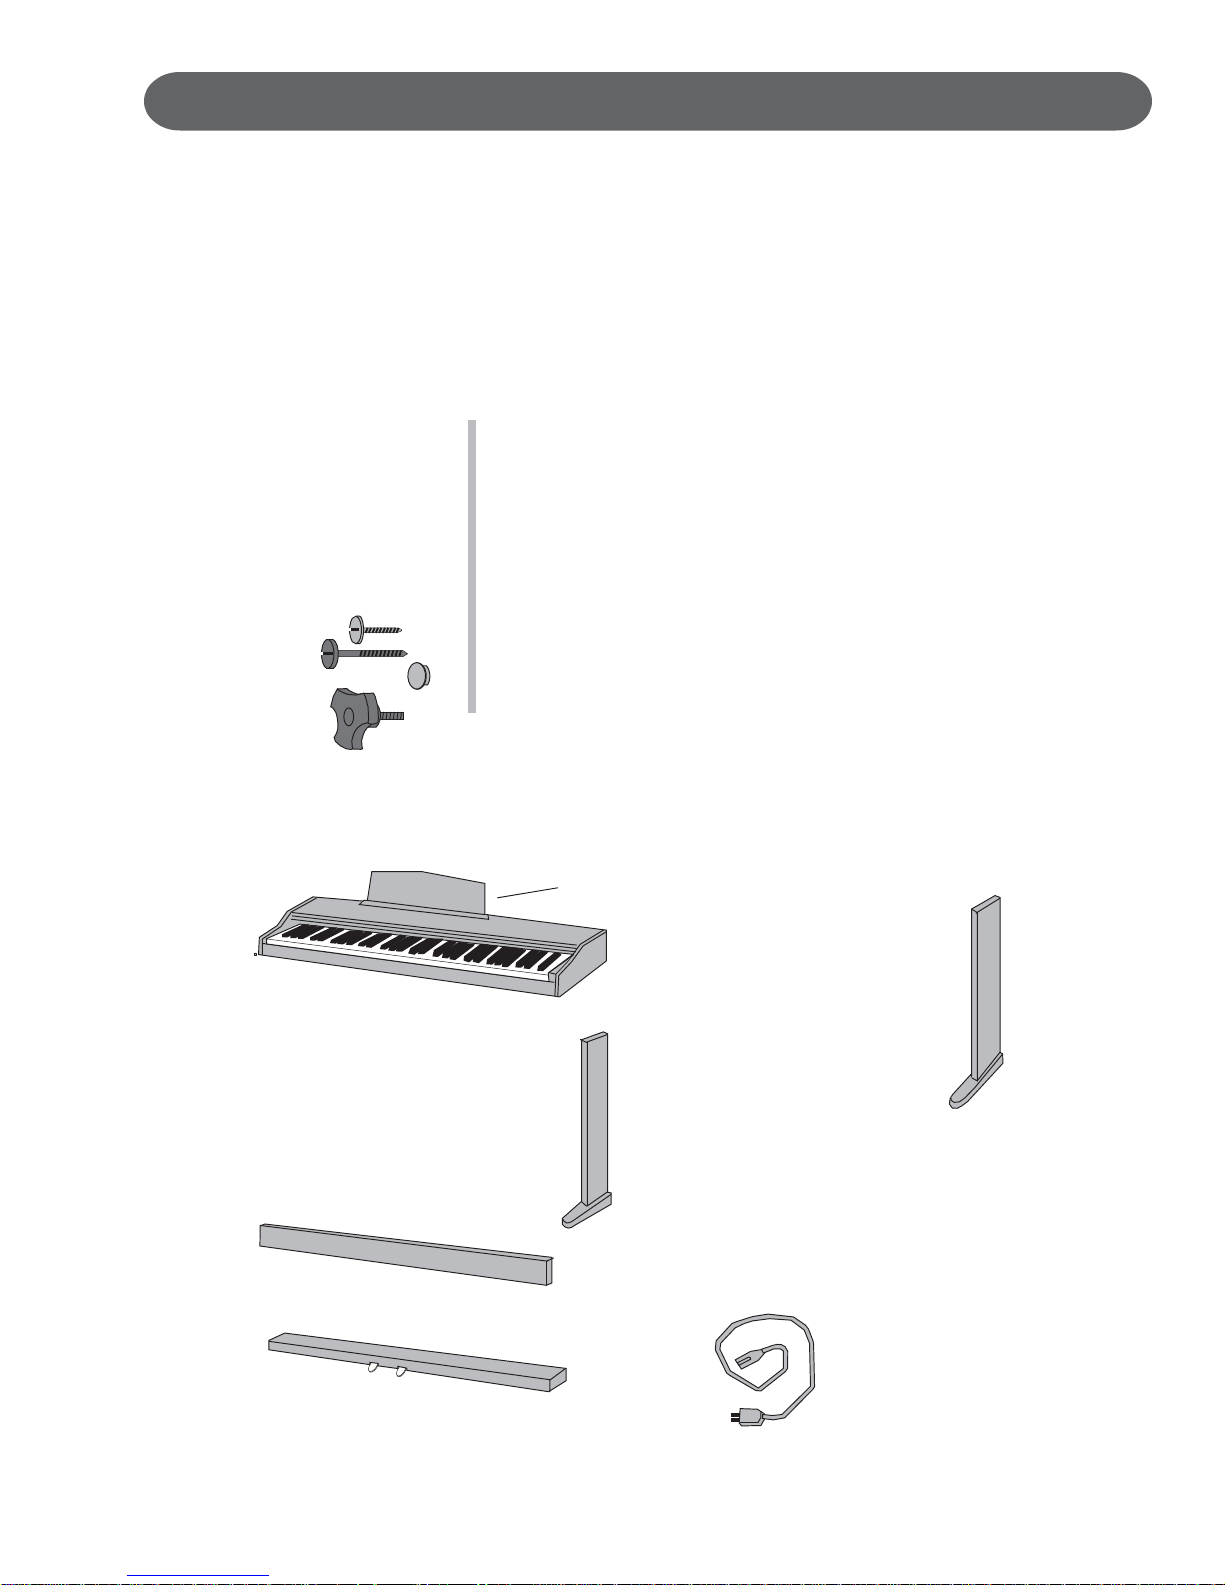
CHECK THE PACKAGE CONTENTS - Make sure that your package contains the
following items:
1. PIANO
2. MUSIC RACK
3. RIGHT PIANO STAND LEG
4. LEFT PIANO STAND LEG
5. CROSSPIECE
6. PEDAL BOARD
7 . OWNER’S MANUAL (not shown)
8. AC POWER CORD
9. CROSSPIECE SCREWS (4)
10. LEG SCREWS (4)
11. LEG SCREW COVERS (4)
12. HAND BOL TS (4)
1. PIANO
5. CROSSPIECE
6. PEDAL BOARD
2. MUSIC RACK
3. RIGHT PIANO STAND LEG
4. LEFT PIANO STAND LEG
8. AC POWER CORD
7
EASY SET UP AND QUICK PLAY
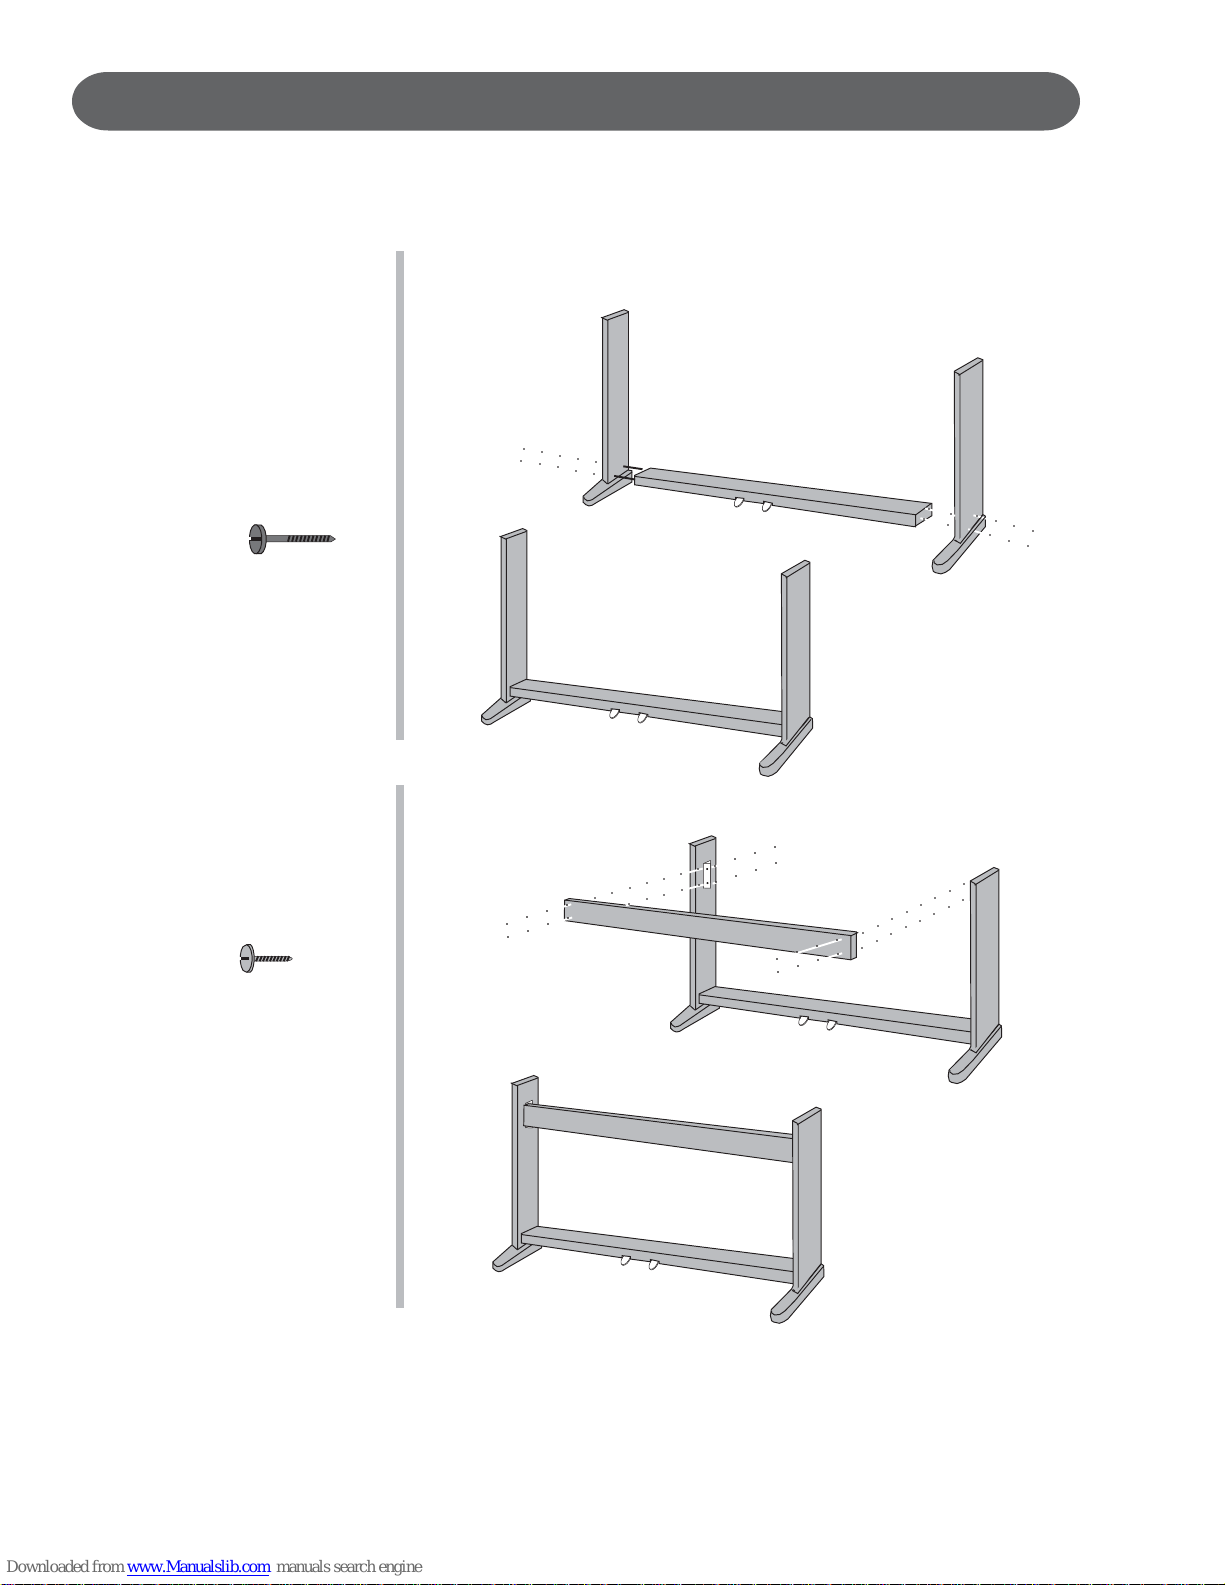
ASSEMBLE THE PIANO STAND - Do all your final tightening only after the assembly
procedure has been completed.
1. Attach the Pedal Board to the Left and Right Piano Stand Legs with the leg
screws.
○○○○○
○○○○○
LEG SCREWS (4)
CROSSPIECE SCREWS (4)
○○
○○○○
○○
○○○○
2. Attach the Crosspiece to the Left and Right Piano Stand Legs with the
crosspiece screws.
○○○○
○○○○
○○○○
○○○○
○○○○○○○○
○○○○○○○○
○○○○
○○○○
○○○○○○○
○○○○○
8
EASY SET UP AND QUICK PLAY
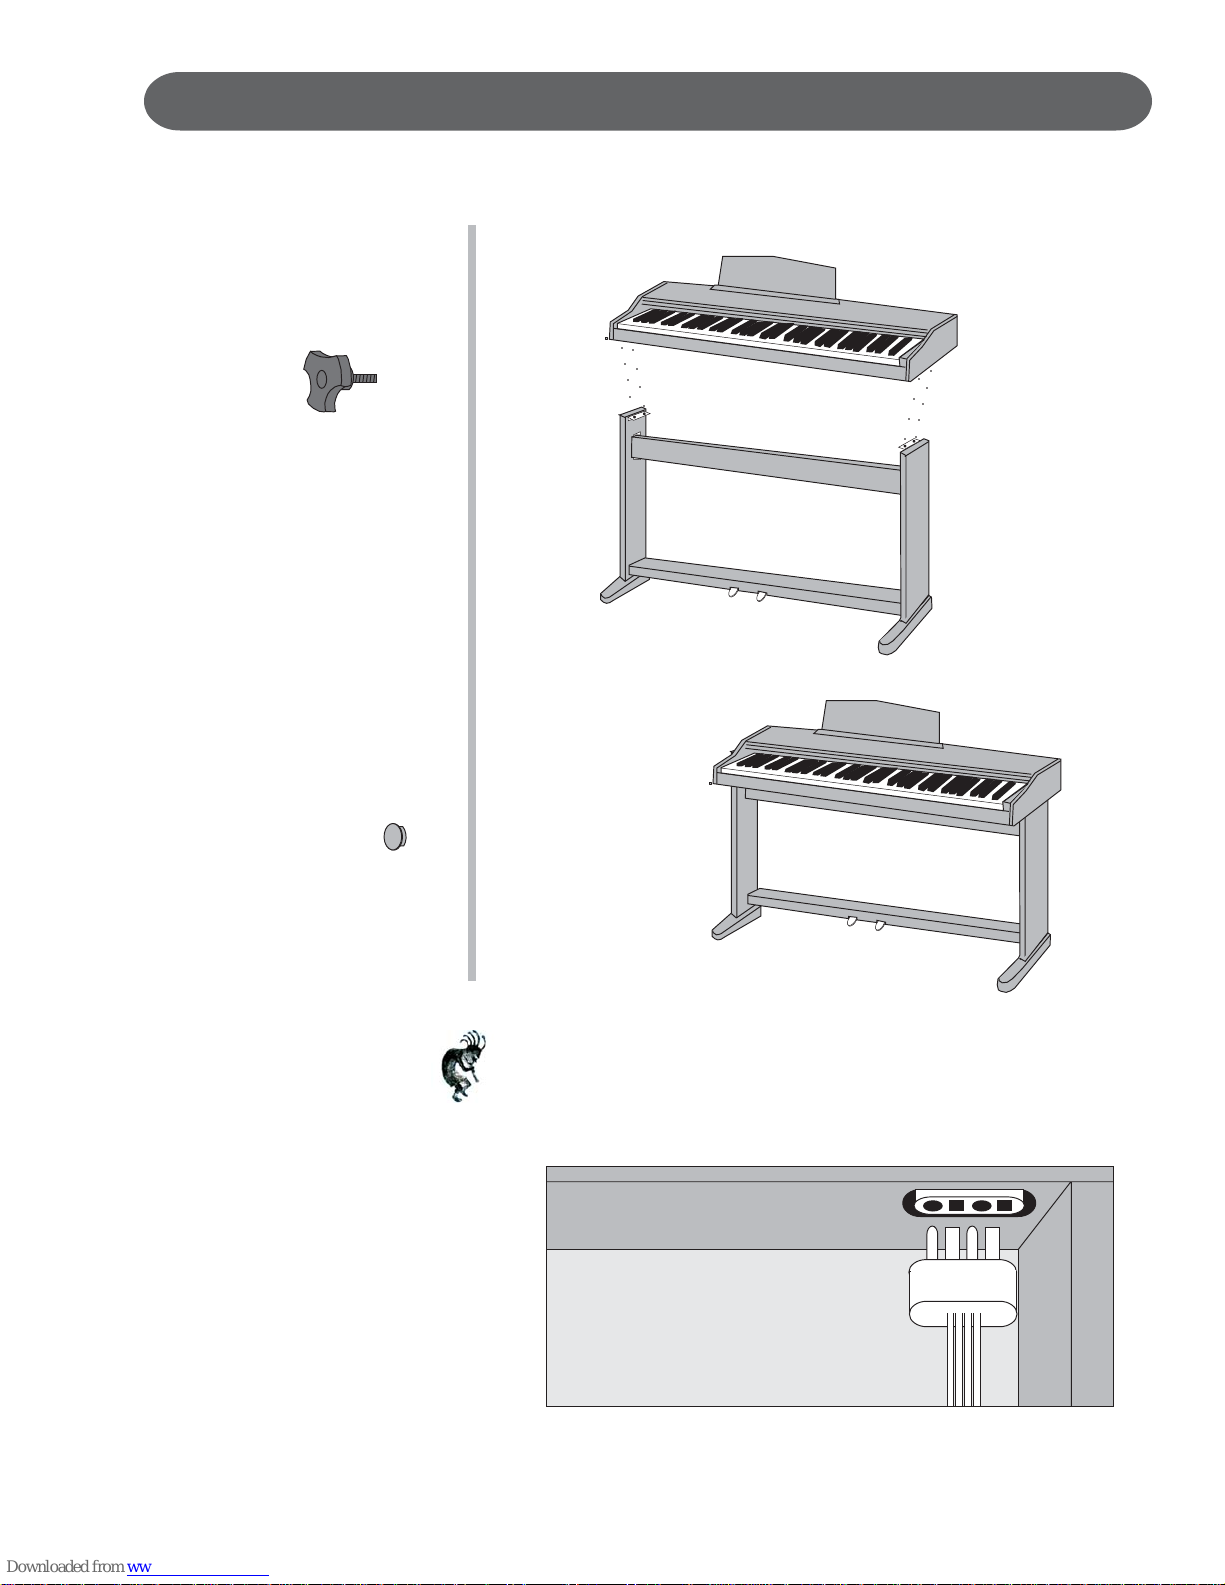
PLACE THE PIANO ON THE ST AND AND PLUG IN
1. Use the hand bolts to attach the piano onto the completed stand.
HAND BOL TS (4)
○○○○○
○○○○
Y ou may now do your final tightening on the piano stand and place the
screw caps where needed
○○○○○
○○○○
LEG SCREW COVERS (4)
Note: On the bottom right portion of the piano, plug the pedal cable into
its receptacle. The plug can only be inserted one way , make sure it is
properly aligned before insertion.
Piano Back
Piano Bottom
Right Leg
Back View
9
EASY SET UP AND QUICK PLAY
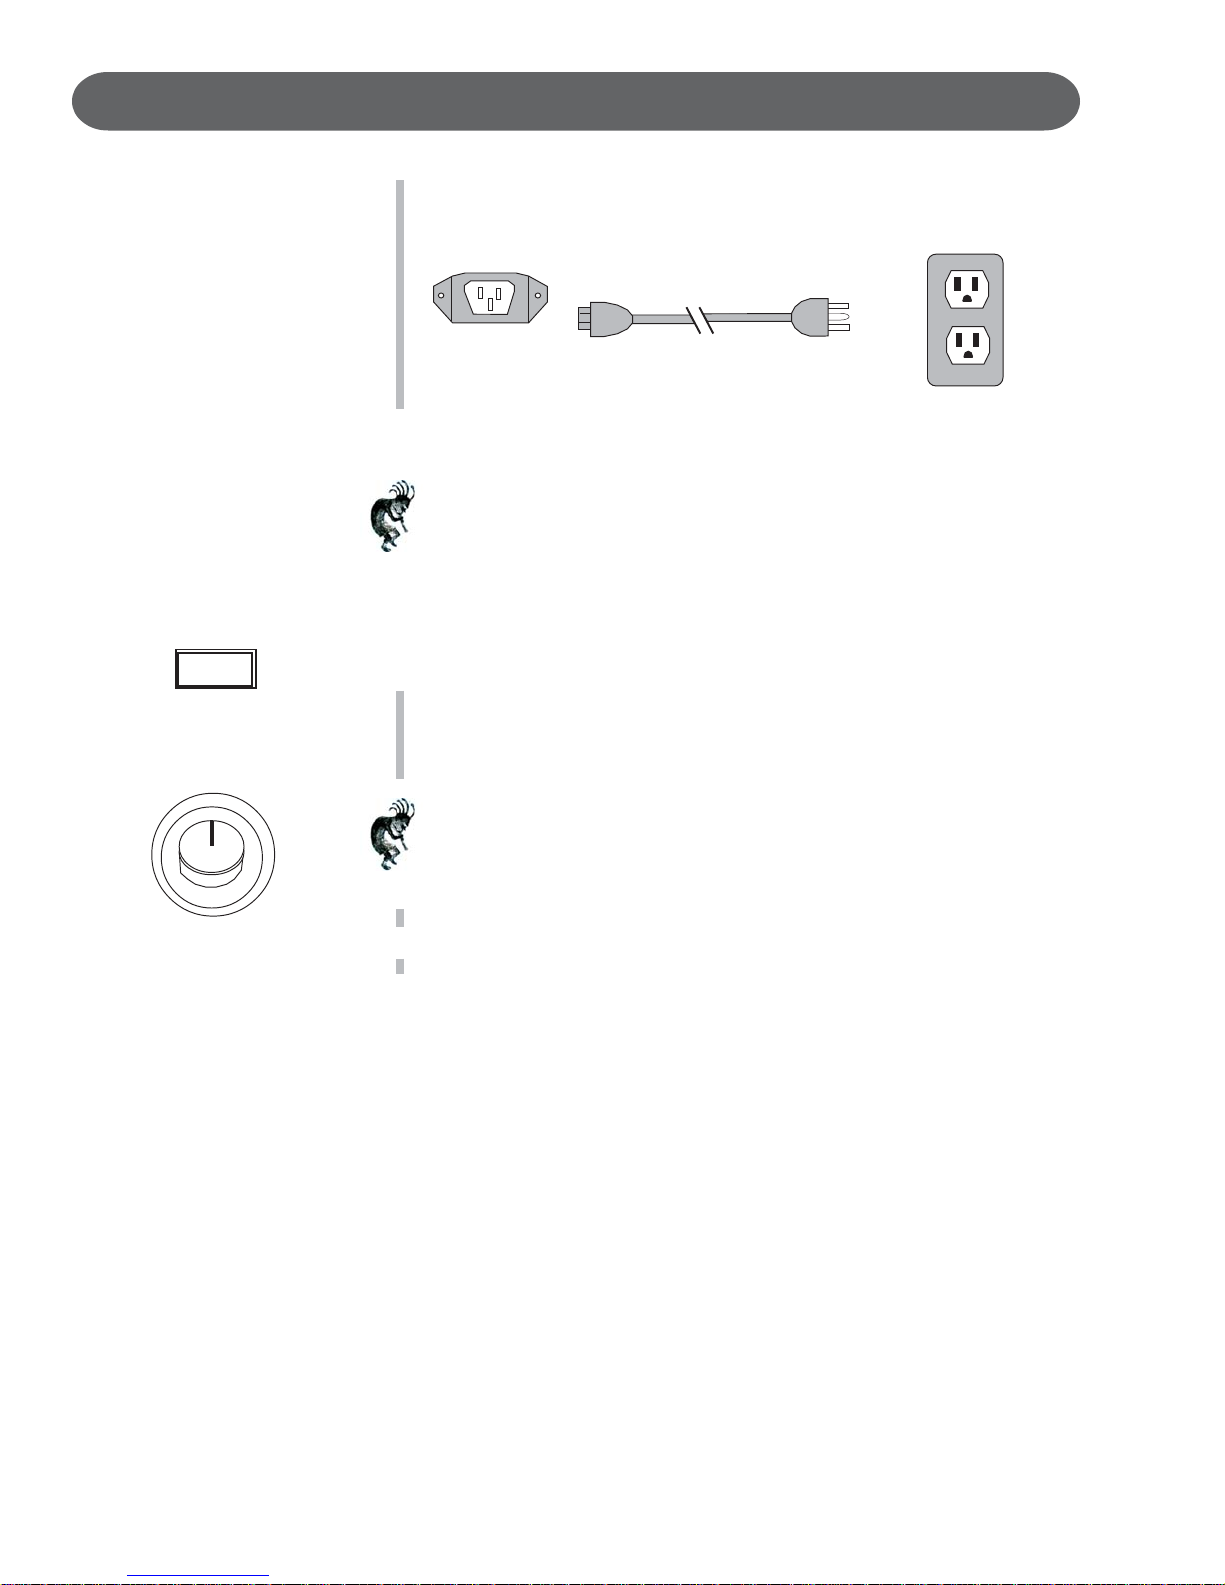
2. Plug the AC cord into the piano, the receptacle jack is located on the
bottom back left portion of the piano. Then plug the AC cord into the
nearest power outlet.
Note: You can pla y in total silence without disturbing other in the room
by plugging a set of headphones into one of the appropriate sockets,
located directly under the keyboard on the left side of the instrument.
T wo sets of headphones may be used.
TURN THE POWER SWITCH ON, ADJUST THE VOLUME AND BEGIN TO PLAY!
POWER
MASTER VOLUME
1. T urn the power switch on, the power switch is located on the right
keyblock. Press the button to turn the power on and off. There is an
LED indicator light on the left front portion of the piano. This light will
be lit when power is on.
Note: when you turn the power off, do not turn it back on immediately.
Wait at least five seconds to turn the power back on so that the
electronic circuits can properly reset.
2. Adjust the volume control to a comfortable level.
3. Begin to play the piano.
10

KEYBLOCK CONTROL PANEL
The following is a brief description of the controls located on the left keyblock of the Suzuki digital piano.
1. DEMO/SONG - The Suzuki piano has 11 built in demonstration songs for
1
DEMO/SONG
2
your listening enjoyment designed to showcase the instrument’s capabilities. Press the DEMO button. The first demo song will begin to play
instantly . Please see the Demonstration Songs section of this manual for
more information.
The piano also has 58 “Play Along” songs, each assigned to a key for use
with the Play Along Song function. Please see the Play Along Songs
section of this manual for more information.
REC
3
PLAY/STOP
4
REVERB/
EFFECT
5
METRONOME
6
VOICE SELECT
7
MASTER VOLUME
2. REC (RECORD) - The record button allows you to record your perfor-
mance for future playback. Please see the Record section of this manual
for more information.
3. PLAY/STOP - This button starts and stops the recording in the music
recorder, the Demonstr ation Songs, the Play Along Songs or other items.
F
U
4. REVERB/EFFECT - The Reverb/Effect is engaged automatically when the
N
C
8
T
I
O
N
5. METRONOME - The Metronome button toggles the Metronome function
6. VOICE SELECT - There are sixteen voices that can be selected by
7 . MASTER VOLUME - Turn this knob to the right to increase the overall
8. FUNCTION (REVERB/EFFECT & METRONOME) - Pressing the Reverb/
Press the Play/Stop Button to engage or terminate your selected function.
power is turned on. Reverb simulates the effect of playing in a big room
or hall where the sound reverberates off the walls and ceiling. Effects
will add chorus, flanger or delay to the instrument voice. The Reverb/
Effect button toggles the Reverb/Effect function on and off and is used to
access the Reverb/Effect Select function. Please see the Reverb/Effect
section of this manual for more information.
on and off and accesses the Metronome Select function.
Please see the Metronome section of this manual for more information.
pressing the Voice Select button to scroll through the v oice list or by
using the Voice Select button to access the V oice Select function. Please
see the Voice Select section of this manual for more inf ormation.
volume of the piano, and to the left to decrease the volume.
Effect button simultaneously with the Metronome button will place the
piano in the Function Mode. Use the Function Mode to access the
functions of the Suzuki piano. Please see the Function Piano Key Con-
trols section of this manual for more information.
11
 Loading...