


INSIGNIA™ USER MAN UAL
EXQU ISI TE DE SI GN / IN TI MATE LUX URY
OVERVIEW
Congr atu lati on s on pu rcha si ng on e of the m ost a dvan ced pe rs ona l mas sag er s
ever mad e. As pa rt of L ELO’s lan dmar k In sign ia™ line, Lyla™, Oden™ and Tiani™,
come wi th the sam e gorgeo us, water proof, and bo dy-safe d esign a estheti c
alongside revolutionary SenseMotion™ Techno lo gy n eve r befo re s ee n in p ro du ct s
of this kind.
SenseMotion™ allow s yo ur Pl ea su re O bj ect to re sp on d to you rs o r you r pa r tn er ’s
movement s w he n ho ld i ng t he c ont ro ll e r in t he p a lm of y ou r ha nd . Mo re t ha n th i s
the cont rol le r ca n al so ac t as an i nd ep end ent p er so nal m as sa ge r by de li ver in g
sensations of its own from the motor housed within, while allowing you to feel wh at
a partner is experiencing.
NOTE: Your Insignia™ Pleasure Object may require charging upon purchase. To charge
your Ple asure O b j e c t, pleas e r e f er to the C h argin g s e c tion of this manual ( p g . 16).
You will a ls o ne ed to i ns er t 2 x AA A b at te ri es i n you r con t rol le r an d es ta bl is h th e
wireless connection with the massager before use.
2 • ENGLISH
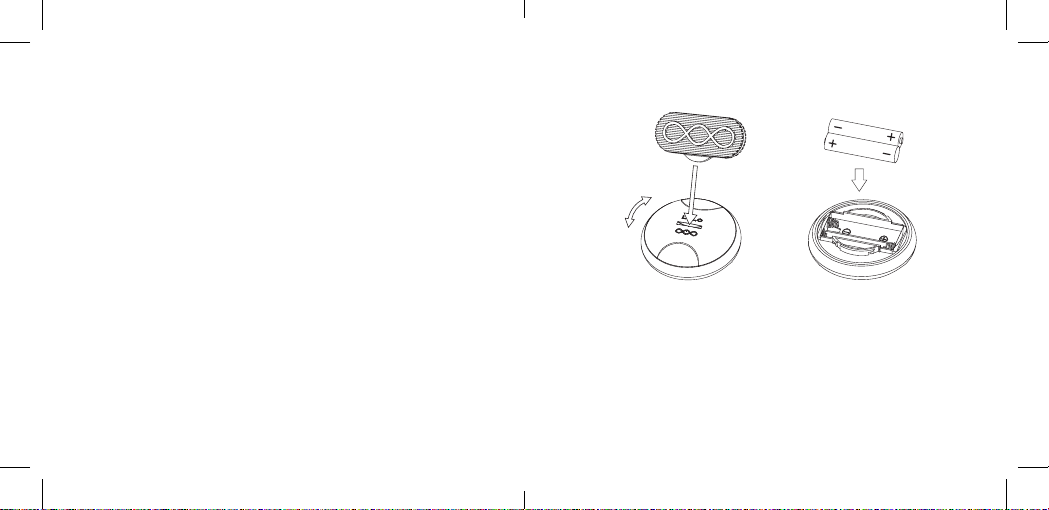
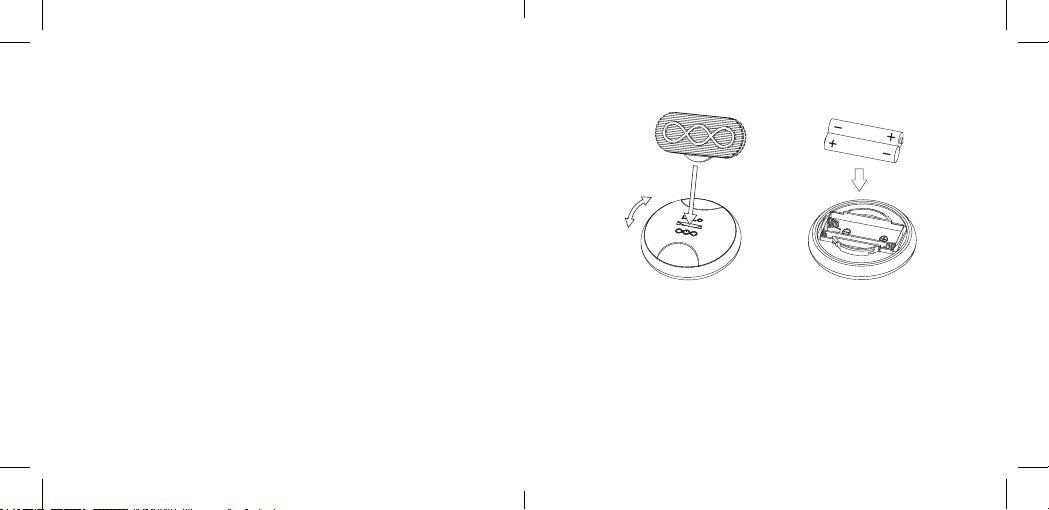
INSE RT ING BAT TE RY IN CON TROL LER
Close
Open
™
The sh i ny ABS face of y o ur Insignia
batte ry comp a rtment. W i t h t he p l a s t i c key i n c l ud e d w i th y o u r I n s ig n i a™ inserted into
the sl ot on t he b at te r y co m pa r t me nt cove r, do a 10 d eg re e t w is t co un ter cl oc k w is e
and remove the lid from the controller.
After the batteries are inserted put the cover back in place and use the key to do another 10
degree twist clockwise. Always ensure the controller is fastened shut before using in water.
wire l e ss controlle r ca n be removed to e xpose the
ENGLISH • 3
ESTABLISHING WIRELESS CONNECTION
To establish wireless connection, you must rst turn on your wireless controller by
press in g th e + butto n on ce. Your w i re les s co nt rol l er i s no w act ive a nd s en di ng a
signal.
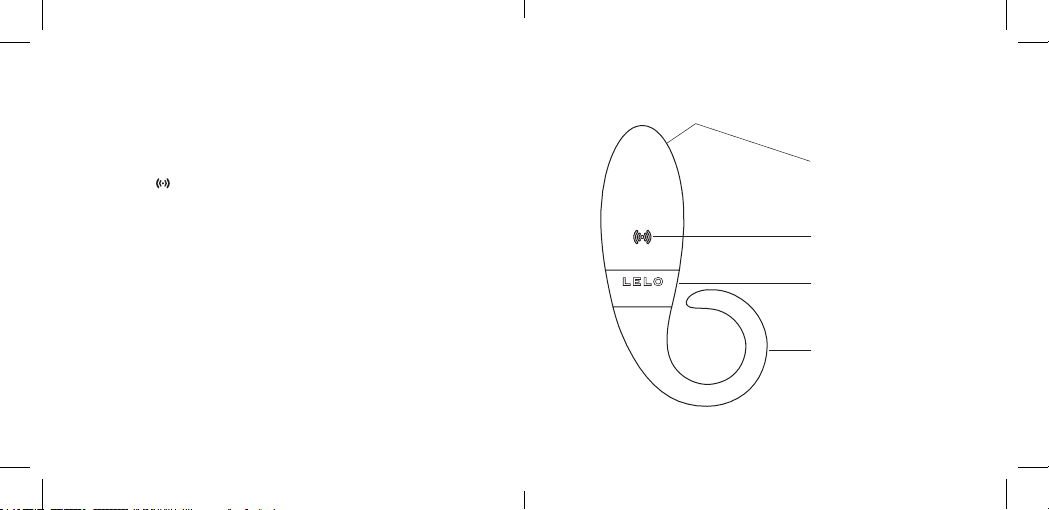
You r Ly la™, Oden™ or Tiani™ also fe atures a n acti vation b utton , marke d with a
wireless symbol . Once your Pleasure Object is fully charged, press and hold this
butto n for 1 s ec on d to ac ti vate yo u r Pl ea su re O b je ct a nd i n it ia te it s ‘se e k’ mo de,
allowing it to connect with your wireless controller.
It may take up to 10 seconds for your product to detect the controller, so please be
patient. The w hite LED in dicator on yo ur Pleasure Object wi ll ash ever y 2 seconds
to indicate that it is functioning and receiving a signal from the wireless controller.
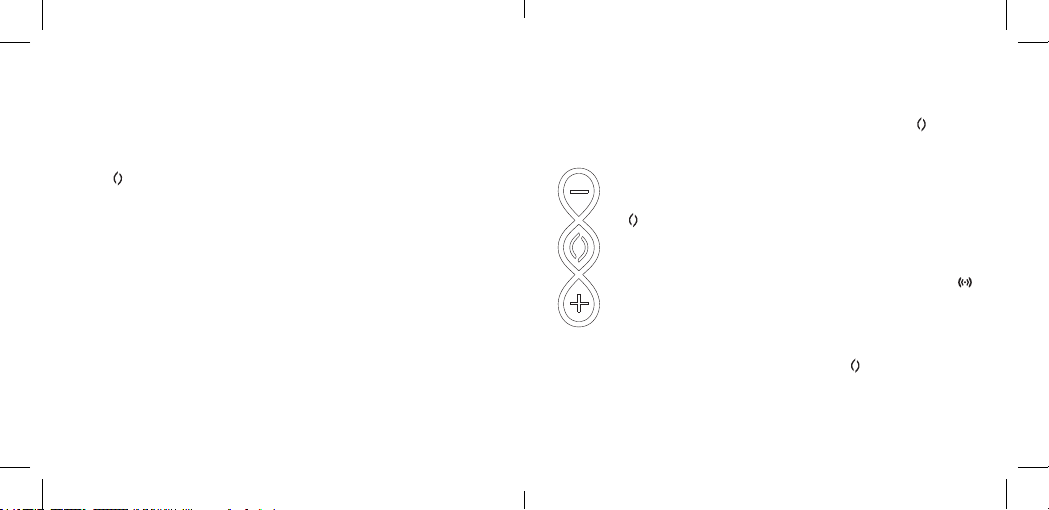
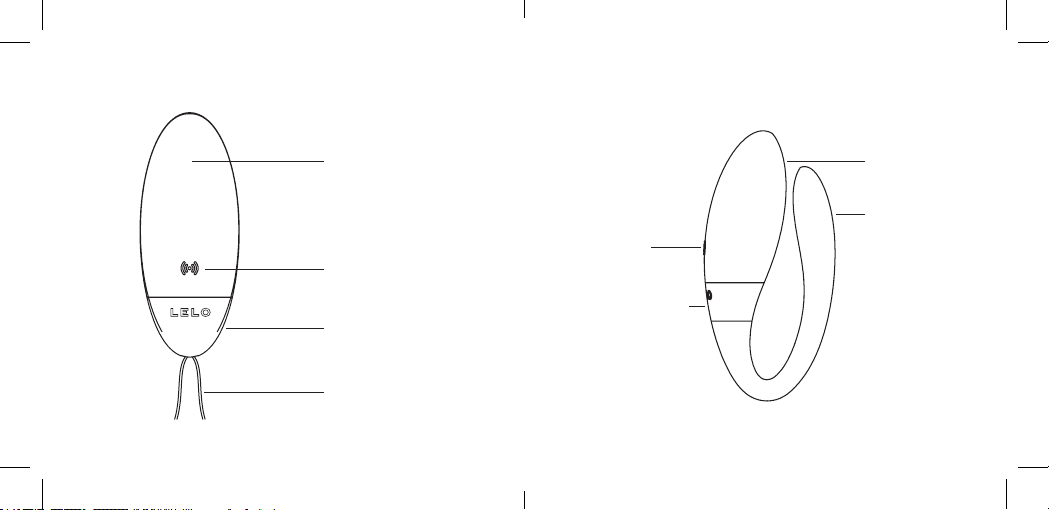
ODEN
™
Pleasure Point
Turn On / Seek
Base Attachment
(turn counterclockwise
to reveal DC port)
Flexible Wearable Portion
ENGLISH • 54 • ENGLISH

LYLA
™
TIANI
™
Pleasure Point
Turn On / Seek
Base Attachment
(turn counterclockwise
to reveal DC port)
Retraction Leash
Turn On / Seek
Base Attachment
(turn counterclockwise
to reveal DC port)
Pleasure Point
Flexible Inserting Arm
ENGLISH • 76 • ENGLISH
USING SENSEMOTION™ MODES
Your Insignia™ Pleasure Object features 2 SenseMotion™ modes w hi ch r es po nd to
different movements.
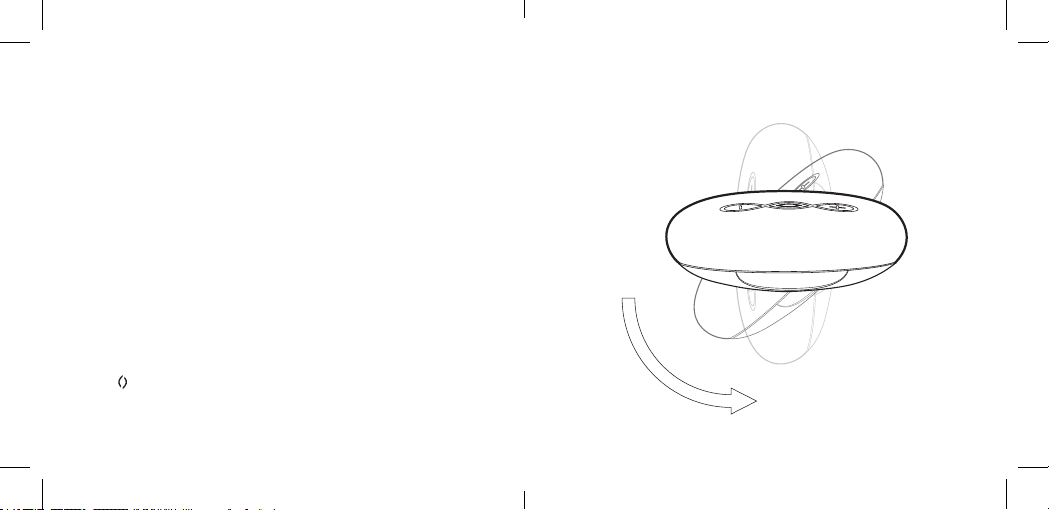
MODE 1
When you r Pleasu re Objec t and wire less cont roller a re connec ted, hold th e
contro ller at in the pa lm of your hand. A l ow vibration w ill come from your Lyla™,
Oden™ or Tiani™.
By tilt in g t he co nt ro ll e r at a n an gl e, yo u w il l fe el t he v i br at io n in ten si t y i nc rea se i n
both the m assager and controller. Mov ing the co n troll er from a h oriz ontal positio n
to a vertical position will increase vibration strength up to 100%.
You can then t ilt the co ntroll er back a nd fort h as you ple ase to cha nge the
vibra tion setti ngs, creat ing your o wn patterns an d nding the level th at is rig ht for
yourself and/or your partner.
When you w ish to u se the se cond Se nseMot ion™ mode pr ess th e center
button once.
USING SENSEMOTION™ MODE 1
10% Intensity
100% Intensity
ENGLISH • 98 • ENGLISH
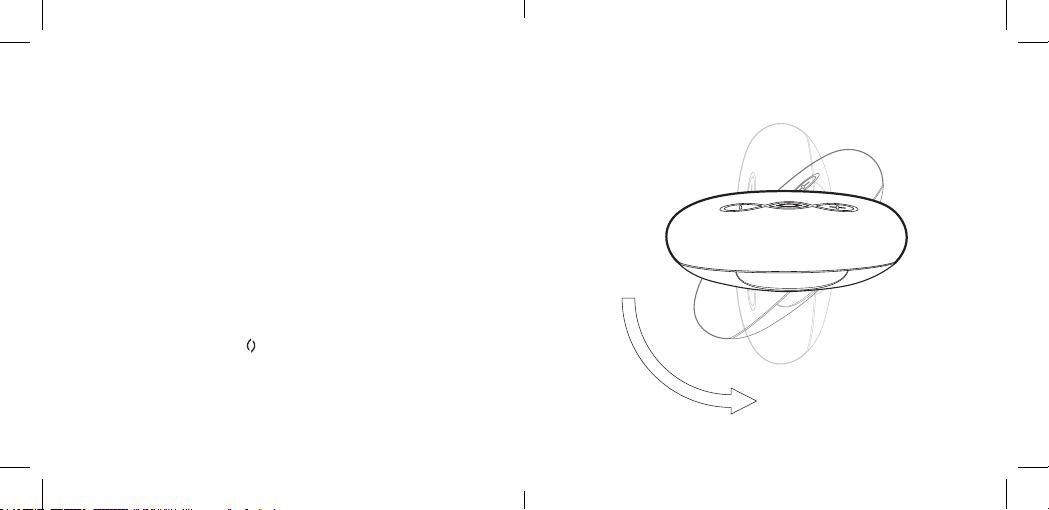
MODE 2
This mode gives you more freedom to explore – try moving the controller in circular
motio ns o r any w ay yo u ch oo se. T he fa ste r yo u move t he co nt ro ll er, th e s tro ng e r
the vib ra ti o n int en si t y. Ex pl o re yo ur o pt io ns a s th e co nt ro ll e r an d Pl ea su re O bj e ct
respon d to you r movem ents. To ex it th e Sen seMot ion™ modes p ress t he cent er
button once more.
NOTE: Wh en us in g Se nse Mot io n™ (modes 1-2), the LED on your wireless controller
will be illuminated.
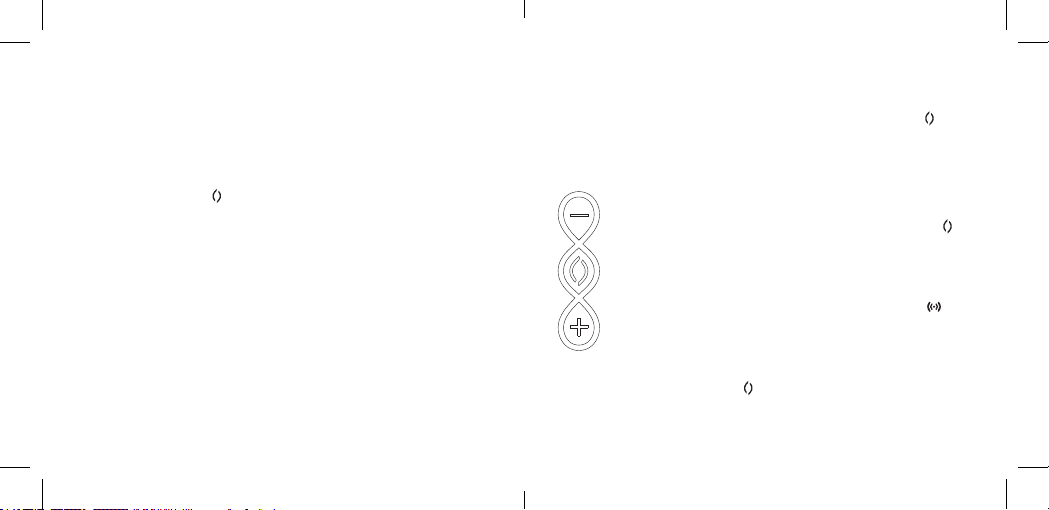
USING CONTROL INTERFACE (MODES 3-8)
After activating and c onnecting yo ur Pleasure O bject to its wir eless controller, you
can proceed to standard remote control by pressing the center button twice.
When not in SenseMotion™ modes, using the control interface is as follows:
• P ressing the + butto n will i ncrea se the v ibrat ion inte nsit y of your
Pleasure Object.
• While your control interface is active, press the center button
to cycle through the 8 stimulation modes, including both
SenseMotion™ control modes.
• P ressing the – button will decrease vibration intensity. Continue
hold ing the – butto n to turn o ff your w irel ess con trol ler. You can
then turn off your Pleasure Object by holding the .
butto n for 1 seco nd. Whe n not rece ivin g a sign al fro m an acti ve
wire less co ntro lle r, your Pl easu re Ob ject w ill g o into st andby fo r 1
hour before deactivating.
NOTE: Wh en us ing s tan dar d cont rol s (mod es 3 - 8), the m otor i ns ide y our w ir ele ss
contro ll e r ca n be t ur n ed of f by p re ss i ng a nd h o ld in g th e
Repeat t h is proce s s to r e a c t i va te t he motor i n t h e c o ntroll er. When us ing stan d ard
controls (modes 3-8), the LED on your wireless controller will not be illuminated.
butto n for 3 s ec on ds .
10 • ENGLISH
ENGLISH • 11
USING YOUR ODEN
™
USING YOUR ODEN
™
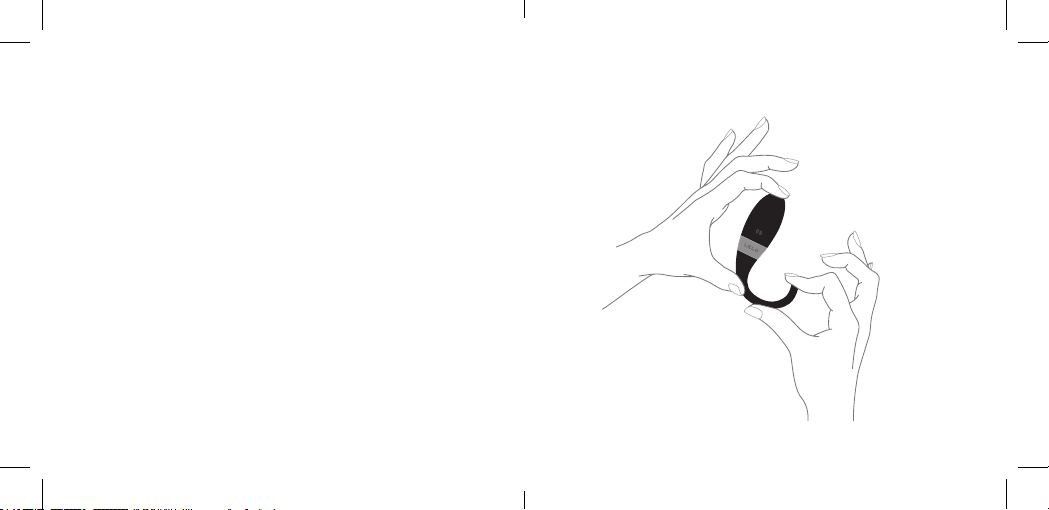
Oden™ is like n o othe r cou ple s’ ri ng in t he wo rl d toda y, with a u niq ue fo rm th at
is eas ier t o put o n and r emove c omp are d to sta nd ard r in g des ig ns . Whi le wo r n,
Oden™ transfers vibrations to both partners.
HOW TO WEA R: W it h pe ni s al r ead y e rec t, ho ld O de n™’s curve d ba se a tta ch me nt
between your t humb a nd fore nger and open the curve d base to a suita ble
wid th. This can th en be sli pped aro und the peni s with the at tened si de of Oden™’s
pleasure point facing your abdomen and pointing upwards towards the navel.
TIPS: Oden™ is ofte n most enjoya ble with th e vibrati ng pleasu re point wor n
upwards to stimulate the clitoris when the woman is on top.
12 • ENGLISH ENGLISH • 13

USIN G YOUR LYLA
™
Lyla™ is beyon d c o mpar ing wit h m assag ers of th is kin d; intended to be enj o ye d b y
a femal e pa r tn er fo r e ith e r ex ter n al u se, o r to be wo r n w ith i n as s he o r a pa r t ne r
intera ct s vi a wi r el es s re mot e. He r s ma l l si ze i s i de al fo r d is c reet p l ea su re s th at ca n
be shared between partners in any place and at any time.
HOW TO WEAR: Lyla™ can be use d as an interna l massager when wo rn 2 to 3 inches
inside the vagina, taking care to leave a portion of Lyla™’s polymer retraction leash
protruding from the vaginal opening to allow for easy removal.
TIPS: App ly a cho sen am ount of w ater- base d lub rica nt to the l ead ing ed ge of
Lyla™ for easier and more comfortable insertion into the vagina.
USIN G YOUR TI ANI
Tiani™ is the u lti mate co upl es’ ma ssa ge r that c an be wo rn by a fe ma le pa rt ner
duri ng int ercou rse, o r enjoye d ind ivid uall y to provi de ex tern al sti mul atio n with
vibrations controlled in the palm of your hand.
HOW TO WEA R: Ben d the a pex of T iani™’s uniqu e U- shap e to a 70 to 90 d egre e
angl e, and ins ert th e non- vibrat ing be ndabl e arm in to the vagi na. Whe n it is
comfortably in place, gently lay Tiani™’s vibra ti ng p l ea su re p oi nt ove r th e cl i tor i s.
During intercourse, the ma n may nd it mo re comfor table to also apply a small
amount of water-based lubricant to allow for easy entry while Tiani™ is inside.
TIPS: App ly a cho sen am ount of w ater- base d lub rica nt to the l ead ing ed ge of
™
Tiani™’s internal arm to facilitate easy insertion.
14 • ENGLISH ENGLISH • 15

CHARGING YOUR INSIGNIA
™
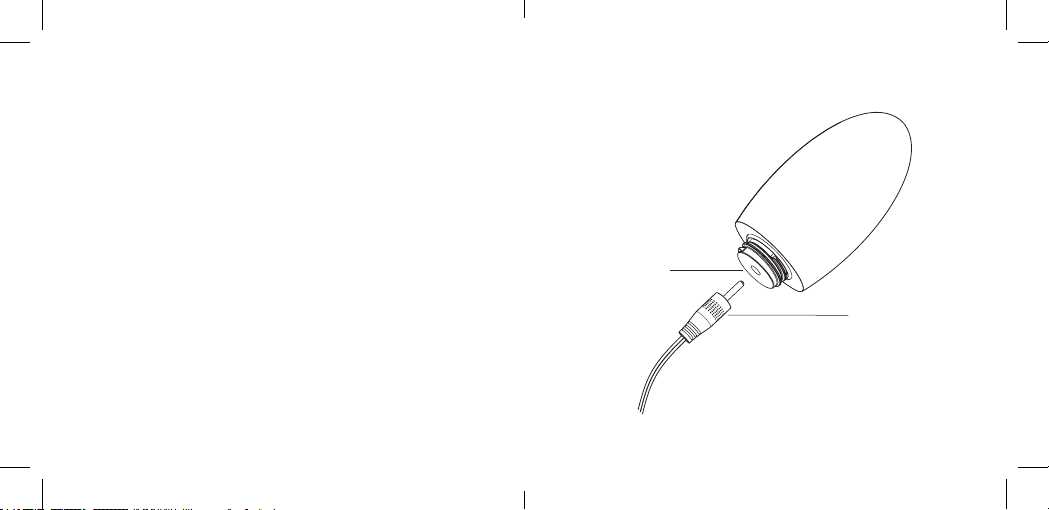
CHARGING
Your new In signia™ features a DC por t concealed by a detacha ble base
attachment that can be simply removed by twisting it off counter-clockwise.
• Unsc rew the base attachme nt at the bottom of you r Insignia™ and in se r t t he
DC pl ug, tak ing care to p ut the attac hment in an e asy-to- nd place so as not
to lose it.
• When t he mains plu g is inserte d into the wa ll socket, the LED o n your Insig nia
™
will pulse to indicate that it is charging. When it is fully charged (after ca. 2
hours) the LED will emit a steady white glow.
• Take care to screw bas e attachm ent back on tig htly, espec ially i f you a re
p la nn i ng to u se yo ur I n si gn i a™ in water. On l y us e or i gi na l ch a rge r s pr ovi de d
by LELO.
If the po we r in yo u r I ns ig n ia™ Pleas u re Ob j ec t is r u nn i ng l ow, th e LE D i nd ic ato r w il l
DC Port
DC Plug
prompt you to charge by as hing rapidl y during operation.
16 • ENGLISH ENGLISH • 17

CLEAN ING, S TOR AGE AND S AFE TY
Your Insignia™ Pleas ure Ob ject’s l ifesp an wil l be gre atly i ncrea sed wi th pro per
maintenance and care.
LELO recommends that you use a water-base d lubricant s uch as LELO’s Persona l
Moisturi zer. Avoid usin g a silicone -based lubricant as this coul d make the silicone
perm anently tack y. If you wish to u se a silico ne-based l ubrican t, perform a pat chtest rst.
Never us e mas sag e oi l or ha nd cr eam a s lub ri can ts wi th yo ur I nsi gn ia™. Alwa ys
clean your Insignia™ thoro ughl y bef ore an d aft er ea ch use. Th e most e ff ecti ve
way of d oing this is to use a purpose -made cleaning solut ion su ch as LELO’s
Anti ba ct er i al C le an i ng S p ray. Al t er na t iv el y, you can wa sh t h e si l ico n e wi t h wa rm
water and antibacterial so ap, rinse with clean h ot water and pat dry wit h a lintfree cloth or towel. Avo id getti ng water into th e DC socket. Never use cl eansers
containing alcohol, petrol or acetone.
Avoid lea v i n g your Ins i gn i a™ in dir ec t s u n l i g ht a n d N E VER expos e i t t o ex treme h ea t .
Store your Insignia™ in a dust-f ree place and keep it away f rom toys of other materia ls.
TROUBLESHOOTING
Your Plea sure Object ’s LED does not pulse whe n charger is con nected?
• Battery i s fully charg ed.
• Battery is drained and will require several minutes to acknowledge that it is
being charged.
• Char ger is not prope rly connected. Chec k wall and DC sockets.
Your wireless controller does not activate when the + button is pre ssed?
• Batterie s are depleted. Replace o r recharge you r batteries.
• Yo ur w ir el es s co nt rol le r is lo ck ed . Ho ld d own th e + and – buttons for 3 seconds
to unlock it.
There i s no connectivity between your Pl easure Object and wirele ss controll er?
• You have exceeded the 10 second s re quired for your Pleasure Object to ‘seek’
an a ct ive w i re le ss c ont ro ll e r. Fi rs t p owe r of f bot h you r I ns ig n ia™ and wireless
co ntr oll er. N ow t ry ag ai n by r st ac tiva tin g you r wi rel ess r emot e by pr ess ing t he
+ butto n, and then p ressi ng and hol ding th e activat ion butto n on your
Pleasure Object for 1 second.
• Your Pleasure Object or wireless controller is out of p ower; re charge your
Pleasure Object and replace or recharge your wireless controller’s batteries.
If you exp erien ce any othe r proble ms with you r Insig nia™ or if you h ave any
questions regarding operation, please contact: CUSTOMERCARE@LELO.COM
18 • ENGLISH ENGLISH • 19
SPECIF I C AT I O NS
SIZE: • Oden™ 94 X 45 X 26mm • Tiani™ 84 X 42 X 28mm
• Lyla™ 80 X 33 X 32mm • Wireless controller 64 X 64 X 26mm
WEIGHT: • Oden™ 28g • Tiani™ 31g
• Lyla™ 36g • Wireless controller 30g
MATERIALS: Lyla™, Oden™, Tiani™: PC-ABS / body-safe silicone /
polymer (retraction leash: Lyla™)
Finish: matte silicone with glossy ABS
Wireless Controller: PC-ABS / body-safe silicone
Finish: matte silicone with glossy ABS
BATTERY: • Lyla
• Wireless controller 2xAAA battery
CHARGING: • Lyla™ 2 h at 5.0 V 200 mA • Tiani™, Oden™ 2 h at 5.0 V 70 mA
USER TIME: up to 2 hours (Pleasure Object) up to 10 hours (wireless controller)
STANDBY: up to 90 days (Pleasure Object)
FREQUENCY: 120 Hz
MAX NOISE LEVEL: <50dB
INTERFACE: 3-button interface, 8 modes, 2-axis motion control function
CARRIER FREQUENCY: 2.4GHz
™
Li-lon 200 mAh 3.7 V • Tiani™, Oden™ Li-lon 70 mAh 3.7 V
DISPOSAL IN F O R MATION
Disposal of old electronic equipment (applicable in the EU and other European
countries with separate waste collection systems):
The crossed-out dustbin symbol indicates that this Pleasure Object should not be
treated as household waste, but rather be brought to the appropriate collection
point for recycling of electrical and electronic equipment.
This device complies with Part 15 of the FCC Rules. Operation is subject to the
following two conditions: (1) this device may not cause harmful interference, and (2)
this device must accept any interference received, including interference that may
cause undesired operation.
compliance could void the user’s authority to operate the equipment.
Under Industry Canada regulations, this radio transmitter may only operate using
an antenna of a type and maximum (or lesser) gain approved for the transmitter by
Industry Canada. To reduce potential radio interference to other users, the antenna
type and its gain should be so chosen that the equivalent isotropically radiated
power (e.i.r.p.) is not more than that necessary for successful communication.
20 • ENGLI S H ENGLI S H • 21

This e qui pm ent h as b een t este d an d fou nd to co mp ly w ith t he l im it s for a C la ss B
digi tal device, p ursu ant to par t 15 of the FCC Ru les. Th ese lim its are d esign ed
to provid e reason able pr otectio n again st har mful inte rfere nce in a resi dentia l
installation. This equipment generates uses and can radiate radio frequency energy
and, if n ot insta lled an d used in a ccordan ce with th e inst ructi ons, ma y cause
harmful int erfe r ence to radio communication s. However, there is n o guarantee that
inter fe re n ce w i l l not o ccu r i n a p a r t ic u la r i n st al l at i on . I f th i s eq u i pm e nt do e s cau s e
harm ful i nter feren ce to radi o or tel evis ion rec eptio n, whi ch can be d eter min ed
by turn i ng t he e qu ip m ent of f a nd o n, t he u se r is e nc ou ra ge d to try to cor r ect t he
interference by one or more of the following
MEASURES: • Reori ent or relocate the receivi ng antenna.
• Inc rease the separ ation between the equi pment and recei ver.
• Conn ect the equipm ent into an outlet on a ci rcuit different from t hat
to which the receiver is connected.
• Cons ult the deale r or an exp erie nced radio/T V technician fo r help.
DISCLAIMER: Users o f th is P le as u re Ob je ct d o so a t the i r ow n r is k. N ei th e r LE LO no r
its retailers assume any responsibility or liability for the use of this Pleasure Object.
Model may be changed for improvements without notice.
© 2011 LELOi AB. ALL RI GHTS RESER VED.
DESI GNED AND DEV ELOPED BY LELO SWEDE N.
ASSEMBLED BY LELO IN PRC.
WEBSITE WWW.LELO.COM SUPPORT CUSTOMERCARE@LELO.COM
22 • ENGLISH
INSIGNIA™ BEDIENUNGSANLEITUNG
EXQU ISI TE S DES IGN / I NT IME R LUXU S
Um das Batteriefach zu öffnen, entfernen Sie die glänzende ABS Oberäche Ihrer Insignia
ÜBERSICHT
EIN LEGE N DE R BATT ERI EN I N DIE F ER NBE DIE NU NG
Herzlichen Glückwunsch zum Erwerb eines der modernsten Intim-Massagegeräte die
je hergestellt wurden. Als Teil von LELOs bahnbrechender Insignia™ Reihe kommen
Lyla™, Oden™ und Tiani™ mit derse lben großartigen, wasserfes ten und hautfreund lichen
Desig n -Ä st het ik u nd da z u noc h mi t de r revol ut io nä ren S en seM oti on™ Technologie,
welche noch nie zuvor in Produkten dieser Art zu sehen war.
SenseMotion™ gibt Ih ne n die M ög lic hkei t Ih r Ple asu re O bje ct üb er ei ne ka bel los e
Fern be di e nu ng z u s teu er n , di e au f Ih re o de r d ie B ewe g un ge n Ih re s Pa r tn er s re ag i er t.
Darü ber hi naus kan n es auch al s zusät zlic hes Mas sageg erät ben utzt we rden,
Zu
Auf
da Sie au fgr und de s zwei ten sep arate n Motor s in de r Fer nbed ien ung ze itgle ich
nachempnd en können was Ihr Par tner fühlt.
HINWE IS: Ihr In signia™ Pleas ure Object m uss nach dem E rhalt au fgelade n
werden. Um es aufzuladen, halten Sie sich bitte an das Kapitel Auaden in dieser
Bedienungsanleitung (S. 38). Vor dem Gebrauch sollten Sie zwei AAA Batterien in die
Fern bedienun g einl egen und die kabellose Verbind ung zum Massag egerät hers tellen.
Fern b e dienu n g . St e c ken Sie den P lasti kschl ü ssel, der Ihre m Insig n ia
ist in die A bdeckung des Batteri efaches und d rehen Sie di esen u m ein e Vie rtel Umdrehung
gegen den Uhrzeigersinn, um die Abdeckung von der Fernbedienung zu entfernen
Verschl ießen Sie da nn das Fach w ieder nach dem die Bat terien ei ngesetzt s ind mit de m
Plast ikschlüs sel durch ein e viertel Um drehung im Uh rzeiger sinn. Stell en Sie sicher, da ss das
Batter iefach gut versc hlossen ist, bevo r Sie es mit Wasser in Verb indung brin gen.
™
Pleasure Object beigelegt
24 • DEUTSCH DEUT SCH • 25
™

DIE K ABE LLOS E VERB IN DUNG H ER STE LLE N
Um d ie kabell ose Verbindung herzus tellen, müsse n Sie zu erst di e Fer nbedienun g
akti vieren , indem S ie den + Knopf e inmal d rücken . Nun ist I hre Fe rnbed ienun g
aktiviert und sendet ein Signal.
Lyla™, Oden™ und Tiani™ verfügen ebenfalls über einen Aktivierungsknopf, der
mit dem Sym bol f ür ‚ka bel lo s‘ geken nz eich net i st . Sobal d Ih r Plea su re Ob ject
volls tänd ig aufg elad en ist, h alten S ie di esen Kn opf zu m Akt ivie ren ei ne Sek unde
lang ge drückt und s tarten den Suchmodu s, dam it es ei ne Ver bindung zur
Fernbedienung herstellen kann.
Es kann b is zu 10 Sekun den dauer n bis Ihr P rodukt di e Fernbe dienung e rkannt
hat, haben Sie also bitte etwas Geduld. Die weiße LED-Anzeige leuchtet alle 2
Sekunden auf, um anzuzeigen, dass Ihr Pl easure Objec t funk tioniert und ein S ignal
von der Fernbedienung bekommt.
ODEN
™
Lustpunk
Aktivieren / Suchen
Unterer Aufsatz (gegen
den Uhrzeigersinn drehen,
um den Stromanschluss
freizulegen)
Flexibler abnehmbarer Teil
26 • D EUTSCH
DEUT SCH • 27
LYLA
™
TIANI
™
28 • DEUTSCH
Lustpunk
Aktivieren / Suchen
Unterer Aufsatz (gegen
den Uhrzeigersinn drehen,
um den Stromanschluss
freizulegen)
Rückholschlaufe
Aktivieren / Suche
Unterer Aufsatz (gegen
den Uhrzeigersinn drehen,
um den Stromanschluss
freizulegen)
Lustpunk
Flexibles Ende
zum einführen
DEUT SCH • 29
DIE VE RWE NDU NG DE R SE NSE MOTI ON™ MODI
Ihr Insignia™ Pleasure Object verfügt über 2 SenseMotion™ Modi, die auf
verschiedene Bewegungen reagieren.
MODUS 1
Wenn I hr Pleas ure Object ei ne Verbin dung zur Fer nbedienu ng hat, ha lten Sie die
Fernbedienung ach in Ihrer Handäche. Nun wird eine schwache Vibration von
Ihrem Pleasure Object Lyla™, Oden™ oder Tiani™ kommen.
Wenn Sie d ie Fe rn bed ien ung i n ein en Wi nkel n eig en, we rde n Sie b eme rken , wie
sich d ie Vibrati onen in der Fernbedi enung und i m Massageg erät intensi vieren. Ei ne
Neigung von de r Hori zontalen in di e Vertikale ver stärkt die V ibrationen bis zu 10 0%.
Sie können die Fern bedienung vor und zurück n eigen , um die I ntensit ät zu verä ndern
bis Sie Ihre und di e gewün schte Vibrationsstärke Ih res Partner s gefunden habe n.
Drüc ken Si e de n mit tl ere n Kno pf , we nn Si e den z we ite n Sen seM otio n™ Modus
versuchen möchten.
DIE VE RWE NDU NG DE S SE NSE MOTI ON™ MODUS 1
10% Intensität
100% Intensität
30 • DEUTSCH
DEUT SCH • 31
MODUS 2
Dieser Modus gibt Ihnen mehr Freiheit zum Ausprobieren – versuchen Sie kreisende
Bewegungen mit der Fernbedienung oder was immer Ihnen gefällt. Je schneller Sie
die Fer nbedienu ng bewegen, desto stärke r wird die Vib rationsinte nsität. Probie ren
Sie di e Mö gl i ch kei ten a us , wäh r en d di e Fe r nb ed i en un g un d da s Pl ea su re O b je ct
auf Ihre Bewegungen reagieren. Um die SenseMotion™ Modi zu beenden, drücken
Sie erneut den Mittelknopf .
HINWE I S: We n n Si e Se n se Mot i o n™ (Modus 1-2) verwenden, leuchtet die LED-Anzeige
ihrer Fernbedienung.
32 • DEUTSCH
BEDIENUNG DER SCHALTOBERFLÄCHE (MODI 3-8)
Nachde m Sie die Ver bindung zwisc hen dem Pleasu re Objec t und der Fe rnbedien ung
herges tel lt ha ben, kö nne n Sie d urch z wei ma lig es Dr ücke n des M itte lk nopfe s mit d er
normalen Einstellung der Fernbedienung fortfahren.
Außerhalb der SenseMotion
Weise verwendet:
• Beim Drücke n des + Knopfes erhöht sich die Vibrationsintensität Ihres
Pleasure Objects.
• Während Ihre Sch altoberäche ak tiv ist, drücken Sie den M ittelknopf , um
dur ch die 8 Vibrat ionsmodi z u schalten, di e beiden Sens eMotion
Modi mit eingeschlossen.
• Beim Drücken d es
Sie d en
könn en Si e au ch I hr Pl ea su re Ob je ct au ss cha lte n, in de m Sie d en K nop f
für e i ne S e ku n de l a n g ge d r ü ck t h a lte n . Wen n I h r Pl e as u re O b je ct ke i n S ig n a l
von der Fernbedienung erhält, geht es in den Standbymodus über und schaltet
sich nach einer Stunde selbst aus.
HINWEIS: Der Motor in der Fernbedienung kann während der Verwendung durch 3
Sekun den la nge s ged rüc kt ha lten d es K nopfe s ausg esc halte t werde n. Wi ede rho len
Sie dies en Vorgang, um den Motor w ieder anzus chalten. Bei de r E instellu ng der
Standardfernbedienung (Modus 3-8), leuchtet die LED-Anzeige nicht.
™
Modi, w ird die S chaltob erfl äche in d er folg enden
Knopfes, verringert sich die Vibrationsintensität. Halten
–
Knopf ge dr ück t, um die F er nbed ien ung a usz usch alte n. Da nach
–
DEUT SCH • 33
™

VERWE NU DNG I HRE S ODE N
Oden™ ist wi e ke i n a nd e r e r Paa r - Ri n g, d a s s D es i g n h at e i n e e i n ma l i g e n F o r m , d i e
sich im Vergl eich mit anderen Ma ssagegerä ten leichter an- und ablegen lässt.
Während der Ver wendung gibt Oden™ Vibration en an beide Par tner weiter.
HINWEISE ZUM ANLEGEN: Wenn Ih r Peni s eri gie rt is t halte n Sie Od en™ mit I hr em
Daum en und Ih rem Zeigef inger a n der Hal terun g der gek rümmte n Basis u nd
öffne n Sie den Um fang so weit, w ie erfo rderl ich. Ode n™ kann dan n auf den
Penis geschoben werden, wo bei die ache Seite des Oden™ Lustp un kt s z u Ih re m
Abdomen zeigen sollte und der Lustpunkt selbst in die Richtung Ihres Nabels.
TIPPS: Oden™ spendet dann am meisten Lust, wenn der vibrierende Lustpunkt nach
oben gerich t et ist, damit er die Klitoris stimulie rt, wenn die Fra u oben ist.
™
VERWE NU DNG I HRE S ODE N
™
34 • DEUTSCH
DEUT SCH • 35

VERWE NU DNG I HRE R LYLA
™
Lyla™ ist ein unverg leichlich es Massagegerät, dass dazu gedach t ist, von der Partner in
genos sen zu we rden. Entweder zur äuße ren oder zur inne ren Anwendung we nn Sie
oder I hr Partn er mit der Fernbedi enung inter agiert. I hre klein e Größe ist idea l für den
diskreten Genuss, der von Paaren jederzeit und überall geteilt werden kann.
HINWE ISE ZU R VERWE DNUNG: Ly la™ kann zu r inne rlich en Mass age ang ewedent
werden , dazu w ird das Gerät 5 bi s 8 cm in die Vag ina eingeset zt, wobei man da rauf
achten so ll ei n Stück d er Lyla™ Rückh olsc hla ufe her aus ragen z u las sen, u m ein e
einfache Entfernung zu ge w e hrleisten.
TIPPS: Tragen Sie eine beliebige Menge wasserbasierten Gleitgel auf, um das
Kopfstück von Lyla™ einfacher und angenehmer Einzuführen.
VERWE NU DNG I HRE S TIA NI
Tiani™ ist das ultimative Massagegerät für Paare. Es kann von der Partnerin während
des Ver kehrs getra gen werden oder es kann ind ividuell verwe ndet werden,
um äußer lich zu s tim uliere n. Die Vib rationen werden mi t der Hand äche kont rolliert.
HINWEISE ZUR VERWEDNUNG: Biegen Sie den Scheitelpunkt von Tianis™ einzigartiger
U- F o rm i n e in en W i nke l vo n 70 bi s 9 0 G rad u nd f üh r en S ie d en n ic ht v ib r ie re nd en
biegsamen Arm in die Vagina ein. We nn es komfortabe l platzier t ist, legen Sie
Tianis™ vibrierenden Lustpunkt über die Klitoris. Der Mann wird es wohl angenehmer
nden , wenn während des Verkeh rs eine kleine Menge was serbasiertes Gleitgel
aufgetragen wird, um leichter eindringen zu können.
TIPPS: Tragen Sie eine beliebige Menge wasserbasiertes Gleitge l auf das Kopfstück
™
von Tianis™ innerem Arm, um eine leichtere Einführung zu ermöglichen.
36 • DEUTSCH DEU TSCH • 37
INSIGNIA™ AUFL ADE N
Ihr neues Insignia™ Pleas ure O bje ct hat e ine n Stro man sch lus s, de r unte r ein em
abnehmbaren Aufsatz am unteren Ende des Massagegerätes verborgen ist. Dieser
lässt sich einfach abnehmen, indem er gegen den Uhrzeigersinn gedreht wird.
• Schr auben S ie den Aufsatz am u nteren Ende d es Gerätes ab und
schließen Sie den Stromstecker an, wobei Sie darauf achten sollten,
den Aufs atz an einer e infach wiede r aufndba ren Stelle abzu legen.
• Soba ld d as G erät a n ei ne Ste ckdose ange schlossen ist, w ird
die LED-Anzeige an Ihrem Insignia™ zu bli nken begin nen und damit
an zeig en, da ss das G erät au fgela den wi rd. Wenn d as Ger ät voll ständ ig
aufgel aden ist (nach etwa 2 Stunden) wi rd die LED- Anzeige wei ss leuc hten.
• Achten Sie dara uf, den Aufsat z fest z u versch liessen, besonder s
dann, wenn Sie beabsichtigen Ihr Insignia™ Pleas ure Obj ect im Wasse r
zu ver wenden. Verw enden Sie aus schliesslich Lad egeräte von LELO.
Wenn Ihr Insignia™ Ple asure Object nur no ch wenig St rom zur Verfüg ung hat, w ird
die LE D -Anz ei g e S ie m i t e in e m sc h ne l l e n Bl i n ke n wä h re n d de s G eb ra u ch s d a ra uf
aufmerksam machen.
AUFLADEN
Strohmanschluss
Strohmstecker
38 • DEUTSCH
DEUT SCH • 39

REINIGEN, AUFBEWA HR UN G UND SICHERHEIT
Die Lebensdauer Ihres Insignia™ Pleas ure Obj et s wird si c h mit der richtigen Wartung
und Sorgfalt deutlich verlängern.
LELO empehlt, dass Sie ein wasserbasiertes Gleitgel mit Ihrem Pleasure Object
verwenden, wie etwa LELOs Personal Moisturizer. Vermeiden Sie die Verwendung
von silikonbasierten Gleitgels, da es das Silikon dauerhaft verkleben kann. Falls Sie
doch ei n silikonbasie rtes Glei tgel verwe nden wolle n, testen Si e dies zuerst an e iner
klei nen Stelle.
Verwenden Sie niemals Massageöl oder Handcreme als Gleitgel mit Ihrem Insignia™
Pleasure Object. Reinigen Sie Ihr Insignia™ Pleasure Object sorgfältig vor und nach
jedem Gebrauch. Der effektivste Weg um dies zu tun, ist die Verwendung eines
spezi ell fü r diesen Zweck hergestell ten Mi ttels, wie etwa LELOs antibak teriell es
Reinigungsspray. Alternativ dazu können Sie das Silikon auch mit warmem Wasser
und a ntibakte rieller Seife reiningen, spüle n Sie das Gerät mi t warmem Wasser ab
und t upfen Sie es mit einem us enfreien Tuch trocken . Vermeide n das Ei ndringen
von Wasse r in d en Str oman sch luss . Ver wende n Sie n iem als Re in igun gsm it tel d ie
Alkoho l, Petroleum oder Azeton ent halten.
Legen S i e ih r I n s i gn i a™ pleasure Object ni cht in direktes Sonnenli cht und set zen Sie
es niem al s ho he r Hi tz e aus . Bewa h ren S ie ih r I ns ign ia™ Pleas ure O bj ect a n ei ne m
staubfreien Ort auf und halten Sie es fern von Spielzeugen aus anderen Materialien.
40 • DEUTSCH
FEHLERBEHEBUNG
Die LED- Anzeige Ihres Ple asure Objects bl inkt nicht wenn es mit dem Lad egerät verbun den ist?
• D er Akku ist vol lständig a ufgeladen.
• Der Akku ist gänzlich erschöpft und braucht einige Minuten um anzuzeigen,
dass er aufgeladen wird.
• D as Ladege rät ist nicht ri chtig ver bunden. Kontrollie ren Sie die Steckdo se und
den Stromanschluss.
Die Fe rnbedienu ng funktio niert nich t wenn der
• D ie Batteri en sind leer. Er setzen Sie di e Batterien o der laden Sie s ie auf.
• I hre Fernbedi enung ist gesper rt. Halte n Si e d en
Es best eht keine Verbi ndung zwi schen dem Pleas ure Object un d der Fernbed ienung?
• S ie haben die 10 S ekunden übe rschrit ten, welche da s Pleasure O bject
brau cht, um die a ktive Fer nbedienu ng zu nde n. Schalten Sie zuer st Ihr In signia
und Ihre F ernbedien ung aus . Nun versuchen S ie es noch einmal, indem Sie zu erst
d ie F e r n be d i en u ng a k t i vi e re n, i n d em S i e de n
den Aktivierungsknopf an Ihrem Pleasure Object für eine Sekunde gedrückt.
• I hr Pl easure Object oder Ihre Fernbed ienung ist leer, laden Sie I hr Pl easure
Object wieder auf und ersetzen oder laden Sie die Batterien Ihrer Fernbedienung.
Wenn andere Probleme mit Ihrem Insignia
hins ichtlich der Ver wendung haben , kontakt ieren Sie bitte: CUSTOMERCARE@LELO.COM
Knopf g edrückt wi rd?
+
und – Knopf für drei Sekunden gedrückt.
+
Knopf drücken, halten Sie dann
+
™
Pleasure Object auftreten oder wenn Sie Fragen
DEUT SCH • 41
™

SPEZIF I KAT ION
GRÖSSE: • Oden™ 94 X 45 X 26mm • Tiani™ 84 X 42 X 28mm
• Lyla™ 80 X 33 X 32mm • Kabellose Fernbedienung 64 X 64 X 26mm
GEWICHT: • Oden™ 28g • Tiani™ 31g
• Lyla™ 36g • Kabellose Fernbedienung 30g
MATERIALIEN: Lyla™, Oden™, Tiani™: PC-ABS / körperfreundliches Silikon /
polymer (Rückholschlaufe: Lyla™)
Kabellose Fernbedienung: PC-ABS / körperfreundliches Silikon
AKKU: • Lyla™ Li-lon 200 mAh 3,7 V • Tiani™, Oden™ Li-lon 70 mAh 3,7 V
• Kabellose Fernbedienung 2xAAA Batterien
AUFLADEN: • Lyla™ 2 Std. Bei 5,0 V 200 mA • Tiani™, Oden™ 2 Std. Bei 5,0 V 70 mA
BENUTZUNGSDAUER: bis zu 2 Stunden (Pleasure Object)
bis zu 10 Stunden (kabellose Fernbedienung)
STANDBY: bis zu 90 Tagen (Pleasure Object)
FREQUENZ: 120 Hz
MAX. SCHALLPEGEL: <50dB
SCHALTOBERFLÄCHE: 3-Knopf-Bedienung, 8 Modi, 2-achsige Bewegungsfunktion
TRÄGERFREQUENZ: 2,4GHz
42 • D EUTSCH
ENTSORG U N G
Die Entsorgung alter elektronischer Geräte (geltend in der EU und anderen
europäischen Ländern mit getrenntem Müllsystem):
Das durchgestrichene Mülltonnensymbol weist darauf hin, dass dieses Pleasure
Object nicht zusammen mit dem Hausmüll entsorgt werden darf, sondern zu einer
betreffenden Sammelstelle für elektronischer Geräte gebracht werden muss.
DEUTSCH • 43

HAFTUNGSAUSSCHLUSS: Die Verwendung dieses Pleasure Objects geschieht auf
eigene Gefahr. Weder LELO noch seine Einzelhändler übernehmen die Haftung
für d ie Verwend ung diese s Pleasure Objects. Änderung en, die ni cht ausdr ücklich
vom Her steller g enehmigt w urden, könn en die Bere chtigung de s Benutzer s
einschränken das Gerät zu benutzen.
Verbesserun gen des Model ls können ohne Vorankü ndigung er folgen.
© 2011 LELOi AB. AL LE RECHTE VORBEHALTE N.
ENTWO RFEN UND ENTWICKELT VON LE LO SCHWEDEN.
ZUSAM MENGEBAUT VON L ELO VRC.
WEBSITE WWW.LELO.COM
SUPPORT CUSTOMERCARE@LELO.COM
44 • DEUTSCH
MANUEL D’UTILISATION INSIGNIA
DES IGN E XQUI S / LUXE I NT IME
™

DESCRIPTION
Félicitations, vous venez d’acheter l’un des masseurs intimes les plus sophistiqués
jamais conçu. Lyla™, Oden™ et Tiani™ sont les n ou vea ux m as seu r s de l a ga mm e
phare d e LELO In sig nia™. Ceux- ci se di sti ngue nt par l eur de sig n subl ime, l eur
étanchéité et leur sil icone extra-doux. Mais c e qui les rend vra iment unique s e st la
technologie révolutionnaire SenseMotion™ dont ils sont dotés.
La technologie SenseMotion™ vous per met d e contrô le r votre Ob jet de P lai sir
grâce à une télécommande sans l qui répond à vos mouvements ou ceux de
votre partena i re . Cet te d e r n iè re d i s po s e d’un m ote u r i nté g ré q ui vo u s pe r m et d e
senti r a u creux de la mai n l’intensi t é d e s v ibrat i o ns resse nties pa r vo t r e p arten aire.
Elle peut également être utilisée comme masseur intime à part entière.
NOTE : Il s e peut que v ous ayez bes oin de re charge r votre Ob jet de Pl aisi r
Insignia™ avant l a prem ière u til isat ion. P our rec harge r vot re Obje t de Pla isi r,
veuil le z vous r éf ér er à l a se ct io n Rec ha rg er d e ce ma nu el ( p.6 0). I l vou s fa ud ra
égale ment ins érer 2 piles LR 03 dans la télécommande et établir la connexion
sans l a vec le masseur avant ut ilisati on.
46 • FRANÇAIS
INSE RE R LES PI LES DA NS L A TÉLÉ COM MAN DE
Fermer
Ouvrir
La par tie bril lante en ABS de la télécom mande sans l Insign ia™ est amovible e t re c o u vre
le comp art iment o ù se trou vent les p iles. I nsér ez la clé e n plas tique f ourn ie avec vot re
Insignia™ dans la fente sur la partie amovible de l’objet, effectuez un de tour de 10 degrés
dans le sens contraire des aiguilles d’une montre et retirez le cache de la télécommande.
Une fois les piles insérées, remettez le cache et refermez en effectuant un de tour de
10 degré s avec l a cl é dan s le s ens d es ai gu il le s d’une m ont re. A ssu rez -vou s que l e
cache est correctement fermé avant toute utilisation dans l’eau.
FRAN ÇAI S • 47

ACTIV ER L A CONN EXI ON SAN S FIL
Pour activer la connex ion sans l, vo us devez d’ab ord all umer la télécomm ande
en appu yant un e fois s ur le bo uton +. La téléco mma nde es t mai ntenan t acti ve
et envoie un signal.
Lyla™, Oden™ et Tiani™ possè dent éga leme nt un bouto n d’activat ion rep résenté
par le symbole sans l . Une fois votre Objet de Plaisir complètement chargé,
appuye z sur c e bou ton pe nda nt 1 se con de po ur l’al lu me r et act ive r le mo de
« rech erche » qui le con nectera à la télé commande sa ns l.
Cela pe ut p ren dre j us qu’à 10 seco nd es m ax i mu m pou r q ue l e pro du it d étec te la
téléco mman de, alo rs soy ez patie nt. Le sig nal lu min eux bl anc de vot re Obj et de
Plaisir clignotera toutes les 2 secondes pour indi quer que l’Objet fonctionn e et
reçoit l e signal de la té lécommande sans l.
ODEN
™
Point de Plaisir
Allumer / Rechercher
Base (tour n er d a ns l e se n s
invers e des aiguil l e s d ’une
montre p our ac céder a u
port de chargement)
Partie exible à po rter
48 • FRANÇAIS
FRAN ÇAI S • 49

LYLA
™
TIANI
™
50 • FRANÇAIS
Point de Plaisir
Allumer / Rechercher
Base (tour n er d a ns l e s en s
inverse des ai guilles d’une
montre p our a ccéder a u
port de chargement)
Cordon de retrait
Allumer / Re chercher
Base (tourner dans
le sens inverse des
aiguilles d’une montre
pour a ccéde r au po rt
de chargement)
Point de Plaisir
Bras exibl e d’insertion
FRAN ÇAI S • 51

UTIL ISE R LES M ODE S SE NSE MOTI ON
Votre Ob jet de Pla isir Insignia™ est doté de 2 modes Sens eMotion™ qui répondent
à différents mouvements.
™
MODE 1
Une foi s votre Ob jet de P lai sir et l a tél écomm and e sans f il co nnec tés, te nez
la télé command e à plat au cre ux de votre ma in. Lyla™, Oden™ ou Tia ni™
vibreront lé gè re m ent.
En inc li na nt l a tél éco m ma nd e, vou s sen ti rez l’i nte ns ité d es v ib ra ti on s au gm ente r
dans le m a ss eu r ai n si q ue d an s l a tél éco m ma nd e. En p as s ant l a té lé com m an de
de la pos it io n ho r izo nta le à l a po sit io n ver t ic al e vous a tt ei nd rez l a pui s san ce d e
vibration maximale.
Vous pouvez ensuite incliner la télécommande en avant et en arrière pour
chang er le s vi brat ion s, cr éer vo s pro pres m ode s et tro uver l e ni veau i déa l pou r
vous et/ou votre partenaire.
Pour essayer le second mode SenseMotion™, appuyez une fois sur le bouton central .
UTIL ISE R LE MO DE 1 SE NSE MOT ION
10% d’intensité
100% d’intensité
™
52 • F RANÇAIS
FRAN ÇAI S • 53

MODE 2
Ce mode vo us laisse plus de liberté pour explor er les différentes pos sibi lités – fa ites
des mou vem ents c ir cul ai res a vec l a tél éco mm and e ou b oug ez- la co mm e vou s
voulez . Plus vit e vous dép lacerez l a télécom mande , plus le s vibrat ions se ront
intens es . Dé cou vr ez tou tes l es o pti o ns e n la is s ant l a té lé com ma n de et l’O bj et d e
Plaisir répondre à vos mouvements. Pour quitter les modes SenseMotion™, appuyez
sur le bouton central une fois.
NOTE : Lor s d e l’uti l is at io n du Se ns eM oti on™ (modes 1-2), le signal lumineux sur la
téléco mmande sans l sera allum é.
UTILISER L A TÉLÉCOMMANDE (MODES 3-8)
Une foi s votre Objet de Plaisir et la télé commande sa ns l connec tés, vous pouvez
revenir aux commandes standards en appuyant deux fois sur le bouton central .
En dehors des modes SenseMotion™, l’interface de control s’utilise comme suit:
• A ppuyez sur le bouton + pour a ug men ter l ’inte ns ité d es v ib ra ti on s
de votre Objet de Plaisir.
• Quand votre interface de control est active, appuyez sur le bouton
centra l po ur n av i gu e r ent re l es 8 m od es d e st i mu l at io n, l es d eu x
modes SenseMotion™ inclus.
• A ppuyez sur le bouton – pour ba isser l’i ntensité de s vibrati ons.
Mainte nez le bo uton – enfoncé p our étei ndre l a téléco mman de.
Vous pouvez ensuite éteindre votre Objet de Plaisir en appuyant sur le
bouton pendant 1 seconde. Votre Objet de Plaisir se mettra en
standby pendant 1 heure avant de s’éteindre s’il ne reçoit pas de signal
d’une télécommande sans l active.
NOTE : Vous pouvez éteind re le moteur de votre télécommande sans fil lo rsque
vous l’uti l i sez e n ma i nte n ant l e b ou to n en fon cé p en d ant 3 s e con d es . Rép étez l a
même ac t i o n po ur remet t r e l e m ote u r e n ro u te. L o r s q u e vo u s ut ilis ez l e s co m m a n d es
standa rds (modes 3- 8), le sign al lumineux su r la télécomman de sans l est éteint.
54 • FRANÇAIS
FRAN ÇAI S • 55

UTILISER ODEN
Oden™ est un an neau p our cou ples s ans équ ivale nt dans l e mond e à ce jour
grâce à sa fo rm e un iqu e. Il es t pl us fac il e à mett re et à ret ire r que l es a nne aux
standards. Porté, Oden™ transmet des vibrations aux deux partenaires.
COMMENT LE PORTER : La verge en ére ctio n, ten ez la b ase re cour bé e d’Ode n™
entre le p ou ce et l’i nd ex et o uv rez l’an ne au à l a la rg eu r dé si ré e. Fa ite s- l e gl i ss er
sur la ve rg e, l a p a r t i e p l at e d’Od e n™ por tan t l e po i nt d e p l a i s i r, tou r n é e ve r s vot r e
abdomen et pointant vers le nombril.
CONSE IL S : La faço n la pl us a gré abl e d’uti li ser O den™ est de di r ige r le p oin t de
plaisir vibrant vers le haut pour stimuler le clitoris lorsque la femme est au dessus.
™
UTILISER ODEN
™
56 • F RANÇAIS
FRAN ÇAI S • 57

UT I LI S ER LYL A
™
Lyla™ n’est comparable à aucun autre masseur de son genre. Destinée aux femmes
pour un usage externe, ou pour être portée alors qu’elles ou leur partenaires utilisent
la télécommande sans l. Sa petite taille est idéale pour des plaisirs discrets qui
peuvent être partagés par les partenaires en tout lieu et à tout moment.
COMMENT LA PORTER : Lyla™ peut être utilisée comme masseur interne, porté entre
5 et 8 cm à l’inté ri eu r du vag in . Pre nez g ard e de la is se r dép as se r une p ar ti e du
cordon de retrait en polymères pour faciliter l’extraction du masseur.
CONSE ILS : Utilisez un lubriant à base d’eau sur l’extrémité de Lyla™ pour une
insertion plus facile et plus confortable.
UTILISER TIANI
Tiani™ est le ma s se ur p ou r co up l es l e pl u s exce pti o nn el q ui p eu t êtr e po r té p ar l a
femme pendant les rapp ort s ou utilisé seul pour une stimulation externe, alors que
les vibrations sont contrôlées au creux de la main.
COMME NT LA P ORTE R : Ecar tez les d eux b ranch es de la fo rme e n U uniq ue de
Tiani™ à un angle de 70 à 90 degrés et insérez la branche mobile non vibrante dans
le vagi n. Un e foi s confo r tab lem ent i nsé rée, p la cez le po int d e pl ai si r vib ran t sur
le cl itoris. Pendant les rappo rts, l’hom me peut p référer uti liser un lubria nt à base
d’eau pour faciliter son entrée.
CONSE I LS : Utilisez un lubriant à base d’eau sur la branche à introduire de Tiani™
™
pour une insertion plus facile.
58 • FRANÇAIS FRAN ÇAI S • 59

RECHARGER VOTRE INSIGNIA
Votre nouveau Insignia™ est doté d’un port de chargement caché sous sa base
dévis sabl e qui pe ut s’ouvr ir e n la tour nan t dans l e sens i nvers e des ai gui lle s
d’une montre.
• Dévi ssez l a base de votre Insignia™ et branc hez le por t de cha rgeme nt.
Pr enez garde d e poser la ba se dans un en droit faci le à retrouve r afin
d’éviter de la perdre.
• Une fois l’appareil branché à la prise m urale, le signal lumineu x de votre
Insignia™ clig note ind iqua nt que le re charg ement e st en cou rs. Le si gnal
ce sse de clig noter pou r émettre un e lumiè re blanche q ui indi que que
l’appare il est complètement re chargé (comptez environ 2 h eures).
• Pren ez soin de bie n refermer la base, su rtout si vou s souhaitez ut iliser I nsig nia
dans l’eau. N’utilisez que les chargeurs fournis par LELO.
Lors de l ’util is ati on, s i la bat ter ie d e votre O bjet d e Pla is ir I nsi gni a™ est fai ble, l e
signal lumineux se mettra à clignoter pour vous inviter à le charger.
™
RECHARGER
Port de chargement
™
Fiche
60 • FRANÇAIS
FRAN ÇAI S • 61

ENTRETIEN, RANGEMENT ET SÉCURITÉ
Pour votr e entière s atisfac tion et pou r une dur ée de vie p rolong ée de votre
masseur, veuillez en prendre soin et l’entretenir de façon appropriée.
LELO vous recommande d’utiliser un lubriant à base d’eau comme l’Hydratant
Inti me de LELO ou ceux d’autres g randes marq ues sur votre Objet de Pla isir. Évitez
les lub riants à b ase de silico ne car ils pourraie nt rendre le si licone de votre Objet
dén itivement collant. Si vous souhaitez to utefois en ut iliser u n, faites d’abord un
test sur une zone limitée.
Ne jamais utiliser d’huil e de massage ou de crème hydrata nte pou r les mains
pour lu brif ier votre I nsigni a™. Nett oyez votre Ins ignia™ soigneusement avant
et après chaque utilisation. La meilleure façon de procéder est d’utiliser une
lotion nettoyante spécialement prévue à cet effet tel que le spray nettoyant
antibactérien de LELO. Vous pouvez aussi nettoyer le silicone avec du savon
antibactérien et à l’eau chaude, le rincer à l’eau claire et chaude et le sécher
avec un l inge pro pre ou une l inget te micro fibre . Évitez d e mettr e le por t de
chargement en contact avec de l’eau. N’utilisez jamais de produits nettoyants
conten ant de l’alcool, des dér ivés du pétrole ou de l’acé tone.
Conse r vez vo t re In s ig ni a™ à l’abri du soleil et ne JAMAIS l’exposer à des chaleurs
extrêmes. Rangez votre Insignia™ dans un e ndroit à l’abr i de la poussière et ne pas
le lai sser au contac t d’objets composés d’aut res matériaux.
62 • FR ANÇAIS
DÉPANNER
Le signal lumi neux de votre Objet de Pla isir ne clignote pas lor sque le chargeu r e st conne cté ?
• La batterie est comp lètement recha rgée.
• L a ba t te ri e e st v id e et p r en d p lu si e ur s m in u te s av a nt d e re c on na î tr e l e ch a rg eu r .
• Le ch argeur n’es t pas cor rectemen t branché. Véri ez les br anchements de la
prise murale et du port de chargement.
La télé commande san s l ne s’allume p as lorsque vous pressez le bouton + ?
• Les pi les sont décha rgées. Rempl acez-les ou rec hargez-les.
• La télécommande est verrouillée. Appuyez simultanément sur les boutons
et – pendant 3 secondes pour la déverrouiller.
Votre Objet de Plaisi r et la télécommande n e se connectent pas ?
• Vous avez dépass é les 10 secondes nécessaires à l a recon naissance par
votre Ob jet de Plais ir de la télécomma nde sans l . Commencez par étei ndre
votre Insignia™ et la télé com ma nd e. E ss ayez d e ra ll u me r la té lé co mm an de
sa ns fil en a ppuyant s ur le bouto n + puis su r le bouto n d’activatio n de
votre Objet de Plaisir pendant 1 seconde.
• Vo tr e Ob je t de Plaisi r / l a tél éc om ma nd e sa ns l e st d éc ha rg é. Re ch ar ge z vot re
Objet de Plaisir et remplacez ou rechargez les piles de la télécommande.
Si vous rencontrez d’autres problèmes avec votre Insignia™ ou si vous avez des questions
sur son fonctionnement, n’hésitez pas à contacter : CUSTOMERCARE@LELO.COM
FRAN ÇAI S • 63
+

FICHE TECH N I QUE
TAILLE : • Oden™ 94 X 45 X 26mm • Tiani™ 84 X 42 X 28mm
• Lyla™ 80 X 33 X 32mm • 64 X 64 X 26mm
POIDS : • Oden™ 28g • Tiani™ 31g
• Lyla™ 36g • 30g
MATÉRIAUX : Lyla™, Oden™, Tiani™: PC-ABS / silicone extra-doux /
polymères (cordon de retrait: Lyla™)
Finition: silicone mat et ABS brillant
BATTERIE : • Lyla™ Li-lon 200 mAh 3.7 V • Tiani™, Oden™ Li-lon 70 mAh 3.7 V
•
RECHARGEMENT : • Lyla™ 2 h a 5.0 V 200 mA • Tiani™, Oden™ 2 h a 5.0 V 70 mA
TEMPS D’UTILISATION : jusqu’à 2 heures (Objet de Plaisir)
VEILLE : jusqu’à 90 jours (Objet de Plaisir)
FRÉQUENCE : 120 Hz
NIVEAU SONORE MAXIMUM : <50dB
TÉLÉCOMMANDE : télécommande à 3 boutons, 8 modes, fonctions
capteurs de mouvements selon 2 axes
FRÉQUENCE PORTEUSE : 2.4GHz
Finition: silicone mat et ABS brillant
PC-ABS / silicone extra-doux
2 piles LR03
64 • F R ANÇAIS
INFOR M AT I ON S U RL’É L IMI NAT I ON D ES D É CHETS
Él i minat ion des pr odui ts é lect roni ques us agés (a pplicable à l’Un i on
Européenne et à d’autres pays européens disposant de différents systèmes de
collecte des déchets).
Le symbole de la « poubelle barrée » indique que cet objet de plaisir ne doit pas
être traité de la même façon que les déchets ménagers mais déposé à un point de
collecte approprié pour le recyclage des équipements électriques et électroniques.
Le présent appareil est conforme aux CNR d’Industrie Canada applicables aux
appareils radio exempts de licence. L’exploitation est autorisée aux deux conditions
suivantes : (1) l’appareil ne doit pas produire de brouillage, et (2) l’utilisateur de
l’appareil doit accepter tout brouillage radioélectrique subi, même si le brouillage est
susceptible d’en compromettre le fonctionnement.
peuvent annuler l’autorité de l’utilisateur à faire fonctionner l’équipement.
Conformément à la réglementation d'Industrie Canada, le présent émetteur
radio peut fonctionner avec une antenne d'un type et d'un gain maximal (ou
inférieur) approuvé pour l'émetteur par Industrie Canada. Dans le but de réduire
les risques de brouillage radioélectrique à l'intention des autres utilisateurs, il faut
choisir le type d'antenne et son gain de sorte que la puissance isotrope rayonnée
équivalente (p.i.r.e.) ne dépasse pas l'intensité nécessaire à l'établissement d'une
communication réussie.
FRANÇAI S • 65

CLAUSE DE NON-RESPONSABILITÉ : Les uti li sateu rs de cet O bjet d e Pla isi r le fon t
à leur s pro pres r is que s. LE LO et ses dé tail la nts dé cl ine nt toute r espo nsa bi lité o u
obligation quant à l’utilisation de cet Objet de Plaisir.
Le modè le peut être modié s ans préavis p our être amélioré.
© 2011 LELOi AB. TOU S DROITS RÉS ERVÉS.
CONÇU E T DÉVELOPPÉ PAR LELO S UÈDE.
ASSE MBLÉ PAR LELO EN RPC.
WEBSITE WWW.LELO.COM
SUPPORT CUSTOMERCARE@LELO.COM
66 • FR ANÇAIS
INSIGNIA™ MAN UAL D E USUAR IO
DIS EÑO E XQU ISI TO / LUJO Í NTI MO

PRESENTACIÓN
Le felic itam os po r habe r adq uir ido u no de l os más a vanz ados m asa jead ores
íntim os jamá s fabr icados . Como pa rte de la l ínea I nsig nia™ de LE LO, Lyla™,
Oden™ y Tiani™ tambi én h an s id o el ab ora do s con a lto s es tán da re s de es tét ica ,
segu r id a d y un d i s eñ o re s i st ent e al a g u a, j u nto co n l a revo l uc i on a r i a te cn o l og í a
SenseMotion™ nunca antes vista en este tipo de productos.
SenseMotion™ le permite con trola r su Objeto de Placer con un mando a distanc ia
que resp ond e ante l os movi mie ntos su yos o de s u par eja. G raci as a su m otor
inter no, ta mb ié n pue de a ctu ar c om o un ma sa je ad or p er so na l in de pen di ent e,
perm itié ndol e adem ás sent ir en l a palm a de su ma no lo qu e su pare ja está
experimentando.
NOTA: Su Ob je to d e Pla ce r In si gn ia™ puede n eces i ta r ca rga a nt es d e su p ri m er
uso. Para ca rg ar su O bj eto d e Pla cer, po r fa vor d ir íj as e a la se cció n de Ca rga
de este manual (pág. 82). Introduzca 2 pilas AAA en el mando, y establezca la
conexión inalámbrica con el masajeador antes de usarlo.
68 • ESPAÑOL
INSE RTAR L AS PI LAS E N EL M AND O
Cerrar
Abrir
La parte brillante ABS del mando a distancia de su Insignia™ puede abrirse, dejando el acceso libre
al compartimento de las pilas. En su Insignia
en la ranu ra de l a tap a de l com par t im ento y re al ice u n gi ro de 10 g rad os en s ent ido co ntr ar io a
las agujas del reloj para abrir la tapa. Cuando haya realizado esta operación puede retirar la llave.
Una vez colocadas las pilas, ponga de nuevo la tapa y utilice la llave para cerrarla, realizando un
giro de 10 grados en el sentido de las agujas del reloj. Asegúrese siempre que el compartimento
de las pilas esté correctamente cerrado antes de utilizar su Insignia
™
viene incluida una llave de plástico, inserte dicha llave
™
en el agua.
ES PA Ñ O L • 69

ESTAB LEC ER LA C ONE XIÓ N INAL ÁM BRI CA
Para establecer la conexión inalámbrica, primero debe activar su mando a
dista nci a. Pa ra el lo p res ion e un a vez el botó n + del man do. E n ese m om ento su
mando a distancia estará activado y enviará una señal.
Su Lyla™, Oden™ o Tiani™ también dispone de un botón de activación
señal izad o con el sí mbol o ina lámb rico . Una vez q ue su Obj eto de Pla cer es té
completamente cargado, podrá activarlo manteniendo pulsado este botón
durante 1 segundo, a continuación su Objeto de Placer iniciará su modo ‘buscar’,
permitiendo la conexión con su mando a distancia.
Por favor s ea pac iente, y a que su p rod ucto pu ede ta rdar h asta 10 s egu ndos e n
detecta r el man do. El i ndi cado r LED d e colo r bla nco de su O bjeto d e Pla cer se
ilum inará cada 2 segundos para in dicarle q ue funciona, y que está recibi endo l a
señal desde su mando a distancia.
ODEN
™
Punto de Placer
Encender / Buscar
Base Adj u nta (se g i ra rá en e l
sentido contrario a las agujas
del rel oj para ac ceder a la
toma de corriente)
Parte exible aju stable
70 • E SPAÑOL
ES PA Ñ O L • 71

LYLA
™
TIANI
™
72 • E SPAÑOL
Punto de Placer
Encender / Buscar
Base Ad ju nta (se g i ra rá en e l
sentido contrario a las agujas
del rel oj para acce der a la
toma de corriente)
Cordón de extracción
Encender / Buscar
Base Adjunta (se
girará en el sentido
contrario a las
agujas del reloj para
accede r a la to m a de
corriente)
Punto de Placer
Parte Flexible
a Introducir
ES PA Ñ O L • 73

USAR LOS M ODOS S EN SEM OTIO N
Su Objet o de P la ce r In si g ni a™ dispone de 2 modos SenseMotion™ que responden
a diferentes movimientos.
™
MODO 1
Cuand o su Ob jeto de P lace r y su ma ndo a d is tanc ia es tén con ecta dos , sost eng a el
mando en posición horizontal en la palma de su mano. Una pequeña vibración surgirá de
su Lyla™, Oden™ o Tiani™.
Al camb ia r el á ng ul o de i nc li na ció n de l ma nd o, us ted se nti rá q ue l a int ens id ad
de la vibración comenzará a elevarse, tanto en el masajeador, como en el
mando. A l varia r la posi ción de l mando d e hori zontal a ver tical , conseg uirá
aumentar la intensidad de la vibración hasta un 100%.
Usted po drá cam bia r la inten sid ad de la v ibrac ión al va ria r la in clin ació n del
mando, ta nto h ac ia a d el an te, co mo h ac ia a tr ás , con s ig u ie nd o cr ea r su s p ro pi os
patrones y encontrando el nivel perfecto para usted y/o su pareja.
Si desea probar el segundo modo SenseMotion™ pulse una vez el botón central .
USAR E L MODO 1 D E SEN SE MOTI ON
10% Intensidad
100% Intensidad
™
74 • ESPAÑOL
ES PA Ñ O L • 75

MODO 2
Este mo do l e da m ás l i be r ta d pa ra i nte rac tu ar – p r ue be a re al i za r co n su m an do
movimientos circul ares, o los que us ted desee. Cuanto m ás rápido sea el
movimiento del mando, más fuerza tendrá la intensidad de la vibración. No dude
en expl orar la s múlti ples op c i o n e s gracia s a la capac i d a d del man d o y d el Objet o
de Placer de responder ante sus movimientos. Para salir de los modos SenseMotion™
pulse una vez el botón central .
NOTA: Cuan do e sté u san do e l Sen se Mot io n™ (modos 1-2), el LED de su mando
a dista n c ia per m a necerá i lumi n a d o.
76 • ESPAÑOL
USAR EL INTERFAZ DE CONTROL (MODOS 3 -8)
Una vez act iva d o y con ec tad o su O b jet o de Pl a ce r al m an d o a di s tan ci a, p od rá
pasar a l control remoto n ormal pulsando 2 ve ces el botón centra l .
Cuando no esté utilizando los modos SenseMotion™, use el in terfaz de c ont ro l d e
la siguiente manera:
• A l pul sar el botó n + conseg uirá au mentar la i ntensid ad de la
vibración de su Objeto de Placer.
• Cu ando el interfa z de co ntrol es té activo, pulse el botón central
para de spl az ar se po r lo s 8 mod os d e est im ul aci ón, i ncl uy end o
ambos modos SenseMotion™.
• A l pulsar e l botón – conseguirá d ismi n u i r l a i n te n s i d a d d e l a v i b ra c i ó n .
Continúe pulsando dicho botón si desea apagar el mando a distancia.
A continuación, usted podrá apagar su Objeto de Placer manteniendo
puls ad o durant e 1 se g u n d o e l b ot ó n . Cu a n d o s u O b j eto d e P l a cer
no reci ba u n a s e ña l d e u n m a n d o a d i s ta n ci a a ct i vo, p a s a rá a m o d o
“en espera” durante 1 hora antes de apagarse por completo.
NOTA: Cuan do esté uti lizan do su Obj eto de Place r, el motor inte rno de su
mando a d is tan ci a pod rá ap ag ar se a l ma nten er p ul sad o du ran te 3 seg un dos
el botón . Re pi ta est a ope ra ci ón pa ra re ac ti var e l moto r de l ma nd o. Cu and o
esté usa n do l o s con tr ol e s es tá nd a r (m od os 3-8 ) el i n d ic ad o r LE D d e su m a nd o a
distancia no estará iluminado.
ES PA Ñ O L • 77

USO DE SU O DE N
No exi ste en el m und o un ani ll o para p arej as com o Oden™, con una fo rma ta n
única y s enci lla d e pone r y quita r, que no s e compa ra con l os ani llo s están dar
disponibles en el mercado. Mientras se lleve puesto, Oden™ transferirá vibraciones a
ambos miembros de la pareja.
CÓMO PONERLO: Con el pene ya erecto, sujete con su dedo pulgar e índice la base
curva de Oden™, y aumente el diámetro de la curva hasta el ancho deseado. Sitúe
la par te pl an a de l punto d e pl ace r Ode n™ de cara a su a bd ome n y apu ntan do
hacia arriba, hacia el ombligo, deslice su Oden™ alrededor del pene.
CONSEJOS: La mejo r fo r ma d e d i sf r u ta r d e Od en™ es poni e nd o e l pu nto d e p la ce r
vibratorio sobre el clítoris cuando la mujer está encima.
™
USO DE SU O DE N
™
78 • E SPAÑOL
ES PA Ñ O L • 79

USO DE SU LYL A
™
Lyla™ está lej os del res to de masa jeado res de su es tilo en t érmin os de dis eño
e innova ció n; des ti nad o pa ra el d is fr ute de l a mu je r, su uso p ued e ser e xte rn o o
inter no y tanto l a muje r como el h omb re podr án inte ractua r gra cias a l contro l
remoto. Su tamaño discreto permite disfrutar y compartir los placeres que ofrece en
cualquier momento o lugar.
CÓMO PONERLO: Lyl a™ puede s er uti li zado co mo un m asaj ead or int ern o al se r
introducido en la vagina unos 5-7 cm. Asegúrese de dejar sobresalir una parte del
cordón de polímero de su Lyla™ para una fácil extracción.
CONSEJOS: Aplique una cantidad de lubricante con base de agua en el borde de
su Lyla™ para que la inserción resulte más cómoda y sencilla.
USO DE SU T IAN I
Tiani™ es el más especial y novedoso masajeador para parejas. Se puede emplear
durante el acto sexual al llevarlo puesto la mujer, o puede ser utilizado de manera
individual al proporcionar estímulos externos mediante vibraciones controladas
desde la palma de la mano.
COMO PONERLO: Tiani™ está di se ña do co n un a ca rac te rí s ti ca fo r ma e n U. Do b le
el vértice de dicha U unos 70-90 grados, e inserte la parte exible que no vibra
en la vag ina. Un a vez que se ha ya situ ado cor rectam ente en el i nteri or y no
provoqu e ni ng un a mo les ti a, co lo qu e sua vem ente e l pu nto de p la cer v ib ra tor io
sobre e l cl íto r i s. Pa ra q ue e l acto s ex ua l res ul te má s có mo da p ar a el h om br e, es
conveni ente ap lica r una p eque ña cant idad d e lub rica nte con b ase de a gua
para facilitar la penetración.
™
CONSEJOS: Aplique una cantidad de lubricante con base de agua en el borde de
la parte interna de Tiani™, para una fácil colocación de éste en la vagina.
80 • ESPAÑOL ES PA Ñ O L • 81

CARGA
Su nuevo In si gn ia™ posee una entrada de corriente situada en la base adjunta.
Dicha base puede desenroscarse fácilmente realizando un giro a la izquierda.
• Dese nrosque la base de su Insignia™ e inse r te l a c l av i j a d e l ad a pta d o r de C A
en l a ent rada d e CA. A seg úres e de col oca r la bas e en un l uga r fáci l de
encontrar para evitar una posible pérdida.
• Una vez que el cable esté conectado a la toma de corriente eléctrica, el LED
de su Insignia™ comen zar á a pa rp ade ar i nd ica ndo q ue s e está c arg an do.
Una vez que el proceso d e carga haya fi nalizado (aprox. 2 horas) el LE D
emitirá una luz permanente de color blanco.
• Asegúres e de enroscar co rrectamente la b ase de su Insi gnia™,
es pe cia lm ente s i pl an ea ut il iz ar lo e n el ag ua . Use ú ni cam ente ca rg ado re s
originales suministrados por LELO.
Cuand o su Ob jeto d e Pl ace r In si gn ia™ esté si end o uti l iza do y s e est é que da nd o
sin batería, el indicador LED le avisará mediante rápidos y continuos parpadeos.
CARGA
Entrada de CA
Clavija del adaptador de CA
82 • ESPAÑOL
ES PA Ñ O L • 83

LIMPIEZA, ALMACENAMIENTO Y SEGURIDAD
La vida út i l d e s u O bj eto d e P l ac e r I ns i g n i a™ se verá au m en tad a s i l o co n se rva con
cuidado y de la manera adecuada.
LELO reco mien da la ut ili zació n de un lu bri cante co n base de a gua, com o el
Person al M ois tu ri zer d e LE LO. Evi te e l uso d e lub ri can tes con b ase d e si li cona ,
ya que pod ría dañ ar la pro pia sil icona de s u Objeto d e Placer vo lvién dola
pegaj os a. S i de se a ut i li z ar u n lu b ri ca nt e con b as e de s i l ico na r ea li ce u n te st d e
prueb a en una super cie pequeña.
Nunca ut ilice aceite para ma sajes o crema hi dratante com o lubricant e
cuando use su Insignia™. Limp ie siem pre mi nucio samen te su In sign ia™, ta nto
antes como después de su uso. La forma más ecaz de limpiarlo es utilizar una
solución creada especícamente para ese uso, como el Antibacterial Cleaning
Spray d e LE LO. Tam bié n pue de l im pia r la s il ic ona co n agu a tem pl ad a y jab ón
anti bac te r ia l o lav ar lo co n ag ua ca li en te y se car l o con un p añ o que n o su el te
pelus a. E vi te q ue en tr e ag ua en l a en tr ada d e co rr ie nt e. Nu nca u ti li ce ja bo nes
que contengan alcohol, gasolina o acetona.
Evit e de ja r su I ns i gn ia™ en conta ct o d ir ec to co n el s ol , y NU N CA l o exp on ga a u n
calor extremo. Guarde su Insignia™ en un lugar libre de polvo y manténgalo alejado
de juguetes fabricados con otros materiales.
84 • ESPAÑOL
SOLUCIÓN DE PR OBLEMAS
El LED de su Objeto de Placer no parpadea cuando el cargador está conectado.
• La b atería ya está co mpletamente ca rgada.
• La ba tería está totalm ente descargada y ne cesitará vario s m inutos para
reconocer la recepción de carga.
• E l carga dor no está conectado correct amente. C ompruebe el enchufe y la
entrada de corriente.
Su mando a distancia no se activa al pulsar el botón
• La s pilas están a gotadas. Reem place, o recargu e las pilas.
• Su m ando a distanci a está bloq ueado. Para desbl oquearlo pu lse conjuntam ente
durante 3 segundos los botones
No existe conexión entre su mando a distancia y su Objeto de Placer.
• H a sobrepasad o los 10 segundos q ue su Objeto de Pla cer necesita pa ra ´buscar´
un mando a distancia activo. El primer paso será apagar tanto su Insignia
el m ando a d istan cia. A co ntinu ación i nténtel o de nuevo a l acti var pr imero
su m ando a di stanci a pulsan do el botón
pulsado durante 1 segundo el botón de activación de su Objeto de Placer.
• Su Objeto de Placer o mando a distancia no tiene batería; recargue su Objeto
de Placer y reemplace o recargue las pilas del mando a distancia.
Si expe rime nta cual quie r otro ti po de pro blem as con su I nsig nia
duda refe re nte a su u so, n o du de e n po ne rs e en co nta cto co n no sot ros a t ra vés de:
CUSTOMERCARE@LELO.COM
y –.
+
.
+
™
, y posteriormente manteniendo
+
™
, o tiene a lgun a
como
ES PA Ñ O L • 85

ESPECI F I CAC I ONES
TAMAÑO: • Oden™ 94 X 45 X 26mm • Tiani™ 84 X 42 X 28mm
• Lyla™ 80 X 33 X 32mm • Mando a distancia 64 X 64 X 26mm
PESO: • Oden™ 28g • Tiani™ 31g
• Lyla™ 36g • Mando a distancia 30g
MATERIALES: Lyla™, Oden™, Tiani™: PC-ABS / Silicona dermatológicamente testeada /
polímero (cordón para la extracción de Lyla™)
Acabado: Silicona mate con núcleo brillante ABS
Mando a distancia: PC-ABS / Silicona dermatológicamente testeada
Acabado: Silicona mate con núcleo brillante ABS
BATERÍA: • Lyla™ Li-lon 200 mAh 3.7 V • Tiani™, Oden™ Li-lon 70 mAh 3.7 V
• Mando a distancia pilas 2 x AAA
CARGA: • Lyla
TIEMPO DE USO: hasta 2 horas (Objeto de Placer)
hasta 10 horas (mando a distancia)
MODO EN ESPERA: hasta 90 días (Objeto de Placer)
FRECUENCIA: 120 Hz
NIVEL MÁXIMO DE SONIDO: <50dB
INTERFAZ DE CONTROL: 3 botones, 8 modos,
2 ejes con función de control del movimiento.
FRECUENCIA NOMINAL: 2.4GHz
™
2 h a 5.0 V 200 mA • Tiani™, Oden™ 2 h a 5.0 V 70 mA
86 • E SPAÑOL
INFOR M AC I Ó N S O B R E E L D E SECHO DE RESID U O S
Cómo deshacerse de los equipos electrónicos antiguos (aplicable en la UE y en
los países europeos que dispongan de sistemas de recogida de basura selectiva).
El símbolo de la papelera tachada nos indica que este objeto no debe ser tratado
como cualquier otro residuo doméstico. El producto debe ser depositado en el
punto de recogida y reciclado de equipos eléctricos y electrónicos, para evitar
posibles consecuencias negativas para el medio ambiente y la salud humana.
ESPA ÑOL • 87

EXENCIÓN DE RESPONSABIL IDADES: Los u su ar i os d e es te O bj eto d e Pl ace r l o ut il i za n
bajo su p ro pi o r ies go y r esp on sa bi l ida d. Ta nto LE LO com o su s di st r ib ui do re s el ud en
todo tipo de responsabilidad ante los daños o perjuicios que pudieran resultar del uso
de es te Obje to de Plac er. Los cambios o m odi cacione s no apro bado s exp líci tamen te
por el fabricante podrían cancelar el derecho del usuario a utilizar el equipo.
Los modelos pueden ver se modicad os para inclu ir mejoras sin previo avis o.
© 2011 LELOi AB. TOD OS LOS DERECHO S RESERVADOS
DISEÑADO Y PRODUCIDO POR LELO SWEDEN.
ENSAMBLADO POR LELO IN PRC.
PÁGINA WEB WWW.LELO.COM
SOPORTE TÉCNICO CUSTOMERCARE@LELO.COM
88 • ESPAÑOL
INSIGNIA™ MANUALE UTENTE
SQUI SITO D ES IGN / LU SSO I NTI MO

PANORAMICA
Congratulazioni per aver acquistato uno dei più avanzati massaggiatori
personali mai creati. Come parte della linea caposaldo Insignia™ di LE LO
Lyla™, Oden™ e Tiani™ giun gono con i l loro be llis simo e av venente d esign
resistente all’acqua e sicuro per il corpo anco a anco con la rivoluzionaria
Tecnologia SenseMotion™ mai vi sta in pro d o tti di qu esto tipo.
SenseMotion™ perm et te di co nt ro ll a re i l tu o Ple as u re Ob j ect co n un d i sp os it ivo
di coma ndo senza f ili ch e rispon de ai movi menti tu oi o del tuo pa rtne r.
In agg iunta, pu ò anche fu ngere d a massa ggiato re perso nale re galan do
sensa zio ni pro pri e proven ient i dal moto re osp itato a l suo inte rno, m entre t i
perm ette d i sa gg ia re ne l pa lm o del la t ua m ano q ue ll o che i l tu o pa r tne r sta
provando.
NOTE: Il tuo Pleasure Object Insignia™ può nece ssitare l a ricaric a dopo
l’acquisto. Per ricaricare il tuo Pleasure Object, ti invitiamo a fare riferimento
alla sezione Ricarica di questo manuale (pag. 104). Prima dell’uso, dovrai,
inol tre, inse rire 2 bat terie A AA nel di sposit ivo di coman do e stabi lire la
connes sione senza li con il massaggi atore.
90 • ITAL IA NO
INSE RI RE LE BAT TER IE N EL DI SPOS IT IVO DI COM AND O
Chiudi
Apri
Il luci do coperchi o in ABS del di spositivo d i controll o del tuo Insi gnia™ può ess ere
rimo sso p er sve la re lo sco mpa r to del le ba tte ri e. Ins er isc i la ch iave d i pla sti ca in clu sa
nel tuo Insignia
senso antiorario per rimuoverlo dal dispositivo.
Dopo che le batterie sono state inserite, ri posiziona il coperchio e utilizza la ch iave per
fare un al tro qu ar to di g iro in s ens o orar io. A ssi cura ti sem pre ch e lo sco mpa rto d ell e
batterie sia saldamente chiuso prima di utilizzarlo in acqua.
™
nell a fessu ra del cop erchi o dell e batte rie e fa i un qua rto di g iro in
ITAL IA NO • 91

STABI LIR E LA CON NE SSI ONE S ENZ A FI LI
Per stabilire la connessione senza li devi, prima di tutto, attivare il tuo dispositivo
per il controllo senza li. Per fare ciò, premi u na volta il pu lsante + del dispositivo.
Il tuo d ispositivo s enza li è ora a ttivo e sta invi ando un segna le.
Il tuo Lyla™, Oden™ o Tiani™ presentano anche un pulsante per l’atti vazione
marcato con il simbolo senza li . Una volta che il tuo Pleasure Object è
compl etamente ca rico, pr emi e tie ni premu to questo p ulsante p er 1 secon do
per att ivare il tu o Pleasu re Object e d inizia re la sua mo dalità ‘r icerca’ che t i
perm ette di connet terlo con il t uo disposit ivo per il cont rollo senza li.
Potrebb ero esse re neces sari a l massi mo 10 secon di perc hé il tuo p rodotto r ilevi
il dis positi vo; sì pazie nte. Il LED d’i ndicazi one del tu o Pleasu re Object d i colore
bianc o lampegg erà ogni 2 s econdi al ne di indicare che è in funzione e sta
riceven do un segnale dal disposi tivo senza li .
ODEN
™
Punto di Piacere
Accensione / Ricerca
Complemento alla Base
(svita lo i n se n so o ra r io p e r
rivelare la presa CC)
Porzione Flessibile Indossabile
92 • ITALIANO
ITAL IA NO • 93

LYLA
™
TIANI
™
94 • ITALIANO
Punto di Piacere
Accensione / Ricerca
Complemento alla Base
(svita lo i n s en so o ra r i o p e r
rivelare la presa CC)
Cordoncino di Ritrazione
Accensione / Ricerca
Complemento alla
Base (sv italo in se nso
orar io per rivel are la
presa CC)
Punto di Piacere
Braccio Flessibile
da Inserire
ITAL IA NO • 95

UTILIZZARE LE MODALITA’ SE NSE MOTION
Il tuo Pleasure Object Insignia™ presenta 2 modalità SenseMotion™ che
rispondono a movimenti diversi.
™
MODALITÀ 1
Quand o il tuo P leasu re Object e il disp ositi vo per il control lo senza li sono connes si,
tini il dispositivo piano sul palmo della tua mano. Una vibrazione leggera giungerà dai
tuoi Lyla™, Oden™ o Tiani™.
Incl in an do i l di sp os iti vo ad u n cer to a ng ol o, se nti ra i ch e l’int ens ità d el la v ib ra zi on e
aumen terà s ia n el m ass ag gi ato re che n el d is pos it ivo d i cont ro ll o. Il m ovi men to del
disp osi tivo d i cont rol lo da u na po si zio ne o ri zz ontal e a ver ti cal e farà a ume ntar e la
potenza de lla vibraz ione no al 100% .
Per var iare le imp ostazion i della vi brazion e, potrai in clinare i l disposi tivo
ori z zo nta l m ent e o vertica l m ent e com e p re fe r is c i, c re an do i t u oi p r op r i s ch em i
e trovand o il giu s to livel l o p er te e/o il tuo p a rtne r.
Se desi deri provare l a seconda mod alità Sense Motion™, premi i l pulsante
centrale una volta.
UTIL IZZ ARE L A MODA LITA 1 SE NS EMOT ION
Intensità 10%
Intensità 100%
™
96 • ITALIANO
ITAL IA NO • 97

MODALITÀ 2
Questa m oda lità t i reg ala m agg ior e lib er tà di es plo raz ion e – prova m uoven do
il dis posi tivo d i contro llo c on un mov ime nto circ ola re o in qu als iasi a ltro m odo
prefer is ci. P iù vel oce ment e muove rai i l di spo sit ivo d i cont rol lo, p iù pot ente sa rà
l’inten si tà de l la v i br az i on e. E sp l o ra le t ue o pz i on i me nt re i l d is po s it ivo e i l P le as u re
Object risponderanno ai tuoi movimenti. Per uscire dalle modalità SenseMotion™,
premi il pulsante centrale un’altra volta.
NOTA: Quando utilizzi SenseMotion™ (modalità 1-2), il LED del tuo dispositivo di
controllo senza li s’illu minerà.
98 • I TALIANO
UTILIZZARE L’INTERFACCIA DI CONTROLLO (MODALITA’ 3-8)
Dopo ave re att ivato e col lega to il tuo Pl easu re Obj ect al su o disp ositi vo di
controll o, puoi utiliz zarlo come un normale telecomando premendo il pulsante
centrale due volte.
Quand o no n è nel le m oda li tà Sen seM otio n™, l’inter facc ia d i cont rol lo s i uti li z za
come segue:
• P remi il p ulsante + per au me nta re l’i nte ns ità d el l a vi b ra zi on e d el t uo
Pleasure Object.
• M entre la tua inte rfaccia di cont rollo è attiva, premi i l pulsante cent rale
per muov erti a ttrave rso le 8 m odali tà di sti mola zion e, inclu se
entrambe le modalità SenseMotion™.
• P remi il pul sante – per di m inui re l ’i n te n s i tà d ella vibrazione. C o ntinua a
tenere p re mu to il p u ls ant e – per spegnere il tuo dispositivo senza li.
Potrai sp eg ne re il t uo P lea su re O bj ect te nen do p rem uto i l pu ls ante
per 1 sec on do. Q ua nd o n on r i ceve un s eg na l e da u n di s po si ti vo
di cont rol lo s en za f il i at ti vo, il t uo Pl ea su re O bj ect a nd rà in s tan dby
per 1 ora prima di disattivarsi.
NOTA: Qua nd o v i en e ut i l i z z a re, i l m oto re a l l’i nt e r no d e l tu o d i sp o si t ivo d i c ont r ol l o
senza f il i può e sse re sp ento p reme ndo e te nen do p remu to il p uls ante p er 3
second i. R ipet i que sto p roce sso p er r iat ti var e il mot ore n el di sp osi tiv o. Qua ndo
util iz zi i co ntro ll i stan dar d (mod ali tà 3 -8), i l LE D del t uo di spo sit ivo di co ntro ll o
senza li non sarà il luminato.
ITAL IA NO • 99

UTIL IZZ ARE I L TUO O DEN
Oden™ è diver s o da tutt i gli altri an e lli pe r coppie a l mondo o g gigi o rno, grazie
all’esc lusiva for ma più faci le da indo ssare e ri muovere ri spetto ai de sign
tradi zio nal i degl i ane lli p er cop pie. Q uand o indo ssato, O den™ trasferisce le
vibrazioni a entra mbi i partne r.
COME INDOSSARLO: Con il pene già eretto, tieni la base cu rvata di Oden™ tra il
poll i ce e l’i nd i ce e a p r i l a ba se c u r va ta ad u n a la rg h ez z a ad at ta . Q ue st a pu ò
esser e poi fat ta scivo lar e atto rno a l pene co n il lat o appi atti to del p unto di
piace r e di Oden™ rivol t o verso i l t uo addo me e puntato verso l’alt o in direzione
dell’ombelico.
™
UTIL IZZ ARE I L TUO O DEN
™
100 • ITA LIA NO
ITAL IA NO • 101

UTIL IZZ ARE L A TUA LYLA
Applica una quantità scelta di lubricante a base d’acqua sul
™
Lyla™ è incom parab ile ai ma ssagg iator i di ques to tipo; è in tesa per es sere
util izzata dal p artner fe mminil e sia ester namente o per e ssere ind ossata
inter namente m entre le i o il par tner i nteragi sce att raverso i l teleco mando
senza f ili. Le sue p iccole dime nsioni so no ideali p er piacer i discreti ch e
posso n o e ssere co n divisi tra i pa rtne r i n ogni l u o g o e in ogni momento.
COME INDOSSARLA: Lyla™ può essere utilizzata come massaggiatore pe rsonale
quand o indo ssata 2 o 3 polli ci inter ni al la vagina, assicu randosi di la sciare
sporg ere una po rzio ne del cord oncino re tratti le in pol imero da ll’aper tura
vagin a le per fac ilita rne la r imozi o n e.
CONSIGLI: Applica un a quant ità suff icie nte di lub rif icante a ba se d’acqua
sul bo rdo s upe ri ore d i Lyla™ per faci li tar e e rend ere p iù co mo do l’i nse ri me nto
UTIL IZZ ARE I L TUO T IAN I
Tiani™ è il supremo massaggiatore per coppie che può essere indossato dal partner
femminile durante l’intercorso o per essere assaggiato individualmente per regalare
una stimolazione esterna con vibrazione controllata nel palmo della tua mano.
COME INDOSSARLO: Piega l’apice de ll’esclus iva forma a d U ad un ango lo dai
70 ai 90 gradi e inserisci il essibile braccio non vibrante nella vagina. Quando è
comodamente in posizione, posa gentilmente il punto di piacere di Tiani™ sul clitoride.
Duran te l’amples so, l’uomo pu ò trovare pi ù confor tevole app licare a nche una
piccol a quantità di lubr icante a base d’acqua pe r facil itarne l’inse rimento.
CONSIGLI IPS:
bordo anteriore del braccio interno di Tiani™ per facilitare l’inserimento.
™
nella vagina.
102 • ITAL IA NO ITAL IA NO • 103

RICARICARE IL TUO INSIGNIA
Il tuo nuovo Insignia™ presenta una presa CC nascosta da complemento rimovibile
alla base che può essere semplicemente rimosso svitandolo in senso orario.
• Svita il complemento alla base del tuo Insign ia™ e inse risci la s pina CC
a ssic uran doti d i posi zio nare i l comp lem ento in u n posto i n cui pu ò esse re
trovato facilmente.
• Quando la spina della rete è inser ita ne lla p resa de l muro, il LE D del tuo
Insignia™ puls er à ad i n d ic a re ch e s ta r i ca r i ca n do. Q u a nd o è co m pl eta m e nte
ricaricato (do pi circa 2 ore) il LED e metterà una luce b ianca stabil e.
• Ass icurati di ri-a vvita re saldamente il complemento del la base speci almente
se hai intenzione di utiliz zarlo il tuo Insignia™ in acqua. Utilizza solo
caricabatterie originali forniti da LELO.
Se l’alim enta zio ne de l tuo P lea sur e Obj ect I nsi gni a™ è bassa , l’ind ica tore L ED ti
avviserà di ricaricarlo lampeggiando rapidamente durante il funzionamento.
™
RICARICARE
Porta CC
Spina CC
104 • ITAL IA NO
ITAL IA NO • 105

PULIZ IA , CONS ERVAZ ION E E SIC URE ZZA
Un’attenta manutenzione e cura garantirà una durata maggiore del tuo
Pleasure Object Insignia™.
LELO consiglia che tu utilizzi un lubrificante a base d’acqua come idratante
Person ale di LE LO sil icone con I nsign ia™ che potrebbero rendere gli strumenti
appiccicosi in modo pe rmanente. Si consiglia d i optare p er un lub ricante a base
d’acqua. Se si desidera utilizzare un lubricante a base di silicone, eseguire prima
un test. N on utilizzare mai olio da m assaggio o crema per le mani come l ubricanti.
Limpie siempre minuciosamente su Insignia™ antes y después de cada uso.
Lável o con ag ua t em pl ad a y jab ón b ac te ri ci da, e nj uág ue lo co n ag ua ca li en te
limp ia y séquelo con un p a ño o toalla que n o e s té desh ilachado ni de j e pelus a s
u otros restos te xtiles.
No emplee nunca productos limpiadores que contengan alcohol, gasolina
o aceton a. No de je que su I nsig nia™ quede ex puest o a la luz s olar d irec ta y
NUNCA lo exponga a altas tem perat uras.
Guard e s u I n s i g n i a™ en un lug ar dond e n o e n tre pol vo y m a n t é n g a l o a l e j a d o d e
jugue tes fab ricados con otr os materiales.
106 • ITAL IA NO
RISOLUZIONE DEI PROBLEMI
Il LED del tuo Pleasure Obje ct non s’illumi na quando il cari cabatter ia è connes so?
• La batte ria è completam ente ricarica ta.
• La batteria è completamente scarica e richiede alcuni minuti per rilevare che e;
sotto carica.
• Il cari cabatteria non è collegato correttamente. Cont rollare la presa a muro e le
prese CC.
Il tuo dis positivo di cont rollo senza l i non si att iva quando vien e premut o il pulsante +?
• Le batte rie sono scar iche. Sostitu isci o ricarica le tue batte rie.
• il t uo dispos itivo di controllo sen za li è b loccato. Tie ni premuto i pulsanti + e
per 3 secondi per sbloccarlo.
Non c’e connet tività tra il tuo Pleasure Obje ct e il disp ositivo di cont rollo senza l i?
• Hai superato i 10 secondi richiesti dal tuo Pleasure Object per effettuare la
‘ricerca’ di un dispositivo di controllo senza li attivo. Per prima cosa, spegni
entrambi il tuo Insignia™ ed il dispositivo di controllo senza li. Ora prova ad
at tivare anco ra il tuo teleco mando sen za fili prem endo il pul sante + e
successivamente premi e tieni premuto il pulsante di attivazione del
tuo Pleasure Object per 1 secondo.
• Il t uo Pleasur e Object o i l disposi tivo di cont rollo senza li sono scar ichi; ricarica
i l tuo Pl easu re Ob ject e so stit uis ci o ri car ica le ba tter ie de l tuo d ispo sit ivo di
contro llo sen za li.
Se si vericano altri problemi con il tuo Insignia™ o per qualsiasi altra domanda
relativa al funzionamento, ti invitiamo a contattare: CUSTOMERCARE@LELO.COM
ITAL IA NO • 107
–

SPECIF I C H E
DIMENSIONI: • Oden™ 94 X 45 X 26mm • Tiani™ 84 X 42 X 28mm
• Lyla™ 80 X 33 X 32mm • 64 X 64 X 26mm
PESO: • Oden™ 28g • Tiani™ 31g
• Lyla™ 36g • 30g
MATERIALI: Lyla™, Oden™, Tiani™: PC-ABS / silicone sicuro per il corpo /
polimero (cordoncino di ritrazione: Lyla™)
Finiture: silicone opaco con ABS lucido
Dispositivo di Controllo Senza Fili: PC-ABS / silicone sicuro per il corpo
Finitura: silicone opaco con ABS lucido
BATTERIA: • Lyla™ Li-lon 200 mAh 3.7 V • Tiani™, Oden™ Li-lon 70 mAh 3.7 V
•
RICARICA: • Lyla™ 2 ore a 5.0 V 200 mA • Tiani™, Oden™ 2 ore a 5.0 V 70 mA
TEMPO DI UTILIZZO:
STANDBY:
FREQUENZA: 120 Hz
LIVELLO DI RUMORE MAX: <50dB
INTERFACCIA: interfaccia a 3 pulsanti, 8 modalità,
funzioni di controllo di movimento a 2 assi
FREQUENZA VETTORE: 2.4GHz
batterie 2xAAA
10 8 • I TAL I ANO
INFOR M AZIONI SULLO SMA LTI M ENTO
Smaltimento di apparecchiature elet troniche usate (applicabile nell’Unione
Il simbolo del cestino con sovraimpressa una croce indica che questo Pleasure
Object non deve essere trattato come un no rmale rifiuto domestico ma
por tato in un adeguato punto di raccolta per il riciclo delle apparecchiature
elettriche ed elettroniche.
I TAL I ANO • 1 09

DECLINAZIONE DI RESPONSABILITÀ: gli utent i di questo Pl easure O bject lo
util izzano a l oro risch io. LELO e i suoi r ivendito ri non si as sumono al cuna
respon sabi lità od o bbli go der ivante da ll’uti liz zo di que sto Plea sure Ob ject.
Cambiamenti o modifiche non espressamente approvate dal produttore
potreb b ero invalidar e l’au torità p e r l ’utili zzo dell’appa recchia t ura.
Il modello pu ò e ssere ca m b iato se n z a preav viso.
© 2011 LELOi AB. TU TTI I DIRITTI RI SERVATI.
PROGE TTATO E SVILUPPATO DA LELO SWED EN.
ASSEMBLATO DA LELO PRC.
SITO WEB WWW.LELO.COM
ASSISTENZA CUSTOMERCARE@LELO.COM
110 • ITA LIA NO


www.lelo.com
 Loading...