

Suze SUSE LINUX 9.2 User Manual

SUSE LINUX
USER GUIDE

10. Edition 2004
Copyright ©
This publication is intellectual property of Novell Inc.
Its contents can be duplicated, either in part or in whole, provided that a copyright label is
visibly located on each copy.
All information found in this book has been compiled with utmost attention to detail.
However, this does not guarantee complete accuracy. Neither SuSE Linux GmbH, the
authors, nor the translators shall be held liable for possible errors or the consequences
thereof.
Many of the software and hardware descriptions cited in this book are registered trademarks. All trade names are subject to copyright restrictions and may be registered trade
marks. SUSE LINUX GmbH essentially adheres to the manufacturer’s spelling. Names of
products and trademarks appearing in this book (with or without specific notation) are
likewise subject to trademark and trade protection laws and may thus fall under copyright
restrictions.
Please direct suggestions and comments to documentation@suse.de.
Authors: Jörg Bartsch, Gernot Hillier, Marcel Hilzinger, Johannes Meixner, Matthias
Nagorny, Siegfried Olschner, Marcus Schäfer, Jens Daniel Schmidt, Arvin
Schnell, Christian Schuszter, Adrian Schröter Rebecca Walter
Translators: Daniel Pisano, Tino Tanner
Editors: Jörg Arndt, Antje Faber, Karl Eichwalder, Berthold Gunreben, Roland
Haidl, Jana Jaeger, Edith Parzefall, Inés Pozo, Thomas Rölz, Thomas
Schraitle, Rebecca Walter
Layout: Manuela Piotrowski, Thomas Schraitle
Setting: DocBook-XML, LATEX
This book has been printed on 100 % chlorine-free bleached paper.

Contents
I Configuration 3
1 The KDE Desktop 5
1.1 Desktop Components . . . . . . . . . . . . . . . . . . . . . . . . . . . 6
1.1.1 The Desktop Menus . . . . . . . . . . . . . . . . . . . . . . . 6
1.1.2 The Trash Bin . . . . . . . . . . . . . . . . . . . . . . . . . . . 8
1.1.3 CD-ROM, DVD-ROM, and Floppy Disks . . . . . . . . . . . 8
1.1.4 The Printer Icon . . . . . . . . . . . . . . . . . . . . . . . . . . 9
1.1.5 The Panel . . . . . . . . . . . . . . . . . . . . . . . . . . . . . 11
1.1.6 The Main Menu . . . . . . . . . . . . . . . . . . . . . . . . . . 12
1.2 Settings . . . . . . . . . . . . . . . . . . . . . . . . . . . . . . . . . . . 13
1.2.1 Peripherals . . . . . . . . . . . . . . . . . . . . . . . . . . . . 13
1.2.2 Desktop . . . . . . . . . . . . . . . . . . . . . . . . . . . . . . 15
1.2.3 Sound & Multimedia . . . . . . . . . . . . . . . . . . . . . . . 16
1.2.4 Appearance . . . . . . . . . . . . . . . . . . . . . . . . . . . . 16
1.2.5 Regional & Accessibility . . . . . . . . . . . . . . . . . . . . . 18
1.3 Konqueror as a File Manager . . . . . . . . . . . . . . . . . . . . . . . 20
1.3.1 The Konqueror Menu . . . . . . . . . . . . . . . . . . . . . . 21
1.3.2 The Toolbar . . . . . . . . . . . . . . . . . . . . . . . . . . . . 23
1.3.3 The Location Bar . . . . . . . . . . . . . . . . . . . . . . . . . 23
1.3.4 The Main Window . . . . . . . . . . . . . . . . . . . . . . . . 23

1.4 Important Utilities . . . . . . . . . . . . . . . . . . . . . . . . . . . . . 24
1.4.1 Creating an Image Gallery . . . . . . . . . . . . . . . . . . . . 24
1.4.2 KInternet — Connecting to the Internet . . . . . . . . . . . . 24
1.4.3 The Download Manager KGet . . . . . . . . . . . . . . . . . 26
1.4.4 SuSEWatcher . . . . . . . . . . . . . . . . . . . . . . . . . . . 27
1.4.5 The Clipboard Klipper . . . . . . . . . . . . . . . . . . . . . . 27
1.4.6 Monitoring Print Jobs . . . . . . . . . . . . . . . . . . . . . . 28
1.4.7 Formatting Floppy Disks with KFloppy . . . . . . . . . . . . 30
1.4.8 Ark: Displaying, Decompressing, and Creating Archives . . 30
1.4.9 Desktop Sharing . . . . . . . . . . . . . . . . . . . . . . . . . 32
1.4.10 Screenshots with KSnapshot . . . . . . . . . . . . . . . . . . 33
1.4.11 The Information Manager Kontact . . . . . . . . . . . . . . . 34
1.4.12 Chatting With Friends: Kopete . . . . . . . . . . . . . . . . . 35
1.4.13 Font Administration with KFontinst . . . . . . . . . . . . . . 38
2 The GNOME Desktop 41
2.1 The Desktop . . . . . . . . . . . . . . . . . . . . . . . . . . . . . . . .
2.1.1 The Icons . . . . . . . . . . . . . . . . . . . . . . . . . . . . . 42
2.1.2 The Desktop Menu . . . . . . . . . . . . . . . . . . . . . . . . 42
2.1.3 The Panel . . . . . . . . . . . . . . . . . . . . . . . . . . . . . 43
2.1.4 The Main Menu . . . . . . . . . . . . . . . . . . . . . . . . . . 43
2.1.5 Handling Floppy Disks, CDs, or DVDs . . . . . . . . . . . . 43
2.2 Settings . . . . . . . . . . . . . . . . . . . . . . . . . . . . . . . . . . . 44
2.2.1 Keyboard . . . . . . . . . . . . . . . . . . . . . . . . . . . . . 44
2.2.2 Mouse Configuration . . . . . . . . . . . . . . . . . . . . . . 45
2.2.3 Menus and Toolbars . . . . . . . . . . . . . . . . . . . . . . . 45
2.2.4 Screensaver . . . . . . . . . . . . . . . . . . . . . . . . . . . . 45
2.2.5 Windows . . . . . . . . . . . . . . . . . . . . . . . . . . . . . 46
2.2.6 Background . . . . . . . . . . . . . . . . . . . . . . . . . . . . 46
2.2.7 Font . . . . . . . . . . . . . . . . . . . . . . . . . . . . . . . . 47
2.2.8 Theme . . . . . . . . . . . . . . . . . . . . . . . . . . . . . . . 47
42
iv Contents

2.2.9 Accessibility . . . . . . . . . . . . . . . . . . . . . . . . . . . . 47
2.2.10 Keyboard Shortcuts . . . . . . . . . . . . . . . . . . . . . . . 49
2.2.11 Sound (system alerts) . . . . . . . . . . . . . . . . . . . . . . 49
2.3 File Management with Nautilus . . . . . . . . . . . . . . . . . . . . . 49
2.3.1 Navigating in Nautilus . . . . . . . . . . . . . . . . . . . . . 49
2.3.2 File Management . . . . . . . . . . . . . . . . . . . . . . . . . 50
2.3.3 Configuring Nautilus . . . . . . . . . . . . . . . . . . . . . . 51
2.4 Important Utilities . . . . . . . . . . . . . . . . . . . . . . . . . . . . . 51
2.4.1 Dictionary . . . . . . . . . . . . . . . . . . . . . . . . . . . . . 51
2.4.2 Managing Archives with File Roller . . . . . . . . . . . . . . 52
II Office Applications 55
3 The OpenOffice.org Office Suite 57
3.1 The OpenOffice.org Quickstarter . . . . . . . . . . . . . . . . . . . . 58
3.2 Getting Help . . . . . . . . . . . . . . . . . . . . . . . . . . . . . . . . 59
3.3 Managing the Transition from Microsoft Office . . . . . . . . . . . . 60
3.3.1 From MS Word to OpenOffice.org Write . . . . . . . . . . . . 60
3.3.2 From MS Excel to OpenOffice.org Calc . . . . . . . . . . . . 61
3.3.3 From MS PowerPoint to OpenOffice.org Impress . . . . . . 61
3.4 Changing the Global Settings . . . . . . . . . . . . . . . . . . . . . . . 61
3.5 Word Processing with OpenOffice.org Writer . . . . . . . . . . . . . 63
3.5.1 Creating Texts with the AutoPilot . . . . . . . . . . . . . . . 63
3.5.2 Creating Texts without the AutoPilot . . . . . . . . . . . . . 64
3.5.3 Selecting Text . . . . . . . . . . . . . . . . . . . . . . . . . . . 64
3.5.4 Working with the Stylist . . . . . . . . . . . . . . . . . . . . . 65
3.5.5 Inserting a Table . . . . . . . . . . . . . . . . . . . . . . . . . 67
3.5.6 Inserting Graphics . . . . . . . . . . . . . . . . . . . . . . . . 68
3.6 Spreadsheets with OpenOffice.org Calc . . . . . . . . . . . . . . . . . 68
3.6.1 Changing Cell Attributes . . . . . . . . . . . . . . . . . . . . 69
SUSE LINUX
v

3.6.2 A Practical Example: Monthly Expenses . . . . . . . . . . . . 69
3.6.3 Creating Charts . . . . . . . . . . . . . . . . . . . . . . . . . . 71
3.6.4 Importing Spreadsheet Tables . . . . . . . . . . . . . . . . . . 72
3.7 Creating Graphics Using OpenOffice.org Draw . . . . . . . . . . . . 73
3.8 Creating Presentations with OpenOffice.org Impress . . . . . . . . . 74
3.8.1 Creating Presentations with the AutoPilot . . . . . . . . . . 74
3.8.2 Adding a Slide . . . . . . . . . . . . . . . . . . . . . . . . . . 74
4 The KWrite Text Editor 77
4.1 Starting KWrite . . . . . . . . . . . . . . . . . . . . . . . . . . . . . . . 78
4.2 The File Menu . . . . . . . . . . . . . . . . . . . . . . . . . . . . . . . 79
4.3 The Edit Menu . . . . . . . . . . . . . . . . . . . . . . . . . . . . . . . 80
4.4 The View Menu . . . . . . . . . . . . . . . . . . . . . . . . . . . . . . 81
4.5 The Bookmarks Menu . . . . . . . . . . . . . . . . . . . . . . . . . . . 81
4.6 The Tools Menu . . . . . . . . . . . . . . . . . . . . . . . . . . . . . . 81
4.7 The Settings Menu . . . . . . . . . . . . . . . . . . . . . . . . . . . . . 82
4.8 The Help Menu . . . . . . . . . . . . . . . . . . . . . . . . . . . . . . 82
4.9 Kate . . . . . . . . . . . . . . . . . . . . . . . . . . . . . . . . . . . . . 82
5 Synchronizing a Handheld Computer with KPilot 83
5.1 How KPilot Works . . . . . . . . . . . . . . . . . . . . . . . . . . . . . 84
5.2 Conduits Used by KPilot . . . . . . . . . . . . . . . . . . . . . . . . . 84
5.2.1 Configuring the Handheld Connection . . . . . . . . . . . . 85
5.2.2 Configuring the KAddressBook Conduit . . . . . . . . . . . 86
5.2.3 Managing To-Do Items and Events . . . . . . . . . . . . . . . 87
5.3 Working with KPilot . . . . . . . . . . . . . . . . . . . . . . . . . . . . 88
5.3.1 Backing up Data from the Handheld . . . . . . . . . . . . . . 88
5.3.2 Installing Programs on the Handheld . . . . . . . . . . . . . 89
vi Contents

6 Scheduling with KOrganizer 91
6.1 Starting KOrganizer . . . . . . . . . . . . . . . . . . . . . . . . . . . . 92
6.2 Configuring KOrganizer . . . . . . . . . . . . . . . . . . . . . . . . . 92
6.3 Using the Calendar . . . . . . . . . . . . . . . . . . . . . . . . . . . . 94
6.3.1 Events . . . . . . . . . . . . . . . . . . . . . . . . . . . . . . . 94
6.3.2 Attendees . . . . . . . . . . . . . . . . . . . . . . . . . . . . . 94
6.3.3 To-Do Items . . . . . . . . . . . . . . . . . . . . . . . . . . . . 95
6.3.4 Categories . . . . . . . . . . . . . . . . . . . . . . . . . . . . . 95
6.4 Printing . . . . . . . . . . . . . . . . . . . . . . . . . . . . . . . . . . . 96
6.5 Address Book . . . . . . . . . . . . . . . . . . . . . . . . . . . . . . . 96
6.6 Help . . . . . . . . . . . . . . . . . . . . . . . . . . . . . . . . . . . . . 97
7 Address Management with KAddressBook 99
7.1 Starting the Program . . . . . . . . . . . . . . . . . . . . . . . . . . . 100
7.2 Creating a New Contact . . . . . . . . . . . . . . . . . . . . . . . . . . 100
7.3 Creating Address Lists . . . . . . . . . . . . . . . . . . . . . . . . . . 101
7.4 Searching Address Data . . . . . . . . . . . . . . . . . . . . . . . . . . 102
7.5 Importing and Exporting Address Data . . . . . . . . . . . . . . . . . 103
7.6 For More Information . . . . . . . . . . . . . . . . . . . . . . . . . . . 103
III Internet 105
8 The Web Browser Konqueror 107
8.1 Starting Konqueror and Opening Web Pages . . . . . . . . . . . . . . 108
8.2 Saving Web Pages and Graphics . . . . . . . . . . . . . . . . . . . . . 109
8.3 Enhanced Web Browsing (Internet Keywords) . . . . . . . . . . . . . 109
8.4 Bookmarks . . . . . . . . . . . . . . . . . . . . . . . . . . . . . . . . . 109
8.5 Java and JavaScript . . . . . . . . . . . . . . . . . . . . . . . . . . . . 110
8.6 For More Information . . . . . . . . . . . . . . . . . . . . . . . . . . . 110
viiSUSE LINUX

9 The Web Browser Galeon 111
9.1 Optimized for the Web . . . . . . . . . . . . . . . . . . . . . . . . . . 112
9.2 Efficient Surfing with Tabs . . . . . . . . . . . . . . . . . . . . . . . . 113
9.3 Smart Bookmarks . . . . . . . . . . . . . . . . . . . . . . . . . . . . . 113
9.4 Settings and Controls . . . . . . . . . . . . . . . . . . . . . . . . . . . 113
9.5 For More Information . . . . . . . . . . . . . . . . . . . . . . . . . . . 114
10 The Mozilla Web Browser 115
10.1 The Initial Browser Window . . . . . . . . . . . . . . . . . . . . . . . 116
10.1.1 The Menu Bar . . . . . . . . . . . . . . . . . . . . . . . . . . . 117
10.1.2 The Navigation Toolbar . . . . . . . . . . . . . . . . . . . . . 118
10.1.3 The Personal Toolbar . . . . . . . . . . . . . . . . . . . . . . . 118
10.1.4 Sidebar . . . . . . . . . . . . . . . . . . . . . . . . . . . . . . . 119
10.2 Working with Tabs . . . . . . . . . . . . . . . . . . . . . . . . . . . . . 119
10.3 Preferences . . . . . . . . . . . . . . . . . . . . . . . . . . . . . . . . . 120
11 Encryption with KGpg 123
11.1 Key Management . . . . . . . . . . . . . . . . . . . . . . . . . . . . . 124
11.1.1 Generating a New Key Pair . . . . . . . . . . . . . . . . . . . 124
11.1.2 Exporting the Public Key . . . . . . . . . . . . . . . . . . . . 124
11.1.3 Importing Keys . . . . . . . . . . . . . . . . . . . . . . . . . . 126
11.2 The Key Server Dialog . . . . . . . . . . . . . . . . . . . . . . . . . . 127
11.2.1 Importing a Key from a Key Server . . . . . . . . . . . . . . 127
11.2.2 Exporting Your Keys to a Key Server . . . . . . . . . . . . . . 128
11.3 Text and File Encryption . . . . . . . . . . . . . . . . . . . . . . . . . 129
11.3.1 Encrypting and Decrypting the Clipboard . . . . . . . . . . 129
11.3.2 Encrypting and Decrypting by Dragging and Dropping . . 129
11.3.3 The KGpg Editor . . . . . . . . . . . . . . . . . . . . . . . . . 130
11.4 For More Information . . . . . . . . . . . . . . . . . . . . . . . . . . . 131
viii Contents

12 KMail — The KDE Mail Application 133
12.1 KMail and Kontact . . . . . . . . . . . . . . . . . . . . . . . . . . . . . 134
12.2 Mail Formats . . . . . . . . . . . . . . . . . . . . . . . . . . . . . . . . 134
12.3 Access Types . . . . . . . . . . . . . . . . . . . . . . . . . . . . . . . . 134
12.4 Configuring KMail . . . . . . . . . . . . . . . . . . . . . . . . . . . . . 135
12.4.1 Defining Your User Identity . . . . . . . . . . . . . . . . . . . 135
12.4.2 Setting up Network Connections . . . . . . . . . . . . . . . . 136
12.4.3 Configuring the Appearance of KMail . . . . . . . . . . . . . 136
12.5 Using KMail . . . . . . . . . . . . . . . . . . . . . . . . . . . . . . . . 137
12.6 Creating a New Message . . . . . . . . . . . . . . . . . . . . . . . . . 138
12.7 Message Folders . . . . . . . . . . . . . . . . . . . . . . . . . . . . . . 139
12.8 Importing Mail . . . . . . . . . . . . . . . . . . . . . . . . . . . . . . . 141
12.9 The Address Book . . . . . . . . . . . . . . . . . . . . . . . . . . . . . 141
12.10 Filters . . . . . . . . . . . . . . . . . . . . . . . . . . . . . . . . . . . . 141
12.10.1 Filter Rules . . . . . . . . . . . . . . . . . . . . . . . . . . . . 142
12.10.2 Examples of Filters . . . . . . . . . . . . . . . . . . . . . . . . 142
12.10.3 Spam Filters . . . . . . . . . . . . . . . . . . . . . . . . . . . . 143
12.11 Encrypting Mail with PGP or GnuPG . . . . . . . . . . . . . . . . . . 145
12.11.1 Signing Messages . . . . . . . . . . . . . . . . . . . . . . . . . 145
12.11.2 Checking the Signature of a Received Message . . . . . . . . 146
12.11.3 Sending Public Keys . . . . . . . . . . . . . . . . . . . . . . . 146
12.11.4 Decrypting Messages . . . . . . . . . . . . . . . . . . . . . . 146
12.11.5 Encrypting Messages . . . . . . . . . . . . . . . . . . . . . . . 146
12.12 For More Information . . . . . . . . . . . . . . . . . . . . . . . . . . . 147
13 Evolution: An E-Mail and Calendar Program 149
13.1 Starting Evolution . . . . . . . . . . . . . . . . . . . . . . . . . . . . . 150
13.2 Importing E-Mail from Other Mail Programs . . . . . . . . . . . . . 150
13.3 Evolution Overview . . . . . . . . . . . . . . . . . . . . . . . . . . . . 151
13.3.1 Summary . . . . . . . . . . . . . . . . . . . . . . . . . . . . . 151
13.3.2 Inbox . . . . . . . . . . . . . . . . . . . . . . . . . . . . . . . . 152
ixSUSE LINUX

13.3.3 Calendar . . . . . . . . . . . . . . . . . . . . . . . . . . . . . . 152
13.3.4 Tasks . . . . . . . . . . . . . . . . . . . . . . . . . . . . . . . . 152
13.3.5 Contacts . . . . . . . . . . . . . . . . . . . . . . . . . . . . . . 152
13.4 E-Mail . . . . . . . . . . . . . . . . . . . . . . . . . . . . . . . . . . . . 152
13.4.1 Configuring Accounts . . . . . . . . . . . . . . . . . . . . . . 153
13.4.2 Mail Preferences . . . . . . . . . . . . . . . . . . . . . . . . . 153
13.4.3 Creating Messages . . . . . . . . . . . . . . . . . . . . . . . . 153
13.4.4 Encrypted E-Mail and Signatures . . . . . . . . . . . . . . . . 154
13.4.5 Folders . . . . . . . . . . . . . . . . . . . . . . . . . . . . . . . 154
13.4.6 Filters . . . . . . . . . . . . . . . . . . . . . . . . . . . . . . . 155
13.4.7 Virtual Folders . . . . . . . . . . . . . . . . . . . . . . . . . . 156
13.5 Calendar . . . . . . . . . . . . . . . . . . . . . . . . . . . . . . . . . . 157
13.5.1 Adding Appointments . . . . . . . . . . . . . . . . . . . . . . 157
13.5.2 Scheduling a Meeting . . . . . . . . . . . . . . . . . . . . . . 157
13.5.3 Adding Tasks . . . . . . . . . . . . . . . . . . . . . . . . . . . 158
13.6 Contacts . . . . . . . . . . . . . . . . . . . . . . . . . . . . . . . . . . . 158
13.6.1 Adding Contacts . . . . . . . . . . . . . . . . . . . . . . . . . 158
13.6.2 Making a List . . . . . . . . . . . . . . . . . . . . . . . . . . . 158
13.6.3 Sharing Contacts . . . . . . . . . . . . . . . . . . . . . . . . . 159
13.7 Public Address Books in Evolution . . . . . . . . . . . . . . . . . . . 159
13.8 For More Information . . . . . . . . . . . . . . . . . . . . . . . . . . . 160
14 ISDN Telecommunication 161
14.1 Configuration . . . . . . . . . . . . . . . . . . . . . . . . . . . . . . . 162
14.1.1 Configuring Fax Services . . . . . . . . . . . . . . . . . . . . 163
14.1.2 Configuring the Answering Machine . . . . . . . . . . . . . 165
14.2 Usage . . . . . . . . . . . . . . . . . . . . . . . . . . . . . . . . . . . . 168
14.2.1 General Notes about Reception . . . . . . . . . . . . . . . . . 168
14.2.2 Fax Operation . . . . . . . . . . . . . . . . . . . . . . . . . . . 169
14.2.3 Operation of the Answering Machine . . . . . . . . . . . . . 171
x
Contents

IV Multimedia 173
15 Sound in Linux 175
15.1 The ALSA PCM Types . . . . . . . . . . . . . . . . . . . . . . . . . . 176
15.2 Mixers . . . . . . . . . . . . . . . . . . . . . . . . . . . . . . . . . . . . 176
15.2.1 gamix . . . . . . . . . . . . . . . . . . . . . . . . . . . . . . . 177
15.2.2 qamix . . . . . . . . . . . . . . . . . . . . . . . . . . . . . . . 177
15.2.3 KMix . . . . . . . . . . . . . . . . . . . . . . . . . . . . . . . . 178
15.2.4 The GNOME Mixer Applet . . . . . . . . . . . . . . . . . . . 178
15.2.5 alsamixer . . . . . . . . . . . . . . . . . . . . . . . . . . . . . 178
15.2.6 Mixer Parameters of Soundblaster Live! and Audigy . . . . 179
15.2.7 The Mixer for the Sound Chip Envy24 . . . . . . . . . . . . . 179
15.2.8 Configuration of the S/PDIF Channels . . . . . . . . . . . . 181
15.3 Players . . . . . . . . . . . . . . . . . . . . . . . . . . . . . . . . . . . 181
15.3.1 amaroK . . . . . . . . . . . . . . . . . . . . . . . . . . . . . . 181
15.3.2 XMMS . . . . . . . . . . . . . . . . . . . . . . . . . . . . . . . 184
15.3.3 kscd — Audio CD Player . . . . . . . . . . . . . . . . . . . . 185
15.3.4 The Audio CD Player WorkMan . . . . . . . . . . . . . . . . 185
15.3.5 GNOME CD Player Applet . . . . . . . . . . . . . . . . . . . 185
15.4 Buffering and Latencies . . . . . . . . . . . . . . . . . . . . . . . . . . 186
15.5 The JACK Audio Connection Kit . . . . . . . . . . . . . . . . . . . . 187
15.6 Hard Disk Recording with Audacity . . . . . . . . . . . . . . . . . . 188
15.6.1 Recording WAV Files and Importing Files . . . . . . . . . . . 189
15.6.2 Editing Audio Files . . . . . . . . . . . . . . . . . . . . . . . . 190
15.6.3 Saving and Exporting . . . . . . . . . . . . . . . . . . . . . . 191
15.7 Direct Recording and Playback of WAV Files . . . . . . . . . . . . . . 191
15.8 Compressing Audio Data . . . . . . . . . . . . . . . . . . . . . . . . . 192
15.9 ALSA and MIDI . . . . . . . . . . . . . . . . . . . . . . . . . . . . . . 193
15.9.1 Loading Sound Fonts: SB Live! and AWE . . . . . . . . . . . 194
15.9.2 vkeybd — Virtual MIDI Keyboard . . . . . . . . . . . . . . . 195
15.9.3 Establishing Connections between MIDI Ports . . . . . . . . 196
xiSUSE LINUX

15.10 MIDI Playback without a WaveTable Card . . . . . . . . . . . . . . . 198
15.10.1 The Sound Font Synthesizer fluidsynth . . . . . . . . . . . . 198
15.10.2 Configuration of timidity++ . . . . . . . . . . . . . . . . . . . 198
15.10.3 Starting timidity++ with the Graphical Interface . . . . . . . 199
15.10.4 The ALSA Server Mode of timidity++ . . . . . . . . . . . . . 200
15.11 AlsaModularSynth — Synthesizer and Effect Processor . . . . . . . 200
15.11.1 Synthesizer Patch Examples . . . . . . . . . . . . . . . . . . . 200
15.11.2 AlsaModularSynth as an Effect Processor . . . . . . . . . . . 201
15.11.3 AlsaModularSynth as a Synthesizer . . . . . . . . . . . . . . 202
15.11.4 Keeping Track with the Control Center . . . . . . . . . . . . 203
15.11.5 The MIDI Out Module . . . . . . . . . . . . . . . . . . . . . . 203
15.11.6 Writing WAV Files with the WAV Out Module . . . . . . . . 205
15.12 NoteEdit and MIDI Sequencers . . . . . . . . . . . . . . . . . . . . . 205
16 TV, Video, Radio, and Webcam 207
16.1 Watching TV with motv . . . . . . . . . . . . . . . . . . . . . . . . . . 208
16.1.1 Video Source and Network Search . . . . . . . . . . . . . . . 208
16.1.2 From Silent Film to Sound Film . . . . . . . . . . . . . . . . . 209
16.1.3 Screen Proportions and Full-Screen Mode . . . . . . . . . . . 209
16.1.4 The Launcher Menu . . . . . . . . . . . . . . . . . . . . . . . 209
16.2 Video Text with alevt . . . . . . . . . . . . . . . . . . . . . . . . . . . 210
16.3 Webcams and motv . . . . . . . . . . . . . . . . . . . . . . . . . . . . 210
16.4 nxtvepg — The TV Magazine for Your PC . . . . . . . . . . . . . . . 211
16.4.1 Importing the EPG Database . . . . . . . . . . . . . . . . . . 211
16.4.2 Sorting the Programs . . . . . . . . . . . . . . . . . . . . . . . 211
16.5 Webcam Operation with gqcam . . . . . . . . . . . . . . . . . . . . . 212
16.5.1 Operation . . . . . . . . . . . . . . . . . . . . . . . . . . . . . 213
16.5.2 Snapshots . . . . . . . . . . . . . . . . . . . . . . . . . . . . . 213
16.5.3 Command Line . . . . . . . . . . . . . . . . . . . . . . . . . . 213
xii Contents

17 K3b — The KDE Burning Application 215
17.1 Creating a Data CD . . . . . . . . . . . . . . . . . . . . . . . . . . . . 216
17.2 Burning CDs . . . . . . . . . . . . . . . . . . . . . . . . . . . . . . . . 217
17.3 Creating an Audio CD . . . . . . . . . . . . . . . . . . . . . . . . . . 218
17.4 Copying a CD . . . . . . . . . . . . . . . . . . . . . . . . . . . . . . . 219
17.5 Writing ISO Images . . . . . . . . . . . . . . . . . . . . . . . . . . . . 220
17.6 For More Information . . . . . . . . . . . . . . . . . . . . . . . . . . . 220
18 Digital Cameras and Linux 221
18.1 Connecting to the Camera . . . . . . . . . . . . . . . . . . . . . . . . 222
18.2 Installating the Programs . . . . . . . . . . . . . . . . . . . . . . . . . 222
18.3 Using Konqueror . . . . . . . . . . . . . . . . . . . . . . . . . . . . . . 222
18.4 Using gtKam . . . . . . . . . . . . . . . . . . . . . . . . . . . . . . . . 223
18.5 Using Digikam . . . . . . . . . . . . . . . . . . . . . . . . . . . . . . . 224
18.6 For More Information . . . . . . . . . . . . . . . . . . . . . . . . . . . 225
19 Kooka — A Scanning Application 227
19.1 The Kooka Window . . . . . . . . . . . . . . . . . . . . . . . . . . . . 228
19.2 The Preview . . . . . . . . . . . . . . . . . . . . . . . . . . . . . . . . 228
19.3 The Final Scan . . . . . . . . . . . . . . . . . . . . . . . . . . . . . . . 228
19.4 The Menus . . . . . . . . . . . . . . . . . . . . . . . . . . . . . . . . . 229
19.5 The Gallery . . . . . . . . . . . . . . . . . . . . . . . . . . . . . . . . . 231
19.6 Optical Character Recognition . . . . . . . . . . . . . . . . . . . . . . 232
20 Manipulating Graphics with The GIMP 235
20.1 Graphics Formats . . . . . . . . . . . . . . . . . . . . . . . . . . . . . 236
20.2 Starting The GIMP . . . . . . . . . . . . . . . . . . . . . . . . . . . . . 236
20.2.1 Initial Configuration . . . . . . . . . . . . . . . . . . . . . . . 236
20.2.2 The Default Windows . . . . . . . . . . . . . . . . . . . . . . 237
20.3 Getting Started in GIMP . . . . . . . . . . . . . . . . . . . . . . . . . 239
20.3.1 Creating a New Image . . . . . . . . . . . . . . . . . . . . . . 239
xiiiSUSE LINUX

20.3.2 Opening an Existing Image . . . . . . . . . . . . . . . . . . . 240
20.3.3 The Image Window . . . . . . . . . . . . . . . . . . . . . . . 240
20.4 Saving Images . . . . . . . . . . . . . . . . . . . . . . . . . . . . . . . 240
20.5 Editing Images: Basics . . . . . . . . . . . . . . . . . . . . . . . . . . . 242
20.5.1 Changing the Image Size . . . . . . . . . . . . . . . . . . . . 242
20.5.2 Selecting Parts of Images . . . . . . . . . . . . . . . . . . . . 243
20.5.3 Applying and Removing Color . . . . . . . . . . . . . . . . . 245
20.5.4 Adjusting Color Levels . . . . . . . . . . . . . . . . . . . . . 247
20.5.5 Undoing Mistakes . . . . . . . . . . . . . . . . . . . . . . . . 248
20.6 Editing Images: Advanced Features . . . . . . . . . . . . . . . . . . . 248
20.6.1 Layers . . . . . . . . . . . . . . . . . . . . . . . . . . . . . . . 248
20.6.2 Image Modes . . . . . . . . . . . . . . . . . . . . . . . . . . . 249
20.6.3 Special Effects . . . . . . . . . . . . . . . . . . . . . . . . . . . 249
20.7 Printing Images . . . . . . . . . . . . . . . . . . . . . . . . . . . . . . 249
20.8 Configuring GIMP . . . . . . . . . . . . . . . . . . . . . . . . . . . . . 251
20.8.1 Customizing Windows . . . . . . . . . . . . . . . . . . . . . . 251
20.8.2 Setting Preferences . . . . . . . . . . . . . . . . . . . . . . . . 251
20.9 For More Information . . . . . . . . . . . . . . . . . . . . . . . . . . . 251
V Excursions 253
21 Working with the Shell 255
21.1 Introduction to Bash . . . . . . . . . . . . . . . . . . . . . . . . . . . . 256
21.1.1 Commands . . . . . . . . . . . . . . . . . . . . . . . . . . . . 256
21.1.2 Files and Directories . . . . . . . . . . . . . . . . . . . . . . . 256
21.1.3 Bash Functions . . . . . . . . . . . . . . . . . . . . . . . . . . 259
21.1.4 Specifying Paths . . . . . . . . . . . . . . . . . . . . . . . . . 260
21.1.5 Wild Cards . . . . . . . . . . . . . . . . . . . . . . . . . . . . 261
21.1.6 Less and More . . . . . . . . . . . . . . . . . . . . . . . . . . 262
21.1.7 Pipes . . . . . . . . . . . . . . . . . . . . . . . . . . . . . . . . 262
xiv Contents

21.1.8 Archives and Data Compression . . . . . . . . . . . . . . . . 263
21.1.9 mtools . . . . . . . . . . . . . . . . . . . . . . . . . . . . . . . 264
21.1.10 Cleaning Up . . . . . . . . . . . . . . . . . . . . . . . . . . . . 264
21.2 Users and Access Permissions . . . . . . . . . . . . . . . . . . . . . . 265
21.2.1 File System Permissions . . . . . . . . . . . . . . . . . . . . . 265
21.2.2 Modifying File Permissions . . . . . . . . . . . . . . . . . . . 267
21.2.3 The setuid Bit . . . . . . . . . . . . . . . . . . . . . . . . . . . 268
21.2.4 The setgid Bit . . . . . . . . . . . . . . . . . . . . . . . . . . . 269
21.2.5 The Sticky Bit . . . . . . . . . . . . . . . . . . . . . . . . . . . 269
21.2.6 Access Control Lists . . . . . . . . . . . . . . . . . . . . . . . 269
21.3 Important Linux Commands . . . . . . . . . . . . . . . . . . . . . . . 270
21.3.1 File Commands . . . . . . . . . . . . . . . . . . . . . . . . . . 271
21.3.2 System Commands . . . . . . . . . . . . . . . . . . . . . . . . 276
21.4 The vi Editor . . . . . . . . . . . . . . . . . . . . . . . . . . . . . . . . 278
22 Ergonomics in the Workplace 281
22.1 The Working Environment . . . . . . . . . . . . . . . . . . . . . . . . 282
22.1.1 The Right Desk . . . . . . . . . . . . . . . . . . . . . . . . . . 282
22.1.2 Sitting Correctly on the Right Working Chair . . . . . . . . . 283
22.1.3 Good Lighting for Productive Work . . . . . . . . . . . . . . 284
22.1.4 Optimum Climate . . . . . . . . . . . . . . . . . . . . . . . . 285
22.1.5 Noise Levels . . . . . . . . . . . . . . . . . . . . . . . . . . . . 286
22.2 Office Equipment . . . . . . . . . . . . . . . . . . . . . . . . . . . . . 287
22.2.1 Buying a Screen . . . . . . . . . . . . . . . . . . . . . . . . . . 287
22.2.2 Screen Location . . . . . . . . . . . . . . . . . . . . . . . . . . 288
22.2.3 The Keyboard and the Wrists . . . . . . . . . . . . . . . . . . 289
22.2.4 The Mouse . . . . . . . . . . . . . . . . . . . . . . . . . . . . . 290
22.3 Links and Literature . . . . . . . . . . . . . . . . . . . . . . . . . . . . 291
A Help and Documentation 293
B SUSE LINUX FAQ 297
SUSE LINUX
xv


Welcome
Congratulations for selecting SUSE LINUX. A few clicks are all that is needed to
prepare the installation, which takes fifteen to twenty minutes. After configuring the users and their passwords and selecting the screen resolution, your SUSE
LINUX system is ready for use. If you are familiar with earlier versions of SUSE
LINUX, you will notice how much the configuration with the system assistant
YaST has been expanded and simplified.
Get to know the graphical desktop environments KDE and GNOME and learn
how to adapt them to your personal preferences. The following sections introduce some very useful and interesting programs from the large range of available
applications in different categories, including office programs such as OpenOf-
fice.org, web browsers, programs to manage your schedule, file managers, scanning tools, and image editing programs.
Additionally find information about the SUSE help system and the available information sources containing further documentation. Also included are a list of
frequently asked questions about SUSE LINUX.
Changes in the User Guide
The following is a list of the changes introduced in this guide, as compared to the
previous version (SUSE LINUX 9.1):
The instructions for the installation and configuration with YaST have been
moved to the Administration Guide.
The following chapters have been revised:

.
The chapter about OpenOffice.org now includes a section discussing
the migration of MS Office documents to the OpenOffice.org formats.
.
The chapter about GNOME has been updated to reflect the current
version.
.
The chapters about the KDE desktop, KOrganizer (schedule manager),
KAddressbook (contact organizer), KMail, and about synchronizing
handhelds with KPilot have been updated to match the current version
of KDE.
Typographical Conventions
The following typographical conventions are used in this book:
/etc/passwd: files or directories
hplaceholderi: replace the character string hplaceholderi (including the angle
brackets) with the actual value
PATH: an environment variable
ls: commands
user: users
Alt : a key to press
‘File’: menu items, buttons
Acknowledgements
With a lot of personal commitment, the Linux developers continue to promote the
development of Linux. We would like to express our sincere gratitude for their
efforts. Without them, this distribution would not exist. Additional thanks go to
Frank Zappa and Pawar. Special thanks, of course, to LINU S TO RVALDS.
Have a lot of fun!
Your SUSE Team
2 Contents

Part I
Configuration


The KDE Desktop
The KDE desktop offers an intuitive graphical interface. The following sections
show you how to make efficient use of KDE’s features and how to customize the
desktop to meet your personal needs. This is followed by an introduction to the
file manager Konqueror and a brief description of some small but useful utilities.
1
The KDE Desktop
1.1 Desktop Components . . . . . . . . . . . . . . . . . . . . 6
1.2 Settings . . . . . . . . . . . . . . . . . . . . . . . . . . . . 13
1.3 Konqueror as a File Manager . . . . . . . . . . . . . . . . 20
1.4 Important Utilities . . . . . . . . . . . . . . . . . . . . . . 24

1.1 Desktop Components
The main components are the icons on the desktop and the panel at the bottom
of the screen. The mouse is your most important tool. Click a symbol or an icon
once to start the associated program or the file manager Konqueror. If you rightclick an icon, different menus appear, depending on the program. As well as the
icons, there are two desktop menus.
1.1.1 The Desktop Menus
If you middle-click the desktop (if your mouse only has two buttons, press both
buttons at the same time), a window and desktop management menu is displayed. The menu lists the various desktops and the windows opened in them.
Click one of the following menu items:
‘Unclutter Windows’ If you have several windows on your desktop, they are
placed next to each other and aligned with the top left corner.
‘Cascade Windows’ Starting from the top left corner, the windows on the desk-
top are placed on top of each other in such a way that only the top and left
borders of the lower windows are visible.
‘Desktop x’ Desktop 1 is your default desktop. This part of the menu lists all
the windows currently opened. You can bring them to the foreground by
clicking one of the respective items.
‘Additional Desktops’ You can use the additional (virtual) desktops provided
and switch to them with the menu or the panel. All functions are available
on all desktops. This limits the number of programs and associated windows that need to be arranged on one desktop. These virtual desktops resemble additional desks in your office.
If you right-click the desktop, a more complex menu is displayed, allowing you
to customize your desktop.
‘Create New’ Use this menu item to create new directories, files, or devices on
the desktop. A list of possible elements is provided for selection in a submenu.
6 1.1. Desktop Components

‘Bookmarks’ The bookmark editor allows you to create, group, change, or
delete bookmarks. The bookmarks are used by the browser and file manager Konqueror. The bookmark editor also allows you to import bookmarks from other browsers, such as Mozilla, Netscape, Opera, and Internet
Explorer.
1
The KDE Desktop
‘Run Command. .. ’ This menu item opens a window in which to enter a com-
mand manually. The command is executed after pressing
‘Undo’ Use this item to undo the last action. For example, if you have just cre-
ated a new directory on the desktop, clicking this item reverts the creation
so the directory disappears.
‘Paste’ To keep a folder or document handy on the desktop, you can copy an
icon from the file manager by right-clicking and selecting ‘Copy’ then moving the mouse to the desired location on the desktop. Right-click again and
select ‘Paste’. The icon is now available on your desktop and can be moved
around by dragging it with the left mouse button pressed.
‘Icons’ This allows you to rearrange the icons on the desktop. You can also
change the order of the icons.
‘Windows’ This arranges the windows on the desktop, either on top of each
other begining from the top left corner or next to each other.
‘Refresh Desktop’ If the desktop should appear garbled in some way, use this
menu item to redraw it.
‘Configure Desktop. .. ’ This menu item starts a configuration dialog with which
to configure the appearance and behavior of the desktop. Details about the
configuration of the desktop are provided in Settings on page 13.
‘Start New Session’ This menu opens a dialog box asking if you want to start a
new user environment. After clicking ‘Start New Session’, the current session disappears into the background and the system switches to a new login screen. Each session has a function key assigned to it:
first session,
sions, press
the desired session.
F8 the second one, and so on. To switch between different ses-
Ctrl -
Alt -
Fhx i , where
Fhx i is the function key corresponding to
Enter .
F7 represents the
‘Lock Screen’ If you leave your workstation and do not log out, you should use
this function to prevent others from gaining access to your files. Depending
on the setting, the screen turns blank or starts displaying a screensaver. To
continue using the computer, enter your password.
7SUSE LINUX

‘Logout’ Log out of your system if you are not going to use the system for some
time.
1.1.2 The Trash Bin
The trash bin is a directory for files marked for deletion. Drag icons from the file
manager or the desktop to the trash bin icon by keeping the left mouse button
pressed then release to drop them there. Alternatively, right-click an icon and select ‘Move to Trash’ from the menu. Click the trash bin icon to view its contents.
You can retrieve an item from the trash if desired.
Files removed with ‘Delete’ are not kept in the trash bin, but permanently deleted
right away. To permanently delete the files in the trash bin itself, right-click the
trash bin icon and select ‘Empty Trash Bin’.
1.1.3 CD-ROM, DVD-ROM, and Floppy Disks
If you click the floppy disk icon when a floppy disk is inserted, the file manager starts and displays the content of the floppy disk. Display a context menu
with various options by right-clicking the individual icons on the floppy disk.
It is also possible to move the icon to a different location, such as the desktop or
your home directory, by simply keeping the left mouse button pressed over it and
dragging it to the destination. You will be asked whether you want to move or
copy the file or create a link. The same technique can be used to copy or move
files from your home directory to the floppy disk.
Right-click the floppy disk icon to access the context menu. ‘Unmount’ is a very
important option. Be sure to unmount the drive before removing a floppy disk
from the drive, because this is necessary to trigger the actual writing of the data
to the floppy disk.
The handling of CDs and DVDs is similar, with the only difference that these media are not writable. Despite this, you must unmount CD and DVD drives, because otherwise you will not be able to remove the disk from the drive. You can
also select ‘Eject’, which causes the medium to be unmounted and ejected. Both
methods only work if the CD or DVD is no longer accessed and any file manager
window displaying the content of the CD or DVD has been closed.
8 1.1. Desktop Components
1.1.4 The Printer Icon
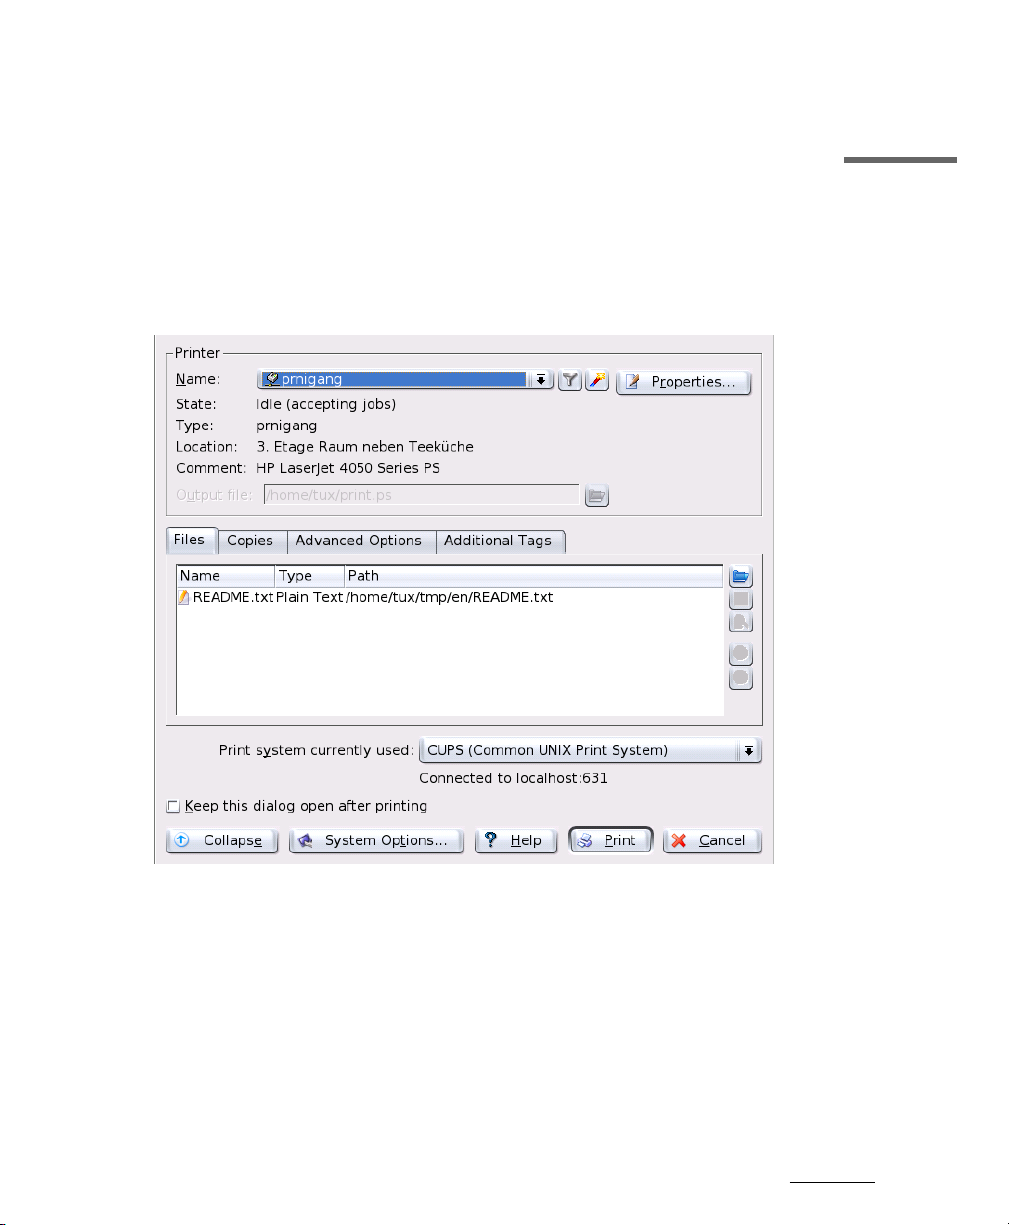
Right-click the printer icon and choose ‘Actions’ ➝ ‘Print files’. The KPrinter di-
alog window starts. This program enables you to adjust a number of settings
and send print jobs directly. The upper part of the main window, like that in Figure 1.1, shows the selected printer. To switch to another printer, click the arrow
next to the printer name and select the device to use from the list displayed.
1
The KDE Desktop
Figure 1.1: The Main Window of KPrinter
To configure the selected printer, click ‘Properties. . .’. A configuration dialog like
that shown in Figure 1.2 on the following page opens, enabling you to change the
paper format (e.g., from A4 to letter) or to select a different paper tray. Changing
trays is especially useful if one of the trays contains letterhead paper and another
contains plain white paper.
9SUSE LINUX
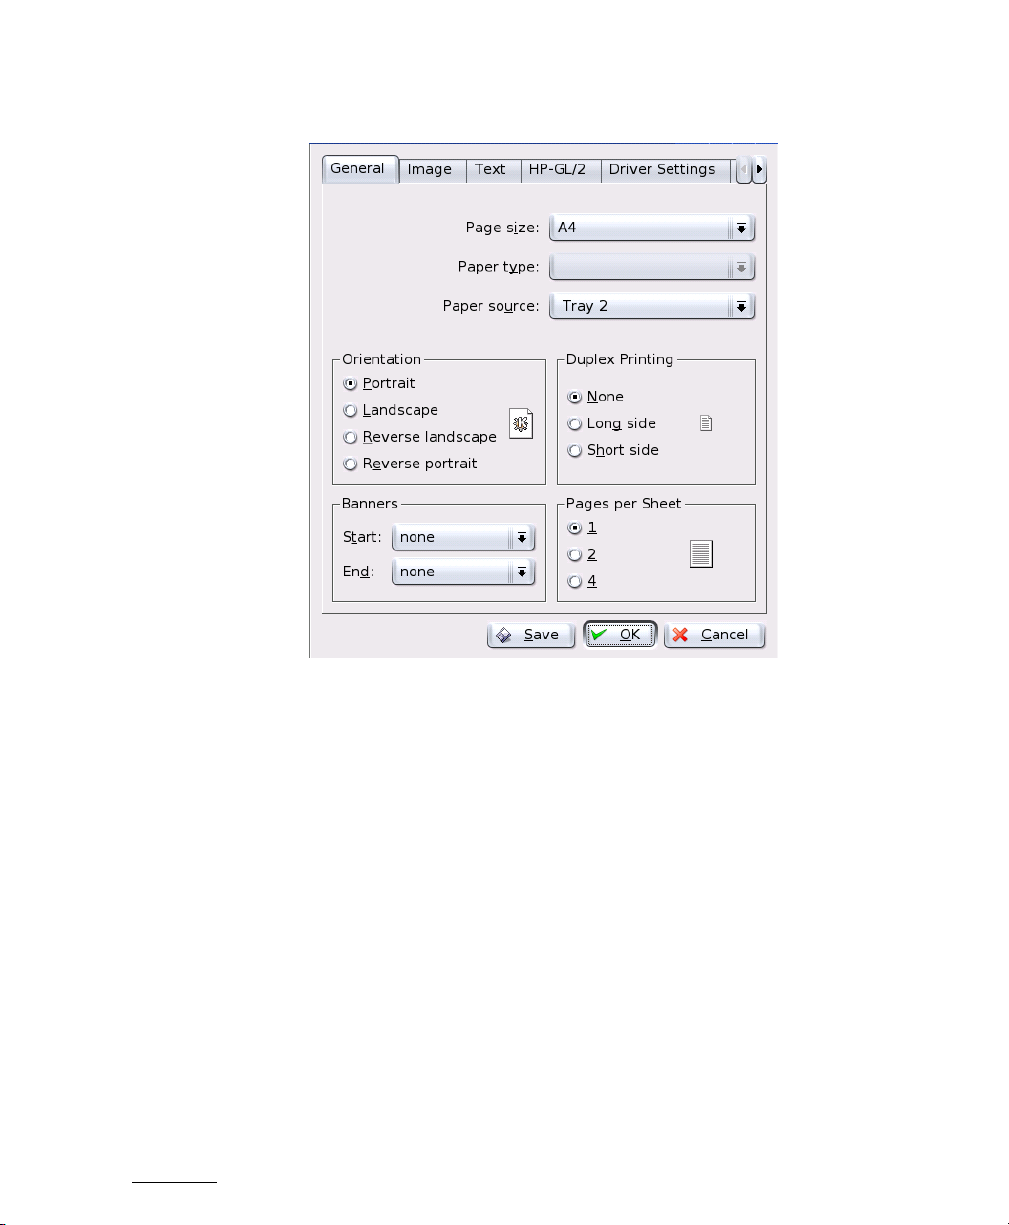
Figure 1.2: Settings in KPrinter
Under ‘Orientation’, choose between ‘Portrait’ and ‘Landscape’ and whether the
pages should be turned 180 degrees so that they are printed upside down. To the
right of ‘Orientation’, specify the settings for two-sided printing. If ‘None’ is selected, only one page is printed per sheet. If you select ‘Long side’, the front and
back are printed like in a book. With ‘Short side’, the back is printed reversely
and you must turn the sheet up to view the text correctly. With ‘Start:/End:’,
specify whether your document should have start or end banners, such as “confidential” or “secret”. Under ‘Pages per Sheet’, select to print two or four pages
on one sheet. For this purpose, the pages are downsized accordingly. If you click
‘Save’, your settings are saved and used again for the following print jobs. However, if you click ‘OK’, the settings only apply to the current job. If you close the
dialog with ‘Cancel’, all changes are discarded.
After making all settings, click ‘Expand’. The second part of the window now
10 1.1. Desktop Components

becomes visible. Click the blue folder icon. By default, your home directory is displayed. Select a file and confirm with ‘OK’. You can also select the file by doubleclicking it. The respective file then appears in the overview of the main window,
together with the name, type, and path specification. Now click ‘Print’ to send
the job to the printer. The job is placed in the queue and can be monitored with
KJobViewer. On the other hand, if you click the document, two additional buttons become active to the right. Use the X button to remove the document from
the selection or use the magnifying glass icon to display, edit, and save the file
with Kwrite or OpenOffice.org (depending on the document type). Afterwards,
simply close the editing program and click ‘Print’ in the KPrinter dialog. The
printout will reflect any changes made to the document while editing.
All KDE applications use KPrinter for printing. For example, if you click the
printer icon in KWrite, the KPrinter dialog appears. The file to print is already preselected.
1.1.5 The Panel
The panel at the lower edge of the screen consists of several areas. By default, the
icon for the main menu is located to the far left. Other icons are next to it. The
house icon provides quick access to your home directory with all subdirectories.
The other icons start applications, such as OpenOffice.org, K-Mail, and the web
browser Konqueror, if these programs were installed.
Next to these icons are the numbered buttons with which to switch desktops.
These multiple desktops enable you to organize your work if you use many programs simultaneously, as if you had several desks for various tasks.
The taskbar is located next to the virtual desktops. All started applications are
displayed in the taskbar. If you click a window title in the taskbar, the application is moved to the foreground. If it is already in the foreground, clicking minimizes the application. If you click it again, it reopens. Next to the taskbar, find
applets, such as the clipboard Klipper, SuSEwatcher, and any other applets you
have started. The clock helps you keep track of the time.
If you right-click an empty space in the panel, a menu providing the usual help
and configuration options for the panel is displayed. Use the menu to change the
size of the panel and to add or remove applications. To add an application, search
for it in the menu and select it. Remove applications or applets by right-clicking
the corresponding icon and selecting ‘Remove’ from the displayed menu.
1
The KDE Desktop
11SUSE LINUX

1.1.6 The Main Menu
Open the main menu by clicking the icon to the far left of the panel. Alternatively,
press
Applications’ (or ‘Most Used Applications’), ‘All Applications’ (a menu with all
applications sorted according to categories), and ‘Actions’. The following section
provides information about a number of actions that can be triggered from the
main menu. Detailed information about the Control Center is available in Settings
on the next page.
‘Bookmarks’ By selecting ‘Edit Bookmarks’ from this menu, start an editor in
‘Run Command. .. ’ This item opens a dialog where you can enter a command.
‘Start New Session’ To start a second session with a graphical user interface on
Alt -
F1 . The main menu is subdivided into these sections: ‘Recently Used
which to organize your bookmarks. If you select one of the bookmarks
present in the menu, the Konqueror browser starts and loads the corresponding URL.
You can use it to quickly start an application whose command you know —
without having to navigate through the program submenus.
your machine, select ‘Start New Session’ from the main menu. Your current
session remains active while you are taken to the login screen. Log in. You
can also start another window manager. Access the first session by pressing
Alt -
F7 . Press
Ctrl -
sessions can be accessed by pressing
F8 instead of
F7 to access the new session. Additional
Ctrl -
Alt -
F9 to
F12 .
‘Lock Screen’ If you leave your workstation, you can blank your screen or start
a screensaver. Access to the session can only be regained with a password.
To unlock, enter your normal login password. Locking the screen ensures
that others cannot read or manipulate your documents or e-mail messages.
Logout User You can log out from the system by means of this menu item. How-
ever, first you will be asked what should happen after the logout. If you
select ‘Login as different user’, the login screen is displayed, allowing you
or another user to log in to the system. You can also shut down and turn off
the computer or shut it down and reboot immediately. Confirm your selection with ‘OK’ or remain logged in by clicking ‘Cancel’.
12 1.1. Desktop Components

1.2 Settings
The KDE desktop can be customized according to your preferences and needs.
‘Control Center’ in the main menu opens the configuration dialog for your KDE
desktop. The following section introduces a number of modules.
1.2.1 Peripherals
This opens the configuration dialogs for the mouse, keyboard, and printer administration.
Keyboard
Keyboard Repeat Keeping a key pressed causes the associated character to be
printed repeatedly as long as the key is pressed. The option is activated by
default.
NumLock on KDE Startup Here, determine whether the number pad of your
keyboard should be active when KDE is started.
Key Click Volume If you want to hear a sound when a key is clicked, activate
this option and adjust the volume with the slider.
Mouse
The mouse configuration comprises three tabs: ‘General’, ‘Advanced’, and
‘Mouse Navigation’. The configuration options of the ‘General’ tab are:
1
The KDE Desktop
Button Mapping Here, specify right-handed or left-handed use of your mouse.
Icons Determine how the system should react to clicks and double-clicks. The
default setting for the KDE desktop is a single click for opening files or folders and a mouse pointer that changes its appearance when it is moved over
icons. To use double-click for opening files and folders, select ‘Double-click
to open files and folders (select icons on first click)’. Finally, set the size and
color of the pointer and the kind of visual feedback given when programs
are started.
Under the ‘Pointer Theme’ tab, choose among a number of themes to give the
mouse pointer an appearance to your liking. The configuration options of the
‘Advanced’ tab are:
13SUSE LINUX

Pointer Acceleration The pointer acceleration defines the relation between
the speed with which you move the input device (mouse) and the pointer
speed as displayed on the screen. The higher the selected factor is, the more
difficult it is to control the screen pointer.
Pointer Threshold The threshold (in pixels) specifies the distance the pointer
must move before the specified pointer acceleration actually comes into
force. In this way, you have exact control over the mouse pointer when
moving it a small distance, but you can still cover a large distance on the
screen with a flick of the wrist.
Double Click Interval Here, set the maximum interval between two mouse
clicks that should still be interpreted as a double-click.
Drag Start Time An object selected with a click is moved only if you continue to
move the pointer for the specified period (in milliseconds).
Drag Start Distance An object selected with a click is moved only if you drag it
the minimum distance specified (in pixels).
Mouse Wheel Scrolls By If you have a wheel mouse, specify the number of
lines the selected element should scroll with each wheel notch.
To be able to navigate the mouse pointer with the arrow keys of the number pad,
activate this function under ‘Mouse Navigation’ and customize the parameters
according to your needs.
Printers
The printer administration module mainly consists of three parts. The top frame
lists all printers available in the network. The center part features a configuration
and information zone comprising four tabs. The lower part indicates the current
print system type. The following description only covers the configuration part.
Note
The configuration options relevant for your daily work with the system can be accessed under ‘Jobs’ and ‘Instances’. ‘Information’ and
‘Properties’ mainly provide information or are used for system administration.
14 1.2. Settings
Note
 Loading...