

Page 1
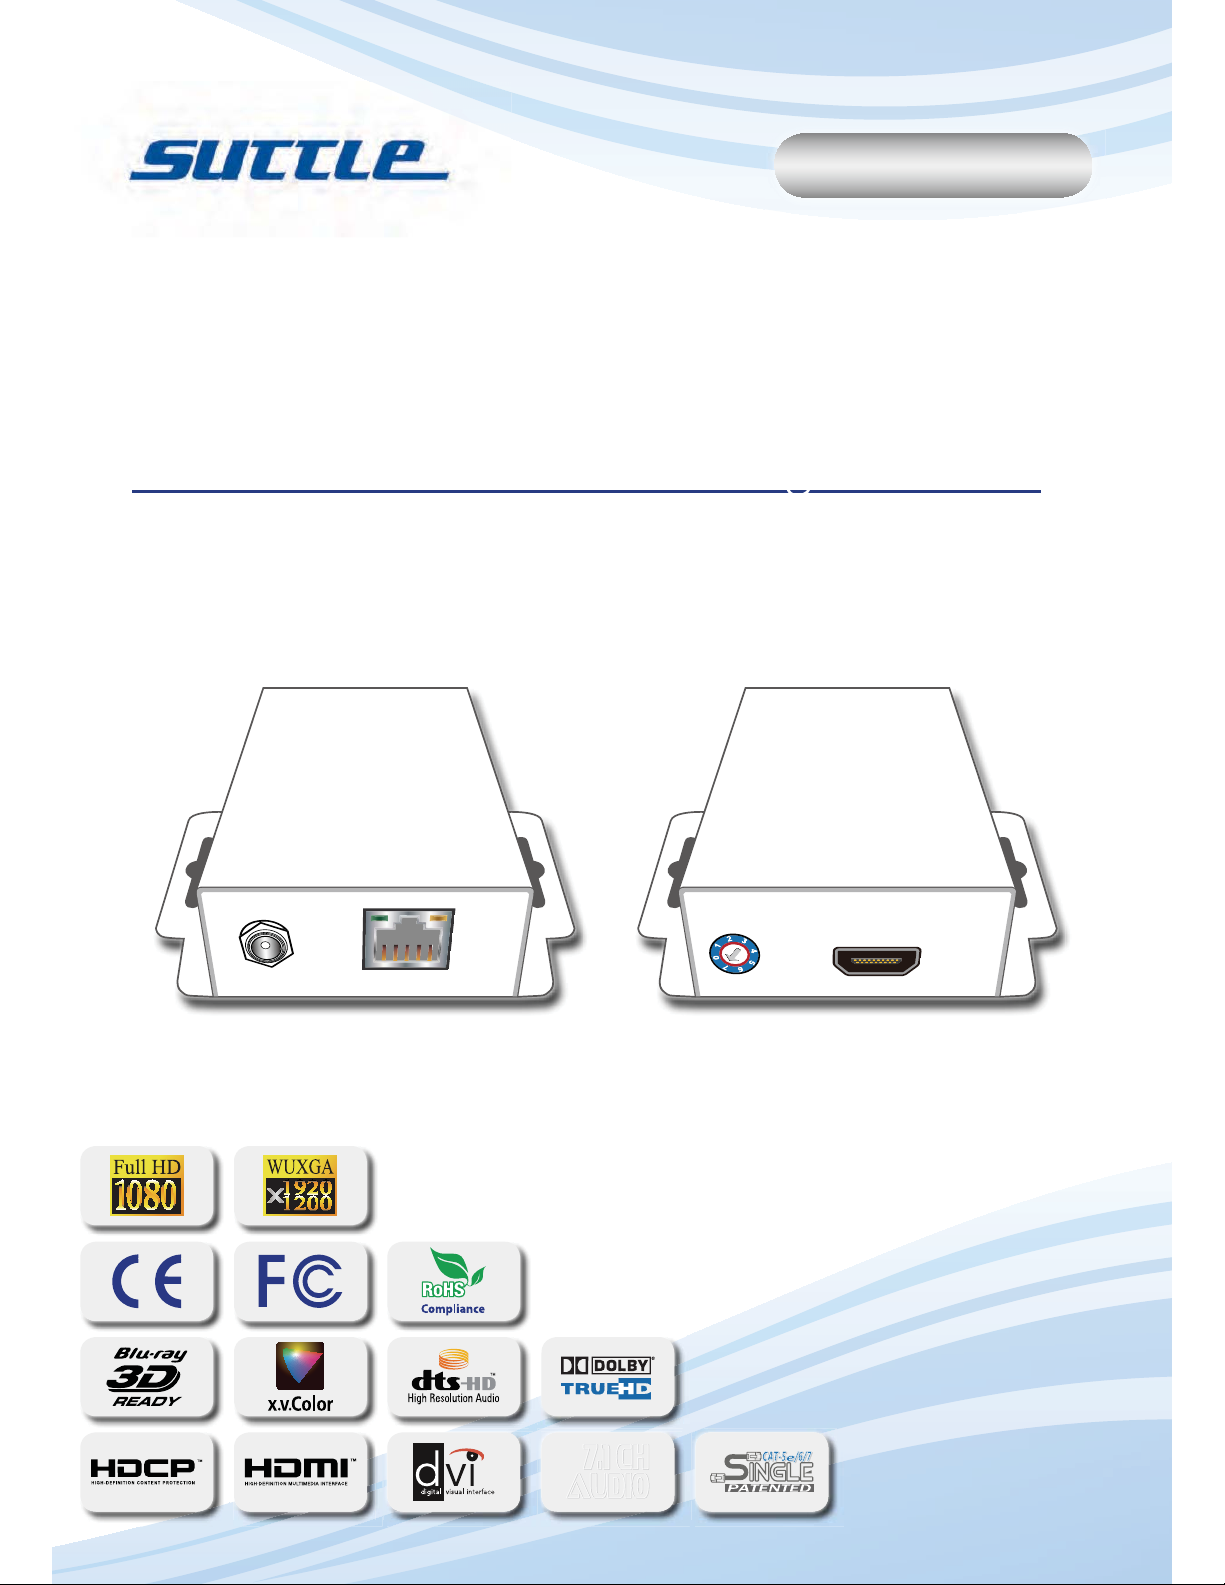
User Manual
H5EA
HDMI Extender over Single Cat5e
7.1 CH
7.1 CH
AUDIO
AUDIO
rev: 110127
Made in Taiwan
Page 2
Safety and Notice
The H5EA HDMI Extender over Single Cat5e has been tested for conformance to safety
regulations and requirements, and has been certified for international use. However, like all
electronic equipments, the H5EA should be used with care. Please read and follow the safety
instructions to protect yourself from possible injury and to minimize the risk of damage to the
unit.
● Follow all instructions and warnings marked on this unit.
● Do not attempt to service this unit yourself, except where explained in this manual.
● Provide proper ventilation and air circulation and do not use near water.
● Keep objects that might damage the device and assure that the placement of this unit is on a
stable surface.
● Use only the power adapter and power cords and connection cables designed for this unit.
● Do not use liquid or aerosol cleaners to clean this unit. Always unplug the power to the device
before cleaning.
TABLE OF CONTENTS
INTRODUCTION ............................... 1
FEATURES ........................................ 1
SPECIFICATIONS ............................. 2
PACKAGE CONTENTS .................... 3
PANEL DESCRIPTIONS .................. 3
Transmitting unit ........................ ........ 3
Receiving unit ................................... 5
INSTALLATION .................................. 6
CONNECTION DIAGRAM ................ 6
EDID LEARNING .............................. 7
NOTICE ............................................. 7
PERFORMANCE GUIDE .................. 8
RJ45 / CAT5 PIN DEFINITION ......... 8
Page 3
INTRODUCTION
The H5EA HDMI Extender over Single Cat5e boosts up your video/audio transmission distance up
to 60m (200ft) in HDTV 1080i format, 40m (130ft) in HDTV 1080p format, and 20m (65ft) in HDTV 1080p
with 36 bit color depth. With only one cost effective Cat5e cable, users can readily extend HDTV sources
from DVD players, Blu-ray Disc player, PS3, PC, and any other kinds of sources compliant with TMDS
to distant display monitors including HDMI/DVI enabled TV sets or LCD PC monitors. With the state-ofthe-art Silicon Image chipsets equipped, deep color video, DTS-HD or Dolby TrueHD audio, and HDCP
supports and compatibility are all further insured. This flexibility makes HDCP compliant DVD players
or PS3 transmit utmost high quality video and audio with a greater distance at the minimal cost, when
integrating several components apart.
The H5EA includes two units: an HDMI transmitting unit and an HDMI receiving unit. The
transmitting unit is used to capture the input HDMI/DVI signals and carry the signals through one RJ45
connector into one cost effective Cat-5/5e/6 cable. The receiving unit is responsible for equalizing the
transmitted HDMI signal. The transmission distance between the sending and receiving units can be up
to 60m (200ft) under HD (720p/1080i) or 40m (130ft) under Full HD (1080p). With an 8-level equalization
rotary control on the receiving unit, users can adjust the equalization strength to the received HDMI
signals accordingly, and therefore optimize the transmission distance between source and destination.
FEATURES
● State-of-the-art Silicon Image (founder of HDMI) chipset embedded for utmost compatibility and
reliability
● HDMI 1.3c compliant
● HDCP 1.1 compliant
● Extends the transmission distance up to 60m (200ft) from the sources under 1080i or 720p
● Extends the transmission distance up to 40m (130ft) from the sources under 1080p
● Provides independent DDC channel, fully HDCP compliant
● Minimizes the cable skew by adjustable 8-level equalization rotary control switch
● Pure unaltered uncompressed 7.1ch digital HDMI over UTP cable transmission
● Allows cascading
● Wall mounting housing design for easy and robust installation
● Perfectly integrated with other HDMI over CAT5e series products
The claimed transmission distance here is subject to the grade of installed cable(s), source
device and display.
i
For CAT5/COAX transmission, the cable(s) has to be solid, not stranded. Any jacks
along the transmission path may reduce the transmission performance significantly!
1
Page 4
SPECIFICATIONS
Model Name H5EA
Technical Transmitting Unit Receiving Unit
Role of usage Transmitter [TX] Receiver [RX]
HDMI compliance High Speed HDMI - Deep Color & 3D support
HDCP compliance Yes
Video bandwidth Single-link 225MHz [6.75Gbps]
Video support 480i / 480p / 720p / 1080i / 1080p60 up to 36-bit color
HDMI over UTP
Audio support Surround sound [up to 7.1ch) or stereo digital audio
Equalization 8-level digital control at RX
Input TMDS signal 1.2 Volts [peak-to-peak]
Input DDC signal 5 Volts [peak-to-peak, TTL]
ESD protection
PCB stack-up 4-layer board [impedance control — differential 100Ω; single 50Ω]
Input 1x HDMI 1x RJ-45
Output 1x RJ-45 1x HDMI
HDMI connector Type A [19-pin female]
RJ-45 connector WE/SS 8P8C with 2 LED indicators
Rotary switch Mode 8-level signal equalization
Mechanical
Housing Metal enclosure
Model [TX/RX] 91 x 60 x 26mm [3.6" x 2.4" x 1.0"]
Dimensions
[L x W x H]
Package 270 x 175 x 80mm [10.6" x 6.9" x 3.1"]
Carton 450 x 370 x 300mm [1'6" x 1'3" x 11.8"]
[1] Human body model — ±19kV [air-gap discharge] & ±12kV [contact discharge]
[2] Core chipset — ±8kV
Full HD (1080p)-40m (130ft) [CAT5e] /50m (165ft) [CAT6]
HD (720p/1080i)-50m (165ft) [CAT5e] / 60m (200ft) [CAT6]
Weight
Fixedness Wall-mounting case with screws
Power supply 5V 2A DC
Power consumption 4 Watt [max] 1.5 Watt [max]
Operation temperature 0~40°C [32~104°F]
Storage temperature -20~60°C [-4~140°F]
Relative humidity 20~90% RH [no condensation]
2
Model 200g [7.1 oz] 196g [6.9 oz]
Package 900g [2.0 lbs]
Page 5
PACKAGE CONTENTS
214
3
1
2
3
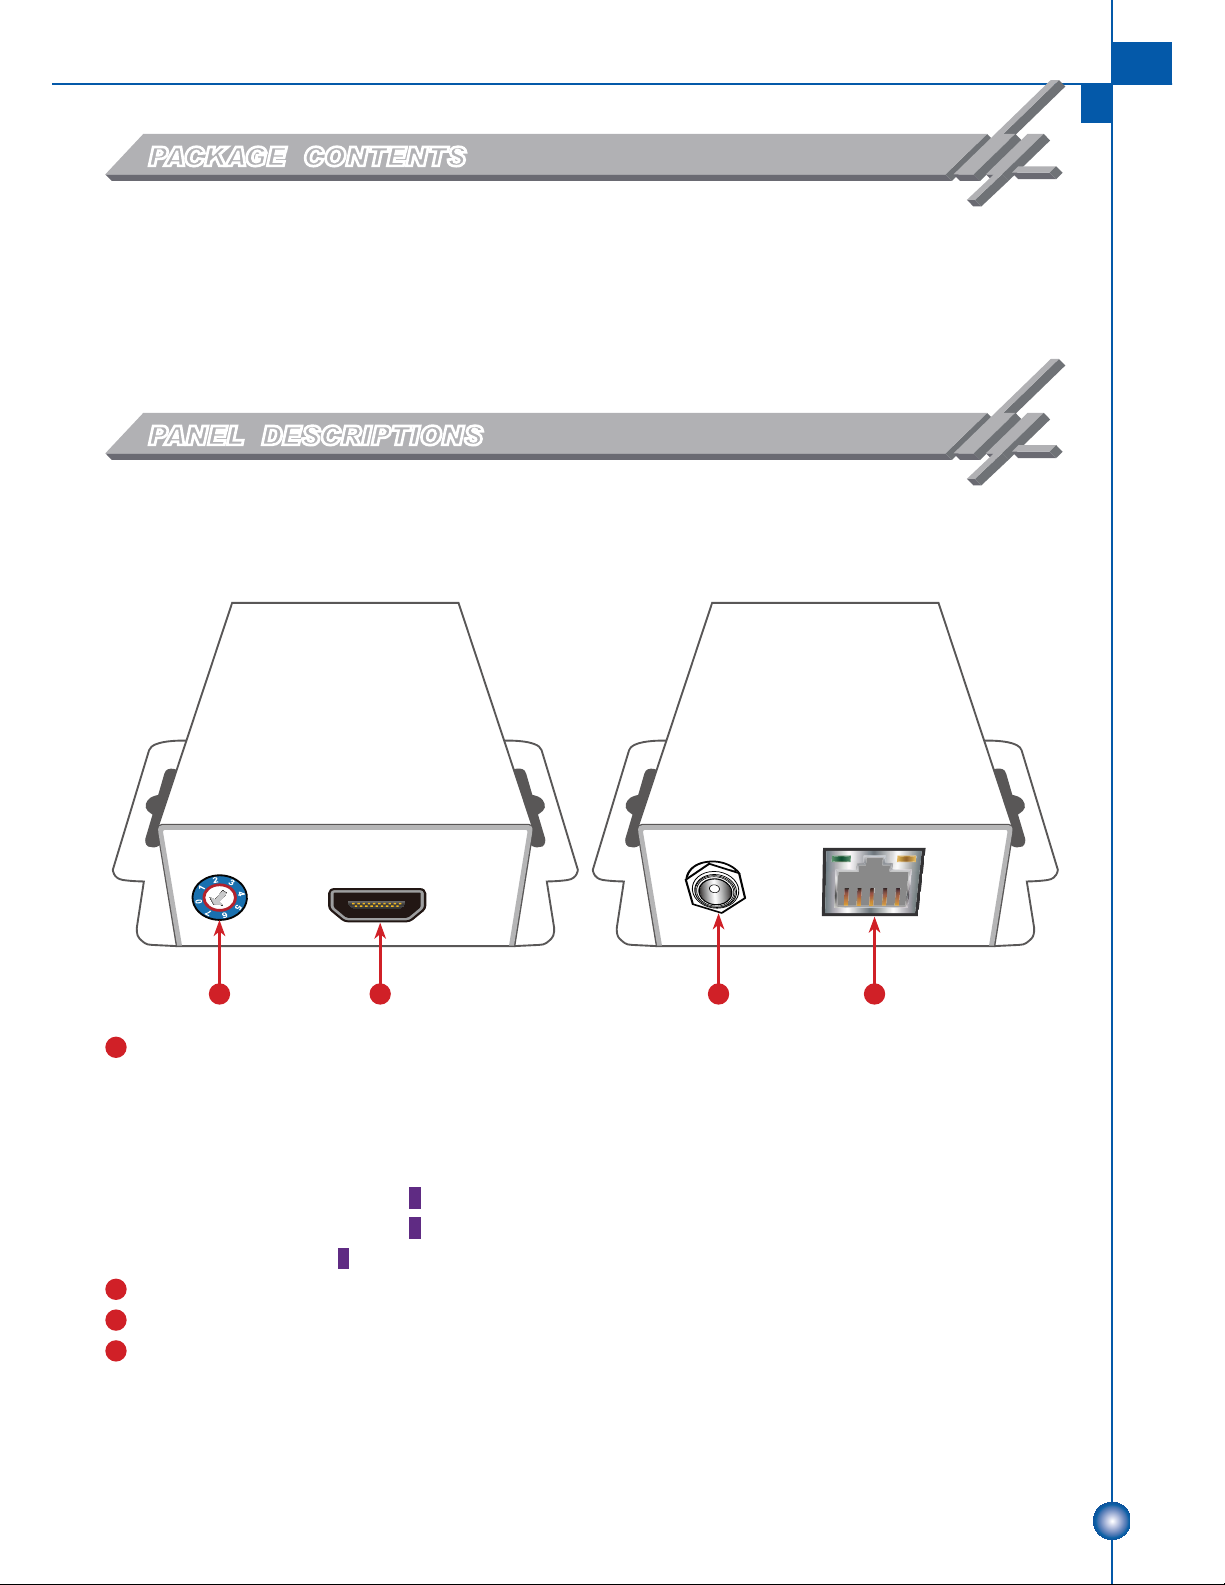
● 1x H5EA [TX & RX]
● 2x DC 5V 2A External Power Supply
● 1x User Manual
PANEL DESCRIPTIONS
Input Panel Output Panel
Transmitting unit
MODE SET: 0 – Supported up to 1080p 36-bit video and up to 7.1ch audio output.
1 – Supported up to 1080p 36-bit video and stereo audio output.
2 – Supported up to 1080p 24-bit video and up to 7.1ch audio output.
3 – Supported up to 1080p 24-bit video and stereo audio output.
4 – Supported up to 1080p 24-bit video in DVI mode and no audio output.
5 – Default EDID
6 – Default EDID
7 – EDID
HDMI IN: Connect to a HDMI source device with a HDMI male-male cable.
+5V DC: Connect to 5V DC power supply unit.
4 HDMI Signal OUT: Connect to the HDMI Signal IN on the receiver unit with a solid
CAT5e/6 UTP/STP cable.
3 learning from the display
1 with up to 1080p 24-bit and stereo audio output
2 with up to 1080p 24-bit and up to 7.1ch audio output
3
Page 6
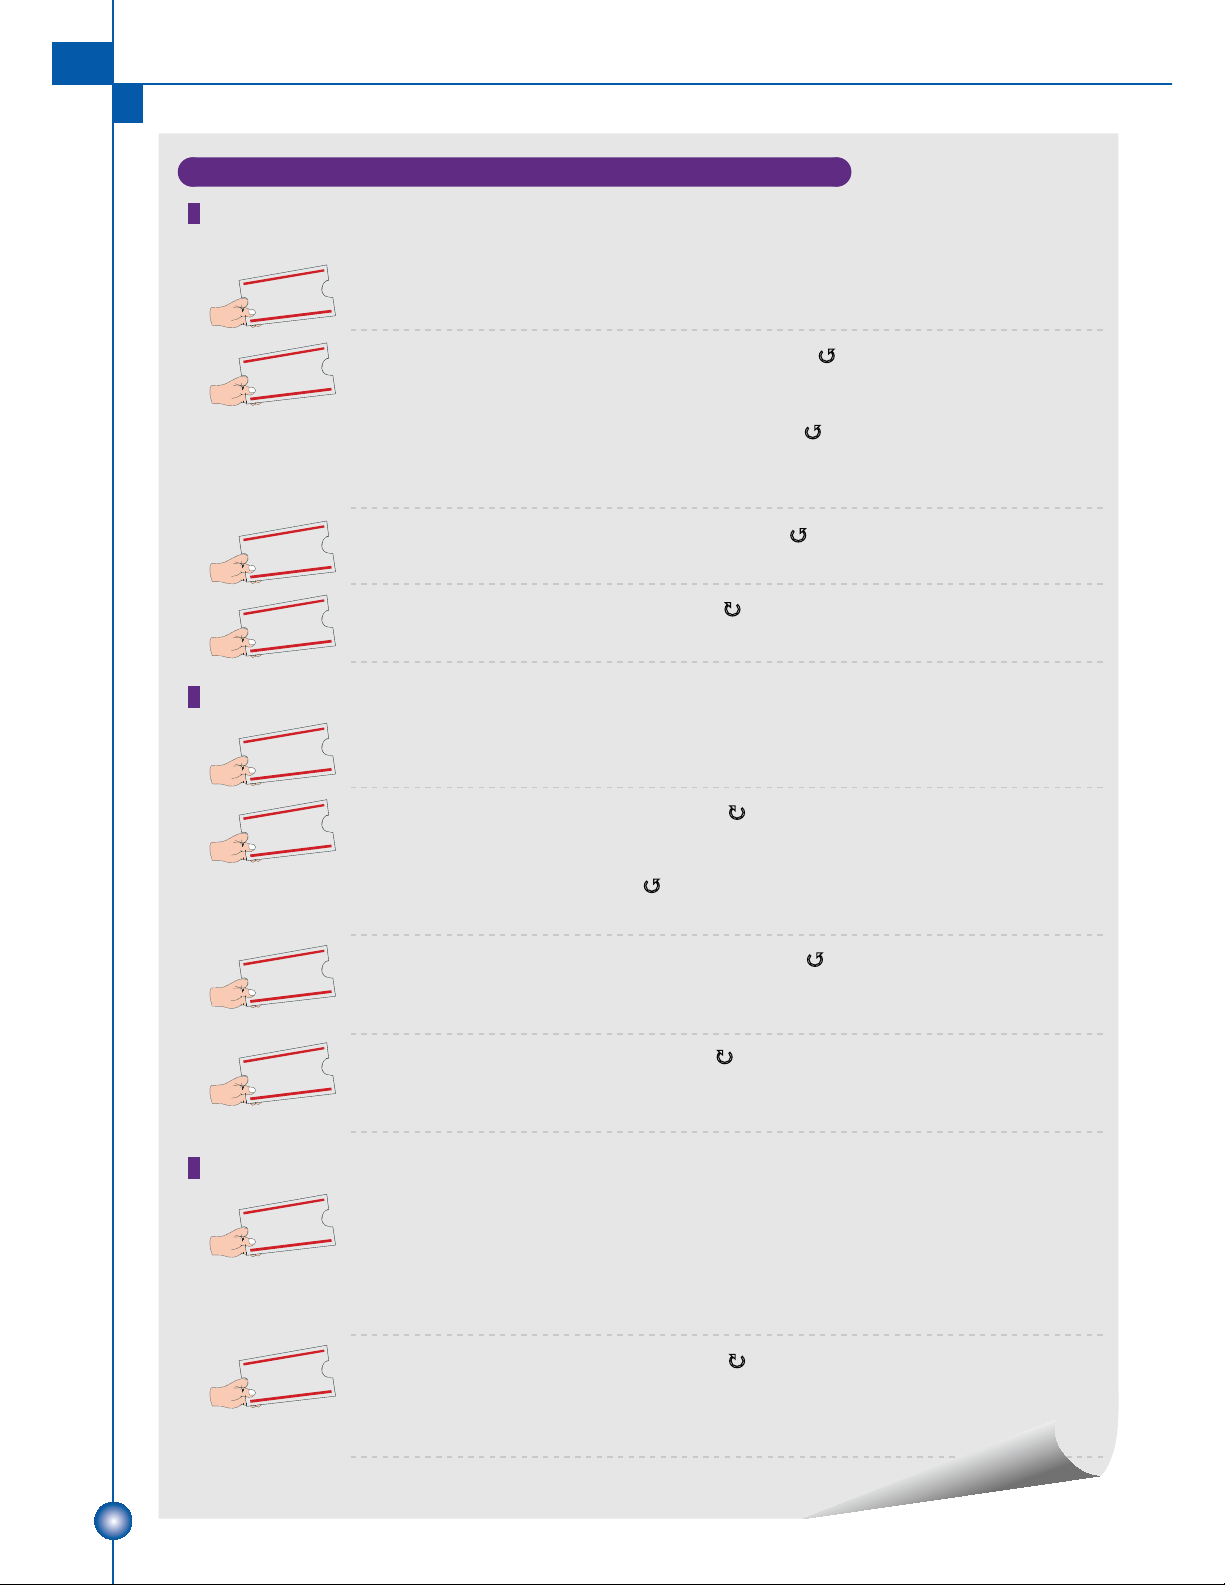
Note for EDID (Extended Display Identification Data) learning
1 If you cannot get the audio / video output from the connected display from the first time
setup. Please follow the instructions below to check if the extender is OK:
Please set the rotary arrow on TX at "Mode 5" for Safe Mode, and wait for the
Step 1
Step 2
Step 3
Step 4
2 For desirable 1080p video output, please follow the instructions below:
Step 1
LED of the RJ45 connector blinks for a couple seconds.
Please turn the rotary arrow counterclockwise [] from Mode 5 to Mode 3.
If you can get audio / video from the display, you can stay tune at this setting
for 1080p and stereo audio. If you need to get 1080p with 7.1ch audio output,
please turn the rotary arrow counterclockwise [
you cannot get the audio / video output normally, please go on to the following
steps.
Please turn the rotary arrow counterclockwise [] from Mode 3 to Mode 7. Wait
a few seconds until the LED of the RJ45 connector dims and then lights again.
Please turn the rotary arrow clockwise [] from Mode 7 to Mode 1. You should
have normal audio / video output. If not, please contact technical support.
Please set the rotary arrow on TX at "Mode 6" for Default Mode, and wait for the
LED of the RJ45 connector blinks for a couple seconds.
] from Mode 3 to Mode 2. If
Please turn the rotary arrow clockwise [
Step 2
Step 3
Step 4
3 To learn EDID from the HDMI display, please follow the instruction below:
Step 1
Step 2
get audio / video from the display, you can stay tune at this setting for 1080p and
stereo audio. If you need to get 1080p with 7.1ch audio output, please turn the
rotary arrow counterclockwise [
audio / video out normally, please go on the next step.
Please turn the rotary arrow counterclockwise [] from Mode 0/1 to Mode 7.
Wait a few seconds until the LED of the RJ45 connector dims and then lights
again.
Please turn the rotary arrow clockwise [
have your desirable audio / video output. If not, please follow the instruction in
Note#1.
Please connect the display which you want to read EDID with a HDMI cable to the
transmitter's HDMI IN and set the rotary arrow at
EDID information from the connected display. The LED on the RJ45 connector of
TX will dim and light again in a few seconds, which indicates the EDID learning
procedure is complete.
Please turn the rotary arrow clockwise [
for desirable audio setting and enjoy the experience. DO NOT let the rotary
arrow pass by
restore the default EDID.
Mode 5 and Mode 6 which will erase the EDID just learned and
] from Mode 1 to Mode 0. If you cannot get the
] from Mode 6 to Mode 1. If you can
] from Mode 7 to Mode 0/1. You should
Mode 7 so the TX can learn the
] from Mode 7 to Mode 0 or Mode 1
4
Page 7
Receiving unit
214
3
1
3
4
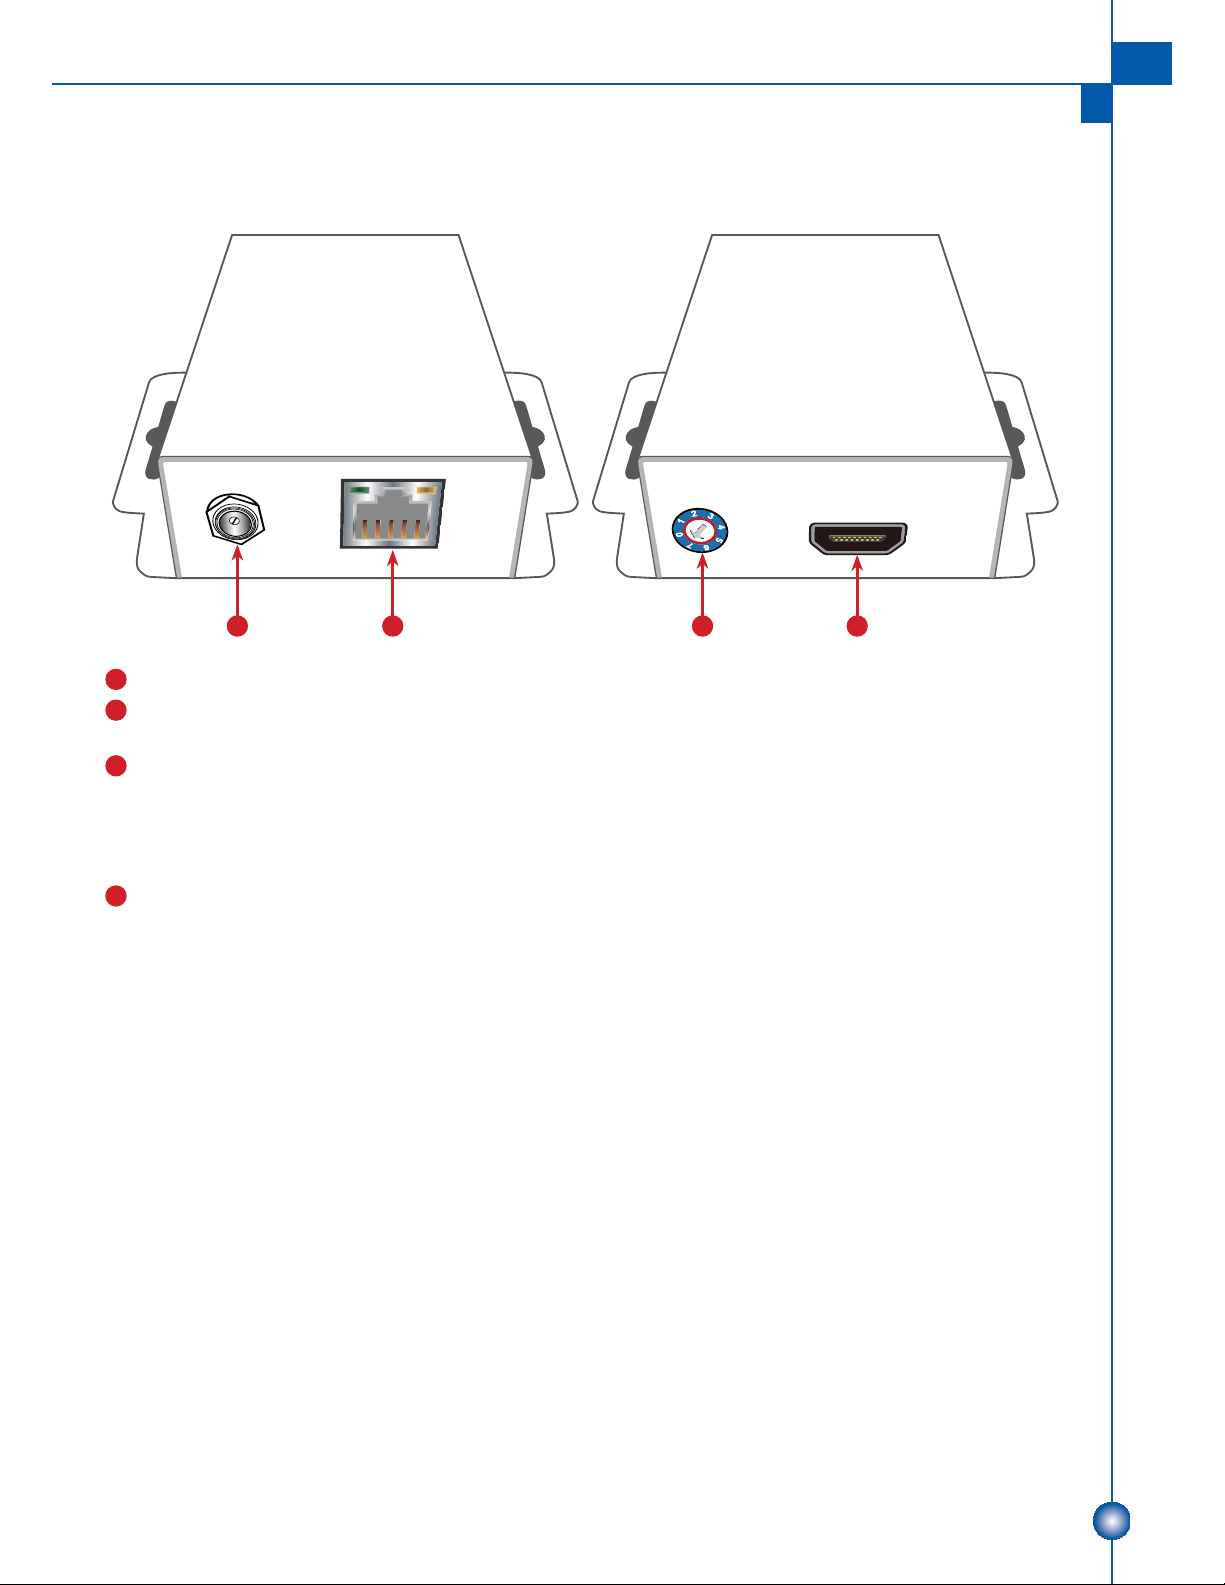
Input Panel Output Panel
+5V DC: Connect to 5V DC power supply unit.
2 HDMI Signal IN: Connect to the HDMI Signal OUT on the transmitter unit with a solid
Cat5e/6 UTP/STP cable.
Signal Level: Adjust the 8-level signal equalization control to the received HDMI signals. The
HDMI signal level varies from 0 (strongest) to 7 (weakest) for respective transmission length from
longest possible range to short distance. Dial the Signal Level from 7 to 0 and stop turning the rotary
switch whenever the audio/video is playing normally. Inappropriate signal level setting may cause
overpowering issues that would shorten the product's life significantly!
HDMI OUT: Connect to a HDMI display or projector with a HDMI male-male cable.
5
Page 8
INSTALLATION
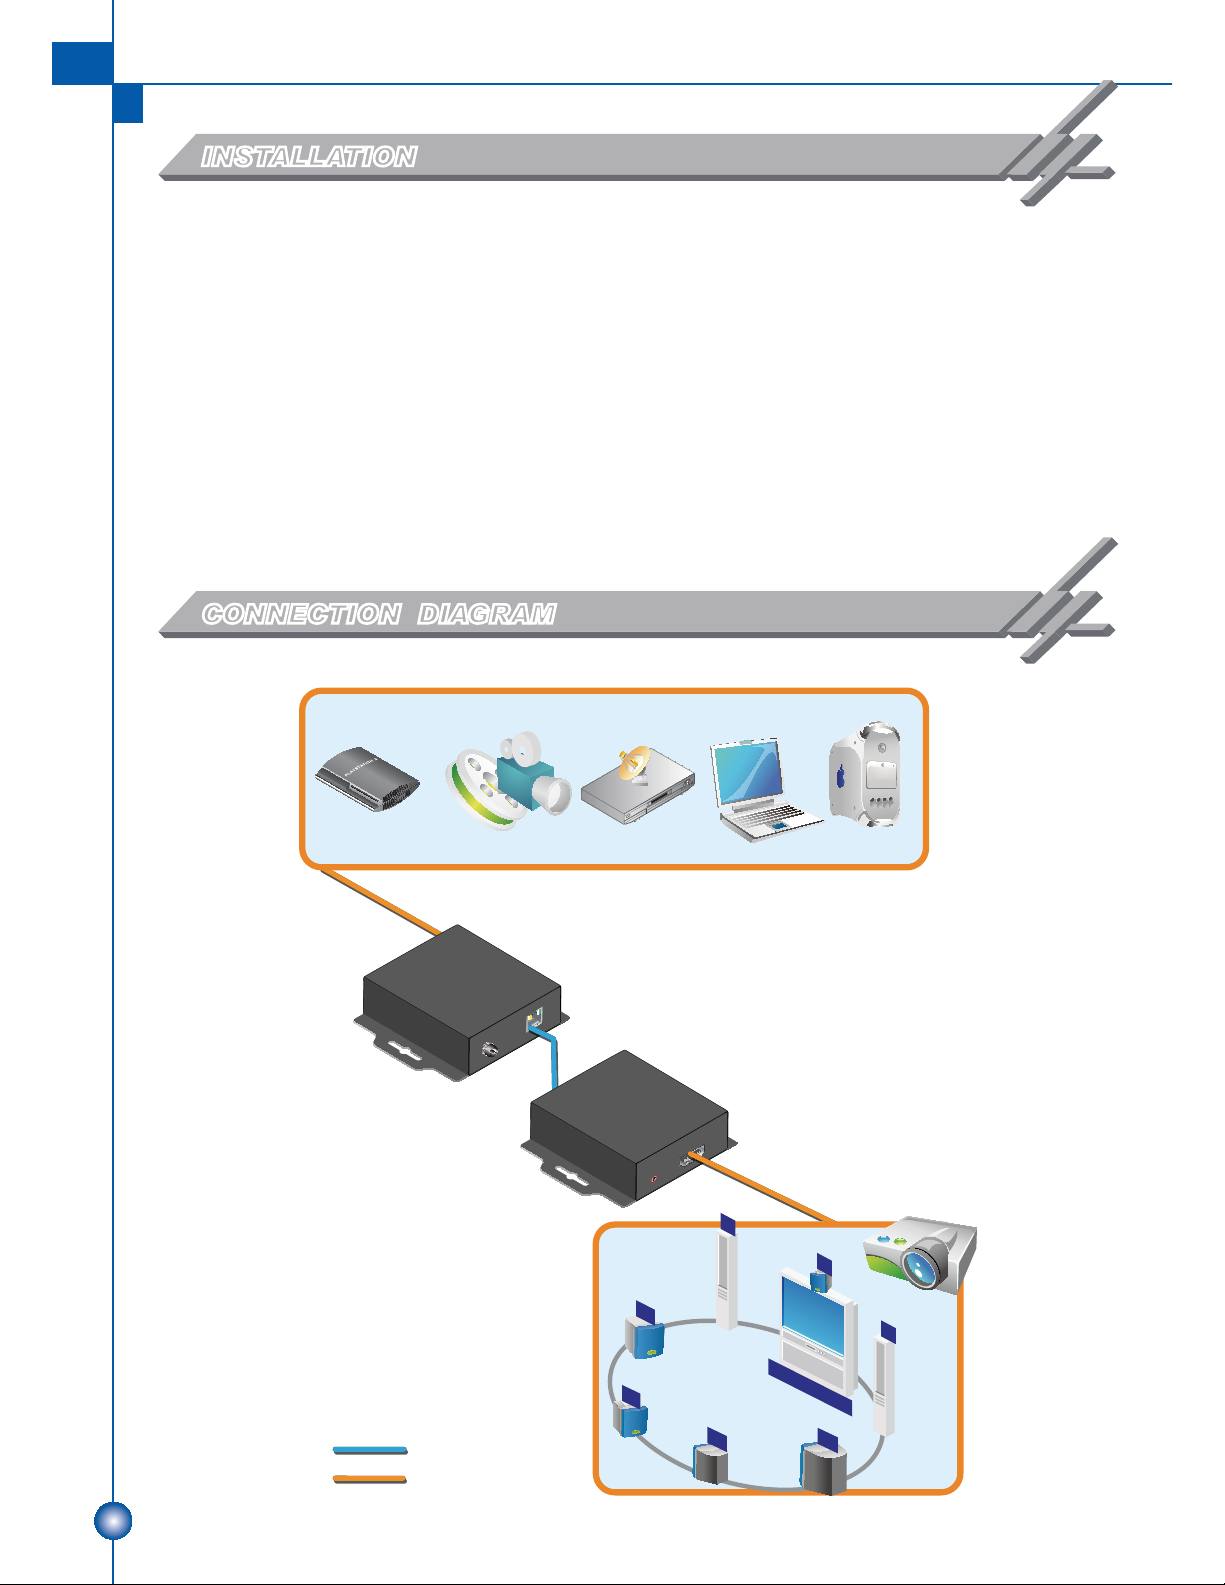
1. Connect a HDMI or DVI source (e.g., a Blu-ray Disc player) to the Transmitter Unit.
2. Connect a HDMI or DVI display (e.g., a LCD HDTV) to the Receiver Unit.
3. Connect a solid Cat-5/5e/6 UTP/STP cable between the Transmitter and Receiver units.
4. Make sure this solid Cat-5/5e/6 UTP/STP cable is tightly connected and not loose.
5. Plug in the 5V DC power supply units to the locking power jack on the Receiver and
Transmitter Unit.
6. If you see flickering or blinking image on the display, adjust the rotary control switch to improve the
cable skew. 0 stands for the strongest HDMI signal level for longest possible transmission length while
7 stands for the weakest HDMI signal level for short transmission length. Try adjusting the signal level
from 7 to 0 to find the optimal setting for the HDMI over CAT5e transmission.
CONNECTION DIAGRAM
HDMI
H5EA
TX
Cat5e Cable
HDMI Cable
H5EA
RX
LS
LB
L
RB
HDMI
C
R
HDMI Display
RS
6
Page 9
EDID LEARNING
1. Turn on Transmitter unit.
2. Set the MODE on the Transmitter unit to 7.
3. Connect the HDMI display to the HDMI IN of Transmitter unit with a HDMI cable. The LED
on the RJ45 connector will dim and light again, which indicates the EDID learning procedure
is complete.
4. Dial the MODE of the Transmitter unit clockwise [
The most important thing is don't let the rotary arrow pass through MODE 5 and MODE 6 which will
erase the EDID just learned and restore to default EDID.
5. Unplug the HDMI cable from the display and follow the instruction in [INSTALLATION] section to set
up the H5EA and enjoy the experience.
] from 7 to 0 (for surround sound) or 1 (for stereo).
NOTICE
1. When adjusting the signal level on the receiver unit, please dial the rotary control switch from 7 to 0
and stop turning the rotary switch whenever the audio/video is playing normally. Inappropriate signal
level setting may cause overpowering issue that would shorten the product life significantly!
2. If the DVI or HDMI device requires the EDID information, please use CV-1001 or CV-5005H EDID
Reader/Writer to retrieve and provide DVI or HDMI display EDID information.
3. All HDMI over CAT5 transmission distances are measured using Belden 1583A CAT5e 125MHz UTP
cable and ASTRODESIGN Video Signal Generator VG-859C & VG-870B.
4. The transmission length is largely affected by the type of Cat-5/5e/6 cables, the type of HDMI sources,
and the type of HDMI display. The testing result shows solid UTP cables (usually in the form of 330m
[1,000ft] bulk cables) can transmit a lot longer signals than stranded UTP cables (usually in the form
of fixed length patch cords). Shielded STP cables are better suited than unshielded UTP cables. A
solid UTP Cat-5e cable shows longer transmission range than stranded STP Cat-6 cable. For long
extension applications, solid UTP/STP cables are the only viable choice.
5. EIA/TIA-568-B termination (T568B) for Cat5e/6 cables is recommended.
6. To reduce the interference among the unshielded twisted pairs of wires in Cat-5/5e/6 cable, one can
use double shielded STP cables to improve EMI problems, which is worsen in long transmission.
7. Because the quality of the category cables has the major effect on how long the transmission limit can
achieve and how good is the received picture quality, the actual transmission range is subject to one's
choice of Cat-5/5e/6 cables. For desired resolutions greater than 1080i or 1280x1024, a Cat-6 cable is
recommended.
8. If your HDMI display has multiple HDMI inputs, it is found that the first HDMI input [HDMI input 1]
generally can produce better transmission performance among all HDMI inputs.
7
Page 10
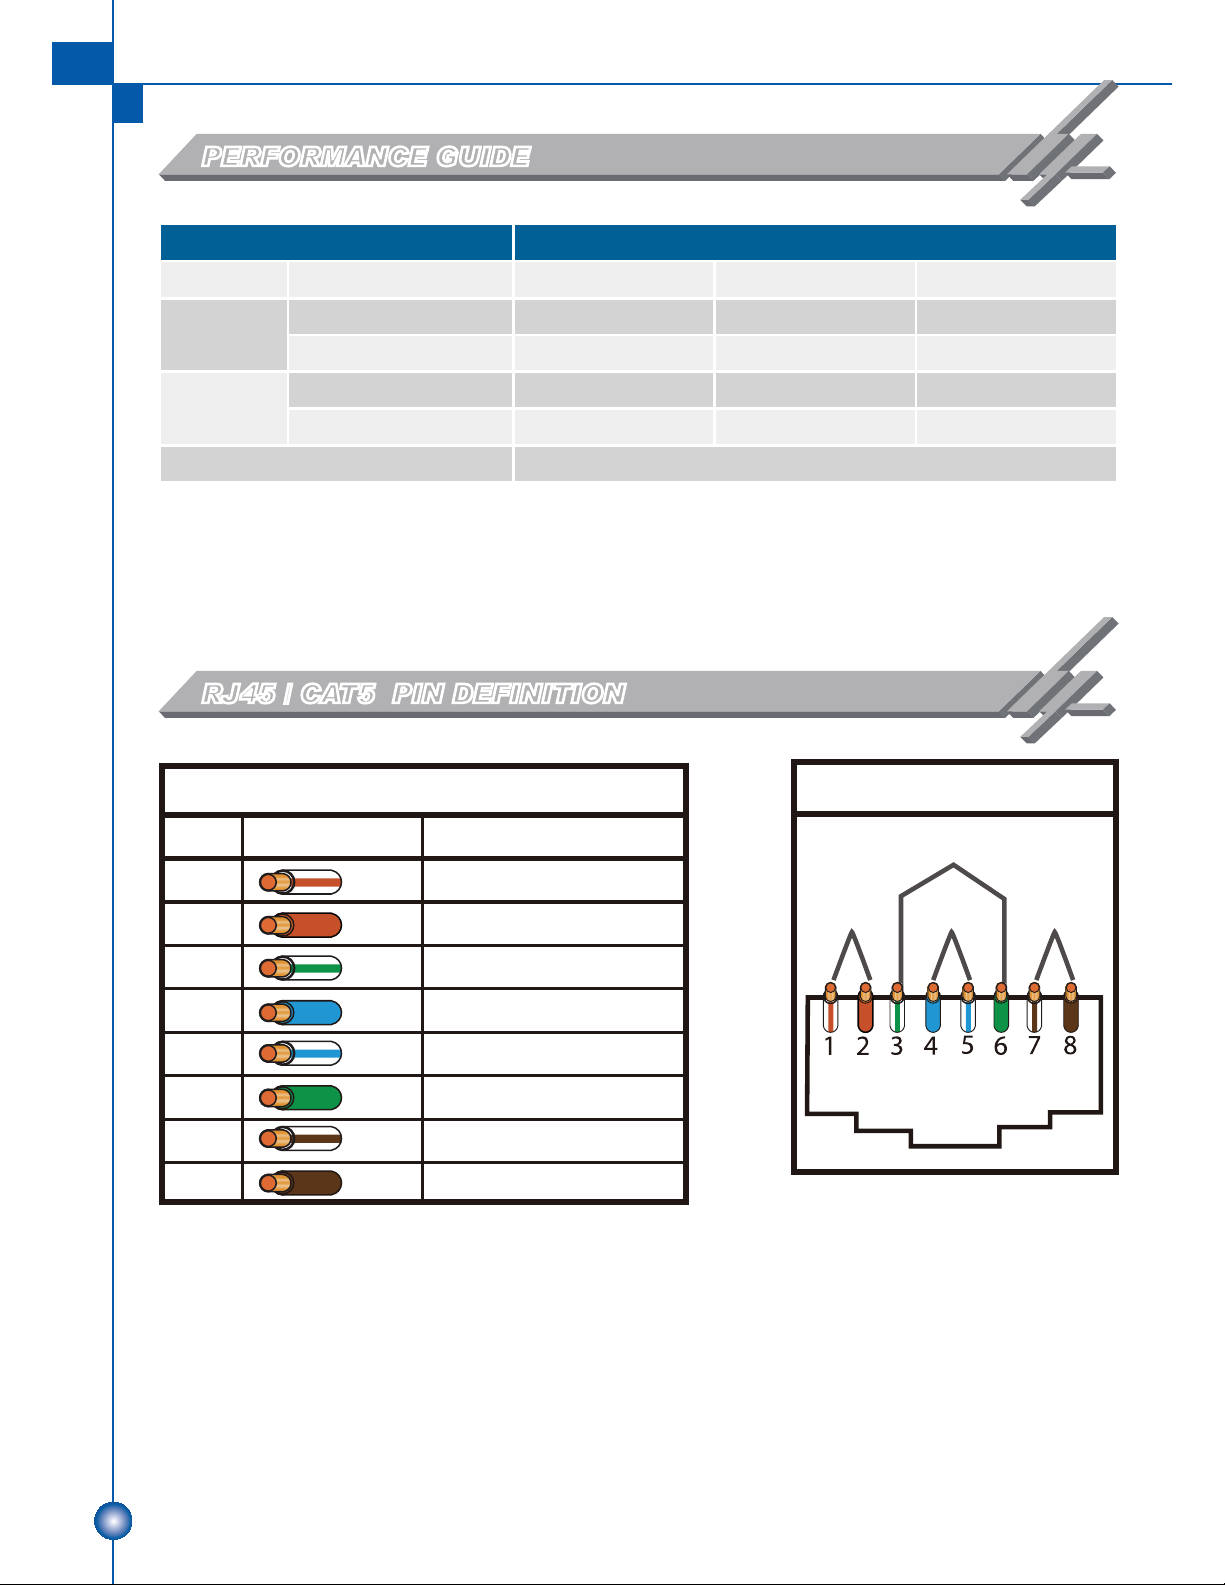
PERFORMANCE GUIDE
Performance rating Type of category cable
Wiring Shielding CAT5 CAT5e CAT6
Solid
Unshielded (UTP)
Shielded (STP)
Unshielded (UTP)
Stranded
Shielded (STP)
Termination Please use EIA/TIA-568-B termination (T568B) at any time
RJ45 / CAT5 PIN DEFINITION
RJ-45 Jack
PAIR3
PIN
1
Data Link TIA/EIA-568-B
Color
W-O
Function
TX0-
2
3
4
5
6
7
8
O
W-G
BL
W-BL
G
W-BR
BR
TX0+
TX1-
TX2-
TX2+
TX1+
TXC-
TXC+
W-O O W-G
JACK POSITION
PAIR1PAIR2 PAIR4
BL
W-BL
G
W-BR
BR
8
 Loading...