

Page 1

KNIFE SHARPENER
Product No.: 148006
www.sutter-gmbh.de
Seite 1
Vertrieb durch: SUTTER GmbH, Am Diesenborn 2, 66606 St. Wendel - Tel.: 06856 92023 - Fax: 06856 92025 - eMail: kontakt@sutter-gmbh.de
Page 2
KNIFE SHARPENER
Product No.: 148006
www.sutter-gmbh.de
Seite 2
Vertrieb durch: SUTTER GmbH, Am Diesenborn 2, 66606 St. Wendel - Tel.: 06856 92023 - Fax: 06856 92025 - eMail: kontakt@sutter-gmbh.de
Page 3
KNIFE SHARPENER
Product No.: 148006
www.sutter-gmbh.de
Seite 3
Vertrieb durch: SUTTER GmbH, Am Diesenborn 2, 66606 St. Wendel - Tel.: 06856 92023 - Fax: 06856 92025 - eMail: kontakt@sutter-gmbh.de
TABLE OF CONTENTS
SET UP INSTRUCTIONS ............................................................................................................................. 4
SET THE SHARPENING ANGLE .................................................................................................................. 5
SE T THE KNIFE GUIDE ............................................................................................................................. 7
OPERATING INSTRUCTIONS ..................................................................................................................... 8
FINISHING THE EDGE-SHARPENING STEELS .......................................................................................... 12
SHORT BLADES....................................................................................................................................... 12
HOLLOW GROUND/SPORT KNIVES ........................................................................................................ 13
GUIDE CLIP ............................................................................................................................................. 13
THINNING THE BLADE ........................................................................................................................... 13
SHARPENING SERRATED EDGES ............................................................................................................ 14
SHARPENING WITHOUT SCRATCHING THE BLADE ................................................................................ 14
THE ULTIMATE EDGE ............................................................................................................................. 14
Painters Tape: l recommend keeping a clean piece of Painters Tape on the end of the BLADE TABLE.
It helps to keep from scratching the blade. There is more on this on page l2. It also keeps you from
cutting into the end of the BLADE TABLE, while you are learning to use the machine. It is not
noticeable if the stone cuts into the plastic, but you can easily see when you hit the tape because the
tape turns from blue to black.
Page 4

KNIFE SHARPENER
Product No.: 148006
www.sutter-gmbh.de
Seite 4
Vertrieb durch: SUTTER GmbH, Am Diesenborn 2, 66606 St. Wendel - Tel.: 06856 92023 - Fax: 06856 92025 - eMail: kontakt@sutter-gmbh.de
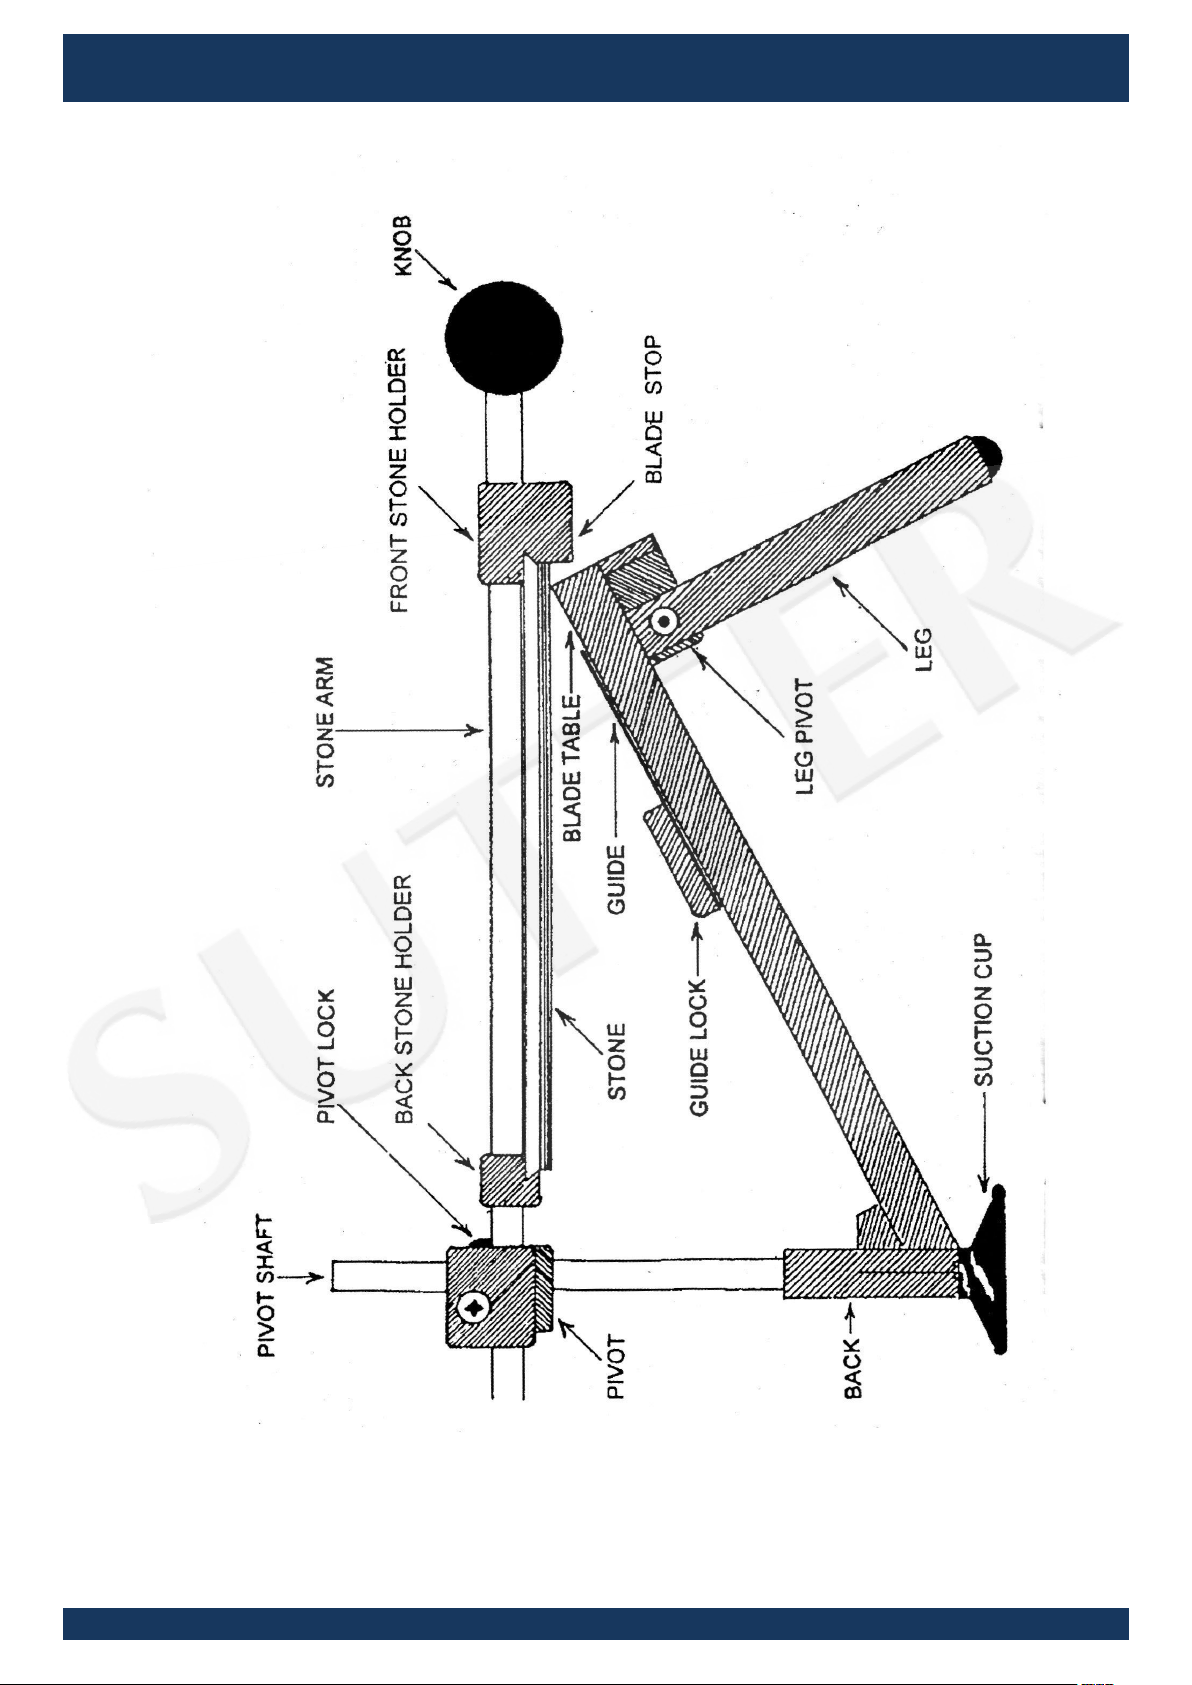
SET UP INSTRUCTIONS
(The Parts of the APEX are referred to in CAPITAL LETTERS)
1. Rotate the LEGS out to 90°. Stick the suction cups down dry, onto a smooth, non-porous
surface. If they won't stick, wipe them with a moist cloth. Too much water and they will slide
around.
2. Insert the PIVOT SHAFT into the BACK. Turn the SHAFT so that the PIN slides down the
VERTICAL SLOT. Rotate the SHAFT so that the colored degree marks are facing you.
3. Start with MEDIUM on a very dull knife or a FINE stone for a knife in good shape.
4. To change stones, turn the KNOB a couple of turns counter-clockwise. Grasp the STONE
ARM, with one STONE HOLDER in each hand. Pull the FRONT STONE HOLDER until the STONE
snaps free, and slide the STONE out sideways. Slide a new STONE in and tighten the KNOB
firmly, but not hard.
5. To attach the STONE ARM to the MACHINE, turn the PIVOT so that the LOCK KNOB is on your
right. Slide the PIVOT on to the PIVOT SHAFT.
Page 5
KNIFE SHARPENER
Product No.: 148006
www.sutter-gmbh.de
Seite 5
Vertrieb durch: SUTTER GmbH, Am Diesenborn 2, 66606 St. Wendel - Tel.: 06856 92023 - Fax: 06856 92025 - eMail: kontakt@sutter-gmbh.de
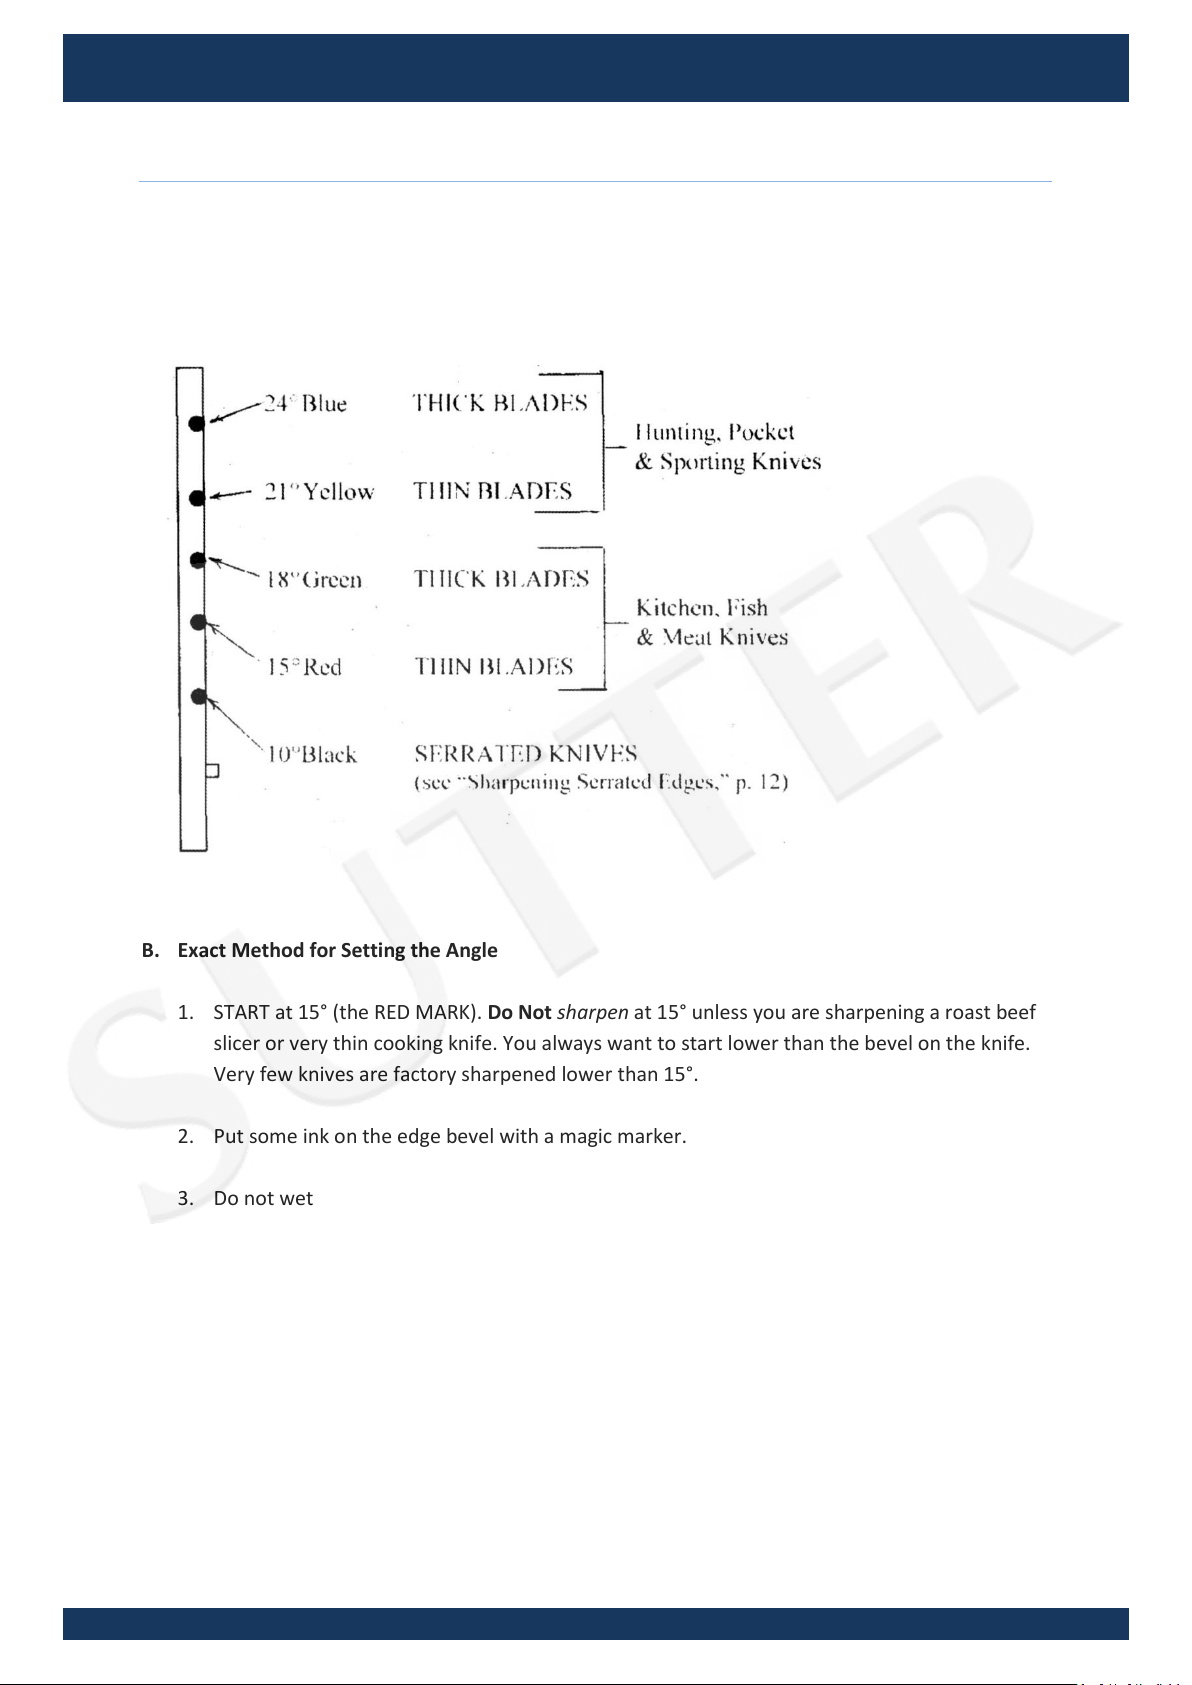
SET THE SHARPENING ANGLE
Set the STONE ARM so that the desired ANGLE INDICATOR MARK is showing just above the PIVOT.
A. Basic Method for Setting the Angle
B. Exact Method for Setting the Angle
1. START at 15° (the RED MARK). Do Not sharpen at 15° unless you are sharpening a roast beef
slicer or very thin cooking knife. You always want to start lower than the bevel on the knife.
Very few knives are factory sharpened lower than 15°.
2. Put some ink on the edge bevel with a magic marker.
3. Do not wet the STONE. Stroke the STONE very lightly across the edge of the blade. Now you
can see where the stone is cutting in relation to the bevel of the knife. Proceed as follows:
Page 6

KNIFE SHARPENER
Product No.: 148006
www.sutter-gmbh.de
Seite 6
Vertrieb durch: SUTTER GmbH, Am Diesenborn 2, 66606 St. Wendel - Tel.: 06856 92023 - Fax: 06856 92025 - eMail: kontakt@sutter-gmbh.de
STONE removes the ink only at
STONE removes the ink along
STONE removes the ink just at
PIVOT and retest.
EXAMPLE 1 – Stone too low
the lop edge of the BEVEL. The
STONE is too low. Raise PIVOT
and retest.
EXAMPLE 2 - Correct
EXAMPLE 3 – Stone too high
most of the BEVEL. Angle is just
right. Sharpen at this angle.
the lower edge of the EDGE
BEVEL. STONE is too high. Lower
Page 7

KNIFE SHARPENER
Product No.: 148006
www.sutter-gmbh.de
Seite 7
Vertrieb durch: SUTTER GmbH, Am Diesenborn 2, 66606 St. Wendel - Tel.: 06856 92023 - Fax: 06856 92025 - eMail: kontakt@sutter-gmbh.de
SET THE KNIFE GUIDE
Position the blade so that the narrowest part of the blade is parallel to and just over the end of the
BLADE TABLE. Position the GUIDE against the back of the blade and tighten the GUIDE LOCK.
HINT: You want as much of the blade as possible, resting on the BLADE TABLE, but you do not want
the stone to cut into the end of the BLADE TABLE as you sharpen.
HINT: Start with your larger knives - they are easier to hold.
HINT: Keep the portion of the edge, that you are sharpening, parallel to the front of the guide as YOU
draw the blade across the BLADE TABLE.
Page 8

KNIFE SHARPENER
Product No.: 148006
www.sutter-gmbh.de
Seite 8
Vertrieb durch: SUTTER GmbH, Am Diesenborn 2, 66606 St. Wendel - Tel.: 06856 92023 - Fax: 06856 92025 - eMail: kontakt@sutter-gmbh.de
OPERATING INSTRUCTIONS
OVERVIEW of how the machine works: With one hand you move the STONE ARM forward and back.
With the other hand, you draw the knife blade under the moving stone, keeping the portion of the
edge that you are sharpening parallel to the front of the GUIDE. This takes some practice. At first you
will hold the knife tighter than necessary. But as you get comfortable, try to relax your hands. You
only need a small amount of pressure on the back of the knife blade to keep it locked into the KNIFE
GUIDE, and little pressure on the stone to get it to cut. You can leave the GUIDE CLIP on if it is not in
the way.
1. Wet the Cloth and ring it out. Wet the stone, with the STONE ARM off to the side so that the
water runs away from the PIVOT. Wipe off excess water.
2. Position the blade on the BLADE TABLE with the knife handle against the machine and the
edge parallel to the front of the GUIDE.
3. Place the STONE on the edge of the knife. Pull the knob all the way toward you, and slide the
STONE over to the HEEL of the blade.
4. The Stroke: Push the STONE ARM forward and at the same time let it slide to the opposite
side of the BLADE TABLE (diagonal motion). PULL the STONE ARM back to the starting
position along the same path. Apply just enough pressure to get the stone to cut. Most of the
sharpening is done on the push stroke. Don't pick the STONE up on the pull stroke, just let it
slide on the edge. Make smooth, long, slow strokes so you just bump the stops gently. Hold
the KNOB loose in your hand so it is free to follow the shape of the knife blade. Let the
STONE slide from side to side in a straight line. Do not move in circles, as it will concentrate
all the sharpening in only one area of the EDGE.
Page 9

KNIFE SHARPENER
Product No.: 148006
www.sutter-gmbh.de
Seite 9
Vertrieb durch: SUTTER GmbH, Am Diesenborn 2, 66606 St. Wendel - Tel.: 06856 92023 - Fax: 06856 92025 - eMail: kontakt@sutter-gmbh.de
HINT: Larger knifes are easier to hold than small
ones, so they are best to learn on.
HINT: If the knob comes loose during
sharpening, you are probably holding it too
tightly. It should just float free in your hand, so
that the stone is free to follow the shape of the
blade. If it still comes loose tighten the knob a
little tighter.
Page 10

KNIFE SHARPENER
Product No.: 148006
www.sutter-gmbh.de
Seite 10
Vertrieb durch: SUTTER GmbH, Am Diesenborn 2, 66606 St. Wendel - Tel.: 06856 92023 - Fax: 06856 92025 - eMail: kontakt@sutter-gmbh.de
As the blade moves across the BLADE TABLE, you want the edge to remain
parallel to the end of the BLADE TABLE.
Page 11

KNIFE SHARPENER
Product No.: 148006
www.sutter-gmbh.de
Seite 11
Vertrieb durch: SUTTER GmbH, Am Diesenborn 2, 66606 St. Wendel - Tel.: 06856 92023 - Fax: 06856 92025 - eMail: kontakt@sutter-gmbh.de
5. Draw the blade across the BLADE TABLE. Make 3 or 4 push and pull strokes starting at the
heel of the knife. Stop sharpening. Move the knife 1". Make 3 or 4 strokes. Stop. Move the
knife l". Make 3 or 4 strokes — continue in this manner until you reach the TIP of the blade.
Lf you have trouble controlling the STONE ARM at the TIP of the blade, sharpen just on the
FORWARD stroke, and lift the STONE ARM off the blade on the AFT stroke. Make sure the TIP
is directly over the corner of the BLADE TABLE for support as you sharpen it.
HINT 1: Keep the STONE ARM operating over the BLADE TABLE. Do not let it wander down
the blade. The exception to this rule is if you are sharpening a stiff blade, like a hunting knife.
Lf the blade is 3" to 5" long you can position it so that it is centered on the BLADE TABLE,
equal amounts of the blade overhanging each side. Now you can sharpen the whole blade
without moving it. Because the blade is stiff enough so it won't flex. You will have to move
longer blades enough to bring the tip of the knife in so it is only overhanging the BLADE
TABLE by 1" or 1 ½".
HINT 2: Go slowly. The STONES cut faster and are easier to control when they are moving
slowly. If you go fast, they just slide over the blade and do not cut.
HINT 3: With practice you will not need to stop sharpening to move the blade. Instead, just
inch it along as you sharpen.
6. Switch the knife and STONE ARM to opposite hands and repeat the process on the opposite
side of the blade.
7. Clean the STONE and wipe the knife blade off every one or two passes (with the STONE ARM
off to the side, so the water runs away from the PIVOT). Put just enough water on the 5 TONE
to cover the surface. This will float the metal and grit away from the surface. Then wipe the
STONE off with a damp terry cloth rag.
8. Bring the edge to a BURR. Continue making equal passes down each side of the blade. When
the two sharpening cuts come together at the edge, the metal breaks down and forms a
BURR, which can be felt by drawing your thumb across and away from the edge on the
opposite side of the last pass.
Page 12

KNIFE SHARPENER
Product No.: 148006
www.sutter-gmbh.de
Seite 12
Vertrieb durch: SUTTER GmbH, Am Diesenborn 2, 66606 St. Wendel - Tel.: 06856 92023 - Fax: 06856 92025 - eMail: kontakt@sutter-gmbh.de
9. Check the edge for a BURR each time you switch sides. The BURR will begin to form in some
areas and not others. Concentrate your sharpening in areas with no BURR and pass lightly
over the areas that have started to BURR. When you have an even BURR down both sides of
the edge, switch to a liner STONE, and make a few light passes on each side of the blade.
10. Remove the BURR. Wipe the stone and knife off. Make two or three passes down each side
of the blade with NO PRESSURE on the STONE just the weight of the STONE ARM. DO NOT
HIT THE STOP. Move the knife along quickly so the STONE only makes one light stroke in each
section of the blade. Check to see that the BURR is gone. If you use too much pressure or
make too many stone strokes, you will keep making new BURR.
FINISHING THE EDGE-SHARPENING STEELS
After removing the BURR, you can use the knife just as it comes off the machine. But if you finish it
with a Ceramic Steel, the edge will be a little smoother and stronger. DO NOT USE REGULAR
(BUTCHER) STEEL. This tool is far too coarse and will damage your perfect new edge. Do not ceramic
a polished edge.
STAND the Ceramic Steel vertically against the counter. Starting at the heel of the knife and the top
of the Steel, draw the knife toward you and let it slide down the Steel. Angle the blade away from the
Steel at l ° or 2° more than the angle you sharpened it at. DO NOT USE ANY PRESSURE. Just let the
edge, lightly touch the Steel. This way you will not roll (damage) the edge if you do not have exactly
the right angle. Use the Ceramic Steel to touch up the edge between sharpenings.
SHORT BLADES
Sharpen the main part of the BLADE as
usual. As you reach the tip, draw the knife
out and pivot the TIP out over the end of
the BLADE TABLE so you can sharpen it. GO
SLOWLY. Do not let the STONE slide off the
BLADE and cut into the BLADE TABLE. (The
BLADE TABLE will get cut up over time, but
you can keep it to a minimum.) Try to pivot
the BLADE in the same manner on each
pass for a more consistent EDGE BEVEL.
Page 13

KNIFE SHARPENER
Product No.: 148006
www.sutter-gmbh.de
Seite 13
Vertrieb durch: SUTTER GmbH, Am Diesenborn 2, 66606 St. Wendel - Tel.: 06856 92023 - Fax: 06856 92025 - eMail: kontakt@sutter-gmbh.de
HOLLOW GROUND/SPORT KNIVES
These blades are very stiff, so you can center the blade on the BLADE TABLE and sharpen the entire
edge without moving it. Put the GUIDE CLIP on. Rest the blade on the hollow ground portion so the
edge rests on the end of the BLADE TABLE. This will tilt the blade toward the stone, so if you are
using the "Basic Method" for setting the PIVOT, compensate by moving the PIVOT up one mark 3.
GUIDE CLIP
This is the plastic clip on the edge the GUIDE. It slides on the front of the GUIDE and allows you to
sharpen a double edged knife. It also works with any knife that has a tendency to slip over the top of
the GUIDE while you are sharpening. (This usually happens because the back of the knife is rounded
instead of square.) Also, you can leave it on while you are learning. It makes the knife easier to hold.
Slide it off if it gets in the way.
THINNING THE BLADE
(DOUBLE BEVELS FOR VERY DULL KNIVES)
As a knife is sharpened over and over, the sharpening cut keeps getting wider and wider as the edge
moves up into the thicker portions of the blade. As this happens, the STONE cuts slower and slower
until the knife becomes difficult to sharpen. To cure this problem, thin the blade by creating a second
bevel. This procedure makes the knife easy to sharpen once again, plus it improves the shape of the
blade so it cuts more easily.
1. Use a Medium Stone and set the PIVOT down one mark from the sharpening angle. For
example, if you want to finish a dull chef’s knife at 18°, set the PIVOT at 15°.
2. Make several passes on each side of the blade until the sharpened angel is less than half its
original width.
3. Return to the original angle. If the edge does not come up to a burr in a few passes, make a
few more passes at the lower angle.
Page 14

KNIFE SHARPENER
Product No.: 148006
www.sutter-gmbh.de
Seite 14
Vertrieb durch: SUTTER GmbH, Am Diesenborn 2, 66606 St. Wendel - Tel.: 06856 92023 - Fax: 06856 92025 - eMail: kontakt@sutter-gmbh.de
SHARPENING SERRATED EDGES
Only sharpen on the side opposite the serrations (the flat side). Just make a few very light passes,
and do not BU RR the points. A little goes a long way.
Optional: If you have ceramic steel and it fits in the serrations, you can run it back and forth a few
times in each serration to remove the BURR from that side.
SHARPENING WITHOUT SCRATCHING THE BLADE
(FOR POLISHED OR ENGRAVED KNIVES)
1. Cover both sides of the blade with long mask (blue painter's tape, available at any hardware
or paint store). Trim off the excess tape with a knife. Then trim the tape off the EDGE BEVEL
so it won't gum up the STONE.
2. Sharpen as usual, but do not run the STONE all the way to the STOP. Sometimes the end of
the STONE will make scratch marks on the edge.
3. Finish the edge and remove the tape.
THE ULTIMATE EDGE
This edge is very strong, very smooth and takes less metal off the knife each time you sharpen, but it
takes practice. The knife needs to be sharpened a few times on the Edge Pro so you have a consistent
angle.
To create this edge, you stop sharpening just before the BURR begins to appear, and the edge is
finished. Go slowly, and lighten your sharpening pressure as the STONE gets close to creating a BURR.
With practice, you will know, "If I make one more pass, l am going to start a BURR." Just stop here
and you have the ULTIMATE EDGE. It does take a fair amount of practice and attention to detail, but
it is worth the effort.
To finish, lightly ceramic the edge.
 Loading...