

Sussman MrSteam W328, MrSteam 300 Series, MrSteam W328CORD, MrSteam W336, MrSteam W336CORD Installation, Operation & Maintenance Manual
Page 1

Installation, Operation & Maintenance Manual
Series 300 Electric Towel Warmers
mr.steam
®
Feel Good Inc.
Page 2
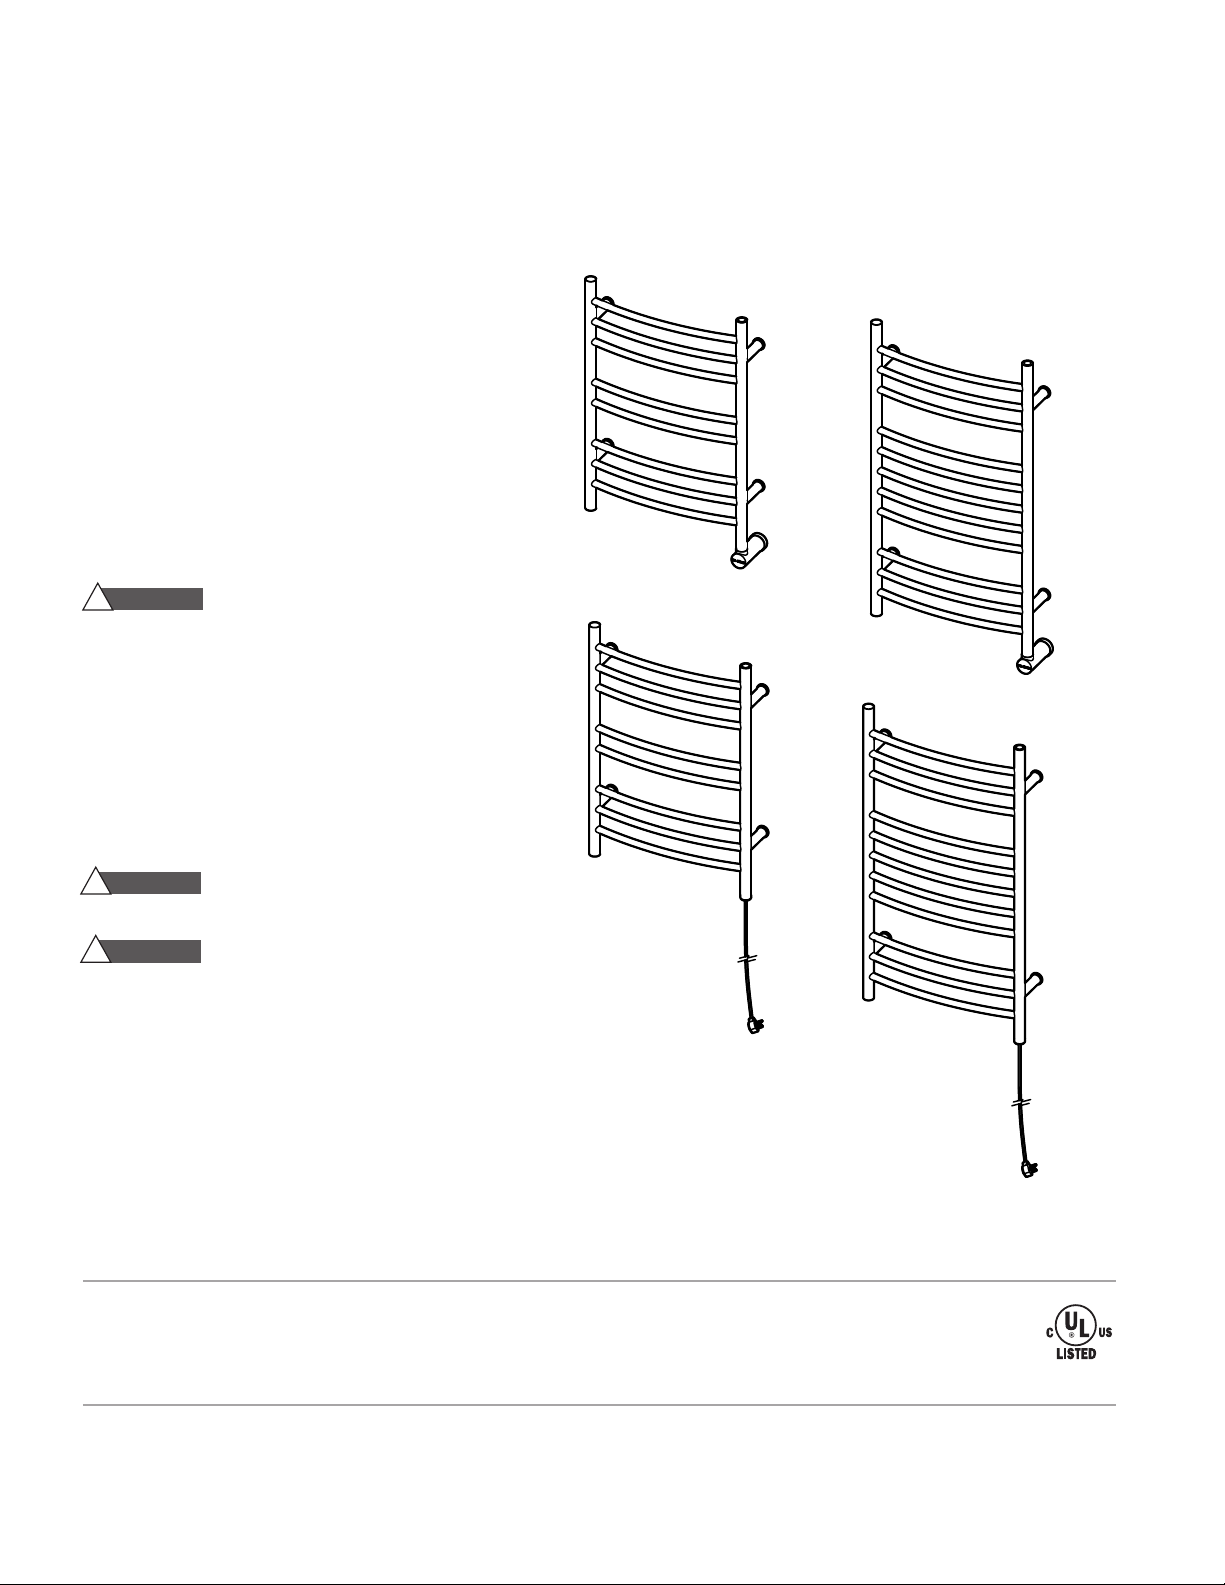
Series 300 Electric Towel Warmers
odels W328, W328CORD, W336, W336CORD
M
TABLE OF CONTENTS
__________________________________________________________
General Information.......................................3
Specifications .................................................3
Wall Preparation.............................................4
Mounting Dimensions....................................4
Installation: W328, W336 ...............................5
Electrical Connections ...................................6
Optional Programmable Timer ......................7
Installation: Cord Models...............................8
__________________________________________________
___________________________________________
Model #
___________________________________________
Serial #
W328
WARNING
!
It must be installed by a licensed electrician in accordance
with the National Electrical Code (NEC) and local code.
_____________________________________________________
IMPORTANT NOTE:
you will notice warning and caution symbols. This blocked
information is important for the safe and efficient installation and operation of this Towel Warmer.
These are types of potential hazards that may occur during
this installation and operation:
WARNING
!
or death if precautions are not followed.
CAUTION
!
or product damage may occur if you do not follow
instructions.
IMPORTANT NOTE:
especially relevant to a problem-free installation.
All information in these instructions are based on the latest
product information available at the time of publication.
Sussman-Automatic Corporation reserves the right to make
changes at any time without notice.
The towel warmer is an electric device.
As you follow these instructions,
states a hazard may cause serious injury
signals a situation where minor injury
This highlights information that is
W336
W328CORD
W336CORD
mr.steam
®
Sussman-Automatic Corporation®[email protected] www.mrsteam.com
43-20 34th Street, Long Island City, NY 11101 1 800 76 STEAM • 9410 S. La Cienega Blvd. Inglewood CA 90301 1 800 72 STEAM
© 2019 Sussman-Automatic Corporation. Mr. Steam and des., Mr Steam, AirTempo, A Lifetime of Pleasure, Aromaflo, AutoFlush, AudioWizard, AutoSteam, Broadway Collection, Butler Package, ChromaSound Spa
Package, ChromaSteam, Clean Steam…Every Time, Club Therapy, Day Spa, Digital 1, Express Steam, eTempo, eTempo/Plus, eTempo/Start, Feel Good Inc., Fifth Avenue Collection, From Bathroom to Spa,
HomeWizard, iButler, iDream Package, iGenie, iSpa Package, iSteam, iTempo, iTempo/Plus, Linear, Linear Steamhead, Making Wellness a Way of Life, Metro Collection, Mrsauna, MusicTherapy, MySteam, Spa
Package, Steam on Demand, Steam@Home, SmartSizing, Steam in a Box, SteamStart, SteamStop, SteamTherapy, Sussman, Tempo, Tala, The Intelligent Steambath, Virtual Spa System, and Warmatowel are registered trademarks of Sussman-Automatic Corporation PUR 100559 Rev 6.19
Page 3
mr.steam
®
Installation, Operation & Maintenance Instructions
_____________________________________________________________________________________________
HOMEOWNER:
______________________________________________________
THANK YOU for selecting MrSteam Towel Warmer, the perfect
addition to bathrooms, family spas, and exercise rooms within
your home. Our products have been a standard for quality and
comfort, and we are sure that you will experience continued
enjoyment from the Towel Warmer you have purchased by following these instructions.
WARNING
!
Warmer is an electrical heating appliance, intended only for
indoor residential applications and, as such, should be
installed and used with certain precautions for your safety.
1. INSTALLATION PROCEDURES FOR WALL-MOUNTED
UNITS MUST BE ACCOMPLISHED BY QUALIFIED PERSONNEL IN STRICT ACCORD WITH APPLICABLE NATIONAL
AND LOCAL BUILDING AND ELECTRICAL CODES.
2. DO NOT place TOWEL WARMER units inside a shower,
sauna or steam room enclosure or any other wet location or
with elevated temperature because the towel warmer may
be an electrocution hazard.
3. CAUTION is advised when a Towel Warmer is accessible to
children because the towel warmer is hot.
4. A dedicated wall switch or timer should be used to control
the TOWEL WARMER unit. Contact MrSteam for an in-wall
24-hour-7 day timer (PN W-103588DIG) Note: All switches
and control devices must be installed on the load (black)
side of the Towel Warmer circuit in compliance with the
National Electrical Code (NEC) and local code. (see page 6
for installation instructions)
IMPORTANT:
tected and maintained by an occasional wiping with a soft,
non-abrasive, damp cloth and lightly polished, thereafter, with
a soft dry cloth when the Towel Warmer is cold. Under no circumstances should abrasive cleaning powders, metal polish or
chlorine-based cleaners be used on any part of this product.
IMPORTANT:
DO NOT use this appliance to dry wet towels.
IMPORTANT:
water. Fabrics that contain soap or detergent residue may
show what appears to be scorch marks. However this may be
the discoloration of the residue. MrSteam is not responsible
for discoloring or damage of any fabrics. Refer to the MrSteam
towel warmer warranty for additional terms and conditions.
TOWEL WARMERS ARE HOT! The Towel
The finish of your Towel Warmer can be pro-
This appliance is for warming towels only.
This appliance is intended for towels washed in
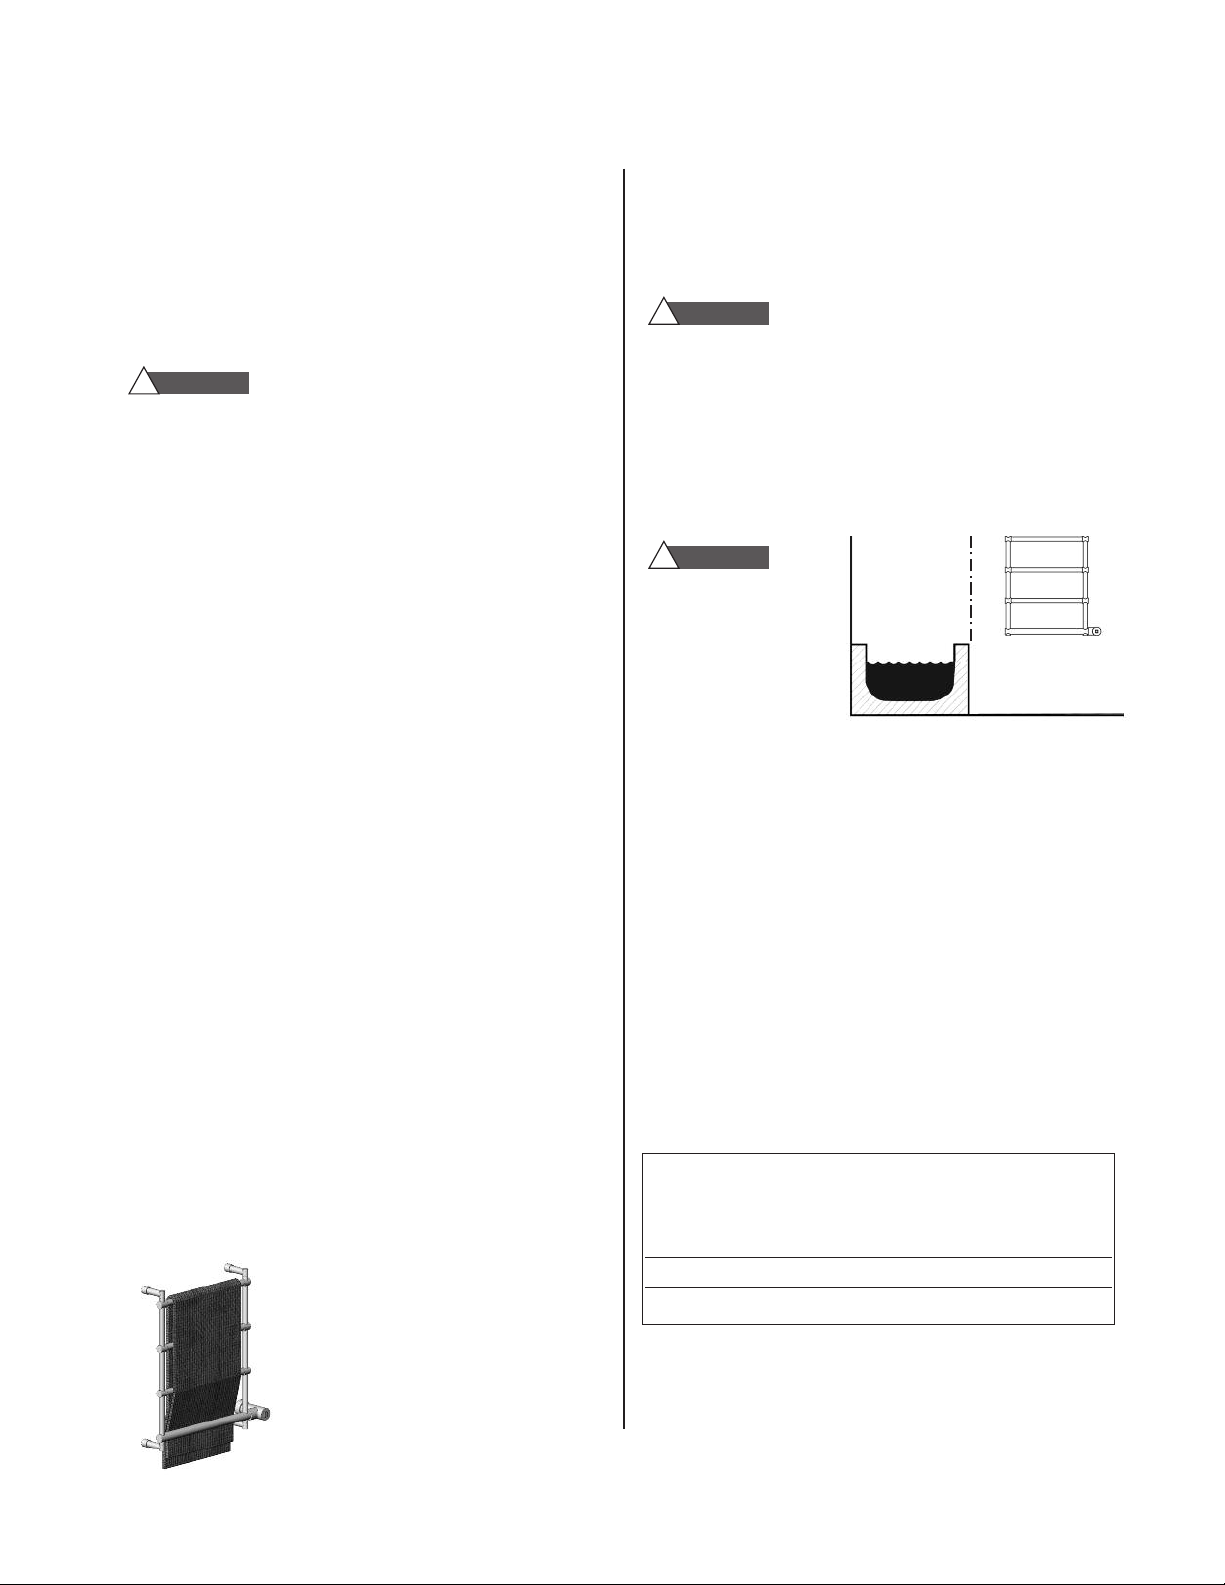
This picture shows the recommended
method of draping a towel on a towel
warmer. Ensure as much as possible of
the towel's surface is touching the
towel warmer for optimum towel
warming.
INSTALLER:
___________________________________________________
READ THIS ENTIRE INSTRUCTION MANUAL THOROUGHLY
BEFORE BEGINNING INSTALLATION. LEAVE THESE INSTRUC-
IONS WITH HOMEOWNER.
T
WARNING
!
• BE CERTAIN ELECTRICITY IS SHUT OFF AT MAIN PANEL
BEFORE ATTEMPTING TO WIRE OR SERVICE THE TOWEL
WARMER. Follow instructions to make certain the Towel
Warmer is properly mounted and secured to the wall. FAILURE
TO FOLLOW THESE STEPS COULD RESULT IN HAZARDOUS
CONDITIONS INCLUDING ELECTROCUTION.
• DO NOT alter or modify any Mr. Steam products. Doing so
may result in an inoperable or hazardous installation and will
void the warranty.
WARNING
!
1. Install in accordance
with National and
local codes.
2. Do not locate in shower stall, tub or near
water spray.
3. Do not locate within
the shower or tub
zone. See illustration.
4. All models are to be protected by dedicated and suitably
rated GFCI circuit breaker or equal.
TO ENSURE CORRECT OPERATION OF YOUR TOWEL WARMER,
PLEASE FOLLOW ALL INSTRUCTIONS CAREFULLY, OBSERVING
THE "CAUTION" and “WARNING” NOTATIONS FOR EACH STEP.
Shower/Tub
Zone
Do not locate the
towel warmer within
the shower/tub zone
For illustrative purposes only
Inspect Towel Warmer
Unpack the Towel Warmer carefully to avoid any damage or loss
of any part. When opening the box be sure that the parts are not
accidentally discarded. Towel Warmers are shipped in specially
designed shipping cartons. The entire surface of the Towel
Warmer is hand-wrapped to protect the finish. It is your responsibility to immediately inspect for any damage.
TOWEL WARMER SPECIFICATIONS
_____________________________________________________________
Model # Dimensions (inches) Amps Volts/Phase Weight (lbs.)
_____________________________________________________________
W328 20 x 31
F328 19
W336 20 x 38
NOTE: Dimensions are approximate
NOTE: Hard wired and cord connected models have the same
dimensions, amps and weight. Cord connected models include an
integral 6 foot power cord.
W x H x D
3
⁄8 x 43⁄4 0.82 120/1 10
7
⁄8 x 343⁄8 x 113⁄4 0.82 120/1 10
7
⁄8 x 43⁄4 1.11 120/1 14
3
Page 4
mr.steam
Wiring Box
U
p
p
e
r
H
e
a
d
e
r
(
Z
)
L
o
w
e
r
H
e
a
d
e
r
(
Z
)
F
inished
wall surface
Towel Warmer
®
Installation, Operation & Maintenance Instructions
_____________________________________________________________________________________________
WALL PREPARATION
CAUTION
!
• DO NOT mount the Towel Warmer without providing
structurally secure upper and lower headers as shown.
• DO NOT mount the Towel Warmer directly to sheet
rock or any other non-structural surface.
• Use longer fasteners as required if the finished wall
surface prevents adequate mounting with the screws
provided.
• Provide a clearance hole in the lower header as
required to route field wiring to the Towel Warmer
wiring box.(not applicable for cord connected models)
IMPORTANT NOTE: See electrical rough-in instruc-
tions on page 6.
IMPORTANT NOTE:
Towel Warmers may have small
dimensional variations and must be measured prior to
installation. Do not use dimensions to determine
location of mounting holes.
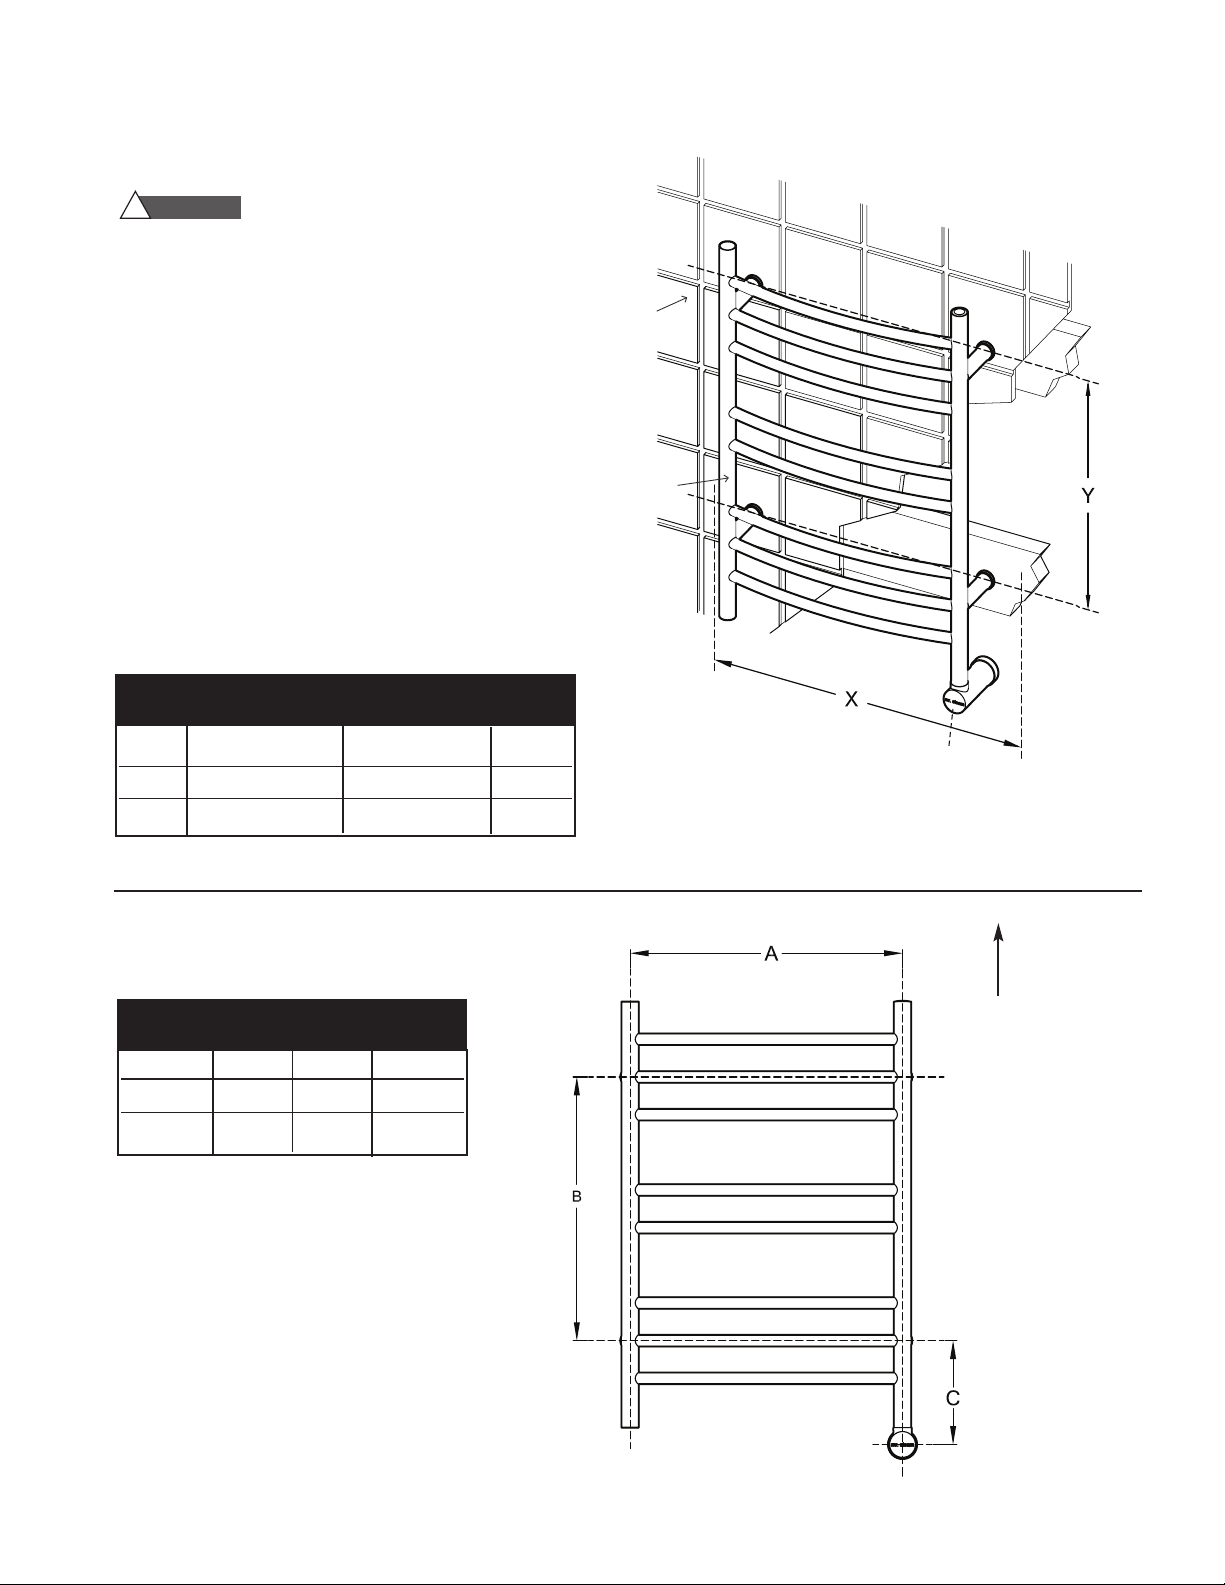
MOUNTING DIMENSIONS
(inches)
Hard Wired & Cord Connected
MODEL X(min) Y Z (min)
W328 19 17
W336 19 25
(Header horizontal length) (Header vertical length) (Header size)
15
⁄
16
9
⁄
16
2 x 6
2 x 6
MOUNTING DIMENSIONS
MOUNTING DIMENSIONS
Hard Wired & Cord Connected
MODEL ABC
W328 18
W336 18
7
⁄
16
7
⁄
16
17
15
25
NOTE: “C” dimension is not applicable for cord connected models
(inches)
1
7
⁄
16
9
⁄
16
⁄
4
1
7
⁄
4
For Technical Service Assistance:
East Coast Tel: 1-800-767-8326
West Coast Tel: 1-800-727-8326
This
End
Up
IMPORTANT NOTE:
Towel Warmers may have
small dimensional variations and must be measured
prior to installation. Do not use dimensions to
determine location of mounting holes.
4
Page 5
mr.steam
A
llen
Wrench
Wiring Box
Mounting
Bracket
Mounting
Screw
Towel
Warmer
Mounting
Bolt
Sleeve
Extension
Wiring Box
Escutcheon
Escutcheon
Set Screw
Wiring Box
Mounting Bracket
Extension
Mounting
Bracket
Set Screw
W
i
r
i
n
g
B
o
x
M
o
u
n
t
i
n
g
Screw
s
W
i
r
i
n
g
Box
Escutcheon
®
Installation, Operation & Maintenance Instructions
_____________________________________________________________________________________________
INSTALLATION: W328, W336
WARNING
!
TY MUST BE TURNED OFF AT THE MAIN PANEL BEFORE ANY
WIRING IS DONE.
IMPORTANT NOTE:
See electrical rough-in instructions on page 6.
WARNING
!
Locate with wiring box on bottom as shown. Failure to install properly may result in a hazardous condition. See page 4.
TO PREVENT SHOCK HAZARD, THE ELECTRICI-
Install Towel Warmers in upright position only.
OX CONTENTS:
B
• Towel Warmer
• (4) Mounting Screws
• (3) Wiring Box Mounting Screws
• (2) Wiring Box Set Screws
• (4) Mounting Brackets
• (4) Mounting bracket Set Screw
NOTE:
(
Cord connected models
use 4 knurled thumb screws)
• (4) Mounting bolts
• (4) Sleeves
• (4) Extensions
• Wiring box escutcheon
• (2) Allen wrenches
• Instructions
• Warranty
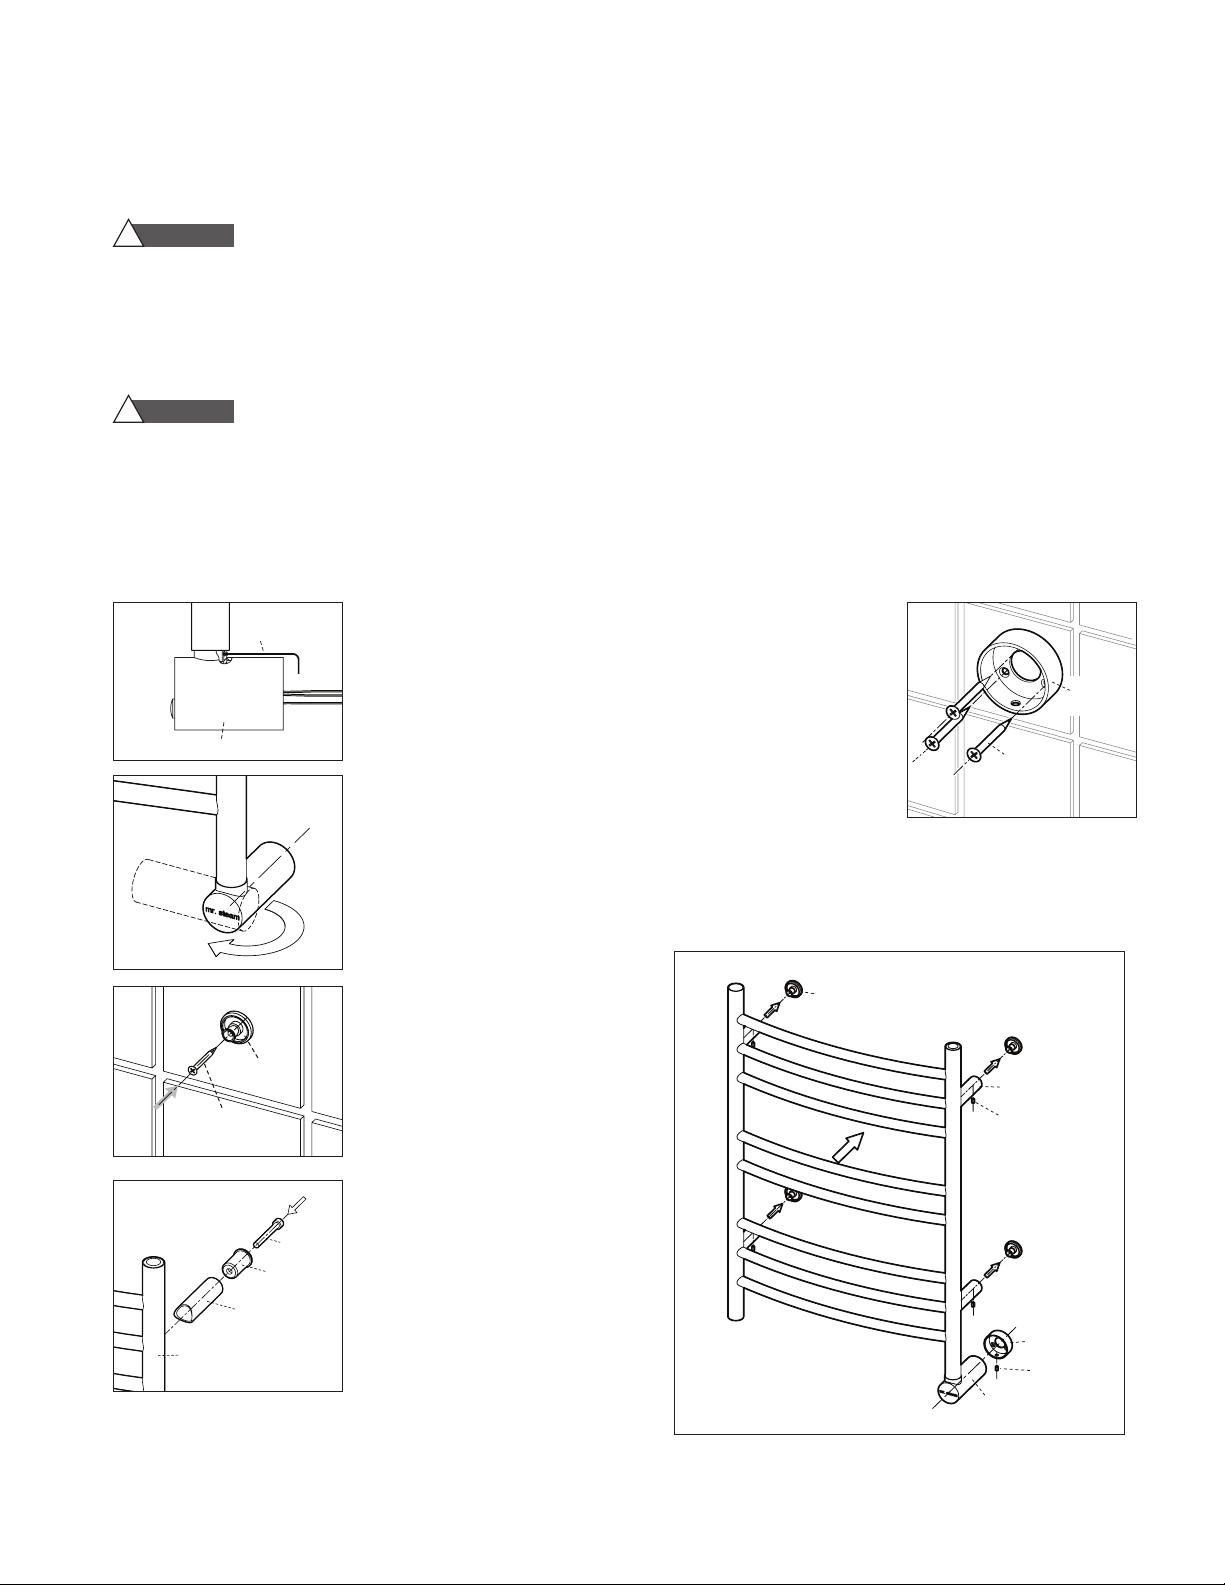
1. Remove Towel Warmer and
parts from the packing
materials.
2. Using the allen key provided,
loosen the wiring box set
screw. DO NOT remove the
wiring box.
3. Gently rotate the wiring box
as shown. Tighten the set
screw firmly to prevent the
wiring box from rotating.
4. Locate the mounting brackets
on the wall by measuring the
mounting holes on the towel
warmer.
5. Using the screws provided
secure the brackets to the
wall.
6. Insert the sleeves into the
extensions. Using the
mounting bolts secure the
extensions and sleeves to
the 4 threaded holes on
the towel warmer.
7. Slide the towel warmer onto
the mounting brackets. Mark
the location for the wiring box
escutcheon.
8. Remove the towel warmer and
secure the escutcheon to the
wall per the instructions on
page 6.
9. Slide the towel warmer onto the mounting
brackets. Secure the towel warmer in place
using the mounting bracket set screws.
5
Page 6
mr.steam
Wiring Box
Wiring Box
Wiring Box
Field
Wires
Wiring Box
Escutcheon
Wiring Box
Escutcheon
B
X Connector
Lock Nut
B
X Cable*
(or greenfield)
Wires from
wiring box
Field
Wires
Wires from
Wiring Box
Wiring Box
Wiring
Box Set
Screw
Wiring
Box
Wiring Box
Escutcheon
Wall
Plate
Screws
®
Installation, Operation & Maintenance Instructions
_____________________________________________________________________________________________
ELECTRICAL CONNECTIONS
WARNING
!
HE ELECTRICITY MUST BE TURNED OFF AT
T
THE MAIN PANEL BEFORE ANY WIRING
IS ATTEMPTED.
WARNING
!
device. It must be installed by a licensed electrician in
accordance with the National Electrical Code (NEC)
and local code.
CAUTION
!
to turn the towel warmer on and off is required.
NOTE: When the towel warmer is energized (ON), the
indicator light on the towel warmer will illuminate.
Note: The Towel Warmer wires are color coded:
BLACK for LINE, WHITE for NEUTRAL,
GREEN/YELLOW for EQUIPMENT GROUND.
WARNING
!
position only. Locate with wiring box and pilot light
on bottom as shown on pages 4 & 5. Failure to install
properly may result in overheating and a hazardous
condition.’
TO PREVENT SHOCK HAZARD,
The towel warmer is an electric
Installation of a wall switch or timer
Install Towel Warmers in upright
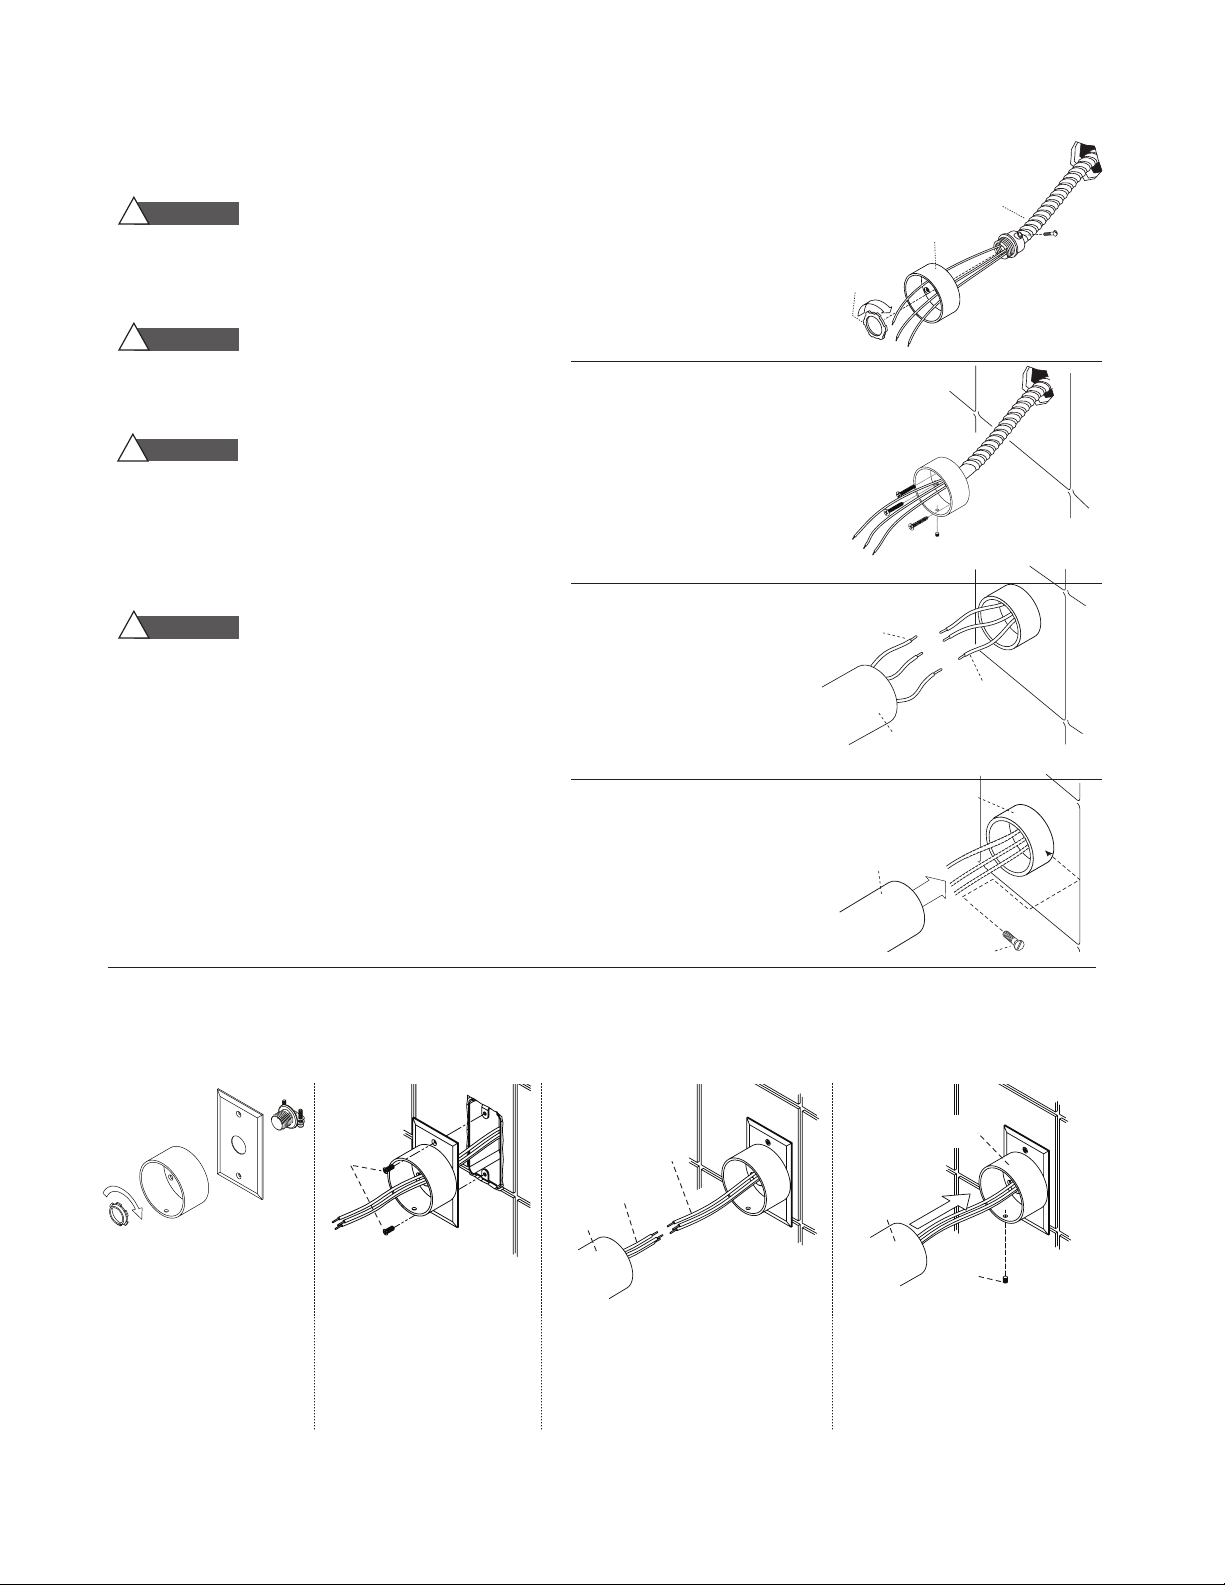
1. Assemble the BX cable
connector to the wiring box
escutcheon as shown.
OTE:
N
NM (non-metallic) cable,
if permitted by National and
Local Codes, may be used
instead of BX cable
2. Secure wiring box escutcheon
to the wall with screws provided. (Use longer screws as
required by construction
conditions.)
3. Connect wiring per
instructions.
All wiring must conform to National Electrical Code
(NEC) and local code.
DO NOT alter or modify any Mr. Steam products.
Doing so may result in an inoperable or hazardous
installation and will void the warranty.
4. Slide the wiring box into the
wiring box escutcheon and
tighten the set screw firmly.
Secure the upper and lower
brackets per the instructions
on page 5.
INSTALLATION OF A 300 SERIES TOWEL WARMER WITH A JUNCTION BOX.
A wall plate is required to complete this installation. Available wall plates:Polished Chrome 104093PC
1. Assemble the bushing
to the wall plate and
wiring box escutcheon
as shown.
2. Secure the assembly
to the junction box
using the screws provided with the wall
plate.
3. Connect wires
per instructions
6
4. Slide the wiring box into the
wiring box escutcheon and
tighten the set screw firmly.
Secure the upper threaded
flanges and lower brackets with
screws provided.
Page 7
mr.steam
Electric Towel Warmer
Element
Heating Element Wiring Box
Field Wiring
L
N
GRND
L
N
GRND
Field Installed Wall Switch or
Mr. Steam Digital Programmable Timer
PN: 103588DIG
Indicator Light
X
X
X
®
Installation, Operation & Maintenance Instructions
_____________________________________________________________________________________________
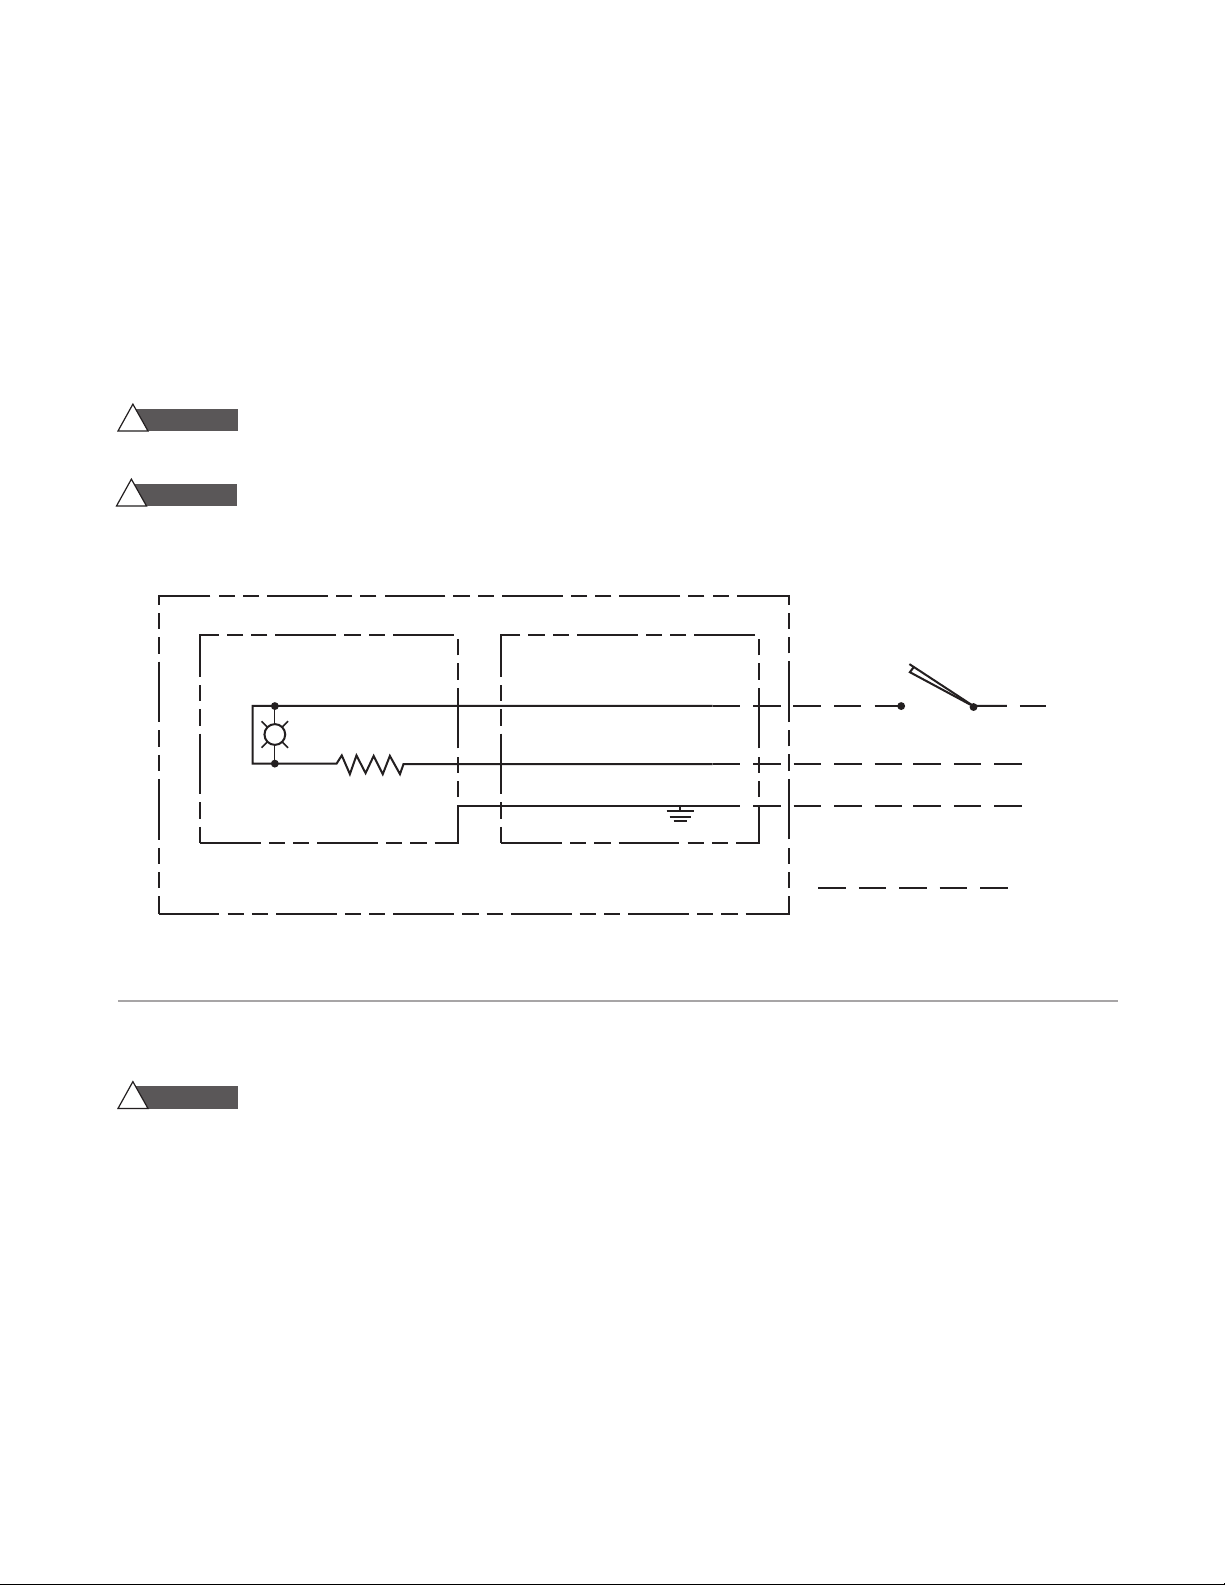
GENERAL:
The Towel Warmer requires 120 VAC, 50/60 Hz power. Specific amperage needed is listed in
the Towel Warmer Specifications Chart on page 3 of this manual.
A. Electrical connections should be made as prescribed by the National Electrical Code and
local code. The unit should be field wired using 14 AWG min 90°C-rated insulated copper
wire. All models are to be protected by a separate 15 amp circuit breaker, GFCI or equal.
B. Make connections between Towel Warmer and house wiring using approved connections to
comply with the National Electrical Code and local codes. LINE (black), NEUTRAL (white),
and GROUND.
WARNING
!
STRANDS SHALL BE EXPOSED AFTER MAKING CONNECTIONS.
CAUTION
!
been turned off.
O PREVENT ELECTRIC SHOCK HAZARD, NO BARE WIRE OR WIRE
T
Towel Warmer surface may continue to be hot for a period of time after it has
OPTIONAL DIGITAL PROGRAMMABLE TIMER
WARNING
!
1. Read the operating instructions provided with the timer.
2. Disconnect power supply prior to installation to prevent electrical shock.
3. Damage to the contacts caused by short circuiting will void the warranty.
4. Wire in accordance with National Electrical and Local Code requirements.
Be sure all connections are secure. Double check all twist-on wire connectors.
5. Mount timer into a single gang wall box using supplied screws.
6. If timer does not operate, check that the timer's black wire is connected to
hot line and not the load. If necessary, reverse connections to red and black
wires
7.When the indicator light on the towel warmer is illuminated, the towel
warmer is energized.
AVAILABLE DECORATIVE
FACE PLATES FOR TIMER:
Polished Stainless Steel 103872D-SP
7
Page 8
mr.steam
Sleeve
Extension
Mounting
Bracket
S
et Screw
Mounting
Screw
Mounting Bolt
Mounting Bracket
Level
(
not supplied)
ON
Indicator
Light
®
Installation, Operation & Maintenance Instructions
_____________________________________________________________________________________________
INSTALLATION: W328CORD, W336CORD
BOX CONTENTS:
• Towel Warmer
• (4) Mounting screws
• (4) Mounting brackets
• (4) Mounting bracket
knurled thumb screw
• (4) Mounting bolts
WARNING
!
Plug into a grounded 3 prong
outlet. DO NOT remove ground prong. DO NOT
use an adapter. DO NOT use an extension cord.
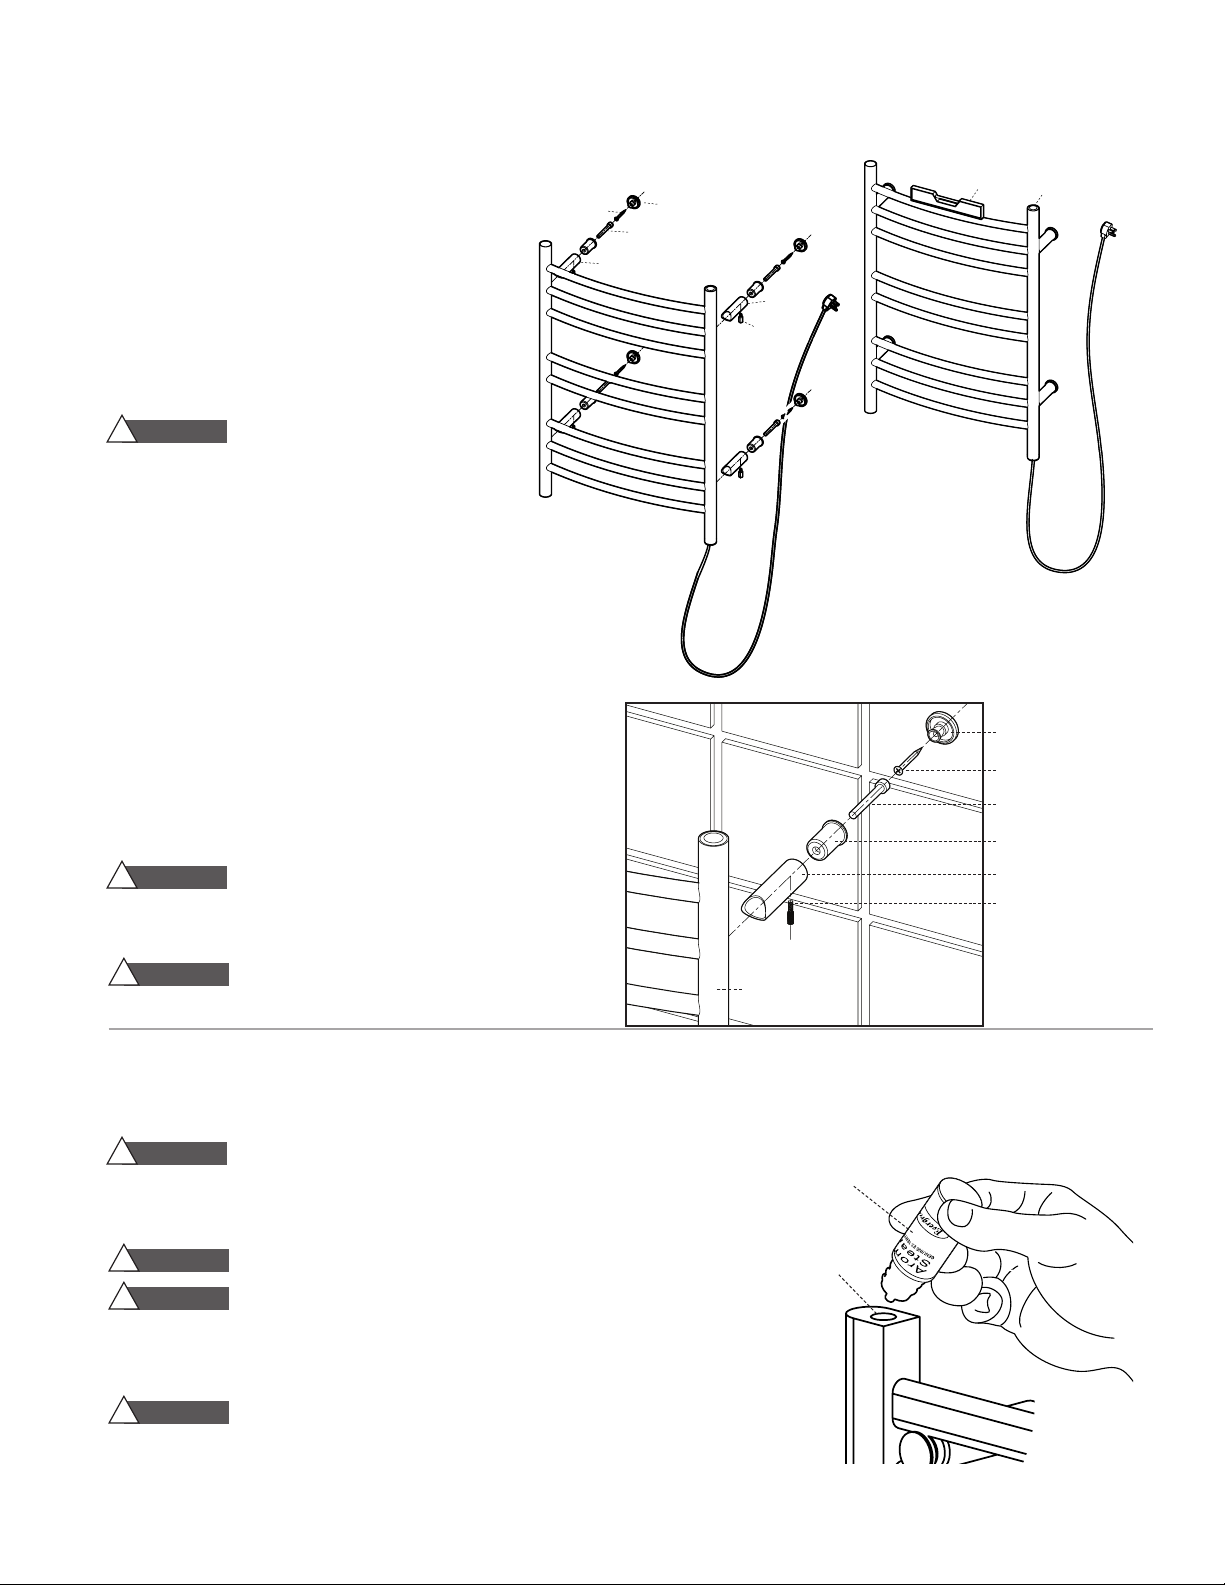
1. Remove Towel Warmer and parts from the
packing materials.
2. An outlet should be provided per National and local
electrical Codes such that when plugged in the cord is
not stretched, pinched or routed in such a manner as
to cause a hazard.
3. Locate the mounting brackets on the wall by measuring
the mounting holes on the towel warmer.
4. Using the screws provided secure the brackets to the wall.
5. Insert the sleeves into the extensions. Using the mounting
bolts secure the extensions and sleeves to the 4 threaded
holes on the towel warmer.
6. Slide the towel warmer onto the mounting brackets and secure
in place using the knurled thumb screws provided with the cord
connection kit.
WARNING
!
Towel Warmers in upright position only. Locate
with cord on bottom as shown. Failure to install properly may
result in a hazardous condition. See page 4.
(4) Sleeves
•
• (4) Extensions
• Allen wrench
• Instructions
• Warranty
Mounting
Bracket
Mounting Screw
Mounting Bolt
Sleeve
Extension
Knurled Thumb
Screw
CAUTION
!
Do not fasten power supply cord to wall surface.
Towel Warmer
USING MR.STEAM ESSENTIAL OILS
Enjoy AromaSteam essential oils by placing one or two drops of oil into your 300 series towel warmer
aroma well as shown in the illustration. Only use MrSteam
WARNING
!
use only. Keep out of reach of children. Essential oils are highly concentrated
and are potent substances and should not be applied directly to the skin as
they can be irritants. Use essential oils with caution.
CAUTION
!
CAUTION
!
Use essential oils with caution. Essential oils are for external
Start with one drop to gauge strength and suitability.
The user should turn off the towel warmer and exit the room
IMMEDIATELY if dizziness occurs. If skin irritation occurs stop using the oils immediately.
Remove any excess oil by washing in mild soap and water. If ingested, rinse mouth
with water. Administer water or milk to dilute. Contact a physician immediately.
CAUTION
!
Use care not to allow oil to contact towels.
Tightly close oil bottles when storing oils. Keep oil bottles away from sources of ignition.
®
AromaSteam essential oils.
8
AromaSteam 10ml bottle
with integrated dropper
Aroma Well
 Loading...