

Surveon SMR2000, SMR6000, SMR8000U, SMR8000, SMR5000 Administrator's Manual

SMR Series
Smart Megapixel Video Recorder
Administrator Manual
Release 1.3

2
About This Document
This manual introduces the hardware components of SMR series and describes
how to install them. It also provides an overview of Server surveillance
functionality, and includes the functions of Video Management Software for
operating and monitoring a Server network.
Version History
Ver
sion Description Date
1.0 Initial release:
1. SMR 2000/5000 series models are put
into this manual; both hardware and
software are covered.
2. Four new steps - Display Resolution,
Change Password, Time Settings and
Network Settings are added in Install
Wizard.
November 2011
1.1 1. SMR 8000 series models are added.
2. Revise the Software Module Framework
and add the System Architecture into
the manual.
3. Add instructions for the CMS.
4. Add Software Installation section.
5. Add instructions for the Web Client.
January 2012
1.2 1. Add functionalities for SMR restore
button.
2. Update the VMS version to 2.4.7.
March 2012
1.3 1. Add SMR 8000U May 2012

3
All Rights Reserved © Surveon Technology 2012
Copyright Statement
No part of this publication may be reproduced, transmitted, transcribed,
stored in a retrieval system, or translated into any language or computer
language, in any form or by any means, electronic, mechanical, magnetic,
optical, chemical, manual or otherwise, without the prior written consent of
Surveon Technology Inc.
Disclaimer
Surveon Technology makes no representations or warranties with respect to
the contents hereof and specifically disclaim any implied warranties of
merchantability or fitness for any particular purpose. Furthermore, Surveon
Technology reserves the right to revise this publication and to make changes
from time to time in the content hereof without obligation to notify any
person of such revisions or changes. Product specifications are also subject to
change without notice.
Trademarks
Surveon and Surveon logo are trademarks of Surveon Technology Inc. Other
names prefixed with “SMR” and “EMR” are trademarks of Surveon Technology
Inc.
Microsoft Windows and Windows are registered trademarks of Microsoft
Corporation.
Linux is a trademark of Linux Torvalds.
Solaris and Java are trademarks of Sun Microsystems, Inc.
All other names, brands, products or services are trademarks or registered
trademarks of their respective owners.

4
Table of Contents
About This Document.................................................................... 2
Version History ........................................................................... 2
Copyright Statement .........................................................................3
Table of Contents .............................................................................4
Safety Precautions.......................................................................... 17
Device Site Recommendations............................................................ 17
Chapter 1. Product Overview............................................................. 18
1.1. Features and Benefits............................................................. 18
1.2. Specifications for the SMR Series ............................................... 18
Model List for SMR Series ............................................................. 18
Hardware Specifications .............................................................. 19
VMS Specifications ..................................................................... 19
Chapter 2. Hardware Overview .......................................................... 21
2.1. Front Panel.......................................................................... 21
2.2. Rear Panel ........................................................................... 22
2.3. Hard Drive Designation............................................................ 24
2.4. LED Definitions ..................................................................... 25
Desktop System Front Panel LEDs.................................................... 25
Rackmount System Front LED Panel................................................. 26
Drive Tray LED.......................................................................... 27
Rear Panel Ethernet LED .............................................................. 28
Chapter 3. Software Overview ........................................................... 29
3.1. Software Introduction............................................................. 29
3.2. Module Framework ................................................................ 29
3.3. System Architecture............................................................... 31
Standalone Server (Client-Server All-in-One) ...................................... 31
Standalone Server + Remote Client (Web Client/iPhone Client)................ 33
Multiple Servers + CMS Client ........................................................ 36
Network Requirements ................................................................ 38

5
Opening Ports...................................................................... 38
Warnings / Precautions........................................................... 38
3.4. Port Forwarding .................................................................... 39
Port Forwarding for Accessing VMS Server.......................................... 40
Chapter 4. Installation ..................................................................... 43
4.1. Before You Start.................................................................... 43
Checklist for Operating Environment................................................ 43
Checklist for Network Topology...................................................... 43
4.2. Hard Drive Installation ............................................................ 44
Hard Drive Installation Prerequisites................................................ 44
Purchase hard drives having the same capacity and using same interface
with the pre-installed ones........................................................... 44
Inserting Hard Drive into Drive Tray (Desktop Series) ............................ 44
Inserting Hard Drive into Drive Tray (Rackmount Series)......................... 46
4.3. System Connections ............................................................... 48
4.4. Powering up SMR ................................................................... 50
SMR Desktop Systems .................................................................. 50
SMR Rackmount Systems .............................................................. 50
4.5. Install Wizard ....................................................................... 51
4.6. Software Installation............................................................... 57
Installing the VMS ...................................................................... 57
4.7. Starting the VMS Client............................................................ 61
Checking the Software Version....................................................... 62
Logging out.............................................................................. 62
Chapter 5. Basic System Settings ........................................................ 63
5.1. Storage Management .............................................................. 63
5.2. Adding Cameras to the Server................................................... 65
Automatic Scan for Cameras ......................................................... 65
Manually Adding Cameras............................................................. 67
5.3. Setting Recording Schedule ...................................................... 69
Weekly Scheduling ..................................................................... 69
Daily Scheduling........................................................................ 70

6
5.4. Adding Alarm Rules ................................................................ 71
5.5. Setting up Live View............................................................... 72
5.6. Using the LCD Menu in SMR Desktop Systems................................. 73
Checking the System Status .......................................................... 73
Rebooting/Shutting Down SMR ....................................................... 73
Chapter 6. Live View ....................................................................... 74
6.1. Live View Window Overview..................................................... 74
Resizing and Minimizing Windows.................................................... 75
Minimizing Controls ............................................................... 75
Hiding and Showing the Explorer Area ......................................... 75
6.2. View Setup .......................................................................... 76
Types of Views.......................................................................... 76
Adding a View........................................................................... 76
Renaming a View ....................................................................... 77
Deleting a View......................................................................... 77
Sending View to a New Window...................................................... 78
Switching Between Views ............................................................. 78
Changing Aspect Ratio................................................................. 78
Switching Between Different Screen Divisions..................................... 78
Creating and Using New Screen Divisions ...................................... 78
Screen Division Page Use......................................................... 79
Auto-flipping Pages ............................................................... 79
Exiting Different Screen Divisions............................................... 80
Managing Sequences ................................................................... 80
Creating a Sequence.............................................................. 80
Editing a Sequence................................................................ 82
Deleting a Sequence .............................................................. 84
6.3. Functionality Within Views....................................................... 86
Digital Zoom ............................................................................ 86
Instant Playback........................................................................ 86
Manual Recording ...................................................................... 87

7
Preset Pan............................................................................... 87
Stream Selection ....................................................................... 87
Image Settings .......................................................................... 88
Video Ratio Adjustment............................................................... 88
Inserting Overlays ...................................................................... 88
Image Overlay ..................................................................... 88
HTML Overlay ...................................................................... 89
Send to Large Channel................................................................. 90
Reconnect ............................................................................... 90
Remove the Camera ................................................................... 90
Onscreen PTZ Control ................................................................. 91
Focus ................................................................................ 91
Zoom ................................................................................ 91
6.4. Full Screen View ................................................................... 92
Entering Full Screen View............................................................. 92
Exiting Full Screen Mode .............................................................. 92
6.5. E-Maps................................................................................ 92
Adding E-Maps .......................................................................... 92
Adding Sub-Maps ....................................................................... 92
Adding Additional E-Maps ............................................................. 93
Changing E-Map Order................................................................. 94
Renaming an E-Map .................................................................... 94
Configuring an E-Map .................................................................. 94
Deleting an E-Map...................................................................... 95
Using the E-Map ........................................................................ 95
Chapter 7. Server Setup ................................................................... 97
7.1. Server Basic Functions ............................................................ 97
Logging into a Server .................................................................. 97
Logging out of a Server................................................................ 97
Renaming a Server ..................................................................... 98
Viewing Server and Client Information.............................................. 98

8
7.2. Server Settings...................................................................... 99
General Server Settings ............................................................... 99
To perform Notification Setting..................................................... 100
Pre/Post Alarm Recording Settings ................................................. 103
Storage Management ................................................................. 103
7.3. Scheduling Recording............................................................ 106
Global Scheduling ..................................................................... 106
Weekly Global Scheduling....................................................... 106
Daily Global Scheduling ......................................................... 107
Individual Scheduling ................................................................. 108
Weekly Individual Scheduling................................................... 108
Daily Individual Scheduling ..................................................... 109
Chapter 8. Camera Setup................................................................ 112
8.1. Adding Cameras .................................................................. 112
Automatic Scan for Cameras ........................................................ 112
Manually Adding Cameras............................................................ 114
Deleting a Camera .................................................................... 116
Initializing a Camera.................................................................. 116
8.2. Camera General Settings........................................................ 117
Logging into a Camera................................................................ 117
Changing the Camera Model and Vendor .......................................... 117
General Settings....................................................................... 118
OSD Settings ........................................................................... 119
Privacy Mask Settings................................................................. 120
8.3. Camera Image and Quality Settings........................................... 121
Camera Image Settings............................................................... 121
Advanced Video Settings ............................................................. 122
8.4. PTZ Settings ....................................................................... 123
PTZ Settings............................................................................ 123
PTZ Preset Settings ................................................................... 124
Adding a Preset................................................................... 125

9
Deleting a Preset................................................................. 126
PTZ Patrol Settings.................................................................... 126
8.5. PTZ Controls....................................................................... 128
Basic Functions ........................................................................ 128
Pan and Tilt ....................................................................... 128
Focus ............................................................................... 128
Zoom ............................................................................... 128
Patrol ................................................................................... 129
Presets.................................................................................. 129
Panning to a Preset .............................................................. 129
Adding a Preset................................................................... 129
Deleting a Preset................................................................. 129
Chapter 9. Alarms and Events .......................................................... 130
9.1. Camera VI Detection Settings.................................................. 131
General Motion Detection............................................................ 131
Configuring and Editing Detection Windows.................................. 131
Testing Detection Windows..................................................... 132
Deleting a Detection Window .................................................. 132
Enabling or Disabling a Detection.............................................. 132
Foreign Object Detection ............................................................ 133
Configuring and Editing Detection Windows.................................. 133
Testing Detection Windows..................................................... 134
Deleting a Detection Window .................................................. 134
Enabling or Disabling a Detection.............................................. 134
Forbidden Area Detection............................................................ 135
Configuring and Editing Detection Windows.................................. 135
Testing Detection Windows..................................................... 136
Deleting a Detection Window .................................................. 136
Enabling or Disabling a Detection.............................................. 136
Missing Object Detection............................................................. 137
Configuring and Editing Detection Windows.................................. 137

10
Testing Detection Windows..................................................... 138
Deleting a Detection Window .................................................. 138
Enabling or Disabling a Detection.............................................. 138
Tampering Detection ................................................................. 139
Configuring Tampering Detection.............................................. 139
Testing Tampering Detection................................................... 139
Enabling or Disabling a Detection.............................................. 140
Camera Motion Detection............................................................ 140
Configuring and Editing Detection Windows.................................. 140
Deleting a Detection Window .................................................. 141
Virtual Fence .......................................................................... 142
Configuring and Editing Detection Windows.................................. 142
Testing Detection Windows..................................................... 143
Deleting a Detection Window .................................................. 143
Enabling or Disabling a Detection.............................................. 144
Object Counting....................................................................... 144
Configuring and Editing Detection Windows.................................. 144
Testing Detection Windows..................................................... 145
Deleting a Detection Window .................................................. 146
Enabling or Disabling a Detection.............................................. 146
9.2. Alarm Rules........................................................................ 147
Adding an Alarm Rule................................................................. 148
Alarm Conditions ................................................................. 148
Alarm Actions ..................................................................... 155
Alarm Scheduling................................................................. 160
9.3. Alarms View and Notification .................................................. 162
Live View Event Log .................................................................. 162
Alarm Popups .......................................................................... 162
Setting Popup Sleep Time....................................................... 163
Video Alarm Panel .................................................................... 164
Playback from Video Alarm Panel ............................................. 164

11
Tagging an Alarm Thumbnail ................................................... 164
9.4. Event Log .......................................................................... 165
Exporting a Log........................................................................ 165
Searching the Event Log.............................................................. 166
System Type ...................................................................... 166
Event Type ........................................................................ 166
Operation Type ................................................................... 166
Performing a Search ............................................................. 167
Event Log Setup ....................................................................... 167
Log for Object Counting.............................................................. 167
System Alarm View.................................................................... 168
Chapter 10. Search and Playback...................................................... 169
10.1. Introduction ..................................................................... 169
10.2. Date/Time Search............................................................... 169
Time Selection......................................................................... 169
Recent Time ...................................................................... 170
Specified Time.................................................................... 170
Use of 1x/4x Views.................................................................... 170
Camera Selection ..................................................................... 171
Timeline ................................................................................ 171
Playback ................................................................................ 173
Advanced Video Settings ........................................................ 174
Synchronized Playback .......................................................... 175
Capturing Screenshot ............................................................ 175
Capturing Video Clip............................................................. 176
10.3. VI Search ......................................................................... 177
Creating a VI Search .................................................................. 177
Time Selection.................................................................... 177
Camera Selection................................................................. 178
Setting New Search Criteria .................................................... 179
Saving/Retrieving a VI Search ....................................................... 191

12
Using the Search Results ............................................................. 192
Selecting the Result.............................................................. 192
Result Playback................................................................... 193
Playback Synchronization ....................................................... 194
Capturing Screenshot ............................................................ 194
Capturing Video Clip............................................................. 195
Logging and Noting............................................................... 196
10.4. Event Search..................................................................... 197
Creating an Event Search ............................................................ 197
Time Selection.................................................................... 197
Camera Selection................................................................. 198
Setting Event Search Criteria................................................... 198
Using the Search Results ............................................................. 199
Selecting the Result.............................................................. 199
Result Playback................................................................... 200
Playback Synchronization ....................................................... 200
Capturing Screenshot ............................................................ 201
Logging and Noting............................................................... 202
Chapter 11. Remote Web Client and iPhone Client for Simple Use (Optional) 203
11.1. Installations for the Web Client.............................................. 203
Installing the Web Server ............................................................ 203
Installing the Web Client............................................................. 206
Prerequisite to use Web Client................................................. 206
Downloading Web Client Components......................................... 206
11.2. Starting the Web Client........................................................ 209
Checking the Software Version...................................................... 210
Setting up Live View.................................................................. 210
Use of 1x/4x views.................................................................... 210
Camera Control........................................................................ 210
PTZ Control ............................................................................ 211
Playback Settings...................................................................... 212

13
11.3. Installing and Starting the iPhone Client................................... 213
Installing the iPhone Client (Optional)............................................. 213
Starting the iPhone Client ........................................................... 213
Checking the Software Version...................................................... 214
Live View on the iPhone Client...................................................... 214
Chapter 12. System Setup............................................................... 215
12.1. Home Page ....................................................................... 215
Entering the Home Page – VMS Server ............................................. 215
Common Server Tasks ........................................................... 215
Common Camera Tasks.......................................................... 216
Common Other Tasks ............................................................ 216
Recent Key Events ............................................................... 217
System Health History ........................................................... 217
System Status ..................................................................... 217
Entering the Home Page – Local Domain........................................... 217
Tasks ............................................................................... 218
NVR Status......................................................................... 219
12.2. Server Setup..................................................................... 220
General Tasks.......................................................................... 220
Alarm Rule Settings .............................................................. 220
View Log........................................................................... 220
E-Map .............................................................................. 220
Global Schedule .................................................................. 221
Individual Schedule .............................................................. 221
Storage............................................................................. 221
Pre/Post Alarm Recording Settings ............................................ 221
Email ............................................................................... 221
SMS ................................................................................. 221
Digital I/O Settings............................................................... 221
Genera Server Settings .......................................................... 222
Joystick ............................................................................ 222

14
Other Tasks ............................................................................ 224
Reboot NVR Server ............................................................... 224
VI Manager ........................................................................ 225
Schedule Reboot.................................................................. 226
Audio Input........................................................................ 226
Playback Buffer................................................................... 227
Auto Login......................................................................... 227
VI Panel............................................................................ 228
Lock Windows..................................................................... 228
Import/Export .................................................................... 228
Customize Logo................................................................... 229
Router Port Mapping ............................................................. 229
12.3. Camera Setup ................................................................... 230
General Tasks.......................................................................... 230
Scan for Cameras................................................................. 230
Add Cameras ...................................................................... 230
Delete Camera.................................................................... 230
Camera Settings ....................................................................... 231
Image Settings .................................................................... 231
Advanced Video Settings ........................................................ 231
General Camera Settings........................................................ 231
Edit Camera....................................................................... 231
PTZ Settings....................................................................... 231
Preset Settings.................................................................... 231
OSD Settings ...................................................................... 232
Mask Settings ..................................................................... 232
Initialize ........................................................................... 232
Video Analytics ........................................................................ 232
General Motion Detection....................................................... 232
Foreign Object Detection ....................................................... 232
Forbidden Area Detection....................................................... 232

15
Intrusion Detection .............................................................. 233
Missing Object Detection........................................................ 233
Tampering Detection ............................................................ 233
Camera Motion Detection....................................................... 233
Virtual Fence...................................................................... 233
Object Counting .................................................................. 233
12.4. Account Manager ............................................................... 234
Adding an Account .................................................................... 234
Editing an Account .................................................................... 236
Deleting an Account .................................................................. 237
12.5. Network Parameters ........................................................... 238
Main Tasks.............................................................................. 238
Maximum Video Connections ................................................... 238
Blacklist/Whitelist Settings..................................................... 239
Bandwidth Monitoring ........................................................... 240
Edit NVR ........................................................................... 240
DHCP Server....................................................................... 241
Web Server ........................................................................ 242
12.6. Other Parameters............................................................... 244
Other Tasks ............................................................................ 244
Import/Export .................................................................... 244
Resolution ......................................................................... 245
Language .......................................................................... 246
Help ................................................................................ 246
About............................................................................... 246
Chapter 13. Using the CMS (Central Management Software) ..................... 247
13.1. Installing the CMS............................................................... 247
13.2. Starting the CMS Client........................................................ 251
13.3. Entering Homepage ............................................................ 252
Entering the Home Page – CMS Domain ............................................ 252
Tasks ............................................................................... 252

16
NVR Status......................................................................... 254
Chapter 14. System Maintenance ...................................................... 255
14.1. Replacing the Power Supply Module (for Rackmount Series) .......... 255
14.2. Replacing a Hard drive (for Desktop Series)............................... 257
14.3. Replacing a Hard drive (for Rackmount Series)........................... 259
14.4. Restore Default Settings....................................................... 261
17
Safety Precautions
Electric Shock Warning
This equipment may cause electric shocks if not handled properly.
Access to this equipment should only be granted to trained operators
and maintenance personnel who have been instructed of, and fully
understand the possible hazardous conditions and the consequences of
accessing non-field-serviceable units such as the power supplies.
The system must be unplugged before moving, or in the even that it
becomes damaged.
Reliable Grounding
Particular attention should be given to prepare reliable grounding for the
power supply connection. It is suggested to use a direct connection to the
branch circuit. Check for proper grounding before powering on the device.
Overloading Protection
The device should be installed according to specifications. Provide a suitable
power source with electrical overload protection. Do not overload the AC
supply branch circuit that provides power to the device.
ESD Precautions
Please observe all conventional anti-ESD methods while handling the device.
The use of a grounded wrist strap and an anti-static work pad are
recommended. Avoid dust and debris in your work area.
Device Site Recommendations
The device should be installed according to specifications. This device should
be operated at a site that is:
Clean, dry, and free of excessive airborne particles.
Well-ventilated and away from heat sources such as direct sunlight
and radiators.
Clear of vibration or physical shock.
Away from strong electromagnetic fields produced by other devices.
Available with properly grounded wall outlet for power. In regions
where power sources are unstable, apply surge suppression.
Available with sufficient space behind the device for cabling.
18
Chapter 1. Product
Overview
1.1. Features and Benefits
The SMR series is a state-of-the-art network video recorder features hardware RAID,
low power and hot swappable hard disks. With bay hard disk trays, the SMR series
is the best in class NVR that supports megapixel quality video of 6 to 48 channels
for video retention periods from 7 to 40 days or more. In addition, the SMR series is
fully burn-in-tested and uses preloaded Enterprise VMS to eliminate compatibility
issues while reducing maintenance overheads. It is out of question that the SMR
series is the most reliable and cost-effective solution for small to medium sized
surveillance needs.
1.2. Specifications for the SMR Series
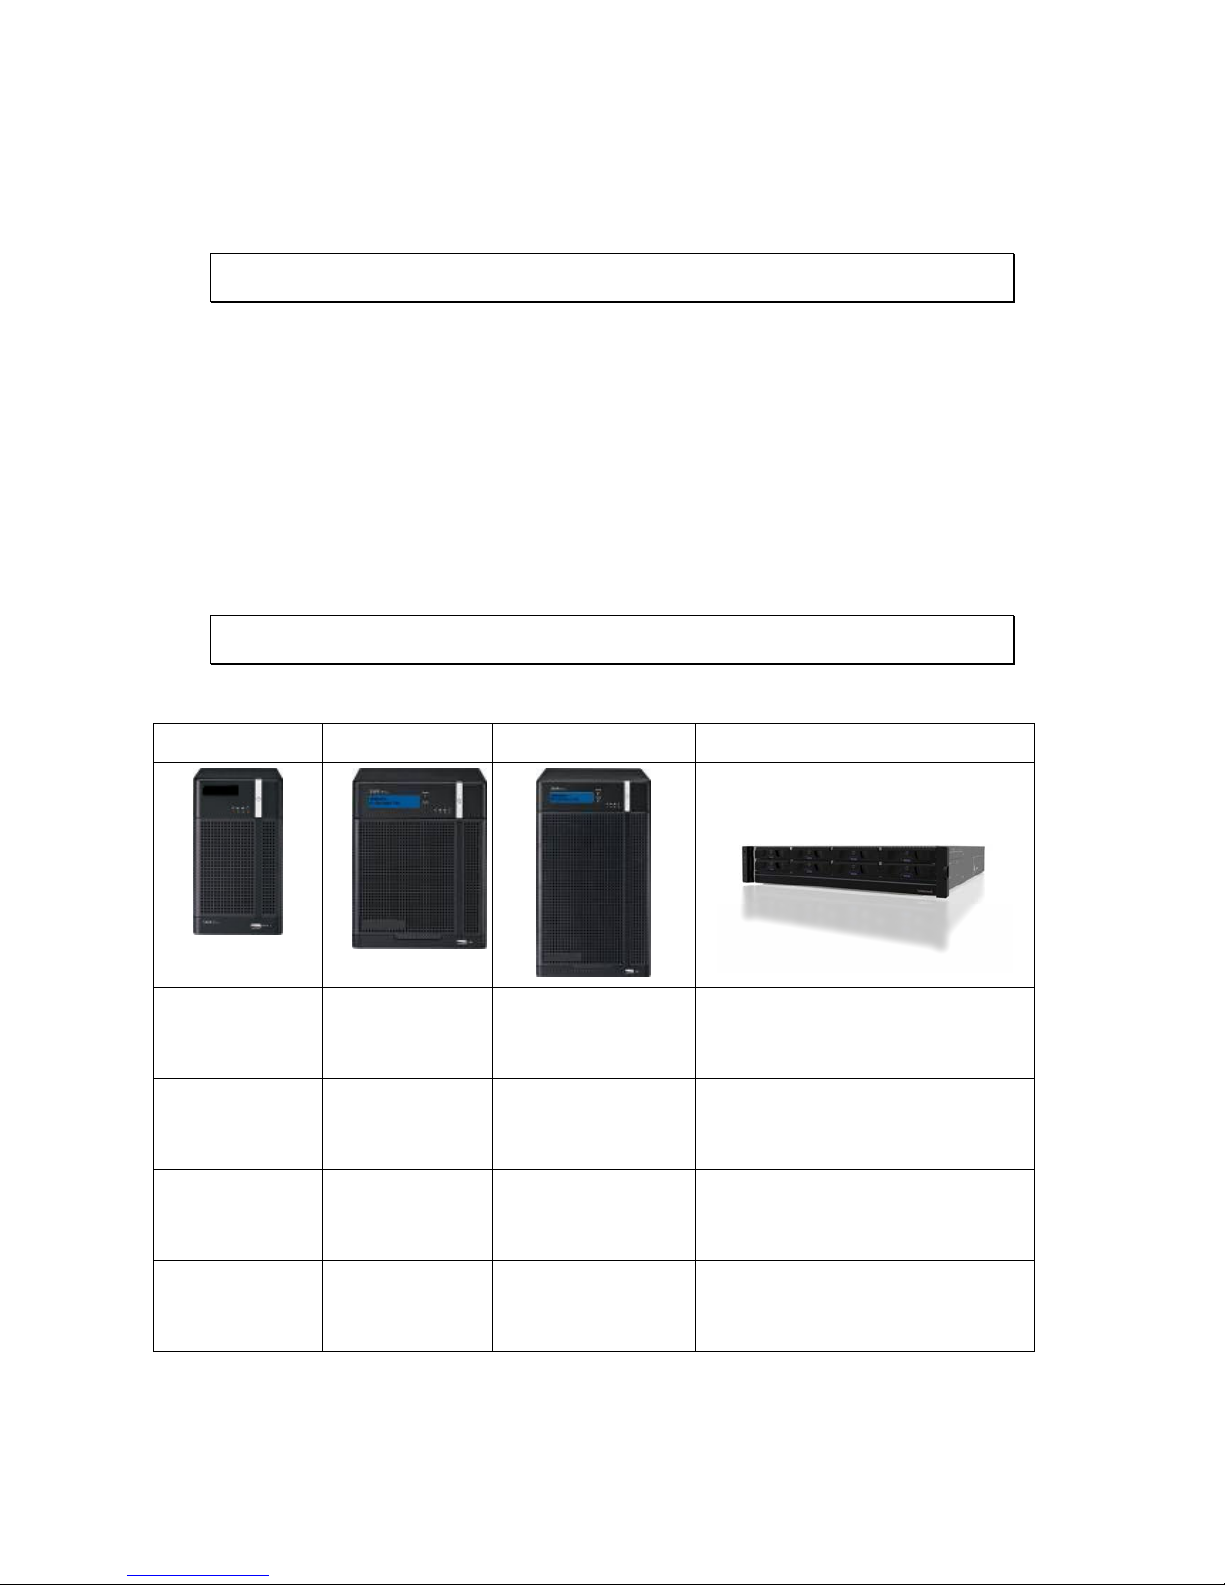
Model List for SMR Series
SMR2000 SMR5000 SMR6000/8000 SMR8000U
SMR2006 –
6CH Megapixel
H/W RAID NVR
SMR5012 –
12CH Megapixel
H/W RAID NVR
SMR8025 –
25CH Megapixel H/W RAID
NVR
SMR8025U –
25CH Megapixel H/W RAID NVR
SMR2010 –
10CH Megapixel
H/W RAID NVR
SMR5016 –
16CH Megapixel
H/W RAID NVR
SMR8032 –
32CH Megapixel H/W RAID
NVR
SMR8032U –
32CH Megapixel H/W RAID NVR
SMR2016 –
16CH Megapixel
H/W RAID NVR
SMR5020 –
20CH Megapixel
H/W RAID NVR
SMR8040 –
40CH Megapixel H/W RAID
NVR
SMR8040U –
40CH Megapixel H/W RAID NVR
SMR8048 –
48CH Megapixel H/W RAID
NVR
SMR8048U –
48CH Megapixel H/W RAID NVR

19
Hardware Specifications
SMR2000 SMR5000 SMR8000 SMR8000U
System Processor
I
ntel ® Dual Core @ 1.8 GHz Intel ® Core i3
System Memory DDR3 2GB DDR3 4GB
Chipset
I
ntel ® ICH9R Intel ® Q67 Express Chipset
Disk on Module 4GB
Storage 3.5” SATA HDD ; HDD hot swappable
Hard Disk Trays 2 bay 5 bay 8 bay
I/O Interface
VGA: 1xD-Sub
RJ-45: 2x1 Gigabit Ethernet
USB: 5x USB2.0
e-SATA: x1
VGA: 1xD-Sub/1xHDMI
RJ-45: 2x1 Gigabit Ethernet
USB: 7x USB2.0 / 6x USB2.0
COM: x1
H/W RAID
RAID 0, 1 RAID 0, 1, 5 RAID 0, 1, 5, JBOD
Electrical
Input Voltage: 12VDC, 5A
Power Consumption
(in operation): 43W
Input V
oltage:
100~240VAC, 3.5A
Frequency: 47~63Hz
Power Consumption
(in operation): 43W
Input V
oltage:
100~240VAC, 4~8A
Frequency: 47~63Hz
Power Consumption (in
operation): 430W
Input Voltage: 100~240VAC
,
5~10A
Frequency: 47~63Hz
Power Consumption (in
operation): 550W
Operating
Environment
Humidity: 5 to 80% (non-condensing)
Temperature: 5 to 40°C
LCD Panel No Yes No
LED Indicator Yes
Dimensions (mm) 190(H) x 110(W) x 245(D) 225(H) x 175(W) x 245(D) 310(H) x 175(W) x 380(D) 88.15(H) x 445 (W) x 651.15 (D)
Weight
(without hard drives)
3 kg 5 kg 8.9 kg
Certificate BSMI, CB, FCC / CE Class B , UL60959/ IEC60950, GOST
FCC / CE Class A 那
VMS Specifications
Live View • Real-time network camera discovery
• Versatile views of various screen divisions
• HTML and image overlays
• Multiple views supported
• View patrolling for single or multiple views
• Real time video/event alarm display
• Instant playback
• Video clip bookmarking
eMAP • Drag-n-drop camera manipulation
• Directional camera display
• Hierarchical map structure
• Real time event alert
• Instant live video of camera
• Multiple maps supported
PTZ • Pan, tilt, zoom operations (dependent of the camera)
• Built-in, floating PTZ control panel
• Preset position (dependent of the camera)
• Scheduled or continuous camera patrolling
• Event-driven camera patrolling
Investigation • Search by date, time, camera
• Search by pre-defined recent time
• Search by VI event combinations

20
• Search over multiple days
• Search over multiple cameras
• Video clip bookmarking and commenting
• Search via built-in VI analyzer
• Customizable bookmark
• Intuitive, video thumbnail search results
• Cue-in, cue-out and repeat
• Quick playback by video thumbnail
• 1/8, 1/4, 1/2, 1x, 2x, 4x, 8x play, pause, stop
• AVI-formatted video clip export
Instant Playback • Supported in video alarm, event alarm, view functions
• Pre-defined playback durations
• Video clip bookmarking
Video Intelligence • General motion detection
• Missing object detection
• Foreign object detection
• Intrusion detection
• Forbidden area detection
• Tampering detection
• Virtual Fence
•Object Counting
Remote Management Full functional operation & management via
standalone VMS Client
3rd Party IPCAM AXIS, SONY, Panasonic, Mobotix, Arecont Vision,
IQinVision, Zavio, VIVOTEK, ACTi, D-Link, Asoni,
AVTechm, Dynacolor
General & Misc • Video codec: H.264, MPEG4, MJPEG
• Image enhancement
• Video privacy mask
• Digital zoom in, zoom out
• Log viewer
• Windows lockup
• Client auto login
• Digital I/O management
• Automatic storage recycling
• Client-server architecture
• Guaranteed performance of long period
recording
• Configurable video retention period
• Language supported: English, French, German,
Portuguese, Spanish, Simple Chinese, Traditional
Chinese
21
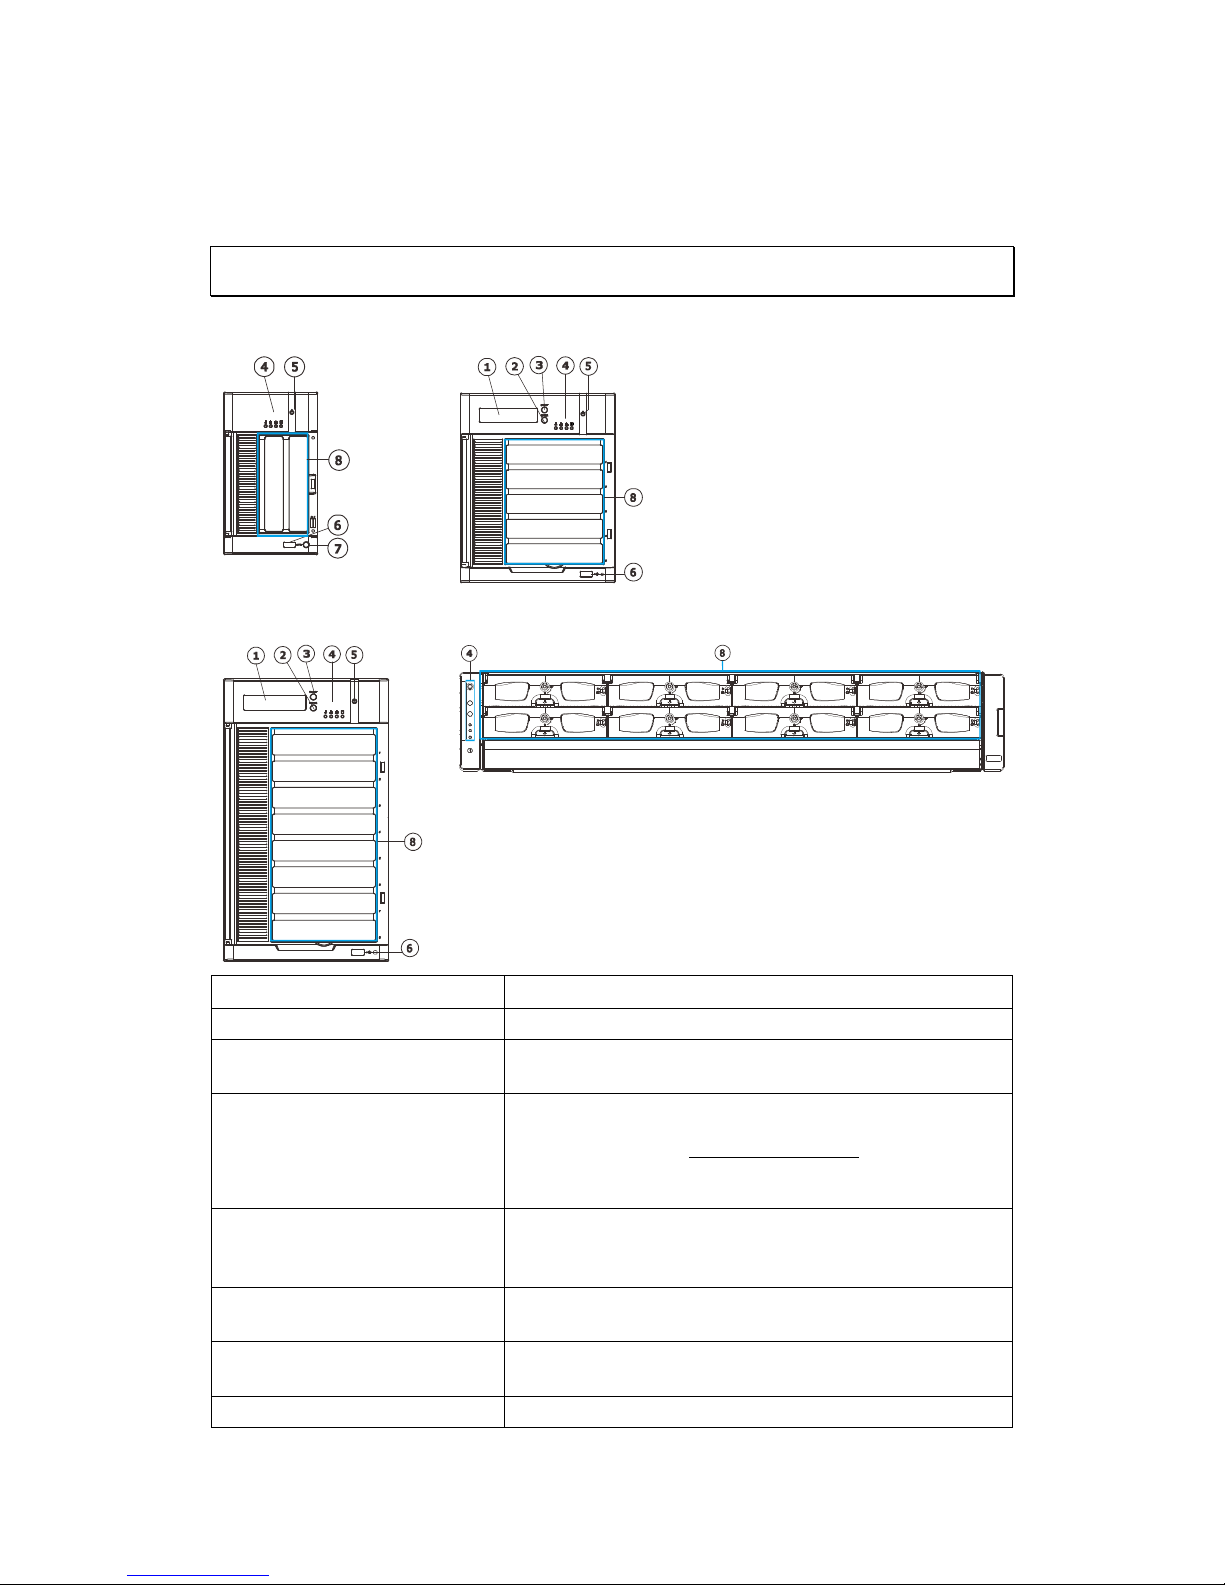
Chapter 2. Hardware Overview
2.1. Front Panel
SMR2000 Series SMR5000 Series
SMR Pro
SMR Pro
SMR8000 Series SMR8000U Series
SMR Pro
Function
1. LCD Display Shows system messages.
2. Enter Switch
Confirms the options and functions after the Select
Switch is used.
3. Select Switch
Shows the menu for choosing RAID0, RAID1 or RAID5.
Please refer to the RAID Option Table while choosing
a RAID level.
4. LED Indicators
Indicates the network, hard drive, and system
status.
5. Power Switch Powers up the SMR. When the power is on, the
power indicator will shine in blue.
6. Front USB Connector Connects external accessories such as mouse,
keyboard or other external devices.
7. Video Back Up Button Reserved.
22
8. Hard Drives Slots Hard drive locations
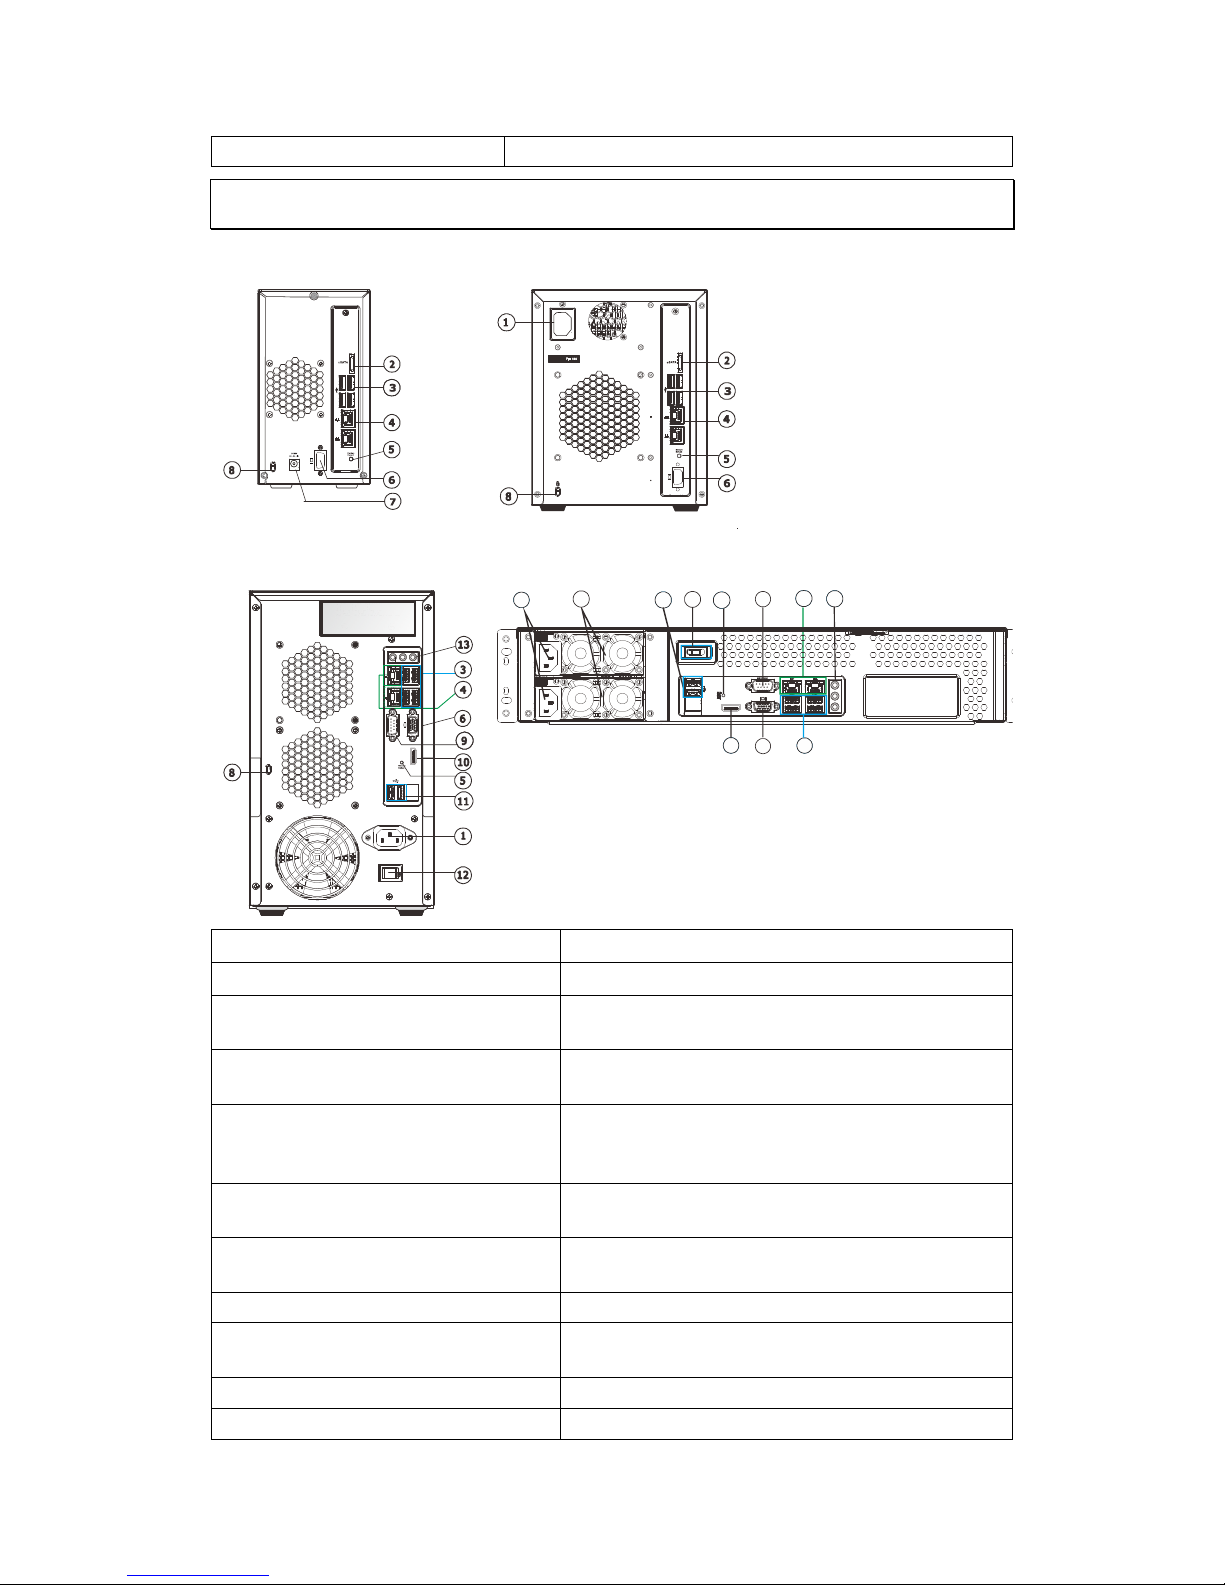
2.2. Rear Panel
SMR2000 Series SMR5000 Series
1
2
EonN AS
1
2
SMR8000 Series SMR8000U Series
1
2
RS
2
32/
4
8
5
33335
3333
11
33334
6
33331
33333
14
9
3333
10
3333
13
15
Function
1. Power Socket
Used for connecting power cable.
2. e-SATA Port x1 Used for connecting the SMR with e-SATA
drives.
3. USB Port x4 Used for exporting video clips as evidence
support to external storage devices.
4. LAN Port (GbE Ethernet port)
x2
Used for connecting the SMR with the
network. Note that only the upper LAN port
can be used.
5. Restore Button Use for reset the system to factory default.
For details, please refer to the table below.
6. VGA Port Used for attaching an external monitor to
the SMR.
7. 12V DC Power Port Used for connecting power cable.
8. Kensington Lock-hole For use with a Kensington lock. Please refer
to your Kensington lock for instructions.
9. COM Port Reserved
10. HDMI Port Used for connecting audio/video devices

23
such as video projectors and DVD players.
11. USB Port x2 Used for exporting video clips as evidence
support to external storage devices.
12. Safety Switch Used for preventing injury if someone
inadvertently attempts to open the
machine. Please make sure it’s on after the
power cable is attached to the power
socket.
13. Audio Ports Used for attaching audio devices such as
headphones and speakers.
14. Power Supply Units The two power supplies are hot-swappable
and redundant.
15. Power Switch The power switch on 8000U system can be
located on the rear panel.
24
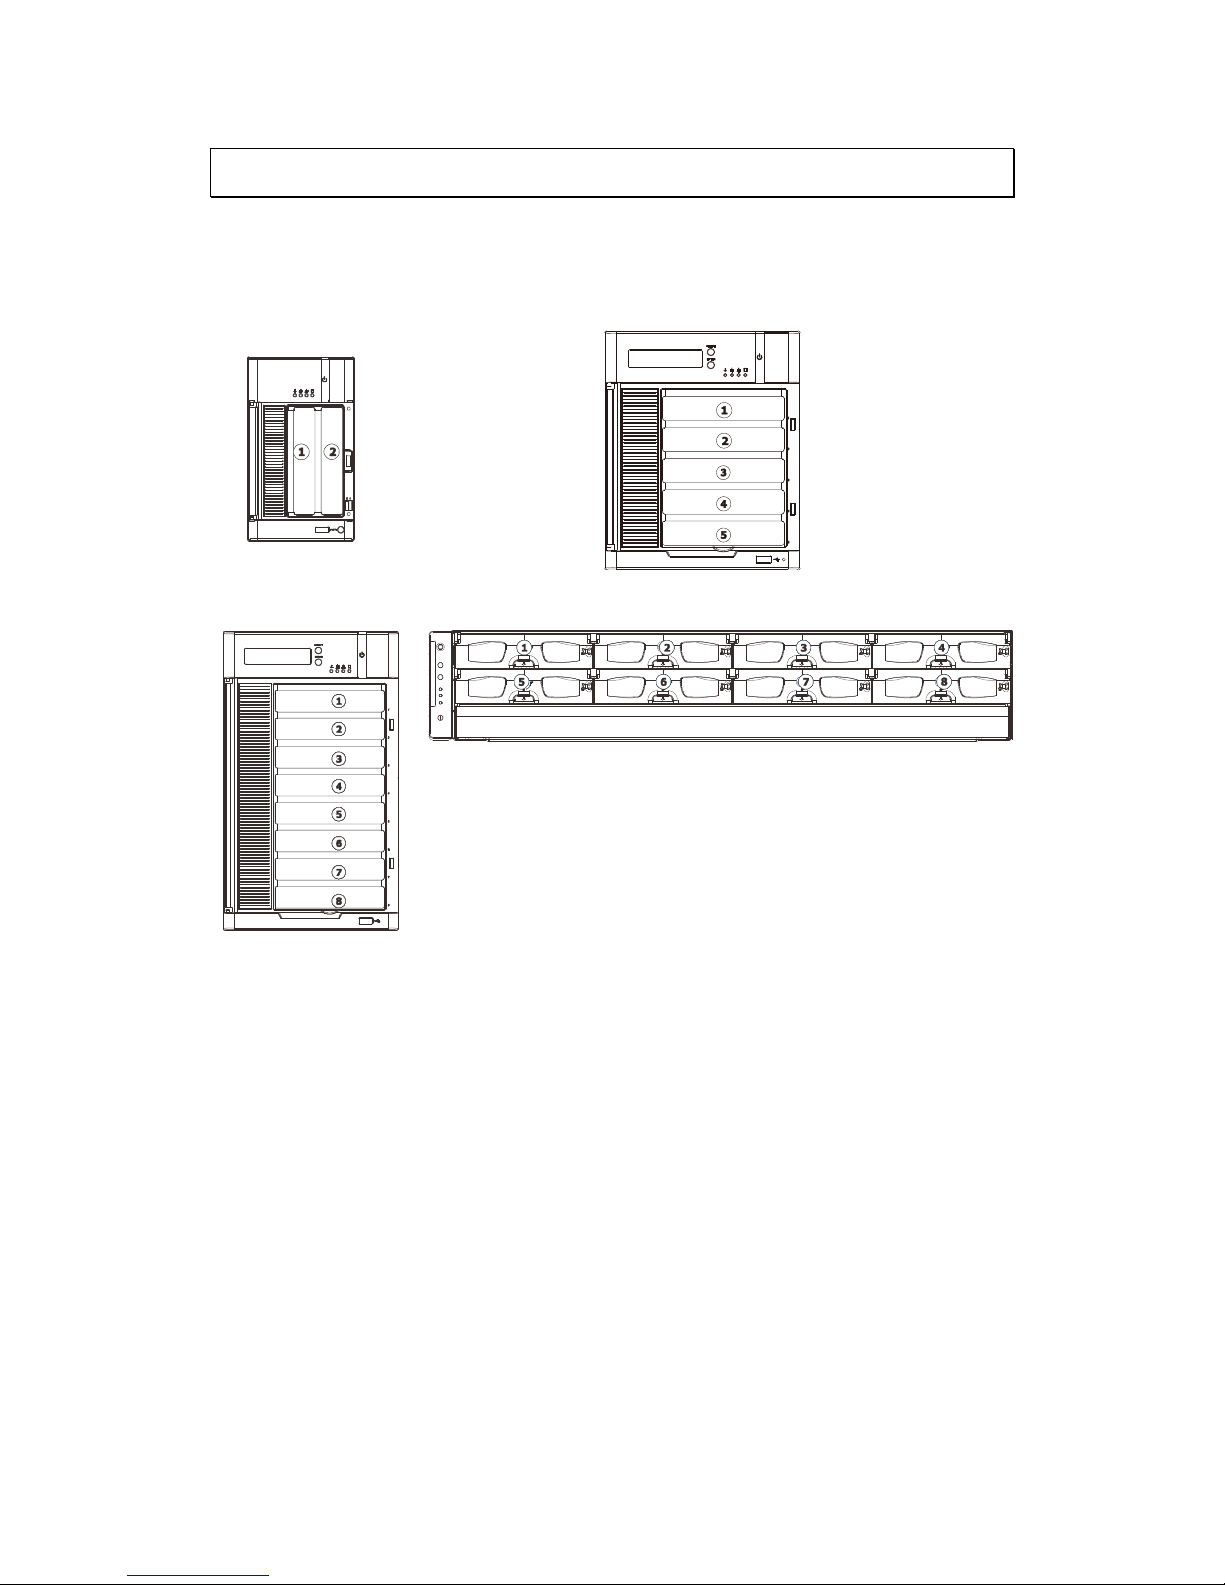
2.3. Hard Drive Designation
The hard drive arrangement for each system is shown below. The general
alignment is from left to right and/ or top to bottom in numeric order.
SMR2000 Series SMR5000 Series
SMR8000 Series SMR8000U Series
25
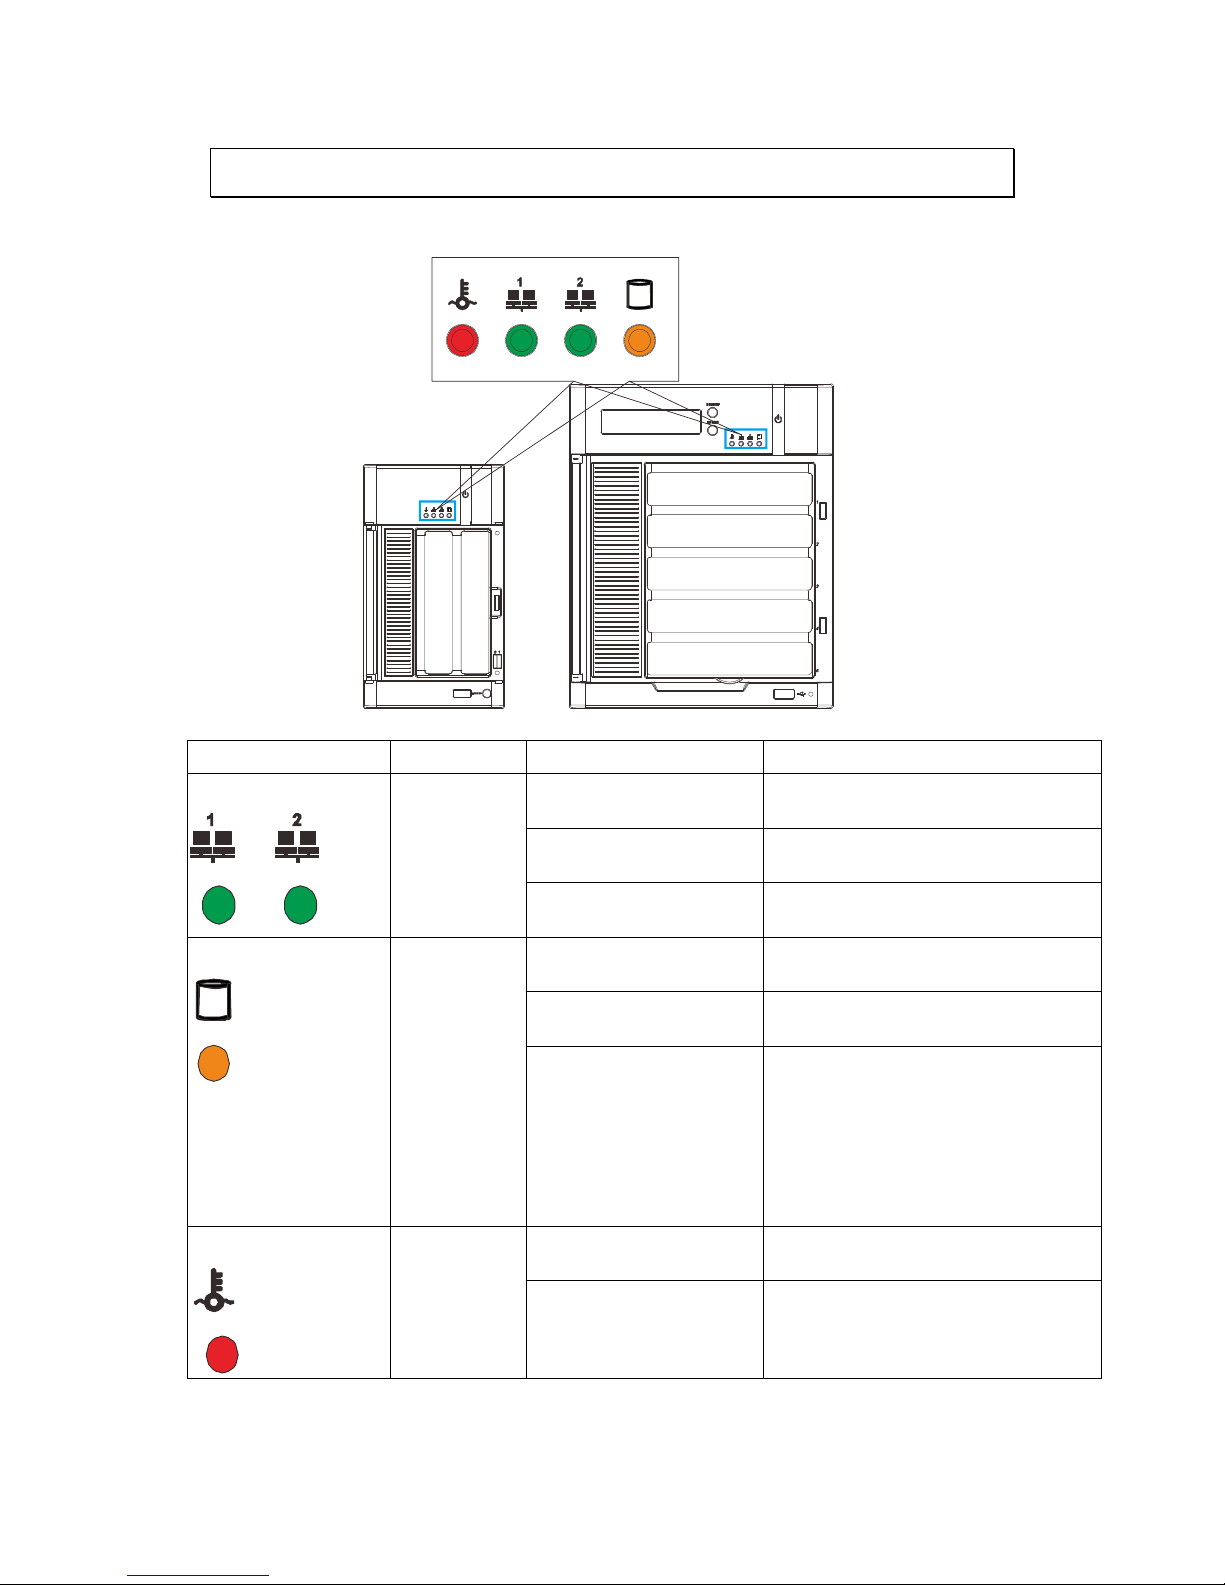
2.4. LED Definitions
Desktop System Front Panel LEDs
Name Color LED Status Function
On Indicates that power is on and
network is connected.
Off Indicates that network is
disconnected.
Network
Green
Blink Indicates that network activity
is in progress.
On Indicates that the hard drive can
be accessed.
Off Indicates that a hard drive
read/write error occurred.
HDD
Amber
Blink Indicates one of the followings:
(1)Disk volume creation is in
progress.
(2)Online RAID level migration is
in progress.
(3)RAID rebuilding is in progress.
On Indicates the system fan is
malfunctioning.
System
Red
Blink Indicates that system is starting
up.

26
Rackmount System Front LED Panel
LEDs / Button
Icon Color Description
Service LED
White
This LED indicates the
system requires service
when lit.
Power Status
LED
Green
(Normal) /
Amber (Fail)
This LED is used to warn
users of power supply
status
Cooling
Module
Status LED
Green
(Normal) /
Amber (Fail)
This LED is used to warn
users of cooling module
status
Temperature
Sensor
Status LED
Green
(Normal) /
Amber
(Abnormal)
This LED is used to warn
users of temperature
status
System Fault
LED
Green
(operating
normally) /
Amber
(Warning)
This LED indicates
normal operation /
system failure
Mute and
Service LED
Off Button
Mute/
Reserved
27
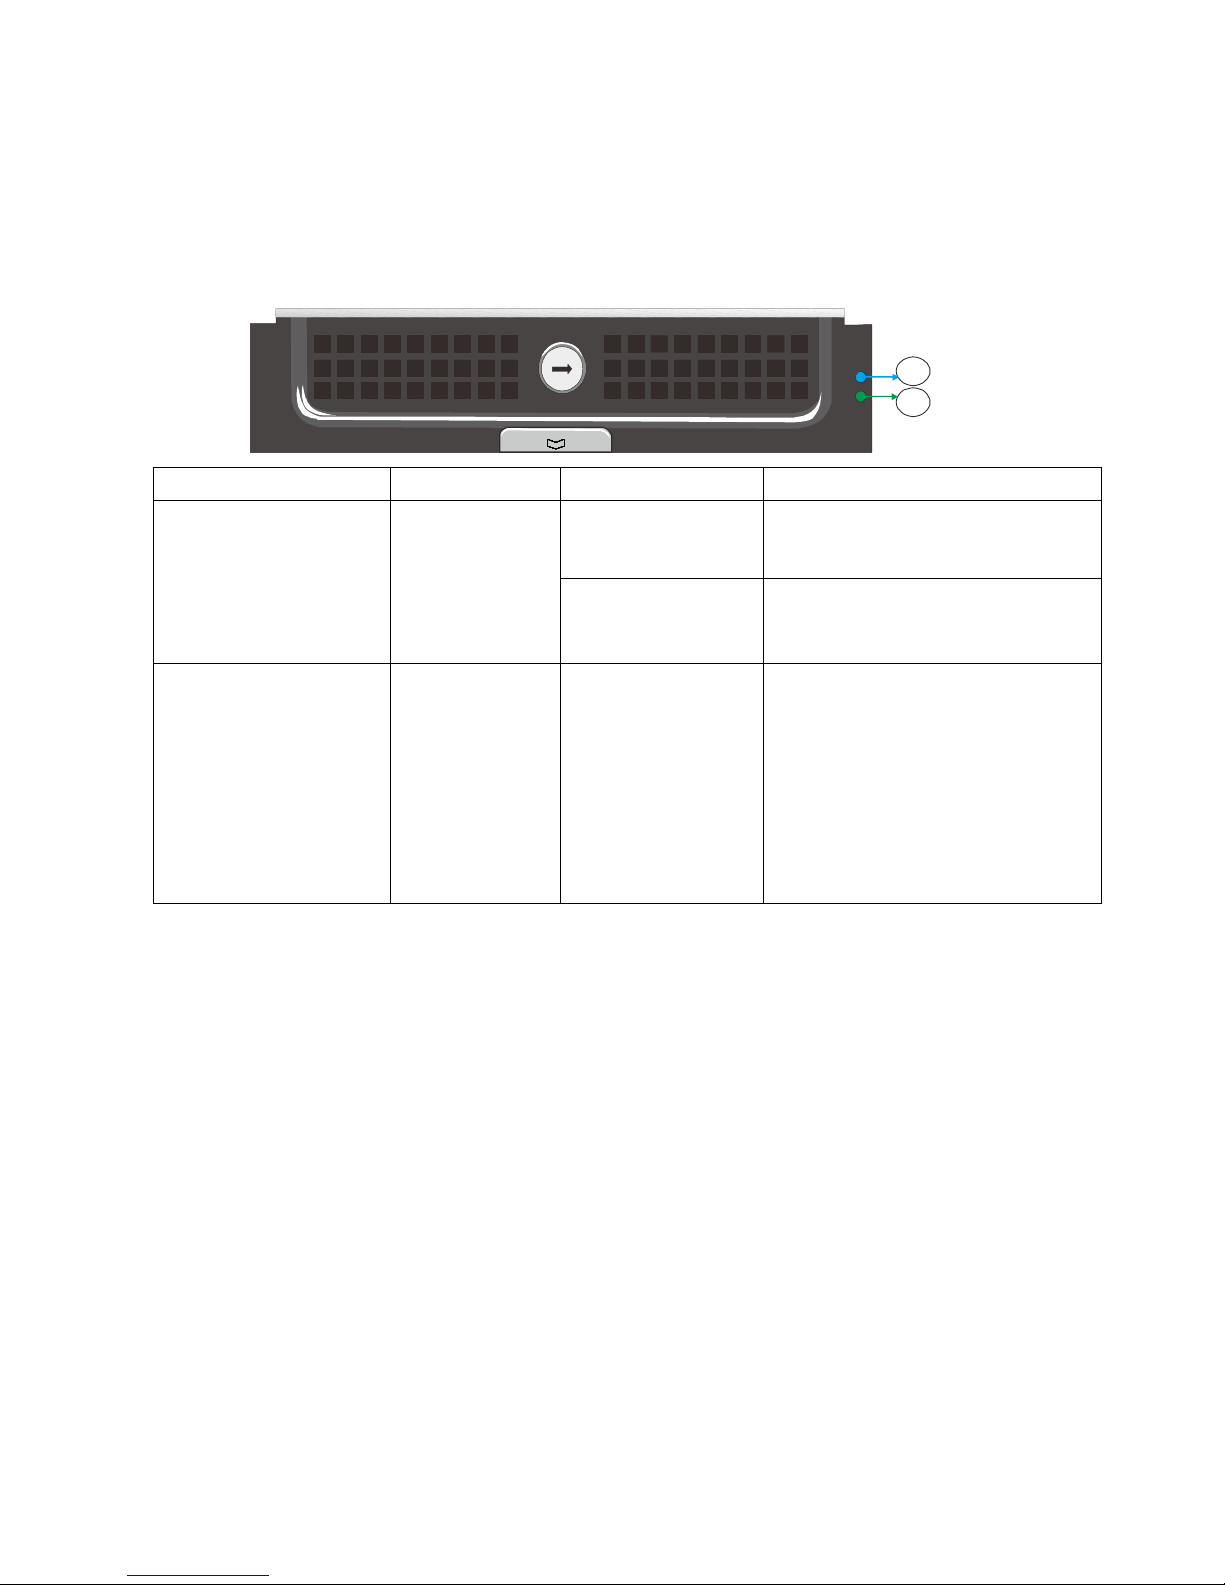
Drive Tray LED
Two LED indicators are located on the right side of each drive tray. When
notified by a drive failure message, you should check the drive tray indicators to
find the correct location of the failed drive.
1
2
Name Color LED Status Function
Blink Indicates that the data is being
written to or read from the
drive.
1. Drive Busy LED Blue
Off
Indicates that there is no
activity on the disk drive.
2. Power Status LED Green / Red On
GREEN indicates that the drive
bay is populated and is working
normally.
RED indicates that the disk drive
has failed, or a connection
problem occurred.
28
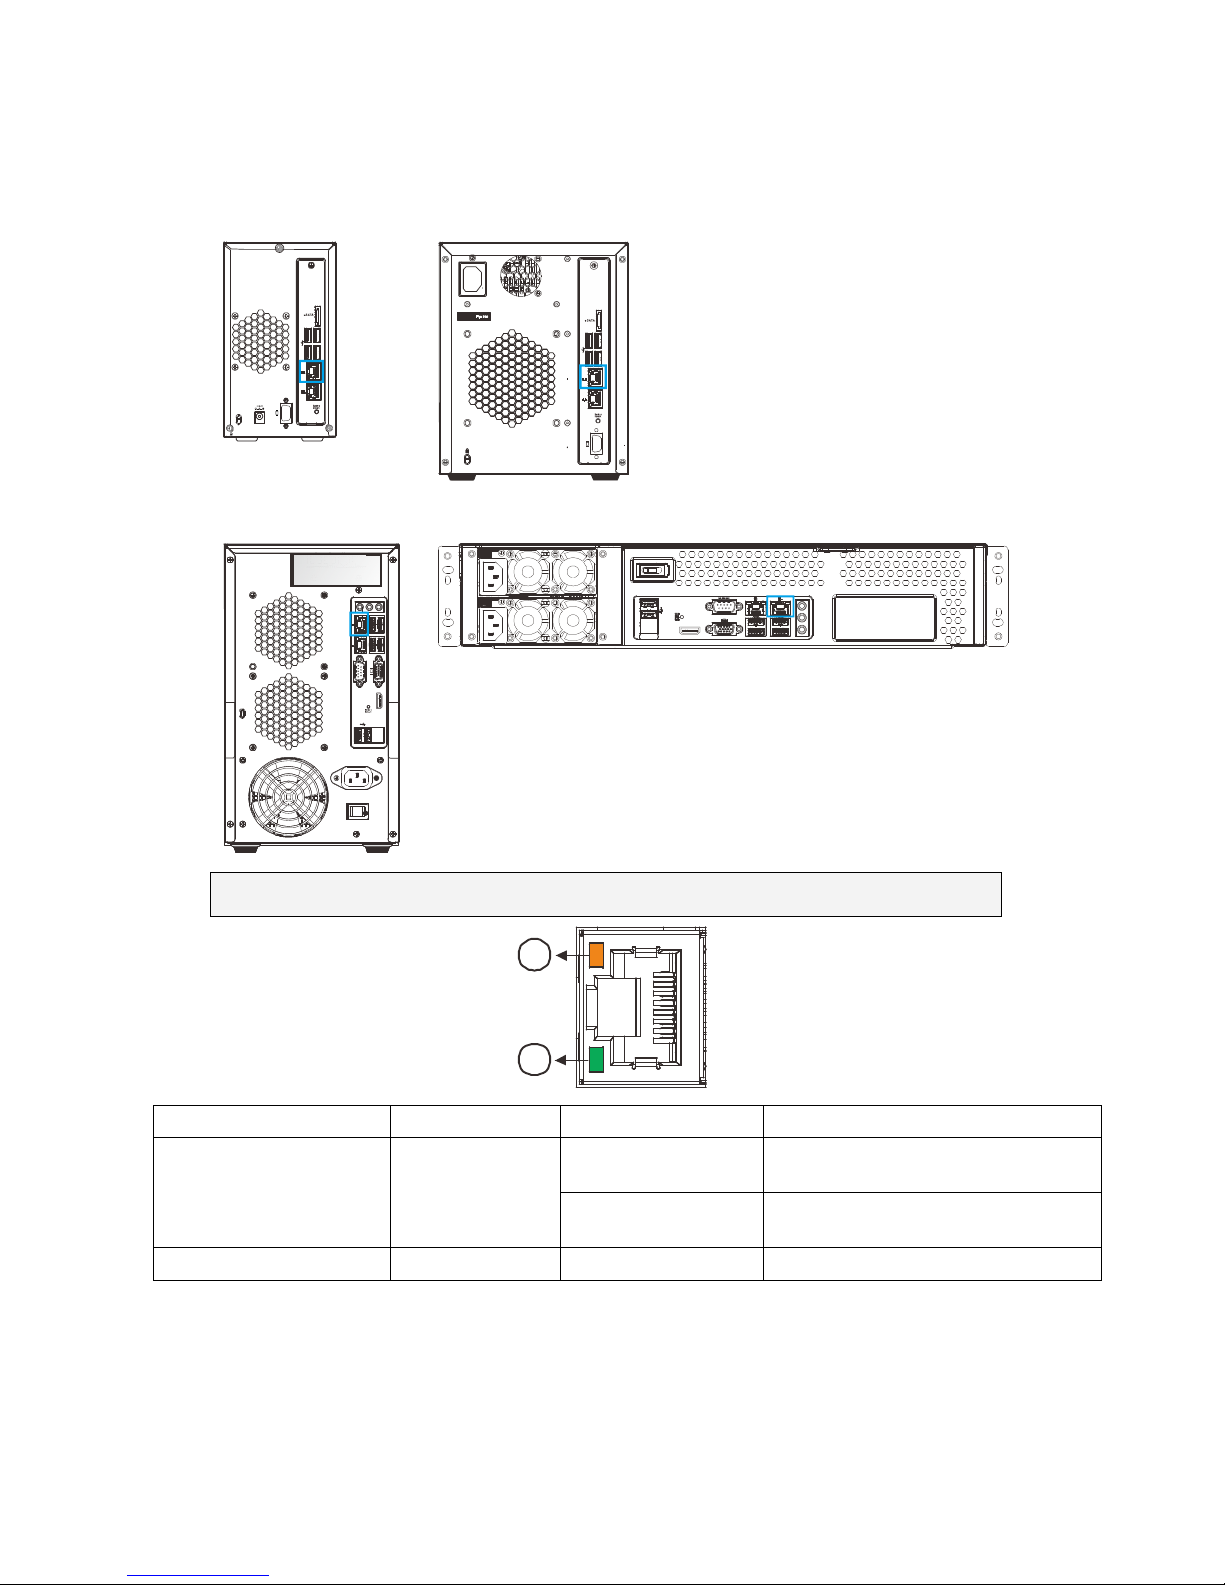
Rear Panel Ethernet LED
SMR2000 Series SMR5000 Series
1
2
EonNAS
1
2
SMR8000 Series SMR8000U Series
1
2
RS
23
2
/48
5
Note: Users can only use LAN port1.
1
2
Name Color LED Status Function
On Indicates that the connection is
established.
1. Link Status LED Green
Off Indicates that the connection is
not established.
2. Activity LED Amber
Blink
Indicates data transfer activity

29
Chapter 3. Software Overview
3.1. Software Introduction
Video Management Software (VMS) is a highly modular and powerful video and
hardware management suite that incorporates Server recording, management, and
video monitoring and playback functionalities to serve the core purposes of a video
surveillance system.
It operates in a client-server mode: The Local Client and Local Domain Server run
for standalone SMR/NVR/VMS Server, while the Remote Client receives live video
streams and event video playbacks from LAN or Internet. All administrative tasks
are performed on the Client. The client software provides the ability to monitoring
and playback recorded videos from multiple cameras. And for users having multiple
SMR/NVR/VMS Servers, Central Management Software (its main functions are the
same with the VMS) can be utilized to manage over the domain infrastructure.
3.2. Module Framework
VMS/NVR Server
••••
Combines video recording, archival and retrieval functionalities for
individual servers/standalone PCs.
••••
Serves as the connection point for client stations.
Local Domain Server
••••
The interface between the VMS/VI Servers and any clients.
••••
User authentication server.
Local Client
••••
Local access, VMS Client installed on standalone PCs/SMRs for live
video monitoring, event recording playback access and VMS system
configuration.
Remote Client (full functions)
••••
Remote access, VMS Client installed on remote PCs for live video
monitoring, event recording playback access.
••••
Serves as the default configuration point for NVR2000 series, which do
not have a Local Client.
Web Client (for simple use)

30
••••
Remote access, an ActiveX application (OCX) installed on remote PCs
for live viewing and event playbacks through the web browser.
iPhone Client (for simple use)
••••
iPhone Client installed on iPhone for basic live viewing.
Web Server
••••
Allows user to access the live video stream, PTZ control and event
recording playbacks through Microsoft Internet Explorer 7.0 (or higher)
after the Web Clients components are downloaded.
VI Server
••••
The video intelligence processing point for a VMS solution.
••••
Preinstalled on SMR/NVR Server, and optional on a separate server/PC
(VMS).
CMS Domain Server
••••
Allows centralized control over multiple Trusted VMS Server points and
connections from multiple clients.
CMS Client
••••
Software capable of accessing multiple Trusted VMS Servers through
the CMS Domain Server
 Loading...