

Page 1
Only qualified service personnel should install and service this product in order to avoid risk of injury from
electrical shock and energy hazard.
Observe all ESD (Electro-static Discharge) procedures during installation to avoid damage to the recorder
and its components.
Warning!
User-provide Items
/4
QUICK INSTALLATION GUIDE
Installation
© by Surv eon Techn ology, In c. All rig hts res erved .
EMR Desktop Series
Rear View
1 Power Socket
2 e-SATA Port x1
3 USB Port x4
HDMI Port
LAN Port x2
Restore Button
USB Port x2
Safety Switch
Audio Ports
VGA Port
Kensington Lock-hole
COM Port
12V DC Power Port
EMR2000 Series
EMR5000 Series
EMR8000 Series
2
3
4
5
6
2
3
4
3
4
1
5
5
6
6
9
10
11
12
13
7
8
8
8
1
Hardware Overview
Front View
1
Note: The function of Video Back Up Button is reserved.
EMR5000 Series
EMR8000 Series
1 LCD Display
2 Enter Switch
3 Select Switch
LED Indicators
Power Switch
4
5
6
7
Front USB Connector
Video Back Up Button
EMR2000 Series
4 5
1 2 3 4 5
1 2 3 4 5
6
6 6
7
2
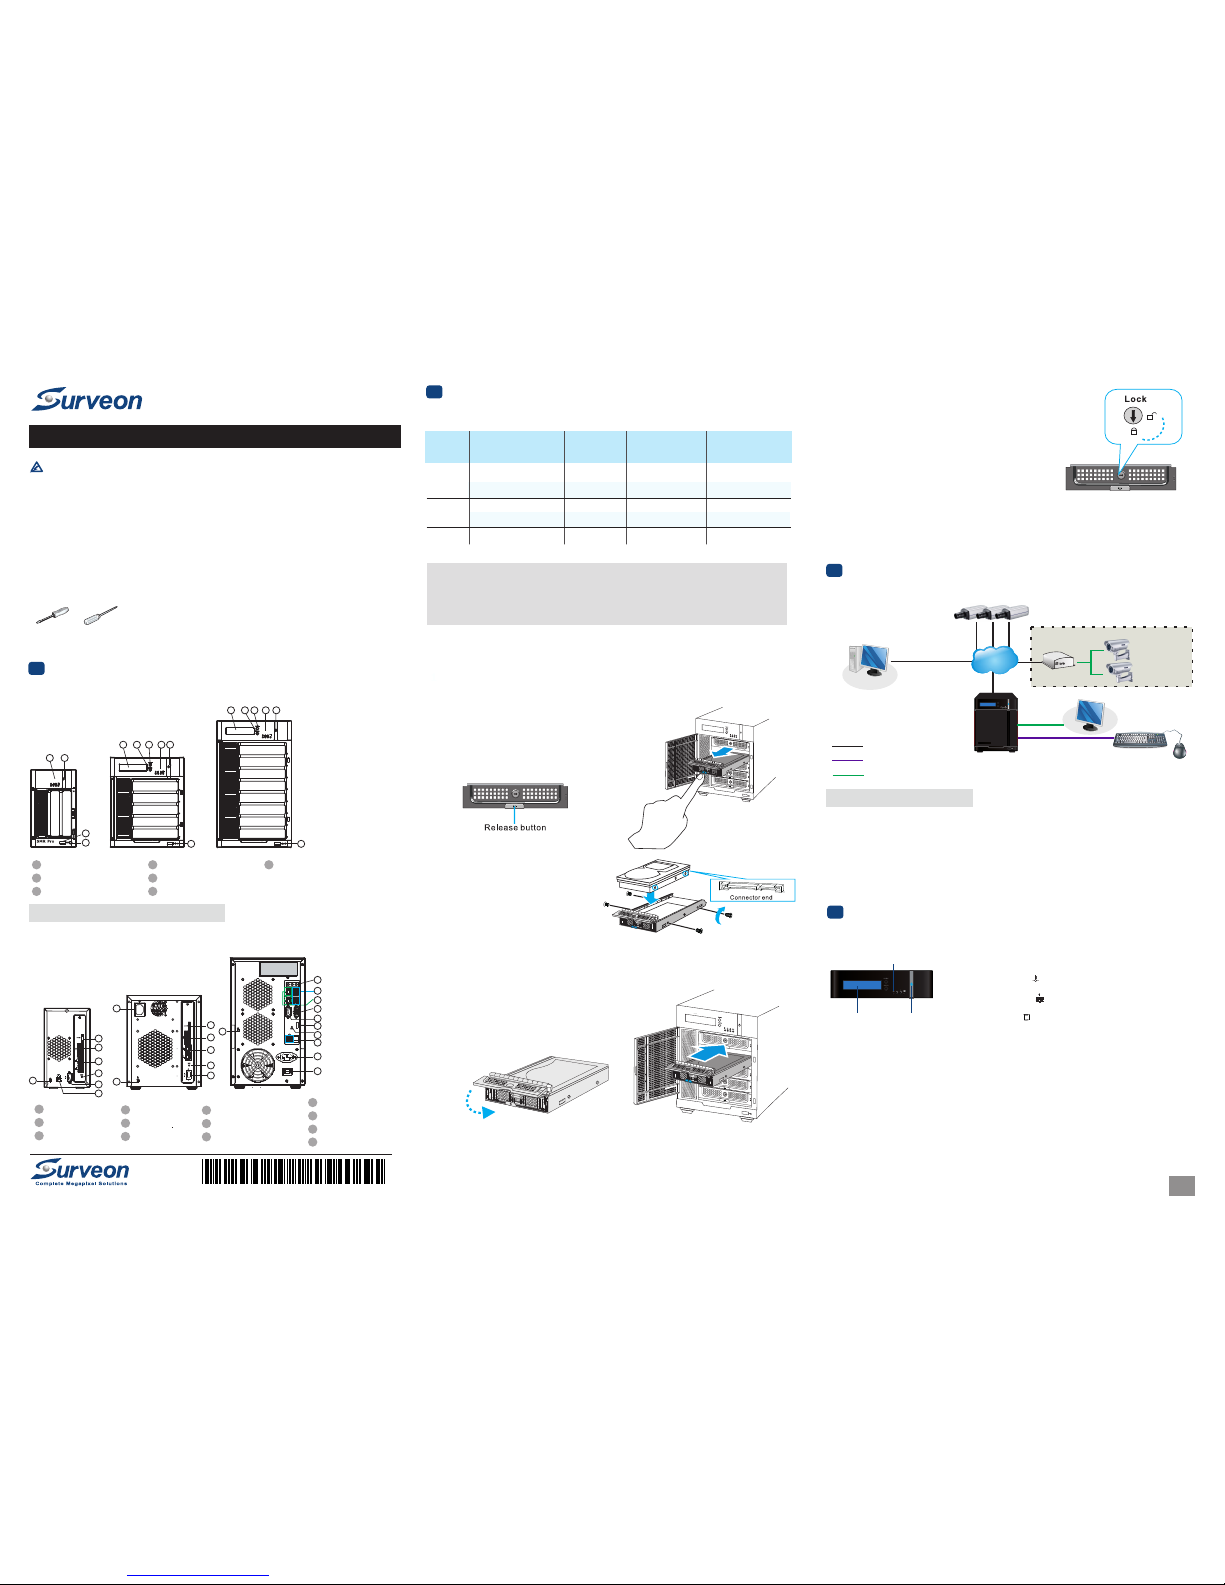
System Connections
3
●
●
Insert the LAN Cable to the LAN Port to a local network where your IP Camera reside.
(Connection to analog cameras is also available via an IP encoder).
●
Connect an external monitor capable of 32 bit or higher color quality to the VGA port to view the
Milestone XProtect interface.
Insert mouse, keyboard to the USB for installing Milestone XProtect Server on the EMR system.
Con nect cab les to th e rear pa nel por ts as fol lows:
Note:
Shaded areas are optional devices.
Poweri ng up EMR
4
LED Indicators
LCD Display Power Switch
1. Att ach the p ower ca ble to th e power s ocket o n the rea r panel .
2. (E MR8000 S erie s) Make su re the sa fety sw itch on t he rear p anel
is swi tched t o the “-” s ide, wh ich mea ns that i t is turn ed on.
3.
4. See i f the sys tem LED i s blink ing, wh ich mea ns that t he syst em
is sta rting u p.
5. Se e if the ne twork L ED has tur ned gre en, whi ch indi cates t hat
the po wer is on a nd netw ork is co nnect ed.
6. Se e if the HD D LED is on, w hich me ans tha t the har d drive c an
be acc essed .
7. The S erver na me and th e IP addr ess wil l
be sho wn on the L CD scre en.
Pres s the pow er swit ch.
(EM R5000/ 8000 se ries)
Q ME 2 5 8 0 A U R 1 0
1/4
Adding Hard Drives (Optional)
Hard Drive Installation Prerequisites
Purc hase ha rd driv es havi ng the sa me capa city an d using s ame int erfac e with the p re-in stall ed ones .
Inserting Hard Drive into Drive Tray
1. Op en the fro nt pane l of the EM R syste m.
2. Pre ss the re lease b utton ( indic ated by t he blue a rrow)
on the b ezel, t he beze l panel s hould o pen aut omati cally
and ge ntly pu ll out th e hard dr ive tra y.
3. Pl ace the ha rd driv e into th e drive t ray.
Make s ure the h ard dri ve’s int erfac e
conn ector i s the ope n side of t he driv e
tray a nd its la bel sid e facin g up. Adj ust
the dr ive’s l ocati on unti l the mou nting
hole s in the dr ive tra y are ali gned wi th
thos e on the ha rd driv e. Secu re the dr ive
wit h four sup plied f lat hea d screw s.
4. Wit h the tra y bezel o pen, in sert th e hard dr ive and
tray i nto the s ystem e nclos ure.
5. Cl ose the tr ay beze l.
6. Us e the smal l flat bl ade scr ew driv er to tur n the bez el lock
from t he unlo ck to loc k posit ion.
7. Repe at abov e steps t o insta ll othe r hard dr ives.
8. Cl ose the sy stem fr ont pan el when y ou are do ne inst allin g hard dr ives.
Password:
●
Quick Installation Guide x1
●
Product DVD x1 (including manuals)
●
Power Cord x1
Accessories
●
HDD Screw x20 (EMR2000 series)
●
HDD Screw x40 (EMR5000/8000 series)
●
●
USB c ompati ble Key board a nd Mous e
LAN Ca ble
●
●
●
Mon itor
●
(Op tional ) Hard Dr ives fo r extra s torage s pace
PC( s) with W indows X P (or abo ve) Use d as Remo te
Mil eston e Smart Cl ient Ma nagem ent Cen ter
USB D rive Use d for Ins talli ng Mile stone S mart Cl ient on
remo te PC(s )
4
5
6
7
8
9
10
11
12
13
Flat blade
Screwdriver
Philips
Screwdriver
●
●
Hard d rives a re pre- insta lled in t he EMR se ries. U sers ca n also ad d suppl ement ary har d drive s and do RA ID
con figura tions t hemse lves. P lease r efer to t he foll owing t able for m ore det ails.
IP Encoder
Analog Camera(s)
Remote Milestone XProtect Smart
Client Management Center
IP Camera(s)
Monitor
Internet
SELECT
ENTER
SMR Pro
Eth ernet Co nnect ion
USB C onnec tion
Vid eo/Mo nitor Co nnect ion
Mode l
EMR2 000
EMR5 000
EMR8 000
Numb ers of Pr e-ins talle d
Hard D rives
1 HDD
2 HDD
1 HDD
3 HDD
2 HDD
Spac e for Add ition al
Hard D rives
RAID O ption s for
Addi tiona l Hard Dr ives
Defa ult RAI D
Conf igura tion
N/A
N/A
N/A
RAID 5
RAID 1
1 HDD
0 HDD
4 HDD
2 HDD
6 HDD
N/A
N/A
RAID 0, 1 or abo ve
RAID 0, 1
RAID 0, 1 or abo ve
.
Note : (1) You s hould g o to Wind ows Disk M anage ment to a lloca te and fo rmat th e logic al driv es
(set t he bloc k size as 6 4K). You c an choo se to do th is befo re or aft er the RA ID conf igrat ion
is don e. (2) Pl ease re fer to Ad vance d RAID Co nfigu ratio n sect ion in th e EMR Ser ies Use r
Manu al for mo re deta ils.
Page 2

.
Note : For mor e detai ls abou t the Wiz ards an d Manag ement A pplic ation , pleas e refer t o Miles tone
Ess entia l Admini strat or’s Ma nual. XPro tect
1. Do uble-c lick In tel Rap id Stor age Tec hnolo gy sho rtcut o n the des ktop.
The pr ogram w ill pro mpt for c reati ng disk v olume s.
You ca n see the cu rrent s tatus o f your di sk driv es on the r ight- hand si de.
Cli ck Creat e a custo m volum e on the le ft or the C reate b utton o n the top .
RAID Configuration through Intel Utility (for EMR2000/5000 Series)
3/4
2/4
Note : (1) Th e trial ve rsion c an be use d for 30 da ys. Als o, vide o chann els are l imite d to
the m aximum . You may pu rchas e licen ses for p erman ent use a nd chan nel
go to p3 E xtend ing Trai l Licen ses for M ilest one XPr otect s ectio n for more d etail s.
eig ht as
add ition s.
Plea se
Go to C: \XPro tect Es senti al\ and d ouble -clic k the ins talla tion fi le.
Cho ose Inst all Tria l and fo llow th e instr uctio ns to sta rt the in stall ation.
2. Se lect th e RAID typ e. Clic k Next to c ontin ue.
Installing Milestone XProtect Server on the EMR System
Starting Milestone XProtect Smart Client
Int el Rapi d Stora ge Technol ogy
Stau s Crea te Mana ge
Pref erenc es
Help
Curr ent Sta tus
Crea t
Your sys tem is fu nctio ning no rmall y.
Crea te a volu me by com binin g avail able di sks to en hance y our sto rage sy stem.
Crea te a cust om volu me
Mana ge
Clic k on any el ement i n the sto rage sy stem vi ew to man age its p roper ties.
Arra y_000 0
MILE STONE In itial izing 0 % compl ete
Array_ 0000
Creat
MILEST ONE
Tpye: RA ID5
2.0 TB
1.8 TB
1.8 TB
1.8 TB
Intern al disk
233 GB
Intern al disk
More he lp on thi s page
3
Stau s Crea te Manage
Pref erenc es
Help
1.S elect
2. Con figur e
3. Con firm
Inte l Rapid S torag e Technol ogy
Sele ct Volu me Type
Flexi ble dat a prote ction ( Recov ery)
Real- time da ta prot ectio n (RAID 1 )
Optimi zed di sk perfo rman ce (RAID 0 )
Effici ent dat a hosti ng and pr otect ion (RA ID 5)
Balan ced per forma nce and d ata pro tecti on
(RAID 1 0)
Prote ction
Perfor mance
Capac ity
Combi ne two di sks to cr eate a vo lume wh ere eac h disk
store s an exac t copy of t he data a nd prov ides re al-ti me
redun dancy.
More he lp on thi s page
Next
Cance l
5
Mil eston e XProt ect Ins talla tion
Milestone XProtect Level
Key Fea tures
XPro tect
Esse ntial
Numb er of Con necte d Camer as
Maxi mum Num ber of Us ers
Vide o Expor t Forma t
Web Cl ient
26
5
JPEG , AVI,
Nati ve Data base
Yes
1
7
RAID Configuration for Additional Hard Drives (Optional)
Hard d rives a re pre- insta lled in t he EMR se ries. U sers ca n also ad d suppl ement ary har d drive s and do
RAI D config urati ons the mselv es. Ple ase ref er to the f ollow ing tab le for mor e detai ls.
.
Note : You can a lso dow nload t he XProt ect ins talla tion fi le from M ilest one's w ebsit e at
http ://ww w.mil eston esys. com.
You mu st inst all Mil eston e XProte ct Serv er on the E MR syst em, whi le the XP rotec t Smart C lient c an be
ins talle d eithe r on the sys tem or on r emote P C(s).
To inst all Mil eston e XProt ect Sma rt Clie nt for rem ote man ageme nts:
1. Co py the Mil eston e XProt ect dir ector y from yo ur EMR se ries an d save it i n the USB d rive.
2. Ins ert the U SB driv e to PC(s ).
3. Do uble- click th e insta llati on file s and fol low the i nstru ction s to star t the ins talla tion.
.
Installing Milestone XProtect Smart Client on Remote PC(s)
The M ilest one XPro tect Ma nagem ent App licat ion Win dows wi ll prom pt afte r the XPr otect S erver
ins talla tion is co mplet e.
Basic System Settings through Wizards
Use t he wiza rds to con figur e the sur veill ance sy stem.
1. Ca mera and o ther ha rdwar e devic es, suc h as vide o encod ers, NV Rs, etc , can be ad ded to you r XProt ect
sys tem thro ugh the A dd Hard ware De vices w izard . If micr ophon es/sp eaker s are atta ched to a h ardwa re
dev ice, the y are aut omati cally a dded as w ell.
4. The S mart Cl ient wi ndow wi ll open .
3. Sp ecify yo ur logi n infor matio n in the fo llowi ng fiel ds.
Whe n ready, cl ick Con nect.
●
●
Authentication: Choose Windows authentication (current user), with which y
Server address: Type the IP address of your EMR server.
ou will be authenticated through
your current Windows login by default, and do not have to specify any user name or password.
1. Do uble-c lick th e Smart C lient s hortc ut on you r deskt op or sel ect Sta rt > Prog rams > Mi lesto ne
XPro tect Sm art Cli ent fro m Windo ws Star t Menu to s tart th e softw are.
2. Th e Smart Cl ient lo gin win dow wil l promp t.
.
Note : to Mi lesto ne XProt ect Ess entia l Admin istra tor’s M anual /Smar t Clien t User
manu al for mo re deta ils.
Ple ase refe r
.
Note : (1) Th e defaul t video r ecord ing pat h is unde r C:\. You s hould g o to Advanc ed Conf igura tion
> Hard ware De vices > C amera N ame on th e side ba r of
Win dows to ch ange it t o D:\ or ot her dri ve part ition s. (2) Au dio set tings s hould b e
disa bled un der
Mil eston e XProte ct Mana gemen t
Appl icati on
Adva nced Co nfigu ratio n for avo iding v ideo lo ss of ONV IF came ras.
2. You c an quick ly conf igure y our cam eras’s v ideo an d recor ding pr opert ies thr ough Co nfigu re Vide o and
Reco rding w izard .
3. Th e Adjust M otion D etect ion wiz ard hel ps you qu ickly c onfig ure you r camera s’ moti on dete ction
prop ertie s.
4. The C onfig ure Use r Acces s wizar d helps y ou quic kly con figur e clien ts’ acc ess to th e XProte ct serv er as
wel l as which u sers sh ould be a ble to us e clien ts.
.
Note : (1) You s hould g o to Wind ows Disk M anage ment to a lloca te and fo rmat th e logic al driv es
(set t he bloc k size as 6 4K). You c an choo se to do th is befo re or aft er the RA ID conf igrat ion
is don e. (2) Pl ease re fer to Ad vance d RAID Co nfigu ratio n sect ion in th e EMR Ser ies Use r
Manu al for mo re deta ils.
Mode l
EMR2 000
EMR5 000
EMR8 000
Numb ers of Pr e-ins talle d
Hard D rives
1 HDD
2 HDD
1 HDD
3 HDD
2 HDD
Spac e for Add ition al
Hard D rives
RAID O ption s for
Addi tiona l Hard Dr ives
Defa ult RAI D
Conf igura tion
N/A
N/A
N/A
RAID 5
RAID 1
1 HDD
0 HDD
4 HDD
2 HDD
6 HDD
N/A
N/A
RAID 0, 1 or abo ve
RAID 0, 1
RAID 0, 1 or abo ve
Page 3

4. Cho ose arr ay type a nd init ializ ation t ype. Sel ect All c an be cli cked to s elect a ll the ha rd driv es you ha ve.
Clic k Creat e to star t the con figur ation .
5. Th e new disk v olume w ill app ear in th e Logic al Devi ce Info rmati on afte r it is cre ated su ccess fully.
3/4
5. Th e volume w ill sta rt init ializ ation a fter th e confi gurat ion is do ne. Ple ase wai t until i t is comp lete.
Note: Disk volume initialization for EMR series might take about several hours or more.
7. The sy stem wi ll shut d own aft er the in itial izati on is fin ished . Press t he powe r switc h to rest art the s ystem .
8. Go ba ck to Int el Rapi d Stora ge Tool aga in to che ck if the R AID is co nfigu red suc cessf ully.
3. On ce succe ssful ly logg ed in, th e infor matio n of your h ard dri ves and e xisti ng disk vo lumes w ill be di splay ed.
Clic k Creat e Array .
/4
3/4
4. Aft er sele cting t he disk s, the sy stem wi ll ask yo u to conf irm the s ettin gs you ha ve just ma de.
Clic k Creat e Volum e to cont inue.
3. Se lect th e disks fo r RAID co nfigu ratio n.
For ac hievi ng bett er perf orman ce, rem ember t o tick Ini tiali ze volu me in Adv anced s ectio n.
Cli ck Next to c ontin ue.
8
Extending Trail Licenses for Milestone XProtect (Optional)
Importing Licenses
Note : Offl ine acti vatio n is intr oduce d below. U se onli ne acti vatio n for a qui ck and co nvenie nt
proc edure , if your E MR syst em has In terne t acces s. Plea se refe r to EMR Us er
det ails.
act ivatio n
Man ual for mo re
The Tri al Lice nses fo r Miles tone XP rotec t can be us ed for 30 da ys. Ple ase con tact yo ur deal er for
purc hasin g licen se key.
Whe n you purc hase th e licen se key, yo u receiv e a tempo rary li cen se fi le (.li c) incl uding a S oftwa re
Lic ense Cod e (SLC) . Save th e .lic fi le and SL C in a USB dr ive.
Int el Rapi d Stora ge Technol ogy
More he lp on thi s page
Stau s Creat e Manage
Pref erenc es
Help
1.S elect
2. Con figur e
3. Con firm
233 GB
233 GB
111
Tpye: RA ID1
233 GB
Array_ 0000
Name: 111
Selec t two dis ks:
Disk on p ort 3 (23 3GB)
Disk on p ort 4 (23 3GB)
Speci fy the vo lume si ze:
Volume s ize: 23 8,475 M B
Array a lloca tion:
100%
Enabl e volum e write -back c ache
Initi alize v olume
Advan ced
Next
Cance l
Back
Stau s Crea te Manage
Pref erenc es
Help
Int el Rapi d Stora ge Technol ogy
1.S elect
2. Con figur e
3. Con firm
233 GB
233 GB
111
Tpye: RA ID1
233 GB
Array_ 0000
Creat e Volume
Cance l
Back
Conf irm Vol ume Cre ation
Revie w the sel ected c onfig urati on.
Warnin g: Perf ormin g a drive r upgra de or
downg rade wh ile a vol ume mig ratio n is in pro gress
will ma ke the vo lume in acces sible d ue to dri ver
incom patib ility. B ack up da ta befo re cont inuin g.
This pr ocess c ould ta ke a whil e depen ding on t he numb er
and siz e of the di sks. You ca n conti nure us ing oth er
appli catio ns duri ng this t ime.
More he lp on thi s page
User N ame
Pass word
RAID
Login
Mana ge Even t Task Se tting SHI L ogout Help
Plea se Logi n
Mana ge Even t Task Se tting SHI L ogout Help
Logi cal Dev ice Inf ormat ion
Type Capa city Cache Pol icy BlockS ize Sect orSiz e OS Name
Stat us
Name
ARRAY_ a-a RAID 1 8.5 8 GB 512 GB H PT DISK 0 _2 Norm al
Maint enanc e
ARRAY_ a-a RAID 1 241 .39 GB 512 GB H PT DISK 0 _3 Norm al
Maint enanc e
Crea te Array
Phys ical De vice In forma tion
Loca tion Mode l Capa city Max Fr ee
1/5 HDT7 22525 DLA32 0-VDS 41BT4 E50UE J 249. 98 GB 0.0 GB
1/6
HDT7 22525 DLA38 0-VDS 41BT4 E4Z4V J 24 9.98 GB 0.0 GB
1/7 HDT7 22525 VLSA8 0-VNR JMHC6 CN8T2 M 249. 98 GB 249.9 8GB
1/8 HDT7 22525 VLSA8 0-VNR J3EC6 DBNLS M 249 .98 GB 249. 98GB
Mana ge Even t Task Se tting SHI L ogout Help
Crea te Array
Arra y Type RAID 0
Arra y Name Defaul t
Init ializ ation M ethod Quic k Init
Cach e Polic y Write B ack
Bloc k Size 64 K
Numb er of RAI D5 memb er disk s -1
Sele ct all
Avail able Di sks
Loca tion Capa city Ma x Free
1/7 HD T7225 25VLS A80-V NRJMH C6CN8 T2M 249 .98 GB 24 9.98G B
1/8 HD T7225 25VLS A80-V NRJ3E C6DBN LSM 249 .98 GB 24 9.98G B
Capa city:
(Acc ordin g to the
Max fr ee spac e
on the s elect ed
disk s)
Crea te
Maxi mum ( MB)
Mana ge Even t Task Se tting SHI L ogout Help
RAID Configuration through HighPoint Utility (for EMR8000 Series)
1. Do uble- click Hi ghPoi nt RAID M anage ment Ut ility s hortc ut on the d eskto p.
The pr ogram w ill pro mpt for c reati ng disk v olume s.
2. En ter the de fault u ser nam e (RAID ) and pas sword ( hpt) fo r loggi ng in.
(Ple ase not e that th e user na me and pa sswor d are cas e sensi tive.)
Mana ge Event Tas k Settin g SHI Logo ut Help
Logi cal Dev ice Inf ormat ion
Type Capacity C ache Po licy BlockSi ze S ector Size OS Na me
Stat us
Name
ARRAY_a -a R AID 1 8.58 GB 512 GB HPT DI SK 0_2 Norm al
Maint enanc e
ARRAY_a -a R AID 1 241.39 G B 512 GB HPT DI SK 0_3 Norm al
Maint enanc e
RAID_ 0_0 RAID 0 499. 96 GB 512 G B HP T DISK 0_ 0 No rmal
Maint enanc e
64k
1. Ins ert the U SB driv e with th e .lic fi le and SL C to your E MR syst em.
2. St art the Mi lesto ne XPro tect Sm art Cli ent. On t he Mana gemen t Appli catio n’s too lbar, clic k
Lice nse Off line > Im port Li cense , and se lect th e tempor ary lic ense fi le (.li c)
Whe n the fil e is succ essfu lly imp orted , click O K.
File > M anage
to im port it.
Activating Licenses
Precondition
Add at l east on e camer a to your E MR syst em.
Step 1: Expo rt Lice nse for A ctiva tion
To expo rt a lice nse fil e with yo ur curr ently a dded de vices fo r activ ation , do the fo llowi ng:
1.O n the Mana gemen t Appli catio n’s too lbar, cli ck File > Ma nage Li cense O fflin e > Expor t Licen se
Acti vatio n.for
2. Sp ecify a fi le name f or the li cense r eques t(.Ir q) file ( autom atica lly gen erated b y XProt ect), a nd
save i t in the US B drive .
Page 4

4. Und er Curr ent SLC s, sele ct the SL C.
5.
6. You w ill rece ive the u pdate d perma nent li cense f ile (.l ic) fro m Miles tone vi a e-mai l. Save i t in
the US B drive .
Step 2: Impo rt Lice nse
1. Mov e the USB d rive ba ck to you r EMR sys tem.
2. On th e Manag ement A pplic ation 's tool bar, clic k File > Ma nage Li cense O fflin e > Impor t
Lice nse, an d selec t your sa ved .li c file to i mport i t.
3. Wh en the per manen t licen se file i s succe ssful ly impo rted, c lick OK .
In the m enu for S LC prop ertie s, use th e Uploa d LRQ fun ction t o uploa d the gen erated . lrq fil e.
3/4
4/4
3. Mov e the USB d rive wi th the .l rq file t o a compu ter wit h inter net acc ess. Op en an int ernet b rowse r
and go t o Miles tone' s websi te at htt p://w ww.mi lesto nesys .com. S elect S oftwa re Regis trati on from
the to p menu. I f you hav e used th e Softw are Regi strat ion Ser vice Ce nter be fore, l og in wit h your
e-m ail and pa sswor d. Othe rwise , click N ew to the S ystem ? to crea te a new us er acco unt and
regi ster yo ur SLC.
 Loading...