

Hidrolavadora Eléctrica
Electric Pressure Washer
Manual de Usuario y Garantía.
User’s Manual and Warranty.
ATENCIÓN: Lea, entienda y siga las instrucciones de seguridad contenidas en este
manual, antes de operar esta herramienta.
WARNING: Read, understand and follow the safety rules in this manual, before operating this tool.
HL730 · HL753

ENGLISH ESPAÑOL
CONTENIDO CONTENT
Normas generales de seguridad
Seguridad eléctrica
Seguridad personal
Utilización y cuidados de las
herramientas eléctricas
Advertencias de seguridad para
hidrolavadoras eléctricas
Características
Desembalaje y ensamble
Instrucciones de operación
Mantenimiento
Solucionador de problemas
Especificaciones técnicas
Notas
Garantía
10
11
12
22
24
3
3
3
4
General safety rules
Electric safety
Personal safety
Tool use and care
13
13
13
14
Specific safety rules for
5
5
6
6
electric pressure washers
Features
Unpacking and assembly
Operation instructions
Maintenance
Troubleshooting
Technical data
Notes
Warranty policy
14
15
15
16
19
20
21
22
24
SIMBOLOS SYMBOLS
PELIGRO, ADVERTENCIA, PRECAUCIÓN:
Indica un riesgo personal o la posibilidad
de un daño.
Herramientas tipo II: Doble aislamiento,
protege las herramientas eléctricas.
2
DANGER, CAUTION, WARNING: Indicates risk of
personal injury and/or the possibility of damage.
Type II power tools: Indicates double insulation.

ESPAÑOL•Manual de Usuario
NORMAS GENERALES DE SEGURIDAD
Esta HIDROLAVADORA tiene características
que harán su trabajo más rápido y fácil. Seguridad, comodidad y confiabilidad fueron previstos como prioridad para el diseño del mismo,
haciendo más fácil su operación.
ADVERTENCIA: Lea todas las advertencias
de seguridad y todas las instrucciones. La omi-
sión de alguna de las advertencias e instrucciones que se enlistan a continuación puede dar
como resultado un choque eléctrico, fuego y/o
un serio daño.
CONSERVE TODAS LAS ADVERTENCIAS Y
TODAS LAS INSTRUCCIONES.
SEGURIDAD EN EL ÁREA DE TRABAJO
Mantenga el área de trabajo limpia y bien iluminada. Las áreas desordenadas y oscuras pro-
vocan accidentes.
No maneje herramientas eléctricas en atmósferas explosivas, tales como en presencia de
líquidos inflamables, gases o polvo. Las herra-
mientas eléctricas crean chispas que pueden
encender el polvo o los humos.
Mantenga alejados a los niños y curiosos
mientras maneja una herramienta eléctrica.
Las distracciones pueden causarle la pérdida
del control.
SEGURIDAD ELÉCTRICA
La clavija de la herramienta eléctrica debe
coincidir con receptáculo. No modificar nunca
la clavija de ninguna manera. No usar ningún
adaptador de clavijas con herramientas eléctricas puestas a tierra. Clavijas no modificadas y
bases coincidentes reducirán el riesgo de choque eléctrico.
Evite el contacto del cuerpo con superficies
puestas a tierra como tuberías, radiadores, cocinas eléctricas y refrigeradores. Hay un riesgo
aumentado de choque eléctrico si su cuerpo
está puesto a tierra.
No exponga las herramientas eléctricas a la lluvia o a condiciones de humedad. El agua que
entre en la herramienta aumentará el riesgo
de choque eléctrico.
No abuse del cable. No usar nunca el cable para
llevar, levantar o desenchufar la herramienta
eléctrica. Mantenga el cable lejos del calor,
aceite, cantos vivos o piezas en movimiento.
Los cables dañados o enredados aumentan el
riesgo de choque eléctrico.
Cuando maneje una herramienta eléctrica en
el exterior, use una prolongación de cable adecuada para uso en el exterior. El uso de una
prolongación de cable adecuada para uso en el
exterior reduce el riesgo de choque eléctrico.
“ESTA HERRAMIENTA CUENTA CON UN
SUJETACABLE TIPO “Y“, EN CASO DE DAÑARSE EL CORDÓN DE ALIMENTACIÓN, ÉSTE DEBERÁ SER REEMPLAZADO POR EL FABRICANTE,
SUS CENTROS DE SERVICIO AUTORIZADOS, O
PERSONAL CALIFICADO A FIN DE EVITAR RIESGOS.”
EXTENSIONES DE CABLE
NOTA: El uso de cables dañados incrementa el
riesgo de descargas eléctricas o quemaduras.
Si es necesario un cable de extensión, debe ser
usado un cable con el tamaño adecuado de los
conductores. La tabla de la siguiente página,
muestra el tamaño correcto para usar dependiendo en la longitud del cable y el rango de
amperaje especificado en la etiqueta de valores nominales del producto. Si está en duda,
use el rango próximo más grande.
Siempre use cables de extensión listados en UL,
CSA ó NOM.
TAMAÑOS RECOMENDADOS DE EXTENSIONES
DE CABLE:
Cuando esté usando el producto afuera, use
una extensión para exteriores marcadas con lo
siguiente: “WA” o “W”. Estas extensiones están
pensadas para trabajar en exteriores y reducen
el riesgo de descarga eléctrica.
SEGURIDAD PERSONAL
Esté alerta, vigile lo que está haciendo y use el
sentido común cuando maneje una herramienta eléctrica. No use una herramienta eléctrica
cuando esté cansado o bajo la influencia de
3

drogas, alcohol o medicamentos. Un momento
de distracción mientras maneja herramientas
eléctricas puede causar un daño personal serio.
Use equipo de seguridad. Lleve siempre protección para los ojos. La utilización para las
condiciones apropiadas de un equipo de seguridad tal como mascarilla antipolvo, zapatos no
resbaladizos, gorro duro, o protección para los
oídos reducirá los daños personales.
Evite un arranque accidental. Asegúrese de
que el interruptor está en posición apagado
antes de conectar a la red y/o a la batería, coger o transportar la herramienta. Transportar
herramientas eléctricas con el dedo sobre el
interruptor o enchufar herramientas eléctricas
que tienen el interruptor en posición encendido invita a accidentes.
Retire llaves o herramienta antes de arrancar
la herramienta eléctrica. Una llave o herra-
mienta dejada unida a una pieza rotativa de
una herramienta eléctrica puede causar un
daño personal.
No se sobrepase. Mantenga los pies bien asentados sobre el suelo y conserve el equilibrio en
todo momento. Esto permite un mejor control
de la herramienta eléctrica en situaciones inesperadas.
Vista adecuadamente. No vista ropa suelta o
joyas. Mantenga su pelo, su ropa y guantes
alejados de las piezas en movimiento. La ropa
suelta, las joyas o el pelo largo pueden ser cogidos en las piezas en movimiento.
Si hay dispositivos para la conexión de medios
de extracción y recolección de polvo, asegúrese de que éstos estén conectados y se usen correctamente. El uso de estos dispositivos puede
reducir los peligros relacionados con el polvo.
IMPORTANTE: Este aparato no se destina
para utilizarse por personas (incluyendo niños)
cuyas capacidades físicas, sensoriales o mentales sean diferentes o estén reducidas, o carezcan de experiencia o conocimiento, a menos
que dichas personas reciban una supervisión o
capacitación para el funcionamiento del aparato por una persona responsable de su seguridad. Los niños deben supervisarse para asegurar que ellos no empleen los aparatos como
juguete.
UTILIZACIÓN Y CUIDADOS DE LAS
HERRAMIENTAS ELÉCTRICAS
No fuerce la herramienta eléctrica. Use la herramienta eléctrica correcta para su aplicación.
La herramienta eléctrica correcta hará el trabajo mejor y más seguro al ritmo para la que
fue concebida.
No use la herramienta eléctrica si el interruptor no gira “encendido” y “apagado”. Cual-
quier herramienta eléctrica que no pueda controlarse con el interruptor es peligrosa y debe
repararse.
Desenchufe la clavija de la fuente de alimentación y/o de la batería antes de efectuar
cualquier ajuste, cambio de accesorios, o de
almacenar las herramientas eléctricas. Tales
medidas preventivas de seguridad reducen el
riesgo de arrancar la herramienta accidentalmente.
Almacene las herramientas eléctricas inactivas
fuera del alcance de los niños y no permita el
manejo de la herramienta eléctrica a personas
no familiarizadas con las herramientas o con
estas instrucciones. Las herramientas eléctricas
son peligrosas en manos de usuarios no entrenados.
Mantenga las herramientas eléctricas. Compruebe que las partes móviles no estén desalineadas o trabadas, que no haya piezas rotas u otras condiciones que puedan afectar la
operación de las herramientas eléctricas. Las
herramientas eléctricas se reparan antes de su
uso, cuando están dañadas. Muchos acciden-
tes son causados por herramientas eléctricas
pobremente mantenidas.
Mantenga las herramientas de corte afiladas y
limpias. Las herramientas de corte mantenidas
correctamente con los bordes de corte afilados
son menos probables de trabarse y más fáciles
de controlar.
Use la herramienta eléctrica, accesorios y puntas de herramienta, etc. de acuerdo con estas
instrucciones y de la manera prevista para el
tipo particular de herramienta eléctrica, teniendo en cuenta las condiciones de trabajo
y el trabajo a desarrollar. El uso de la herra-
mienta eléctrica para aplicaciones diferentes
de las previstas podría causar una situación de
peligro.
4

ESPAÑOL•Manual de Usuario
SERVICIO
Haga revisar su herramienta eléctrica por un
servicio de reparación calificado usando solamente piezas de reemplazo idénticas. Esto garantizará que la seguridad de la herramienta
eléctrica se mantiene.
ADVERTENCIAS DE SEGURIDAD
PARA HIDROLAVADORAS
Este producto no fue diseñado para ser utilizado por personas con capacidades físicas o mentales reducidas, incluyendo a niños, los faltos
de experiencia o conocimiento, a menos que se
les provea supervisión o instrucciones especificas del producto de alguna persona responsable de su seguridad.
PRECAUCIÓN: Este aparato ha sido diseñado para su uso con productos de limpieza suministrado o recomendado por el fabricante. El
uso de otros productos de limpieza o productos químicos puede afectar negativamente a la
seguridad del equipo.
ADVERTENCIA: Los chorros de alta presión
pueden ser peligrosos si no se utilizan adecuadamente. El chorro no debe dirigirse a personas, equipos eléctricos o el propio aparato.
- Para garantizar la seguridad del producto,
utilice únicamente piezas de repuesto originales del fabricante o aprobados por el fabricante.
- No utilice la máquina si el cable de alimentación o partes importantes del aparato están
dañados, por ejemplo, dispositivos de seguridad, mangueras de alta presión y pistolas.
- Si se utiliza una extensión, el enchufe y la
toma de corriente deben ser a prueba de agua.
ADVERTENCIA: Los cables de extensión inadecuados pueden ser peligrosos.
- Quite el enchufe de la toma de corriente durante la limpieza o el mantenimiento y al cambiar accesorios. La máquina debe ser atendida
durante la operación.
- El suministro eléctrico a esta máquina, debe
incluir ya sea un dispositivo de corriente residual que interrumpirá el suministro si la corriente a tierra es superior a 30 mA para 30 ms
o un dispositivo que pruebe el circuito de tierra. (Sólo como recomendación).
1. NUNCA dirija el chorro hacia ninguna persona o animal.
2. Nunca dirija el chorro hacia el cableado o
equipo eléctrico.
3. NUNCA mantenga el dedo sobre la boquilla
de alta presión.
4. NUNCA permita que los niños utilicen esta
máquina.
5. NUNCA opere la máquina sin las cubiertas
colocadas.
6. NUNCA intente ninguna reparación a la máquina consulte siempre a un centro de servicio
calificado.
7. NUNCA suministre cualquier líquido que no
sea agua a la entrada de agua.
8. NUNCA use la entrada de inyección de detergente para solventes, tales como diluyentes de
pintura, gasolina, aceite, etc.
9. SIEMPRE libere la presión residual en el sistema, cerrando el suministro de agua y haciendo
funcionar el gatillo antes de desconectar cualquier manguera o accesorio.
10. SIEMPRE mantenga la máquina seca y alejada del rocío de agua.
11. Use SIEMPRE ropa y lentes de seguridad.
Partículas sueltas y otros escombros pueden ser
propulsados a altas velocidades por el chorro
de agua.
12. SIEMPRE sostenga la pistola con firmeza antes de presionar el gatillo, espere que la pistola
de un ‘contragolpe’ durante el inicio.
14.Cuando no esté en uso, siempre desconecte
del suministro de agua, y compruebe que el sistema está completamente vacía. Almacene en
un lugar fresco y seco.
15. Cuando utilice el sistema de inyección de
detergente, use solamente los agentes químicos de limpieza (detergentes) que estén aprobados para hidrolavadoras o recomendados
por el distribuidor.
CARACTERÍSTICAS
CONOZCA SU HERRAMIENTA
Antes de intentar usar la herramienta lea cuidadosamente este manual y comprenda todas
sus capacidades y limitantes antes de comenzar
a utilizar esta máquina.
1. PISTOLA. 2. BOQUILLAS.
3. MOTOR. 4. LLANTAS.
5. BOMBA. 6. ESTRUCTURA.
7. LANZA.
5

2
3
6
1
7
2. Empuje la pistola en el conector.
3. Suelte el conector.
NOTA: Asegúrese de que la conexión esté asegurada.
Fig.4
Fig.5
5
4
DESEMBALAJE Y ENSAMBLE
DESEMBALAJE
Desempaquetar su hidrolavadora y verifique
que los siguientes artículos estén presentes.
Comuníquese con su vendedor inmediatamente si alguna pieza falta o está dañada.
• La manguera, pistola / lanza, la lanza de rociado, herramienta de limpieza, la boquilla, la
manguera de detergente con filtro, tapón de
aceite, Pies de goma, Elementos de Fijación .
ENSAMBLE
ENSAMBLANDO LAS LLANTAS
1. Retire la tuerca, la arandela de resorte y la
arandela del eje.
2. Coloque los ejes en
los puertos del eje,
como se muestra, asegúrelos con la tuerca,
la arandela de resorte
y la arandela (Fig. 1).
3. Coloque las ruedas en los ejes y asegure con
la tuerca y la arandela.
PIES DE GOMA
1. Monte las patas de
goma en los extremos,
como se muestra en la
figura 2.
ARMAR LA LANZA
1. Conecte la lanza y
apriete firmemente
(Fig. 3).
MANGUERA DE ALTA PRESIÓN
CONECTAR LA MANGUERA A LA PISTOLA
1. Deslice el conector de la manguera hacia
atrás (Fig.4-1).
Fig.1
Fig.2
Fig.3
CONECTE LA MANGUERA A LA HIDROLAVADORA
1. Deslice el conector de la hidrolavadora hacia
la máquina (Fig. 5-1).
2. Empuje la manguera en el conector.
3. Suelte el conector.
NOTA: Verifique de que la conexión esté asegurada.
CONECTAR A
LA FUENTE DE AGUA
1. Conecte la manguera de suministro de
agua a la entrada de
agua de la máquina
(Fig. 6).
Fig.6
NOTA: La fuente de agua debe proporcionar
un mínimo de 19 litros por minuto a 20 PSI.
NOTA: Asegúrese de que la manguera de suministro de agua esté enroscado firmemente.
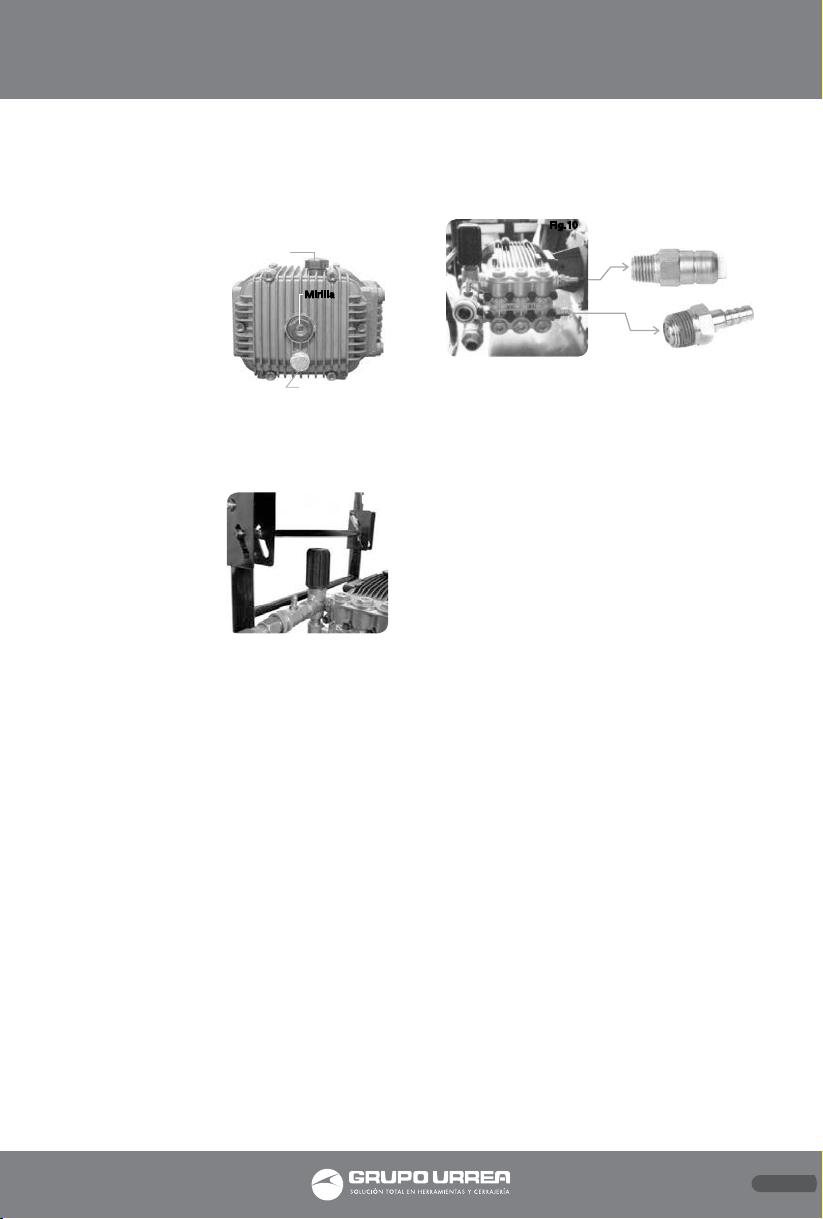
SOPORTE DE LA PISTOLA / MANGUERA
1. Monte el gancho
en la posición que se
muestra, fijelo con las
arandelas y tuercas en
el soporte (Fig.7).
Fig.7
INSTRUCCIONES DE OPERACIÓN
ANTES DE LA OPERACIÓN
ADVERNTENCIA: Para llevar a cabo esta
comprobación, coloque la hidrolavadora en
una superficie nivelada con el motor apagado.
ADVERNTENCIA: Tenga cuidado de no tocar las partes calientes de la hidrolavadora al
verificar los niveles de aceite.
IMPORTANTE: La bomba se suministra sin
aceite y se deberá llenar al nivel correcto y con
el aceite adecuado antes de su uso, vea las siguientes instrucciones.
6
ESPAÑOL•Manual de Usuario
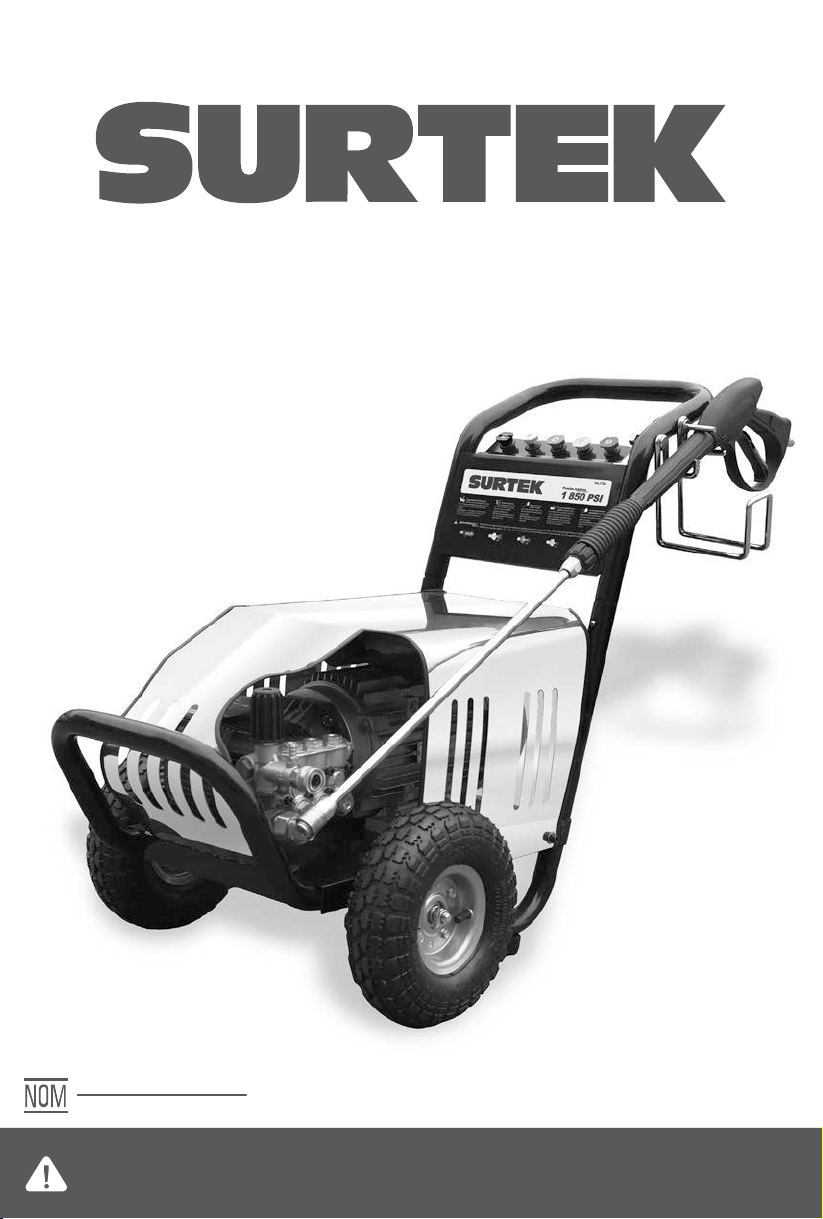
COMPROBACIÓN DEL NIVEL DE ACEITE DE LA
BOMBA
Vea la mirilla de la bomba para comprobar que
el nivel de aceite esté en la posición media de
la mirilla.
Si fuera necesario,
quite el tapón de llenado de aceite y llenelo con aceite (Fig. 8).
Tapón de llenado
de aceite
Mirilla
Fig.8
• Se recomienda el uso
de aceite SAE 30 en
esta hidrolavadora, la
capacidad del tanque
de aceite es de 500 ml.
Tapón de drenado
REGULADOR DE PRESIÓN
Cuando se suministra el regulador de presión
puede ser ajustado al mínimo.
Gire el regulador de
presión en la bomba
Fig.9
completamente hacia
la derecha para permitir que la presión
del agua se acumule
cuando la hidrolavadora esté en operación (Fig. 9).
Si la presión es demasiado alta, lo puede ajustar más adelante.
USANDO LA HIDROLAVADORA ELÉCTRICA
TERMINOLOGÍA DE LA HIDROLAVADORA
ELÉCTRICA
MODO BYPASS: En el modo bypass la bomba
recircula el agua debido a que el gatillo de la
pistola no está siendo presionado. Si se deja la
unidad en el modo de bypass durante más de
dos minutos, la temperatura del agua se elevará a niveles peligrosos y podría dañar los componentes internos de la bomba.
NOTA: Los daños a la bomba debido a estas
causas, no serán cubiertos por la garantía.
SISTEMA DE INYECCIÓN DE DETERGENTE:
Mezcla limpiadores o productos de limpieza
con agua a presión para mejorar la efectividad
de la limpieza (Fig. 10-a).
VÁLVULA TÉRMICA: En un esfuerzo para prevenir daños extremos, las bombas están equipadas con una válvula de descarga térmica. Esta
válvula se abrirá cuando la temperatura dentro de la bomba aumente excesivamente. Esta
válvula , liberará un chorro de agua en un intento para reducir la temperatura dentro de la
bomba. Inmediatamente después de que esto
ocurra, la válvula se cerrará (Fig. 10-b).
Fig.10
a.
b.
VÁLVULA DE ARRANQUE FÁCIL: Durante el
arranque con la soga, cuando el motor está encendido, la presión se acumula en el sistema, la
presión integrada en el sistema es una enorme
carga para intentar el motor se trate de encender. La válvula de arranque fácil resuelve estos
problemas, ésta descargará el agua al tirar
de la soga de arranque para ayudar a que el
motor encienda fácilmente, cuando apriete el
gatillo, la válvula se cerrará, pero ésta descargará el agua cuando el sistema esté en modo
bypass. También es una característica que utilice para succionar el agua desde el depósito o
piscina. Pero tiene que conectar la manguera
que se suministra.
ARRANCANDO LA HIDROLAVADORA ELÉCTRICA
Antes de comenzar, verifique que la tensión de
alimentación eléctrica o la frecuencia correspondan a los especificados en la etiqueta de
información del aparato.
1. Asegúrese de que el interruptor de la máquina está en la posición OFF de apagado.
2. Compruebe que la fuente de alimentación
de la red eléctrica esté equipado con una conexión a tierra adecuada.
3. Asegúrese de que el cable de alimentación,
manguera, cualquier conector y la pistola no
tenga ningún daño.
4. Asegúrese de que el filtro esté en la entrada
de agua de la bomba.
• El lado cónico, mire hacia afuera.
5. Abra la fuente de agua, y el gatillo de la pistola para liberar la presión durante el arranque.
NOTA: debe dirigir la pistola a una dirección
segura.
7

ADVERNTENCIA: EL NO ABRIR EL SUMINIS-
TRO DE AGUA, PODRÍA CAUSAR DAÑOS A LA
BOMBA. LA OPERACIÓN DE LA UNIDAD SIN
AGUA, HARÁ QUE EL SELLADO SE desgaste en
un minuto.
6. coloque el interruptor de la máquina en la
posición ON de encendido.
NOTA: Si el motor no se inicia después después
de encendido, o el motor se inicia con mucho
ruido, detenga el motor inmediatamente y
compruebe que el voltaje de alimentación
eléctrica o la frecuencia corresponden con los
los indicados en etiqueta de datos.
7 . Tire del gatillo de la pistola para iniciar el
chorro de agua:
• Párese en una supercie estable y agarre la
lanza y la pistola firmemente con ambas manos.
• Espere que la pistola haga un retroceso cuando apriete el gatillo.
8. Suelte el gatillo para detener el flujo de
agua.
NOTA: La hidrolavadora pasará automáticamente al modo de bypass.
ADVERNTENCIA: NO PERMITA QUE LA UNIDAD FUNCIONE EN MODO BYPASS PARA MÁS
DE DOS MINUTOS. EL SOBRECALENTAMIENTO
PUEDE CAUSAR DAÑOS A LA BOMBA.
USO DE LAS BOQUILLAS DE ROCIADO
Siga estas instrucciones para cambiar las puntas de rociado:
1. Active el seguro del gatillo de la pistola.
2. Jale hacia atrás el anillo del conector rápido
y retire la punta de rocío instalada.
. 3 Seleccione la punta de rociado deseada:
Para un enjuagado suave, seleccione blanco
40 º o boquilla de pulverización 25 º verde.
Para fregar la superficie, seleccione amarilla
15 o rojo punta 0 pulverización. Para aplicar
productos químicos, seleccione la boquilla de
rociado negro.
4. Tire hacia atrás el anillo e inserte la nueva
punta de rociado, en seguida suelte el anillo.
Tire de la punta de rociado para comprobar
que esté bien instalada.
5. Para una limpieza más efectiva, mantenga la
boquilla de rociado de 8 a 24 pulgadas lejos de
la superficie a limpiar.
6. NO se coloque la boquilla más cerca de 6 pulgadas cuando esté limpiando llantas.
Boquillas de rociado
BAJA PRESIÓN
para aplicar detergente
Negro
Blanco
Verde
40°
25°
BOQUILLAS DE ALTA PRESIÓN
Amarillo
15°
MANTENIMIENTO DE LA BOQUILLA DE ROCIADO
Una sensación pulsante se siente al momento
de apretar el gatillo de la pistola de rociado
puede ser causada por una presión excesiva en
la bomba. La causa principal de una presión
excesiva en la bomba es cuando la boquilla se
encuentra atascada o tapada con materiales
extraños, tal como tierra, etc Para corregir el
problema, limpie inmediatamente la boquilla.
AJUSTANDO LA PRESIÓN
La configuración la presión se establece desde
fábrica. Para bajar la presión:
1. Ajuste el regulador de presión en la bomba.
Gire la perilla del regulador de presión hacia
la izquierda para bajar la presión. Una vez
que haya terminado de usar su hidrolavadora,
regrese el regulador de presión a su posición
original.
2. Aléjese de la superficie a limpiar. Cuanto más
lejos se encuentre, menor será la presión sobre
la superficie a limpiar.
3. Ajuste el rociado a un ángulo más amplio.
APLICACIÓN DE PRODUCTOS QUÍMICOS Y
PRODUCTOS DE LIMPIEZA
1. Coloque la manguera de productos
de limpieza en el accesorio situado cerca de
la conexión de la manguera de alta presión
en la bomba, como se
muestra en la Fig.11.
2. Coloque el otro extremo de la manguera con
su filtro instalado en el recipiente de productos
de limpieza.
• La relación agua / detergente es de 7:1, por
cada 7 litros de agua bombeada se usará 1 litro
de solución de limpieza.
Rojo
Point Jet
Fig.11
8

ESPAÑOL•Manual de Usuario
CONSEJOS DE LIMPIEZA
Disuelva la suciedad aplicando detergente
líquido a la superficie todavía seca, después
aplique el chorro en modo abanico. Para las
superficies verticales, empezar a trabajar de
abajo hacia arriba.
Para una mejor limpieza deje el detergente
actuar durante 1 ó 2 minutos sin permitir que
el detergente se seque. Aplique el chorro de
agua a alta presión manteniendo una distancia
superior a 30 cm de la superficie a limpiar, y comience desde abajo. Evite que el líquido de enjuague gotee sobre las superficies no lavadas.
ADVERTENCIA: Siempre pruebe el rocío en
una zona libre de personas y objetos. Antes de
rociar en la superficie a limpiar.
LAS CUBIERTAS DE MADERA Y VINILO
Enjuague la cubierta y el área circundante con
agua limpia. Si se utiliza detergente, llene el
depósito de detergente y aplique en la zona a
limpiar a baja presión. Para obtener resultados
óptimos, reduzca su área de trabajo en pequeñas secciones y limpie una sección a la vez. Permita que el detergente repose en la superficie
durante unos minutos y luego enjuague a alta
presión. NO DEJE QUE EL JABÓN SEQUE. Limpie siempre de izquierda a derecha y de arriba
a abajo para obtener los mejores resultados.
Enjuague a alta presión mediante el rocío en
abanico manteniendo la punta de la boquilla
de rocío por lo menos 6-9 pulgadas de la superficie de limpieza. Mantenga una distancia
mayor de la zona de limpieza cuando se utiliza
un rocío directo.
PRECAUCIÓN: Para maderas más blandas,
aumente la distancia de la zona de limpieza.
PATIOS DE CEMENTO, PIEDRA Y LADRILLO
Enjuague la cubierta y el área circundante
con agua fresca. Si se utiliza detergente, llene
el depósito de detergente y aplíquelo a baja
presión en la zona que a limpiar. Enjuague a
alta presión mediante el chorro plano con un
movimiento de barrido, manteniendo la punta
de la boquilla por lo menos 3-6 pulgadas de
la superficie a limpiar. Mantener una distancia
mayor de la zona de limpieza cuando se utiliza
un rocío directo.
CARROS, BOTES Y MOTOCICLETAS
Enjuague y limpie el área circundante con agua
fresca. Si utiliza detergente, llenar el depósito
de detergente y se aplican a la zona que se limpia a baja presión. Para obtener mejores resultados, limpie un lado a la vez. Permitir que el
detergente actue en la superficie durante unos
minutos, pero no permita que el detergente
seque.
Enjuague a alta presión mediante el chorro
plano con un movimiento de barrido, manteniendo la punta de la boquilla por lo menos 8
pulgadas de la superfice a limpiar. Mantenga
una distancia prudente de la zona de limpieza
cuando se utiliza un presión directa, Limpie la
superficie seca para un acabado pulido.
¡IMPORTANTE!
Solo utilice detergente líquido. “NO USE detergente en polvo”.
PARRILLAS, EQUIPOS DE ENERGÍA Y HERRAMIENTAS DE JARDÍN
Enjuague y limpie el área circundante con agua
fresca. Si se utiliza detergente, llenar el depósito de detergente y se aplican a la zona que se
limpia a baja presión. Permita que el detergente actue en la superficie durante unos minutos,
pero no deje que el detergente se seque. Enjuague a alta presión mediante la presión en
abanico manteniendo la punta de la boquilla
por lo menos 1-3 pulgadas de la superficie de
limpieza.
Mantener una distancia más lejana de la zona
de limpieza cuando se utiliza presión directa
(jet).
APAGADO
1. Después de cada uso, si ha aplicado productos de limpieza, coloque la manguera en un recipiente de agua limpia y deje correr el agua a
través del sistema de inyección de productos de
limpieza para purgar el sistema por completo.
NOTA: Si no lo hace, podría dañar la bomba.
2. Coloque el interruptor del motor en la posición OFF de apagado o desconecte el enchufe
para detener el motor.
NOTA: NUNCA cierre la llave de agua cuando la
unidad esté en funcionamiento.
3. Cierre el suministro del agua.
9

4. Presione el gatillo de la pistola rociadora
para liberar la presión del agua.
5. Véase la sección de almacenamiento en este
manual para seguir el procedimiento adecuado.
MANTENIMIENTO
CAMBIANDO EL ACEITE DE LA BOMBA
ATENCIÓN: LA EXPOSICIÓN PROLONGADA
AL ACEITE USADO ES PELIGROSO, siempre lávese las manos después de manipular el aceite
usado.
1. Desenrosque y quite el tapón del tanque de
aceite.
2. Coloque la bandeja de recolección de aceite
(no suministrado) bajo el tapón de drenado.
3. Desenroscar el tapón de vaciado y permita
que el aceite usado se drene desde el cárter a
la bandeja de recolección de aceite.
NOTA: Drene el aceite cuando el motor esté caliente, esto asegurará que el aceite fluya más
rápido.
4. Vuelva a colocar el tapón de drenaje y su anillo de sellado.
5. Con la hidrolavadora en posición nivelada,
llene hasta el centro de la mirilla con el aceite
recomendado.
6. Vuelva a colocar el tapón del tanque de aceite.
PROTECCIÓN AMBIENTAL
Una de las fuentes más perjudiciales de la contaminación, es el petróleo. No tire el aceite
usado junto con la basura doméstica o en los
desagües y sumideros. Colóquelo en un recipiente a prueba de fugas y llévela a un sitio
local de eliminación de desechos.
COMPROBACIÓN DE LA MANGUERA DE ALTA
PRESIÓN
Las mangueras de alta presión pueden desarrollar fugas debido al desgaste, dobleces o
abuso. Inspeccione la manguera antes de cada
uso de ella. Revise que no haya cortes, fugas,
abrasiones, levantamiento de la cubierta, daño
o desplazamiento de los coples. Si encuentra
cualquiera de estas condiciones, remplace la
manguera inmediatamente.
REVISE EL INYECTOR DEL DETERGENTE
Examine el filtro en el tubo del detergente y
límpielo si se encuentra sucio. El tubo debería
quedar apretado en la pieza. Examine el tubo
para detectar fugas o fisuras. Reemplace el filtro o el tubo si alguno está dañado.
REVISE LA PISTOLA Y LA BOQUILLA EXTENSIONES
Examine la conexión de la manguera a la pistola y asegúrese de que es seguro. Pruebe el
gatillo presionándolo y asegurándose de que
éste vuelva a su sitio cuando lo suelte.
Coloque el seguro del gatillo en la posición de
encendido y pruebe el gatillo. Usted no deberá
ser capaz de oprimir el gatillo.
LIMPIEZA DE LA BOQUILLA
Si la boquilla se tapa con materiales extraños
como suciedad, desarrollará una presión excesiva. Si la boquilla se encuentra parcialmente
tapada o bloqueada, la presión de la bomba
pulsará, limpie la boquilla inmediatamente
viendo las siguientes instrucciones:
1. Apague la hidrolavadora y cierre el suministro de agua.
2. Presione el gatillo de la pistola para liberar
la presión del agua.
3. Desconectar la lanza de la pistola.
4. Retire cualquier obstrucción con la herramienta de limpieza de boquilla provista, limpie
y enjuague con agua limpia.
5. Dirija el suministro de agua en el extremo
lanza durante 30 segundos para purgar partículas aflojadas.
6. Vuelva a conectar lanza a la pistola y abra el
suministro de agua.
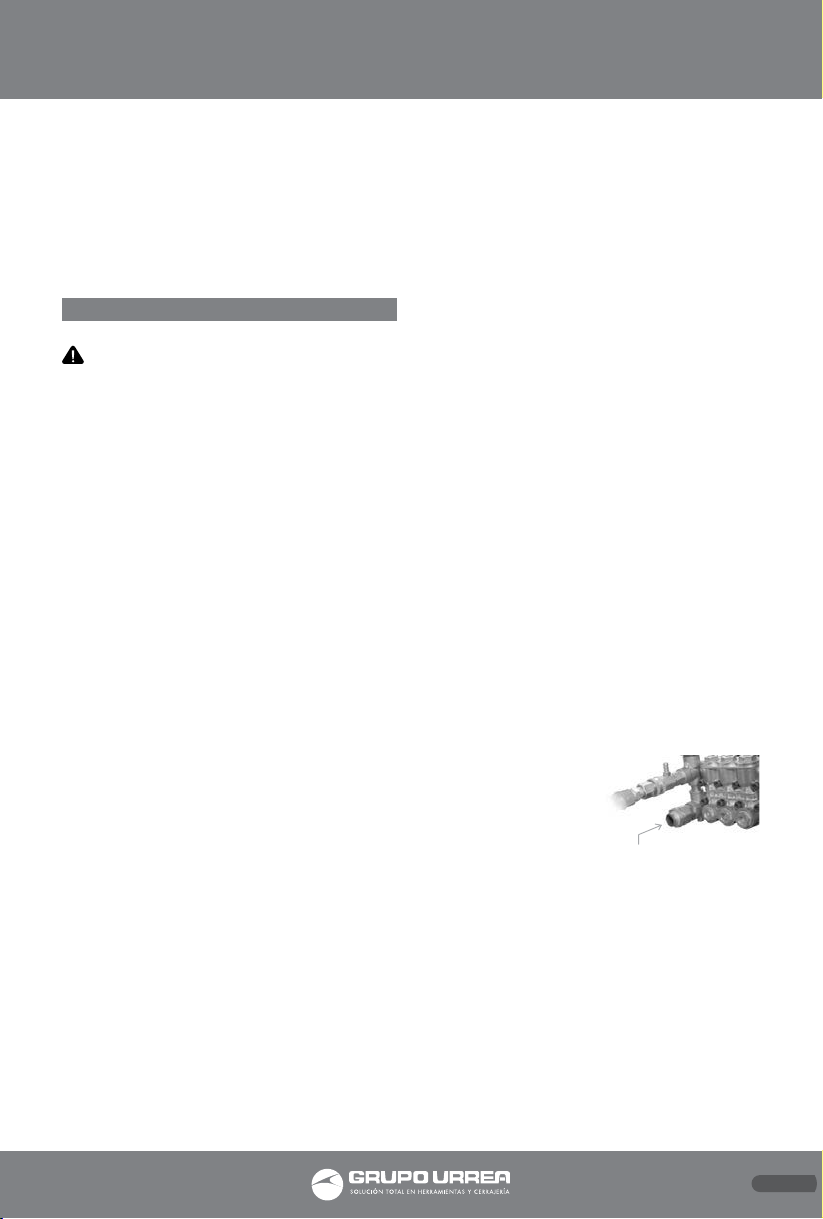
LIMPIEZA DEL FILTRO DE ENTRADA DE AGUA
Este filtro de malla debe revisarse periódicamente y limpiarse cuando sea necesario.
1. Retire el filtro de la
entrada de agua de la
Fig.12
Fig.12
bomba como se muestra en la figura 12.
2. Limpie el filtro enjuagándolo en ambos
lados con agua.
Filtro de entrada
de agua
3. Vuelva a colocar el filtro en la entrada de
agua.
• Lado cónico hacia fuera.
NOTA: No utilice la hidrolavadora sin el filtro
instalado adecuadamente.
10

ESPAÑOL•Manual de Usuario
BOMBA DEL MOTOR
1. Drene toda el agua de la manguera de alta
presión ubicado en el lado del mango de la hidrolavadora.
2. Drene toda el agua de la pistola y rocíe la
lanza sosteniéndolos en posición vertical con la
boquilla hacia abajo y apretando el gatillo. Coloquelos en el soporte de la pistola /manguera.
3. Guarde todas las demás partes de modo que
estén protegidos contra daños.
FILTRO DE ENTRADA DE AGUA
1. Almacénelo seco, evitar un cambio brusco de
la temperatura.
2. No coloque el motor demasiado alto, esto
puede causar daños en el paquete del motor
en la parte inferior.
3. Evite colocarlo boca abajo o inclinar el motor
durante el almacenamiento y el transporte.
PROCEDIMIENTO DE ALMACENAMIENTO
El agua no debe permanecer en la unidad por
largos períodos de tiempo. Los sedimentos minerales se pueden depositar en componentes
de la bomba y “detener” su funcionamiento. Si
usted no piensa usar la hidrolavadora por más
de 30 días, siga este procedimiento:
1. Enjuague la manguera de detergente colocando el filtro en un balde de agua limpia en el
modo de presión baja. Enjuague durante uno
o dos minutos.
2. Retire mangueras de alta presión y de jardín,
enseguida haga funcionar el motor durante 10
segundos para descargar el agua que quede en
la bomba.
4. Asegúrese de que la bomba esté limpia y vaciada para evitar su corrosión y que sus componentes se inmovilicen.
5. Almacene la unidad en un área limpia y seca.
SOLUCIONADOR DE PROBLEMAS
EL MOTOR NO ARRANCA CUANDO SE ENCIENDE EL INTERRUPTOR
El enchufe no está bien conectado o hay ausencia de energría en la fuente de alimentación: Verifique el enchufe, el cable y el inte-
rruptor.
CUANDO ENCIENDA LA UNIDAD, EL MOTOR SUENA PERO NO FUNCIONA
La tensión de alimentación es insuficiente o inferior a la mínima requerida: Compruebe que
la fuente de alimentación de la red eléctrica
sea la adecuada.
La bomba está atascada o inmóvil: Compruebe
girando el motor manualmente como se describe en las instrucciones.
Extensión de cable inadeacuada: La sección
transversal del la extensión de cable debe ser
proporcional a su longitud. Cuanto más larga
sea, mayor debe ser su sección transversal.
BOMBA RUIDOSA
La bomba succiona aire: Revise que los accesorios de la manguera se encuentren bien apretados.
Las válvulas están desgastadas, sucias o atascadas: Revise, limpie o reemplace.
Rodamientos desgastados: Verifique, limpie o
reemplace cuando sea necesario.
NINGUNA O BAJA PRESIÓN (primer uso)
El suministro de agua no es el adecuado: Asegúrese de que el suministro de agua pueda entregar 19 litros por minuto a 20 psi.
Fuga en la conexión de la manguera de alta
presión: Apriete la conexión, utilce cinta ais-
lante si es necesario.
La boquilla está obstruida: Limpie la boquilla.
La malla del filtro de agua está obstruido: Reti-
re y limpie el filtro.
Válvula de arranque defectuoso: Deberá ser
sustituido por un centro de servicio autorizado.
Aire en la manguera: Apague el motor. Cierre
el suministro de agua. Desconecte la manguera de la entrada de la bomba y abra la llave
de agua para expulsar el aire de la manguera.
Cuando todo el aire se haya eliminado, cierre
el suministro de agua y vuelva a conectar la
manguera a la bomba. Abra el suministro de
agua y apriete el gatillo para expulsar el aire
de la pistola/lanza.
LA BOMBA NO PUEDE ABASTECER DETERGENTE
El filtro de detergente está obstruído: Limpie
el filtro.
El detergente utilizado es muy espeso: Diluya
el detergente. El detergente debe tener una
consistencia acuosa.
11

La manguera de presión es demasiado larga:
Utilice una manguera de suministro largo en
lugar de una manguera más larga de alta presión.
Detergente acumulado en el interior del inyector de detergente: Haga que las partes a
limpiar o reemplazar sea hecha por un distribuidor autorizado.
NO HAY PRESIÓN O EXISTE UNA BAJA PRESIÓN (después de un período de uso normal)
Los sellos o empaques se han desgastado: Deberá ser sustituido por un centro de servicio
autorizado.
Válvulas desgastadas u obstruidos: Deberá ser
sustituido por un centro de servicio autorizado.
Pistón de control desgastado: Deberá ser sustituido por un centro de servicio autorizado.
Válvula de arranque desgastados: Deberá ser
sustituido por un centro de servicio autorizado.
FUGA DE AGUA EN LA PISTOLA
O-ring desgastados o rotos: Revíselos y sustitúyalos si es necesario.
Conexión de la manguera suelta: Apriételo.
FUGA DE AGUA EN LA BOMBA
Conexiones sueltas: Apriételo.
Los empaques del pistón están desgastados:
Deberá ser sustituido por un centro de servicio
autorizado.
O-rings desgastados o rotos: Deberá ser sustituido por un centro de servicio autorizado.
Cabezal de la bomba o tubos dañados por congelamiento: Deberá ser sustituido por un cen-
tro de servicio autorizado.
Si el problema es recurrente a más de una vez,
contacte su centro de servicio más cercano.
TECHNICAL DATA
HL730
VOLTAJE-FRECUENCIA
PRESIÓN MÁXIMA
ALIMENTACIÓN MÍNIMA
FLUJO MÁXIMO
POTENCIA
PESO
HL753
VOLTAJE-FRECUENCIA
PRESIÓN MÁXIMA
ALIMENTACIÓN MÍNIMA
FLUJO MÁXIMO
POTENCIA
PESO
120 V ~ 60 Hz
12,8 MPa (1 850 PSI)
19 L/min
8,3 L/min
2 200 W
53 kg (116,8 lb)
220 V ~ 60 Hz
17,2 MPa (2 500 PSI)
19 L/min
10,6 L/min
4 000 W
60 kg (132,2 lb)
FUGA DE ACEITE EN LA BOMBA
Retenes desgastados: Deberá ser sustituido
por un centro de servicio autorizado.
Tapón de vaciado suelto: Apriételo.
O-ring desgastados: Revíselo y sustitúyalo.
LA BOMBA PULSA
Boquilla obstruida: Despeje la boquilla.
*Si el motor enciende y no se vuelve a encender
durante la operación, espere de 2 a 3 minutos
antes de encender la herramienta nuevamente
(la funcion de sobrecarga se ha activado).
12

ENGLISH•User's manual
GENERAL SAFETY RULES
Your PRESSURE WASHER has many features
that will make your job faster and easier. Safety, performance and reliability have been given
top priority in the design of this tool, qualities
to make easy to maintain and to operate.
WARNING: Read and understand all instructions. Failure to follow all indications list-
ed below, may result in electric shock, fire and/
or serious personal injury.
SAVE THESE INSTRUCTIONS.
SAFETY IN WORKING AREA
Keep your work area clean and well lit. Cluttered benches and dark areas may cause accidents.
Do not operate power tools in explosive atmospheres, such as in the presence of flammable
liquids, gases or dust. Some power tools create
sparks which may provoke fire.
Keep away observers, children and visitors
while operating a power tool. Distractions can
cause you to lose control.
ELECTRIC SAFETY
Double insulation eliminates the need for the
three wire grounded power cord and grounded power supply system.
Avoid the body contact with grounded surfaces such as pipes, radiators and refrigerators.
There is an increased risk of electric shock if
your body is grounded.
Don’t expose power tools to rain or wet conditions. The precense of water into power tools
will increase the risk of electric shock.
Do not abuse of the power cord. Never use the
power cord to carry the tool and do not pull
the plug off the outlet. Keep the cable away of
heat, oil, sharp edges or moving parts. Replace
damaged cords immediately. Damaged cords
increase the risk of electric shock.
When operating a power tool outside, use an
outdoor extension cord marked “W-A” or “W”.
These cords are rated for outdoor use and reduce the risk of electric shock.
EXTENSION CORDS
Replace damaged cords immediately. The use
of damaged cords can shock, burn or electric
shock. If an extension cord is necessary, a cord
with adequate size conductors should be used
to prevent excessive voltage drop, loss of power or overheating. The table below shows the
correct size to use, depending on cord length
and nameplate amperage rating of tools. In
case of doubt use the next heavier gauge. Always use UL listed extension cords.
SIZE RECOMMEND EXTENSION CABLES
PERSONAL SAFETY
Stay alert, watch what you are doing and use
common sense when operating a power tool.
Don’t use the tool if you are tired or under the
influence of drugs, alcohol or medication. A
moment of unattention while operating power tools may cause a serious personal injury.
Dress properly. Do not wear loose clothing or
jewellery. Contain long hair. Keep your hair,
clothing and gloves away of moving parts.
Loose clothes, jewellery or long hair can be
caught in moving parts.
Avoid an accidental starting. Be sure that the
switch is OFF before plugging in. Carrying
tools with the finger on the switch or plug in
the tool switch in ON may cause accidents.
Remove the adjusting keys or wrenches before turning the tool on. A wrench or a key
that is left close to a rotating part of the tool
may provoke a personal injury.
Do not overreach. Keep proper footing and
balance at all times. Proper footing and bal-
ance enables better control of the tools on unexpected situations.
Use safety equipment. Always wear eye protection. Dust mask, nonskid safety shoes, hard
hat, or hearing protection must be used for appropriate conditions.
Before connecting the tool to a power source
(receptacle, outlet, etc.) be sure that the voltage supplied is the same as that one specified
on the nameplate of the tool. To use a not
specified voltage may cause a serious injury to
the user as well as damage the tool.
13

IMPORTANT: This appliance is not intended
for use by persons (including children) with reduced physical, sensory or mental capabilities
may be different or reduced, or lack of experience or knowledge, unless such persons are supervised or trained to operate the product by
a person responsible for their safety. Children
should be supervised to ensure they do not use
the devices as toys.
TOOL USE AND CARE
Do not force the power tool. Use the correct
tool for the application. The correct tool will
do the job better and more safely at the rate
that it was designed to work at.
Do not use tools if switch does not turn it on or
off. Any tool that cannot be controlled whith
the switch is dangerous and must be repaired.
Disconnect the plug from the power source
before making any adjustments, changing accessories or storing the tool. This preventive
safety measures reduce the risk of accidental
starting of the tool.
When the power tool is not in use, store it out
of the reach of children, and do not allow individuals who are not familiar with the power
tool or these instructions to operate it. Power
tools are dangerous in the hands on untrained
users.
Maintain the power tool. Check for misalignment or binding of moving parts, broken parts,
and any other condition that may affect the
operation of the power tool. If it is damaged,
have it repaired before using. Many accidents
are caused by poorly maintained power tools.
Check for misalignment or bonding of moving
parts, breakage parts, and any other condition
that may affect the tools operation. If you find
a damaged tool, take it to service before use it.
Use only accessories that are recommended by
the manufacturer of your model. Suitable ac-
cessories for one tool, may become hazardous
when are used on another tool.
Keep cutting tools, sharpened and clean. Cutting tools in good condition with sharpened
edges, are less likely to stuck in workpieces or
easier to control.
Is recommendable to use a safety device suitable, such a thermal and diferential switch
when you are using an electric equipment.
SERVICE
Tool service must be perfomed only by qualified repair personnel. Service or maintenance
performed by unqualified personnel could result in a risk of injury.
SPECIFIC SAFETY RULES FOR
ELECTRIC PRESSURE WASHER
WARNING: This appliance has been designed for use with the cleaning agent supplied or recommended by the manufacturer.
The use of other cleaning agents or chemicals
may adversely affect the safety of the appliance.
WARNING: High pressure jets can be dangerous if subject to misuse. The jet must not be
directed at persons, live electrical equipment
or the appliance itself.
- To ensure appliance safety, use only original spare parts from the manufacturer or approved by the manufacturer.
- Do not use the appliance if a supply cord or
important parts of the appliance are damaged,
e.g. safety devices, high pressure hoses, trigger
gun.
- If an extension cord is used, the plug and
socket must be of watertight construction.
WARNING: Inadequate extension cords can
be dangerous.
- Remove the plug from the socket-outlet during cleaning or maintenance and when replacing arts or converting the machine to another
function. The machine must be attended during operation.
- The electric supply to this appliance should include either a residual current device that will
interrupt the supply if the leakage current to
earth exceeds 30mA for 30ms or a device that
will prove the earth circuit. (Only for recommend).
1. NEVER direct the spray towards any person
or animal.
2. NEVER direct the spray towards electrical
wiring or equipment.
3. NEVER hold your finger over the high pressure nozzle.
4. NEVER allow children to use this machine.
5. NEVER operate the machine with any of the
covers removed.
6. NEVER at tempt any repairs to this machine
always refer to a qualified service agent.
14

ENGLISH•User's manual
7. NEVER supply any liquid other than water to
the water inlet.
8. NEVER use the chemical injection facility to
introduce solvents, e.g. paint thinners, petrol,
oil etc.
9. ALWAYS release any residual pressure in the
system by turning off the water supply and operating the trigger before disconnecting any
hose or accessory.
10. ALWAYS keep the machine itself dry and
well clear of water spray
11. ALWAYS wear protective clothing and safety glasses. Loose particles and other debris may
be propelled at high speed by the water jet.
12. ALWAYS grip the gun firmly before pressing the trigger, expect the gun to ‘kick’ when
starting.
13. ALWAYS respect the requirements of the
local water company. Power washers may only
be connected to the mains drinking water supply, if a backflow preventer valve is installed in
the supply hose.
14.When not in use, ALWAYS disconnect from
the water supply, and ensure the system is completely drained. Store in a cool dry location.
15. When using the chemical injection facility,
use only the chemical cleaning agents (detergents), that are approved for power washers
or recommended by the dealer
1. GUN.
2. NOZZLE.
3. MOTOR.
4. WHEEL.
5. PUMP.
6. FRAME.
7. LANCE.
UNPACKING AND ASSEMBLY
UNPACKING
Unpack your power washer and check to ensure the following items are present.
Contact your seller immediately if any parts are
missing or damaged.
• Hose, Gun/lance, Spray wand, Hook, Nozzle,
Detergent hose with filter, Oil plug, Rubber
feet, Fixings pack.
ASSEMBLY
CONNECTING THE WHEELS
1. Remove the nut, spring washer and washer
from the axle.
2. Fit the axles into the
axle ports as shown,
secure with the nut,
spring washer and
washer (Fig. 1).
3. Fit the wheels to the axles and secure with
the nut and washer.
Fig.1
FEATURES
KNOW YOUR TOOL
Before attempting to use this product, become
familiar with all of its operating features and
safety requirements.
7
6
2
3
5
4
RUBBER FEET
1. Fit the rubber feet
to the legs as shown
in figure 2.
ASSEMBLE THE LANCE
1
1. Connect the spray
wand to the lance and
tighten securely (Fig.3).
THE HIGH PRESSURE HOSE
CONNECT THE HOSE
TO THE GUN
1. Slide the connector
on the hose backwards (Fig.4-1).
2. Push the gun into
the connector.
3. Release the connector.
NOTE: Mak e sure the connection is secure.
Fig.2
Fig.3
Fig.4
15

CONNECT THE HOSE TO THE WASHER
1. Slide the connector
Fig.5
on the power washer
towards the machine
(Fig.5-1).
2. Push the hose into
the connector.
3. Release the connector.
NOTE: Mak e sure the connection is secure.
CONNECT WATER SOURCE
1. Connect the water
supply hose to the
water inlet (Fig.6).
NOTE: Water source
must provide a min
imum of 5 gallons per
Fig.6
minute at 20 PSI.
NOTE: Make sure the water supply hose is
screwed on tightly.
GUN/HOSE HOOK
1. Fit the hook into
the position shown
and secure using the
washers and nuts on
Fig.7
the bracket.
OPERATION INSTRUCTIONS
BEFORE USE
WARNING: To carry out this check, place
the power washer on level ground with the
motor switched off.
WARNING: Take care not to touch any hot
parts of the power washer when checking the
oil levels.
IMPORTANT: The PUMP is supplied without
any oil in it and must be filled to the correct
level and proper oil before use, see below.
CHECKING THE PUMP OIL LEVEL
Look at the sight glass
Oil filler cap
on the pump to check
the oil level it should
be at the 1/2 position
of the sight glass If
required, remove the
oil filler cap and top
up with oil (Fig.8).
• We recommend the use of SAE30 oil in this
power washer, and the oil capcity is 500ml.
Fig.8
Sight glass
Drain cap
PRESSURE REGULATOR
When supplied the pressure regulator may be
set to minimum.
Turn the pressure
Fig.9
regulator on the
pump fully clockwise
to allow water pressure to build up when
the pressure washer is
running (Fig.9).
If you find the pressure is too high, you can
adjust this later.
USING YOUR POWER WASHER
POWER WASHER TERMINOLOGY
Bypass mode: In bypass mode, the pump re-
circulates the water because the trigger of the
spray gun is not being pulled. If unit is left in
bypass mode for more than two minutes, the
water temperature will rise to a dangerous
level and could damage internal components
of the pump.
NOTE: Any damage to pump due to these
causes will not be covered under warranty.
Chemical Injection System: Mixes cleaners or
cleaning solvents with the pressurised water to
improve cleaning effectiveness (Fig.10-a).
Fig.10
a.
b.
Thermal Relief Valve: In an effort to prevent
extreme damage, pumps are equipped with
a thermal relief valve. This valve will open
when the temperature inside the pump rises
too high. This valve will then release a gush of
water in an effort to lower the temperature
inside the pump. Immediately after this occurs,
the valve will close (Fig.10-b).
Easy start Valve: During pull starting, when
the engine is turned over pressure builds in the
system, the pressure in built in the system is a
tremendous load to attempt the engine starting against. The easy start valve solves these
issues, it will dischage the water when pulling
start to help the engine to easy start, when
squeeze the trigger the valve will shut of, but
16

ENGLISH•User's manual
it will dischage the water when the system is in
by pass. It is also a features that use for sucking
the water from tank or pool. But it have to be
connect the hose that supply with.
STARTING THE POWER WASHER
Prior to starting, please check the electrial supply voltage and the frequency correspond to
those specified on the applicance data plated.
1. Make sure the switch of the machine is in the
OFF position.
2. Check the mains power supply should
equipped with an adequate earth connection.
3. Make sure the power cord, hose, any connector and gun is without any damaged.
4. Make sure that the filter screen is in water
inlet of pump.
• Cone side faces out.
5. Turn water source on, and trigger on the
gun to relieve the pressure while starting.
NOTE: must point the gun to a safty direction.
WARNING: FAILURE TO TURN ON THE WA-
TER COULD CAUSE DAMAGE TO THE PUMP.
OPERATION THE UNIT WITHOUT WATER WILL
CAUSE SEALING WEARING OUT IN A MINUTER.
6. Inser the plug or switch the machine in the
ON position to start the machine.
NOTE: If please stop the motor immediately
and check the the electrial supply Voltage and
the Frequency correspond to data plated.
the motor does not start after after switched
on, or the motor start noisy,
7. Pull the trigger on the gun to start water
jetting:
• Stand on a stable surface and grip gun/spray
wand firmly with both hands.
• Expect the gun to kick when the trigger is
pulled.
8. Release trigger to stop water flow.
NOTE: The power washer will automatically go
into bypass mode.
WARNING: DO NOT ALLOW UNIT TO OPERATE IN BYPASS MODE FOR MORE THAN TWO
MINUTES AT ANY TIME. OVERHEATING OF
PUMP CAN CAUSE DAMAGE TO PUMP.
USING THE SPRAY NOZZLE TIPS
Follow these instructions to change spray tips:
1. Engage trigger lock on spray gun.
2. Pull back collar on quick-connect and pull
current spray tip off.
3. Select desired spray tip:
For gentle rinse, select white 40 or green 25
spray tip. To scour surface, select yellow 15 or
red 0 spray tip. To apply chemical, select black
spray tip.
4. Pull back on collar, insert new spray tip and
release collar. Tug on spray tip to make sure it
is securely in place.
5. For most effective cleaning, keep spray tip
from 8 to 24 inches away from cleaning surface.
6. DO NOT get closer than 6 inches when cleaning automobile tires.
Spray Tips
LOW PRESSURE
to apply detergent
Black
White
40°
Green
HIGH PRESSURE TIPS
25°
Yellow
15°
SPRAY NOZZLE MAINTENACE
A pulsing sensation felt while squeezing the
spray gun trigger may be caused by excessive
pump pressure. The principal cause of excessive
pump pressure is a nozzle clogged or restricted
with foreign materials, such as dirt, etc. To
correct the problem, immediately clean the
nozzle.
ADJUSTING THE PRESSURE
The pressure setting is preset at the factory. To
lower the pressure:
1. Adjust the pressure regulator on the pump.
Turn the pressure regulator knob counter
clockwise to lower pressure. Once you have
finished using your power washer, return the
pressure regulator to its original position.
2. Back away from the surface to be cleaned.
The further away you are the less the pressure
will be on the surface being cleaned.
3. Adjust the spray to a wider angle.
Red
Point Jet
17

APPLYING CHEMICALS AND CLEANING
SOLVENTS
1. Push the chemical
Fig.11
hose onto the barbed
fitting located near
high pressure hose
connection of pump
as shown in figure 11.
2. Place other end of chemical hose with filter
on it into c ontainer holding chemical/cleaning
solution.
• The water/chemical ratio is 7:1, for every 7
gallons of water pumped 1 gallon of chemical/
cleaning solution will be used.
RECOMMENDED CLEANING PROCEDURE
Turn on the water supply tap FULLY. Release
the safety catch, then press the trigger for a
few seconds to allow air to escape and to discharge residual pressure in the pipes.
Dissolve dirt by applying detergent with the
fan jet to the dry surface. On vertical surfaces,
work from the bottom upwards.
Leave the detergent to act for 1 to 2 minutes,
but do not allow to dry out. Apply the high
pressure jet, keeping the nozzle at least 10”
(30 cm) from the surface, working from the
bottom upwards. Avoid allowing the rinsing
water to run on to unwashed surfaces.
WARNING: Always test the spray in an area
free and clear of people and objects before
you sprayat the intended cleaning surface.
WOOD AND VINYL DECKS
Rinse deck and surrounding area with fresh
water. If using detergent, fill the detergent
reservoir and apply to the area being cleaned
at low pressure. For optimal results, reduce
your work area to smaller sections and clean
each section one at a time. Allow the detergent to rest on the surface for a few minutes
and then rinse at high pressure. DO NOT LET
THE CLEANSER DRY. Always clean from left to
right and top to bottom for best results. Rinse
at high pressure using the fan spray keeping
the tip of the spray nozzle at least 6-9 inches
from the cleaning surface. Maintain a further
distance from the cleaning area when using a
direct spray.
CAUTION: For softer woods, increase the
distance from the cleaning area.
CEMENT PATIOS, STONE, AND BRICK
Rinse cleaning and surrounding area with fresh
water. If using detergent, fill the detergent
reservoir and apply to the area being cleaned
at low pressure. Rinse at high pressure using
the fan spray in a sweeping motion keeping
the tip of the spray nozzle at least 3-6 inches
from the cleaning surface. Maintain a further
distance from the cleaning area when using a
direct spray.
CARS, BOATS, AND MOTORCYCLES
Rinse cleaning and surrounding area with fresh
water. If using detergent, fill the detergent
reservoir and apply to the area being cleaned
at low pressure. To achieve the best results,
clean one side at a time. Allow the detergent
to rest on the surface for a few minutes, but do
not let the detergent dry. Rinse at high pressure using the fan spray in a sweeping motion
keeping the tip of the spray nozzle at least 8
inches from the cleaning surface. Maintain a
further distance from the cleaning area when
using a direct spray. Wipe surface dry for a
polished finish.
IMPORTANT: Only use liquid detergent, DO
NOT use regular detergent.
BARBECUE GRILLS, POWER EQUIPMENT, AND
GARDEN TOOLS
Rinse cleaning and surrounding area with fresh
water. If using detergent, fill the detergent
reservoir and apply to the area being cleaned
at low pressure. Allow the detergent to rest
on the surface for a few minutes, but do not
let the detergent dry. Rinse at high pressure
using the fan spray keeping the tip of the spray
nozzle at least 1-3 inches from the cleaning
surface.
Maintain a further distance from the cleaning
area when using a direct spray.
SHUTTING DOWN
1. After each use, if you have applied chemicals, place chemical hose into container of
clean water and run clean water through
chemical injection system to flush the system
thoroughly.
NOTE: Failure to do s o could cause damage to
the pump.
2. Switch the motor in the OFF position, or pull
out the plug to stop the motor.
18
ENGLISH•User's manual
NOTE: NEVER turn the water off with the unit
is in running.
3. Turn water source off.
4. Pull trigger on spray gun to re lieve any water pressure.
5. See storage section in this manual for proper
storage procedures.
MAINTENANCE
CHANGING THE PUMP OIL
CAUTION: PROLONGED EXPOSURE TO
USED OIL IS DANGEROUS, ALWAYS WASH
YOUR HANDS THOROUGHLY AFTER HANDLING USED OIL.
1. Unscrew and remove the oil filler cap.
2. Place the oil collection tray (not supplied)
under the drain cap.
3. Unscrew the drain cap, and allow the used
oil to drain from the crankcase into the oil collection tray.
NOTE: Drain the oil when the engine is warm,
this will ensure the oil flows out quicker.
4. Replace the drain plug and its ring seal.
5. With the power washer in a level position,
fill to the centre of the sight glass with the
recommended oil.
6. Replace the oil filler cap.
ENVIRONMENTAL PROTECTION
One of the most damaging sources of pollution
is oil. Do not throw away used oil with your domestic rubbish or down drains and sinks. Place
it in a leak proof container and take it to you
local waste disposal site.
CHECKING HIGH PRESSURE HOSE
The high pressure hose can develop leaks from
wear, kinking, or abuse. Inspect the hose each
time before using it. Check for cuts, leaks,
abrasions or bulging of cover, damage or
movement of couplings. If any ofthese conditions exist, replace the hose immediately.
CHECK GUN AND NOZZLE EXTENSION
Examine the hose connection to the spray gun
and make sure it is secure. Test the trigger by
pressing it and making sure it springs back into
place when you release it.
Put the trigger lock in the on position and test
the trigger. You should not be able to press the
trigger.
CLEANING THE NOZZLE
If the nozzle becomes clogged with foreign
materials such as dirt, excessive pressure
may develop. If the nozzle becomes partially
clogged or restricted, the pump pressure will
pulsate, clean the nozzle immediately by follow the below Instructions:
1. Shut off the power washer and turn off the
water supply.
2. Pull trigger on gun handle to relieve any
water pressure.
3. Disconnect the spray wand from the gun.
4. Remove any obstructions with the nozzle
cleaning tool provided and back flush with
clean water.
5. Direct water supply into spray wand end for
30 seconds to back flush loosened particles.
6. Reconnect spray wand to gun and turn on
water supply.
CLEANING THE WATER INLET FILTER
This screen filter should be checked periodically and cleaned if necessary.
1. Remove filter from
the water inlet of the
Fig.12
pump as shown in figure 12.
2. Clean filter by flushing both sides with
water.
Water
inlet Filter
3. Replace the filter into the water inlet.
• Cone side faces out.
NOTE: Do not operate power washer without
filter properly installed.
CHECK DETERGENT SIPHONING TUBE
Examine the filter on the detergent tube and
clean if clogged. The tube should fit tightly on
the barbed fitting. Examine the tube for leaks
or tears. Replace the filter or tube if either is
damaged.
MOTOR PUMP
1. Drain all water from the high pressure
hose holder located on the side of the power
washer handle.
2. Drain all water from the spray gun and spray
wand by holding the gun/wand vertically with
the nozzle pointing dow n and pulling the trigger. Store in the gun/hose holder.
19

3. Store all other parts so that they are protected from damage.
1. Keep dry in storage, avoid drastic temperature change.
2. Do not pile up the motors too high, this may
result in damage of package of the motors at
bottom.
3. Avoid up side down or incline of motor in
storage and transportation.
STORAGE PROCEDURE
Water should not remain in the unit for long
periods of time. Sediments or minerals can
deposit on pump parts and “freeze” pump
action. If you do not plan to use the pressure
washer for more than 30 days, follow this procedure:
1. Flush chemical injection hose by placing
filter into a pail of clean water while running
pressure washer in low pressure mode. Flush
for one to two minutes.
2. Remove high pressure and garden hoses,
then run the motor for 10 seconds to discharge
the water that remain in the pump.
4. Ensure pump is clean and empty to prevent
corrosion build up and freezing of pump components.
5. Store unit in a clean, dry area.
TROUBLESHOOTING
THE MOTOR DOES NOT START WHEN
SWITCHED ON
The plug not well connected or lack of power
supply: Check plug, cable and switch.
Valves worn, dirty or stuck: Check, clean or
replace.
Bearings worn: Check, clean or replace if necessary.
NO OR LOW PRESSURE (initial use)
Water supply is not adequate: Make sure your
water supply can deliver 5 gals per minute at
20psi.
Leak in the high pressure hose fitting: Tighten
the fitting, use sealant tape if required.
Nozzle is obstructed: Clear the nozzle.
Water filter screen is clogged: Remove and
clean the filter.
Defective E-Z start valve: Have it replaced by
your dealer.
Air in the hose: Turn off the motor. Turn off
the water supply. Disconnect the water source
from the pump inlet and turn on the water
source to expel the air from the hose. When
all the air has been removed, turn of f the water supply and reconnect the hose. Turn on the
water supply and pull the trigger to expel any
air in the gun/wand.
WILL NOT DRAW CHEMICALS
Chemical filter is blocked: Clean the filter.
Chemicals being used are too thick: Dilute the
chemicals. The chemicals should have the consistency of water.
Pressure hose is too long: Use a longer supply
hose instead of a longer high pressure hose.
Chemical build up inside the chemical injector: Have the parts cleaned or replaced by your
dealer.
WHEN SWITCH ON THE UNIT, THE MOTOR
HUMS BUT DOES NOT RUN
The mains voltage is insufficient, lower than
the minimum required: Check the mains power
supply is adequate.
The pump is stuck or frozen: Check by turning
the motor manually as described in instructions.
Incorrect extension cable: The cross-section of
the extension cable should be proportionate to
its length. The longer it is, the greater its crosssection should be.
NOISY PUMP
Pump sucking air: Check tightness of hose fittings.
20
NO OR LOW PRESSURE (after a period of
normal use)
Worn seal or packing: Have it replaced by your
dealer.
Worn or obstructed valves: Have it replaced by
your dealer.
Worn unloader piston: Have it replaced by
your dealer.
Worn E-Z start valve: Have it replaced by your
dealer.
WATER LEAKING AT THE GUN/SPRAY WAND
CONNECTION
Worn or broken O-ring: Check and replace.
Loose hose connection: Tighten.

ENGLISH•User's manual
WATER LEAKING AT THE PUMP
Loose connections: Tighten.
Piston packings worn: Have it replaced by your
dealer.
Worn or broken O-rings: Have it replaced by
your dealer.
Pump head or tubes damaged f rom freezing:
Have it replaced by your dealer. See “Storage”
on page18.
OIL LEAKING AT THE PUMP
Oil seals worn: Have it replaced by your dealer.
Loose drain plug: Tighten.
Worn O-rings: Check and replace.
PUMP PULSATES
Nozzle obstructed: Clear the nozzle.
TECHNICAL DATA
HL730
VOLTAGE-FREQUENCY
MAX. PRESSURE
MINIMUM FEEDING
MAX. FLOW
POWER
WEIGHT
HL753
VOLTAGE-FREQUENCY
MAX. PRESSURE
MINIMUM FEEDING
MAX. FLOW
POWER
WEIGHT
120 V ~ 60 Hz
12,8 MPa (1 850 PSI)
19 L/min
8,3 L/min
2 200 W
53 kg (116,8 lb)
220 V ~ 60 Hz
17,2 MPa (2 500 PSI)
19 L/min
10,6 L/min
4 000 W
60 kg (132,2 lb)
21

Notas / Notes
22

Notas / Notes
Manual de usuario / User’s manual
23

ESPAÑOL
POLIZA DE GARANTÍA
ENGLISH
WARRANT POLICY
Urrea Herramientas Profesionales S.A. de C.V.
garantiza este producto por el termino de 1 año
en sus piezas, componentes y mano de obra contra cualquier defecto de fabricación a partir de la
fecha de entrega.
Fecha de venta: ____/____/____
Producto: ___________________
Marca: ______________________
Modelo: ____________________
______________________________
Sello y firma de distribuidor
Comercializado e Importado por:
Urrea Herramientas Profesionales S.A. de C.V.
km 11,5 Carretera A El Castillo, El Salto, Jalisco, México. C. P. 45680, Tel. (33) 3208 7900,
RFC UHP900402Q29
Condiciones:
Para hacer efectiva la garantía deberá presentar
el producto junto con la poliza de garantia debidamente firmada y sellada por el establecimiento
donde la adquirio, en cualquiera de los centros de
HL730
servicio autorizados.
Los gastos de transportación que se deriven del
cumplimiento de la garantía seran cubiertos por:
Urrea Herramientas Profesionales S.A. de C.V.
Esta garantía no será valida en los siguientes
casos:
· Cuando el producto haya sido utilizado en condiciones distintas a las normales o al desgaste natural de sus partes.
· Cuando el producto no haya sido operado de
acuerdo al instructivo de uso que lo acompaña.
· Cuando el producto haya sido alterado o repara-
HL753
do por personas no autorizadas.
Urrea Herramientas Profesionales S.A. de C.V.
Warranties this product for a period of 1 year in
its parts, components and manual labour against
any manufacture defect from the purchasing date.
Purchase date: ____/____/____
Product:____________________
Brand:______________________
Model:______________________
______________________________
Distributor seal and signature
Sold and Imported by:
Urrea Herramientas Profesionales S.A. de C.V.
km 11,5 Carretera A El Castillo, El Salto, Jalisco, México. C. P. 45680, Tel. (33) 3208 7900,
RFC UHP900402Q29
Terms:
In order to make warranty effective you must present the product along with the warranty properly
fillled and signed to an authorized distributor or
service center.
Urrea Herramientas Profesionales S.A. de C.V.
will cover the transportation cost related to the
warranty.
This warranty is not applicable in the following cases:
· When the product has not been used according
to normal conditions or natural wear of its parts.
· When the product has not been used according
with this user’s manual instructions.
· When the product has been fixed or modified by
unauthorized or unqualified person.
24
 Loading...