

SurgiTel Odyssey Wireless LED, Odyssey Wireless LED Air User Instructions

Doc No. 26452A
Thank you for choosing SurgiTel
®
!
Your SurgiTel® LED headlight has been designed to meet the demanding
needs of today’s clinical professionals by allowing you to see, work, and feel
your best.
TECHNICAL DATA
®
• The user of this product should be thoroughly familiar with the use and
care of this product.
• The user should carefully study the manual before making any attempt to
use this product clinically.
• Before each procedure carefully inspect the LED system to ensure proper
maintenance.
• Use care not to point the light directly at the eyes during operation;
patient use of safety glasses is recommended.
FIRE HAZARD: DO NOT PLACE THE LED LIGHT UNIT ON ANY FLAMMABLE
OBJECT WHILE IT IS OPERATING.
WARNING:
• The LED light unit will get hot when left on. Handle with care. It is
recommended to turn off the LED before handling LED light or making any
adjustments to it.
• Avoid direct light contact with the eyes.
• Avoid direct light irradiation in patient’s eyes; patient use of safety glasses
is recommended.
Battery Charger (cradle) & AC Power Adapter
• Use only the Battery Charger & AC Power Adapter supplied with this
system
• Do not disassemble, modify or short circuit
• Do not leave in hot places, such as inside a car or outside in hot weather
• Do not allow to get wet
Odyssey Wireless LED
USER INSTRUCTIONS
GENERAL WARNINGS
SurgiTel
®
LED Light Several opcs available
Baery Charge Life
(with 3 baeries)
Up to 10 hours
Baery
Rechargeable Lithium Ion Baery,
3.7V 700 mAh
Baery Charger (cradle) &
AC Power Adapter
Input: 100-240V, 50-60Hz, 0.35A
Output: 5V 200mA
SurgiTel’s mission is to provide the best products for your Vision & Ergonomics
at Work. To support this commitment SurgiTel® warranties all of its products.
SurgiTel® strives to make the best loupes and light systems available. Please
inspect and try on product immediately upon receipt. If you notice any issues,
contact our customer service department at 800-959-0153.
For both warranty and out-of-warranty issues, contact SurgiTel® Customer Service
regarding repairs.
Warranties vary by product. Check www.surgitel.com/warranty for more details.
Check www.surgitel.com/help for up to date care information/instructions.
Please keep up to date on care information/instructions, as warranties can be
affected if product is misused.
SurgiTel
®
a division of General Scientific Corporation
77 Enterprise Drive • Ann Arbor, MI 48103-9503
E-mail info@surgitel.com • www.surgitel.com
WARRANTY
• Protecon against electric shock: Class II including AC/DC Adapter.
• Applied parts : No applied parts.
• Protecon against harmful ingress of water: ordinary IPXO.
Direct current
Class II
equipment
CE mark Serial No.
Alternang
current
Aenon, consult
accompanying
documents
CLASSIFICATION
Storing the LED system in a safe place will prolong the life of the unit. The
following guidelines will help in sustaining the LED systems useful life:
• Keep the opcal face on the light unit from touching hard surfaces which may
cause scratches on the surface. Scratches on the surface will diminish the light
quality.
• When cuts or punctures are visible on the system’s light cord, the wireless LED
system is no longer safe to use; it should be taken out of service immediately.
MAINTENANCE
• Do not immerse in water or any liquid; wipe down with damp cloth. Do not use
HOT or COLD water; using “room-temperature” water is acceptable
• Avoid using running water and disinfectant sprays on or near open slots located
on light unit. Carefully wiping with damp cloth is ok.
• Do not use Lysol® or any disinfectants containing glutaraldehydes, iodophors,
ammonia, alcohol, or ethanol
• Do not autoclave
Disinfecon: Use SciCan® “OPTIM 33 TB” wipes/soluon only.
*Note: SciCan® OPTIM 33 TB soluon can be purchased through SurgiTel in 8 oz.
boles
FACTORY REFURBISHMENT CLEANING: is available if you come across a dicult
cleaning situaon. Call customer support for details: 800-959-0153
*IMPORTANT*
CLEANING
OPERATION
Dove Tail
Adapter
Clip
Adapter
(provided w/
kit)
ATTACHING LIGHT ADAPTER TO LOUPE
• Charge Time = approximately 2 hours
• Charge Level Indicator Lights (3 qty., color: blue): All 3 lights on = fully charged
• Maximum connuous operaon ( 1 baery) from full power is approximately
1.75 hours
Note: To maximize use of Wireless LED, remember to replace and charge baery
aer use
• Aach the LED light to loupes or glasses using appropriate adapter
H
I
J
Oponal Light Adapter Assembly (H):
Recommended opon if experiencing aachment dicules or alignment
issues with loupe, remove screw and reassemble by changing the light
adapter posion (as shown)
Vercal Alignment #1 (I):
Maximum range of adjustment for light system placement
Vercal Alignment #2 (J):
Minimal range of adjustment for ne tuning light beam posion
CAUTION: Do not apply too much force when adjusting, this action can lead
to light cord damage
ADJUSTMENTS
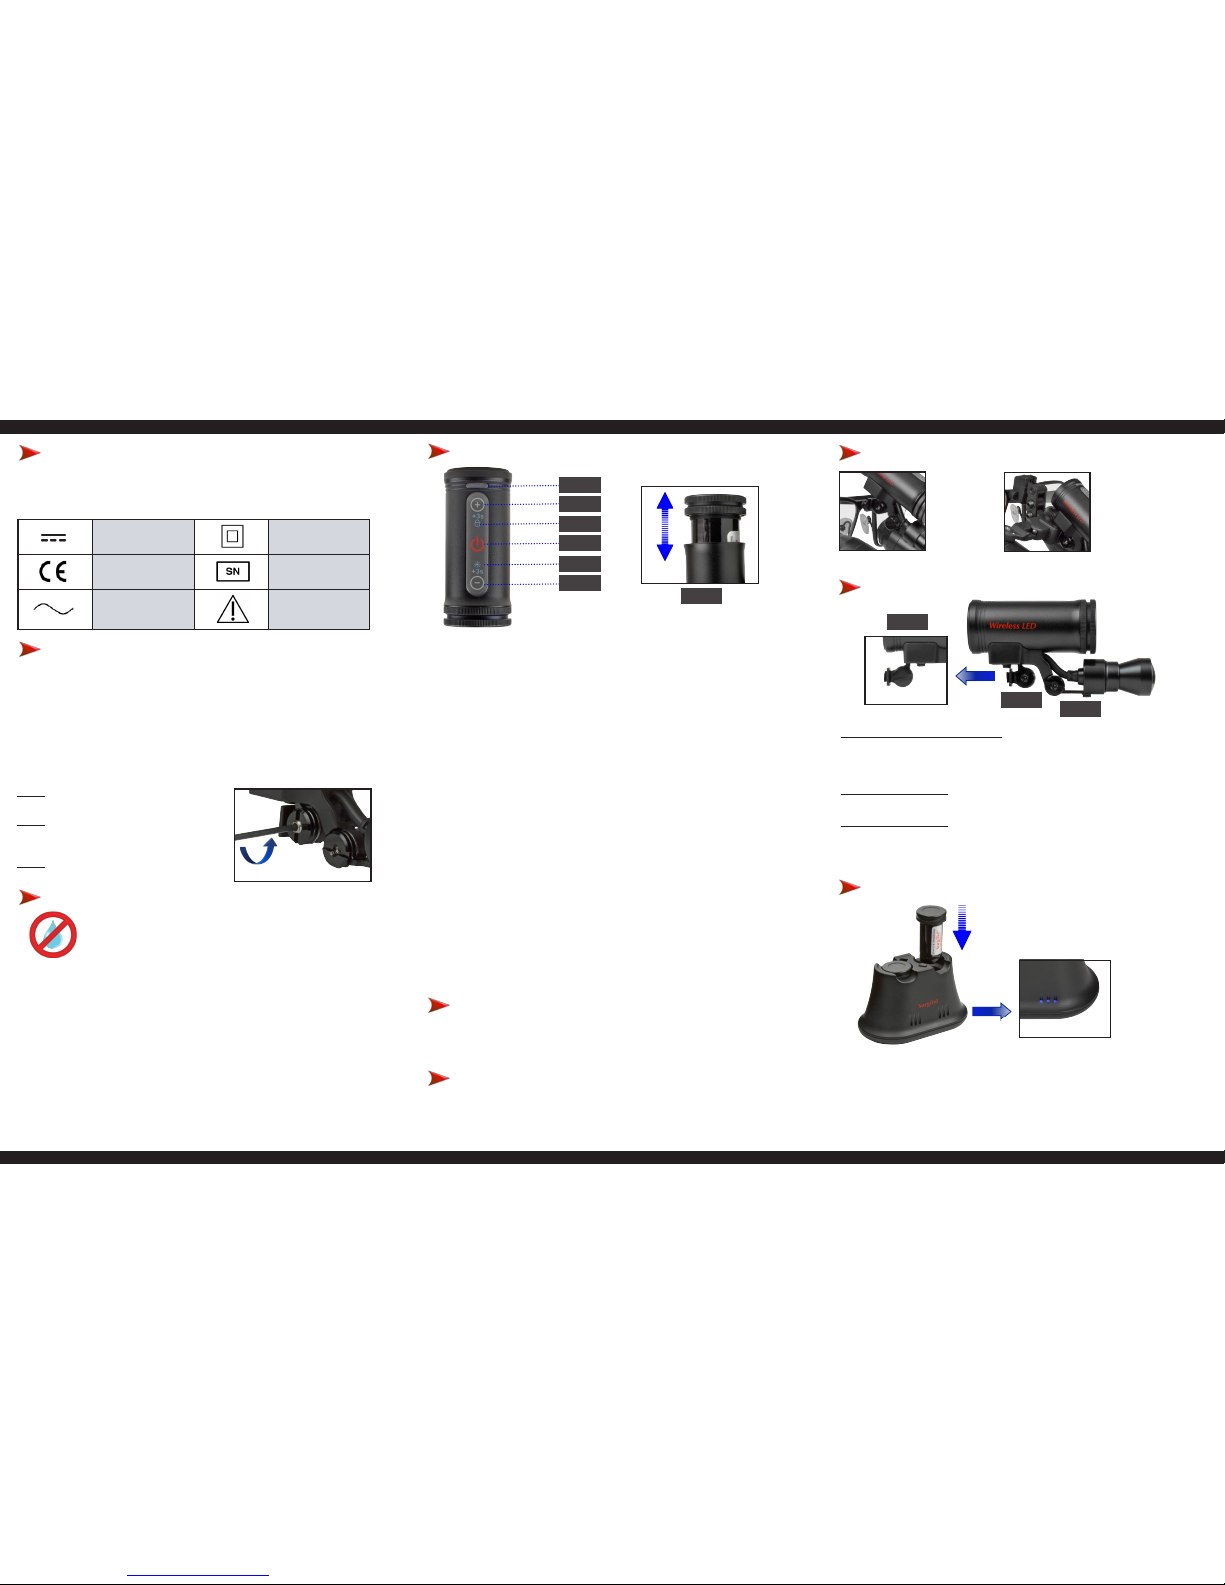
RECHARGEABLE BATTERIES
(push click to charge/eject battery)
Charge Level
Indicator
Note about light-cured composites
• Although it is not recommended to use this LED Light while working with
light-cured composites, seng the light to a lower light intensity may allow
you to work briey with materials before hardening
• Using the appropriate COLOR FILTER (orange lter) is STRONGLY
RECOMMENDED when using light-cured materials with the LED Light
• Ambient temperature range 10 to 40oC
• Relave humidity range 30 to 75%
• Atmospheric pressure range 70 to 106 kPa
• Ambient temperature range -40 to 70oC
• Relave humidity range 10 to 100%
• Atmospheric pressure range 50 to 106 kPa
OPERATING CONDITION
TRANSPORT & STORAGE CONDITION
Fixing Hinge Tension (too loose or too tight):
Step 1: Use provided hex key to remove hinge
set screw (see photo to the right)
Step 2: Use two at-head screwdrivers (placed
on each side) to loosen/ghten special
screw and nut
Step 3: Once desired tension is met,
reassemble and ghten set screw
HOW TO TURN LIGHT ON AND OFF
1. Touch on/o symbol (D) or anywhere on control panel to turn light on or o
2. To lock light in the on/o posion, touch lock symbol (C) with your nger
and hold unl you hear one beep. To restore use of power switch, hold lock
symbol (C) again unl same beep is heard
HOW TO SET BRIGHTNESS OF LIGHT
1. Touch light symbol (E) with your nger and hold unl you hear two beeps,
at this point the indicator light (A) will show purple. This means the
brightness can now be adjusted.
• To increase brightness of light, touch plus symbol (B) (3 brightness
opons)
• To decrease brightness of light, touch minus symbol (F)
2. To lock brightness seng, hold light symbol (E) unl you hear two beeps
and purple indicator light is not visible (A)
SYSTEM RESET
Unscrew baery and reassemble (G). This acon will restore the system to the
original sengs.
G
A
B
C
D
E
F
 Loading...