

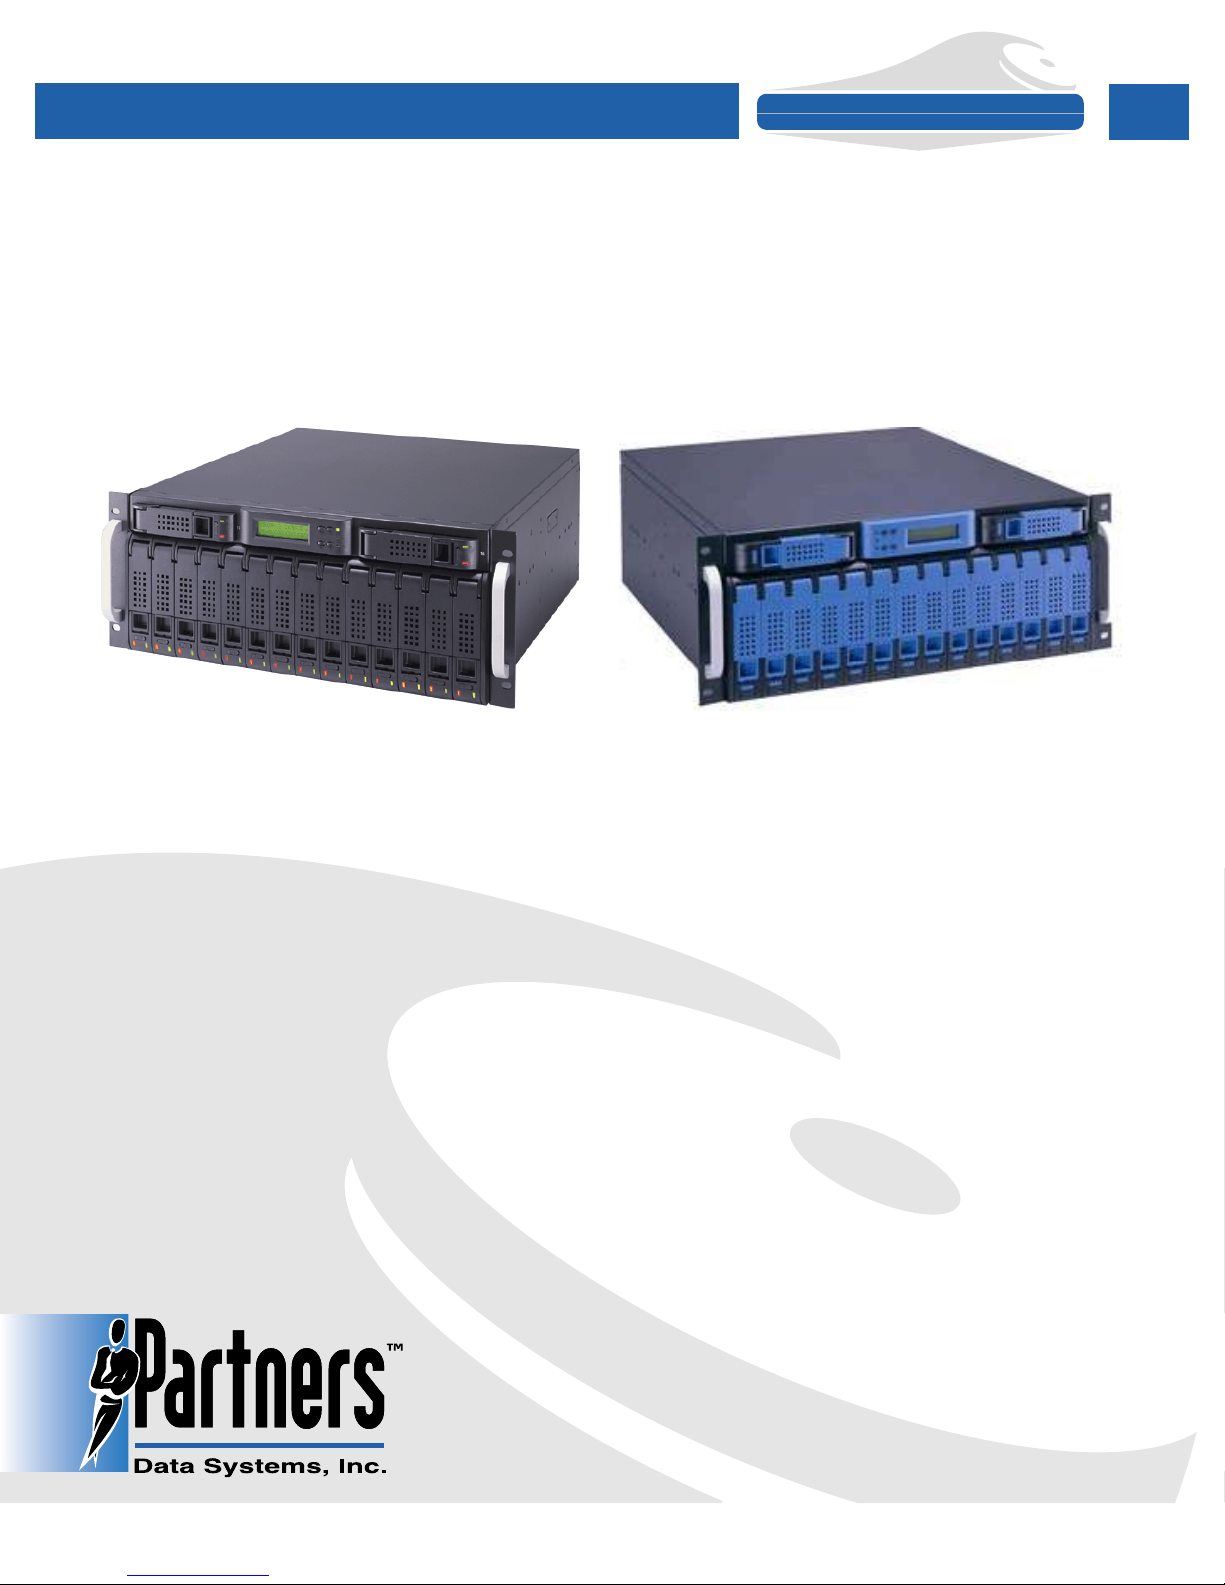
SurfRAID LC16 Series, LCE16 Series User Manual
SCSI & Fibre Channel - Storage Systems
SurfRAID
SurfRAID LC16 & LCE16 Series Enhanced RAID Storage
®
User’s Manual
Support - 800-550-3005

NOTICE
This document contains proprietary information protected by copyright, and this User’s Manual and all the
accompanying hardware are copyrighted. All rights are reserved. No part of this document may be photocopied
or reproduced by mechanical, electronic, or other means in any form.
Partners Data Systems, Inc. reserves the right to make changes to the hardware and Users’s Manual content
without obligation to notify any person or organization of the revision or change.
LIMITED WARRANTY
Partners Data Systems, Inc. (PDS) warrants to the original purchaser that this product is free from any defective
material and/or workmanship and agrees to repair or replace any part of this product which proves defective by
reason of improper workmanship or material for a period of one year from date of original purchase and subject
to the conditions set forth below.
If this product does not perform as described herein, owner’s sole remedy shall be repair or replacement as
provided below. In no event will PDS be liable for damages, lost data, lost revenue, lost wages, lost savings or any
other incidental or consequential damages arising from purchase, use, or inability to use this product, even if PDS
has been advised of the possibility of such damages.
For warranty support, any defective product should be returned to (PDS), by first obtaining an RMA (Return
Material Authorization) number. Be prepared to supply a copy of the sales invoice, and a detailed description
of the problem you are experiencing. The product serial number should be intact.
No express or implied warranty is made for any PDS product damaged by accidents, misuse, abuse, natural or
personal disaster or unauthorized modification. PDS reserves the right to make modifications and enhancements
to its products without incurring obligation of any kind.
First Edition / 08-01-02
All brand and product names are the trademarks of their respective owners.
Copyright © 2002 by Partners Data Systems, Inc.
All rights reserved. Printed in the U.S.A.
PARTNERS DATA SYSTEMS, INC.
3663 Via Mercado
La Mesa, CA 91941-8316 • U.S.A
Telephone: (619)-415-2000 • Fax: (619) 415-2001
2
SurfRAID LC16 Series User’s
Manual

Contents
Chapter 1. INTRODUCTION
1.1 RAID CONCEPTS ................................................................................................7
1.1.1 RAID Levels .............................................................................................. 7
1.1.1.1 Striping (RAID 0) ............................................................................7
1.1.1.2 Mirroring (RAID 1)..........................................................................8
1.1.1.3 Striping with Dedicated Parity (RAID 3) ............................................8
1.1.1.4 Striping with Interspersed Parity (RAID 5) .........................................9
1.1.1.5 Stripping with Mirroring (RAID 0+1).................................................9
1.1.2 Comparison Table .......................................................................................10
1.2 FEATURE HIGHLIGHTS.......................................................................................11
Chapter 2. GETTING STARTED
2.1 UNPACKING & CHECKING THE EQUIPMENT ................................................12
2.2 IDENTIFYING PARTS OF THE SurfRAID LC16 ..................................................12
2.2.1 Front View..................................................................................................12
2.2.2 Rear View...................................................................................................15
2.3 SPACE REQUIREMENTS.....................................................................................16
2.4 SYSTEM CONNECTING .....................................................................................16
2.5 INSTALLING THE DISK......................................................................................16
2.5.1 Removing the disk cartridge..........................................................................16
2.5.2 Installing the disk .........................................................................................17
2.5.3 Installing the disk cartridge............................................................................17
2.6 POWER ON AND SELF-DIAGNOSTIC...............................................................18
2.6.1 Powering on the system................................................................................18
2.6.2 Self-Diagnostic mode ...................................................................................18
Chapter 3. CUSTOMIZING YOUR RAID
3.1 FROM CONTROL PANEL & LCD ON FRONT PANEL ......................................19
3.2 FROM ANSI TERMINAL VIA MONITOR UTILITY ............................................19
3.2.1 Monitor Utility.............................................................................................19
3.2.2 Key Definitions Under ANSI/VT-100 Terminal ..............................................20
3.2.3 Connecting Terminals ...................................................................................20
3.2.3.1 Communication Ports Settings ...........................................................20
3.2.3.2 Terminal Access ...............................................................................20
3.2.3.3 Using The Monitor Utility..................................................................21
3.2.3.4 Running Configuration Mode .............................................................21
3.3 CONFIGURING RAID..........................................................................................22
3.3.1 Quick Setup................................................................................................22
3.3.1.1 Default value of Quick Setup .............................................................22
3.3.2 Customizing Setup .......................................................................................22
3.3.2.1 RAID Params menu .........................................................................23
SurfRAID LC16 Series User’s
Manual
3

3.3.2.2 SCSI/Fibre Params menu .................................................................24
3.3.2.3 RS232 Params menu ........................................................................26
3.3.2.4 SYSTEM Params menu ...................................................................27
3.3.2.5 NVRAM .........................................................................................28
3.3.2.6 RAID Funcs menu ...........................................................................28
3.4 SAMPLES.............................................................................................................31
3.4.1 Sample 1. RAID 5 with Hot Spare Disk ........................................................31
3.4.2 Sample 2. Change the Password of your RAID..............................................32
Chapter 4. HOT SWAP COMPONENTS
4.1 SWAPPING THE DISK.........................................................................................34
4.2 SWAPPING THE POWER SUPPLY MODULE......................................................34
4.3 SWAPPING THE COOLING FAN ........................................................................35
4.3.1 System Cooling Fans ...................................................................................35
Chapter 5. ADVANCE SETUP
5.1 UPDATING FIRMWARE.......................................................................................36
APPENDIX A. TROUBLESHOOTING & ERROR MESSAGES
A.1 TROUBLESHOOTING .........................................................................................37
A.2 ERROR MESSAGES .............................................................................................39
APPENDIX B. TECHNICAL SPECIFICATIONS................................. 41
APPENDIX C CONNECTORS ............................................................... 42
APPENDIX D GLOSSARY ...................................................................... 44
APPENDIX E CREATING TWO LUNs ................................................. 46
APPENDIX F FIBRE RAID TO HOST CONNECTIVITY .................. 47
4
SurfRAID LC16 Series User’s
Manual
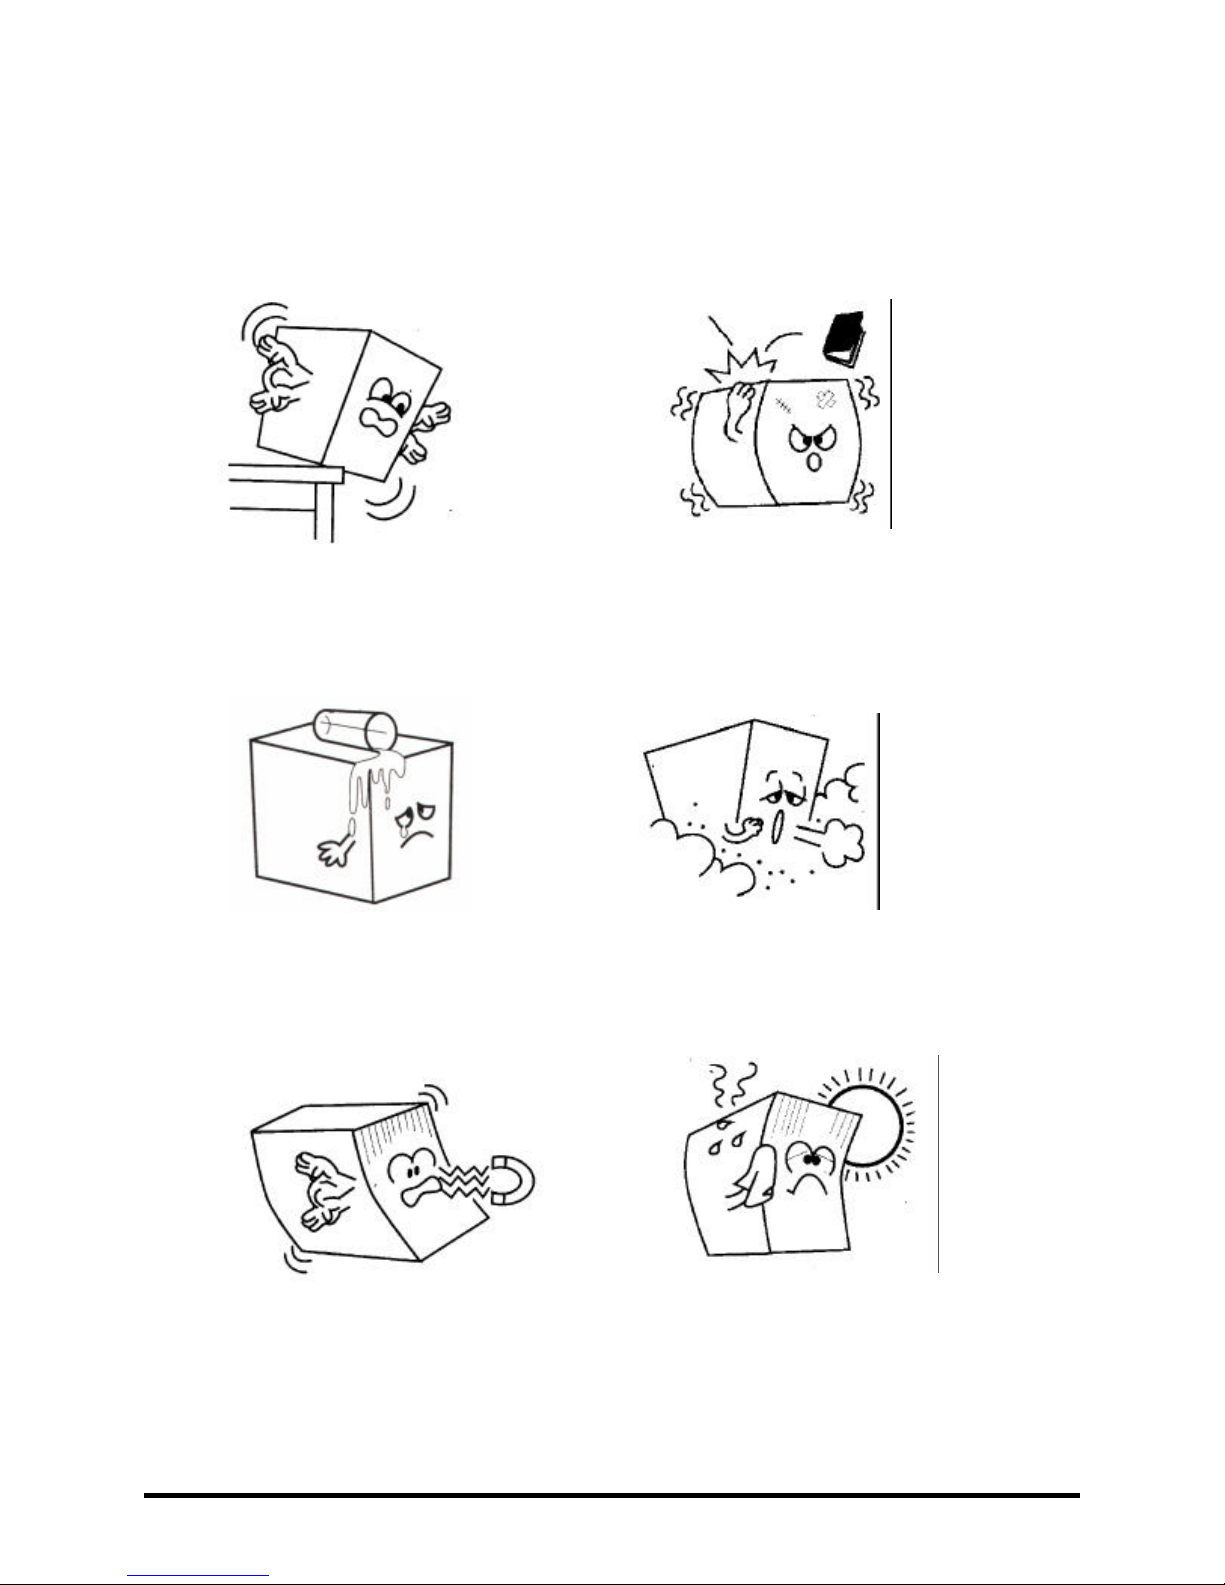
General Safety Guidelines
DO NOT place the SurfRAID
LC16 on uneven or unstable work
surfaces. Seek servicing if the casing
has been damaged.
DO NOT expose the SurfRAID
LC16 to liquids, rain or moisture.
DO NOT place or drop objects on top
of the SurfRAID LC16 and do not shove
any foreign objects into it.
DO NOT expose the SurfRAID
LC16 to dirty or dusty environments.
DO NOT expose the Sur-
fRAID LC16 to magnetic fields.
SurfRAID LC16 Series User’s
Manual
DO NOT expose the SurfRAID LC16 to
extreme temperatures or to direct sunlight.
5

About your User’s Guide
Welcome to your SurfRAID LC16 Redundant Array of Independent Disks System User’s Guide. This
manual covers everything you need to know in learning how to install or configure your RAID system.
This manual also assumes that you know the basic concepts of RAID technology.
This manual is divided into five chapters and three appendixes.
Chapter 1. INTRODUCTION
Gives introduction on RAID technology and SurfRAID LC16 features.
Chapter 2. GETTING STARTED
Helps user to identify parts of the SurfRAID LC16 and prepare the hardware for
configuration.
Chapter 3. CONFIGURING YOUR RAID
Quick Setup
Provides a simple way to setup your SurfRAID LC16.
Customizing Setup
Provides step-by-step instructions to help you to do setup or re-configure your
SurfRAID LC16.
Chapter 4. HOT SWAP COMPONENTS
Describes all hot swap modules on SurfRAID LC16 and provides the detailed procedure to replace them.
Chapter 5. ADVANCED SETUP
Updating Firmware
Provides step-by-step instructions to help you to update the firmware to the latest
version.
Appendix A. TROUBLE SHOOTING AND ERROR MESSAGES
Appendix B. TECHNICAL SPECIFICATION
Appendix C. CONNECTORS
Appendix D. GLOSSARY
Appendix E. CREATING TWO LUNs
Appendix F. FIBRE TO HOST CONNECTIVITY
6
SurfRAID LC16 Series User’s
Manual

CHAPTER 1. INTRODUCTION
RAID CONCEPTS
The need to ensure continuous access to critical computer data is essential today in such a highly
competitive business environment. Data loss and server downtime caused by drive failure often
results in lost productivity, decreased profitability, and can differentiate between success and
failure in a competitive business environment. RAID (Redundant Array of Independent Drives)
addresses this problem. The Benefits of RAID include:
Availability
Provides fault-tolerance by mirroring or parity operation. If any single disk drive in the RAID
fails, the RAID still continues to function without loss of data.
Capacity
Provides disk spanning by weaving all connected drives into one single volume.
Performance
Increases disk access speed by breaking data into several blocks when reading / writing to several
drives in parallel. With RAID, storage speed increases as more drives are added.
1.1.1 RAID LEVELS
The SurfRAID LC16 supports RAID Levels 0, 1, 3, 5 & 0+1. Each RAID level offers a different
performance, functionality and fault tolerance, depending on the application that will be used.
The following is a brief explanation of each RAID level. Before configuring the SurfRAID LC16, be
sure to know which RAID level is best suited for your application.
1.1.1.1 Striping (RAID 0)
Striping refers to the storing of data across multiple drives in a drive group. If there are three
drives in a drive group then the subsequent data will be stored across all three drives. This creates a very high performance virtual disk with the capacity equal to the combined capacity of the
installed disks. RAID Level 0 provides high availability and very high performances for both
read and write operations. However, no redundant parity is generated for protection against disk
failure.
Data
Block1
Block2
Block3
Block4
Block5
Block6
Block7
Block8
RAID 0
Block1 Block2
Block3 Block4
Block5 Block6
Block7 Block8
Disk 1
Striping
Disk 2
SurfRAID LC16 Series User’s
Manual
7
1.1.1.2 Mirroring (RAID 1)
Mirroring refers to the replication of data on two or more drives. Each drive contains a mirror
image of the data on the primary drive. Virtual disk space equals to capacity of the smallest
installed disk drive. Mirroring causes operational overhead resulting in lower performance for
write operations, however it does provide the highest data reliability among RAID Levels 0 to 5
with very high performance for read intensive operations.
RAID 1
Data
Mirroring
Block1
Block2
Block3
Block4
Block5
Block6
Block7
Block8
Block1 Mirror1
Block2 Mirror2
Block3 Mirror3
Block4 Mirror4
Block5
Block6
Block7
Block8
Disk 1
Mirror5
Mirror6
Mirror7
Mirror8
Disk 2
1.1.1.3 Striping with Dedicated Parity (RAID 3)
Performs Block Striping with Dedicated Parity. One drive member is dedicated to storing the
parity data. When a drive member fails, the controller can recover / regenerate the lost data of the
failed drive from the dedicated parity drive.
RAID 3
Data
Block1
Block2
Block3
Block4
Block5
Block6
Block7
Block8
8
Striping with Dedicated Parity
Block1 Block2
Block3 Block4
Block5 Block6
Block7 Block8
Disk 1
Disk 2
Parity1,2
Parity3,4
Parity5,6
Parity 7,8
Disk 3
SurfRAID LC16 Series User’s
Manual
1.1.1.4 Striping with Interspersed Parity (RAID 5)
Striping with Parity is a method of storing data striped across multiple drives like RAID 0 but
with parity (redundant data calculated by XOR logic used to reproduce data in case of lost data)
also striped across the drives. RAID Level 5, which offers a very high data redundancy, availability and performance.
RAID 5
Data
Block1
Block2
Block3
Block4
Block5
Block6
Block7
Block8
Block1 Block2
Parity 3,4 Block3
Block6 Parity 5,6
Block7 Block8
Disk 1
Striping with Parity
Parity1,2
Block4
Block5
Parity 7,8
Disk 2
1.1.1.5 Striping with Mirroring (RAID 0+1)
This RAID level is a combination of RAID 0 (Striping) and RAID 1 ( mirroring), it contains both
features of these arrays-security and sequential performance. Sometimes it is referred to as RAID
10.
RAID 0+1
Data
Block1
Block2
Block3
Block4
Block5
Block6
Block7
Block8
Disk 1
Block1
Block3
Block5
Block7
Mirror1
Mirror3
Mirror5
Mirror7
Striping
Striping
Disk 3
Mirror
Block2
Block4
Block6
Block8
Mirror2
Mirror4
Mirror6
Mirror8
SurfRAID LC16 Series User’s
Manual
Disk 2
Disk 4
9

1.1.2. RAID LEVEL COMPARISON TABLE
Minimum
RAID
Name Description
Level
0 Data Striping
1 Mirrored Disks
3 Striping with
dedicated parity
disk
5 Independent Drives
With Spread Parity
0+1 Data Striping with
Mirroring
* The Data is broken down into strips
and striped across the member disks
of the array.
* Provides no redundancy.
* Provides redundancy by writing
identical data to each member disk of
the array.
* Provides redundancy by writing parity
to a dedicated Disk.
* Provides redundancy by distributing
parity across some or all of an array’s
member disks.
* This RAID Level is a combination of
RAID 0 (striping) & RAID 1
(Mirrored).
Available
Drives
Required
2 [N]
2 [1 ]
3 [N-1]
3 [N-1]
4 [N/2]
disk
Number.
Data
Availability
Low
Very High
High
High
Very High
10
SurfRAID LC16 Series User’s
Manual

1.2 FEATURE HIGHLIGHTS
The SurfRAID LC16 is designed to meet today’s demand of higher storage solutions for the emerging
needs of databases, e-mail, web servers and imaging systems. It provides a maximum data protection
and exceptional performance in a storage subsystem. Target usage ranges are set from small business to
departmental and corporate server needs. The SurfRAID LC16 is designed for easy integration, smooth
data expansion and server migration.
The SurfRAID LC16 supports the following features:
* Host System independence
* Operating System independence
* High performance processor
* Superior Array Management Firmware
* Multiple RAID function support, up to 4 Arrays.
* Advanced PCI bus architecture
* 512MB of cache
* Support for RAID Levels 0, 1,3, 5 and 0+1
* Dual Ultra-160 SCSI Host Interconnect Support - SurfRAID LC16.160S
* Dual Loop of 2Gb/sec Fibre Channel - SurfRAID LC16.200F
* Redundant and Hot Swappable Fan, Power and Drives.
* Hot Swap, Hot Spare and Automatic Drive Rebuild Support
* Programmable Page and FAX event notification
SurfRAID LC16 Series User’s
Manual
11
CHAPTER 2. GETTING STARTED
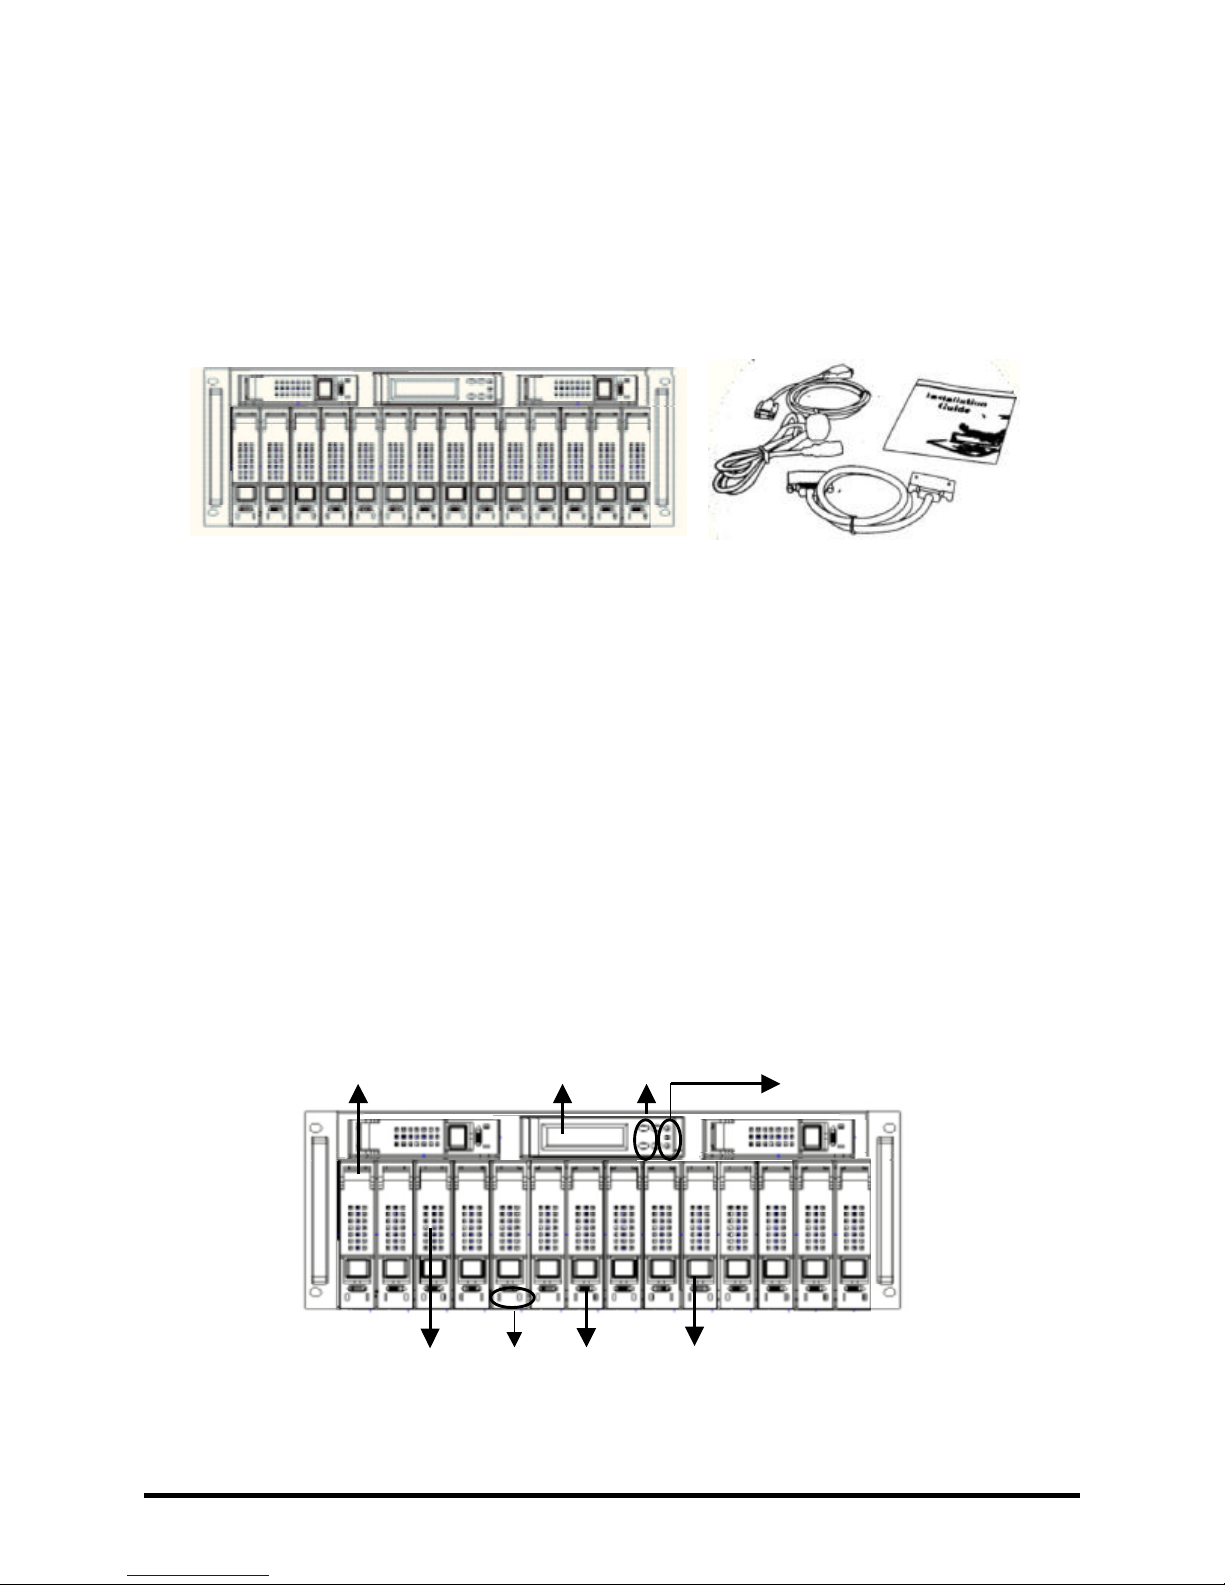
2.1 UNPACKING & CHECKING THE EQUIPMENT
Before unpacking the SurfRAID LC16, prepare a clean, stable surface to put the contents of your
SurfRAID LC16 shipping container. Altogether, you should find the following items in the package :
Remove all the items from the container. If anything is missing or broken, please inform us ASAP. It is
advisable to keep the packaging, as you might need to ship your SurfRAID LC16 or send it in for
service. You will need the shipping container.
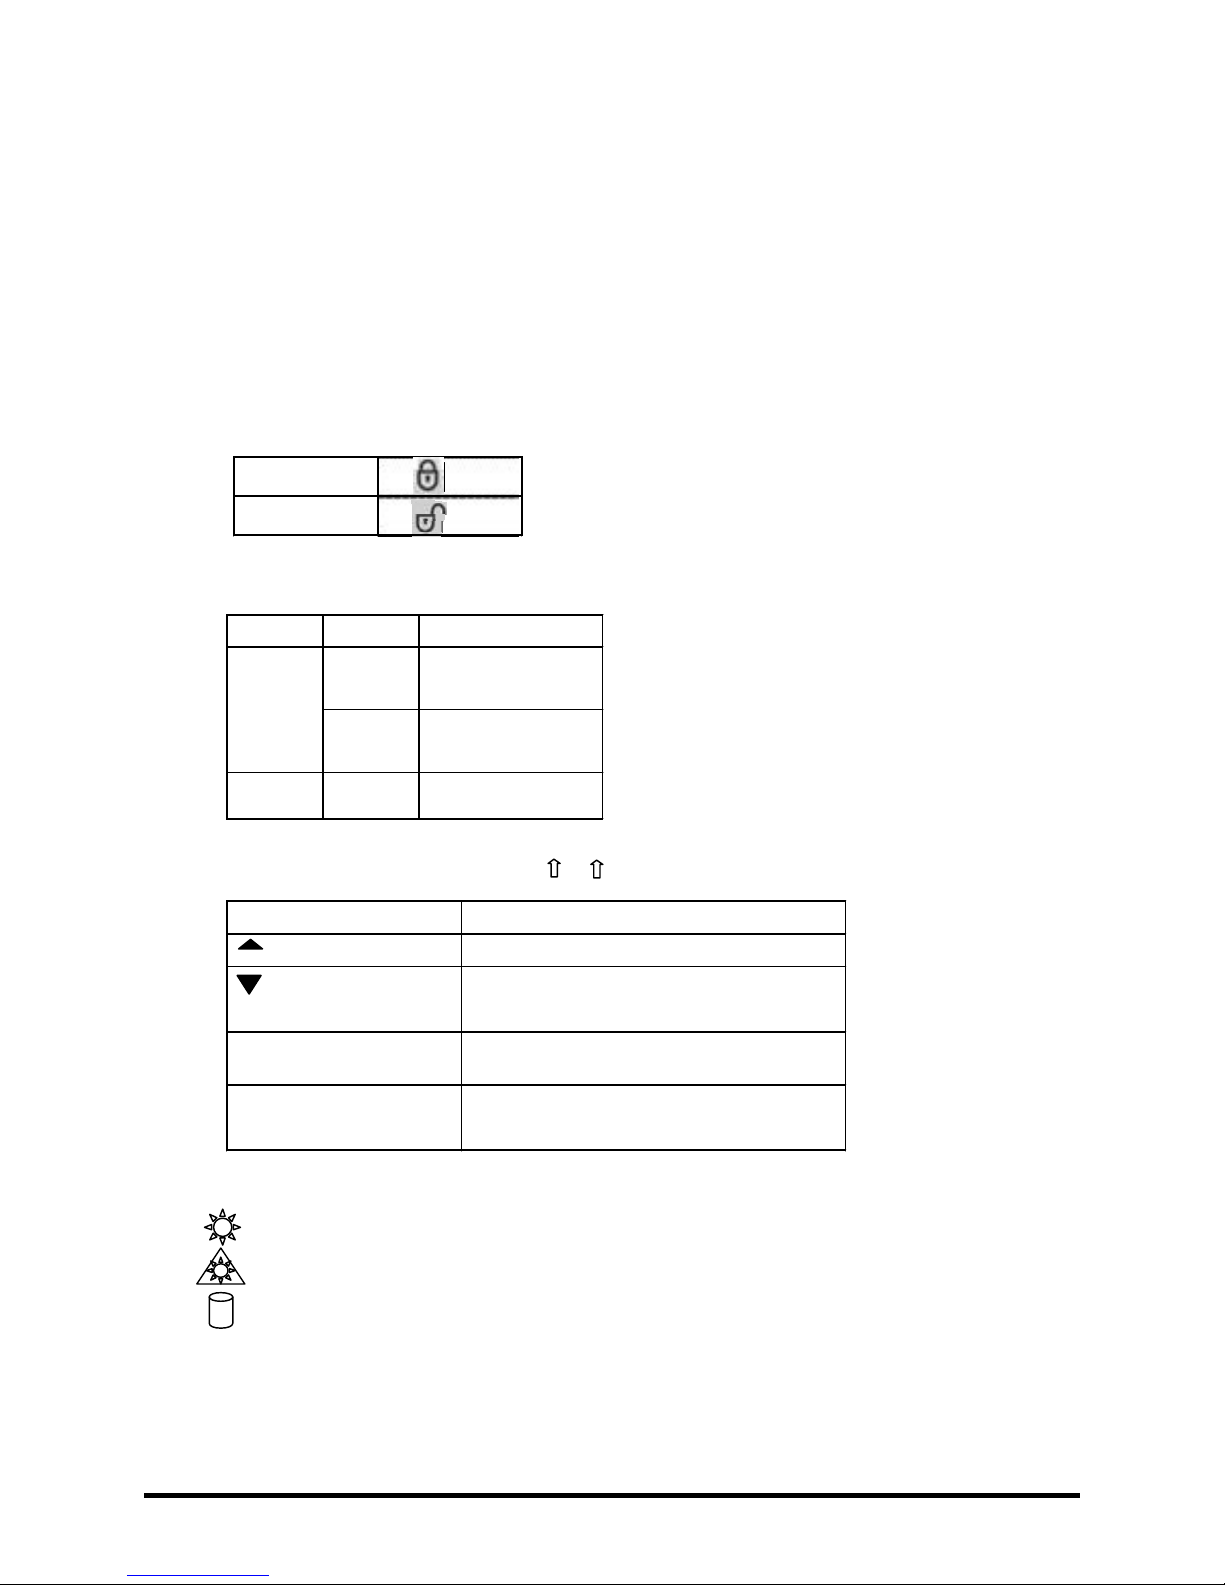
2.2 IDENTIFYING PARTS OF THE SurfRAID LC16
The illustrations below identify the various features of the SurfRAID LC16. Get yourself familiar with
these terms as it will help you when you read further in the following sections.
2.2.1 FRONT VIEW
SurfRAID LC16
8
2. 1. 7.
9
10
3. 6. 5. 4.
12
SurfRAID LC16 Series User’s
Manual

1. LCD Display Panel.
The front panel LCD continuously displays the status of the SurfRAID LC16. The following is an
example of the SurfRAID LC16.
Field Description
SurfRAID LC16
SurfRAID LC16
JJJJJJJJJJJJJ
The model of
The model of
Total sixteen disks channel status. Other symbols are:
Symbol Description
X Disk is not Installed
A Disk is being Added
I Identifying Disk.
1 Disk is a member of Array 1
2 Disk is a member of Array 2
3 Disk is a member of Array 3
4 Disk is a member of Array 4
J
SurfRAID LC16S
SurfRAID LC16F
Disk is on line, but does not
belong to any existing Array.
S Disk is a Spare Disk
SurfRAID LC16 Series User’s
Manual
13
When the “[Enter]” button is pressed in operation mode, the SurfRAID LC16 will enter Configuration
?
Mode. Note: During Configuration Mode if no button is pressed within 3 minutes (180 seconds), the
SurfRAID LC16 will automatically switch back to Operation Mode.
2. Disk Cartridge (Total 16 pcs.)
3. Cartridge Handle
4. Release-Button
5. Latch
LOCK
UNLOCK
6. HDD status LED Indicator
LED Colors Indicate
Green HDD On Line
Amber HDD Access
Red HDD Error
7. Function keys. (ENT , ESC, , )
Keys Descriptions
Up Arrow To scroll upward through the menu items
Down Arrow To scroll downward through the menu
items
(ENT ) Enter To confirm a selected item
(ESC) ESC To exit a sub-menu and return to
previous menu.
8. Power On Indicator (green).
9. Power Fail Indicator (Red)
10. Host System Access Indicator (Yellow).
14
SurfRAID LC16 Series User’s
Manual

2.2.2 REAR VIEW
1. RS232 Port (For Terminal)
2. Modem Port
3. Host SCSI Channel Port
4. Second Host SCSI Channel Port
OR
5. 1st Fibre Channel Loop
6. 2nd Fibre Channel Loop
7. System Cooling Module 1.
8. System Cooling Module 2.
9. System Cooling Module 3.
10. Power Switch
11. AC Inlet with the Latch
12. Power Supply “Alarm” Reset Button.
13. Power Module 1.
14. Power Module 2.
15. Power Module 3.
SurfRAID LC16 Series User’s
Manual
15
 Loading...