

Surf Control Web Filter User Manual

SurfControl Web Filter
Administrator's Guide
Version 5.5
™

Notices
NOTICES
©1996–2008, Websense Inc.
All rights reserved.
10240 Sorrento Valley Rd., San Diego, CA 92121, USA
Published January 2008
This document may not, in whole or in part, be copied, photocopied, reproduced, translated, or reduced to any electronic medium or
machine-readable form without prior consent in writing from Websense Inc.
Every effort has been made to ensure the accuracy of this manual. However, Websense Inc., makes no warranties with respect to
this documentation and disclaims any implied warranties of merchantability and fitness for a particular purpose. Websense Inc. shall
not be liable for any error or for incidental or consequential damages in connection with the furnishing, performance, or use of this
manual or the examples herein. The information in this documentation is subject to change without notice.
Trademarks
SurfControl and Websense are registered trademarks of Websense, Inc. in the United States and certain international markets.
Websense has numerous other unregistered trademarks in the United States and internationally. All other trademarks are the
property of their respective owners.
Microsoft, Windows, Windows NT, Windows Server, and Active Directory are either registered trademarks or trademarks of Microsoft
Corporation in the United States and/or other countries.
This product includes software distributed by the Apache Software Foundation (http://www.apache. or g
Copyright (c) 2001-2004. The Apache Software Foundation. All rights reserved. Licensed under the Apache License, Version 2.0
(the "License"); you may not use this file except in compliance with the License. You may obtain a copy of the License at http://
www.apache.org/licenses/LICENSE-2.0.
Other product names mentioned in this manual may be trademarks or registered trademarks of their respective companies and are
the sole property of their respective manufacturers.
This product contains software licensed under the BSD open source license. For more information visit www.opensource.org.
SurfControl Web Filter contains the MD5.H - header file for MD5C.C: Copyright © 1991-2, ROSA Data Security, Inc. Created 1991. All
rights reserved.
).
SurfControl Web Filter v5.5 Administrator’s Guide i

Notices
ii Administrator’s Guide SurfControl Web Filter v5.5

TABLE OF CONTENTS
Notices............................................................................................................................................. i
Introduction to Web Filter.............................................................................................. 1
About SurfControl Web Filter.......................................................................................................... 2
Basic Configuration ........................................................................................................ 3
Introduction..................................................................................................................................... 4
Basic Web Filter Service Settings ..................................................................................... 4
Initial Monitored Data Settings........................................................................................... 4
Basic Rules Configuration ................................................................................................. 4
Scheduling Tasks.............................................................................................................. 4
Reporting........................................................................................................................... 4
Basic Service Settings.................................................................................................................... 5
Accessing the Service Settings ......................................................................................... 5
Understanding the Settings ............................................................................................... 5
More Information ....... ... .......................................... ... .... .......................................... ... ... .... 8
Initial Monitored Data Settings........................................................................................................ 9
The Default Monitor Settings............................................................................................. 9
More Information ....... ... .......................................... ... .... ... .......................................... ... .. 12
Basic Rule Configuration.............................................................................................................. 13
Recommendations for Creating and Applying Rules....................................................... 13
Scheduling Tasks......................................................................................................................... 14
More Information ....... ... .......................................... ... .... ... .......................................... ... .. 14
Remote Administration ................................................................................................ 15
Introduction................................................................................................................................... 16
What the Remote Administration Client Does ................................................................. 16
Prerequisites.................................................................................................................... 16
Licensing....................................................................................................................... 17
Licensing Web Filter.................................. .... ... ... ... .......................................... ... .... ..................... 18
Entering a Web Filter License Key .................................................................................. 18
Privacy Edition.............................................................................................................. 19
What It Does................................................................................................................................. 20
Comparing the Standard and Privacy Editions................................................................ 20
Privacy Edition Features............................................................................................................... 22
Change the Manager and Union passwords ................................................................... 22
Viewing User Details ....................................................................................................... 22
The Web Filter Manager ............................................................................................... 25
Introduction................................................................................................................................... 26
Opening the Web Filter Manager .................................................................................... 26
Working With the Web Filter Manager.......................................................................................... 27
The Navigation Pane....................................................................................................... 27
The Central Pane ............................................................................................................ 27
The Information Pane...................................................................................................... 28
SurfControl Web Filter v5.5 Administrator’s Guide iii

SurfControl Web Filter............................................ ... .... ... ............................................................ 30
Data Displayed................................................................................................................ 30
Tasks............................................................................................................................... 30
Web Filter Server............. .... .......................................... ... ... ... ...................................................... 32
Server Information Dashboard ........................................................................................ 32
Tasks............................................................................................................................... 33
Monitored Data.......................................... .... ... ... ... ... .... ... .......................................... ... ............... 34
Data................................................................................................................................. 34
Filters............................................................................................................................... 34
Users............................................................................................................................................ 36
Summary User Information.............................................................................................. 36
Detail User Information.................................................................................................... 36
Tasks............................................................................................................................... 38
Monitored Data Tasks ..................................................................................................... 39
Monitored Users Tasks.................................................................................................... 41
Monitored Connections Tasks......................................................................................... 44
Destinations.................................................................................................................................. 45
Detail Destination Information ......................................................................................... 45
Tasks............................................................................................................................... 46
Monitored Destinations tasks .......................................................................................... 47
Categories.................................................................................................................................... 49
Summary Category Information....................................................................................... 49
Detail Category Information............................................................................................. 49
Tasks............................................................................................................................... 51
Categories tasks..................... ... .......................................... ... .... ... ... ... ............................ 51
Content Protection........................................................................................................................ 52
Maintenance................................................................................................................................. 53
Rules Administrator...................................................................................................... 55
Introduction................................................................................................................................... 56
Guidelines For Rule Creation .......................................................................................... 56
Rule Objects............................................................................... ... ... ............................................ 59
Who Objects............................................................................... ... ... ............................................ 60
Creating User Defined Who Objects ............................................................................... 61
Where Objects.............................. .... ... ... ... .......................................... .... ... ... ... ... .... ..................... 64
Creating User Defined Where Objects............................................................................ 64
Category Object............................................................................................................... 67
Where Lists......... .... ... ... ... .... ... ... ... .......................................... .... ... ... ............................... 69
What Objects................................................................................................................................ 70
Protocols/Ports Objects.................................................................... ... ... .... ... ... ............... 70
Precise Bandwidth Controls Object.................. ... ... ... .... ... ... ... .... ... ... ............................... 73
What Lists........................................................................................................................ 74
When Objects............................................................................................................................... 75
Allowance Objects........................................................................................................................ 78
10 MB Volume Object................ ... .......................................... .... ... ... ... ... .... ..................... 78
30 Minute Time Object .................................................................................................... 79
Notify Objects............................................................................................................................... 81
iv Administrator’s Guide SurfControl Web Filter v5.5

HTTP Deny Page Objects ............................................................................................................ 84
Default............................................................................................................................. 84
Allowance........................................................................................................................ 85
Other HTTP Deny Page Objects ..................................................................................... 86
Constructing HTTP Deny Pages ..................................................................................... 86
Viewing Another Collector............................................................................................................ 87
Real Time Monitor......................................................................................................... 89
Introduction................................................................................................................................... 90
Display Columns........................................................................................................................... 92
Category Color ............................................................................................................................. 93
Other Settings......... .......................................... ... ... .......................................... ... .... ... ..... 93
Collector Details ........................................................................................................................... 94
Stopping and Starting the Real-Time Monitor .............................................................................. 95
Web Filter Settings ....................................................................................................... 97
Introduction................................................................................................................................... 98
How To Configure the Web Filter Settings ...................................................................... 98
Available Settings......................................................................................................................... 99
Start/Stop Service Tab ............................................................................................................... 100
Active Directory Tab........ .... ... ... ... .... .......................................... ... ... ... .... ... ... ............................. 101
Subnets Tab............................................................................................................................... 102
Subnet Monitoring ......................................................................................................... 102
Advanced Tab ............................................................................................................................ 104
Network Settings ........................................................................................................... 104
TCP/IP Name Resolution (DNS) ................................................................................... 105
Monitor to Database Settings........................................................................................ 105
Categorization Tab..................................................................................................................... 106
Categorization ............................................................................................................... 106
Company Domains and Intranet Destinations............................................................... 106
Internet Threat Database Improvement Program.......................................................... 106
Protocol Signatures Tab............................................................................................................. 107
Ignored Ports Tab....................................................................................................................... 108
Creating new ports ........................................................................................................ 109
Username Resolution.................................................................................................... 109
Enterprise User Monitoring............................................................................................ 110
Real-Time Monitor Tab............................................................................................................... 111
Database Tab............................................................................................................................. 112
E-mail Notifications Tab.............................................................................................................. 114
Custom Categorization............................................................................................... 117
Introduction................................................................................................................................. 118
How It Works ................................................................................................................. 118
The VCA in Evaluation Mode ........................................................................................ 118
Using Custom Categorization..................................................................................................... 119
List of Destinations Tab................................................................................................. 119
VCA Settings Tab................................ ... ... ... .... ... ... .......................................... ... .... ... ... 121
VCA Results Tab........................................................................................................... 122
The VCA Service Settings............................................................................................. 124
SurfControl Web Filter v5.5 Administrator’s Guide v

Databases.................................................................................................................... 127
Creating a New SQL Server Database............. ... ... ... .... ... ... ... .... ... .......................................... ... 128
Managing databases.............. .......................................... ... ... .... ... ... ... .... ... ... ... ... ....................... 129
Archive........................................................................................................................... 130
Purge............................................................................................................................. 130
Compact........................................................................................................................ 131
Delete............................................................................................................................ 131
Restore.......................................................................................................................... 132
Options.......................................................................................................................... 133
Updating Your Database............................................................................................................ 134
Upgrading your database........................................................................................................... 136
Importing/exporting databases................................................................................................... 137
exporting manually categorized sites ............................................................................ 137
Importing manually categorized sites ............................................................................ 138
Scheduler..................................................................................................................... 139
Introduction................................................................................................................................. 140
Available Events......................................................................................................................... 142
Command Line.............................................................................................................. 142
Database Management................................................................................................. 142
Database Update........................................................................................................... 143
Internet Threat Database Update.................................................................................. 144
Network Groups Update................................................................................................ 144
Appendix...................................................................................................................... 145
Contact Technical Support......................................................................................................... 146
Sales and Feedback.................................. .... ... ... ... ... .... ... ... ... .... ................................................ 148
Index..............................................................................................................................149
vi Administrator’s Guide SurfControl Web Filter v5.5

Chapter 1
Introduction to Web Filter
About SurfControl Web Filter. . . . . . . . . . . . . . . . . . . . . . . . . . . . . . . . . . . . . . . . . . . . . . . . . . .page 2

I
NTRODUCTION TO
About SurfControl Web Filter
1
W
EB FILTER
ABOUT SURFCONTROL WEB FILTER
Web-based e-mail, file downloads, Instant Messaging (IM), Peer to Peer (P2P), and unauthorized Web
surfing can expose your enterprise network to serious, debilitating attacks and undesirable code, including
spyware, adware, malware, and pornography. SurfControl Web Filter offers a proactive security solution
that protects your enterprise against known, emerging, and customer-specific threats before they reach
your network.
Your IT staff will appreciate how easy it is to deploy and manage SurfControl's enterprise-wide Web
protection. With fewer administrative headaches, they can focus on other important assignments and
projects.
SurfControl Web Filter allows you to actively monitor network use and abuse anywhere in your
organization. You can even extend real-time protection to mobile users who connect to the corporate
network with SurfControl Mobile Filter. The same corporate security rules apply, so mobile devices are
shielded from unwanted intrusions, minimizing unexpected shutdowns that lead to lapses in productivity.
SurfControl Web Filter bolsters your defenses by providing:
• Bullet proof infrastructure security – Automatic, real-time security updates through our
comprehensive threat database, which is constantly kept current with knowledge gath er ed by ou r
global threat experts.
• Legal liability protection – Prevents circulation of inappropriate content that violates copyright laws
or infringes rights.
• Regulatory compliance – Helps you meet HIP AA, Sar banes-Oxley, and other industry or government
security requirements.
• Enhanced employee productivity – Limits Web surfing and downtime due to attacks and improves
IT productivity because it's easy to implement and manage.
2 Administrator’s Guide SurfControl Web Filter v5.5

Chapter 2
Basic Configuration
Introduction . . . . . . . . . . . . . . . . . . . . . . . . . . . . . . . . . . . . . . . . . . . . . . . . . . . . . . . . . . . . . . . . . . . page 4
Basic Service Settings . . . . . . . . . . . . . . . . . . . . . . . . . . . . . . . . . . . . . . . . . . . . . . . . . . . . . . . . . . page 5
Initial Monitored Data Settings. . . . . . . . . . . . . . . . . . . . . . . . . . . . . . . . . . . . . . . . . . . . . . . . . . . . page 9
Basic Rule Configuration . . . . . . . . . . . . . . . . . . . . . . . . . . . . . . . . . . . . . . . . . . . . . . . . . . . . . . . page 13
Scheduling Tasks . . . . . . . . . . . . . . . . . . . . . . . . . . . . . . . . . . . . . . . . . . . . . . . . . . . . . . . . . . . . . page 14

B
ASIC CONFIGURATION
Introduction
2
INTRODUCTION
This chapter introduces you to some basic features and configuration settings that will help you set up
Web Filter effectively.
This chapter will cover the following:
BASIC WEB FILTER SERVICE SETTINGS
This section explains some of the service settings for Web Filter. These settings control how Web Filter
monitors Internet traffic and the actions it takes when blocking access to sites. This sec tio n cov er s:
• Where to find the service settings.
• What some of the basic service settings do.
• What effect changing the settings will have.
• Where to find more information.
INITIAL MONITORED DATA SETTINGS
Web Filter allows you to monitor various Internet behaviors, and apply settings to individual users or
groups. This section covers:
• Where to find the monitor settings.
• What the default settings are.
• The other settings that are available.
BASIC RULES CONFIGURATION
You can either implement some of the default rules supplied with Web Filter or construct your own. This
section explains how you should approach rule creation.
SCHEDULING TASKS
You can organize tasks that need to be performed when Internet traffic is low, or when your users are not
logged on to your network. This section describes what events are available.
REPORTING
For reporting with Web Filter, you need to install SurfControl Report Central. This section describes some
of the features of our reporting tool.
4 Administrator’s Guide SurfControl Web Filter v5.5

B
ASIC CONFIGURATION
Basic Service Settings
2
BASIC SERVICE SETTINGS
This section will explain some of the basic service settings for Web Filter.
ACCESSING THE SERVICE SETTINGS
You can access the service settings in one of three ways:
• From the Control Panel > SurfControl Web Filter menu item.
• By right-clicking the SurfControl Web Filter icon in the notification area of the taskbar and selecting
Configure Web Filter Service from the menu.
• From the Configuration menu item in the Web Filter Manager navigation tree.
UNDERSTANDING THE SETTINGS
This section explains the features of some of the service settings and further options you may want to
consider.
This section covers:
• Stopping and starting the service
• Configuring subnets for balancing the load on your Web Filter server.
• E-mail notifications
Restart the Web Filter Service
Web Filter can require you to restart the Web Filter service befo re changes you have mad e can be applied.
These changes can include changing the Web Filter service settings. You can restart the service by rightclicking the SurfControl Web Filter icon and selecting Restart Web Filter Service.
Note: This option is also available in the Start/Stop Service tab of the SurfControl Web Filter
Service Settings dialog.
You can also stop or start the Web Filter service by right-clicking the Web Filter icon and selecting Start
Web Filter service or Stop Web Filter service.
SurfControl Web Filter v5.5 Administrator’s Guide 5
B
ASIC CONFIGURATION
Basic Service Settings
2
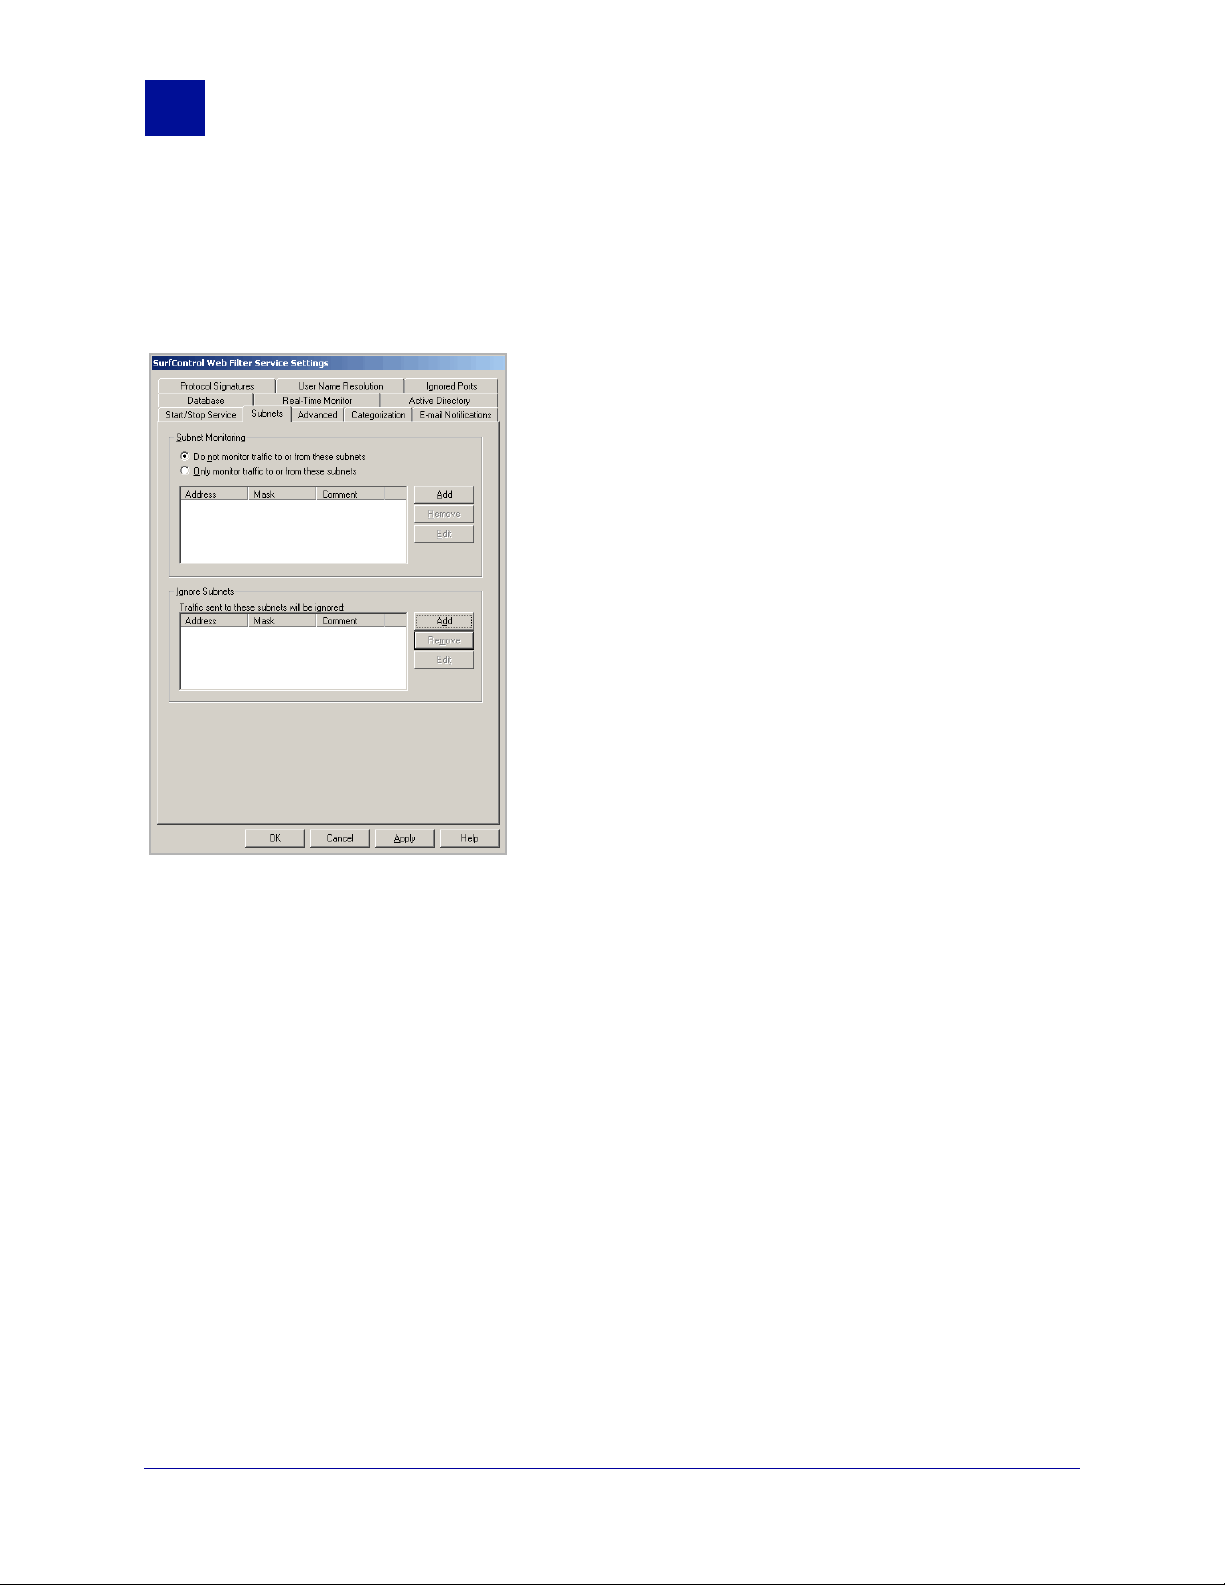
Configure Subnets
Configuring subnets helps to reduce or balance the load on your Web Filter server(s), enabling it to work
more efficiently. Use the Subnets tab to configure subnets:
Figure 2-1 Subnets tab
The Subnets tab has two sections:
• Subnet Monitoring – These settings help reduce or balance the load on your Web Filter server.
• Ignore Subnets – These settings show the internal subnets that were detected when you ran the
Configuration Wizard. These subnets are not monitored.
Subnet Monitoring
The Subnet Monitoring section is used to identify which parts of your network should be monitored or not
by each Web Filter server. How you decide on this, depends on whether you have single or multiple Web
Filter servers, and how you want to divide the network volume load of traffic between those servers. To
configure your subnets on a single Web Filter server:
1 Identify the external traffic subnets you do not want to monitor.
2 Click the Subnets tab, and click Add.
3 Enter the IP address of the subnet in the IP Address text box.
4 Enter the subnet mask in the Mask text box.
5 Click OK.
6 Repeat steps 1 to 5 for other subnets you do not want to monitor.
7Select Do not Monitor traffic to or from these subnets.
6 Administrator’s Guide SurfControl Web Filter v5.5

B
ASIC CONFIGURATION
Basic Service Settings
By configuring subnets on multiple Web Filter servers, you ensure the subnets are only monitored on one
server in your network environment. You need to specifically identify subnets you do not want to monitor
on one Web Filter server, and define one or more subnets you do want to monitor on each subsequent
Web Filter server. This allows you to divide the volume load of network traf fic acro ss your servers, making
them more efficient. To configure your subnets on multiple Web Filter servers:
1 Identify the subnets you do not want to monitor.
2 On the first Web Filter server, click the Subnet tab, and click Add.
3 Enter the IP address of the subnet in the IP Address text box.
4 Enter the subnet mask in the Mask text box.
5 Click OK.
6 Repeat steps 1 to 5 for other subnets you do not want to monitor.
7Select Do not Monitor traffic to or from these subnets.
8 For each subsequent Web Filter server, you should identify a specific subnet that you do want to
monitor. To do this, identify subnets you do want to monitor, and follow steps 2 to 5.
9Select Only Monitor traffic to or from these subnets.
2
Ignore Subnets
The internal subnets detected during the initial running of the Configuration Wizard are listed in the Ignore
Subnets section of the Subnets tab. You also have the following options:
• Add a new subnet.
• Remove a subnet.
• Edit the IP address or subnet mask for an existing subnet.
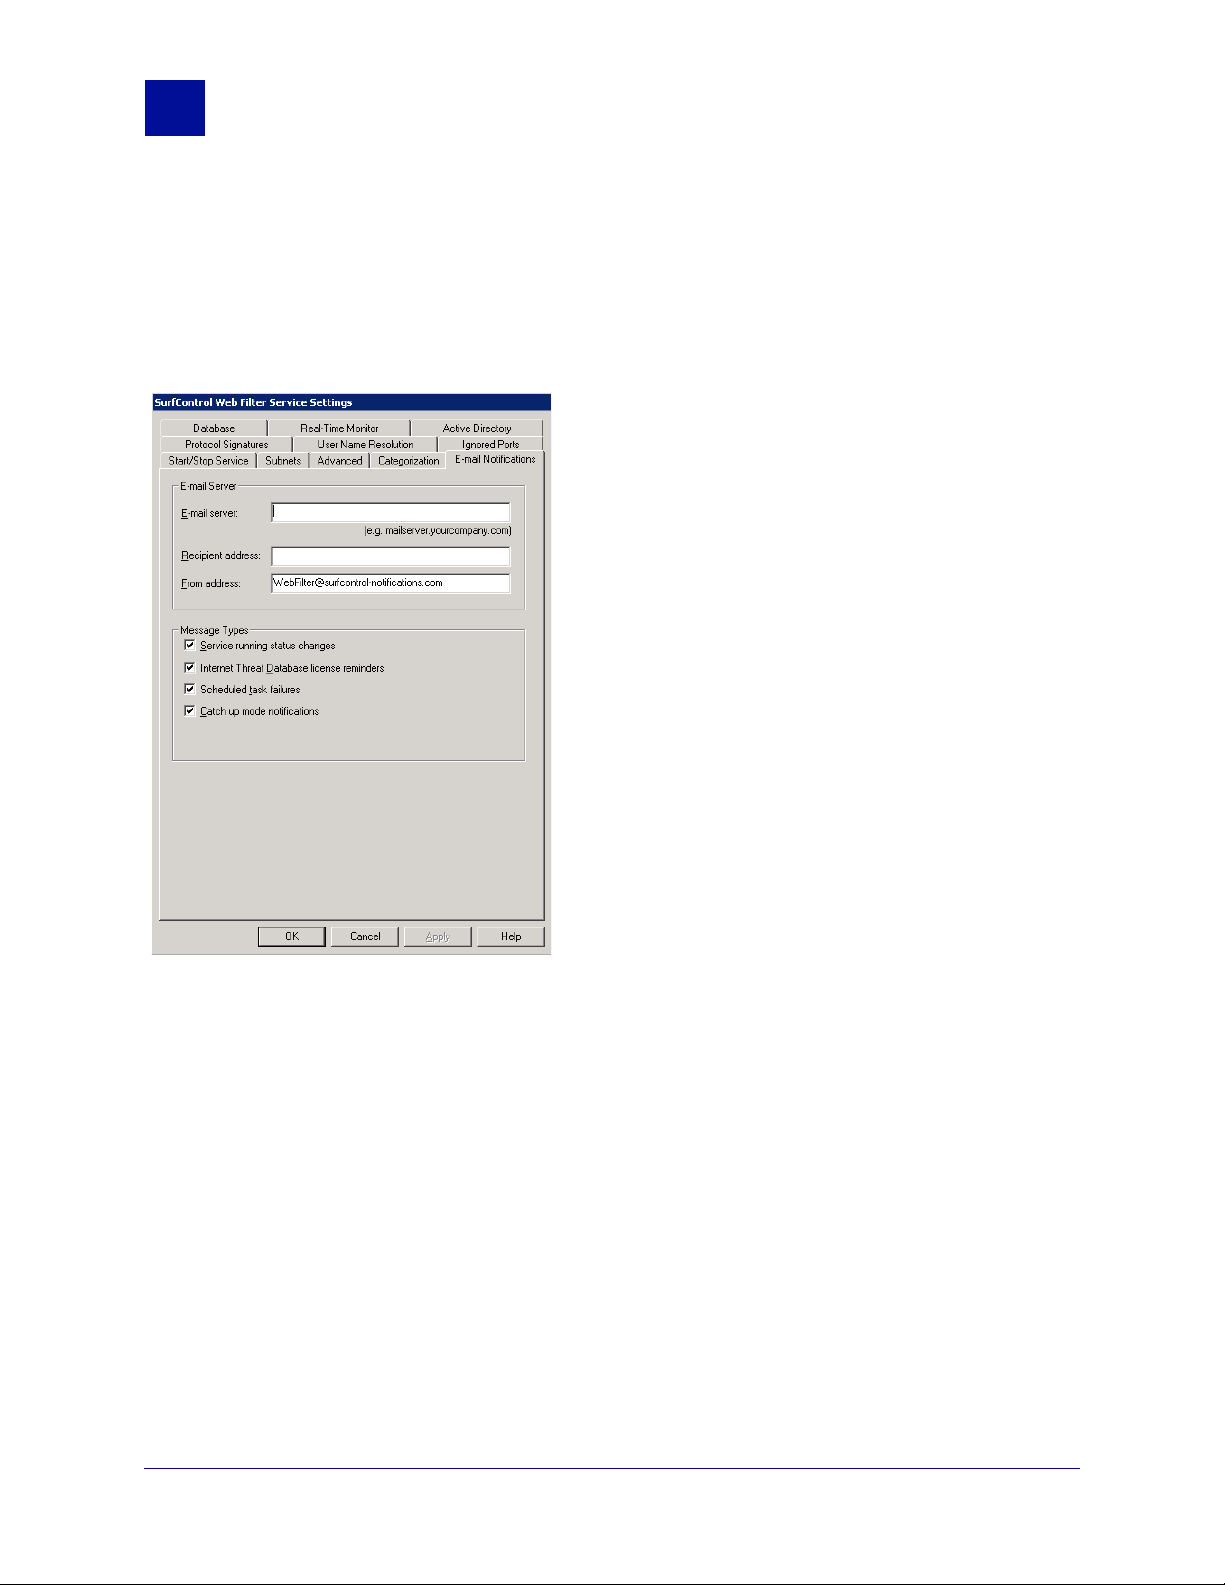
E-mail Notifications
When running the Configuration Wizard during installation, you were asked to give the following e-mail
setup information:
• E-mail Server
• Recipient Address
• From Address
You were also asked to select the types of messages that the System Administrator should receive alerts
about:
• Service running status changes – If the Web Filter or Scheduler service is stopped or started.
• Internet Threat Database license reminders – A reminder will be sent when a subscription to the
Internet Threat Database is due for renewal. A reminder will be sent a month from expiry, then a week
from expiry, and a day from expiry. Once a subscription has expired a reminder will be sent every 24
hours.
• Scheduled task failures – If any scheduled task fails to run successfully.
SurfControl Web Filter v5.5 Administrator’s Guide 7
B
ASIC CONFIGURATION
Basic Service Settings
2
• Catch up mode notifications – If the service becomes overloaded, monitoring will be restricted to
HTTP traffic. If the overload becomes critical, monitoring will be temporarily suspended. An e-mail will
be sent when Web Filter enters and exits catch up mode.
You can edit these settings via the E-mail Notification tab shown below:
Figure 2-2 E-mail Notification tab
There are three other e-mail alerts that the recipient address will receive:
• Unlicensed product reminders - If you are using an unlicensed product past its thirty day trial period,
you will be sent daily reminders.
• Internet Threat Database category changes - As the Global Threat Experts add ne w categories to
the Internet Threat Database, this e-mail informs you of any modifications that have been made.
• Internet Threat Database updates - A reminder is sent if it is more than a week (seven days) since
an Internet Threat Database update.
MORE INFORMATION
For more details on the other Service Settings, see Chapter 9.
8 Administrator’s Guide SurfControl Web Filter v5.5
B
ASIC CONFIGURATION
Initial Monitored Data Settings
2
INITIAL MONITORED DATA SETTINGS
This section will explain what the default monitoring settings are for Web Filter, and what other options are
available.
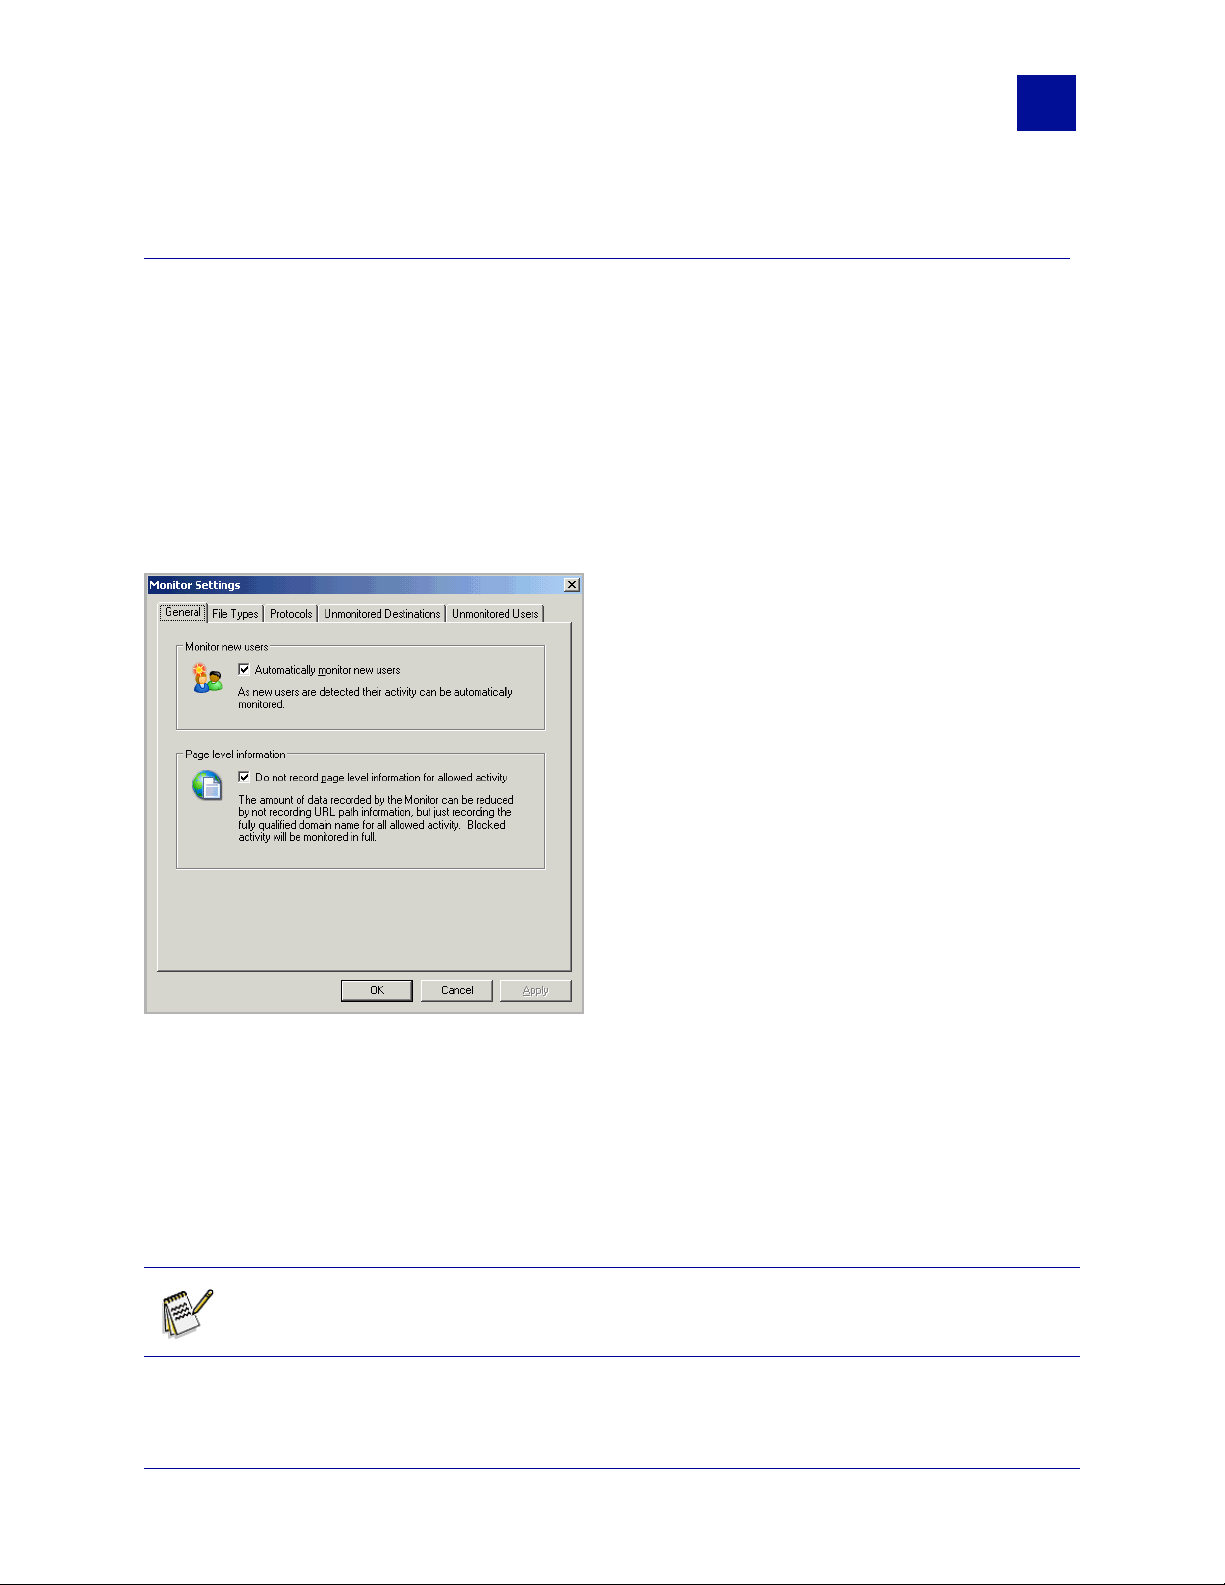
Accessing the Monitor Settings
1 To access the Monitor Settings, select: Start > All Programs > SurfControl Web Filter >
SurfControl Web Filter Manager.
2 In the Navigation tree, select Monitored Data for your Web Filter collector or database.
3 In the Information panel, click Monitor Settings from the Monitored Data Tasks panel.
Figure 2-3 Monitor Settings dialog box
THE DEFAULT MONITOR SETTINGS
Web Filter’s default settings enable you to start monitoring users and their Internet connections
immediately. You can see the Internet traffic generated by your users as it happens by opening the Real-
Time Monitor from the Web Filter Manager > Content Protection menu, or from the Start > All
Programs > SurfControl Web Filter menu. This traffic is then saved to your database, where it can be
viewed in the Monitored Data window, and can also be used by SurfControl Report Central for
generating reports. The Monitor Settings allow you to control what activity is saved to the database.
Note: Any change made to the Monitored Data settings only affects data from that point
onwards. It does not affect historic data.
SurfControl Web Filter v5.5 Administrator’s Guide 9

B
ASIC CONFIGURATION
Initial Monitored Data Settings
2
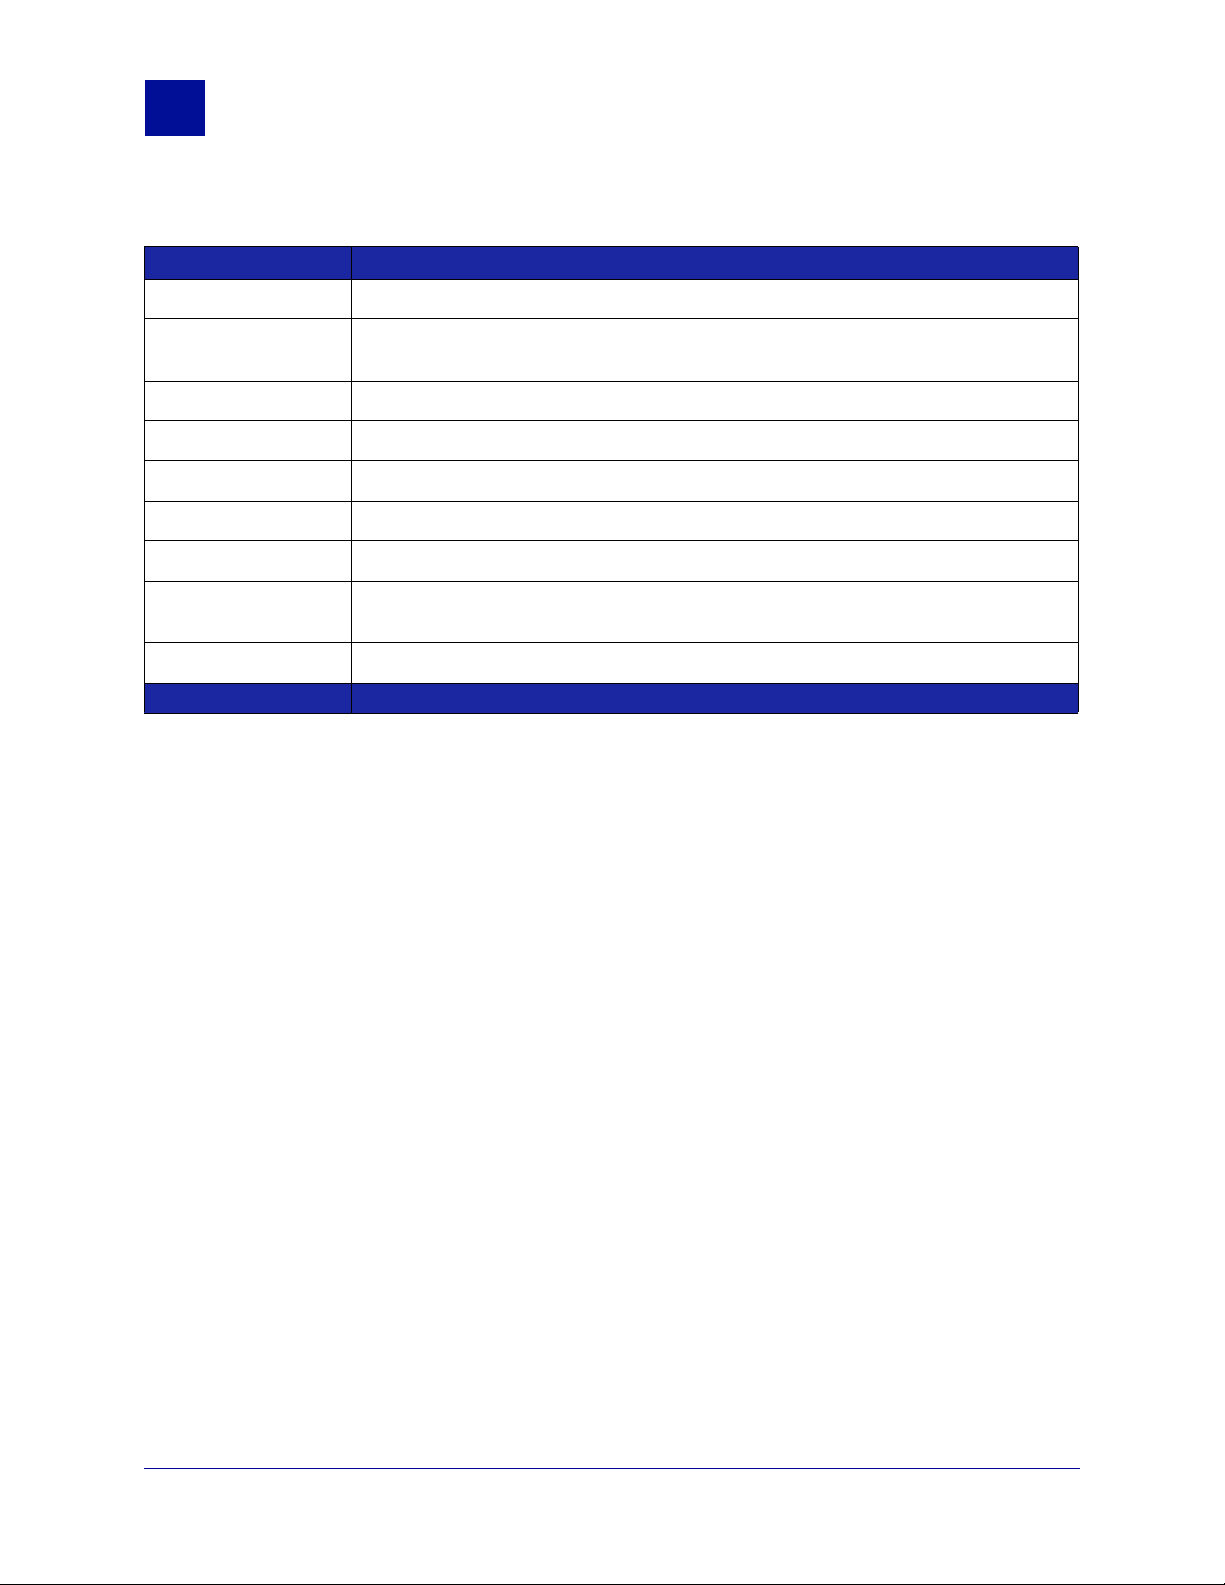
Table 2-1 Monitor Settings
Tab Description
General Monitor new users
By default all new users who log on to your network are detected by Web
Filter, and their Internet activity is automatically monitored. You can
select not to automatically monitor new users.
Page level information
This option is selected by default. It will only store the domain name of an
allowed site. For example, www.allowedsite.com/someinfo will be stored
as www.allowedsite.com. This can help reduce the size of your monitor
database.
With this option selected, you will just see a ‘/’ in the Detail column.
All blocked sites are stored with the full path. For example:
www.blockedsite.com/music/mp3
File Types By default, only certain web page file types (asp, aspx, htm, html, jsp,
mspx, shtml, stm) are monitored. The complete list of file types is shown
in Table 2-2 on page 12.
Monitoring of too many file types can impact on the performance of Web
Filter. If you suspect a certain file type is being accessed significantly,
select the file type and monitor it for a set period of time.
You have the following options when selecting Monitored custom file
types:
• Select the file type. All file extensions associated with this file type
are monitored.
• Select a specific file extension. The file type entry which this
extension belongs to will be grayed out, indicating a partial selection
for this file type.
You can also create your own groups with customized lists of file
extensions. See "Create New File Type Groups" on page 39 for more
details.
10 Administrator’s Guide SurfControl Web Filter v5.5

B
ASIC CONFIGURATION
Initial Monitored Data Settings
Table 2-1 Monitor Settings
Tab Description
Protocols Web Filter monitors the following protocols and associated ports by
default:
• HTTP: 3128, 80, 8000, 8080
• BitTorrent: 6881 - 6999
• EDonkey: 4661, 4662
• EZPeer: 8870
• FastTrack (Kazaa): 121 4
• FTP: 20, 21
• Gnutella: 6346, 6347
• Gopher: 70
• Hotline Connect: 5500 - 5503
• HTTPS: 443, 8443
• IRC: 6660 - 6669
• Jabber/SIMP: 7467
• Jabber/XMPP: 5222 - 5224
• Liquid Audio: 18888
• MSN Messenger: 1863
• NNTP: 119
• Oscar (AIM/ICQ): 5190
• PNM/PNA: 7070
• RTSP: 554, 8554
• Skype: 33033
• Windows Media: 1755
• WinMX: 6699
• Yahoo! Messenger: 5050
You can add new protocols and add new ports to existing protocols as
you require, see "Adding New Protocols And Ports" on page 40 for more
details.
2
Unmonitored Destinations You can exclude destinations (including domains) from being monitored.
See "Unmonitoring Destinations or Users" on pag e 41 for more details.
Unmonitored Users You can exclude individual users or a whole domain from being
monitored. See "Unmonitoring Destinations or Users" on page 41 for
more details.
SurfControl Web Filter v5.5 Administrator’s Guide 11
B
ASIC CONFIGURATION
Initial Monitored Data Settings
2
Table 2-2 List of File Types
File Type Group File Extensions Monitored
Audio Files aac, aif, aifc, aiff, au, cda, m3u, m4p, mid, midi, mp3, ogg, rmi, snd, wav, wax, wma.
Compressed Files ace, arc, arj, b64, bhx, cab, gz, gzip, hqx, iso, jar, lzh, mim, rar, tar, taz, tgz, tz, uu, uue,
xxe, z, zip.
Documents csv, doc, docx, dot, pdf, ppt, pptx, ps, rtf, txt, xls, xlsx.
Executables bat, cfc, cmd, com, dll, exe, jse, ocx, xpi.
Feeds opml, rdf, rss, rss2, xml.
Images bmp, gif, jfif, jpe, jpeg, jpg, pcx, png, psd, tif, tiff, wmf.
Scripting cgi, js, php, pl, py, vb, vbe, vbs.
Video Files asf, asx, avi, divx, ivf, mlv, mov, mp2, mp2v, mpa, mpe, mpeg, mpg, mpv2, qt, ra, ram,
rm, swf, wm, wmd, wmp, wmv, wmx, wvx, wxv.
Web Pages asp, aspx, css, htm, html, jsp, mspx, shtml, stm.
MORE INFORMATION
For further details on the Monitored Data settings, see Chapter 6.
12 Administrator’s Guide SurfControl Web Filter v5.5

B
ASIC CONFIGURATION
Basic Rule Configuration
2
BASIC RULE CONFIGURATION
SurfControl Web Filter uses rules, which you can use to apply your Acceptable Use Policy to your users.
There are three types of rules:
• Allow - Uses positive filtering to give access. This is the default sett ing for any new ru le you c reat e.
• Disallow - Uses negative filtering to deny access.
• Allowance - Uses a combination of positive and negative filtering to set up limits for internet access.
The allowance value can either be time based (allowing access for a predefined time limit), or value
based (allowing only a predefined amount of bandwidth to be consumed). Once these limits have b een
reached, access is blocked.
Rules are created and activated from the Rules Administrator, which you can access via the Web Filter
Manager > Content Protection option for your collector or database, or from the Start > All Programs >
SurfControl Web Filter menu. Web Filter rules consist of various objects which can be configured to suit
your needs. To help you, the Rules Administrator comes supplied with some preconfigured rules. If you
wish to implement any of these rules, all you have to do is activate them. You can do this in the following
way from the Rules Administrator interface:
1 Select the check box to the left of the rule you wish to activate, or right-click the rule you want to
activate and select Active from the right-click menu.
2 Click Commit to save the changes to your database.
RECOMMENDATIONS FOR CREATING AND APPLYING RULES
Before building your own rules, consider altering one of the preconfigured rules in the list. To examine the
rule’s objects, select a rule and from the right-click menu, select properties. You can check how the rule
objects have been used, and modify the settings for each one. For an in depth description of the various
rule objects, see Chapter 7.
When applying rules keep the following in mind:
• Rules are read sequentially and will not be overwritten by a rule that follows. The fewer rules you have,
the more efficiently Web Filter will perform.
• Rules are processed from the top of the list in the Rule Panel downwards. Rules which are applied to
individuals or small groups should be placed near the top of the list.
• NEVER set up a "Disallow, Anybody, Anywhere, Anytime" rule because it will block all access
throughout your network. It is recommended that you test rules on a single machine before
implementing a network-wide policy.
• It is strongly recommended that only one user modifies rules in the Rules Administrator at any one
time. This is to prevent any corruption of the database which will cause the Rules Administrator to
crash, rendering it inoperable.
SurfControl Web Filter v5.5 Administrator’s Guide 13

B
ASIC CONFIGURATION
Scheduling Tasks
2
SCHEDULING TASKS
When you ran the Configuration Wizard, you were asked to set up two scheduled tasks:
1 Internet Threat Database updates
2 Database Maintenance
These tasks are controlled by the Scheduler, accessed from the Web Filter Manager > Maintenance
option for your database, or from the Start > All Programs > SurfControl Web Filter menu. The
Scheduler enables you to run certain events at a time when you will have no users logged on to your
network, or if an event requires a lot of bandwidth.
You can configure the following events in the Scheduler:
• Command Line
• Database Management
• Database Update
• Internet Threat Database Update
• Network Groups Update
MORE INFORMATION
For more information on configuring the various events, see Chapter 12.
14 Administrator’s Guide SurfControl Web Filter v5.5

Chapter 3
Remote Administration
Introduction . . . . . . . . . . . . . . . . . . . . . . . . . . . . . . . . . . . . . . . . . . . . . . . . . . . . . . . . . . . . . . . . . . page 16
What the Remote Administration Client Does . . . . . . . . . . . . . . . . . . . . . . . . . . . . . . . . . . . . . . page 16
Prerequisites . . . . . . . . . . . . . . . . . . . . . . . . . . . . . . . . . . . . . . . . . . . . . . . . . . . . . . . . . . . . . . . . . page 16

R
3
EMOTE
Introduction
A
DMINISTRATION
INTRODUCTION
The Remote Administration Client allows you to remotely access the Web Filter server to create reports,
design or edit rules, and view the database.
You can install the Remote Administration Client on computers in your network that comply to the
minimum requirements specified in the St arter Guide . For details on installing the Remote Administration
Client, refer to the Starter Guide.
WHAT THE REMOTE ADMINISTRATION CLIENT DOES
You can use the Remote Administration Client to access the following Web Filter functions from a different
computer:
• The Web Filter Manager - View Internet traffic via the Monitored Data Navigation tree option.
• The Rules Administrator - Create and edit rules.
• The Web Filter database - Connect to your database without being at the actual machine.
• The Real-Time Monitor - See your Internet traffic in real time.
Note: You cannot use the Remote Administrator to configure the Web Filter service.
PREREQUISITES
For each Computer:
• The Remote Administration Client version of Web Filter must be installed. Refer to the Starter Guide
for more details.
• From the Web Filter Manager, select Add Server from the Tasks tab. Enter the name of the Web
Filter server you want to connect to.
• For reports you will need the client shortcut URL to be able to log in to Report Central. See the
SurfControl Report Central Starter Guide for more details.
16 Administrator’s Guide SurfControl Web Filter v5.5

Chapter 4
Licensing
Licensing Web Filter . . . . . . . . . . . . . . . . . . . . . . . . . . . . . . . . . . . . . . . . . . . . . . . . . . . . . . . . . . . page 18

L
ICENSING
Licensing Web Filter
4
LICENSING WEB FILTER
You can use Web Filter on a trial basis for 30 days. To continue to use the full functionality of the product
past the trial period, including updating the Internet Threat Database, you must contact SurfControl to
obtain an appropriate license for your user count. For more details on obtaining a license, visit
www.surfcontrol.com
ENTERING A WEB FILTER LICENSE KEY
To license your Web Filter product:
1 Obtain a Web Filter license serial number from SurfControl.
2 Right-click the SurfControl icon in the notification area of the taskbar. From the menu, select
About. The About SurfControl dialog box will appear.
3 Click Serialize. The Serialize dialog box will appear. Enter the Serial Number obtained from
SurfControl in the field. Click OK.
The next time you view the About dialog box, you will see your serial number and user license details. This
dialog box also holds information on the latest Internet Threat Database installed, as well as the numb er of
days your subscription has left. When you purchase a license for Web Filter, a one year subscription to
Internet Threat Database updates is included. A reminder e-mail will be sent to the Systems Administrator
when this subscription is due for renewal.
18 Administrator’s Guide SurfControl Web Filter v5.5

Chapter 5
Privacy Edition
What It Does. . . . . . . . . . . . . . . . . . . . . . . . . . . . . . . . . . . . . . . . . . . . . . . . . . . . . . . . . . . . . . . . . . page 20
Privacy Edition Features. . . . . . . . . . . . . . . . . . . . . . . . . . . . . . . . . . . . . . . . . . . . . . . . . . . . . . . . page 22
P
5
RIVACY
What It Does
E
DITION
WHAT IT DOES
In certain European countries, laws have been passed which prohibit the use of monitoring software to
check user browsing details, unless express permission has been given by a manager and a union
representative.
COMPARING THE STANDARD AND PRIVACY EDITIONS
The tables below outline the differences between Web Filter Standard and Privacy Editions of SurfControl
Web Filter.
Table 5-1 Web Filter Manager
Item Action Standard Edition Privacy Edition
User Menu Rename User Yes No
Right-Click User Menu Get Friendly Name Yes No
Get User Name Yes No
View User Detail No Yes
Monitored Data Tasks Change Manager
Password
Change Union Password No Yes
Table 5-2 Real-Time Monitor
Item Action Standard Edition Privacy Edition
Options Menu User Yes Unavailable
Client Name Yes Unavailable
Client IP Address Yes Unavailable
No Yes
20 Administrator’s Guide SurfControl Web Filter v5.5

P
RIVACY
Table 5-3 SRC Reports
Item Type Standard Edition Privacy Edition
E
DITION
What It Does
5
Quick Reports Top N Workstations by
Connections
Summary Reports Top N Workstations by
Connections
For further information about available Reports, see the SurfControl Report Central Administrator’s Guide.
Yes No
No Yes
SurfControl Web Filter v5.5 Administrator’s Guide 21
P
RIVACY
Privacy Edition Features
5
E
DITION
PRIVACY EDITION FEATURES
Viewing users details requires the permission of a manager and a union representative. The Privacy
Edition is supplied with a preconfigured password of ‘admin’, for both the manager and union
representative. SurfControl recommends that the designated manager and union representative change
their password as soon as possible after installation.
CHANGE THE MANAGER AND UNION PASSWORDS
To change the passwords:
1 From the Web Filter Manager > Monitored Data, select Change Manager or Change Union
Password from the Tasks tab.
2 Enter the old password (‘admin’ for the original password).
3 Enter a new password. This can be up to 40 characters long and can be alpha, numeric or a
combination of both.
4 Verify the password by re-entering it.
5 Click OK to set the password.
VIEWING USER DETAILS
The Monitored Data shows users in the format ‘User X’ as shown in the figure below:
Figure 5-1 Privacy Edition Monitored Users
22 Administrator’s Guide SurfControl Web Filter v5.5

To view a user’s details:
1 Select a user in the Summary User Information panel.
2 From the Monitored Users Tasks, select View User Details.
3 Have the Manager enter their passwo rd.
4 Have the union representative enter their password.
5 Click OK.
6 The following details are then displayed in a dialog box:.
P
RIVACY
Privacy Edition Features
E
DITION
5
• User Name
• Original Detected Name
• Workstation Name
• IP Address
• Ethernet Address
7 Click OK to close the dialog box.
SurfControl Web Filter v5.5 Administrator’s Guide 23
 Loading...