

Page 1

SurfControl RiskFilter - E-mail
Administrator's Guide
Version 5.2.4
™
Page 2

CONTENTS
Notices............................................................................................................................................... i
FINDING YOUR WAY AROUND ..................................................................................... 1
How RiskFilter works ......................................................................................................................... 2
Managing your messages with RiskFilter ............................................................................2
Load balancing with RiskFilter........................................................................................................... 4
Launching SurfControl RiskFilter....................................................................................................... 6
RiskFilter System Management Console ............................................................................6
RiskFilter Management Console (Administrator) ................................................................. 7
Before you start ................................................................................................................................. 8
SYSTEM SETTINGS .................................................................................................... 9
The System Settings tab ................................................................................................................... 10
Terminology used ................................................................................................................10
What can be configured in the System Settings tab? ..........................................................10
General.............................................................................................................................................. 11
Configuration .......................................................................................................................11
User Directories ................................................................................................................... 13
Secure Proxy ....................................................................................................................... 22
Logs and Archives ............................................................................................................... 24
Certificate ............................................................................................................................25
Receive Settings................................................................................................................................ 27
Connection Control ..............................................................................................................27
Directory Attack Control .......................................................................................................29
Relay Control ....................................................................................................................... 30
Recipient Validation .............................................................................................................33
Message Control ................................................................................................................. 34
Exception Control ................................................................................................................ 35
Black List .............................................................................................................................37
White List ............................................................................................................................. 39
Send Settings .................................................................................................................................... 41
Domain-Based Delivery .......................................................................................................41
Traffic Control ...................................................................................................................... 43
Advanced Delivery ...............................................................................................................43
User Management ............................................................................................................................. 45
Account Manager ................................................................................................................45
Personal E-mail Manager .................................................................................................... 48
End-user Control ................................................................................................................. 52
User Authentication .............................................................................................................53
License & Updates ............................................................................................................................ 55
Update Now .........................................................................................................................55
Scheduled Update ...............................................................................................................57
License Status ..................................................................................................................... 58
Update Server ..................................................................................................................... 59
License Server ..................................................................................................................... 60
SurfControl RiskFilter - E-mail V5.2.4 Administrator’s Guide i
Page 3

Help ...................................................................................................................................................61
Admin Guide ........................................................................................................................61
Contact Support ................................................................................................................... 61
Firstboot Wizard .................................................................................................................. 62
Configuration Wizard ...........................................................................................................62
Key Points .........................................................................................................................................63
POLICY MANAGER ................................................................................................... 65
The Policy Manager tab..................................................................................................................... 66
Terminology used ................................................................................................................66
What can be configured in the Policy Manager tab? ........................................................... 66
Creating a Policy ............................................................................................................................... 67
Step 1 - Defining users ........................................................................................................67
Step 2 - Defining the action .................................................................................................67
Step 3 - Defining the Rules ..................................................................................................68
Address Group ..................................................................................................................................69
Importing and exporting Lists .............................................................................................. 69
Deleting Address groups ..................................................................................................... 70
Queue Manager................................................................................................................................. 71
Adding Queues ....................................................................................................................71
Dictionary Manager ........................................................................................................................... 73
SurfControl Dictionaries .......................................................................................................73
Custom Dictionaries ............................................................................................................75
Importing dictionaries .......................................................................................................... 76
Global Policy...................................................................................................................................... 79
Creating a new Sub-policy ...................................................................................................79
Editing a sub-policy ............................................................................................................. 81
Adding Filters to the policy ..................................................................................................81
Defining a filter ..................................................................................................................... 82
The Anti-Virus Agent Filter .................................................................................................. 83
The Anti-Spam Agent Filters ............................................................................................... 85
Internet Threat Database Filter ............................................................................................88
Standard Disclaimer ............................................................................................................89
General Content Filter .........................................................................................................91
advanced content filter ........................................................................................................92
Message Attachment Filter ..................................................................................................96
Content Guardian ................................................................................................................98
Dictionary Threshold Filter ...................................................................................................100
Key Points .........................................................................................................................................103
REPORTS & LOGS ..................................................................................................... 105
The Reports and Logs tab ................................................................................................................. 106
Terminology used ................................................................................................................106
What can be configured in the Reports and Logs tab? ....................................................... 106
Dashboard ........................................................................................................................... 107
Master Report.................................................................................................................................... 108
Querying the Master Report ................................................................................................ 108
Message Report ................................................................................................................................ 110
ii Administrator’s Guide SurfControl RiskFilter - E-mail V5.2.4
Page 4

Querying the Message Report ............................................................................................. 110
Policy Report ..................................................................................................................................... 111
Querying the Policy Report ..................................................................................................111
Virus Report....................................................................................................................................... 112
Querying the Virus Report ................................................................................................... 112
Spam Report ..................................................................................................................................... 113
Querying the Spam Report .................................................................................................. 113
Connection Report............................................................................................................................. 114
Querying the Connection Report .........................................................................................114
System Report................................................................................................................................... 116
Isolated Messages............................................................................................................................. 117
Managing Isolated Messages .............................................................................................. 117
Virus Messages ................................................................................................................................. 119
Managing the Virus Messages ............................................................................................ 119
Spam Messages................................................................................................................................ 121
Managing Spam Messages .................................................................................................121
Archived Messages ...........................................................................................................................123
Managing Archived Messages ............................................................................................ 123
Deferred Messages ...........................................................................................................................127
Querying Deferred Messages ..............................................................................................127
Key Points .........................................................................................................................................129
RISKFILTER SYSTEM MANAGEMENT CONSOLE ................................................................ 131
Overview............................................................................................................................................ 132
What can be configured with the System Management Console? ......................................132
Accessing the RiskFilter System Management Console ..................................................... 133
The rfmngr account .............................................................................................................133
The Webmin Tab ............................................................................................................................... 134
What can be configured in the Webmin tab? ....................................................................... 134
Webmin Actions Log ............................................................................................................ 135
Webmin Configuration ......................................................................................................... 135
Webmin Servers Index ........................................................................................................ 137
The System Tab ................................................................................................................................ 138
What can be configured in the System tab? ........................................................................ 138
Bootup and Shutdown .........................................................................................................139
Change Passwords ............................................................................................................. 139
Historic System Statistics .................................................................................................... 139
Multi Gateway Policy Routing ..............................................................................................140
Network Configuration ......................................................................................................... 141
Running Processes ............................................................................................................. 146
System Time ........................................................................................................................ 146
System and Server Status ................................................................................................... 147
The RiskFilter Tab ............................................................................................................................. 148
What can be configured in the RiskFilter tab? ..................................................................... 148
RiskFilter Services Manager ................................................................................................ 149
RiskFilter Backup Manager ................................................................................................. 149
RiskFilter Cluster Wizard ..................................................................................................... 150
RiskFilter Web Access Manager ......................................................................................... 153
SurfControl RiskFilter - E-mail V5.2.4 Administrator’s Guide iii
Page 5

Update RiskFilter - E-mail ....................................................................................................154
Key Points .........................................................................................................................................155
APPENDIX .............................................................................................................. 157
Using the Command Line Interface ...................................................................................................158
qtool.sh ................................................................................................................................ 159
uninstall.sh ........................................................................................................................... 163
Internet Threat Database Categories ................................................................................................ 165
Core / Liability Categories ................................................................................................... 166
Productivity Categories ........................................................................................................167
INDEX................................................................................................................................................169
iv Administrator’s Guide SurfControl RiskFilter - E-mail V5.2.4
Page 6

Finding your way around
Chapter 1
How RiskFilter works. . . . . . . . . . . . . . . . . . . . . . . . . . . . . . . . . . . . . . . . . . . . . . . . . . page 2
Load balancing with RiskFilter . . . . . . . . . . . . . . . . . . . . . . . . . . . . . . . . . . . . . . . . . . page 4
Launching SurfControl RiskFilter. . . . . . . . . . . . . . . . . . . . . . . . . . . . . . . . . . . . . . . . page 6
Before you start . . . . . . . . . . . . . . . . . . . . . . . . . . . . . . . . . . . . . . . . . . . . . . . . . . . . . . page 8
Page 7
F
INDING YOUR WAY AROUND
1
How RiskFilter works
HOW RISKFILTER WORKS
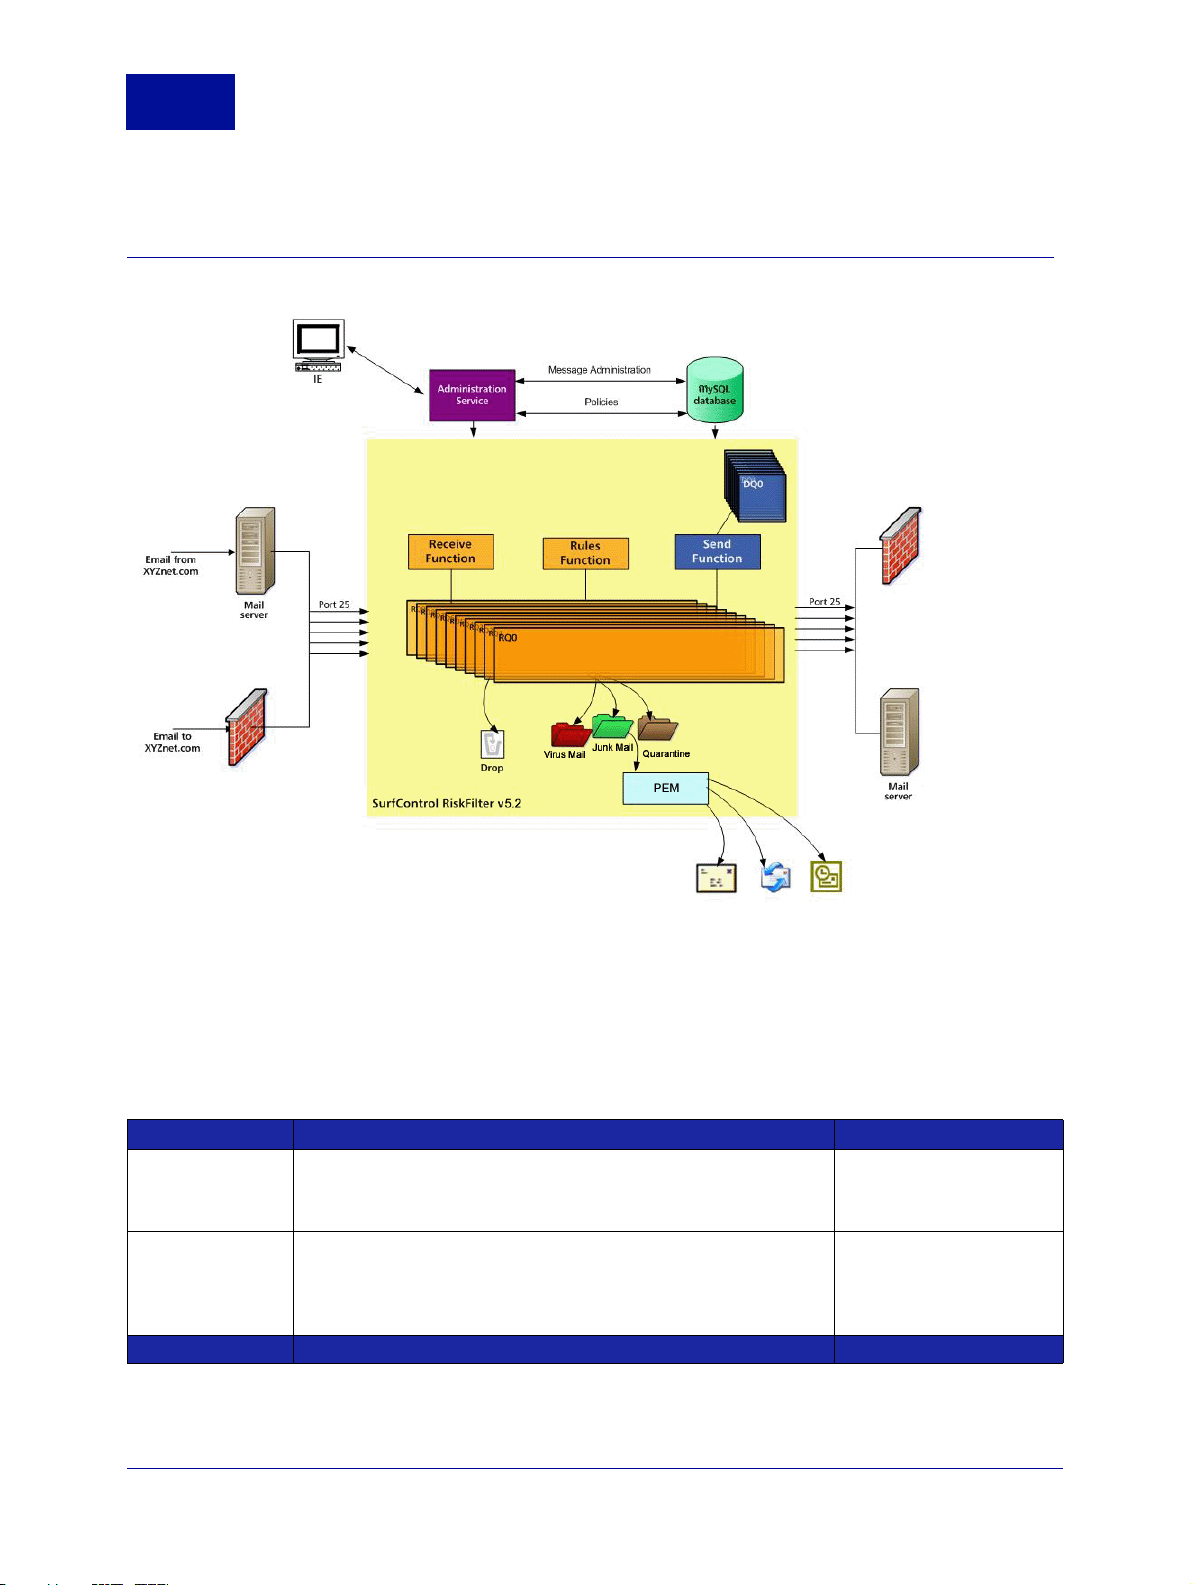
Figure 1-1shows how a message is processed by RiskFilter:
Figure 1-1 The RiskFilter filtering process
MANAGING YOUR MESSAGES WITH RISKFILTER
RiskFilter gives you access to several tools with which you can manage your E-mail messages:
Table 1-1 RiskFilter Core Components
Component What it does Find out more
Queues
Filters
2 Administrator’s Guide SurfControl RiskFilter - E-mail V5.2.4
Any isolated e-mails are moved to different queues (depending on
the the type of message) for safe keeping. You can then release,
move or delete them. These directories also show the activity logs.
Filters govern whether a message should be delivered or isolated.
Use the supplied filters: Anti-Virus, Anti-Spam and Internet Threat
Database, or create your own custom filters to catch specific
messages.
See Queue Manager in
the Policy Manager
chapter.
See Global Policy >
Adding Filters
Policy
in the Policy
Manager chapter.
to the
Page 8
F
INDING YOUR WAY AROUND
How RiskFilter works
Table 1-1 RiskFilter Core Components
Component What it does Find out more
Connection
Control
Limit the number of simultaneous connections made on your
server. Determine whether to perform real-time blacklist checking.
See Receive Settings >
Connection Control in the
System Settings chapter.
1
Dictionary
Management
Relay Control
Dictionaries are used by the filters to detect particular kinds of
content – use Dictionary Management to configure Dictionaries to
suit your needs.
Stop your e-mail system from being used as an open relay by
spammers.
See Dictionary Manager
in the Policy Manager
chapter.
See Receive Settings >
Relay Control in the
System Settings chapter.
SurfControl RiskFilter - E-mail V5.2.4 Administrator’s Guide 3
Page 9
F
INDING YOUR WAY AROUND
1
Load balancing with RiskFilter
LOAD BALANCING WITH RISKFILTER
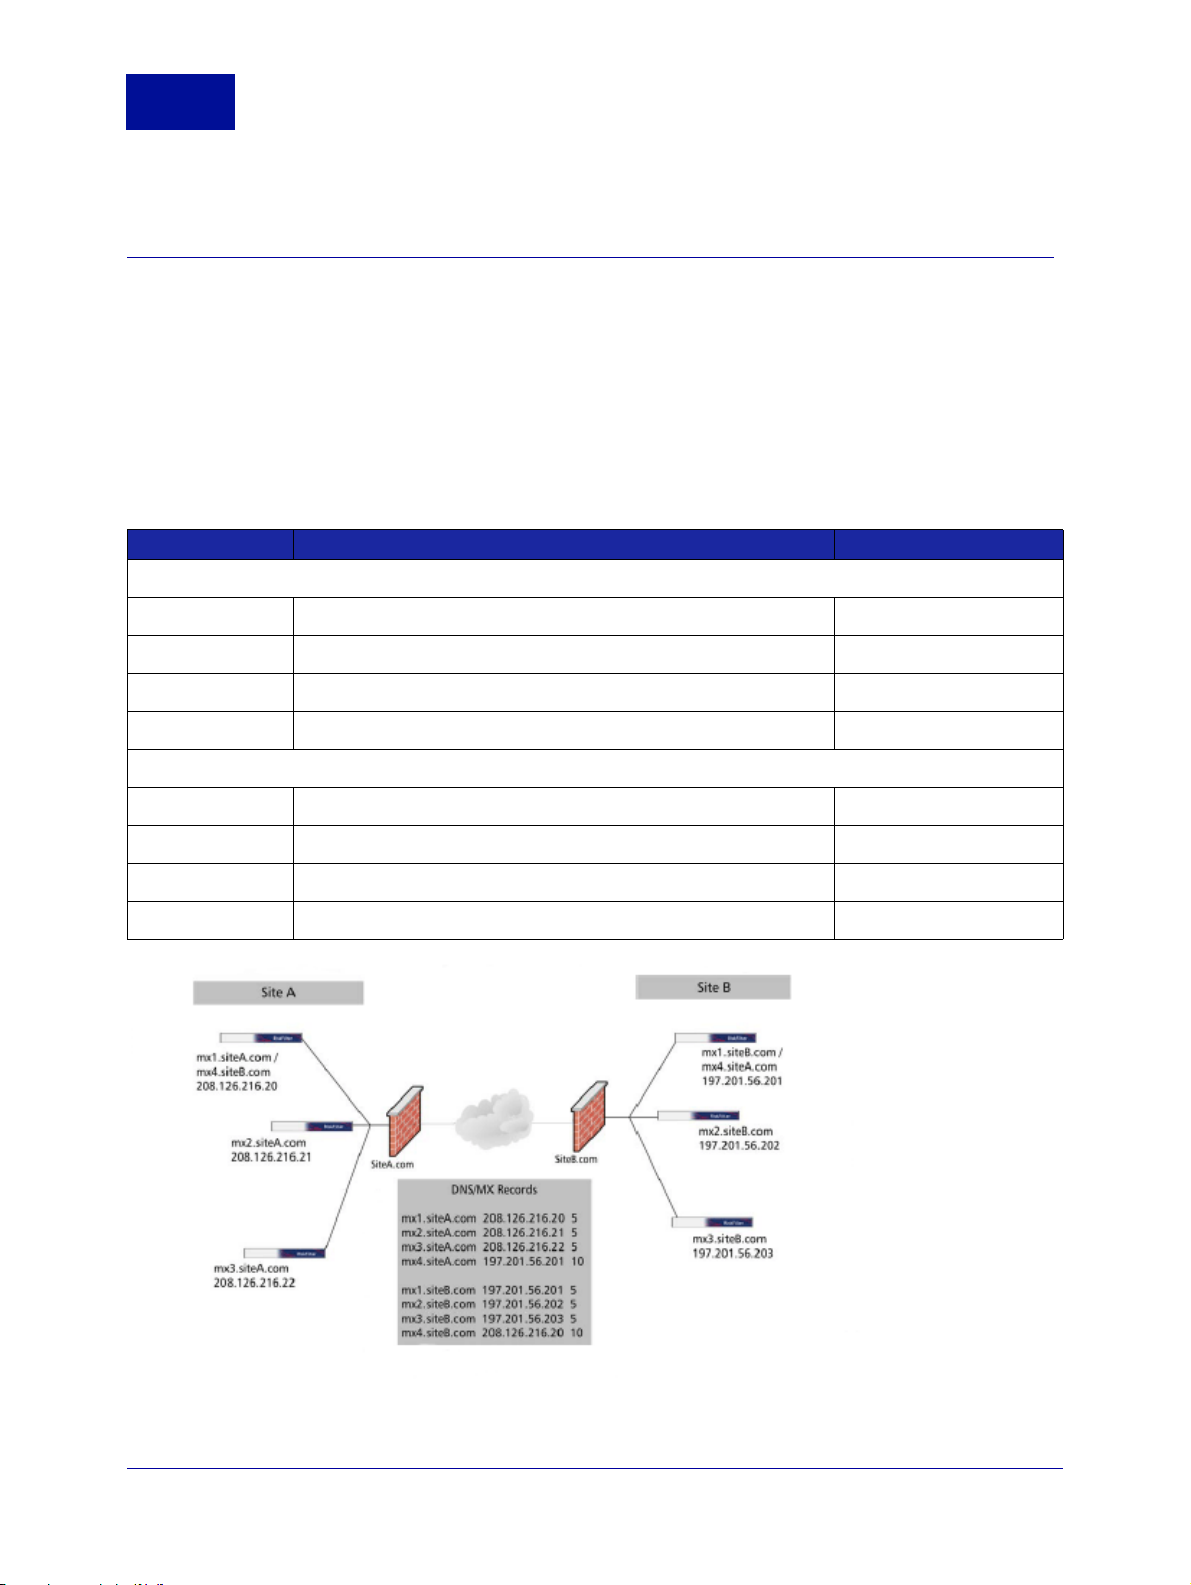
You can deploy RiskFilter in a cluster and load-balance using MX records:
1 On the DNS server hosting your domain, create an MX record for each primary RiskFilter server using
the same MX preference.
2 Give the failover server a higher number. This will give it a lower preference.
Table 1-1 shows an example of MX preference assignments for load-balancing and failover using MX
records.
Table 1-1 Using MX Records for Load-Balancing
Mail Exchanger IP Address MX Preference
Site A
mx1.siteA.com 208.126.216.20
5
mx2.siteA.com 208.126.216.21
mx3.siteA.com 208.126.216.22 5
mx4.siteA.com 197.201.56.201 10
Site B
mx1.siteB.com 197.201.56.201
mx2.siteB.com 197.201.56.202
mx3.siteB.com 197.201.56.203
mx4.siteB.com 208.126.216.20
5
5
5
5
10
Figure 1-2 Load balancing
4 Administrator’s Guide SurfControl RiskFilter - E-mail V5.2.4
Page 10

F
INDING YOUR WAY AROUND
Load balancing with RiskFilter
A lower MX preference number gives higher priority than a lower one. In Figure 1-2, e-mail is sent in the
following way:
• E-mail sent to site A.com round-robins between mail exchangers 1, 2,and 3, because each RiskFilter
appliance has the same MX preference of 5.
• The same thing happens for e-mail sent to site B.com. If site A is down (e.g., with a network failure),
the sending mail server will route e-mail to the fourth (failover) MX record, which is the address of a
server in a different physical location.
For the described failover to work properly, RiskFilter appliances at site A are configured to accept
messages for site B, and RiskFilter appliances at site B are configured to accept messages for site A.
The failover servers have static routes configured so that RiskFilter knows where to route the e-mail. There
are also advanced load-balancing switches that can be used for these purposes. These switches offer a
variety of load-balancing algorithms, in addition to round-robin delivery, which provide efficient load
distribution and timely failover. Using load-balancing switches may improve the overall efficiency of your
SMTP infrastructure.
1
SurfControl RiskFilter - E-mail V5.2.4 Administrator’s Guide 5
Page 11

F
INDING YOUR WAY AROUND
1
Launching SurfControl RiskFilter
LAUNCHING SURFCONTROL RISKFILTER
SurfControl RiskFilter consists of two interfaces:
• RiskFilter System Management Console
• RiskFilter Management Console (Administrator)
There is also a third interface available to users if you enable Personal E-mail Manager (PEM). This
enables them to manage spam messages that have been isolated (See “Personal E-mail Manager” on
page 48 for more details).
Note: All text fields within RiskFilter can accept non-Latin characters such as Japanese.
However, there is a text-limit of 64 characters within these fields. Any values entered into these
fields such as port and refresh rates, must be valid integers.
RISKFILTER SYSTEM MANAGEMENT CONSOLE
The RiskFilter System Management Console enables you to configure the RiskFilter appliance itself as
well as its interaction with the surrounding network. With RiskFilter System Management Console you can:
• Use IP Access Control to only allow access to those IP addresses that you trust.
• Make changes to the language that titles, prompts and messages etc will be displayed in, within the
RiskFilter appliance interfaces.
• Make network specific changes, such as adding RiskFilter Management Console servers and
specifying which IP addresses and ports RiskFilter Management Console will bind to.
• Keep records of the various actions taken by administrators on the RiskFilter Management Console
server.
• Check things like historic system settings and running processes.
• Change passwords.
To open the RiskFilter System Management Console:
3 Open a web browser and type:
https://<hostname_or_ipaddress>:10000/
where ‘<hostname_or_ipaddress> is the name or IP address of your RiskFilter appliance.
4 At the RiskFilter Management Console login page enter the username and password. The default
username and password are:
– Username =
– Password = $rfmngr$
5 Click Login.
See “RiskFilter System Management Console” on page 131 for detailed information on all of RiskFilter
Management Console’s functionality and how to use the interface.
6 Administrator’s Guide SurfControl RiskFilter - E-mail V5.2.4
rfmngr
Page 12
F
INDING YOUR WAY AROUND
Launching SurfControl RiskFilter
1
RISKFILTER MANAGEMENT CONSOLE (ADMINISTRATOR)
The SurfControl RiskFilter Management Console is where you manage the RiskFilter software. You can
use this interface to:
• Manage user accounts and licensing.
• Schedule updates to Anti-Virus and Anti-Spam agents.
• Manage servers and connection issues.
• Set up policies to manage how users send and receive e-mail.
• Run reports on these users and their messages.
To open the RiskFilter Management Console:
1 Open a web browser and type:
https://<hostname_or_ipaddress>/admin
where ‘<hostname_or_ipaddress> is the name or IP address of your RiskFilter appliance.
2 At the RiskFilter Management Console login page enter the user name and password that you want to
use to access the account. The default user name and password are:
–User name =
– Password =
3 Click Login.
administrator
admin
Opening the RiskFilter Management Console
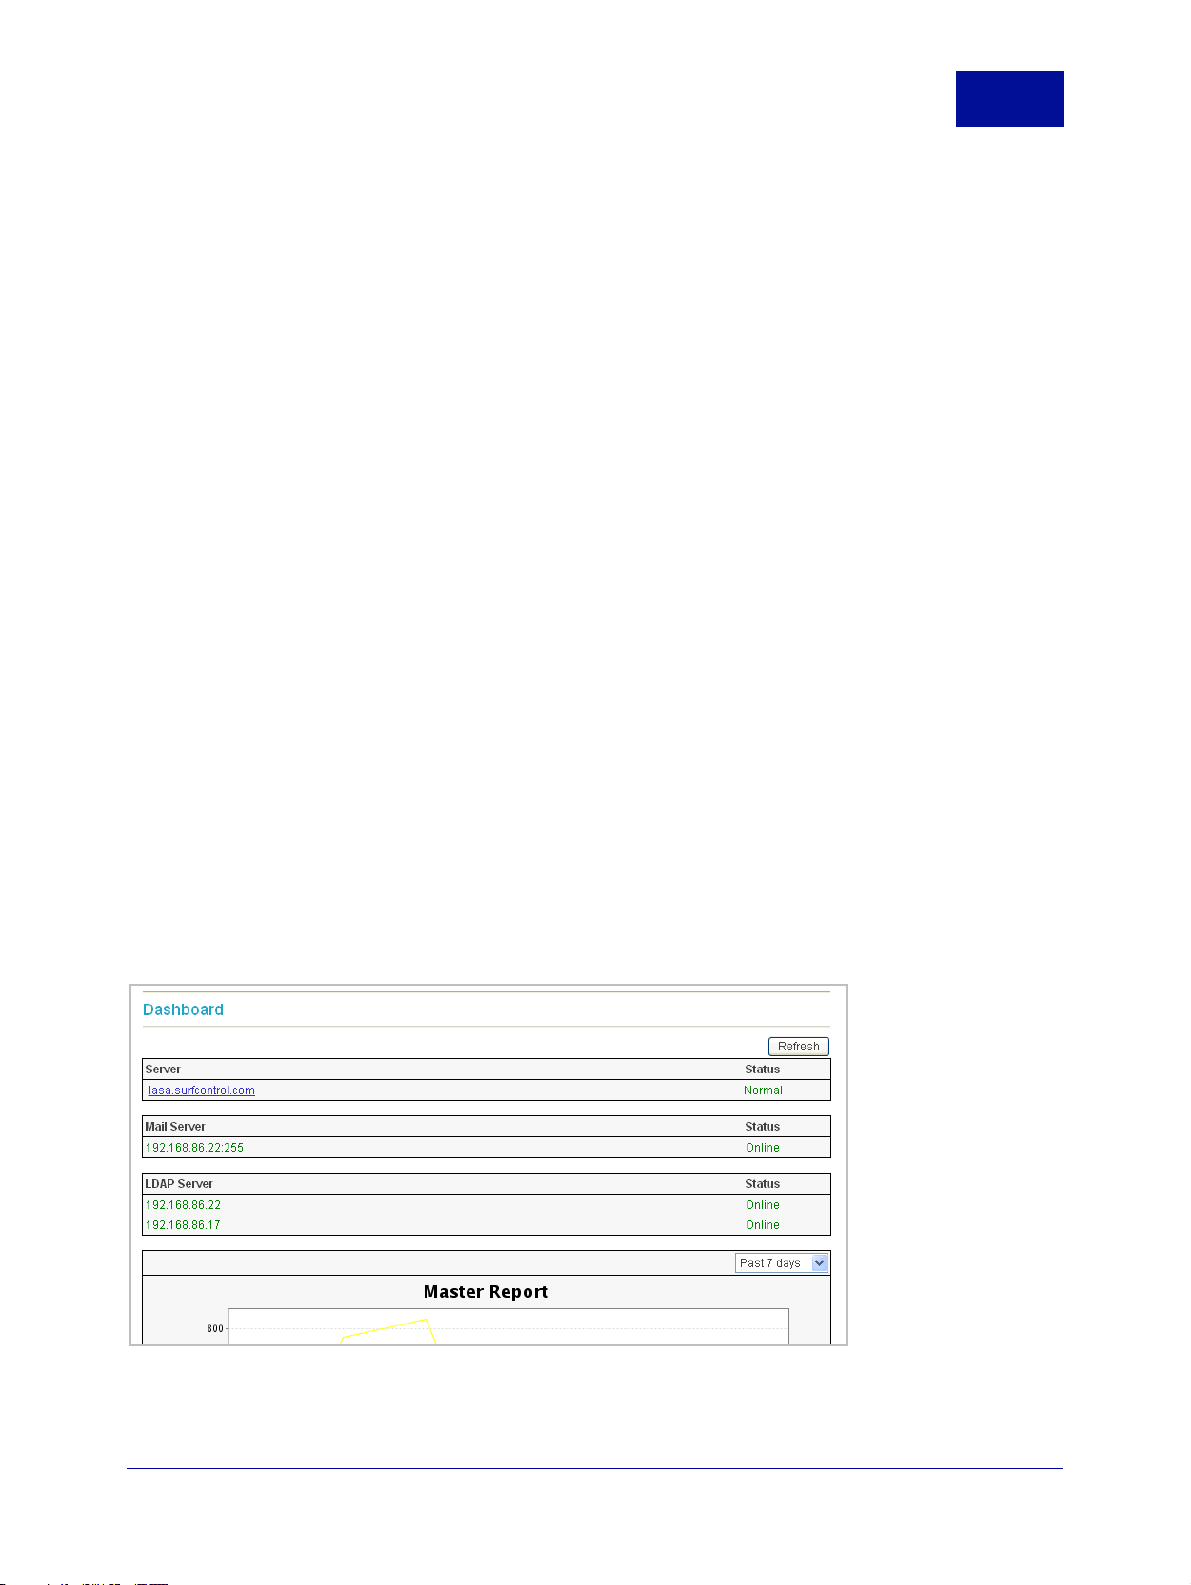
As soon as the RiskFilter Management Console opens, you will see the Dashboard containing brief
information about servers used, as well as a report showing general e-mail use:
Figure 1-3 The Dashboard
SurfControl RiskFilter - E-mail V5.2.4 Administrator’s Guide 7
Page 13

F
INDING YOUR WAY AROUND
1
Before you start
BEFORE YOU START
This Administrator’s guide assumes that you have completed the following steps:
1 Mounted the appliance using the supplied hardware set up guide.
2 Gathered the network information that is required for the configuration of the RiskFilter appliance.
3 Configured the RiskFilter appliance via your chosen connection, using the network information that
you gathered earlier. The RiskFilter Starter guide contains details of the different connection options.
4 Updated the SurfControl OS and software using the RiskFilter Management Console.
5 Activated your RiskFilter license.
6 Updated the Anti-Virus and Anti-Spam agents.
7 Configured Relay Control and e-mail-routing.
For instructions on how to carry out these steps refer to the Starter Guide which is supplied with the
RiskFilter appliance.
8 Administrator’s Guide SurfControl RiskFilter - E-mail V5.2.4
Page 14

System Settings
Chapter 2
The System Settings tab . . . . . . . . . . . . . . . . . . . . . . . . . . . . . . . . . . . . . . . . . . . . . . . . . . . . .page 10
General . . . . . . . . . . . . . . . . . . . . . . . . . . . . . . . . . . . . . . . . . . . . . . . . . . . . . . . . . . . . . . . . . . page 11
Receive Settings. . . . . . . . . . . . . . . . . . . . . . . . . . . . . . . . . . . . . . . . . . . . . . . . . . . . . . . . . . . . page 27
Send Settings. . . . . . . . . . . . . . . . . . . . . . . . . . . . . . . . . . . . . . . . . . . . . . . . . . . . . . . . . . . . . . page 41
User Management . . . . . . . . . . . . . . . . . . . . . . . . . . . . . . . . . . . . . . . . . . . . . . . . . . . . . . . . . . page 45
Help. . . . . . . . . . . . . . . . . . . . . . . . . . . . . . . . . . . . . . . . . . . . . . . . . . . . . . . . . . . . . . . . . . . . . page 61
Key Points . . . . . . . . . . . . . . . . . . . . . . . . . . . . . . . . . . . . . . . . . . . . . . . . . . . . . . . . . . . . . . . . page 63
Page 15

S
2
YSTEM
The System Settings tab
S
ETTINGS
THE SYSTEM SETTINGS TAB
This chapter explains how to use the System Settings tab to:
• Configure the transport of e-mails.
• Authenticate the senders and recipients of e-mails.
TERMINOLOGY USED
The following terminology is used in this chapter:
• PEM – Personal E-mail Manager. Enables users to manage their own isolated messages.
• User Directories – Provides RiskFilter with recipient address validation and end-user authentication.
• ESMTP – Extended Simple Mail Transfer Protocol. Enhances SMTP by specifying extensions for
sending e-mail to support graphics, audio and video files. It also enables SMTP to support the sending
of text in various national languages.
• CSR – Certificate Signing Request. Contains the public key information which matches the private key
installed on RiskFilter and enables you to import a new certificate. When the CSR is exported to the
same directory as the new certificate, the certificate will pick up this information so that RiskFilter can
recognize it.
• AVA – Anti-Virus Agent
• ASA – Anti-Spam Agent
WHAT CAN BE CONFIGURED IN THE SYSTEM SETTINGS TAB?
The System Settings tab is where you configure the receiving and delivery of messages to and from the
RiskFilter appliance.
Figure 2 - 1 The System Settings Tab
System Settings enables you to:
• Configure user authentication and directories for storing messages and log files
• Set up Personal E-mail Manager (PEM)
• Set up a postmaster e-mail address
• Configure sending and receiving information
• Set up licensing and updates
10 Administrator’s Guide SurfControl RiskFilter - E-mail V5.2.4
Page 16
S
YSTEM
S
ETTINGS
General
2
GENERAL
The General menu contains sub-menus that enable you to set up the delivering and receiving of e-mails.
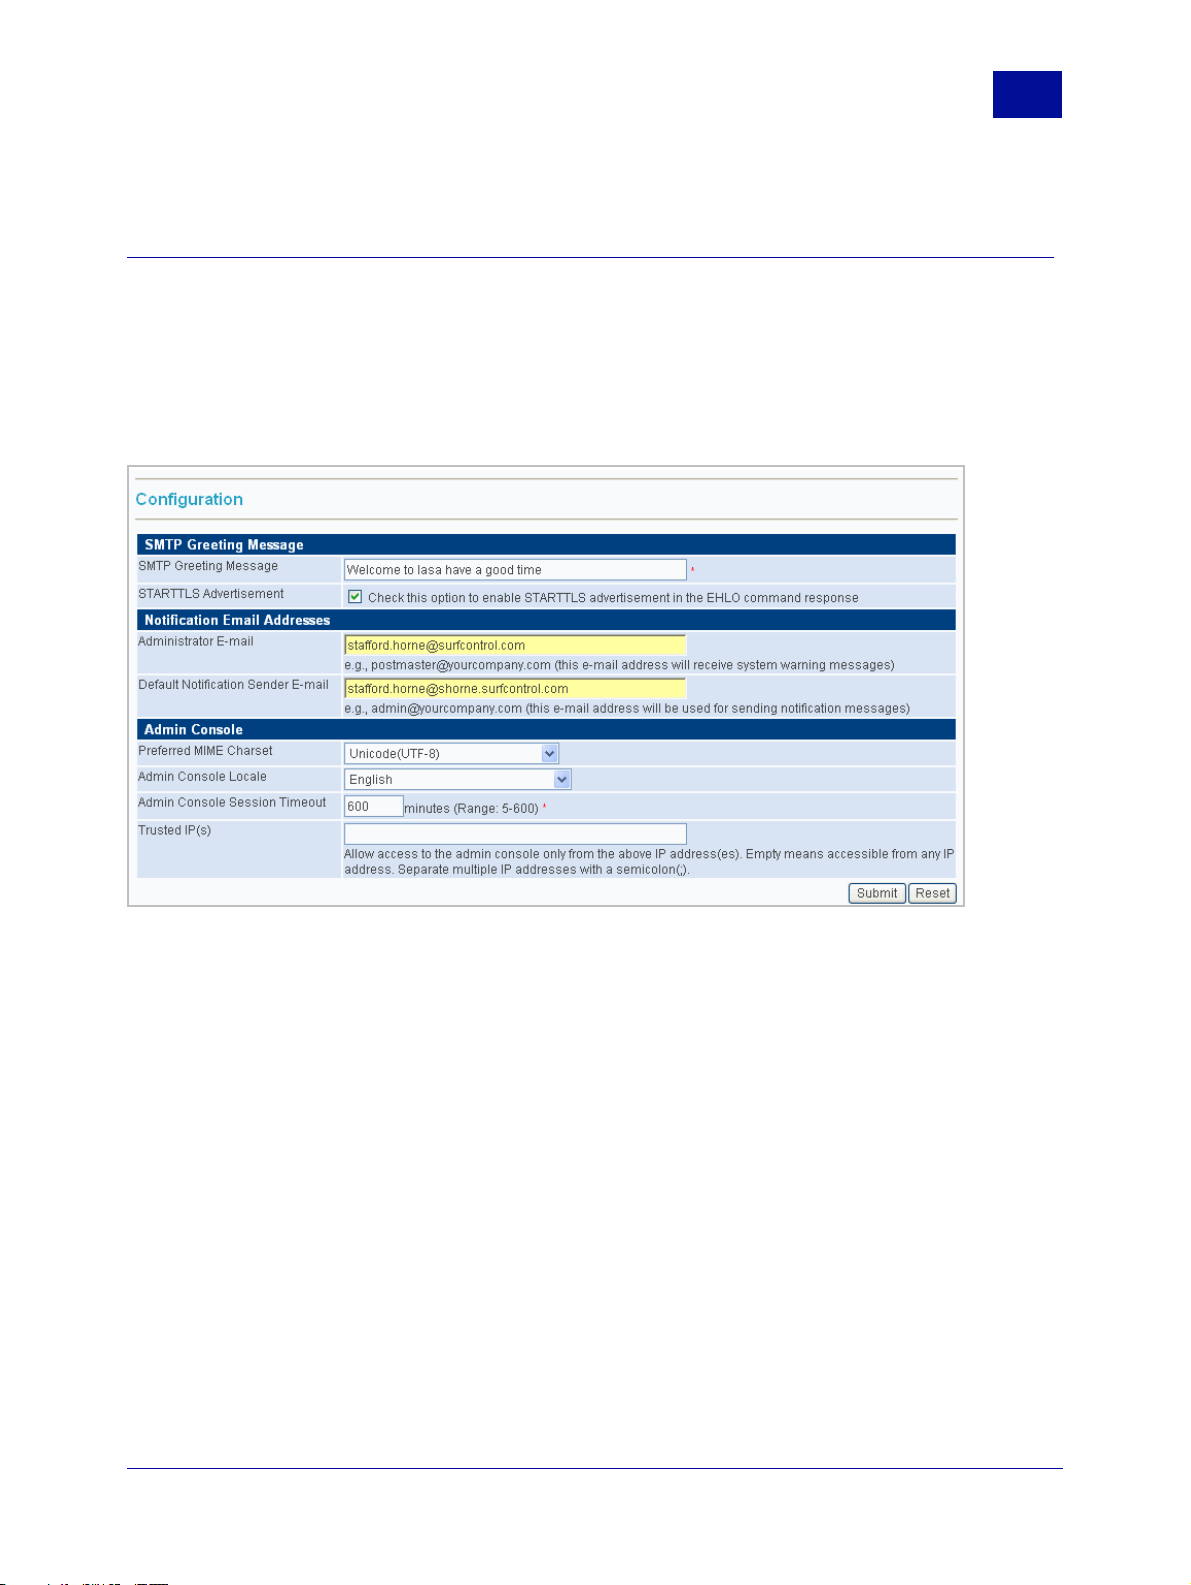
This includes specifying how RiskFilter should treat connections from other administrators, and where to
send alert messages and notifications.
CONFIGURATION
These settings are added in the Configuration screen.
Figure 2 - 2 The Configuration screen
Postmaster e-mail address
If a service stops, or a similar event occurs, RiskFilter can send a warning message to a predefined
address. This predefined postmaster e-mail address is usually the administrator’s.
To set up the Postmaster e-mail address:
1Select General > Configuration from the System Settings tab.
2 Enter the e-mail address of the administrator into the Administrator E-mail field. This is the address
that will receive the system warning messages.
3 Enter the e-mail address of the administrator into the Default Notification Sender E-mail field.
Notifications will be sent to the user from this address, informing them that the message has been
isolated.
4 Click Submit. For information on the other settings that can be entered into this screen see Table 1 on
page 12.
SurfControl RiskFilter - E-mail V5.2.4 Administrator’s Guide 11
Page 17
S
2
YSTEM
General
S
ETTINGS
Table 1 Other Settings
Setting What it does
SMTP greeting
message
Admin Console
Locale
Preferred MIME
Charset
Admin Console
Session Timeout
The greeting message can indicate that the system is working correctly when you
first start to set up the RiskFilter appliance using Hyper Terminal. An example of
where this message appears would be:
[root@smg10 conf]# telnet localhost 25
Trying 127.0.0.1...
Connected to localhost.
Escape character is '^]'.
220 Surfcontrol RiskFilter ESMTP Service Ready
To set a new message, enter this message into the SMTP greeting message field.
Set the language that is used within RiskFilter by choosing one of the options:
• User Language specified by Browser - RiskFilter will select the language
automatically according to the browser’s language setting.
• English
• Simplified Chinese
• Japanese
Select the MIME Charset which will be used to encode mail. We recommend that
you select ISO 8859-1.
If the administrator connects to the RiskFilter appliance then leaves the connection
idle, the connection will be dropped after a certain amount of time. To set this
timeout, enter the length of time in minutes into the RiskFilter Console Session
Timeout field.
12 Administrator’s Guide SurfControl RiskFilter - E-mail V5.2.4
Page 18
S
YSTEM
S
ETTINGS
General
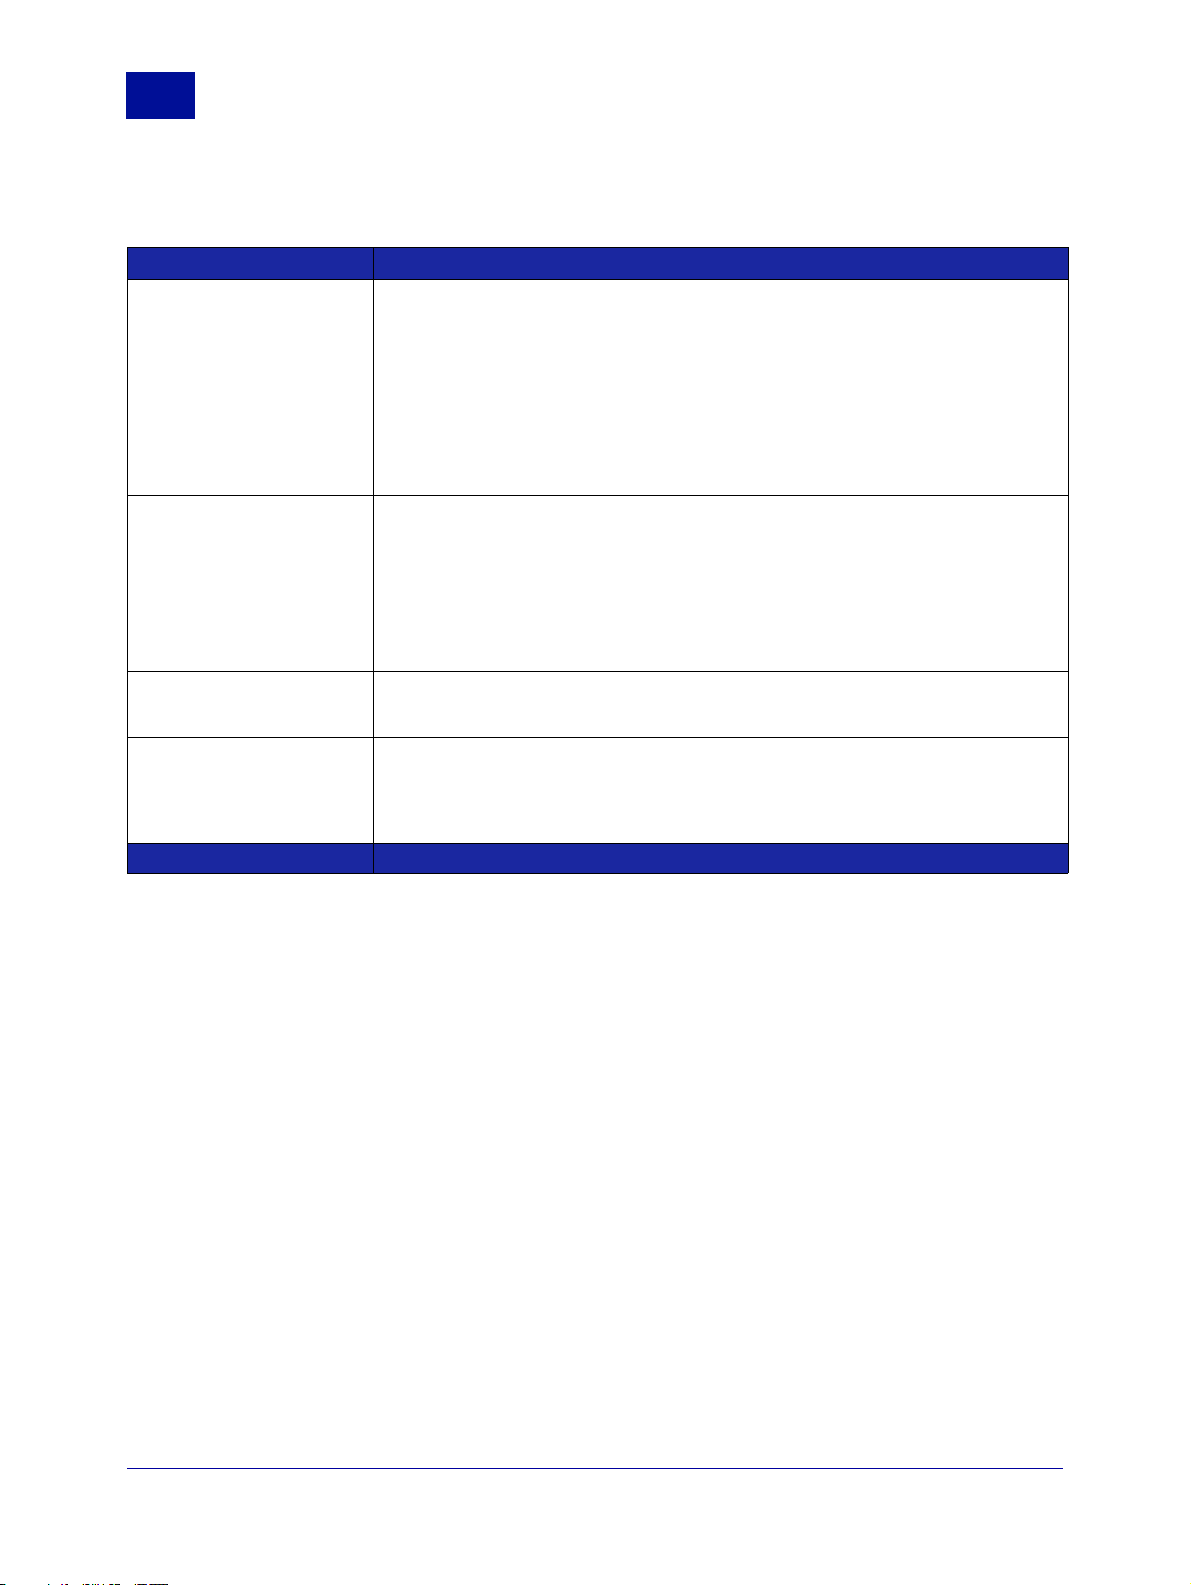
USER DIRECTORIES
User Directories provide RiskFilter with recipient address validation and end-user authentication:
• Address validation takes place when a message is received.
• User authentication is used by end-users to log in and check their isolated messages.
To add User Directories:
1Select General > User Directories from the System Settings tab.
2 Click
3 Select your Directory Type from the list of options.
Add.
2
Figure 2 - 3 Defing the type of directory you want to create
4 Enter details into the screen that follows according to the type of User Directory you are adding.
5 Click Submit.
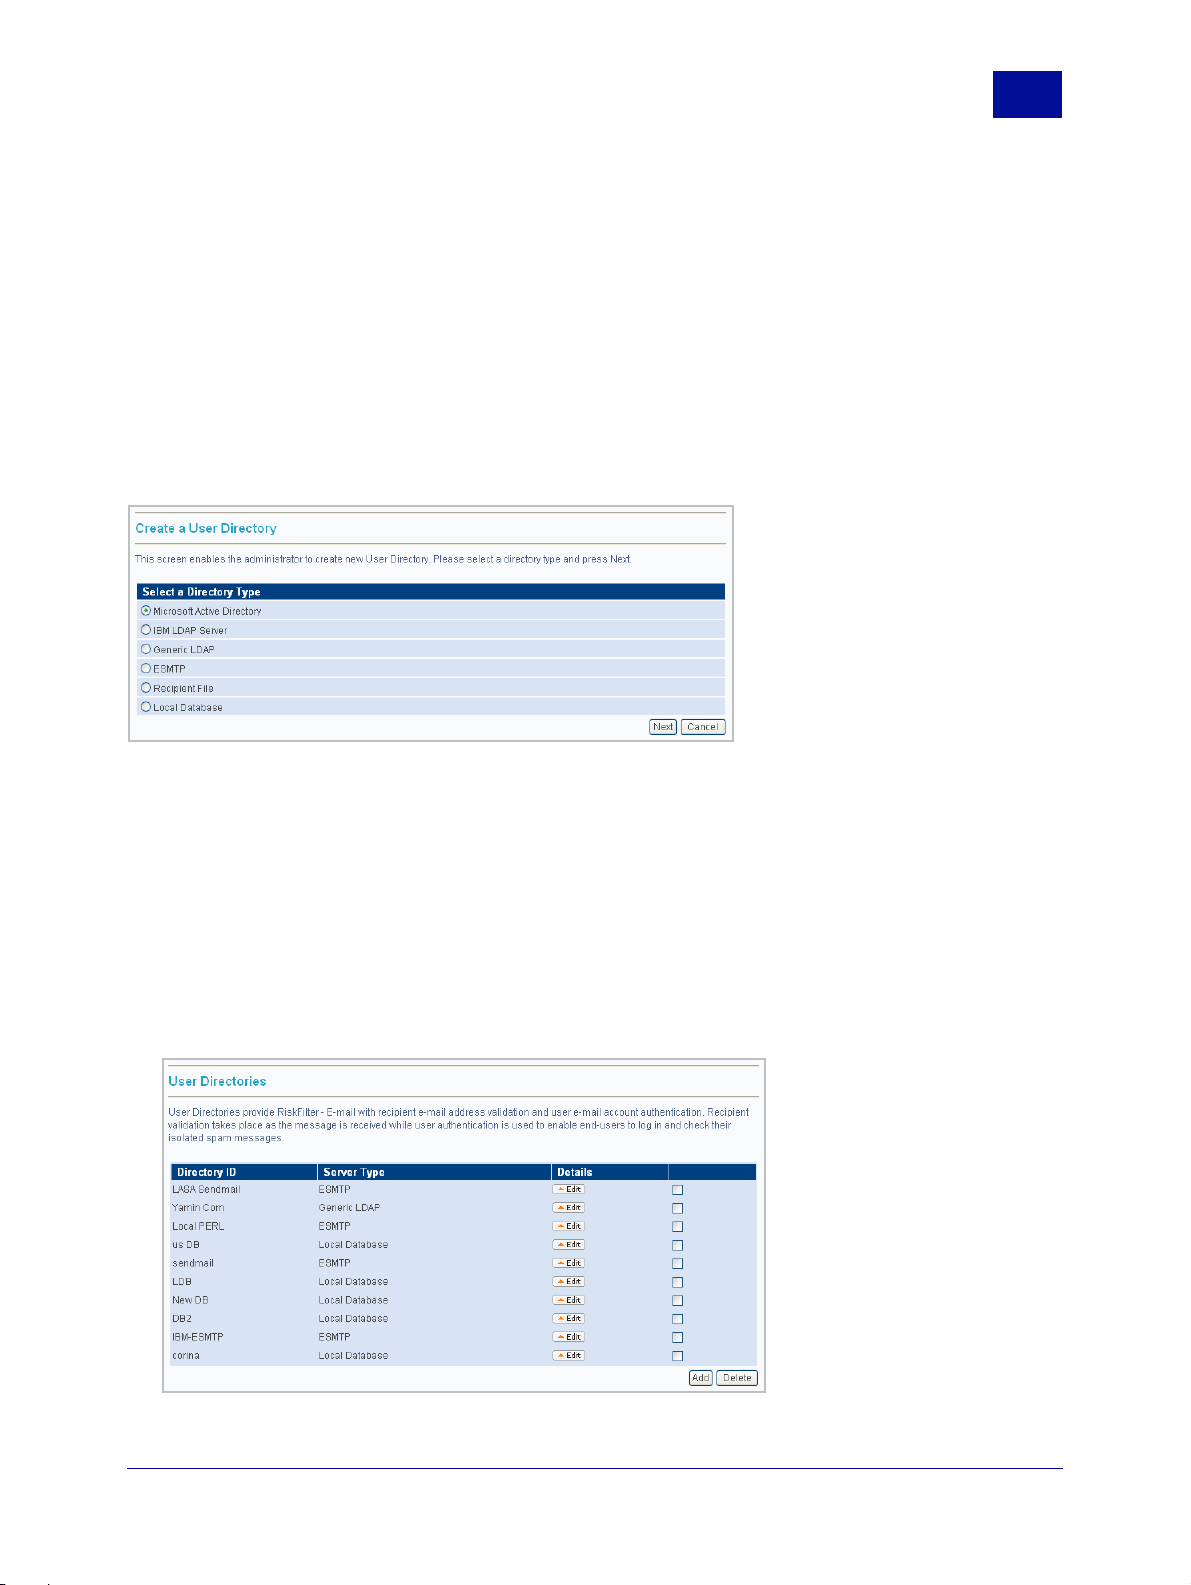
Editing User Directories
Once you have added your User Directory you can edit it at any time providing you have not configured
Recipient Validation or User Authentication. If you have added either of these, the directory ID of the User
Directory cannot be edited.
To edit a User Directory:
1 In the User Directories screen click the Edit button alongside the directory you want to edit:
Figure 2 - 4
SurfControl RiskFilter - E-mail V5.2.4 Administrator’s Guide 13
Existing User Directories
Page 19
S
YSTEM
2
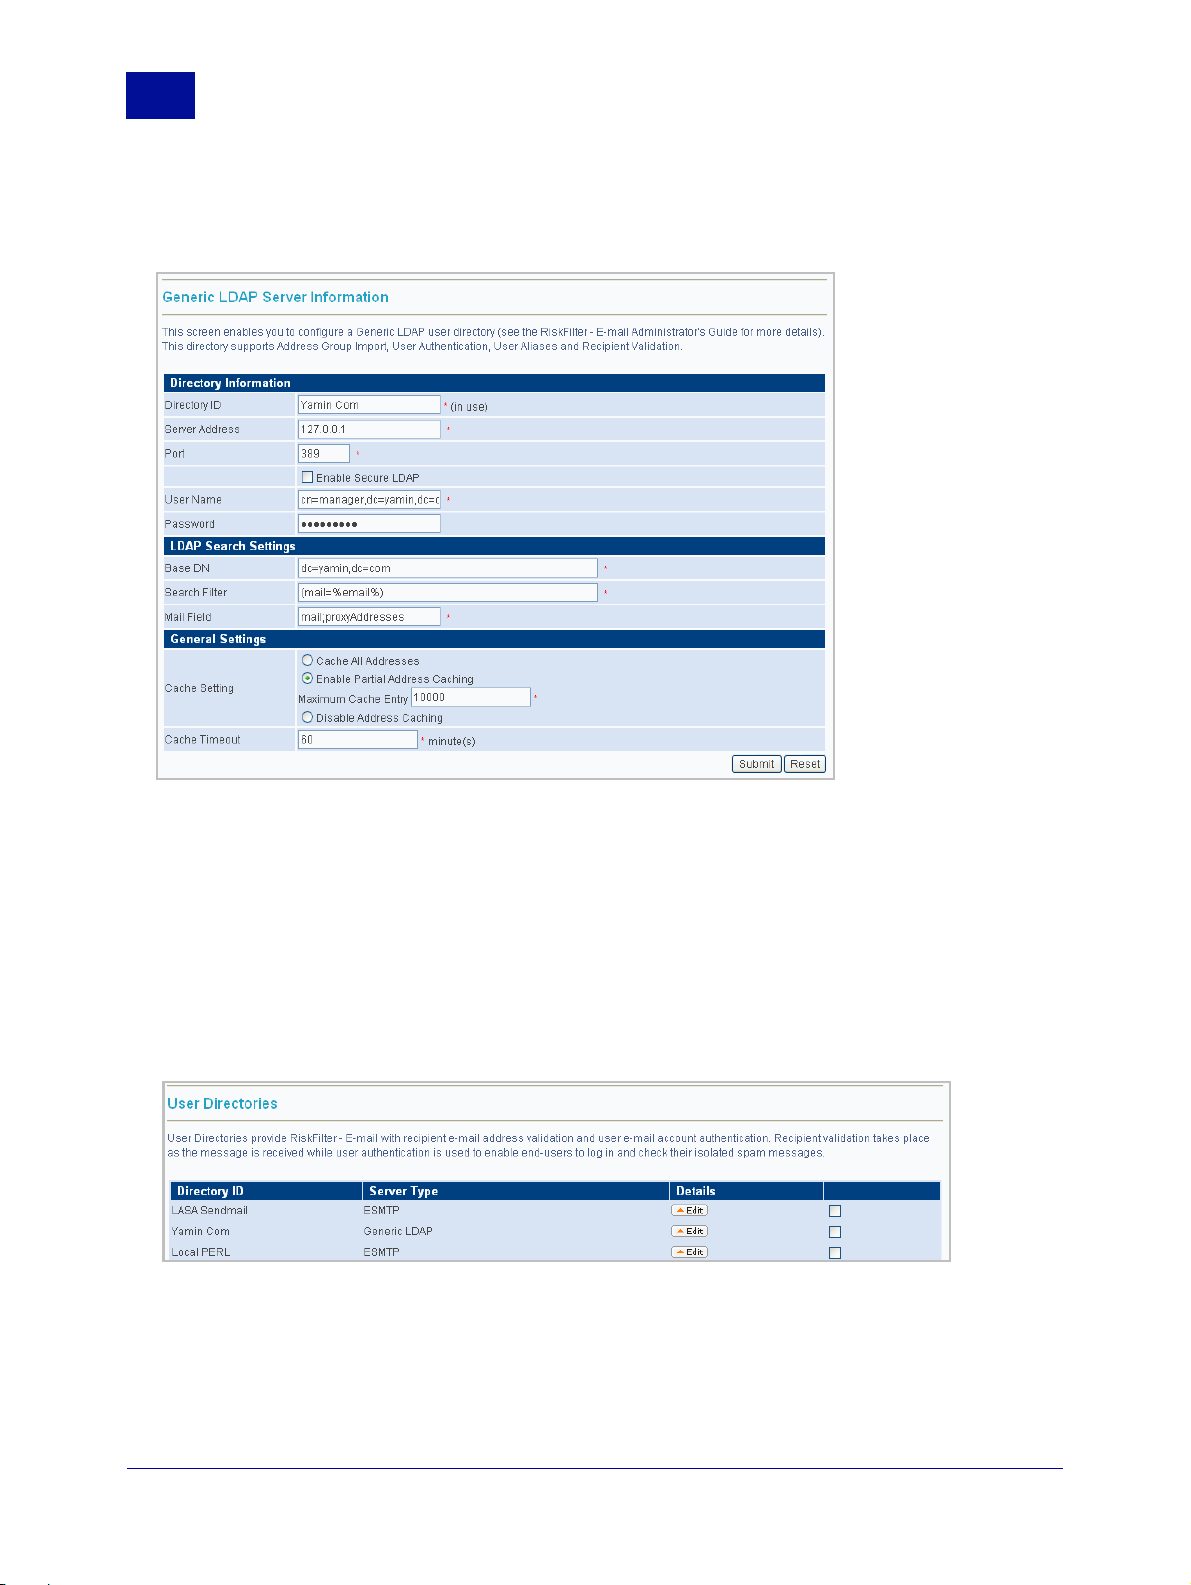
2 This will show a screen containing all of the details of the User Directory that you want to edit. The
General
following example shows a Generic LDAP User Directory:
S
ETTINGS
Figure 2 - 5
3 Make changes to the User Directory by editing these details.
4 Click Submit to save the changes or click Reset to undo any changes that you have made.
Generic LDAP Server Information
Deleting a User Directory
You can delete any User Directory you have added providing you have not configured Recipient Validation
or User Authentication. If you have added either of these, the User Directory cannot be deleted.
To delete a User Directory:
1 Open the User Directories screen.
Figure 2 - 6
2 Select the check box alongside the User Directory that you want to delete.
3 Click Delete.
Existing User Directories
The following sections cover the different types of user directories that you can add to RiskFilter and the
information you need to add.
14 Administrator’s Guide SurfControl RiskFilter - E-mail V5.2.4
Page 20

S
YSTEM
S
ETTINGS
General
Microsoft Active Directory
This is the default server type. Microsoft Active Directory supports Address Group Import, User
Authentication, User Aliases and Recipient Validation.
To add a Microsoft Active Directory server:
1 Click Add in the User Directories screen.
2 Make sure that the default Microsoft Active Directory option is selected.
3 Click Next. The Microsoft Active Directory Server Information screen is displayed.
2
Figure 2 - 7 Microsoft Active Directory Server Information
4 Enter the following information:
• Directory ID – The ID of the directory. This field is limited to 64 characters.
• Server Address – The address of your LDAP server.
• Port – The default is 389.
• Enable Secure LDAP – Select the check box if you wish to enable Secure LDAP. This will change
the default port number to 636.
• User Name / Password – The user name and password for this appliance.
• Base DN – This is the Base DN of the LDAP server when applying the validation filter. It can
contain any of the above variables.
• Search Filter – The search filter is a standard LDAP query and can also use the variables listed.
For example: |(mail=%email%)(user=%user%)(ou=Engineering)
• Cache Setting – Select the option that corresponds to how you want to treat Address Caching:
– Cache All Addresses – All addresses will be cached.
SurfControl RiskFilter - E-mail V5.2.4 Administrator’s Guide 15
Page 21

S
YSTEM
2
General
– Enable Partial Address Caching – This is the default setting. Enter a value into the Maximum
Cache Entry field to specify how many entries should be stored in the memory cache. The
default is 10000.
– Disable Address Caching - No addresses will be cached.
• Cache timeout – When Cache All Addresses or Enable Partial Address Caching are enabled,
addresses of all e-mails passing through RiskFilter are checked against the validation server.
E-mails from valid addresses are delivered, and the addresses held in cache for a set time. If an email is sent from a previously validated address within this cache timeout, the e-mail is delivered
without contacting the validation server. However, if another e-mail is sent from this address after
the cache timeout, the server will be contacted again to validate the address. This setting must be
in valid Integers. The default is 60.
S
ETTINGS
IBM LDAP server
IBM LDAP supports Address Group Import, User Authentication, User Aliases and Recipient Validation. If
you use a server running IBM LDAP authentication, you can add an IBM LDAP server.
To add an IBM LDAP server:
1 Click Add in the User Directories screen.
2Select IBM LDAP Server.
3 Click Next. The IBM LDAP server screen is displayed.
4 Enter the following information:
• Directory ID – The ID of the directory. This field is limited to 64 characters.
• Server Address – The address of your LDAP server.
• Port - The default is 389.
• Enable Secure LDAP – Select the check box if you wish to enable Secure LDAP. This will change
the default port number to 636.
• User Name / Password – The user name and password for this appliance.
• Cache Setting – Select the option that corresponds to how you want to treat Address Caching:
– Cache all addresses – All addresses will be cached.
– Enable Partial Address Caching – This is the default setting. Enter a value into the Maximum
Cache Entry field to specify how many entries should be stored in the memory cache. The
default is 10000.
– Disable Address Caching - No addresses will be cached.
• Cache timeout – When Cache All Addresses or Enable Partial Address Caching are enabled,
addresses of all e-mails passing through RiskFilter are checked against the validation server.
E-mails from valid addresses are delivered, and the addresses held in cache for a set time. If an email is sent from a previously validated address within this cache timeout, the e-mail is delivered
without contacting the validation server. However, if another e-mail is sent from this address after
the cache timeout, the server will be contacted again to validate the address. The default is 60.
5 Click Submit.
16 Administrator’s Guide SurfControl RiskFilter - E-mail V5.2.4
Page 22

S
YSTEM
S
ETTINGS
General
Generic LDAP
Generic LDAP supports Address Group Import, User Authentication, User Aliases and Recipient
Validation.
To add an Generic LDAP server:
1 Click Add in the User Directories screen.
2Select Generic LDAP.
3 Click Next. The Generic LDAP screen is displayed.
4 Enter the following information:
• Directory ID – The ID of the directory. This field is limited to 64 characters.
• Server Address – The address of your LDAP server.
• Port – The default is 389.
• Enable Secure LDAP – Select the check box if you wish to enable Secure LDAP. This will change
the default port number to 636.
• User Name/ Password – The user name and password for this appliance.
• Base DN – This is the Base DN of the LDAP server when applying the validation filter.
• Search Filter – The search filter is a standard LDAP query and can also use the variables listed.
For example: |(mail=%email%)(user=%user%)(ou=Engineering)
2
• Mail Field – The field in the LDAP query that contains the e-mail address to be imported.
• Cache Setting – Select the option that corresponds to how you want to treat Address Caching:
– Cache All Addresses – All addresses will be cached.
– Enable Partial Address Caching – This is the default setting. Enter a value into the Maximum
Cache Entry field to specify how many entries should be stored in the memory cache. The
default is 10000.
– Disable Address Caching – No addresses will be cached.
• Cache Timeout - When Cache All Addresses or Enable Partial Address Caching are enabled,
addresses of all e-mails passing through RiskFilter are checked against the validation server. Emails from valid addresses are delivered, and the addresses held in cache for a set time. If an email is sent from a previously validated address within this cache timeout, the e-mail is delivered
without contacting the validation server. However, if another e-mail is sent from this address after
the cache timeout, the server will be contacted again to validate the address. The default is 60
5 Click Submit.
.
SurfControl RiskFilter - E-mail V5.2.4 Administrator’s Guide 17
Page 23

S
2
YSTEM
General
S
ETTINGS
Validation settings
Variables which can be used for validation. These can be set when you are adding your LDAP server.
Search Filter. There are three variables which can be used in the Search filter for validation:
• %user% = the user name of the user to be validated
• %domain% = the domain that this user belongs to
• %email% = the e-mail address of this user
LDAP will try to validate a message by checking with the LDAP server using this search, for example:
jbloggs@mycom.com
This message will be validated using the variables as follows:
• %user%= jbloggs
• %domain%= mycom.com
• %email%= jbloggs@mycom.com
Base DN. BaseDN, is an LDAP term meaning the base Domain Name which will be in the form of:
cn=users,dc=example,dc=com
Mail Field. The mail field is a list of LDAP entries containing e-mail addresses. When importing address
groups, the mail field is used to find out which entries/field in the LDAP server are e-mail addresses.
ESMTP Server Information
ESMTP adds many enhancements to the SMTP protocol such as security and authentication. It supports
User Authentication and Recipient Validation.
To add an ESMTP server:
1 Click Add in the User Directories screen.
2Select ESMTP.
3 Click Next. The ESMTP Server Information screen is displayed.
4 Enter the following information:
• Directory ID – The ID of the directory. This field is limited to 64 characters.
• Server Address – The address of your ESMTP server.
• Enable secure connection using STARTTLS – Allow validation and authentication using TLS
Note: SurfControl recommends that STARTTLS is enabled for security reasons. Using TLS
may, however, have some impact on performance, as extra CPU processing is needed to
encode and decode the TLS encrypted data.
• Port - The default port is 25.
• E-mail Verification Method – Select the option that corresponds to how you want e-mail to be
verified:
– Use the return status of the VRFY command
– Use the return status of the RCPT command
18 Administrator’s Guide SurfControl RiskFilter - E-mail V5.2.4
Page 24

S
YSTEM
S
ETTINGS
General
2
• Cache Setting – Select the option that corresponds to how you want to treat Address Caching:
– Enable Partial Address Caching – This is the default setting. Enter a value into the Maximum
Cache Entry field to specify how many entries should be stored in the memory cache. The
default is 10000.
– Disable Address Caching – No addresses will be cached.
• Cache Timeout – When Enable Partial Address Caching is enabled, addresses of all e-mails
passing through RiskFilter are checked against the validation server. E-mails from valid addresses
are delivered, and the addresses held in cache for a set time. If an e-mail is sent from a previously
validated address within this cache timeout, the e-mail is delivered without contacting the
validation server. However, if another e-mail is sent from this address after the cache timeout, the
server will be contacted again to validate the address. The default is 60.
5
Click Submit.
Recipient File
You can validate a user ID with a recipient address file. Recipient file supports Address Group Import, as
well as Recipient Validation.In addition, you can save user addresses as a text file (one e-mail address per
line), for user recipient validation.
To add Recipient File validation:
Note: Recipient File cannot be used for PEM authentication.
1 Click Add in the User Directories screen.
2Select Recipient File.
3 Click Next. The Recipient File screen is displayed.
4 Enter a name for the Recipient File into the Directory ID field. This field is limited to 64 characters.
5 Click Browse to navigate to your list of e-mail addresses.
Note: These must be text format, with one address per line.
6 Locate the file then click Open.
7 Click Submit.
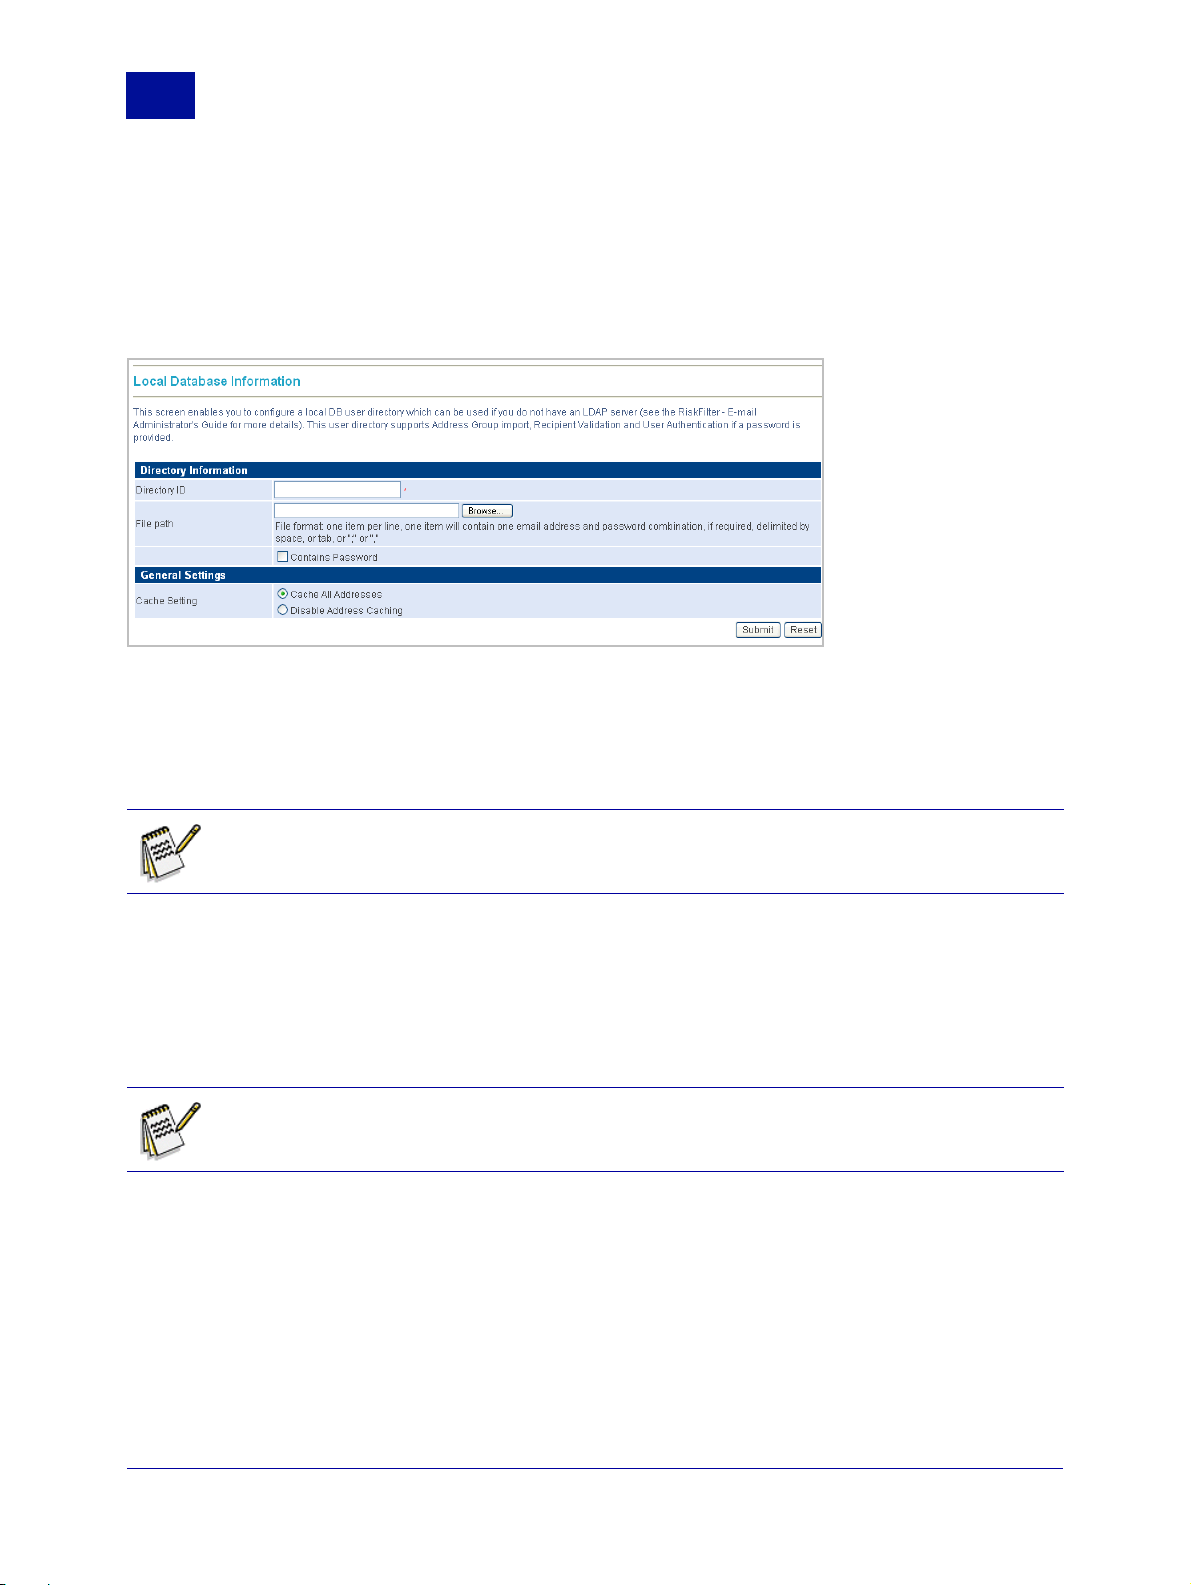
Local Database
A user-defined list of e-mail addresses and passwords can be imported onto the RiskFilter appliance and
stored in the database for authentication and validation purposes. Local Database supports Address
Group import, Recipient Validation and User Authentication if a password is set.
Note: The text file that you want to import names and e-mail addresses from should be a plain
text file (.txt) or an Excel file in csv format. Users’ e-mail addresses and passwords must be
separated by a semi-colon (;), space, tab or comma (,).
SurfControl RiskFilter - E-mail V5.2.4 Administrator’s Guide 19
Page 25
S
2
YSTEM
General
S
ETTINGS
To add a local database:
1 Click Add in the User Directories screen.
2Select Local Database.
3 Click Next. The Local Database Information screen is displayed:
Figure 2 - 8 Local Database Information
4 Enter the following information:
• Directory ID – The ID of the directory. This field is limited to 64 characters.
• File Path – The path to the database. Enter the path or click Browse to navigate to it.
Note: You can create a user directory for Local Database without the database path being
specified, then create and add the actual database manually, later. Just leave the File Path field
blank when you are creating the user directory.
5 Select the ‘Contains Password’ check box if the file being imported contains passwords which you
want to use:
• If you create a local database with a password, then this local database can be used for Recipients
Validation and User Authentication.
• If you create a local database with no password, then this local database can be used for
Recipients Validation.
Note: Once you have selected or cleared the ‘Contains Password’ check box, it cannot be
subsequently altered. You must create a new Local Database User Directory in order to change
it.
6 Set up address validation caching for the RiskFilter appliance in the General Settings section by
choosing one of the following options:
• Cache All Addresses – All addresses will be cached.
• Disable Address Caching – Addresses will not be cached.
7 Click Submit.
20 Administrator’s Guide SurfControl RiskFilter - E-mail V5.2.4
Page 26
S
YSTEM
S
ETTINGS
General
2
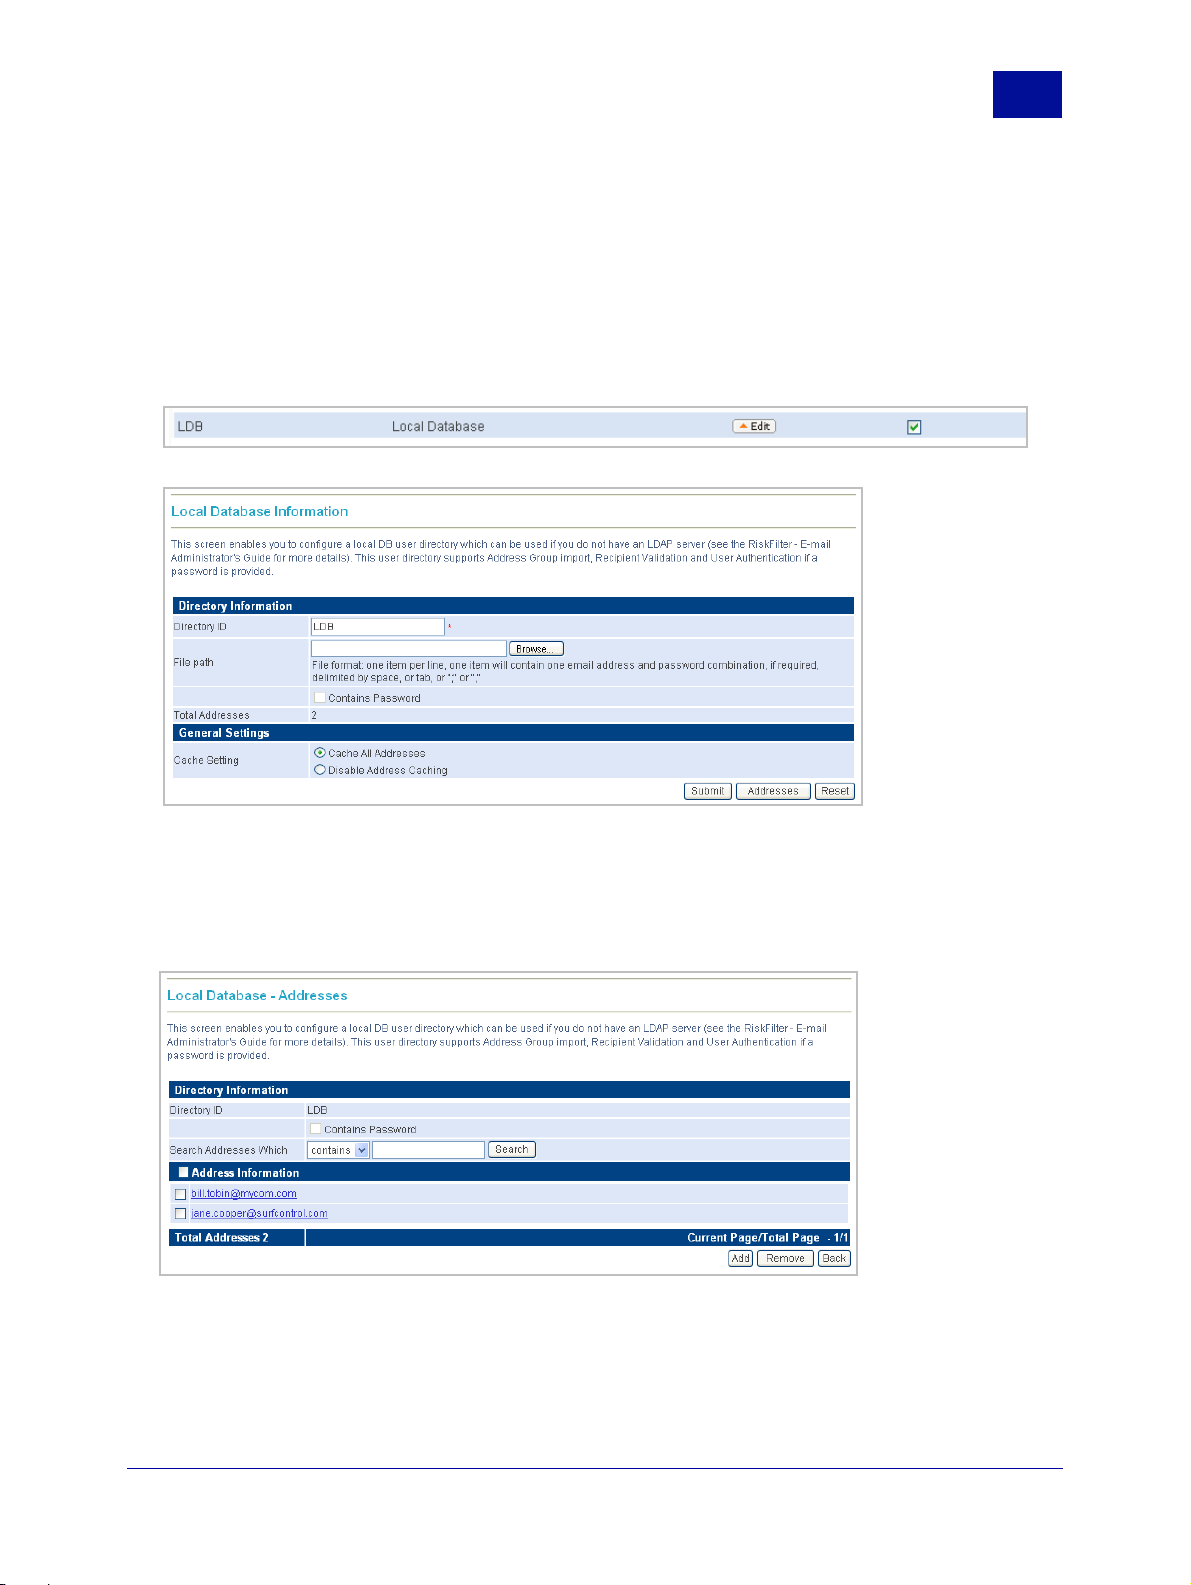
Adding addresses to a local database. You can add specific addresses from a user list by adding them
manually. This can also be used if you have created your user directory before you created your user list
and now want to add this list to the user directory.
To add addresses manually:
1 Create your database and store it in a place accessible to RiskFilter.
2 In the User Directories screen select the User Directory you want to add the addresses to.
3 Click Edit. The Local Database Information screen is displayed.
Figure 2 - 9
Local Database Information
4 Click Browse and browse to the database containing the addresses that you want to add.
Alternatively, enter the path to the file in the File path field.
5 Click Addresses. The Local Database - Addresses screen is displayed.
Figure 2 - 10 Local Database - Addresses
6 Click Add.
SurfControl RiskFilter - E-mail V5.2.4 Administrator’s Guide 21
Page 27
S
2
YSTEM
General
S
ETTINGS
7The Local Database - Add/Edit Address screen is displayed.
Figure 2 - 11 Adding an address to the database
8 Enter the address that you want to add into the Address field.
9 If the database you are adding has a password then you need to enter this password into the
Password field then confirm it. If the database does not have a password, you can leave these fields
blank.
10 Click Submit.
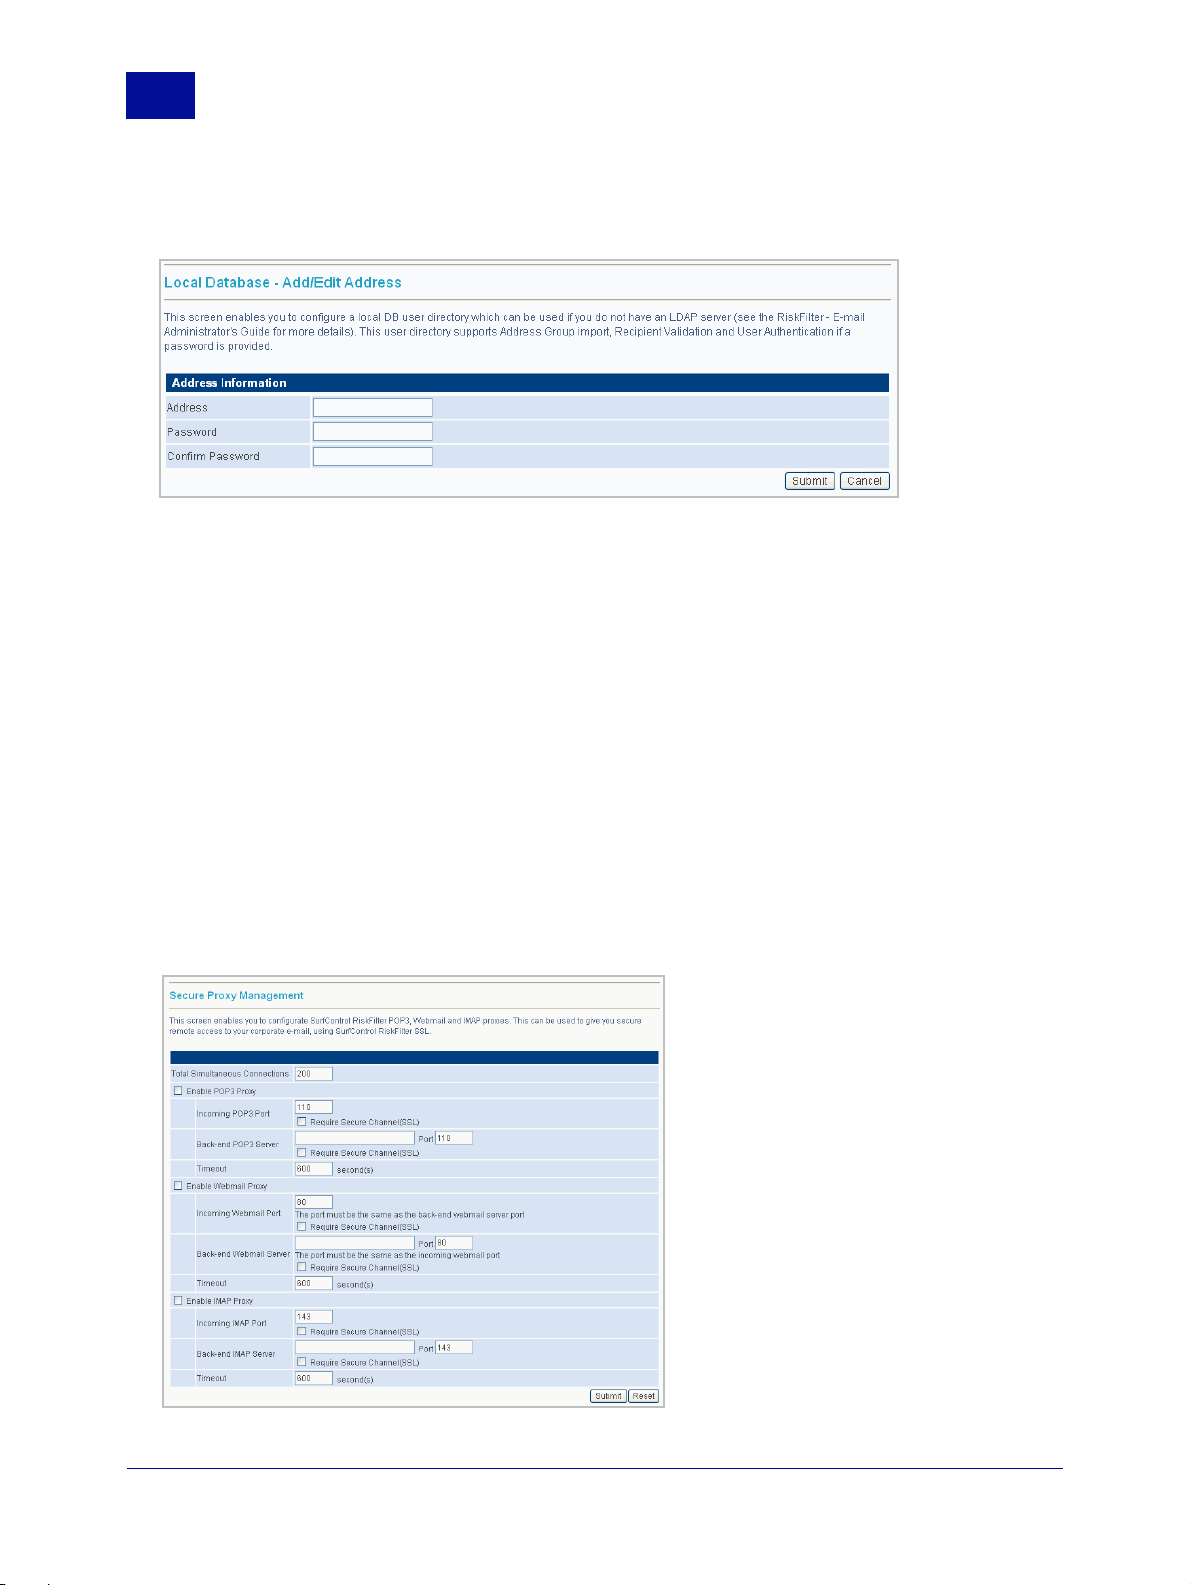
SECURE PROXY
You can configure RiskFilter to act as a proxy server. In this setup, your users connect to the RiskFilter
appliance rather than the mail server itself. The RiskFilter appliance collects the requested mail from the
mail server and passes it back to the user. Using RiskFilter in this way provides an extra layer of security
though you will need a POP3 server, Webmail or an IMAP proxy to do this. Your e-mail system can then be
accessed remotely via the RiskFilter SSL VPN gateway.
To enable a proxy server:
1Select General > Secure Proxy from the System Settings tab.
Figure 2 - 12 The Secure Proxy Setting screen
22 Administrator’s Guide SurfControl RiskFilter - E-mail V5.2.4
Page 28

S
YSTEM
2 In the Total Simultaneous Connections field, enter the maximum number of connections that you
want to be connected at any one time. The default setting is 200
3Select Enable POP3 Proxy.
4 Enter the following information:
• Incoming POP3 Port – The port number. The default port number is 110. Select the Require
Secure Channel (SSL) option if required. It is not selected by default.
• Back-end POP3 Server – The IP address or domain name of the e-mail server required to act as
your back-end proxy. In the Port field, enter the right port number. The default setting is 110. Select
the Require Secure Channel (SSL) option if required.
• Timeout – The timeout period in seconds, the default value is 600 seconds
5Select Enable Webmail Proxy.
6 Enter the following information:
• Incoming Webmail Port – The port number. The default port number is 80. Select the Require
Secure Channel (SSL) option if required.
• Back- end Webmail Server – The IP address or domain name of the e-mail server that is required
to act as your back-end proxy.
• Port – The port number, the default port number is 80. Select the Require Secure Channel (SSL)
option if required.
• Timeout – The time period for timeout in seconds. The default setting is 600 seconds.
.
S
.
ETTINGS
General
2
7Select Enable IMAP Proxy.
8 Enter the following information:
• Incoming IMAP Port – The port number, the default port number is 143. Select the Require
Secure Channel (SSL) option if required.
• Back-end IMAP Server – The IP address or domain name of the e-mail server that is required to
act as your back-end proxy.
• Port – The port number. The default port number is 143. Select the Require Secure Channel
(SSL) option if required.
• Timeout – The time period for timeout in seconds, the default setting is 600 seconds.
9 After entering the above information, click Submit to save your settings. Click Reset to put all of the
information back to its original state.
SurfControl RiskFilter - E-mail V5.2.4 Administrator’s Guide 23
Page 29
S
2
YSTEM
General
S
ETTINGS
LOGS AND ARCHIVES
SurfControl RiskFilter stores messages that have been isolated. Initially these messages will be stored in
the default directory. If you want RiskFilter to store messages in a different place, you must change the
default directories within the Logs and Archives screen.
Figure 2 - 13 The Logs and Archives screen
Setting up the storage directories
You can set up directories to hold log files, spam messages etc. using the Directories screen.
To set up directories:
1Select General > Directories from the System Settings tab.
2 Define how log files will be stored and how they will be treated when this happens:
• Directory to store log files – If you don’t want to use the default location, enter the path to the
required directory into this field.
• Days to keep log files – Leave this field blank to store log files indefinitely. If you enter a number
into this field, the log file will be deleted after this length of time has passed.
• Zip log files older than... – Enter a number of days into the field then any log file that has been
stored for this length of time will be zipped.
Caution: Zip files will be deleted along with any other log files, so you should move any zip
files that you want to keep indefinitely out of this directory.
• Keep maximum storage size at ... MB and remove old ones on a FIFO basis - specify that
once the storage size of isolated messages reaches a certain size then the oldest will be deleted
so the newest can be stored.
3 If there are no other directories that you want to set, click Submit.
4 The Archived messages directory enables you to specify where archived messages are stored.
24 Administrator’s Guide SurfControl RiskFilter - E-mail V5.2.4
Page 30
S
YSTEM
• Archive level – Define whether or not to archive files and what type of messages to archive if
archiving takes place:
–Select None for no archiving.
–Select All messages except then select the relevant check boxes if you want to archive, but
do not want to save this type of message.
• Directory to store messages – Define where you want the archived messages to be stored by
entering the path into the field.
• Days to keep messages – Leave this field blank to store messages indefinitely. If you enter a
number into this field, the log file will be deleted after this length of time has passed.
• Keep maximum storage size at ... MB and remove old ones on a FIFO basis – Specify that
once the storage size of isolated messages in the directory reaches a certain size then the oldest
will be deleted so that the newest can be stored.
5 Once you have entered all of the details that you need, click Submit.
S
ETTINGS
General
2
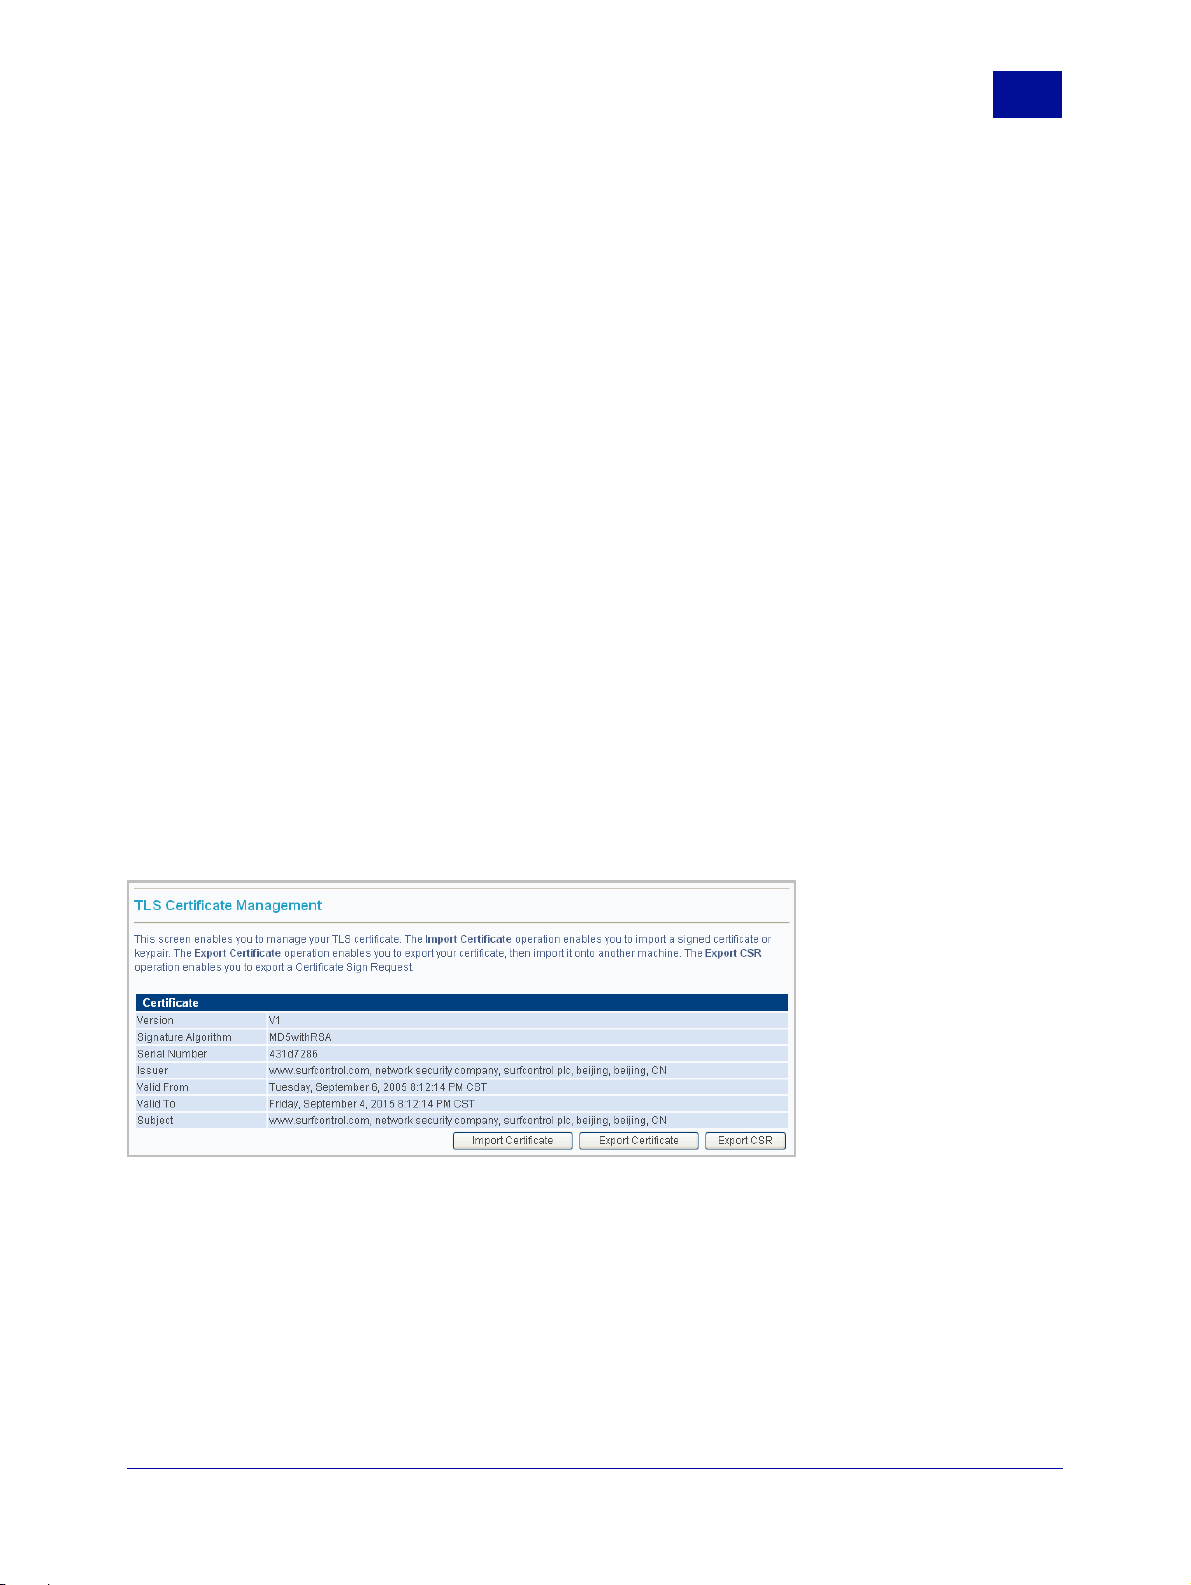
CERTIFICATE
For an extra layer of security RiskFilter supports the use of TLS verification. This helps prevent devices
such as non-trusted routers from allowing a third party to monitor or alter the communications between
server and client. It also enables SMTP agents to authenticate each others identities, should this be
necessary. The RiskFilter server can receive messages transferred over TLS and can also send messages
via this protocol to particular domains.
For TLS to work, the domains that will use this TLS authentication must be listed in the Domain-based
Delivery screen. Certificates are managed in the General > Certificate > Certificate Management
screen.
Figure 2 - 14 The TLS Certificate Management screen
Notifications
When your certificate is due to expire, RiskFilter will send notifications until you import a new certificate.
When you see these notifications you need to import a new certificate. They are sent in the following order:
• 30 days before the expiry date.
• Once every week after the first notification.
• Every day during the last week before expiry.
SurfControl RiskFilter - E-mail V5.2.4 Administrator’s Guide 25
Page 31

S
2
YSTEM
General
S
ETTINGS
Importing Certificates
A default certificate is supplied with RiskFilter but this will need to be renewed when it expires. The Import
Certificate feature enables you add a new version to RiskFilter. You can also import a certificate that you
have previously exported to a location on your network. or add a new certificate of your own. A custom
certificate can be added as long as it is in one of the following formats:
• DER encoding certificate(binary) + private key; ( keypair )
• DER encoding certificate(binary); (no private key)
• Base 64 encoding certificate (text) + base 64 encoding private key with PKCS8; ( keypair )
• Base 64 encoding certificate (text); (no private key)
• Base 64 encoding certificate (text) + base 64 encoding private key with PKCS8 + ASN1; ( keypair )
To import a certificate:
1Select General > Certificate from the System Settings tab.
2 In the Certificate screen click Import Certificate.
3An Import Certificate File dialog box will appear where you can either enter the path to your
certificate or click Browse to navigate to it.
4 Once you have located your certificate click Import>>
.
Exporting Certificates
It is a good idea to make a backup of the default certificate supplied with RiskFilter. This means that in the
event of the certificate on the RiskFilter appliance being corrupted or destroyed, you can simply import
your backup copy onto the machine. To do this you need to export your certificate to the network where
you can store it in a location of your choice.
To export your certificate:
1Select General > Certificate from the System Settings tab.
2 In the Certificate screen click Export Certificate.
3 A File Download dialog box will appear enabling you to save the certificate to your network.
4 Click Save and save the certificate into a location that can be accessed by the machine that you want
to export it to.
Certificate Signing Request
You can export a CSR (Certificate Signing Request) for the default certificate. This contains the public key
information which matches the private key installed on RiskFilter. The default directory for this key is:
/opt/riskfilter/smg/conf/serverKeyStore.
If you are renewing your license you will need to export the CSR so that the updated license holds the
same information.
To export the CSR:
1Select General > Certificate from the System Settings tab.
2 In the Certificate screen click Export CSR.
3 A File Download dialog will appear enabling you to save the CSR to your network.
4 Click Save and save the CSR into the same location as the default certificate it should accompany.
26 Administrator’s Guide SurfControl RiskFilter - E-mail V5.2.4
Page 32

S
YSTEM
S
ETTINGS
Receive Settings
2
RECEIVE SETTINGS
The Receive Settings menu contains all the sub-menus that are concerned with how mail is accepted
before it is filtered. These settings specify how the mail should be treated when it is delivered to RiskFilter
for processing.
CONNECTION CONTROL
Connection Control enables you to:
• Limit the number of simultaneous connections made on your server.
• Enable or disable Real-Time Blacklist checking.
• Enable or disable reverse domain name lookup for IP addresses of incoming data.
• Allow specified IPs to bypass Real-Time Blacklist checking for data coming from specified IP
addresses.
Use the Connection Control screen to enhance security.
Figure 2 - 15 The Connection Control screen
Connection Settings
Use this section to improve system performance by limiting the number of simultaneous connections to the
system.
SurfControl RiskFilter - E-mail V5.2.4 Administrator’s Guide 27
Page 33

S
2
YSTEM
Receive Settings
S
ETTINGS
RBL
Real-Time Blacklist (RBL) checking verifies the validity of message senders. If a sender is listed on an
RBL, they will be prevented from sending messages to your internal MTA.
Reverse DNS enables you to make sure that e-mails sent to your RiskFilter server, are from legitimate
domains. RiskFilter will stop them from sending e-mails to your internal MTA if reverse DNS fails (i.e. the
sender is not from a legitimate domain). The default setting is not to perform a Real-Time blacklist (RBL)
check so this function will need to be enabled if you want to use it
RiskFilter will close the connection if reverse DNS lookup fails to validate the host. If you choose to enable
Reverse DNS you must be aware that it may affect the performance of the RiskFilter server, causing
legitimate users to be rejected. To obtain more RBL servers, visit: http://www.declude.com
.
SMTP Greeting Delay
You can specify that a SMTP greeting message is delayed for a specified time so that if a client tries to
send data ahead of this time, the connection is dropped. This helps to prevent spam, as spam sending
applications send a lot of messages very quickly. The connection is dropped as soon as a message is sent
to the SMTP server before it is ready. This feature is disabled by default.
Allow Access List
Allow Access List enables you to specify an IP address or a group of IP addresses as trusted IP
addresses. This enables them to bypass RBL checks and SMTP greetings.
To create an Access List:
1Select Receive Settings > Connection Control from the System Settings tab.
2 Enter the maximum connections allowed per IP into the’ Simultaneous connections per IP’ field. The
default setting is 100.
3 Enter the maximum number of connections allowed on the RiskFilter server into the Simultaneous
connections on each server field. The default setting is 500.
4 Enter the maximum length of time for timeout in seconds into the Timeout field.
5Select the Perform real-time black list (RBL) check check box. to enable RBL checking, then enter
the network address of the blacklist provider into the Real-Time black list service provider field.
6Select Perform reverse DNS lookup on every incoming connection to enable reverse DNS lookup.
7 Select the Enable SMTP greeting message delay check box.
8 Enter the number of seconds that you want the SMTP server to wait before it displays the SMTP
greeting SMTP greeting, into the Delay the SMTP greeting message to untrusted clients for _
seconds field.
9 Enter the trusted IP address or IP address range into the IP or subnet address field.
10 Click Add to add an IP address or range to the address list on the right. If you want to delete an IP
address or address range in the list, select the IP address or address range then click Remove.
11 Click Submit to put the new settings into effect or Reset if you want to cancel the modifications made
to the current settings.
28 Administrator’s Guide SurfControl RiskFilter - E-mail V5.2.4
Page 34

S
YSTEM
S
ETTINGS
Receive Settings
2
DIRECTORY ATTACK CONTROL
Directory Attack is used by questionable sources to gain access to internal e-mail accounts. A directory
attack not only occupies large amounts of system resource but also, through the acquisition of e-mail
accounts, creates spam problems for e-mail end users. RiskFilter enables you to control directory attack to
limit the maximum messages and connections coming from an IP address over a given time period. Use
the Directory Attack Control screen to configure this.
Figure 2 - 16 The Directory Attack Control screen
There are two levels of control within this pane. The first enables you to specify in seconds how often the
limit on messages is to be applied. The second will apply the same limits but in minutes. Specifying that
messages are limited by the second gives you greater control than when you limit them by the minute.
To configure directory attack control:
1Select Receive Settings > Directory Attack Control from the System Settings tab.
2 Select the Limit number of messages/connections per IP every ... seconds to enable the level 1
control then set the maximum number of messages, and connections. You can also set how often the
same message is allowed to pass through RiskFilter.
3 Select the Limit number of messages/connections per IP every ... minutes to enable the level 2
control then set the maximum number of messages, and connections. You can also set how often the
same message is allowed to pass through RiskFilter.
4 If you have selected one of the directory attack control options, you can select the Drop Connection
option and set a percentage. Once the invalid messages/connections exceed this percentage of the
total number of invalid messages/connections, the connection will be dropped automatically.
5 Click Submit to put the new settings into effect or Reset if you want to cancel the modifications made
to the current settings.
SurfControl RiskFilter - E-mail V5.2.4 Administrator’s Guide 29
Page 35

S
2
YSTEM
Receive Settings
S
ETTINGS
RELAY CONTROL
RiskFilter enables you to stop your e-mail system from being used as an open relay by spammers. Relay
control limits the server to only relaying e-mails for specific domains. Use the Relay Control screen to
control relaying to and from your system.
Figure 2 - 17 The Relay Control screen
Note: If you wish to define access to reports and logs by domain, you will first need to add these
domains to this page.
SPF Authentication Configuration
You can ask E-mail Filter Appliance to check that messages are actually from a legitimate server. If
enabled, this feature checks messages against the SPF record belonging to the sender and, if the server is
not listed, the message will be rejected. This stops spammers forging messages that seem to be from the
users themselves.
Controlling relaying of messages
Messages from IP addresses that have been added to the ‘Accept e-mail for relay from the following IPs’
list will be accepted for relay without any of the Connection Control, Relay Control, Message Control,
Directory Attack Control or User Validation processes being performed on them.
To control relaying of messages:
1Select Receive Settings > Relay Control from the System Settings tab.
2 Select the Perform SPF checking against e-mail sender check box if you want incoming message
senders to be checked against an SPF (Sender Policy Framework) record. When SPF checking is
selected RiskFilter will reject mail senders who fail to meet the SPF policy of the sending domain. Any
other messages will be accepted, unless the following are selected:
• Reject mail from senders with no SPF records – When SPF checking finds that the senders
domain does have an SPF record, reject the mail.
30 Administrator’s Guide SurfControl RiskFilter - E-mail V5.2.4
Page 36

S
YSTEM
S
ETTINGS
Receive Settings
2
• Reject mail from senders when SPF softfails – When SPF checking finds that the senders
domain does not match the published SPF policy and ends with a SoftFail, reject the mail.
• Reject mail from senders when there is an SPF error – When SPF checking finds that the
senders domain has published an erroneous SPF record, reject the mail.
Note: These options appear when you select the Perform SPF checking against e-mail sender
check box.
3 Enter the domain name you want to relay into the domain field.
• Adding one domain e.g. mydomain.com will only accept messages from this domain.
• Adding the domain with an asterisk e.g. *mydomain.com will accept messages from this domain
and any sub-domains.
4 Click Add>>, the domain will be added to the list on the right. If you want to delete any domain from
this list, select the domain then click <<Remove to delete it.
Allowing relaying to specific domains
You can configure E-mail Filter Appliance to only receive and relay messages that will be sent to specific
domains. Messages sent to other domains will be rejected. You can add domains manually, or import lists
of domains in a batch. These could be a list you have created and stored on the network or a list that you
have previously exported from another appliance.
To manually add domains for relaying:
1 Enter the domain into the ‘domain’ text field.
2 Click Add. This will add the domain to the list. Click Remove to remove it.
3 Click Submit.
Importing lists of domains. You can import a list of domains to the appliance. This list must be a text
file with the following properties:
• The charset must be UTF-8 if the files contains Chinese or Japanese characters.
• Each line is a domain name with leading and trailing spaces trimmed.
• The domain name is case insensitive.
• When the file is scanned, an empty line is ignored.
• Lines starting with # or / are considered to be comments so are skipped.
• Invalid domains are ignored.
An example of this type of file would be:
sgyw.com
cddn.net
shkjm.com
shhongtu.com
#shshenyang.com
SurfControl RiskFilter - E-mail V5.2.4 Administrator’s Guide 31
Page 37

S
YSTEM
2
To import a list:
1 In the Relay Control screen, click Import.
2 In the dialog that follows, enter the path to the file or click Browse to navigate to it.
3 Click OK.
Receive Settings
S
ETTINGS
Exporting a list of domains. You can create a list of domains which can be exported, then imported
on to another appliance. To do this:
1 In the Relay screen, click the Export button.
2 Specify where you want the text file to be stored.
3 Click OK.
RELAY FOR INTERNAL SENDERS
Specify the authentication needed when a user sends an e-mail from inside the domain:
• Authentication or trusted IP required - When a sender is from the internal relay domain, the user
must be authenticated or be sending messages from a trusted IP.
• Authentication or trusted IP not required but only allow relay to internal recipients - When a
sender is from the internal relay domain, Authentication or trusted IP is only required when sending to
external domains.
• Authentication or trusted IP not required and allow relay to any addresses - When a sender is
from the internal relay domain, they can send to any domain even without being from a trusted IP. This
will act as an open relay providing the user is from an internal domain.
Caution: Choosing the last option may leave your system open to security breaches.
32 Administrator’s Guide SurfControl RiskFilter - E-mail V5.2.4
Page 38

S
YSTEM
S
ETTINGS
Receive Settings
2
RECIPIENT VALIDATION
The Recipient E-mail Address Validation screen enables you to improve the performance of the RiskFilter
gateway system. Receivers’ addresses are validated by user directories in order to prevent directory attack
before inbound messages are received. Use the Recipient E-mail Address Validation screen to configure
validation.
Figure 2 - 18 The Recipient E-mail Address Validation screen
Adding details of domains
In order to provide greater security, RiskFilter needs to check that the user comes from a valid domain.
When you add a domain to the Recipient E-mail Address Validation screen, you first need to supply details
of the domain. The domain List section enables you to do this.
Add validation servers
You must supply RiskFilter with a list of servers that are able to validate the user/s that you have added.
Before you can do this you must create a connection with the server that will validate these users. Using
this connection, e-mail messages are then checked to ensure that they belong to a domain and can be
validated.
To add validation servers:
1Select Receive Settings > Recipient Validation from the System Settings tab.
2 Click Add. The Recipient Email Address Validation screen is displayed.
3 In the Description field enter a description for this domain. This field is limited to 64 characters.
4 Select the domain that you need to be validated from the Domain list box.
5 Click Add>> to add it to the list. If you need to remove a domain from this list click the <<Remove.
6 Select the server that will supply validation from the Server list box.
7 Click Submit to put the new settings into effect or Reset if you want to cancel the modifications made
to the current settings.
SurfControl RiskFilter - E-mail V5.2.4 Administrator’s Guide 33
Page 39

S
2
YSTEM
Receive Settings
S
ETTINGS
MESSAGE CONTROL
You can limit the message size, data size per connection, number of messages per connection, and the
number of recipients per message. Use the Message Control screen to do this:
Figure 2 - 19 The Message Control screen
34 Administrator’s Guide SurfControl RiskFilter - E-mail V5.2.4
Page 40

S
YSTEM
To configure message control:
1Select Receive Settings > Message Control from the System Settings tab.
2Select Limit message size and enter a maximum message size into the corresponding Maximum
size (KB) field. This can prevent very large messages from using valuable bandwidth.
3Select Limit data size per connection and enter a maximum amount of data into the corresponding
Maximum data size (KB) field. This can help limit the receiving of messages with very large
attachments, which can take up valuable bandwidth.
4Select Limit number of messages per connection and enter a maximum number of connections into
the Maximum messages field.
5Select Limit number of recipients per message and enter a maximum number of recipients into the
Maximum recipients field. This can save bandwidth by preventing one message from being sent to
hundreds of users.
6Select Block messages with attachments of a specific type if you never want to receive certain
attachments.
• Enter the attachment extension into the Attachment Extensions field. Multiple extensions must
be separated by a semi-colon.
• Enter a message into the Error Message field. This will be displayed to the MTA client when a
message is blocked.
S
ETTINGS
Receive Settings
2
7 Click Submit to put the new settings into effect or click Reset if you want to cancel the modifications
made to the current settings.
EXCEPTION CONTROL
While RiskFilter is processing messages, it may encounter unexpected exceptions, such as encrypted email messages. Exception Control enables you to specify what action is to be taken when exceptions
occur:
• Deliver message – Send the message to the recipient. This is the default action.
• Drop message – Delete the message.
• Isolate message – Send the message to the Isolate queue.
You can also specify that a message is sent when the Exception Control filter is triggered. Selecting this
check box opens the screen up further so that you can enter details for this message.
Figure 2 - 20 Set what action is taken on messages
SurfControl RiskFilter - E-mail V5.2.4 Administrator’s Guide 35
Page 41

S
YSTEM
2
To configure exception control:
1Select Receive Settings > Exception Control from the System Settings tab.
2 Choose a filter action from the When messages fail to be processed drop-down list box:
3 Choose a Queue to send the message to, if the Filter Action is set to Isolate message.
4 Select the Send Notification check box if you want a message to be sent to the administrator when a
Receive Settings
• Deliver message – Deliver the message to the intended recipient.
• Drop message – Delete the message without delivering it.
• Isolate message – Instead of delivering the message, send it to an specified folder and send a
message to the intended recipient that the message could not be delivered. This is the default
action.
filter is triggered. This will open up the screen so that you can enter information about the message.
S
ETTINGS
Figure 2 - 21
5 Select the option that corresponds to who you want to be listed as the sender of the notification:
• Original E-mail Sender – List the person who sent the original message as the sender of the
notification.
• Administrator – List the administrator as the sender of the notification.
• User Specified – List the user whose e-mail address is in the field as the sender of the
notification.
6 Select the option that corresponds to who you want the notification sent to:
• Original E-mail Sender – Send the notification to the person who sent the original message.
• Original E-mail Receiver – Send the notification to the person who was supposed to receive the
original message.
• Administrator – Send the notification to the administrator.
• User Specified – Send the notification to the user whose e-mail address is in the field. You can
add multiple users but each entry must be separated by a semi-colon.
36 Administrator’s Guide SurfControl RiskFilter - E-mail V5.2.4
The Exception Control screen
Page 42

S
YSTEM
7 Enter the subject that you want to be displayed when the notification is received, into the Subject field.
For example: ‘Caution: Invalid e-mail message format’.
8 Enter the message that you want to be displayed in the Notification body into the Message Content
pane.
9 Specify what you want to do with the original message:
• Do not attach message – Send the notification without the original message.
• Attach modified message – Send a re-mimed version of the message with the return path
removed.
• Attach original message – Send the notification with the original message in it’s original format.
10 Click Submit to put the new settings into effect or Reset if you want to cancel the modifications made
to the current settings.
S
ETTINGS
Receive Settings
2
BLACK LIST
Connections and messages will be refused if they come from addresses or domains, which are listed in the
blacklist. The blacklist can be defined manually or imported from an address file. It can also be exported to
a specified file. Use the Black List screen to configure your blacklist.
Figure 2 - 22 The Black List screen
Adding an IP or subnet address to the blacklist
You can block either a single IP or a block of IPs by using the Subnet Mask:
• Adding a single IP address such as 10.1.4.2 will deny messages from one IP address.
• Adding a block such as 10.1.4.0/24 will deny messages from a group of IP addresses.
SurfControl RiskFilter - E-mail V5.2.4 Administrator’s Guide 37
Page 43

S
2
YSTEM
Receive Settings
S
ETTINGS
Importing and exporting Lists
If you already have a list of IP addresses that you want to block you can import this list to your blacklist.
Conversely once you have this list in your blacklist List (perhaps because you have been adding them
dynamically on a regular basis) you can export this ready-made list of IP addresses to another appliance.
Adding domain or e-mail addresses to the blacklist
The blacklist enables you to deny access to specific domains or e-mail addresses. You can import/export
lists of these domains and e-mail addresses to the blacklist in the same way as you import lists of IP
addresses.
To create a blacklist:
1Select Receive Settings > Black List from the System Settings tab.
2 Click Add>>. The IP address or subnet mask will appear in the list on the right. To remove an IP
address or subnet mask select it in the list and click <<Remove. You can use the Lookup feature to
find an IP address:
3 Enter a number into the Begins With: field.
4 If you want to import or export a list click Import or Export. This will show an Explorer dialog box from
which you can import or export the list.
5 Enter a path to the blacklist file or use Browse to navigate to the file.
6 Depending on what you are trying to do you will see either Import>> or Export>>:
• Import>> – You will now see the list of IP addresses in the right-hand pane.
• Export>> – You will be asked if you want to Save or Open the list.
• Click Open to view the list in a text editor such as Notepad.
• Click Save to save it to your system for use elsewhere.
7 Enter the domain or e-mail address, into the E-mail address field.
8 Click Add>>. The domain or e-mail address will appear in the list on the right. To remove a domain or
e-mail address, select it in the list and click <<Remove. Use the Lookup feature to find an IP address:
• Enter a number into the Begins With: field.
• Click Look up.
9 Click Submit to put the new settings into effect or Reset if you want to cancel the modifications made
to the current settings.
38 Administrator’s Guide SurfControl RiskFilter - E-mail V5.2.4
Page 44

S
YSTEM
S
ETTINGS
Receive Settings
2
WHITE LIST
Messages will bypass Anti-Spam checking if they come from addresses or domains, which are listed in the
White List. Use the White List screen to configure your White List.
:
Figure 2 - 23 The White List screen
Adding an IP or subnet address to the White List
You can block either a single IP or a block of IPs by using the Subnet Mask:
• Adding a single IP address such as 10.1.4.2 will allow messages from one IP address.
• Adding a block such as 10.1.4.0/24 will allow messages from a group of IP addresses.
Importing and exporting Lists
If you already have a list of IP addresses that you want to allow you can import this list to your White List.
Conversely once you have this list in your White List (perhaps because you have been adding them
dynamically on a regular basis), you can export this ready-made list of IP addresses to another appliance.
Dynamic White List
A Dynamic White List can be auto-generated based on the e-mail process information defined by
RiskFilter. This ensures that normal messages can proceed to their destination directly, without any AntiSpam policy checking being performed on them. This is done by setting an occurrence value which, when
it is reached, will copy the address into the Dynamic White List automatically.
To set up a dynamic white list:
1Select Receive Settings > White List from the System Settings tab.
2In the IP or subnet address field, add a single IP address or a block of IP addresses. You can use the
Lookup feature to find an IP address:
• Enter a number into the Begins With: field.
• Click Look up.
3 Click Add>>. The IP address or subnet mask will appear in the list on the right. To remove an IP
address or subnet mask, select it in the list and click <<Remove
SurfControl RiskFilter - E-mail V5.2.4 Administrator’s Guide 39
. When you click Submit the counter
Page 45

S
YSTEM
2
4 If you want to import or export a list click Import or Export. This will show an Explorer dialog box from
5 Enter a path to the White List file or use Browse to navigate to the file.
6 Depending on what you are trying to do you will see either Import>> or Export>>:
7 Enter the domain or e-mail address, into the E-mail address field.
8 Click Add>>. The domain or e-mail address will appear in the list on the right. To remove a domain or
9 If you want to import or export an already existing list see steps 4 - 6 above.
Receive Settings
above the section will change to match the amount of IPs that you have added, and you will see text
stating that the update was successful.
which you can import or export the list.
• Import>> – You will now see the list of IP addresses in the right-hand pane.
• Export>> – You will be asked if you want to Save or Open the list.
– Click Open to view the list in a text editor such as Notepad.
– Click Save to save it to your system for use elsewhere.
e-mail address select it in the list and click <<Remove. When you click Submit, the counter above the
section will change to match the amount of domains and e-mail addresses that you have added, and
you will see text stating the update was successful.
S
ETTINGS
40 Administrator’s Guide SurfControl RiskFilter - E-mail V5.2.4
Page 46

S
YSTEM
S
ETTINGS
Send Settings
2
SEND SETTINGS
The Send Settings menu provides sub-menus that enable you to specify how messages will be delivered
when they are sent on to the user via RiskFilter E-mail.
DOMAIN-BASED DELIVERY
Domain-Based Delivery enables you to configure relay routing based on the domain of a recipient. It can
also help you to configure the routing delivery methods for e-mail by resolving e-mail servers via DNS or
forwarding to specified e-mail servers. If outgoing mail fails, RiskFilter will retry until a predefined limit is
reached. Routing delivery is configured in the Domain-Based Delivery screen.
Figure 2 - 24 Existing routing methods for specific domains
Setting up the destination domains
To use Domain-based delivery, you need to add the domains of the destination servers to the Relay
Control screen in RiskFilter. You can add multiple servers. If more than one user-specified e-mail server is
listed, RiskFilter will control traffic automatically to ensure load balancing.
Delivering the messages
There are two ways of delivering a message:
• Resolve e-mail server via the following DNS server(s) – Send messages to the internal SMTP
server via a DNS server for resolution of host names.
• Forward e-mail to the following SMTP server(s) – Send messages to the internal SMTP server
directly so that it can deliver the message.
We recommend that you use Forward e-mail to the following SMTP server(s) for routing mail.
SurfControl RiskFilter - E-mail V5.2.4 Administrator’s Guide 41
Page 47

S
2
YSTEM
Send Settings
S
ETTINGS
Using TLS authentication (Transport Layer Security)
If a message is sent via TLS then RiskFilter will be able to receive it, if STARTTLS Advertisement is
enabled. However, if your mail server will only accept messages that are sent using TLS, then TLS must
be enabled in RiskFilter in order for mail to be delivered to this server. See Certificate on page 25 for more
information.
To set up domain-based delivery:
1Select Send Settings > Domain-Based Delivery from the System Settings tab.
2
You will see the Default Routing Method that is supplied with the product.
Figure 2 - 25
3 Click Edit
4 Enter or edit the domain name in the Description field if necessary.
5 Select your domain from the Domain list box in the Destination Domain Names section.
6 Click Add>> to add the domain to the list on the right. If you need to remove a domain from this list
click Remove>>.
7Select Forward mail to the following SMTP server(s).
8 Enter the IP address of the SMTP server into the Server address field.
9 Enter the port number into the Port field. The default port number is 25.
10 Click Add>> to add the server to the list on the right.
11 RiskFilter supports the transferring of messages via the security protocol TLS. It will always RECEIVE
messages sent by TLS transfer regardless of it’s settings. However, if your mail server requires TLS
authentication to DELIVER mail, then you must enable TLS mail delivery.
To enable TLS delivery, select My server(s) require communication over transport layer security.
Note: if your server does not require TLS for mail delivery, do NOT select this feature as this
will stop settings from being submitted.
12 For more information on TLS see Certificate on page 25.
The supplied Default Routing Method
13 Select My server(s) require authentication if you want users to supply a username and password
before they can access the server.
14 Enter a valid user name and password for authentication into the relevant fields.
15 Click Submit to put the new settings into effect or Reset if you want to cancel the modifications made
to the current settings.
42 Administrator’s Guide SurfControl RiskFilter - E-mail V5.2.4
Page 48

S
YSTEM
S
ETTINGS
Send Settings
2
TRAFFIC CONTROL
After completing the security verification for mail, RiskFilter will forward it to the e-mail server according to
the route configuration. To protect e-mail systems from the impact of heavy traffic, Traffic Control is
designed to limit the mail traffic sent to the e-mail system. Use the Traffic Control screen to do this.
Figure 2 - 26 The Traffic Control screen
To set up traffic control:
1Select Send Settings > Traffic Control from the System Settings tab.
2 In the Maximum number of messages relayed to an internal e-mail server field, enter the
maximum number of messages that you want to be relayed to your internal e-mail server per hour.
This should be set up according to the incoming traffic setting of your e-mail server.
3 Click Submit to put the new settings into effect or Reset if you want to cancel the modifications made
to the current settings.
ADVANCED DELIVERY
If a delivery attempt fails because the e-mail server reports a receiving error, RiskFilter places the
message into the Deferred Messages queue. It then tries to deliver the message again according to
specified rules. You can specify how long RiskFilter continues to make delivery attempts, the maximum
retry period and the relevant actions to take after delivery has failed. Undeliverable messages are returned
to the original sender or, if this cannot be done, a message is sent to the specified postmaster account.
This is.accompanied by a copy of the original message. Use the Advanced Delivery screen to configure
delivery attempts.
Figure 2 - 27 The Advanced Delivery screen
To configure Advanced Delivery:
1Select Send Settings > Advanced Delivery from the System Settings tab.
SurfControl RiskFilter - E-mail V5.2.4 Administrator’s Guide 43
Page 49

S
YSTEM
2
2 Enter a time in minutes into the Retry interval’ field. This specifies how long the server should wait
3 Enter a time in minutes into the Maximum retry period field. Once this period of time is reached the
4 In the Postmaster e-mail address field, enter an e-mail address to receive the message after
5 Click Submit to put the new settings into effect or Reset if you want to cancel the modifications made
Send Settings
before attempting to deliver the message again.
server will stop trying to send the message. Enter a time in minutes into the Maximum retry period
field.
delivery has failed. When the maximum retry period is reached, and after attempting to send the
message back to the original sender fails, RiskFilter will drop the message delivery and forward it to
this specified e-mail account stating that the mail delivery failed. This will be accompanied by a copy of
the original message.
to the current settings.
S
ETTINGS
44 Administrator’s Guide SurfControl RiskFilter - E-mail V5.2.4
Page 50

S
YSTEM
S
ETTINGS
User Management
2
USER MANAGEMENT
Once you have completed the initial configuration of SurfControl RiskFilter there are other settings to
implement that are vitally important to enable the product to work at its best. SurfControl recommends that
you enhance RiskFilter’s security in the following ways:
• Change the passwords to the Administrator accounts of the RiskFilter Console and RiskFilter
Management Console.
• Set permissions for individual Administrators that will administer RiskFilter. In this way you can allow
certain administrators to make departmental policy changes but stop them from administering the
RiskFilter console itself.
There are two different accounts that are used to administer the RiskFilter appliance and they are both
supplied with default passwords:
• RiskFilter Console administrator account – The default password for this account is admin -
use the RiskFilter Console to change this.
• RiskFilter System Management Console administrator account – The default password for this
account is rfmngr - use the RiskFilter Management Console to change this.
See See “Launching SurfControl RiskFilter” on page 6 for more information on how to start each of
these consoles.
ACCOUNT MANAGER
The Administrator Account Manager enables you to manage the accounts of anyone who has access to
RiskFilter. It enables you to:
• Add new accounts by clicking Add.
• Delete redundant accounts by selecting the account and clicking Delete.
• Edit existing accounts by clicking Edit alongside the account.
You can see these accounts in the Administrator Account Manager.
Figure 2 - 28 The Administrator Account Management screen
SurfControl RiskFilter - E-mail V5.2.4 Administrator’s Guide 45
Page 51

S
2
YSTEM
User Management
S
ETTINGS
Changing the Administrator Account Password
SurfControl recommends that you change the supplied default passwords as soon as possible to enhance
the security of the SurfControl RiskFilter appliance. The RiskFilter E-mail Console administrator account
password is changed within the Admin Account Management screen.
To change the Administrator account password:
1 Log in to the RiskFilter console using the following details:
•username = administrator
• password = admin
2 Choose Account Manager from the User Management menu. The Administrator Account Management
screen is displayed.
3 Click Edit.
4 Enter your new password into the Password field and confirm it.
5
Click Submit.
Specifying Administrator Access
Administrator Access can be useful to give certain people access to the RiskFilter appliance in order to
carry out specific tasks such as making policy changes or managing messages stored in the various
Queues.
The scope of the changes that these people can make will depend on the permissions that you set up for
them. For example, you can allow certain individuals to make departmental policy changes, yet not allow
them to administer the RiskFilter console itself. The Administrator Account Management screen is where
you specify the type of access that you
want your administrator/s to have.
Figure 2 - 29 The Administrator Account Manager screen
46 Administrator’s Guide SurfControl RiskFilter - E-mail V5.2.4
Page 52

S
YSTEM
S
ETTINGS
User Management
2
For each of the users you elect to carry out some of the administrative tasks within RiskFilter you need to:
• Create an account for each user (administrator).
• Add their appliance IP address as an authorized user. Once you have created an account for the
administrator you can add the IP address of their machine to the RiskFilter console so that RiskFilter
will recognize them as an authorized user. This will give you an extra level of security as, without it, the
RiskFilter console will be accessible from anywhere.
• Select the parts of RiskFilter that they are allowed to manage. These tasks are divided into groups
called Managed Modules. The following table contains an explanation of each module.
Table 1 Managed Modules
Module What it does
System Settings
Policy Manager
Reports and Logs
Enables the administrator to configure settings in the System Setting tab, as well as
being able to view dash board and system report in the Reports and Logs tab.
Enables the administrator to configure the settings in the Policy Manager tab.
Enables the administrator to configure the settings in the Report and Logs tab.
Isolated Messages Enables the administrator to manage messages that have been isolated.
Virus Messages Enables the administrator to manage messages that have been isolated because they
contain a virus.
Spam Messages
Archived Messages
Deferred Messages
Enables the administrator to manage messages that have been isolated because they
are believed to be spam.
Enables the administrator to manage messages that have been archived.
Enables the administrator to manage messages that have been deferred.
Setting up Administrator Access
To set up this administrator access you need to create an account for each administrator who will access
the appliance.
To create an administrator account:
1Select User Management > Account in the System Settings tab.
2 In the Administrator Account Manager screen click Add. Enter the following information:
• User Name – Enter the network username of the administrator.
• Status – Enable. You can choose Disable if you need to deny the administrator access to the
RiskFilter console.
• First/Last Name – Enter the first and last name of the administrator.
• Password/Confirm Password – Enter a password for this administrator, and confirm it.
• Description – Enter a description that will help you to identify this administrator.
• Managed Modules – Select the modules that you want the administrator to have access to.
3 Click Submit.
SurfControl RiskFilter - E-mail V5.2.4 Administrator’s Guide 47
Page 53

S
YSTEM
2
4 Select Configuration from the General menu.
5 In the Trusted IP(s) field enter the IP addresses of all of the administrator’s machines that you want to
6 Click Submit.
User Management
be able to access the RiskFilter appliance. If you enter more than one, then each IP address must be
separated by a semicolon.
S
ETTINGS
Editing Administrator Accounts
To edit the account once you have set it up:
1Select Account Manager from the User Management menu.
2 In the Administrator Account Manager screen click Edit. Change the relevant details in the
Administrator Account Management screen.
3
Click Submit.
PERSONAL E-MAIL MANAGER
Personal E-mail Manager (PEM) enables the user to look at their isolated spam messages and lets them
decide whether to delete the messages or treat them as legitimate e-mails. The RiskFilter console enables
you set up the notification message that will be sent to users when they have isolated spam messages.
PEM can be configured within the Personal E-mail Manager screen.
Figure 2 - 30 The PEM screen
48 Administrator’s Guide SurfControl RiskFilter - E-mail V5.2.4
Page 54

S
YSTEM
The PEM screen is composed of three sections:
• Digest Notification Schedule – Set the time that a message will be sent to a user to inform them that
they have spam messages waiting to be actioned.
• Digest Message Template – Set up this message to the exact format that you require. This is the
message that the user will see in their Inbox to tell them that they have spam waiting to be actioned.
• Recipients List – Create a list of all of the users that you want to be able to use PEM.
For example: john@domain.com will apply only to this user while *@domain.com will apply to all users
within domain.com
Note: Digest messages will only be sent to protected domains (those domains or addresses
listed in Relay Control). Non-protected domains will not be able to receive digest messages.
S
ETTINGS
User Management
2
Setting up the PEM message
The PEM screen enables you to define how and when you want messages to be automatically sent to
users.
To set up PEM message:
1 Set a time for the message to be sent to users to tell them that they have spam messages waiting:
• Max Messages – Set how many linked messages are carried by each message. For example, if
Max Messages is set to 50 and there are 150 messages waiting, three messages will be sent to
the user (each carrying 50 messages and links) at the time specified in PEM Time. If Max
Messages were set to 150, one message would be sent with all of the messages (and links) within
it up to a maximum of 150 per message.
• Digest Time(s) – Select a time for the message to be sent to the users to say that they have
messages waiting.
2 The PEM Message Template sets out the format for the messages that are sent to users when they
need to manage their spam messages.
• Operation – Select one of the check boxes to indicate that the message is not spam. There are
two options to choose from:
– Report – adds a button to the message that, when clicked will send the message to
notspam@surfcontrol to indicate that this kind of message should not be classed as spam.
– Deliver – adds a button to the message that, when clicked, will deliver the message to the user
without reporting it to SurfControl.
– Delete – delete the message without sending.
– Always enforce end-user authentication – when the user clicks the link to access their mail
they will be asked to log in. Leaving this clear will allow them to check their mail without having
to supply a user name and password.
• Base URL – This can be set so that it reflects the IP address of the RiskFilter appliance. If you are
using a master/slave configuration, then this must be set to the URL of the master server.
• Company – This is the title of the message that the user receives informing them that they have
spam messages waiting. You can change this default title by entering your own company details
here.
SurfControl RiskFilter - E-mail V5.2.4 Administrator’s Guide 49
Page 55

S
YSTEM
2
3 Once you have enabled PEM you can choose who has access to it by entering their details into the
User Management
• Description – This lists the product that is filtering spam messages. You can change the default
title by entering your own details here.
• Sender – The default setting is postmaster@$(domain). You can change this to something that
more closely reflects your company set up, if necessary.
Note: You must enter the e-mail address in a valid format. This address might not even exist,
but it must be in the correct form: XXXX@XXX.XXX, without any spaces.
• Subject – As this will appear in the Inbox of the users e-mail client, it is a good idea to enter a title
that will immediately draw their attention, e.g. ‘You have isolated e-mail waiting’.
• Header – You can replace the default The following messages are believed to be spam
message with a message of your own.
• Footer – You can change the default message so that it provides information on who to contact if
they have a problem, for example the administrator’s e-mail address or telephone number.
Recipients List section. There are two options in this section:
S
ETTINGS
• All except the list below – Every user on the system will be able to use PEM and will receive
messages unless their details are entered into the Enter recipient address: field.
Select this option to change RiskFilter from the default setting. This way, if you have not added a
list of users, everyone will still have access to this feature.
• Only the list below – Only the users listed in the Enter recipient address: field will receive
messages and will be able to manage their own spam. With this option checked you MUST enter a
list of users otherwise, even with PEM enabled, it will not work.
4 You can use wildcards to widen the range of addresses without having to enter them individually.
5 Once you have set up your message template click Submit. A message reflecting this style will now
be sent to users when they have spam e-mail messages waiting.
Figure 2 - 31
50 Administrator’s Guide SurfControl RiskFilter - E-mail V5.2.4
What the user sees: Personal E-mail Manager
Page 56

S
YSTEM
S
ETTINGS
User Management
2
Adding users
You can add users or lists of users to PEM.
To add users:
1 Enter the user details of any user that you want to add to the Recipients List into the Enter recipient
address: field.
2 Click Add. This will add them to the right-hand pane. If you want to remove any users from this list,
select the user then click
Remove.
Exporting lists of users
Lists of users can be exported for use with other features.
To export a list:
1 Select the list you want to export in the right-hand pane of the Recipients List section.
2 Click Export. You will be asked if you want to open the file or save it to your computer. Clicking Open
will open the list in a text editor such as Notepad so that you can view it and print it if necessary.
3 Click Save to
show a Save As dialog box where you can navigate to where you want to save the file.
Importing lists of users
You can import a list that you have created or have been sent. If you want to import a list you have created
in RiskFilter (for example on another RiskFilter appliance) you must first export it to the network then
import it onto the appliance that you want to add it to. Any user list that you want to import should be in a
text file, with one address per line.
For detailed information on exporting then importing lists see Importing and exporting Lists on page 69
for more information.
To import lists of users:
1 Click Import. An Import or Export Address File dialog box is displayed.
2 Click Browse and navigate to your saved text file containing your list of e-mail addresses. This could
be a file created by exporting one of your own lists or a file that someone has supplied you with. The
path to this file will appear in the field.
3 Click
Import. You will now see the list of addresses in the right-hand pane.
SurfControl RiskFilter - E-mail V5.2.4 Administrator’s Guide 51
Page 57

S
2
YSTEM
User Management
S
ETTINGS
END-USER CONTROL
Authorized users can log in to PEM with their own account and password, validated by a ‘User Validation’
connection and, depending on the settings in the Users List pane, can manage their own Black and White
lists. To use PEM, a User Validation connection with ‘Account Authentication’ must be set up for End-Users
to manage their own Black/White Lists.
Use the End User Control screen to set up End User Control.
Figure 2 - 32 The End-User Control screen
End-user Bypass Anti-Spam Setting
You can allow listed users to receive mail without an Anti-Spam check being run on them. If you have a
user who must receive all messages, regardless of type, then this will prevent important messages being
isolated as spam. It also can help where the type of mail a user receives results in a lot of false positives.
User List
You can specify users or lists of users then apply one of two conditions to them:
• Enable White List & Black List for all EXCEPT the address list below – Everyone EXCEPT the
users listed can manage their Black/White Lists.
• Enable White & Black List ONLY for the address list below – ONLY the users listed can manage
their Black/White Lists.
Setting up End User Control
To set up End User Control:
1Select User Management > End-User Control from the System Settings tab.
2Select Enable end-users to bypass Anti-Spam checking.
3 Decide who you want to apply the settings to and select the option that matches the way you want to
apply the setting (see above).
4In the Enter user e-mail address: field enter a domain or e-mail addresses in one of the following
ways:
• Enter the e-mail addresses of all users that you want to apply the settings to, e.g.
user@mydomain.com
• Enter *@ followed by the domain – all users in that domain will be included in the list.
52 Administrator’s Guide SurfControl RiskFilter - E-mail V5.2.4
Page 58

S
YSTEM
5 Click Add. The item will be added to the list on the right. If you want to delete a domain or e-mail
address in the group, select the relevant address from the list and click Remove.
6 Click Submit to put the new settings into effect or Reset if you want to cancel the modifications made
to the current settings.
S
ETTINGS
User Management
2
USER AUTHENTICATION
There are two ways in which authentication is used:
• For authenticating PEM users - Give users password protected access to the appliance, in order to
manage their PEM account. This will not give them access to the RiskFilter Administrator.
• For authenticating remote users - Authenticate users who send mail from the protected domain, from
an IP address not listed in the Relay Control screen. These could include, for example, dial-up users.
This will enable successful delivery of legitimate mail, while still denying e-mails from fraudulent
addresses.
Authenticating PEM users
RiskFilter will authenticate users’ accounts and passwords via user directories, before they log on to the
PEM login page to check spam messages. Authentication is carried out in the User E-mail Account
Authentication screen.
Figure 2 - 33 The User E-mail Account Authentication screen with existing accounts
RiskFilter enables end users to use a whitelist and a blacklist in order to manage their isolated spam
messages.
Note: For more information on using PEM (originally called End User Spam Management), see
Personal E-mail Manager on page 48.
To set up user authentication:
1Select User Management > User Authentication from the System Settings tab.
2 Click Add.
3 Enter a name for the account into the Description field. This is limited to 64 characters.
4 Choose the domain that this user belongs to from the Domain list box.
5 Click Add>>. This will add it to the list pane on the right. To remove a domain, select it and click
<<Remove.
SurfControl RiskFilter - E-mail V5.2.4 Administrator’s Guide 53
Page 59

S
YSTEM
2
6 Choose the server that will provide the authentication for this user from the ‘Server’ drop-down list.
7 Click Add>>. This will add it to the list pane on the right. To remove a server, select it and click
8 Click Submit to put the new settings into effect or Reset if you want to cancel the modifications made
User Management
<<Remove.
to the current settings.
S
ETTINGS
Authenticating remote users
To authenticate remote users you first need to configure an LDAP connection and then add the user’s
domain to RiskFilter:
1 Configure an LDAP connection. See “User Directories” on page 13 for information on how to do this.
2Select User Management > User Authentication from the System Settings tab.
3 Click Add.
4 Enter a name for the account into the Description field. This is limited to 64 characters.
5 Choose the domain that this user belongs to from the Domain list box.
6 Click Add>>. This will add it to the list pane on the right. To remove a domain, select it and click
<<Remove.
7 Select the LDAP connection you have just created from the Directory drop down menu.
8 Click Add>>. This will add it to the list pane on the right. To remove a server, select it and click
<<Remove.
9 Click Submit to put the new settings into effect or Reset if you want to cancel the modifications made
to the current settings.
Note: Remote users will need to configure their mail clients to authenticate to the Riskfilter
server when sending mail. They should use their email address as the username and their
network password.
54 Administrator’s Guide SurfControl RiskFilter - E-mail V5.2.4
Page 60

S
YSTEM
S
ETTINGS
License & Updates
2
LICENSE & UPDATES
To ensure that RiskFilter is filtering at its optimum level you must update it regularly. This can either be a
manual update which updates the product (and it’s components) immediately, or you can specify a time
and date for a regular (scheduled) update to take place.
UPDATE NOW
You can ask RiskFilter to update your Anti-Virus and Anti-Spam Agent definitions instantly in the Update
Now screen.
Figure 2 - 34 The Update Now screen
To update your Anti-Virus Definitions:
1Select License & Updates > Update Now from the System Settings tab.
2 Click Anti-Virus Agent Definitions to expand the list. This screen shows details of:
• Server – The name of the server where the Anti-Virus Agent is installed.
• Engine Type – The Anti-Virus engine that this agent uses: e.g McAfee.
• Latest Definitions – The date and version number of the last definitions that were downloaded.
• Last Update Attempt – The last time an update was attempted.
• Last Update Status – How successful the update was:
– Up to date – the last update downloaded the most up to date database. There is no more
recent database available.
– Failed – the update started but was disconnected or timed out.
– Disabled – there are no filters which use this database. Because of this, this update is disabled
to conserve bandwidth.
– Not Licensed – there is no license available to update this database.
– Waiting – the update event is queued as only one update can be downloaded at one time.
3 Updating – This database is currently attempting to update.
4 Select the check box alongside Anti-Virus Agent Definitions.
5 Click Submit to start the update.
SurfControl RiskFilter - E-mail V5.2.4 Administrator’s Guide 55
Page 61

S
2
YSTEM
License & Updates
S
ETTINGS
Updating your Anti-Spam Agent Definitions
To update your Anti-Spam Agent definitions:
1Select License & Updates > Update Now from the System Settings tab.
2 Click the Anti-Spam Agent Definitions link to expand the list. This screen shows details of:
• Server – The name of the server where the Anti-Spam Agent is installed.
• Content Type – The type of content filter that this Anti-Spam engine uses include:
– Digital Fingerprints
– Heuristics
– LexiRules
– Internet Threat Database
• Latest Definitions – The date and version number of the last definitions that were downloaded, if
applicable. This is not shown for Internet Threat Database.
• Last Update Attempt – The last time an update was attempted.
• Last Update Status – How successful the update was:
– Up to date – the last update downloaded the most up to date database. There is no more
recent database available.
– Failed – the update started but was disconnected or timed out.
– Disabled – there are no filters which use this database. Because of this, this update is disabled
to conserve bandwidth.
– Not Licensed – there is no license available to update this database.
– Waiting – the update event is queued as only one update can be downloaded at one time.
– Updating – this database is currently attempting to update.
3 Select the check box alongside Anti-Spam Agent Definitions.
4 Click Submit to start the update.
AVA and ASA License Expired
As your Anti-Virus Agent and/or Anti-Spam Agent license approaches its expiry date a message will be
sent reminding you to renew your license.
56 Administrator’s Guide SurfControl RiskFilter - E-mail V5.2.4
Page 62

S
YSTEM
S
ETTINGS
License & Updates
2
SCHEDULED UPDATE
It is important to schedule updates to the Anti-Spam and Anti-Virus agents so that you can be sure of the
maximum protection. The Anti-Spam database is updated three times a day so the level of protection you
are receiving can change rapidly on a day to day basis. Setting up these updates as an automatic event
will ensure that your databases never run the risk of being out of date.
You can schedule updates in the Scheduled Update screen. Choose License and Updates
Scheduled Update in the System Settings tab. This will show you the Scheduled Update screen.
then
Figure 2 - 35 The Scheduled Update screen
Use this screen to update the Anti-Virus and Anti-Spam Agents.
Updating the Anti-Virus Agent
To update the AntiVirus Agent:
1 Select the Anti-Virus Agent Update check box.
2 Specify how often the update is to occur by choosing an interval from the Repeat Interval list box. By
default this is set to Every hour. We recommend that you keep this setting to ensure you receive
updates as soon as they are ready.
3 If you set the repeat interval to Every Week, you need to specify the day of the week that you want the
update to take place.
4 Specify the time of day that the update is to take place. For example:
• Repeat interval = Every week
• Day of week = Saturday
•Time = 23:30
This will perform an online update of the Anti-Virus engine and definitions automatically, every
Saturday at 11:30pm.
5 Click Submit to put these changes into effect.
SurfControl RiskFilter - E-mail V5.2.4 Administrator’s Guide 57
Page 63

S
2
YSTEM
License & Updates
S
ETTINGS
Updating the Anti-Spam Agent
To update the Anti-Spam Agent:
1 Select the Anti-Spam Agent Update check box.
2 Specify how often the update is to occur by choosing an interval from the Repeat Interval list box. By
default this is set to Every hour. We recommend that you keep this setting to ensure you receive
updates as soon as they are ready.
If you set the repeat interval to Every Week, you need to specify the day of the week that you want the
update to take place.
3 Specify the time of day that the update is to take place. For example:
• Repeat interval = Every week
• Day of week = Saturday
•Time = 23:30
This will perform an online update of the Anti-Virus engine and definitions automatically, every
Saturday at 11:30pm.
4 Click Submit to put these changes into effect.
LICENSE STATUS
You can check your licenses in the License Status screen.
Figure 2 - 36 The License Status screen
Updating Component Licenses
In order to use the Anti-Spam and Anti-Virus Agents in your filters you need to have a valid license. Once
you have registered these components you can check their status by looking at the Component License
page.
Figure 2 - 37 The Component License screen
58 Administrator’s Guide SurfControl RiskFilter - E-mail V5.2.4
Page 64

S
YSTEM
S
ETTINGS
License & Updates
2
Viewing component licenses
To view your component licenses:
1Select License & Updates > License Status from the System Settings tab.
2The License Status screen is displayed. You will see a list of licenses that are registered on this
appliance. Click View by Component License to see all of the details of any licenses you have for
these agents.
UPDATE SERVER
If you need to view the details of the server that updates your components (such as Anti-Virus and AntiSpam agents), or even specify an alternative one, then you can do this in the Update Server Configuration
screen.
Figure 2 - 38 The Update Server Configuration screen
The reason for this could be:
• You want to use a different update server to the default, to update your component licenses.
• You use a proxy server to access the Internet so any component updates will have to be carried out via
this computer.
Manually setting up a license server
To manually set up your license server:
1 In the System Settings screen choose License & Updates > Update Server.
2 Enter the path to the update server into the Directory field.
3 Enter the name of the server into the Server field.
4 Enter the port number into the Port field. The default port number is 80.
5 Enter the path to the proxy server into the Server field.
6 Enter the proxy port number into the Port field.
Note: You can use the Configuration Wizard to add or amend license details by choosing Help
> Configuration Wizard in the System Settings tab.
SurfControl RiskFilter - E-mail V5.2.4 Administrator’s Guide 59
Page 65

S
2
YSTEM
License & Updates
S
ETTINGS
LICENSE SERVER
If you need to view the details of your license update server or specify an alternative one then you can do
this in the License Server Configuration screen.
Figure 2 - 39 The License Server Configuration screen
The reason for this could be:
• You want to use a different License Server to the default.
• You use a proxy server to access the Internet so any license updates will have to be carried out via this
computer.
Note: You can use the Configuration Wizard to add or amend license details by choosing Help
> Configuration Wizard in the System Settings tab.
Manually setting up a License server
To set up a license manually:
1 In the System Settings screen choose License & Updates > License Server.
2 Enter the path to the License server into the Server field.
3 Enter the path to the proxy server into the Server field.
4 Enter the port number into the Port field.
5 Click Submit.
User Number Exceeded
If the number of users exceeds that stipulated by your user license, you will be sent a message informing
you of this fact. RiskFilter calculates the number of users by counting the number of successfully delivered
e-mail messages over seven days.
60 Administrator’s Guide SurfControl RiskFilter - E-mail V5.2.4
Page 66

S
YSTEM
S
ETTINGS
Help
2
HELP
The Help menu gives you access to tools that can help you solve problems with RiskFilter E-mail.
ADMIN GUIDE
A direct link to this guide. Selecting this menu will launch this RiskFilter Administrator’s Guide in pdf format.
CONTACT SUPPORT
You can fill in the Support screen and submit information to SurfControl Support so that they can help you
with any aspect of the appliance that you are having difficulty with.
Figure 2 - 40 The Contact Support screen
Submitting a Support Request
To submit a Support Request:
1Select
2 Ensure that the Recipient field contains the Support address: support @SurfControl.com
3 Enter your e-mail address into the Sender’s Address field.
4 Enter your name into the Sender’s Name field.
5 Enter the name of your organization into the Organization field.
6User the Request Type drop-down list box to specify the type of request you are making and enter the
SurfControl RiskFilter - E-mail V5.2.4 Administrator’s Guide 61
Help > Contact Support from the System Settings tab
relevant text into the Additional Information pane:
• Suggestion – Enter any ideas you have to improve RiskFilter.
• Question – Ask a general question about RiskFilter.
• Feedback – Enter feedback about a problem and whether it was fixed or not.
• Problem – Enter details of the problem and include relevant files as a diagnostic tool (see step 7).
Page 67

S
YSTEM
2
7 Select the relevant check boxes from the Attach list to send configuration files to Support:
8 Fill in the ‘Additional Information’ pane with your request (see Step 6).
9 Click Submit.
Help
• Surfcontrol RiskFilter configuration – This gives a summary of the RiskFilter software
configuration and includes:
– RiskFilter E-Mail Version
– Cluster Configuration
– PEM Digest Configuration
• System information – This includes information useful for restoring the customers environment
on Support machines and includes:
– Policy Manger and Filter Settings
–System Settings
– User Authentication Settings
– Connection Control Settings
• SurfControl RiskFilter latest log – This attaches the latest activity log from RiskFilter.
S
ETTINGS
FIRSTBOOT WIZARD
The FirstBoot wizard enables you to set up how the RiskFilter appliance is configured within your system
using a wizard. See the Starter Guide for more details.
CONFIGURATION WIZARD
The Configuration wizard enables you to set up how the RiskFilter software is configured within your
system using a wizard. See the Starter Guide for more details.
62 Administrator’s Guide SurfControl RiskFilter - E-mail V5.2.4
Page 68

S
YSTEM
S
ETTINGS
Key Points
2
KEY POINTS
The following list is a summary of the main points covered in Chapter 2. Use this list as a quick reminder of
what you can do within the System Settings tab:
Q RiskFilter can notify the administrator by sending a message to a predefined address, when an event
such as a service stopping occurs.
Q User Directories provide RiskFilter with recipient address validation and end-user authentication.
Servers that can be used are: Microsoft Active Directory, IBM LDAP Server, Generic LDAP, ESMTP,
Recipient File and Local Database.
Q Microsoft Active Directory, IBM LDAP Server, Generic LDAP, ESMTP and Local Database can all be
used for PEM authentication.
Q A user-defined list of e-mail addresses and passwords can be imported onto the RiskFilter appliance
and stored in the database for authentication and validation purposes.
Q You can configure RiskFilter to act as a proxy server for POP3, Webmail and IMAP.
Q You can store messages in a different place to the default by changing the default directories within the
Logs and Archives screen.
Q For an extra layer of security RiskFilter supports the use of TLS verification/encryption.
Q If your certificate is due to expire, RiskFilter will notify you of the fact. When you see these notifications
you need to import a new certificate.
Q A default certificate is supplied with RiskFilter but this will need to be renewed when it expires, or
replaced with a certificate from a certificate authority such as Verisign.
Q It is a good idea to make a backup of the default certificate supplied with RiskFilter. This means that in
the event of the certificate on the RiskFilter appliance being corrupted or destroyed, you can simply
import your backup copy onto the machine.
Q Improve system performance by limiting the number of simultaneous connections to the system.
Q You can specify that a SMTP greeting message is delayed for a specified time, so that if a client tries to
send data ahead of this time, the connection is dropped. This helps to prevent spam, as spam sending
applications send a lot of messages very quickly.
Q You can specify an IP address or a group of IP addresses as trusted IP addresses, to enable them to
bypass RBL checks and SMTP greeting.
Q RiskFilter enables you to stop your e-mail system from being used as an open relay by spammers.
Relay control limits the server to only relaying e-mails for specific domains.
Q You can limit the message size, data size per connection, number of messages per connection, and
the number of recipients per message.
Q A message can be sent to the administrator when a filter is triggered.
Q Connections and messages will be refused if they come from addresses or domains which are listed in
the blacklist.
SurfControl RiskFilter - E-mail V5.2.4 Administrator’s Guide 63
Page 69

S
YSTEM
2
Q You can block either a single IP or a block of IPs by using the Subnet Mask.
Q If you already have a list of IP addresses that you want to block, you can import this list to your
Q A Dynamic White List can be auto-generated based on the e-mail process information defined by
Q Domain-Based Delivery enables you to configure relay routing based on the domain of a recipient. It
Q If a message is sent via TLS then RiskFilter will be able to receive it. However, if your mail server will
Q Traffic Control is designed to limit the mail traffic sent to the e-mail system to protect e-mail systems
Key Points
blacklist.
RiskFilter. This ensures that normal messages can proceed to their destination directly, without any
Anti-Spam policy checking being performed on them.
can also help you to configure the routing delivery methods for e-mail by resolving e-mail servers via
DNS or forwarding to specified e-mail servers.
only accept messages that are sent using TLS, then TLS must be enabled in RiskFilter in order for mail
to be delivered to this server.
from the impact of heavy traffic.
S
ETTINGS
Q If a delivery attempt fails because the e-mail server reports a receiving error, RiskFilter places the
message into the Deferred Messages queue.
Q Administrator Access can be useful to give certain people access to the RiskFilter appliance in order to
carry out specific tasks such as making policy changes, or managing messages stored in the various
Queues.
Q If you enter more than one trusted IP address, then each IP address must be separated by a
semicolon(;).
Q Personal E-mail Manager (PEM) enables the user to look at their isolated spam messages and lets
them decide whether to delete the messages or treat them as legitimate e-mails.
Q You can use wildcards to widen the range of PEM user addresses without having to enter them
individually.
Q You can allow listed users to receive mail without an Anti-Spam check being run on them.
Q You must update components such as Anti-Spam Agent and Anti-Virus Agent regularly, to ensure that
RiskFilter is filtering at its optimum level.
Q The Anti-Spam database is updated three times a day, so the level of protection you are receiving can
change rapidly on a day to day basis.
Q If the number of users exceeds that stipulated by your user license, you will be sent a message
informing you of this fact.
64 Administrator’s Guide SurfControl RiskFilter - E-mail V5.2.4
Page 70

Policy Manager
Chapter 3
The Policy Manager tab . . . . . . . . . . . . . . . . . . . . . . . . . . . . . . . . . . . . . . . . . . . . . . . . . . . . . .page 66
Creating a Policy . . . . . . . . . . . . . . . . . . . . . . . . . . . . . . . . . . . . . . . . . . . . . . . . . . . . . . . . . . . page 67
Address Group. . . . . . . . . . . . . . . . . . . . . . . . . . . . . . . . . . . . . . . . . . . . . . . . . . . . . . . . . . . . . page 69
Queue Manager. . . . . . . . . . . . . . . . . . . . . . . . . . . . . . . . . . . . . . . . . . . . . . . . . . . . . . . . . . . . page 71
Dictionary Manager . . . . . . . . . . . . . . . . . . . . . . . . . . . . . . . . . . . . . . . . . . . . . . . . . . . . . . . . . page 73
Global Policy . . . . . . . . . . . . . . . . . . . . . . . . . . . . . . . . . . . . . . . . . . . . . . . . . . . . . . . . . . . . . . page 79
Key Points . . . . . . . . . . . . . . . . . . . . . . . . . . . . . . . . . . . . . . . . . . . . . . . . . . . . . . . . . . . . . . . page 103
Page 71

P
OLICY MANAGER
3
The Policy Manager tab
THE POLICY MANAGER TAB
This chapter explains how to use the Policy Manager tab to configure anything to do with the management
of e-mail messages that pass through RiskFilter. By controlling who has policies applied to them and what
these policies actually do, you can fine-tune your filtering to exactly match your company’s needs.
TERMINOLOGY USED
The following terminology is used in this chapter:
• DFP (Digital Fingerprint) – Compares mail messages to known spam from different categories.
• Heuristics – Uses regular expressions to determine the likelihood that an e-mail message is actually
Spam.
• LexiRules – Analyses words, phrases and patterns commonly found in spam to identify e-mail
messages as possible spam.
WHAT CAN BE CONFIGURED IN THE POLICY MANAGER TAB?
The Policy Manager tab is where you set up your filtering policies. You can use the ready-made filters
supplied with the product or you can create your own filters.
Figure 3 - 1 The Policy Manager tab
Policy Manager enables you to:
• Add and remove groups of users and addresses.
• Create and manage queues for isolated e-mails to be stored in.
• Set up dictionaries that enable RiskFilter to search for specific words in a message.
• Configure global policies that apply to everyone.
66 Administrator’s Guide SurfControl RiskFilter - E-mail V5.2.4
Page 72

P
OLICY MANAGER
Creating a Policy
3
CREATING A POLICY
There are three steps to creating a policy:
Step 1 - Defining users – Add the users, and groups of users, that you want to filter.
Step 2 - Defining actions – Define what should be done with a message that triggers a filter.
Step 3 - Defining the rules – Create filters to find messages of a specific type. You can filter virus/spam
messages by adding one or more types of filter to the policy.
Note: RiskFilter supports multi-layered policies: global policy and sub-policy. If a filter is
writable, it can be overwritten by a sub-policy (its child or grandchild). A read-only policy cannot
be overwritten by a sub-policy.
STEP 1 - DEFINING USERS
RiskFilter enables you to apply different filtering solutions to messages from specific address groups,
according to different routing paths. There are three ways to add an e-mail address:
• Add the address/es manually
• Import the address/es from a file
• Import the address/es from an LDAP connection
See Address Group on page 69 for more details on how to add addresses.
STEP 2 - DEFINING THE ACTION
Filter action determines how the message is finally processed. RiskFilter scans the messages and their
attachments then takes action according to the settings in the different filters. The action is set when you
create a new filter, within that filter’s configuration screen.
Figure 3 - 2 The Action if filter triggered section
These actions include:
• Modify Subject – Modify the original subject, by adding specific content in front of the original subject.
• X Header – Add a specified X-Header to all messages which triggered the filter.
• Copy to – Send a copy of the original message to a specified e-mail account. This would generally be
the e-mail system administrator, the recipient will have no knowledge of this action.
SurfControl RiskFilter - E-mail V5.2.4 Administrator’s Guide 67
Page 73

P
OLICY MANAGER
3
• Save to Isolate Message – Send the message to the isolated message store for further processing.
• Save to Spam Message: – Send the message stopped by an Anti-Spam filter to the Spam Message
• Save to Virus Message – Send the message stopped by an Anti-Virus filter to the Virus message store
• Send Notification – Sends a pre-defined notification to specified recipients including a copy of the e-
• Deliver Message – Deliver the message.
• Drop Message – Delete the message without delivery.
See Address Group on page 69 for details on how to manage these queues.
Creating a Policy
store for further processing.
for further processing.
mail message that triggered the filter.
STEP 3 - DEFINING THE RULES
Once you have defined who you want to apply policies to, plus the actions that should be taken when
messages trigger filters applying to these users, you need to create the rules. Rules are defined by
creating filters that set the contraints, and action to be taken, on messages that trigger one of these filters.
All messages passing through SurfControl RiskFilter - E-mail will be checked against the Global Policy
filters. By default, sub-policies inherit filters from their parent policies. Sub-policies can also overwrite their
parent filters to meet their own specific needs.
Figure 3 - 3 The Global Policy Filter List
See Global Policy on page 79 for details on how to create and configure filters.
68 Administrator’s Guide SurfControl RiskFilter - E-mail V5.2.4
Page 74

P
OLICY MANAGER
Address Group
3
ADDRESS GROUP
You can add one or more address group(s) to the address group list, and each address group can include
a group of e-mail address lists. Addresses are added using the Address Group screen.
Figure 3 - 4 The Address Group screen
IMPORTING AND EXPORTING LISTS
If you already have a list of domain or e-mail addresses to apply your policy to, you can import this list into
Policy Manager and use it in your policy. You can also export a list of IP addresses to another appliance.
To add addresses to Policy Manager:
1 Choose Address Group from the Policy Manager tab menu.
Figure 3 - 5 The Address Group screen
2 Click Add. The Address Group page is displayed (See Figure 3 - 4).
3 Enter the address group name that you want to define (such as in.com) into the Name field.
4 In the E-mail address field, enter the e-mail address(s) that will form the group.
5 In the Enter user e-mail address: field enter domain or e-mail addresses in one of the following ways:
• Enter the e-mail addresses of all users that you want to apply the settings to e.g.
john@mydomain.com
SurfControl RiskFilter - E-mail V5.2.4 Administrator’s Guide 69
Page 75

P
OLICY MANAGER
3
6 Click Add, the item will be added to the list on the right. To delete an e-mail address in the group,
7 If you want to import or export a list, click Import or Export. This will show an Explorer dialog box.
8 Enter a path to the blacklist file or use Browse to navigate to the file. The path to this file will then
9 Depending on what you are trying to do, you will see either Import>> or Export>>:
Address Group
• Enter *@ followed by the domain to have all users in that domain included in the list
e.g.*@mydomain.com
• Enter *@* to have all users included in the list regardless of their domain e.g.*@*.com
select the relevant address from the list on the right and click Remove.
appear in the field.
• Import>> – There are two types of file import available:
– Import from file – click Browse and navigate to your saved text file containing your list of e-mail
addresses. This could be a file created by exporting one of your own lists or a file that someone
has supplied you with. The path to this file will appear in the field.
– Import from an LDAP server
e-mail addresses to be imported from the drop-down list. You must have a LDAP connection
configured before you can do this. You will now see the list of IP addresses in the right-hand
pane.
– choose the directory name of an LDAP server that includes the
• Export>> – You will be asked if you want to Save or Open the list.
– Click Open to view the list in a text editor such as Notepad.
– Click Save to save it to your system for use elsewhere.
10 Click Submit to save your settings or click Reset to cancel changes made to the current settings.
DELETING ADDRESS GROUPS
You can delete address groups that you no longer require.
To delete addresses:
1 In the Address Group screen, select the check box for the address group that you want to remove.
2 Click Delete. This will remove the selected address group.
70 Administrator’s Guide SurfControl RiskFilter - E-mail V5.2.4
Page 76

P
OLICY MANAGER
Queue Manager
3
QUEUE MANAGER
When a message triggers a filter it can be sent to a queue, where it can be stored until you are ready to
deal with it. Queue Manager enables you to manage the three supplied queues as well as any queue that
you create. The default queues are:
• Virus mail – This stores messages that have triggered the Anti-Virus filter.
• Junk mail – This stores messages that have triggered the Anti-Spam filter.
• Quarantine – This stores messages that need to isolated, but which haven’t triggered the Anti-Virus or
Anti-Spam filter.
These queues can be configured in the Queue Manager screen.
Figure 3 - 6 The Queue Manager screen
ADDING QUEUES
You can create your own custom queues where messages that have been stopped can be stored. You
could, for example, have separate queues for different virus engines or a queue for messages that need to
be stopped and checked before delivery. Queues are created in the Queue Manager Screen.
Figure 3 - 7 Creating a new Queue
After you have submitted your changes the new queue will appear in the Save to list box in the Actions if
Filter Triggered section.
SurfControl RiskFilter - E-mail V5.2.4 Administrator’s Guide 71
Page 77

P
OLICY MANAGER
3
To add a Queue:
1Select Queue Manager from the Policy Manager tab.
2 Click Add in the Queue Manager screen.
3 Enter a name for the Queue into the Queue Name field.
4 Enter a description of the Queue into the Description field.
5Select Enable sending digest message and end user e-mail management if you want to use this
6 Specify how long you want messages in this queue to be kept before they are deleted, in the Days to
7 Specify how the size in MBs that the queue will be allowed to reach before messages will start to be
8 Click Submit to save these new settings.
Queue Manager
feature. In the Directory to store messages field, enter the path to the new queue.
keep messages days (blank means no limit) field. If you do not enter a value in this field, messages
will be kept indefinitely.
deleted, in the Keep maximum storage size at MB and remove old ones on a FIFO basis (blank
means no limit) field. Once this value is reached, the oldest message in the queue will be deleted to
make space for the newest. This will be a continuous process.
Editing a Queue
Once you have created a queue you can edit it at any time.
To edit a queue:
1 In the Policy Manager tab click Queue Manager in the left-hand menu.
2 In the Queue Manager screen, click Edit alongside the queue you want to edit.
3 Make changes to the settings within the Update Queue screen.
4 Click Submit to save these new settings.
72 Administrator’s Guide SurfControl RiskFilter - E-mail V5.2.4
Page 78

P
OLICY MANAGER
Dictionary Manager
3
DICTIONARY MANAGER
You can use the supplied SurfControl dictionaries or create your own using the Dictionary Manager. These
then be used for the following:
• Setting a threshold for a word within the Dictionary Threshold Filter for tracking how many times a
particular word appears in a message.
• Using dictionaries to select words for the Expression List in the Advanced Content Filter.
SURFCONTROL DICTIONARIES
The SurfControl dictionaries are provided with the RiskFilter appliance. They cover the same type of
content as the categories found within the Internet Threat Database. You can import or export dictionaries,
particularly dictionary packs that are available from
Editing SurfControl Dictionary properties
You can change the name, add messages and set the language of any of the SurfControl dictionaries.
www.surfcontrol.com.
To edit a dictionary:
1Select Dictionary Manager > SurfControl Dictionaries from the Policy Manager tab.
2 Click the title of the dictionary that you are interested in.
3 To change the name of the dictionary, enter a new name into the Dictionary Name field.
4 To give a brief summary of the dictionary contents, enter relevant words into the Comment field.
5 To add a message, enter a message into the Open Message pane and check the Display this
message when dictionary launches. The picture shows one of these messages created for the Adult
dictionary which appears when you click the Adult link to view the dictionary contents:
6 To change the Language of the dictionary, select the required language from the Language list. The
following screen shot shows the Dictionary Properties for the Adult Dictionary. The text entered into the
Open Message pane will appear in the warning dialog box in Step 5.
Figure 3 - 8 Setting Dictionary Properties
7 See the following procedures for information of further changes that can be made to the SurfControl
dictionaries.
8 Click Submit to save these new settings.
SurfControl RiskFilter - E-mail V5.2.4 Administrator’s Guide 73
Page 79

P
OLICY MANAGER
3
Dictionary Manager
Changing the value of words in the SurfControl Dictionaries
You can change the value of a word or phrase to fine-tune your filtering. You may want to do this for the
following reasons:
• You find that messages containing a certain word are not being stopped. Increasing the value will mean
that any messages containing this word will need to have fewer occurances before the filter triggers.
• You find that messages containing a certain word are being stopped unnecessarily. Decreasing the
value will allow more occurances of the word within a message before the filter is triggered.
To change the value of words and phrases:
1Select Dictionary Manager > SurfControl Dictionaries from the Policy Manager tab.
2 Click the title of the dictionary that you are interested in.
3 Click the word or phrase that you want to change the value for.
4 In the Add/Edit Phrase screen you will see the settings for the selected word or phrase. Change the
value in the Phrase Value: field.
Figure 3 - 9 Add a Word or Phrase or Phrase Value
• Increasing the value will increase filtering strength
• Decreasing the value will decrease filtering strength
5 Click Submit. The new value will be seen in the dictionary list alongside the word it is attached to.
6 Click Submit to save these new settings.
Adding words to the SurfControl Dictionaries
If you find that a useful word or phrase is missing from one of the SurfControl Dictionaries you can add it
yourself. This saves creating a new custom dictionary simply to hold this word or phrase.
To add a word or phrase:
1Select Dictionary Manager > SurfControl Dictionaries from the Policy Manager tab.
2 Click the title of the dictionary that you are interested in.
3
Click Add.
4 Enter the word or phrase you want to add into the Word or Phrase field.
5 Enter a phrase value into the Phrase Value field.
6 Click Submit. The new word or phrase will be seen in the dictionary list.
7 Click Submit to save these new settings.
Deleting a word or phrase
You can remove any word or phrase from the dictionary.
74 Administrator’s Guide SurfControl RiskFilter - E-mail V5.2.4
Page 80

P
OLICY MANAGER
Dictionary Manager
To remove a word or phrase:
1Select Dictionary Manager > SurfControl Dictionaries from the Policy Manager tab.
2 Click the title of the dictionary that you are interested in.
3 Select the check box alongside the word or phrase that you want to remove.
Note: Selecting the check box alongside a dictionary, rather than one of the words within it, then
clicking Delete will delete the whole dictionary. Only do this if you are sure you want to delete
the whole dictionary.
4 Click Delete.
5 Click Submit to save these new settings.
3
CUSTOM DICTIONARIES
You can create a dictionary that fits your needs exactly, giving you a shortcut to words that you know are
particularly applicable to the type of filtering that you need.
Create a new dictionary
When you create a new dictionary, you first have to create the dictionary then add words and phrases to it.
These words and phrases must then have a value assigned to them so that the Dictionary Threshold filter
can use them.
To create a new dictionary:
1Select Dictionary Manager > Custom Dictionary from the Policy Manager tab.
2 Click Add.
3 Enter a new name for the dictionary into the Dictionary Name field.
4 Enter words to give a brief summary of the dictionary contents into the Comment field.
5 Add a message to the Open Message pane and select Display this message when dictionary
launches check box. The picture shows a message created for the adult dictionary which appears
when you click the Adult link to view the dictionary contents.
6 Select the Language for the dictionary by selecting the required language from the Language list. The
following picture shows the Dictionary Properties for the Adult Dictionary: The text entered into the
Open Message pane will appear in the warning dialog box in Step 5.
Figure 3 - 10 Dictionary Properties
SurfControl RiskFilter - E-mail V5.2.4 Administrator’s Guide 75
Page 81

P
OLICY MANAGER
3
7 Click Add.
8 Enter the word or phrase you want to add into the Word or Phrase field.
9 Enter a phrase value into the Phrase Value field.
10 Repeat steps 8 and 9 till you have added all of the words you require to the dictionary.
11 Click Submit to save the dictionary.
Dictionary Manager
Figure 3 - 11 Add a Word or Phrase or Phrase Value
IMPORTING DICTIONARIES
Rather than creating a new dictionary, you can import a ready-made one from elsewhere. There are two
ways in which you can import dictionaries into RiskFilter:
• Import a SurfControl dictionary pack
• Import a unicode text file
Importing a SurfControl Dictionary Pack
SurfControl RiskFilter E-mail provides language dictionaries for the following languages:
•Dutch
• French
•German
• Italian
• Japanese
• Portuguese
• Spanish
• Traditional Chinese
• Simplified Chinese
76 Administrator’s Guide SurfControl RiskFilter - E-mail V5.2.4
Page 82

P
OLICY MANAGER
Dictionary Manager
By default, the appliance installs the English language dictionaries but you can add other language
dictionaries using the Import-Export utility. Use the Import Dictionaries screen to import dictionaries.
3
Figure 3 - 12 The Import Dictionaries screen
To import a dictionary:
1 Download the SurfControl dictionary pack onto your system from www.surfcontrol.com
2Select Dictionary Manager > Custom Dictionaries from the Policy Manager tab.
3 Click Import.
4 Enter the path to the dictionary file you downloaded earlier, or click Browse and navigate to the
location of this dictionary file.
5Select Import from a SurfControl dictionary pack.xml file.
6Select Overwrite if dictionary by the given name already exists. If you do not select this option and
the dictionary is already in existence, an error will be shown.
7 Click Import. You will now see the dictionary in the Custom Dictionaries screen.
Creating a unicode text file
Importing a unicode text file is an easy way to add large numbers of words and their scores to a dictionary.
To create a unicode text file:
1 Create a .txt file that has one word and one value per line. Enter the words and dictionary scores you
want to add to the dictionary. Put the words in inverted commas (‘’) and put a tab space in between
each word and its score. For example:
"worthless"(tab space)15
"balance"(tab space)10
2 Save the file with a unicode format in a place that can accessed by the RiskFilter appliance.
SurfControl RiskFilter - E-mail V5.2.4 Administrator’s Guide 77
Page 83

P
OLICY MANAGER
3
Dictionary Manager
Importing a unicode text file
To import a text file:
1Select Dictionary Manager > Custom Dictionaries from the Policy Manager tab.
2 Click Import.
3 Enter the path to the dictionary file you want to import into the Select file field. Alternatively, click
Browse and navigate to the location of the dictionary file.
4Select Import from a Unicode text file.
5 Enter a name for the dictionary into the Dictionary Name field.
6 Enter text to summarize the dictionary into the Comment field if necessary.
7 If you want a message to appear when the dictionary is opened enter this message into the Open
Message pane and select Display this message when dictionary launches.
8 Choose a language for the dictionary.
9Select Overwrite if dictionary by the given name already exists. If you do not select this option and
the dictionary is already in existence, an error will be shown.
10 Click Import. You will now see the dictionary in the Custom Dictionaries screen.
Exporting a dictionary
You use Dictionary Management to export dictionaries from RiskFilter. This is useful if you want to edit the
dictionaries when you are running multiple instances of RiskFilter, because you only have to edit the
dictionary once. There are two ways in which you can export Dictionaries:
• As a SurfControl Dictionary pack (an XML file)
• As a unicode file
To export a dictionary:
1Select Dictionary Manager > Custom Dictionaries from the Policy Manager tab.
2 You will see a list of all your custom dictionaries. Select the check box alongside the dictionary that you
want to export.
3 Click Export.
4 You will see all dictionaries with your chosen dictionary selected. Select any other dictionaries that you
want to export.
5Select Export to a Unicode text file or Export to a SurfControl dictionary pack.xml file.
6 Click Export.
78 Administrator’s Guide SurfControl RiskFilter - E-mail V5.2.4
Page 84

P
OLICY MANAGER
Global Policy
3
GLOBAL POLICY
RiskFilter provides a global filtering Policy Manager. With this you can define filters, and the actions to be
taken when these filters are triggered. Policy and filter configuration is carried out in the Policy Manager
tab.
Figure 3 - 13 The Policy Manager tab
The Global Policy Filters screen is where you create and configure the filters that will be used with the
global policy and any subsequent policies you create. It enables you to add new filters or edit the filters
supplied with the product.
CREATING A NEW SUB-POLICY
Creation and configuration of sub-policies begins in the Global Policy screen. This screen enables you
create new policies as well as showing any sub-policies that you already have created.
Figure 3 - 14 The Global Policy screen
The policy module of RiskFilter supports infinite policy recursion, i.e., the global policy can include
multilevel sub-policies. You can define the corresponding sub-policies according to the different mail
routing paths. By default, each level of a sub-policy will inherit the filters enabled by its parent policy
(previous level policy). You can modify a sub-policy filter so that it can overwrite the filter defined by its
parent policy.
SurfControl RiskFilter - E-mail V5.2.4 Administrator’s Guide 79
Page 85

P
OLICY MANAGER
3
Global Policy
To create a sub-policy:
1Select Global Policy from the Policy Manager tab.
2 Click Add. The Sub-policy Management screen is displayed.
Figure 3 - 15 Enter the details of the new Sub-policy
3 Enter a name for your Sub-policy into the Sub-policy Name field.
4Select Enable in the Sub-policy Status section.
5 Enter a brief Sub-policy description.
6 Click Next. The NewFilter Route screen is displayed.
Figure 3 - 16 Enter the relevant route paths
7 Enter the relevant route paths into the From and To fields. You can directly enter the path, or click
Select to see a list of all the Address Lists that you have defined.
Figure 3 - 17 Defined Address Groups
8 RiskFilter defines the message’s route path (Policy Route) by specifying sender and recipient
addresses, such as:
• Specify single sender address to single recipient address: simon@SurfControl.com to
tom@SurfControl.com
80 Administrator’s Guide SurfControl RiskFilter - E-mail V5.2.4
Page 86

P
OLICY MANAGER
Global Policy
• Specify single sender address to all users of SurfControl.com domain: simon@SurfControl.com to
*@SurfControl.com
• Specify single sender address to all recipients: simon@SurfControl.com to * (* indicates any e-mail
address).
9 Select which list/s you want to be applied to the filter and click Submit.
10 If you want to add another route click Add Route. To delete a route select the check box to the left of
the route and click Delete Route.
11 Click Submit to add this route to your sub-policy. You will now see your new sub-policy within the
Global Policy screen.
3
EDITING A SUB-POLICY
Once you have created a policy, you can edit it at any time.
To edit a policy:
1Select Global Policy from the Policy Manager tab.
2 Click Edit. The Sub-policy Management screen is displayed.
3 Make the required changes to the policy.
4 Click Submit to save these new settings.
DELETING A SUB-POLICY
Policies can be deleted when they are no longer needed.
To delete a policy:
1Select Global Policy from the Policy Manager tab.
2 Select the check box for the policy that you want to delete.
3 Click Delete.
4 Click Submit to save these new settings.
ADDING FILTERS TO THE POLICY
Filters enable you to ask RiskFilter to look for different attributes in messages, then apply an action to them
if they match the criteria set up in the filter. The supplied filters consist of:
• Anti-Virus Filter - McAfee – Enables RiskFilter to stop messages carrying viruses, without any
configuration on your part.
• Anti-Spam Filters - Heuristics and LexiRules – Enable RiskFilter to control spam messages without
having to configure anything initially. You can add multiple Anti-Spam filters if necessary.
• Internet Threat Database Filter – Compares URL's from SurfControl's Internet Thread Database to
the the URL's found in E-mail messages.
• General Content Filter – Enables you to do keyword scanning, in the message subject, message body
or message size.
• Advanced Content Filter – Enables you to filter content in the message header, body and attachments
more intelligently, with complex keyword expressions.
SurfControl RiskFilter - E-mail V5.2.4 Administrator’s Guide 81
Page 87

P
OLICY MANAGER
3
Global Policy
• Message Attachment Filter – Enables you to scan for maximum message size or specify the types of
attachments that you want to filter. These include types of attachment, such as *.gif, *.mp3 files, and
executable files, such as *.exe and *.dll files by file extension or MIME type.
• Content Guardian – Provides maximum flexibility in filtering using SurfControl Content Dictionaries,
with multiple filtering arguments.
• Standard Disclaimer filter – Adds text to all e-mail messages coming into or out of your organization
enabling you to add your own corporate disclaimer easily.
Note: For Global Filtering Policy, all messages will pass through each filter one by one in the
global filtering policy until a filter is triggered. When a message triggers a filter (except for the
standard disclaimer), the action of this filter will be executed immediately. This message will not
pass through all the remaining filters.
When you add a new sub-policy, all of these filters are made available to the new policy with whatever
configuration you have set. You cannot edit filters from within a sub-policy, all editing must be done from
within the Global Policy Filters menu. Configuration of Global Policy Filters is carried out in the Global
Policy Filters screen.
Figure 3 - 18 The Global Policy Filter List screen
DEFINING A FILTER
To add a new filter to your policy, first specify the type of filter that you want to add. This is done in the
Create New Filter screen.
Figure 3 - 19 Supplied Filters
Note: Filters can also be added at the sub-policy level.
82 Administrator’s Guide SurfControl RiskFilter - E-mail V5.2.4
Page 88

P
OLICY MANAGER
Global Policy
3
Creating a new filter
To create a new filter:
1 In the Global Policy Filter List screen click Add. The Create New Filter screen is displayed.
2 Select the type of filter that you want to create. Details of the different types of filter available are
covered in the following sections.
3 Click Next.
4 Fill in the properties for the filter that you want to create and click Submit.
Once you have added one of the following filters you will be unable to add another filter of the same type.
You will not be able to select them in the Create New Filter screen though you will be able to edit them by
clicking the corresponding link in the Global Policy Filter List screen. The filters are:
• Anti-Virus Agent - McAfee
• Anti-Spam Agent - DFP
• Anti-Spam Agent - Heuristics
• Anti-Spam Agent - LexiRules
• Standard Disclaimer
THE ANTI-VIRUS AGENT FILTER
The Anti-Virus Agent filter is supplied with the product and enabled by default. This means that it will filter
messages automatically without any prior modification. The McAfee filter provides fast, reliable inline virus
filtering and is a RiskFilter standard.
Editing the Anti-Virus Agent Filter
You can fine-tune the Anti-Virus Agent filter to your company’s filtering requirements.
To edit the Anti-Virus Agent Filter:
1Select Global Policy > Filters from the Policy Manager tab.
2 Click Add. The Create New Filter screen is displayed.
3 Select the Anti-Virus Agent that you want to edit and click Next.
4 If you want to change the name of this filter, enter a new name into the Filter Name field.
5Select disable if you want to switch the filter off.
6 Change the Filter Permission setting to writable to enable the filter to be overwritten by a sub-policy.
Note: If the Anti-Virus Agent (AVA) filter is enabled in a global policy, it cannot be enabled in,
then overwritten by, a sub-pulicy. For example: You can enable McAfee in one global policy, and
then enable it in a sub policy that is attached to a different global policy. You cannot, however,
enable it in a global policy and its sub-policy at the same time.
7 Configure how you want the filter to scan messages for viruses:
• Treat errors as infected – If any errors are encountered during the scanning of a message, the
file will be assumed to be infected. The default setting is on.
SurfControl RiskFilter - E-mail V5.2.4 Administrator’s Guide 83
Page 89

P
OLICY MANAGER
3
8 Configure how you want messages to be treated if they contain a virus:
Global Policy
• Treat encrypted files as infected – If a message is encrypted in a way that the anti-virus engine
does not understand, it will be assumed to be infected and treated as such. The default setting is
on.
• Treat macros as infected – If a file contains macros, it will be treated as an infected file. This is
off by default and is only available with the McAfee filter.
• Heuristics Analysis – Used if an unknown virus is found. This is on by default.
• Macro Analysis – Used if an unknown macro virus is found. This is on by default.
• Scan all files for viruses – Scans all files, regardless of file extension. This is off by default.
• Malicious applications – Scans for potentially harmful applications such as password crackers.
Also scans for some joke programs. This is on by default.
• Joke/Hoax Viruses – Scans for Hoax/Joke programs. This is on by default.
• Scan message body for viruses – Scans the message body for embedded malicious scripts or
attachments that can’t be scanned properly. If, because of message format problems, attachments
are seen as part of the message body, they will still be scanned and viruses picked up.
• Clean virus – Select this option if you want RiskFilter to try to clean a virus if it finds one. This is a
good option if you are not sure that you want attachments deleted without checking, but at the
same time don’t want them stored on the appliance. You can also select the check box beneath
this option to ask for the attachment to be deleted if the virus cannot be cleaned.
• Remove the infected attachment files – Deletes the attachment and virus automatically.
• Keep (no action taken) – This is the default action. The attachment and virus is stored in a
predefined location and, if required, a message is sent to the administrator stating that a virus has
been found. This message can be edited if necessary.
• Insert a notice when a message is delivered with a virus – Enables you to configure a
message to be sent to the administrator when a virus is found. You can choose where the notice is
positioned within the message.
9 Set the action that will be taken if the filter is triggered. See “Step 2 - Defining the action” on page 67
for details on what these actions are.
10 Click Submit to save these new settings.
84 Administrator’s Guide SurfControl RiskFilter - E-mail V5.2.4
Page 90

P
OLICY MANAGER
Global Policy
3
THE ANTI-SPAM AGENT FILTERS
The Anti-Spam filters check messages to see if they are likely to be spam.
• Anti-Spam Agent - DFP – Compares mail messages to known spam from different categories.
• Anti-Spam Agent - Heuristics – Uses regular expressions to determine the likelihood that an e-mail
message is actually Spam.
• Anti-Spam Agent - LexiRules – Analyses words, phrases and patterns commonly found in spam to
identify e-mail messages as possible spam.
You can fine-tune the Anti-Spam Agent filters to your company’s filtering requirements. All of the filters can
be edited in their corresponding property screen.
Configuring the Digital Fingerprinting (DFP) Anti-Spam Agent Filter
The Digital Fingerprinting Anti-Spam Agent filter is configured in the Anti-Spam Agent DFP screen.
Figure 3 - 20 The Anti-Spam Agent - DFP screen
To configure the DFP Anti-Spam Agent filter:
1Select Global Policy from the Policy Manager tab.
2 Click Filters. The Global Policy Filter list screen is displayed.
3 Click Add. The Create New Filter screen is displayed.
4Select Anti-Spam Agent - DFP.
Note: You will only see this if you have not added an Anti-Spam Agent -DFP filter previously
5 Click Next.
SurfControl RiskFilter - E-mail V5.2.4 Administrator’s Guide 85
Page 91

P
OLICY MANAGER
3
Global Policy
Configuring the Anti-Spam Agent - Heuristics Filter
The Anti-Spam Agent - Heuristics filter is configured in the Anti-Spam Agent Heuristics screen.
Figure 3 - 21 The Anti-Spam - Heuristics screen
To cofigure the Anti-Spam Agent - Heuristics filter:
1Select Global Policy from the Policy Manager tab.
2 Click Filters. The Global Policy Filter list screen is displayed.
3 Click Add. The Create New Filter screen is displayed.
4Select Anti-Spam Agent - Heuristics.
Note: You will only see this if you have not added an Anti-Spam Heuristics Filter previously.
5 Click Next.
6 Enter a name into the Filter Name field.
7 This filter is enabled by default. Select the ‘disable’ option if you want to switch it off.
8 If you want to make the filter so that it can be overwritten by a sub-policy change the Filter
Permission setting to writable. The default is read-only.
9 Select the Sensitivity Level. This sets how strictly RiskFilter scans messages:
• Lowest – You should not get any false positives with this setting but it is very likely that some
spam messages will not be stopped.
• Low – Only messages that are definitely spam will be stopped. With this setting, false positives will
be less but you also run the risk of messages that are spam getting through.
• Medium – More messages will be stopped as the criteria for deciding whether a message is spam
or not, is much wider. However, some messages that are not spam may be stopped.
86 Administrator’s Guide SurfControl RiskFilter - E-mail V5.2.4
Page 92

P
OLICY MANAGER
Global Policy
3
• High – Any message that could be spam will be stopped. Although this offers the most
comprehensive protection, more messages will be stopped that are not spam.
• Highest – Virtually all spam will be stopped but there could be quite a few false positives. With this
setting it is advisable to check all spam before deleting, just in case.
10 Select Scan only message headers if you want RiskFilter to only scan the header, not the body of the
message.
11 Select Bypass Anti-Spam Agent scanning if message size is more than ... KB and set a maximum
message size. This means that any message that is particularly large will not be scanned as possible
spam. The default setting is 100KB.
12 Set the action that will be taken if the filter is triggered. See Step 2 - Defining the action on page 67
for details on what these actions are.
13 Click Submit to save these new settings.
Configuring the Anti-Spam Agent - LexiRules Filter
The Anti-Spam Agent - LexiRules filter is configured in the Anti-Spam Agent LexiRules screen.
Figure 3 - 22 The Anti-Spam Agent - LexiRules filter
To configure the Anti-Spam Agent - LexiRules filter:
1Select Global Policy from the Policy Manager tab.
2 Click Filters.The Global Policy Filter list screen is displayed.
3 Click Add. The Create New Filter screen is displayed.
4Select Anti-Spam Agent - LexiRules.
Note: You will only see this if you have not added an Anti-Spam LexiRules Filter previously
SurfControl RiskFilter - E-mail V5.2.4 Administrator’s Guide 87
Page 93

P
OLICY MANAGER
3
5 Click Next.
6 Enter a name in to the Filter Name field.
7 This filter is enabled by default. Select the disable option if you want to switch it off.
8 If you want to make the filter so that it can be overwritten by a sub-policy change the Filter
9Select Bypass Anti-Spam Agent scanning if message size is more than ... KB and set a maximum
Global Policy
Permission setting to writable. The default is read-only.
message size. This means that any message that is particularly large will not be scanned as possible
spam. The default setting is 100KB.
INTERNET THREAT DATABASE FILTER
The Internet Threat Database Filter enables you to maximise message filtering by using SurfControl’s
database of 9 Million URLs. Each category contains a list of URLs that have been added and are
constantly updated by a team of SurfControl researchers. These categories enable you to apply a rule to a
group of URLs rather than having to enter each one individually.
You also have the option to add specific URLs that are not covered in the categories already provided.
Configuration of the Internet Threat Database Filter is carried out in the Internet Threat Database Filter
screen.
Figure 3 - 23 The Internet Threat Database Filter screen
88 Administrator’s Guide SurfControl RiskFilter - E-mail V5.2.4
Page 94

P
OLICY MANAGER
Global Policy
Editing the Internet Threat Database Filter
You can fine-tune either (or both) of the Internet Threat Database filter to your company’s filtering
requirements.
To edit the Internet Threat Database filter:
1Select Global Policy from the Policy Manager tab.
2 Click Filters.The Global Policy Filter list screen is displayed.
3 Click Add. The Create New Filter screen is displayed.
4 Select the Internet Threat Database Filter and click Next.
5 Enter a new name into the Filter Name field to change the name of this filter.
6 This filter is enabled by default. Select disable if you want to switch it off.
7 If you want to make the filter so that it can be overwritten by a sub-policy change the Filter
Permission setting to writable. The default is read-only.
8 Select the categories that you want to apply the filter to (for descriptions of these categories see
Internet Threat Database Categories on page 165):
3
• Adult/Sexually Explicit
• Criminal Skills
• Drugs, Alcohol & Tobacco
• Gambling Hacking
• Hate Speech
• Violence
• Weapons
9 Click Submit to save these new settings.
STANDARD DISCLAIMER
Standard Disclaimer enables you to add corporate disclaimers to the top or bottom of the message body.
When the recipient receives the message, they will see the disclaimer in their message. You can configure
different disclaimers by adding the standard disclaimer to the sub-policy.
Figure 3 - 24 The Standard Disclaimer screen
SurfControl RiskFilter - E-mail V5.2.4 Administrator’s Guide 89
Page 95

P
OLICY MANAGER
3
For example, if you have added two sub-policies, Incoming and Outgoing, you could create disclaimers for
each of them:
• Global Policy – ‘Innovation makes your life better’
• Incoming – ‘All messages have been scanned by RiskFilter’
• Outgoing – “Powered by RiskFilter”
We recommend that you put the Standard Disclaimer filter at the end of the filter list in the Global Policy
Filter List screen and that you do not include words in the message that are keywords for other filters. This
will make sure that any messages carrying the Standard Disclaimer are not stopped by other filters (such
as Anti-Spam) once it has been added. It also makes sure that the Standard Disclaimer is not
unnecessarily added to messages that are then stopped for other reasons.
Global Policy
Editing the Standard Disclaimer Filter
You can edit this filter to exactly match your company’s requirements.
To edit the Standard Disclaimer filter:
1Select Global Policy from the Policy Manager tab.
2 Click Filters.The Global Policy Filter list screen is displayed.
3 Click Add. The Create New Filter screen is displayed.
4 Select the Standard Disclaimer Filter.
Note: You will only see this if you have not added an Standard Disclaimer Filter previously.
5 Click Next.
6 Enter a new name into the Filter Name field to change the name of this filter.
7 This filter is enabled by default. Select the disable option if you want to switch it off.
8 If you want to make the filter so that it can be overwritten by a sub-policy change the Filter
Permission setting to writable. The default is read-only.
9 Enter the text that you want RiskFilter to add to e-mail messages by entering your own message into
the Standard Disclaimer Content screen.
10 Specify where you want your disclaimer to be put within the message:
• At the beginning of the message body – The disclaimer will placed at the top of the message.
• At the end of the message body – The disclaimer will placed at the end of the message.
11 Click Submit to save these new settings.
90 Administrator’s Guide SurfControl RiskFilter - E-mail V5.2.4
Page 96

P
OLICY MANAGER
Global Policy
3
GENERAL CONTENT FILTER
The General Content Filter enables you to filter all incoming and outgoing messages passing through the
RiskFilter.
Figure 3 - 25 General Content Filter screen
Editing the General Content Filter
You can edit this filter to exactly match your company’s requirements.
To edit the General Content filter:
1Select Global Policy from the Policy Manager tab.
2 Click Filters. The Global Policy Filter list screen is displayed.
3 Click Add . The Create New Filter screen is displayed.
4 Select the General Content Filter and click Next.
5 Enter a new name into the Filter Name field to change the name of this filter.
6 This filter is enabled by default. Select disable if you want to switch it off.
7 If you want to make the filter so that it can be overwritten by a sub-policy change the Filter
Permission setting to writable. The default is read-only.
SurfControl RiskFilter - E-mail V5.2.4 Administrator’s Guide 91
Page 97

P
OLICY MANAGER
3
Global Policy
ADVANCED CONTENT FILTER
The Advanced Content Filter provides more complex checking of message header, message body and
message attachments and supports the dynamic evaluation of keyword frequency to enhance flexibility.
Figure 3 - 26 The Advanced Content Filter screen
Editing the Advanced Content Filter
You can edit this filter to exactly match your company’s requirements.
To edit the Advanced Content filter:
1Select Global Policy from the Policy Manager tab.
2 Click Filters. The Global Policy Filter list screen is displayed.
3 Click Add. The Create New Filter screen is displayed.
4 Select the Advanced Content Filter and click Next.
92 Administrator’s Guide SurfControl RiskFilter - E-mail V5.2.4
Page 98

P
OLICY MANAGER
Global Policy
3
Using the Expression List
A valid keyword expression is composed of keywords and logical operators. You can enter keyword
expressions by either typing them manually or choosing them from the Content dictionaries. The Content
dictionaries also have about 20 categories with approximately 14,600 keywords. If you are going to be
using keyword checks then you need to add them to the Expression List section.
To configure Expression lists:
1 Click Add.The Expression screen is displayed.
Figure 3 - 27 The Expression screen
2Select Enable to activate the Expression.
3 Enter an expression into the field by manually entering it (see Using Logical Operators on page 94’ for
details on how to do this). Alternatively, click Select SurfControl Content Dictionary. The Content
Dictionaries dialog box is displayed
.
4 Select the following:
• Language – the Content dictionaries have eight languages: English, Simplified Chinese,
Traditional Chinese, German, French, Italian, Spanish and Japanese.
Note: By default, the Content Dictionaries dialog opens with the ‘Adult’ dictionary in view. This
shows a list of words that are offensive.
SurfControl RiskFilter - E-mail V5.2.4 Administrator’s Guide 93
Page 99

P
OLICY MANAGER
3
5 Dictionary Category – the type of dictionary that you need to use is defined by the style of message
6 Select the logical operator that you want to use in this expression (see Using Logical Operators on
You can also add an <OCCUR> to the filter to specify how many times the keyword/s must appear before
the filter is triggered.
1 Click Select. Once you have entered your expression either by adding it manually or by clicking Select
Global Policy
you want to filter.
page 94 for more details):
• <AND> multiple selections – This filter will trigger if one of the selected keywords AND another
selected keyword appear in the message. If only one of these words appears in the message the
filter will not trigger.
•<OR> multiple selections – This filter will trigger if either one of the selected keywords appears in
the message.
from the Content Dictionaries it will appear in the Expression List section.
Note: You can add multiple expressions to complete the filtering content.
2 Specify whether you want the case of the words to be considered by selecting ‘Yes’ or ‘No’ in the Case
Sensitive section.
3 If you have added an <OCCUR> operator to your expression to specify how often the word must
appear in the message, you can check the Enable Level of Severity option. RiskFilter will compare
the frequency of the expression triggering in the mail header, mail body and mail attachment with the
threshold value entered in the Severity Threshold field. If the frequency is greater than this value,
RiskFilter will perform the pre-configured filter actions.
4 Click Submit to save these new settings.
Using Logical Operators
The Advanced content filter now supports three types of logical operator: <OR>, <AND> and <OCCUR>.
• <OR> – An expression with an <OR> operator checks whether either of the keywords, ‘one before’ and
‘one after’ the operator, appears. If either keyword does appear, the expression is a match.
• <AND> – An expression with an <AND> operator checks whether both of the keywords appear. If they
do, the expression is a match. If just one keyword appears, the expression is not a match.
• <OCCUR> – An expression with an <OCCUR> operator checks the frequency of the keywords in the
expression. If the number of occurrences of the keyword in the expression is equal to or greater than
the value set by Frequency, this expression will be a match. The default value for Frequency is 1.
94 Administrator’s Guide SurfControl RiskFilter - E-mail V5.2.4
Page 100

P
OLICY MANAGER
Global Policy
3
Examples showing the use of Operands
The following examples show how operands can be inserted and how RiskFilter will use them to decide
whether to trigger the action defined in the Advanced Content Filter:
RiskFilter <AND> Gateway <AND> Innovation
This expression matches content when “RiskFilter”, “Gateway” and “Innovation” are all present.
Content Result
Welcome to SurfControl RiskFilter for a secure mail gateway solution at Innovation! Matches
Welcome to SurfControl RiskFilter home page! Does not match
For a secure mail gateway solution, come to Innovation. Does not match
RiskFilter <OR> Gateway <OR> Innovation
This expression matches content when “RiskFilter”, “Gateway” or “Innovation” is present.
Content Result
Welcome to SurfControl RiskFilter for a secure mail gateway solution! Matches
Welcome to SurfControl RiskFilter home page! Matches
For a secure e-mail server solution, you are welcome to contact us. Does not match
<OCCUR> gateway
(Assume Frequency =2 )
This expression matches content if “gateway” occurs more than twice.
Content Result
Welcome to SurfControl Risk Filter - E-mail for a secure mail gateway solution! Does not match
Innovation gateway provides a secure…gateway… Does not match
For a secure mail gateway solution, check…gateway…and Innovation gateway is
high performance…
Matches
Multiple operators can be used in a single keyword expression, but multiple operator types are not allowed
in a single dynamic keyword expression.
For example: RiskFilter<OR>Gateway<AND>Innovation is an invalid keyword expression.
Valid keyword expression examples:
• RiskFilter
• innovation
• RiskFilter <AND> innovation
SurfControl RiskFilter - E-mail V5.2.4 Administrator’s Guide 95
 Loading...