


QUICK START GUIDE
Wi-Fi Cable Modem
SBG6950AC2SBG6950AC2
SBG7400AC2 SBG7400AC2
SBG7600AC2SBG7600AC2
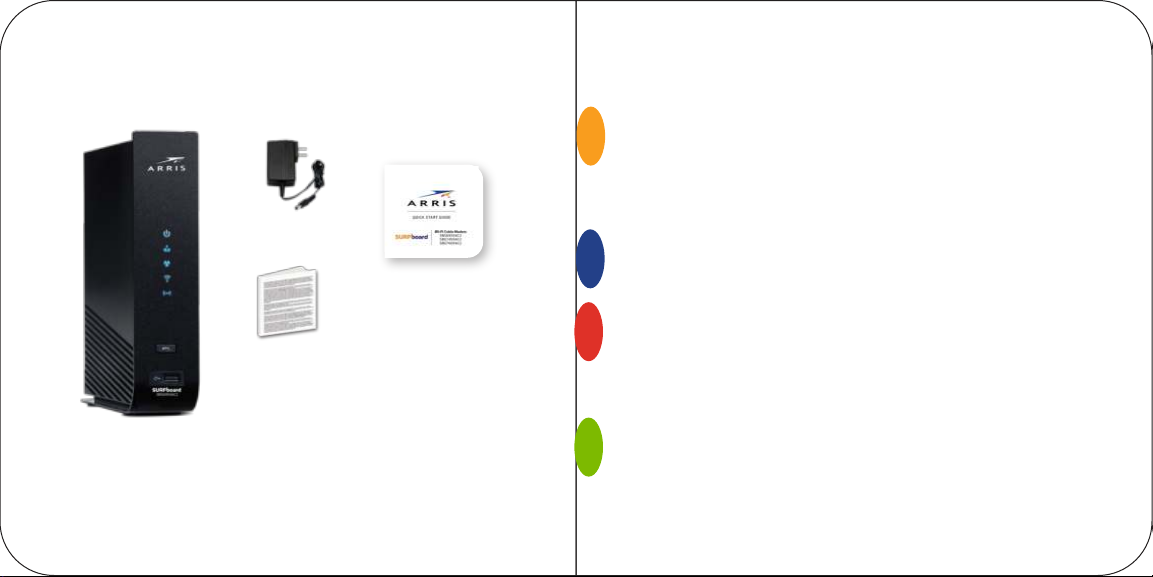
In the box
Introduction
Status indicators
1
Front panel LEDs
LED status indicators
Power adapter
2
Get started
Quick Start Guide
SBG6950AC2
SBG7400AC2
Soware License
& Warranty card
Wi-Fi cable modem
SBG6950AC2
SBG7400AC2
SBG7600AC2
2 3
SBG7600AC2
Set up your Wi-Fi network connection
3
3.1 Download ARRIS SURFboard® Manager mobile app
3.2 Connect using your Wi-Fi enabled device
4
Web Manager
4
5
6
9
16
17
20
24
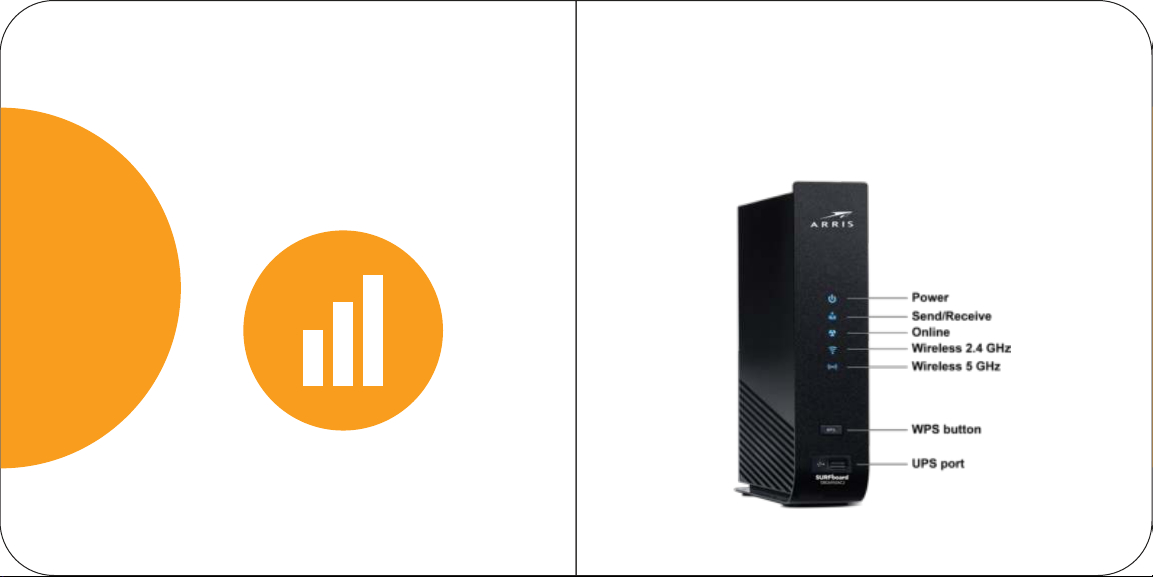
Status indicators
Front panel LEDs
1
4 5
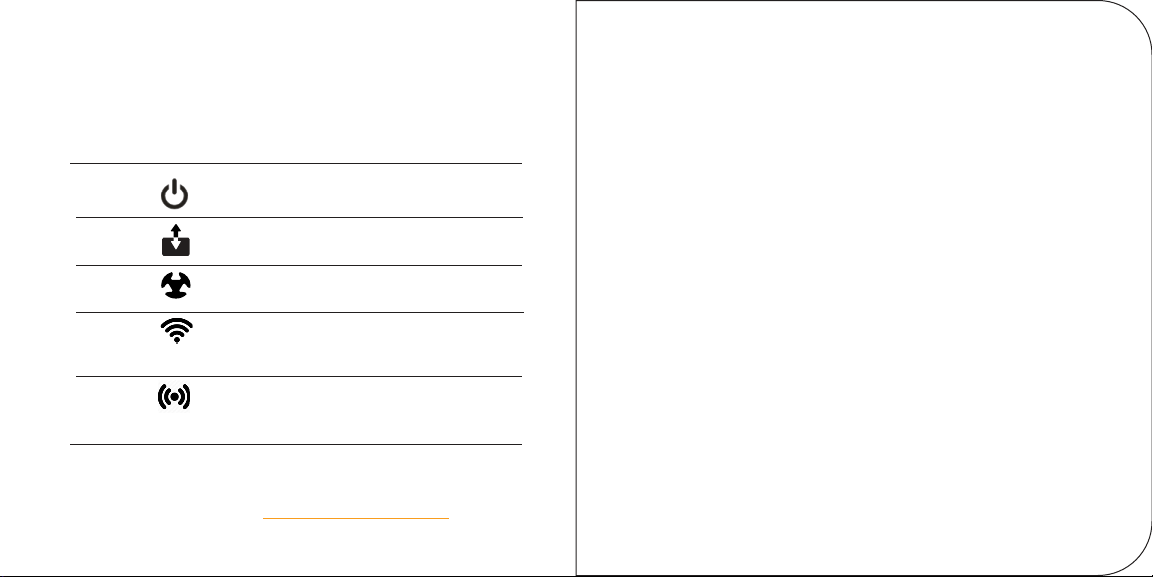
LED status indicators
Note: If the Send/Receive LED is flashing, this indicates
that the firmware for your Wi-Fi cable modem is
Power
Send
Receive
Online
2.4 GHz
Wireless
5 GHz
Wireless
On
Power is properly connected to the
Wi-Fi cable modem
On
Upstream (send) and Downstream
(receive) status
On
Wi-Fi cable modem is connected to
the network
Flash
2.4 GHz wireless connection is made
between the Wi-Fi cable modem and
your Wi-Fi device
Flash
5 GHz wireless connection is made
between the Wi-Fi cable modem and
your Wi-Fi device
updating. You may not be able to access the Internet
during the firmware update. To access the Internet,
please wait 10 to 15 minutes for the firmware update to
finish.
The SBG6950AC2, SBG7400AC2, and SBG7600AC2
do not support Digital Subscriber Line service (twisted
pair telephone phone service) and also do not support
Satellite Internet service.
Note: Detailed LED status information is available online in the
SBG6950AC2, SBG7400AC2, & SBG7600AC2 User Guide at
the ARRIS support website,
6 7
www.arris.com/selelp.

This SURFboard device is a combination of DOCSIS 3.0
cable modem and four-port Ethernet router with Wi-Fi. It
uses DOCSIS 3.0 technology to provide ultra high-speed
Internet access on your Wi-Fi home or small business
network.
Using the connection capabilities of the Wi-Fi cable
modem, you can connect your computer and other
network-enabled devices via the four Ethernet ports or
the 2.4 GHz and 5 GHz Wi-Fi connections. The Wi-Fi
cable modem connects to the existing coaxial cable
connection in your home.
Note: For Internet connections, you need a cable service
connection (coaxial cable line) with a cable Internet
service provider. The SBG6950AC2, SBG7400AC2, and
SBG7600AC2 will not operate with a Digital Subscriber
Line service (DSL) (twisted pair phone line) or Satellite
Internet service.
8 9
2
Get started

A
Connect a coaxial cable (not included) to a cable wall
outlet or an RF splier (not included) and to the Cable
connector on the rear of your Wi-Fi cable modem.
Tighten the
connector by hand.
10 11

B
C
Connect the power adapter to the Power port on the
rear of your Wi-Fi cable modem and then plug it into
an electrical wall outlet that is not controlled by a wall
switch to power on your Wi-Fi cable modem.
Your Wi-Fi cable modem
will automatically power
ON when the power
adapter is connected.
12 13
(Optional step) Connect an Ethernet cable (not
included) to any Ethernet port on the rear of your
Wi-Fi cable modem and the Ethernet port on your PC
or laptop.
Note: Alternatively, you
can connect your PC or
laptop to the Internet
via your existing Wi-Fi
connection.

D
E
Check the front panel LEDs on your Wi-Fi cable
modem. Aer a brief pause, the first three LEDs
Note: For Internet access, you will need a cable service
connection.
should light up SOLID blue.
Activate your new Wi-Fi cable modem; choose one of
the following options:
• Call your cable service provider.
• Connect to your cable operator’s activation web
site using your computer or laptop:
Power ON your computer or laptop and log in.
Enter your service provider’s web browser URL:
• Comcast/Xfinity: www.xnity.com/acvate
The 2.4 GHz and 5 GHz wireless
LEDs will light up SOLID when Wi-Fi
connectivity is available and ready.
14 15
• Cox: www.cox.com/acvate
• Spectrum: spectrum.net/selnstall

Set up your Wi-Fi
network connection
3.1
3
Download ARRIS SURFboard® Manager mobile app
Do the following to set up your Wi-Fi network
connection:
3.1 Download ARRIS SURFboard® Manager
3.2 Connect using your Wi-Fi enabled device
16 17
Download the iOS or android version of the ARRIS
SURFboard Manager mobile app for your iOS or
android Wi-Fi enabled device to set up your Wi-Fi
home or small business network connection.

A
B
Use the ARRIS SURFboard Manager mobile app (see
page 19) or the Web Manager for your SBG6950AC2,
SBG7400AC2, or SBG7600AC2 (see page 25) to
set the same network name and password, if you
are replacing the router or the Wi-Fi cable modem in
an existing Wi-Fi network. This will ensure that your
Wi-Fi devices will automatically connect to your new
SBG6950AC2, SBG7400AC2, or SBG7600AC2
Wi-Fi network.
18 19
Download the ARRIS SURFboard Manager mobile
app from the Apple app store or Google play store.
Scan the SURFboard Manager mobile app QR code
to download the mobile app on your iOS or android
mobile device:
Open the ARRIS SURFboard Manager mobile app and
follow the prompts to configure your SBG6950AC2,
SBG7400AC2, or SBG7600AC2.

A
Access the Seings screen on your Wi-Fi enabled
device and then select: Wi-Fi, Wireless, or
Connections.
Check thatWi-FiorWirelessis set to ON.
3.2
Connect using your Wi-Fi enabled device
!
Some of the selections used in this procedure
may vary slightly depending on your Wi-Fi enabled
device and operating system. Please make sure to
select the most applicable selections on your Wi-Fi
enabled device.
20 21

B
C
Select the SBG6950AC2, SBG7400AC2, or
SBG7600AC2 Wi-Fi network from the list of
available Wi-Fi networks.
22 23
Enter your Wi-Fi network password in the Password
field and selectJoin or Connect.
This is the password that you set up during the Wi-Fi
cable modem activation.

A
Web Manager
4
24 25
Manage your SBG6950AC2, SBG7400AC2, or
SBG7600AC2 using the Web Manager.
Open a web browser (e.g., Internet Explorer, Google
Chrome, etc.) on your connected computer or laptop
and then type 192.168.0.1 in the address bar.
The default login is case-sensitive:
User name: admin
Password: password
Change the default Web Manager password located
under Basic Setup, Login Seings and then click
Apply to update your login password.

B
C
Customize the default Wi-Fi network name or SSID
(ARRIS-####) for your Wi-Fi home network aer
installing your Wi-Fi cable modem and seing up your
network connection(s).
Note: You have the option to either keep the default
Wi-Fi network name or create a new network name to
help you to easily identify your Wi-Fi home network.
Note: When opening the Web Manager, the Untrusted
Certificate pop-up may display. If it does, you must
accept it to open the Web Manager.
For additional assistance with your Wi-Fi cable modem,
ARRIS is available to help. Choose one of the following:
• Visit www.arris.com/selelp for self help, FAQs,
product manuals, live chat, and email support.
• Call us at 1-877-466-8646.
26 27
Verify Wi-Fi cable modem connectivity by accessing
the Internet on your connected PC or laptop.
Visit any public web page such as www.suroard.com.
If the web site fails to open, please contact your service
provider to set up your Internet service or activate your
Wi-Fi cable modem.

Wi-Fi cable modem label
If the label is not
aached, please check
the boom of your Wi-Fi
cable modem.
© 2020 CommScope, Inc. All rights reserved.
ARRIS and the ARRIS Logo are trademarks of CommScope, Inc. and/or its affiliates. All
other trademarks are the property of their respective owners.
No part of this content may be reproduced in any form or by any means or used to make
any derivative work (such as translation, transformation, or adaptation) without wrien
permission from CommScope, Inc. and/or its affiliates (“CommScope”). CommScope
reserves the right to revise or change this content from time to time without obligation
on the part of CommScope to provide notification of such revision or change.
CommScope provides this content without warranty of any kind, implied or expressed,
including, but not limited to, the implied warranties of merchantability and fitness for a
particular purpose. CommScope may make improvements or changes in the products
or services described in this content at any time. The capabilities, system requirements
and/or compatibility with third-party products described herein are subject to change
without notice.
ARSVD01735-j
28
 Loading...