

Page 1
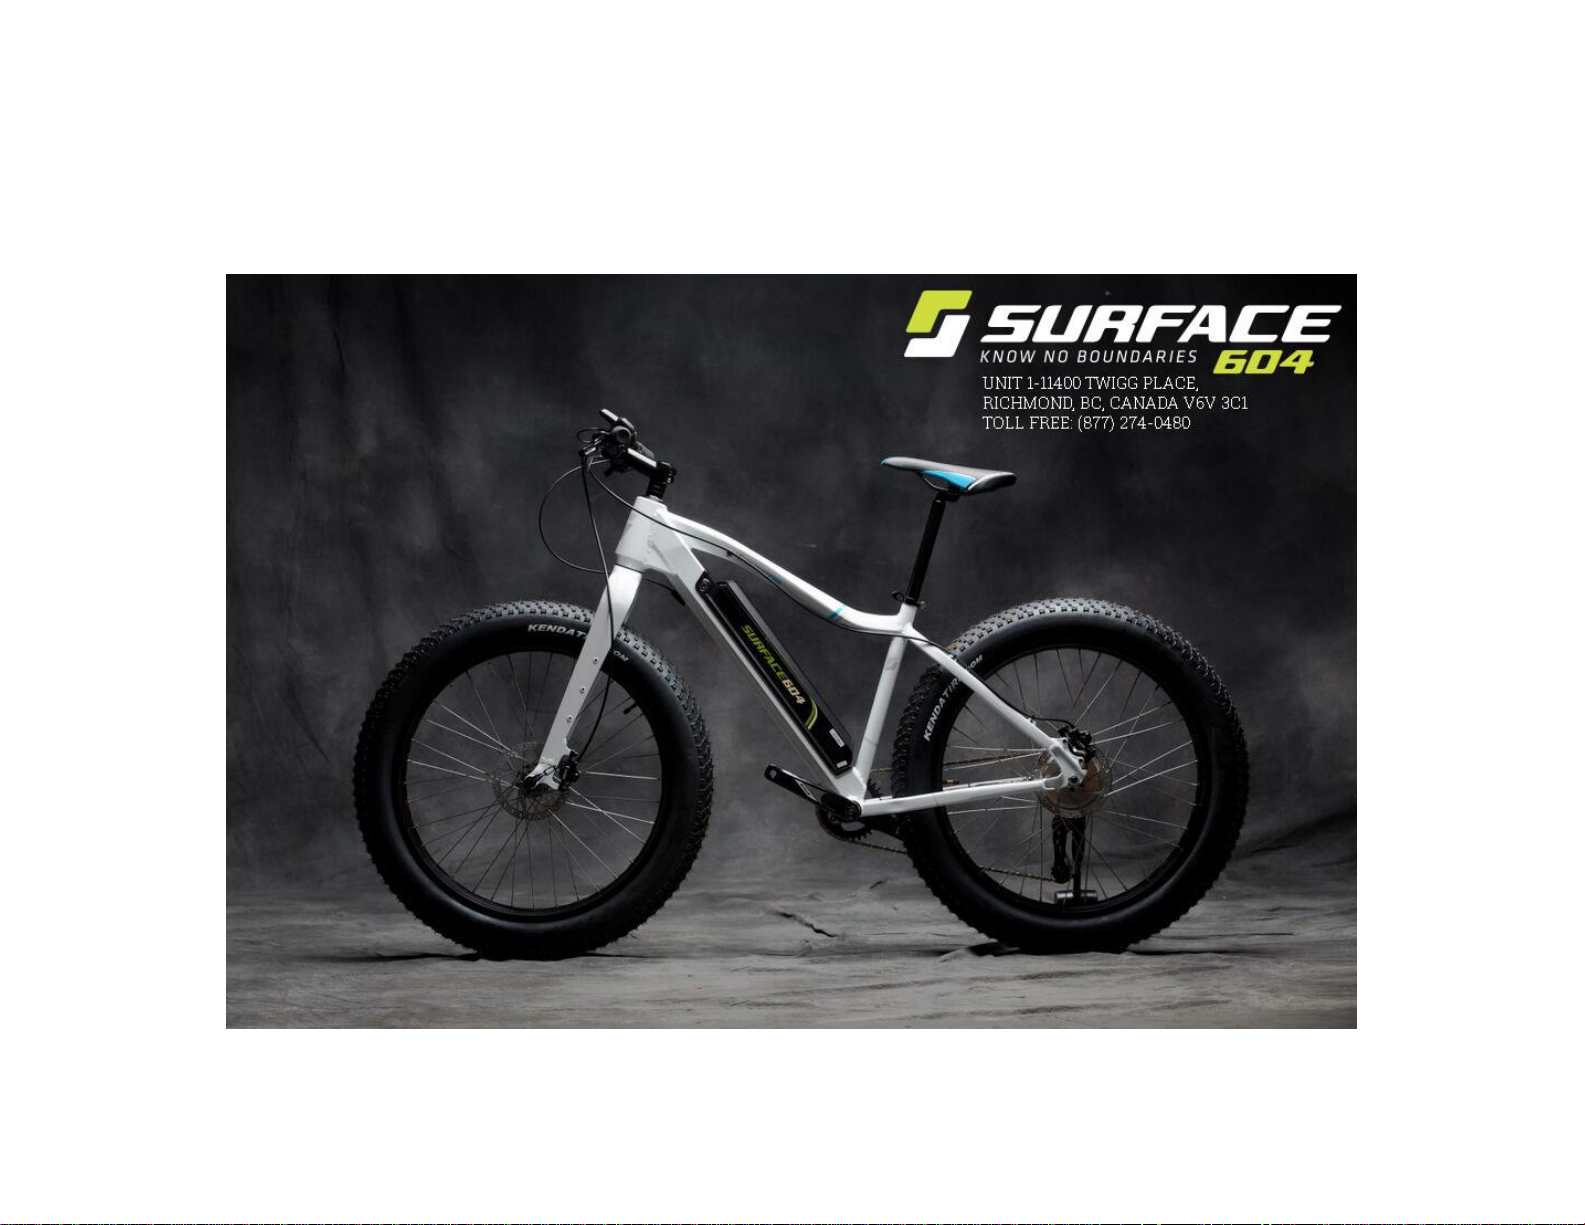
SURFACE 604 E250/E350 BOAR OWNERS MANUAL
1
Page 2
Thank you for purchasing a Surface604 Boar.
We welcome you to the exciting and revolutionary world of alternative transportation. Your high quality,
power on demand Surface604 bicycle offers a new form of environmentally friendly transportation and
recreation. Throughout this Manual you will find useful tips and important safety, performance and
maintenance information to ensure that you enjoy all the features Surface604 bicycles have to offer for
your riding enjoyment.
IMPORTANT: Please read this Manual before taking your first ride on your Surface604 bicycle. It is very
important to familiarize yourself with the product to ensure you experience the bike’s full performance
potential, all the while ensuring your safety and riding pleasure. We also recommend that you keep the
Manual on hand for future reference.
NOTE: It is important to understand that this is not a comprehensive use, repair or service Manual. Please
contact your local Surface604 dealer for all service, repair and maintenance. Your local dealer will also be
able to refer you to additional books, DVDs, websites or cycling clinics/classes available in your community
to broaden your skills and knowledge in bicycle use, repair and maintenance.
ABOUT THIS MANUAL: The main purpose of producing this owner’s Manual is to ensure your safety at all
times while enjoying our product. Along with many others in the cycling community, we constantly strive to
reduce possible risks associated with our products. We also recognize the importance of you, the rider, to
clearly understand that with proper instruction of bicycle use and maintenance, the risk of
cycling-related accidents can be reduced. It is within this context we created the following Manual and invite
you to take responsibility to learn about how to reduce inherent risks while bicycling and enjoying your
Surface604 bicycle. We also wrote the Manual to ensure readability and ease in efficiently finding information.
We strongly recommend that you read the entire Manual and look for the WARNINGS or CAUTIONS we have
included throughout to alert you to potential risks of injury and/or damage.
2
Page 3

>> CONTENTS
GENERAL WARNING ....................................................................................................................................... 5
ONE > BEFORE YOU RIDE .............................................................................................................................. 6
BIKE FIT ...............................................................................................................................................................
SAFETY FIRST! ...................................................................................................................................................
MECHANICAL SAFETY CHECK ............................................................................................................. 7
SOME ADDITIONAL PREPARATIONS ..............................................................................................................
FIRST RIDE .........................................................................................................................................................
OWNER’S MANUAL > ..................................................................................................................................10
TWO > SAFETY ..............................................................................................................................................11
THE BASICS ........................................................................................................................................ 11
RIDING SAFETY ..............................................................................................................................................
OFF ROAD SAFETY ......................................................................................................................................... 1
WET WEATHER RIDING ................................................................................................................................... 1
NIGHT RIDING .................................................................................................................................................. 1
EFFICIENT RIDING TECHNIQUE ..................................................................................................................... 1
CHANGING COMPONENTS OR ADDING ACCESSORIES ................................................................ ........... 1
THREE > FIT ................................................................................................................................................... 17
STANDOVER HEIGHT ...................................................................................................................................... 1
SURFACE604 FRAME FIT ................................................................................................................................ 1
SADDLE POSITION .......................................................................................................................................... 1
HANDLEBAR HEIGHT AND ANGLE ..................................................................................................... 19
CONTROL POSITION ADJUSTMENTS ................................................................................................ 20
BRAKE REACH ..................................................................................................................................... 20
6
6
9
9
11
3
4
4
5
6
7
8
8
3
Page 4

FOUR > TECHNICAL INFORMATION ............................................................................................................ 21
WHEELS .............................................................................................................................................. 21
SEATPOST QUICK RELEASE ........................................................................................................................ 25
BRAKES .............................................................................................................................................. 26
SHIFTING GEARS ........................................................................................................................................... 27
PEDALS ............................................................................................................................................... 29
BICYCLE SUSPENSION ..................................................................................................................... 31
TIRES AND TUBES ................................................................................................................................ .......... 32
POWER ASSIST DRIVE SYSTEM ................................................................................................................... 34
FIVE > SERVICE ............................................................................................................................................. 35
SERVICE INTERVALS ..................................................................................................................................... 36
GETTING HOME WHEN SOMETHING BREAKS .......................................................................................... 37
IF YOUR BICYCLE SU STAINS AN IMPACT ................................................................................................... 39
SIX > ABOUT YOUR SURFACE604 DEALER................................................................................................ 40
ACCESSORIES ................................................................................................................................... 40
SEVEN > LIMITED WARRANTY .................................................................................................................... 41
WARRANTY REGISTRATION .......................................................................................................................... 42
EIGHT > CONTROL PANEL DISPLAY ...................................................................................................... 43-53
INFO & SETUP .............................................................................................................................................. 43-53
NINE > MOTOR SPECIFICATIONS................................................................................................................. 53
DETAILED SPECS ............................................................................................................................................. 53
TEN > BATTERY ....................................................................................................................................... 54-56
PRECAUTIONS & CARE ............................................................................................................................... 54-56
4
Page 5

Like many forms of transportation and recreation, bicycling involves the potential risk of injury and/or damage. By choosing to cycle, you are
assuming responsibility for these risks. In an attempt to reduce the risk, we believe you need to know and practice the rules of safe and
responsible riding and of proper use and maintenance, which will help to reduce the risk of injury or damage. Consequently, you will find
many “WARNINGS” and “CAUTIONS” throughout this Manual followed by discussions on the consequences in failing to inspect and
maintain your bicycle and/or following safe cycling protocol. Again, we recommend you familiarize yourself with this information since we are
highlighting it with your safety in mind.
It is impossible to anticipate or discuss all situations or conditions in this Manual, which may or may not lead to injury or damage while
riding this bicycle. We have taken the utmost care and attention in manufacturing a safe and reliable product and in providing you with this
informative Manual that will assist you in reducing risks associated while using your bicycle. However, there are risks that cannot be
predicted or avoided, and consequently, are the sole responsibility of you, the rider. Our intention here is not to cast fear in riding a bicycle,
but instead to recognize the potential dangers associated with traveling on two wheels and thereby ensuring a safe and enjoyable
experience.
The combination of the safety alert symbol and the word WARNING indicates a potentially hazardous situation which, if not avoided,
could result in serious injury or death.
The combination of the safety alert symbol and the word CAUTION indicates a potentially hazardous situation which, if not avoided, may
result in minor or moderate injury, or is an alert against unsafe practices.
The word CAUTION used without the safety alert symbol indicates a situation which, if not avoided, could result in serious damage to the
bicycle or the voiding of your warranty.
5
Page 6

ONE > BEFORE YOU RIDE
>> NOTE: As already strongly recommended, please
read this Manual in its entirety. Here we explain the
importance of fitting the bike, safety and general
maintenance. Be sure you understand each point in this
section before setting out
on your first ride. Refer to specific sections of the Manual
for detailed content to ensure you are prepared and
ready for a safe and enjoyable ride.
BIKE FIT
1 > The fit of your bicycle is extremely important. If the bicycle
is too large or too small, this may pose a danger in causing
you to lose control or fall. In addition, proper fit is essential for
maximum performance and comfort. To determine the right
size of bike that suits your body, go to Sections 3.1 and 3.2.
Your dealer will also be able to assist you in finding the right
size. When referring to size, bicycles are measured according
to the frame size. This number signifies the size of the frame
and the overall size of the bike.
2 > With the right sized frame, you can now adjust accessories
to maximize safety, comfort an d performance. Start with
determining whether your seat height is set correctly. To check
this and/or make adjustments, go to Section 3.3.
3 > Now check to ensure the saddle is securely fastened to the
post (see Section 3.3) and the post clamp is secured (see
Section 4.2). A securely fastened saddle does not move in any
direction and a secure post clamp prevents the post from
sliding up or down.
4 > Check to see if the handlebars and stem are set at the
right height for you and are secure. To confirm, go to
Section 3.4.
5 > Now check the brakes. Squeeze the brake levers. Can you
operate them with ease? Do you see the front brake pads
grasping the disc when you squeeze the brake levers? It is also
a good idea to lift your bicycle, spin each wheel, grasp the
brake and ensure proper function. If the brake does not
function with ease have your local dealer/mechanic adjust
them.
6 > Lastly, ensure that you fully understand how to operate your
new Surface604 bicycle (see Section 4.9). Your new bicycle
offers features unlike regular pedal operated bicycles. Contact
your local dealer to have any features or functions explained to
you before your first ride.
SAFETY FIRST!
1 > ALWAYS WEAR AN APPROVED HELMET WHEN RIDING
YOUR SURFACE604 BICYCLE. Please refer to your helmet
manufacturer’s instructions for proper fit, use and care of the
helmet. Helmets are available from your dealer.
2 > Check to see that you have all required and
recommended safety equipment for your first and future rides.
Also, be sure that you know all laws pertaining to cycling in
your region. The laws may include where you can cycle, the
use of hand signals or the need for mandatory equipment
while cycling.
3 > Next, are your wheels securely fastened to the
frame/forks? Wheels that are not safely secure can wobble
and impede the bicycle performance or worse, dislodge while
riding and cause injury or death. For your Surface604 bicycle,
the front wheel has a quick release mounting mechanism and
the rear wheel has a bolted mounted device. See Section 4.1
for an explanation on how to properly secure both types of
mounting devices.
6
Page 7

4 > Now look at your pedals. Check to see that they are securely
fastened and the peda ls spin freely.
5 > Your Surface604 bicycle comes equipped with a suspension
fork and a suspension seat post. It is very important that you
understand how the suspension works because it will influence
the performance and handling of the bicycle. Either consult your
local dealer to explain or read Section 4.6.
6 > Check to see if you have “toe-overlap” – this can occur with
smaller sized frames when your toe(s) make contact with the front
wheel when the wheel is turned and the pedal is in a forward
position. This can cause injury or harm to you and/or your bicycle.
If you are rubbing the front wheel (or any other part of the bicycle
while pedaling) see Section 4.5 or contact your local dealer before
you ride.
7 > Check to see that the lighting system is operating at peak
performance. To activate the lights, press the Mode button for
three seconds and check the rear and front fixtu re for strong
light output. It may be helpful to roll your bike up to a wall and
turn the light on to see the output level and angle of the light.
Please refer to the lighting system manufacturer’s Manual for
more information about light output and adjusting the fixture
angles for peak performance.
8 > Check to see that the battery is fully charged and operating
properly. Look for a full battery charge level on the command
console. If this is not the case, refer to Section 5.4 on charging
your battery. Always make sure your battery container is well
fastened to the frame and locked.
MECHANICAL SAFETY CHECK
Always do a complete check of the condition of your bike
before every ride. We also recommend regular maintenance
of your bicycle to prolong the life of the components and
maximize safety.
✔ Nuts, Bolts and Straps: Ensure all are secure. An easy
way to test for this is to lift the front wheel off the ground
by two or three inches and then drop the wheel. Listen,
watch and feel for anything loose. Do the same for the
rear wheel. Next, do a quick visual and tactile inspection
of the entire bicycle. If you find something loose, tighten it
before your ride. This is a good habit to develop before
each ride. Lastly, if you do discover something you are not
sure about, please consult your local dealer to ensure all is
safe.
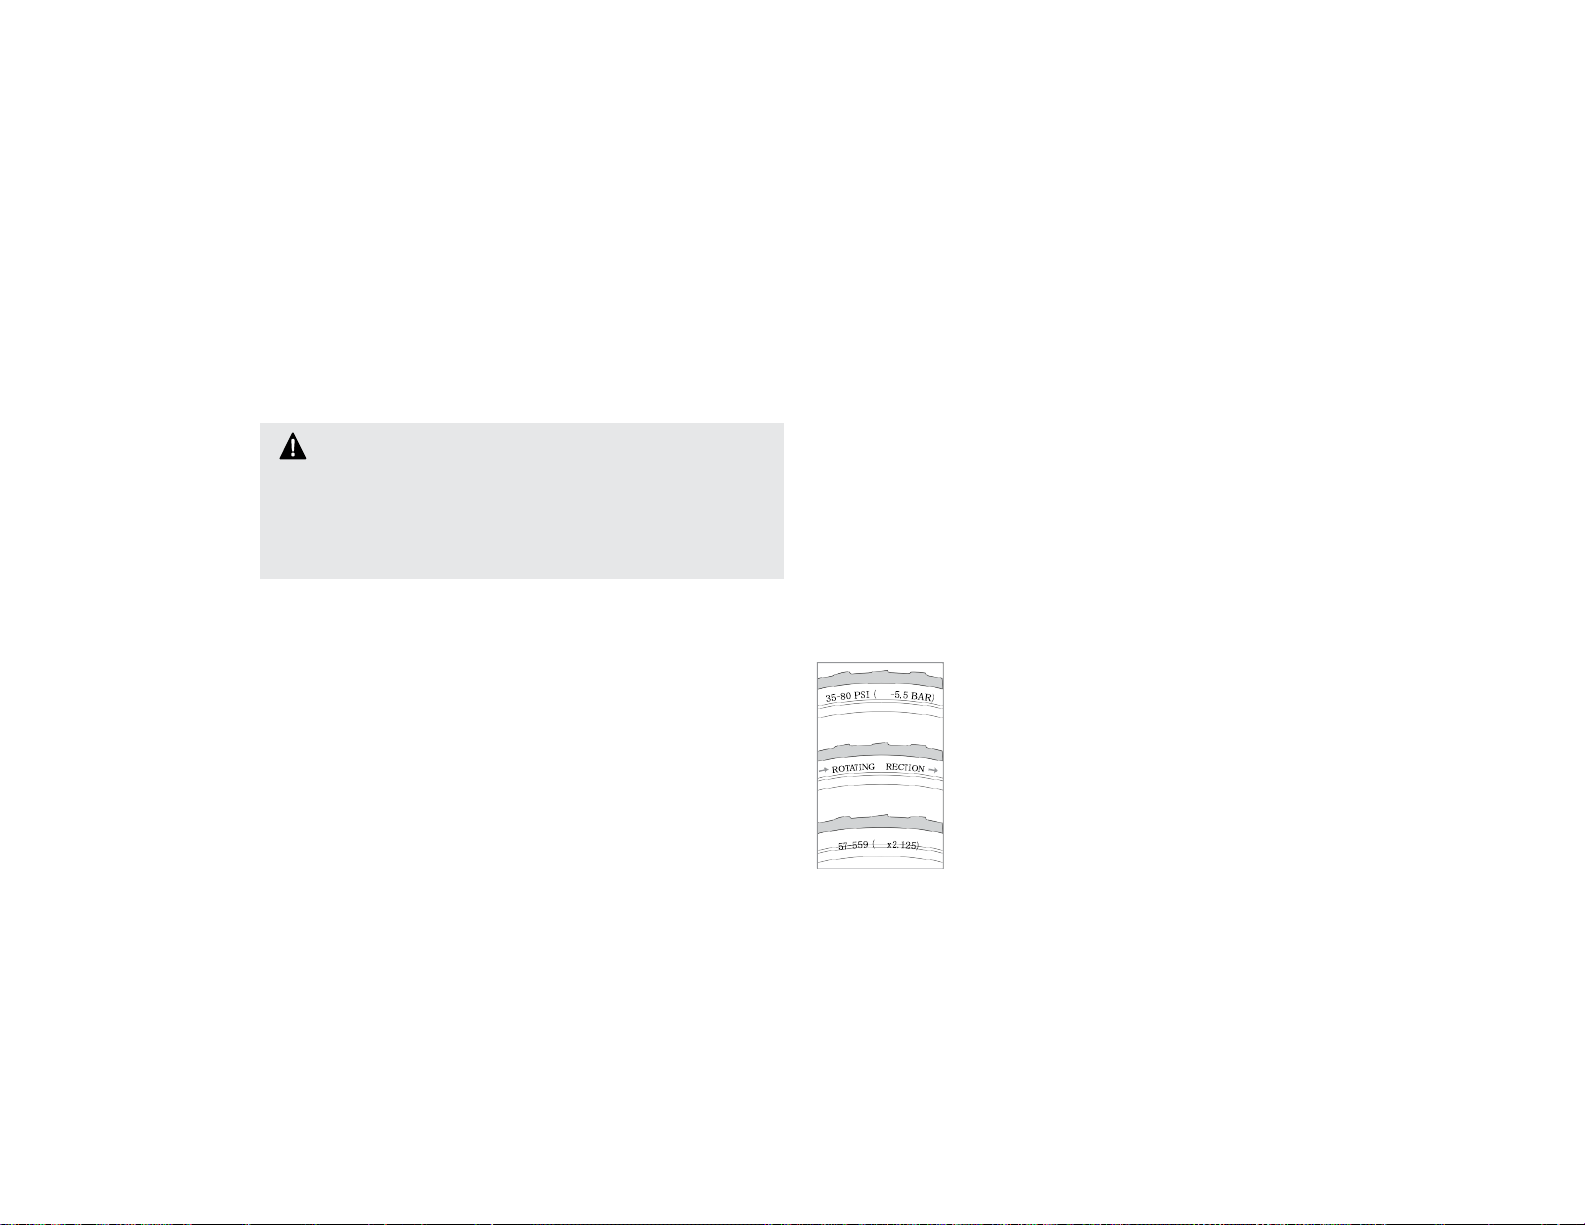
✔ Tires and Wheels: Make sure your tires have the correct
amount of air pressure. Tires with too little or too much air
pressure can impede performance and be unsafe while riding
your bike. To ensure your tires are at the necessary air
pressure (or psi), there are two steps you can follow. First, if
you have a tire gauge, apply it to the tire valve and check the
psi. Much like a tire on a car, the recommended psi is
stamped on the sidewall of the bicycle tire. When you are
sure the tire is set to the correct psi, squeeze the tire to
familiarize yourself with how the tire should feel to your hand.
With your tires ready to roll, slowly spin each wheel and watch
for any cuts in the tread and sidewall, or road debris lodged in
the tire such as wood, glass or nails. Remove any debris and
ALWAYS replace any tires with cuts or visual damage before
you ride. Lastly, check to ensure your wheel (or rim) spins
straight or “true” – this means that when you spin the wheel, it
does not wobble side to side or rub against your brake pads.
If you find your wheel wobbles side to side or rubs against
7
Page 8
the brake pad even slightly, take your bicycle to your local
bicycle mechanic to have the wheel trued.
CAUTION: For your brakes to work effectively, the
wheel (or rim) must be “true.” Do not attempt to true a
wheel unless you have the knowledge, tools and
experience. Truing the wheel is better left to your local
bicycle mechanic to ensure your wheel performs properly
and safely.
✔ Brakes: Check to see the brakes are working correctly
(see Section 4.3). Squeeze the brake levers for both front
and rear brakes and look to see if the front wheel quickrelease lever is closed, all control cables are seated and
securely engaged, and that the brake discs are intact.
Also, check that the brake levers, when fully squeezed, do
not touch the handle-bar. If you find a problem, DO NOT
RIDE THE BICYCLE and take the bicycle to your local
dealer for service.
✔ Quick Release: Check to see the front wheel and seat post
quick-release mounts are properly adjusted and securely
fastened. (see Sections 4.1.1 and 4.2, respectively)
✔ Handlebar and Saddle Adjustment: Check to see the
handlebar stem and suspension seat post are properly aligned
and securely fastened. Make sure the handlebar stem and
suspension seat post are parallel with the bicycle’s “centre
line” (imagine a straight line that runs from the rear tire to the
front tire). Also, ensure the stem and post are clamped
securely so that neither can be twisted or moved.
✔ Handlebar Ends: Check to see the handlebar grips are secure
and in good condition.
WARNING: Loose or damaged handlebar grips
can cause you to lose control of the bicycle and fall.
Unplugged handlebar ends can cut your body (handlebar ends
are often cut when the bicycle is assembled and may not be
filed to remove sharp edges or spurs) and can cause serious
injury in an otherwise minor accident.
✔ Bicycle Suspension: For your seat post suspension, check
the rail clamp plate screw for proper torque and that the seat
post quick-release is properly tightened (see Section 4.6 for
more details). For the front suspension fork, ensure that it is set
correctly for the terrain you have chosen for your ride.
✔ Battery Container: Ensure the battery container is locked in
place and connected; check by depressing the mode button on
the command console to confirm digital control activation.
8
Page 9

✔ Carry sufficient water (e.g., water bottles, water bladders, etc.)
SOME ADDITIONAL PREPARATIONS
Here are some additional preparations we recommend to help in
ensuring you have a safe and comfortable ride:
✔ Carry a good quality hand pump, patch kit, spare tube and
know how to repair a tire (see Section 5.2 and Section 4.7). Take
a bicycle maintenance/repair course or access the many books/
DVDs that your Surface604 dealer can recommend.
and food to ensure your body is properly fueled. Although your
bicycle is equipped with power on demand, your body is also a
contributing engine – no fuel, no go!
✔ Dress appropriately. Wear form fitting yet comfortable clothing
designed for cycling. A good pair of shorts, jacket, gloves and
glasses will ease wear and tear of long and short rides (see
Sections 2.1 (#5), 2.4 and 2.5 for more information).
✔ As with any activity in life, take a good attitude. Relax and enjoy
your ride – there is no hurry. Ride according to your athletic
ability but also know you have power on demand to assist you.
FIRST RIDE
It is time for your first ride. Before you strap on your helmet and
prepare to ride, take a moment to choose a location that is a
controlled environment to allow time to familiarize yourself with the
controls, features and performance of your bike. The location should
be clear of cars, other cyclists, obstacles or other hazards.
Be sure to familiarize yourself with the braking system of the bike
(see Section 4.3). Start with riding at a slow speed and test the
brakes. Put your weight toward the rea r and gently apply the rear
brakes first before engaging the front brakes. Sudden or excessive
application of the front brakes can cause your body to lunge forward
and could pitch you over the handlebars. Applying brakes too hard
at anytime when riding can lock up a wheel, which can cause you to
lose control and fall.
If your bicycle has cliples s pedals, be sure to practice getting in
and out of them (see Section 4.5).
Your bicycle comes equipped with a suspension seat post and front fork
suspension. Familiarize yourself with how the suspension systems
respond to brake application and rider weight shifts (see Section 4.6).
Next, practice shifting the gears (see Section 4.4) while pedaling - do not
attempt to shift gears when not pedaling. Also, remember not to shift
gears when pedaling backwards or pedal backwards after shifting
gears. This could jam the chain and cause serious damage to the bicycle
and dri vetrain.
Familiarize yourself with the power assist drive system (see Section
4.9) in order to safely enjoy this feature. Take time to be comfortable
with the command console.
Finally, familiarize yourself with the overall handling and response of
the bike and ensure you are comfortable while riding the bicycle.
If you have any questions, please contact your local Surface604
dealer for assis tance. See Section 6.1 for contact information.
9
Page 10

OWNER’S RECOR D
Please fill out the following Warranty Registration for your records and mail a copy of the Warranty Card to Surface604, or register on-line.
First name:
Last name:
Address:
City:
State/Province:
Model:
Serial number:
Date of sale(MM/DD/YY):
Dealer name:
Notes:
ZIP/postal code:
Country:
Phone: ( )
Email:
10
Page 11
TWO > SAFETY
THE BASICS
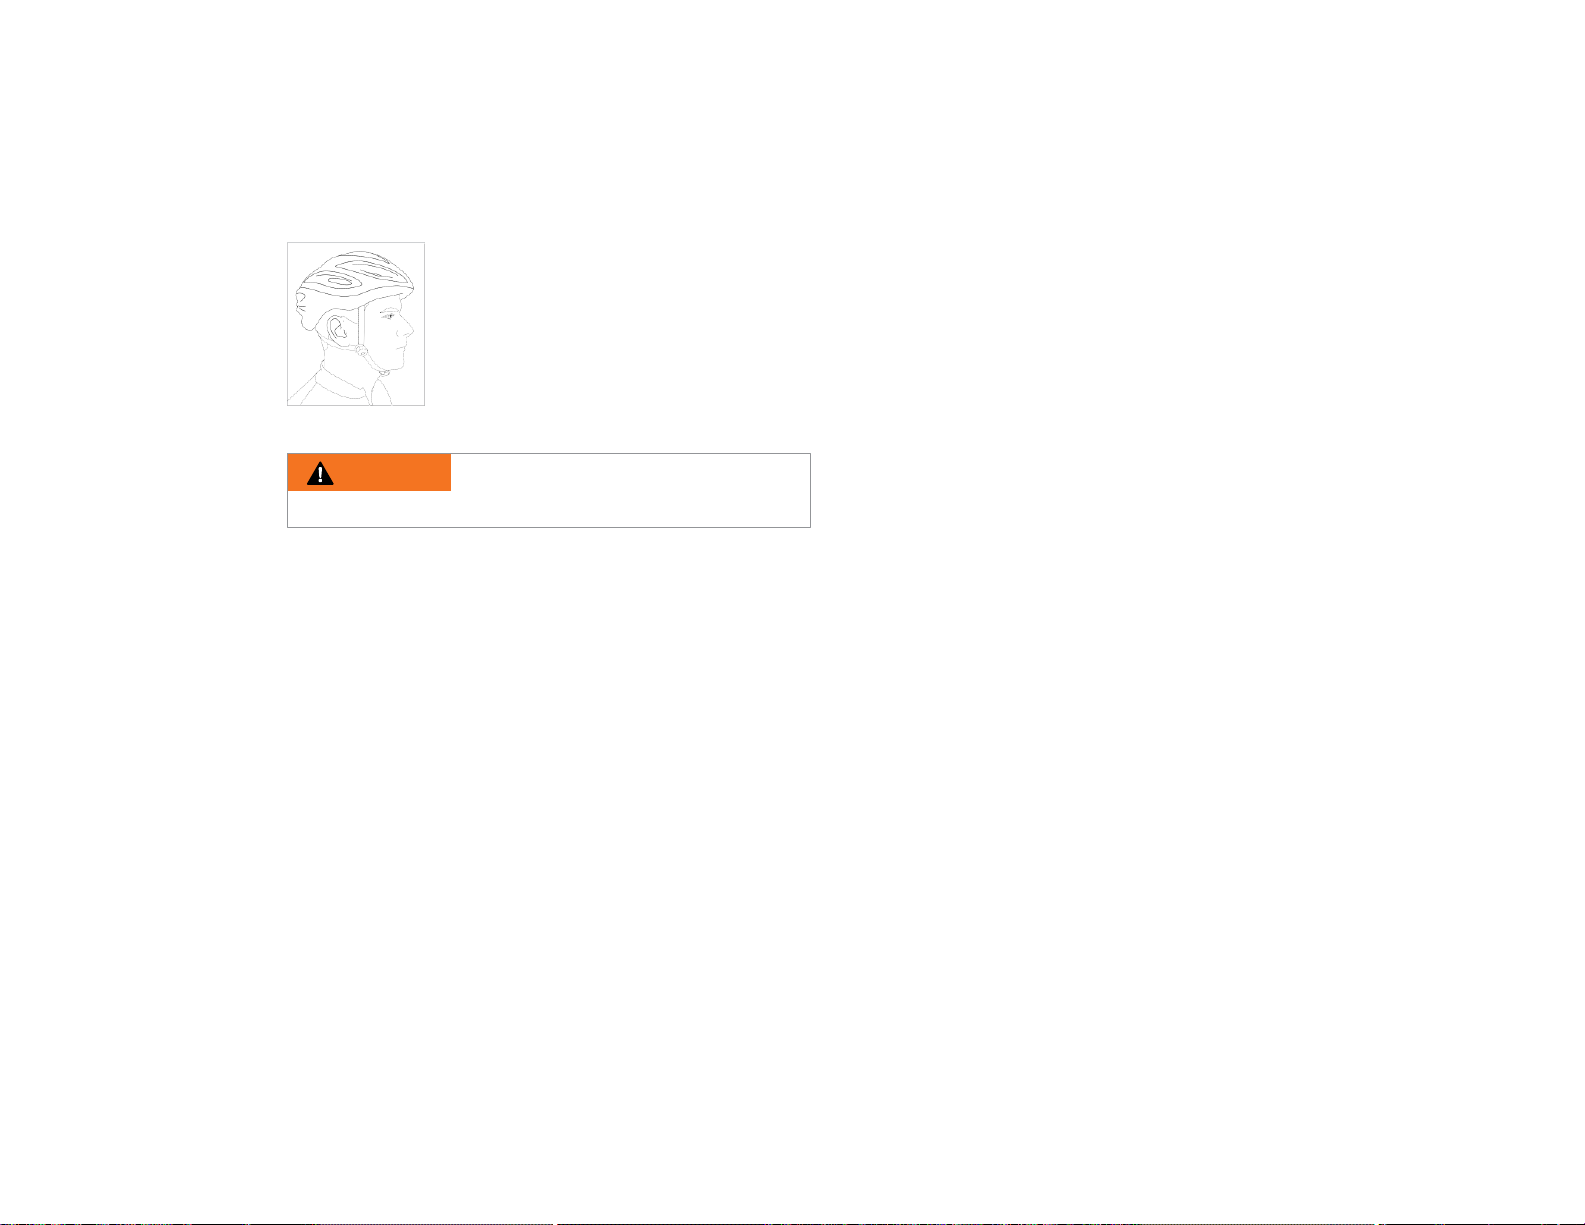
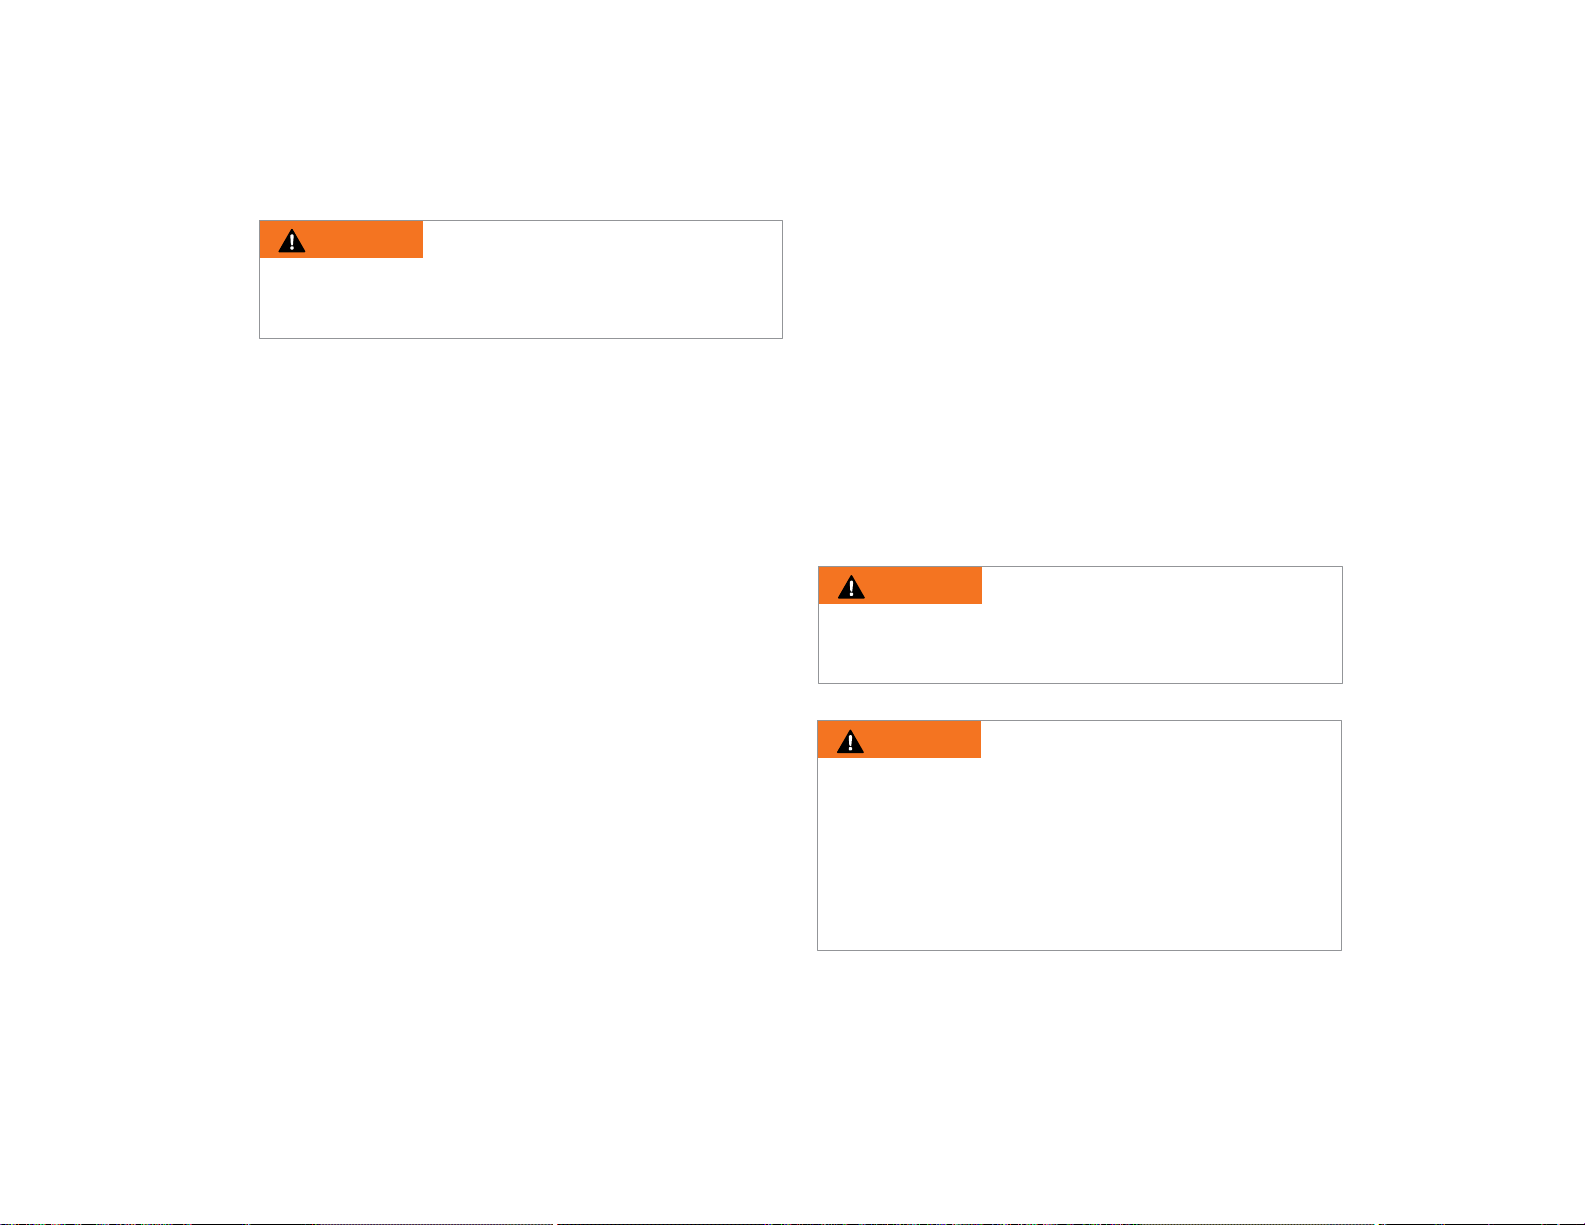
1 > Always wear a bicycling he lmet that
meets the latest certification standards and
follow the helmet manufacturer’s
instructions for proper fit, use and care of
your helmet. Most serious bicycle injuries
involve head injuries, which may have been
avoided if the rider had worn a helmet.
Fig 2.1
WARNING: Failure to wear your helmet when
riding a bicycle may result in serious injury or death.
2 > Always do the Mechanical Safety Check before you get
on your bike (see Section 1.3).
3 > Be competent in operating the controls on your bicycle:
brakes (see Section 4.3); pedals (see Section 4.5), shifting
(see Section 4.4) and power assist drive system (see
Section 4.9).
4 > Be careful to kee p body parts, clothing and other
objects clear from the sharp teeth of the chainrings, the
moving chain, the turning pedals and cranks, and the
spinning wheels of your bicycle.
5 > Always wear:
✔ Shoes that fit your feet properly and grip the pedal securely.
Do not ride your bicycle barefoot or with loose fitting sho es
such as sandals.
✔ Appropriate cycling clothing that is bright, visible and fit snugly
to your body. Loose clothing can tangle in your drivetrain or
wheel or be snagged by objects at the side of the road or trail.
✔ Protective eyewear to protect against airborne dirt, dust and
bugs. Also, if it is sunny, wear tinted lenses and, depending on
your riding preference, clear, yellow or orange lenses when not.
6 > Do not jump with your Surface604 bike. Jumping a bike can
be fun, but it puts you and your bike at risk of serious harm.
Jumping causes stress on everything from the spokes to your
pedals, and if you lose control, you can cause serious injury or
death. If you insist on jumping your bicycle, understand that you
are doing this at your own risk.
7 > Ride your bicycle at a speed that is appropriate for the
conditions in which you are riding.
RIDING SAFETY
1 > Observe all local bicycle laws and regulations. Pertinent
laws include, but are not limited to, helmet laws, child
carrier laws and special bicycle traffic laws. Important
regulations include, but are not limited to, licensing of
bicycles, riding on sidewalks, and regulations concerning
bike path and trail use. It is your responsibil ity to learn and
obey all laws and all regulations that pertain to cycling in
your area.
2 > Always respect the rights of other road or path users such
as motorists, pedestrians and other cyclists.
3 > Ride defensively. Always assume that others do not see
you. Never underestimate the unpredictability and risks
associated with road riding.
11
Page 12

4 > Some helpful defensive habits include looking ahead to avoid:
•
Vehicles slowing or turning, entering the road or your lane
ahead of you, or coming up behind you.
•
Parked car door opening – it is a good habit to scan parked
cars for people in the driver seat to alert you to the possibility
of a door opening.
•
Pedestrians stepping out
•
Children or pets playing near the road
•
Hazardous road conditions: pot holes, gravel, sewer grates,
expansion joints, road or sidewalk construction, debris and
other obstructions that could cause you to swerve into traffic,
catch your wheel or otherwise cause you to lose control and
have an accident. The many other hazards and distractions,
which can occur on a bicycle ride.
5 > Whenever possible, ride within designated bike lanes, on
designated bike paths or if riding on the road, ride as close to the
edge as possible. If you feel uncomfortable with the riding
conditions (e.g., road with very narrow shoulder or no shoulder at
all) seek out alternative routes that are safe.
6 > Obey all traffic laws. Stop at all stop signs and traffic lights
and slow down to look both ways before proceeding through all
intersections regardless of whether you have the right of way or
not. Remember that a collision with a vehicle, whether the
driver’s fault or not, will likely cause you much more harm than
the vehicle.
7 > Learn and use hand signals to let other users on the road
know where you are turning or changing your position while on
the road.
8 > Never ride with headphones. They may mask important
traffic sounds and emergency vehicle sirens. The
headphones, or the sounds they are amplifying may distract
you from concentrating on what is happening around you.
9 > Never hitch a ride from vehicles or other cyclists.
10 > Never ride your bicycle while under the influence of alcohol
or drugs.
11 > Observe and yield the right of way at all times, especially
for vehicles.
12 > Always respect the road – do not weave in and out of traffic
or make any sudden moves that may surprise other people with
whom you are sharing the road.
13 > Do not perform jumps, stunts or wheelies -- they can cause
you to lose control of your bicycle and result in injury or death
and/or damage to your bicycle.
14 > Never carry a passenger unless it is a small child wearing a
certified bicycle helmet and who is secure in a certified and
correctly mounted child carrier or a child-carrying trailer.
15 > Never wear or carry anything that obstructs your vision
or impairs complete control of your bike or which can
become entangled in the moving parts of your bicycle.
16 > Whenever possible, avoid riding your bike in conditions
with poor visibility or are hazardous, such as in bad weather,
riding at dusk or in the dark, or when you are extremely tired.
Each of these conditions increases the risk of an accident.
17 > Your new Surface604 bicycle purchase will inevitably create
much excitement and the opportunity to ride with other people
can also be exhilarating. Do not get so carried away that you
forget safety precautions, traffic laws and common sense –
always ride safely and defensively to enjoy many more rides to
come!
12
Page 13

OFF ROAD SAFETY
1 > Just as in road riding, never underestimate the
unpredictability and risks associated with off-road riding. The
variable conditions and hazards of off-road riding demand close
attention and specific skills. If you are riding off-road for the first
time, consider riding with others with experience or, if available,
take an off-road riding course in your community. Ask your local
dealer for information. Regardless, start slowly and choose a
relatively flat and easy terrain to build up your skills and
confidence. Your Surface604 bicycle comes equipped with front
suspension and a seatpost, which will take some time to get
used to as the suspension does soften the ride and may allow
you to experience increased speeds. The increased speed may
cause you to lose control of your bicycle and fall. Get to know
how to handle your bike safely before increasing speeds or
advanced terrain.
2 > Always wear appropriate safety gear required for the type
of riding you are doing (see Sections 2.4 and 2.5). Ask your
dealer for more information.
3 > Do not perform jumps, stunts or wheelies -- they can cause
you to lose control of your bicycle and result in injury or death
and/or damage to your bicycle.
4 > Never ride alone when in remote areas. Even if riding with
other people, always ensure someone (e.g., friend, family
member, co-worker) knows where you are and when to expect
your return.
5 > Ensure you ride on trails designated for or permit bicycling.
Learn and obey all laws regulating how and where you can ride
off-road. Always respect private property, which can be difficult to
know in remote areas.
6 > Be respectful of the rights of other trail users – motorists,
pedestrians, equestrians and other cyclists.
7 > Yield right of way to pedestrians and animals. Always
ride in a way that does not startle, surprise or endanger
them. Stay far enough away so that their unexpected moves
do not endanger you. Communicate with the person or
animal before approaching to alert them of your presence,
to reduce the chance of startling them.
8 > Always stay on the designated trail and respect the natural
environment. Do not contribute to erosion by riding in mud or
with unnecessary sliding or skidding. Avoid locking the wheels
as much as possible to prevent skidding and additional erosion.
Do not disturb the ecosystem by cutting your own trail or
shortcut through vegetation or streams. It is your responsibility
to minimize your impact on the environment. Always leave the
natural environment as you find it and always take out
everything (e.g., food wrappers, accessories) you brought in.
9 > BE PREPARED. Ensure you have adequate food/water,
appropriate clothing for a range of weather conditions and
essential tools.
13
Page 14
WET WEATHER RIDING
WARNING: Wet weather impairs traction, braking
performance and visibility for you and your bicycle and
other motorists or cyclists on the road. The risk of an
accident is dramatically increased while riding in wet weather.
Wet weather can make it harder to control your bicycle and
easier to lose control. Wet conditions can dramatically reduce
the stopping power of your braking system (and for those of
other vehicles or cyclists on the road). In addition, your tires will
not grip as well as in drier conditions, which can impair braking.
Exercise extra caution and safety when riding in wet weather by
riding more slowly and applying your brakes earlier and more
gradually than you would in drier conditions. Comfort while riding
your bike in wet weather can also be impaired. Fortunately, there
is a range of clothing available to help keep you warm and dry,
which will benefit you in terms of conserving energy and
ensuring you can remain focused on the road. Dress
appropriately for the weather conditions in which you are riding.
Check with your local dealer for a selection of clothing options
and accessories.
NIGHT RIDING
Riding a bicycle at night is many times more dangerous than
riding during daylight hours. It can be more difficult for
motorists and pedestrians to see you while riding your bicycle
at night. Your Surface604 bicycle does come equipped with a
quality lighting system to increase your visibility by motorists
and pedestrians and to improve your vision as you ride.
However, a lighting system does not provide the same amount
of light as daylight and therefore we remind you to ride at your
own risk. We do advise that children should never ride at
dawn, at dusk or at night and adults ride at their own
discretion.
WARNING: Please remember that riding at dusk,
dawn, at night or in conditions of poor visibility, without
your lighting system operating properly is dangerous and
may result in serious injury or death.
WARNING: Check to see that your lighting
system is operating properly and that the fixtures (front
and back) are clean, straight, unbroken and securely
mounted. Have your local dealer replace or repair damaged
fixtures and straighten or tighten any that are bent or loose.
Your dealer can also assist you in repairing any problems with
the lighting system overall. It is a very good habit to regularly
check to see that your lighting system is operating at peak
performance.
14
Page 15

If you choose to ride under conditions of poor visibility, always
check to ensure you comply with local laws pertaining to riding a
bicycle at night and take the following strongly recommended
additional precautions:
•
Make sure your bicycle’s lighting system is operating
properly, is correctly positioned and securely mounted (see
Section 4.8)
•
Always wear reflective and brightly colored clothing and
accessories such as reflective vest, reflective arm and leg
bands, and reflective strips on your helmet*. Any reflective
device and bright lighting systems will help attract attention
from motorist, pedestrians or other cyclists on the road.
•
Ensure that none of your clothing or accessories are
obstructing light fixtures or reflective pieces.
* Note: Please check your certified helmet manufacturer’s
warranty details to ensure that adding a reflective strip does
not void the warranty before attaching anything to your helmet.
If in doubt, contact your local dealer for assistance.
While riding at dusk, dawn or in conditions of poor visibility, ride
safely and cautiously. Avoid dark areas or areas with heavy or
fast- moving traffic. Avoid road hazards and if possible, ride on
familiar routes. If this is not possible, try to find well-lit routes
with minimal traffic.
EFFICIENT RIDING TECHNIQUE
Enjoying your ride is directly associated with ensuring you
have sufficient energy throughout the duration of your ride. It is
important to learn to ride efficie ntly. You may have noticed that
experienced bicycle riders look smooth and rel axed as they
pedal, legs turning circles, almost flowing, which is a good
indicator that they are using their energy efficiently. By riding
smoothly, you will have more energy and better control of your
bike. Here are some tips to keep in mind or even visualize while
riding:
•
Both on-road and off-road riders need to strive to keep their
upper body relaxed and relatively free of movement (e.g.,
hips should not be rocking side to side) except if you
dismount or stand on the pedals to climb a hill.
•
Remain on your seat as much as possible – standing on the
pedals can burn more energy than while remaining mounted
on the saddle.
•
Remember to breathe! Learn proper breathing techniques
when ridin g hard or climbing hills to help keep your muscles
fresh and your mind focused.
Your Surface604 bicycle comes equipped with an intelligent
energy management system that helps you maximize your
riding efficie ncy (see Section 4.9).
Your bike must be fitted correctly to your body. With a properly
fitted bike, you can then focus on your posture and pedal
techniques to develop a smooth, brisk, confident, and round
pedaling stroke.
15
Page 16
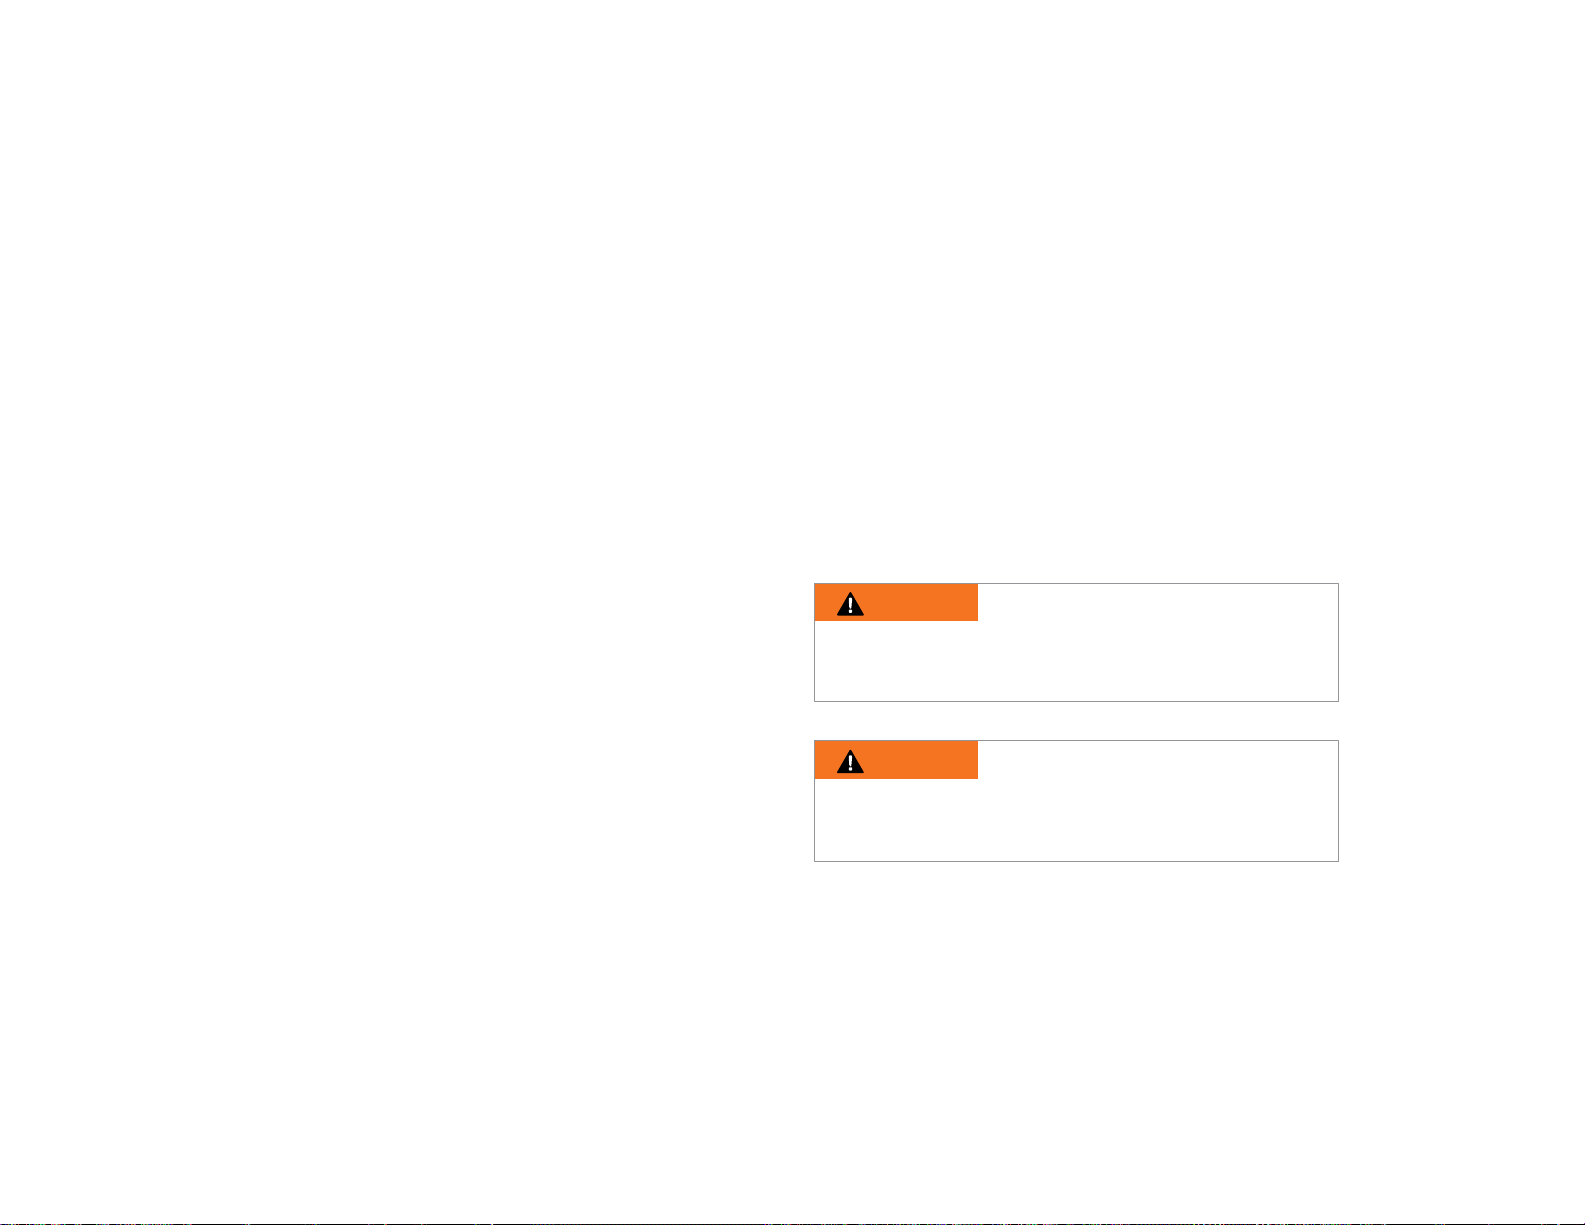
When practicing efficient cadence, concentrate and visualize
pedaling smooth, flowing circles - not squares. An efficient
pedal stroke flows through one complete revolution. Most
riders will find that their ideal cadence is around 90 revolutions
per minute (rpm), although it may be as low as 75 rpm. By
developing a basic bicycling technique from these tips, you will
be able to ensure efficient energy output when riding your
Surface604 bike.
You may also want to contact your local dealer for
additional resources or courses available in your
community.
CHANGING COMPONENTS OR ADDING
ACCESSORIES
There are a range of components and accessories available
on the market to enhance the comfort, performance and
appearance of your Surface604 bicycle. Please know that if
you choose to change components or add accessories on
your bicycle, you are doing so at your own risk. We are
unable to test that all components or accessories available on
the market are compatible, reliable or safe on your Surface604
bicycle. Before installing any component or accessory, please
consult your local dealer to ensure that it is compatible with
your bike.
WARNING: Failure to confirm compatibility
to properly install and maintain any component or
accessory can result in serious injury or death or
damage to your bicycle.
WARNING: Changing components or accessories
on your bicycle may void the warranty. Please refer to your
warranty and check with your local dealer before making any
changes to your bicycle.
or
16
Page 17
THREE > FIT
>> NOTE: Correct fit and properly adjusted components
are essential for maximum performance, safety and
comfort while riding your Surface604 bicycle. Your dealer
can assist in ensuring you have the right sized frame.
Making adjustment s to your bicycle to ensure the correct
fit for your body
and riding conditions requires appropriate skills, special
tools and experience. Always have your dealer make the
adjustments on your bicycle. If you have the necessary
skills, tools and experience and prefer to make the
adjustments yourself, have your dealer check your work
before riding.
Ensure you have a Surface604 bicycle that ‘fits’ you properly.
This means that the frame is the right size and the
components/parts are
adjusted to your preference. A bike that is too big, too small
and/or not set up properly is harder to control and can make for
an uncomfortable ride.
WARNING: If your bicycle does not fit properly,
you may lose control and fall.
STANDOVER HEIGHT
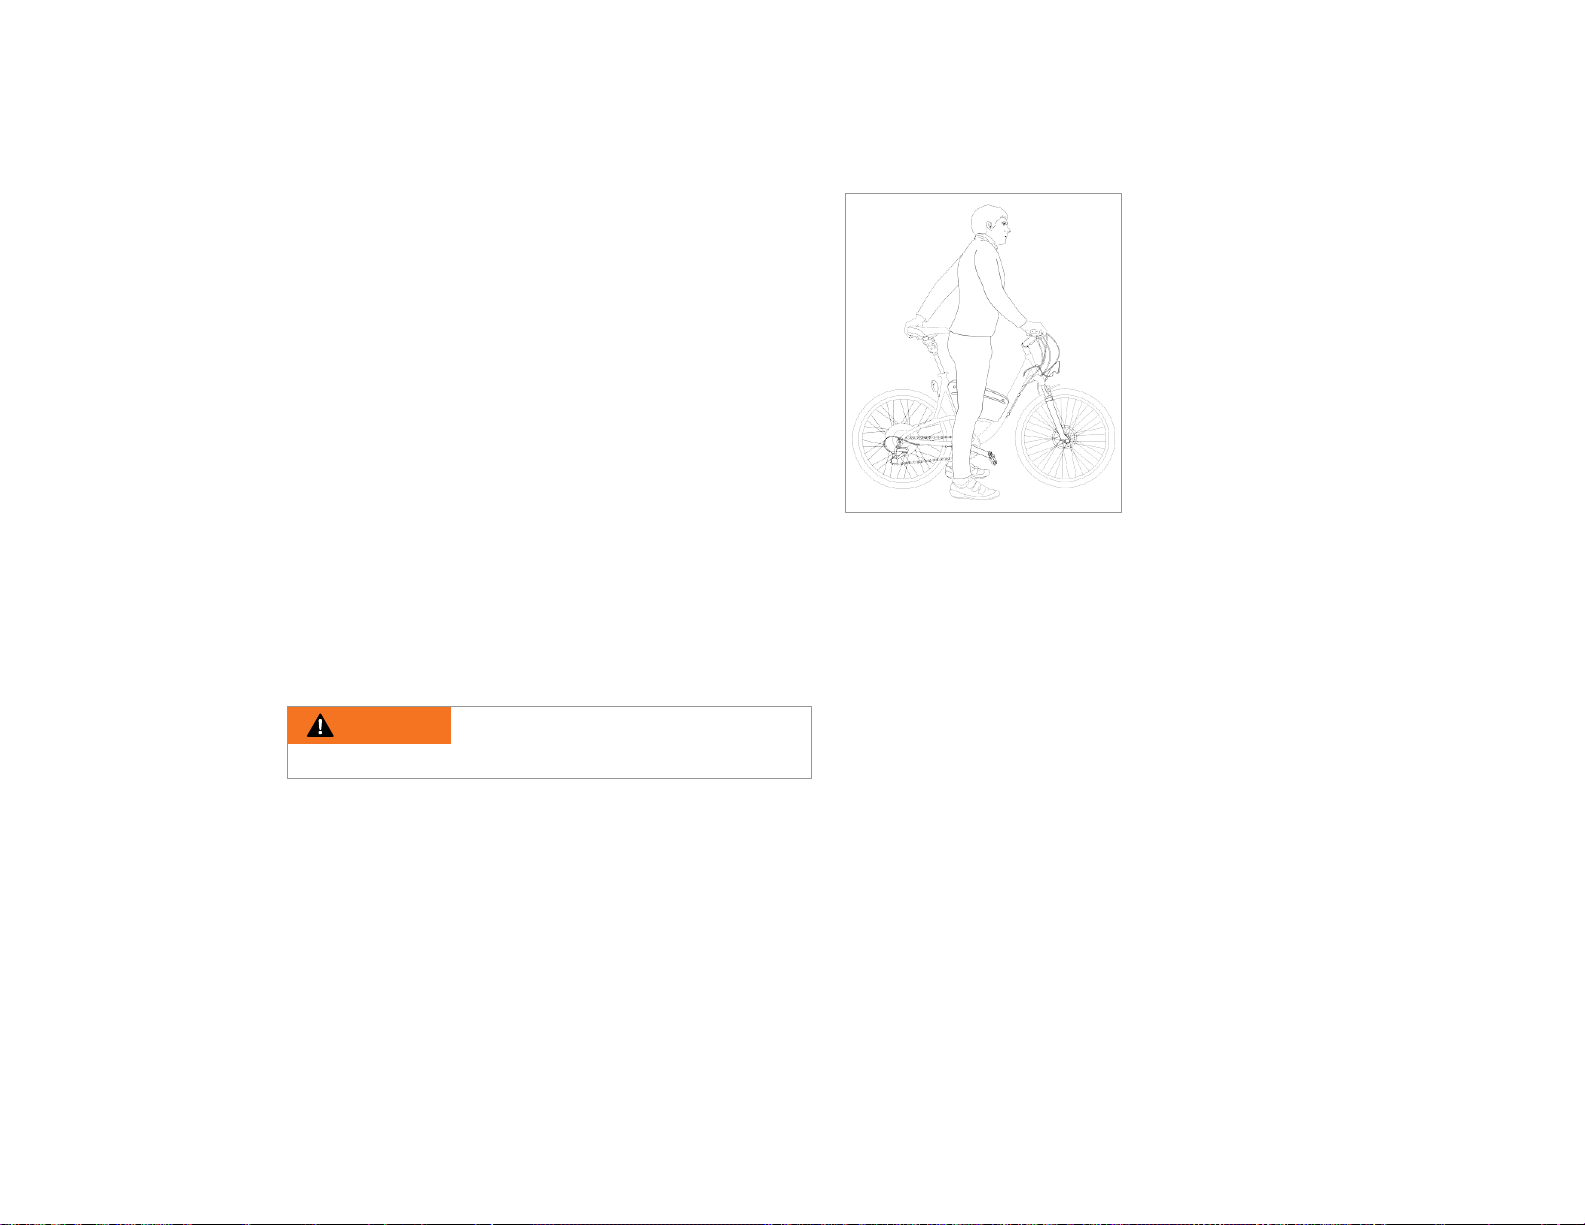
Stand over height is the basic element of the bike fit (see Fig
3.1). For most bikes, it is the dis tance from the ground to the
top of the bicycle’s frame at that point where your crotch would
be if you were straddling the bike and standing half way
between the saddle and the handlebars. However, your
Surface604 frame does not have a
Fig
3.1
Paved surfaces and never take off-road should give you a
minimum
stand over height clearance of 7 centimeters (2.8 inches). A
bike that you’ll ride on unpaved surfaces should give you a
minimum of 10 Centimeters (4 inches) of stand over clearance.
>> NOTE:
ideal frame for your size and riding style.
If in doubt, have your dealer assist you in finding the
top tube. Instead, you can
follow the same protocol as
with other bikes but use
the top of the battery
container as your guide.
Therefore, to check for
correct stand over height,
straddle the bike while
wearing the kind of shoes
in which you’ll be riding and
bounce vigorously on your
heels. If your crotch
touches the top of the
battery container, the
frame is too big for you.
A bike which you ride
17
Page 18
SURFACE604 FRAME FIT
As your Surface604 bicycle does not have a top tube you may
also use the seat tube measurement to determine proper fit. The
seat tube length designation is measured as the length from the
middle of the bottom bracket to the top of the seat tube. For
example, if you rode a 19’’ bicycle in the past, you may also
consider a 19” Surface604 frame.
>> NOTE: Have your dealer assist you in finding the ideal
frame for your size, riding style and experience.
SADDLE POSITION
It is very important that
your saddle position is set
according to your personal
preference to ensure
maximum performance
and comfort while riding
your bike. If you find that
the saddle is not
comfortable, ask your
dealer to assist you in
making any adjustments.
He/she will have the
necessary tools and skills
required for the
adjustment. The saddle
can be adjusted in three
directions:
1 > Up and down adjustments. To check for the correct saddle
height
•
Sit on the saddle;
•
Place one heel on a pedal;
•
Rotate the crank until the pedal with your heel on it is in the
down position and the crank arm is parallel to the seat tube.
Evaluation: if your leg is not completely
straight (but not locked) and just
touching the centre of the pedal, your
saddle needs to be adjusted. If your
hips have to rock for the heel to reach
the pedal, the saddle is too high. If your
knees are obviously bent with your heel
on the pedal, your
saddle is too low. When you have
ensured the saddle is set to the correct
height,
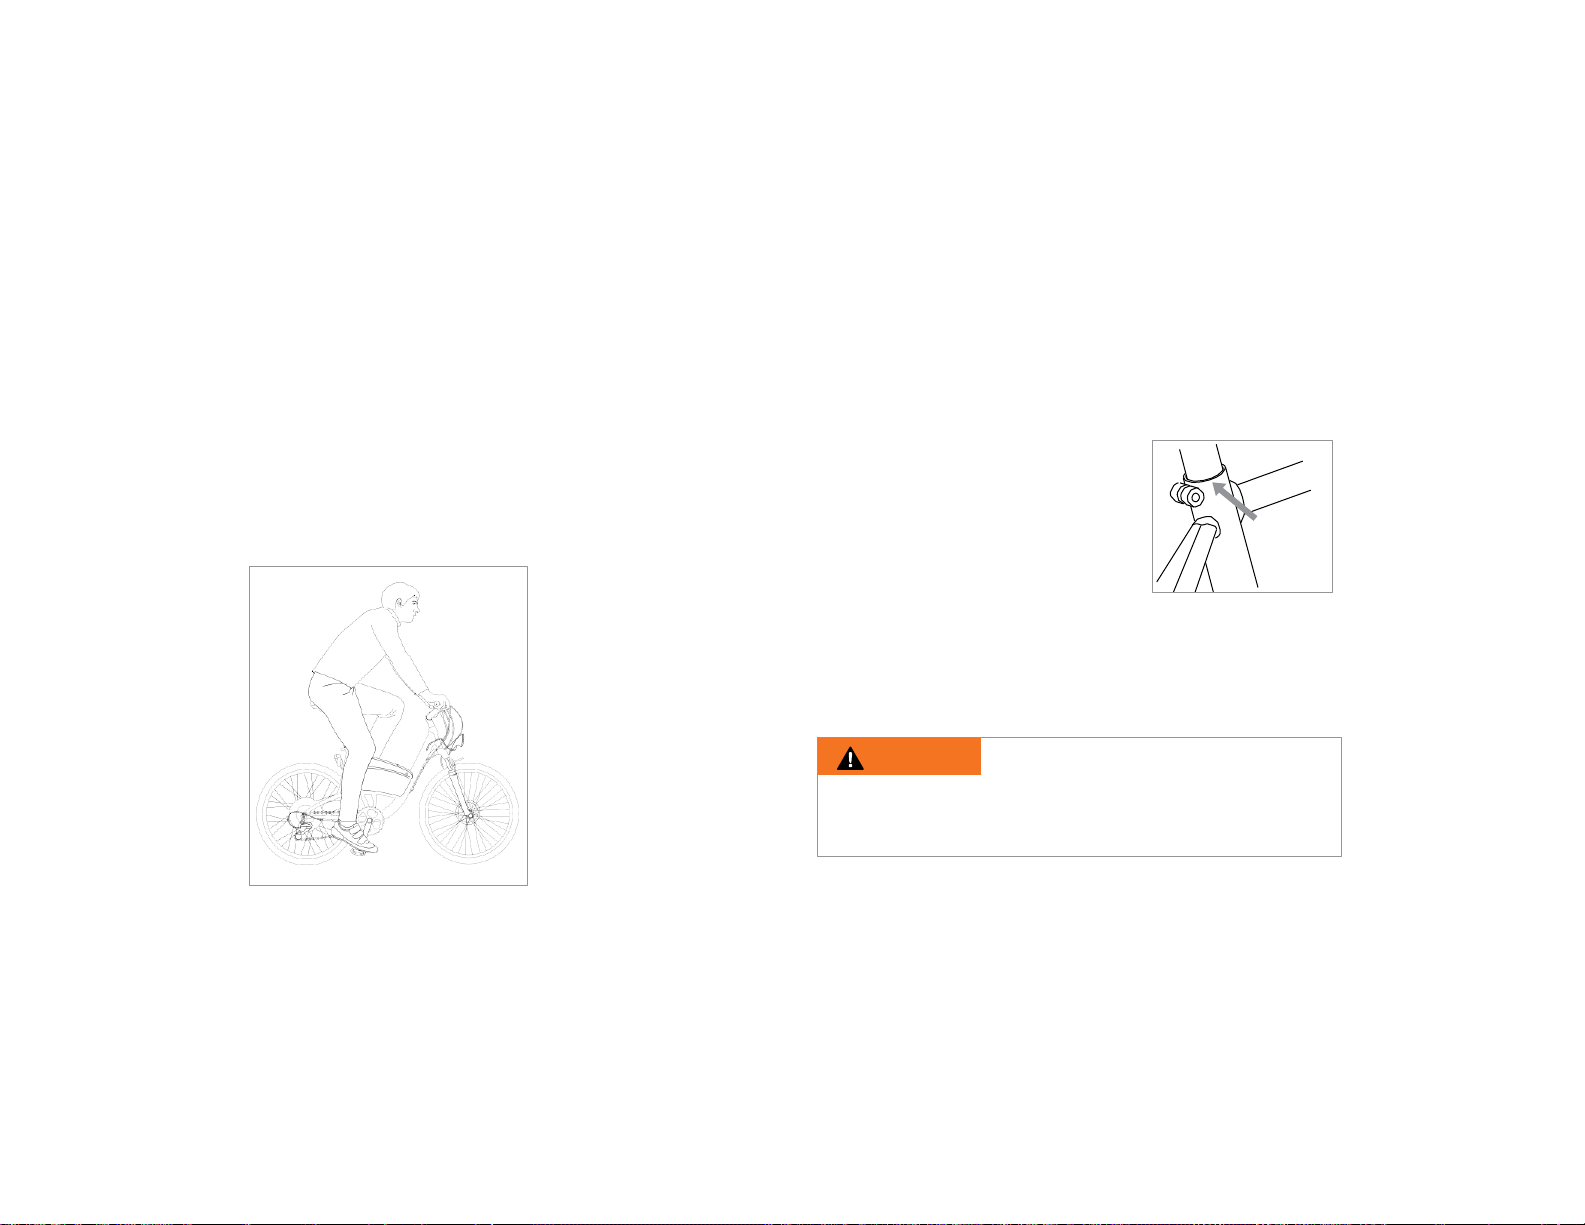
make sure that the seat post does not exceed the minimum
insertion or maximum extension (see Fig 3.3b). There will be a
line or marking on the seat post indicating the point at which you
cannot extend the post before it is unsafe.
WARNING: A mounted seat post that exceeds the
allowable Minimum Insertion or Maximum Extension
mark (see Fig 3.3b) can cause injury and/or for you to
lose control of your bike and/or damage your bicycle.
Minimum
insertion line
18
Page 19

2 > Front and back adjustments. The saddle can be adjusted
forward or back to ensure you get optimal position for
performance and comfort. Ask your dealer to set the saddle for
your optimal riding position and to show you how to make any
adjustments.
3 > Saddle angle adjustments. The saddle angle can be
adjusted either up or down. Most riders prefer a horizontal
saddle, but some also like the saddle angle adjusted slightly up
or down. Your dealer can make any adjustments for you and/or
teach you to do it yourself. If you do make adjustments,
remember that small changes to the saddle angle can have a
substantial effect on the bicycle’s performance and your
comfort. Therefore, make small adjustments to the saddle for
one direction at a time. Ride the bicycle in a safe environment to
evaluate performance and comfort before making any further
adjustments.
WARNING: Be sure to double check that you have
securely tightened the saddle adjusting mechanism after
each adjustment before riding. A loose saddle clamp can
cause damage to your bicycle and/or cause you to lose control
of the bicycle and fall. When the saddle is securely tightened,
there is no saddle movement in any direction. It is a good habit
to periodically check the saddle for movement before riding the
bicycle. This is done easily and quickly by grabbing the saddle
and trying to move it in different directions.
WARNING: Some people have claimed that
extended riding with a saddle that is not adjusted
correctly or that does not support your pelvic area
correctly can cause short-term or long-term injury to
your nerves and blood vessels, or even cause impotence.
If your saddle causes you pain, numbness or discomfort, see
your dealer as soon as possible to ensure the saddle model
and/or adjustments are correct for your body and riding style.
HANDLEBAR HEIGHT AND ANGLE
Your Surface604 bicycle comes equipped with an adjustable
stem. We recommend that you contact your local dealer for
assistance in making any adjustments to the stem. Your
Surface604 dealer can help you with any adjustments to the
handlebar height and angle.
WARNING: The stem’s Minimum Insertion Mark
must not be visible above the top of the headset. If you
see that the Minimum Insertion Mark is visible, have your local
dealer make the necessary adjustments. A stem that exceeds
the Minimum Insertion Mark may break or damage the fork’s
steering tube, which can cause you to lose control and fall.
19
Page 20
WARNING: If the stem binder bolt, handlebar
binder bolt or bar and extension clamping bolt ar e not
securely tightened, you could lose control of your bicycle
and fal l and/or damage your bicycle. To quickly check to
ensure bolts are secure, place the front wheel between your
legs and attempt to twist the handlebar/assembly. If you can
twist the stem in relation to the front wheel, turn the handlebars
in relation to the stem, or turn the bar and extensions in relation
to the handlebar, the bolts are not fastened properly. Either
fasten them yourself or see your dealer for help. Do not ride
your bicycle until you are sure all bolts are securely fastened.
CONTROL POSITION ADJUSTMENTS
The positioning and angle of the control mechanisms (e.g.,
brake levers, derailleur adjustors, and command console) on
your handlebars can be adjusted. Ask your dealer to make
any adjustments to suit your preference.
BRAKE REACH
The brake levers can be adjusted for optimal reach; however, we
do not recommend that you attempt to adjust them yourself
because your hydraulic disc braking system is fluid filled. If you
have small hands or find it difficult to squeeze your brake levers,
ask your local dealer to assist you in making an adjustment or
replace the levers with ones that suit your needs or preferences.
WARNING: The shorter the brake lever reach, the
more critical it is to have correctly adjusted brakes, so
that full breaking power can be applied within available
brake lever travel. Insufficient brake lever travel can result in
serious injury or death.
20
Page 21
FOUR > TECHNICAL INFORMATION
Understanding how your Surface604 bicycle works will contribute
greatly to your safety, performance and overall riding enjoyment.
We strongly recommend that you become knowledgeable of the
basic technical information as explained in the following pages
and if required, contact your local dealer for clarification.
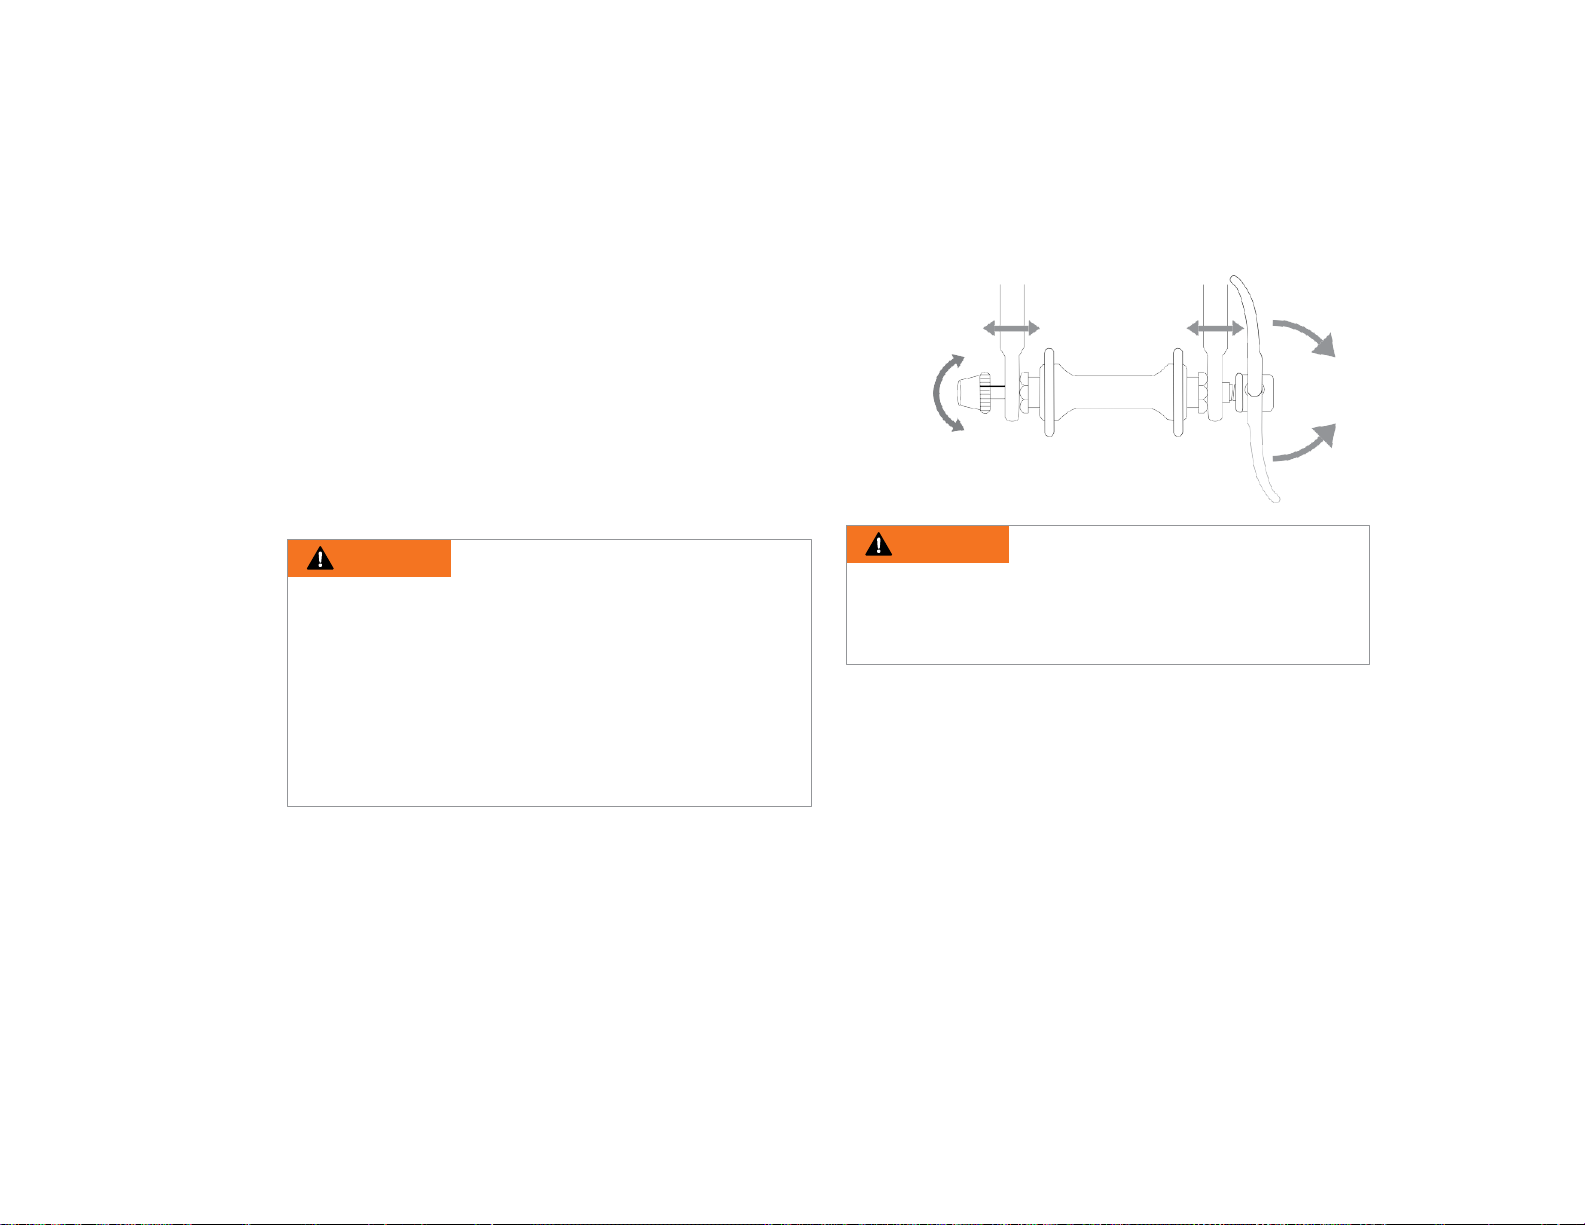
Fig 4.1.1
turn to adjust
clamping force
open
closed
closed
open
closed position
open
close
WHEELS
FRONT WHEEL QUICK RELEASE
WARNING: Riding with an improperly mounted
or adjusted wheel quick release can cause the wheel
to wobble or disengage from the fork, causing injury or
death to the rider. Therefore, it is essential that you:
✔ Ask your dealer to help ensure that you know how to remove
and install the wheel properly.
✔ Understand and apply the correct technique for mounting
your wheel with the quick release device.
✔ Check to see that the wheel is correctly mounted before
every ride.
The wheel quick release uses a cam action to clamp the bike’s
wheel in place (see Fig 4.1.1). Because of its adjustable nature, it
is critical that you understand how it works, how to use it
properly, and how much force you need to apply to secure the
wheel.
WARNING: Holding the nut with one hand and
turning the lever like a wing nut with the other hand until
everything is as tight as you can get it will not clamp the
wheel safely in the dropouts. Full force of the cam action is
needed to clamp the wheel securely.
ADJUSTING THE QU IC K RELEASE MECHANISM
The wheel hub is clamped in place by the force of the quick
release cam pushing against one dropout and pulling the
tension-adjusting nut, by way of the skewer, against the other
dropout. The tension- adjusting nut controls the amount of
clamping force. Turning the tension-adjusting nut clockwise
while keeping the cam lever from rotating increases clamping
force; turning it counterclockwise while keeping the cam lever
from rotating reduces clamping force. Less than half a turn of
the tension-adjusting nut can make the difference between safe
clamping force and unsafe clamping force.
open position
21
Page 22
FRONT WHEEL SECONDARY RETENTION
DEVICES
Your Surface604 bicycle has a secondary wheel retention
device to keep the wheel from disengaging from the front forks
if the quick release is incorrectly mounted. However, the
secondary mounting device is not a substitute for correct quick
release adjustments.
For more information, contact your Surface604
dealer.
WARNING: Removing or disabling the secondary
retention device is extremely dangerous and may lead to
serious injury or death. It may also void the warranty.
REMOVING AND INSTALLING A QUICK RELEASE
FRONT WHEEL
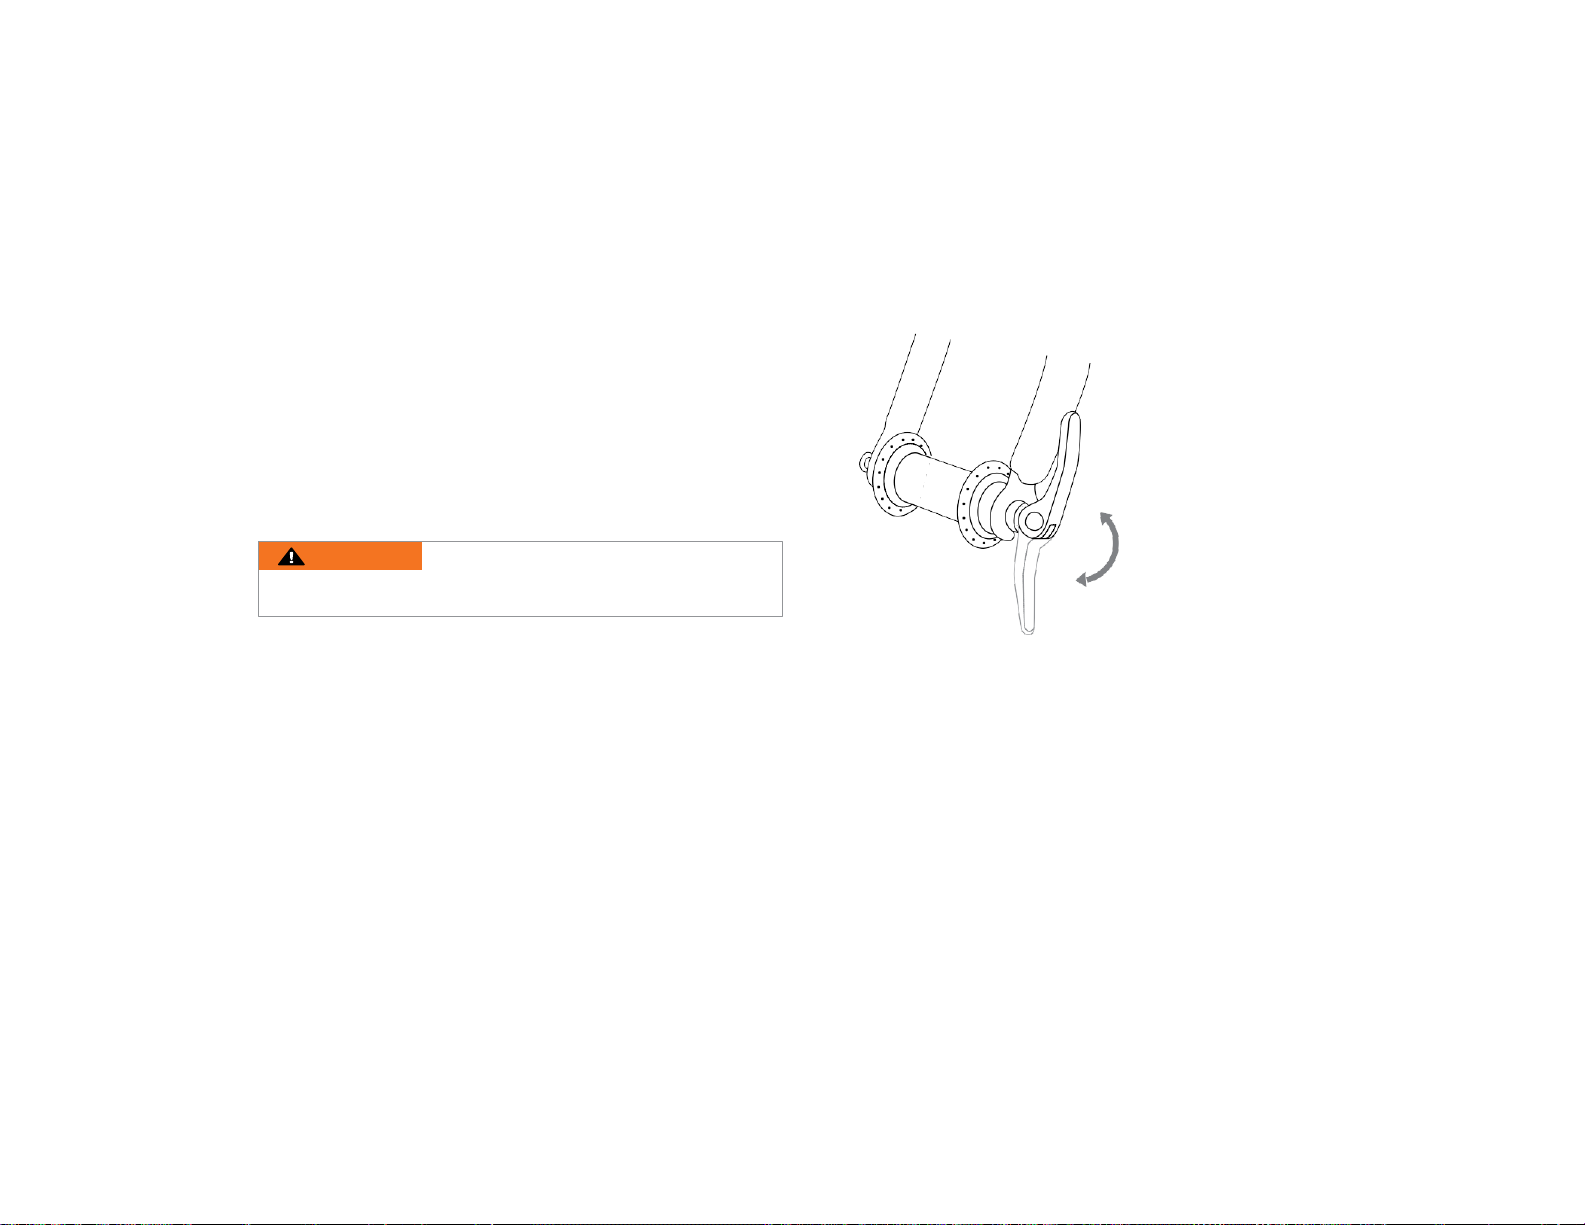
Fig 4.1.2
Open
Closed
REMOVING THE QUICK RELEASE WHEEL
a.
Move the wheel’s quick release lever from the locked or
CLOSED position to the OPEN position (see Fig 4.1.2).
b.
To disengage the secondary quick release, loosen the tensionadjusting nut enough to allow removing the wheel.
c.
Now raise the front wheel a few inches off the ground and bang
the top of the wheel with the palm of your hand to knock the
wheel out of the front fork.
22
Page 23
INSTALLING A QUICK RELEASE FRONT WHEEL
CAUTION: Your Surface604 bicycle is equipped with disc
brakes. Be very careful not to damage the disc, caliper or brake
pads when re-inserting the disc into the caliper. Never activate a
disc brakes control lever unless the disc is correctly inserted in
the caliper (see also Section 4.3).
a.
Move the quick release lever so that it curves away from the
wheel
(see Fig 4.1.2). This is the OPEN position.
b.
With the steering fork facing forward, insert the wheel
between the fork blades so that the axle seats firmly at the
tip of the slots, which are at the tips of the fork blades – the
fork dropouts. The quick release lever should be on the left
side of the bicycle
(see Fig 4.1.2).
c.
Holding the quick release lever in the OPEN position with
your right hand, tighten the tension adjusting nut with your
left hand until finger tight against the fork dropout (see Fig
4.1.1).
d.
While pushing the wheel firmly to the top of the slots in the
fork dropouts, and at the same time centering the wheel rim
in the fork, move the quick release lever upwards and swing it
into the CLOSED position (see Fig 4.1.2). The lever should
now be parallel to the fork blade and curved toward the
wheel. To apply enough clamping force, you should have to
wrap your fingers around the fork blade for leverage, and the
lever should leave a clear imprint in the palm of your hand.
CAUTION: Securely clamping the wheel takes
considerable force. If you can fully close the quick release
without wrapping your fingers around the fork blade for
leverage, and the lever does not leave a clear imprint in the
palm of your hand, the tension is insufficient. Open the lever,
turn the tension-adjusting nut clockwise a quarter turn, then
try again.
e.
If the lever cannot be pushed all the way to a position parallel
to the fork blade, return the lever to the OPEN position; then
turn the tension-adjusting nut counterclockwise one-quarter
turn and try tightening the lever again.
f.
Re-engage the brake quick release mechanism to restore
correct brake pad to disc clearance; spin the wheel to make
sure that it is centered in the frame and clears the disc, then
squeeze the brake lever and make sure that the brakes are
operating correctly.
WARNING: Secondary retention devices are not a
substitute for correct quick release adjustment. Failure
to properly adjust the quick release mechanism can cause the
wheel to wobble or disengage, which could cause you to lose
control and fall, resulting in serious injury or death.
23
Page 24
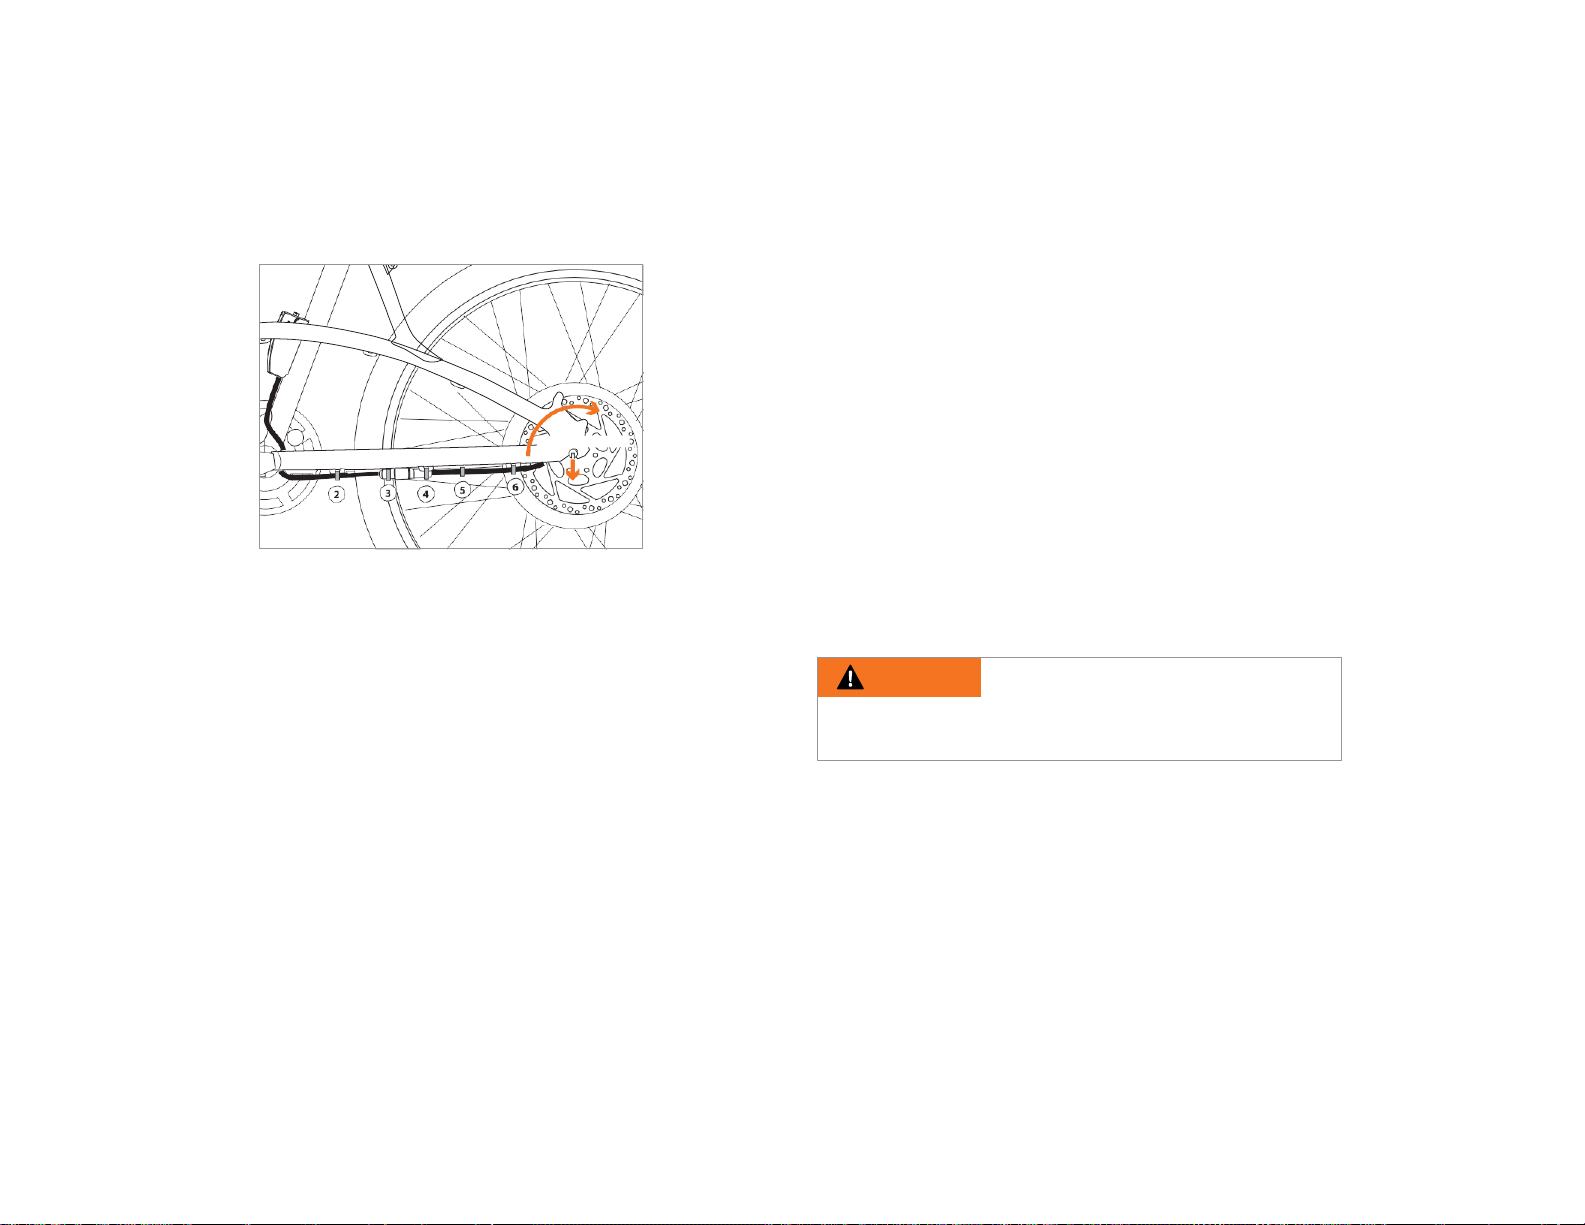
REMOVING AND INSTALLING
BOLT-ON REAR WHEEL
INSTALLING A BOLT-ON REAR WHEEL
Fig 4.1.3
1
✔ Shift the rear derailleur to its outermost position and pull
the derailleur back with your right hand.
✔ Put the chain on the smallest sprocket. Then, insert the wheel
into the frame dropouts and pull it all the way in to the
dropouts. The axle nut washers should be on the outside,
between the frame and the axle nut.
✔ Make sure that the axle groove is pointing directly toward the
floor (6 o’clock).
✔ Using the correct size wrench (15mm), tighten the axle nuts
as tightly as you can. Torque to 40 N.m. (30 ft/lbs)
TORQUE TO 40 N.m.
✔ Push the rear derailleur back into position.
✔ Re-engage the brake quick release mechanism to restore correct
brake pad to disc clearance; spin the wheel to make sure it is
centred in the frame and clears the brake pads; then squeeze
the brake lever and make sure that the brakes are operating
correctly.
✔ Reconnect the electric motor cables and fasten with zap-
straps in the required locations. (see Fig 4.1.3)
REMOVING A BOLT-ON REAR WHEEL
✔ Disconnect the electric motor cables and zap-straps (located
on the bottom left hand chain stay) (see Fig 4.1.3)
✔ Shift the rear derailleur to high gear (the smallest rear
sprocket) and pull the derailleur body back with your right
hand.
✔ Using the correct size wrench, loosen the two axle nuts.
✔ Lift the rear wheel off the ground a few inches and, with the
derailleur still pulled back, push the wheel forward and down until
it comes out of the rear dropouts.
WARNING: The motor acts as a rear hub and
should not be adjusted once the rear wheel is properly
mounted. For more information, contact your Surface604
Dealer.
24
Page 25
SEATPOST QUICK RELEASE
The seat post quick release clamp works exactly like the front
wheel quick release (see Section 4.1.1). While a quick release
looks like a long bolt with a lever on one end and a nut on the
other, the quick release uses a cam action to firmly clamp the
seat post.
WARNING: Riding with an improperly tightened
seat post can allow the seat to turn or move and cause
you to lose control and fall.
Therefore, it is essential that you:
✔ Ask your dealer to help ensure that you know how to
correctly clamp your seat post.
✔ Understand and apply the correct technique to clamp your
seatpost quick release.
✔ Check to see that the seat post is correctly mounted before
every ride.
ADJUSTING THE SEATPOST QUICK RELEASE MECHANISM
The quick release cam squeezes the seat collar around the seat
post to hold the seat post securely in place. The tensionadjusting nut controls the amount of clamping force. Turning the
tension-adjusting nut clockwise while keeping the cam lever from
rotating increases the clamping force; turning it counterclockwise
while keeping the cam lever from rotating reduces clamping
force. Less than half a turn of the tension-adjusting nut can make
the difference between safe and unsafe clamping force.
CAUTION: Holding the nut with one hand and turning the
lever like a wing nut with the other hand until everything is as
tight as you can get it will not clamp the seat post securely. The
full force of the cam action is needed to clamp the seat post
securely.
CAUTION: If you can fully close the quick release without
wrapping your fingers around a frame tube for leverage and the
lever does not leave a clear imprint in the palm of your hand, the
tension is insufficient. Open the lever, turn the tension-adjusting
nut clockwise a quarter turn and then try again.
25
Page 26
BRAKES
Your Surface604 com es equipped with a front and rear
hydraulic disc brake system.
Braking systems today are very effective in providing responsive
braking power.
•
Applying brakes too hard or too suddenly can lock up a wheel,
which can cause you to lose control and fall. Sudden or
excessive application of the front brake may pitch the rider
over the handlebars, which may result in serious injury or
death.
•
Your hydraulic disc braking system, when properly set up and
maintained, is extremely powerful. Take extra care in becoming
familiar with these brakes and exercise particular care when
using them.
•
Always apply your rear brake (RH lever) first.
•
Disc brakes can get extremely hot with extended use. Be
careful not to touch a disc brake until it has had time to cool.
•
See the brake manufacturer’s instructions for installation,
operation and care of your disc brakes. If you do not have the
manufacturer’s instructions, see your Surface604 dealer for
assistance.
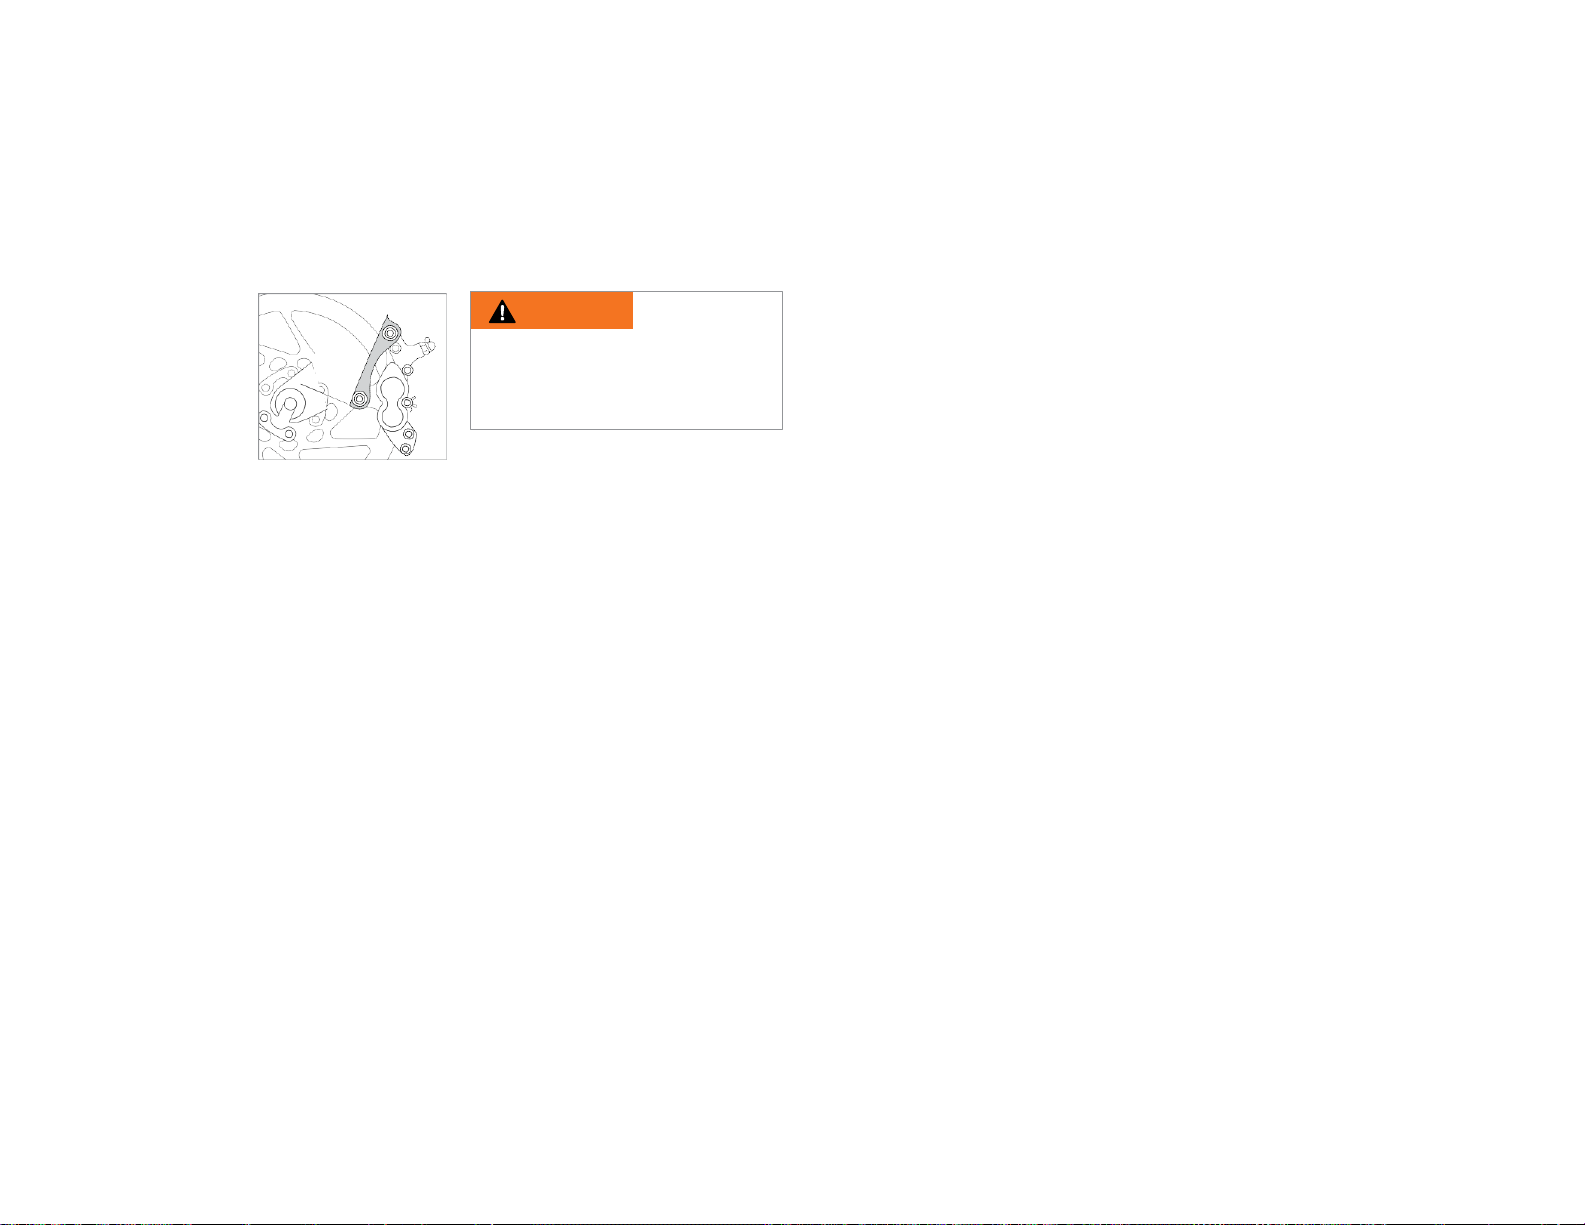
WARNING: Riding with
improperly adjusted brakes or
worn brake pads is dangerous
and can result in serious injury
or death.
Fig 4.3
HOW BRAKES WORK:
It is very important for your safety that you learn how the
brake system works and which brake levers engage the front
and back brakes on your bike. Check to ensure your brakes
are working properly before every ride.
The braking action on your bicycle is a function of the friction
between the brake surface – the disc – and the brake pad. To
ensure you have maximum friction available, keep the disc and
caliper clean and free of lubricants, waxes or polishes.
Make sure the brake levers are positioned correctly by testing
to see that your hands can reach and squeeze the brake levers
comfortably. If your fingers cannot reach the levers and operate
the braking system comfortably, consult your dealer before
riding the bike. The lever reach can be adjusted to suit your
hand or you may need a different brake lever design.
>> NOTE: Along with the purpose of stopping your bike,
braking is used to control your speed. Maximum braking
force for each wheel occurs at the point just before the wheel
“locks up” (stops rotating) and starts to skid. Once the tire
skids, you actually lose most of your stopping force and alldirectional control. You need to practice slowing and
stopping smoothly without locking up a wheel. The technique
is called progressive brake modulation. Instead of jerking the
brake lever to the position where you think you will generate
appropriate braking force, squeeze the lever smoothly to
progressively increase the braking force. If you feel the wheel
beginning to lock up, release pressure just a little to keep the
wheel rotating just short of lockup. It is important to develop a
26
Page 27
feel for the amount of brake lever pressure required for each
wheel at different speeds and on different surfaces. To better
understand this, experiment a little by walking your bike and
applying different amounts of pressure to each brake lever,
until the wheel locks.
When you apply one or both brakes, the bike begins to slow,
but your body wants to continue at the speed at which it was
going. This causes a transfer of weight to the front wheel (or,
under heavy braking, around the front wheel hub, which could
send you flying over the handlebars).
Besides learning about the braking pressure “threshold” – the
point in which squeezing the brake levers causes wheels to
lock up. It's important to learn how the transfer of body weight
plays a crucial role in safe and effective stopping or slowing
down. A wheel with more weight on it will accept greater
brake pressure before lockup; a wheel with less weight will
lock up with less brake pressure. So, as you apply brakes and
your weight is transferred forward, you need to shift your body
toward the rear of the bike, to transfer weight back on to the
rear wheel and at the same time, you need to both decrease
rear braking and increase front braking force. This is even
more important on descents, because descents shift weight
forward.
Two keys to effective speed control and safe stopping are
controlling wheel lockup and weight transfer. This weight transfer
is even more pronounced with having a front suspension fork on
your Surface604 bicycle. Front suspension “dips” or “travels”
under braking, increasing the weight transfer (see Section 4.6).
Practice braking and weight transfer techniques where there is
no traffic or other hazards and distractions.
Everything changes when you ride on loose surfaces or in wet
weather. Tire adhesion is reduced, so the wheels have less
cornering and braking traction and can lock up with less brake
force. Moisture
or dirt on the brake discs reduces their ability to grip. To maintain
control on loose or wet surfaces it is wise to go more slowly.
CAUTION: The motor in the rear wheel also
becomes a generator when using the rear brake. Please
note that the generative mode does not replace the
existing brakes, but increases considerably the braking
quality and will help you slow down when needed. It
activates as soon as the rear brake lever is activated.
(see Section 4.9)
SHIFTING GEARS
Your bicycle has a combination of a derailleur drive train and a
variable power assist drive system. (For power assist details, see
Section 4.9)
HOW A DERAILLEUR DRIVETRAIN WORKS
The gear-changing mechanism on your Surface604 bicycle
includes:
•
Shifters on the handlebar
•
Rear derailleur
•
Rear freewheel sprocket cluster
•
One chain ring
•
Drive train
27
Page 28
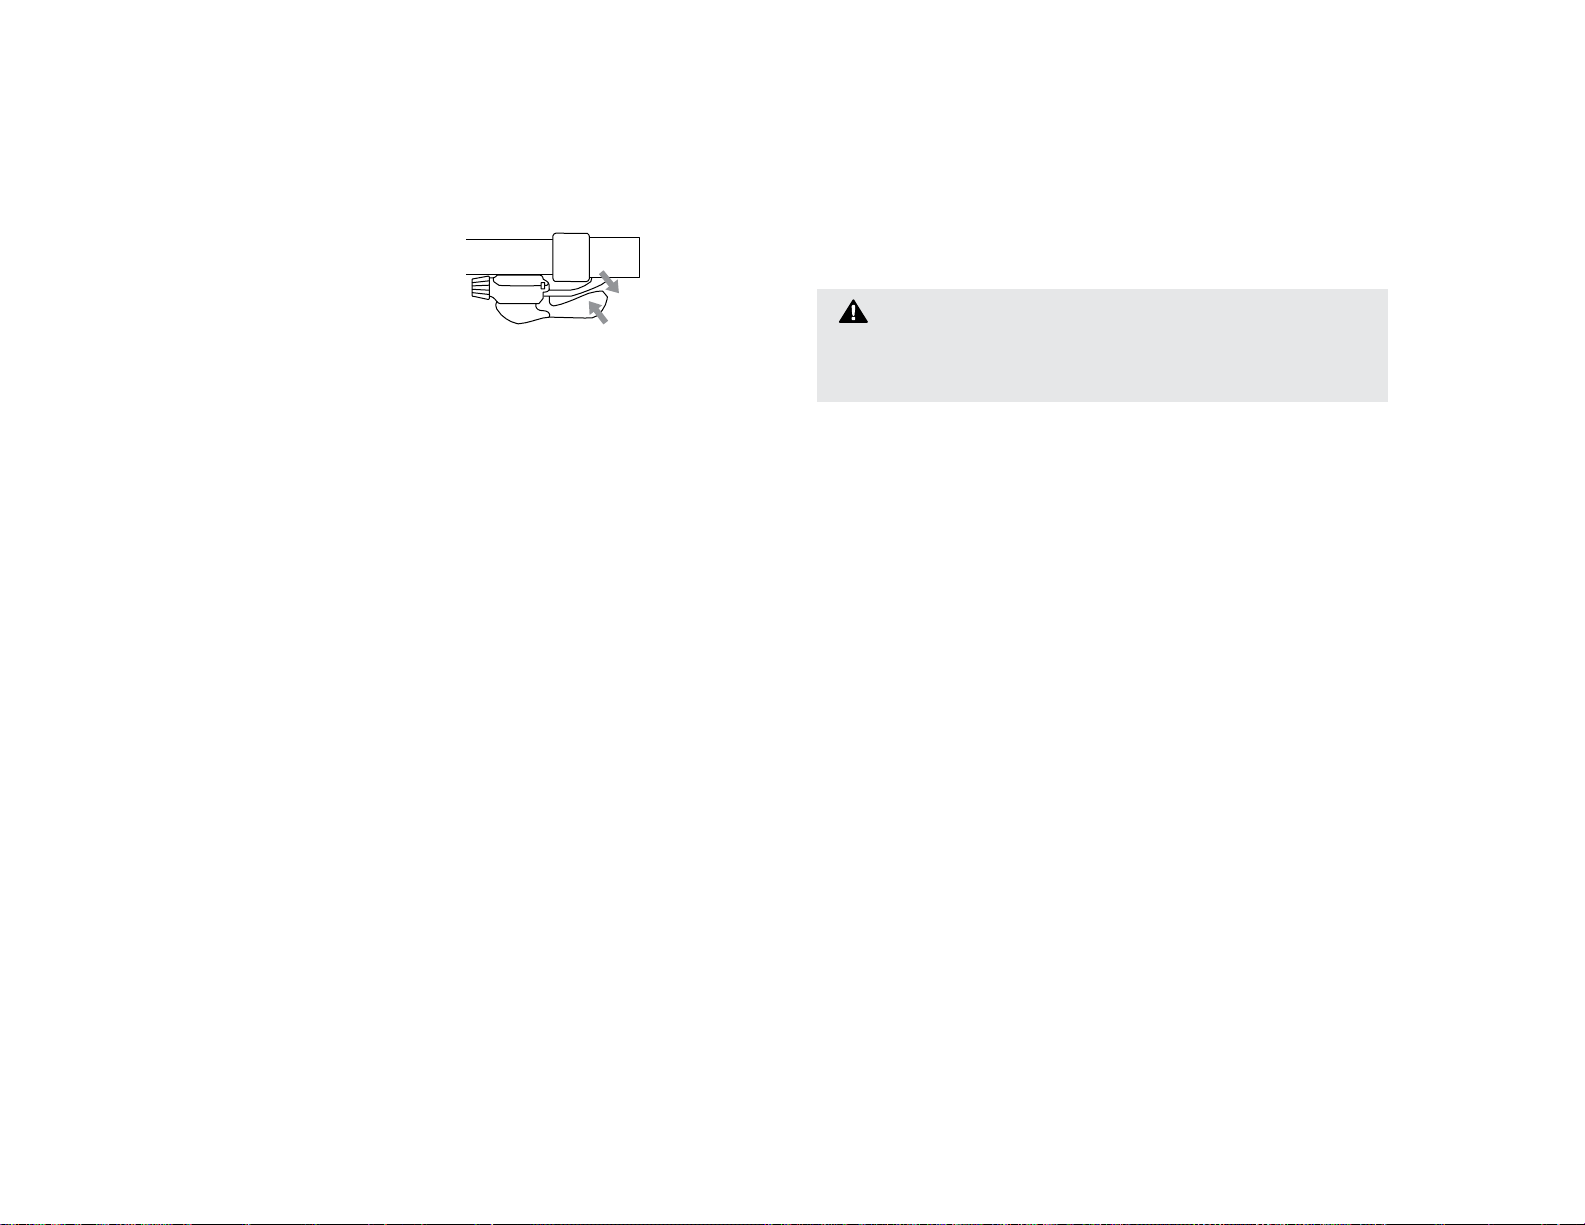
Downshift
Up
shift
SHIFTING GEARS
Fig 4.4a
Downshift
Surface604 bicycles come equipped with lever style shifters.
A downshift is a shift to a “slower” gear, one which is easier to
pedal. An up shift is a shift to a “faster”, harder to pedal gear.
For example, you can select a gear which will make pedaling
easier on a hill (make a downshift) in one of two ways: shift the
chain down the gear “steps” to a smaller gear at the front, or up
the gear “steps” to a larger gear at the rear. So, at the rear gear
cluster, what is called a downshift actually looks like an up shift.
The way to keep things straight in your head is to remember that
shifting the chain in towards the centre line of the bike is for
accelerating and climbing and is called downshifting. Moving the
chain out or away from the bike's centerline is for speed and is called
up shifting.
Whether up shifting or downshifting, the bicycle derailleur system
design requires that the drive chain be moving forward and be
under at least some tension. A derailleur will shift only if you are
pedaling forward.
CAUTION: Never move the shifter while pedaling
backward, nor pedal backwards after having moved the shifter.
This could jam the chain and cause serious damage to the
bicycle.
SHIFTING THE REAR DERAILLEUR
The rear derailleur is controlled by the right lever on the handlebar.
The function of the rear derailleur is to move the drive chain from
one gear sprocket to another. The smaller sprockets on the gear
cluster produce higher gear ratios. Pedaling in the higher gears
requires greater pedaling effort, but takes you a greater distance
with each revolution of the pedal cranks. The larger sprockets
produce lower gear ratios. Using them requires less pedaling
effort, but takes you a shorter distance with each pedal crank
revolution. Moving the chain from a smaller sprocket of the gear
cluster to a larger sprocket results in what we are calling a
downshift. Moving the chain to a larger sprocket results in an up
shift. In order for the derailleur to move the chain from one
sprocket to another, the rider must be pedaling forward.
28
Page 29
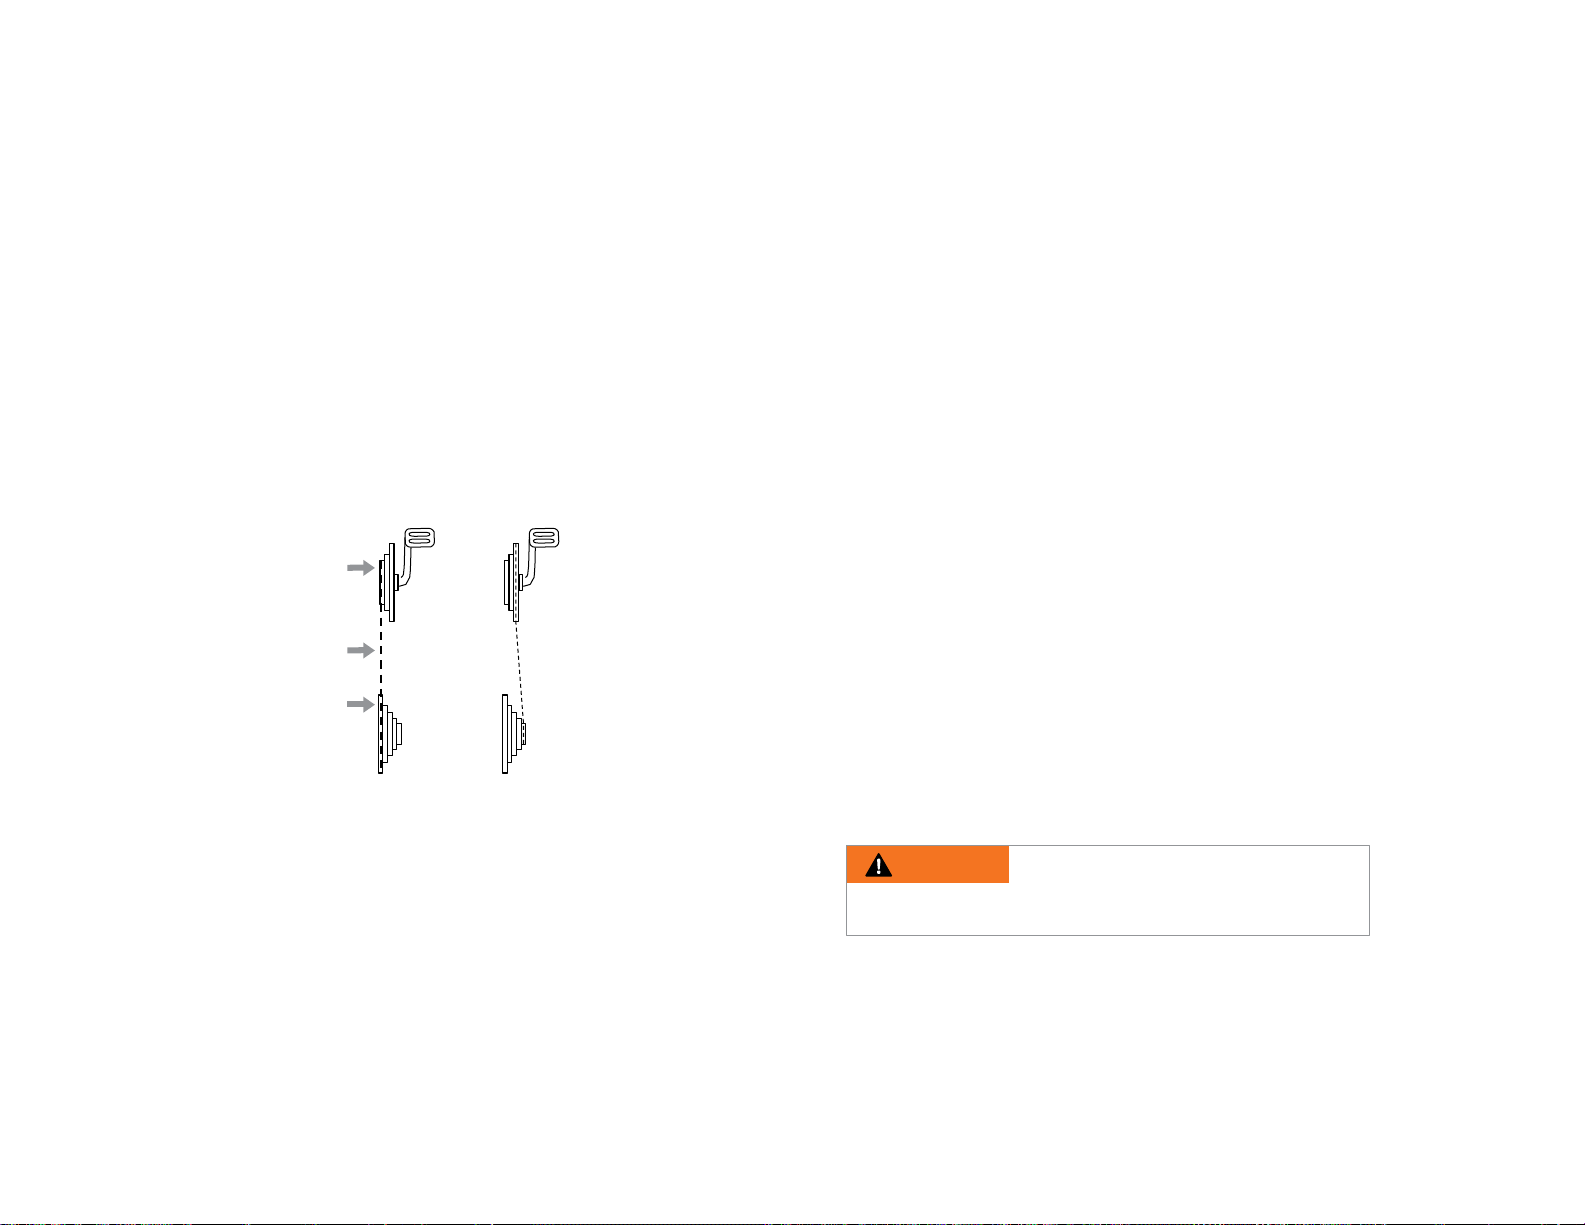
SHIFTING THE FRONT DERAILLEUR
Shifting the chain onto a smaller chain ring makes pedaling
easier (a downshift). Shifting to a larger chain ring makes
pedaling harder (an up shift).
WHICH GEAR SHOULD I BE IN?
Fig 4.4b
A
(Hills)
(Greatest speed)
Chain
Largest
rear
B
Smallest
rear
The combination of largest rear and smallest front gears (see
Fig 4.4b “A”) is for the steepest hills. The smallest rear and
largest front combination (see Fig 4.4b “B”) is for the greatest
speed. It is not necessary to shift gears in sequence. Instead,
find the “starting gear” which is right for your level of ability – a
gear which is hard enough for quick acceleration but easy
enough to let you start from a stop without wobbling – and
experiment with up shifting and downshifting to get a feel for
the different gear combinations. At first, practice
there are no obstacles, hazards or other traffic, until
shifting where
you’ve built
up your confidence. If you have difficulties with shifting the
problem could be mechanical adjustment. The problem could
be mechanical adjustment. See your dealer for assistance.
PEDALS
Your Surface604 bicycle comes equipped with standard pedals.
Be sure to check that when you are properly fitted and positioned
on the bicycle you do not have ‘toe overlap’. Toe Overlap is when
your toe can touch the front wheel when you turn the handlebars
to steer, while a pedal is in the forward-most position. This is
common on smaller framed bicycles, and is avoided by keeping
the inside pedal up and the outside pedal down when turning.
WARNING: Toe Overlap co ul d cause you to lose
control and fall. If you have toe overlap, exercise extra care
when turning.
29
Page 30
If you would like a different pedal design, please contact your
dealer to show you a number of options. In the meantime,
please consider the following when considering pedal design
options:
1 > There are high performance pedals available, which have
sharp and potentially dangerous surfaces. These surfaces are
designed to add safety by increasing adhesion between the
rider’s shoe and the pedal. If you prefer this type of highperformance pedal, you must take extra care to avoid serious
injury from the pedals’ sharp surfaces. Based on your riding
style or skill level, you may prefer a less aggressive pedal
design.
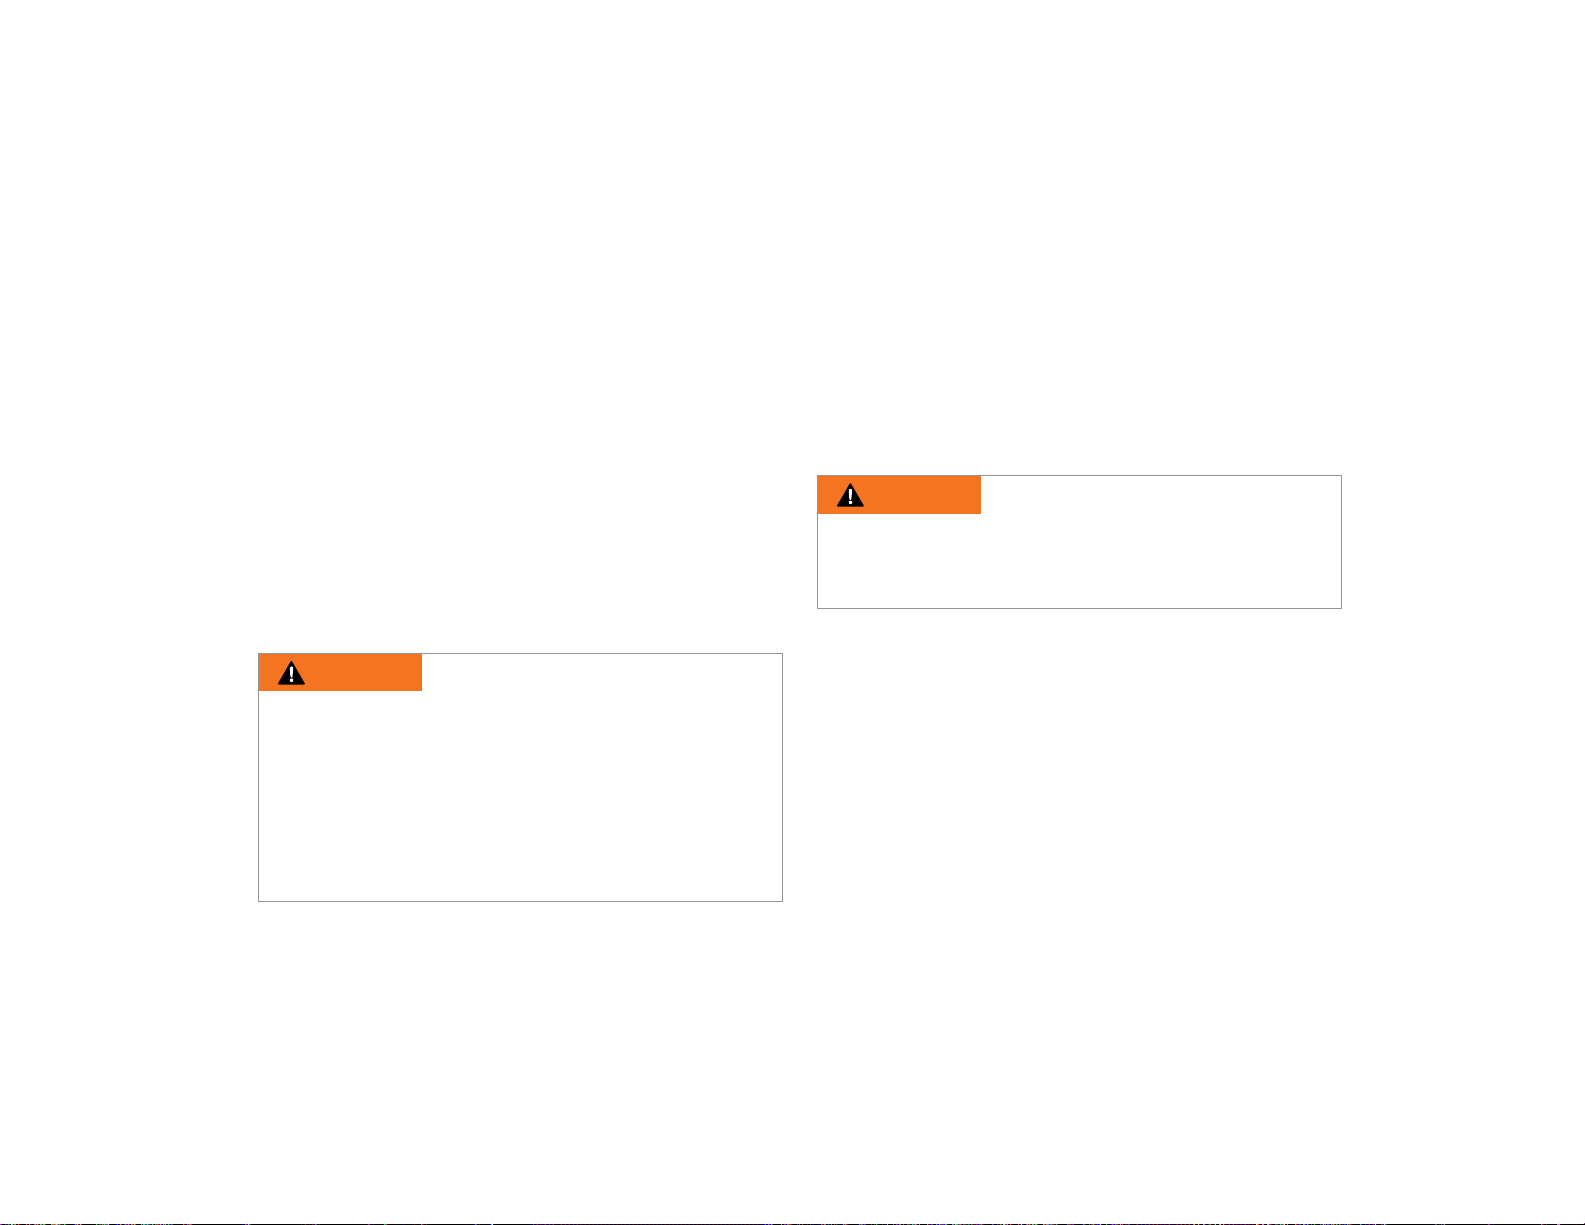
2 > Toe clips and straps are a means to keep feet correctly
positioned and engaged with the pedals. The toe clip
positions the ball of your foot over the pedal spindle, which
gives maximum pedaling power. The toe strap, when
tightened, keeps the foot engaged throughout the rotation
cycle of the pedal. While toe clips and straps give some
benefit with any kind of shoe, they work most effectively with
cycling shoes designed for use with toe clips.
WARNING: Getting in and out of pedals with
toe clips and straps requires skill, which can only be
acquired with practice. Until it becomes a reflex action, the
technique requires concentration which can distract the rider’s
attention, causing you to lose control and fall. Practice the use
of toe clips and straps where there are no obstacles, hazards
or traffic. Keep the straps loose to start with, and do not tighten
them until your technique and confidence in getting in and
out of the pedals warrants it. Never ride in traffic with your toe
straps tight.
3 > Clipless pedals (or “step-in-pedals”) are another means to
keep feet securely in the correct position for maximum pedaling
efficiency. A cleat on the sole of the shoe clicks into a springloaded fixture on the pedal. Clipless pedals require shoes and
cleats that are compatible with the make and model pedal being
used. Many clipless pedals are designed to allow the rider to
adjust the amount of force needed to engage or disengage the
foot. Follow the pedal manufacturer’s instructions, or ask your
dealer to show you how to make this adjustment. Use the
easiest setting until engaging and disengaging becomes a reflex
action. Always ensure that there is sufficient tension to prevent
unintended release of your foot from the pedal
WARNING:
use with shoes specifically made to fit them and are
designed to firmly keep the foot engaged with the
pedal. Using shoes that do not engage the pedals correctly is
dangerous.
Clipless pedals are intended for
30
Page 31
BICYCLE SUSPENSION
Your Surface604 bicycle is equipped with a suspension system.
Be sure to read and follow the suspension manufacturer’s set up
and service instructions.
WARNING: Failure to maintain, check and properly
adjust the suspension system may result in suspension
malfunction, which may cause you to lose control and
fall.
WARNING: Changing suspension adjustment can
change the handling and braking characteristics of your
bicycle. Never change suspension adjustment unless you are
thoroughly familiar with the suspension system manufacturer’s
instructions. Always check for changes in the handling and
braking of the bicycle after a suspension adjustment.
SET UP NOTES FOR SEAT POST SUSPENSION
Your Surface604 bicycle uses a seat post suspension that can
be tuned to your particular weight, riding style and terrain on
which you ride - by adjusting the preload. The preload can be
adjusted for riders from 144 to 220.5 lb. (65 to 100kg).
Before you make any adjustments, take a ride and feel the
function of the seat post. If you feel too much “SAG” (the saddle
moves down and back when you mount the saddle), you have to
increase the preload of the seat post, in order to compensate
the “SAG”. A certain amount of “SAG” - between 0 - 10mm (4
inches) is allowed, but it depends on your weight and the terrain
on which you are riding. Changing the preload alters the “SAG”
and the firmness of the initial seat post movement. In order to
increase the preload, you have to turn the adjuster plug at the
bottom of seat post in a clockwise direction using a 6mm Allen
key. Do not turn the adjuster plug counterclockwise beyond the
initial position at delivery, as this could result in failure of the
preload adjuster plug and can strip the threads. In this basic
position, around 10mm (.4 inches) of the seat post thread
should be visible.
SET UP NOTES FOR FRONT SUSPENSION
Your Surface604 bicycle is equipped with a front suspension
system. Be sure to read and follow the suspension
manufacturer’s set up and service instructions. If you do not
have the manufacturer’s instructions, see your local
Surface604 dealer.
WARNING: Failure to maintain, check and properly
adjust the suspension system may result in suspension
malfunction, which may cause you to lose control and
fall.
With front suspension, increased speed may also increase your
risk of injury. When braking, the front of your bicycle will dip and may
cause you to lose control and fall. Learn to handle your suspension
system safely.
WARNING: Changing suspension adjustment can
change the handling and braking characteristics of your
bicycle.
31
Page 32
5
2
DI
Never change suspension adjustment unless you are thoroughly
familiar with the suspension system manufacturer’s instructions.
Always check for changes in the handling and braking
characteristics of the bicycle after a suspension adjustment, by
taking a careful test ride in a hazard-free area.
Suspension can increase control and comfort by allowing the
wheels to better follow the terrain. This enhanced capability may
allow you to ride faster, but you must not confuse the enhanced
performance of the bicycle with your own capabilities as a rider.
Proceed carefully until you have learned to handle the full
potential of your bike.
CAUTION: Not all bicycles can be safely retrofitted
with some types of front suspension. The maximum rated
travel for your Surface604 bicycle front suspension is
85mm (3.3 inches).
Check with your local dealer before retrofitting the suspension
of any Surface604 bicycle.
>> NOTE: In order to ensure maximum performance,
safety and overall operating life of the suspension seat
post and front suspension, maintenance is required.
Depending on the riding conditions and frequency of use,
the maintenance should be performed regularly. We
recommend that your local Surface604 dealer perform
maintenance on your suspension seat post or front
suspension unless you are equipped and knowledgeable
in proper technique, skill and requirements. We strongly
recommend that before every ride, and as part of your
Mechanical Safety Check (see Section 1.3), you check
the seat rail clamp plate for proper torque.
TIRES AND TUBES
TIRES
Bicycle tires are available in many designs and specifications,
ranging from general purpose designs to tires designed to
perform best under very specific weather or terrain conditions. If,
once you have gained experience with your new Surface604
bike, you feel that a different tire might better suit your riding
needs, your dealer can help you select the most appropriate
design.
Changing to a tire which is a larger or smaller width will alter the
handling characteristics of your bicycle and in some cases may
make it unsafe to ride. With your dealer’s help, be sure to select
an inner tube that correctly corresponds with the size of the new
tire. In some cases, particularly when you select a larger
diameter tire, you may find that the clearance between the tire
and the bicycle frame is reduced. This may cause damage to
other parts of the bicycle, in particular, the frame. Furthermore,
this is potentially dangerous and may cause injury or death. It
may also void your warranty.
Fig 4.7a
The size, pressure rating, and on some high-
2.
performance tires, the specific recommended
use, are marked on the sidewall of the tire
(see Fig 4.7a). It is important to know the tire
pressure for the tire you are using.
6
32
Page 33
WARNING: Never inflate a tire beyond maximum
pressure marked on the tire’s sidewall. Exceeding the
recommended maximum pressure may blow the tire off the rim,
which could cause damage to the bike and injury to the rider
and bystanders.
The best and safest way to inflate a bicycle tire to the correct
pressure is with a bicycle pump, which has a built-in pressure
gauge.
WARNING: There is a safety risk in using gas
station air hoses or other air compressors. They are not
made for bicycle tires. They move a large volume of air very
rapidly and can quickly raise the pressure in your tire, which
can cause the tube to explode.
Tire pressure is given either as maximum pressure or as a
CAUTION: Pencil type automotive tire gauges can be
inaccurate and should not be relied upon for consistent,
accurate pressure readings. Instead, use a high quality
dial gauge obtained from your local bike dealer.
Ask your dealer to recommend the best tire pressure for the
kind of riding you will most often do and have the dealer inflate
your tires to that pressure. Then, check the inflation so you’ll
know how correctly inflated tires should look and feel. Some
tires may need to be brought up to pressure every week or two.
Some special high-performance tires have unidirectional treads:
their tread pattern is designed to work better in one direction
than in the other. The sidewall marking on a unidirectional tire will
have an arrow showing the correct rotation direction. If you
choose to use unidirectional tires, be sure that they are mounted
to rotate in the correct direction.
pressure range. How a tire performs under different terrain or
weather conditions depends largely on tire pressure. Inflating
the tire slightly near its maximum recommended pressure gives
the lowest rolling resistance, but also produces the bumpiest or
most sens itive ride depending on the type of terrain you ride.
Tire pres sure that is too low for your weight and the riding
conditions can cause a puncture of the tube by allowing the tire
to deform enough to pinch the inner tube between the rim and
the riding surface.
High pressures work best on smooth, dry pavement. Very low
pressures, at the bottom of the recommended pressure range,
give the best performance on smooth, slick terrain such as
hard- packed clay, and on dee p, loose surfaces such as deep,
dry sand.
33
Page 34
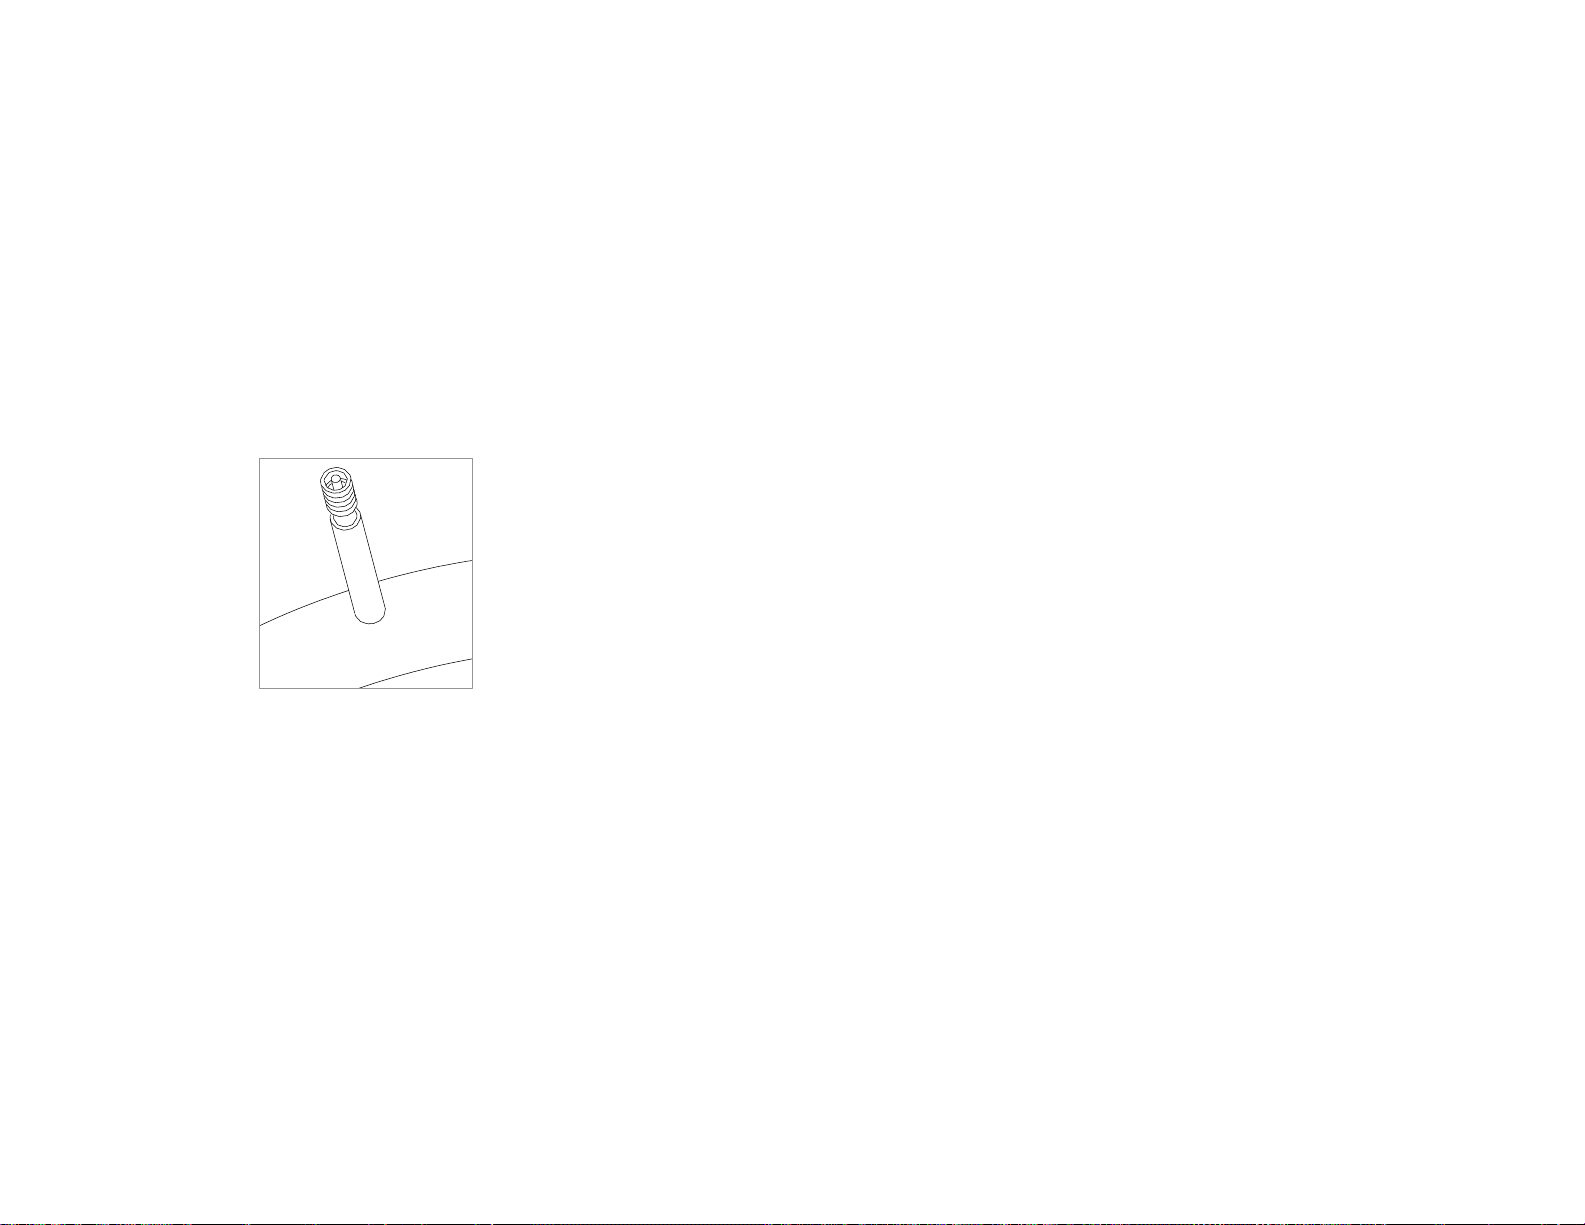
TIRE VALVES
Surface604 bicycles use Schrader tire valves:
The Schrader valve (see Fig 4.7b) is like the valve on a car
tire. To inflate a Schrader valve tube, remove the valve cap
and clamp the pump fitting onto the end of the valve stem. To
let air out of a
Schrader valve, depress the pin in the end of the valve stem with
the end of a key or other appropriate object. The bicycle pump
you use must have the fitting appropriate to the valve stem
on the bicycle.
Fig 4.7b
SCHRADER VALVE
POWER ASSIST DRIVE SYSTEM
The power as sist dri ve system, consisting of a motor, battery
pack, and digital command console, is what makes your
Surface604 unique from other bicycles on the market. This
intelligent energy management system allows you to travel
long distances without exhausting yourself. It is therefore very
important that you know how to operate the system with
confidence and ease. Please refer to the supplementary User
Manual for information about operating the Power-assist Drive
System installed on your Surface604 E-Bike.
34
Page 35
FIVE > SERVICE
WARNING: Please note that bicycle technology is
continuously changing to improve performance and use,
but this has also made components mechanically more
complex. It is therefore very important that you minimize the
chance of an accident or potential injury by having any repair
or maintenance, not discussed in this Manual, be performed
by your local Surface604 bicycle dealer. In addition, your
individual maintenance requirements will be determined by a
number of factors from your riding style to your geographic
location. Your dealer can assist you in identifying maintenance
requirements for your specific riding needs.
WARNING: Many bicycle service and repair
tasks require specific knowledge, tools and skills. Do
not attempt to perform any adjustment or service to your
Surface604 bicycle that you are unfamiliar with or are ill
equipped to perform properly. Improper adjustments or
service can result in damage to your bicycle (and its
components) or result in an accident while riding, which can
damage your bicycle and/or cause you serious injury or
death.
If you want to learn more about proper maintenance and
service on your bicycle, consider the following options:
1. Ask your dealer for copies of the manufacturer’s installation
and service instructions for the components on your bike, or
contact the component manufacturer directly.
2. Ask your dealer to recommend a book on bicycle repair.
3. Ask your local dealer about the availability of bicycle
repair courses in your area.
Regardless of the option you choose, we strongly recommend
that you have your local dealer check to ensure the quality of
your adjustment or service the first time you perform the work.
This will ensure you have completed the work properly. This
will likely mean that your dealer’s mechanic will need to take
the time to evaluate your work and result in modest charge for
his/her time. This small investment in ensuring your
adjustment or service is correct will contribute greatly in
reducing the possibility of damage or harm to you or your
bicycle, and will assist you in developing your skills in bicycle
maintenance.
35
Page 36

SERVICE INTERVALS
Regular maintenance and service will help ensure the bicycle
operates at an optimal performance level, will help promote the
life and dependency of your components and will reduce the
risk of injury and/or death inherently associated with bicycling.
1 > BREAK-IN PERIOD: Much like a new automobile, your bike
needs time to break in before riding it for extended distances. It
is very important to have your bicycle serviced soon after 10-15
hours of riding to have any adjustments made. Refer to your
Mechanical Safety Check (see Section 1.3) to help guide you
through some things that may need readjustment. However,
even if you feel you have completed all adjustments properly, we
strongly recommend that you have your local dealer evaluate
your bicycle at this time. Dealers often recommend that you
return the bicycle in 30 days for a checkup. Overall, if you think
at any time there is something wrong with your bicycle, always
visit your local dealer before riding the bicycle.
2 > BEFORE EVERY RIDE: See the Mechanical Safety
Check in Section 1.3.
3 > AFTER EVERY LONG OR HARD RIDE: If the bike has
been exposed to water or grit (or after at least every 150 kms,
95 miles or 5 hours), clean the bike and lightly oil the chain. This
is important to prevent rust or avoidable wear on your
components. Be sure to wipe off any excess oil or lubricant
when finished. As for how much lubrication is appropriate and
the frequency of application, consult your local dealer. Different
climatic conditions will determine
which type and frequency of lubricant is best suited for your
riding environment. It is not recommended to use pressured
water to wash your bicycle to avoid unwanted damage to
components.
✔ Squeeze both brake levers so that the brakes are fully
engaged and rock the bicycle from front to back. Does
everything feel solid? Are there any clunking or strange
sounds when you rock the bike front to back? If there is a
clunking sound, you may have a loose headset – have your
dealer check it.
✔ Lift the front wheel and swing it from side to side to reenact
steering when riding. Does it sw ing smoothly? If you feel any
resistance, binding or roughness in the steering, your headset
may be too tight – have your dealer check it.
✔ Grab one pedal and rock it toward and away from the centerline
of the bike; then do the same with the other pedal. Anything feel
loose? If so, have your dealer check it.
✔ Take a look at the front brake disc. Starting to look worn or not
hitting the disc squarely? Time to have the dealer adjust or
replace them.
✔ Carefully check the control cables and cable housings. Any
rust? Kinks? Fraying? If so, have your dealer replace them.
✔ Squeeze each adjoining pair of spokes on either side of each
wheel between your thumb and index finger. Do they all feel
about the same? If any feel loose, have your dealer check the
wheel for tension and trueness.
✔ Check the frame, particularly in the area around all tube joints,
the handlebars, the stem, and the seat post for any deep scratches,
36
Page 37

cracks or discoloration. These are all signs of stress-caused
fatigue and indicate that a part is at the end of its useful life
and needs to be replaced.
✔ Check to make sure that all parts and accessories are still
secure, and tighten any that require adjustment.
✔ Recharge battery after it has cooled to room temperature.
WARNING: As with any mechanical device, your
bicycle and its components are subject to wear and
stress. Your bicycle is made up of a range of different materials
and mechanisms which wear or fatigue from use at different
rates and have different life cycles. If a component’s life
cycle is exceeded, the component can suddenly fail, causing
serious injury or death to the rider. While the materials and
workmanship of your bicycle or of individual components may
be covered by a warranty for a specified period of time by the
manufacturer, this is no guarantee that the product will last the
term of the warranty. Product life is often related to the kind
of riding you do and the treatment to which you submit your
bicycle. The bicycle’s warranty is not meant to suggest that the
bicycle cannot be broken or will last forever. It only means that
the bicycle is covered subject to the terms of the warranty.
GETTING HOME WHEN SOMETHING
BREAKS
Unless you can walk home or call someone to pick you up
if something breaks on your bike, you should never go for
a ride without the following equipment:
✔ Patch Kit and spare tire tube.
✔
Tire levers (make sure they are plastic)
✔ Tire pump or cartridge inflator with the correct mounting head
to fit the type of valve you have on your tire (see Section 4.7)
✔ 4mm, 5mm and 6mm Allen wrenches. These are used to
tighten various clamping bolts and are readily available from your
local dealer or most sporting goods shops.
✔ Small crescent wrench.
✔ Some money for a snack, beverage or emergency phone call.
✔ Some identification so people know who you are in case of an
accident.
IF YOU GET A FLAT TIRE
It is very likely that you will experience a flat tire at some point
during a ride. However, with the appropriate tools (see above),
you can fix it easily and be on your way again quickly. To change
the tire tube, find a safe place to perform your repair away from
traffic or other dangers. Start with depressing the tire valve to
ensure all of the air is out of the tube. Remove the wheel from
your frame (see Section 4.1) and then remove the tube from the
rim. To do this, grasp the tire with both hands at a point opposite
the valve stem and, at the same time, pull the tire so that the
37
Page 38
“beads” (there are two) are removed from the rim. If the bead is
too tight for you to unseat with your hands, which will likely be the
case most of the time, use your plastic tire levers to lift the bead
carefully over the rim. It is not likely you will be able to unseat
both beads, so start with one by inserting the lever under the
bead and, while sliding the lever along the rim, pull the bead out
and over the rim. Continue sliding the lever around the entire rim
exposing the tube. Be careful when approaching the valve stem
so as not to damage it when sliding the lever past it. Next, push
the valve stem out of the hole of the rim (remove the valve lock if it
has one) and remove from the inside of the tire. At this time, you
still have one tire bead remaining in the cradle of the rim. You can
either remove the tire completely off the rim by repeating the
steps above or simply leave the tire partially seated in the rim.
Now carefully inspect the outside and inside of the tire for the
cause of the puncture and remove the cause if it still there. If the
tire is cut, try using tape, a spare patch, a dollar bill or whatever
you have handy to line the inside of the tire to contain the reinstalled tube when inflated. This technique is a temporary repair
so that you can return home or get to your local dealer for a new
tire.
WARNING: If the tire is cut, you must replace
with a new tire as soon as possible to avoid the risk
of injury while riding your bicycle.
Now decide if you want to use a patch (follow instructions in
your patch kit) or simply replace the tube for a quicker repair. If
you choose the latter option, and depending on the damage to
the tube, you may be able to repair the tube when you return
home and use it again.
WARNING: Patching a tube is an emergency
repair. If you do not apply the patch correctly or apply
several patches, the tube can fail, resulting in possible tube
failure, which could cause you to lose control and fall.
Replace a patched tube as soon as possible.
>> NOTE: If you prefer to evaluate the damage to the tube to
determine your course of action, begin with locating the hole in
the tube. You may not be able to easily see the hole so take
your pump and inflate the tube until you hear air escaping the
tube. If you have water available, you can also pour water on the
tube after partially inflating and watch for bubbles or a hissing
sound. When the hole is located, decide if you want to use a
patch or replace the tube.
Now it is time to reinstall the tire and tube. If you have
removed the tire completely, start with pushing one tire bead
inside the rim and when completed, grab your tube and insert
the valve stem through the hole of the rim. Gently stuff the
tube into the cavity of the tire being very careful not to twist
the tube. Now inflate the tire just enough to give it some
shape. Starting at the valve stem and working around both
sides of the rim to the side opposite the valve stem, use your
thumbs to push and seat the other bead of the tire inside the
rim. Be careful not to pinch the tube between the tire
38
Page 39
bead and the wheel rim. If you have trouble getting the last few
centimeters of bead over the edge of the rim with thumb
pressure, use a plastic tire lever to push and slide the tire bead
into its proper seated position in the rim. Be careful again not to
pinch the tube.
CAUTION: If you use a screwdriver or any tool other than a
plastic tire lever, you are likely to puncture the tube.
Check to ensure the tire is evenly seated throughout both sides
of the rim and the tube is stuffed inside the tire cavity. Push the
valve stem into the tire to make sure that its base is seated
within the tire’s beads. Inflate the tube slowly to the
recommended pressure, (see Section 4.7) while checking to
make sure that the tire beads stay seated in the rim. It is useful
to grab the tire and gently push/ pull along the entire tire to
double check that the tube is not being pinched and the tire is
seated properly while inflating. Screw down the valve stem
locknut finger-tight. Replace the valve cap. Replace the wheel
in the bike (see Section 4.1).
IF YOU BREAK A SPOKE
Although there are many spokes in a wheel, even just one
spoke that becomes loose or breaks will affect the
performance and structural integrity of your wheel. If you break
a spoke on your ride, we recommend you walk your bike home
if it is close by or ride
as not to break additional spokes. If you choose to ride the
bicycle home, twist the broken spoke around the spoke next to
it to keep it from flopping around and getting caught between
the wheel and the frame. Next, because the spoke is broken
the bicycle very slowly and carefully so
(or loose), your wheel will not likely be “true.” Spin the wheel to
check to see if the rim clears any components or the frame. If the
rim does make contact and will not spin, it is strongly
recommended to call for a pick-up or walk the bike home.
IF YOUR BICYCLE SUSTAINS AN IMPACT
First, check yourself, and any others involved, for possible
injuries and treat as best you can. Seek medical attention
immediately if necessary.
Next, assess your bicycle for damage and fix what you can so
that you can return home safely. Have your bicycle assessed by
your local dealer for a thorough check to identify and service any
damage. If the bicycle is damaged beyond a safe use, do not
attempt to ride and contact a friend or family member for a ride
home.
39
Page 40

SIX > ABOUT YOUR SURFACE604
DEALER
Your authorized Surface604 dealer can help you:
•
Find the proper size frame and component configuration for
your type of riding.
•
Understand how different components function.
•
Maintain your Surface604 bike for maximum performanc e
•
Recommend a wide variety of accessories to increase your
riding enjoyment.
Your Surface604 dealer is here to help. If you experience any
problem, talk to your dealer for expert advic e on resolving the
problem.
6.1 ACCESSORIES
Your dealer offers many accessories that can increase your riding
enjoyment.
Once you determine the correct bike fit, the comfort of the
bicycle will depend on how the saddle fits to your body shape.
Ask your dealer to assist you in making any adjustments.
Skin tight Lycra or loose fitting cycling shorts and jerseys are
designed to reduce friction and chafing. Cycling shorts and
jerseys are made from special lightweight materials for extra
comfort and performance.
A bicycle tool kit can help you make simple repairs or
adjustments during your ride.
A water bottle is an essential accessory for any ride. It’s
important to replenish fluids before, during and after your ride.
Surface604 WEBSITE
If you have further questions:
contact us at [email protected] or visit the Surface604
website at
http://www.surface604.com
40
Page 41

SEVEN > LIMITED WARRANTY
Surface604 (“Surface604”) limited warranty:
DRIVE SYSTEM
The drive system including motor, battery and display is
warranted against manufacturing defects in materials or
workmanship for a period of three years to the original owner
from date of purchase.
FRAMES
Surface604 frames are warranted against manufacturing
defects in materials or workmanship for a period of three
years to the original owner from date of purchase.
RECHARGEABLE BATTERY
The rechargeable battery is warranted against manufacturing
defects in materials or workmanship for a period of one year to
the original owner from date of purchase.
COMPONENTS
All other components, including suspension parts and frame
fixtures, are warranted against manufacturing defects in materials
or workmanship for a period of one year to the original owner
from date of purchase.
TERMS OF WARRANTY:
Your Surface604 bicycle is subject to the terms of the limited
warranty. This warranty applies only to the original registered
owner of a Surface604 bicycle and is not transferable. This
warranty applies only to Surface604 bicycles purchased from
and assembled by Authorized Surface604 Dealers.
This limited warranty does not apply to normal wear and tear,
nor to defects, malfunctions, or failures of bicycles subjected
to abuse, neglect, improper repair, improper maintenance,
alteration modification, and accident or other improper use.
To obtain warranty service, the original owner must deliver the
bicycle, warranty card and bill of sale to an Authorized
SURFACE604 Dealer.
All labor charges for warranty service are the responsibility of the
bicycle’s owner. Surface604 shall repair or replace all parts that
are found by Surface604 to be defective and covered by the
limited warranty. All freight charges for warranty service will be
borne by the original owner.
THIS IS THE EXCLUSIVE REMEDY UNDER THIS WARRANTY.
ANY AND ALL OTHER REMEDIES AND DAMAGES THAT MAY
OTHERWISE BE APPLICABLE ARE EXCLUDED INCLUDING,
BUT NOT LIMITED TO, INCIDENTAL OR CONSEQUENTIAL
DAMAGES OR PUNITIVE DAMAGES.
THIS IS THE ONLY WARRANTY MADE BY SURFACE604 ON
ITS FRAMES AND COMPONENTS AND THERE ARE NO
WARRANTIES WHICH EXTEND BEYOND THE DESCRIPTION
HEREIN. ANY WARRANTIES THAT MAY BE OTHERWISE
IMPLIED BY LAW INCLUDING, BUT NOT LIMITED TO, ANY
IMPLIED WARRANTY OF MERCHANTABILITY OR FITNESS
FOR A PARTICULAR PURPOSE ARE EXCLUDED.
41
Page 42

7.1 WARRANTY REGISTRATION
We encourage you to register your bicycle by mail or through
our website. Registering your bicycle helps us ensure your
continued satisfaction as well as enabling us to contact you
with important product information.
Mail in: Complete the Warranty Registration Card located on
page 9 and send a copy to:
Surface604
11400 Twigg Place
Richmond, BC Canada V6V 3C1
Our website: Go to our website and complete the registration
information online: http://Surface604.com/support/product-
registration/
WHEN PRESENTING A WARRANTY CLAIM, PLEASE NOTE
THAT YOU MUST HAVE YOUR ORIGINAL PROOF OF
PURCHASE.
THE SPECIFIC WARRANTY COVERING YOUR SURFACE604
BICYCLE IS GOVERNED BY THE LAWS OF BRITISH
COLUMBIA, CANADA.
PLEASE READ “SURFACE604 LIMITED WARRANTY” IN THIS
MANUAL FOR COMPLETE INFORMATION.
Surface604 respects your privacy, for details go to:
http://www.Surface604.com/privacypolicy/
42
Page 43
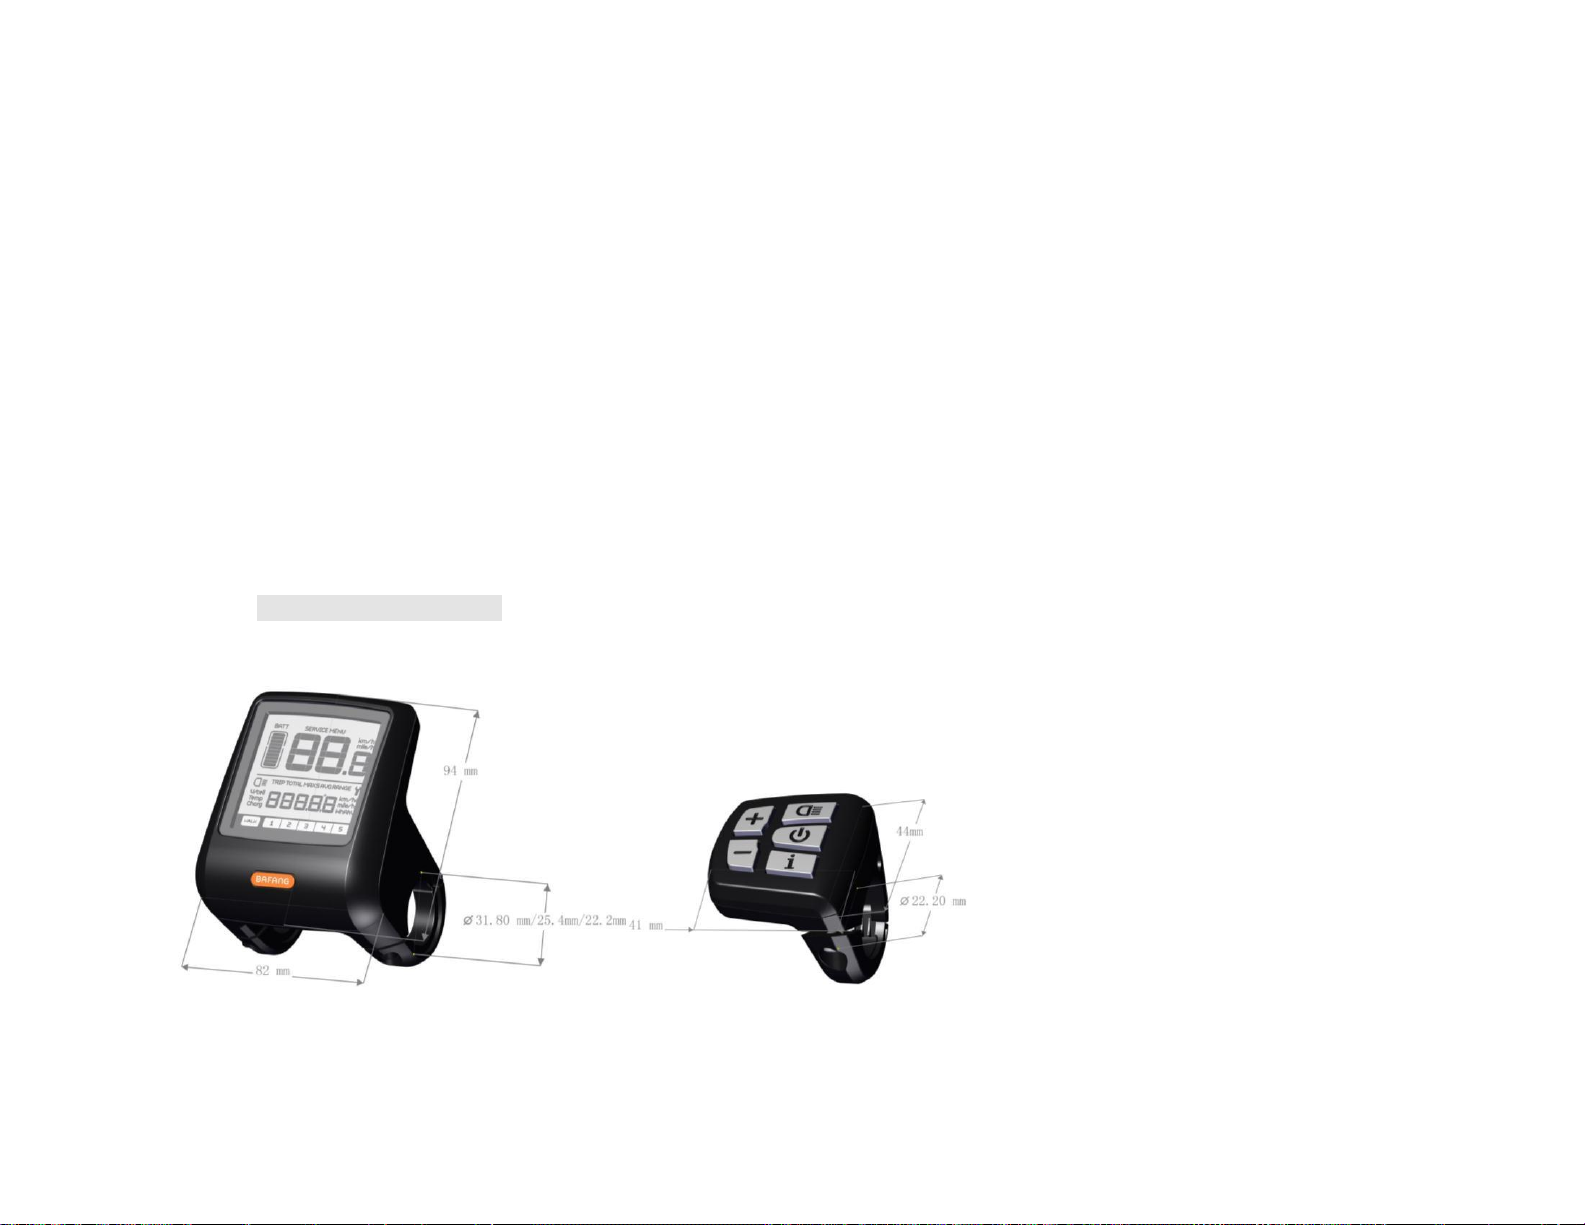
EIGHT > CONTROL PANEL DISPLAY
Specifications and Parameters of the Display
36V/48V Power Supply;
Rated Current: 10mA
Maximum Operating Current: 30mA
Power-off Leakage Current: <1uA
Operating Current Supplied to the Controller: 50mA
Operation Temperature: -18 ~ 60 ℃
Storage Temperature: -30 ~ 70 ℃
Waterproof Grade: IP65
Storage Humidity: 30%-70%
Appearance and Dimensions
Materials and Dimensions
The shell is made of PC (polycarbonate). The liquid crystal interface is made of hard hardness acrylic.
43
Page 44

Function Overview and Key Definitions
Function Overview
The display adopts a two-way serial communication protocol. The external five-key keypad enables users to operate the display conveniently.
Speed display: displaying the real-time speed, the max speed MAXS and the average speed AVG.
Km or mile: the user can set the unit of distance as km or mile according to personal habit.
Intelligent battery level indication: with an optimization algorithm, a stable display of the battery level is ensured, and the problem of fluctuant
Items to be Shown on the Display
battery level indication common with an average display is avoided.
Automatic light-sensitive headlight/taillight: as the outside light changes, the headlight and taillight will be automatically turned on/ off.
Backlight brightness: there are 5 levels of brightness for the display backlight, of which Level 1 indicates the darkest backlight while Level 5
indicates the brightest backlight.
Mode indication: it displays the current assist mode (Mode 1 to Mode 5);
Trip distance indication: there are two distance modes, single-trip distance TRIP and accumulated distance, TOTAL. The displayable max
distance is 99999.
Fault code prompt.
Walk assistance.
Parameter settings: various parameters, including mode, wheel diameter, speed limit, etc. can be set on the computer via a communication
cable. See the parameter setting instruction document for details.
Maintenance warning (this function is inactive by default): there prompts, on the display, maintenance warning information based on
battery charge/discharge cycles and riding distance. The display automatically estimates the battery life, and gives battery maintenance
warnings when the number of charge/discharge cycles exceeds the set value. When the accumulated riding distance exceeds the set value, the
display will also prompt bicycle maintenance necessity.
44
Page 45
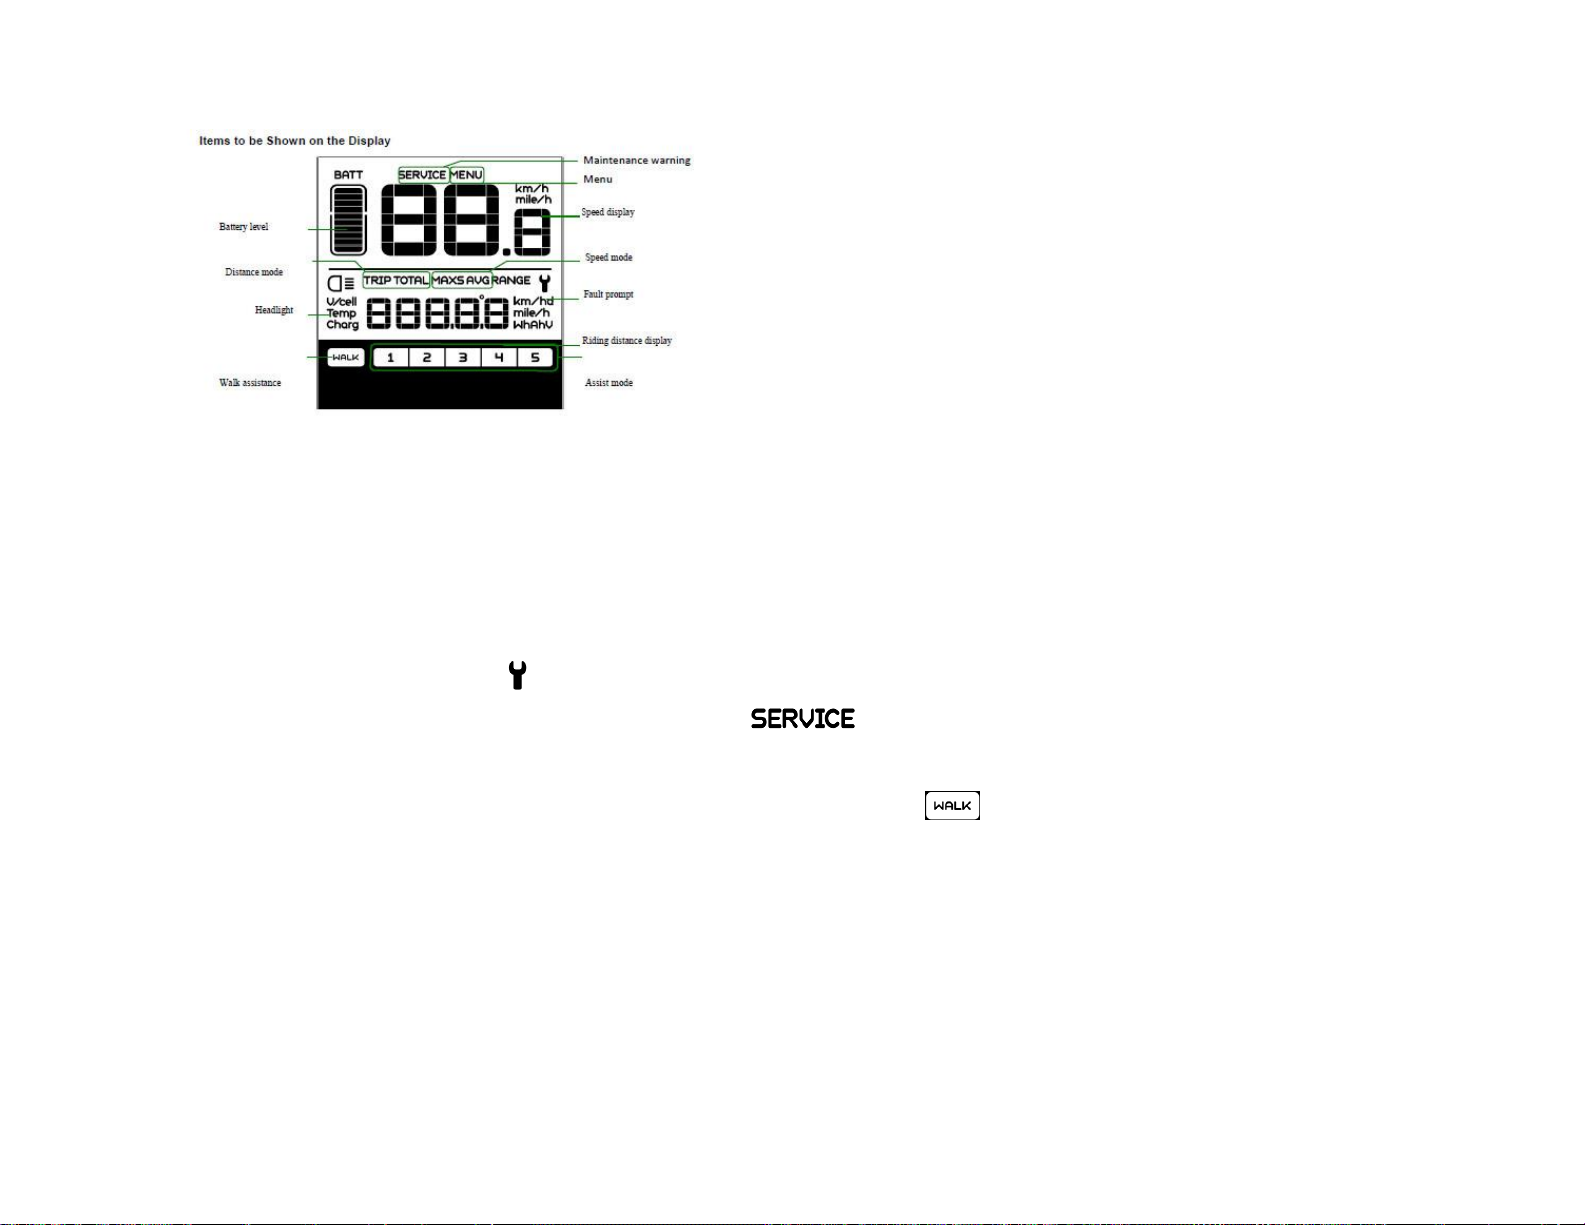
Speed mode: average speed (AVG km/h), maximum speed (MAXS km/h)
Speed display: display of the speed, km/h or mile/h
Battery level: 10-segment battery indication; the voltage that each segment represents can be customized
Headlight indication: only active when the headlight and backlight are on.
Fault prompt: the symbol will be displayed when a fault is detected.
Maintenance warning (inactive by default): the symbol is displayed when there is a need for maintenance (the riding distance or
the number of battery charge/discharge cycles exceeds the set value)
Mode indication: it displays the current assistance mode (mode 1 to mode 5); if there is no numeric display, it means that there is no
assistance. If the rider is walking and pushing his/her bicycle, only the symbol will be displayed.
Distance mode: there are two distance modes, single-trip range TRIP and accumulated distance, TOTAL.
Distance indication: it displays the information on distance according to the settings.
45
Page 46
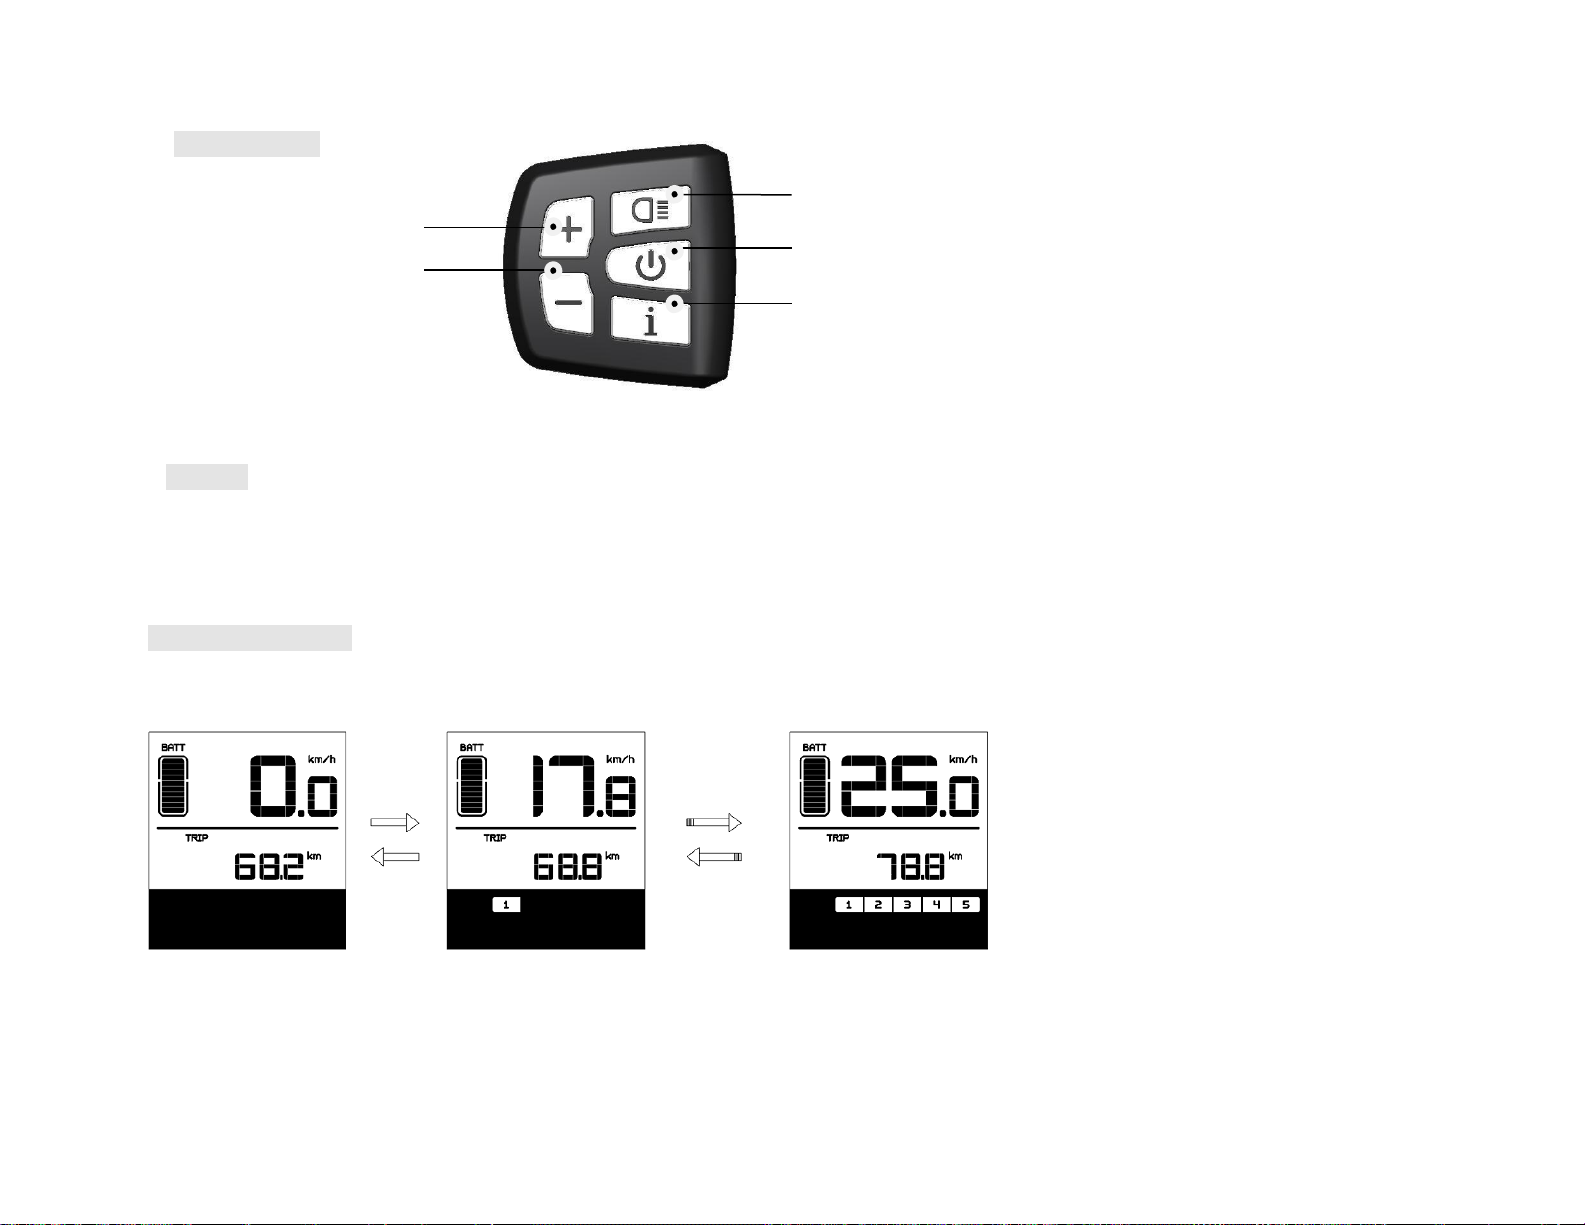
Key Definitions
“up” key “down”
Headlight key “on/off”
“mode”
Normal Operation
On/off
Turn on the power. Press and hold the “on/off” key for 2 seconds to power on the display; when the display is on, pressing and
holding the “on/off” key for 2 seconds will power off the display. If the bike is left unused and the display is left un-operated for 5
minutes (the time can be set by the user), the display will be automatically turned off.
Assist Mode Selection
In the manual gearshift mode, press the "up" or "down" key to switch the assist mode to change the motor assist power. The lowest mode is Mode 1 and the
highest mode is Mode 5. When the display is on, the default mode is Mode 1. It indicates no power assist when there is no numeric mode display.
46
Page 47
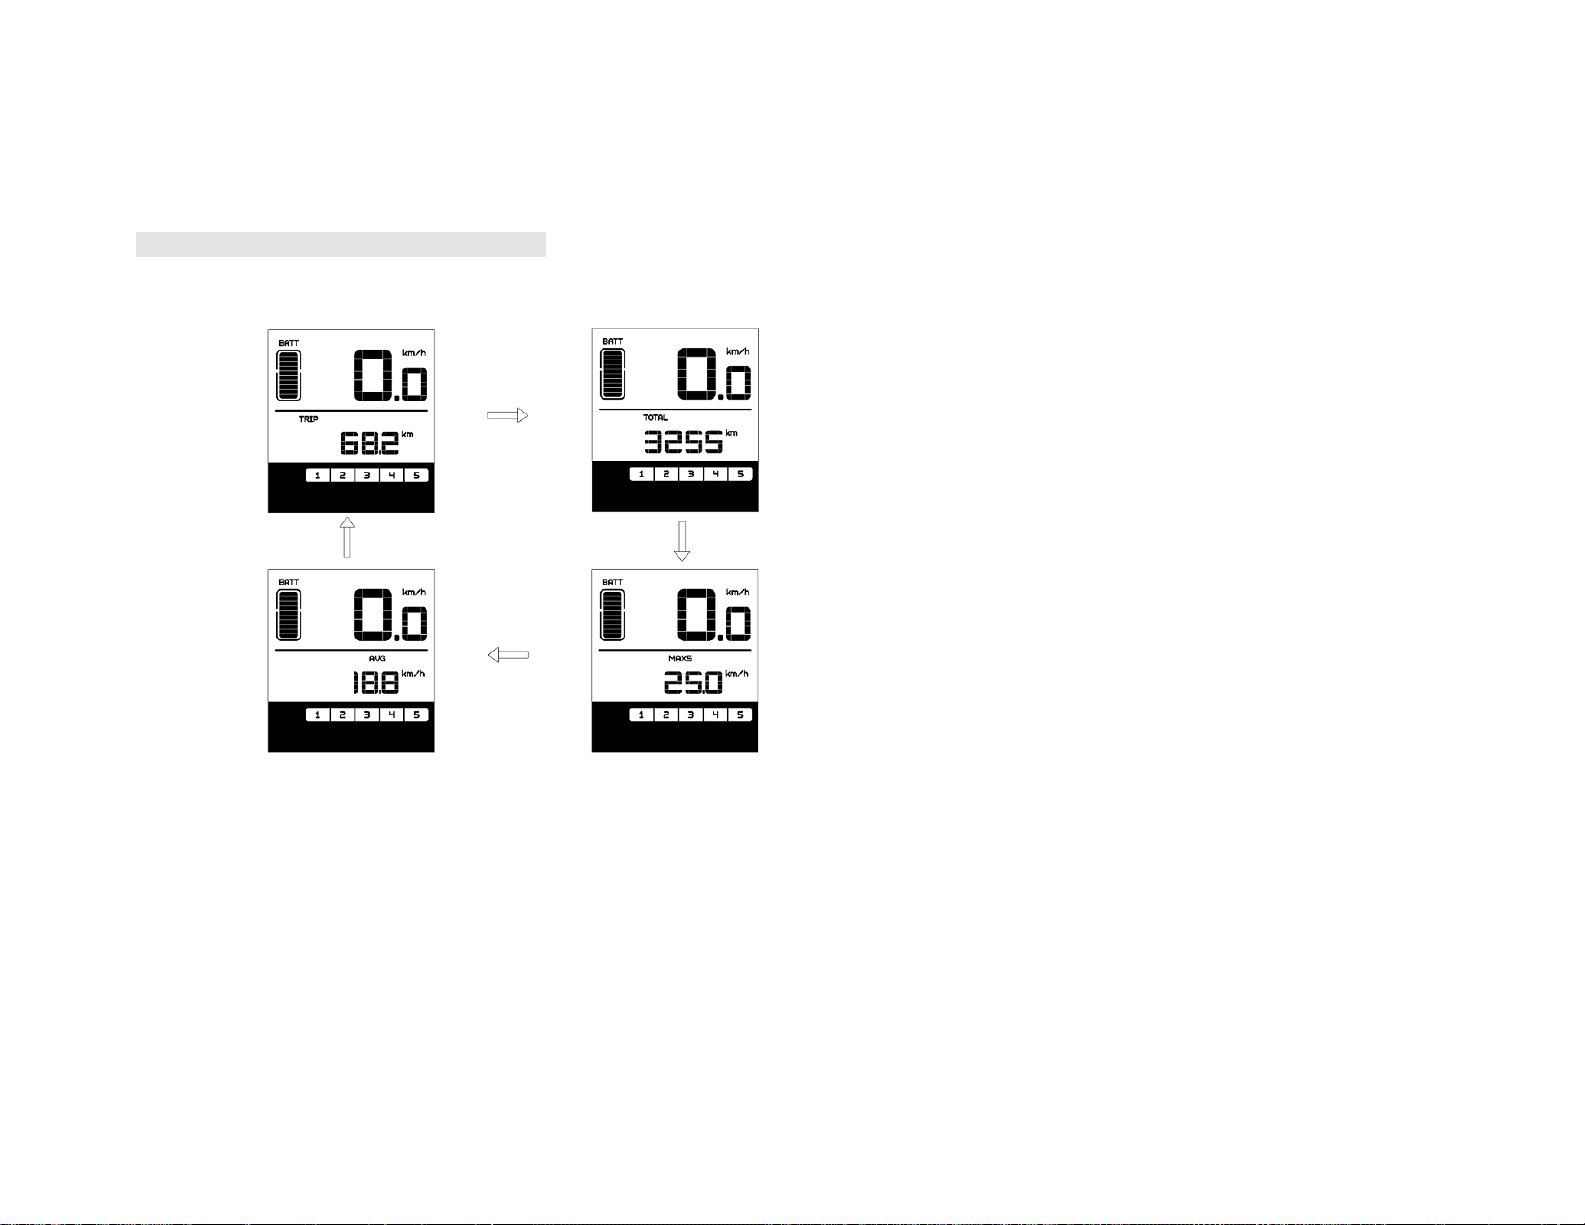
Assist Mode Selection Interface
Distance Mode and Speed Mode Switch
Press the "mode" key to switch distance/speed display information, giving a display of single-trip distance (TRIP km), accumulated distance (TOTAL km),
maximum riding speed (MAXS km/h) and average riding speed (AVG km/h) sequentially.
47
Page 48
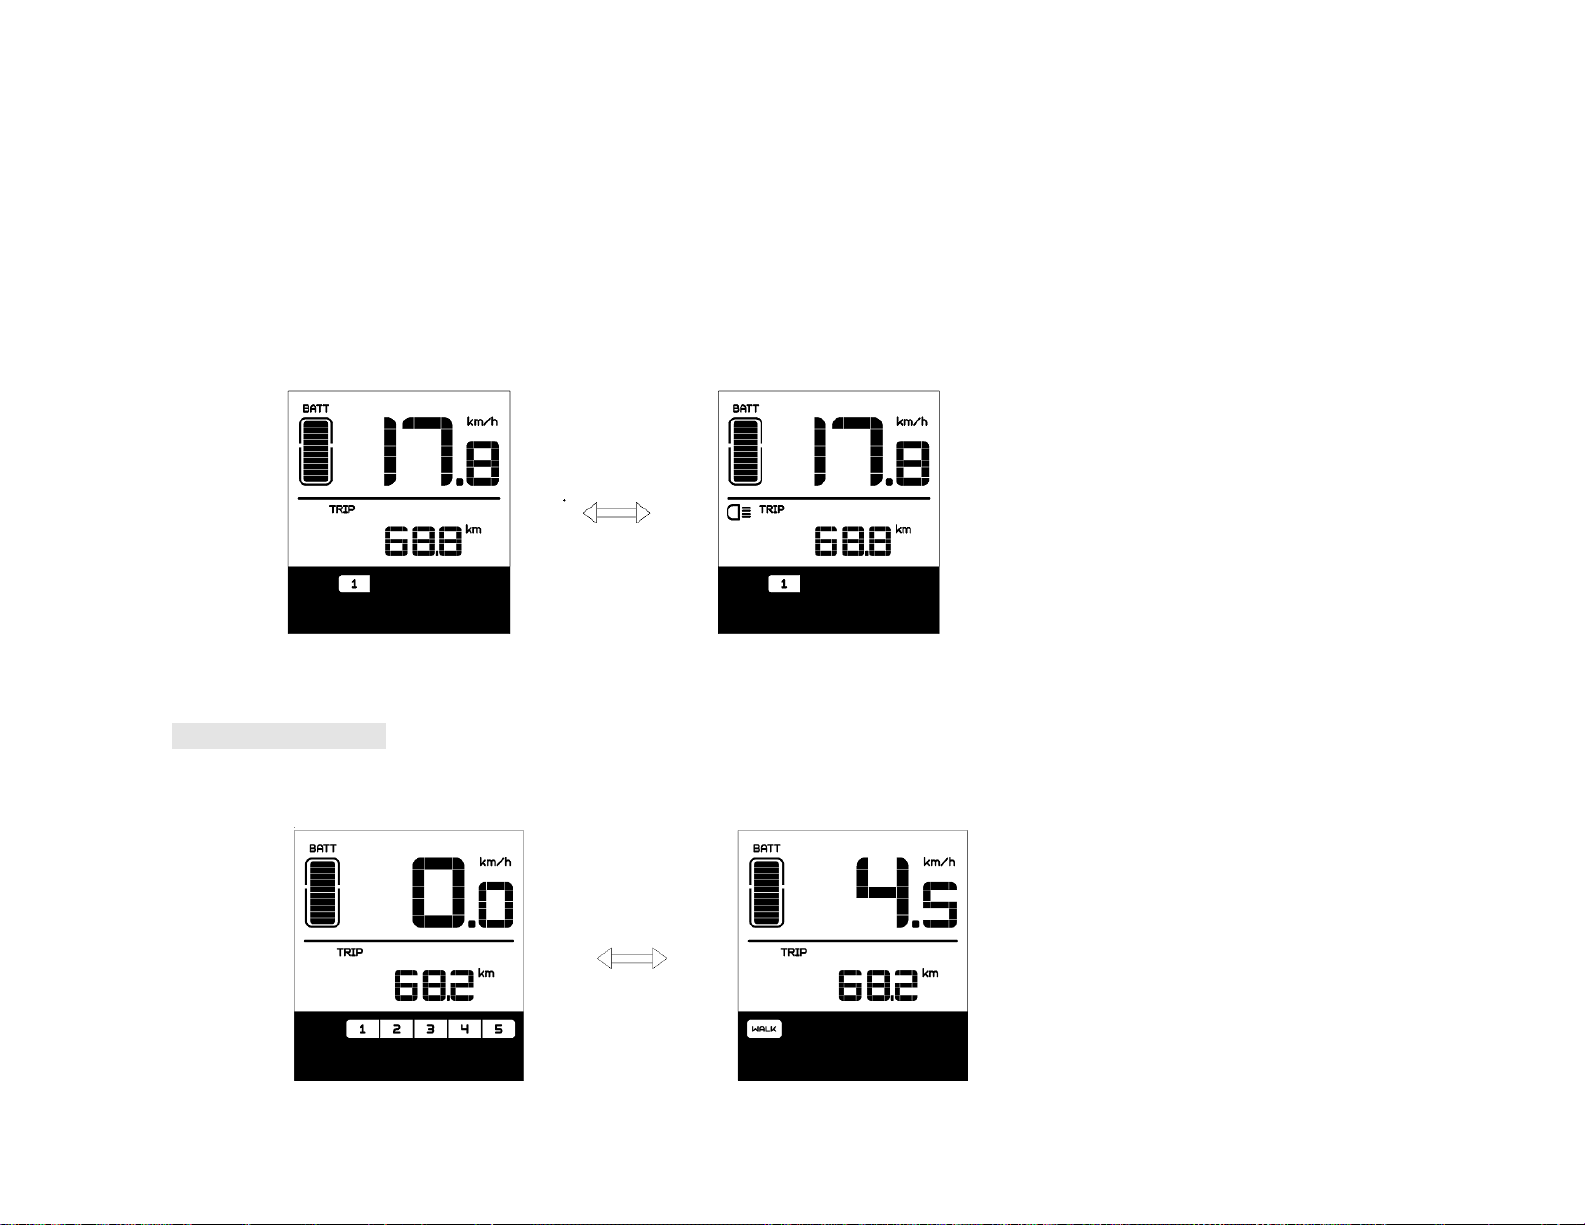
Mode Switch Interface
Headlight/ Backlight Switch
After pressing and holding the "headlight" key for 2 seconds, both the backlight of the display, and the headlight (needing the support of the controller) will be
turned on. Hold and press the headlight again for 2 seconds to power off the headlight and the display backlight (If the display is turned on in a dark
environment, the backlight/ headlight will be automatically turned on. But if the backlight/ headlight is then manually turned off, they have to be manually turned
on afterwards).
* There are 5 levels of backlight brightness for selection and the user can set the value as needed.
Headlight/Backlight On/off Interface
Walk Assistance Mode
After pressing and holding the “down” key for 2 seconds, the electric bicycle enters the state of walk assistance, and the symbol WALK is displayed in the
field of assistance mode. Once the “down” key is released, the electric bicycle will exit the mode of walk assistance.
48
Page 49
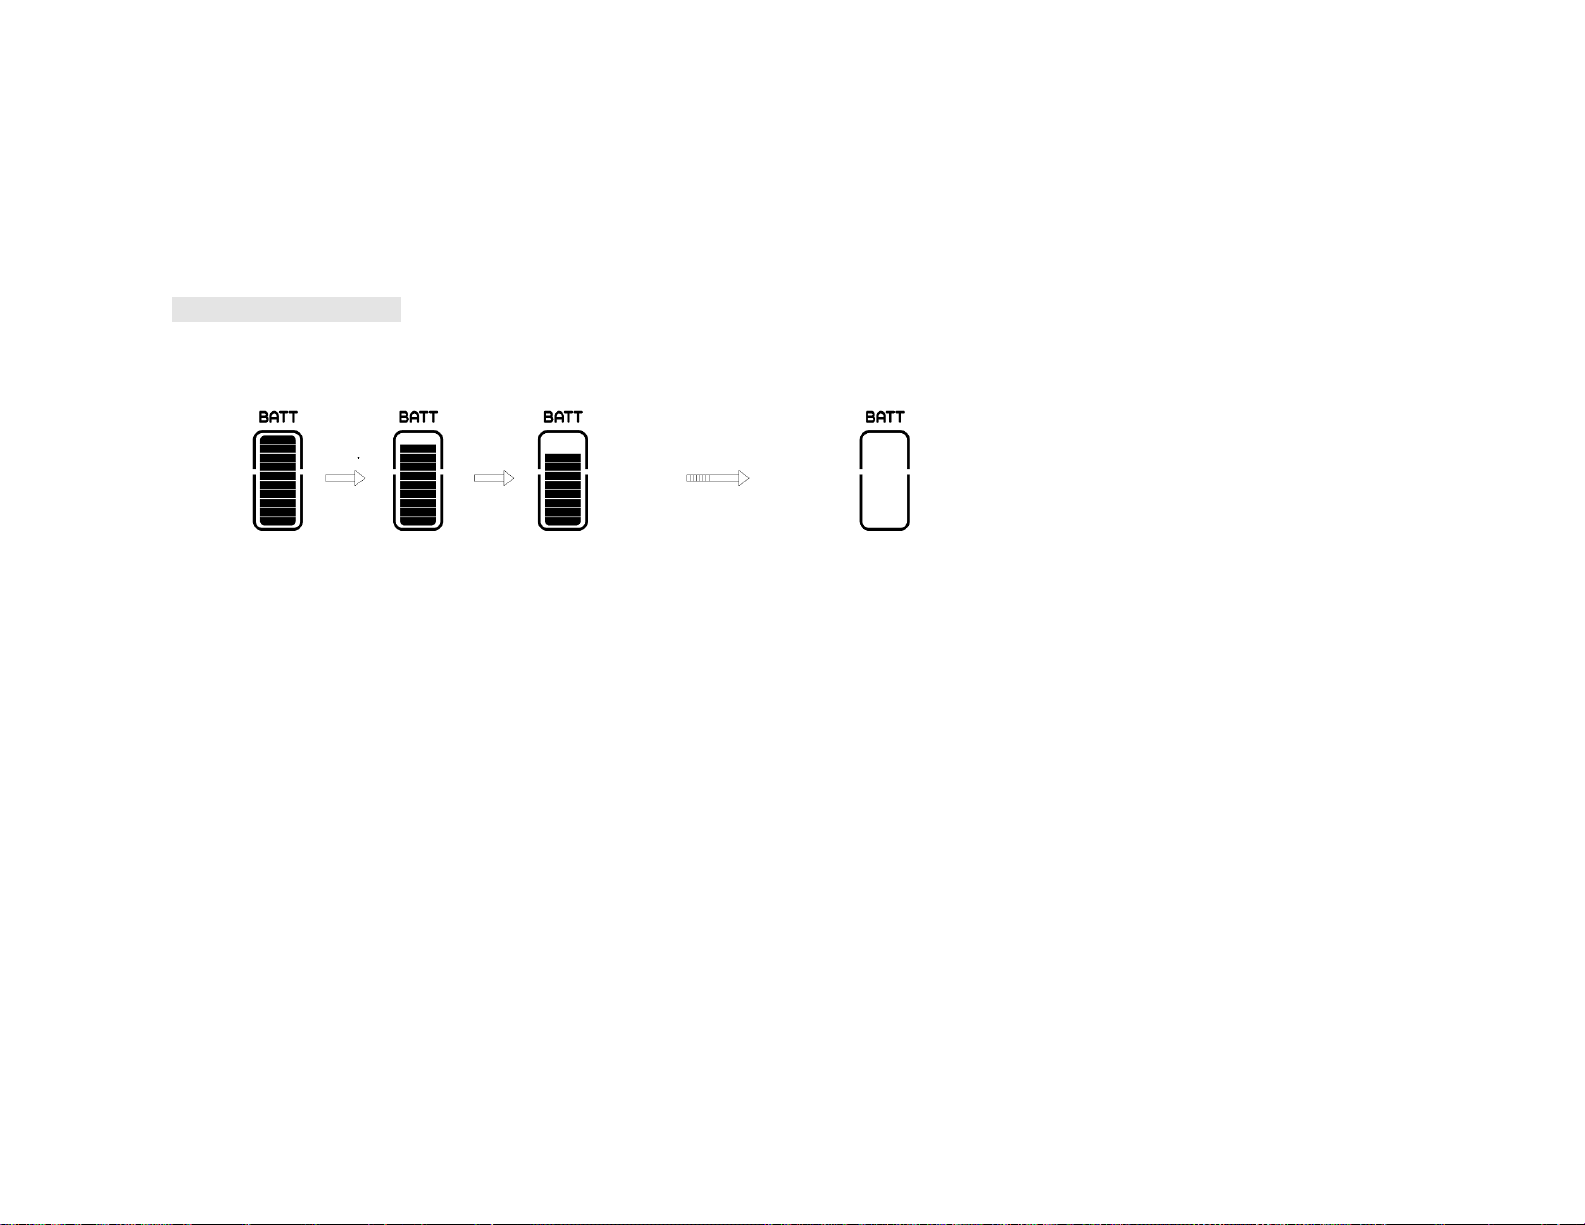
Battery Level Indication
When the battery voltage is normal, the battery is indicated by a certain number of segments with the border lighted according to the actual quantity of
electricity. It the battery is under-voltage, all of the 10 segments will black out with the border blinking, indicating that the battery needs to be charged
immediately.
Walk Assistance Mode Switch Interface
Battery Level Indication
49
Page 50
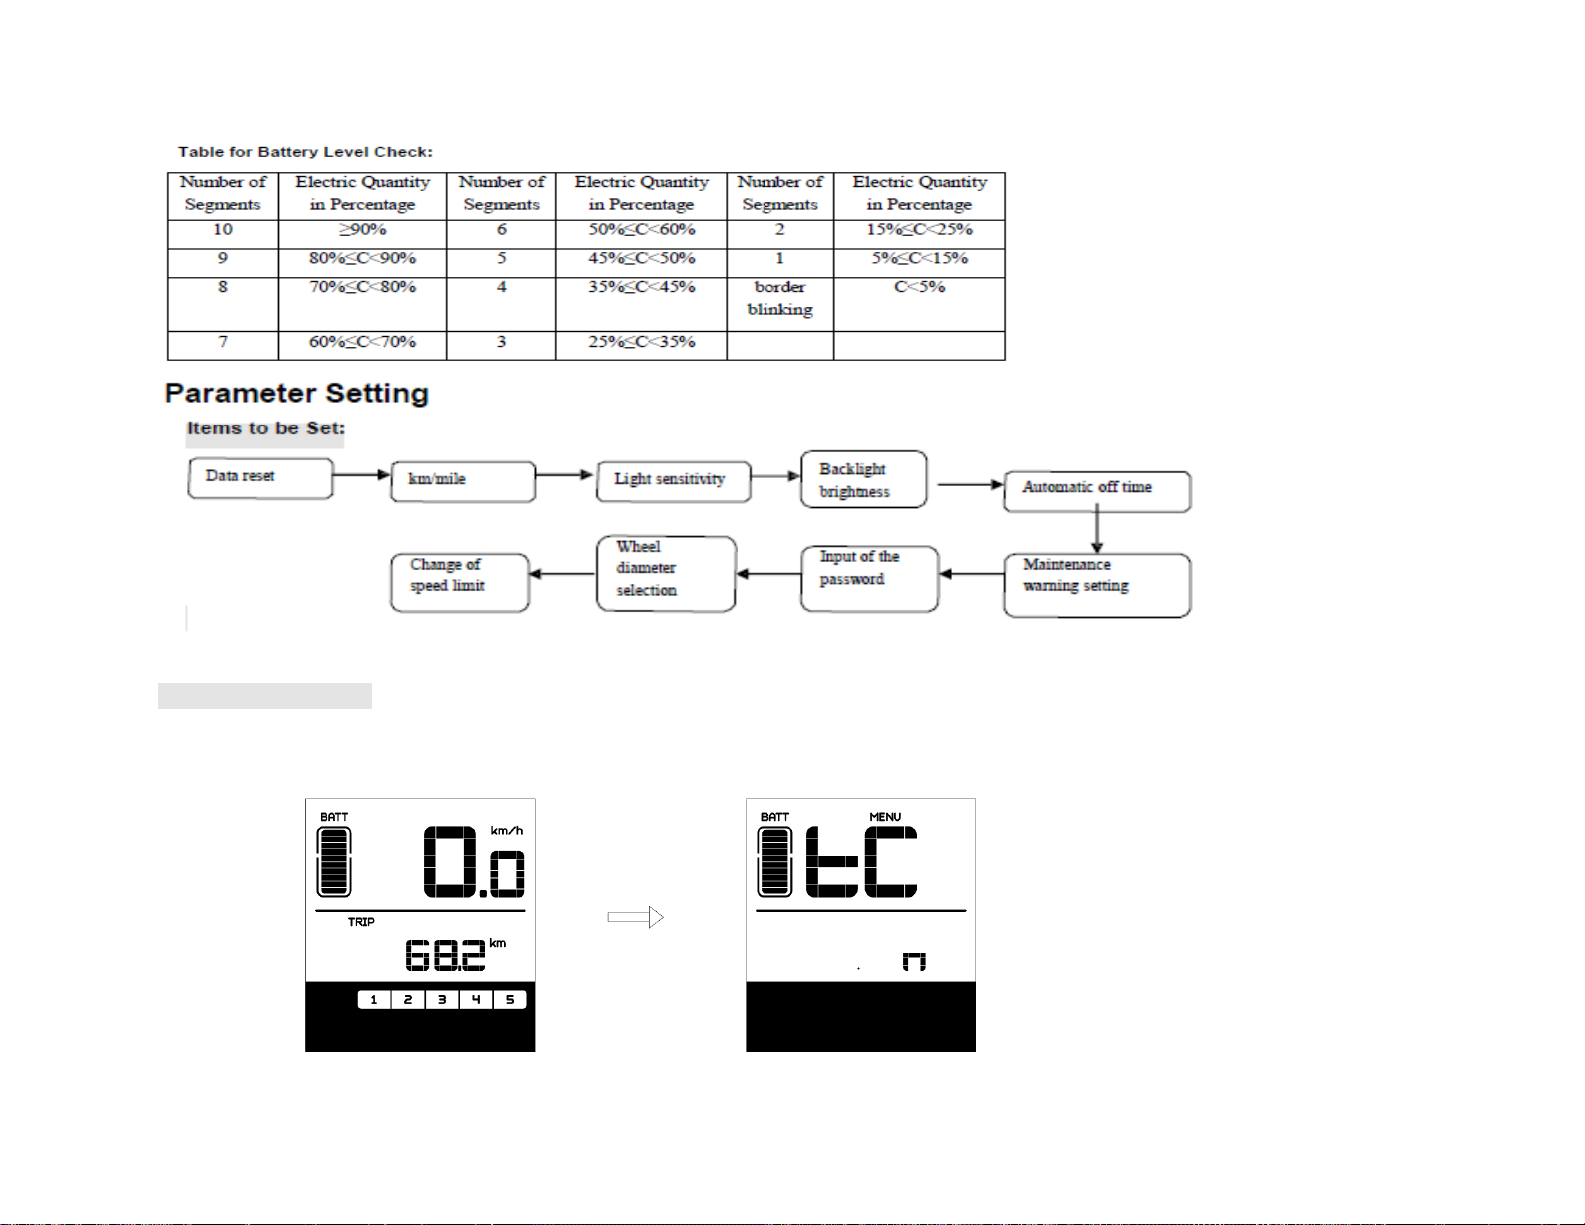
Setting Preparation
When the display is active, pressing the “mode” key two times (the interval between the two pressing actions should be shorter than 0.3 seconds), the system
will enter the MENU parameter setting state, in which the display parameters can be set. Press the “mode” key two times (the interval between the two pressing
actions should be shorter than 0.3 seconds) once again to exit the parameter setting state.
Enter the Parameter Setting Interface
50
Page 51
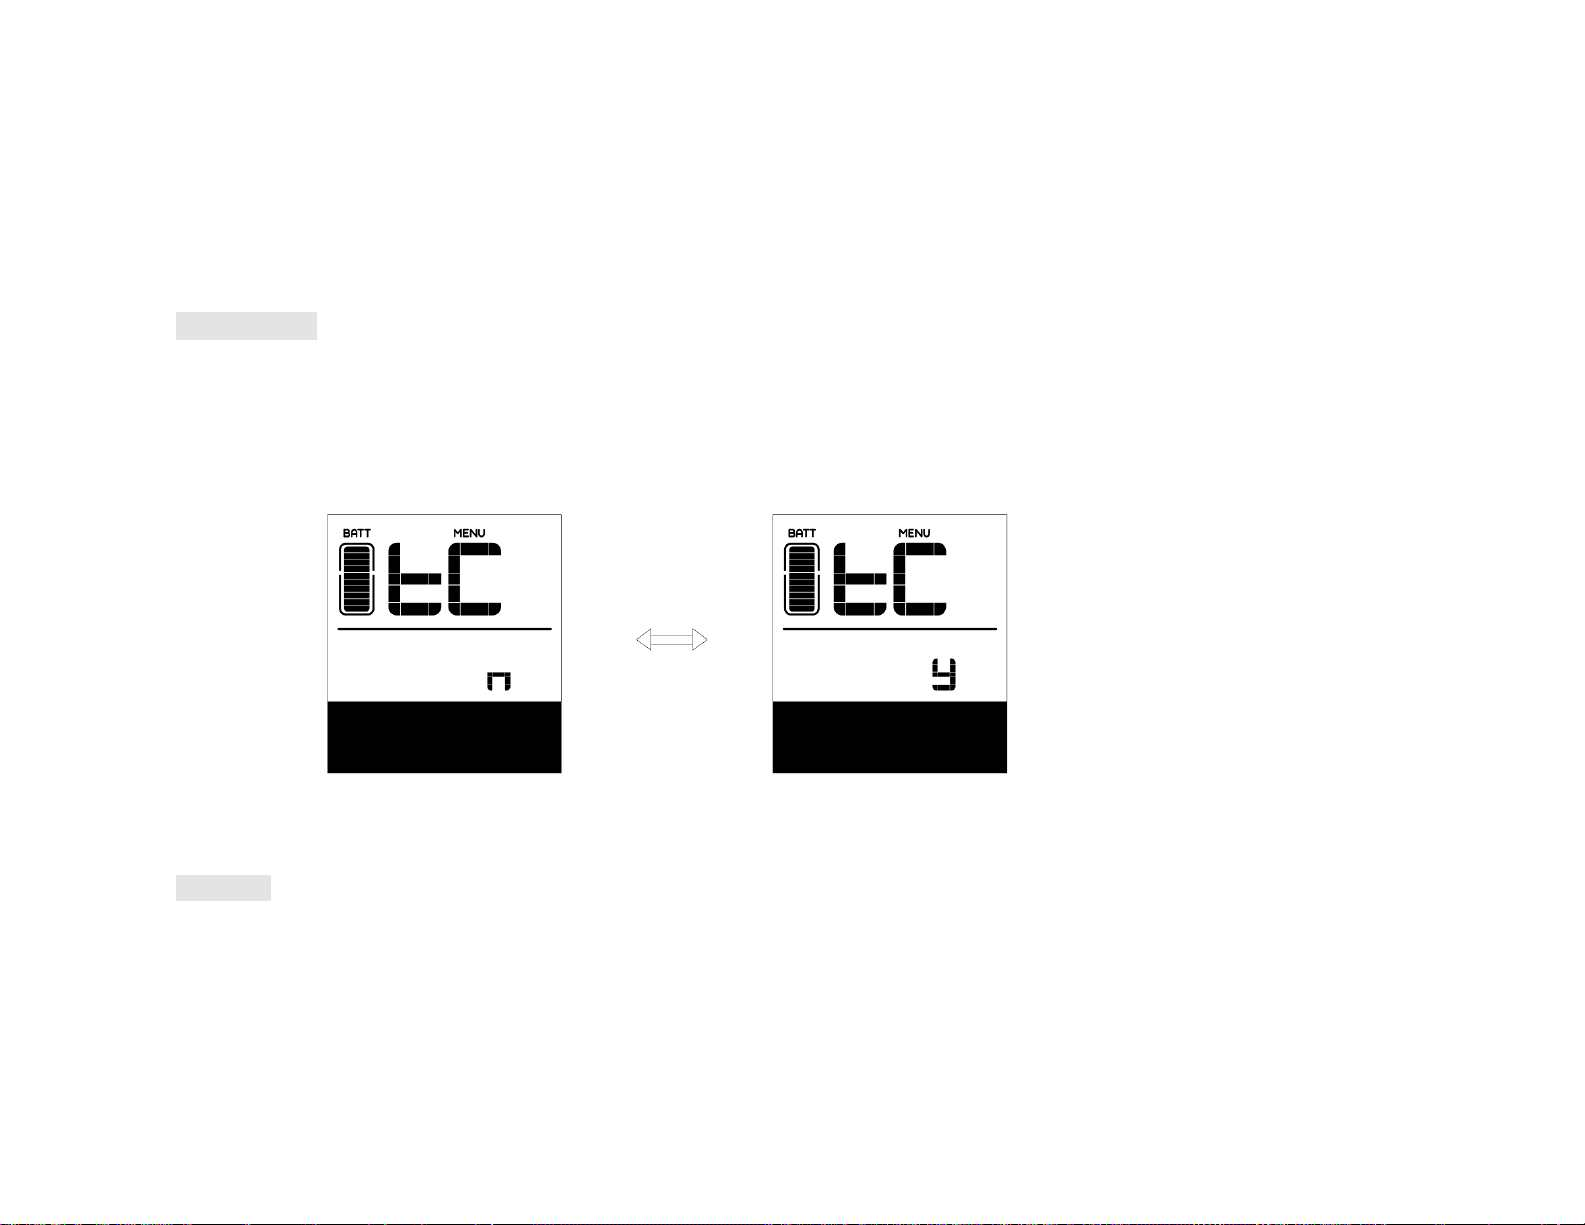
In the parameter setting state, when the parameter to be set begins to flash, press the "up" or "down" key to adjust the parameter value. Press the
"mode" key to switch among the to-be-set parameters. Press the "mode" key two times (the interval between the two pressing actions should be shorter than
0.3 seconds) to exit the parameter setting state.
* In the parameter setting state, if no operation is performed to the display for 10 seconds, the display will return to the normal riding state.
Data Reset:
After pressing the "mode" key 2 times (the interval between the two pressing actions should be shorter than 0.3 seconds), the display enters the
MENU state. In this state, the speed field displays tC and then also displays y after pressing the "up" key. At this moment, the temporary data,
including maximum speed (MAXS), average speed (AVG) and single-trip distance (TRIP) can be cleared. After this setting, press the "mode" key for
shorter than 0.3 seconds to enter the km/mile setting interface.
If the user has never made any reset operation, the single trip distance and the accumulated riding time will be automatically cleared when the accumulated
riding time exceeds 99 hours and 59 minutes.
*When the display or the bicycle powers off, the above-mentioned data won't be cleared!
Km/ mile:
When the speed field displays S7, press the “up” or “down” key to switch between km/h and mile/h or km and mile.
After this setting, press the "mode" key for shorter than 0.3 seconds to enter the setting interface of light sensitivity.
51
Page 52
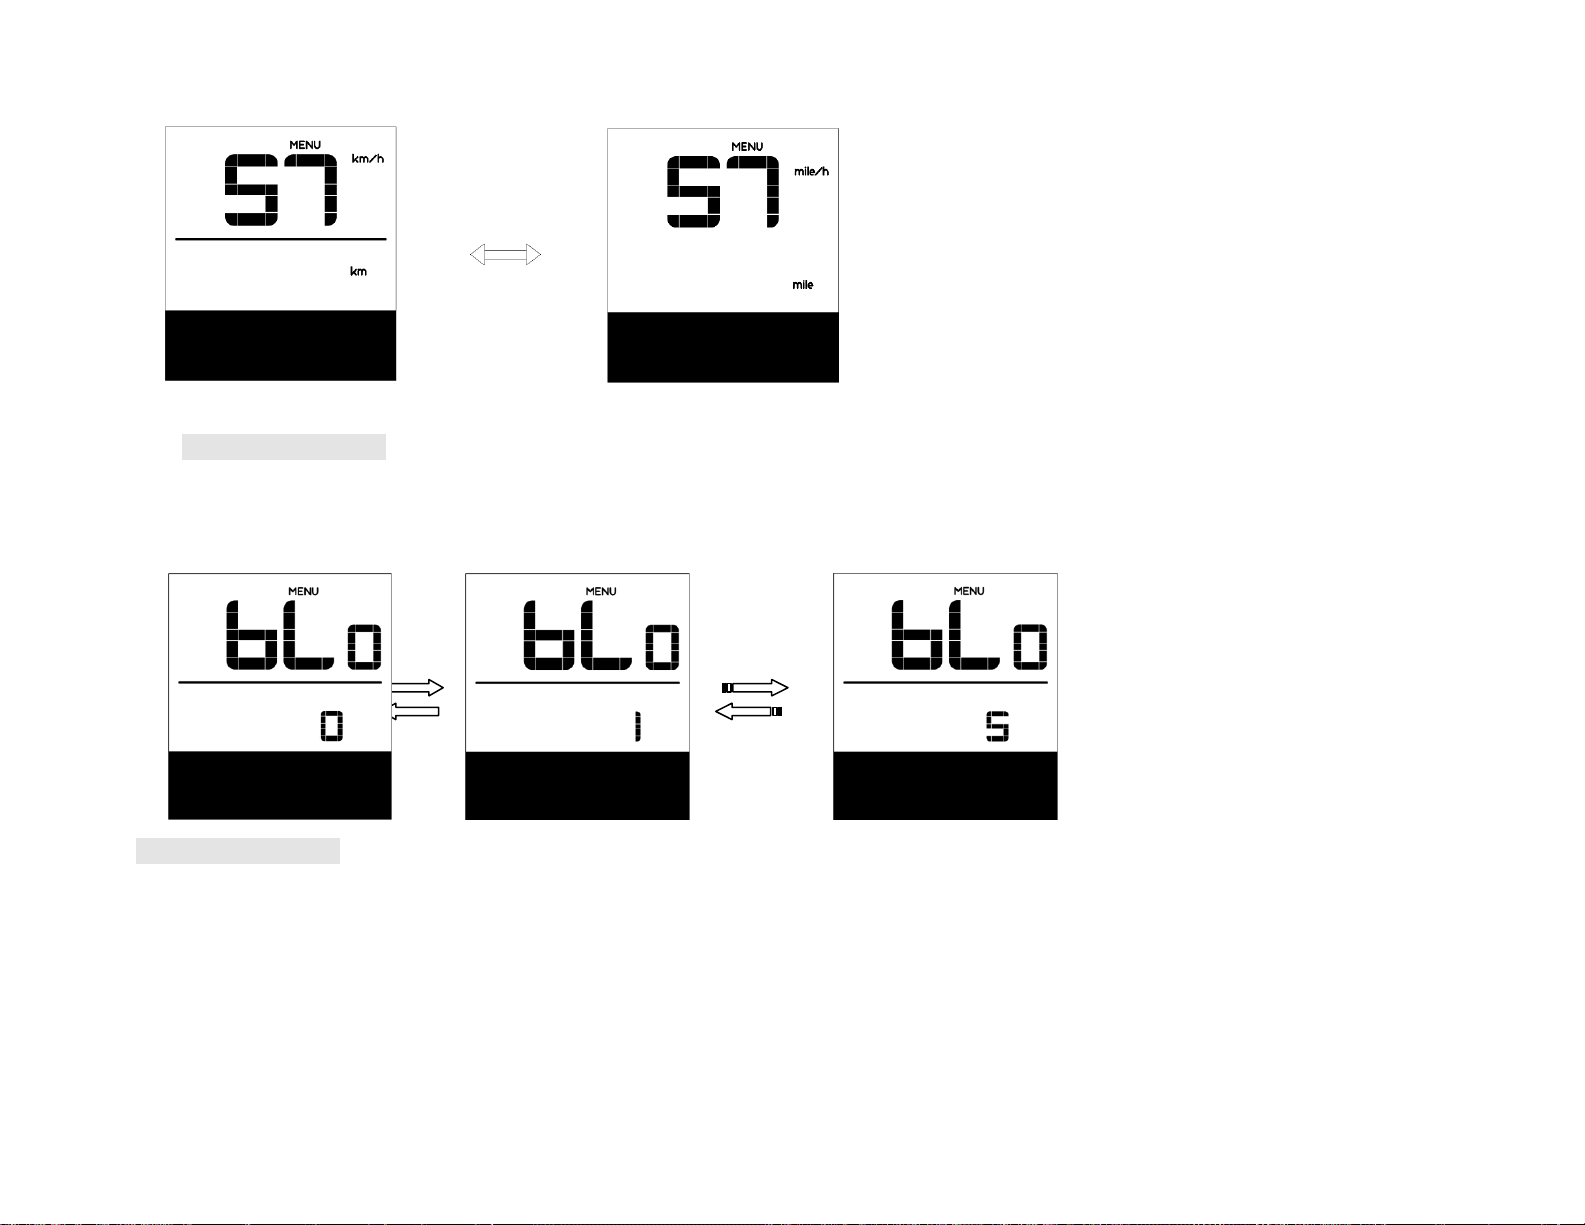
Light Sensitivity:
When the speed field displays bL0, press the “up” or “down” key to display a figure between 0 to 5. 0 represents the shutdown of light-sensing
function. As the figure increases, light sensitivity gradually increases.
After this setting, press the "mode" key for shorter than 0.3 seconds to enter the setting interface of backlight brightness.
Backlight Brightness:
When the speed field displays bL1, press the “up” or “down” key to display a figure between 1 to
5. The figure 1 represents the lowest backlight brightness while 5 indicates the highest backlight brightness.
After this setting, press the "mode" key for shorter than 0.3 seconds to enter the setting interface of automatic off time.
52
Page 53
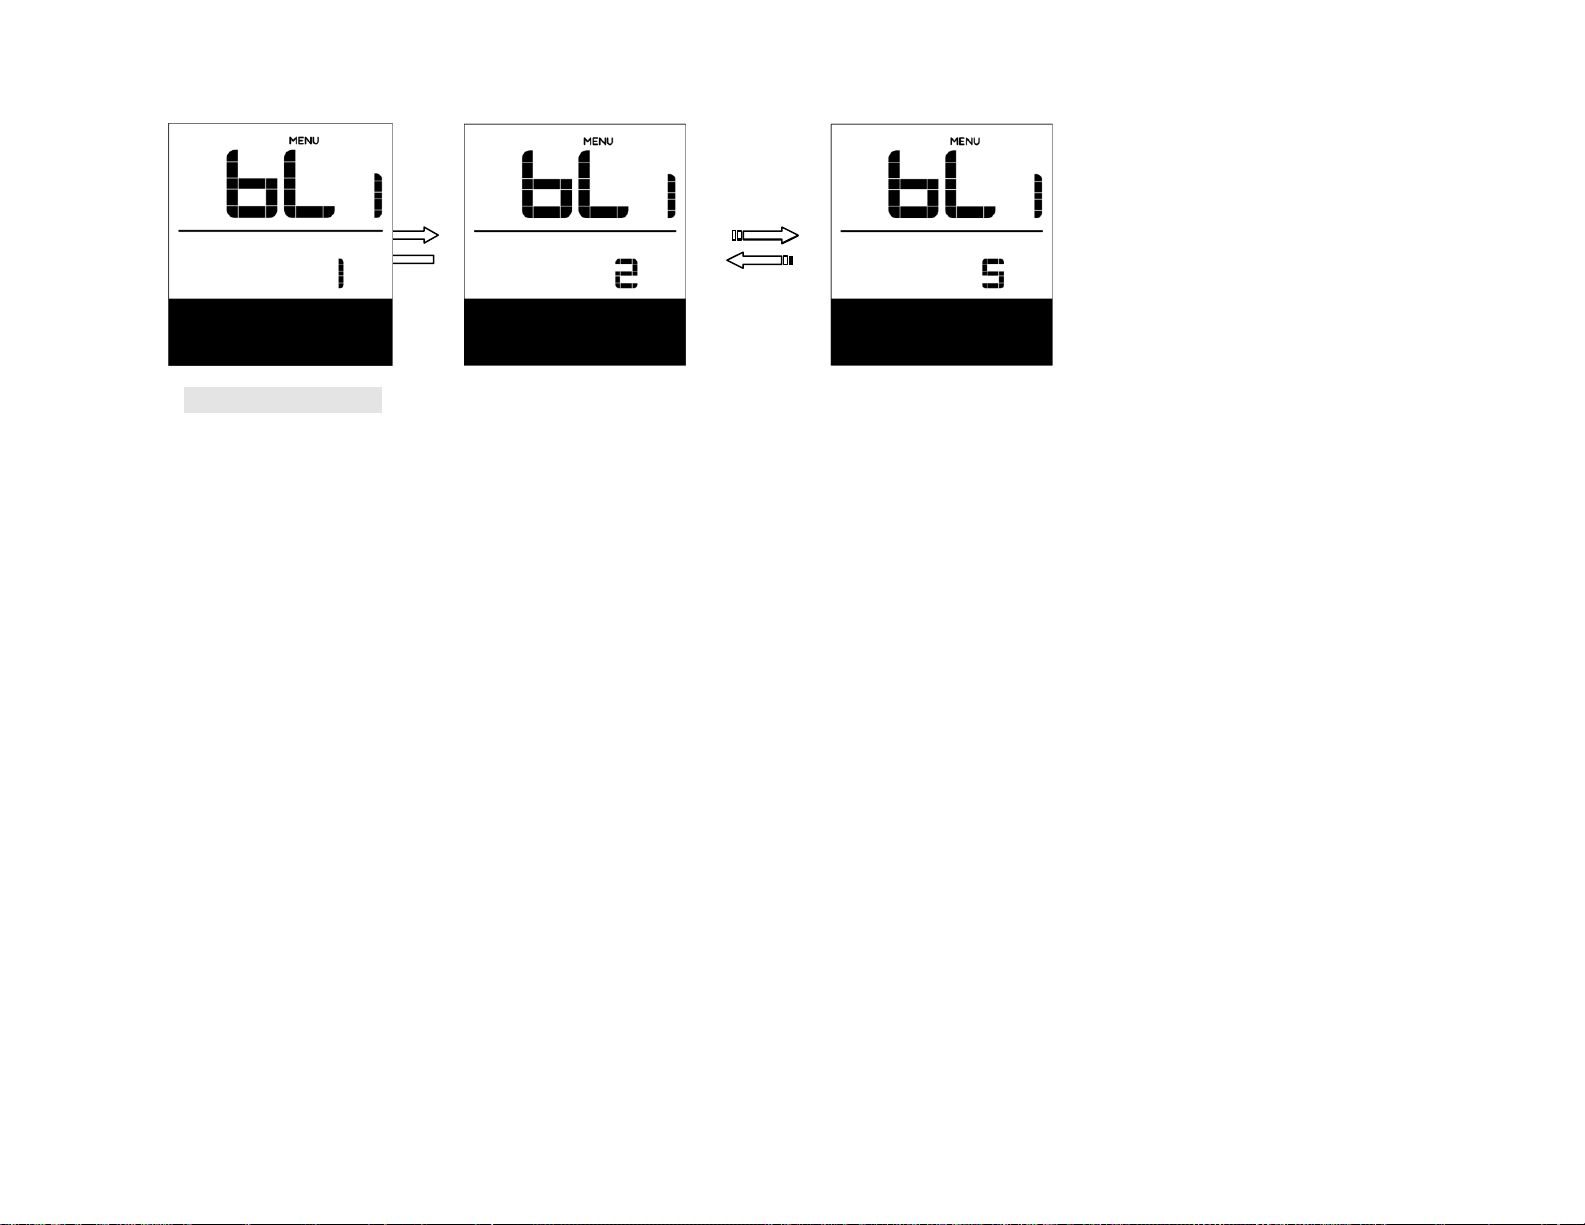
Position
Rear Motor
Construction
Geared Motor
Nominal Voltage
36/48V
Power
200-500 W
RPM
180-350
Torque
60-80 Nm
Efficiency
≥78
Brake
Disc Brake
Weight
≤4.6 kg
Installation Widths
175 mm
Automatic Off Time:
When the speed field displays OFF, press the “up” or “down” key to display a figure between 1 to 9. This figure indicates the minute that it takes to
automatically shut down the display.
After this setting, press the "mode" key for shorter than 0.3 seconds to enter the setting interface of maintenance warning.
NINE > MOTOR SPECS
This extremely strong driving rear motor has a maximum power of 350 watts. The geared motor is suitable for e-bikes that are conceived for the use in snowfield,
e.g. snow vehicles. Thanks to the down gearing (1:5) the motor can unfold its power efficiently. It has a high torque of 60-80 Nm and thus gives ideal support for
acceleration from stationary. With an installation width of 175 mm this motor corresponds to the current snow vehicle standards. Suitable as a component
especially for e-bikes that are conceived for sporty use thanks to being equipped with disc brakes. It is available in black and chrome.
SPECIFICATIONS
Core Data
Mounting Parameters
53
Page 54

Max. Housing Diameter
≥ 158.5 mm
Cabling
Shaft Center, Right
Spoke Specification
12G/13G
Cadence (Pulses/Cycle)
6/1
Reduction Ratio
1:5
Magnet Poles
20
Noise
<55 dB
Hall Sensor
optional
Connector
optional
IP-Code
IP 54
Compliance
ROHS
Label
CE
Further Specifications
Tests & Certifications
TEN > BATTERY
Precautions
If any liquid leaking from the battery gets into your eyes, immediately wash the affected area thoroughly with clean water such as tap water without rubbing
your eyes, and seek medical advice immediately. If this is not done, the battery liquid may damage your eyes.
Do not recharge the battery in places with high humidity or outdoors. Doing so may result in electric shock.
Do not insert or remove the plug while it is wet. If this is not observed, electric shocks may result. If there is water leaking out of the plug, dry it
thoroughly before inserting it.
If the battery does not become fully charged after 6 hours of charging, immediately unplug
the battery from the outlet to stop charging, and contact the place of purchase. Not doing so may cause overheating, bursting, or ignition of the battery.
Do not use the battery if it has any noticeable scratches or other external damage. Doing so
may cause bursting, overheating or problems with operation.
The operating temperature ranges for the battery are given below. Do not use the battery in temperatures outside these ranges. If the battery is used or
stored in temperatures outside these ranges, fire, injury or problems with operation may occur.
Temperature for discharge: –10 °C - 50 °C
Temperature for charging: 0 °C - 40 °C
54
Page 55

Danger
Do not deform, modify, disassemble or apply solder directly to the battery. Doing so may cause leakage, overheating, bursting, or ignition of the battery.
Do not leave the battery near sources of heat such as heaters. Do not heat the battery or throw it into a fire. Doing so may cause bursting or ignition of the battery.
Do not subject the battery to strong shocks or throw it. If this is not observed, overheating,
Bursting, or fire may occur.
Do not place the battery into fresh water or sea water, and do not allow the battery terminals to get wet. Doing so may cause overheating, bursting, or ignition of
the battery.
Use the specified charger and observe the specified charging conditions when charging the battery. Not doing so may cause overheating, bursting,
or ignition of the battery.
Do not short-circuit the discharge port with a metal part, or else it may cause overheating,
Bursting, or ignition of the battery
Do not leave the battery in a place exposed to direct sunlight, inside a vehicle on a hot day, or other hot places. Doing so may result in battery leakage.
If any leaked fluid gets on your skin or clothes, wash it off immediately with clean water.
The leaked fluid may damage your skin.
Store the battery in a safe place out of the reach of infants and pets
Use the Battery Properly
The battery can always be charged at any time no matter how much power is left. However, in the following cases, you should have the battery fully
charged. Make sure to use the specified charger to charge the battery.
The battery is usually not fully charged for the convenience of transport. Make sure the battery is fully charged before using the battery.
If the battery is not intended for use in a long time, make sure the e-bike battery is charged before storage and is afterwards charged at least once every
twelve months. Do not leave the battery completely discharged.
Once you have begun to use the battery, please have it charged at least once every two weeks.
Note: If the battery is completely discharged, charge it as soon as possible. If you do not charge the battery, it will be damaged.
55
Page 56
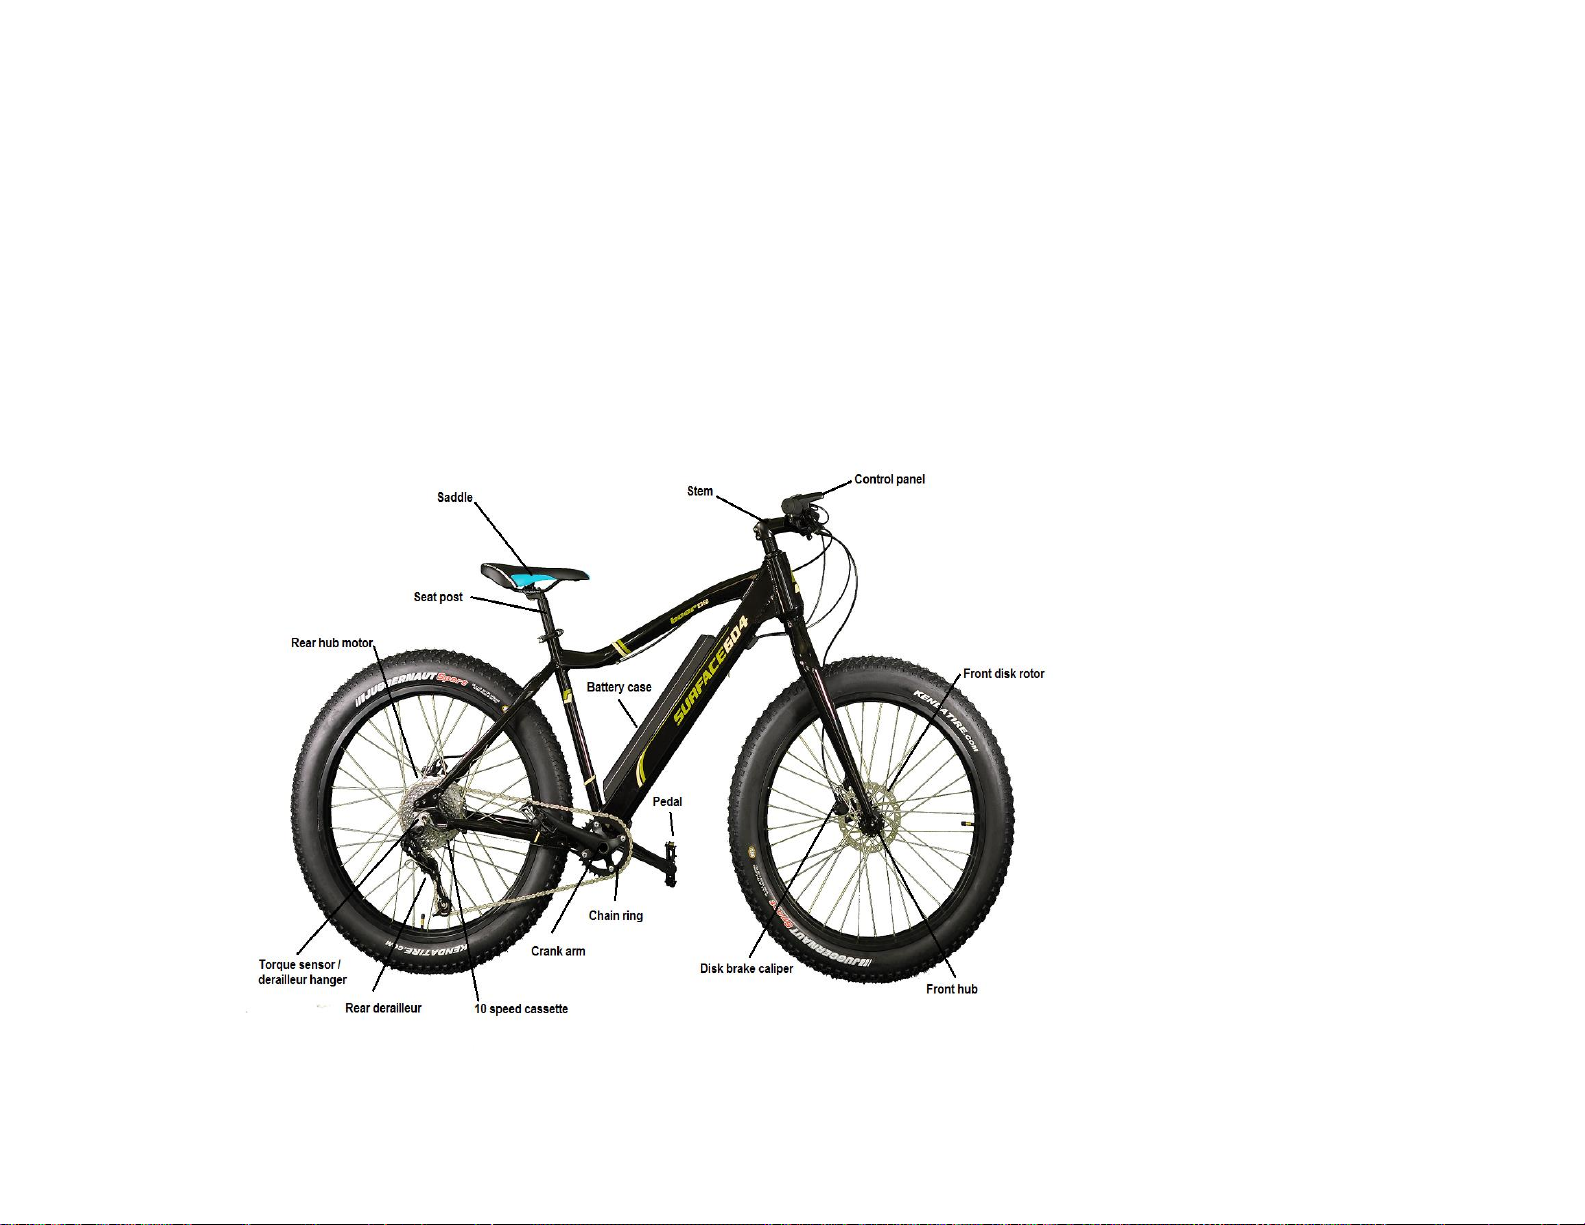
Charge the Battery
When using the battery for the first time, check whether the battery has not run low due to transportation or storage.
When the battery is not intended for use in a long time, charge the battery regularly to avoid excessive battery discharge.
Please charge the battery as soon as possible before it runs out; over-discharge can cause permanent damage to the battery.
No matter how much power is left, the battery can be charged at any time. However, the specified charger must be used to avoid overcharge of the
battery.
To maintain the proper use of the battery, do not subject the battery to heavy shocks or a heat source, or disfeature the battery or short circuit its
terminals.
Battery Capacity Display
Press the battery level display switch and the lights indicating the left battery capacity will be on
56
 Loading...