


SureWest
DVR Manual
(Digital Video Recorder)
December 2008
Important
information!
Retain for your
reference.


SureWest DVR (Digital Video Recorder)
You’ll never watch TV the same way ever again.
Record your favorite programs
With SureWest DVR, it’s easy to record your favorite programs. Plus, if you have a high
definition television set and subscribe to SureWest HD service you can also record your
favorite HD programs. No tapes, timers, VCRs or phone lines to connect. Just you and
SureWest Digital TV with DVR.
Watch your favorite programs whenever you want
With SureWest DVR you’ll always have something to watch. Watch programs you have
recorded whenever you want and as many times as you want. It’s your choice.
Take control of live TV
With SureWest DVR, you have full control of live TV. Need to answer the phone? Need to
step away from the TV? Get a snack? Want to watch that great catch over again? No problem.
With SureWest DVR you can:
• Pause a live program.
• Replay live TV.
• Rewind through the program portion you have been watching.
• Fast-forward up to the point of live TV.
• Record two programs at the same time.
• Program your DVR to record every episode of your favorite program all season long!
It’s your digital TV! Take control with SureWest DVR.
1

2
Let’s Get Started
Get to know your SureWest DVR
Your SureWest DVR is an ADB 5810WX. It supports all of SureWest’s digital TV services including
Pay Per View and On Demand. It is also HD-capable.
Your DVR has an internal hard disk drive. It must be handled much in the same way as a
computer to reduce potential for damage.
• Position it in an open space to allow airflow around the DVR
• Do not place the DVR in an enclosed entertainment unit or cabinet
• Do not place the DVR on a soft surface such as a rug, sofa, bed or other similar surface
• The DVR should not be next to an external heat source that could raise the temperature
of the unit
• Connection into a surge protector along with your other audio/video equipment is
highly recommended
Front Panel
Rear Panel
USB slot
USB slot, placed under the lid,
allows you to connect external
devices (not activated).
Function buttons
These buttons perform the same
function as the corresponding
ones on the remote control.
LEDs and Display
The LED indicators inform you
about the status of your DVR.
Display presents current time.
1. USB port (not activated)
2. Ethernet port
3. HDMI (HD Digital Output)
4. Component Output (HD Analog Output)
5. CVBS Video and Stereo Audio Output
6. RF modulated output to TV
7. S-VIDEO Output
8. VIDEO Output
9. RCA Stereo Audio Output
10. S/PDIF (Digital Audio Output)
11. Power plug (12V)

3
Included Accessories
SureWest
DVR Manual
(Digital Video Recorder)
November 2008
Important
information!
Retain for your
reference.
Remote control
Batteries
RCA jacks
Power Adaptor
Audio SPDIF cable
RGB (component) cables
Welcome Kit
DVR Manual
HDMI cable
Programming Remote
Control Guide

4
Remote Control
Program your Remote
Each remote control must be programmed with a 5-digit code corresponding to the brand of
TV, DVD Player or VCR in use. This was done for you at the time of initial service installation,
and must be done again whenever a TV, DVD Player or VCR is replaced.
For a listing of common codes and step by step instructions on how to program your remote
please see the Programming Remote Control document included with your DVR, or go to
www.urcsupport.com and click on the SureWest logo.
Remote Control
To view your Digital TV service, complete the following steps:
A. Press the STB button on your
remote control to select your DVR.
B. Press the Power button on your
remote control to turn on your
DVR.
C. Press the TV button on your
remote to select your television.
D. Press the Power button on your
remote control to turn on your
television.
E. Press the Menu button to display
the main menu.
F. Use the cursor keys to select
an option: DVR, VOD, SVOD,
Vault, Parental Controls, Settings,
Favorites, Search, Guide or Sign
Out then press OK to confirm
your selection.
You are now ready to select a TV program or
entertainment option of your choice.
Remote Control Functions
Use your remote to access programs, adjust volume,
control your DVR and On Demand (VOD & SVOD)
selections as well as scroll through and confirm actions
within the on-screen menus.
4
3
17
24
21
1
19
10
11
5
13
22
23
27
30
31
39
40
41
20
15
12
14
8
16
25
2
18
9
6
7
26
28
29
32
33
34
35 36
37 38

5
Remote Control
No. Button Use
1 Setup Used to enter activation codes to activate your remote to control your TV, DVR, DVD, Audio
or Auxiliary equipment.
2 Power Turns your TV, DVR , DVD, Audio or Auxiliary equipment on or off.
3 AUX, DVD, AUD, Switch the device handled by the remote. Use these buttons to activate controls for your
TV, STB TV, DVR, DVD, Audio or Auxiliary equipment.
4 Rewind Press this key while watching live TV, previously recorded programs and VOD titles to
rewind. This key can be used to control your DVD player or VCR. Press it multiple times to
increase rewind speed.
5 Replay Press this key to skip back in 60 second increments while watching a previously recorded
program or a VOD title.
6 List Press the list key to go directly to the DVR main menu.
7 Live Press this key to take you directly to live TV when watching a previously recorded program
or a VOD selection. When watching buffered programming press this key to take you back
to the point of live TV.
8 Fast-Forward Press this key to fast-for ward VOD & SVOD movies, or while viewing previously recorded
programming on your DVR. Press it multiple times to increase fast-forward speed. This key
can also be used to control your DVD player or VCR.
9 Play Press this key to star t watching previously recorded programming or to restart
programming/recording while in rewind, fast-forward or pause mode.
10 Stop Press this key to stop recording or play programming.
11 Pause Press this key to pause live TV, recorded programming, VOD and SVOD titles.
12 Record Press this key to begin recording the currently watched program or while in the guide to
begin or schedule a recording.
13 Guide Use this key to display the list of programs on each channel in your program guide.
Press this key consecutively will switch your program guides through All, Favorite, HD or
Subscribed viewing options.*
14 Menu Displays and exits the main menu.
15 Info When you are watching a program or recording, this key displays a banner that provides
you with program information. By pressing the key twice, it shows additional program
information.
16 Exit Press this key to exit out of any menus open on the screen.
17 Next/ Day + Press this key to move forward one day at a time in the programming guide.
18 Page + Press this key to page for ward in the Programming Guide.
19 - Prev Press this key to move back to a previous day in the programming guide.
20 Page - Press this key to page back in the programming guide.
21 Left, Right, Up, Use these arrows to navigate through the menu and programming guide screens.
Down Arrows
22 OK Use this key to select or confirm selections in the programming guide and menu screens.
23 A/Yellow Used to navigate through the settings menu.
24 B/Blue Used to navigate through the settings menu.
25 C/Red Used to navigate through the settings menu.
26 D/Green Used to navigate through the settings menu.
27 Vol + - Increase/decrease audio volume
28 On Demand Press this key to go directly to the Video On Demand (VOD) menu (SVOD is accessed
through main menu)
29 Ch + - While viewing a channel these keys tune the DVR to next/previous channel in your current
channel line up.
30 Mute This key enables you to mute the volume on your TV. When pressed a second time, it
restores the volume on your TV.
31 FAV Press this key to go directly to the Programming Guide. Pressing this key consecutively will
switch your program guide through All, Favorites, HD and Subscribed.*
32 Last Press this key to return to the last channel viewed
33 Number key pad The number keys enable you to type your choice directly such as channels numbers or PIN.
34 # Reserved for future use.
35 Home Reserved for future use.
36 Phone Reserved for future use.
37 WWW Reserved for future use.
38 Advance Press this key to fast-for ward previously recorded programming in 30 second increments.
39 Delete Press this key to delete entries when entering Passwords and PIN.
40 My Media Reserved for future use.
41 Closed Captioning Press this key to activate the closed captioning function on your DVR .
*HD guide option only available to customers who subscribe to SureWest HD Life.

6
Connect your SureWest DVR
Basic Connections
These are the required connections for your DVR to operate properly.
Connect the power supply via the Power Adaptor. Next connect the Ethernet port
with the Ethernet socket using the Ethernet cable.
Power Adaptor
Power Socket
Ethernet Cable to Ethernet Socket
SDTV
HDTV
TV Connections
Choose one of the available types of connections for your DVR with your TV. Keep in mind that
HDMI and YPbPr connectors are for HDTV and other connectors for SDTV.

7
Home Cinema
TV
Hi-Fi Equipment
DVD Recorder
DVD Recorder
VCR
VCR
Audio Connections
Choose one of the three types of audio connections available. If you have a home theater system
you can connect it to your DVR using the SPDIF connector and the appropriate cable.
VCR, DVD Recorder Connections
As an option you can connect your DVR to your VCR or DVD recorder to record programs outside
of the DVR. Choose one of the two possible connections.
Note: To record sound, you need to connect your VCR or DVD Recorder to the audio output of your DVR using an RCA cable.
Connect your SureWest DVR

8
Set up your SureWest DVR
Remote Control
To change the batteries, open the cover on the back of the remote. Press the cover gently and
lift the cover up. Other ways of opening the cover may result in breaking the cover. The batteries
should be installed observing the polarity presented on the inside of the battery compartment.
DVR Initial Boot Up
Once you have completed connecting your DVR to your TV, turn on your DVR. The DVR will
boot up and communicate with the SureWest server in order to download all programming
information. This process will typically take 5-10 minutes.
NOTE: To confirm a successful initial boot up press the menu button on your remote to ensure
the DVR icon is located within the main menu. If the DVR icon is not in the main menu unplug
the Power Adaptor from the wall socket, wait five seconds and plug the Power Adaptor in again
to reboot your DVR. The reboot may take an additional 10 minutes. After the reboot the DVR icon
should appear within the main menu. If after the reboot the DVR icon still does not appear in the
main menu please call SureWest Technical Support at 1-866-SureWest and follow the prompts for
current customers.
HDTV Set Up
The default setting for DVR is standard definition (SD). If you will not be connecting the DVR
to an HDTV, proceed to the Control live TV and recording section. If you will be connecting
the DVR to an HDTV, proceed with the following steps.
TV Configuration (Step 1)
1. Press the STB button on your remote control to switch
your remote to the DVR function.
2. Press the Menu button on your remote.
3. Scroll through the Menu using your cursor keys and
select Settings.
4. Enter your password (default password is 1234) and
press OK.
5. Using your cursor keys navigate to the Hardware
Settings icon and press OK.

9
6. Once selected, the loading screen will appear, this may
take a few moments.
7. While in Settings, configure your choice of TV
configurations by selecting TV configuration.
(Recommended HDTV settings are 16:9 and Fullscreen).
• Fullscreen — SD channels will be viewed in full screen
• Letterbox — SD channels will be viewed in the middle
of the screen with brackets surrounding them.
• Pan-Scan — Automatically adjusts the picture to fit the
screen.
8. To accept your TV configurations press OK.
9. Press the red button on your remote to go back
to the Settings main screen.
Display (Step 2)
1. Scroll to Display and press OK.
2. For optimum resolution select 1920x1080I.
3. Digital output should be set to HDMI.
4. To accept your display configuration press OK.
5. After you have accepted your display configurations a black
screen will display followed by a 9 second count down timer.
Press OK during the timer to confirm your configurations.
Failure to do so will cause your DVR to revert back to its
original settings.
6. Press the red button on your remote to go back to
the Settings main screen.
Set up your SureWest DVR

10
Audio (Step 3)
1. Scroll down to
Audio and press OK.
2. Press OK to highlight the primary language.
3. Using your left to right cursor buttons, select English and
press OK.
4. Scroll down to the Secondary language and press
OK.
5. Select either English or Spanish and press
OK.
Note: Other languages are not supported at this time.
6. Use your cursor buttons to scroll to the Digital audio output
box and select Dolby Digital as the default audio setting.
Press OK to confirm your selections.
Note: If you experience no audio after you have completed
the basic settings for your DVR, check your audio cable
connections or switch the audio option to stereo PCM.
7. Press the red button on your remote to go back to the
Settings main screen.
RF Modulator (Step 4)
1. Scroll down to RF Modulator and press OK.
2. Select channel 4 and press OK.
3. Press the red button on your remote to go back to the
Settings main screen.
4. You have now completed the basic setting for your DVR.
5. Press the Menu button on your remote to exit Settings.
11
DVR Functions
Control live TV and recording
With SureWest DVR you will be able to control your TV like never before. Pause, fast-forward or
rewind as many times as you want – all with a push of a few buttons on your remote control.
Buffered Programs
Your DVR will create a temporary recording of all programs you are watching. This feature is
referred to as a buffer and your DVR will automatically buffer the program you are watching.
Your DVR will buffer up to 5 hours of SD content and 2 hours of HD content and will continue
to buffer the channel until you:
• Switch to another channel. Switching channels will cause your DVR to begin buffering the
program you just tuned in and remove the previous program stored in the buffer.
• Record a program. When you press Record on your remote control, or when a scheduled
recording begins while watching live TV, your DVR will clear the buffer and start recording at the
moment you selected to record.
• Turn off your DVR. When you turn off your DVR, it clears the buffer.
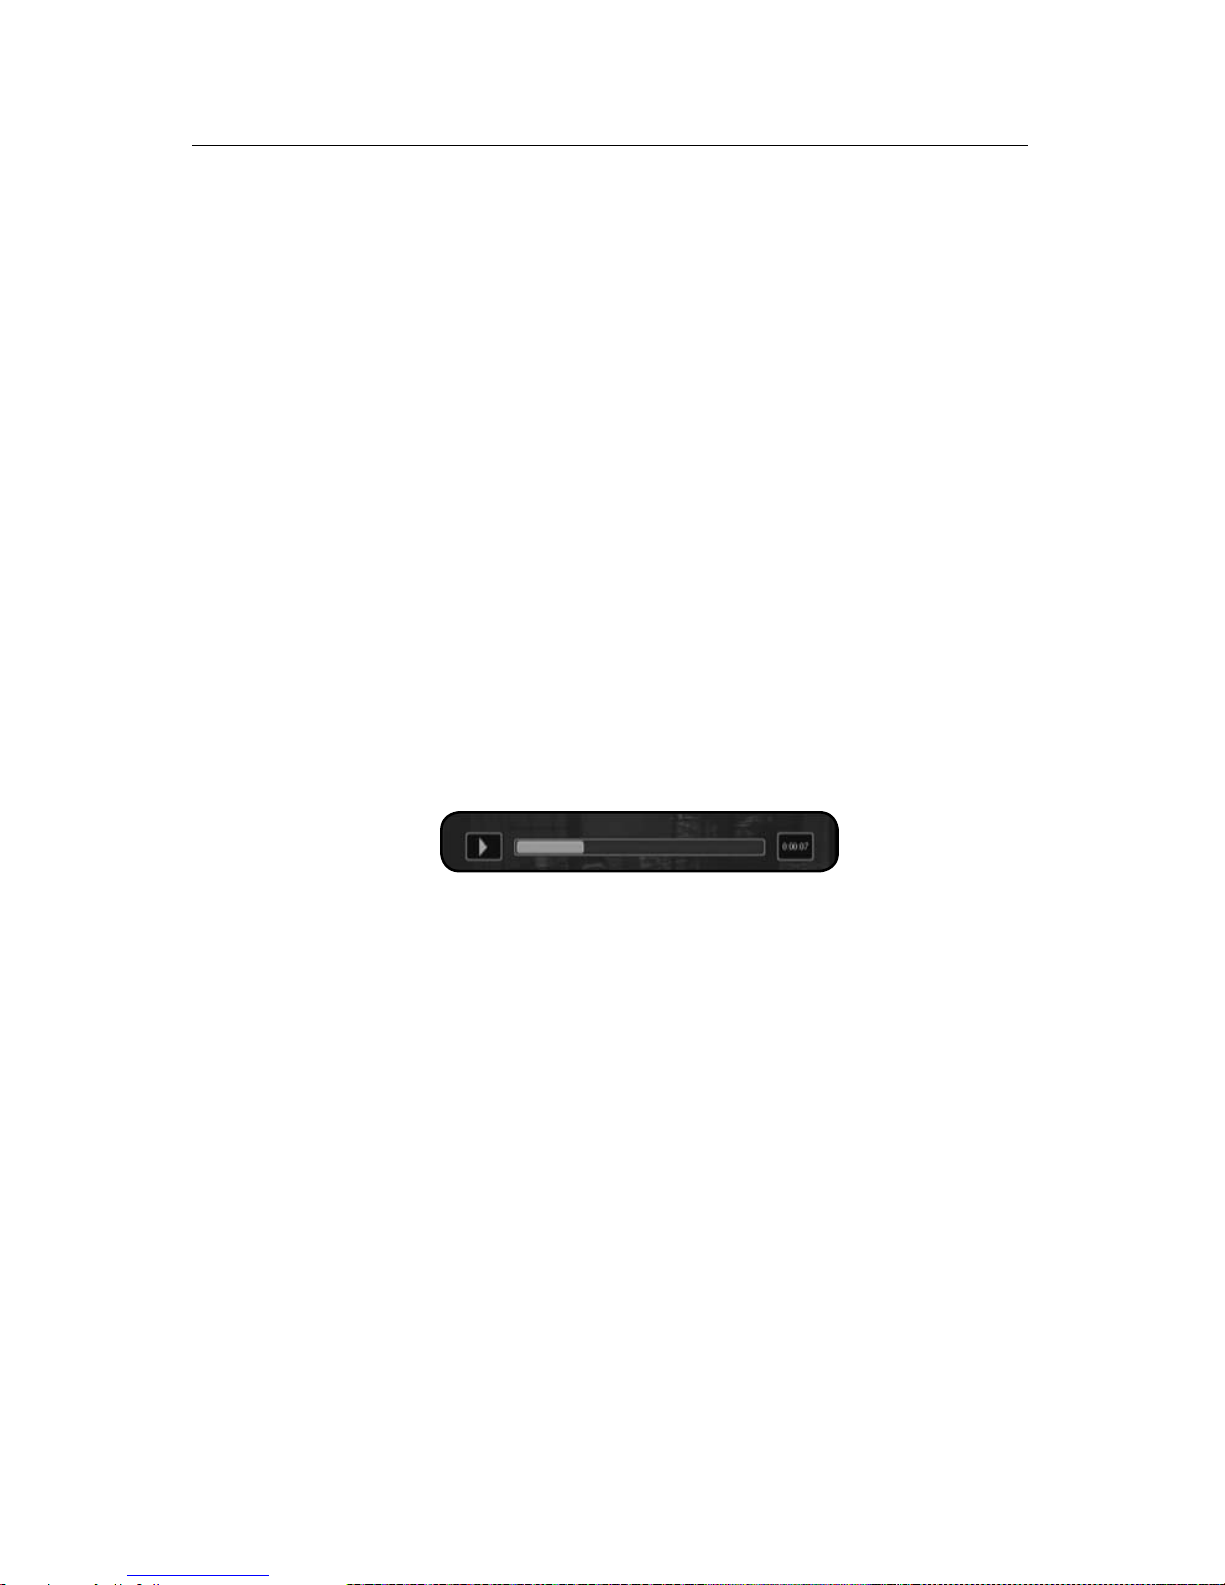
Status Bar
The Status Bar appears whenever you use a playback control such as pause, fast-forward or
rewind. The status bar also provides you details about the program you are watching.
Pause a live program
Use Pause to freeze the program you are watching. Programs will remain in pause for up to 2 hours.
1. Press Pause to freeze the program.
2. Press Play to resume watching at normal speed.
Rewind or Fast-forward a live program
You can rewind or fast-forward at four different speeds: 2x, 15x, 50x or 300x.
1. Press Rewind or Fast-forward up to four times to increase the speed. The status bar at the
top of your screen will indicate the speed you have selected. You will see 2x, 15x, 50x or 300x
when you rewind or fast-forward.
2. You can only fast-forward up to the point of the live TV program. You cannot fast-forward ahead
of live TV.
3. Press Play to resume watching at normal speed.
Catch up to the live TV program
When you pause or rewind a live TV program, you can choose to either watch the buffered
program or catch up to live TV by pressing Fast-forward on your remote.

12
Record and play back programs
Your SureWest DVR can record up to 88 hours of SD programming or up to 18 hours of HD
programming. Storage space will depend on the type of content you are recording, (HD or SD).
To record a single program
a. While watching TV. Press Record on your remote. The
channel information bar will appear with a record notice on
the top right hand side of the information bar.
b. While in the Program Guide. Highlight a program and
press Record on your remote. A red dot will appear next to
the selected program title verifying your recording selection.
c. Record a future single program. Use the cursor keys on
the remote to move forward in the program guide. Highlight
a program and press Record on your remote. A red dot
will appear next to the selected program title verifying your
recording selection.
d. Record two programs at the same time. Press the
guide button on your remote and scroll to the first program
you want to record and press the record button on
your remote. Now using your remote scroll through the
programming guide to choose the second program you
would like to record at the same time. Press the record
button on your remote. A red dot will appear next to both
selected programs verifying your dual recording selections.

13
Series recording
SureWest DVR makes it easy to record every episode of your favorite program. With the Series
Record feature you can schedule recordings of your favorite program by title, date or time. You
can choose to have all episodes record or just new episodes. Series Record gives you the ability
to choose which channels to record, whether to record in SD or HD and whether to start the
recording early or end the recording late.
a. Schedule a Series Recording while in the
program guide.
1. Scroll to the program that you would like to schedule
a Series Recording for and press OK on your remote
control.
2. A Pop Up screen will come up asking you what would
like to do.
3. Scroll to and select
Record Series.
This will schedule a series recording for all episodes of
this program.
b.
Edit a Series Recording. On your remote control press
Menu, scroll to DVR and press OK. Now scroll to and
select Schedule Priority. Now choose the series you
would like to edit and press OK. You will now see a pop
up box that allows you to edit the selected series. Scroll
down to Edit Series Recording and press OK.
1. On the Channels options you can specify whether you
want this series to be recorded on all channels that it
may air on or only specific channels.
2. In the
Preference option you can choose whether you
would like your DVR to record this series in Standard or
HD (High Definition).
3. On the Episodes option you can choose to record all
episodes or new episodes only.
4. The Pad In option allows you to have a series recording
start earlier than scheduled in the program guide. You
can choose to begin recording your program 0, 1, 5, 30
or 60 minutes earlier than scheduled in the guide.
5. The Pad out option allows you to have a series
recording end later than scheduled in the program guide.
You can choose to extend the recording time by 0, 1, 5,
30 or 60 minutes past the originally scheduled end time.
This feature is great when recording a sporting event that
may go into overtime.
6. The
Limit To option allows you to limit your series
recordings to all episodes, 1 episode, 5 episodes or
10 episodes.
DVR Functions

14
Conflict Management
With Conflict Management you can effectively manage your recordings to ensure you never
miss out on an episode of your favorite program. When you schedule multiple recordings that
conflict due to date and time a pop up screen will appear advising you of the recording conflict.
Within this pop up screen you will have the ability to resolve the conflict by choosing to leave the
original recording as previously scheduled or selecting to record the new episode.
Simply scroll to the conflict management box and press OK. The program that will not be
recorded is highlighted in green. To change the cancelled recording, scroll through the program
titles and press OK when the program to be cancelled is highlighted in green. Now scroll to OK
and press the OK button on your remote control.
If you have a Series Recording scheduled and choose to
cancel a single episode due to a conflict, this will not affect
future episodes. Those will record as previously scheduled.
Schedule Priority
With your DVR you can easily change the recording priority of your scheduled recordings. The
schedule priority feature allows you to edit and delete scheduled recordings and series recording
schedules.
To prioritize your recordings press Menu and select DVR.
Scroll to and select Schedule Priority. Scroll to an asset and
press OK on your remote control, you will get a pop up box
asking you to choose an action. Select Move Down to move
a specific title down in the priority list. To move an asset up or
down multiple spaces in the priority list you will need to repeat
this process one time for each space you want an asset moved.

15
Play back a recorded program
On your remote control press Menu, then select DVR from the menu bar. Scroll to Recordings
and highlight the program you wish to view and press OK. Select Play Recording and press OK
on your remote. From this menu you also have the option to:
• Play Recording. Select this option to play the highlighted program.
• Lock. By selecting this option the highlighted program will not be deleted automatically. To
unlock the program go back in this screen and select Unlock.
• Delete Recording. Selecting this option will delete the highlighted program. Once selected
you will be prompted to confirm your action.
• Cancel. Returns you to the main DVR screen.
DVR Main Screen
The DVR Menu Screen is accessed by selecting the DVR
icon within the main menu. The DVR Menu Screen displays
scheduled recordings, recorded programs available for viewing,
recording history and DVR storage capacity.
DVR hard drive space is viewable on the DVR Menu Screen to
assist you in effectively managing your DVR recording capacity.
a. Recordings. A listing of all recorded programs available
for viewing.
1. All. This option allows you to view all recorded assets.
2. Title. This option allows you to sort all recorded assets
by title in ascending or descending order.
3. Date. This option allows you to sort recorded assets
by ascending or descending dates.
4. Channel. This option allows you to sort recorded assets
in ascending or descending order by channel number.
5. Viewed/Not. This option allows you to sort recorded
assets by viewed or not viewed in order of newest to
oldest.
6. When your DVR has multiple recordings with the same
title they will be grouped by title. Each recording will be
consolidated and only one entry will be listed with that
title followed by a count of the recordings. If you scroll
to a title that has multiple recordings press OK on your
remote to sort these recordings by Date, Channel,
Viewed/Not.
DVR Functions

16
DVR Main Screen continued
b. To Record. A listing of programs scheduled to be recorded.
1. All. This option allows you to view all scheduled
recordings.
2. Title. This option allows you to sort all scheduled
recordings by title in ascending or descending order.
3. Date. This option allows you to sort scheduled
recordings by ascending or descending dates.
4. Channel. This option allows you to sort scheduled
recordings in ascending or descending order by
channel number.
5. Skipped/Not. This option allows you to sort scheduled
recordings by skipped or not skipped in order of newest
to oldest.
c. Schedule Priority. Here you can prioritize your
scheduled recordings, edit a series recording or cancel
a series recording.
d. Schedule Event. Schedule a future single recording or a
series of recordings from this screen.
e. Record History. Displays the history of scheduled
recordings. The DVR stores a history of recorded events
such as record start, record stop, and record delete.

17

Frequently Asked
Questions

19
Questions about your SureWest DVR
Where can I find details on how to install my DVR?
Installation information is found in the Let’s Get Started section of your DVR manual.
I have questions about my DVR and would prefer to speak with a Technical Support
representative.
Please call 1-866-SureWest and follow the prompts for current customers.
How many hours of programming can I store in my DVR?
The total number of recording hours will depend on the mix of SD (standard-definition)
or HD (high-definition) programs you have recorded. On average you can store up to
18 hours of HD programming and up to 88 hours of SD programming.
Can I view and record HD programming with my DVR?
Yes. Your DVR supports both SD and HD formats. A subscription to SureWest HD Life
and Digital Choice or higher is required to view and record HD programming.
Do I need to have my DVR connected to a telephone line?
No. Your DVR updates through the Ethernet connection
What happens if my DVR temporarily loses power?
All recordings saved prior to the power loss will be saved, as well as your future recording
schedules. Recordings that are set to record during the power loss will be missed.
If the power goes out, will my Parental Control, Favorites, Users Settings, Reminders
and Auto Tunes be saved?
Yes. These settings should not be lost if your DVR loses power.
Questions about recording and playing back programs
How many channels can I watch and record at the same time?
You can watch one program while recording two others as long as the program you are watching
is one of the two being recorded. You may also record two programs and watch a previously
recorded program at the same time.
Can I watch a show I’m recording before the recording has completed?
Yes. You can either watch the program live as it is being recorded, or you can rewind the
program to the beginning and watch it while it continues to be recorded.
What if the program I record runs beyond the time on the program guide?
Extend the amount of recording time in the Schedule Event screen with the pad in/pad out feature
to anticipate for example, a sporting event running over its originally scheduled time frame. If a
game is scheduled to play for two hours, you can add minutes in the Schedule Event screen with
the Pad In/Pad Out feature.
Can I record On Demand programs?
No. Your DVR does not record On Demand (VOD and SVOD) programs. Keep in mind that On
Demand programming can be watched over a specified period of time and you have the ability
to start it any time you choose.
Frequently Asked Questions

20
If I have a home theater will my DVR record a program in Dolby Digital 5.1®?
Yes. If the program is broadcast in Dolby Digital 5.1® the program will be recorded with Dolby
Digital 5.1®. If the program is broadcast in analog sound, the recording will also be in analog
sound despite your home theater’s audio connection to your DVR.
What picture format will my DVR record programs in?
Your DVR will record the programs in the same format they are broadcasted in.
Can I increase the rewind and fast-forward speed?
Yes. Your DVR has the ability to rewind and fast-forward at four speeds when viewing live TV or
recorded programming: 2X, 15X, 50X and 300X. Each press of the rewind or fast-forward button
increases the speed. The speeds will appear in the status bar as 2X, 15X, 50X and 300X.
Does my DVR record any of the menu bar, on-screen program guide, audio volume
changes or anything else that appears on the screen when I am using my remote control?
No. Your DVR only records the audio and video of the program you are recording.
A recording may start a minute or more after the program has begun. Why is this?
Your DVR is synced with the TV listing and if a network starts a program earlier than on the
program guide the DVR will miss that time unless you program your DVR to record earlier.
Only a part of my program was recorded. Why?
If the beginning of the program did not record, you may have tuned in after the program had
begun. If the end of the program did not record, it could be your DVR has reached its content
storage capacity. Another reason could be loss of power or digital TV signal during the recording.
Questions about managing your recordings
How long can I keep my recordings?
You can keep them as long as you want. Lock the programs you do not want auto-deleted. You
may need to erase some locked recordings to make room for others if storage capacity becomes
an issue.
Does my DVR automatically erase programs to make rooms for new ones?
Yes. Your DVR will automatically erase programs when space is needed. Your DVR will delete the
oldest recordings first.
Can I erase part of a recorded program?
No. Your DVR can only erase the program in its entirety.
How many future recordings can I schedule?
You can set as many future recordings as you want provided you have the necessary
storage capacity.
Do Parental Controls work with my DVR?
Yes. Your Parental Controls will restrict what is viewed or recorded. If you schedule a recording
for a program or channel that is blocked the program will record but the video will not appear
and the audio will be muted. You will need to enter your PIN to view the program while it
is being recorded.
Frequently Asked Questions


1.866.SureWest
surewest.com
10050.159 CA DVR Manual Nov08
 Loading...