

Page 1
1
Page 2

is manual is version 1.0 and the most up to date version
at the time of printing. For any updates please visit our
website www.sureshotgps.com
2
Page 3

Quick Start Guide to the Sureshotgps
TM
Micro 300X
Thank you for purchasing the Sureshotpgs Micro 300X. For
your convenience the 300X is preloaded with maps and ready
for immediate use. It is highly recommended that you register
the device for warranty purposes and software upgrades.
What’s included:
■ Micro300X
■ Quick start guide
■ Mini USB cable
■ AC/DC adaptor
3
Page 4

Tabe of Contents
Front page 1
Manual version 1.0 2
Quick Start Guide to the Sureshotgps
Getting to know your Sureshotgps
1.0 Prior to use 7
1.1 Charging 7
1.2 Registering 7
2.0 Ready to Play 8
3.0 Main Menu 9
3.1 Automatic Course Recognition 10
4.0 Hole Selection
4.1 Automatic hole advance (AHA) 11
4.2 Selecting your start hole 11
4.3 Play Golf (Green View) 11
TM
Micro 300X 3
TM
4
6
Page 5

5.0 Page information 12
5.1 Scorecard 12
5.2 Editing Par and Score 12
5.3 Shot Distance 13
5.4 Edit Course 14
6.0 Settings Menu 15
6.1 Metre/Yard Option 15
6.2 ResetRound Time 16
6.3 Backlight Value 16
6.4 Auto Shuto 17
6.5 Auto Hole Advance 17
6.6 Set Time Zone 18
6.7 Set Time Format 18
6.8 Odometer 19
6.9 Device Info 19
7.0 Sureanalysis Soware 21
7.1 System Requirements 21
8.0 FAQ’s 22
9.0 Limited Warranty 23-25
10.0 Declaration of Conformity 26
11.0 Soware Licensing 27
5
Page 6
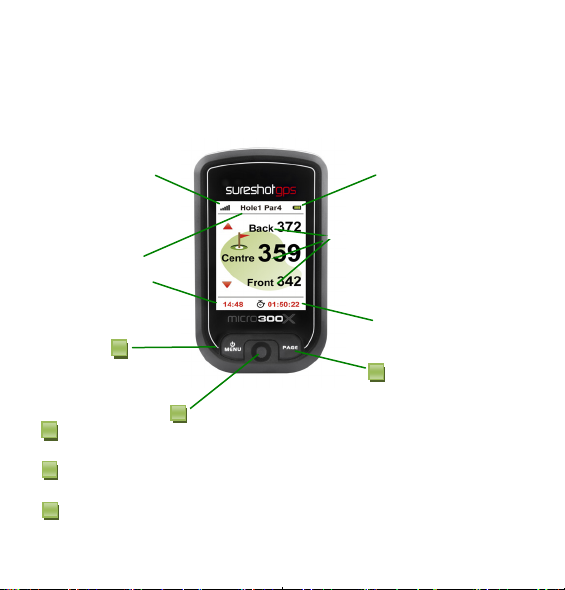
Getting to know your Sureshotgps
1
2
3
1
2
3
TM
Satellite Signal
Hole & Par
Time
Menu/Power Key: To power on/o Micro300X and access main menu.
Page Switching Key: To switch between displayed page, set starting
point of shot distance and correct course data.
Navigation 5-way key
6
Battery Status
Relative distance between
current position (from
satellite) and putting green
(centre, front and back)
Timer
Page 7

1.0 Prior to use
1.1 Charging
It is important that the battery has been charged before use.
Using the USB cord provided, plug the USB connection
into the charging port on the back of the unit [under rubber
cover]. Now plug the other end into the wall adaptor. You can
now plug the wall adaptor into a power outlet to begin charging. Full charging will take at least 4 hours.
1.2 Registering
It is recommended that you register your Micro 300X for
warranty purposes. Follow the easy instructions at
www.sureshotgps.com/register. Upgrades to soware will
only be possible if you have registered.
7
Page 8

2.0 Ready to Play
Your Micro 300X comes preloaded with Australian & New
Zealand Golf Courses. To make it easy to nd courses, the
unit will automatically display the ve closest golf courses
to your location. You can then select the course you want to
play. NOTE: this feature only works once you arrive at the
golf course and has GPS reception.
8
Page 9
3.0 Main Menu
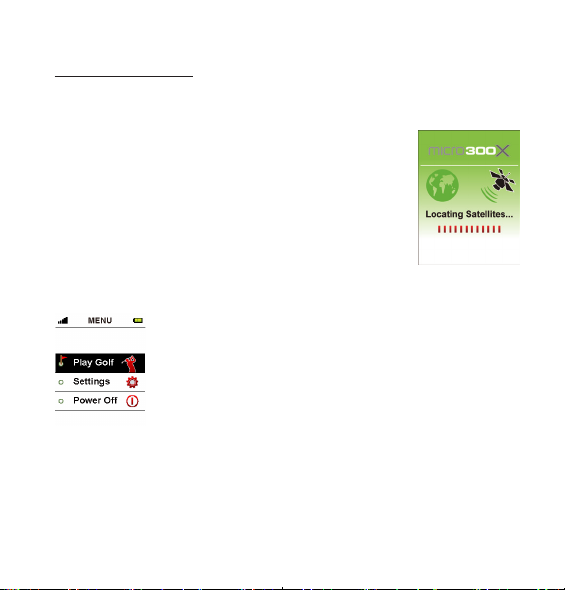
Hold the Menu button down for 3 seconds until the
unit is turned on.
e GPS will begin searching for satellites as shown
in the picture. To skip this and go straight to the main
menu press the Menu button.
In the main menu you will see 3 options:
<Play Golf>, <Settings> and <Power o>, use the
5-way key to move from one option to another. To
enter push down on the Middle of the 5-way key.
9
Page 10
3.1 Automatic Course Recognition
For best GPS reception always ensure you are in an open area.
When you are at the course select Play Golf.
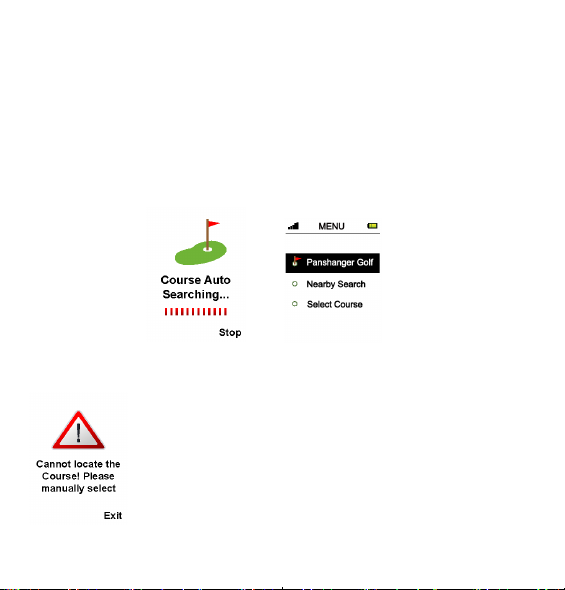
The Micro 300X’s Auto Course Recognition will highlight the
closest 5 courses to you. You can choose from the courses displayed,
or < Select Course > to choose your own course from the course list.
If there are no courses located, the device willl show
the error message shown on the left. Please press the
Middle of the 5-way key to get into the courses list
where you will be able manually select a course you
are interested in. After you select a course, you willl
automatically move to the Play Golf page.
10
Page 11
4.0 Hole Selection
4.1 Automatic hole advance (AHA)
is feature allows you to move around the golf course
without having to change the hole you are viewing. It
can be turned on or o. e AHA requires the unit to go
within 29m of the centre of the gree and then move away
31m from the centre of the green- the Micro 300X will
then advance to the next hole. You can manually select a
hole by turning o this feature o in the Auto Hole
Advance option in settings.
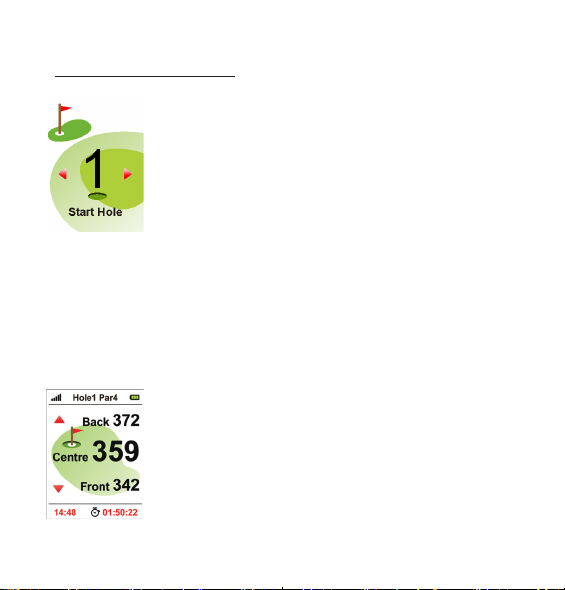
4.2 Manually selecting your start hole
Please choose the hole that you would like to start at. You
can do this by pressing Right/Le on the 5-way key. Press
the Middle key to see information about the hole.
4.3 Play Golf (Green View)
is display willl show you the relative distances between
you and the Front, Centre and Back side of the putting
green. Press Up/Down on the 5-way key to switch holes.
11
Page 12
5.0 Page Information
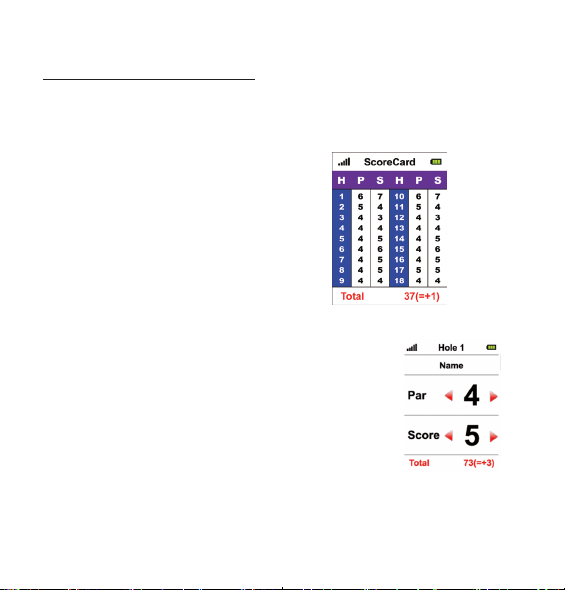
In Play Golf, press right of the 5 way key to access Scorecard at
any time throughout the round.
5.1 Scorecard
Scorecards provide relevant information to
the fairway. It will display hole number, par
and scores. e Micro 300X automatically
calculates total value and the dierences
between par and your score. Press Le on
the 5 way key to go back to Play Golf.
5.2 Editing Par and Score
Press the Middle of the 5-way key to edit Par and
Score. Use Up/Down key to switch between the two
and the Right/Le key to edit the score.
Once you have entered your par and score press the
middle key again to return to Scorecard. To return
to Play Golf press Le of the 5 way key.
12
Page 13
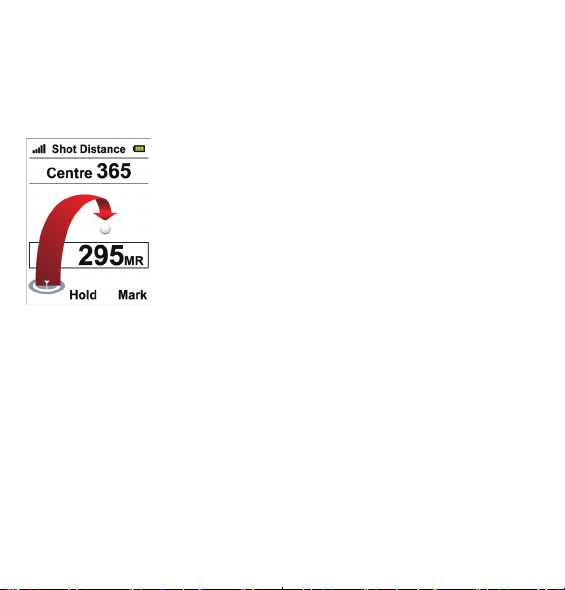
5.3 Shot distance
In Play Golf press right twice on the 5 way key to
access the Shot Distance page. The Shot Distance
function can let you measure your shot distance
easily and precisely. When starting your shot,
press the Page key to set your current position,
the value will be reset to 0. While walking to your
ball the screen will display the distance from the
start point to your current position instantly.
Press Up/ Middle key to hold the distance calculation for <End>.
To start a new measurement, press Up/ Middle key to release from
<HOLD> and press Page to reset for a new start point. You can use the
pointer of swing distance function to make an easy measurement on the
distance between any two points on the course.
13
Page 14
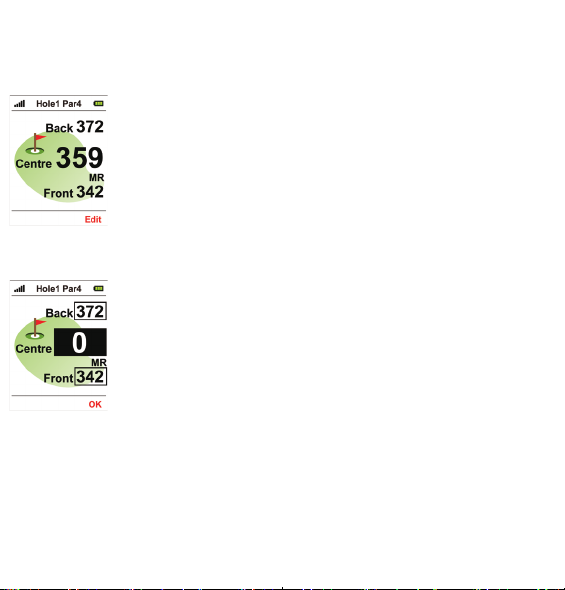
In Play Golf press le on the 5 way key to access the Edit Course page
5.4 Edit Course
GPS green location information is determined on the actual course
situation when the information is collected. In the event the green
location has had some changes, you can use this function to edit
it. In the Edit Course page, please press the PAG E key and select
<Edit>, you should see a black mark on the screen. Press the
Up/Down key to switch focus to the location you would like to
calibrate, then press PAG E key to conrm the change.
For example, if you are going to correct the distance of the green
centre on the rst hole, please press the Up/Down key to choose
the rst hole on the Green View page aer you get to the green
center; then press Up/Down key to switch the focus to the green
center column, and press PAG E to reset as <0>, which means the
distance between you and the green center is 0.
You can also use Up/Down key to choose the Front or Back side
of the green to mark corrections continuously aer nishing the
correction on green center distance.
e above method is available when you want to correct the Front,
Center and Back side of putting green of any course. However you
need to move to the Front, Center and Back side of green prior to
corresponding corrections. To return to Play Golf press Right of
the 5 way key.
14
Page 15
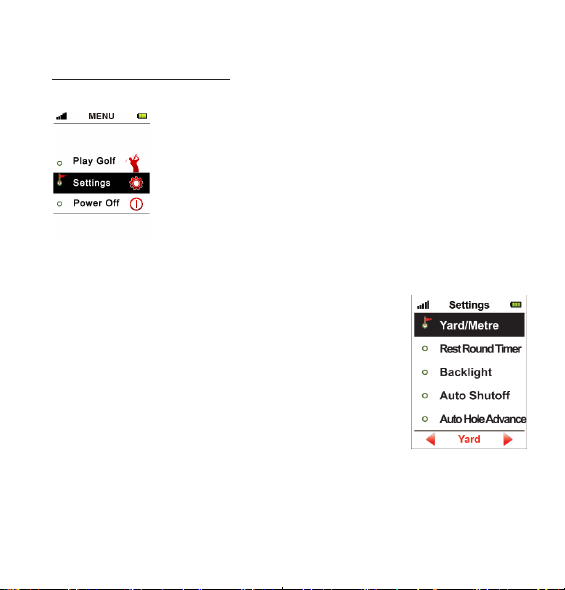
6.0 Settings Menu
From the Main Menu, select
Settings by pressing the Middle
button on your 5-ways key.
6.1 Metre/Yard Option
e distance unit is preset to Metre. If you want
to change it, you can choose <Yard/Metre>
on the settings menu and use the Right/ Le
key to change the unit setting. Press Menu to
return to the Main Menu.
15
Page 16
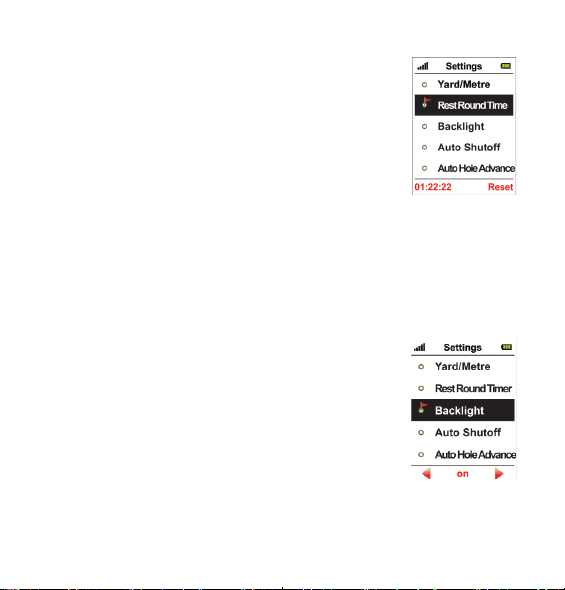
6.2 Reset Round Time
e device provides you a simple timer to help you
record the time spent in the Play Golf section aer
locating a satellites. You can reset the timer to zero
at any time by selecting < Reset Round Time > and
pressing the Page key, the timer will then return to
zero. If you want to know present play time during a
play, please go to the Green View page. Press Menu to
return to the Main Menu.
6.3 Backlight
is device provides an <Auto Backlight O> function
to save power. If any key is not touched for a specic time
period the screen will turn to dark automatically. Using
the Right/Le key you can increase or decrease the
backlight duration. ere are several selections to choose
from: 1min, 3min, 10min, 30min and on
(backlight always on). Press Menu to return to the
Main Menu.
16
Page 17
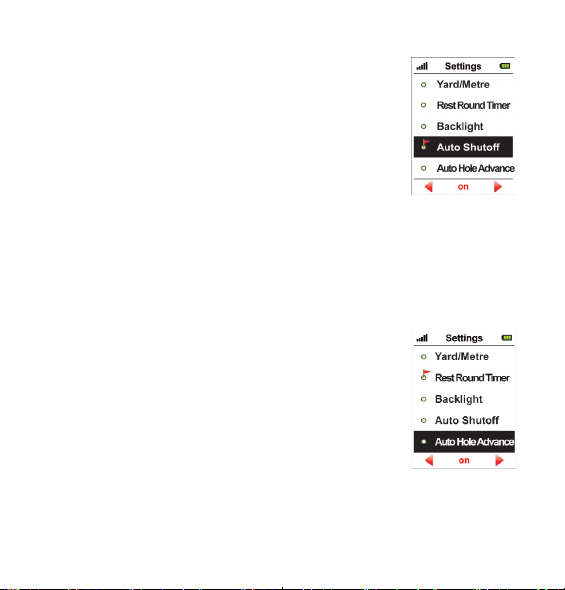
6.4 Auto Shuto
is device provides an <Auto Shuto> function to
save power. If you set the power timeout, the device
will turn o automatically aer the timer if you don’t
touch any key for the set time period.
To set press the Right/Le key to change the settings.
You will have several selections to choose from: On,
30min, 40min, 50min, 60min,70min, 80min, 90min,
100min, 110min ad 120min. Press Menu to return to
the Main Menu.
6.5 Automatic Hole Advance
Once you have nished putting and are walking to
the next hole, the device will automatically advance
on to the next sequent hole as you move around the
course. You can turn on/o this function by pressing
the Right/ Le key in <Auto Hole Avance> under set-
tings. You can then manually select the hole as you are
golng. Press Menu to return to the Main Menu.
17
Page 18
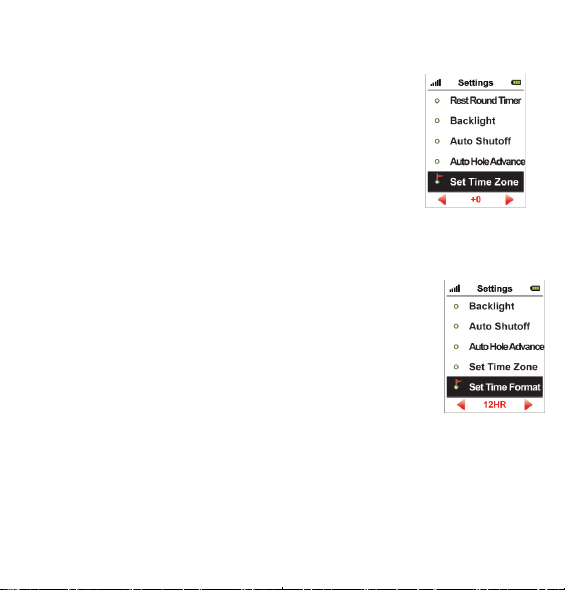
6.6 Set time Zone
e device will set the present time zone automatically
according to relevant data of GPS satellites. You can
adjust the time zone of your location if needed by
entering <Time Set Zone> and using the Right/Le key
to increase or decrease the times. Press Menu to return
to the Main Menu.
6.7 Set Time Format
Directly under <Time Set Zone> you will see the <Set
Time Format>. Change the time format from 12 or 24
hours by using the Right/ Le buttons on the 5-way key.
Press Menu to return to the Main Menu.
18
Page 19
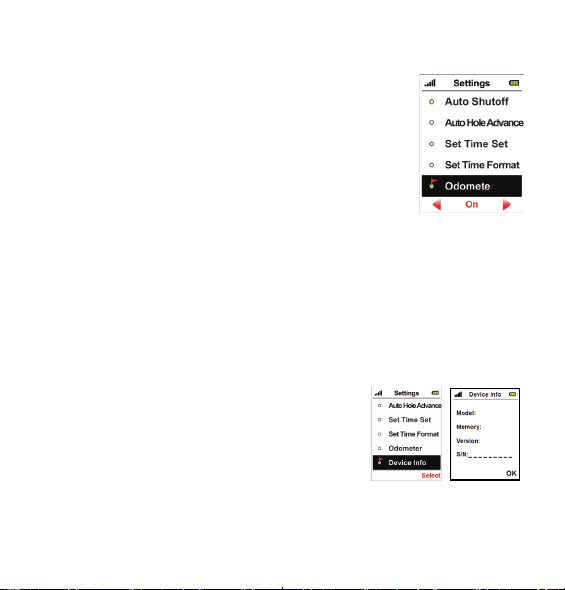
6.8 Odometer
e device provides an odometer option so you can
track the distance you cover. You can turn this function
on or o by pressing Right/Le on your 5 way key.
6.9 Device Info
You can check model, soware/ hardware version and product
serial number (S/N) of the Micro 300X by selecting <Device
Info> and then pressing Page. You can go back to the Setting
Menu by pressing Page again.
19
Page 20

7.0 Sureanalysis Soware
Sureanalysis (300X soware) allows you to update the course
library on your Micro 300X. Even though the Micro 300X comes
with courses pre-loaded, we are continually updating our course
library by adding new courses and updating existing ones.
Sureanalysis allows you to keep your 300X updated with the
latest course data.
You can also perform rmware upgrades to ensure that your unit
is functioning at its optimal level. Download the Sureanalysis
soware by visiting our website and go to the Download Soware
page. Follow the easy instructions: www.sureshotgps.com/downloads
7.1 System Requirements
Compatible with Windows XP, Vista (32 & 64 bit) and Windows 7.
Micro 300X is currently not compatible with Apple Mac as at
October 2012. Please check our website for any updates of this status.
Otherwise please use one of the above systems.
20
Page 21

8.0 FAQ’s
Who can help me with technical questions & support? Our friendly team is available
on email at [email protected] It is recommended you email your request
rather than returning to the place of purchase for the fastest response to your enquiry.
Q1- How do I download or update my courses?
SureAnalysis works only in conjunction with our website.
1. Make sure your Micro is plugged into the PC during the installation of the soware
2. Select Sureanalysis and then click Uninstall. If you are prompted for an administrator
password or conrmation, type the password or provide conrmation
3. Visit the link below and follow the prompts on the website to download the latest
version hhtp://www.sureshotgps.com/download.php
4. If you are still experiencing problems downloading soware contact
Q2- e Sureshotgps website will not display properly.
Delete your temporary internet les and cookies. To do this, follow these steps;
-Click Start, point to Settings and then click Control Panel
-Double click on Internat Options
- Click the temporary internet les, click the Settings button
-en click the Delete Cookies button and conrm this decision by clicking Yes at the
next prompt
-Next click the Delete Files button and conrm this decision by
clicking Yes at the next prompt.
21
Page 22

9.0 Limited Warranty
Sureshotgps™ Pty Ltd (“SS”) warrants the Micro 300X device delivered in
this package will be free from material defects for two (2) years following the
date of purchase from SS or its authorised reseller. e accessories included
in the package including USB cable and Wall charger, are covered for
material defects for one (1) year. For the purpose of this warranty, “material
defect” means any defect in a SS product that can be reproduced by SS and
is a substantial nonconformity from the published specications for such
product. SS shall not be responsible for any loss or damage whatsoever
resulting from any defect in or associated with its products which occur or
are notied by the purchaser to SS or its authorised repairer more than one
year form said date of purchase.
is Limited Warranty does not apply to normal wear and tear or if any
component of the Sureshotgps hardware is opened or repaired by an
unauthorised person or company, and does cover repair or replacement
of any Sureshotgps hardware damaged by: MISUSE, MOISTURE OR
LIQUIDS, EXPOSURE TO HEAT, ACCIDENT, ABUSE OR NEGLECT.
Dropping your Micro 300X can permanently damage the receiver, which is
not covered under the terms of the Limited Warranty.
is Limited Warranty does not cover physical damage to the surface
of the Sureshotgps, including cracks or scratches on the LCD screen.
22
Page 23

9.0 Limited Warranty Continued
Neither the manufacturer or distributor or reseller shall be responsible
for data that may be damaged or lost at any time. As the SS may gain
information either through USB or wireless technology, we cannot
guarantee the successful transmission of information.
is Limited Warranty does not extend to any defects which have been
caused or contributed by neglect, misuse or accident, nor in respect of
product which has been altered by other than authorised SS personnel
or its authorised repairers. e determination as to whether the terms
of this warranty are to apply to returned products is within the sole
discretion of SS or its authorised repairer. Provided any returned
product is determined to be covered by this warranty, SS or its
authorised repairers shall at SS’s sole discretion, repair or replace, free
of charge, any products or parts thereof.
In no event whatsoever shall SS be liable for any incidental, special or
consequential loss or damage resulting from the purchase and/or use
of its products howsoever caused and howsoever claimed. Any liability
on SS under this warranty in respect of any repair and /or replacement
and/or any action involving any of its products shall be limited to and
not exceed the purchase price of the product in question. e terms of
this warranty are subject to relevant provisions of any Federal, State or
Municipal law. Any dispute or action in relation to this warranty or the
construction of it shall be subject to and conducted in accordance with
the laws of Victoria, Australia.
23
Page 24

9.0 Limited Warranty Continued
Before returning any product, contact the SS Customer Support Group
and obtain an RA number. Visit the Sureshotgps™ web site www.
sureshotgps.com for support contact details. If the Customer Support
Group veries that the product is likely to be defective they will issue
an RA number to place on the outer package in which the product will
be shipped. SS cannot accept any product without an RA number on
the package. Warranty returns must also be accompanied by a copy
of the dated proof of purchase. Deliver the product along with the RA
number to SS. If you ship the product you must assume the risk of
damage or loss in transit.
You must use the original container (or the equivalent) and pay the
shipping charge. SS may replace or repair the product with either a
new or reconditioned product and the returned product becomes SS’s
property.
SS warrants the repaired or replaced product to be free from material
defects for a period of the greater of (i) ninety (90) days from the return
shipping date; or (ii) the period of time remaining on the original one
(1) year warranty.
If there is any inconsistency between this Limited Warranty and any
Warranty included in the packaging of the Sureshotgps, the provisions
of this Limited Warranty shall apply.
24
Page 25

10.0 Declaration of Conformity
We, Sureshotgps™ Pty. Ltd declare under our sole responsibility that the
Sureshotgps™ conforms to all world standards of compliance.
Sureshotgps™ Pty. Ltd. operates a policy of continuous development.
Sureshotgps™ Pty. Ltd. reserves the right to make changes and improvements to the Sureshotgps™ and any other of its products without prior
notice.
e contents of this document are provided “as is”. Except as required
by applicable law, no warranties of any kind, either express or implied,
including, but not limited to, the implied warranties of merchantability and tness for a particular purpose, are made in relation to the
accuracy, reliability or contents of this document. Sureshotgps™ Pty.
Ltd reserves the right to revise or withdraw it at anytime without prior
notice.
25
Page 26

11.0 Soware licensing
is product contains embedded soware. You have a non-exclusive,
non-transferable right to use the soware only as embedded in the
hardware and may not copy, disassemble or attempt to reverse
engineer the soware or use it on any other hardware.
e soware includes soware supplied to SS by third parties
(“Suppliers”) which is provided without warranty by such
Suppliers. e soware is owned by SS or its Suppliers and is
protected by copyright laws and laws protecting trade secrets,
intellectual property and condential information.
26
Page 27

27
 Loading...