

User Instructions
Radio Collar Dog Fence
Sureguard
POWER INNOVATIONS - 114 Keen St, Lismore NSW 2480. ABN: 82 337 837 213
Manufacturer of Sureguard Animal Containment Systems.
“Sureguard” is a Registered Trademark
POWER INNOVATIONS -
Manufacturer of Sureguard Animal Containment Systems.
114 Keen St, Lismore NSW 2480. ABN: 82 337 837 213
“Sureguard” is a Registered Trademark

Contents
1
2
3
5
6
8
9
Kit #600 - Contents
Introduction
How to Setup Your Boundary Wire
Example #1 - Full Boundary
Example #2 - Single Boundary
Example #3 - Customized Boundary
Wiring Techniques
Solving Boundary Wire Faults
The Radio Collar Receiver
How to Switch Between Training Mode and Containment Mode:
How to Adjust the Activation Distance:
What is the Alert Indicator?
What is the Escape Indicator?
Battery Installation
Collar Size Adjustment
Collar Maintenance
Problem Solving Collar Faults
Training Your Dog to the Warning Sound
Training Method:
General Training Principles and Procedures:
4 Boundary Wire Transmitter
Boundary Wire Connection:
Power Source:
Control Panel:
Activation Distance - Selection Guidelines:
Testing the Selected Activation Distance:
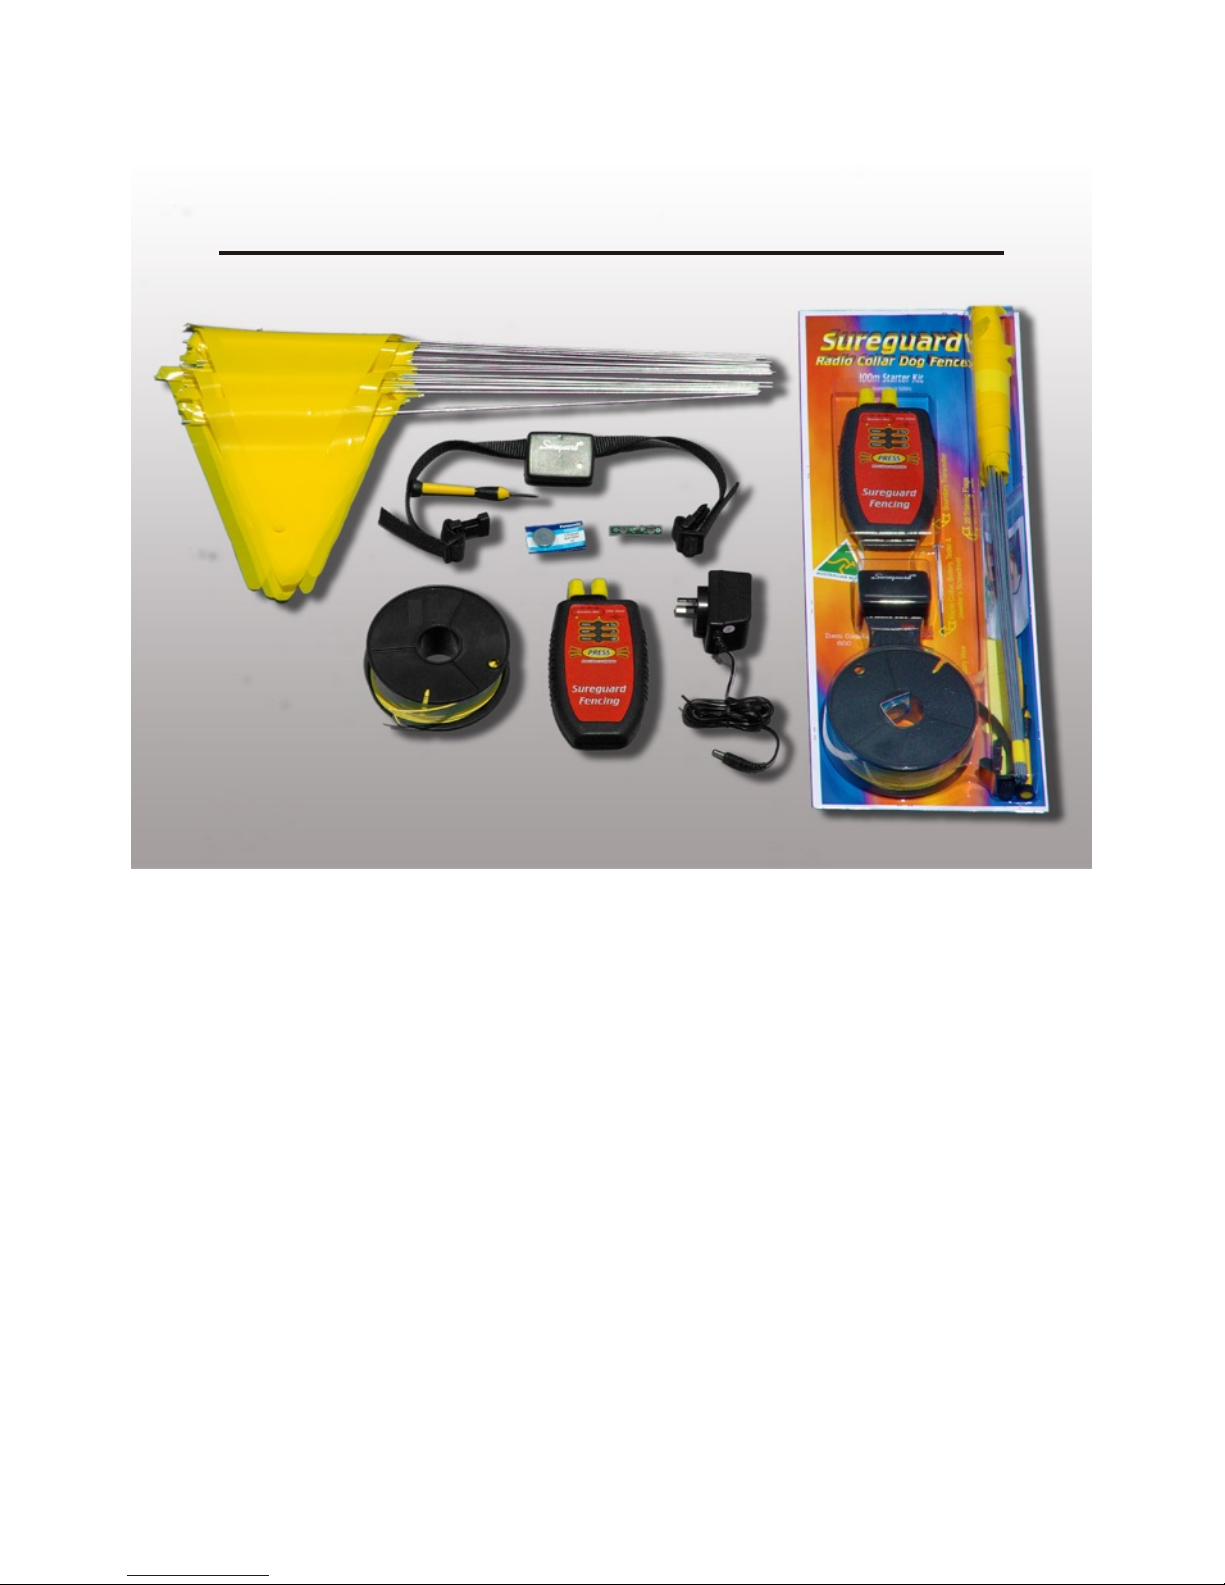
Kit #600 Contains:
Radio Collar (1)
Transmitter (1)
Mains Adapter (1)
Boundary Wire (100m)
Training Flags (20)
Collar Accessories:
- Battery, Screwdriver, Correction Tester
1

Frustrated by your badly behaved dog?
Can't stop your dog climbing or jumping over your fence?
Perhaps your dog is a digger, tunnelling under fencing or charging around your garden beds digging holes where
you don't want them or ripping out your plants?
Maybe your dog simply walks out of your driveway?
The Sureguard Radio Collar Dog Fence is a convenient solution to all these problems. Ideal for acreage properties! So highly
effective, you'll wonder why you didn't install it sooner!
Is this like an Electric Fence?
No, it is very different! There is no electrified wire to touch and the system
can be made completely invisible.
The system has two parts: a boundary wire connected to a radio
transmitter device, and a radio collar receiver worn by your dog. The
transmitter sends a signal to the receiver whenever your dog is near the
boundary. Your dog does not touch the boundary wire; the wire simply
defines the location of the boundary using the radio signal. You can place
the boundary wire almost anywhere to create a "no-go" area. Locate it, for
example, along an existing fence-line at the base of the fence, around
garden beds, across lawn areas, across open driveways and gateways.
Usually the wire is placed on the ground but may be buried to make the
system completely invisible.
How Does it Contain Your Dog?
The Radio Collar is able to give your dog an electrical "correction" on the neck muscles to persuade your dog to remain contained. It is safe
and humane because your dog is always in control of the situation. A warning tone gives your dog an opportunity to back-off and stay
contained without receiving a correction. A correction is given only if your
dog ignores the warning, or will activate instantly if your dog tries to cross
the wire. The correction your dog feels will automatically vary to suit the
situation. If your dog frequently tests the boundary then the radio collar will
automatically increase the intensity of correction. After several days of
correct behaviour the correction level will return to normal.
How Does Your Dog Know to Back Off?
Some initial training develops a "back-off" response in your dog. This backoff response must be triggered by the warning sound emitted by the radio
collar. You will require two consecutive days for training.
Perfect Dog Control!Perfect Dog Control!
Radio Collar Dog FenceRadio Collar Dog Fence
IMPORTANT:
Puppies must already be trained to walk on a leash prior to training.
2

Installation Guide
Installation can be divided into a few simple steps:
1/ Place the boundary wire where you want the barrier.
2/ Adjust the radio collar’s activation distance from this boundary wire.
3/ Train your dog to understand "I hear the warning sound & back away”.
How to Setup Your Boundary Wire
The yellow boundary wire supplied in your kit is used to establish the "no-go" area for your dog. The boundary is a single continuous piece of
wire with each end connected back to terminals on the transmitter device. Your design of this no-go area will be determined by: 1/ the size
and layout of your property, 2/ how you want to control your dog’s behaviour. The following examples show what can be achieved. Contact
Sureguard if you have an unusual or difficult design situation to solve.
Example #1 - Full Boundary
For most installations all you need is a single boundary wire
around the whole property. You can protect garden beds as
illustrated. Notice how the wires are twisted together to run
from the boundary to the inner garden bed (upper right) and
from the boundary to the transmitter device (lower left).
Twisting a pair of wires cancels the radio signal over these
wires. This works because the signal is flowing in opposite
directions in each wire. This method allows your dog to pass
over the twisted wire.
With this simple wiring method you cannot create an opening or
eliminate the signal on the boundary.
The activation distance of the collar from the boundary wire is
mostly constant and is set inside the collar (described later).
Sometimes you may want a shorter distance in a cer tain area
(eg. narrow path between house and fence). A slight reduction
in distance is achieved by raising the wire to the top of the fence.
Example #2 - Single Boundary
This design forms a barrier on one boundary line only. Set the
distance inside the collar to maximum (described later). In the
illustration the wire forms a long rectangle separated by 20cm
to 200cm. The wider the separation, the greater the activation
distance.
Example #3 - Customized Boundary
Use a doubled wire to customize the no-go areas and solve
almost any containment situation. A doubled wire design may
be necessary to: 1/ eliminate the signal in certain areas (eg.
Kennel already fixed in place at a boundary), 2/ vary the
activation distance with location (eg. To accommodate narrow
passages, or house located close to wire).
In this example, the dog is contained to the rear of the property
and cannot pass the lawn areas on the left and right of the
house. All garden beds are protected. However, the twisted pair
around certain section of the fence-line do not emit any signal
(ie. perhaps the fence is already secure there).
Set the collar distance to maximum (described later). Adjust the
separation of the boundary wire to produce the desired
activation distance.
3

(4) Continue
until cap
exudes
adhesive.
WATERPROOF
WIRE SEAL
(Repair Kit #615)
(2) Twist wires
securely.
(3) Fit cap.
Apply heat
evenly to
shrink the cap.
E.g. use a
lighter or flame.
(1) Strip 15mm
(1/2") of
insulation
from each cable.
Boundary Wire Transmitter
Boundary Wire Connection:
The boundary wire is one continuous piece around the containment area. Run both
ends back to the transmitter. Remove 15mm of insulation and twist the exposed
copper. Unscrew each terminal to expose the hole in the shaft. Place the exposed
copper wire into this hole and screw the terminal finger tight. Repeat for the second
terminal and its wire.
Power Source:
Connect the 12 volt mains power adapter into the socket next to the yellow terminals.
Switch on the power adapter at the wall socket. The “Power” light on the front control
panel will start to glow.
The transmitter also has a battery compartment on the back of the case. You have the
option of installing rechargeable backup batteries. The transmitter will charge these
batteries when connected to mains power. Install two “AA” sized batteries of at least
2000mAH rating for a backup operating time of 2~3 days.
Control Panel:
If a fault occurs the “Fault” light will glow and an alarm will automatically sound.
Fix the fault immediately as the collar may not activate properly. Use the following
guide to identify and fix the problem.
To switch the boundary wire transmitter ON, press & release the push button switch
labelled “Press”. The “Fence” light will glow when the transmission is on. Press &
release the “Press” again to switch the transmitter OFF. The “Fence” light will go off.
Wiring Techniques
l For consistent distance setting, we recommend you place the boundary wire at ground level, or bury it no more than 20cm or raised no
more than 20cm above ground. Try to keep the full wire installation about the same height. The activation distance will vary slightly if
sections are at different heights. You may raise the wire to any height to decrease the activation distance in that area, but this might make
this area less secure. We do not recommend placing the wire at the top of a fence over the entire installation.
l Corner activation distances are slightly greater than straight sections. This is because the radio collar calculates the distance by
measuring the strength of the radio signal. At corners the signal is detected from two directions at once and this additional strength
causes the no-go area to round on the inside corners. If the containment area is small, you may want to reduce this effect. You can
achieve this by gradually raising the wire to the top of the fence at the corner. Start at about 2m to 4m from the corner. Ramp back down
over the same distance after the corner.
l Burying the boundary wire is optional. We recommend no less than 5cm and no greater than 20cm. Do not bury damaged or repaired
sections of wire. Only bury the wire after containment is achieved. This allows for fine position adjustments, if required. Protect or bury
the wire if it presents a trip hazard.
l Protect the wire when crossing a driveway or pathway. On concrete you can often use the expansion
joint to protect the wire by pushing it into this gap. On gravel you should protect the wire inside PVC
conduit. On bitumen you should protect the wire inside soft black polythene pipe (irrigation pipe). The
polythene pipe can be nailed onto the bitumen. On pavers you can often lift the pavers and place the wire
directly under it.
l When wiring a battle axe block (long narrow driveway), with example #1, the wire crosses the driveway
at the house end. If you want to protect the road entry end you must use a customized installation (similar
technique to examples #2 and #3).
l For boundary wire repairs and joints, you must ONLY use Sureguard waterproof seals (Order kit item
#615).
l Signal anomalies: When wiring like example #1, it is important to keep the wire as far away as possible
from large steel objects because the radio signal can distort through and around the object (does not
apply to steel fencing). For example, a boundary wire run behind a shed might result in the collar
activating at the front of the shed. A Trampoline near the wire can might cause the collar to trigger directly
under its frame. Steel frames houses or a steel staircase may also distort the signal. A single wire run
along a house wall can transmit its signal through the steel footings to doorways on the other side of the
house. All of these situations can be fixed by increasing the separation of the wire to the steel object, or
reducing the activation distance in the collar. A doubled boundary wire like example #2 or 3 will always
solve this issue. (Call technical support if you need assistance).
4

Solving Boundary Wire Faults
#1 - Device has no power
! Make sure the power adapter is properly plugged into the wall socket and transmitter.
! If you have installed batteries, remove them and check that they were placed in the correct orientation.
! Try again without batteries in case they are faulty.
! If you do not have batteries installed, then either the power adapter is faulty or the surge protection component inside the
transmitter has blown. Call Sureguard for advice.
#2 - Power source low
! If you do not have batteries installed, then either the power adapter or transmitter is faulty. Call Sureguard for advice.
! If you have batteries installed but no power adapter attached, then the batteries need recharging.
#3 - Fence fault
!
!
!
!
!
!
#4 - Possible device malfunction
! Remove all power to the device and verify that all indicator lights are off. Wait 10 seconds. Reapply power. Switch the fence ON. If
the fault repeatedly occurs then call Sureguard for advice.
There is no transmission on the boundary wire. The radio collar will not activate at the boundary. Your dog could escape!
The cause is either a break in the boundary wire, corroded connection, or a faulty transmitter. Do
the following transmitter self test before looking for boundary wire faults..
How to do a self test of the transmitter: 1/ Switch OFF the Fence. 2/ Disconnect the boundary wires & connect the two output
terminals together using a short piece of wire. 3/ Switch the Fence ON. If the transmitter now operates properly, the fault is in your
boundary wire. However, if this self test does not clear the fault contact Sureguard for advice.
Look for breaks in the boundary wire & repair using only Sureguard’s waterproof connectors.
Look for kinks in the boundary wire. Cut out the kink and re-join it with a Sureguard waterproof connector.
If you have repaired the boundary wire but not used Sureguard’s waterproof connectors, you might fix this fault by redoing all of
these connections.
If you still cannot find the problem then redo all repaired joints or replace the boundary wire.
You must
rectify this problem immediately!
FAULT
FENCE
POWER
INDICATOR LIGHTS
NORMAL OPERATING CONDITIONS
The device has power. Fence is ON.
The device has power. Fence is OFF.
Symbols Used Below:
No Light
Light Flashes ON & OFFConstant Light
The device has no power to operate.
#1
Possible device malfunction.
Fence has a Fault.
Battery is low. Fence is ON.
Battery is low. Fence is OFF.
Battery is low. Fence has Fault.
#3
#2
#2
#4
#2 & 3
PROBLEM
SOLVING
FAULT
FENCEPOWER
INDICATOR LIGHTS
FAULT CONDITIONS
5

The Radio Collar Receiver
The radio collar has two modes of operation: “Training Mode”and “Containment Mode”.
In Training Mode the correction mechanism is switched off but the warning sound will still activate at the boundary. Leave the collar in
Training Mode during the initial two days of training. Also, switch to Training Mode whenever you want to test or adjust the Activation
Distance.
Containment Mode is used only after training is completed. If your dog enters the outer zone of the “no-go” area, the radio collar will emit a
warning sound for 3 seconds before giving a correction. This warning sound is your dog’s cue to back-off. If your dog does not back away
then the collar will generate a low level correction. While your dog remains in the outer zone the collar will repeatedly sound a 3 second
warning followed by a further low level cor rection. After 15 seconds a cutout will activate which will only reset after your dog exits the no-go
area.
If your dog enters the inner zone, the collar will activate
instantly. The intensity of the correction is higher in the inner
zone. Twelve levels of intensity are available and the collar
automatically selects what is most appropriate according to
the history of recent encounters with the boundary. Once
activated in the inner zone, the collar will apply the correction
for a few seconds even after coming away from the
boundary. So, for example, if your dog is chasing another
animal the prolonged correction will distract your dog in
order to stop the chase. Your dog will learn it is undesirable to
cross the boundary. Correction is never more than 15
seconds because of the automatic cutout.
NOTE: When the warning sound activates at the boundary,
the light on the side of the case will flash in the inner zone but
not the outer zone.
1
2
3 4
Outer Zone
Inner Zone
Correction Zones
1
2
3 4
Activation
Distance (m)
2
3
4
1
5
Use a "Jeweller's Screwdriver" to adjust the
activation distance. The grey screw head in
the middle of the blue adjuster can be set to
the metre positions shown in this illustration.
How to Switch Between Training Mode and Containment Mode:
The mode of operation is selected when you install the battery. If the collar detects the radio transmission from the boundary wire at the
instant that you insert the batter y then it will switch into training mode. Otherwise it will switch to containment mode.
1/ Switch ON the transmitter (ie. Fence light ON), 2/ open the radio collar, 3/ remove the battery, 4/ press the battery arm down to reset the
electronics, 5/ hold the collar next to the boundary wire and insert the batter y, 6/ the Alert Indicator (explained later) will verify that training
mode has been selected.
1/ Open the radio collar, 2/ remove the battery, 3/ press the battery arm down to reset the electronics, 4/ Switch OFF the transmitter, OR,
move well away from the no-go area and insert the batter y, 5/ the collar will give a single “click” and is ready for use on your dog.
How to Adjust the Activation Distance:
The Activation Distance is measured from the boundary wire to the point at which the collar
starts to sound its warning. Each collar can have its own setting. You must select an
appropriate distance according to your dog’s behaviour and the type of boundary you have. For
best results we recommend a bigger distance during the first week or so. You can reduce the
distance once reliable containment is achieved.
Select Training Mode:
Select Containment Mode:
6

Activation Distance - Selection Guidelines:
Testing the Selected Activation Distance:
Use the following as a guide but keep the maximum distance to less than 15% of your boundary dimensions. For example, if your boundary
is 20m by 100m then the activation distance must be no more than 3m. The following are minimum values:
l Dog digging under a fence: 1m
l Dog walking into garden beds: 1-1.5m (depending on size of dog)
l Dog jumping a fence from stationary: 1-1.5m (depending on size of dog)
l Dog jumping a fence while running: 2-4m (depending on size & speed of dog)
l No fence and dog runs: 4m
l No fence but dog doesn’t run: 2-3m
l Custom boundary (see page 2, examples #2 and #3): Fully Clockwise (adjust distance using wire separation method)
Caution: When adjusting the distance use only the supplied jeweller’s screwdriver. From minimum to maximum positions is only ¾ of
a turn. Never force the adjuster past these end points!
The activation distance may not always correspond exactly with that illustrated above. The actual distance can be less if: 1/ you have
installed the optional collar protector (”Chew Guard”), 2/ you have more than about 400m-800m of boundary wire installed. Test the actual
activation distance and make any fine adjustment as necessary.
Put the collar into training mode. (Never use containment mode for testing distance.) When testing, always hold the collar at the same height
and angle that is worn by your dog. The front of the case must face toward the boundary wire. The radio antenna inside the collar “looks”
through the front of the case. In other words, the collar is looking in the same direction as your dog and will cease to see the signal if the
collar turns away from the boundary wire. Slight variations in distance are usual so do not try to define a line over which your dog can’t pass.
The aim is to produce a no-go area, not a boundary line.
What is the Alert Indicator?
The Alert Indicator is the collar’s way of conveying information to you. If something triggers the
Alert Indicator then it will sound every 5 minutes. If all is well the Alert Indicator will not sound,
so if you hear it going off you should rectify the problem that it indicates.
When the Alert Indicator sounds, you will hear a chime followed by a number of beeps. As soon
as you hear the chime get ready to count the beeps. The number counted conveys the
information, and the meaning as follows:
3 Beeps - Your dog has entered the boundary area and a correction was generated but your dog felt nothing. The collar tried five times
but each time it failed. Do the following: 1/ Trim the fur behind the radio collar so
that the studs on the back of the case make good contact with your dog’s neck skin. Do this even if you think your dog has short fur!
2/ Ensure the collar is not loose. 3/ Test for possible failure of the correction mechanism by doing the following test: While in
Containment Mode, place the supplied green test strip onto the two studs on the back of the radio collar. While holding the tester firmly
against the studs, take the radio collar over to the boundary wire so that collar generates a correction. The light on the tester should
momentarily flash with the correction pulse. (NOTE: This test must be done outside in daylight because the neon test light will not light
up in darkness). Move away from the boundary. Wait for the correction mechanism to stop. If the correction mechanism failed you will
hear the 3-beep alert again. Repeat to verify result. Contact Sureguard if the collar fails this test. If the correction worked this will
cancel the 3-beep alert. NOTE: To cancel this alert, simply activate the collar at the boundary while holding the green test strip on the
studs.
4 Beeps - Replace the battery now. Use only lithium type CR-2032. Replacing the battery will cancel this alert.
5 Beeps - The radio collar is currently set to Training Mode and will not generate a correction. Changing to Containment Mode will cancel
this alert.
6 Beeps - The radio collar has activated at the boundary for more than about 15 seconds and the automatic cutout is now active. Moving
away from the no-go area will cancel this alert.
What is the Escape Indicator?
Every 5 minutes the light on the side of the collar will flash a number to indicate the number of attempted escapes over the previous 24-hour
period. Count the number of flashes. Record this number for the first seven days. Contact Sureguard if your dog exhibits persistent escape
behaviour.
This is a serious problem which must be rectified.
= Replace Battery
= Collar Fit / Remove Fur
= Training Mode
= 15 Sec. Safety Cutout
7

Battery Installation
Battery life for a well behaved dog can be up to 18 months but frequent encounters with the boundary will reduce this. A low battery will
trigger the Alert Indicator. Insert a new battery as soon as this happens. The lithium type CR-2032 battery has a long shelf-life so you may
want to have spares on hand.
To access the battery, remove the screw on the back of the radio collar’s case and carefully open the case into two par ts. Use the point of a
fine jeweller’s screwdriver (or equivalent) to hook under the battery and with your thumb on top pull it out. Take care not to overly bend the
arm upwards. Clean the battery holder with a toothbrush and dishwashing liquid. Rinse clean. Dr y with a tissue. Leave to air dry. Open the
new battery packet. Clean the battery between a dr y tissue. Hold the battery by the edges. Do not finger the contact surfaces. IMPORTANT:
Press the battery arm down to reset the electronics and re-tension the battery arm. Make sure the batter y’s positive terminal is facing
uppermost and slide the new battery into place under the battery ar m. Keep your hand away from the correction studs! Close the case taking
care not to pinch the wires connecting to the lid. Do not over-tighten this screw. Ensure the case closes fully on all sides (if not the wire might
be pinched). Note: Bore water is not suitable for cleaning; use rain or distilled water.
Collar Size Adjustment
Adjust the collar size to fit your dog. You should be able to comfortably insert your two fingers under the collar without it feeling too loose.
Adjust both sides equally so the collar receiver sits at the lowermost point of the neck and collar fastener at the top. Cut off any excess collar
webbing. To avoid fraying place a lighter under the cut edge and melt it. Check your dog’s neck over the next few days to ensure any
pressure of the studs on the skin is not causing irritation. Reduce the wearing time if necessary.
Collar Maintenance
Once a month test the collar using the green test strip. Ensure the light flashes and the 3-beep alert does not trigger. Then test without
anything connected to the collar studs. This should trigger with 3-beep alert. If it doesn’t trigger, the correction impulse may be shorting
through dirt on the collar fabric. Remove the two studs holding the collar to the case and wash the collar fabric. Clean the exposed case
between the studs behind the fabric. When the fabric is dry re-attach it. Test again to verify this has fixed the problem.
The collar is waterproof. However, we recommend you immediately wash the inside of the collar (as described in “Battery Installation”) if it
is exposed to salt laden water, for example, pool water, sea water, dam water, bore water, etc. Salts may cause corrosion if not washed
away.
8

Problem Solving Collar Faults
lWhen the battery is inserted it doesn’t emit any sound but the light on the side of the case flashes momentarily.
The buzzer in the lid or the leads connecting to the lid are damaged. Return the collar to Sureguard for repair.
lWhen the battery is inserted it doesn’t emit any sound or light.
No sound or light indicates that there is no power to activate the collar. Check the following: 1/ Ensure that the positive terminal of the battery
is uppermost. 2/ Try another battery. 3/ Clean the battery holder and battery as advised for battery changes.
lWhen the battery is inserted it continuously emits the low battery alert.
The battery test, as you inserted the battery, has failed and will not allow the collar to start. Check the following: 1/ Clean the battery
holder and battery as advised for battery changes. 2/ Remove and reinser t the battery. 3/ Try another new battery. 4/ Contact
Sureguard for advice.
lWhen the battery is inserted, the collar indicates it is in training mode but I want containment mode.
When you inserted the batter y it simultaneously detected a transmission and the collar interpreted that as meaning you want to set the collar
to training mode. If you are wanting containment mode, remove the battery, reset the device (push battery arm down) and reinsert the
battery while at a sufficient distance from the boundary wire AND at least 3m away from the case of the transmitter.
lWhen the battery is inserted it won’t switch into training mode.
If there is no sound or flashing light on the radio collar then refer to the check points above. Otherwise, the collar has not detected the
transmission in order to switch it into training mode. Check the following: 1/ On the transmitter make sure the power light and fence light are
ON and the fault light is OFF. (If its not transmitting then refer to the transmitter’s problem solving guide.) 2/ Ensure the collar is within 10cm
of the boundary wire when the battery is inser ted. 3/ Contact Sureguard for advice.
lThe radio collar activates everywhere inside the boundary.
The Activation Distance is too long. Reduce it, especially if the current distance is more than 15% of the boundary width.
lThe radio collar sometimes activates well away from the boundary wire.
It is virtually impossible for the radio collar to activate falsely away from the wire from anything other than the supplied transmitter. Perhaps
if the collar is activated in the inner zone and your dog runs back to you it might appear to have falsely triggered when in fact it was still
completing the correction cycle triggered at the boundary. This is not a problem. However, if you think the collar has activated
inappropriately then look for signal anomalies: 1/ Re-read the section “Wiring Tips”. Sometimes a large metal object can distort the no-go
area.2/ A transmission signal radiates around the case of the transmitter for a distance of up to 3m. If this is activating the collar then move
the transmitter to a more appropriate location. 3/ Remove any metal objects within 2cm of the light on the collar. For example, name tags,
clips, etc. Metal dangling close to the case can make the antenna more sensitive and increase the activation distance.
lThe dog’s neck is irritated by the collar.
Try the following: 1/ Let your dog’s fur grow. If cutting is necessary for proper containment the collar will tell you. 2/ Readjust the collar size
because it may be too tight. 3/ Shorten the amount of time your dog wears the collar. 4/ Remove the collar if skin is broken and apply an
antiseptic medication.
Training Your Dog to the Warning Sound
You will require two consecutive days for training. The aim of training is to achieve a reliable back-off response when your dog hears the
warning sound. Training is performed before your dog ever feels a correction. Your dog must already be trained to walk on a leash. This
procedure is important to achieve quick and reliable containment.
Training Method:
1/ Install training flags at 1~2m spacings over any visually open areas of boundary (eg. Open lawn areas, un-fenced sections, etc). Order
additional flags if necessary.
2/ Trim your dog’s fur to ensure reliable skin contact with the studs on the back of the radio collar. Cut a section no bigger than the size of the
collar where it naturally sits. Use sissors to remove the bulk of fur. Do not shave the fur off as this might cause shaving rash from the collar
rubbing against the neck.
3/ Set the radio collar into training mode. Your dog will wear the collar continuously for at least 8 hours on this first day. While the collar is in
training mode the alert indicator will sound ever y 5 minutes. This is part of your dogs training to desensitize your dog to this chime. (Do not
skip this step). When the collar is used in containment mode the chime will only occur if a problem requires your intervention.
Important: Training is vital for reliable containment. Do not skip this
training!
Important: Do not skip this step even if you think your dog has short fur.
9

4/ On day one, every hour for 6~8 hours spend about 5~10 minutes doing the following:
a/ Put the radio collar on your dog (if not already on).
b/ Attach a walking lead to your dog's usual collar.
c/ Take your dog from a holding area to the boundary so that the warning sound activates and with an Inquisitive tone of voice say
"LISTEN". Allow a few seconds for your dog to pay attention to the sound and then growl a "NO" while simultaneously pointing to the
training flags (or what ever other visual marker eg. Fence).
d/ Quickly and firmly guide your dog back to a safe area and tell your dog to sit and stay. Reward your dog's good response.
e/ Take your dog to a different part of the boundary and repeat steps c and d for up to 10 minutes. As training progresses you should
quicken the response you require from your dog. If your dog is particularly inclined to escape at specific locations then intensify
training at those locations.
f/ Take your dog back to a holding area ensuring there is no access to the boundary between sessions.
5/ During the first half of day 2 repeat the training exercises. Over these two days you should aim to follow this training pattern 30~50 times
total. The repetition is important to achieve a quick back-off response when your dog first feels the correction.
6/ Half way through day 2 switch the radio collar into containment mode and place back on your dog. Allow your dog freedom to roam the
containment area on its own. Monitor your dog’s behaviour while remaining out of sight. When your dog experiences its first correction it
should run back to the safe area as per your training. Immediately praise your dog for this correct response. Training is now complete.
General Training Principles and Procedures:
l Train with minimal external distractions such as other dogs, family members, passers by, etc.
l Try to keep the training upbeat so that your dog doesn't start to get bored.
l Always finish a training period on a positive note.
l When praising or reprimanding first get your dog's attention. This means having eye contact.
l Dogs respond to tone of voice. Verbal corrections should be given with a loud deep growl in your voice. Praise should be given in an
upbeat happy voice.
l Use consistent commands. If you growl a NO always use a NO, don't change to STOP or whatever other word.
l Don't use food treats on every reward; use verbal praise more.
l Never train after a dog has just eaten.
l If you have more than one dog you must perform the training individually. Remove other dogs from the training area.
l If you want to take your dog for a walk during the two day training period, you must NOT allow your dog to walk across the boundary.
This would appear different to your pattern of leash training and could confuse your dog and reduce the effectiveness of the training.
Instead, remove the collar and leave your property by car. After the two day training, you should start to set up a patter n of behaviour for
going walks. 1/ Show your dog the lead. 2/ In an up beat tone tell your dog it is time for going walks "GOING WALKS". 3/ Attach the lead
to your dog's usual collar. 4/ Remove the radio collar. 5/ Show your dog the radio collar and again in an up beat tone say "GOING
WALKS". 6/ Cross the boundary at the same spot every time you leave for walks and always on the lead. NEVER allow your dog to cross
the boundary while off the lead. 7/ Follow the reverse procedure on the return. Remember to tell other family members to follow your
routine.
l Give consideration to what might be motivating your dog’s wrong behaviour and try to remove this temptation. For example, if your dog
is visiting a neighbour for food or company then explain to your neighbour that you have installed an electronic containment system.
Explain that feeding or otherwise paying attention to your dog becomes a reward that might encourage further escapes or diminish the
effectiveness of the system. Another example might be your dog’s digging habits that you are trying to kerb. Certainly, install the
boundary around your garden beds but do leave at least one area where your dog can dig, because this is a natural behaviour.
DO NOT perform this training again on any dog that has already felt the correction from the collar.
10
 Loading...