

Page 1
Page 2
2017
Owner’s
Manual
Boat Information
Hull Identication Number:________________________________
Date of Purchase:________________________________________
Dealership:_____________________________________________
Dealer’s Phone Number:__________________________________
Registration Number:____________________________________
Engine Serial Number:____________________________________
Trailer Serial Number:____________________________________
1717 Henry G. Lane Street
Maryville, Tennessee 37801
Supra® is a federally registered trademark owned by Skier’s Choice, Inc. Skier’s Choice™, the Skier’s Choice logo, the Supra Logo, SR™, SA™, SG™,
SE™, VISION Touch™, Swell™, Launch™ and AutoWake™ are trademarks owned by Skier’s Choice, Inc. All other trademarks are property of their
AutoWake™: U.S. Patent No. 8,798,825 and other patents pending. See www.skierschoice.com/patents
Skier’s Choice, Inc. reserves the right to change product specications at any time without incurring obligation.
© 2008 Skier’s Choice, Inc.
© 2015 Skier’s Choice, Inc.
© 2016 Skier’s Choice, Inc.
© 2016 Skier’s Choice, Inc.
Trademarks & Patents
respective owners.
©2016 Skier’s Choice, Inc. All rights reserved.
1 —
1 —
Page 3

Table of Contents
Section 1 ..................Introduction ...........................................3
Section 2 ..................Boating Safety ....................................... 5
Section 3 ..................Emergency Procedures ................... 12
Section 4 ..................Boating Rules ...................................... 15
Section 5 ..................Boat Specications ........................... 19
Section 6 ..................Break in Period ................................... 20
Section 7 ..................Starting & Operation ........................ 21
Section 8 ..................Instrument Panel & Control ........... 25
Sectioin 9 .................Equipment & Options ...................... 71
Sectiion 10 ..............Service & Maintenance .................... 78
Section 11 ...............Cleaning, Care & Storage ................ 82
Section 12 ...............Winterization & Dry Storage .......... 84
Section 13 ...............Technical Information ...................... 86
Section 14 ...............Trailering Your Boat .......................... 88
Section 15 ...............Supra Limited Warranty .................. 91
Notes
_______________________________________________________________________________
______________________________________________________________________________
_____________________________________________________________________________________________
____________________________________________________________________________________________
_______________________________________________________________________________
______________________________________________________________________________
_____________________________________________________________________________________________
____________________________________________________________________________________________
_______________________________________________________________________________
______________________________________________________________________________
_____________________________________________________________________________________________
____________________________________________________________________________________________
_______________________________________________________________________________
______________________________________________________________________________
_____________________________________________________________________________________________
____________________________________________________________________________________________
_______________________________________________________________________________
______________________________________________________________________________
_____________________________________________________________________________________________
____________________________________________________________________________________________
______________________________________________________________________________
— 2
— 2
© 2015 Skier’s Choice, Inc.
© 2016 Skier’s Choice, Inc.
© 2016 Skier’s Choice, Inc.
© 2016 Skier’s Choice, Inc.
Page 4
Introduction
Supra inboard watersports boats are manufactured by Skier’s Choice, Inc.
in Maryville, Tennessee and distributed throughout the United States and
the world.
This manual provides an overview for operating your Supra boat. It should
be considered a permanent part of your Supra boat, and contains important
information on Safety, Boating Rules, Proper Operation and Maintenance
of your boat. Should the boat be sold, this manual will provide the same
important information to the next owner.
Be sure to read and understand all aspects of Boating Safety and Operation
before using your boat. If you have any questions, your dealer can
provide the information you need to have a safe and pleasurable boating
experience.
All information, illustrations and specications in this manual are based on
the latest product information available at the time of printing. Supra may
discontinue models and equipment or change specications and designs
without any notice and without incurring obligation.
Section 1
Introduction
This manual contains information about several Supra models. Some
information may not apply to your boat since standard and optional
equipment may vary from model to model.
As you read through this manual, you will find CAUTION, WARNING
and DANGER symbols which require special attention. Please read them
carefully! They may tell you how to avoid problems and/or endangering
yourself, your passengers, and other boaters. PLEASE REVIEW ALL SAFETY
INFORMATION.
A maintenance schedule and accessory information are included to
assure trouble-free operation of your boat. Should service problems arise,
remember that your Supra dealer knows your boat best and is interested
in your total satisfaction.
Thank you for purchasing a Supra boat. We hope your ownership results
in an enjoyable and rewarding boating experience. Be safe and enjoy the
fun!
© 2015 Skier’s Choice, Inc.
© 2016 Skier’s Choice, Inc.
© 2016 Skier’s Choice, Inc.
© 2016 Skier’s Choice, Inc.
3 —
3 —
Page 5
• Drain Plugs (Securely in place?)
• Life-Saving Devices (One for every person on board?)
• Steering System (Working smoothly and properly?)
• Fuel System (Adequate fuel? Leaks? Fumes?)
• Battery (Fully charged? Cable terminals clean and tight?)
• Engine (In Neutral?)
• Capacity Plate (Are you overloaded or overpowered?)
• Weather Conditions (Safe to go out?)
• Electrical Equipment (Lights, horn, blower, bilge pump, etc.?)
• Emergency Gear (Fire extinguisher, bailer, paddle, anchor & line, signaling device, tool kit, etc.?)
• Bilge Pump (Working properly?)
NOTE: Bilge pump should be checked prior to each use to ensure proper operation!
Check BEFORE running (where applicable)
• Engine Oil level
• Transmission Lubricant level
• Engine Drain Plug, Transom Drain Plug and Center Drain Plug
• Leakage (Fuel, water lines and connections)
DO NOT operate engine without cooling water owing through water pump, otherwise pump will sustain
damage and subsequent engine damage may result!
Check BEFORE running
• Oil Pressure: Refer to Engine Owner’s Manual
• Water Temperature: 160 degrees to 180 degrees for raw water systems (water is not recirculated), and 180 degrees
to 200 degrees for closed cooling systems (water is recirculated).
• Idle RPM: (650-750) in gear.
• Maximum Forward RPM: See Engine Owner’s Manual.
•
• GASOLINE VAPORS CAN EXPLODE! It is very important to check for fuel spillage or leaks prior to each
use of your boat.
• Check engine compartment for gasoline vapors.
• Operate blower for 4 minutes before starting the engine.
• Always operate blower below cruising speed.
• NOTE: Please refer to your Engine Owner’s Manual for maximum RPM and engine break-in procedure.
— 4
— 4
© 2015 Skier’s Choice, Inc.
© 2016 Skier’s Choice, Inc.
© 2016 Skier’s Choice, Inc.
Page 6
Section 2
Boating Safety
Important Safety Information!
Your safety, as well as the safety of others with and around
you, is a direct result of how you operate and maintain your
boat. Read and comprehend this manual. Make sure that
you understand all the controls and operating instructions
before attempting to operate the boat. Improper operation is
extremely dangerous.
The basic safety rules are outlined in this section of the manual.
Additional precautions throughout the manual are noted by
the following symbols:
This symbol indicates a potentially hazardous circumstance,
which, if not avoided, may result in minor or moderate injury. It
may also be used to alert against unsafe practices.
This symbol indicates a potentially hazardous situation, which,
if not avoided, could result in death or serious injury.
This symbol indicates an imminently hazardous situation, which,
if not avoided, will result in death or serious injury. This is
limited to the most extreme situations.
The precautions listed in this manual and on the boat are
not exhaustive. If a procedure, method, tool or part is not
specifically recommended by Skier’s Choice, you must
satisfy yourself that it is safe for you and others, and that
the boat will not be damaged or made unsafe as a result of
your decision.
REMEMBER: ALWAYS USE COMMON SENSE WHEN OPERATING,
SERVICING OR REPAIRING THE BOAT!
In addition to everyday safety, failure to observe safety
recommendations may result in severe personal injury or death
to you or to others. Use caution and common sense when
operating your boat. Don’t take unnecessary chances!
Be certain that all boat passengers are aware of this information
and conform to boat safety principles.
Safe Boating
Safe boating practices may seem obvious, but people have
thought up risky and dangerous activities in boats, with boats,
and behind boats. Just because you or your passengers have
seen a boating maneuver performed or have seen a particular
activity promoted, do not assume there is no risk of injury or
death. Before you or your passengers go out in the boat and
engage in any water sport activity, give careful consideration to
the risks. Plan ahead. Think twice before you try something new
behind your boat or with your boat. Know the limits of you, your
passengers and your equipment and do not exceed them.
In addition to careful review of this manual, you should be aware
as well that there are many sources of information available.
Skier’s Choice urges you to pursue additional training, such as
safety and seamanship courses oered by the U.S. Coast Guard
Auxiliary and the U.S. Power Squadron.
Safe boating and safe actions may seem obvious, yet every
year US Coast Guard statistics give evidence that many people
disregard safe boating practices. Do not take safety for granted.
Think twice. We want all our boat owners and their passengers,
friends, and families to have a safe and enjoyable experience
on the water.
US Coast Guard Auxiliary
Boating Safety Course
The purchaser of a new 2017 Supra boat is entitled to a USCGA
Boating Safety Course that Supra will pay for. Please see the
Certicate in your owner’s packet or your dealer for more details.
Water Sports Names and Terminology
There are many types of towed water sports, and they are
known by many dierent names. The more popular sports
are wakeboarding, waterskiing, surfing, wakeskating and
tubing. And there are many others. The terms used to describe
participants in towed water sports activities also vary greatly.
Typical terms include rider, skier, and wakeboarder. To keep the
language in this manual straightforward, we use rider or skier
to refer to a participant in any towed water sport. The terms ski,
skiing, riding, surng or wakeboarding are used to refer to any
towed water sport.
© 2015 Skier’s Choice, Inc.
© 2016 Skier’s Choice, Inc.
© 2016 Skier’s Choice, Inc.
5 —
5 —
Page 7

Safety Training Organizations
Safety Equipment
The following is a listing of just some of the agencies and
organizations that oer safety training or information:
American Red Cross, National HQ
2025 E Street NW, Washington, DC 20006
(202) 303-4498 www.redcross.org
USA Waterski
1251 Holy Cow Rd., Polk City, FL 33868
(863) 324-4341 www.usawaterski.org
Boat Owners Association of the United States (BOAT/US)
880 South Pickett Street, Alexandria, VA 22304
(703) 461-4666 www.boatus.com
National Safe Boating Council
P.O. Box 509, Bristow, VA 20156
(703) 361-4294 www.safeboatingcouncil.org
U.S. Coast Guard Auxiliary Public Relations Center
9449 Watson Industrial Park, St. Louis, MO 63126
(877) 875-6296 www.cgaux.org
U.S. Power Squadron
P.O. Box 30423, Raleigh, NC 27622
(888) 367-8777 www.usps.org
On-Line Basic Boating Safety Course
www.boatsafe.com
National Marine Manufacturers Association
231 S. LaSalle Street, Suite 2050, Chicago, IL. 60604
(312) 946-6200 www.nmma.org
Your Supra has been equipped at the factory with most of the
federally required safety equipment for inland waters (Class 1,
16’-to-26’). This equipment includes:
• UL-approved Marine Fire Extinguisher, Type A-BC (2 lbs.),
good for solids, liquids, and electrical re
• ABYC-approved Marine Muers with water injection
• USCG-approved Marine Flame Arrestor
• USCG-approved Engine Box Ventilation with sparkless
power blower
• ABYC-approved Electric Horn sound warning device
• USCG-approved inland lighting
Federal law also requires at least one Type I, II or III Personal
Flotation Device (PFD) for each person on board or being towed
on water skis or other recreational equipment. In addition, one
throwable Type IV PFD must also be on board. As the owner,
obtaining the appropriate PFDs is your responsibility. Your
Supra dealer can and will be happy to assist you.
NOTE: Requirements for coastal waters and inland
waters dier. Check with the local authorities for more
information.
A smart owner will avoid potential problems on an outing
by having additional equipment on board. Normally, this
equipment is dependent on the body of water and the length
of the trip.
We suggest the following—as a minimum. Your Supra dealer
can also assist you with additional recommendations.
Federal law requires certain safety equipment to be onboard at
all times. In addition, responsible boaters carry other equipment
in case of emergency. Check with the local boating authorities
for any additional requirements over and above the federal
stipulations.
• An anchor with at least 75 feet of line
• A manual bailing device for removing water
• A combination oar/boat hook
• A day-and-night visual distress signal
• A rst aid kit and manual
• An airway breathing tube
• A waterproof ashlight
• A set of local navigation charts
• Mooring lines and fenders
• Extra engine oil
• A tool kit
• A portable AM/FM radio or weather radio
• VHF hand held marine radio
• Cell Phone
Boating-related accidents are generally caused by the operator’s
failure to follow basic safety rules or written precautions. Most
accidents can be avoided if the operator is completely familiar
with the boat, its operation, and can recognize potentially
hazardous situations before an accident occurs.
— 6
— 6
© 2015 Skier’s Choice, Inc.
© 2016 Skier’s Choice, Inc.
© 2016 Skier’s Choice, Inc.
Page 8
General Safety Precautions
Failure to adhere to these precautions may result in severe injury
or death to you and/or others.
• Improper operation is extremely dangerous. Operators must
read and understand all operating manuals supplied with
the boat before operation.
• Remain seated at all times while the boat is in motion.
• Never stand or allow passengers to stand while the boat is
moving. You or others may be thrown from the boat.
• Children in the bow of the boat should be accompanied by
an adult at all times.
• Never operate the boat while under the inuence of alcohol
or drugs.
• On-board equipment must always conform to the governing
federal, state, and local regulations.
• Gasoline vapors can explode. Before starting engine, open
engine box, check engine compartment for gasoline vapors,
and operate blower for at least four minutes. Run blower
below cruising speed.
• Leaking fuel is a re and explosion hazard. Inspect system
regularly. Examine fuel tanks for leaks or corrosion at least
annually.
• Never override or modify the engine safety shut-o switch
or engine neutral starting safety switch in any way.
• Never remove or modify components of the fuel system
in any way except for maintenance by qualied personnel.
Tampering with fuel components may cause a hazardous
condition.
• Never allow any type of spark or open ame on board. It
may result in re or explosion.
• It is the owner’s responsibility to check tightness of the tower
bolts BEFORE each use.
• The tower is designed to pull a single (1) individual. DO NOT
climb or sit on the tower. Rope may loop on inverted tricks.
DO NOT sit behind the pulling point of the tower.
• Comply with the capacity limits stated on the capacity
warning label in the boat.
General Safety Precautions (continued)
• The tow bar is not designed for vertical extensions. Any
modications to the tow bar or its mountings may result in
damage to the boat and injury to the user.
• The tower may strike low objects. Check clearance height
around docks, shore, overhanging objects, bridges and
power lines.
• Do not pull past 45 degrees of the centerline of the boat.
Failure to follow this rule could result in the boat capsizing.
• It is the driver’s responsibility to ensure all passengers are
seated when the boat is underway.
Failure to adhere to these warnings may result in severe injury
or death to you and/or others.
• This boat is a high-performance boat and capable of quick
and tight turns and changes in direction. It is the driver’s
responsibility to operate the boat in a manner to ensure the
safety of all passengers.
Boaters must continuously be aware of weather conditions.
• Sudden storms, wind, lightning, etc., can unexpectedly put
boaters in grave danger. Always check the local weather
report before going boating.
It is the driver’s responsibility to determine if weather or other
factors have created an unsafe boating environment.
• To avoid serious personal injury, DO NOT be on or about the
swim platform while engine is running and keep away from
rear of boat while engine is running.
• To avoid serious personal injury, DO NOT operate engine
while anyone is on or about the swim platform or in the
water near the boat.
© 2015 Skier’s Choice, Inc.
© 2016 Skier’s Choice, Inc.
© 2016 Skier’s Choice, Inc.
The driver is solely responsible for the consequences of their
actions.
7 —
7 —
Page 9

Water Sports Safety
Carbon Monoxide (CO) Safety (continued)
Riders are obligated to be as aware of the fundamental safety
rules as well as the boat operator. If you are new to towed water
sports, seek certied training before starting. You will nd
it especially helpful to join a local ski club and USA Waterski
when possible.
Always remember that the majority of water sports injuries are
the result of impacts with other objects, so always look where
you are going and be aware of what is going on around you.
Failure to adhere to these warnings may result in severe injury
or death to you and/or others.
• Every skier must always wear a USCG-approved personal
otation device.
• Maintain a distance of at least 100 feet from all other objects,
including other boats, piers, rafts, mooring and navigational
buoys, pilings, abutments, or any other items.
• Always have an experienced driver and observer in the boat
when skiing.
• Never ski in shallow water, close to shore, or in water where
you do not know the depth or what is beneath the surface.
• Never put your arm, head, or any other part of your body
through the handle-bridle of the ski line nor wrap the line
around any part of the body at any time.
• Never ski at night, or directly in front of other boats.
• Never jump from a boat that is moving at any speed, nor enter
or exit the water when the engine is running (ON).
• Make sure that everyone knows and uses approved skiing
hand signals and common skiing courtesy.
Carbon Monoxide (CO) Safety
Carbon monoxide is a colorless, odorless and tasteless gas. It is
produced by gasoline engines and is a component of exhaust
fumes.
NMMA
National Marine Manufacturers Association
231 S. LaSalle St., Suite 2050, Chicago, IL 60604
312-946-6200 www.nmma.org
American Boat & Yacht Council, Inc.
613 Third St., Suite 10, Anapolis, MD 21403
410-956-4460 www.abycinc.org
Product Misuse
Misuse of the product or use of it in a manner for which it was
never intended can create dangerous situations. The driver and
passengers are responsible for using the product safely and as
intended. The driver must operate the boat in a manner that
ensures the safety of all passengers. If you or your passengers
are unsure about use of the product, about performing certain
boating maneuvers or are unsure about a particular water
activity, refer to this manual or contact a knowledgeable source
such as your local dealer, Skier’s Choice, Inc., the US Coast Guard,
or your local boating authority.
Capacity and Weighting Your Boat
Do not exceed the capacity warning label axed to the boat
in the helm area. The capacity limit is shown in the number of
people and weight limit in pounds. The combined weight of
people and gear must be considered when loading the boat.
Factory ballast and fuel have been considered in the capacity
limit and do not need to be added to the people and gear
weight. Ballast weight above factory installed equipment must
be calculated into the total weight of people and gear.
Although water intrusion and waves spilling inside a boat is
an obvious boating hazard, this hazard can increase when
weighting your boat for water sports such as wakeboarding
or wakesurng. Do not overweight the boat or exceed boat
capacity. Use good judgment when using unbalanced weight
in your boat. Concentrating weight in a rear corner of the boat
for wakesurng puts the top of the deck closer to water level.
Backwash, large waves and choppy water are more likely to
swamp the boat in this situation.
Shut o the engine when people are on the swim platform or
in the water around the rear of the boat.
Do not do any other activities which puts people in close
proximity of the transom when the engine is running.
For the most current information on carbon monoxide, you
may call, write or visit on-line any of the following:
United States Coast Guard
Oce of Boating Safety (CG-5422)
2100 Second Street SW STOP 7581,
Washington, DC 20593-7581
1-800-368-5647 www.uscgboating.org
— 8
— 8
When loading your boat give separate attention to the bow area.
Excess and unevenly distributed weight in the bow of the boat
can create a water inux hazard, unstable steering conditions,
and even loss of control. Driver visibility can be reduced if the
bow is overloaded or unevenly weighted.
Excess and improper loading of bow area forward of windshield
may cause water inux, operating instability, and loss of control
resulting in injury or death. Bow Capacity Limit - Refer to seating
capacities in this manual
Use good judgment when weighting your boat for any towed
water sports. Educate yourself on the proper responses for
the differing and potentially unsafe conditions you could
encounter.
© 2010 Skier’s Choice, Inc.
© 2016 Skier’s Choice, Inc.
© 2016 Skier’s Choice, Inc.
Page 10
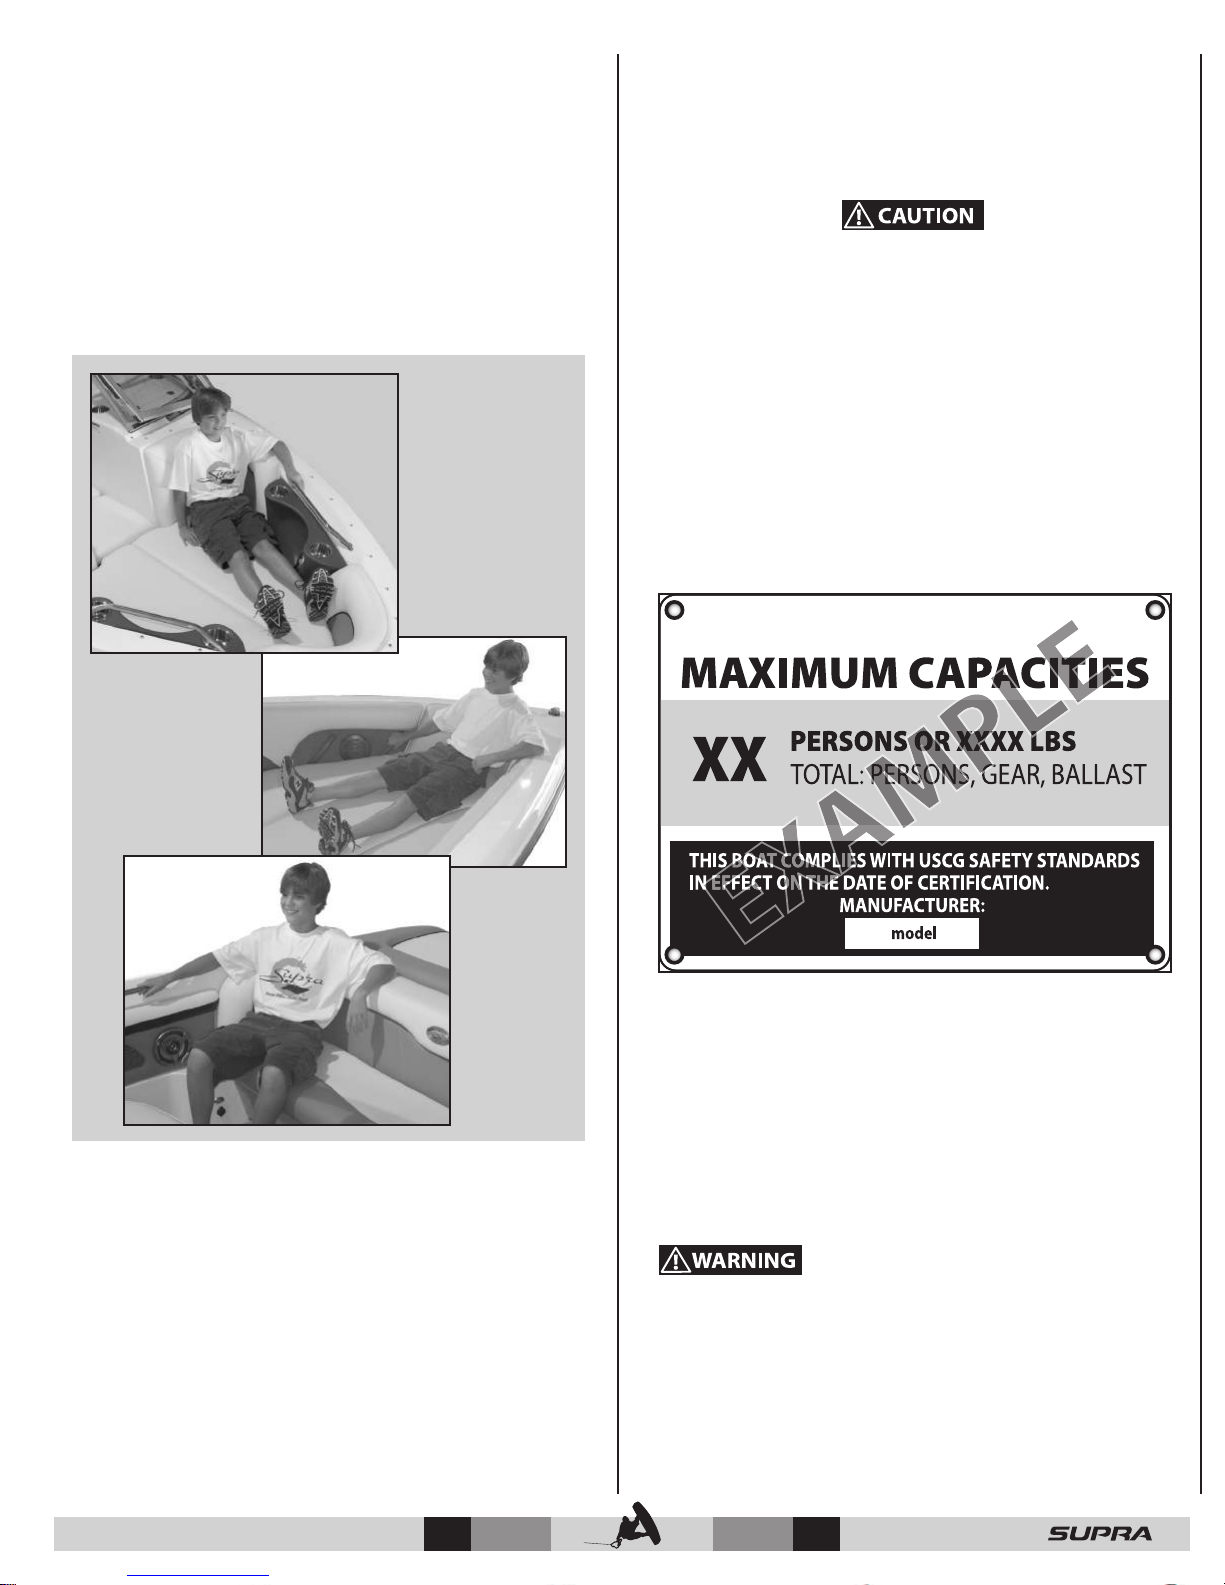
Proper Seating
Proper seating is an important element of boating safety. Proper
seating consists of sitting with your buttocks in full contact with
a seat cushion within easy reach of a suitable handhold or grab
rail anytime the boat is underway. Handholds and grab rails
should be used to secure oneself and prevent loss of balance.
Do not sit in locations not designed as a seat. For instance, do
not sit on seat backs, do not sit on the sides or gunwale of the
boat, and do not sit on the sundeck while the boat is in motion.
See examples below of proper sitting positions.
Convertible Rear Seat
Some Supra models are equipped with a convertible rear seat.
The rear seat lifts from the back, hinges forward, and can be
used for a cockpit table. Lift the table forward and it becomes
a rear facing seat.
The convertible rear seat back does not lock into place. It is not
intended as support. Do not lean on or use as a brace in case
of sudden change in direction.
Coast Guard Regulations
The United States Coast Guard boating regulations prescribe
minimum standards of safety to be met and maintained by all
watercraft. It is necessary that your boat remain in compliance
with these regulations.
The staff at Skier’s Choice, Inc. recommend that all boat
operators complete a Coast Guard approved boating safety
course.
The driver must be aware of all passenger’s locations and
positions, and passengers must stay alert to changes in
direction.
The boat is capable of quick and tight turns. Such maneuvers
can cause unseated occupants to be thrown around or out of
the boat. Alert passengers before changes in direction.
© 2010 Skier’s Choice, Inc.
© 2016 Skier’s Choice, Inc.
© 2016 Skier’s Choice, Inc.
Maximum Capacities
In compliance with United States Coast Guard Regulations,
Supra Boats meet or exceed all safety standards designed for
recreational boats. To ensure safe handling and performance,
each Supra boat displays a maximum capacity sticker (see
sample), stating the maximum total weight load allowable.
NOTICE: Refer to the Maximum Capacity Sticker on your
boat for allowable loading.
Do not exceed the maximum capacity of the boat.
Contact Information
If you have questions regarding the operation of your boat,
accessory or options or questions in regard to Boat Safety,
contact your dealer or Skier’s Choice, Inc. at 865-983-9924.
9 —
9 —
Page 11

Seating Capacities
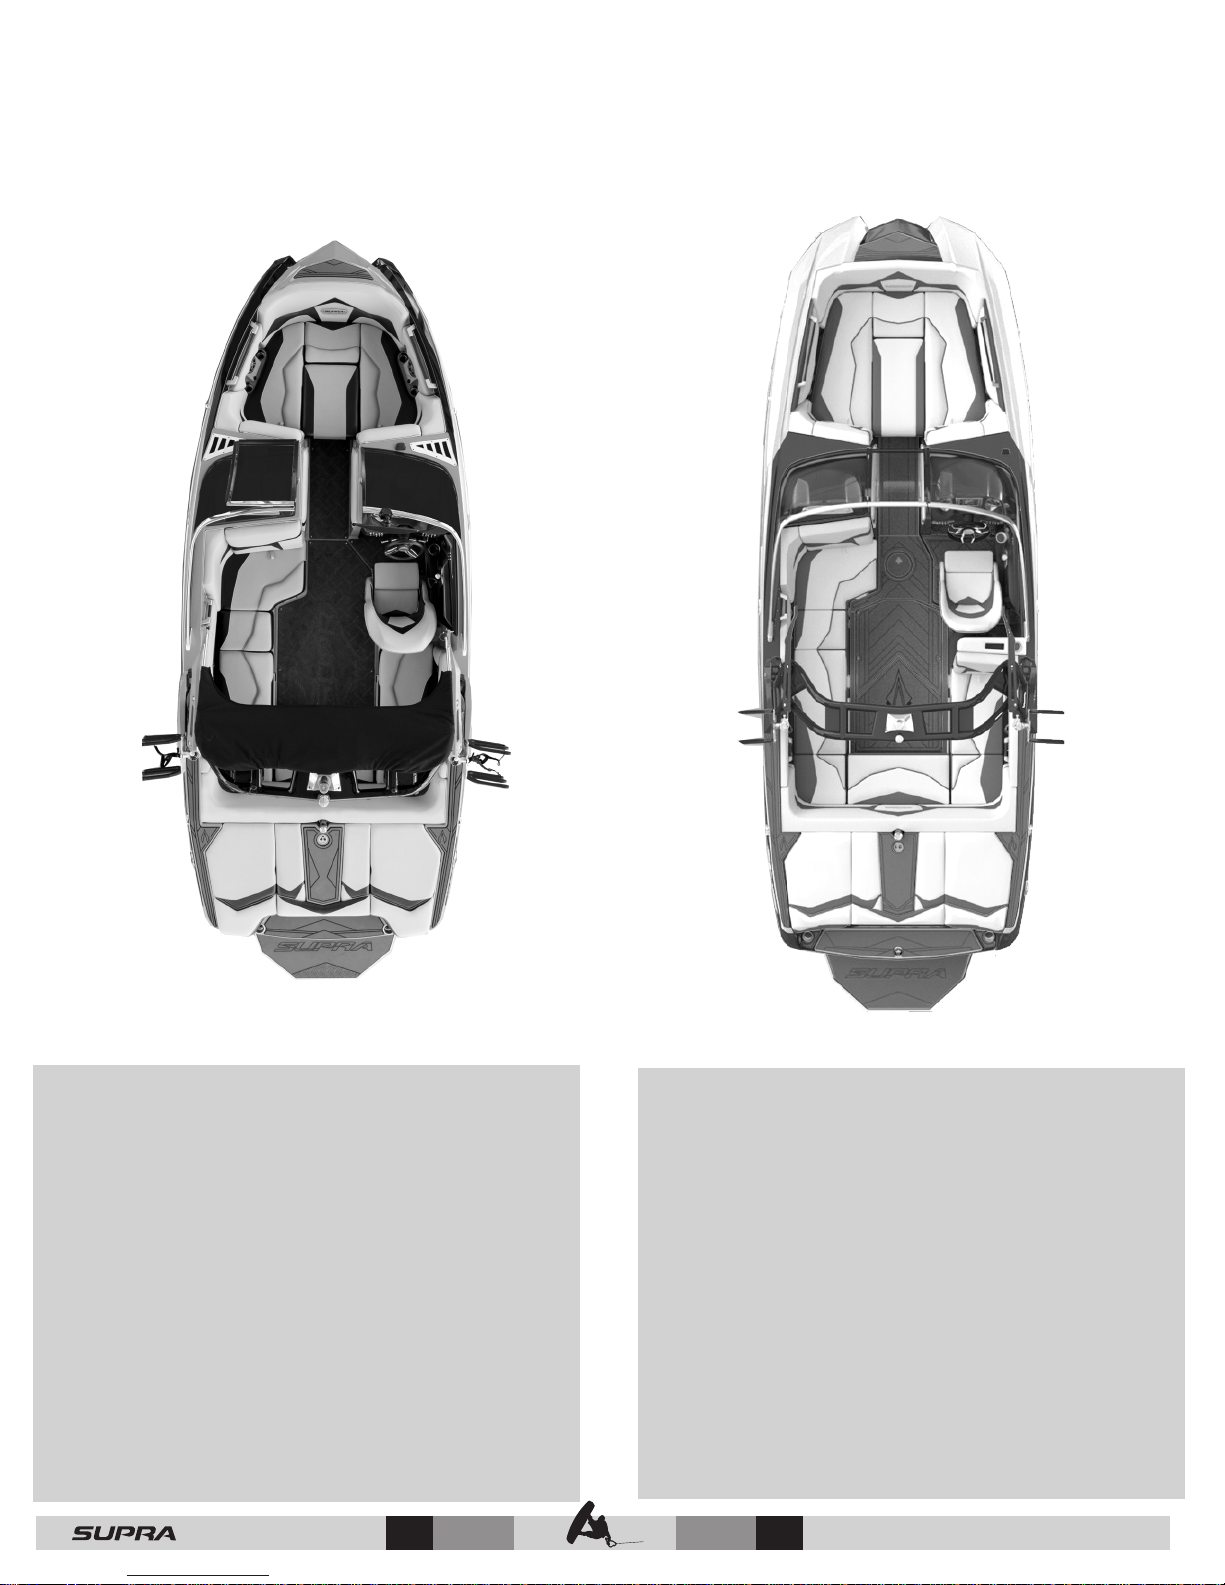
Each 2017 model is marked below to illustrate designated seating positions.
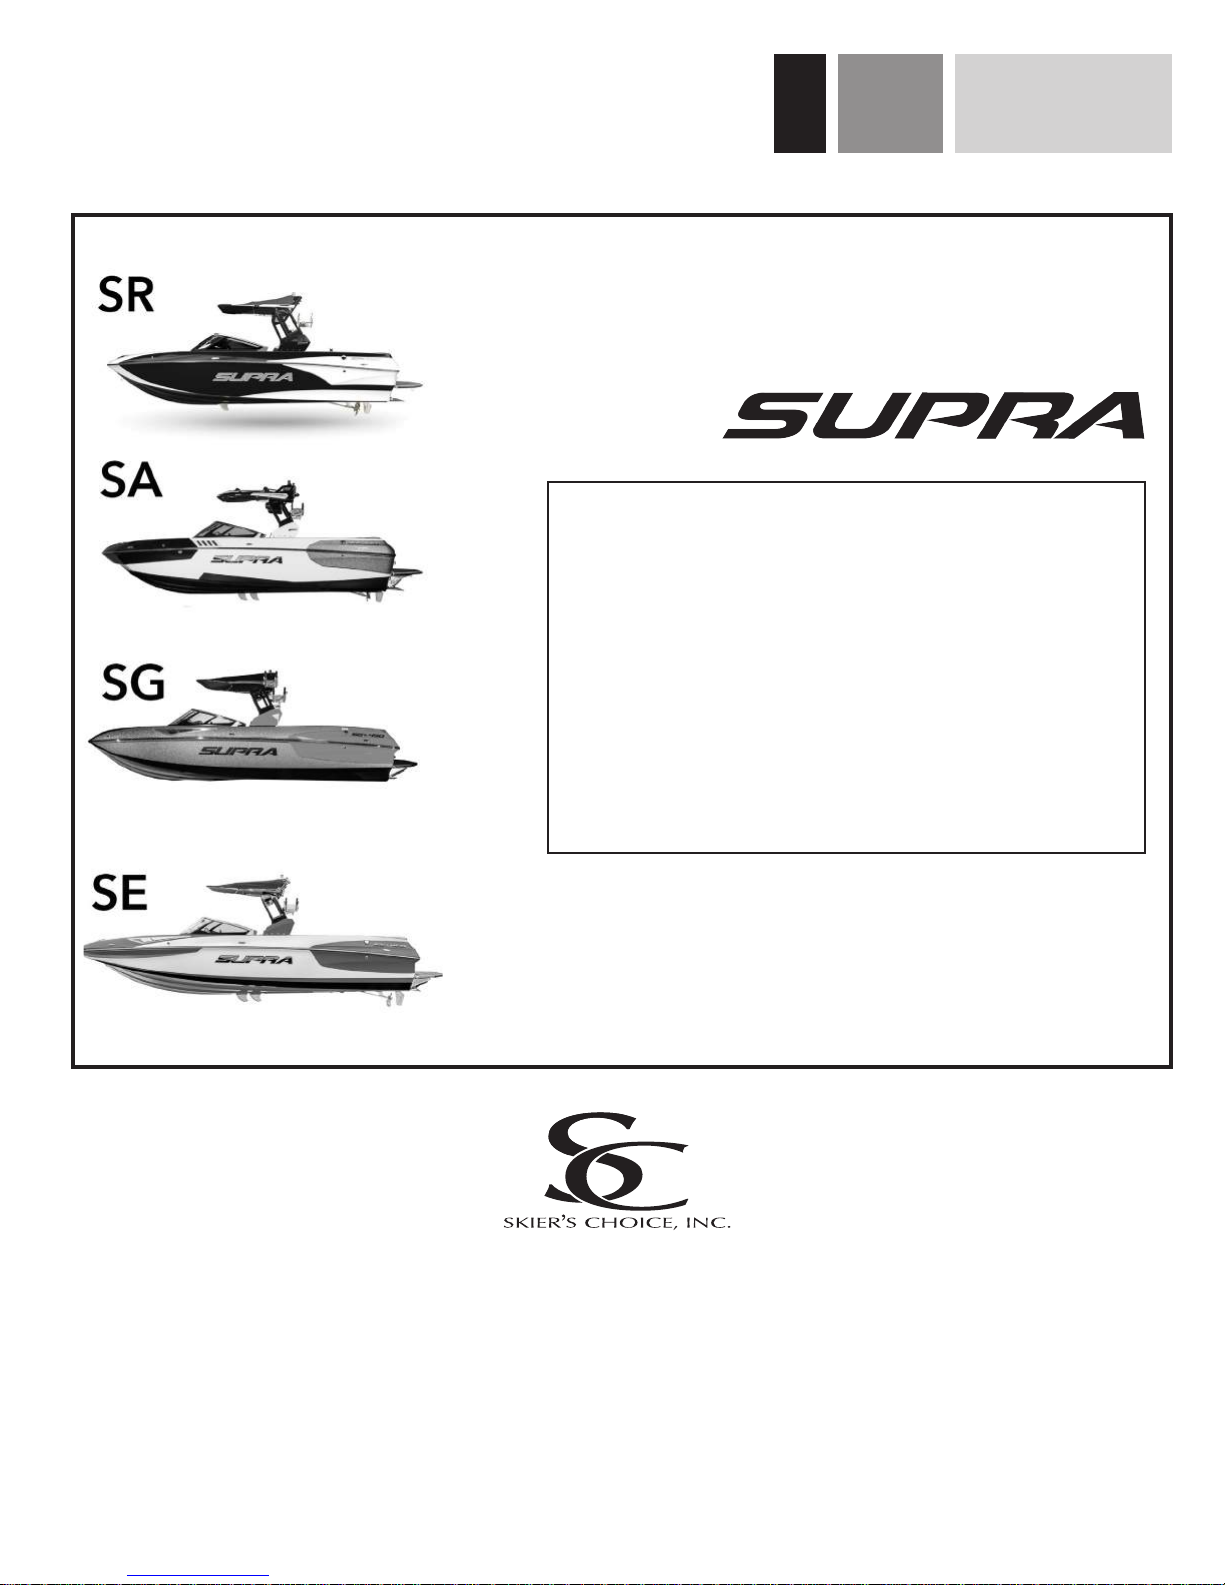
SR-
14 Passengers
SA-
16 Passengers
SG-
17 Passengers
SE -
18 Passengers
— 10
© 2016 Skier’s Choice, Inc.
© 2016 Skier’s Choice, Inc.
Page 12
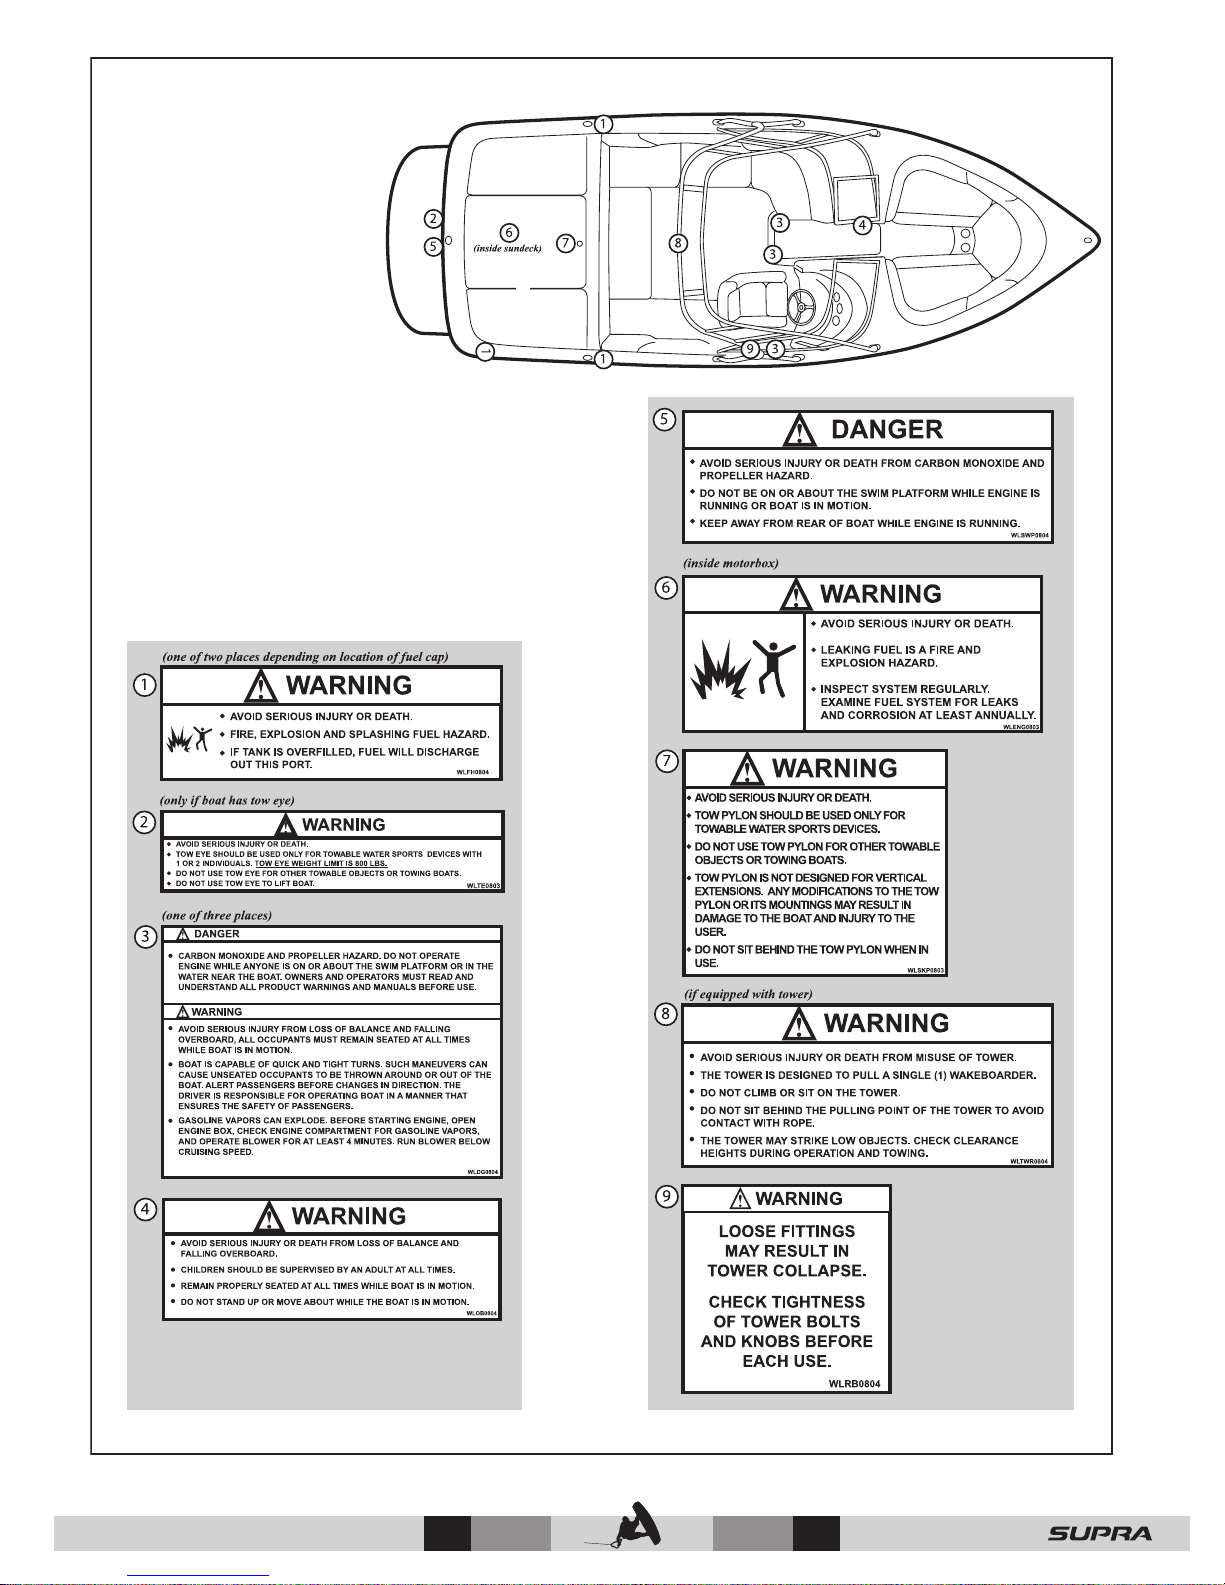
Typical Warning Label Locations
V-Drive Models
Warning labels are placed on your
boat to alert you to potential
hazards that may not be obvious.
They also tell you how to avoid
the hazard. Warning labels should
never be removed and, if any
label is damaged, it should be
replaced as soon as possible.
Warning Plates & Labels
Read and note ALL warning plates and labels from bow to
stern that appear on the boat, including these.
If your warning decals should become damaged in any
way, please contact your Moomba Dealer or write Skier’s
Choice, Inc. to request replacement warning decals. The
decals will be provided free of charge. Your boat’s serial
number (located on the transom) must be included for
warning decal requests.
Skier’s Choice, Inc. reserves the right to change warning labels without notication or incurring obligation. For a copy of the most current warning
labels, please contact your dealer or Skier’s Choice, Inc.
© 2008 Skier’s Choice, Inc.
© 2016 Skier’s Choice, Inc.
© 2016 Skier’s Choice, Inc.
© 2016 Skier’s Choice, Inc.
— 11
© 2015 Skier’s Choice, Inc.
11 —
11 —
11 —
Page 13

Reprinted from “Fishing and Skiing Boats Owner’s Manual” with permission
from the NMMA.
Section 3
Emergency Procedures
The time to think about emergencies is before they happen.
Plan ahead. Know what to do before you encounter any of
these situations. Wear a PFD (Personal Flotation Device) when
boating.
Explosion & Fire
EXPLOSION/FIRE/ASPHYXIATION HAZARD
• Open ame cooking appliances consume oxygen. This can
cause asphyxiation or death.
• Maintain open ventilation.
• Liquid fuel may ignite, causing severe burns.
• Use fuel appropriate for type of stove.
• Turn o stove burner before lling.
• Do not use stove for comfort heating.
FIRE/ASPHYXIATION HAZARD - Use special care with ames or
high temperatures near urethane foam, if used in construction
of your boat. Burning, welding, lights, cigarettes, space heaters
and the like can ignite urethane foam. Once ignited, it burns
rapidly, producing extreme heat, releasing hazardous gases and
consuming much oxygen.
Explosion
• If explosion is imminent, put on PFDs, grab distress signals
and survival gear, and immediately abandon ship.
Abandoning Ship
BURN HAZARD
Swim against the current or wind if you abandon ship. Leaking
fuel will oat with the current and may ignite.
• When clear of danger, account for all who were on board,
and help those in need.
• Use distress signal.
• Keep everyone together to make rescue easier.
Flooding, Swamping or Capsizing
• STAY WITH THE BOAT! A boat will usually oat even if there
is major hull damage. Rescuers can spot a boat much easier
than a head bobbing in the water.
• Signal for help.
Collision
• Account for everyone on board.
• Check for injuries.
• Inspect structural damage.
• Reduce ooding.
• Signal for help.
• STAY WITH THE BOAT!
Fire
• Turn o engines, generators, stoves and blowers. Extinguish
smoking materials.
• Fixed fire suppression system, if equipped, has heat
sensors that automatically flood machinery space with
a fire extinguishant. Allow extinguishant to “soak”
compartment for at least 15 minutes to cool hot metals or
fuel before cautiously inspecting re area. Have portable
re extinguishers ready. Do not breathe fumes or vapors
caused by the re or extinguishant.
• If no xed reghting system is installed and re is in engine
compartment, discharge portable re extinguishers through
the transmission cover which is typically located under the
rear seat. Do not open engine hatch as this feeds oxygen
to the re.
• If you have access to re, direct contents of extinguishers at
base of ames, not at the top.
• Throw burning materials overboard if possible.
• Move anyone not needed for reghting operations away
from the ames.
• Signal for help.
• Put on PFDs, grab distress signals and survival gear, and
prepare to abandon ship.
Grounding
Action depends on how hard the boat hits bottom and whether
the boat remains stranded. If it is a simple touch, you may need
only to inspect the hull. If you are aground, assess the situation
before reacting. In some cases, throwing the boat into reverse
can cause more damage.
Basic Guidelines
• Inspect damage to hull, propulsion and steering systems.
• Check for leaks. If water is coming in, stopping the ow takes
priority over getting free.
• Determine water depth all around the boat and type of
bottom (sand, mud, rocks, etc.). This will help you decide
which way to move the boat.
• Determine if tide, wind or current will drive the boat harder
aground or will help free it.
© 2016 Skier’s Choice, Inc.
— 12
© 2016 Skier’s Choice, Inc.
12 —
Page 14

Leaks
Both Vessels
• Immediately switch on bilge pumps.
• Assign crew to operate manual pumps, if needed.
• If boat is taking on water, have someone take the helm while
you manage damage control.
• Slow or stop to minimize inow. However, if you can keep a
hole above water by maintaining speed, do so.
• If possible, patch the outside with whatever material is
available.
Towing
PERSONAL INJURY HAZARD
Towing or being towed stresses the boats, hardware and
lines. Failure of any part can seriously injure people or
damage the boat.
A recreational boat towing another is usually a last resort
because of possible damage to one or both boats. The Coast
Guard or a private salvage company is better equipped. A
recreational boat may assist by standing by, and possibly
keeping the disabled boat’s bow at a proper angle until help
arrives. Only when conditions are ideal—that is, waters are calm,
disabled boat is small, and one or both skippers know correct
technique—should a recreational boat tow another.
Towing Vessel
• Be sure your boat will not run aground too.
• Because you are maneuverable and the grounded boat is not,
you should pass the towline to the grounded boat.
• Use double-braided or braid-on-braid line. Never use threestrand twisted nylon; it has too much elasticity and can snap
back dangerously.
• Fasten the towline as far forward as possible on the upwind
or up-current side of the towing boat.
• Fastening it to the stern will restrict maneuverability of the
towing boat.
• If possible, use a bridle.
• Move slowly to prevent sudden strain on slack line.
• Be ready to cast loose or cut the line if the towing situation
becomes hazardous.
Vessel Being Towed
• If you attach the towline to a tting, be sure the tting
is fastened with a through bolt and is reinforced on the
underside.
• Creating a bridle with a line around the hull or superstructure
will distribute the load over a wide area; pad pressure points.
This technique can be used on both the towing and towed
boat.
• Keep lines clear of propellers on both boats.
• Keep hands and feet clear of the other boat.
• Never hold a towline after it is pulled taut.
Person Overboard
• Immediately sound an alarm and keep pointing to the
person overboard.
• Throw a life preserver even if the person is wearing a PFD.
It will serve as a marker.
• Immediately stop or slow the boat, then circle toward the
victim.
• Keep person overboard on helm side so operator has the
person constantly in sight.
• Approach from downwind and move alongside into the
wind for pickup.
• When almost alongside, stop the engine in gear to prevent
dangerous propeller “windmilling.”
• As part of your emergency plan, consider what to do if you
were alone and fell overboard (e.g., wear PFD, keep signal
device in PFD, attach emergency stop switch lanyard to
yourself).
Drowning
• Swim to rescue a drowning victim only as a last resort.
• Immediate resuscitation is critical! At least two people on
board should be certied in CPR.
• Keep the victim warm.
• Use care in handling. Spinal injury may exist if the victim
fell overboard.
• Signal for help.
Medical Emergency
• Attach the towline to the bow eye.
• If the boat has eyebolts in the transom for pulling skiers, a
towline may be attached to a small bridle hooked to both
eyebolts.
• If it is necessary to be towed after being freed, keep someone
at the wheel to steer.
© 2016 Skier’s Choice, Inc.
• In an emergency, you may be far from professional medical
assistance. Be prepared. Take a rst aid course, and carry a
rst aid kit. Be aware of special conditions that may aect
anyone on board.
13 —
Page 15

Carbon Monoxide
Distress Signals
Carbon monoxide is an odorless, colorless, extremely toxic gas.
Symptoms of carbon monoxide poisoning are dizziness, ears
ringing, headaches, nausea and unconsciousness. A poisoning
victim’s skin often turns cherry red.
Have the victim breathe fresh air deeply. If breathing stops,
resuscitate. A victim often revives, then relapses because organs
are damaged by lack of oxygen. Seek immediate medical
attention.
Propulsion, Control or Steering Failure
• Shut o engine.
• Put out an anchor to prevent drifting.
• Determine if you can x the problem yourself. See engine
operator’s manual if engine is ooded.
• Signal for help.
Radio Communication
Radio is the boat operator’s main method of receiving safety
information and summoning aid. VHF-FM radio is the primary
means of short-range communication. Single sideband radio
(SSB) is used for longer range communication.
VHF-FM Channel 16 and SSB 2182 kHz are designated for
emergency use. Such situations can be categorized as:
• Emergency — “M AY D AY, MAYDAY, M AYDAY” — Used
when a life or vessel is in imminent danger.
• Urgency — “PAN-PAN, PAN-PAN, PAN-PAN” (pronounced
PAHN-PAHN) — Used when a person or vessel is in some
jeopardy less than indicated by a Mayday call.
• Safety — “SECURITY, SECURITY, SECURITY” (pronounced
SAY-CURE-IT-TAY ) — Used for navigational safety or weather
warning.
An emergency situation will be hectic and there will not be
time to learn proper radio procedure. LEARN WHAT TO DO
BEFORE YOU NEED TO DO IT.
Consult your national boating law enforcement agency.
Visual Distress Signals
• U.S. Coast Guard regulations require boats in coastal waters
and the Great Lakes to carry visual distress signals for day or
night use, as appropriate for the time of operation. Exempt
from the day signals requirement, but not night signals, are
boats less than 4.8 meters (16 feet), open sailboats less than
7.9 meters (26 feet), boats participating in organized events,
and manually propelled boats.
• If you are required to have visual distress signals, at least
three safety-approved pyrotechnic devices in serviceable
condition must be readily accessible. They must be marked
with a date showing the service life, which must not be
expired.
• Carry three signals for day use and three signals for night use.
Some pyrotechnic signals, such as red ares, meet both day
and night use requirements.
• Store pyrotechnic signals in a cool, dry location. An orange
or red watertight container prominently marked “Distress
Signals” is recommended.
Other recognized visual distress signals include:
• Flames in a bucket
• Code ags November and Charlie
• Square ag and ball
• Black square and ball on orange background ag
• Orange ag (certied)
• Electric distress light (certied) - for night use only.
• Dye marker (any color)
• Person waving arms
• U.S. ensign own upside down
Audible Distress Signals
U.S. Coast Guard regulations require one hand, mouth or poweroperated whistle or horn, audible for at least a half mile.
If you hear a distress call, stop all radio transmissions. If you
can directly assist, respond on the emergency frequency. If
you cannot assist, do not transmit on that frequency. However,
continue to monitor until it is obvious that help is being
provided.
— 14
Other recognized audible distress signals include:
• Radio communication (see Emergency Procedures - Radio
Procedures - Radio Communication)
• Radio-telegraph alarm
• Position indicating radio beacon
• Morse Code SOS (3 short, 3 long, 3 short) sounded by any
means
• Fog horn sounded continuously
© 2016 Skier’s Choice, Inc.
Page 16
Section 4
Boating Rules
Basic Boating Rules
You should be aware of these rules and follow them whenever
you encounter another vessel on the water.
The rules presented in this manual are condensed and have
been provided as a convenience only. Consult your local U.S.
Coast Guard Auxiliary (USCGA) or Department of Motor Vehicles
(DMV) for a complete set of rules governing the waters in which
you will be using your boat. If you plan to travel—even for a
short trip—you would be well served to contact the regional
USCGA or DMV in the area where you will be boating.
Review and understand all local and state laws.
Any time two vessels on the water meet one another, one vessel
has the right-of-way. It is called the stand-on vessel. The vessel
which does NOT have the right-of-way is called the give-way
or burdened vessel.
These rules determine which vessel has the right-of-way, and
accordingly, what each vessel should do.
The vessel with the right-of-way has the duty to continue its
course and speed, except to avoid an immediate collision. When
you maintain your direction and speed, the other vessel will be
able to determine how best to avoid you.
Encountering Other Vessels
There are three main situations in which you may encounter
other vessels and you must observe the Steering Rules in order
to avoid a collision. These are:
• Meeting (you are approaching another vessel head-on)
• Crossing (you are traveling across the other vessel’s path)
• Overtaking (you are passing or being passed by another
vessel)
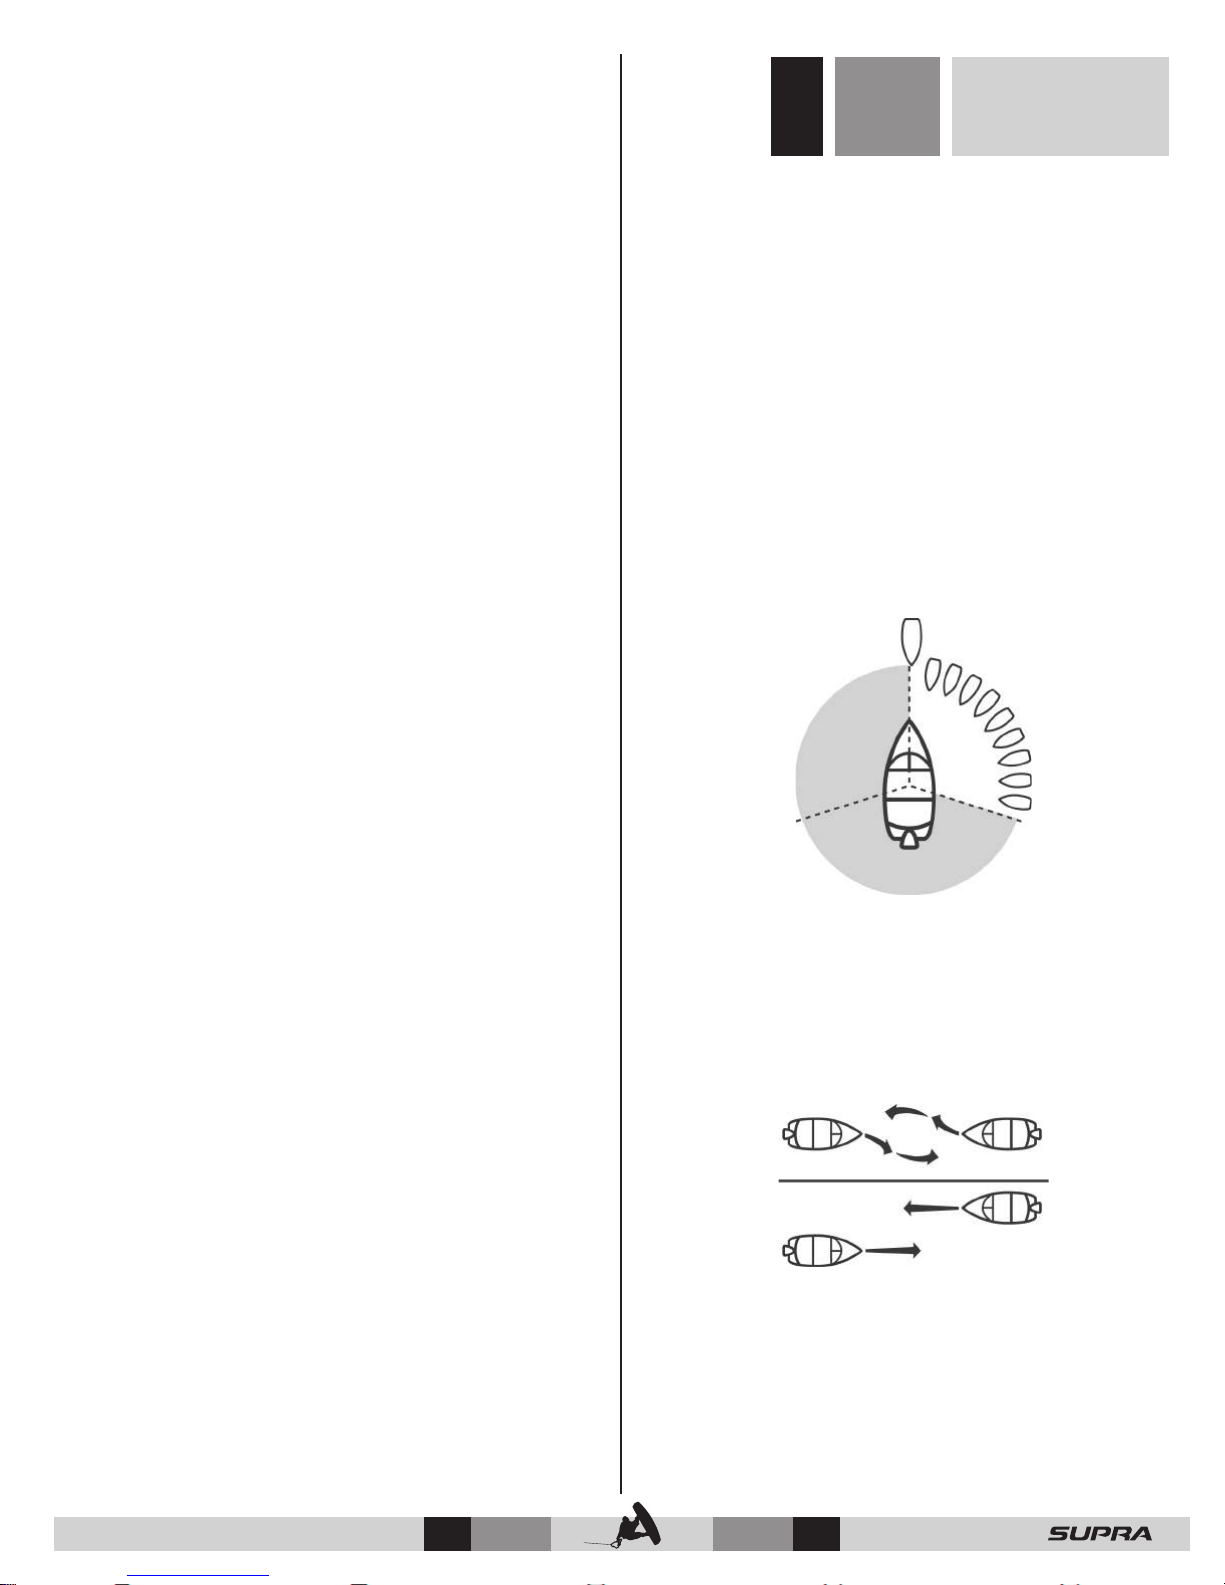
Using the following illustration in which you are the boat in
the center, you should give right-of-way to all vessels shown
in the white area. In this instance, you are the give-way vessel.
All vessels in the shaded area must yield to you as you are the
stand-on vessel. Both you and the meeting vessel must alter
course to avoid each other.
The vessel which does not have the right-of-way has the duty
to take positive and timely action to stay out of the way of the
stand-on vessel. Normally, the give-way vessel should not cross
in front of the stand-on vessel. Slow down or change directions
briey and pass behind the other vessel. You should always
move in such a way that the stand-on operator can see what
you are doing.
This rule is called Rule 2 in the International Rules and says, “In
obeying and construing these rules due regard shall be had
to all dangers of navigation and collision, and to any special
circumstances, which may render a departure from the above
rules necessary in order to avoid immediate danger.”
If you are meeting another power vessel head-on, and you
are close enough to run the risk of collision, neither of you has
the right-of-way. Both of you should alter course to avoid an
accident. You should keep the other vessel on your port (left)
side. This rule doesn’t apply if both of you can clear each other
by continuing your set course and speed.
© 2016 Skier’s Choice, Inc.
© 2016 Skier’s Choice, Inc.
15 —
Page 17
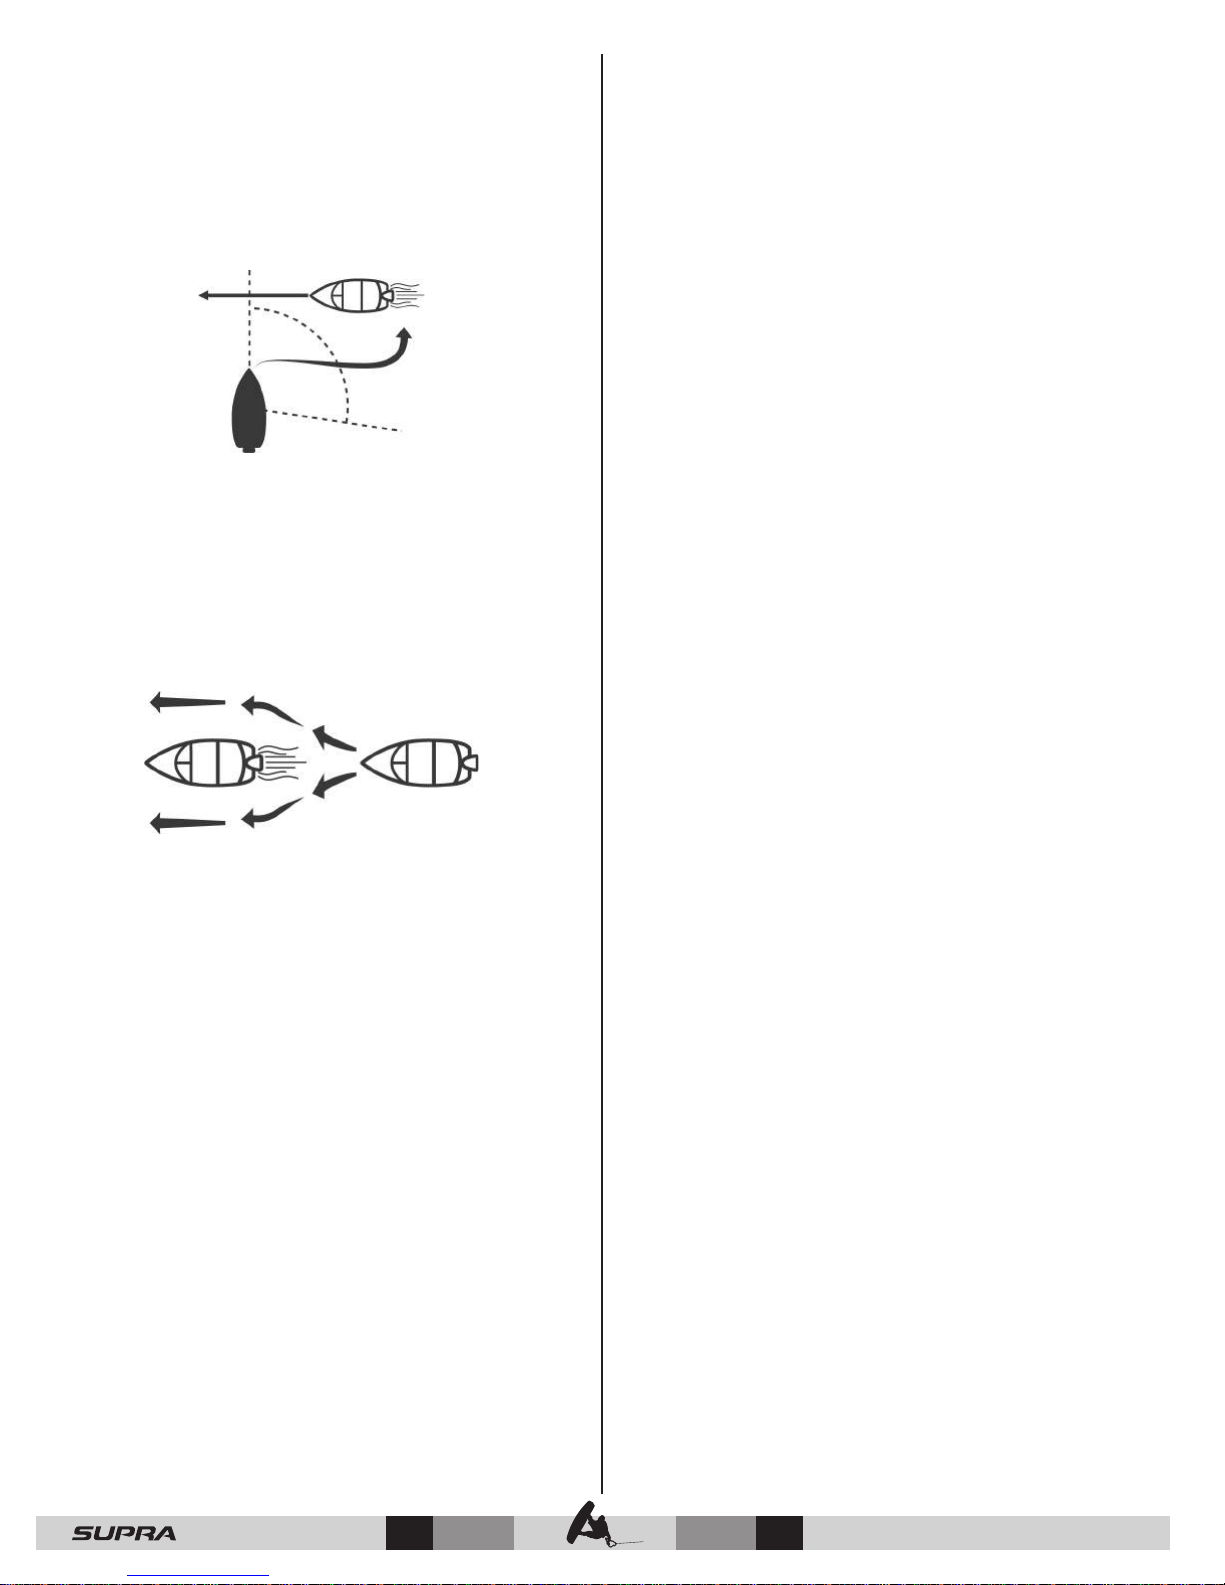
When two power-driven vessels are crossing each other’s path
close enough to run the risk of collision, the vessel that views the
crossing vessel to the starboard (right) side must give-way.
All vessels which are fishing with nets, lines or trawls are
considered under International Rules to be shing vessels. Boats
with trolling lines are not considered shing vessels.
If the other vessel is to the port (left) side, maintain your course
and direction, provided the other vessel gives you the right-ofway as it should.
If you are passing another vessel, you are the give-way vessel.
This means that the other vessel is expected to maintain its
course and speed. You must stay out of its way as you clear it,
altering course and speed as necessary.
Conversely, if you are being passed by another vessel, you
should maintain your speed and direction so that the other
vessel can steer itself around you.
There are three other rules to always remember when driving
your boat around other vessels.
When navigating in narrow channels, you should keep to the
right when it is safe and practical to do so. If the operator of a
power-driven vessel is preparing to go around a bend that may
obstruct the view of other water vessels, the operator should
sound a prolonged blast on the whistle or horn—four to six
seconds.
If another vessel is around the bend, it too should sound the
whistle or horn. Even if no reply is heard, however, the vessel
should still proceed around the bend with caution.
If you navigate these type of waters, you should carry a portable
air horn, which are available from local marine supply stores.
Fishing vessels have the right-of-way, regardless of position.
These vessels, however, cannot impede the passage of other
vessels in narrow channels.
Sailing vessels should normally be given the right-of-way. The
exceptions to this are:
• When the sailing vessel is overtaking the power-driven
vessel, the power-driven vessel has the right-of-way.
• Sailing vessels should keep clear of any shing vessel.
• In a narrow channel, a sailing vessel should not hamper the
safe passage of a power-driven vessel which can navigate
only in such a channel.
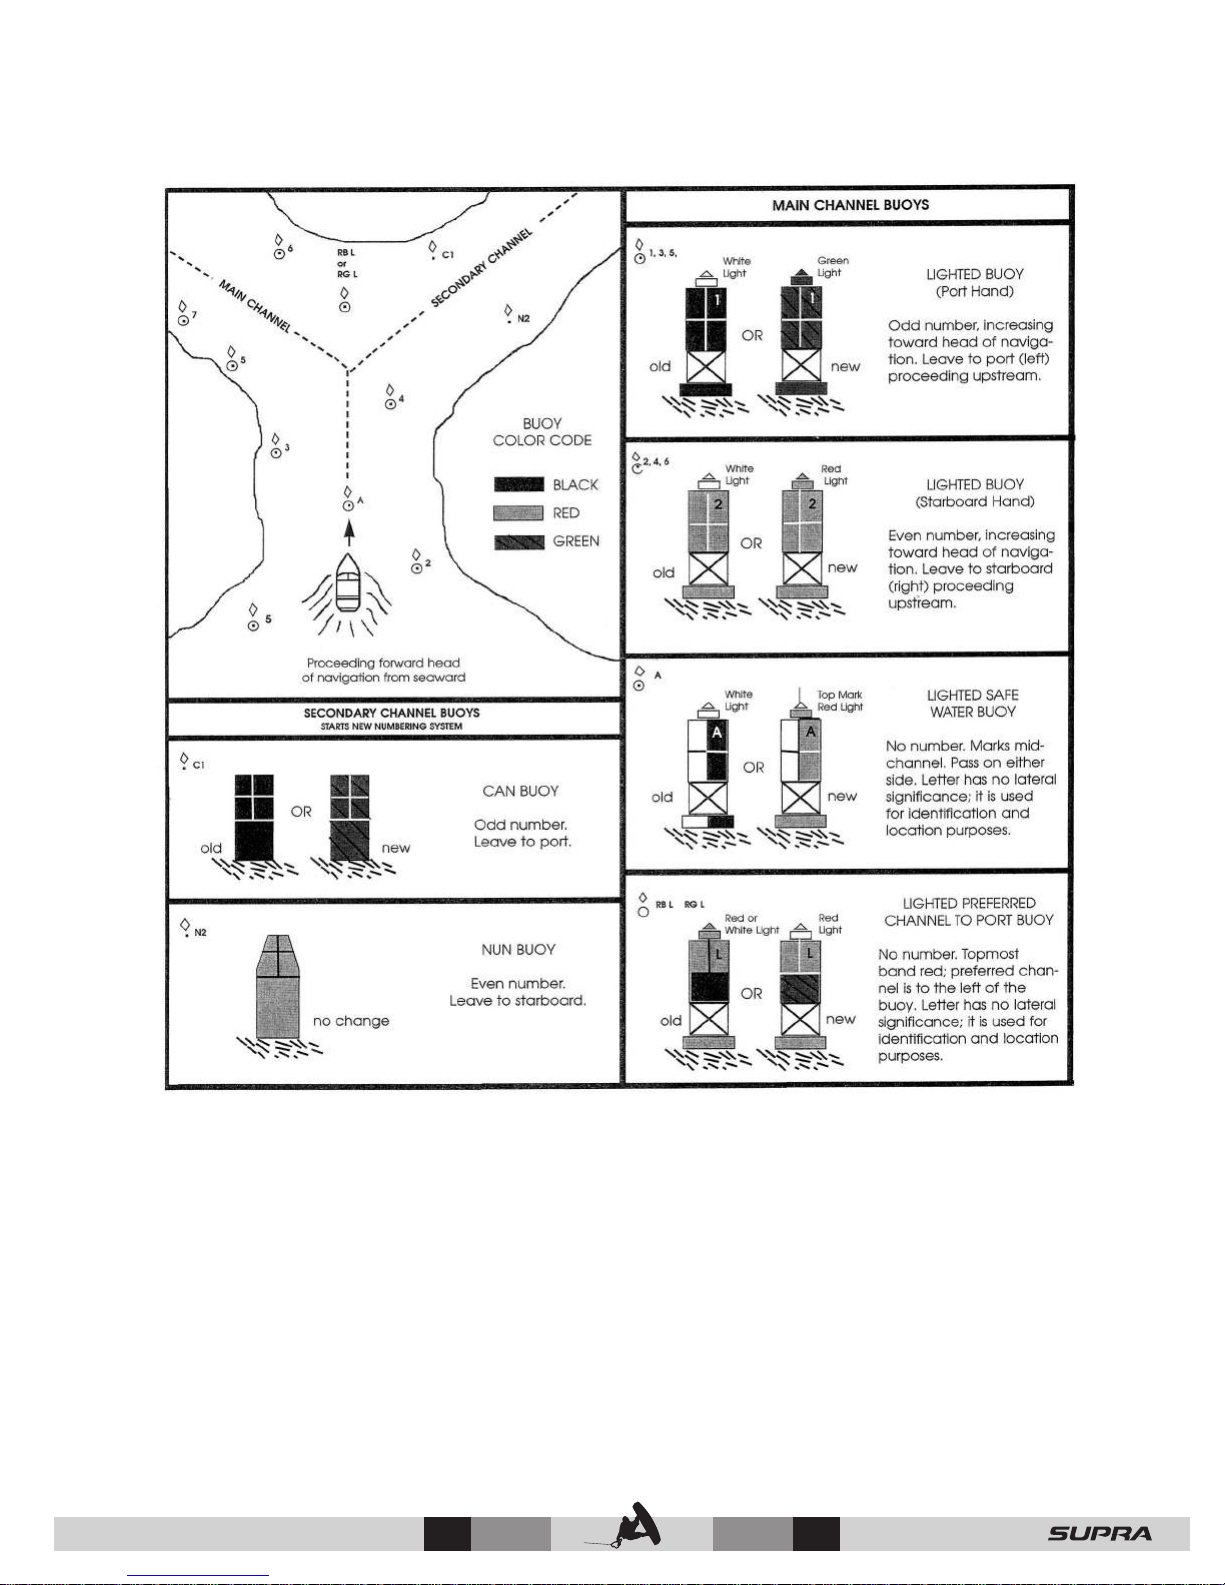
The waters of the United States are marked for safe navigation
by the lateral system of buoyage. The markers and buoys you
will encounter have an arrangement of shapes, colors, numbers
and lights to show which side of the buoy a boater should pass
when navigating in a particular direction.
The markings on these buoys are oriented from the perspective
of being entered from seaward while the boater is going towards
the port. This means that red buoys are passed on the starboard
(right) side when proceeding from open water into port, and
black buoys are to port (left) side. When navigating out of port,
your position to the buoys should be reversed: red buoys to port
and black buoys to starboard.
Many boating bodies of water are entirely within the boundaries
of a single state. The Uniform State Waterway Marking Systems
has been devised for these waters. This system uses buoys and
signs with distinctive shapes and colors to show regulatory or
advisory information.
These markers are white with black letters and orange borders.
The information signies speed zones, restricted areas, danger
areas and general information.
Remember: Markings may vary by geographic location. Always
consult local boating authorities before driving your boat in
unfamiliar waters.
(See examples of buoys and markers next page.)
— 16
© 2016 Skier’s Choice, Inc.
© 2016 Skier’s Choice, Inc.
Page 18
© 2016 Skier’s Choice, Inc.
© 2016 Skier’s Choice, Inc.
17 —
Page 19
SR SA
Boat Specifications:
Overall Length w/o Platform ...........................20’ 11” ................. 6.4M
Overall Length w/Platform................................. 23’ 1” ................ 7.0M
Overall Length w/Platform & Trailer ............ 26’10” ................. 8.2M
Width (Beam) ............................................................102” ................. 2.6M
Overall Width w/Trailer ..........................................102” ................. 2.6M
Draft ............................................................................... 28” ................. 0.7M
Weight - Boat Only ........................................4,800 lbs. ..............2,177K
Weight - Boat & Trailer ................................. 6,300 lbs. ..............2,540K
Capacity - Passenger ..................................................14 ...................... 14
Capacity - Weight ..........................................2,200 lbs. ................. 771K
Capacity - Fuel ....................................................45 gals. ................. 170L
Capacity - Ballast ............................................3,000 lbs. ...............1361K
Engine .............................................Raptor 400 - SR400 ...................6.2L
NOTE: Add weight for Fuel, Batteries, Options & Gear to determine true boat weight.
— 18
Boat Specifications:
Overall Length w/o Platform ............................. 22’ 8” ...............6.90M
Overall Length w/Platform...............................24’ 10” ................. 7.6M
Overall Length w/Platform & Trailer .............. 28’ 7” ................. 8.7M
Width (Beam) ............................................................102” ...............2.54M
Overall Width w/Trailer ..........................................102” ...............2.59M
Draft ............................................................................... 28” ................ .0.7M
Weight - Boat Only ........................................5,300 lbs. ..............2,404K
Weight - Boat & Trailer ................................. 6,900 lbs. ..............3,130K
Capacity - Passenger ..................................................16 ...................... 16
Capacity - Weight ..........................................2,400 lbs. ................. 861K
Capacity - Fuel ....................................................65 gals. ................. 189L
Capacity - Ballast ............................................3,200 lbs. ................. 408K
Engine ............................................ Raptor 400 - SA400 ...................6.2L
NOTE: Add weight for Fuel, Batteries, Options & Gear to determine true boat weight.
© 2016 Skier’s Choice, Inc.
© 2016 Skier’s Choice, Inc.
Page 20
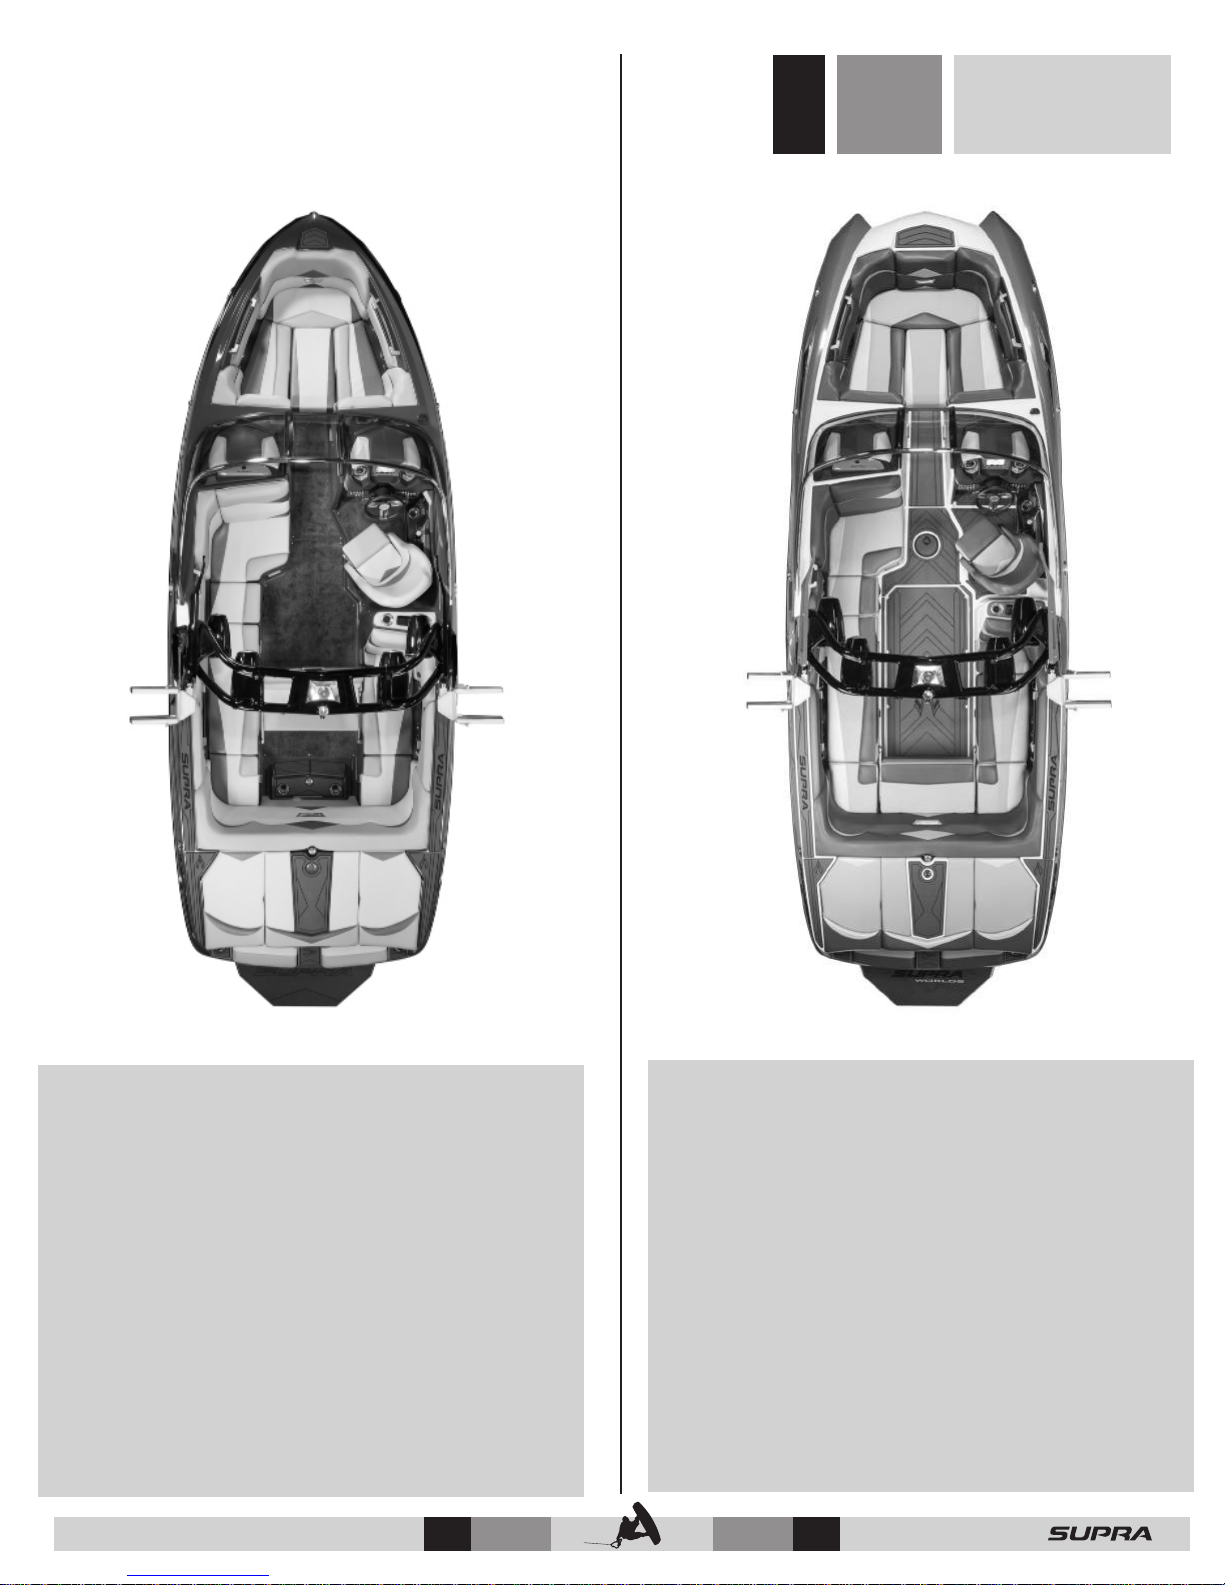
Section 5
Boat Specications
SG
SE
Boat Specifications:
Overall Length w/o Platform ............................. 23’ 8” ...............7.34M
Overall Length w/Platform................................. 25’ 9” ................. 7.6M
Overall Length w/Platform & Trailer .............. 29’ 6” ................. 9.0M
Width (Beam) ............................................................102” ................. 2.6M
Overall Width w/Trailer ..........................................102” ................. 2.6M
Draft ............................................................................... 28” ................. .66M
Weight - Boat Only ........................................5,200 lbs. ..............2,359K
Weight - Boat & Trailer ................................. 6,800 lbs. ..............3,084K
Capacity - Passenger ..................................................17 ...................... 17
Capacity - Weight ..........................................2,500 lbs. ................. 952K
Capacity - Fuel ....................................................72 gals. ................. 253L
Capacity - Ballast ............................................3,200 lbs. ................. 997K
Engine ............................................ Raptor 440 - SG450 ...................6.2L
NOTE: Add weight for Fuel, Batteries, Options & Gear to determine true boat weight.
© 2016 Skier’s Choice, Inc.
© 2016 Skier’s Choice, Inc.
Boat Specifications:
Overall Length w/o Platform ............................. 24’ 6” ...............7.34M
Overall Length w/Platform................................. 26’ 7” ................. 7.8M
Overall Length w/Platform & Trailer .............. 30’ 4” ................. 8.6M
Width (Beam) ............................................................102” ...............2.59M
Overall Width w/Trailer ..........................................102” ................. 2.6M
Draft ............................................................................... 28” ................. .66M
Weight - Boat Only ........................................5,400 lbs. ..............2,450K
Weight - Boat & Trailer ................................. 7,000 lbs. ..............3,175K
Capacity - Passenger ..................................................18 ...................... 18
Capacity - Weight ..........................................2,800 lbs. ................. 952K
Capacity - Fuel ....................................................83 gals. ................. 253L
Capacity - Ballast ............................................3,200 lbs. ................. 997K
Engine ............................................. Raptor 440 - SE450 ...................6.2L
NOTE: Add weight for Fuel, Batteries, Options & Gear to determine true boat weight.
19 —
Page 21

Section 6
Break-In Period
Break In Period
Taking care to properly break in your new engine will pay o in
the long run. In our years of eld testing, we have proven that
an Indmar engine, when properly broken in according to our
simple procedures, will last longer, run better and have fewer
repairs over its lifetime.
Your new engine does not require an elaborate break-in
procedure. Just follow these simple instructions and you are
o to a great start.
The three (3) most important aspects of new engine break-in
are:
1. Avoid running engine at high speeds.
2. Do not carry a heavy load (passengers, gear, etc.).
3. Vary your boat speed during break-in. Don’t run at the same
RPM for a long period of time.
BREAK-IN STEPS
• For the rst hour, do not exceed 2,000 RPM.
• For the second hour, do not exceed 3,000 RPM.
• For the next seven hours, do not exceed 4,000 RPM and vary
the RPM regularly
NOTES:
BREAK-IN TIPS
• Avoid fast accelerations and don’t carry (or pull) a heavy load
during this period.
• Always let engine warm up gradually before acceleration.
• Check oil frequently. During the rst 50 to 100 hours, an
engine can use more oil than usual. Maintain oil at a proper
level at all times (do not overll).
• Monitor transmission uid levels.
• Report abnormal noises or vibrations to your dealer.
• Keep an eye out for loose mountings, ttings, nuts, bolts,
and clamps.
During the BREAK-IN process, engine temperature should be
carefully monitored and speed should be reduced if overheating
is evident. ALSO, PLEASE REFER TO ENGINE OWNER’S
MANUAL FOR BREAK-IN INFORMATION.
NOTICE: PLEASE REFER TO ENGINE OWNER’S MANUAL for
maximum RPM and engine break-in procedure.
Do not exceed maximum RPM recommended for your
engine. Exceeding the maximum RPM may result in damage
to the engine.
Before starting your engine you must open the engine box
and check engine compartment and bilge for gasoline and
oil vapors.
— 20
© 2016 Skier’s Choice, Inc.
© 2016 Skier’s Choice, Inc.
Page 22
Section 7
Starting & Operation
A standard pre-starting procedure should be always be followed before the rst start-up of the day.
1. Check the engine oil level.
2. Check for gasoline fumes in bilge or engine compartment.
3. Operate engine blower for 4 minutes before starting the engine to remove any fumes.
4. Check manual and automatic operation of bilge pump. Make sure bilge areas are empty.
Other items might also be inspected, depending on the boat and its use. It is advisable to formulate a check list
particular to the equipment and operation of your boat.
REFER TO THE BOATMAN’S CHECKLIST OF THIS MANUAL.
Consult the local Coast Guard Auxiliary or Power Squadron for full details on boating safety.
NOTE: Add-on electrical accessories should never be connected to the ignition terminal or ignition circuit.
IMPORTANT: DO NOT continue to operate the starter for more than 15 seconds at a time without pausing to allow the starter motor
to cool down for at least 2 minutes. This will also allow the battery to recover between starting attempts. PLEASE REFER TO ENGINE
OWNER’S MANUAL FOR ADDITIONAL DETAILS.
BEFORE STARTING ENGINE, BE SURE THAT THE SHIFT SELECTOR IS IN NEUTRAL.
The correct starting procedure depends upon the type of engine. Please refer to the engine manual before starting.
Do not start engine if gas fumes are present.
To Start Electronic Fuel Injection
(EFI) Engine
1. Place shift selector in Neutral with the throttle in the upright
(zero) position. (If throttle is not in the idle position, the
throttle position sensor will not allow the engine computer
to proceed with a normal starting procedure).
2. Turn Ignition Key to Start Position to operate the starter.
3. Release the Key when engine starts (key will return to run
position).
4. Allow the engine to establish a good idle (30 to 60 seconds)
before getting underway.
5. Shift slowly into forward or reverse, allowing the transmission
time to engage before powering up.
NOTE: Should the EFI engine become “ooded” use the
following procedure to start:
1. Place shift selector in Neutral and disengage the transmission
by pushing the transmission lockout button located at the
bottom of the lever.
2. With the transmission disengaged, push the lever forward to
full throttle position. (This will cause the computer to shut
o the fuel injectors, which will allow the engine to clear of
excess fuel during starting).
3. Turn the Ignition Key to Start Position and operate the starter
for no more than 15 seconds at a time, until the engine
starts.
4. When the engine starts, back o the throttle and allow the
engine to establish a good idle (30 to 60 seconds).
NOTE: It is normal for the idle to speed up in cold start
conditions.
5. Return the throttle to idle position and the transmission
lockout will automatically reengage the transmission in
neutral position.
6. When ready to get underway, shift slowly into forward
DO NOT continue to operate the starter for more than 15
seconds at a time without pausing to allow the starter motor to
or reverse, allowing the transmission time to engage the
gearing before powering up.
cool down for at least 2 minutes. This will also allow the battery
to recover between starting attempts. PLEASE REFER TO ENGINE
Engine Warm-Up
OWNER’S MANUAL FOR ADDITIONAL DETAILS.
Always let engine warm up to normal operating temperature
before accelerating.
© 2016 Skier’s Choice, Inc.
— 21
© 2016 Skier’s Choice, Inc.
Page 23
Fuel Precautions
Use a gasoline with a minimum octane rating of 89. The
Supercharged engine should use a minimum octane rating of
93. See engine owner’s manual for more information.
DO NOT use gasoline containing methyl alcohol (methanol).
Methanol can damage your boat’s fuel system.
Fuel Precautions
Sparks while fueling could cause an explosion!
Before Fueling:
1. Turn o engine.
2. Turn o all electrical systems.
3. Extinguish cigarettes or any open ame.
While Fueling:
1. Keep fuel hose nozzle in contact with ll pipe to provide
grounding.
2. Fill tank at a slow rate to avoid spills.
Gasoline Stabilizer should be added to the fuel tank when
the boat is used infrequently or whenever your boat will not
be used for two weeks or more. During storage, always add
Gasoline Stabilizer to reduce gumming or tank sludge.
E-10 fuels require fuel stabilizers that are specifically
designed for E-10 fuels to help prevent moisture absorption,
phase separation and gasoline stabilization.
E15 FUEL WARNING
• DO NOT USE E15 FUELS! E15 fuel WILL damage your
engine and it will not operate.
• THIS DAMAGE IS NOT COVERED BY ANY WARRANTY
Filling the Tank
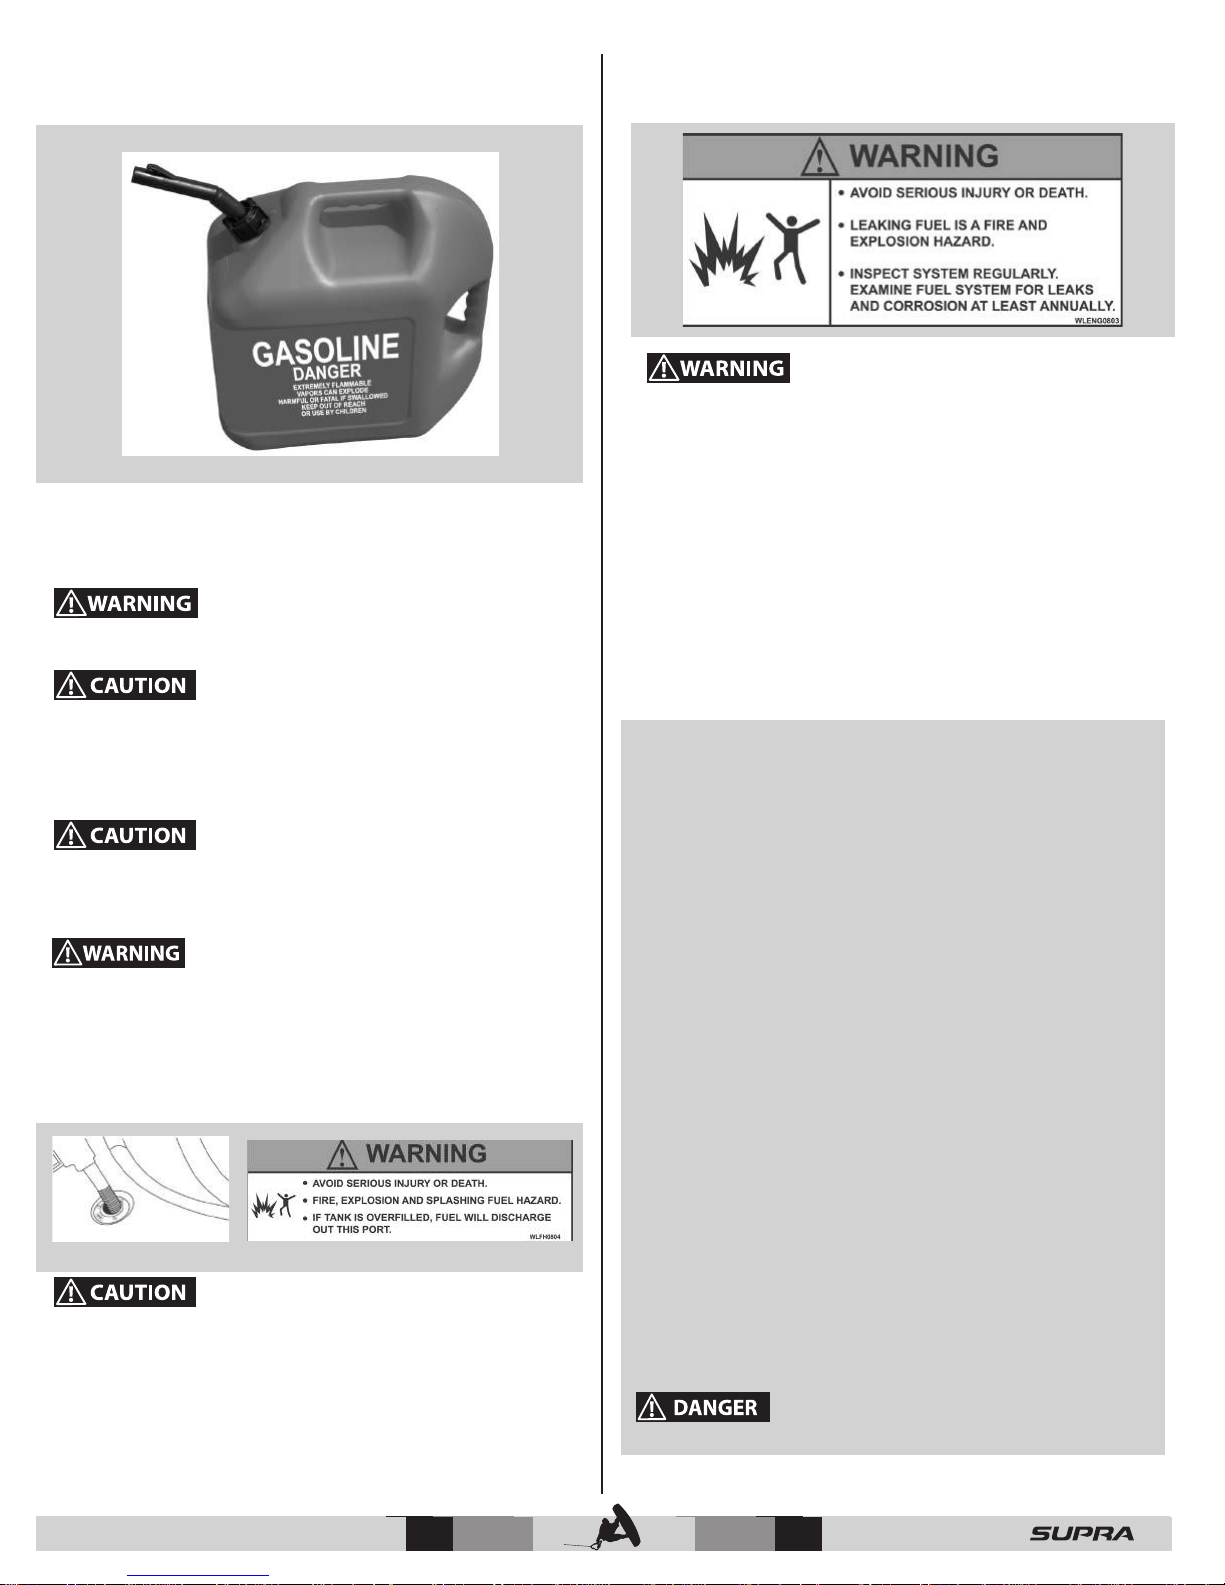
Be especially careful when lling the fuel tank. DO NOT
over ll the tank. Fuel may empty through the fuel vent and
damage to nishes could result.
Fuel Vent
The fuel cap is located on the rear deck, 2-4 feet from
the stern. To open, push the black tab located on
the bottom side of thegas cap. When the black tab is
pushed, the gas cap will hinge upward. To close, push
the gas cap down. When the gas cap is completely
closed a “click” sound should be heard. The audible
“click” ensures that the gas cap is closed and sealed.
The new fueling system prevents spillage from
occurring. Air is allowed to escape from the front
and rear of the gas tank. Both vents are on a central
fuel line, which runs to a central holding container
for the vapor. The vapor is released over time. This
type of venting system allows for the tank to be filled
without building any back pressure. Without back
pressure, spillage should be completely eliminated
from the fueling process.
This venting system doesn’t allow water to enter the
fuel system. In the unlikely event that water runs up
against the fuel vent, the fuel vent has a one-way
valve. The one way valve allows for air to release,
but denies water from entering. The gas cap itself
is sealed with a rubber seal. When the gas cap is
“clicked” closed the seal prevents any water from
entering the system.
If fuel is spilled on stripes or decals, apply a common bath
cleaner (nonabrasive) and wipe with a damp cloth. Rinse the
spill area with clean water.
© 2016 Skier’s Choice, Inc.
— 22
© 2015 Skier’s Choice, Inc.
© 2016 Skier’s Choice, Inc.
22 —
Page 24
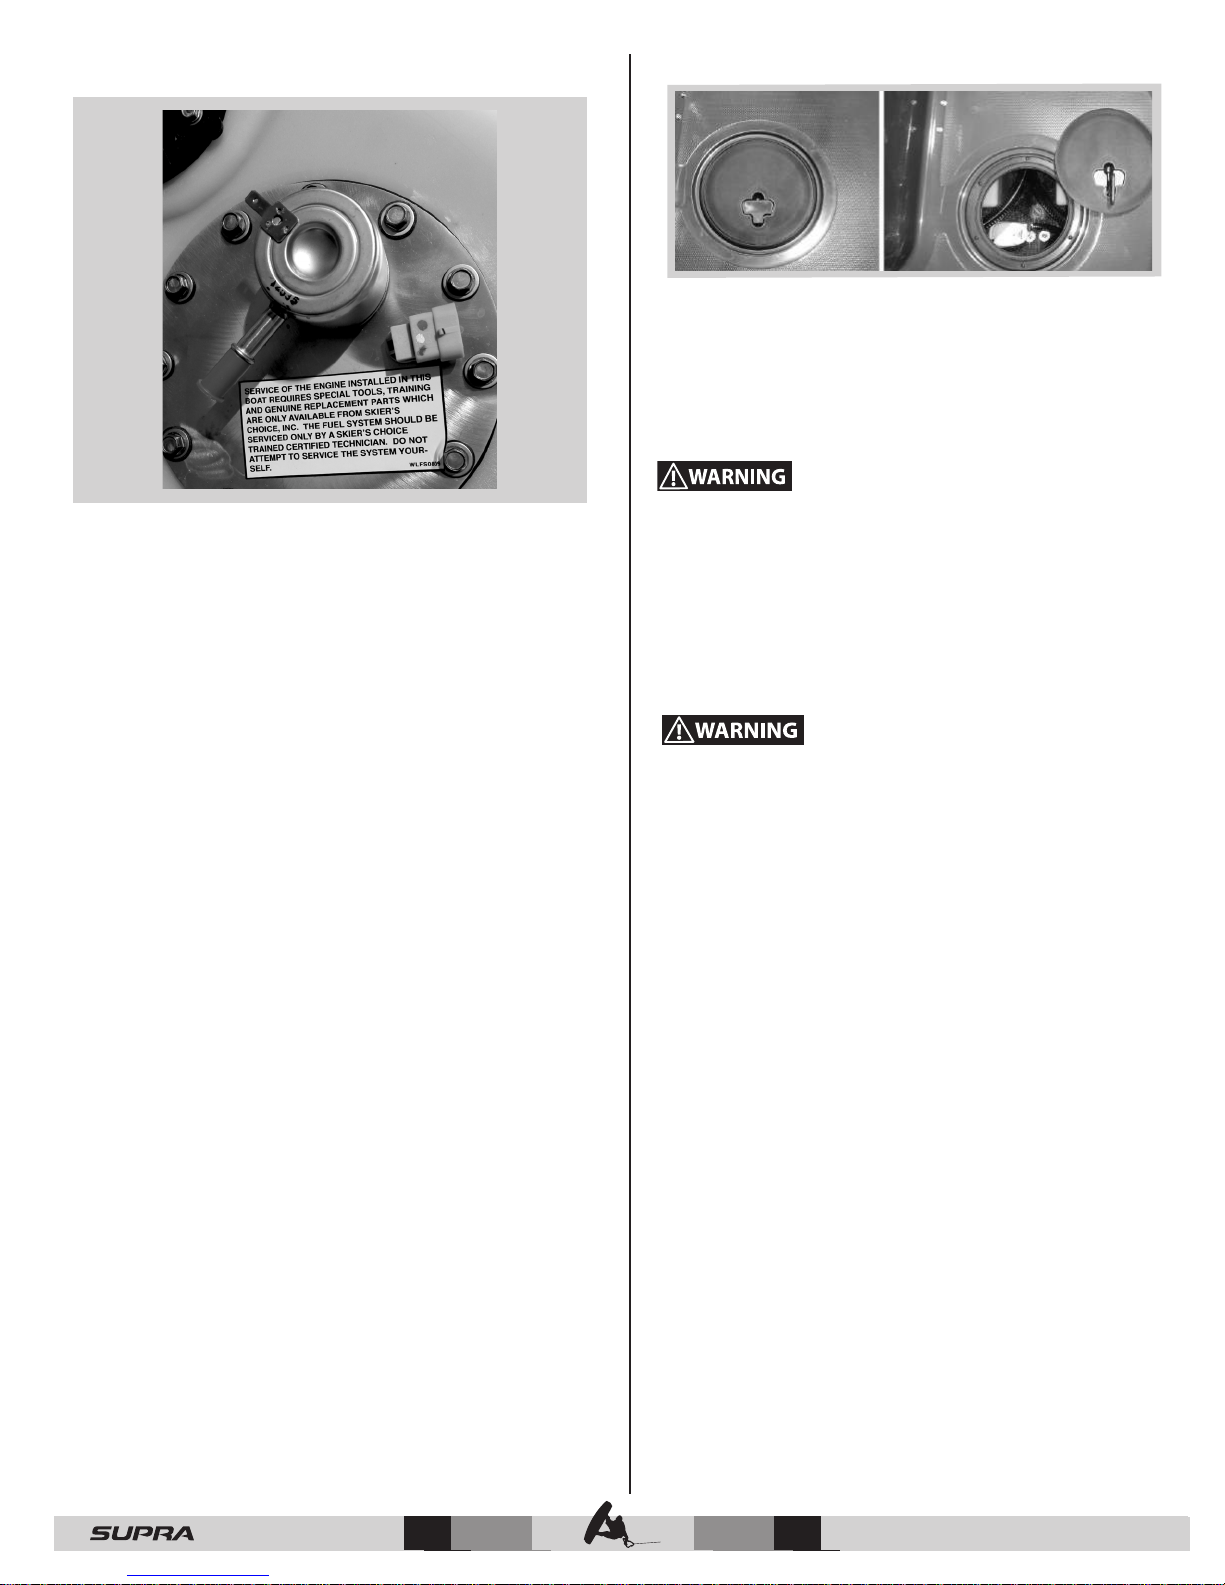
Your boat contains a fuel system that is designed using current
fuel delivery technology. The common terminology for this
type of system is: Pump in Tank.
The system consists of a dual high pressure pump canister that
is mounted inside the fuel tank. On the top of the canister there
is a fuel pressure regulator. The engine’s fuel lines are connected
to the in tank fuel pump via a specially designed shielded,
exible high pressure fuel hose. This hose is pressurized. This
system requires special tools and knowledge to service and
maintain and as such is not owner serviceable.
The fuel lter for the boat’s fuel delivery system is in the fuel
tank. This style lter system is considered a lifetime lter under
normal circumstances.
The pump in tank fuel delivery system uses the fuel to lubricate
and cool the fuel pumps. Running the pumps with very low
fuel levels or running the pumps without fuel in the tank can
induce air into the pumps which may shorten the fuel pump’s
longevity. This type of fuel pump damage is not warrantable.
Center Drain PlugFuel Tank Pump
On V-drive models the center drain plug is accessed via the
access cover in the center oor panel.
It is extremely important that the drain plug is always checked
before starting the engine. The drain plug should be secured
in place using a wrench.
DO NOT start engine until center drain plug is checked and
secured in place.
Rear Drain Plug
The rear drain plug is located at the back of the boat, near the
bottom of the transom (See photo). It is extremely important
that the drain plug is always checked before starting the engine.
The drain plug should be secured in place using a wrench.
DO NOT start the engine until the drain plug is checked and
secured in place.
DO NOT try to install the drain plug while the engine is
running.
The following USCG information is important to
your safety and safe operation of the boat:
”THIS BOAT COMPLIES WITH U.S. COAST GUARD
SAFETY STANDARDS IN EFFECT ON THE DATE OF
CERTIFICATION WITH THE EXCEPTION OF CERTAIN FUEL
SYSTEM REQUIREMENTS ASSOCIATED WITH ITS FUEL
INJECTED ENGINE AS AUTHORIZED BY U.S. COAST GUARD
GRANT OF EXEMPTION (CGB 09-003). MAINTENANCE OF THE
FUEL SYSTEM IN THIS BOAT SHOULD BE PERFORMED ONLY BY
EXPERIENCED TECHNICIANS USING IDENTICAL FUEL SYSTEM
COMPONENTS.”
“SERVICE OF THE ENGINE INSTALLED IN THIS
BOAT REQUIRES SPECIAL TOOLS, TRAINING AND GENUINE
REPLACEMENT PARTS WHICH ARE ONLY AVAILABLE FROM
SKIER’S CHOICE, INC. THE FUEL SYSTEM SHOULD BE
SERVICED ONLY BY A SKIER’S CHOICE TRAINED CERTIFIED
TECHNICIAN. DO NOT ATTEMPT TO SERVICE THE SYSTEM
YOURSELF.”
© 2015 Skier’s Choice, Inc.
© 2016 Skier’s Choice, Inc.
— 23
© 2016 Skier’s Choice, Inc.
23 —
Page 25
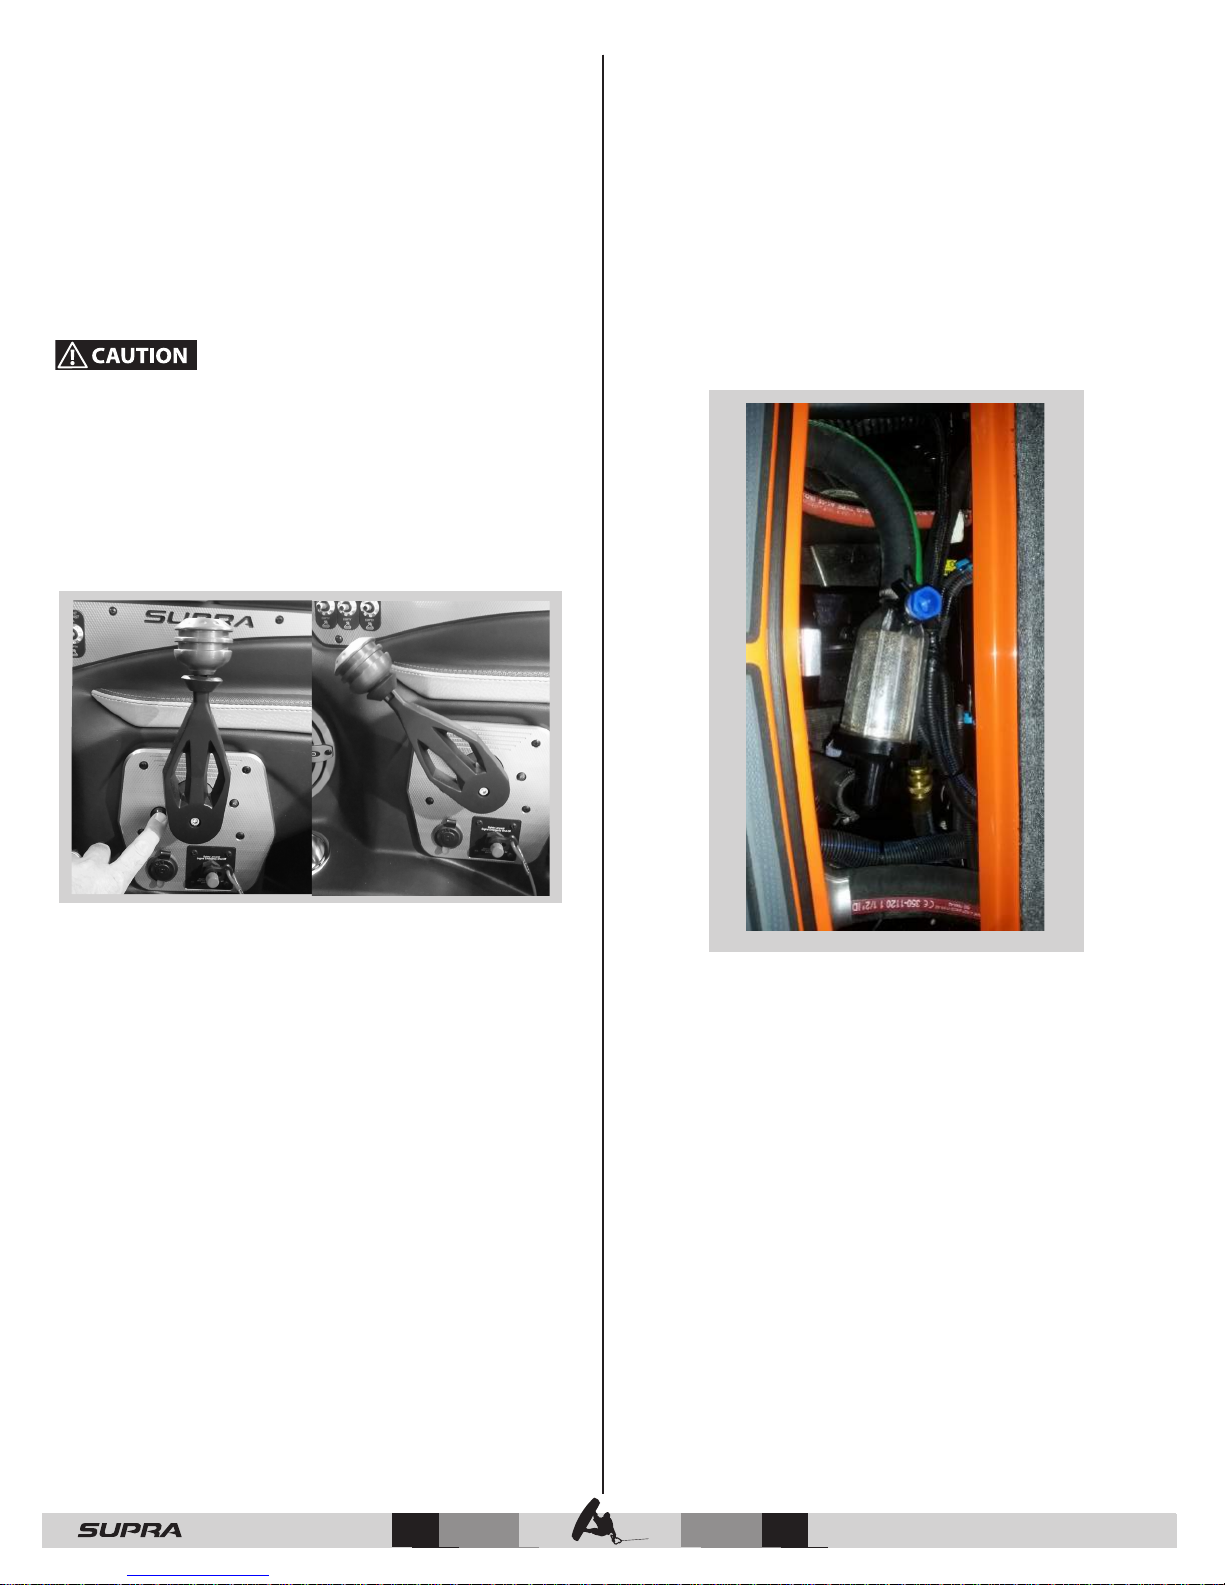
Throttle Lever
The throttle lever controls both the throttle and the transmission.
The idle position (normally vertical) is the zero throttle position
and the neutral position for the transmission. A safety ring
(umbrella) keeps the lever from being accidentally moved to
engage the transmission.
To place the transmission into gear, with your hand placed over
the lever ball, pull up on the safety ring (umbrella) and slowly
push the lever into forward gear or slowly pull the lever back
into reverse gear.
Never shift the lever directly from the neutral (vertical) position
into a speed position.
• To prevent damage to the transmission, always allow the
transmission time to engage before accelerating the engine.
• Once the transmission’s engaged, you may accelerate as
quickly as you like.
Optional Water Strainer
The optional engine water strainer is a lter for the engine
cooling water. It is recommended for boats that are going to
be operated in weedy conditions or other areas where debris
could clog the engine. It consists of a stainless steel mesh lter
inside a clear cup. It is located between the water intake on the
bottom of the boat and the engine’s raw water pump. It should
be checked periodically for debris as conditions dictate. To
remove debris, unscrew the clear sight cup, remove the o-ring
and stainless steel mesh lter and proceed to rinse out the cup.
Be sure to reinstall the mesh lter and o-ring before reattaching
the sight cup to the inlet.
Optional Water Strainer & Fresh Water Flush
Transmission Lockout
The Transmission Lockout button allows the transmission to
be disengaged while giving the throttle full operating range.
With the lever in the idle position (normally vertical), push the
button located at the bottom of the lever to disengage the
transmission. The throttle may then be operated in any open
position (forward of neutral or back of neutral upright position).
Return the throttle to idle position, and the transmission lockout
will automatically reengage the transmission in neutral position.
© 2015 Skier’s Choice, Inc.
— 24
The optional Fresh Water Flush kit is a valve specifically
designed to allow you to attach a garden hose to your engine
water intake to ush brackish or salt water out of your engine.
To use the Fresh Water Flush, simply attach a garden hose to
the valve. Turn on the water to the valve. Start the engine.
Monitor the exhaust ports on the transom of your boat and
engine temperature gauge. Water should come out of the
exhaust ports while the engine is running. It is recommended
that you run the engine at a low RPM while ushing, since
the engine’s raw water pump at higher RPMs can pump more
water than the garden hose can supply. If you have questions
on the operation of your Fresh Water Flush kit, consult your
Supra Dealer.
© 2016 Skier’s Choice, Inc.
© 2016 Skier’s Choice, Inc.
24 —
Page 26
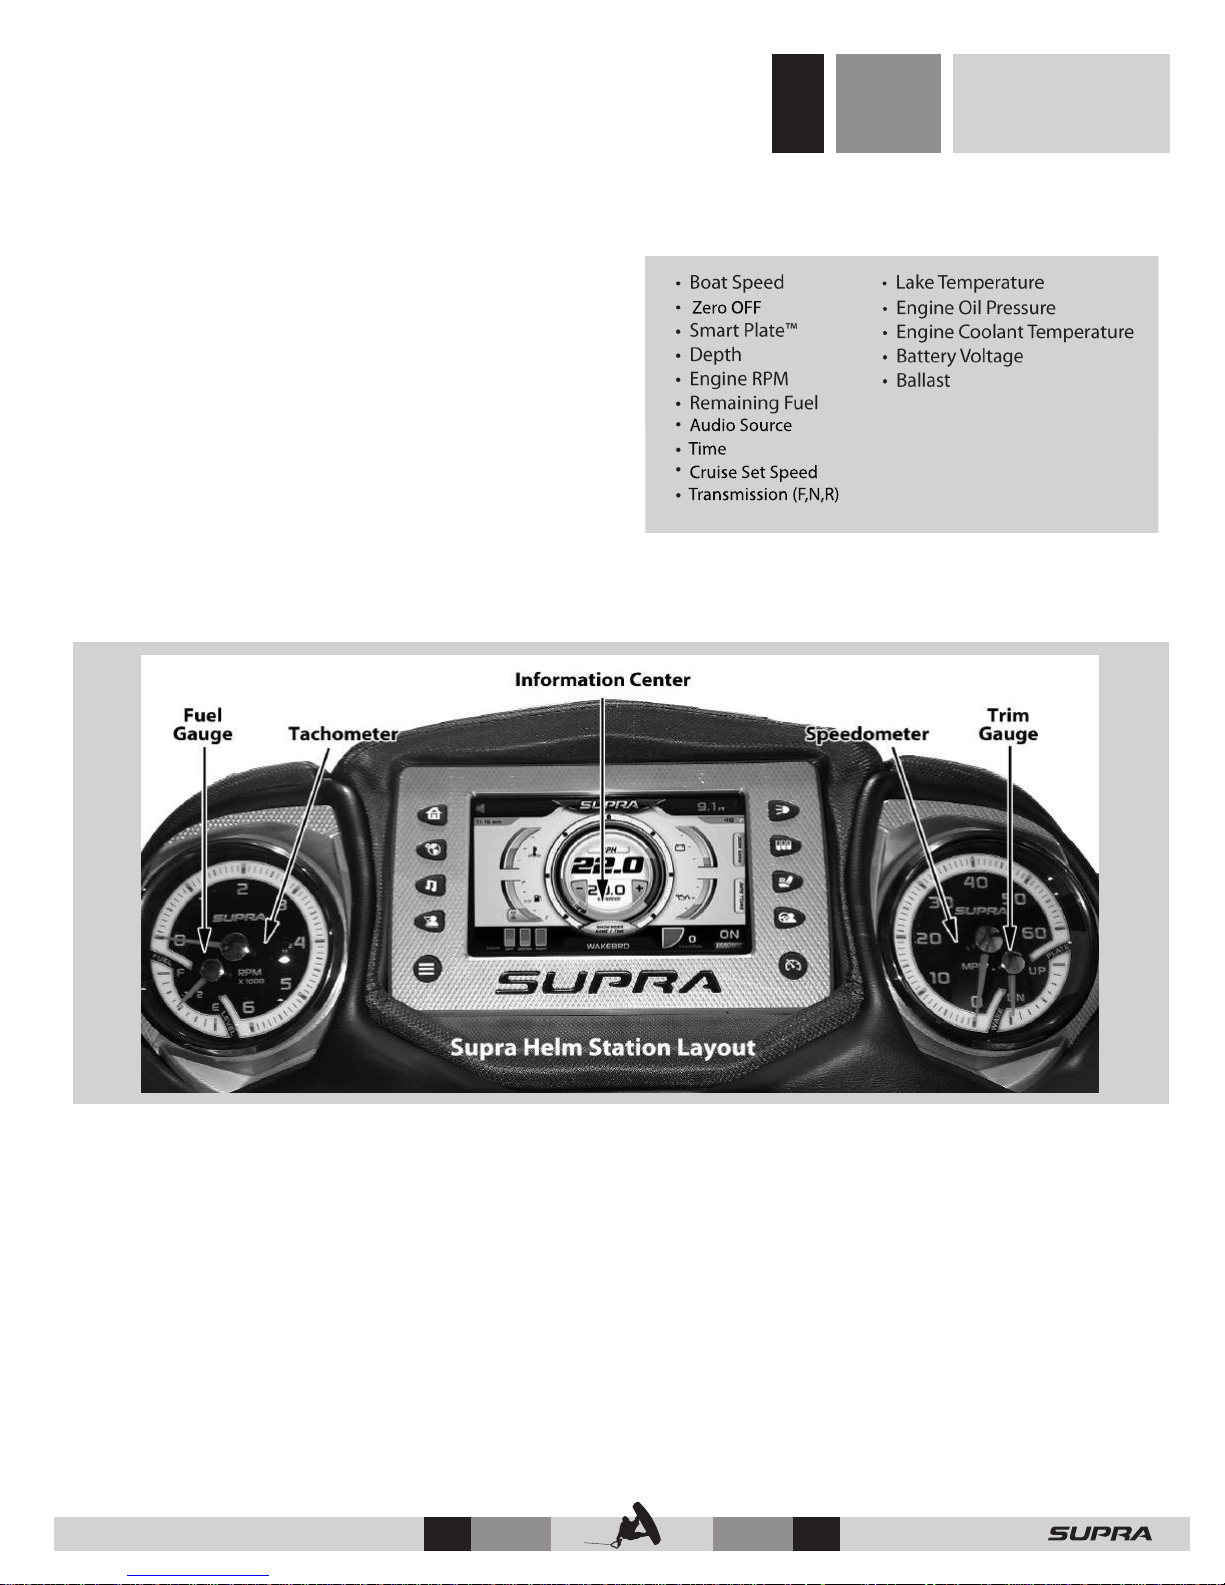
This section provides the information needed to understand
and operate the VISION Dash System installed on all Supra
Boat Models.
The instrument system includes gauges, digital displays, and a
Graphical Information Center to communicate vital real-time
information about the status and performance of the boat to
the driver. By just glancing at the dash, the driver can access:
Section 8
Instrument Panel
& Controls
© 2016 Skier’s Choice, Inc.
© 2016 Skier’s Choice, Inc.
Speed Calibration
NOTE: Some options are shown.
25 —
Page 27

Tachometer
Speedometer
The tachometer indicates the engine revolutions per minute
(RPM).
The speedometer indicates the water speed of the boat in miles
per hour. It is recommended that the speedometer be checked
for accuracy periodically.
DO NOT exceed the recommended RPM during break-in and
normal operation of your motor. Exceeding the manufacturer’s
suggested RPM may cause damage to the engine.
Engine Data Displayed on VISION Center Main Page
Oil Pressure Display
The oil pressure display indicates the oil pressure in the engine while the engine is running. If the oil pressure remains below the
normal range of 10 to 80 psi, stop the engine immediately. If engine is allowed to run while oil pressure is too low, permanent engine
damage may occur.
Running the engine with low oil pressure may cause severe engine damage.
Coolant Temperature Display
The temperature display indicates the engine coolant temperature while the coolant is circulating inside the engine. Engine
operating temperatures will vary depending on the weather conditions and engine load. Normal operating temp range is between
160 degrees and 180 degrees.
NOTICE: Refer to your Engine Owner’s Manual for additional details.
Damage from overheating an engine IS NOT warrantable.
Voltage Display
The voltage displayed indicates the battery voltage when the engine is running or the battery voltage when the engine is stopped.
The voltmeter should indicate a voltage between 13 and 16 volts when the engine is running. The electronics in Supra boats are
designed to operate with batteries that have 10.8 volts or higher. Components will not work properly if battery voltage is below
10.8 volts.
Speedometer Paddle Wheel
The Speedometer pickup is a paddle wheel located on the bottom of the boat. Poor water
conditions may cause the wheel to become clogged or give incorrect information.
© 2016 Skier’s Choice, Inc.
— 26
© 2016 Skier’s Choice, Inc.
Page 28
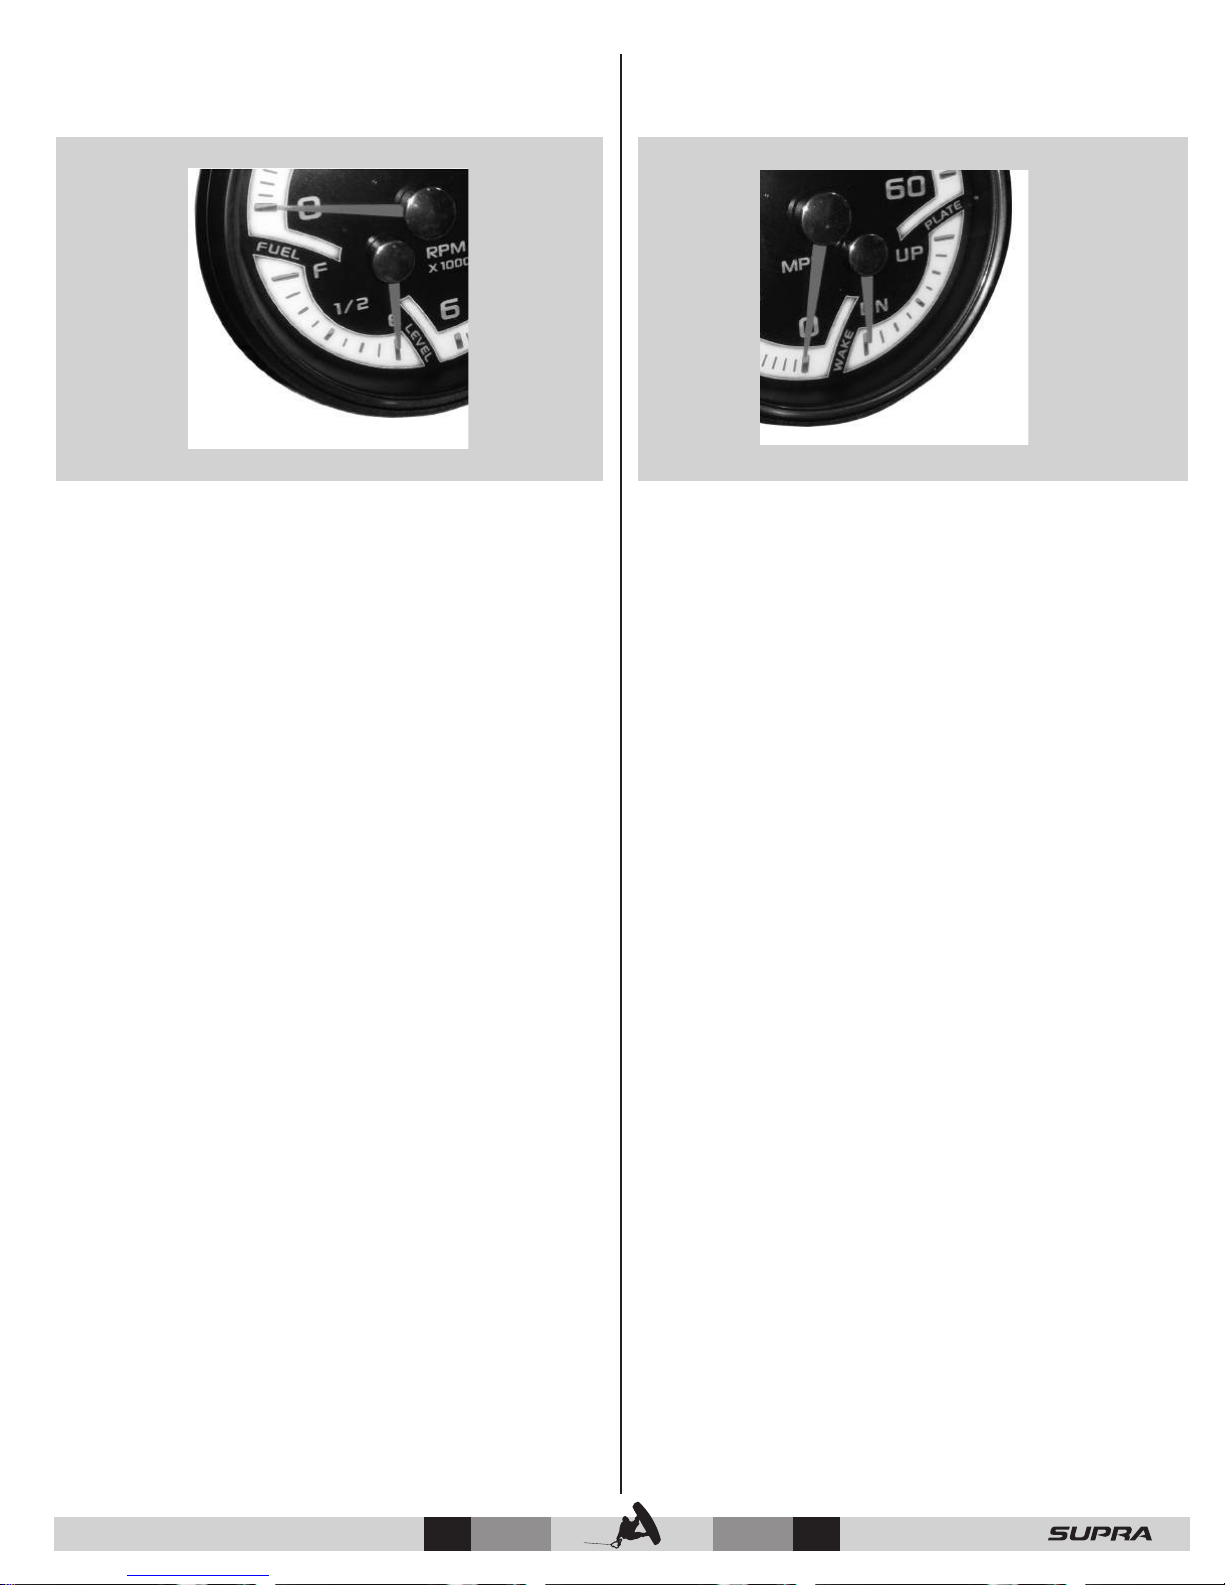
Fuel Gauge
Trim Gauge
The Fuel Gauge, located on the Tachometer, indicates the
amount of fuel remaining in the fuel tank.
This gauge indicates the approximate quantity of fuel remaining
in the tank when the ignition is in the “ON” position.
NOTICE: DO NOT run the tank to empty. To prevent
condensation from forming in the tank, it is recommended
that the tank be lled when the gauge indicates 1/4 tank
of fuel remaining.
The following conditions may be considered normal operation
of the fuel gauge and fuel system:
• Gas station pumps may shut off before the fuel gauge
indicates FULL.
• The amount of fuel required for fill-up may not exactly
correspond to the gauge.
• The gauge needle may not move away from FULL until some
time after ll-up.
• The gauge needle may move around when boat is in motion.
NOTICE: Become familiar with engine hourly fuel
consumption at various speeds and know when to check
the fuel gauge.
The Trim Gauge, located on the Speedometer, indicates the
position of the Wake Plate.
© 2016 Skier’s Choice, Inc.
27 —
Page 29
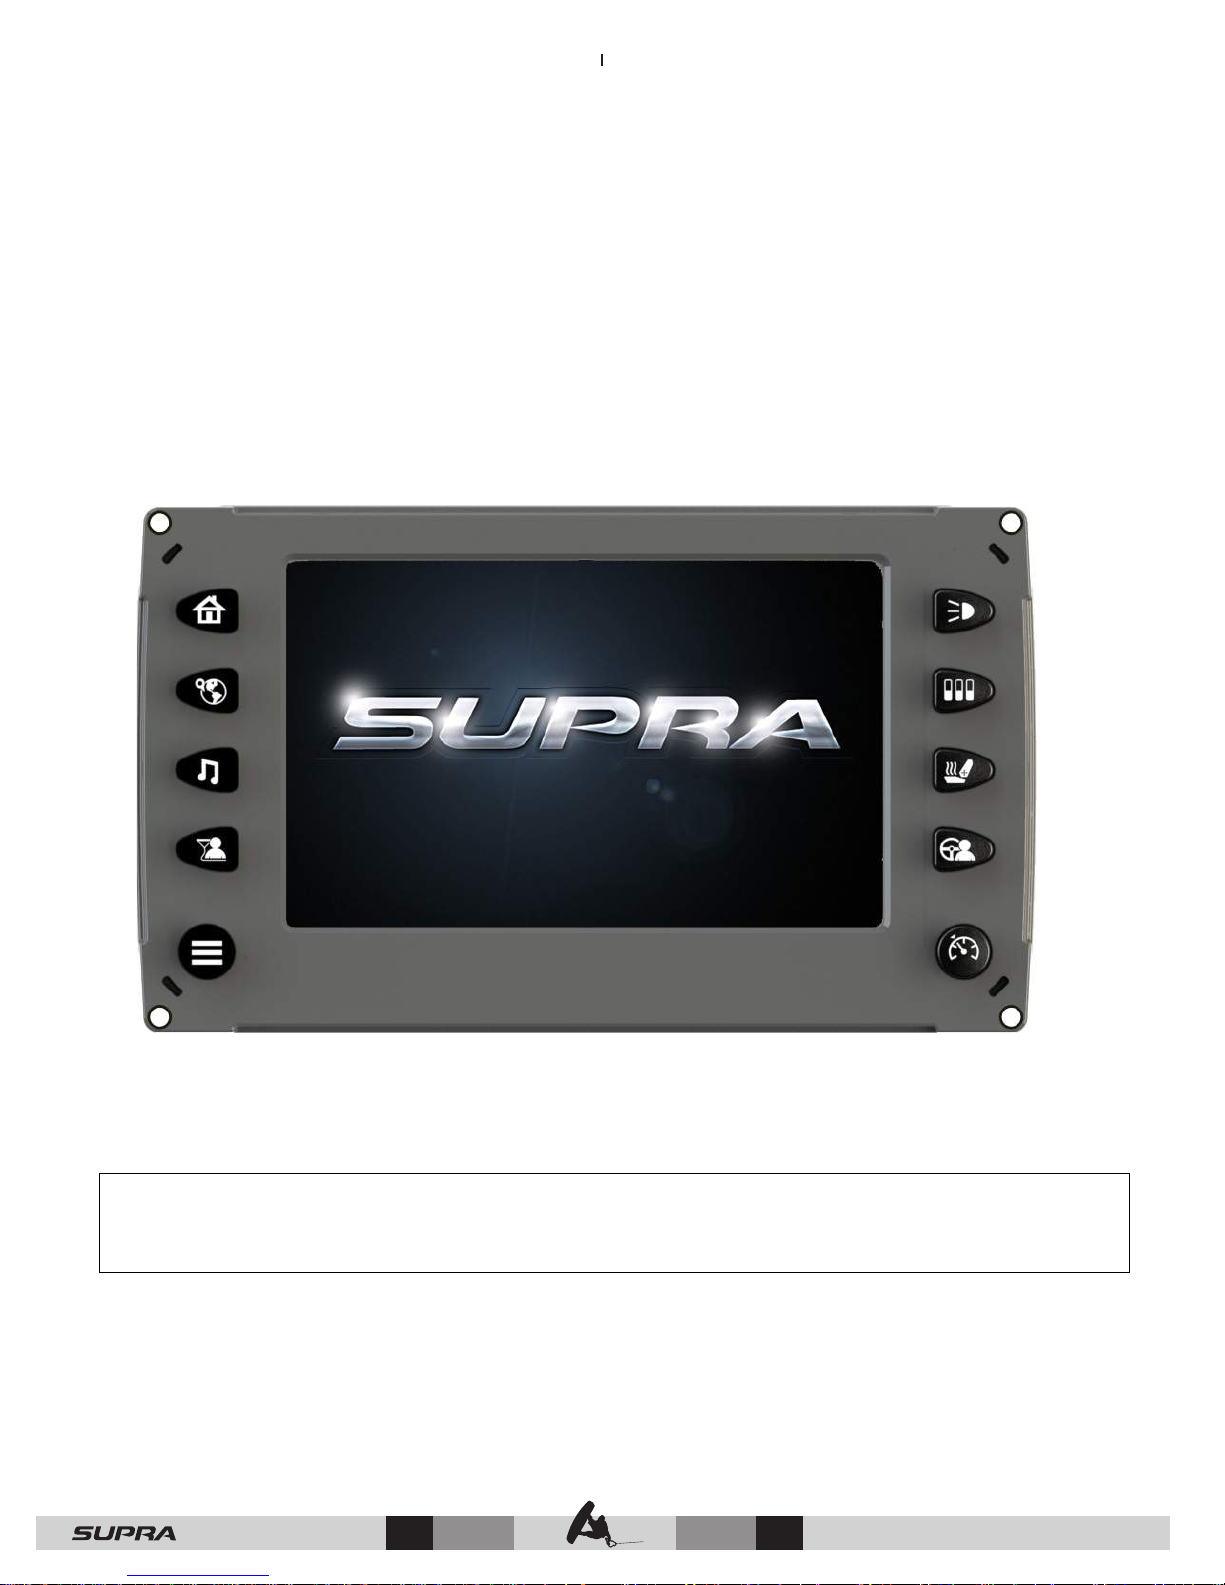
Supra
VISION TOUCH
2017
We continually strive to bring you the highest quality, full-featured products. As a result, you may find
that your actual display screens may be slightly different than what was represented in this manual at the
time of printing.
— 28
© 2016 Skier’s Choice, Inc.
Page 30
Product Information
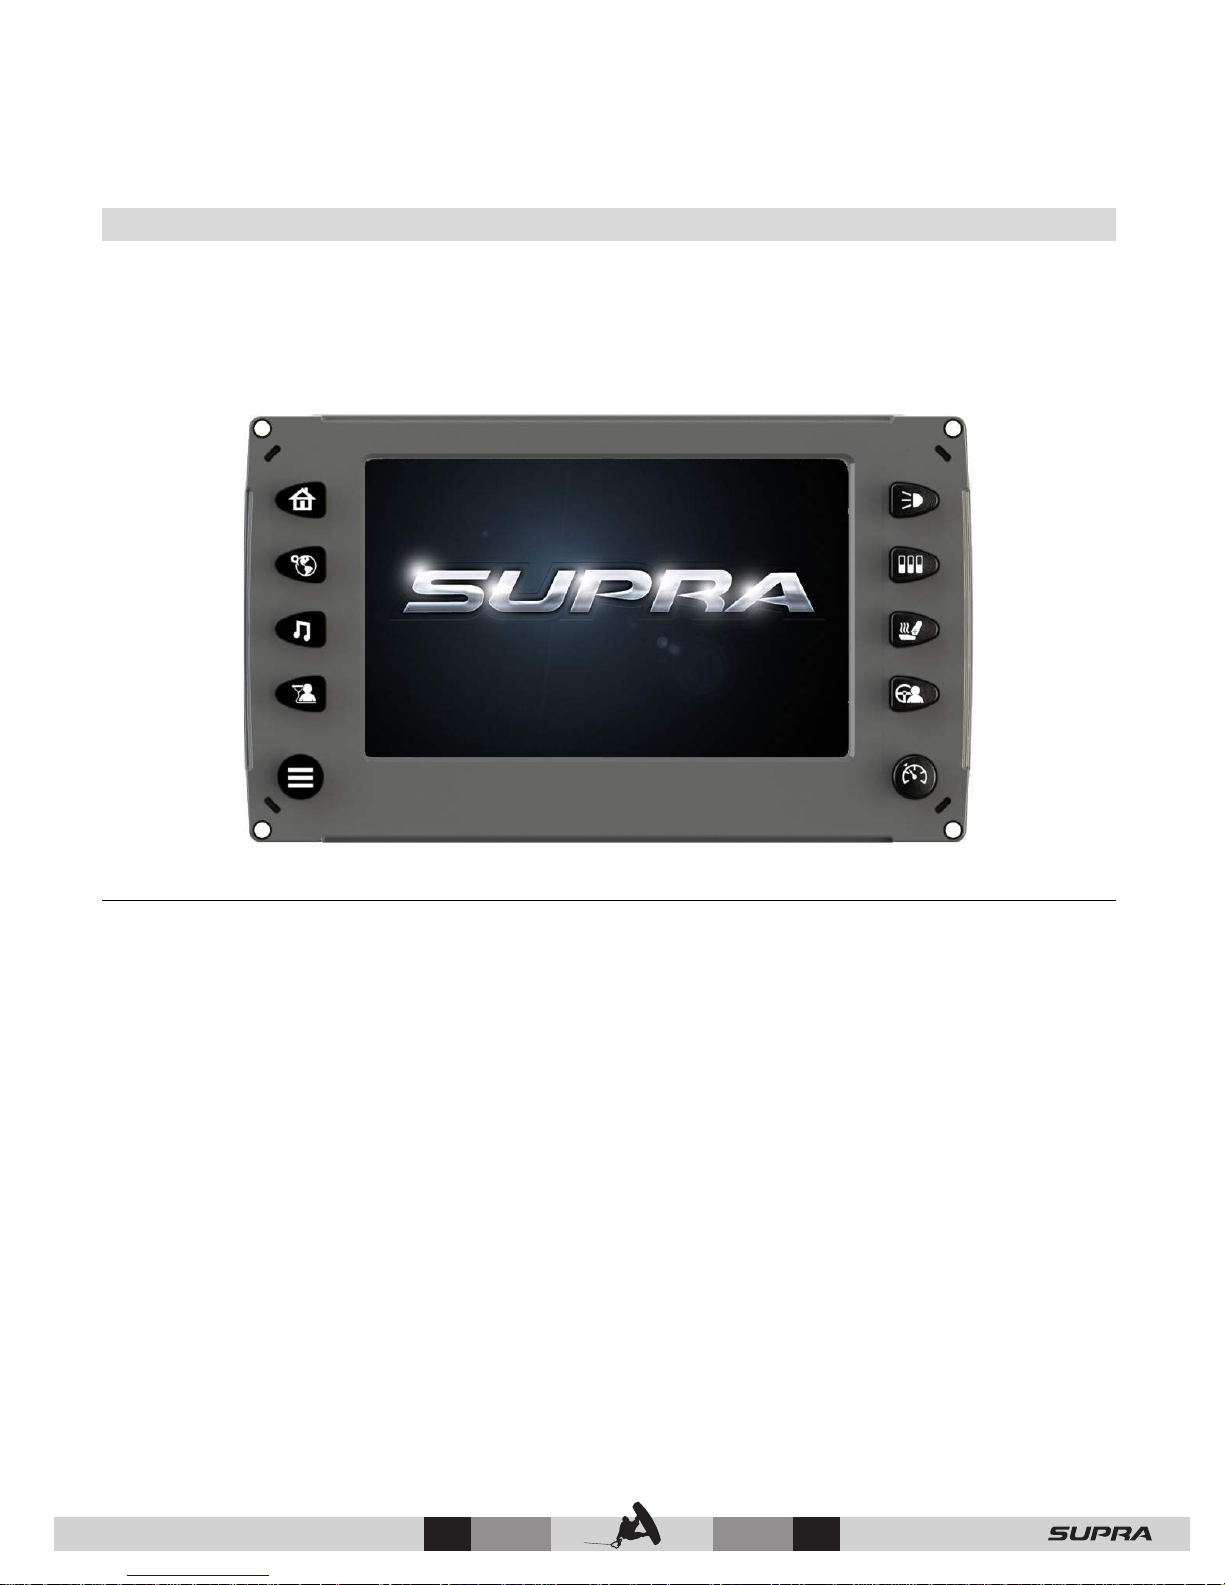
The Supra Vision Touch 2017 display is designed for instrumentation and control on
electronically controlled engines communicating via SAE J1939 and NMEA 2000. The display
enables boat operators to view many different engine, ballast, transmission parameters and
service codes and is a multifunctional tool that provides GPS tracking, a multimedia display,
cruise control and rider profiles. Included with this solution is the HV700 Touch unit.
Care and Maintenance
General maintenance is not required; however, a soft cloth can be used for cleaning the units.
Window cleaner or alcohol can also be used to clean the glass portion of the display. Do not
use harsh or abrasive cleaners on the unit.
© 2016 Skier’s Choice, Inc.
29 —
Page 31
Basic Navigation Features
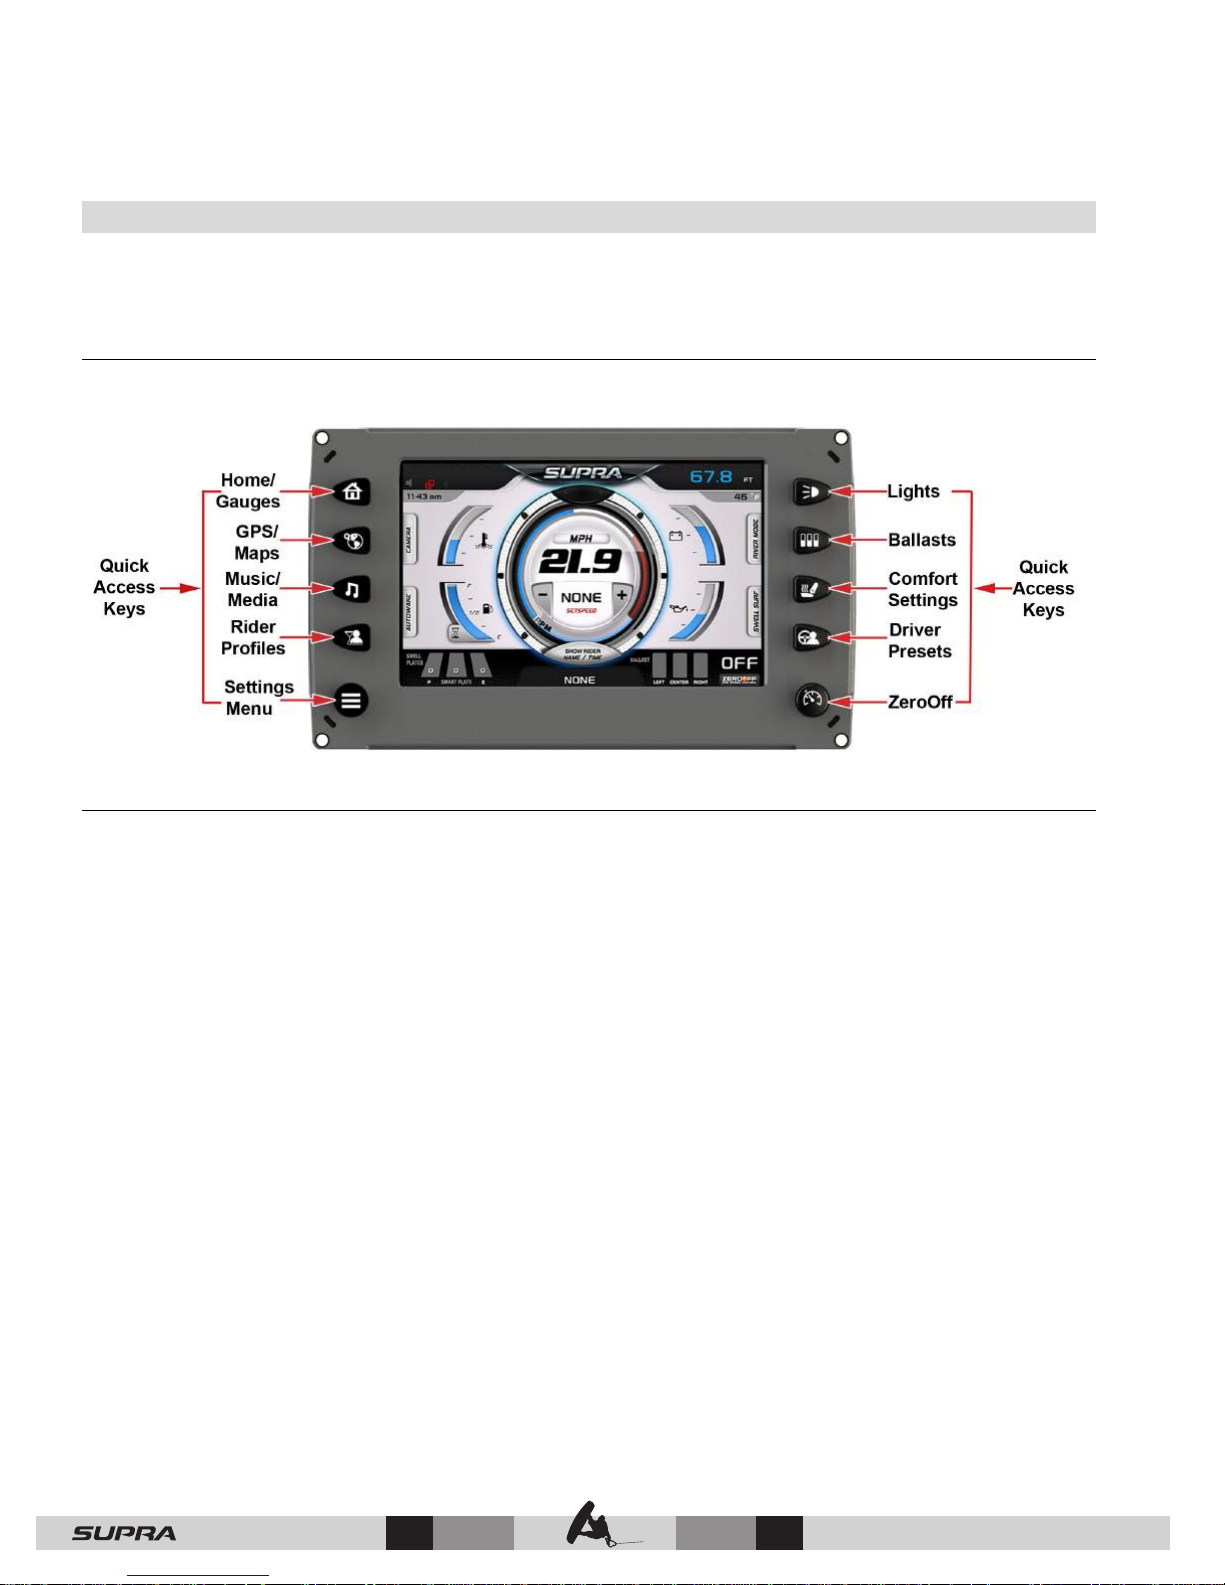
All product features are easily accessed through Quick Access Keys, Touch Point commands
and Menus.
Quick Access Keys
A new screen can be accessed quickly by pressing one of the following Quick Access Keys:
Touch Point Commands
Once the desired screen is accessed, navigation within the screen is controlled with Touch
Point commands. They are executed by touching the screen in areas that are outlined with a
highlighted bezel.
— 30
© 2016 Skier’s Choice, Inc.
Page 32
Features
Home Screen
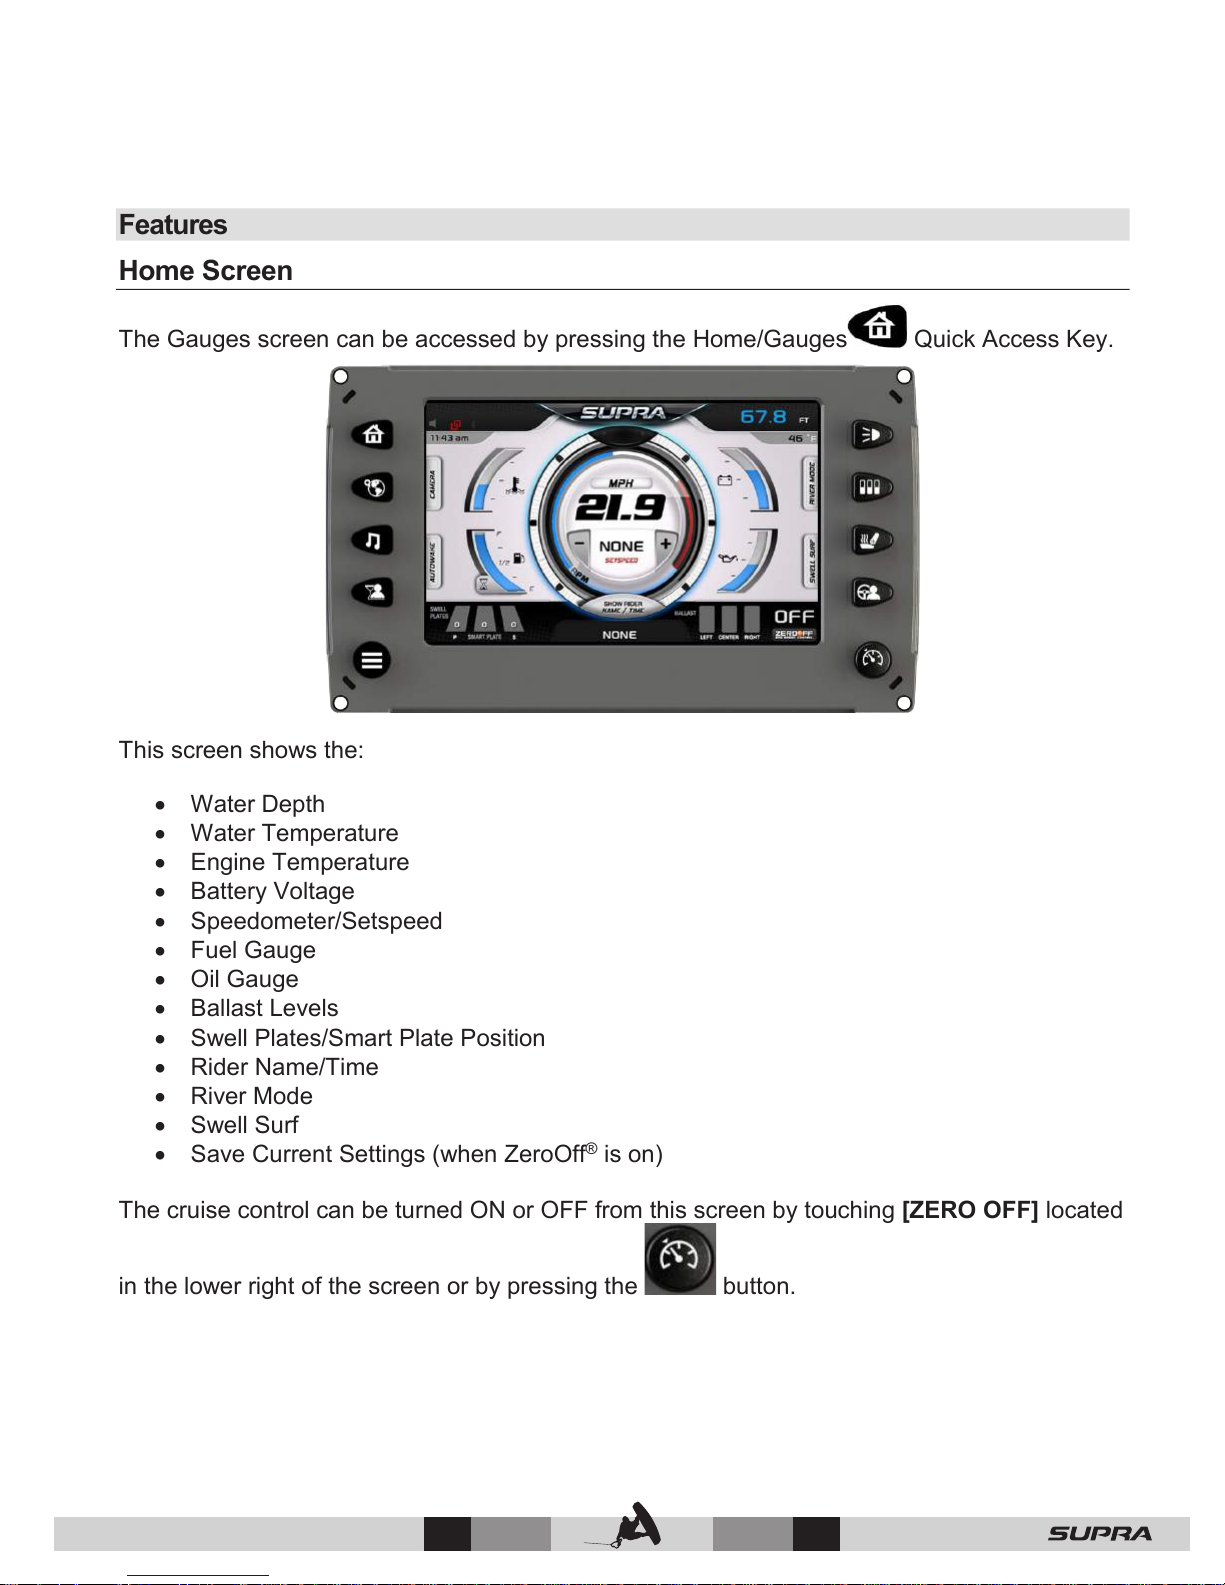
The Gauges screen can be accessed by pressing the Home/Gauges Quick Access Key.
This screen shows the:
• Water Depth
• Water Temperature
• Engine Temperature
• Battery Voltage
• Speedometer/Setspeed
• Fuel Gauge
• Oil Gauge
• Ballast Levels
• Swell Plates/Smart Plate Position
• Rider Name/Time
• River Mode
• Swell Surf
• Save Current Settings (when ZeroOff
®
is on)
The cruise control can be turned ON or OFF from this screen by touching [ZERO OFF] located
in the lower right of the screen or by pressing the button.
© 2016 Skier’s Choice, Inc.
31 —
Page 33
active stereo is muted.
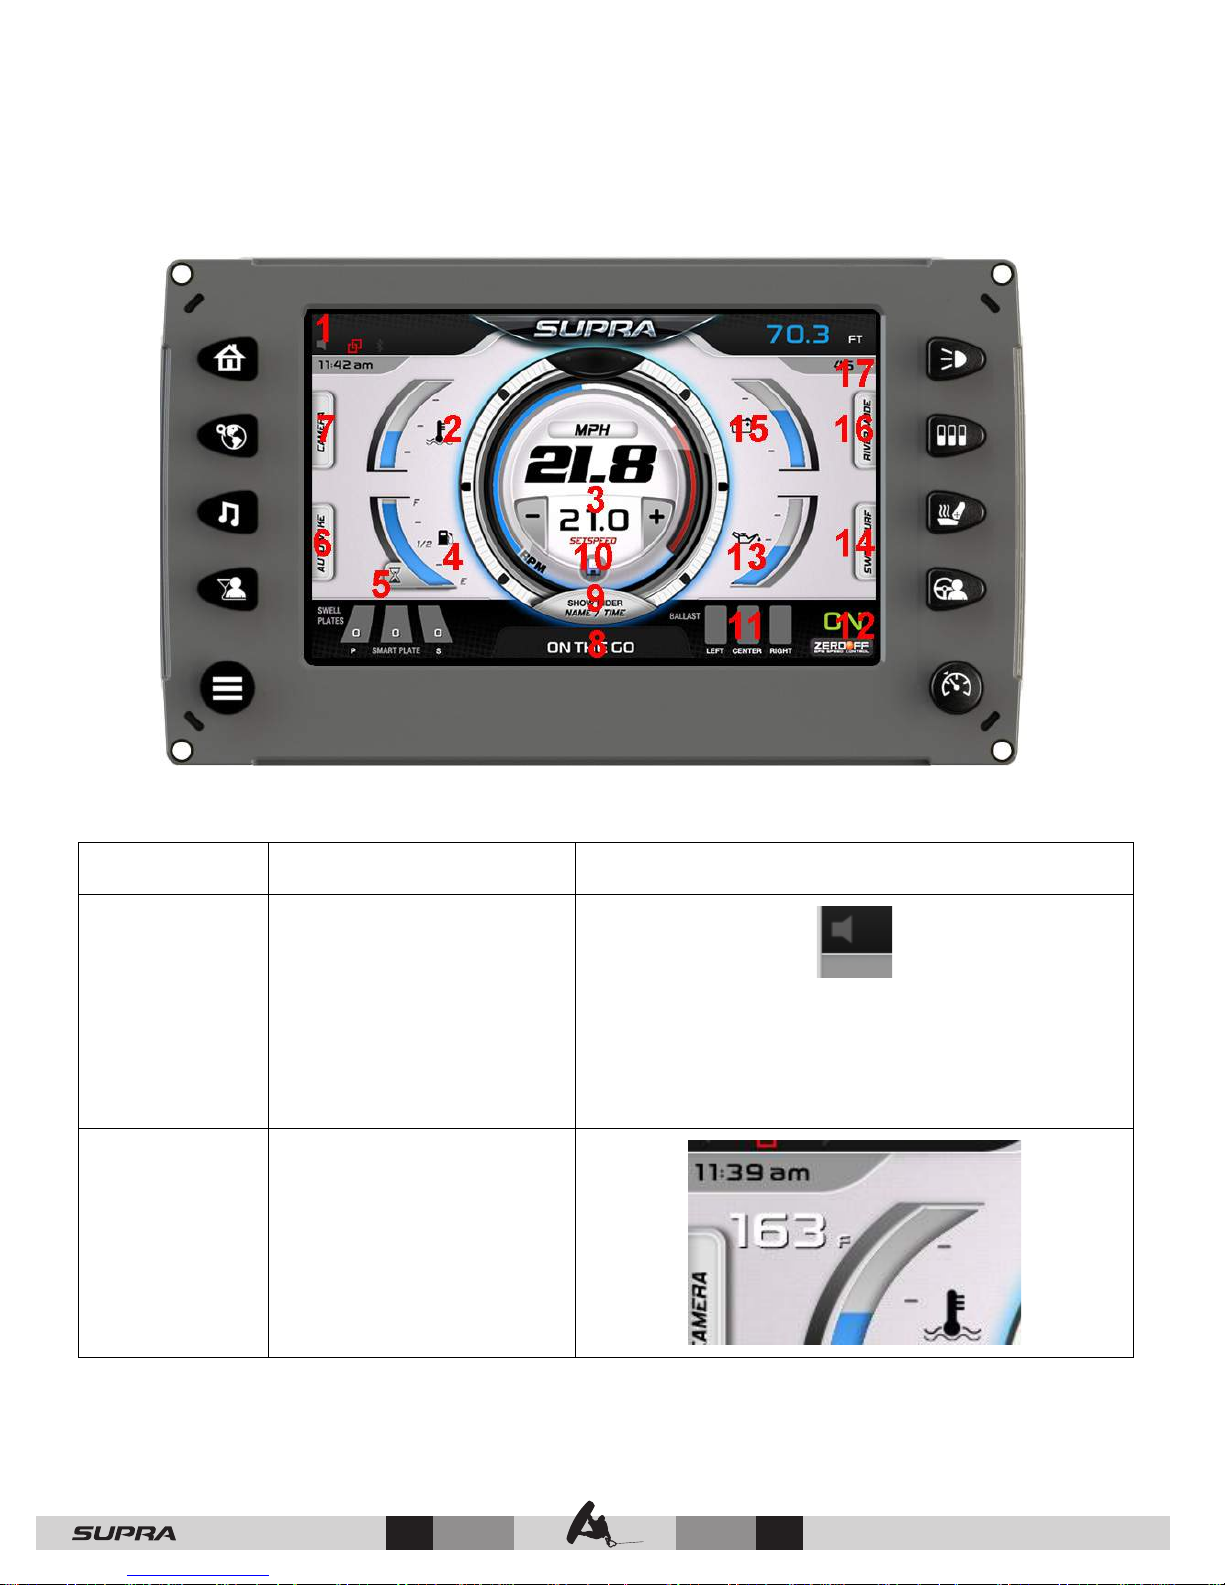
Home Screen Touch Points
Touch Point Description Screen View
1 – Stereo Opens the Stereo screen.
Other multimedia options
and video viewing screens
are accessed from this
screen. When held down
for 2-3 seconds while on
the home screen, the
2 – Engine
Temp
Displays the engine
temperature when touched
and held.
— 32
© 2016 Skier’s Choice, Inc.
Page 34
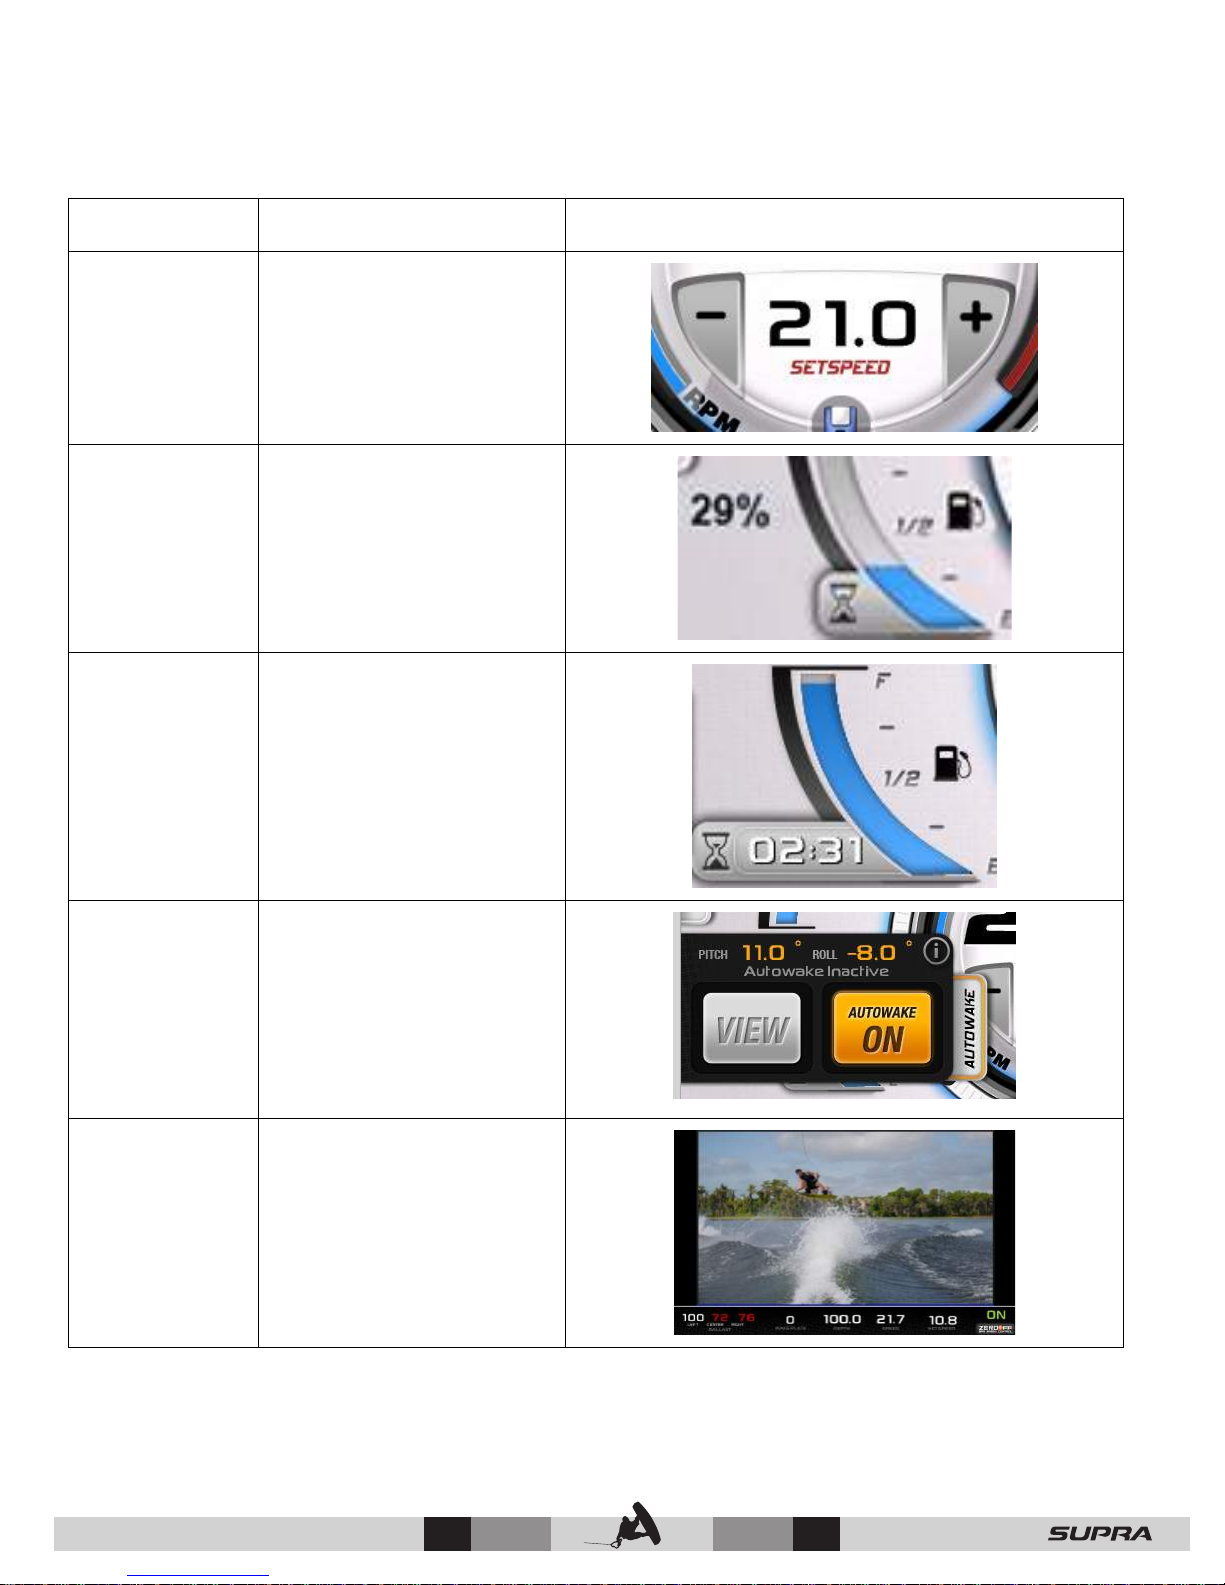
Touch Point Description Screen View
3 – Set
speed+/-
Interactive speed control
adjustment by touching
the + and – icons (GPS
Speed Control ON mode).
4 – Fuel Level Displays the fuel level in
percent when touched and
held.
5 – Fuel/Run
Time
Displays an estimated
engine run time using
current fuel level when
touched and held.
6 – Autowake Autowake will control the
Patented
Technology*
ballast to attempt to
achieve and maintain a set
pitch and roll (determined
by the rider profile and the
currently selected surf
side).
7 – Camera Activates the camera to
view the current rider in
action.
*AutoWake: U.S. Patent No. 8,798,825 and other patents pending. See www.skierschoice.com/patents
© 2016 Skier’s Choice, Inc.
33 —
Page 35
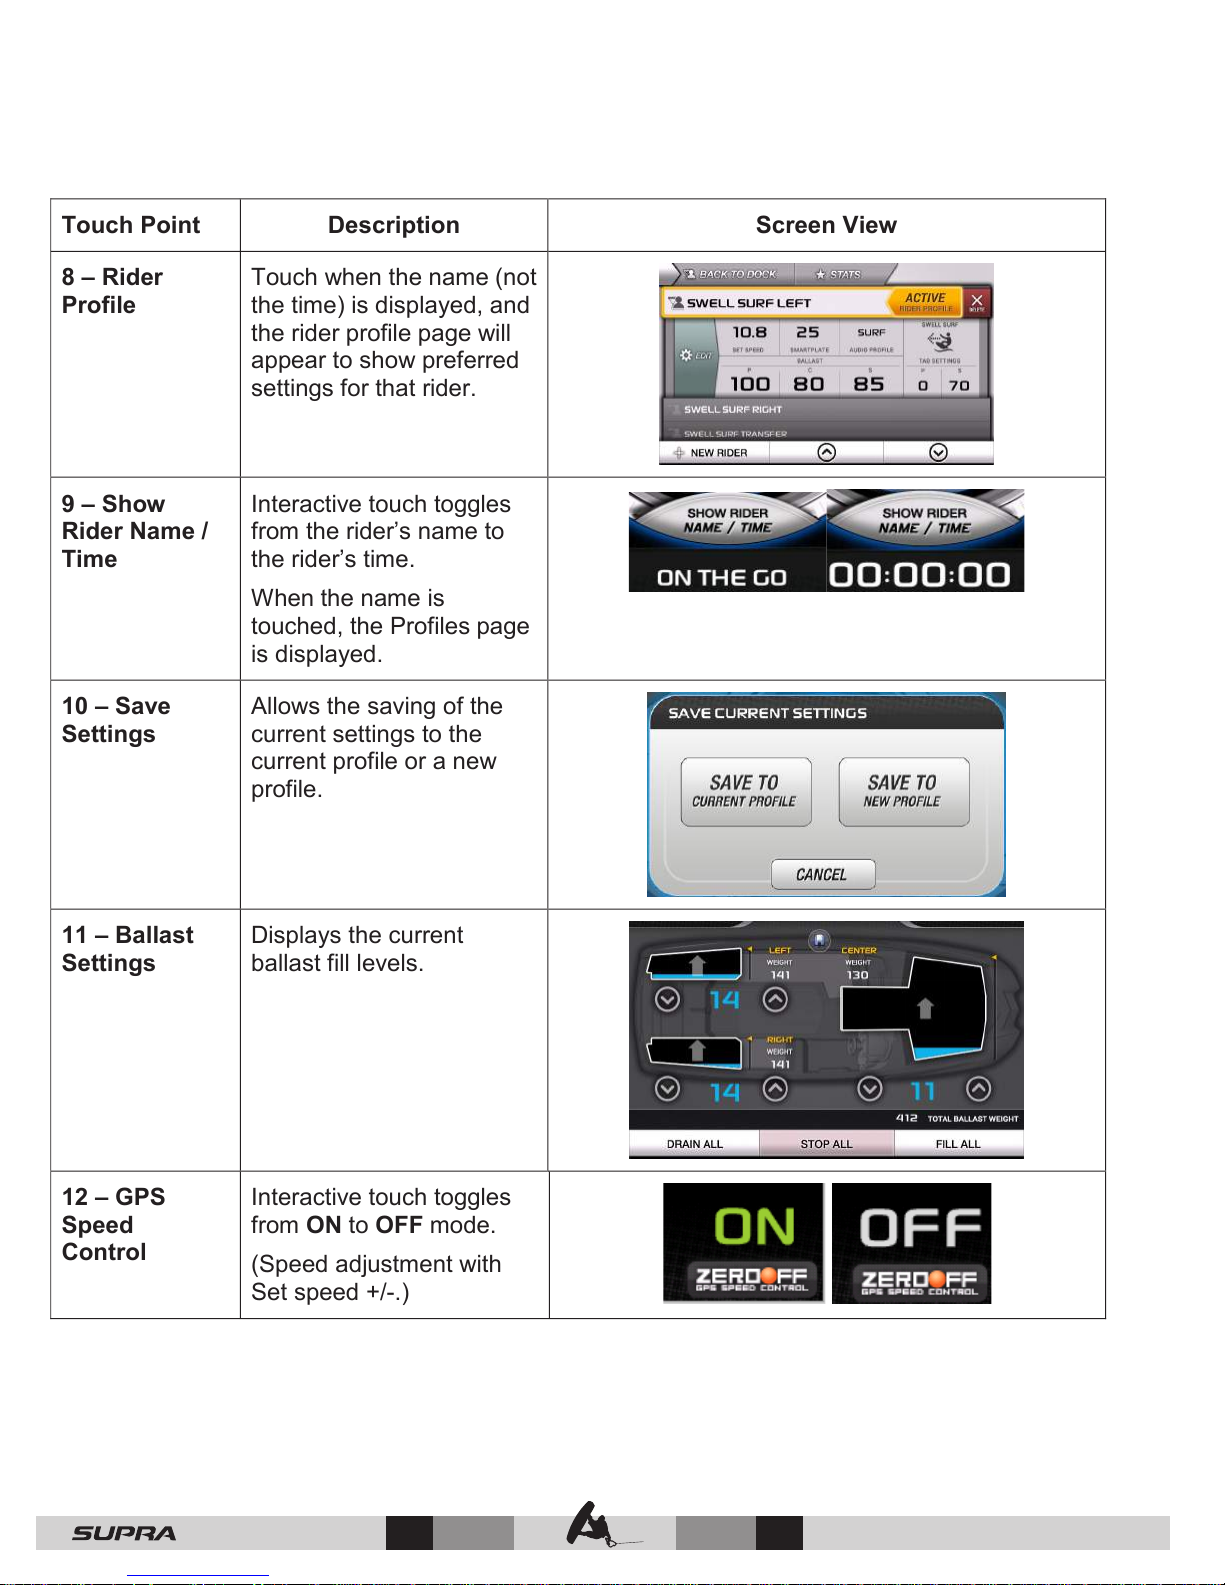
Touch Point Description Screen View
8 – Rider
Profile
Touch when the name (not
the time) is displayed, and
the rider profile page will
appear to show preferred
settings for that rider.
9 – Show
Rider Name /
Time
Interactive touch toggles
from the rider’s name to
the rider’s time.
When the name is
touched, the Profiles page
is displayed.
10 – Save
Settings
Allows the saving of the
current settings to the
current profile or a new
profile.
11 – Ballast
Settings
Displays the current
ballast fill levels.
12 – GPS
Speed
Control
Interactive touch toggles
from ON to OFF mode.
(Speed adjustment with
Set speed +/-.)
— 34
© 2016 Skier’s Choice, Inc.
Page 36
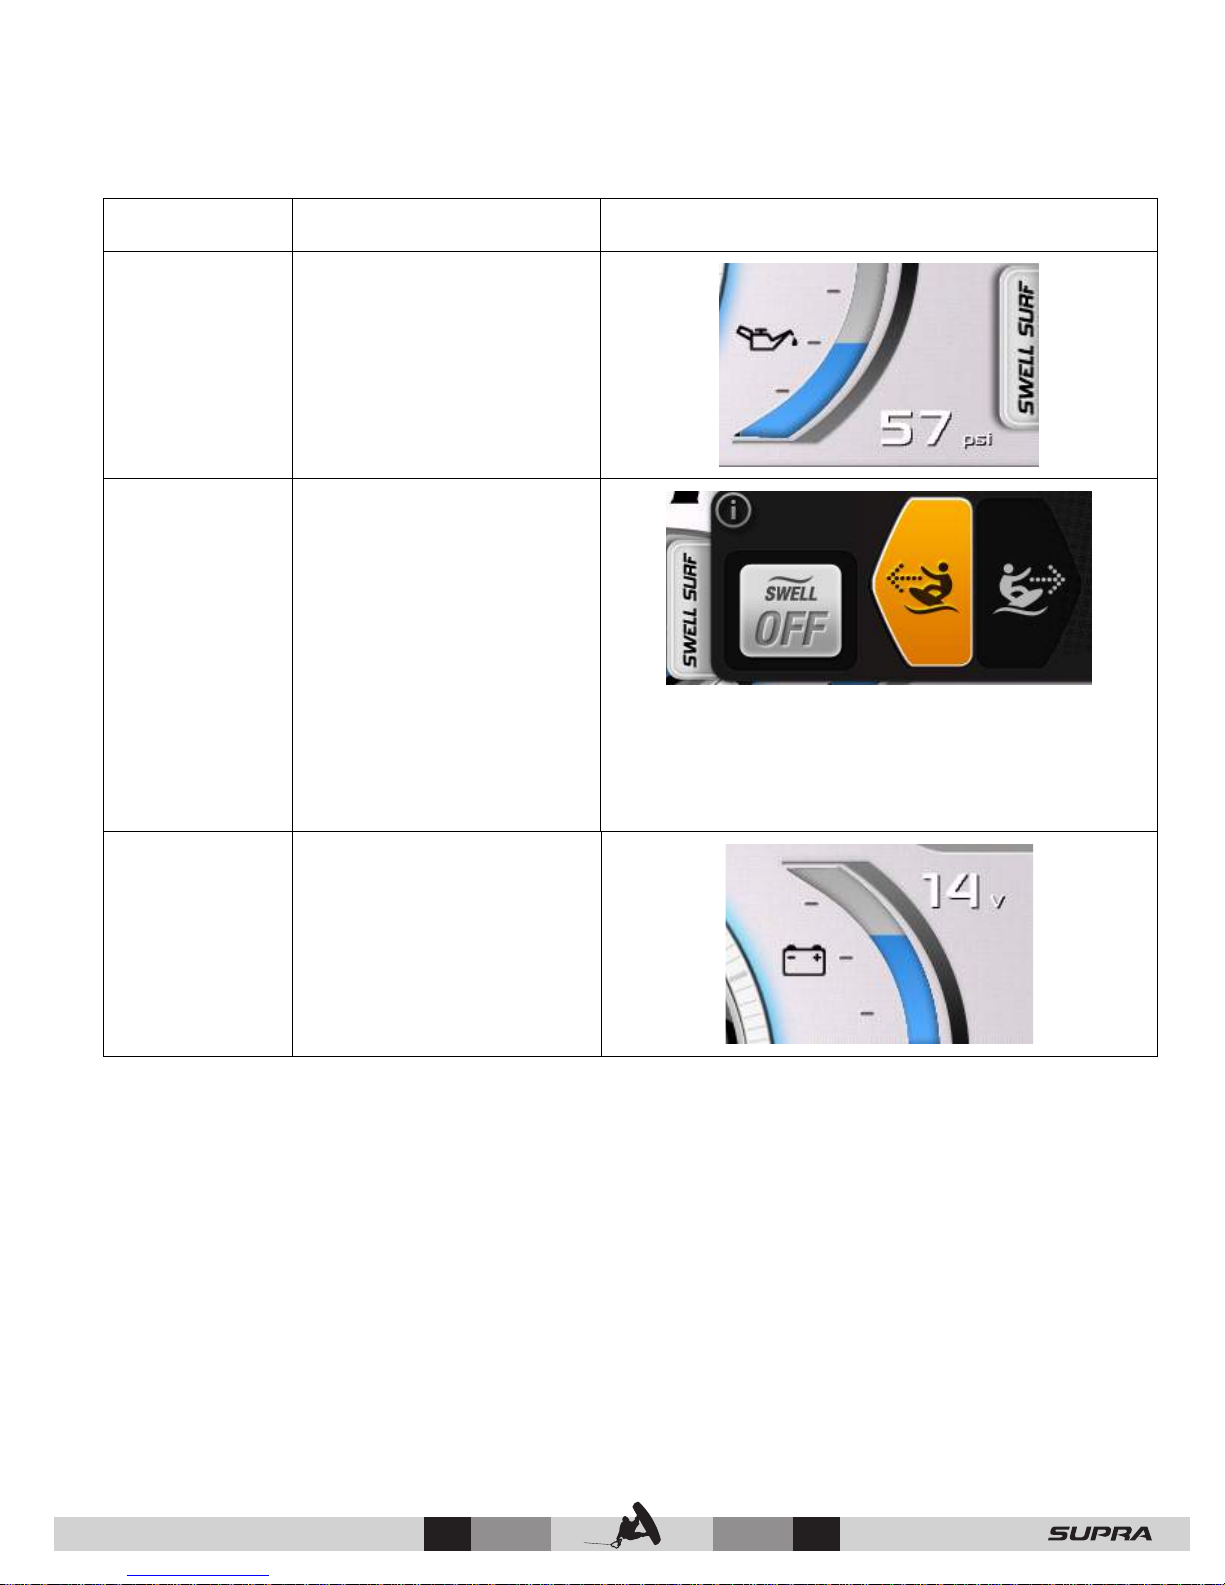
Touch Point Description Screen View
13 – Engine
Oil Pressure
14 – Swell
Surf
Displays the engine oil
pressure when touched
and held.
Interactive pop-up
including toggles for Swell
On/Off, Port and
Starboard ballast settings.
Use the directional icons
to select either Port or
Starboard. Use Profiles to
make adjustments to the
surf wave.
Swell does not activate if Auto is active. Swell Surf
will only engage when Cruise is on and your set
speed is between 7 mph and 12 mph.
15 – Boat
Battery
Displays the battery
voltage when touched and
held.
© 2016 Skier’s Choice, Inc.
35 —
Page 37
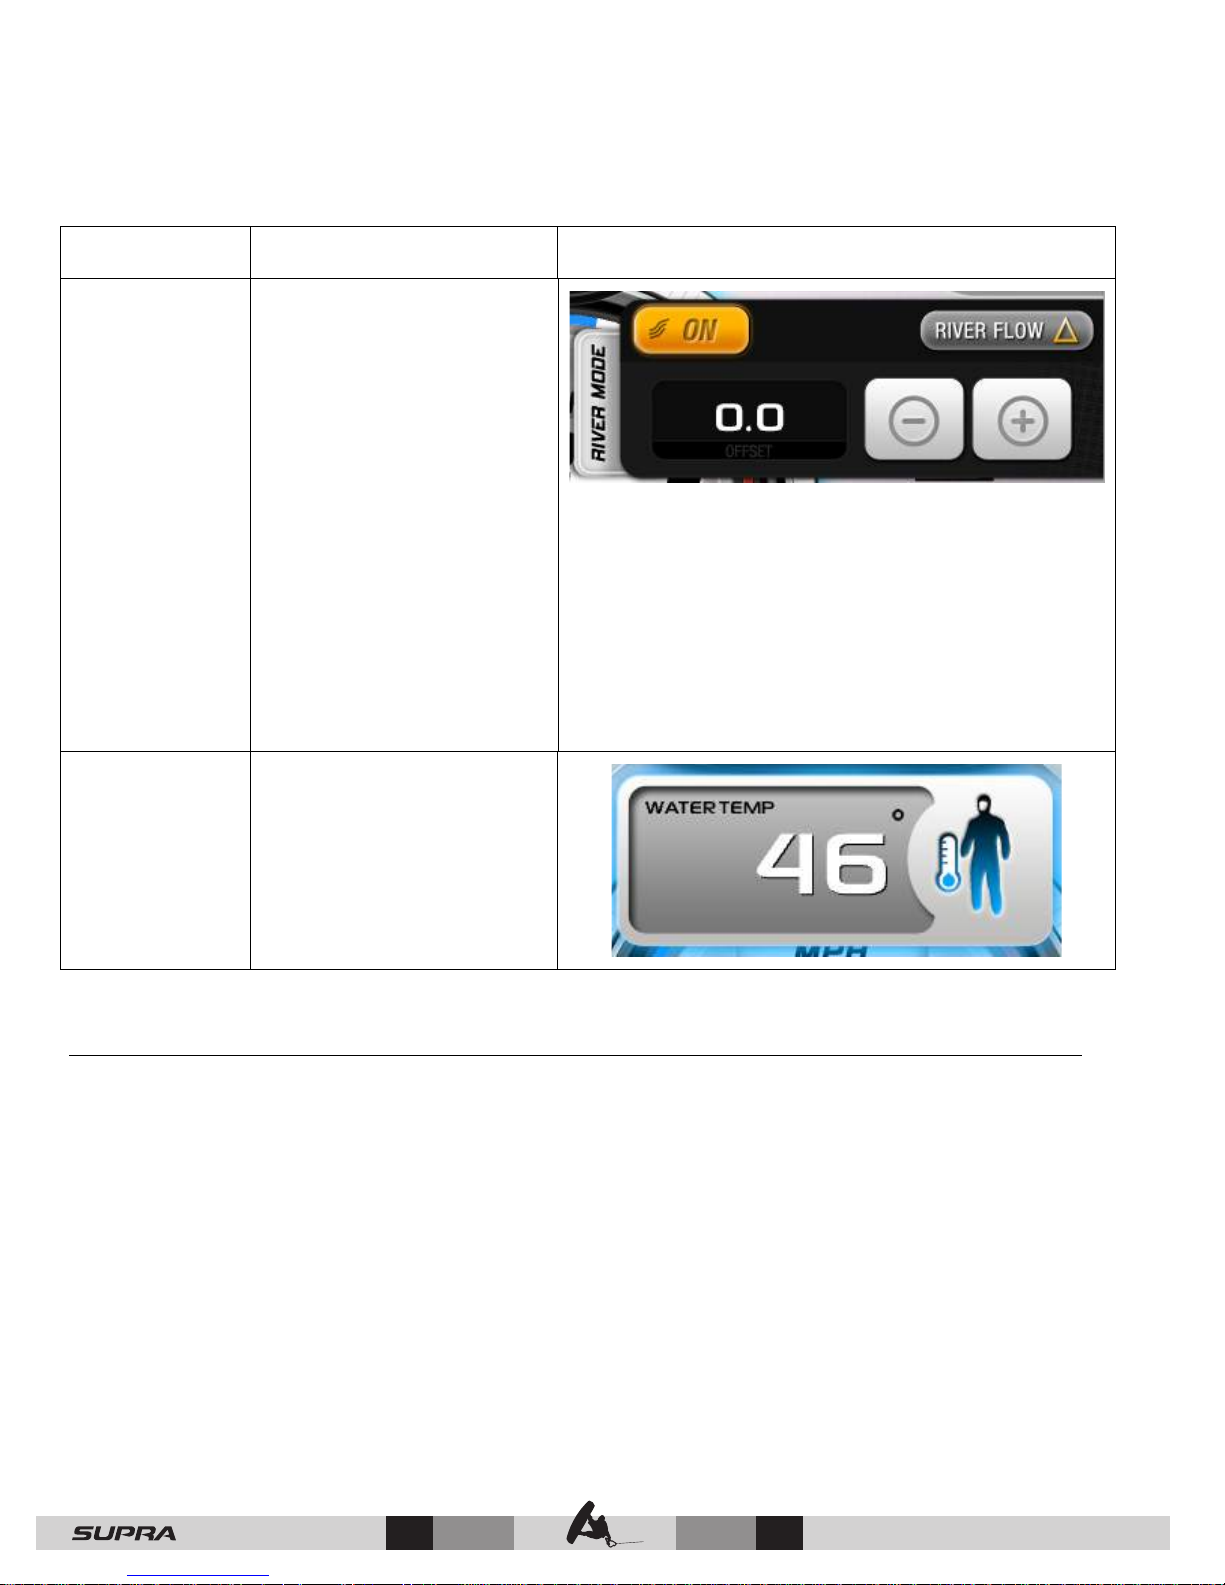
Touch Point Description Screen View
16 – River
Mode
17 – Water
Temp
Interactive touch pop-up
toggles from ON to OFF
and automatic River Flow
settings.
River Mode is a user interface for estimating both
upstream and downstream river current without the
use of a paddle wheel. The River Flow UP/DN icon
switches back and forth during the turns as you turn
against or with the current. The river current estimate
value will be added to (downstream) or subtracted
from (upstream) the base speed set point and should
deliver a reasonably consistent speed over the water.
If River Mode is turned off, the set speed will track the
normal set speed regardless of direction.
Displays the current
temperature of the water
when touched and held.
Autowake
Autowake is a system that will manipulate the ballast levels in order to achieve and maintain
the best possible wake for surfing and wakeboarding. Using an inclinometer (a device that
measures angle of pitch and roll), the boat will orient itself for the best boating experience.
When a rider profile is active, Autowake will activate once the ballasts are filled to their profiledefined levels, cruise is ON and the set speed is between 7 and 26 mph.
Changes to the pitch and roll set points will be saved to the active rider profile under the
currently selected surf side. Each rider can have differing set points for Surf Port, Surf
Starboard and Wake.
Touch the Autowake tab on the left side of the screen:
— 36
© 2016 Skier’s Choice, Inc.
Page 38
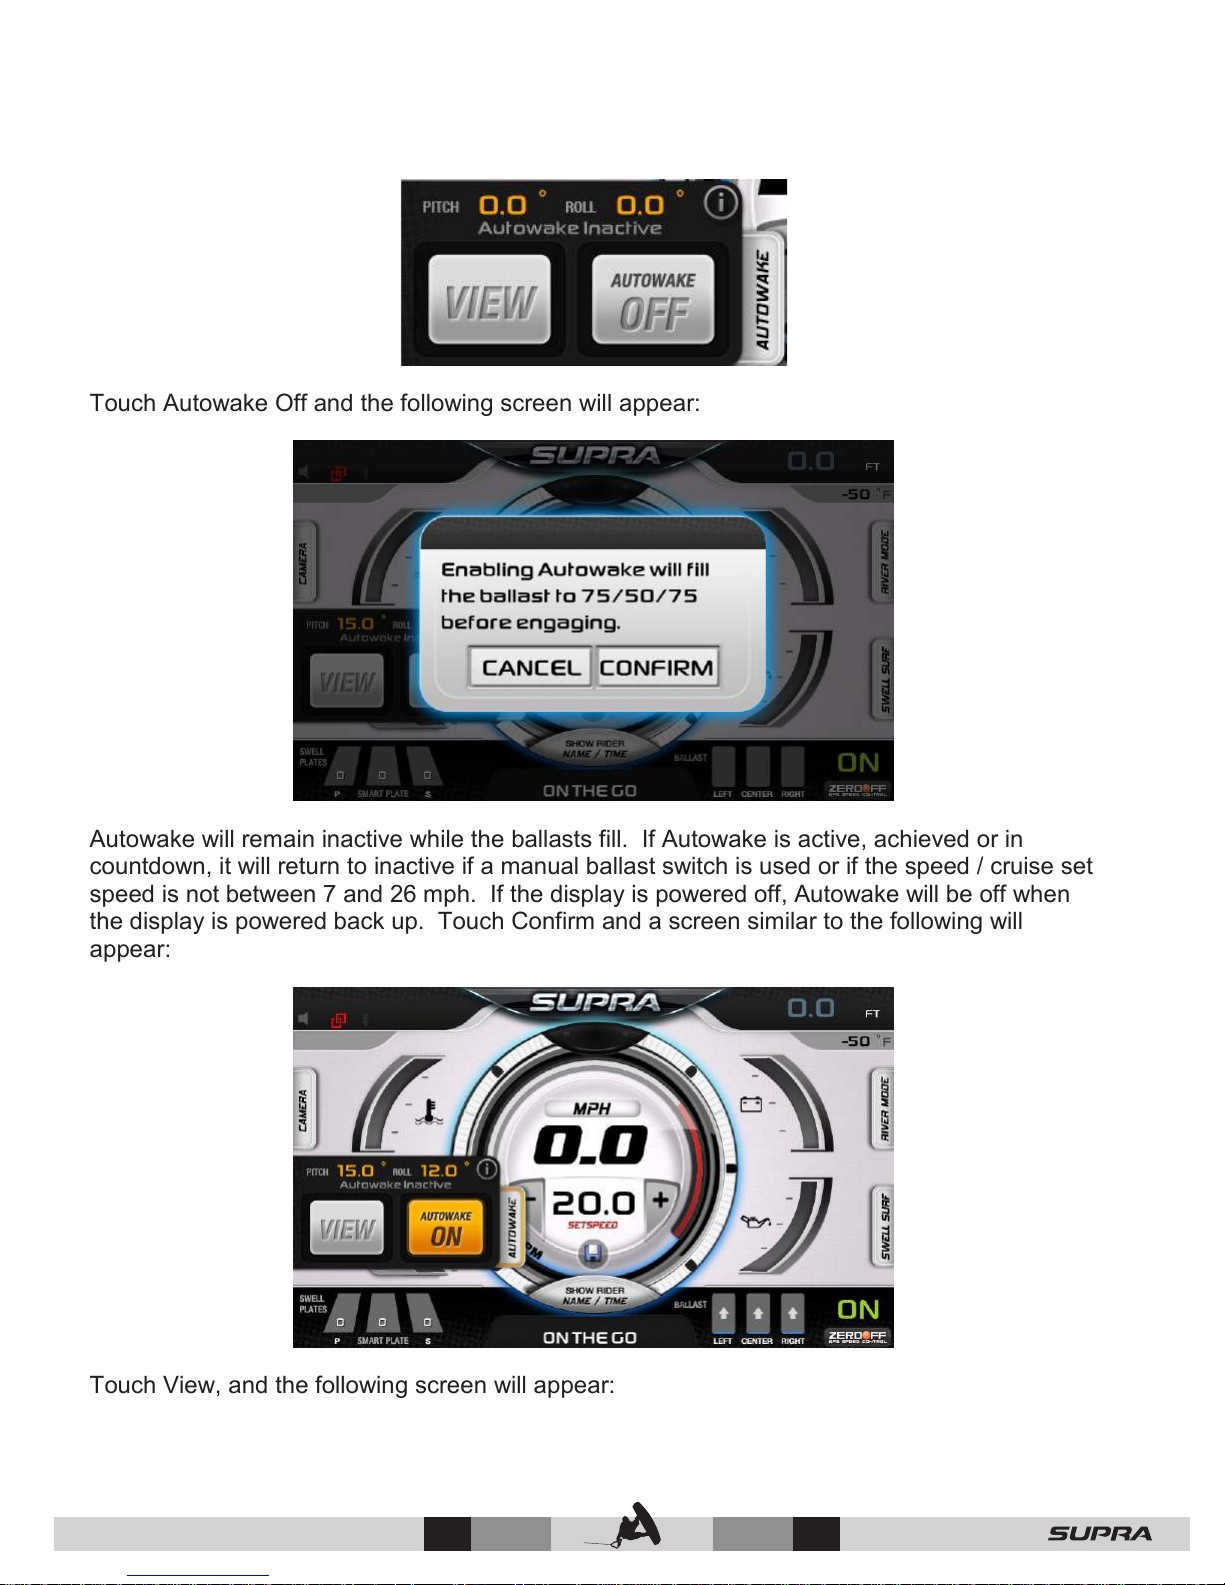
Touch Autowake Off and the following screen will appear:
Autowake will remain inactive while the ballasts fill. If Autowake is active, achieved or in
countdown, it will return to inactive if a manual ballast switch is used or if the speed / cruise set
speed is not between 7 and 26 mph. If the display is powered off, Autowake will be off when
the display is powered back up. Touch Confirm and a screen similar to the following will
appear:
Touch View, and the following screen will appear:
© 2016 Skier’s Choice, Inc.
37 —
Page 39
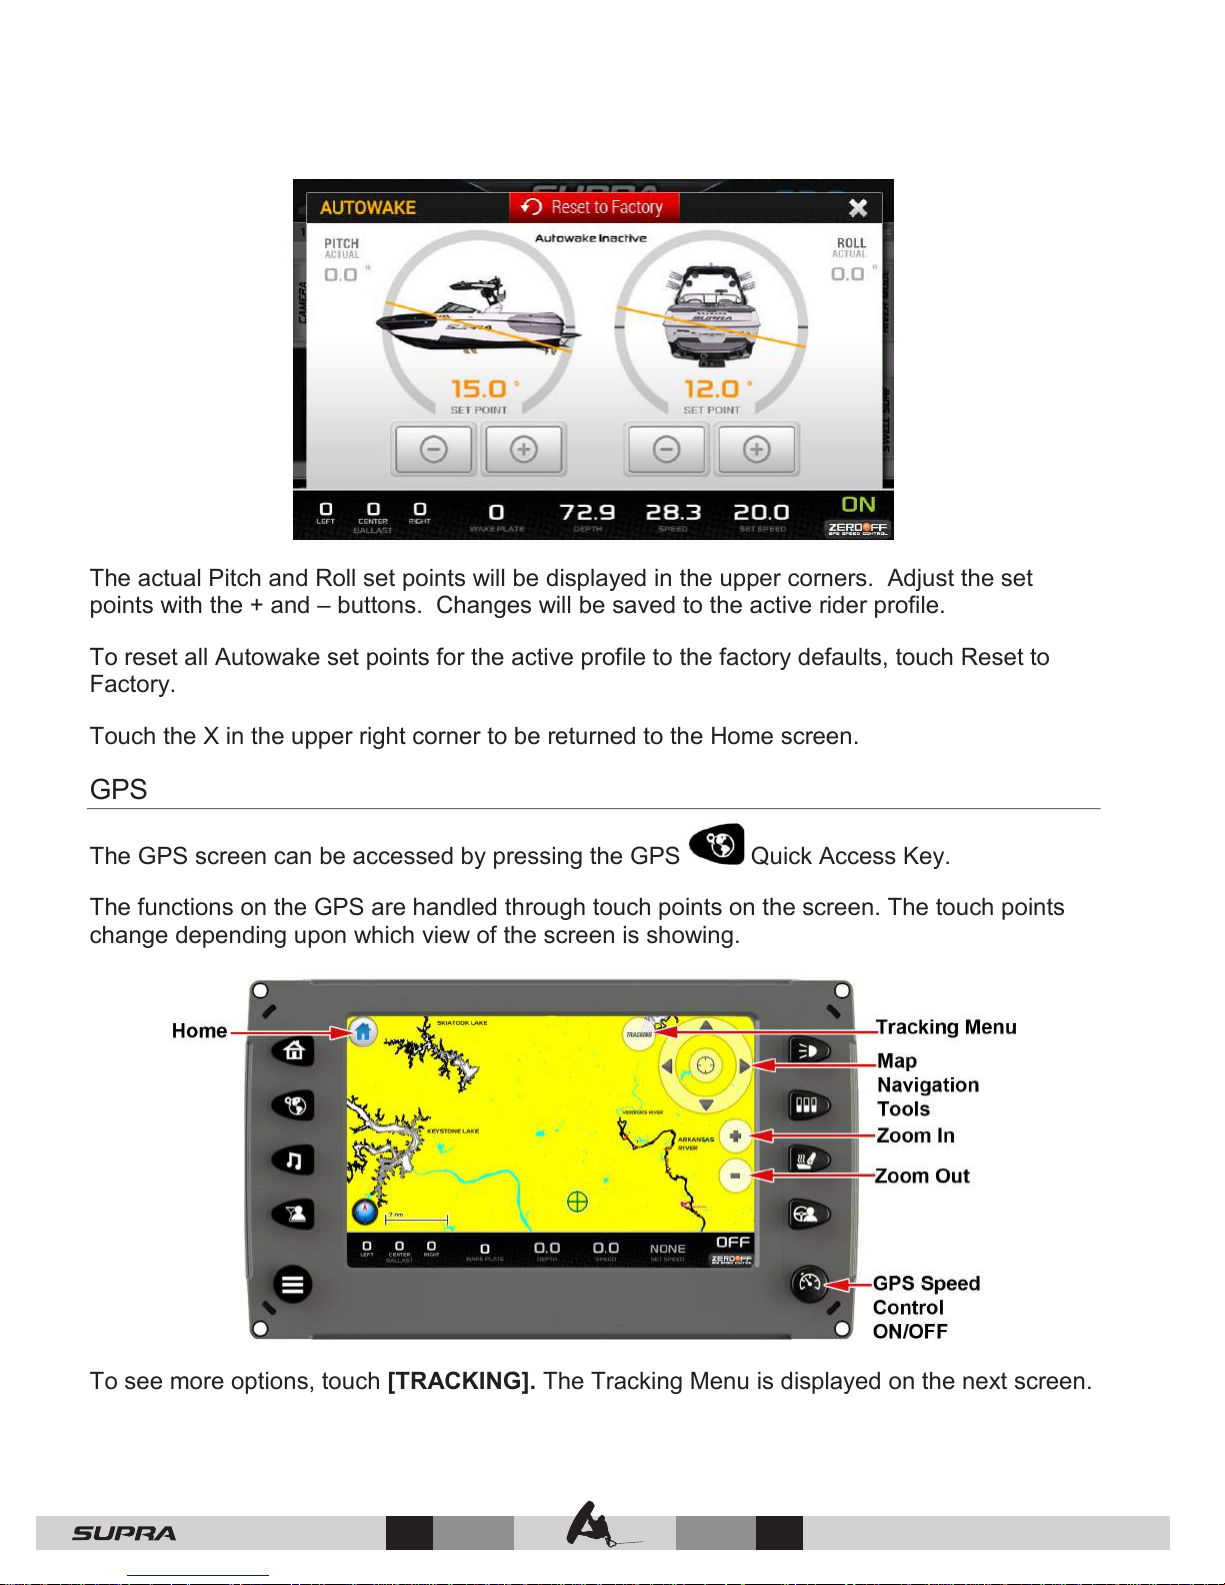
The actual Pitch and Roll set points will be displayed in the upper corners. Adjust the set
points with the + and – buttons. Changes will be saved to the active rider profile.
To reset all Autowake set points for the active profile to the factory defaults, touch Reset to
Factory.
Touch the X in the upper right corner to be returned to the Home screen.
GPS
The GPS screen can be accessed by pressing the GPS Quick Access Key.
The functions on the GPS are handled through touch points on the screen. The touch points
change depending upon which view of the screen is showing.
To see more options, touch [TRACKING]. The Tracking Menu is displayed on the next screen.
— 38
© 2016 Skier’s Choice, Inc.
Page 40
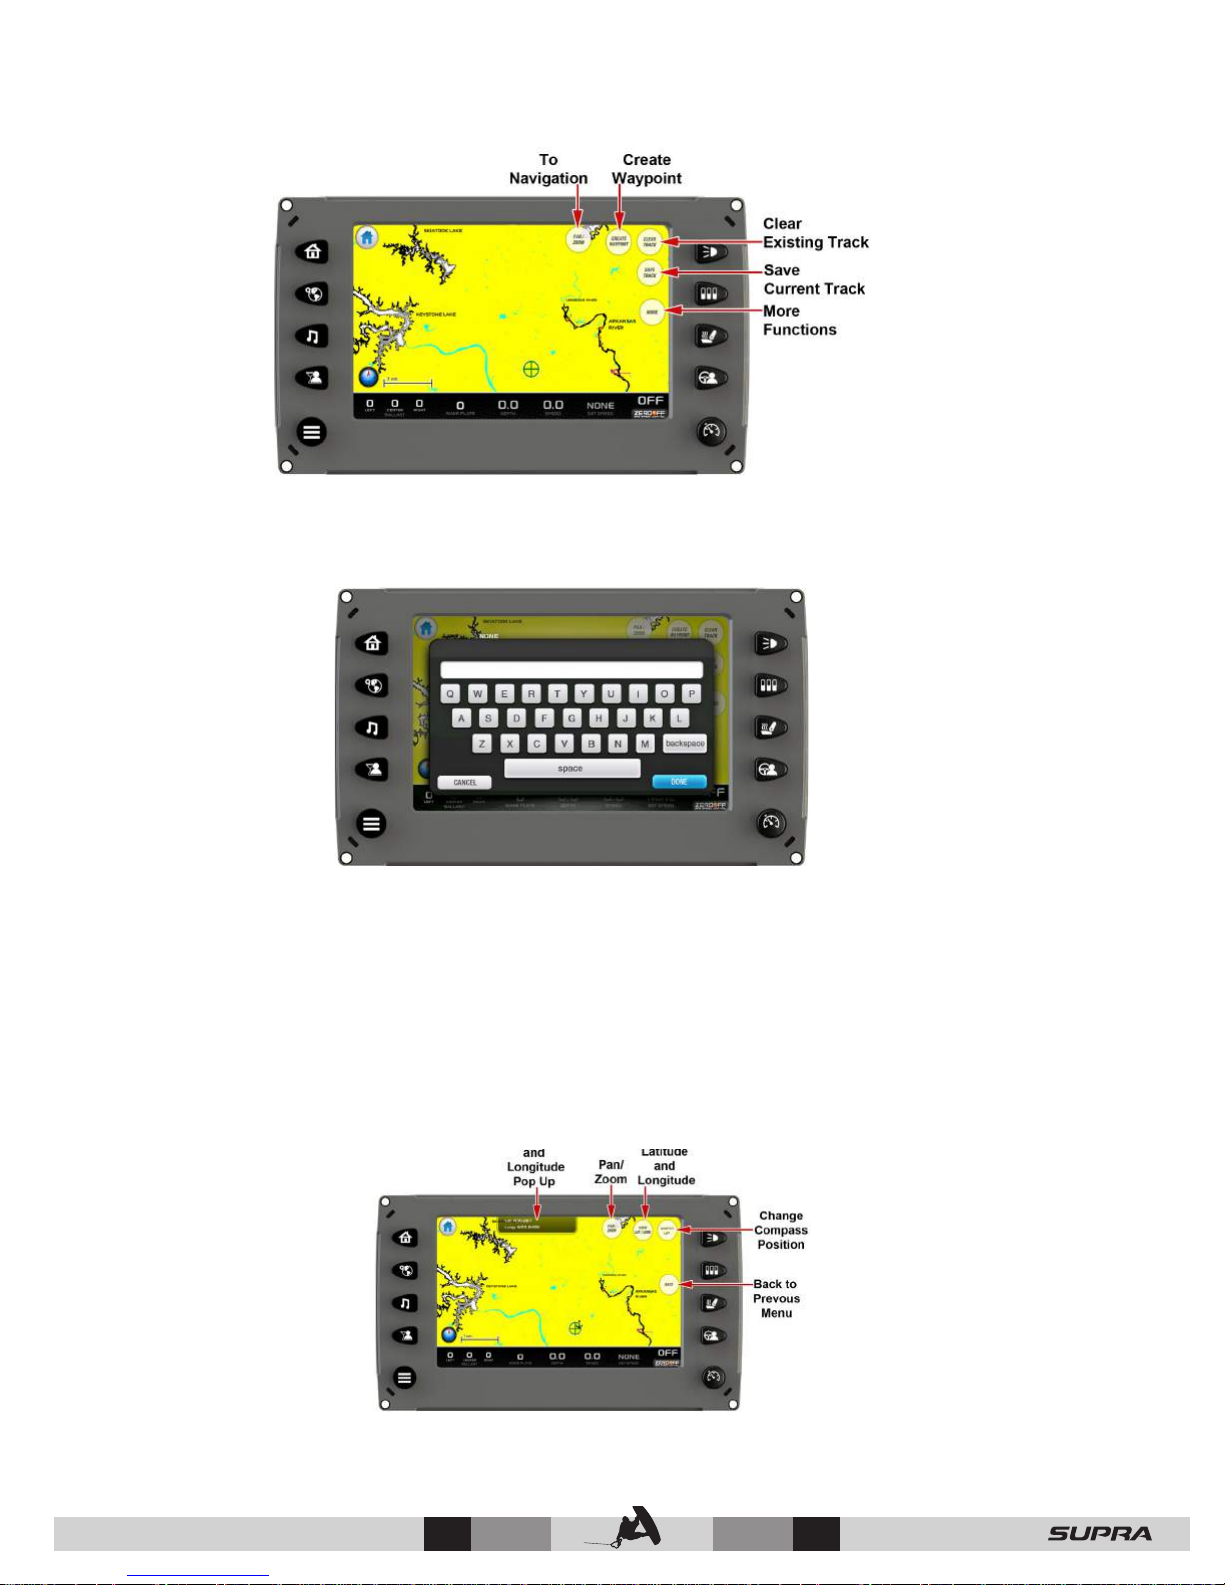
Touch [PAN/ZOOM] to return to the previous view.
Touch [CREATE WAYPOINT] to add a waypoint to the map. A keypad is displayed to type the
name (10 alpha character limit). When finished typing the name touch [DONE].
The waypoint is now displayed on the map represented by an anchor icon. This anchor icon
can be changed to another icon in the Waypoint Manager (for more information on the
Waypoint Manager, see GPS Settings under the Settings Menu).
Touch [CLEAR TRACK] to clear currently recording track. This action will restart the track
recording from the current position of the boat.
Touch [SAVE TRACK] to save the currently recorded track. This action will save the currently
recorded track from where the recording started to the current position and restart the track
recording from the current position of the boat.
Touch [MORE] to view latitude and longitude of the current position of the boat and change the
compass to desired position (choices are North up or Course up).
© 2016 Skier’s Choice, Inc.
39 —
Page 41
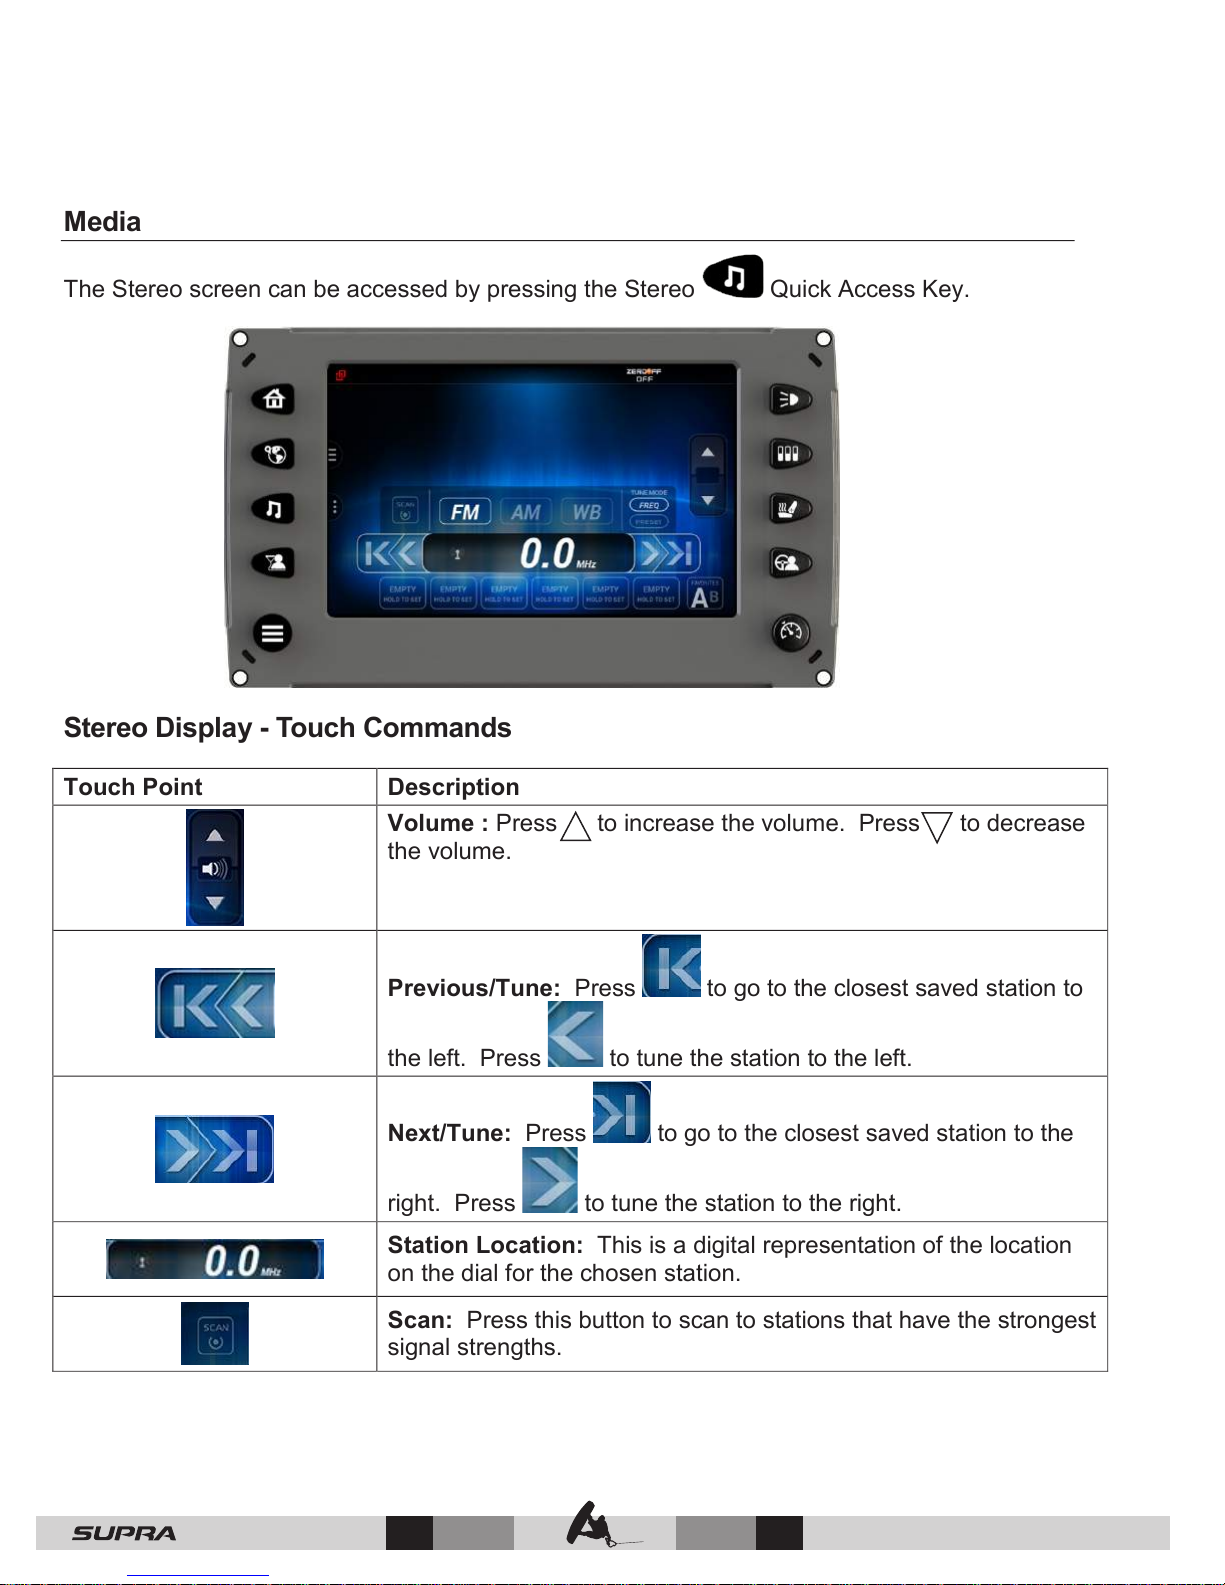
Media
The Stereo screen can be accessed by pressing the Stereo Quick Access Key.
Stereo Display - Touch Commands
Touch Point
Description
Volume : Press to increase the volume. Press to decrease
the volume.
Previous/Tune: Press to go to the closest saved station to
the left. Press to tune the station to the left.
Next/Tune: Press to go to the closest saved station to the
right. Press to tune the station to the right.
Station Location: This is a digital representation of the location
on the dial for the chosen station.
Scan: Press this button to scan to stations that have the strongest
signal strengths.
— 40
© 2016 Skier’s Choice, Inc.
Page 42
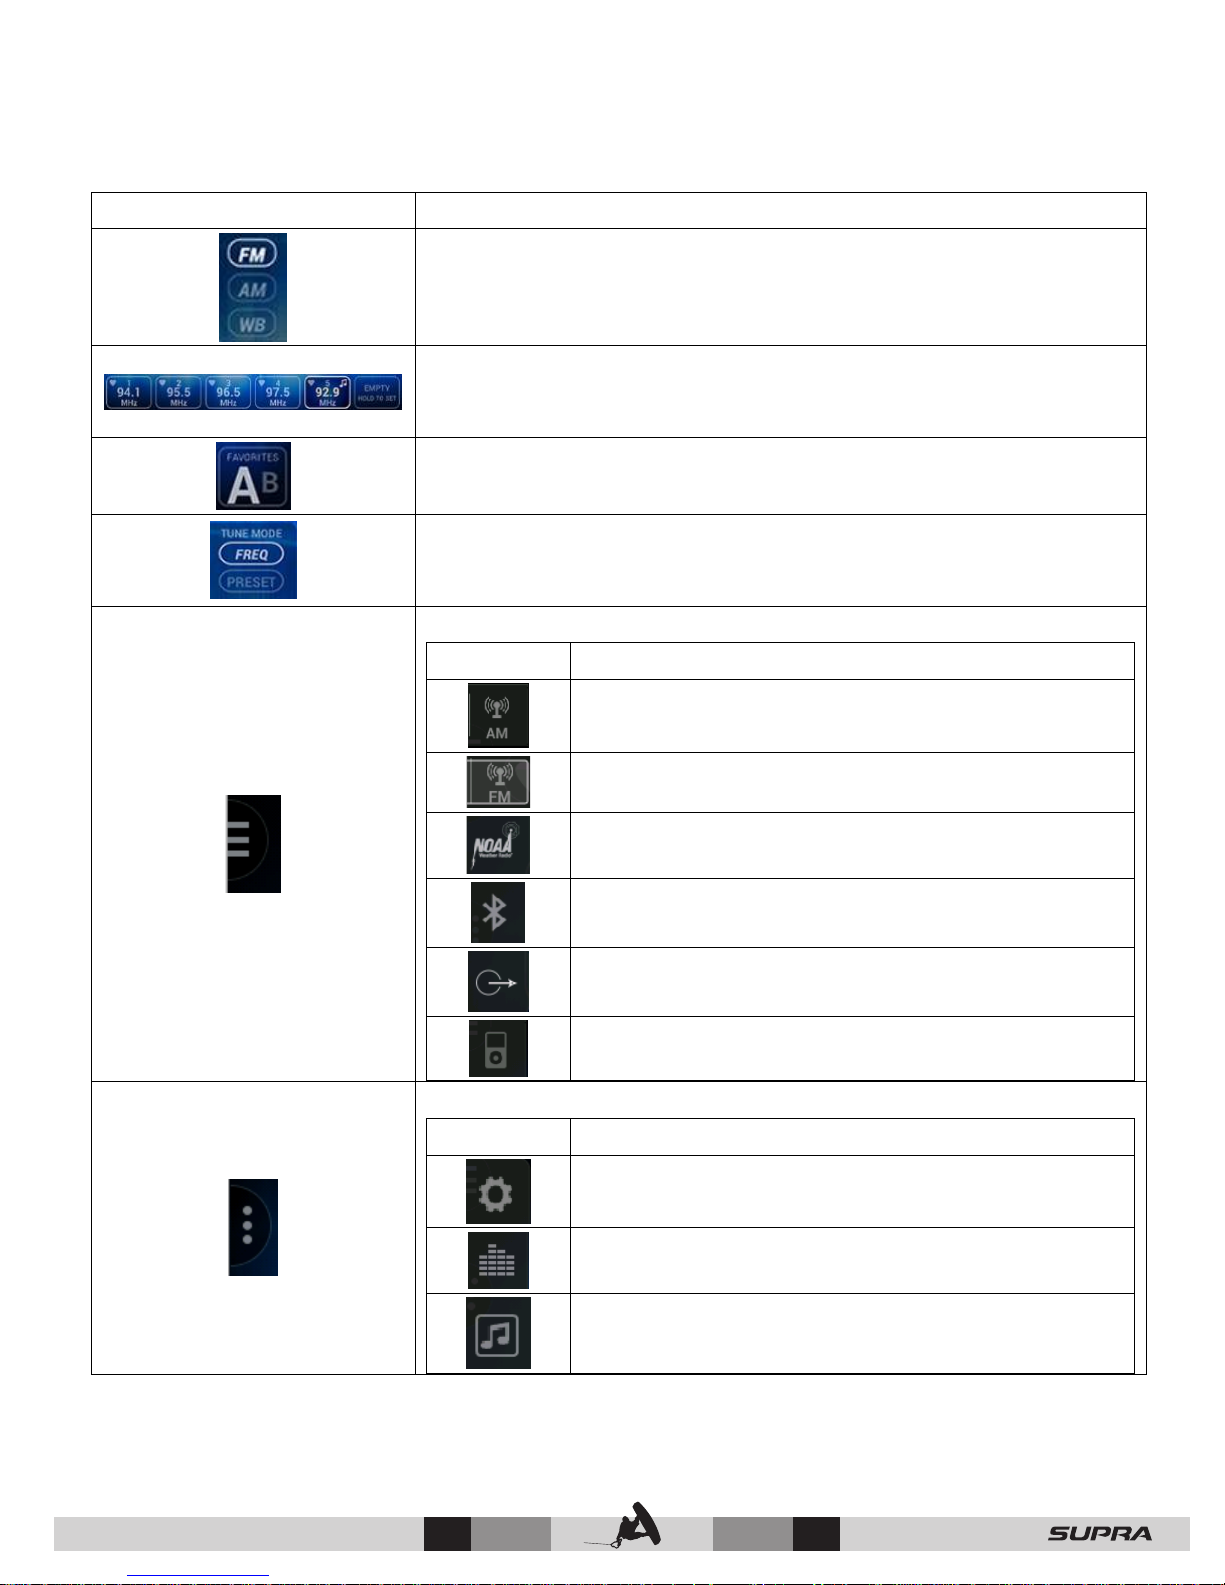
Touch Point
Description
favorite stations on the dial.
Icon
Description
Icon
Description
Band Selector: Choose between FM, AM or Weather.
Preset Stations: This list contains six of the previously saved
favorite stations. Hold your finger on the slot to save the current
station as a preset station.
Favorites List – Touch to alternate between List A and List B.
This provides 12 pre-saved favorite stations.
Tune Mode – Choosing FREQ will allow the scanning of all
stations on the dial. Choosing PRESET will only scan the saved
List – Touch this point to expand the following list of icons:
Switches to the AM band.
Switches to the FM band.
Displays the Weather band.
Displays the Bluetooth utility.
Displays the Auxiliary Input display to choose
between three channels.
Displays the iPod/USB screen.
List – Touch this point to display a list of the following icons:
Displays the BT (Bluetooth) Devices menu.
Displays the Sound Control (Equalizer) menu.
Displays the Audio Profiles screen.
© 2016 Skier’s Choice, Inc.
41 —
Page 43
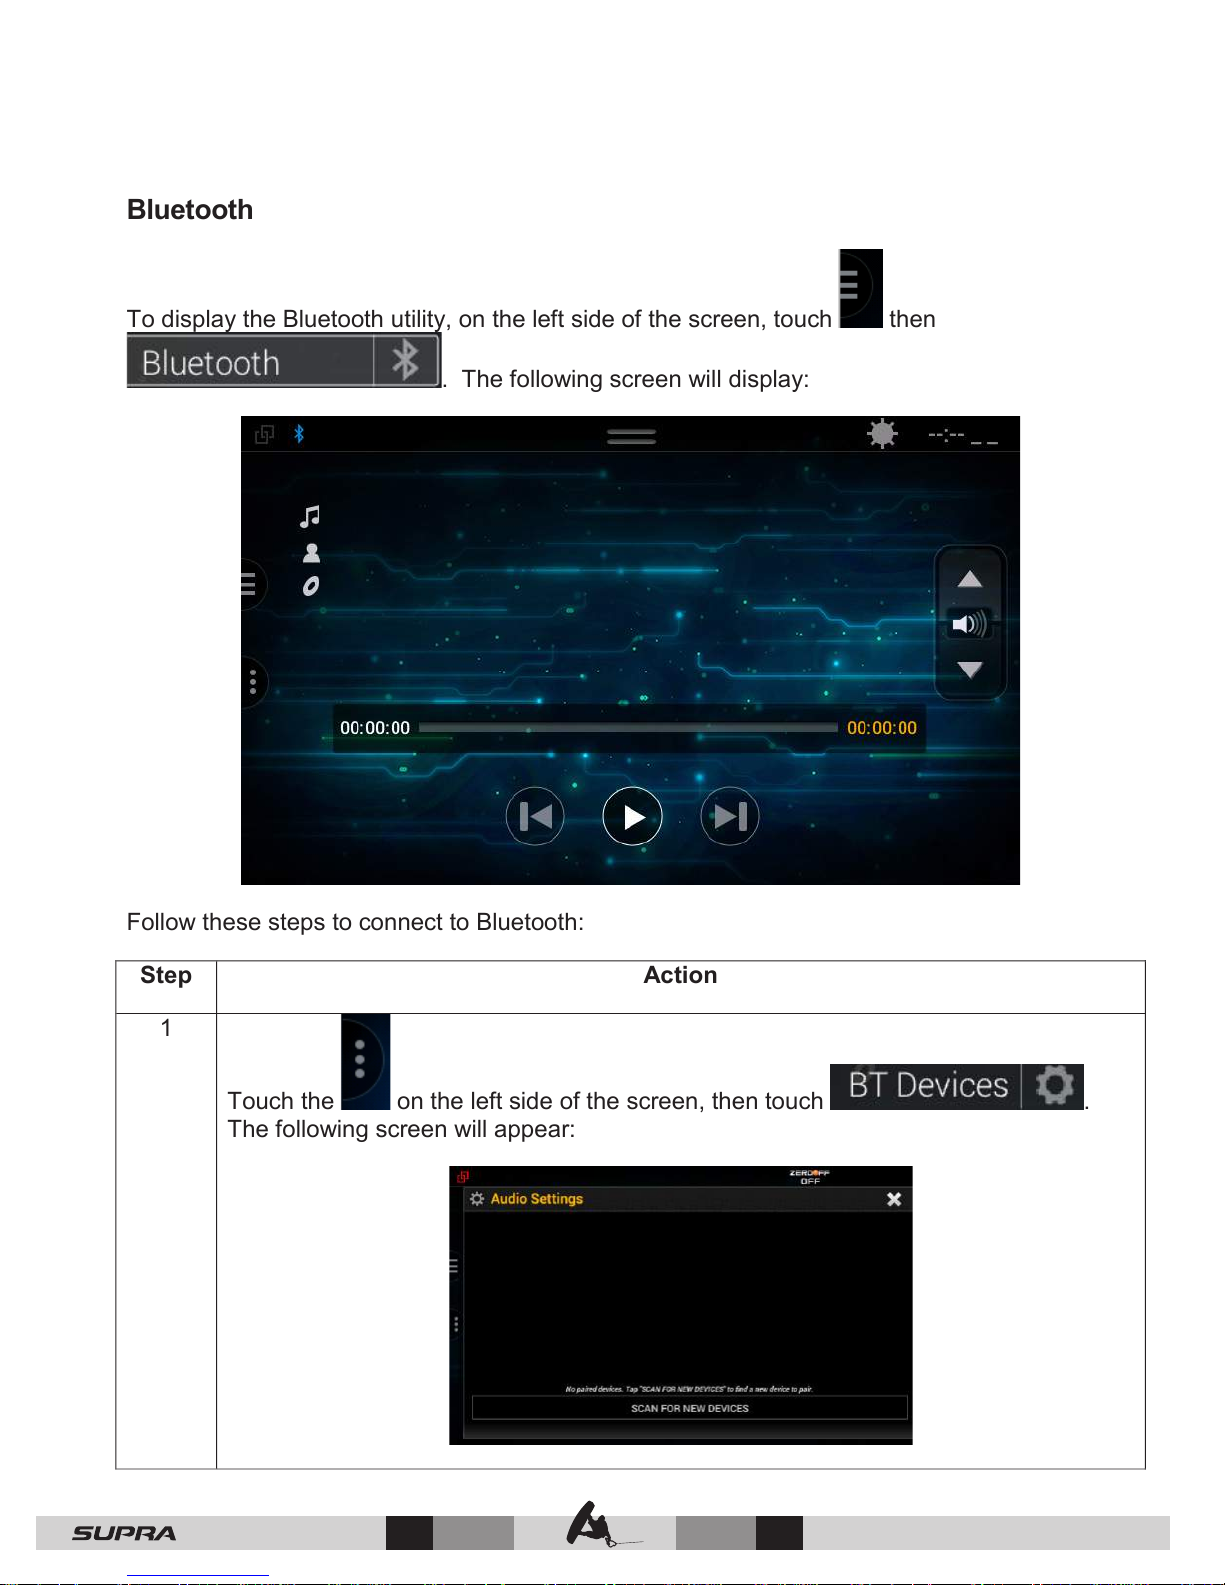
Bluetooth
To display the Bluetooth utility, on the left side of the screen, touch then
. The following screen will display:
Follow these steps to connect to Bluetooth:
Step
Action
1
Touch the on the left side of the screen, then touch .
The following screen will appear:
— 42
© 2016 Skier’s Choice, Inc.
Page 44
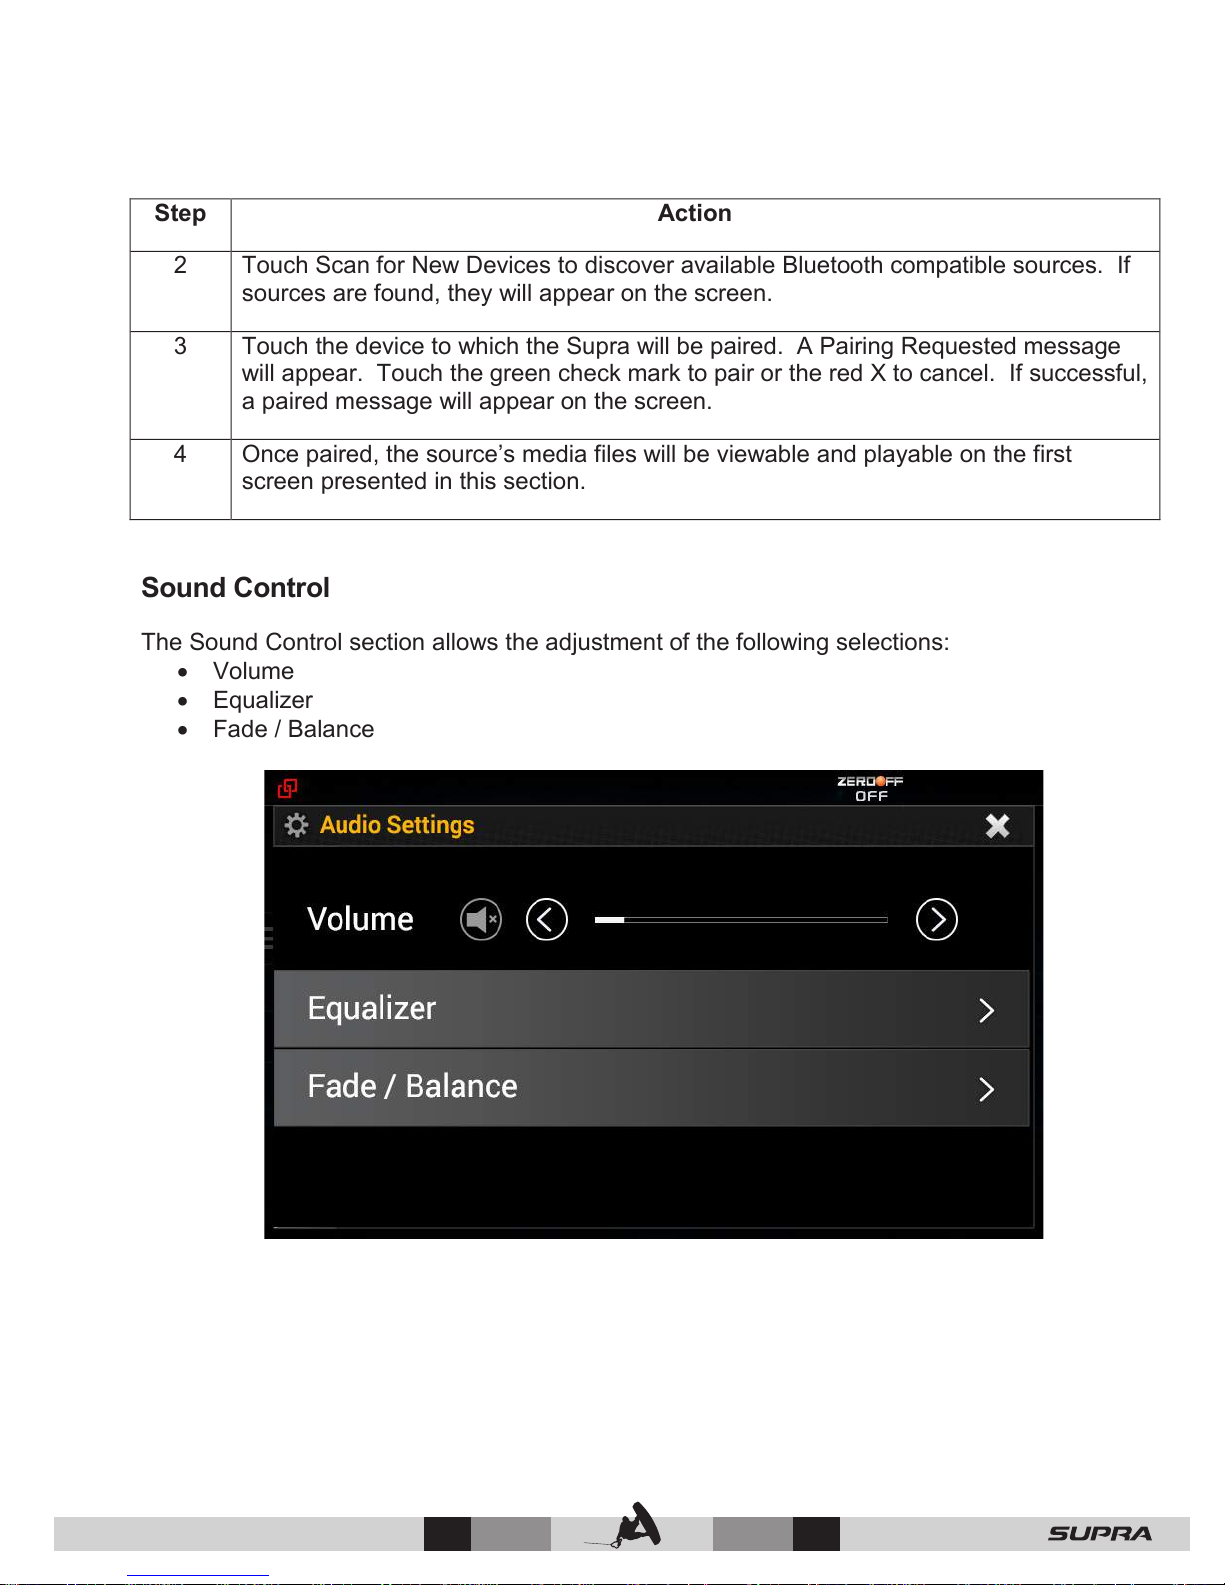
Step
Action
2
Touch Scan for New Devices to discover available Bluetooth compatible sources. If
sources are found, they will appear on the screen.
3
Touch the device to which the Supra will be paired. A Pairing Requested message
will appear. Touch the green check mark to pair or the red X to cancel. If successful,
a paired message will appear on the screen.
4
Once paired, the source’s media files will be viewable and playable on the first
screen presented in this section.
Sound Control
The Sound Control section allows the adjustment of the following selections:
• Volume
• Equalizer
• Fade / Balance
© 2016 Skier’s Choice, Inc.
43 —
Page 45
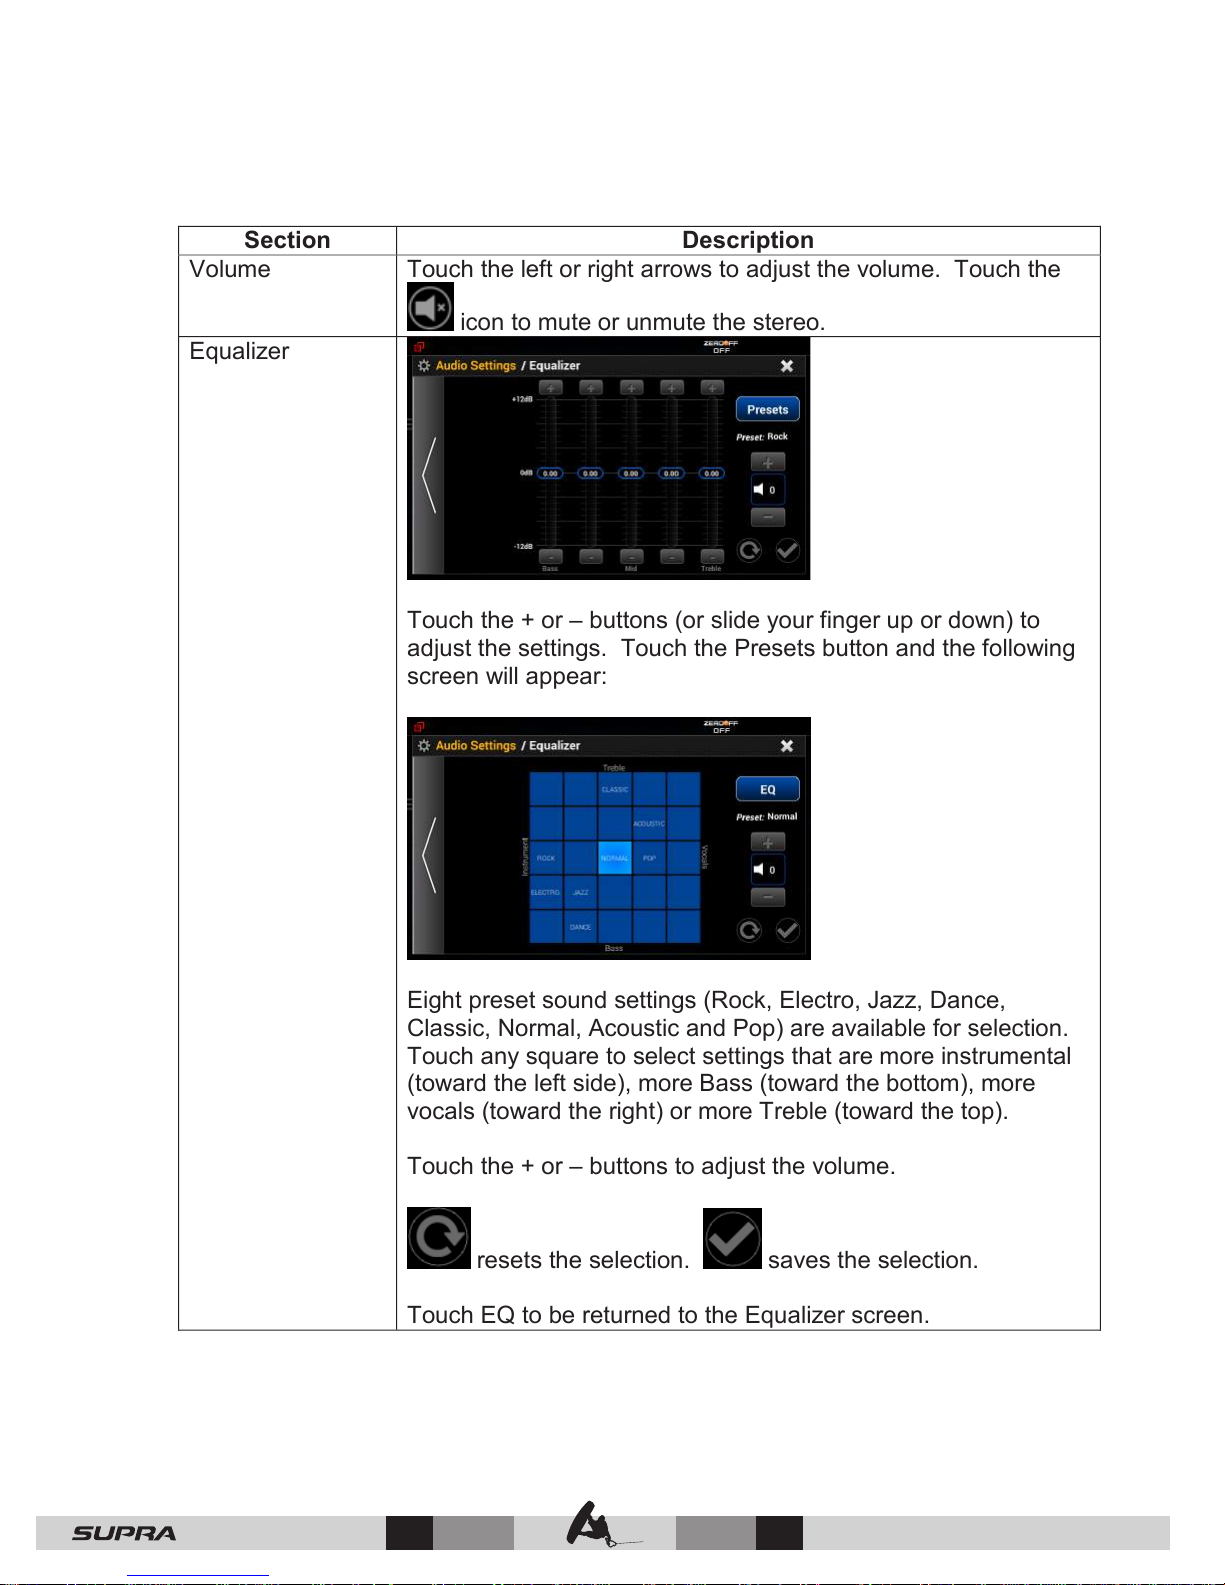
Section
Description
Volume
Touch the left or right arrows to adjust the volume. Touch the
icon to mute or unmute the stereo.
Equalizer
Touch the + or – buttons (or slide your finger up or down) to
adjust the settings. Touch the Presets button and the following
screen will appear:
Eight preset sound settings (Rock, Electro, Jazz, Dance,
Classic, Normal, Acoustic and Pop) are available for selection.
Touch any square to select settings that are more instrumental
(toward the left side), more Bass (toward the bottom), more
vocals (toward the right) or more Treble (toward the top).
Touch the + or – buttons to adjust the volume.
resets the selection. saves the selection.
Touch EQ to be returned to the Equalizer screen.
— 44
© 2016 Skier’s Choice, Inc.
Page 46
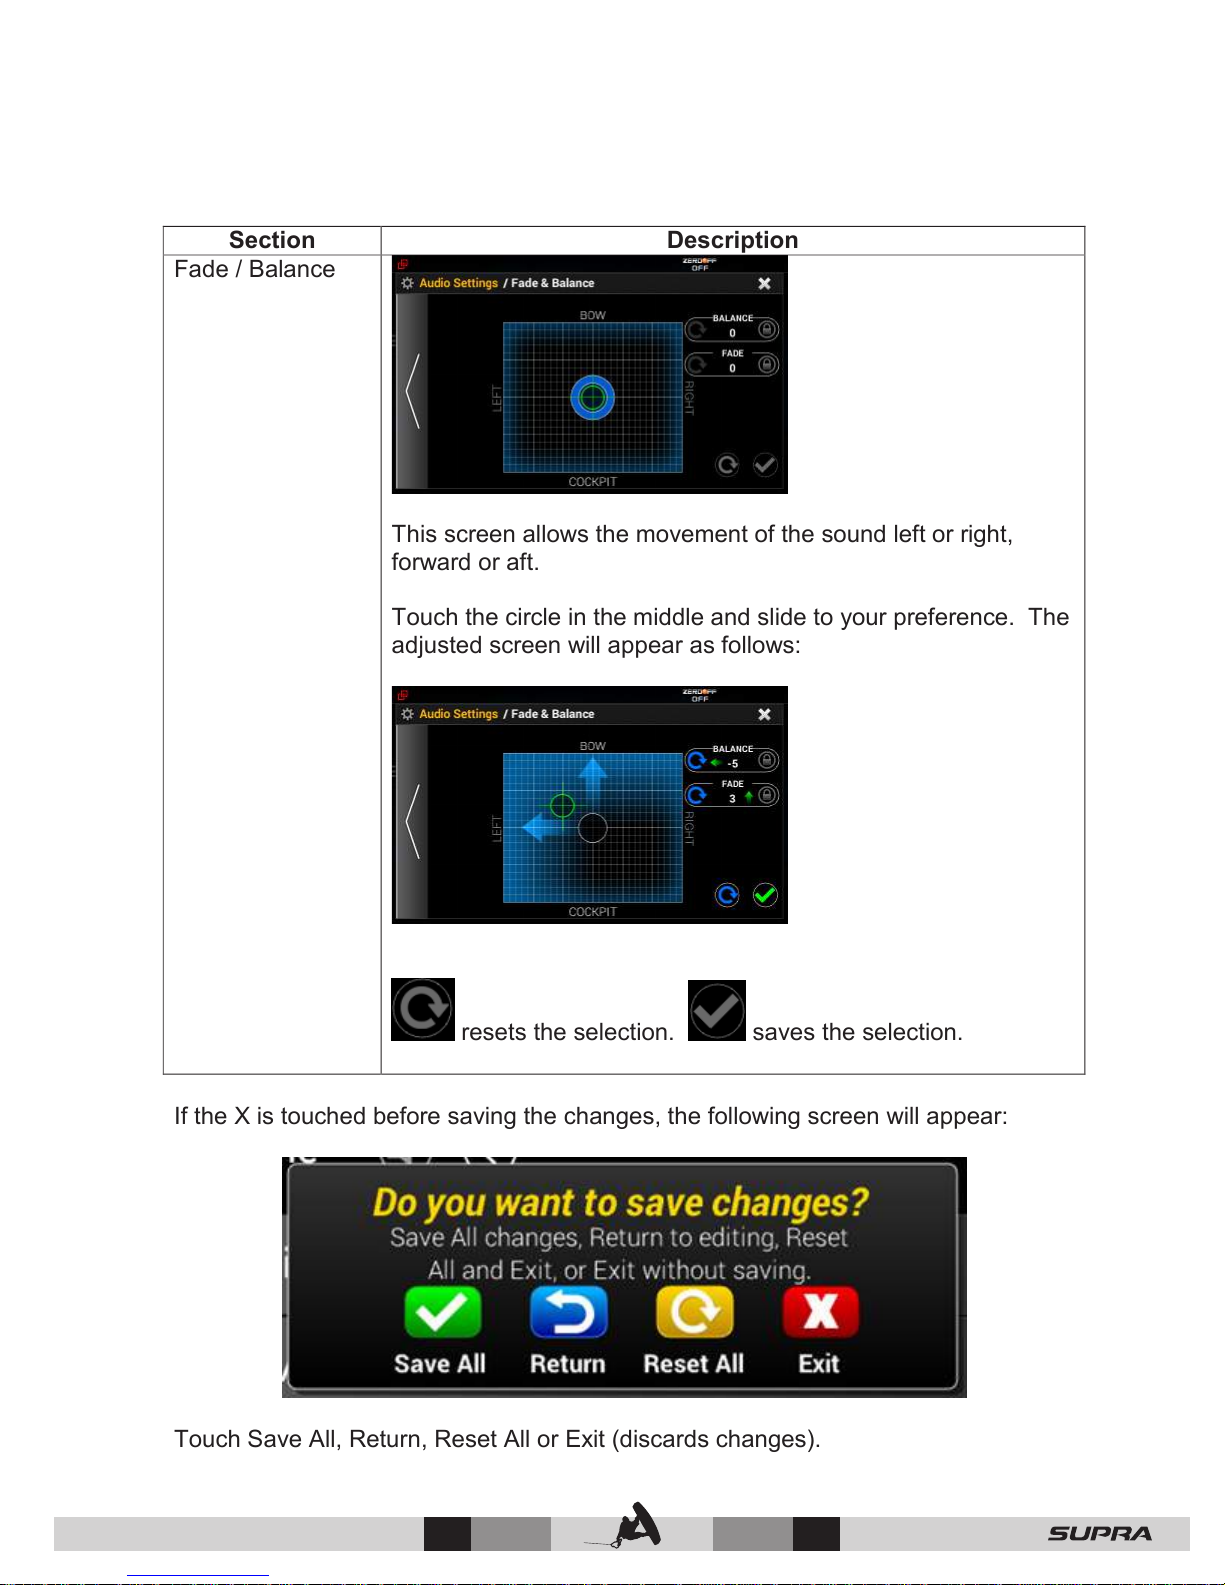
Section
Description
Fade / Balance
This screen allows the movement of the sound left or right,
forward or aft.
Touch the circle in the middle and slide to your preference. The
adjusted screen will appear as follows:
resets the selection. saves the selection.
If the X is touched before saving the changes, the following screen will appear:
Touch Save All, Return, Reset All or Exit (discards changes).
© 2016 Skier’s Choice, Inc.
45 —
Page 47
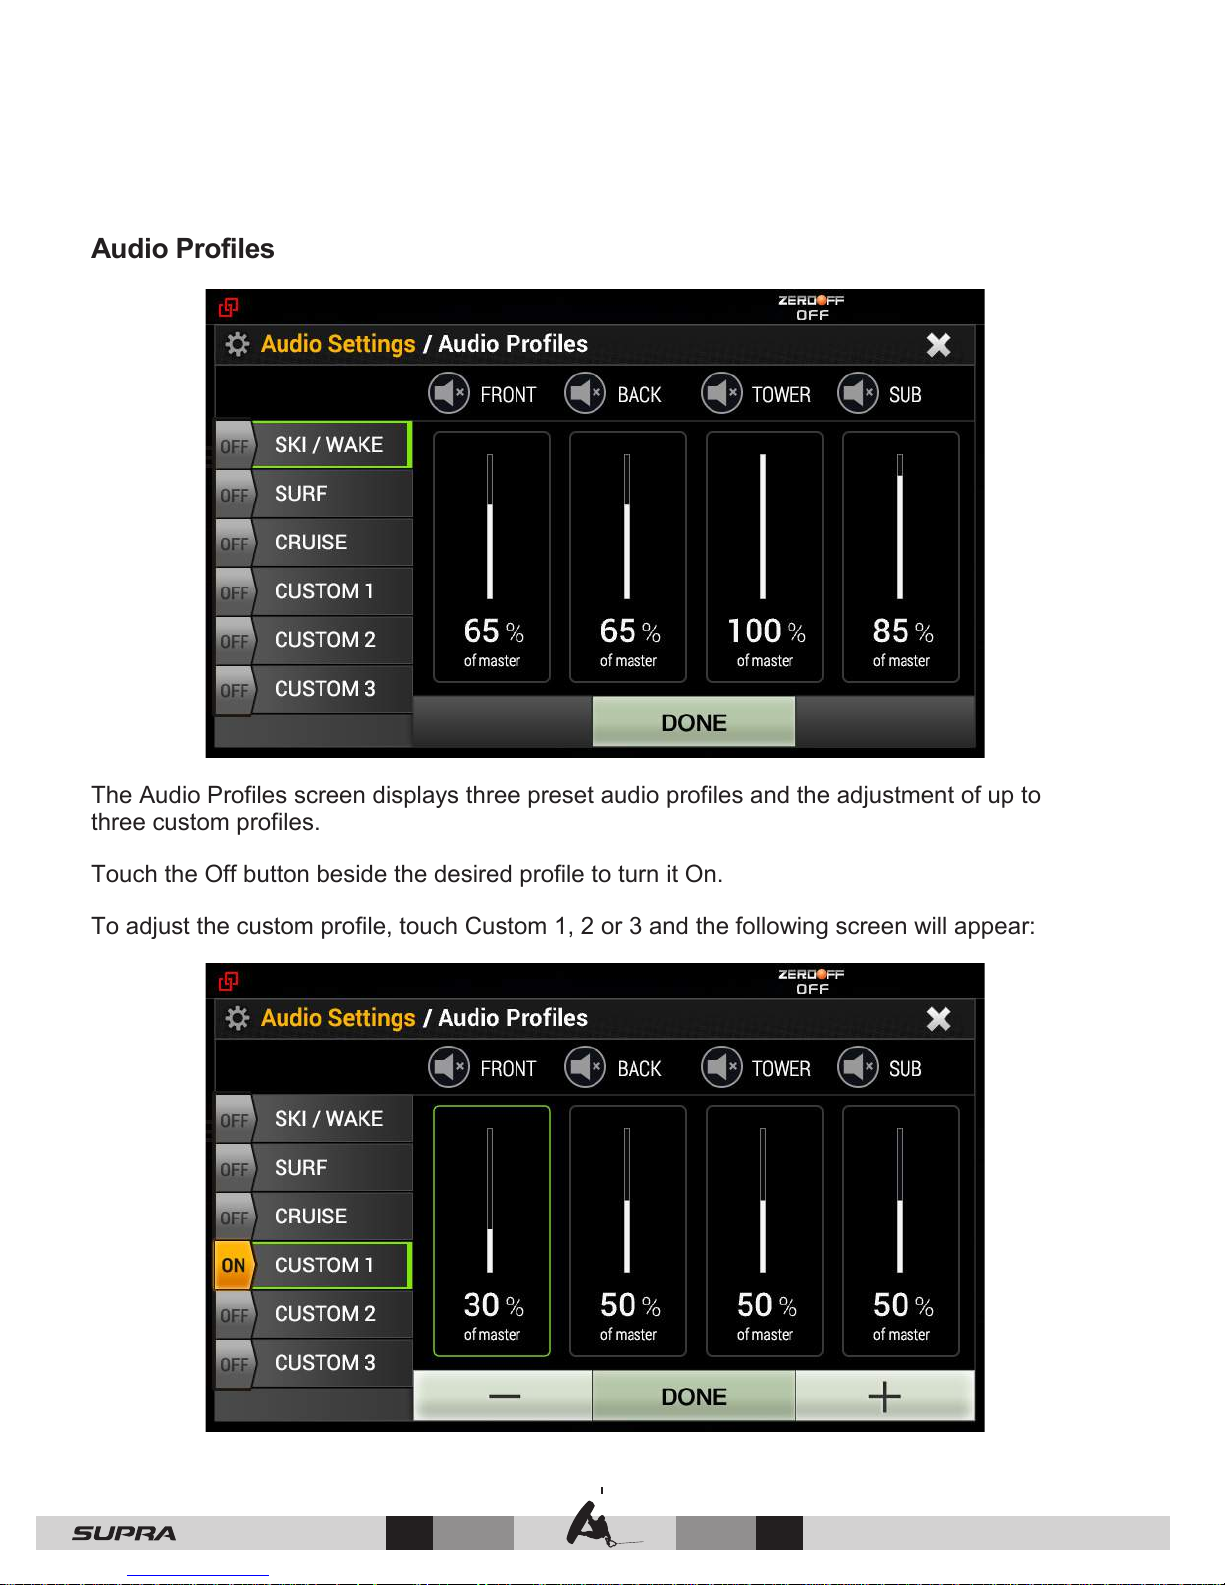
Audio Profiles
The Audio Profiles screen displays three preset audio profiles and the adjustment of up to
three custom profiles.
Touch the Off button beside the desired profile to turn it On.
To adjust the custom profile, touch Custom 1, 2 or 3 and the following screen will appear:
— 46
© 2016 Skier’s Choice, Inc.
Page 48
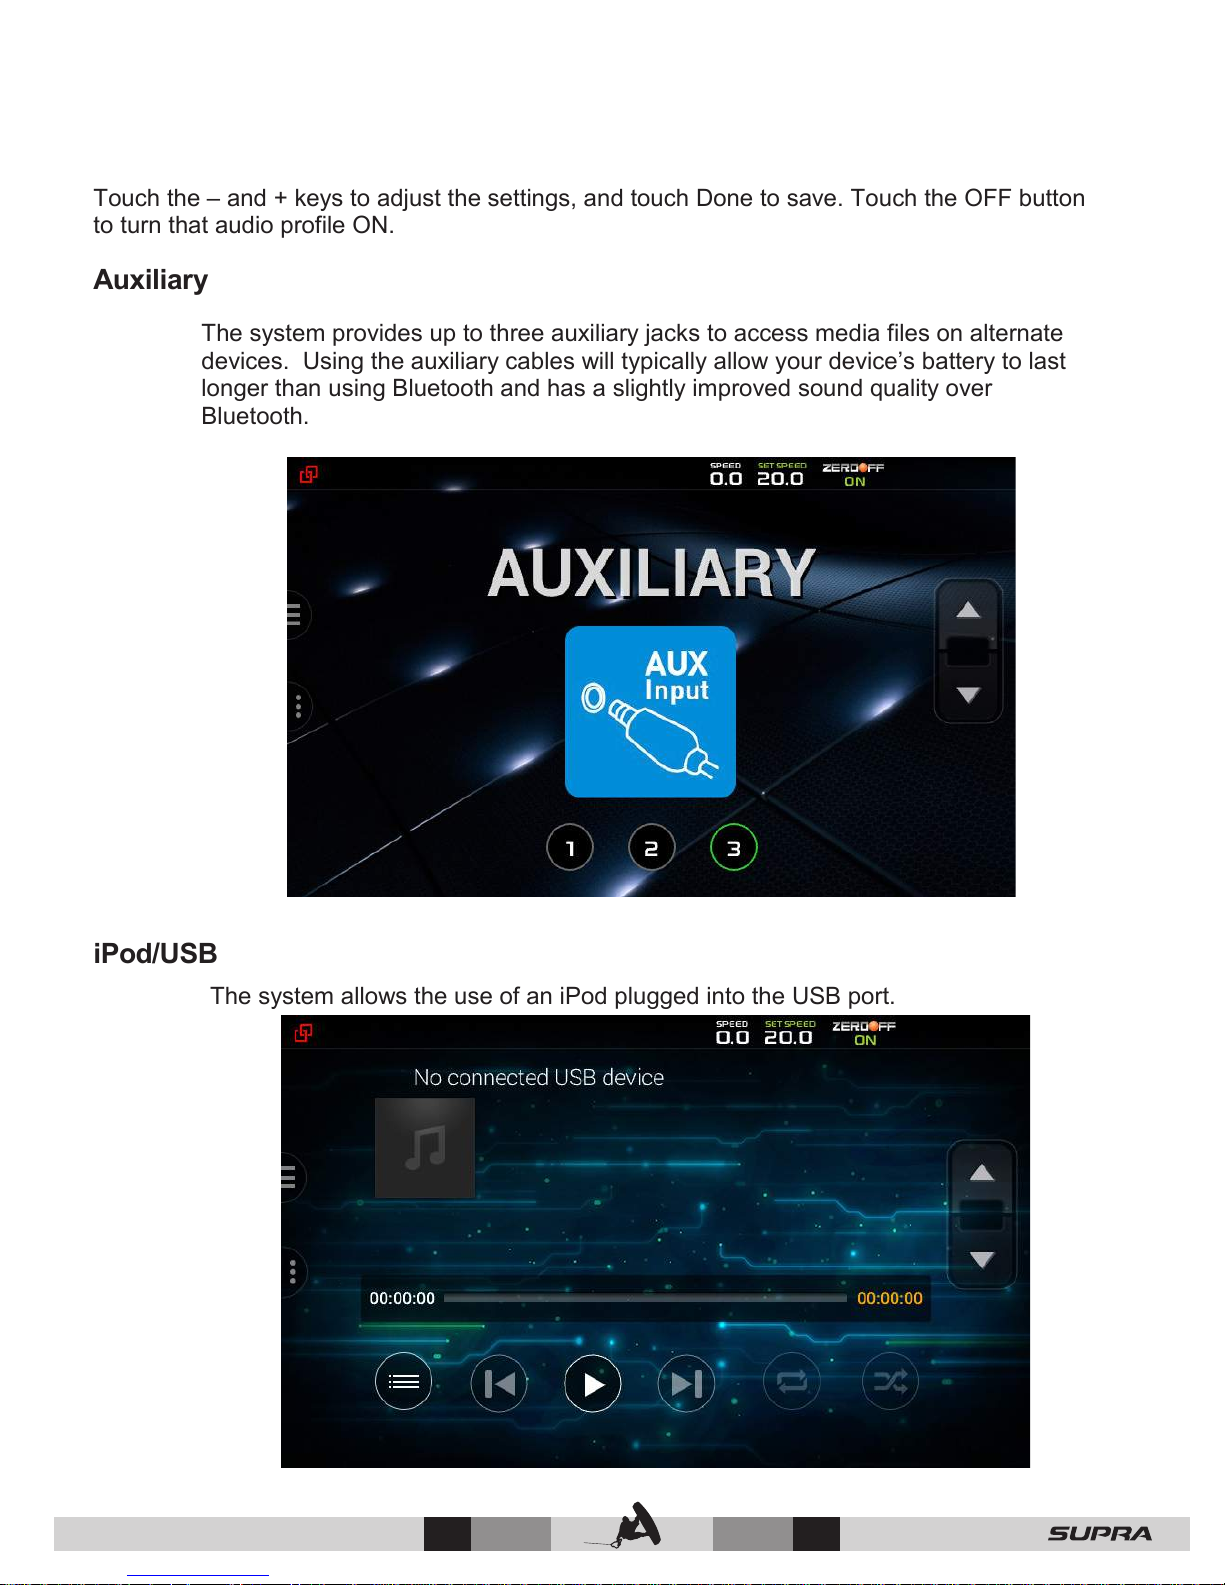
Touch the – and + keys to adjust the settings, and touch Done to save. Touch the OFF button
to turn that audio profile ON.
Auxiliary
The system provides up to three auxiliary jacks to access media files on alternate
devices. Using the auxiliary cables will typically allow your device’s battery to last
longer than using Bluetooth and has a slightly improved sound quality over
Bluetooth.
iPod/USB
The system allows the use of an iPod plugged into the USB port.
© 2016 Skier’s Choice, Inc.
47 —
Page 49
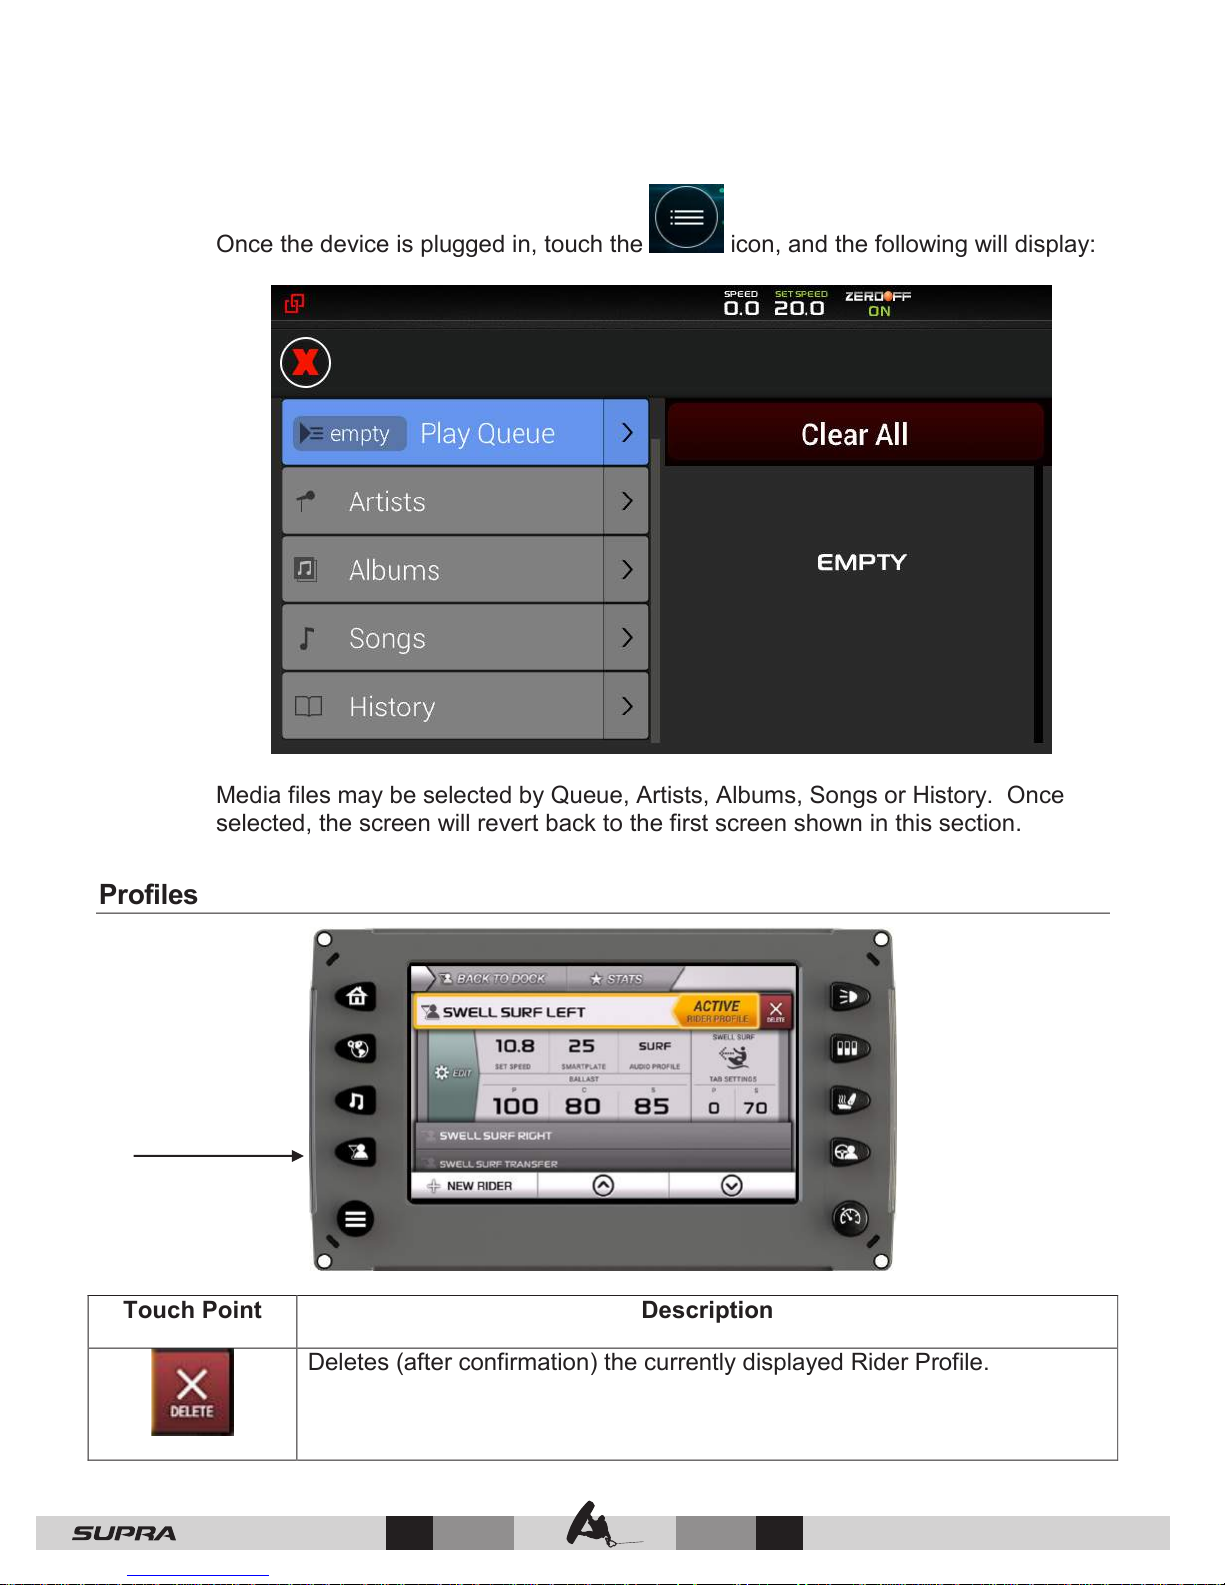
Once the device is plugged in, touch the icon, and the following will display:
Media files may be selected by Queue, Artists, Albums, Songs or History. Once
selected, the screen will revert back to the first screen shown in this section.
Profiles
Touch Point
Description
Deletes (after confirmation) the currently displayed Rider Profile.
— 48
© 2016 Skier’s Choice, Inc.
Page 50
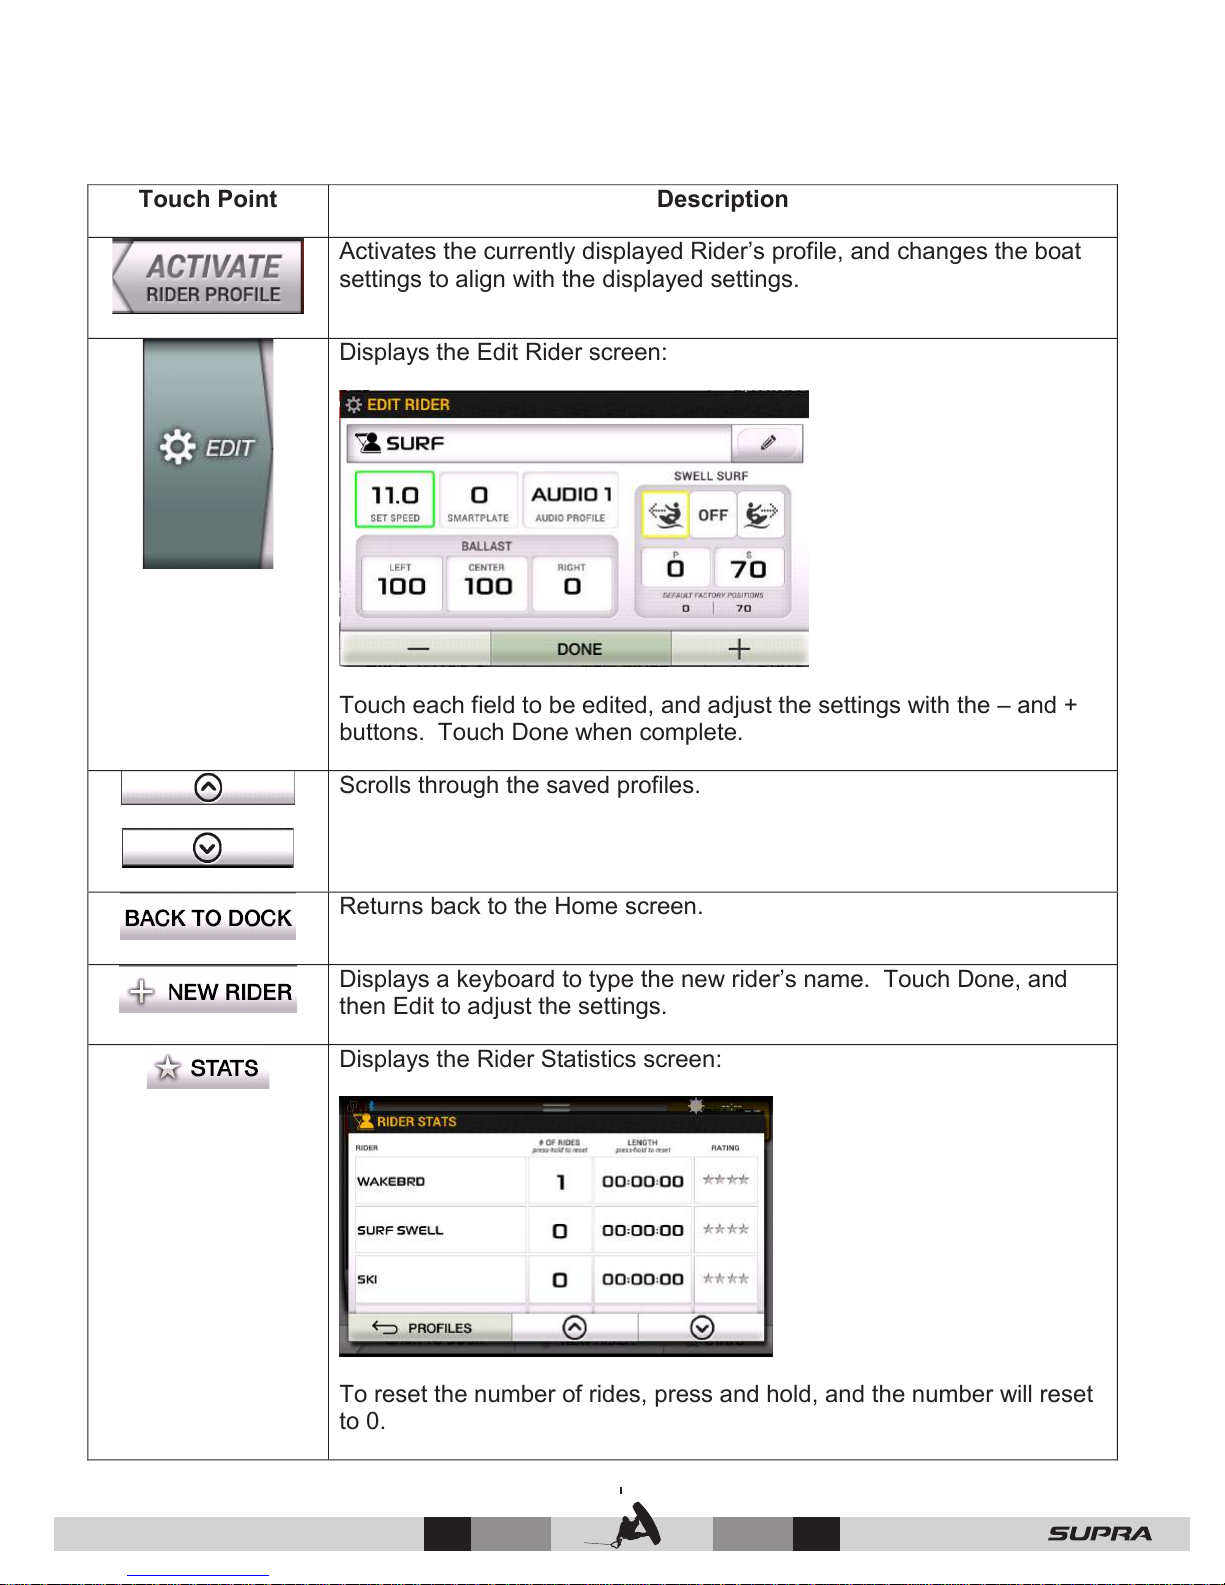
Touch Point
Description
Activates the currently displayed Rider’s profile, and changes the boat
settings to align with the displayed settings.
Displays the Edit Rider screen:
Touch each field to be edited, and adjust the settings with the – and +
buttons. Touch Done when complete.
Scrolls through the saved profiles.
Returns back to the Home screen.
Displays a keyboard to type the new rider’s name. Touch Done, and
then Edit to adjust the settings.
Displays the Rider Statistics screen:
To reset the number of rides, press and hold, and the number will reset
to 0.
© 2016 Skier’s Choice, Inc.
49 —
Page 51
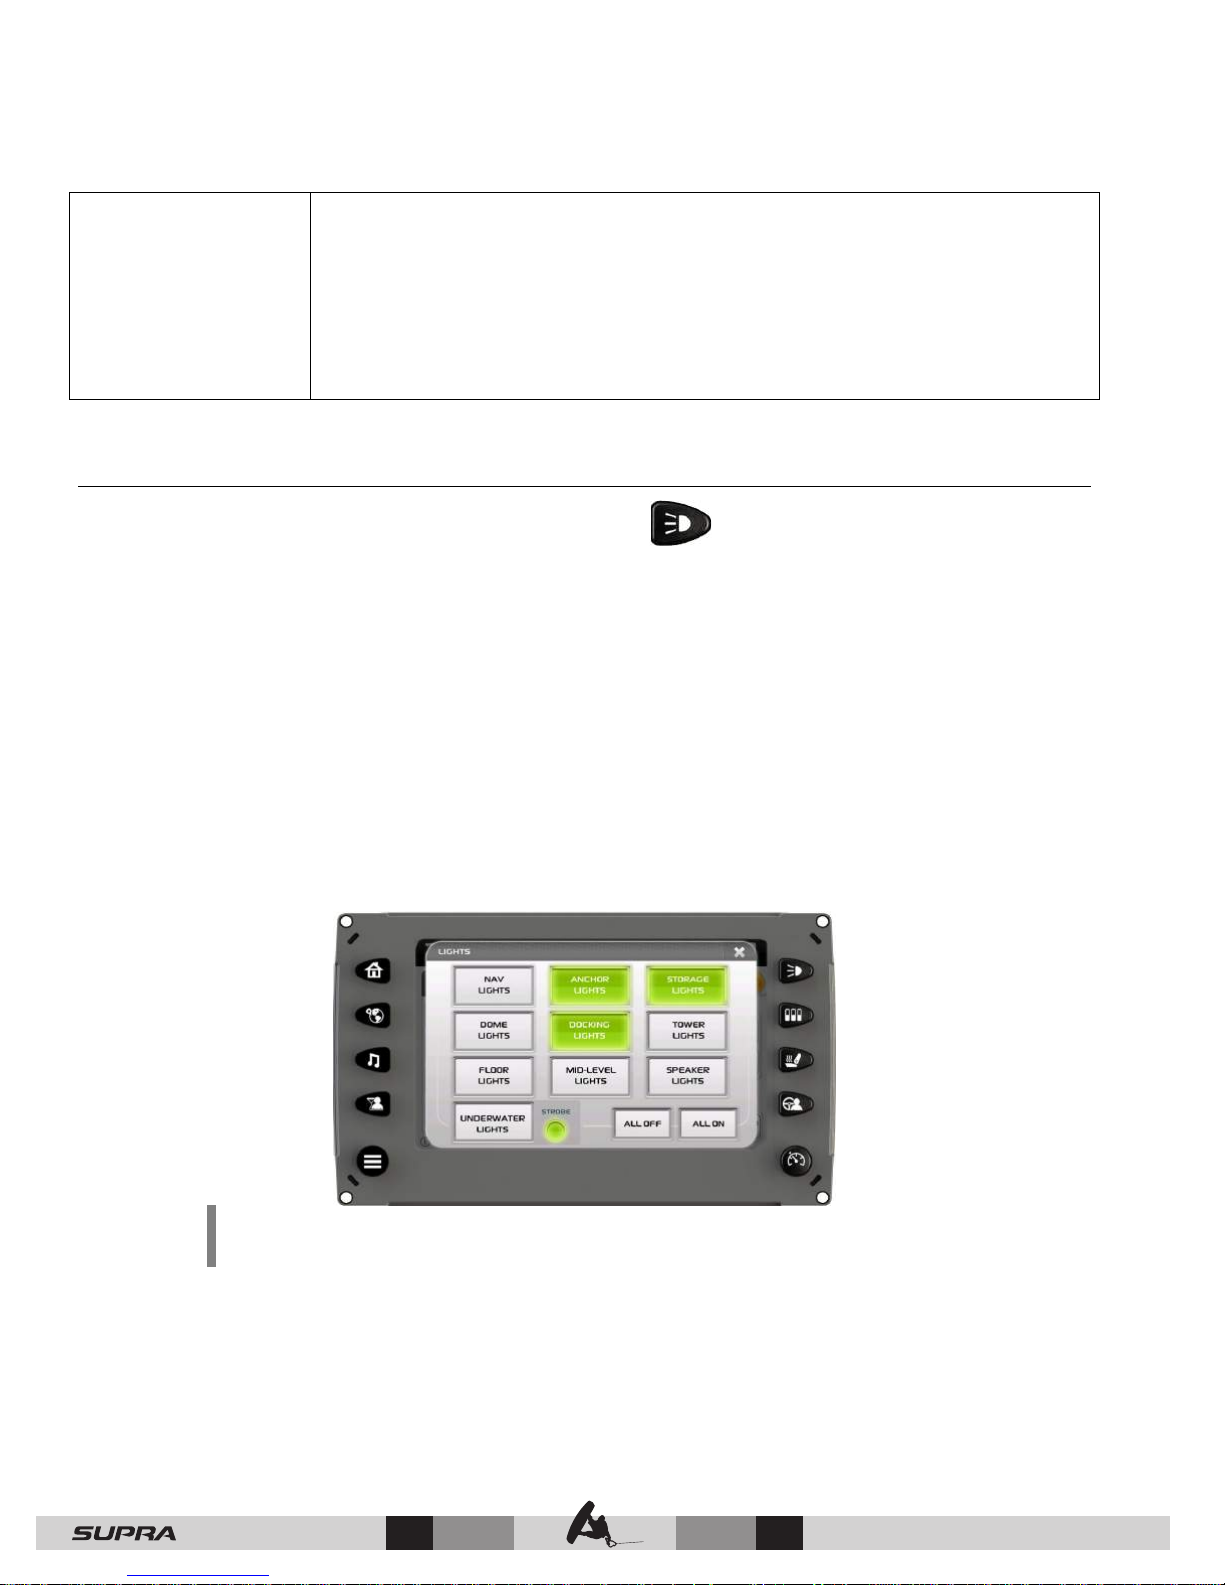
To reset the length, press and hold, and the time will reset to 00:00:00.
To provide a rating, touch the stars for each desired star to be lit up.
Touch Profiles to return to the Profiles screen.
Touch the UP and DN arrows to view additional statistics.
Lights
The Lights screen is accessed by pressing the Lights Quick Access Key. On this screen
the following lights can be turned on and off:
• Navigation Lights
• Anchor Lights
• Storage Lights
• Dome Lights
• Docking Lights
• Tower Lights
• Floor Lights
• Mid-Level Lights
• Speaker Lights
• Underwater Lights/Strobe
• All Off/All On
NOTE: If the cell is gray, this indicates the lights are OFF. If the cell is
green, this indicates the lights are ON.
— 50
© 2016 Skier’s Choice, Inc.
Page 52
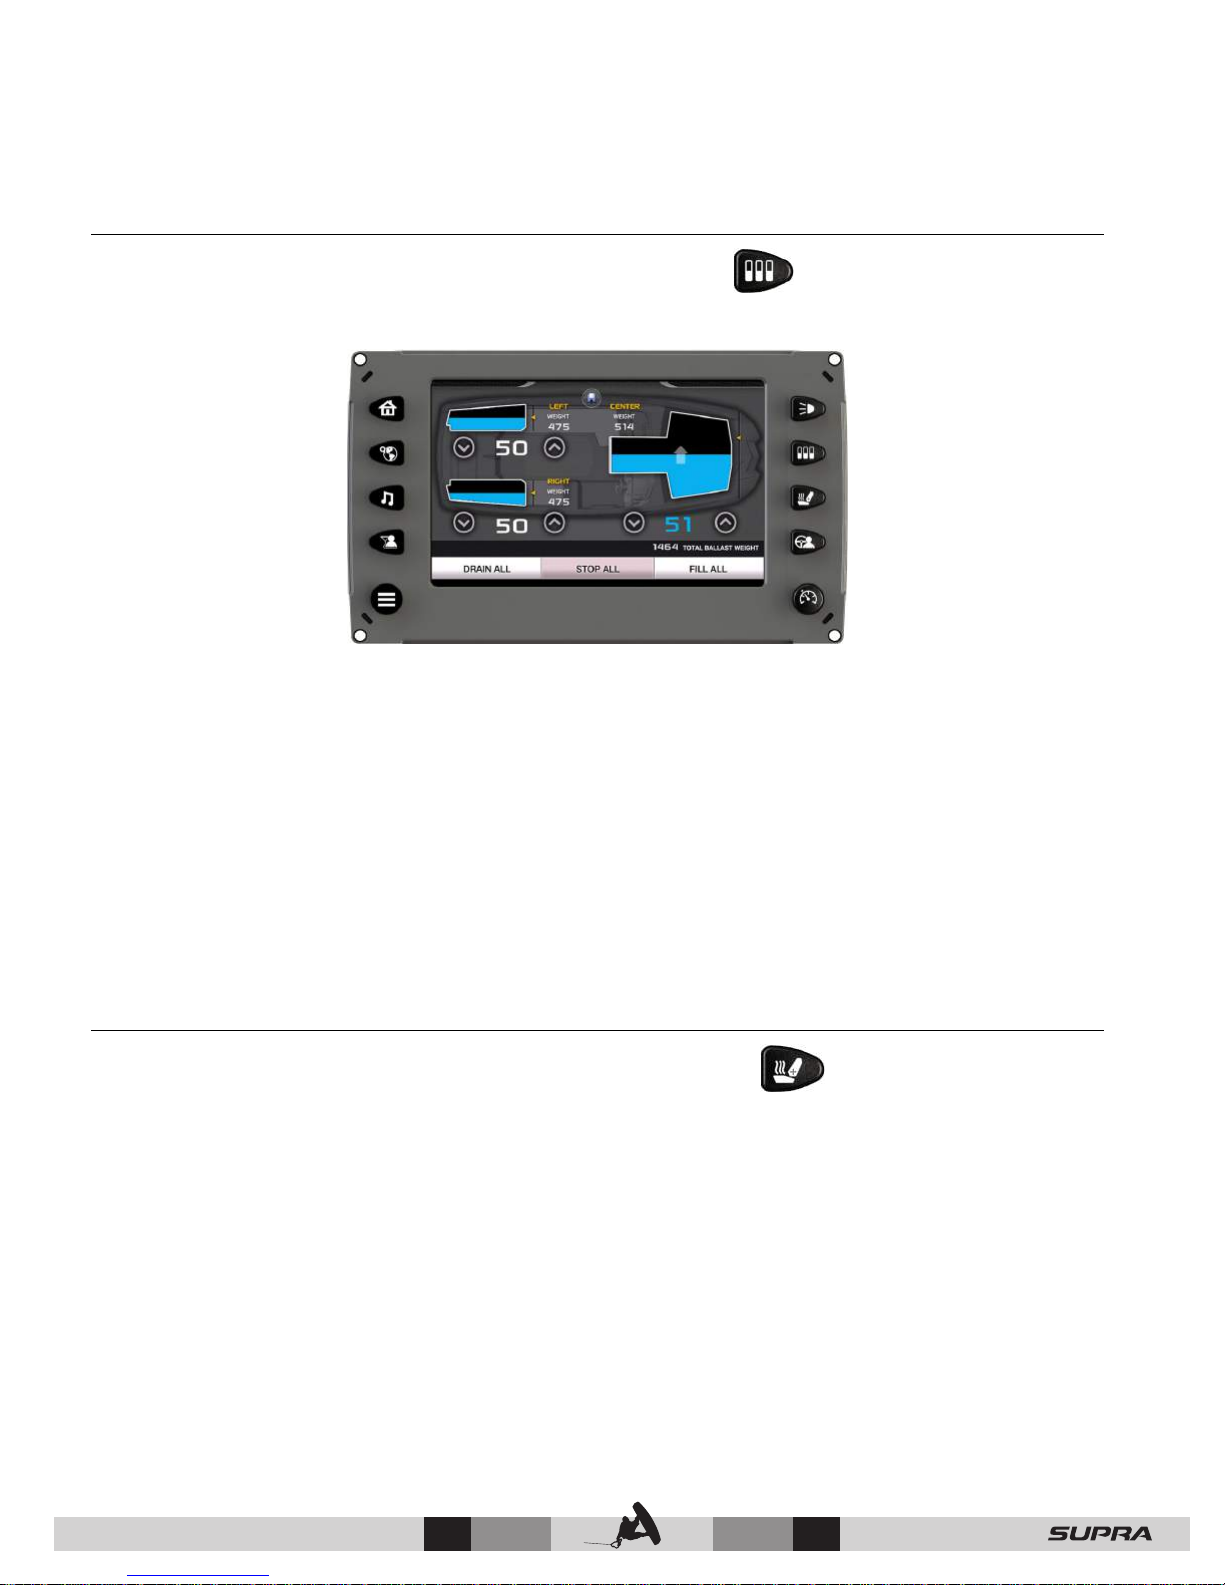
Ballast
The Ballast screen can be accessed by pressing the Ballast Quick Access Key. This
screen displays the current state of the ballasts and is interactive for immediate settings.
To adjust the Ballast settings slide finger up the tank to the desired level or tap the UP or
DOWN arrows below the tank. As an example, the illustration shows the Center tank filling to
achieve 51 percent and the left and right ballasts have achieved 50 percent tank capacity.
The following functions can also be accomplished from this screen:
• FILL ALL – touch to fill all the ballasts
• DRAIN ALL – touch to drain all the ballasts
• STOP ALL – touch to stop all filling or draining activity
• SAVE – touch to save the current settings to the current profile or a new profile
• X – touch to exit the current screen
Comfort
The Comfort screen can be accessed by pressing the Comfort Quick Access Key. On
the Comfort screen, touch a cell to activate. Touch it again to change the setting or use the
arrows. The following comfort settings can be made if the option is installed on your boat
package:
• Heater – HIGH/LOW/OFF
• Seat Heater – ON/OFF
• Seat Height – UP/DOWN
These settings can also be set for specific boat drivers through the driver presets.
© 2016 Skier’s Choice, Inc.
51 —
Page 53
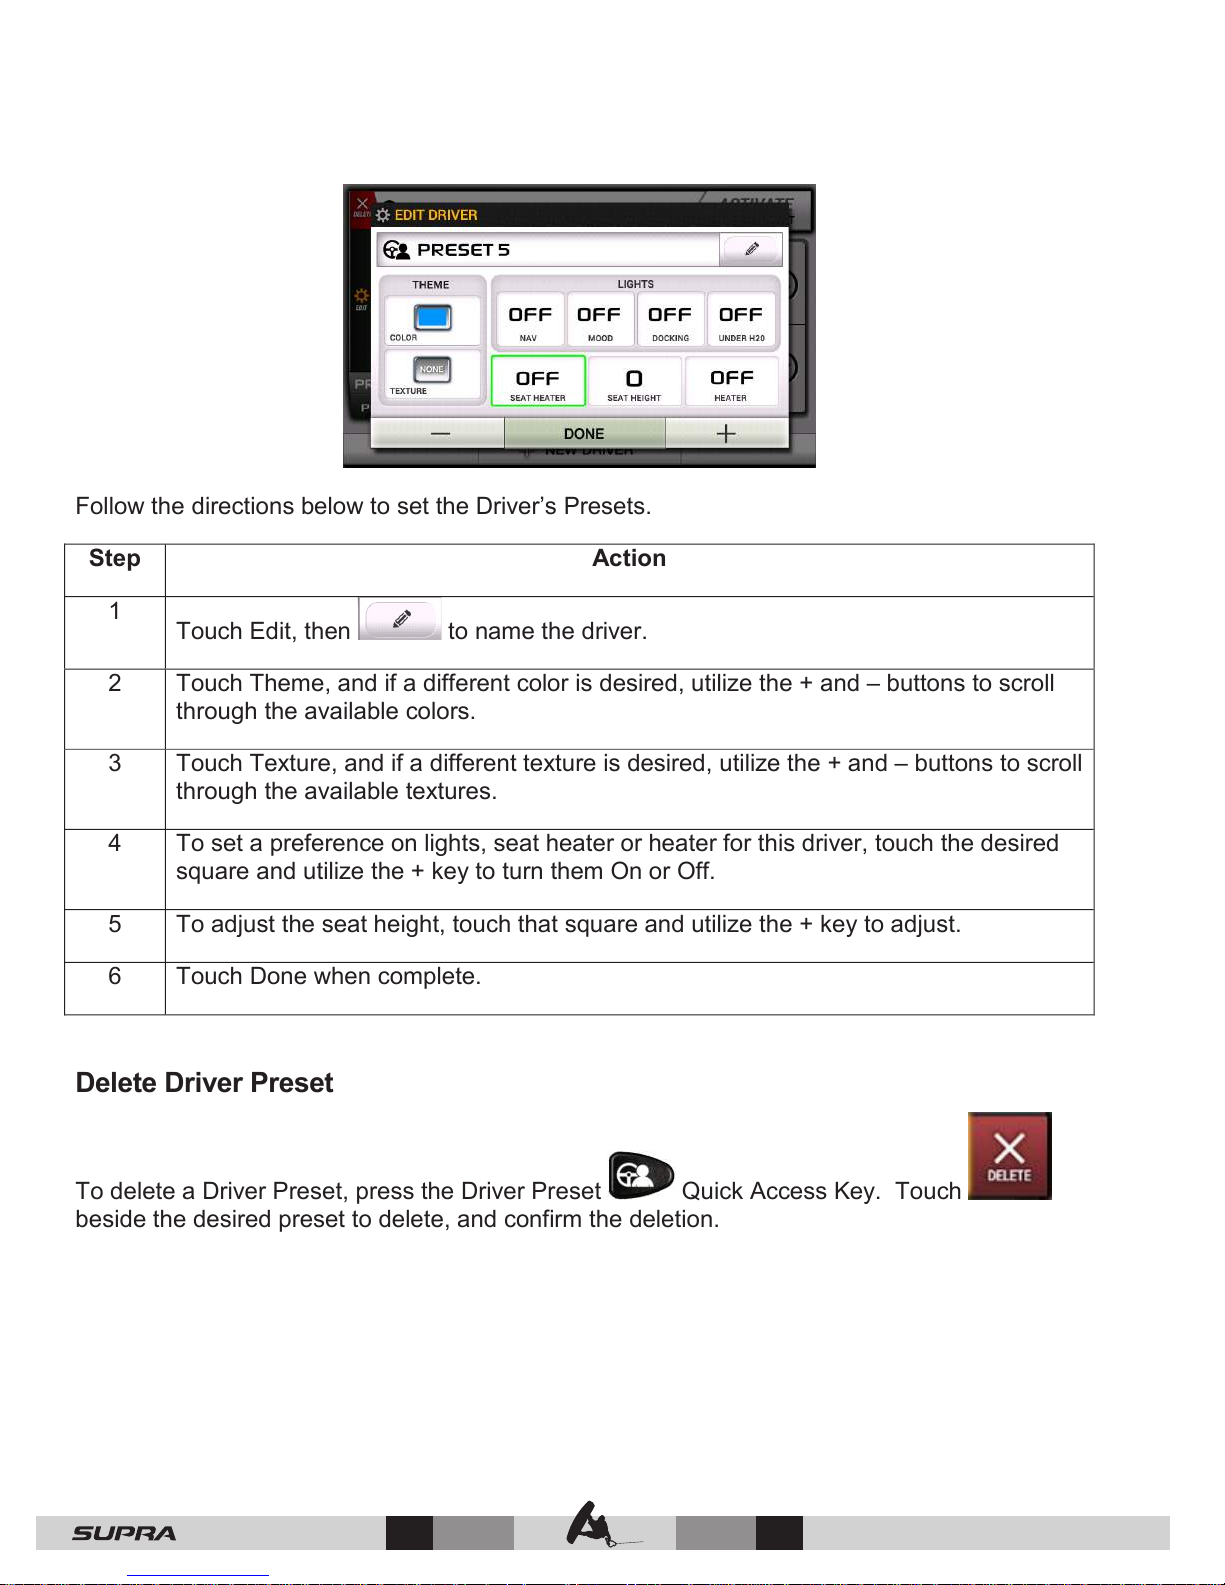
Follow the directions below to set the Driver’s Presets.
Step
Action
1
Touch Edit, then to name the driver.
2
Touch Theme, and if a different color is desired, utilize the + and – buttons to scroll
through the available colors.
3
Touch Texture, and if a different texture is desired, utilize the + and – buttons to scroll
through the available textures.
4
To set a preference on lights, seat heater or heater for this driver, touch the desired
square and utilize the + key to turn them On or Off.
5
To adjust the seat height, touch that square and utilize the + key to adjust.
6
Touch Done when complete.
Delete Driver Preset
To delete a Driver Preset, press the Driver Preset Quick Access Key. Touch
beside the desired preset to delete, and confirm the deletion.
— 52
© 2016 Skier’s Choice, Inc.
Page 54
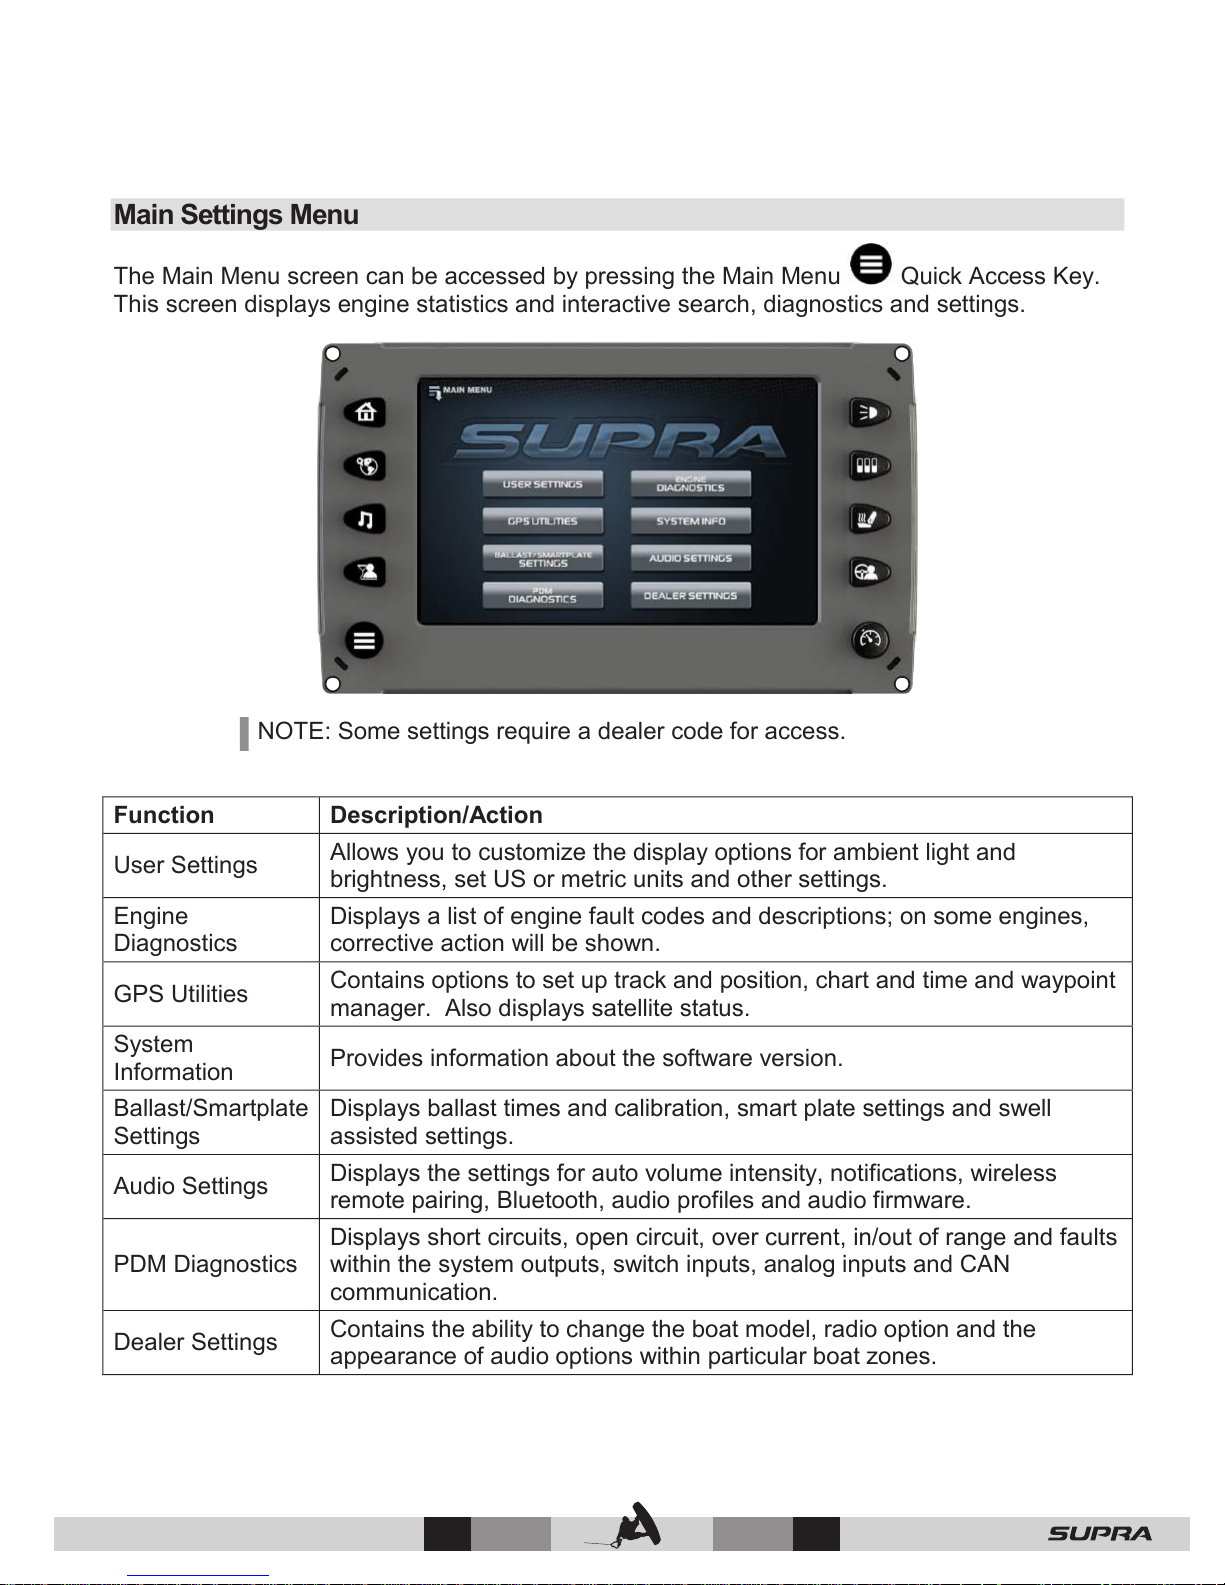
Main Settings Menu
The Main Menu screen can be accessed by pressing the Main Menu Quick Access Key.
This screen displays engine statistics and interactive search, diagnostics and settings.
NOTE: Some settings require a dealer code for access.
Function
Description/Action
User Settings
Allows you to customize the display options for ambient light and
brightness, set US or metric units and other settings.
Engine
Diagnostics
Displays a list of engine fault codes and descriptions; on some engines,
corrective action will be shown.
GPS Utilities
Contains options to set up track and position, chart and time and waypoint
manager. Also displays satellite status.
System
Information
Provides information about the software version.
Ballast/Smartplate
Settings
Displays ballast times and calibration, smart plate settings and swell
assisted settings.
Audio Settings
Displays the settings for auto volume intensity, notifications, wireless
remote pairing, Bluetooth, audio profiles and audio firmware.
PDM Diagnostics
Displays short circuits, open circuit, over current, in/out of range and faults
within the system outputs, switch inputs, analog inputs and CAN
communication.
Dealer Settings
Contains the ability to change the boat model, radio option and the
appearance of audio options within particular boat zones.
© 2016 Skier’s Choice, Inc.
53 —
Page 55
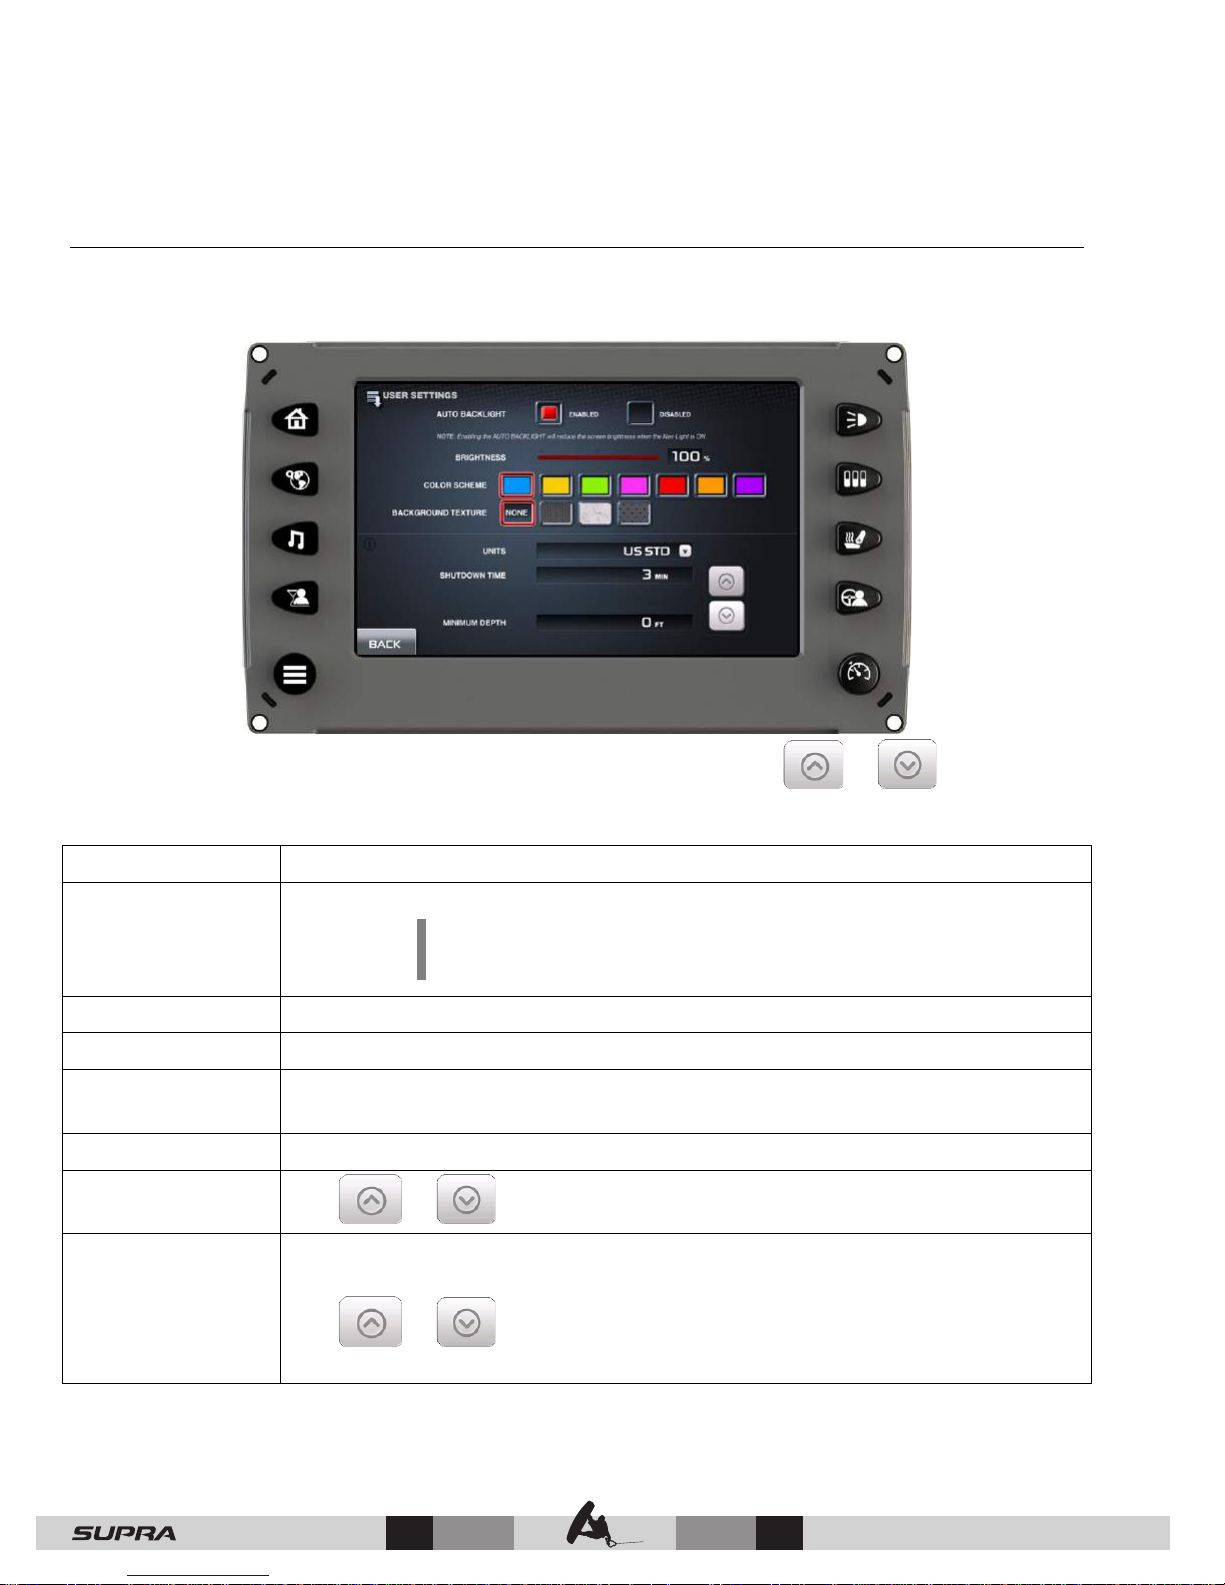
Function
Description/Action
User Settings
On the Main Menu screen, touch [USER SETTINGS] to access the User Settings screen. The
User can set viewing preferences for the display.
To edit the settings, touch the field to the right of the label or touch or arrows to
adjust the settings. Touch [Back] to save the settings and return to the Main Menu screen.
The choices are: Enable or Disable.
Auto Backlight
NOTE: Enabling the Auto Backlight will reduce the
screen brightness when the Nav Light is ON.
Brightness Touch and slide finger along the brightness bar to adjust the setting.
Color Scheme Touch one of the colors to change the color scheme of the display.
Background
Texture
Touch one of the background textures to change the texture of the
display.
Units Pull down the arrow and choose either US STD or Metric.
Shutdown Time
Tap or to adjust the setting.
This allows you to choose a minimum depth (measured from bottom of
keel) to give an alarm if the vessel comes into a minimum depth situation.
Minimum Depth
Tap
or to adjust the setting. Choosing zero turns this option
OFF.
— 54
© 2016 Skier’s Choice, Inc.
Page 56
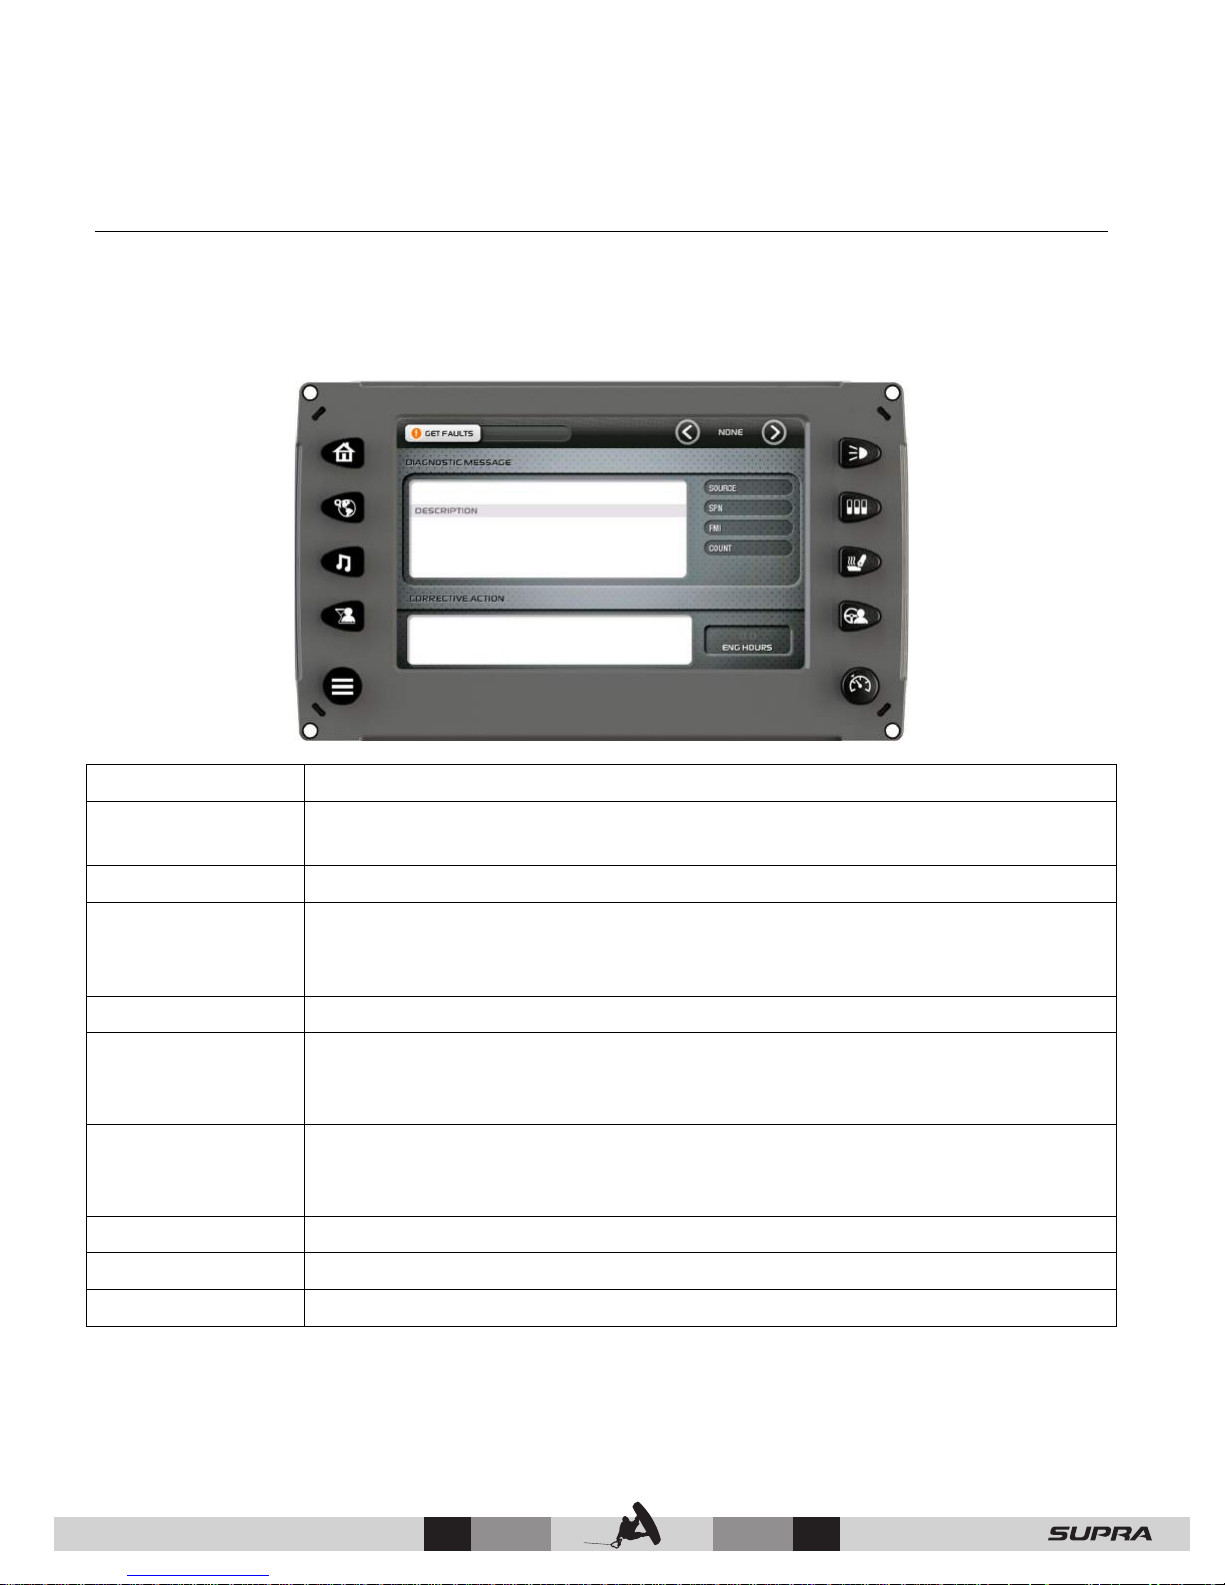
Engine Diagnostics
On the Main Menu screen, touch [Engine Diagnostics] to access the Engine Diagnostics
screen. When choosing this selection, the display queries the engine’s ECU and displays
feedback on any diagnostic codes that have been activated and stored in the ECU for service
needs.
Function Description/Action
Get Faults
Touch [GET FAULTS] to show the number of active faults and the fault
number currently being displayed.
Arrows The Left and Right arrows at the top of the page scroll through messages.
Diagnostic
Message and
Description Field
Most common SPNs and FMIs have text for the description stored in the
display. If there is no text, then this SPN and FMI must be defined by
referring to the engine manufacturer or the SAE J1939 standard.
Source Indicates the source of the message.
Suspect Parameter Number - fault code
SPN
If not translated into text by the display, see the engine manufacturer's
literature for the definition of the SPN number.
Failure Mode Indicator - fault code
FMI
The FMI is defined by SAE J1939. If not translated into text, see the SAE
standard or the engine manufacturer's literature.
Count Number of messages.
ENG Hours Number of in-use engine hours.
Corrective Action Suggested action for correction.
© 2016 Skier’s Choice, Inc.
55 —
Page 57
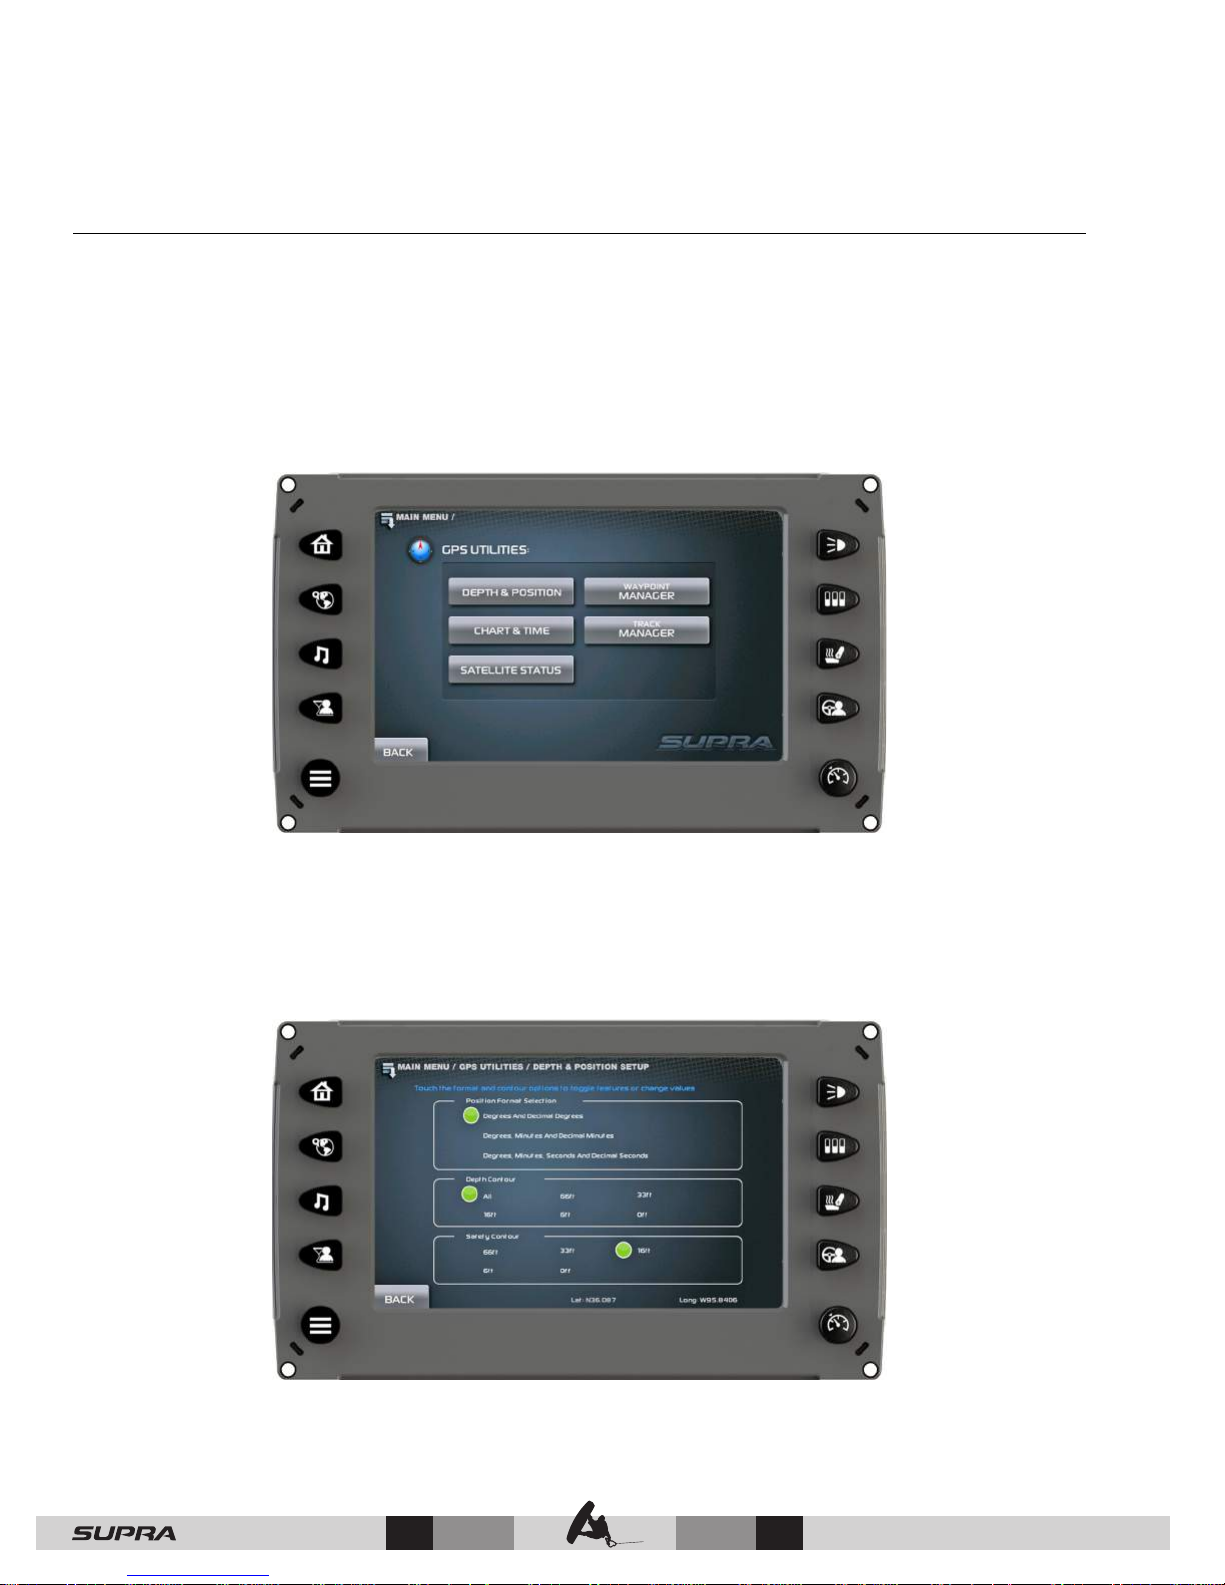
GPS Utilities
On the Main Menu screen, touch [GPS Utilities] to access the GPS Utilities screen. The GPS
Utilities includes the following:
• Depth and Position
• Waypoint Manager
• Chart and Time
• Track Manager
• Satellite Status
Depth and Position Settings
On the GPS Utilities screen, touch [Depth and Position] to access the Depth and Position
screen. This feature allows you to define the amount of detail to display for longitude and
latitude information on the GPS map and depth display.
— 56
© 2016 Skier’s Choice, Inc.
Page 58
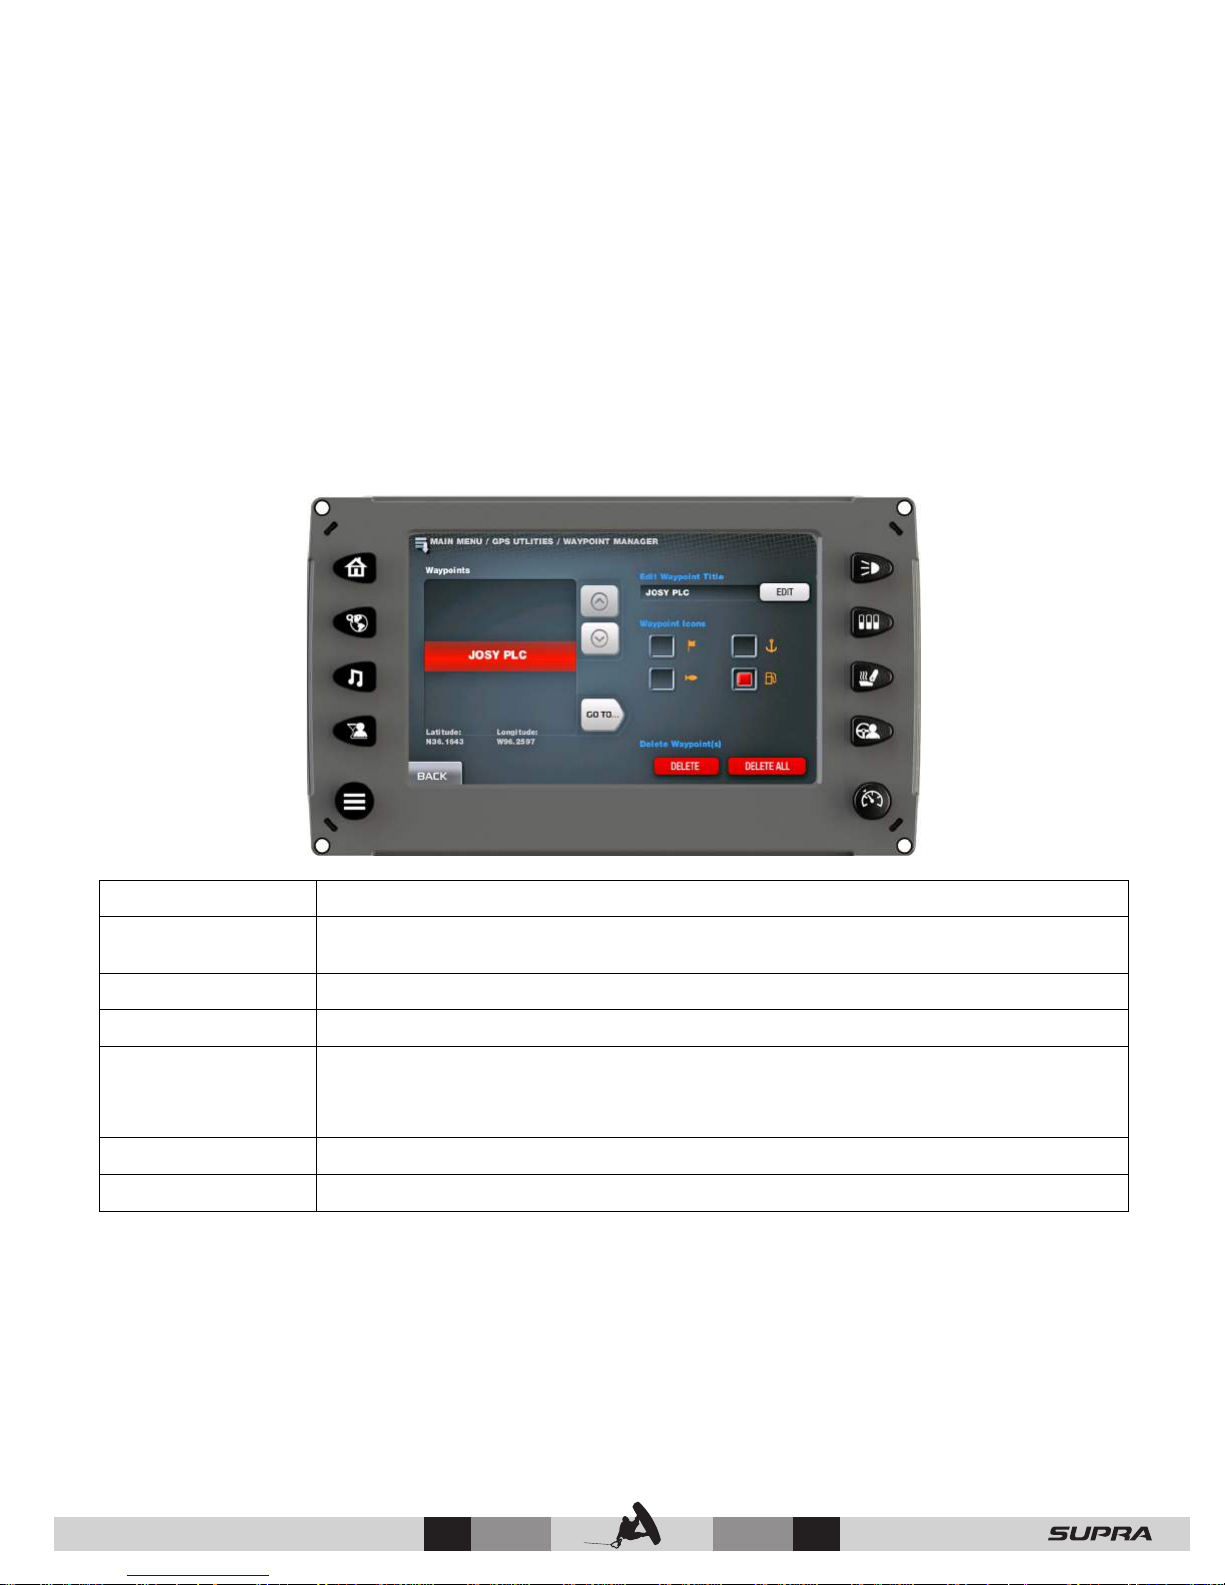
Displays a list of existing waypoints that have been set. Use the [Up] and
[Down] keys to highlight the desired waypoint.
Waypoint Manager
On the GPS Utilities screen, touch [Waypoint Manager] to access the Waypoint Manager
screen.
Waypoints allow you to mark specific locations by latitude and longitude. Once the waypoints
are established, the Waypoint Manager allows you to associate an icon with them for
identification. You can delete a single waypoint by using the [Delete] key or all of them at
once with [Delete All]. Pressing the [Go To…] key displays the GPS screen containing the
currently highlighted waypoint.
Function Description/Action
Waypoints
Waypoint Title Edit the waypoint title.
Waypoint Icon Assign one of four different icons to any of the waypoints listed.
Displays latitude and longitude values for the currently highlighted
Go To…
waypoint on the list. When touched, it will jump to the maps application
and the location of the selected waypoint.
Delete Delete a single waypoint.
Delete All Delete all waypoints at once.
© 2016 Skier’s Choice, Inc.
57 —
Page 59
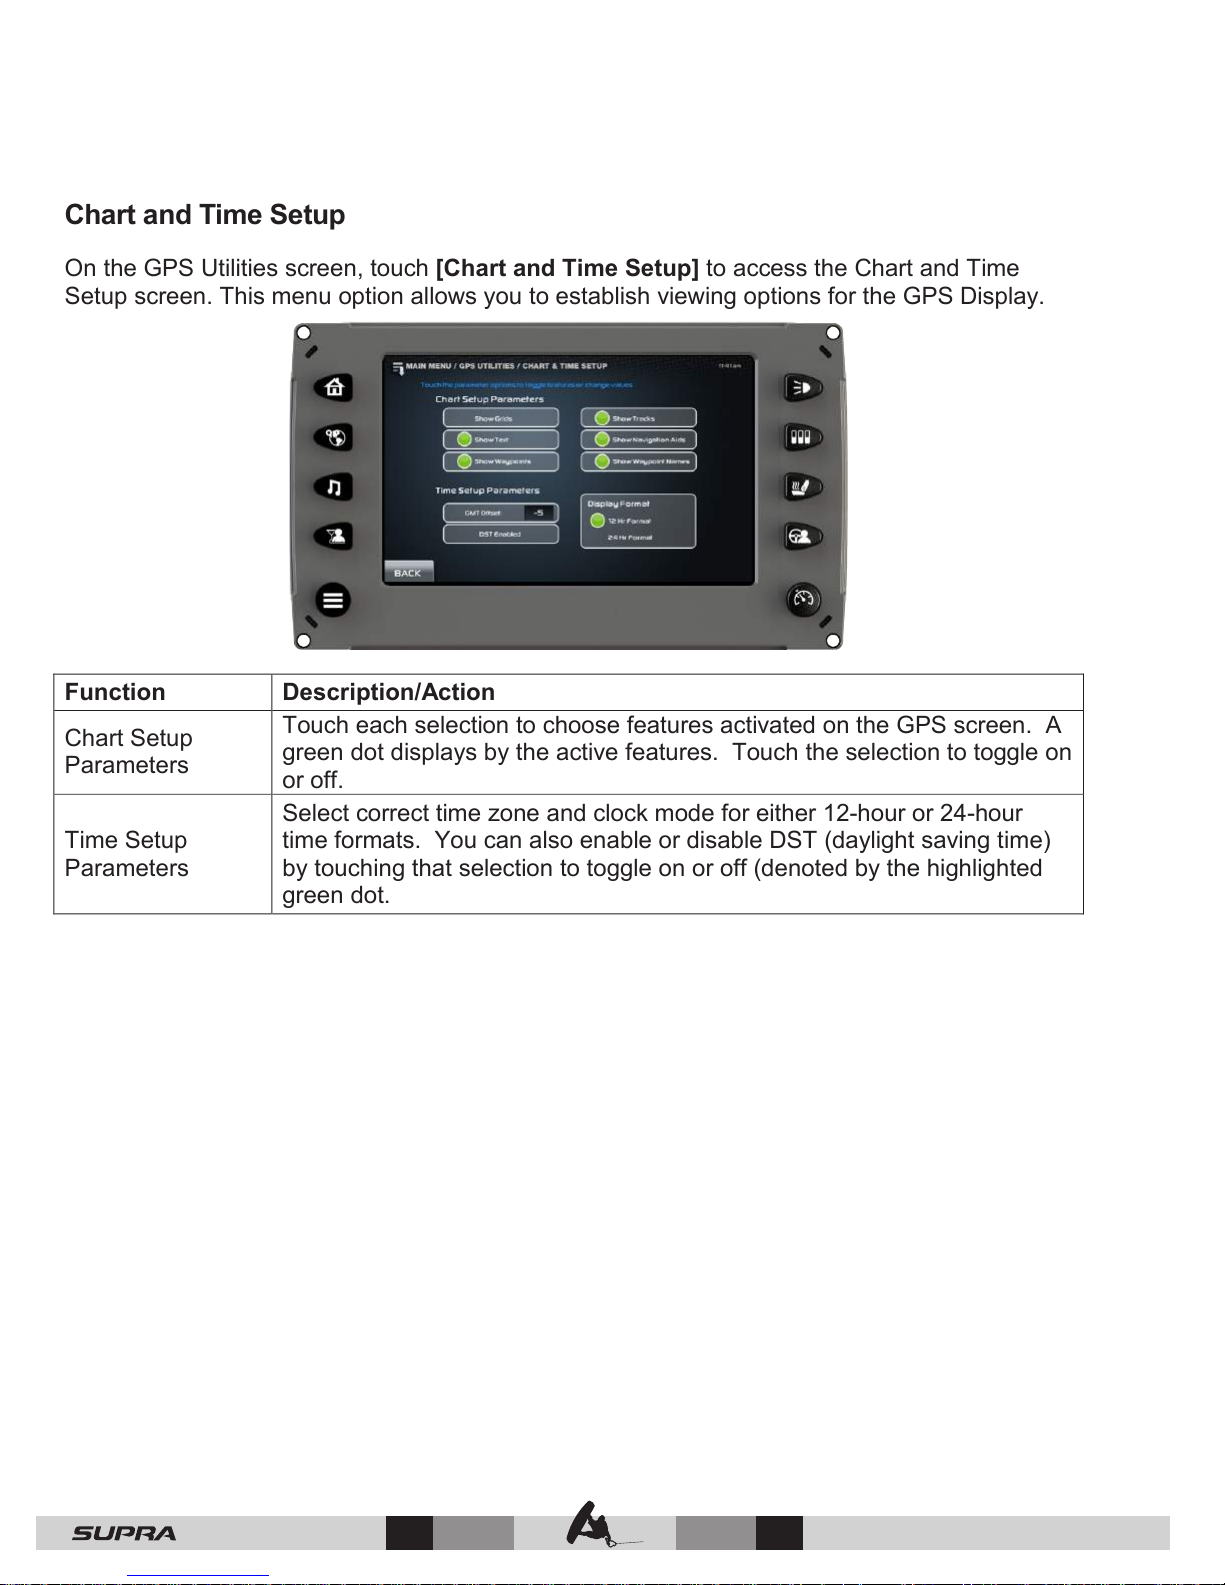
Chart and Time Setup
On the GPS Utilities screen, touch [Chart and Time Setup] to access the Chart and Time
Setup screen. This menu option allows you to establish viewing options for the GPS Display.
Function Description/Action
Chart Setup
Parameters
Touch each selection to choose features activated on the GPS screen. A
green dot displays by the active features. Touch the selection to toggle on
or off.
Time Setup
Parameters
Select correct time zone and clock mode for either 12-hour or 24-hour
time formats. You can also enable or disable DST (daylight saving time)
by touching that selection to toggle on or off (denoted by the highlighted
green dot.
— 58
© 2016 Skier’s Choice, Inc.
Page 60
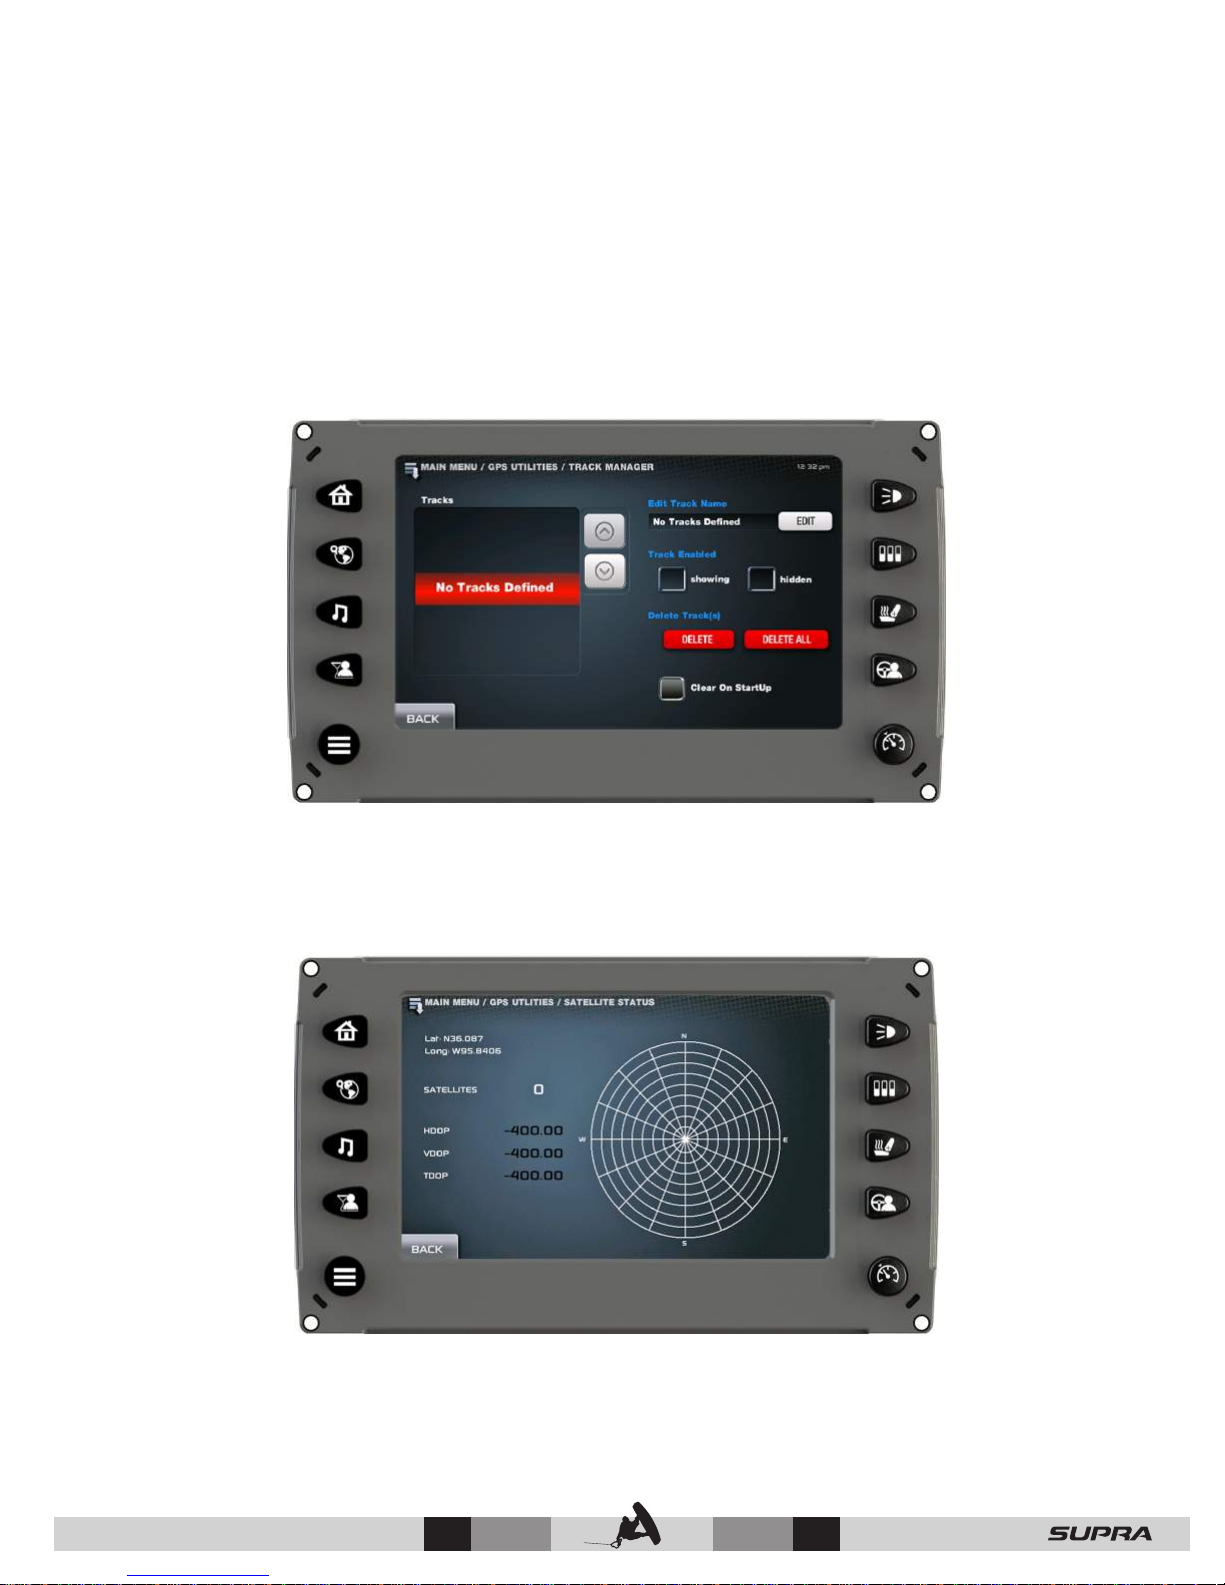
Track Manager
On the GPS Utilities screen, touch [Track Manager] to access the Track Manager screen.
Multiple tracks for displaying on the GPS map can be established. The Track Manager allows
you to select tracks to show or hide on the map you are currently using. You may [Delete] one
track or [Delete All] tracks at once.
Select [Clear on Startup] to erase any non-saved tracks.
Satellite Status
On the GPS Utilities screen, touch [Satellite Status] to access the Satellite Status screen.
This screen is an information-only screen that displays the location of detectable satellites.
© 2016 Skier’s Choice, Inc.
59 —
Page 61
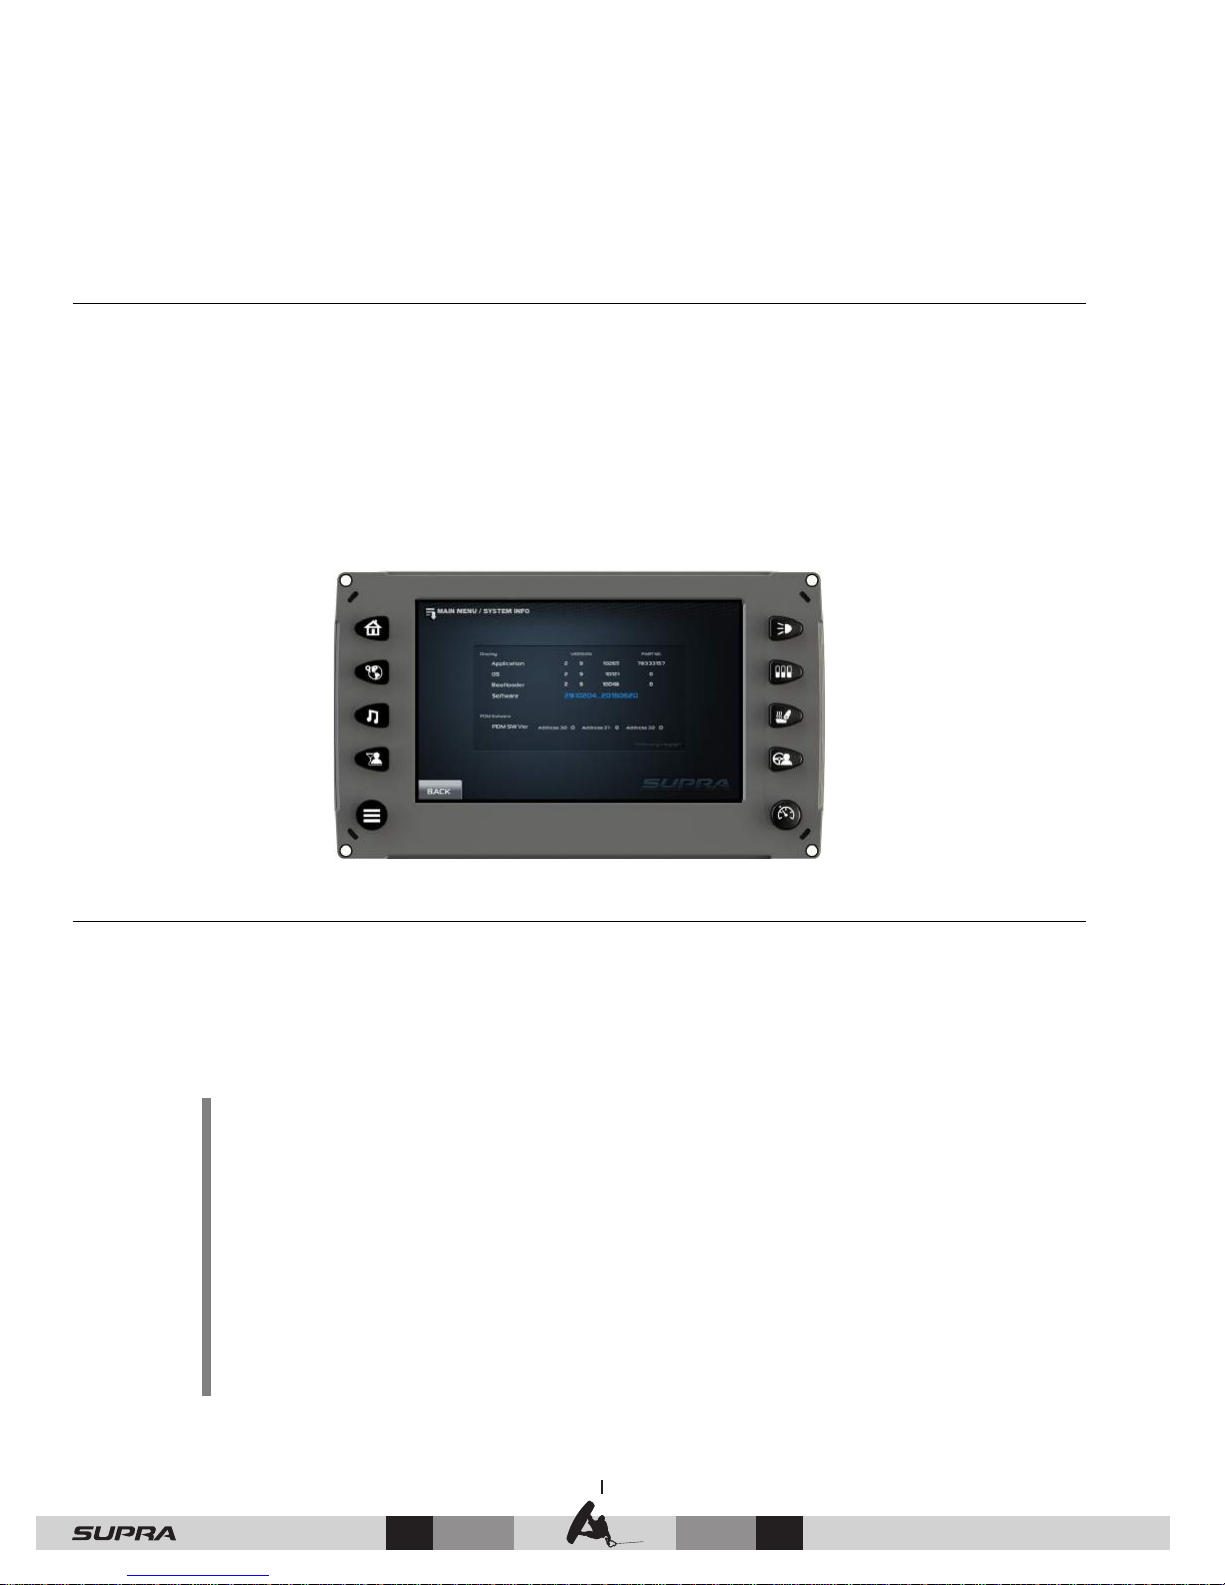
System Information
On the Main Menu screen, touch [System Info] to access the System Information screen. This
information-only screen provides the following:
• Application version and part number
• Operating system version and part number
• Bootloader version and part number
• Software version
• PDM Software Version Address(es)
Ballast/Smartplate Settings
On the Main Menu screen, touch [Ballast/Smartplate Settings] to access the
Ballast/Smartplate Settings screen. This screen provides default fill times for ballasts and
default settings for the Smartplate.
To access the edit points of the Ballast and Smartplate settings, with the cell highlighted, touch
the [Up] or [Down] arrows to change the setting.
NOTE: The [Crossover Point] defaults to 50 percent of your set speed.
This is the point at which the Smartplate will be automatically driven to the
active profile set point. If no set point is active, the Smartplate will be
driven to the [Smartplate Up] setting (default 50 percent).
The [Smartplate Down] setting (default 100 percent) is the position that
the Smartplate is driven to below the crossover setting.
Having the Smartplate deployed to 100 percent when the boat is at rest
and then automatically retracting to the Smartplate set point at the
crossover is what helps the boat keep the bow down and on plane during
acceleration.
— 60
© 2016 Skier’s Choice, Inc.
Page 62
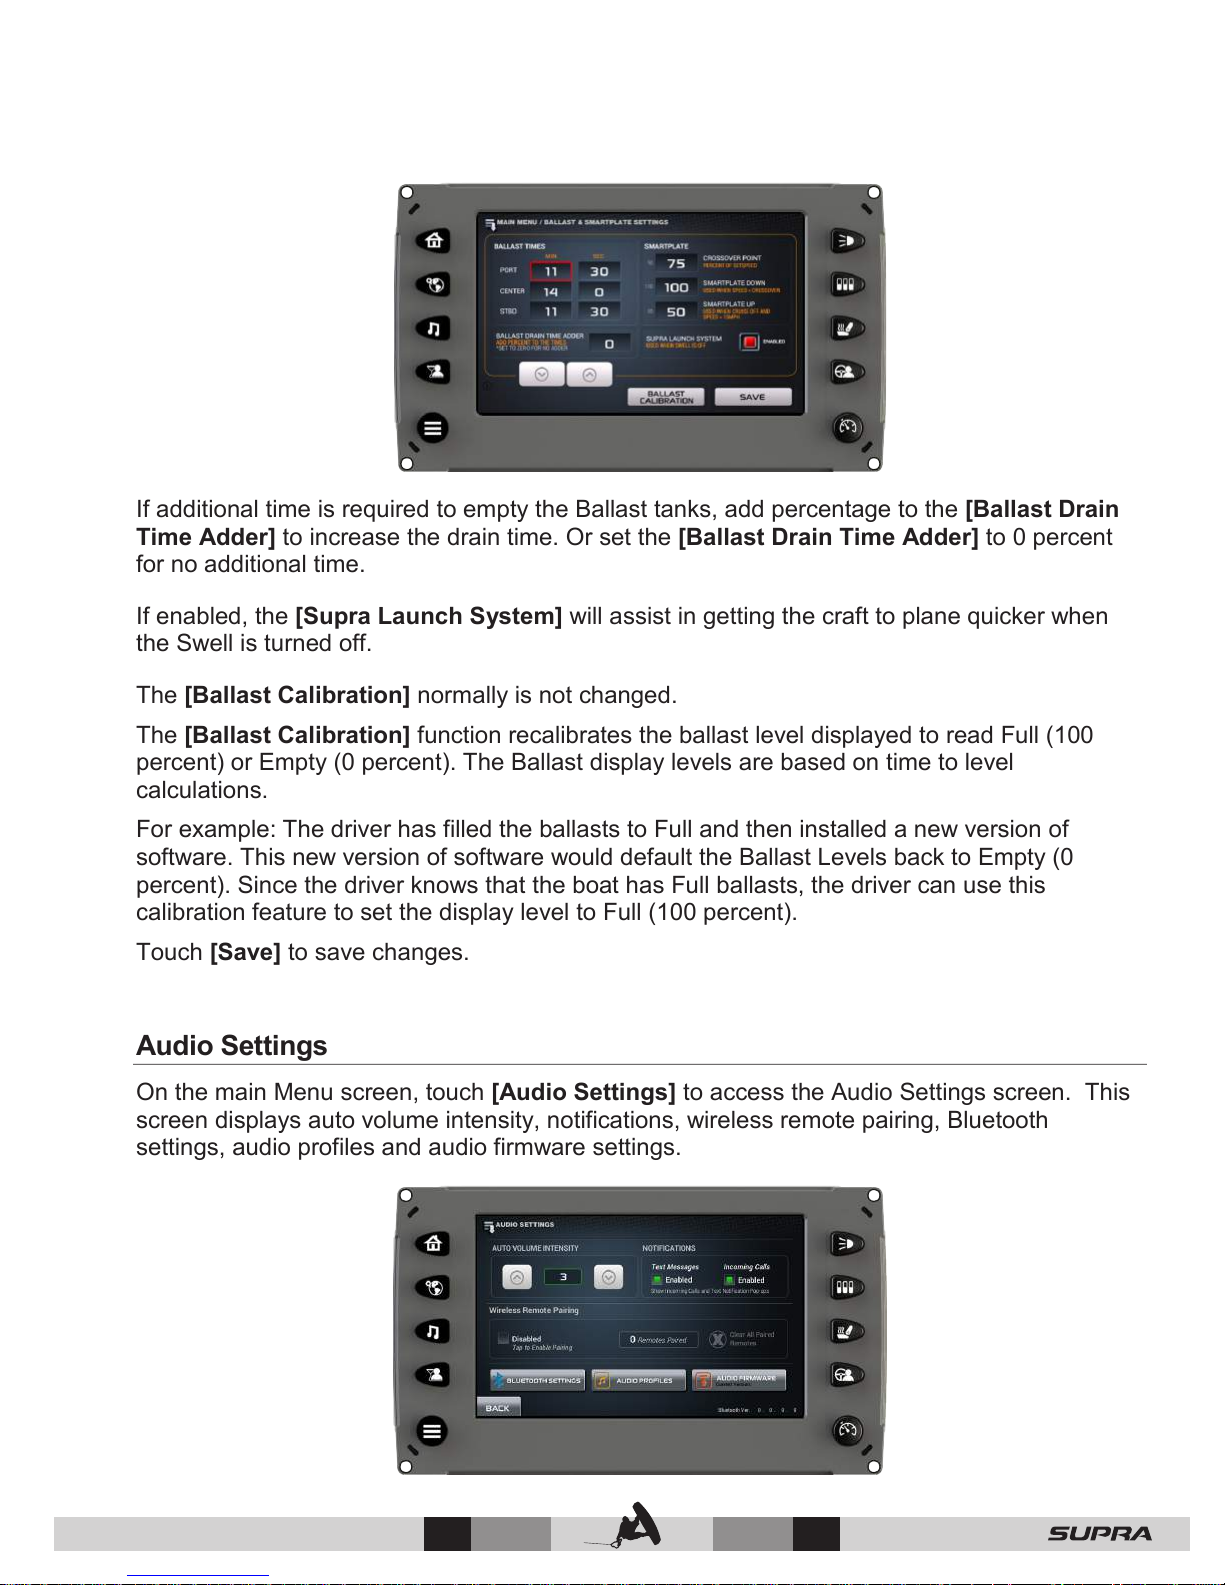
If additional time is required to empty the Ballast tanks, add percentage to the [Ballast Drain
Time Adder] to increase the drain time. Or set the [Ballast Drain Time Adder] to 0 percent
for no additional time.
If enabled, the [Supra Launch System] will assist in getting the craft to plane quicker when
the Swell is turned off.
The [Ballast Calibration] normally is not changed.
The [Ballast Calibration] function recalibrates the ballast level displayed to read Full (100
percent) or Empty (0 percent). The Ballast display levels are based on time to level
calculations.
For example: The driver has filled the ballasts to Full and then installed a new version of
software. This new version of software would default the Ballast Levels back to Empty (0
percent). Since the driver knows that the boat has Full ballasts, the driver can use this
calibration feature to set the display level to Full (100 percent).
Touch [Save] to save changes.
Audio Settings
On the main Menu screen, touch [Audio Settings] to access the Audio Settings screen. This
screen displays auto volume intensity, notifications, wireless remote pairing, Bluetooth
settings, audio profiles and audio firmware settings.
© 2016 Skier’s Choice, Inc.
61 —
Page 63
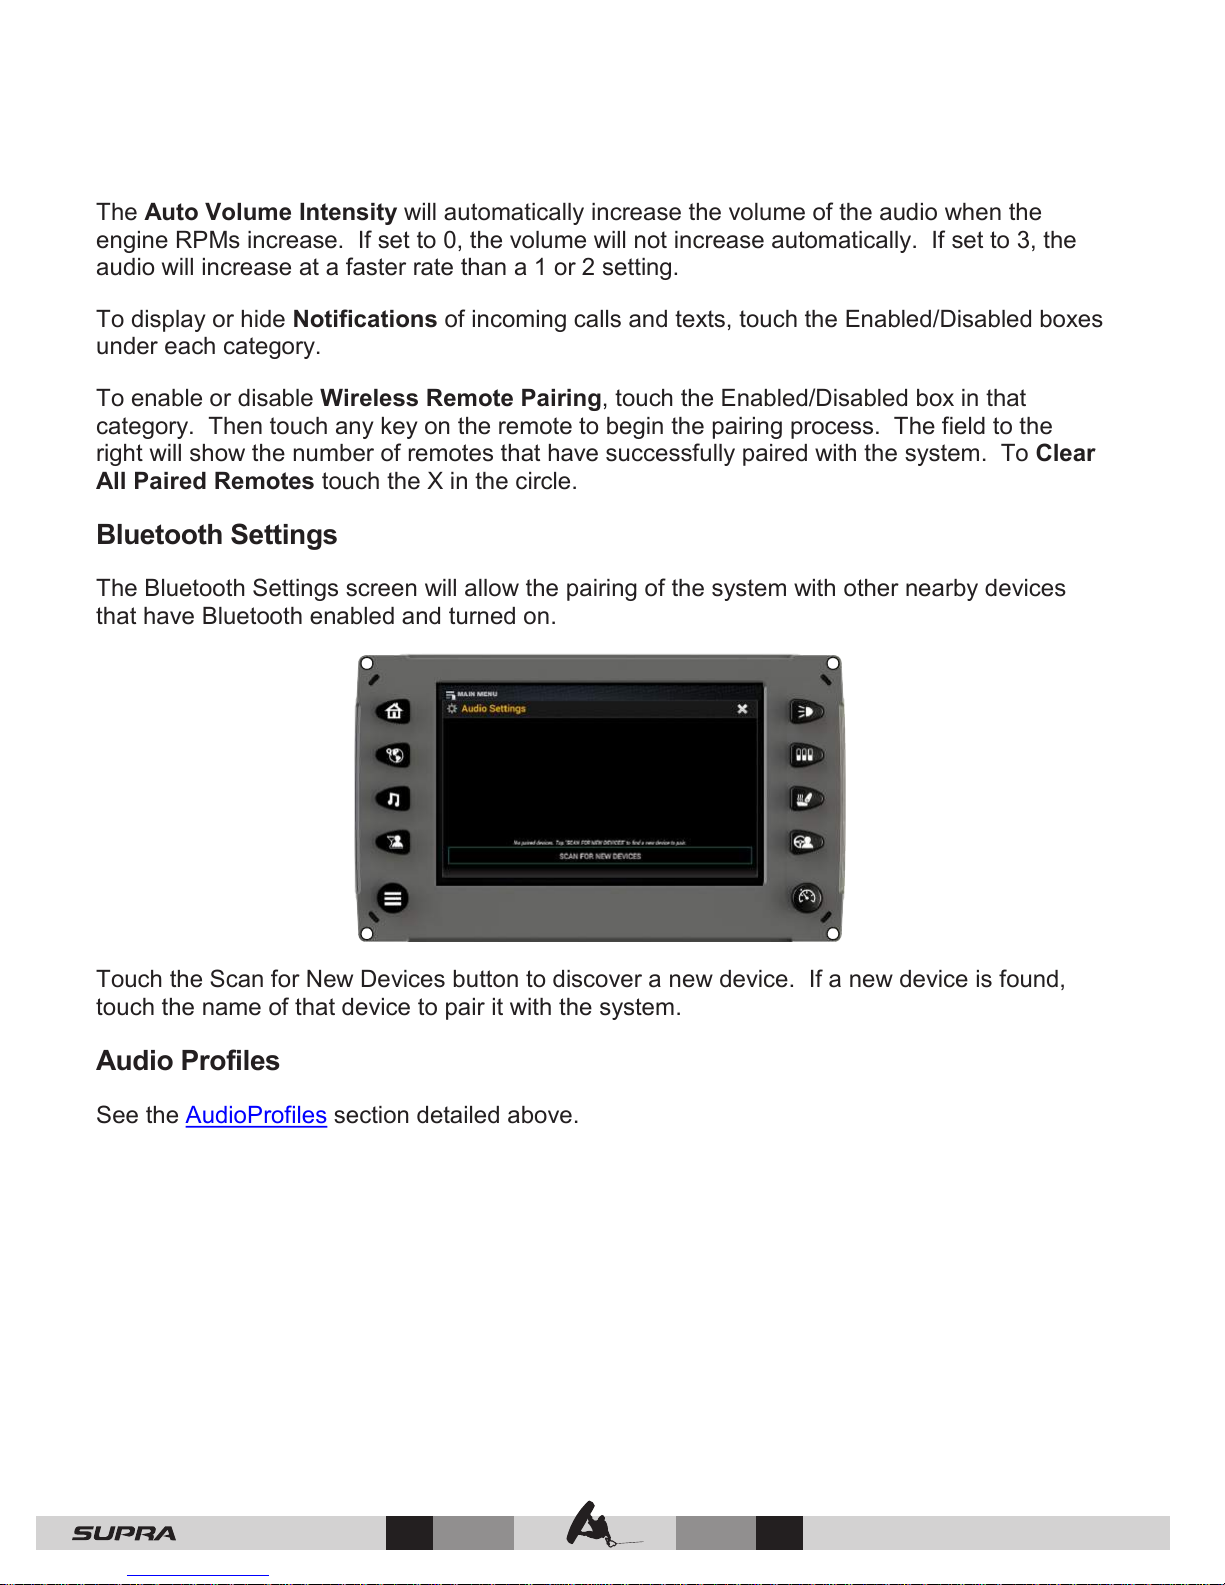
The Auto Volume Intensity will automatically increase the volume of the audio when the
engine RPMs increase. If set to 0, the volume will not increase automatically. If set to 3, the
audio will increase at a faster rate than a 1 or 2 setting.
To display or hide Notifications of incoming calls and texts, touch the Enabled/Disabled boxes
under each category.
To enable or disable Wireless Remote Pairing, touch the Enabled/Disabled box in that
category. Then touch any key on the remote to begin the pairing process. The field to the
right will show the number of remotes that have successfully paired with the system. To Clear
All Paired Remotes touch the X in the circle.
Bluetooth Settings
The Bluetooth Settings screen will allow the pairing of the system with other nearby devices
that have Bluetooth enabled and turned on.
Touch the Scan for New Devices button to discover a new device. If a new device is found,
touch the name of that device to pair it with the system.
Audio Profiles
See the AudioProfiles section detailed above.
— 62
© 2016 Skier’s Choice, Inc.
Page 64

Audio Firmware
The Audio Firmware screen will provide a method by which the audio firmware files may be
updated.
Insert a USB flash drive with the update files loaded into one of the available USB slots on the
craft. Touch the green check mark to upload the files.
PDM Diagnostics
On the main Menu screen, touch [PDM Diagnostics] to access the PDM Diagnostics screen.
The screen displays short circuits, open circuit, over current, in/out of range and faults within
the system outputs, switch inputs, analog inputs and CAN communication.
Touch the [PDM2] or [PDM3] touch command to view alternate screens. Touch the [Back]
Touch Command to return to the main menu.
© 2016 Skier’s Choice, Inc.
63 —
Page 65
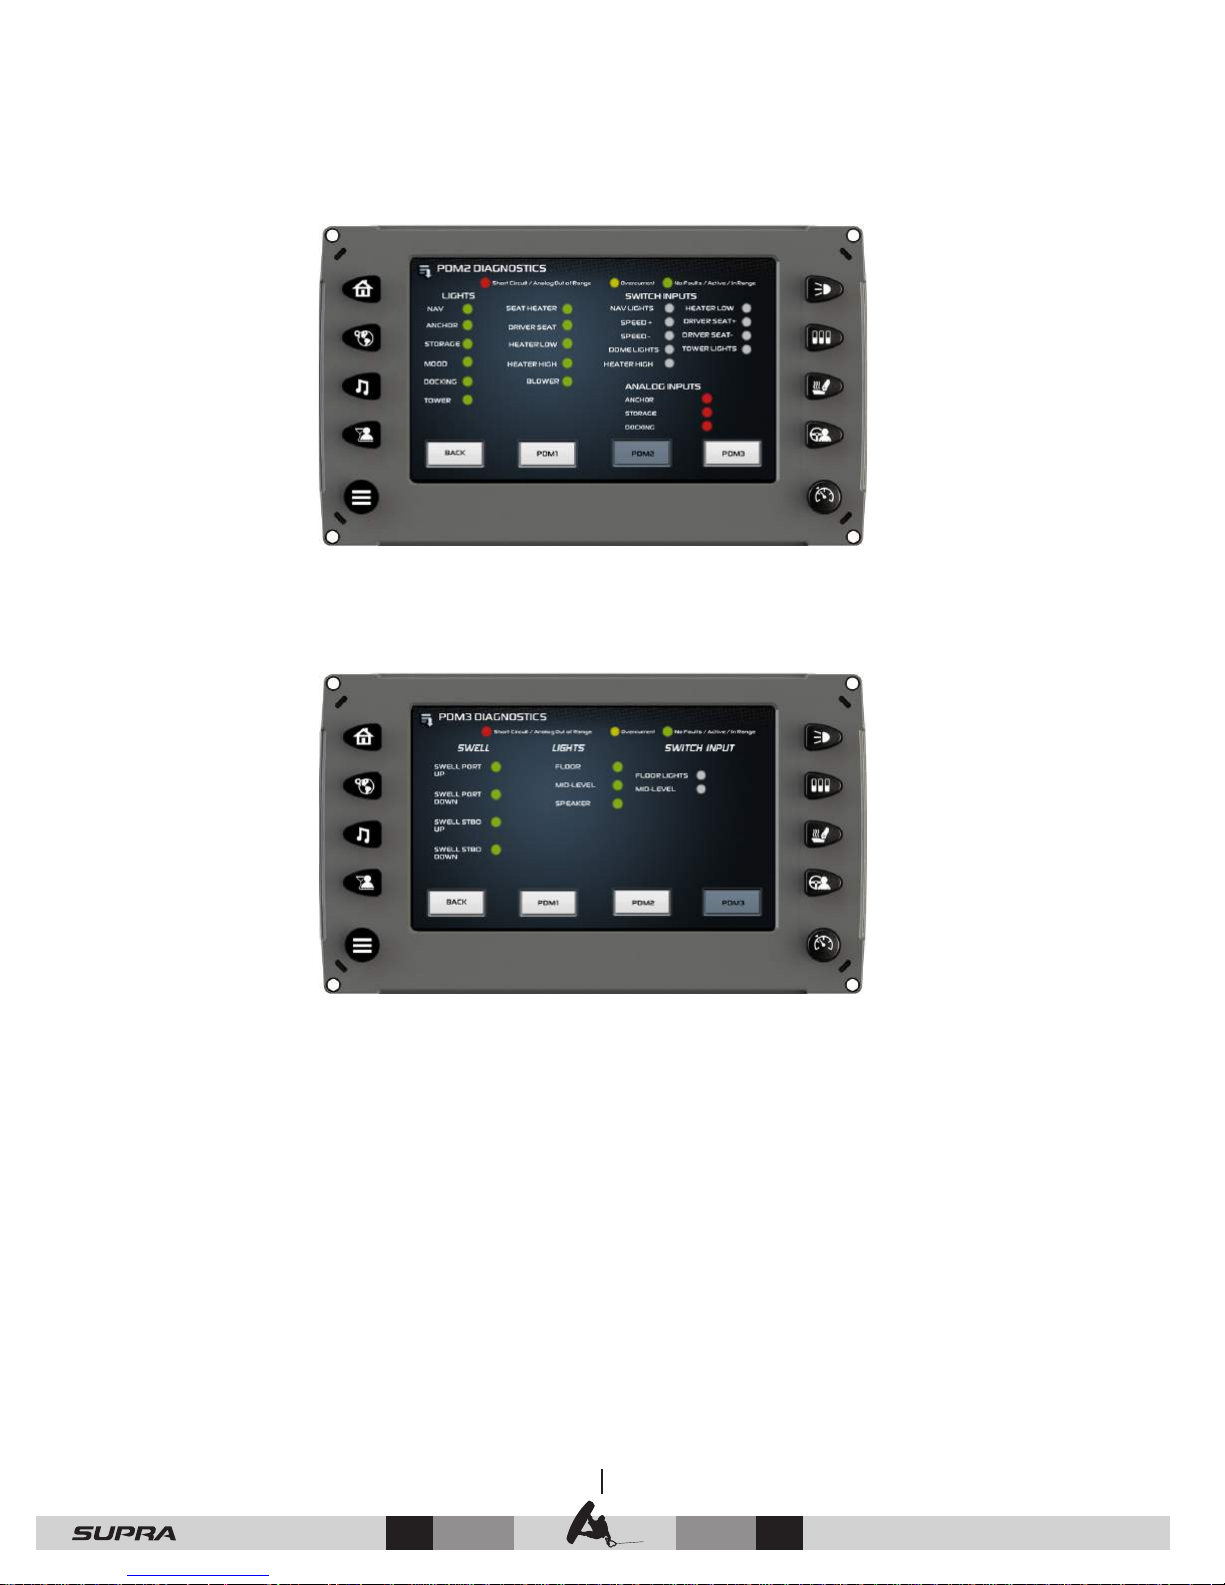
PDM2 Diagnostics
PDM3 Diagnostics
— 64
© 2016 Skier’s Choice, Inc.
Page 66

Troubleshooting
General Troubleshooting Guide
Display appears not to work or doesn’t come ON.
1. Display could be in sleep mode. Touch a key on the keypad to activate the display.
2. Check for loose connections at battery and display unit.
3. Check for reversed polarity on the power connections.
4. Verify battery has a minimum voltage of 6 Volts.
Display resets or goes OFF when starting engine.
1. Check display supply wires are connected properly to battery.
2. Verify battery is charged properly.
3. Check battery for efficient starter current.
Display has no backlight.
Contact your Supra service center.
Display has no keypad backlight.
Contact your Supra service center.
© 2016 Skier’s Choice, Inc.
65 —
Page 67
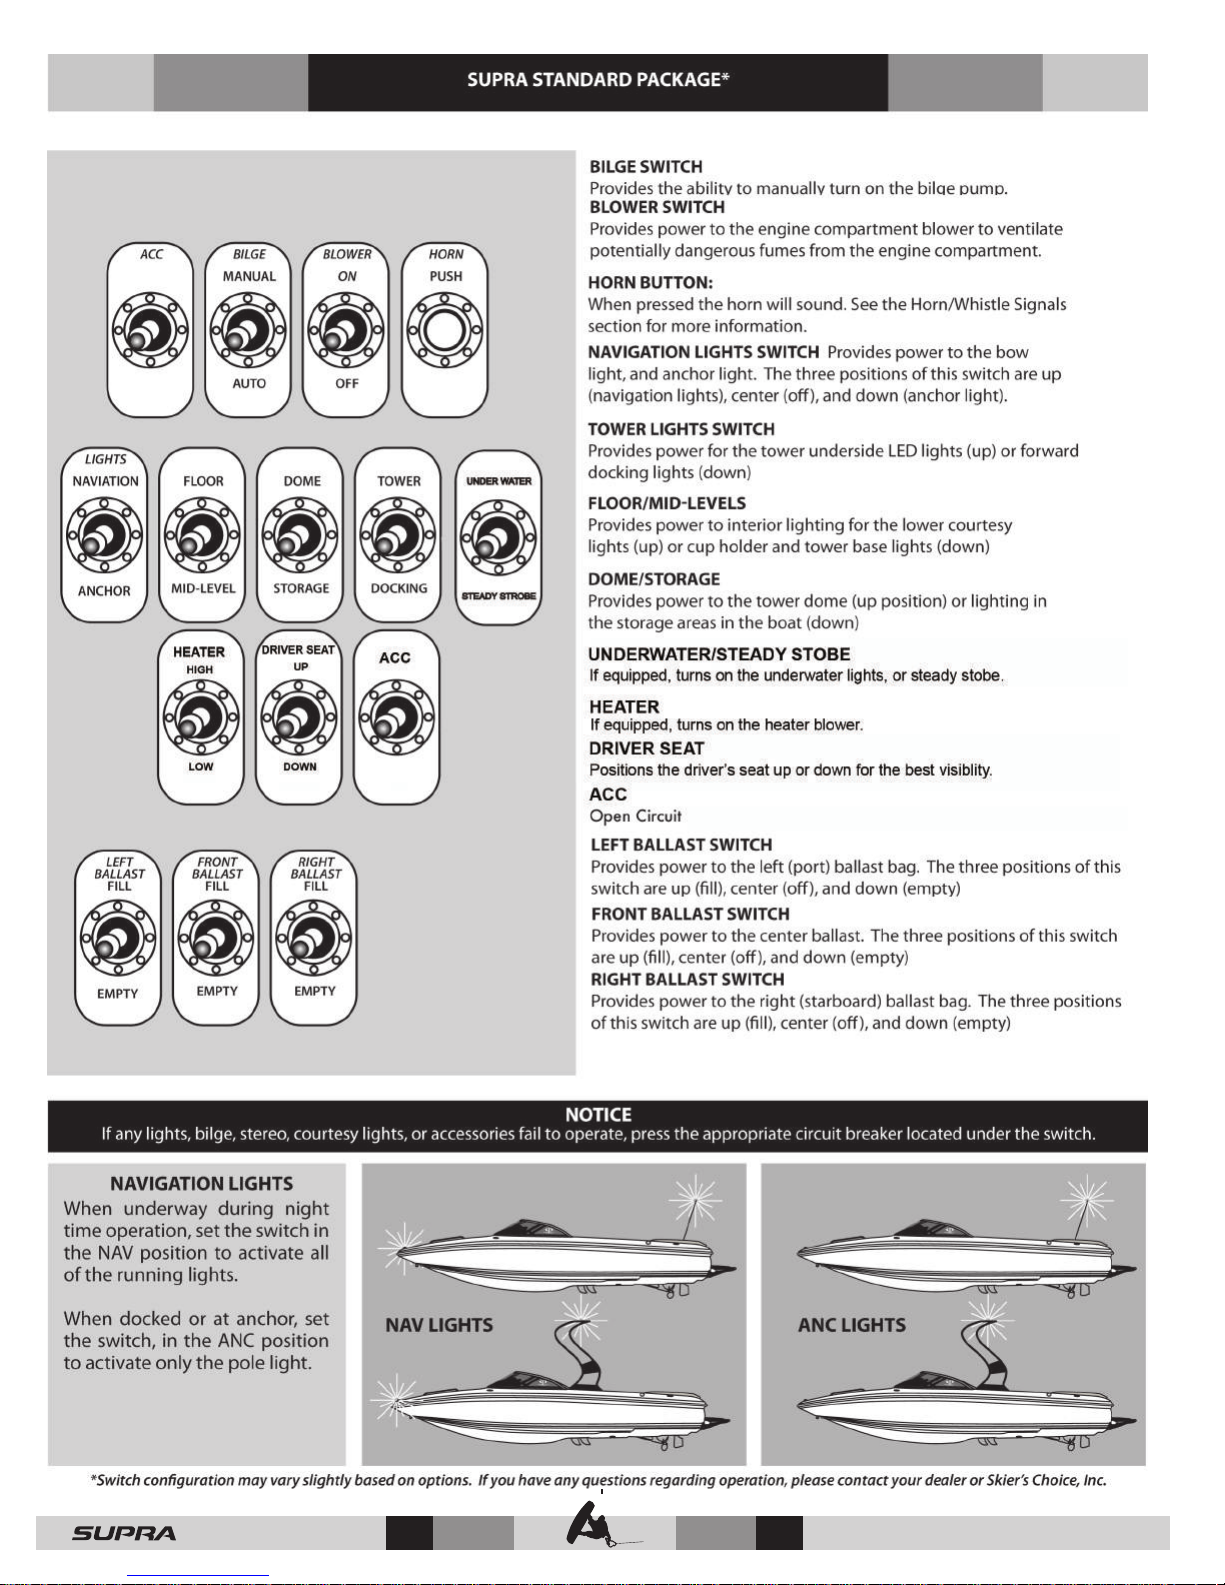
— 66
© 2016 Skier’s Choice, Inc.
Page 68
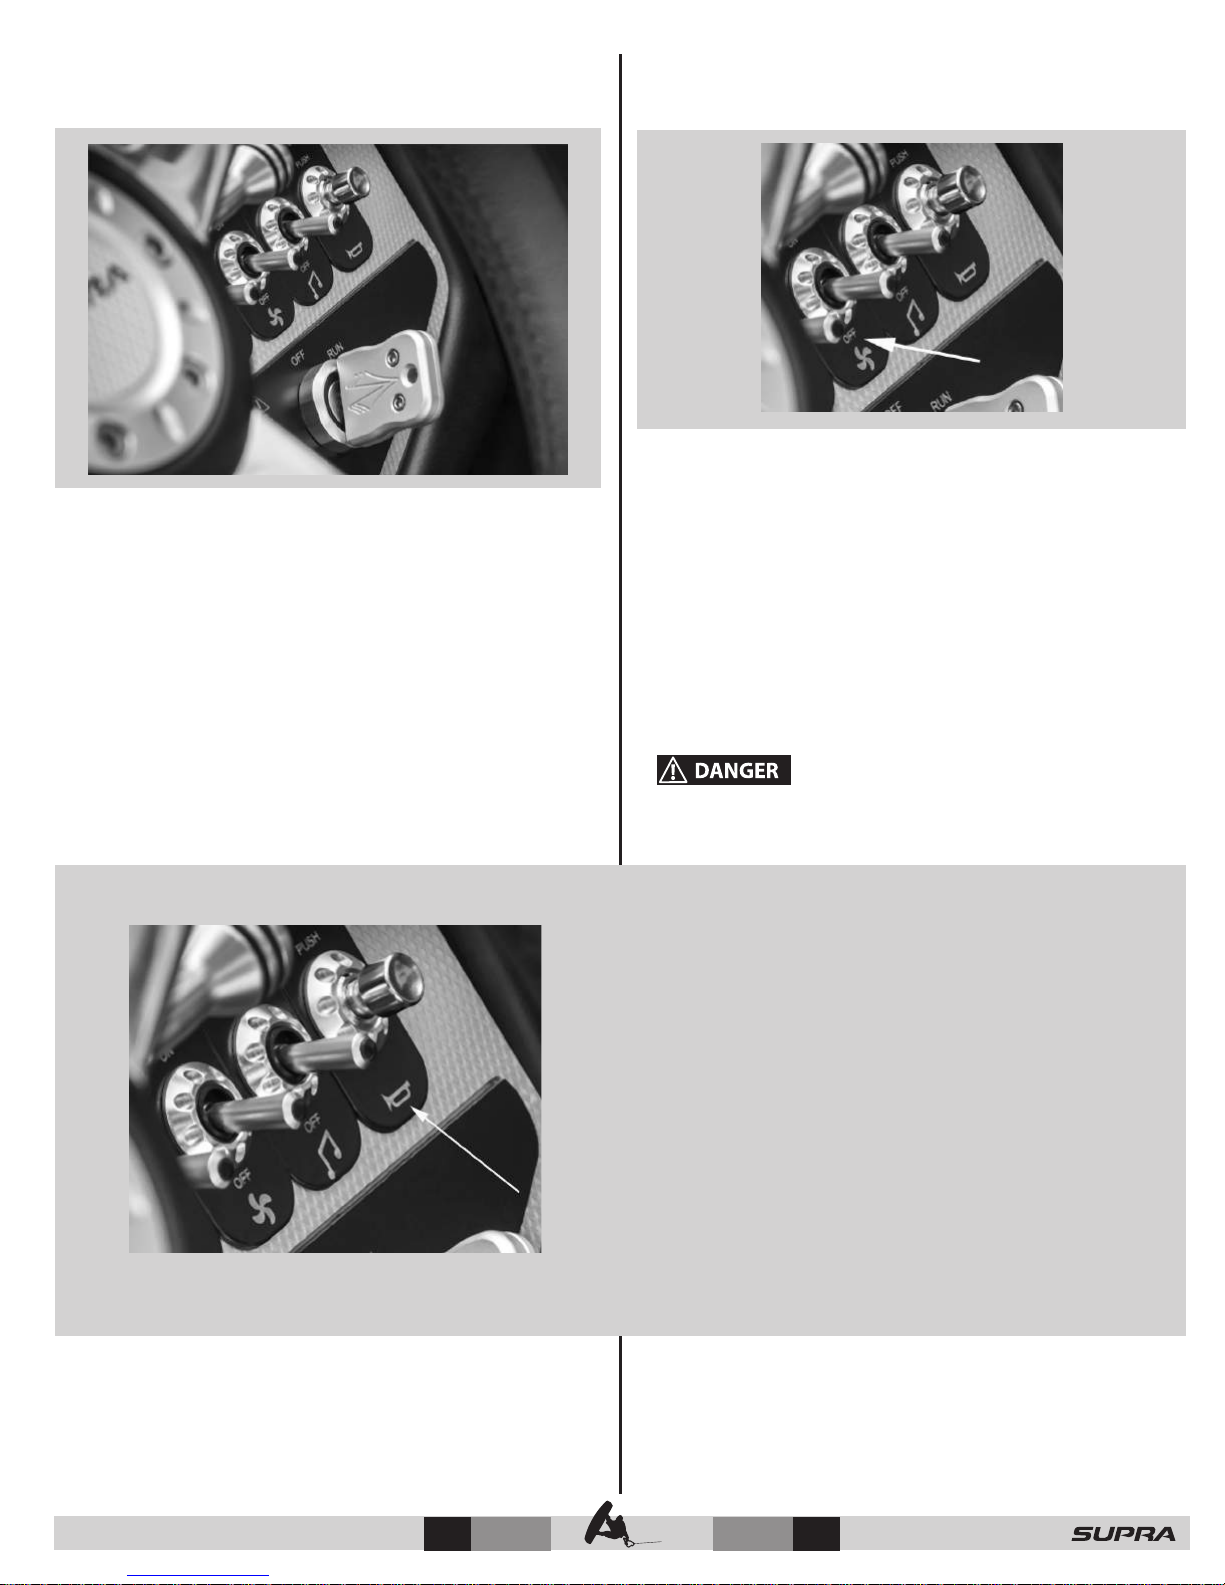
Ignition Switch
Located on the port side of the dashboard, the ignition switch
has four positions. In the vertical position the ignition is “OFF”.
In the OFF position, only the blower and bilge switches are
powered.
One position counterclockwise is the “ACC” position. This will
power the dash switches.
Blower Switch
The blower switch activates the blower motor. The primary
function of the blower fan is to remove any fumes from the
bilge area. The blower also draws fresh air into the engine
compartment.
Never depend solely on the blower to eliminate dangerous
fumes. Before starting the engine, always open the motor box to
check if fumes are present. Switch on the blower fan a minimum
of four minutes before starting the engine.
One position clockwise is the “ON” position and this will power
the switches and energize the motor.
The full clockwise position is the “START” position.
NOTE: All electrical equipment should be turned o when
the boat is in storage.
Horn Button
The Horn Switch is located on the starboard switch panel. Sound
the horn by depressing the button.
NOTICE: If the blower fails to operate, reset the circuit
breaker. If the blower still does not operate, notify your
Supra dealer.
Failure to operate the blower in accordance with the Coast
Guard Recommendation could result in an explosion.
Horn/Whistle Signals
One Long Blast:
Warning Signal (Coming out of slip)
One Short Blast:
Pass on my Port Side
Two Short Blasts:
Pass on my Starboard Side
Three Short Blasts:
Engines in Reverse
Four or More Blasts:
Danger Signal
1. OVERTAKING / PASSING: Boat being passed has the right-of-
way. KEEP CLEAR.
2. MEETING HEAD-ON: Keep to the right.
3. CROSSING: Boat on the right has the right-of-way. slow down
and permit him to pass.
© 2016 Skier’s Choice, Inc.
© 2016 Skier’s Choice, Inc.
— 67
© 2015 Skier’s Choice, Inc.
67 —
Page 69
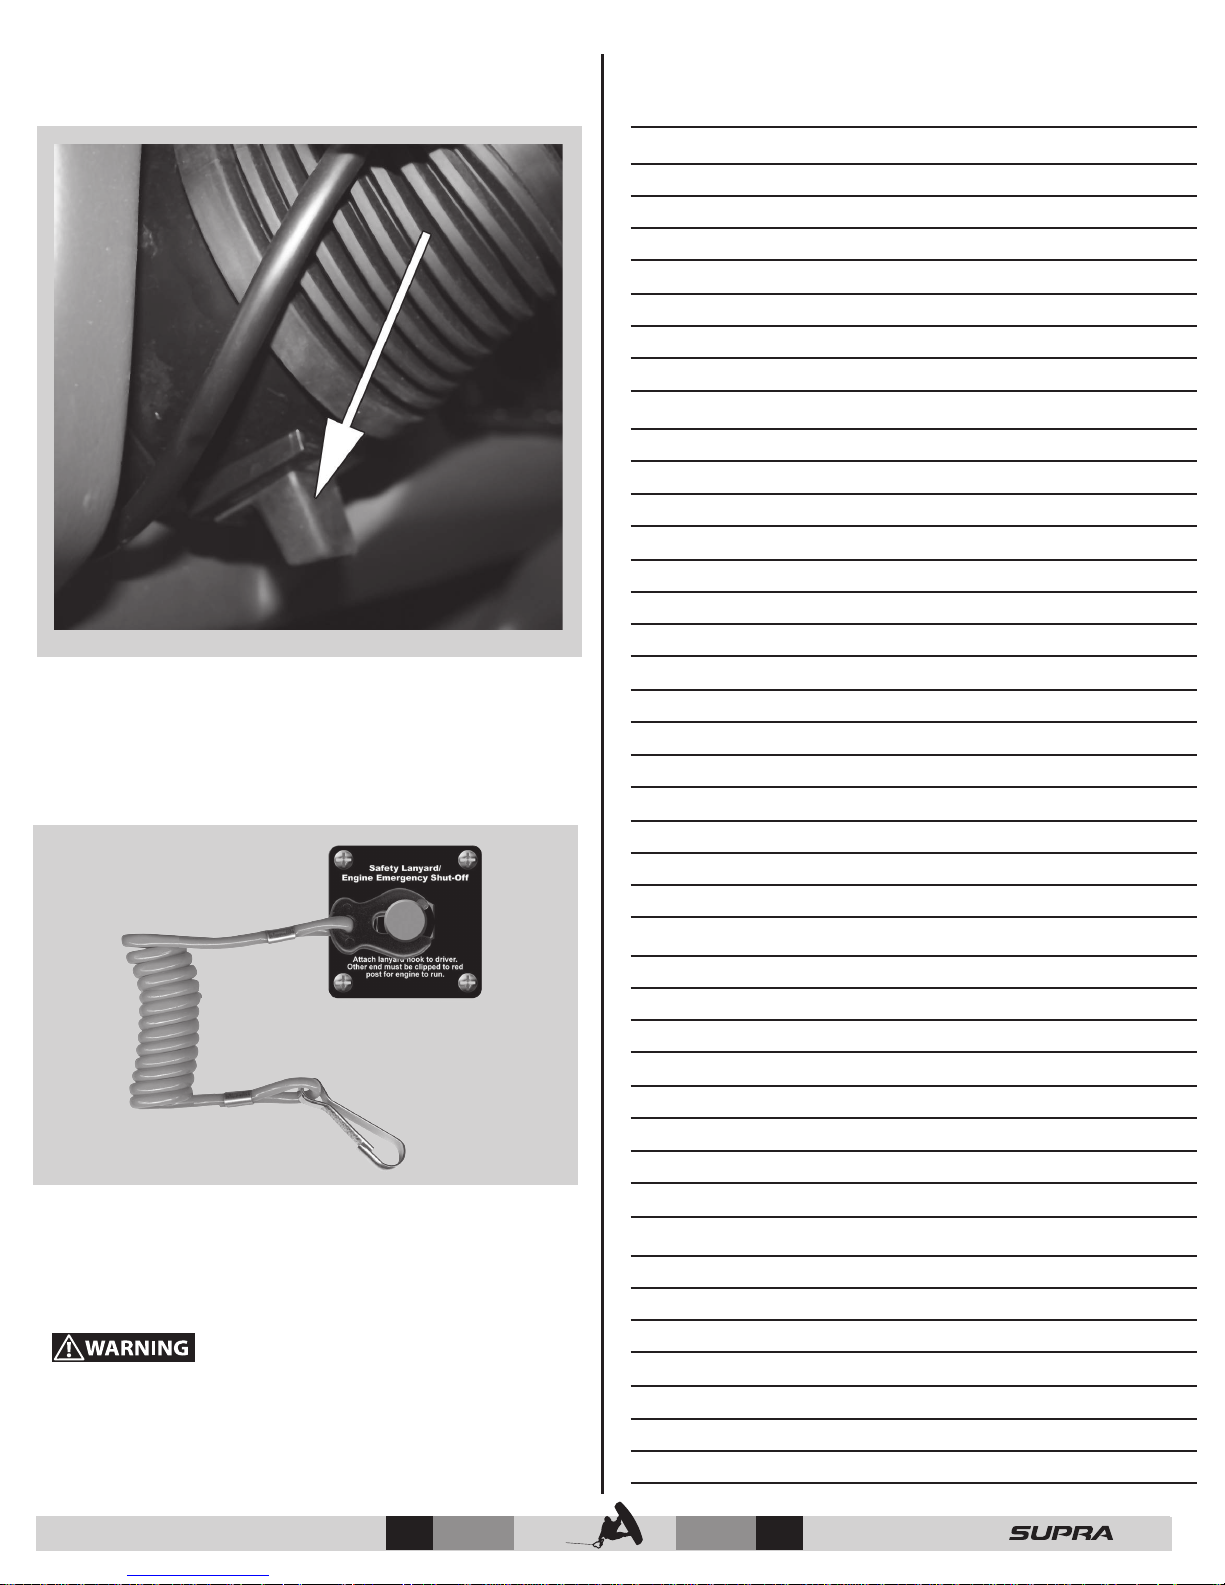
Tilt Steering
NOTES:
Tilt steering may be adjusted up or down in ve dierent
locking positions. To adjust, depress the tilt lever located
beneath the bezel and move the steering wheel to the desired
position. Release the lever to lock the wheel into place.
Safety Lanyard/Engine
Shut Off Switch
Your Supra is equipped with a Safety Lanyard/Engine Shut O
switch. In order for the engine to run, the plastic tip of the safety
lanyard must be attached to the switch. If the clip is removed
from the switch, the engine will not run.
Note: Extra Lanyard in Glovebox.
Avoid serious injury or death. Attach Safety Lanyard to
driver prior to operating boat.
© 2015 Skier’s Choice, Inc.
© 2016 Skier’s Choice, Inc.
© 2016 Skier’s Choice, Inc.
68 —
— 68
Page 70
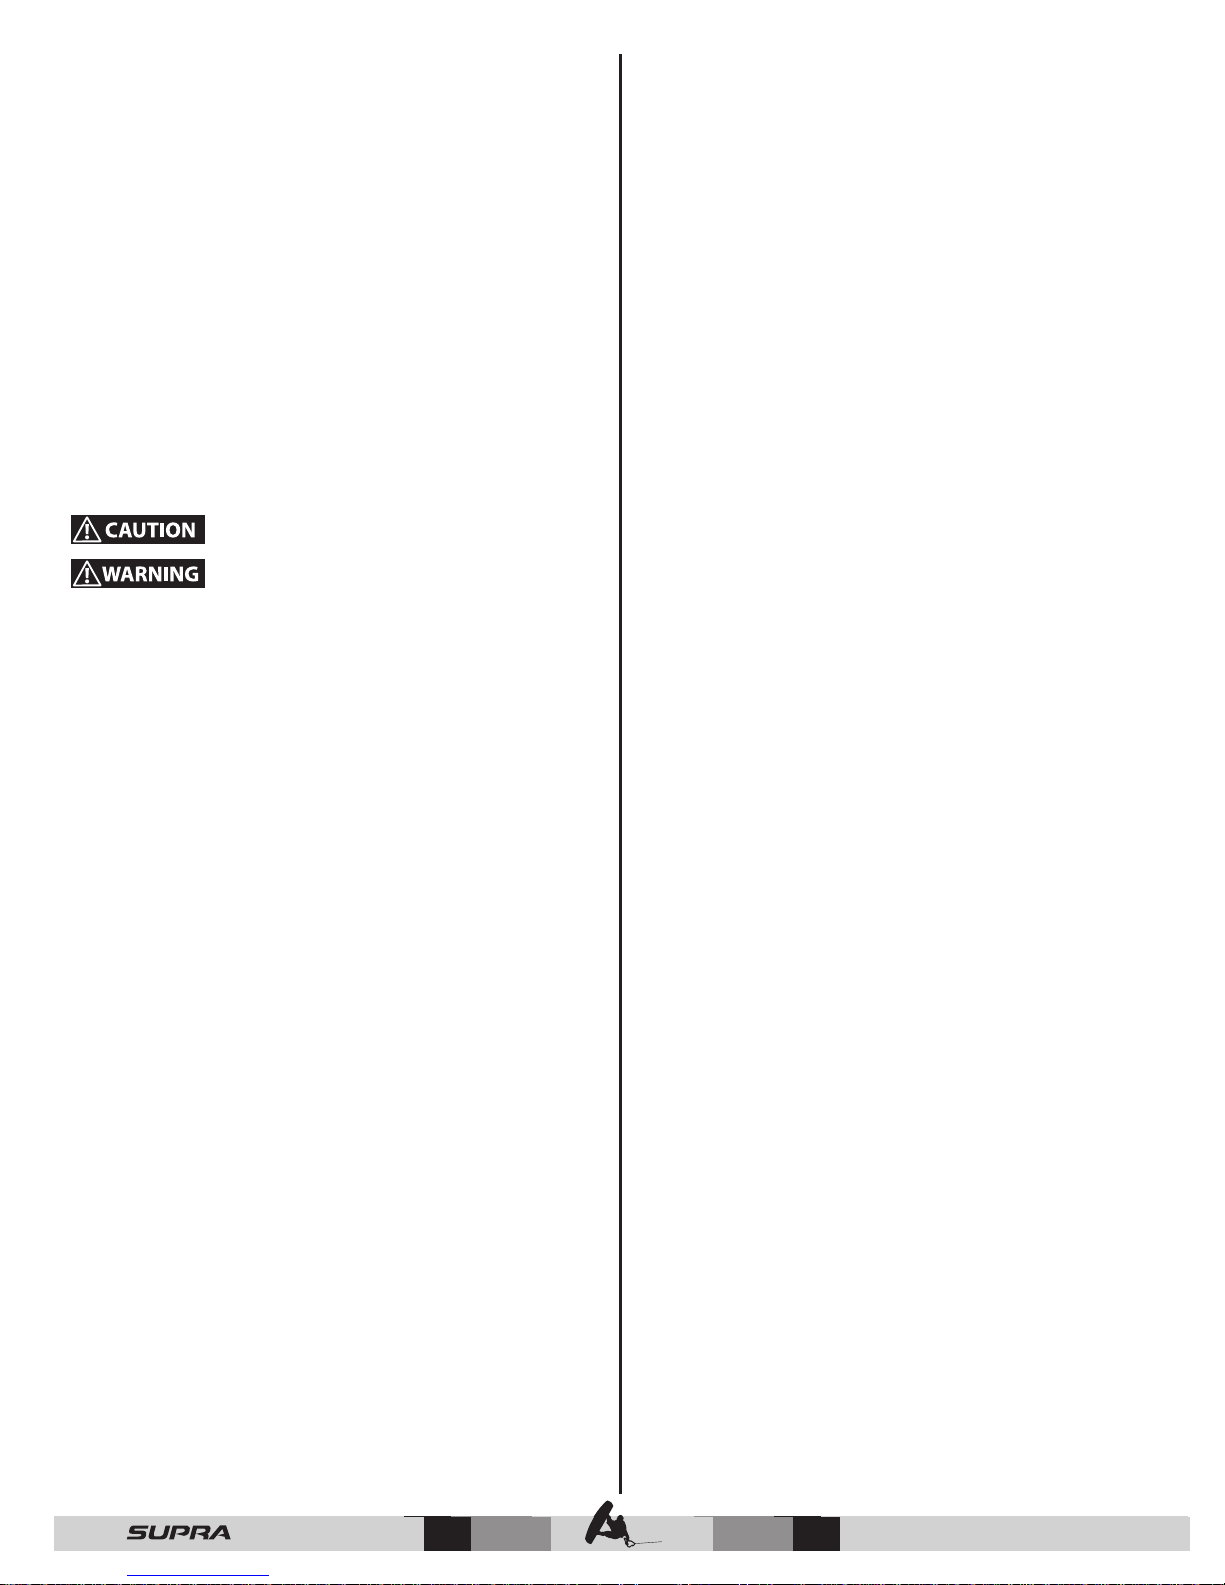
Liquid Lead Ballast System
The Liquid Lead* Ballast System in your boat is an electronically
controlled ballast system that can be operated from the driver’s
seat. The system can be controlled by using the ballast
switches or through the Supra Vision Dash. The Supra Vision
Dash allows for stored preset ballast levels (see “User Preset
Screen” in the Vision System section of this Owner’s Manual)
for easy rider setup. The manual switches for this three position
system are located in the switch panel directly below the shifter
mechanism.
The Ballast System in your boat is an integrated and logically
controlled system. At the heart of the system is a series of
reversible pumps that use impellers to pump water in and out of
the ballast system. The controller for the system runs the pumps
an appropriate amount of time to ll and to empty the bags.
When bags begin to vent, shut o!
Do Not overll ballast bags!
*Liquid Lead is a marketing name. Supra Boats do not contain
lead ballast
Filling the System-In normal operation of the system, ipping
one of the switches to “Fill” will start the system lling the
associated ballast. The ballast gauge on the Supra Vision system
will turn green. The pump will automatically turn o when the
appropriate amount of time to ll the system has been reached.
The light on the switch will still be luminated as it is in the “Fill”
position, but the pump will not be running. The ballast gauge on
the Supra Vision system will turn yellow. The switch should be
turned back to the “o” position when the pump stops running.
Ballast Pump Impellers- The pumps that ll and drain the
ballast system use an impeller. Your Supra ballast impeller uses
the latest polymer technology in an eort to have the longest
service life possible. The impellers are a wear item and dierent
use patterns, water types, debris, etc. can greatly aect the
service length of the impeller. As the impellers wear, the amount
of water that is pumped into and out of the ballast system is
reduced. The Vision System does have provision for adjusting
ll and empty times to accommodate decreased eciency due
to impeller wear or changing to dierence sized bags (See Vision
Dash “System Settings” For more info). Running the pumps
without water will greatly accelerate the wear and prolonged
running of the pumps without water will damage the impeller
to the point that they will require immediate replacement.
Note: Impellers are a wear item and not covered by warranty.
Ballast System Utilities- It is not recommended to change any
of the ballast conguration that are found under the” Utilities”
menu on the Vision Dash unless specically directed to do so
by your Authorized Supra dealer. Changing these values may
negatively aect the ballast system or may make the system fail
to work all together.
Emptying the System-In normal operation of the system,
ipping one of the switches to “Empty” will start the system
emptying the associated ballast. The ballast gauge on the Supra
Vision system will turn green. The pump will automatically turn
o when the appropriate amount of time to empty the system
has been reached. The light on the switch will still be luminated
as it is in the “Empty ” position, but the pump will not be running.
The ballast gauge on the Supra Vision system will show empty.
The switch should be turned back to the “o” position when
the pump stops running.
© 2016 Skier’s Choice, Inc.
69 —
— 69
© 2015 Skier’s Choice, Inc.
© 2016 Skier’s Choice, Inc.
Page 71
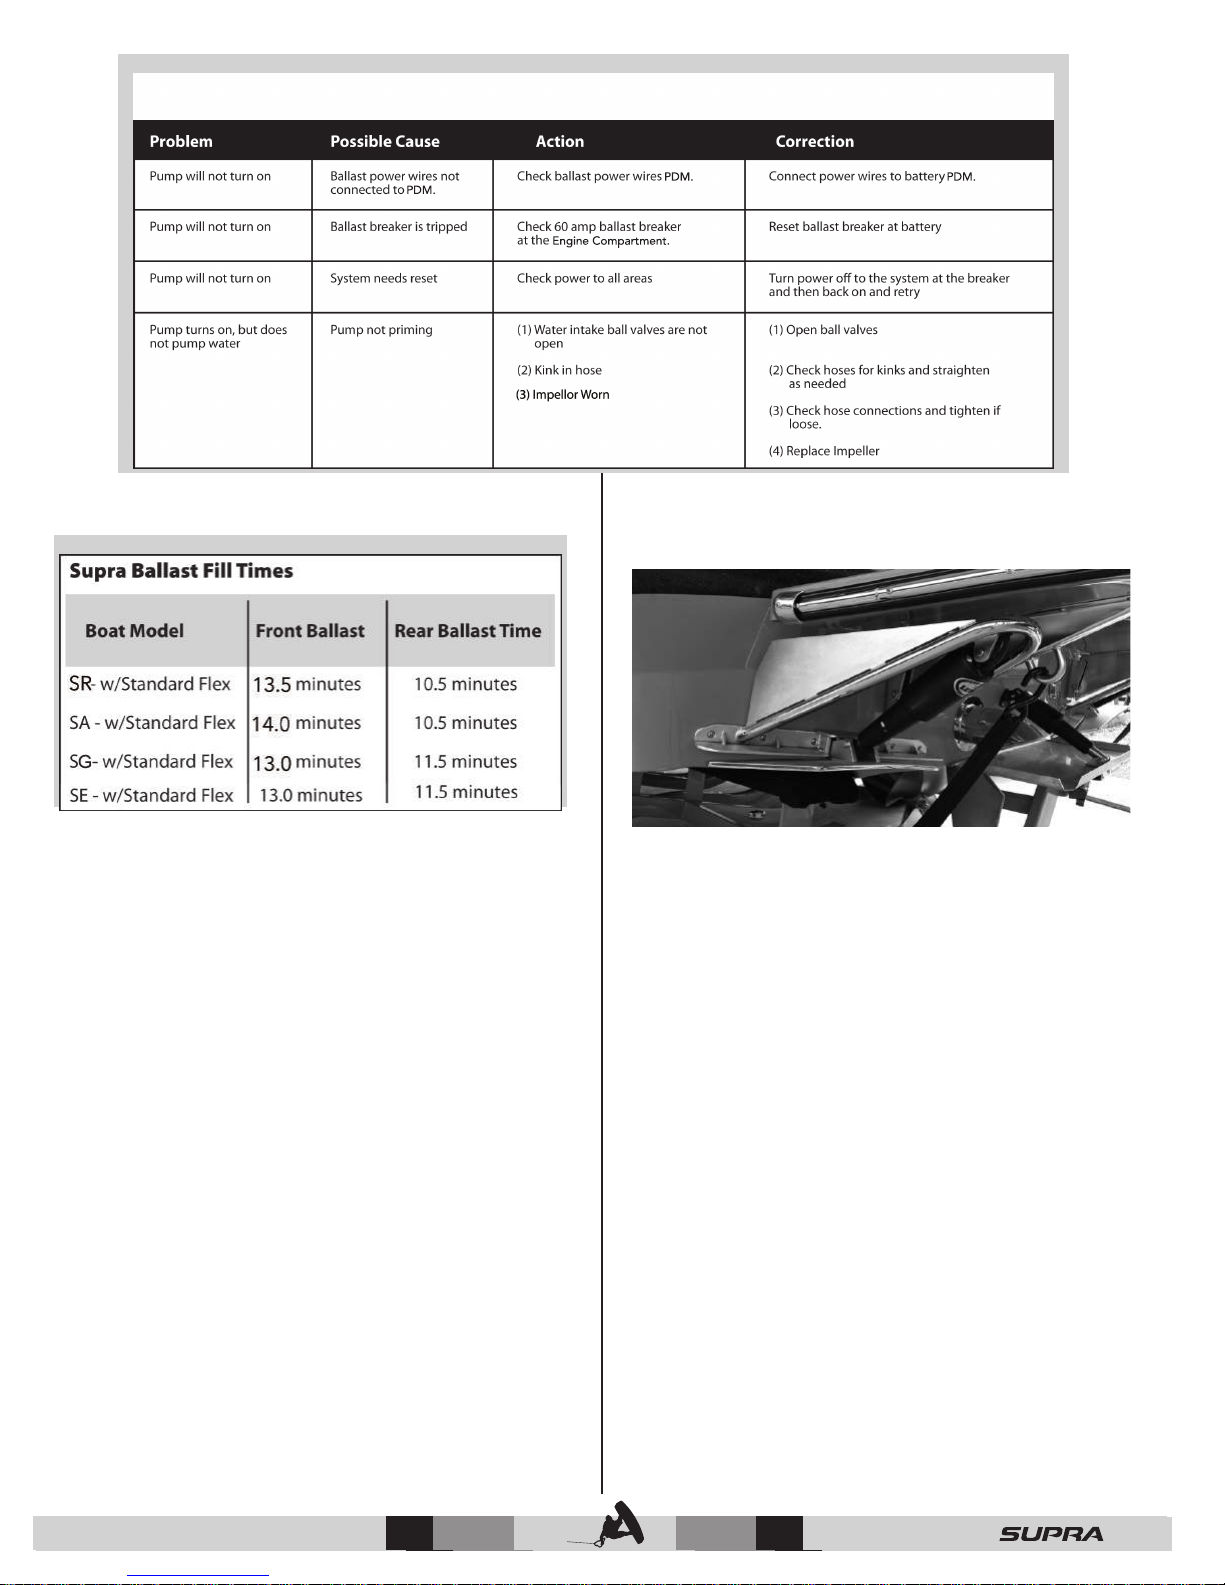
Ballast Trouble Shooting Guide
Swell Surf & Screen
The Swell Surf System utilizes high-speed rams to adjust 5/16inch stainless steel blades laser cut and bent to control water
turbulence off the rear of the boat’s running surface. The
specially designed trailing edge of these blades, or aps as these
types of elements are referred to in a uid dynamics, create a
vortex-eect behind the boat resulting in specic wave shapes.
Dierent angels of deployment of the blades create custom
eects in the water turbulence to swell-up surf waves. Swell
blades benet from a shot peen nish, a strengthening process
commonly utilized in aeronautical construction, to increase the
fatigue life of the piece. The Swell System is mounted and held
together by a series of stainless steel through-bolts and stainless
brackets for an extremely stable platform for wave making
© 2015 Skier’s Choice, Inc.
© 2016 Skier’s Choice, Inc.
© 2016 Skier’s Choice, Inc.
70 —
— 70
Page 72
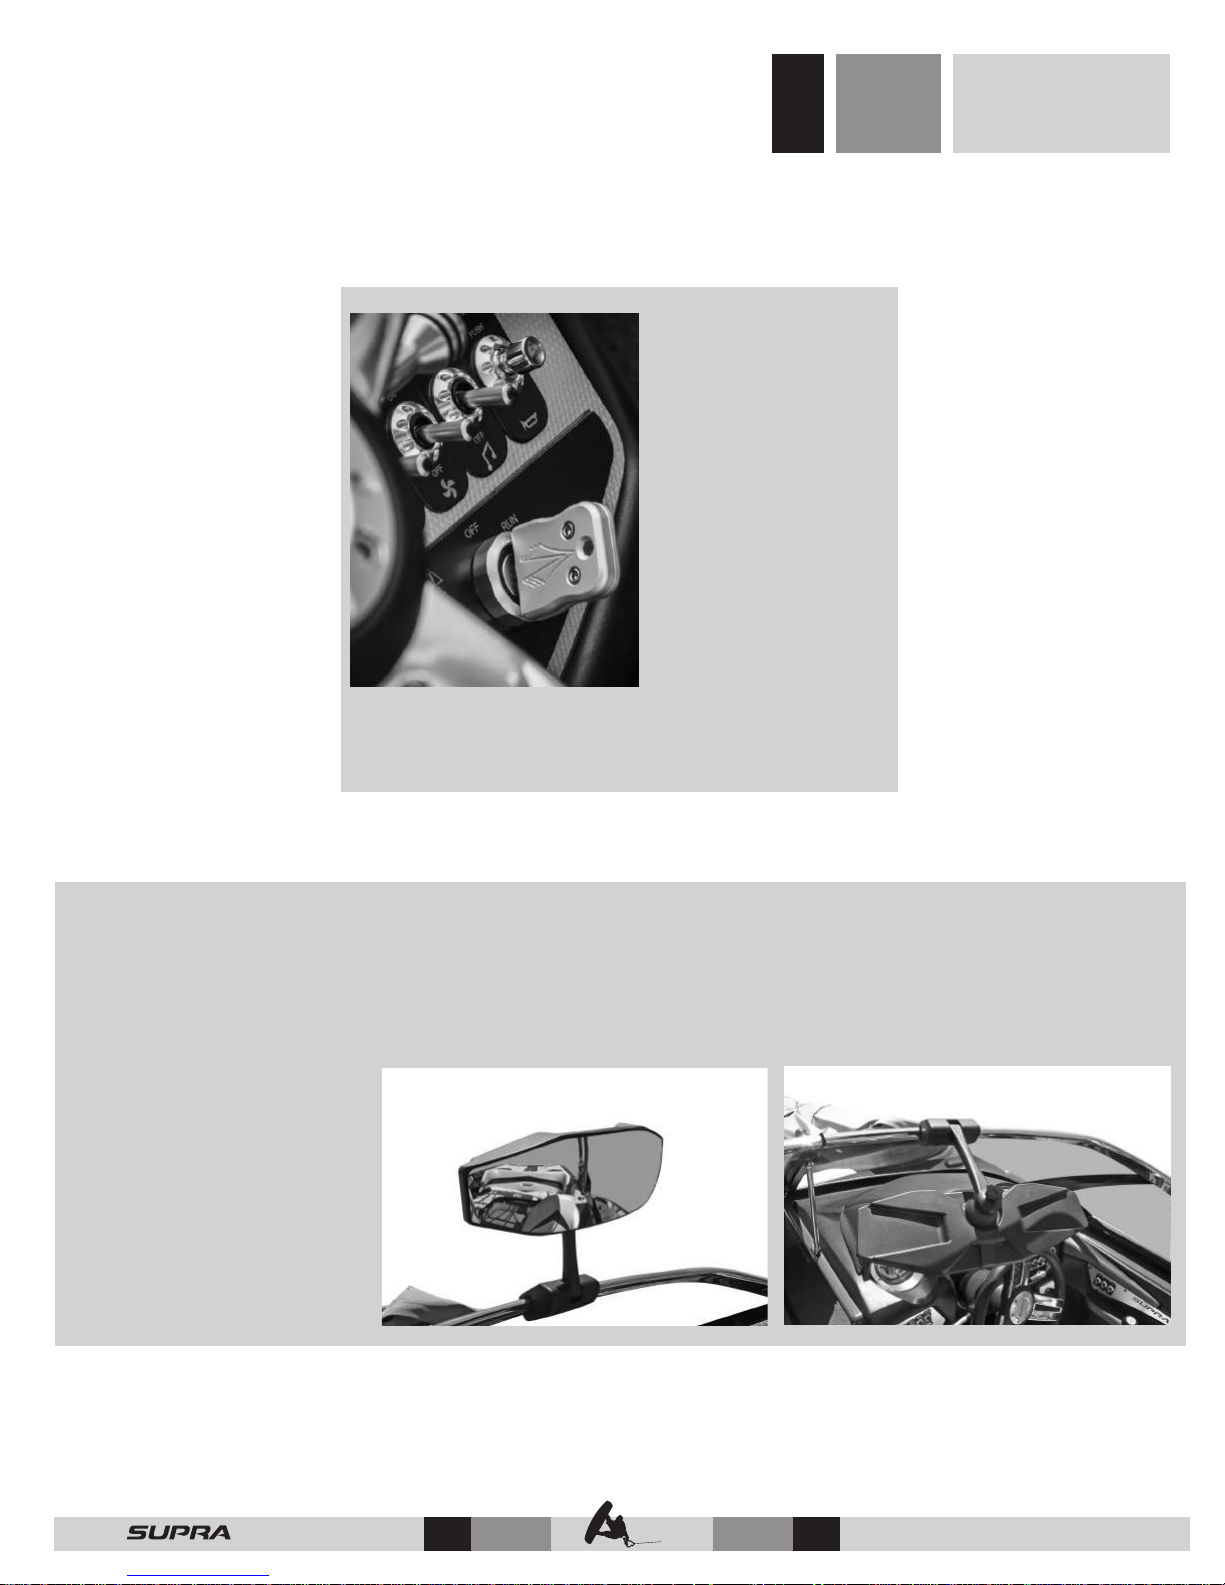
Ignition Keys
Two ignition keys are
provided with the boat. Key
entry into the ignition may
be dicult due to the boot
protector. Please, do not
unduly force the key into the
ignition. Key tumblers are
located vertically, thus the
key should be vertical when
placed into the switch.
NOTE: Always attach the
ignition key to a oating
key chain to prevent loss
in the water.
Section 9
Equipment & Options
Mirrors
The rear view mirror is installed as a standard item. The mirror is adjustable and is not permanently placed so that it may be set for
each driver.
• Mirror should always be checked before driving.
• Mirror angle will change with each new driver.
Wide Angle Mirror
Wide Angle Mirror (down)
© 2016 Skier’s Choice, Inc.
71 —
© 2016 Skier’s Choice, Inc.
Page 73
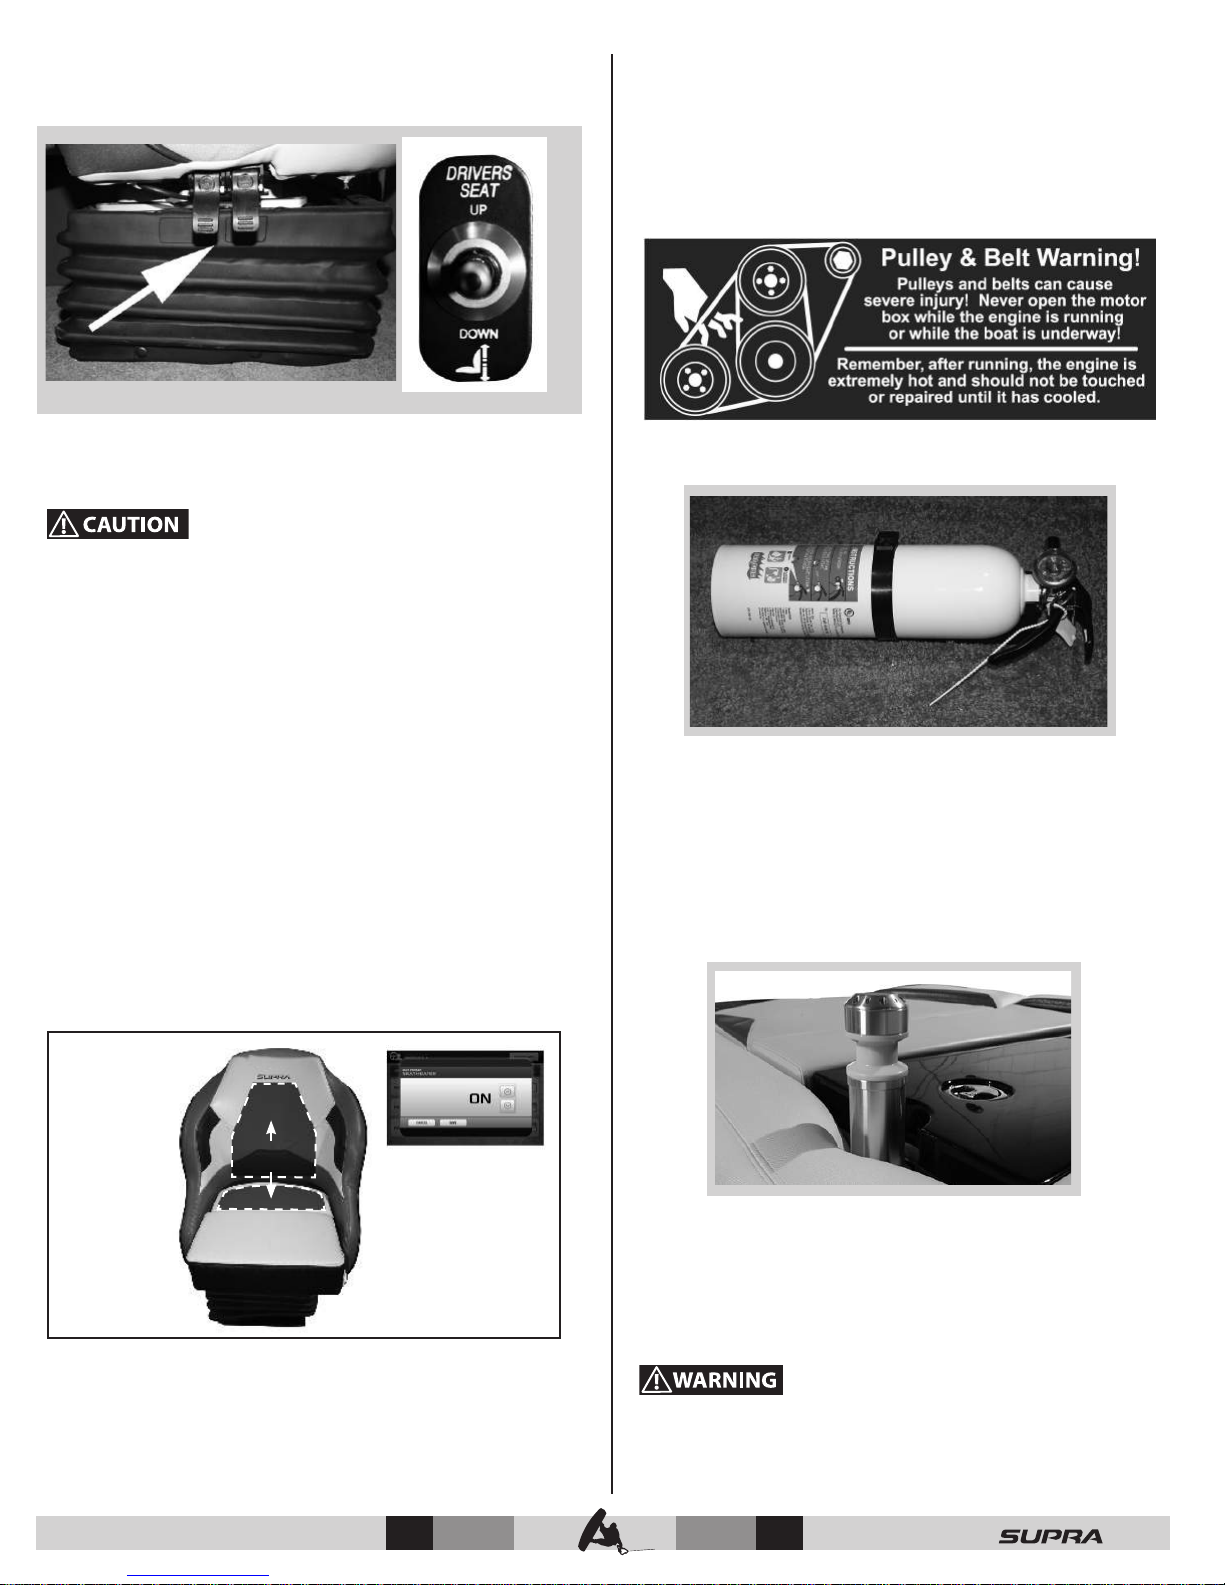
Driver’s Seat & Seat Adjustments
The Rise-R Seat is a unique driver seat enhancement. The front
edge of the driver’s seat cushion lifts up to give the driver a
taller sightline.
Be careful of the articulating hinge. Do not place ngers or
other objects in the hinge mechanism during use.
The driver’s seat may be adjusted forward or backward by
moving the lever below the side of the seat. Use body pressure
to move the seat to the desired position. Release the lever then
check to feel the seat lock into place.
V-Drive Engine Compartment
To access the engine compartment, turn latch and pull to
raise the center sun deck lid. When the ski lockers and engine
compartment lids are closed, the upholstered lids double as a
cushioned sun deck.
Fire Extinguisher
The driver’s seat may be swiveled by pressing the button on
the side of the seat.
Adjustable Seat Height
To adjust the seat height, use the driver’s seat switch on the left
hand panel or through the Vision screen using the seat button
located on the right side of the monitor.
The driver’s seat height should be adjusted to insure proper and
safe visibility to operate the boat.
Heated Driver’s
Heated
Areas
Heated
Driver’s
Seat with
Vision
Panel
A standard United States Coast Guard approved re extinguisher
is provided with your Supra boat. The re extinguisher is usually
located under the observer’s seat cushion, however, locations
vary by boat. You should know the exact location of your boat’s
re extinguisher in case of an emergency.
NOTICE: Refer to the instructions on the re extinguisher
for proper use.
V-Drive Ski Pylon
The ski pylon is to be used to pull skiers. DO NOT use ski pylon
to hoist boat! Only use the lifting rings for this purpose.
To use, pull pylon up, twist counterclockwise and push back
down into the lock position. To retract, pull pylon up, twist
clockwise and push down to storage position.
© 2016 Skier’s Choice, Inc.
DO NOT mount any Pylon Extension on the rear pylon
(located at the rear sundeck).
© 2016 Skier’s Choice, Inc.
— 72
Page 74
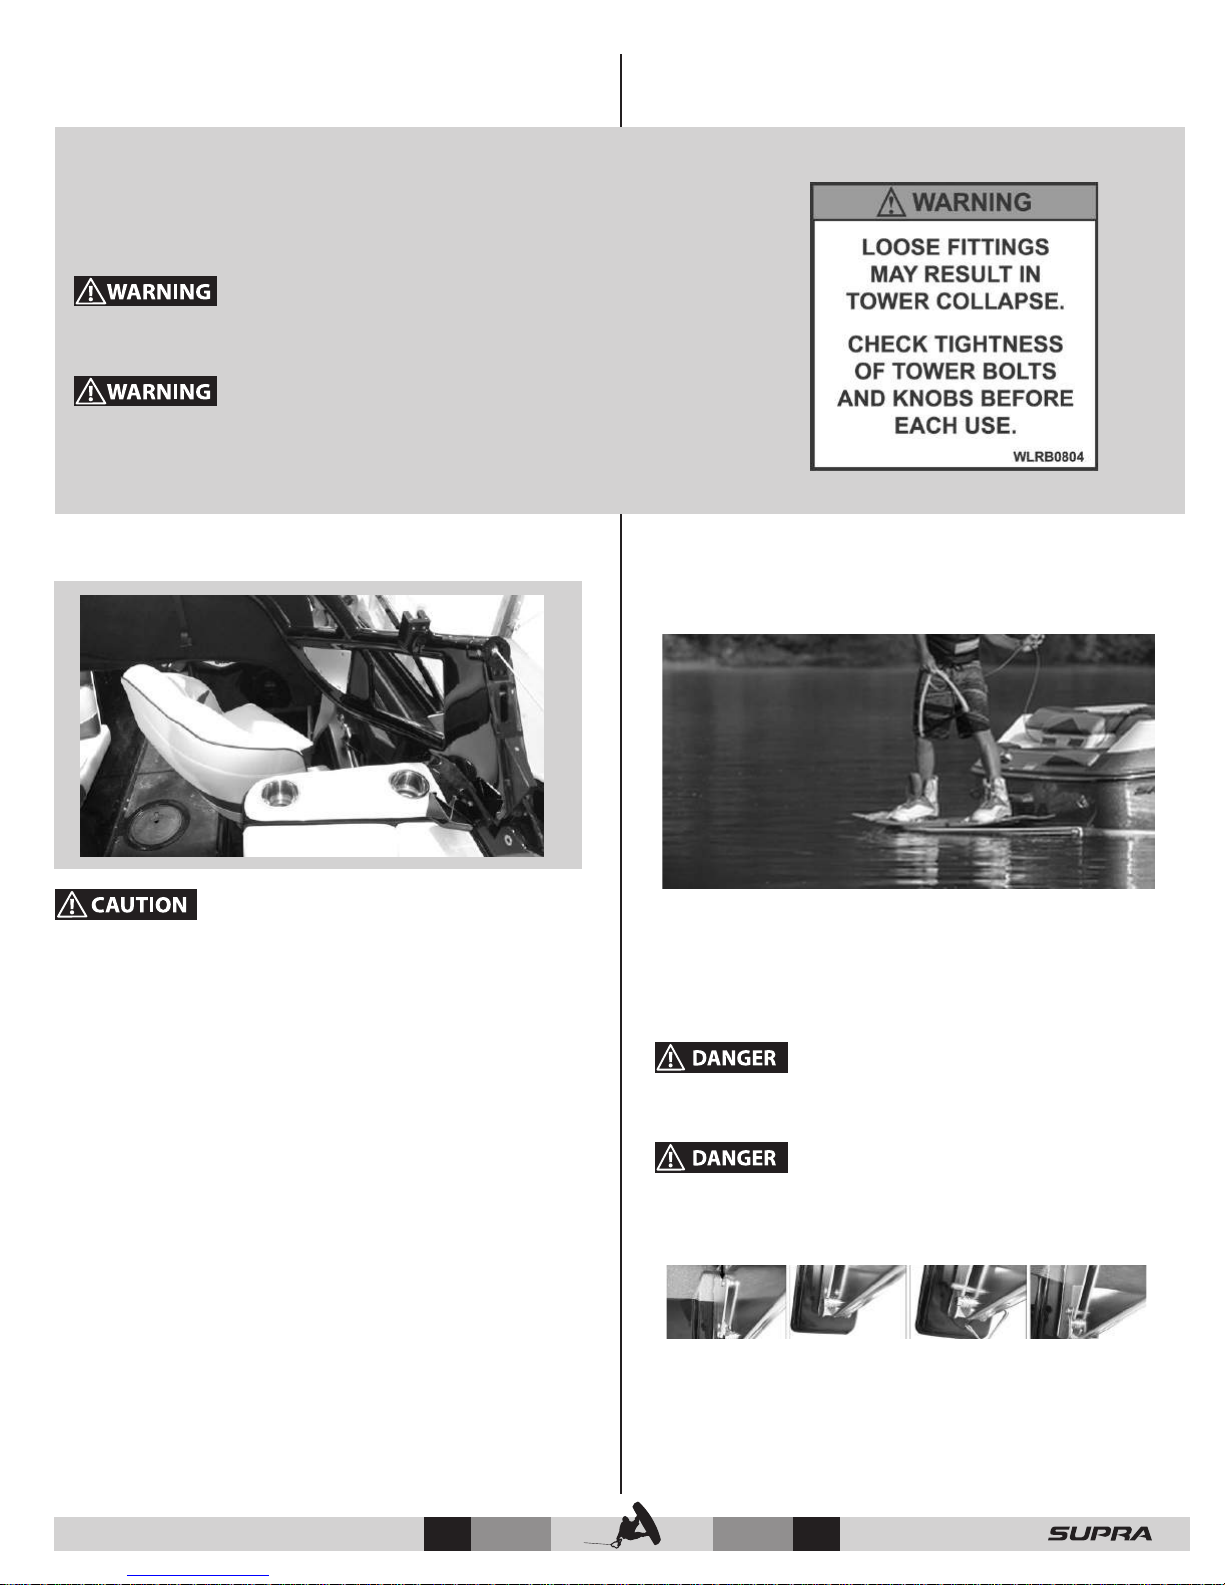
Supra Tower
If your Supra model has been equipped with a tower, please review this section
for details on it’s usage, maintenance and storage. The cage is designed as a stable
tower to enhance wakeboarding. It is NOT intended to be used to tow skiers,
barefoot skiers, or multiple wakeboarders. Such use will void any warranties
written or implied.
Before use, be sure that all mounting bolts are properly tightened in
place.
Be aware of and avoid low overhead objects such as bridges, power lines,
overhanging trees, etc.
Platform
After adjusting the seat, be sure that it has locked into place by
pushing forward and backward until it has securely latched.
DO NOT attempt to adjust the driver’s seat while the boat is
moving.
Ensure that seat swivel is locked prior to driving boat. Do not
swivel seat while boat is in motion.
Note:
When lowering the tower, the driver’s seat should be swiveled so
the tower does not rest on the seat. The tower can damage the
The transom mounted ski platform allows easy access to and
from the water for skiers and swimmers.
It is recommended that entries to and exits from the water be
made from the platform to avoid accidents. (The berglass deck
can become slippery when wet)
Shut o the engine when people are on the platform or in
the water near the platform.
Exhaust fumes contain carbon monoxide. Direct or
prolonged exposure to carbon monoxide will cause brain
damage or death.
Detachable Bracket
The ski platform is attached to the boat with detachable
brackets. The platform may be removed from the boat by 1.
Set platform on bracket. 2. Locate lower pin. 3. Locate locking
pin through brackets. 4. Swing locking arm over end of pin.
© 2016 Skier’s Choice, Inc.
73 —
Page 75
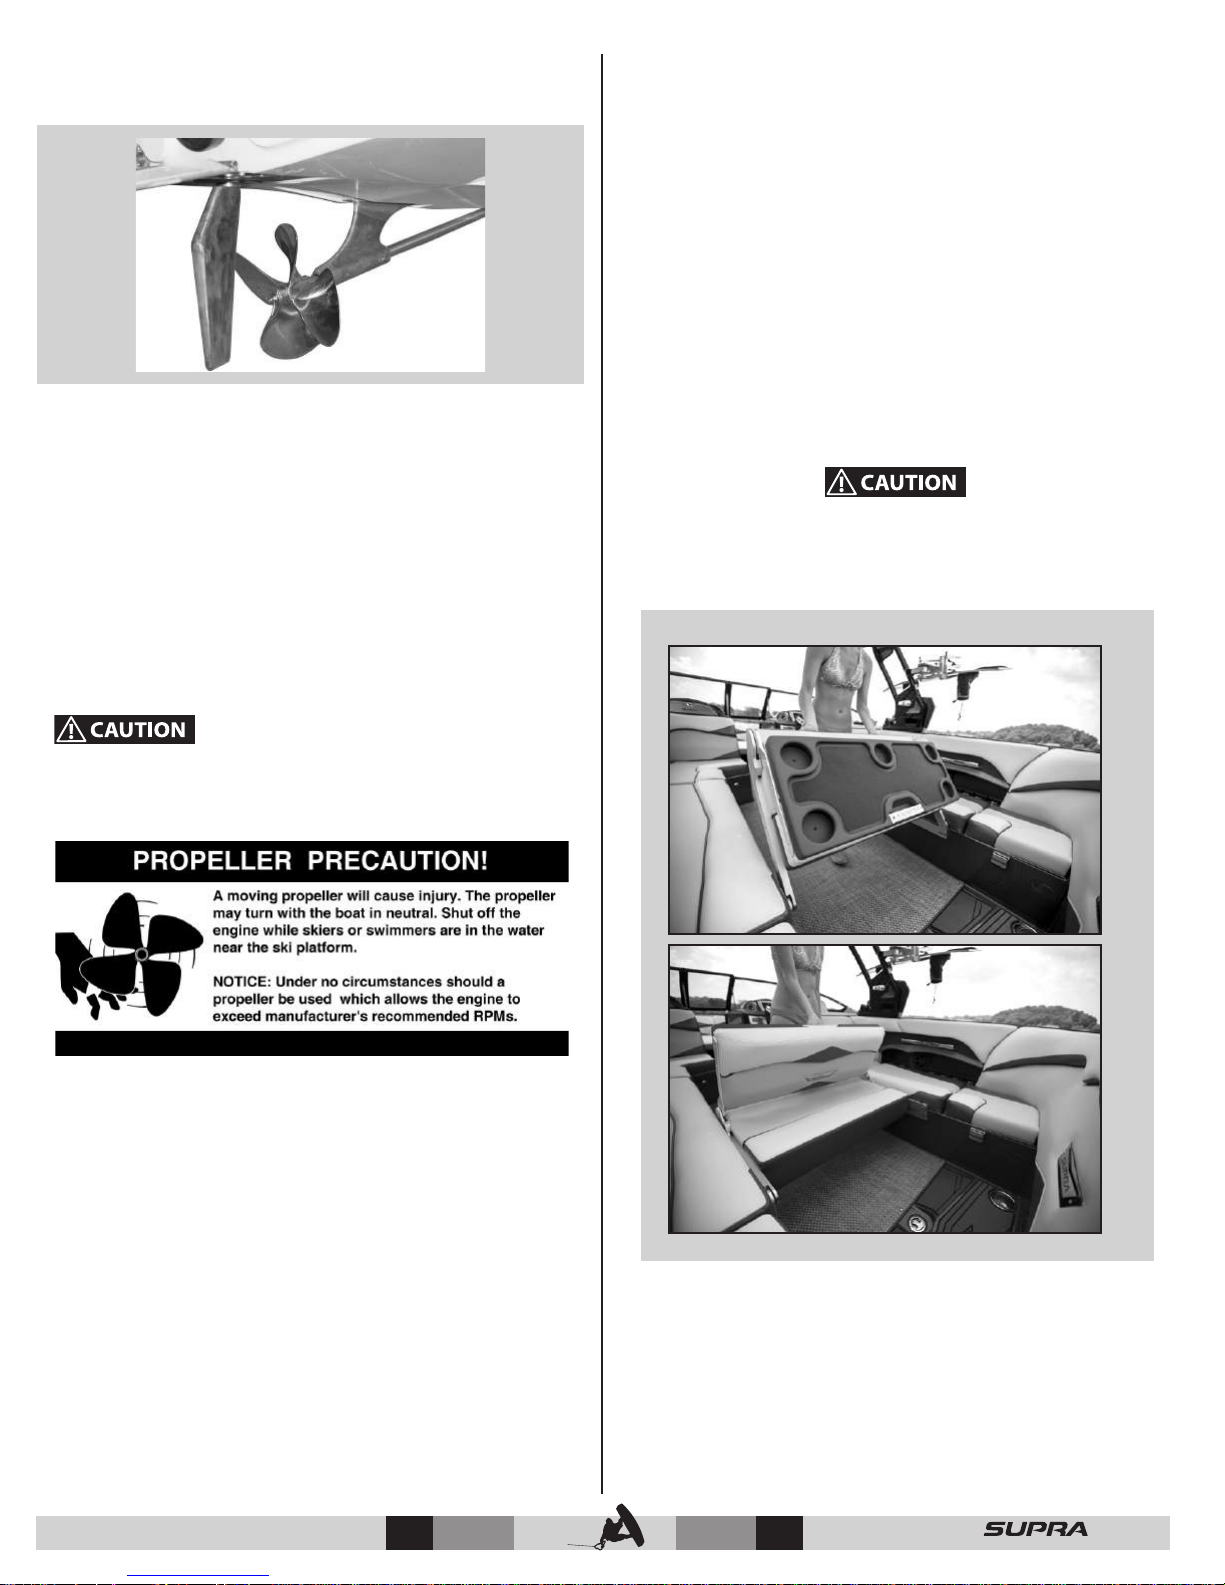
Propeller Triple-Up Seating
The research and design team at Skier’s Choice has carefully
explored and tested many different propellers and pitch
angles for use on our boats. All tests indicate that the current
propeller installed on your model is the best for the variety of
boating performance required, whether skiing competitively
or for pleasure.
It is strongly recommended that your Supra dealer be notied
before changing the propeller. In general, changing to a lower
pitched propeller may increase acceleration, but will decrease
top speed. Changing to a higher pitched propeller may achieve
higher top speed with a light load, while acceleration and
power may decrease.
Supra boats have “Triple-Up” seating. This unique type of
seating can be stored at or ipped up for extra rear facing
seating. To use this seating, lift and pull the seat back into
the locked position. Be sure that the metal arms are locked
straight before applying pressure. To lay seat back down,
simply pull the lever section of the metal support arm to
release the lock mechanism.
Convertible Rear Seat
Some Supra models are equipped with a convertible rear seat.
The rear seat lifts from the back, hinges forward, and can be
used for a cockpit table. Lift the table forward and it becomes
a rear facing seat.
The convertible rear seat back does not lock into place. It is not
intended as support. Do not lean on or use as a brace in case
of sudden change in direction.
Avoid engine damage. Do not exceed the maximum RPM
as listed for your motor. Some props may allow the engine
to over rev, which can cause non-warrantable engine
damage.
© 2016 Skier’s Choice, Inc.
© 2016 Skier’s Choice, Inc.
— 74
Page 76
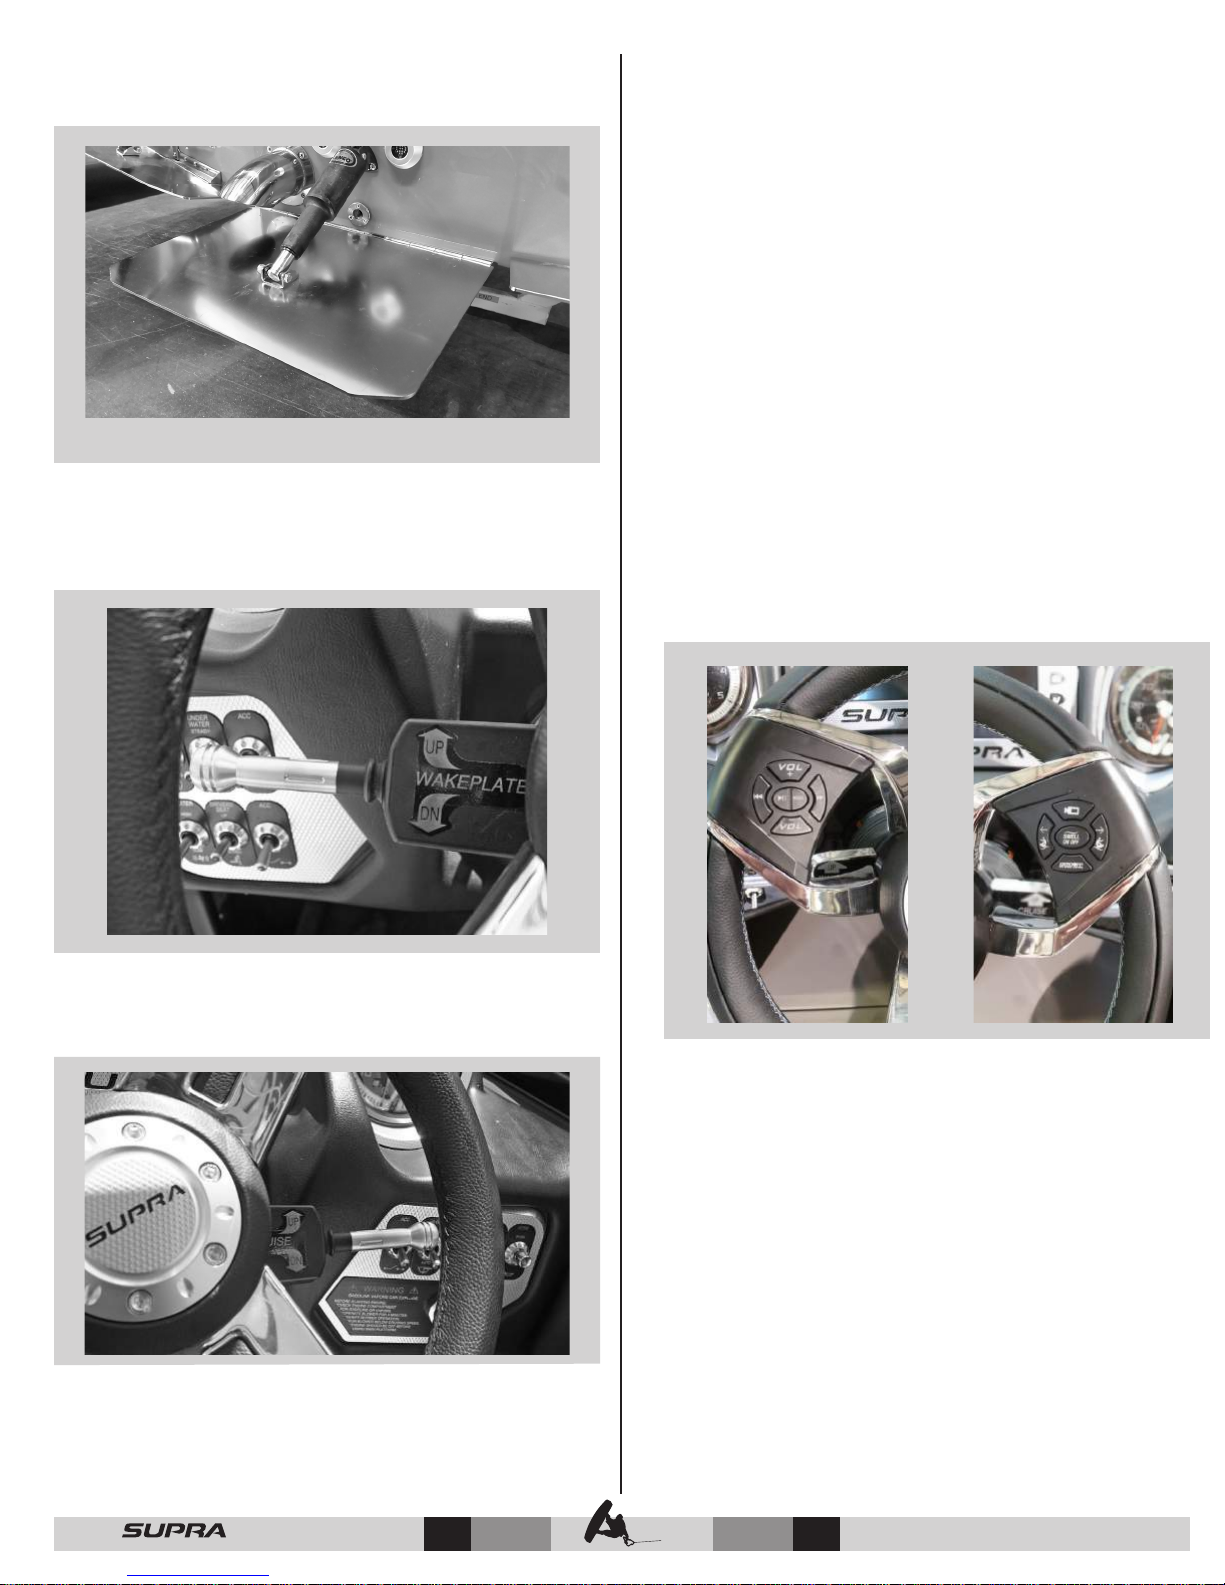
Wake Plate
The wake plate allows the driver to control the running
attitude of the boat. It can be controlled by the switch on the
dashboard.
Trim Switch
Billet Glove Box
To open the glove box, press the button on the door. To close
the lid, simply push the lid back until it latches.
Walk-Thru Windshield
The movable center windshield panel allows access to and
from the bow deck. To open, turn safety latches to vertical and
push. Lay the center windshield panel gently against the xed
side panel.
Optional Steering Wheel with Wireless Controls
Some Supras are equipped with steering wheel mounted
controls. Two remotes control functions of audio, Zero O, Swell,
and the rear view camera.
The remotes must be paried with the ICE Audio control. See
the Vision Touch instructions earlier in this manual on how to
pair the remotes.
This switch controls the wake plate. The gauge indicates the
position of the plate.
Cruise Control Speed Adjustment
This switch allows the speed of the boat to be increased or
decreased while the Zero-O is engaged.
© 2016 Skier’s Choice, Inc.
75 —
© 2016 Skier’s Choice, Inc.
Page 77
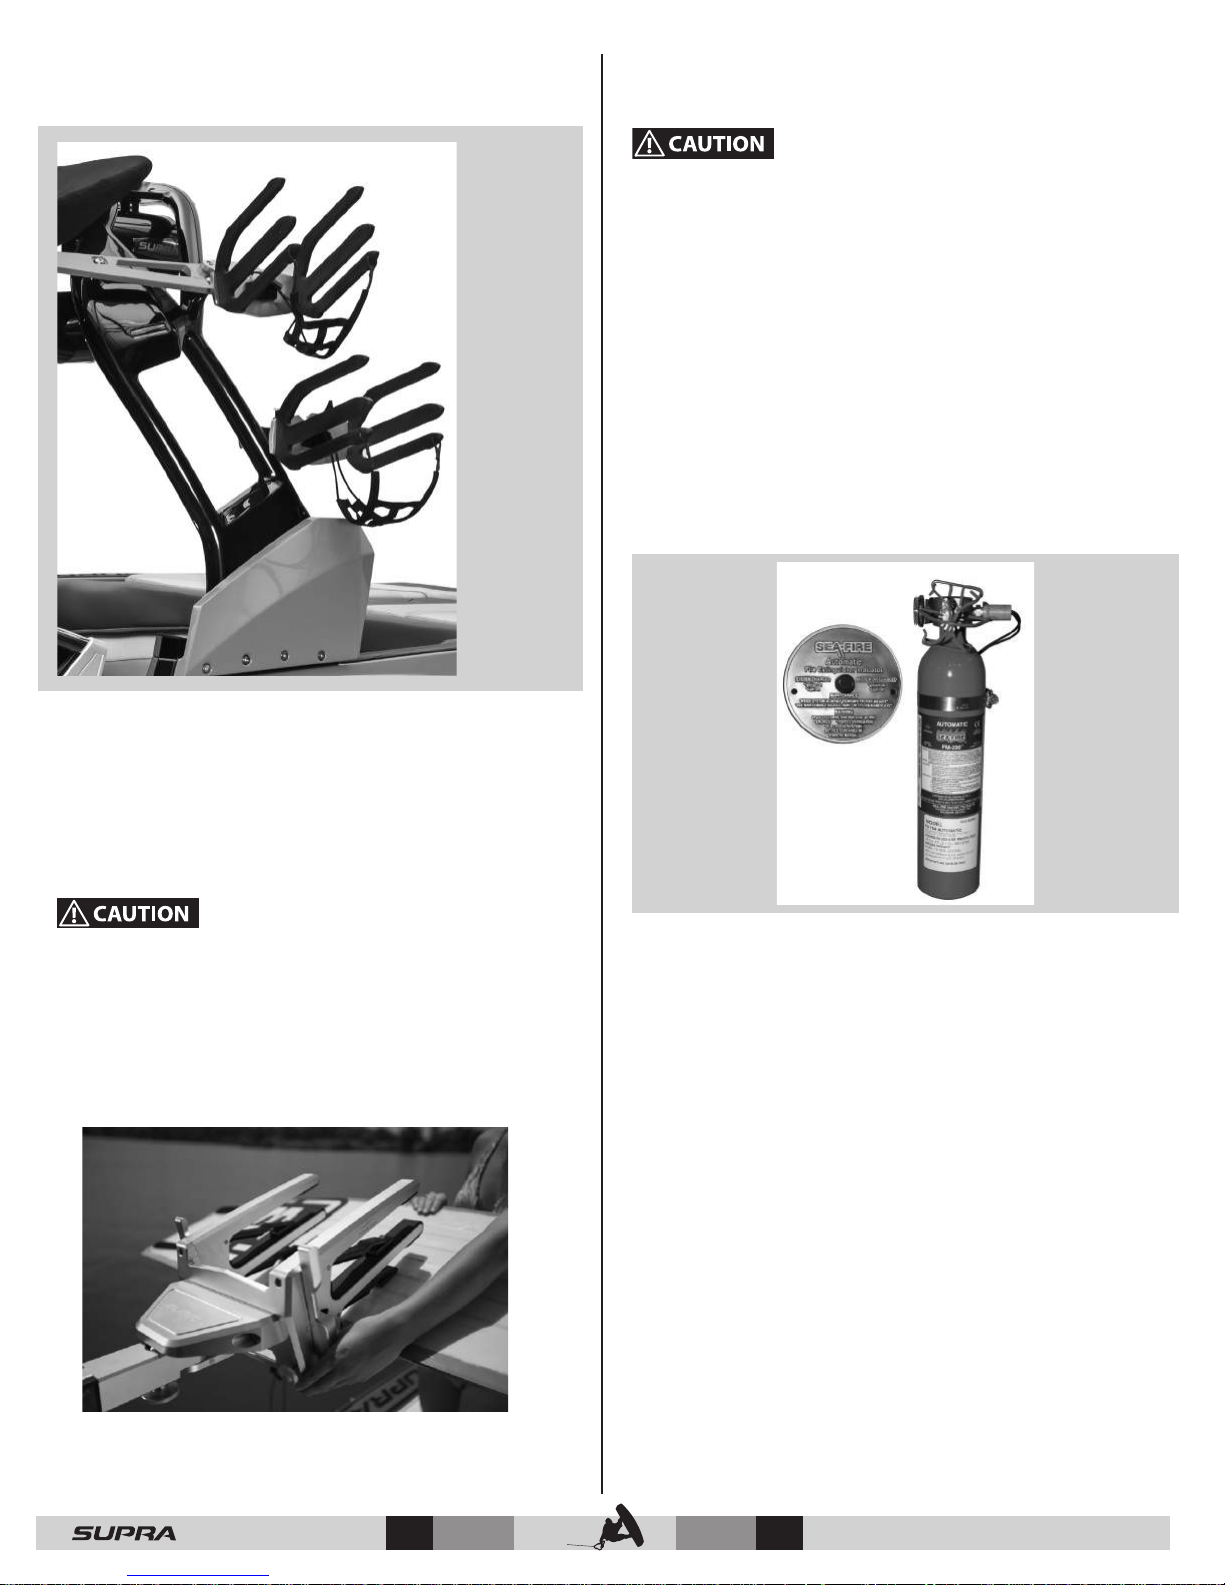
Wakeboard Racks
Optional Underwater Lights
Do not operate underwater lights out of water. It can cause
the lights to overheat and lead to failure of light and damage
boat. This damage is not covered by warranty
Docking Lights
The docking lights are designed to help you dock, load and
unload your boat in low light or at night.
NOTE: Docking lights are not to be used as running lights at
night. USCG regulations mandate that a boat under power
after sunset must display a 360 degree white light and a
red/green bow light.
Optional Automatic Fire Suppression System
Wakeboard racks are a convenient way to store wakeboards
while using your boat.
Supras have swing arm wakeboard racks for easier loading and
unloading of boards. The swing arm has a stop at 0 , 90, and
180 degrees. To operate, pull the pin and rotate the wakeboard
rack. Lock the pin into postition to ensure rack does not rotate
unexpectedly.
• Place wakeboard swing arm in the 0 degree position
prior to putting the boat in gear.
• Check tightness of all mounting hardware before each
use.
• DO NOT trailer the boat with wakeboards mounted in the
racks.
Optional Clamping Wackboard Rack
The optional Automatic Fire Suppression System has a sensor
in the engine compartment that is designed to detect a re.
Under normal conditions, the dash area warning light will glow
green when the ignition is “ON”. If the engine compartment
sensor is activated by a re, it will deploy the content of it’s re
extinguisher and the dash mounted warning light will turn red.
Optional on Supra Boats are wakeboard racks that gently clamp
down onto boards to hold them secure while underway.
— 76
© 2016 Skier’s Choice, Inc.
© 2016 Skier’s Choice, Inc.
Page 78
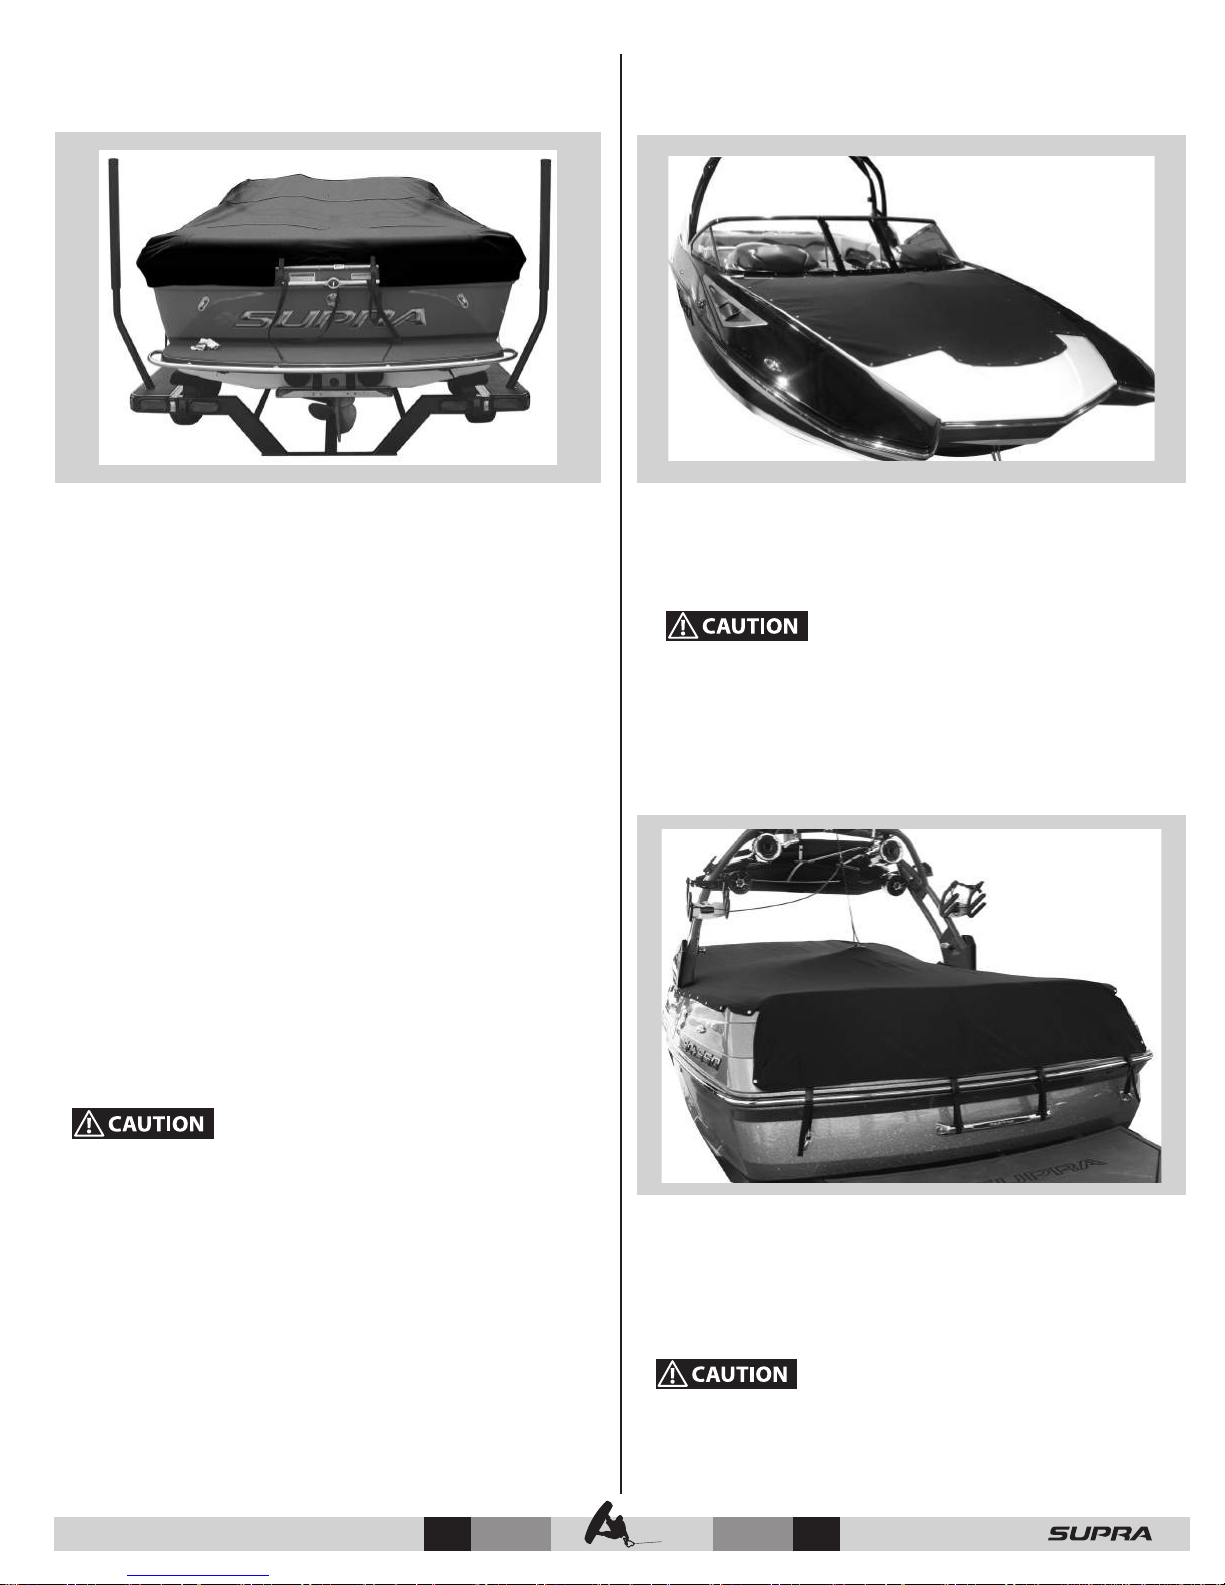
Optional Mooring Cover
Optional Tonneau Cover
Your Supra boat cover is made from the nest canvas and
webbing to ensure that your boat will be protected in the o
season. The cover has been designed to t securely around
each boat.
Use the following procedure when covering the boat:
1. Be sure that the cover ts snugly at the bow then unfold
from front to back.
2. Be sure to install cover pole(s) and adjust to proper height,
using set screw on pole(s). This will keep water from
gathering in the center, which can damage the cover.
3. Secure all fastening straps around the trailer frame.
4. Use the ratchet system to tighten the drawstrap.
Folding Cover
When folding the cover for storage, be sure the cover is dry. Take
care not to scratch the canvas nish against rough surfaces.
Store in a dry location.
Cover Repair
If the cover becomes damaged, immediately patch and reseal
the area. Use a tent seam sealer to reseal any new stitches.
Spray fabric guard on scraped or worn surfaces. Canvas tears
should be repaired professionally and stitches sealed to prevent
leakage.
The optional tonneau cover is designed to snap over the bow
of the boat. Its purpose is to minimize air ow into the cockpit
area when the boat is in use and as a storage cover when used
in combination with the optional cockpit cover.
DO NOT trailer the boat with the tonneau cover installed.
The tonneau cover is not designed as a trailer cover and
may come unsnapped or rip. This type of damage IS NOT
covered by your boat warranty!
Optional Cockpit Cover
DO NOT trailer the boat with the mooring cover installed.
This type of damage IS NOT covered by your boat
warranty!
© 2016 Skier’s Choice, Inc.
© 2016 Skier’s Choice, Inc.
The optional cockpit cover is a snap down storage cover
designed to help protect the interior of your boat. To install the
cover, start at the windshield and work towards the transom.
Be sure to install the hangtyte rope to prevent water pocketing.
DO NOT trailer the boat with the cockpit cover installed.
The cockpit cover is not designed as a trailer cover and may
come unsnapped or rip. This type of damage IS NOT covered
by your boat warranty!
77 —
Page 79
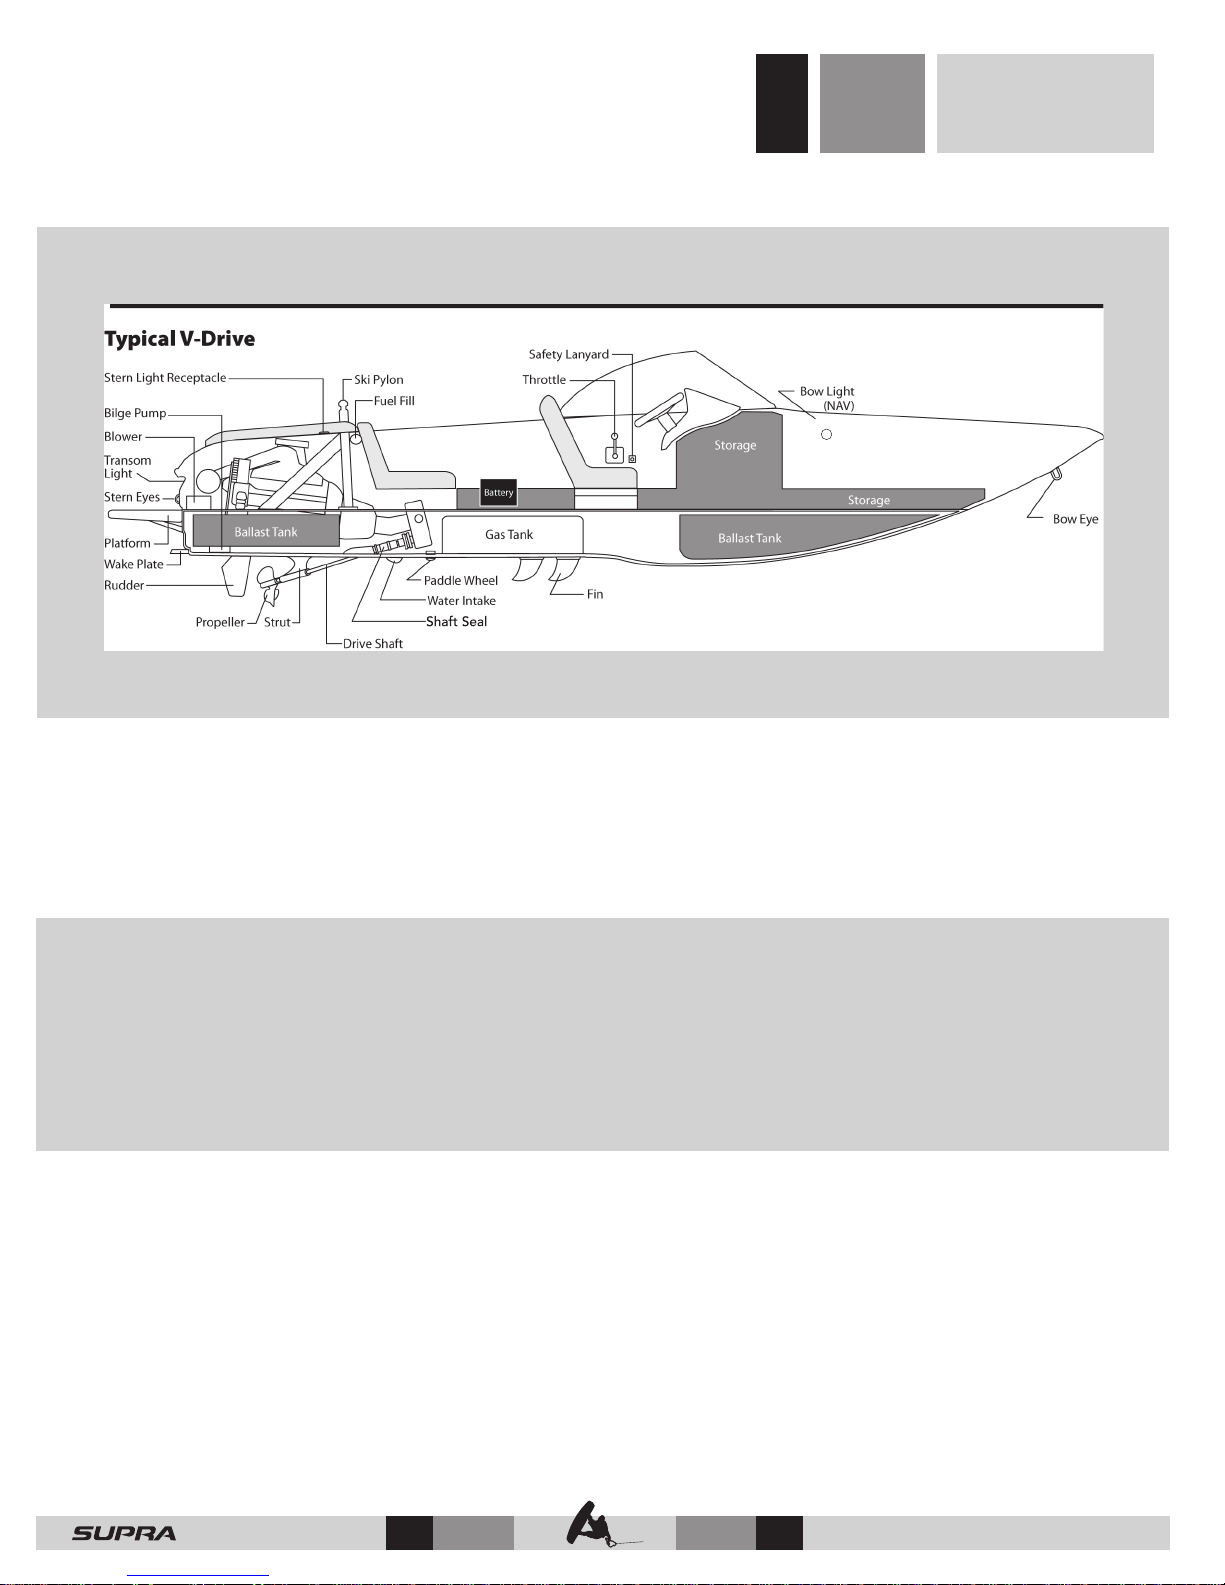
Section 10
Service & Maintenance
The illustration above denotes the areas which may need to be accessed or may require cleaning or maintenance. It is important
to have basic understanding of the parts and their location on the boat. However, it is recommend that any service beyond routine
maintenance be performed by an authorized Supra dealer.
Service & Maintenance
For your convenience, a maintenance schedule has been included in this manual. The items listed outline when to perform
safety checks, lubrication and general service to your boat. Engine hours or elapsed time determine when service is
necessary.
It is recommended that any replacement parts used during maintenance or for repair be supplied by an authorized Supra
dealer.
NOTICE: You are responsible for keeping records of all maintenance on your boat. To maintain your new boat warranty,
you may be required to prove that required maintenance was performed.
— 78
© 2016 Skier’s Choice, Inc.
© 2016 Skier’s Choice, Inc.
Page 80
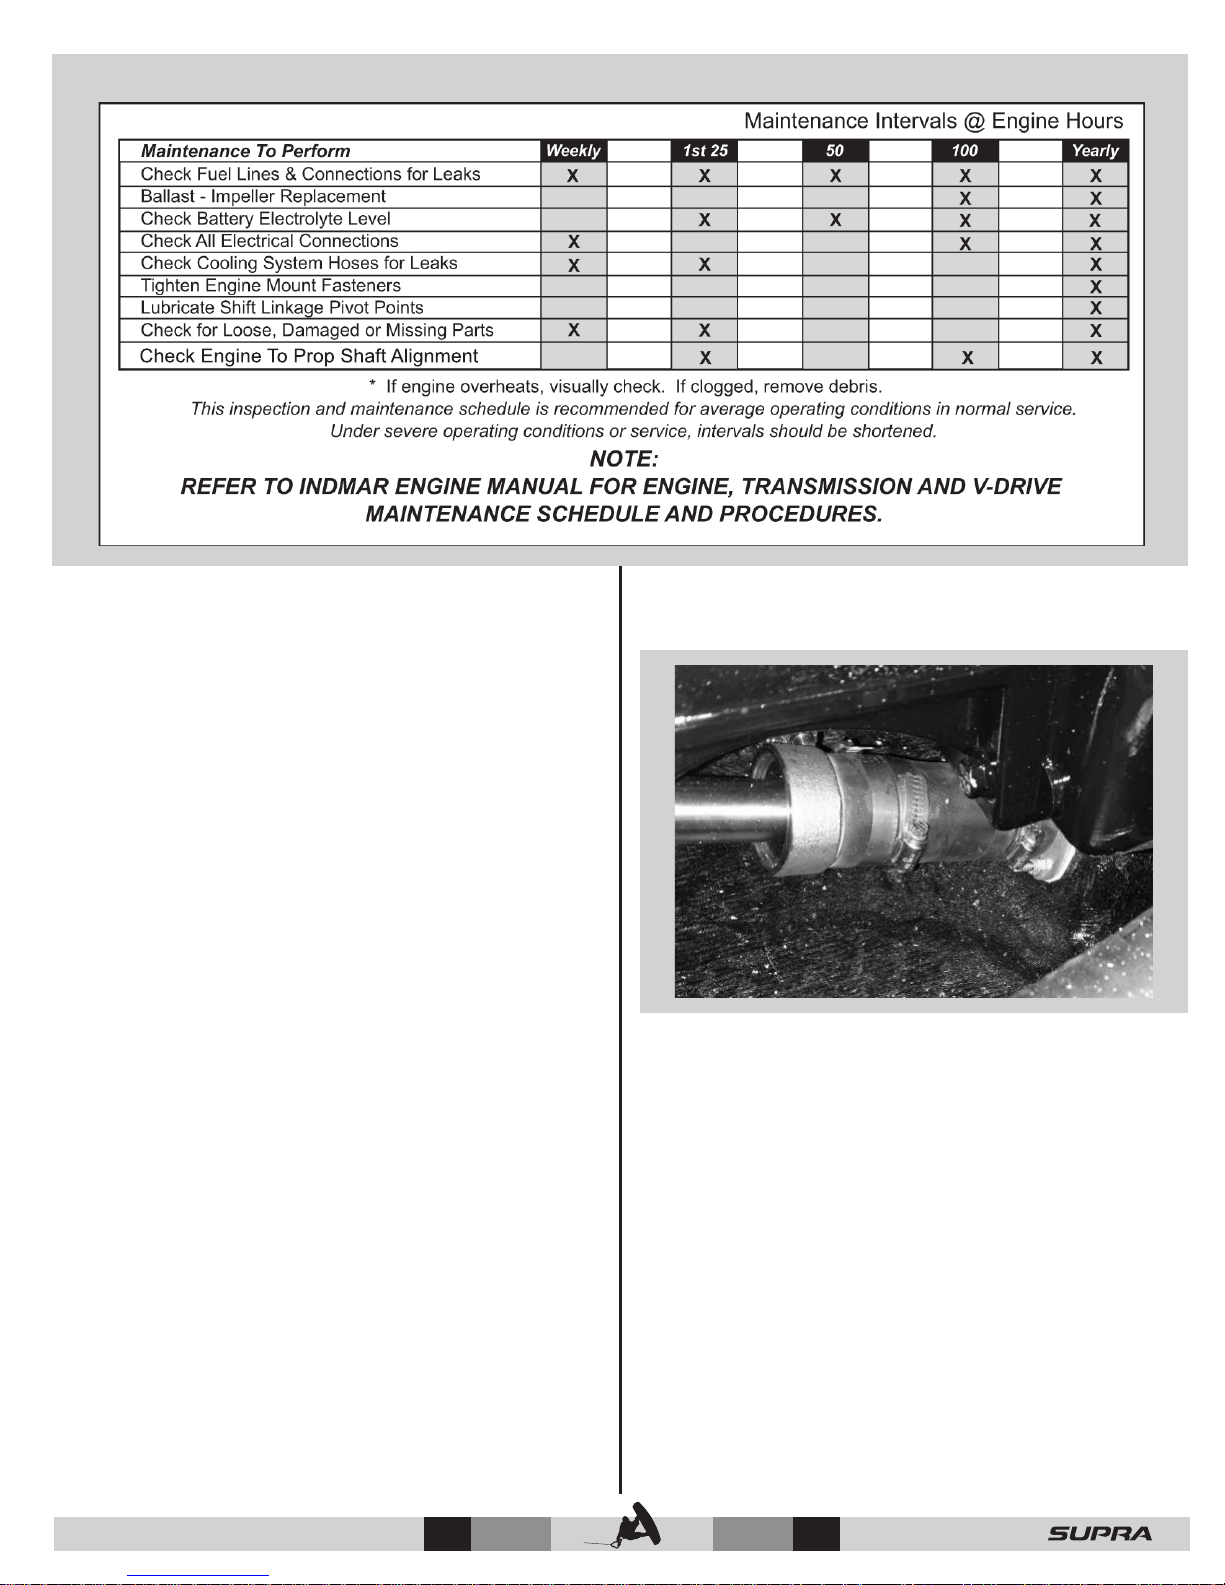
Component Lubrication
Normal use of your Supra causes metal to metal movement
at some parts in the boat. The driver’s seat track should be
lubricated with a water resistant chassis lubricant such as
silicon grease.
Dripless Shaft Seal
Your Supra comes standard with a dripless shaft seal. If any
seepage occurs, contact your dealer.
© 2016 Skier’s Choice, Inc.
79 —
Page 81
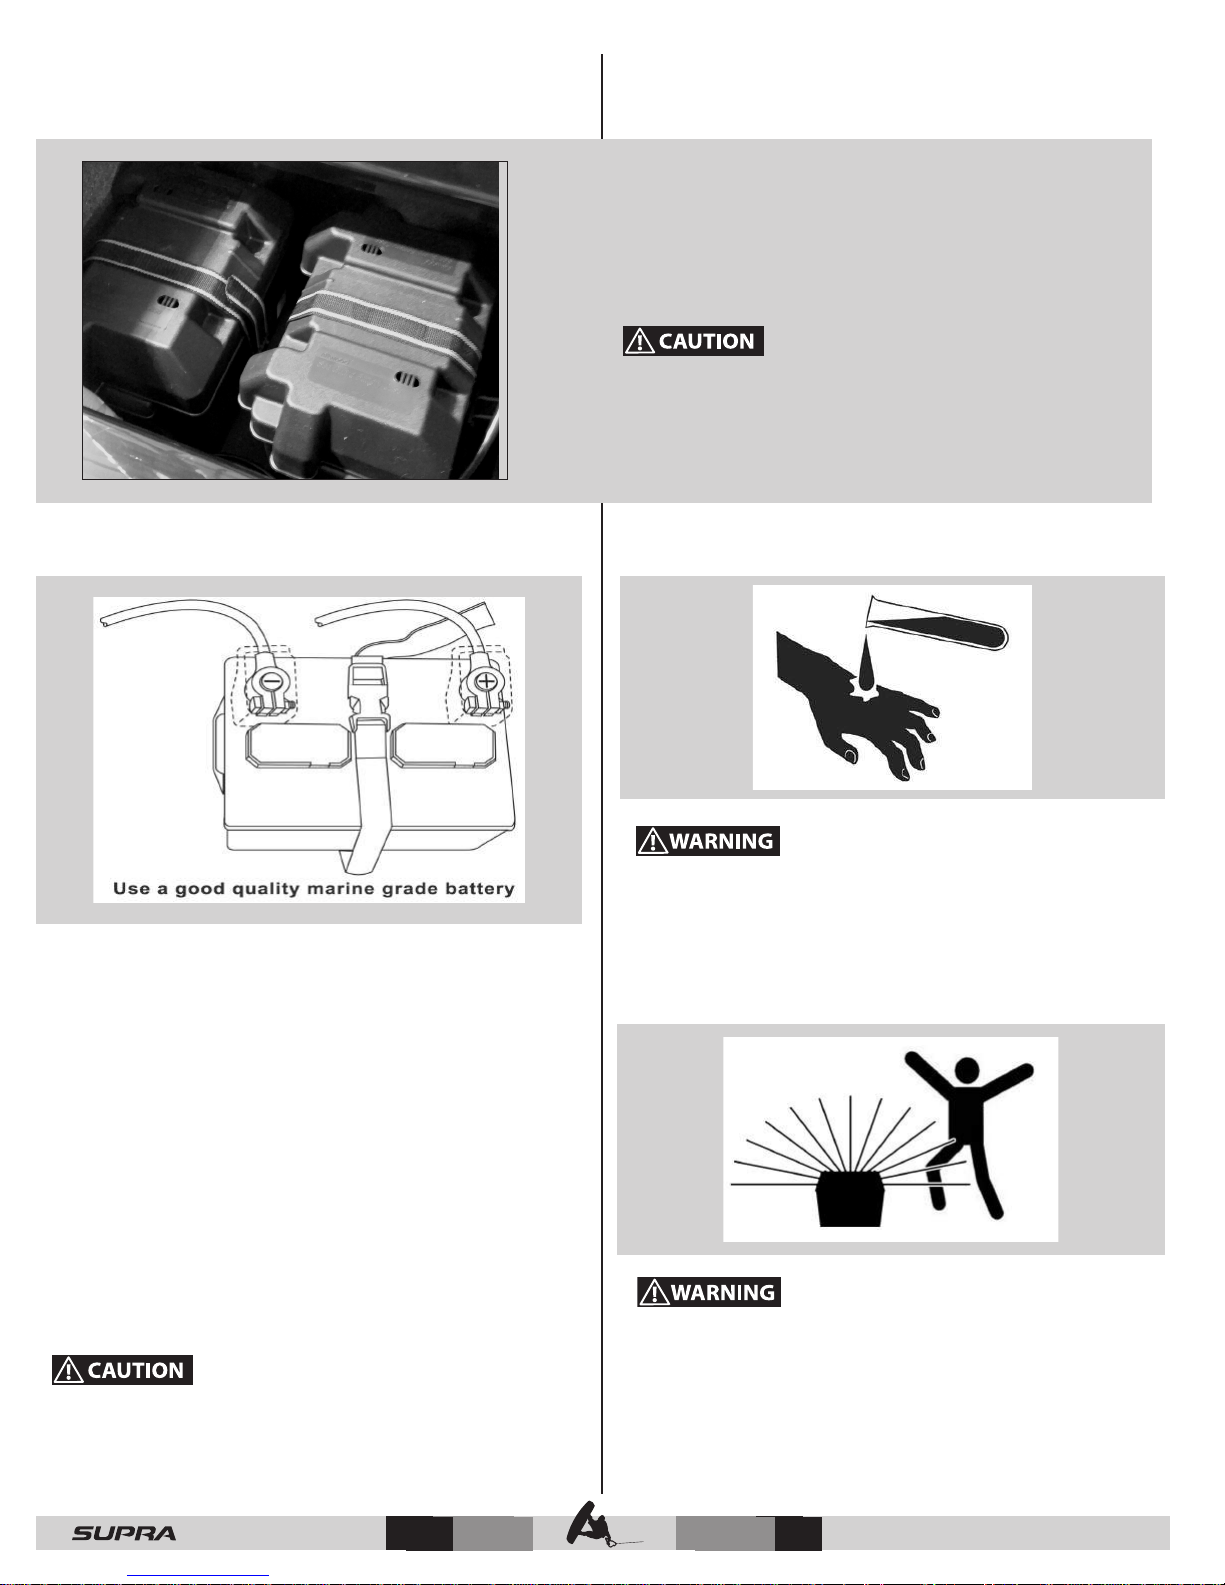
Battery Box
Battery Cable
Installation & Precautions
The battery is mounted inside the observer’s seat storage
compartment. Location may vary slightly depending on the
model.
NOTICE: It is recommended that the battery cables be
disconnected from the battery when the boat is placed in
storage.
Avoid damage or injury from battery acid. Ensure that the
battery is properly secured before using boat.
Your battery is an important part of your boat. It provides all
the power to start your boat and allows all of your electrical
components (bilge pump, blower, stereo, etc.) to work even if
the motor is not running.
Because of its important role, Supra recommends using a good
quality “Marine Dual Purpose” battery. The “Dual Purpose” rating
means that it can provide the cranking Amps needed to start
your motor, yet it also has an Amp hour discharge rating so it
can handle low electrical drawdown cycle.
Your Supra electrical system is a negative ground type. The
negative battery cable is grounded to the engine block. The
positive battery cable is connected to the starter solenoid.
Connect the positive (+) battery cable to the positive (+) post
on the battery. Connect the negative (-) battery cable to the
negative (-) post on the battery.
Failure to connect battery cables as outlined will damage
the system and void the warranty.
Sulfuric acid in the battery can cause serious burns. If spilled
on skin or in eyes, ush with clean water immediately, then
seek medical attention.
Hydrogen and oxygen gases are produced during normal
battery operation and charging. Sparks or ames near the
battery vent openings can cause the mixture to ignite and
explode.
— 80
© 2016 Skier’s Choice, Inc.
Page 82
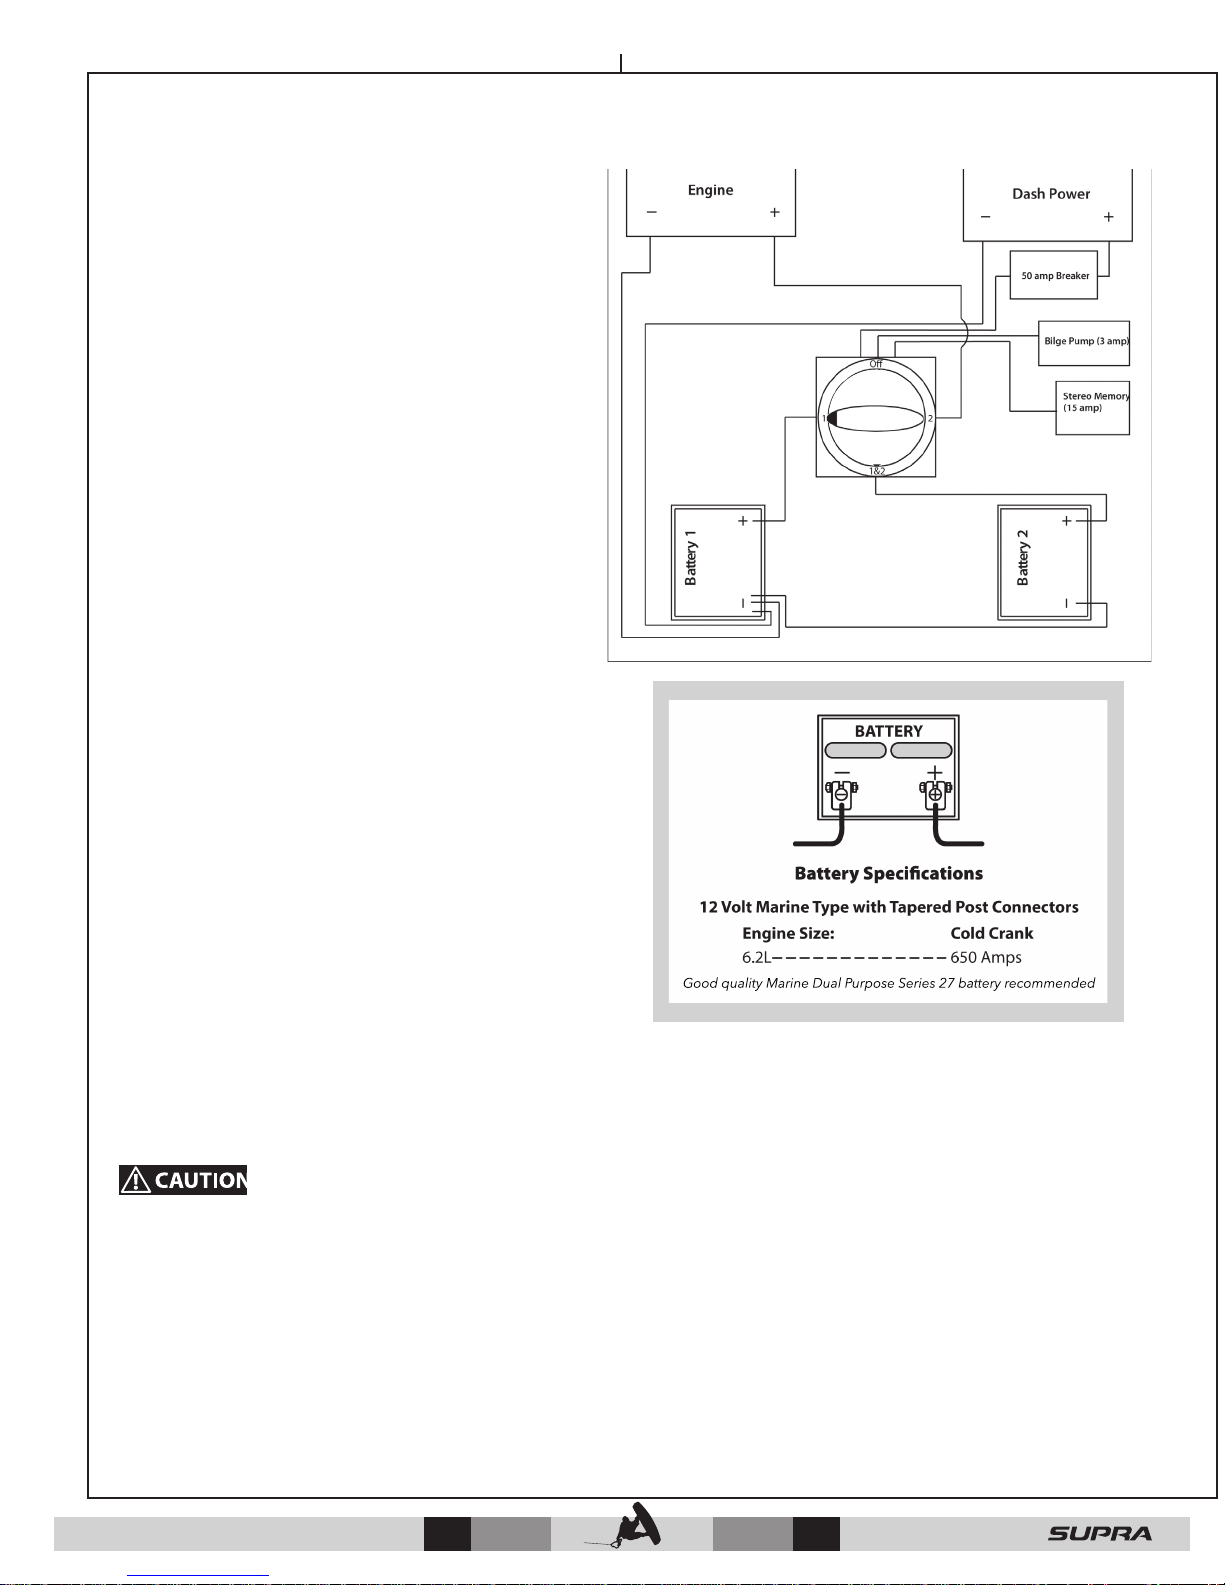
Dual Battery (Option) Hookup
To properly hook up the two batteries;
1. Connect the grounding strap provided from the negative
(-) post on Battery 1 to the negative (-) post on Battery 2.
2. Connect the negative (-) cable from the grounding buss
bar to the negative (-) post on Battery 1.
3. Connect the negative (-) cable from the engine to the
negative (-) post on Battery 1.
4. Connect the positive cable from the left side of the
battery switch to the positive (+) post on Battery 1.
5. Connect the positive cable from the bottom of the switch
to the positive (+) post Battery 2.
Battery 1 is designated as the primary battery and Battery
2 is designated as the secondary battery.
Skier’s Choice installs a 4-position battery switch on any
boat equipped with dual batteries. It is recommended
that both batteries be fully charged between each use to
insure they can deliver the electrical demands required
for each outing. The purpose of our recommendation is
to utilize one primary battery for all operational needs,
and have the other as a backup if the primary battery
discharges.
This situation could occur if you run your accessories
such as ballast or stereo for a long time, without running
the boat. The dual battery setup is designed to create
a redundant system allowing the user to have a backup
battery. The switch must be in the “1” or “2” position to
create the redundancy.
The 4 positions available on the battery switch are: O
/ 1 / 2 / 1&2. These choices indicate which battery is
being used to power the boat and which battery is being
charged by the engine’s alternator.
We recommend using only position 1 or 2 while boating.
Battery switch position “1&2” is available but not recommended as power will be drawn from both batteries and the
alternator will have diculties keeping both batteries charged simultaneously. It also creates a ground dierentiation which
in turn will create issues with sensitive electrical components such as the Vision screen. The only time you may need Position
1 & 2 would be in an emergency situation where both batteries are low and need power from both to help start the engine.
Do not turn the selector switch to the “O ” position when the motor is running. The alternator will be permanently damaged and
is not covered under Skier’s Choice or Indmar warranty.
It is highly recommended that Position “1” be used in most situations so the secondary battery will be available to start the engine
from Battery 2 (secondary) if necessary.
Be aware that if position “1&2” is selected, both batteries will drain power at the same time and could leave you stranded due to
weak batteries.
NOTE: It is recommended that you fully recharge your batteries using a battery charger periodically or after a period of high
discharge (running many accessories for an extended period of time).
NOTE: Skier’s Choice highly recommends using quality “Dual Purpose” batteries.
© 2016 Skier’s Choice, Inc.
81 —
Page 83
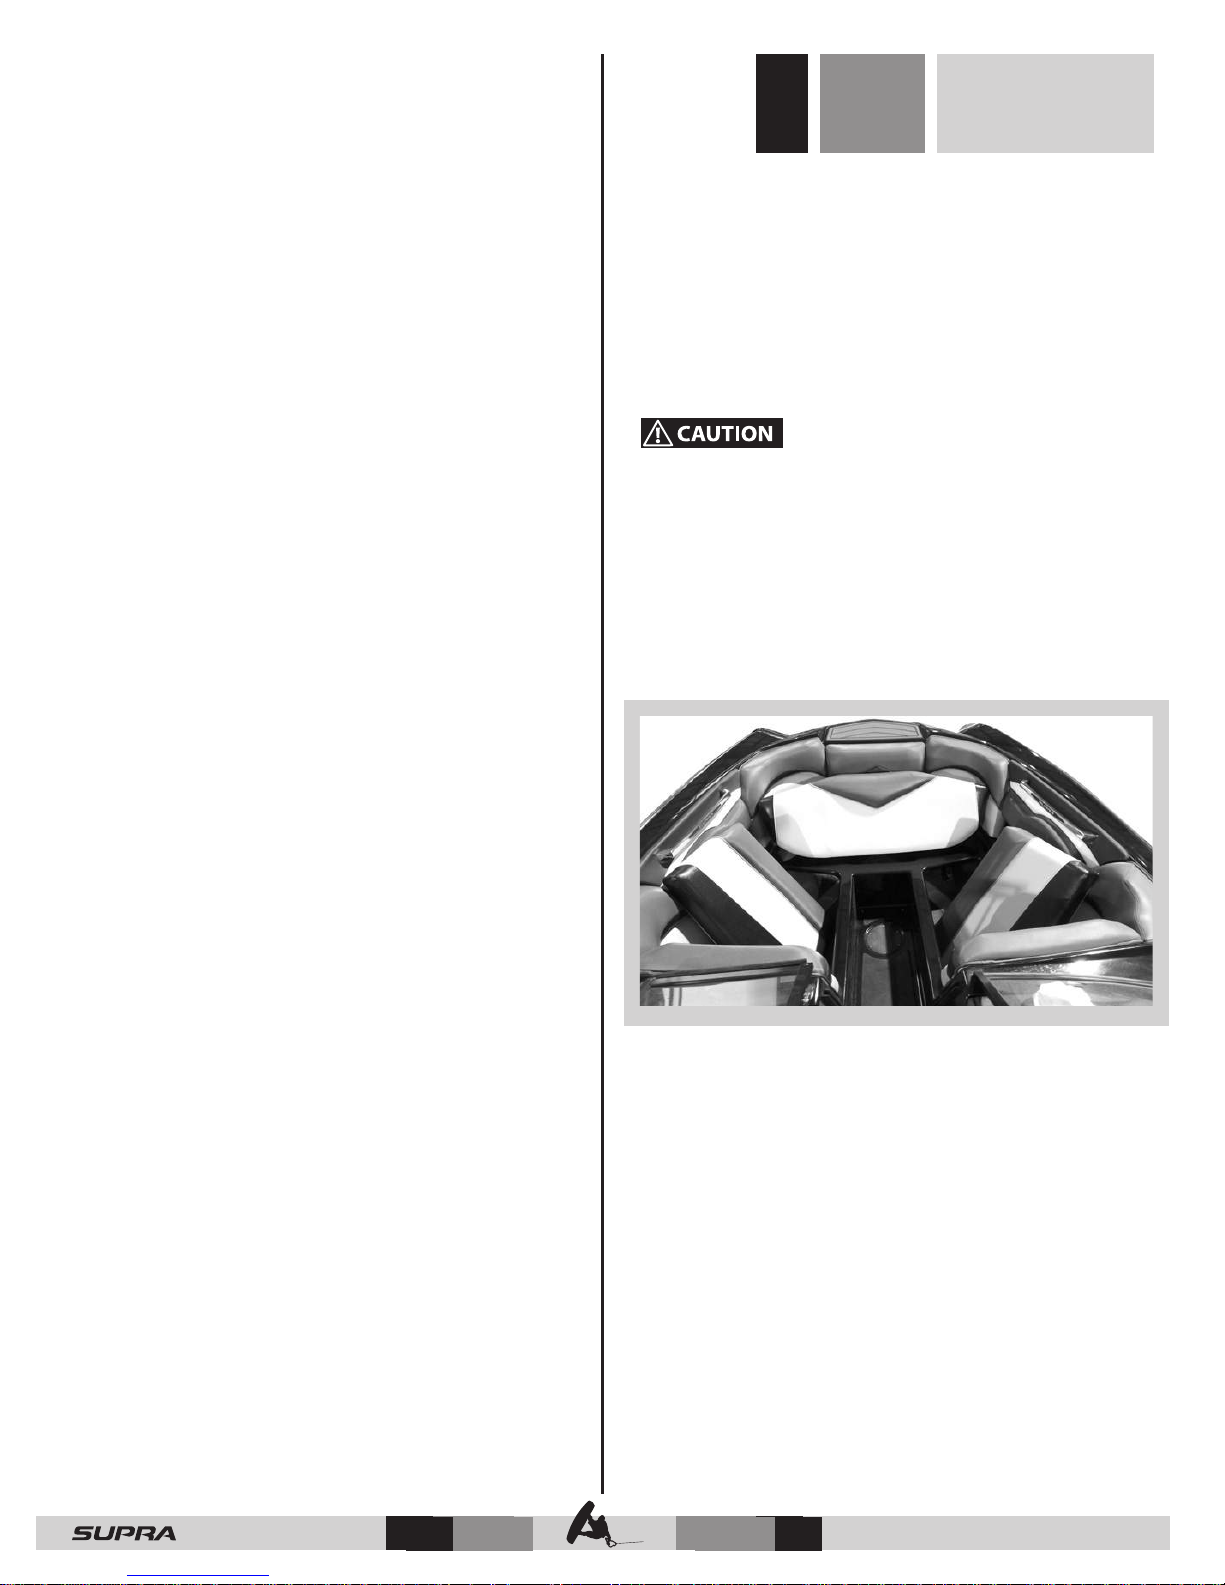
Fiberglass Care
Washing and waxing the boat hull and deck regularly will extend
the life and beauty of your Supra. It is a good routine to rinse
your boat with fresh water after each day’s use.
Section 11
Cleaning, Care
& Storage
Upholstery Care
It is recommended that the hull and deck be cleaned and waxed
after every 25 hours of use. This will decrease water friction
and lesson the potential for staining or spotting on the gelcoat
surface.
When the original gelcoat shine cannot be restored by waxing,
the shine may be restored by hand bung with a commercial
polishing compound. Be sure to apply a new coat of wax
containing Carnauba over the area that has been polished.
IMPORTANT: Porcelain cleaning powders are too abrasive
for use on gelcoat and may cause permanent discoloration
if used. Household detergents containing ammonia or
chlorine should not be used on gelcoat. Never use acetone
or ketone solvents to clean your boat nish.
Washing Your Boat
The easiest way to preserve the beauty of your boat is to keep
it clean by frequent washing. Wash the boat with luke warm
or cold water. Wipe the boat down immediately after washing
to avoid water spots. Avoid using hot water or washing your
boat in direct sunlight. Avoid using strong soaps or chemical
detergents. To avoid spotting, all cleaning agents should be
thoroughly rinsed from the surface promptly and not allowed
to dry on the nish.
All upholstery items on your Supra are made of tough marine
grade vinyl that is easily cleaned.
It is important to provide for the drying of all upholstery
and carpet after each use of the boat. Open all storage
compartments and slide all removable cushions out about an
inch to allow air to circulate behind.
Strong detergents and cleaners may shorten the life
of the vinyl. PLEASE SEE VINYL MANUFACTURER’S
RECOMMENDED CARE GUIDE INCLUDED IN YOUR OWNER’S
MANUAL PACKAGE.
FAILURE TO FOLLOW CARE GUIDE MAY VOID VINYL
WARRANTY.
Drying Upholstery
Rub Rail Care
Use a sponge or other soft material to wash and wax the rub
rail. To wax, use a commercial automotive bumper wax.
NOTICE: When tying up to a dock or another boat, always
use cushioned fenders (dock bumpers) to protect your boat
from hard surfaces.
Windshield Care
All Supra windshields are constructed of tempered safety glass
to ensure passenger safety. The glass surfaces should be cleaned
regularly to ensure that visibility is not obstructed.
Use a commercial glass cleaner to remove any spotting or
stubborn stains that develop on the windshield. Never use
abrasive cleaners on glass surfaces.
It is important to provide for the drying of all upholstery
and carpet after each use of the boat. Open all storage
compartments and slide all removable cushions out about an
inch to allow air to circulate behind.
Improper drying of your cushions can attract mold spores under
the vinyl which develop pink or blue stains depending on the
type of mold. These stains are not covered under the limited
warranty.
— 82
© 2016 Skier’s Choice, Inc.
Page 84

Foreign Deposits
Tree sap, bird droppings, airborne chemicals, petroleum
products and other foreign matter may damage the gelcoat
surface if not removed promptly (See Washing Instructions).
Boat Hull Protection
If your Supra is to remain in the water for an extended period,
the hull below the water line should be painted with a marine
bottom paint. Boats left in the water for extended periods
of time without bottom paint may experience blistering or
discolorization. This type of damage is not covered by your
boat’s warranty.
Damage caused by improper care, cleaning agents,
conditioner oils, waxes, gasoline, etc., IS NOT covered under
your boat’s warranty. Use only the recommended vinyl
cleaner as listed on the Vinyl Care Instruction Sheet.
Please refer to www.syntecind.com for more information
regarding vinyl care.
NOTES:
Wet Slipping Boats
• In the event of large storms, boats in wet slips are more likely
to be damaged.
• If you do not use the boat often, the battery can go dead
from pumping out water.
• The boat may develop organic growth which can greatly
reduce performance, attack and discolor the gelcoat.*
• The boat may develop osmotic blisters.*
• The boat may get a stain line which cannot be removed.*
* Painting the area below the waterline of the boat with Interlux or Pettit
products will reduce the likelihood of these last three.
© 2016 Skier’s Choice, Inc.
83 —
Page 85
Winterization
When the boating and ski season comes to a close, it is important
to have your boat professionally winterized.
Section 12
Winterization
& Dry Storage
Summerization
If your boat is exposed to temperatures below 32 degrees F (0
degrees C), it is possible for water in the engine, ballast system,
heater core, etc., to freeze. As this water freezes, it expands and
can crack pumps, valves, heat exchangers, engine blocks, etc.
This type of damage usually requires the replacement of the
cracked item and can be very expensive to repair.
It is extremely important to follow the proper winterizing
procedure. The engine must be correctly winterized for
safe storage in your climate. This should be done by a
professional. Your Supra dealer will know exac tly what must
be done to ensure the longest possible life for your boat.
In addition to having your boat professionally winterized, the
following tasks should be done to protect your boat during
storage:
1. Remove the drain plug from the boat.
2. Thoroughly clean the boat inside and out. Inspect the hull
for any residue or algae growth and remove if required.
3. Clean the bilge area thoroughly and operate the bilge pump
to remove any water from the bilge hose.
4. Remove all seat cushions and open all storage areas to air
circulation in the boat interior. When thoroughly dry, replace
cushions and close storage areas.
5. Top off fuel tank to prevent any condensation from
accumulating in the fuel system. Use a commercially available
fuel stabilizer to remove water and prevent gumming.
6. If the boat is stored on its trailer, ensure that the boat is
properly positioned. If possible, lift the tongue so that the
bow is slightly raised to promote drainage from the drain
hole.
7. Install the canvas cover and secure the straps in accordance
with cover instructions.
Before using the boat after it has been in dry storage requires
some special treatment. Supra recommends having your boat
professionally summerized, preferably by the same facility that
prepped it for storage. They will be familiar with what items
were done in the fall and what items need to be addressed
in the spring.
In addition to having your boat professionally summerized, the
following list of tasks should be done to ensure a successful
start to your boating season.
Check Trailer
Tire Pressure
Bearing Lube
Lights
Charge Battery
Clean & Wax Gel Coat
Clean Interior
Check All Systems
Blower
Bilge Pump
Navigation Lights
Interior Lights
When launching the boat for the rst time of the season,
carefully watch all gauges to ensure that the boat is not
overheating, the alternator is charging and the engine has
proper oil pressure.
NOTE: During the winter months, water is a boat’s
worst enemy. Always store the boat when the interior is
completely dry. Periodically check on the condition of the
stored boat.
Damage due to improper winterization IS NOT covered
under your boat’s warranty.
E-10 fuels require fuel stabilizers that are specifically
designed for E-10 fuels to help prevent moisture absorbtion,
phase separation and gasoline stabilization.
— 84
© 2016 Skier’s Choice, Inc.
Page 86
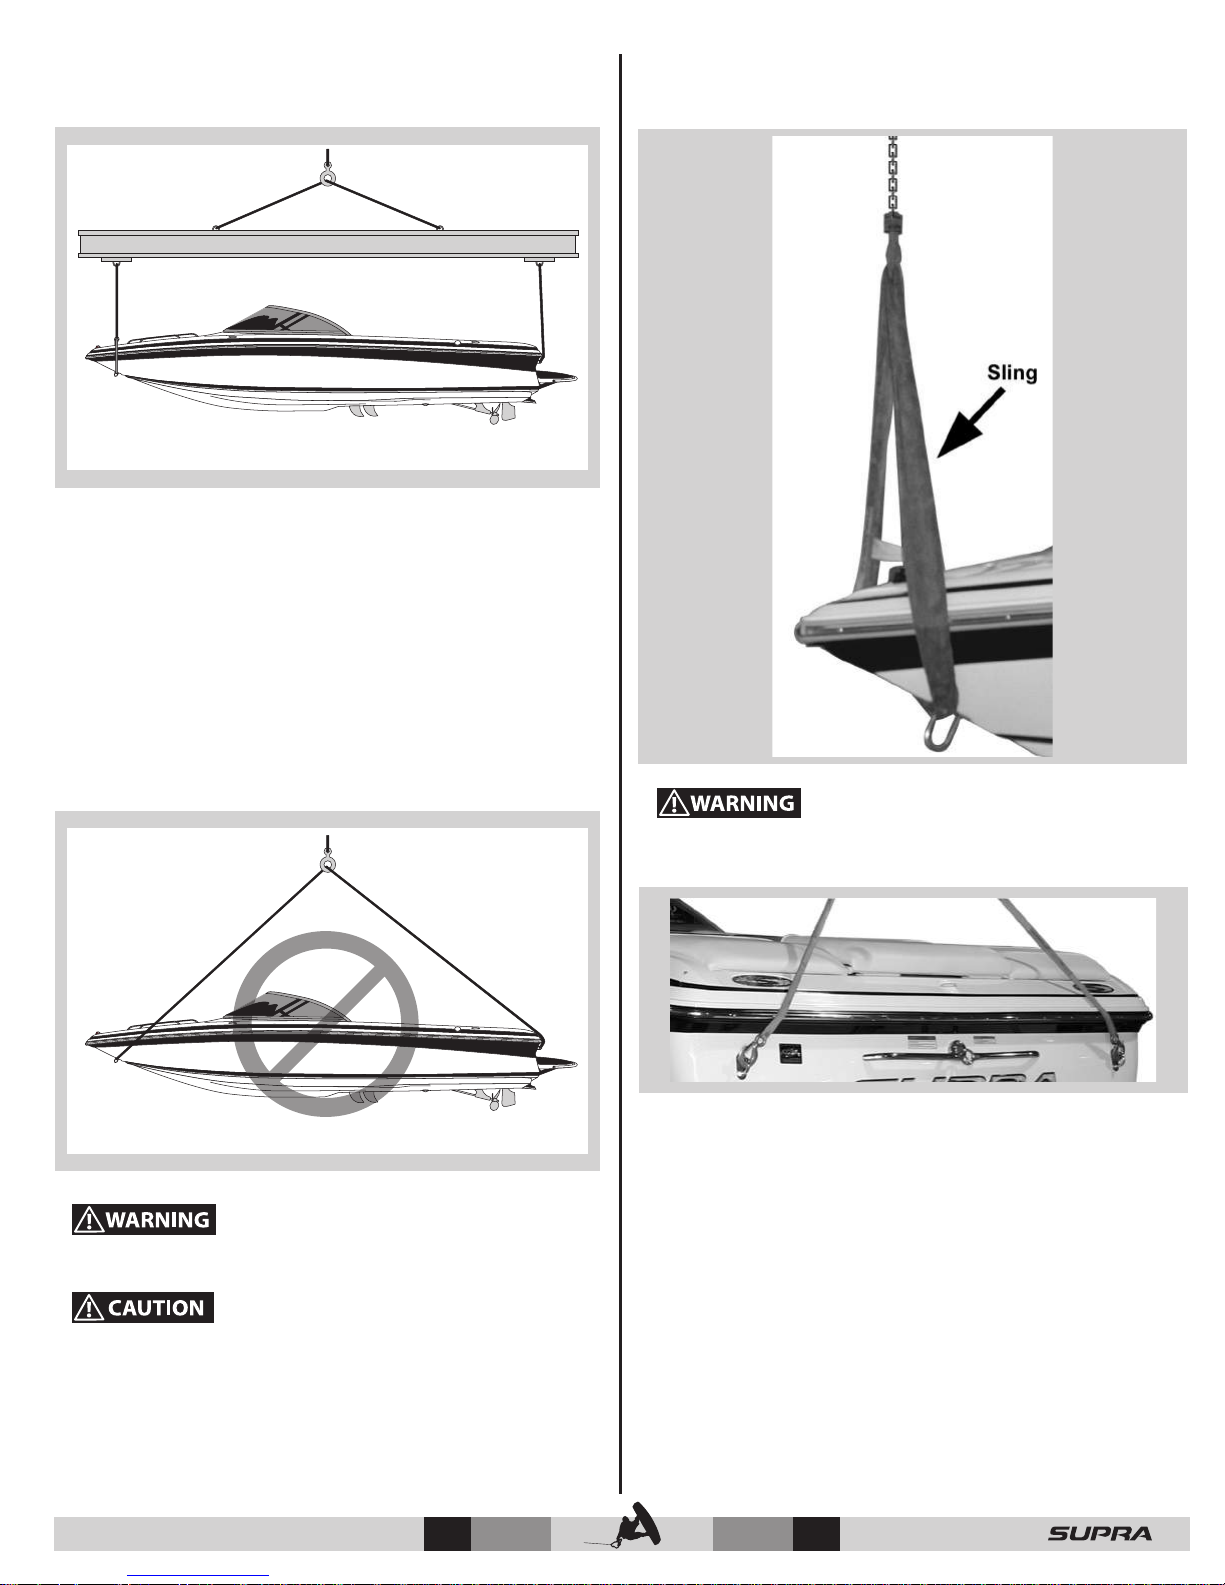
Temporary Hoisting
Correct Hoisting
If the boat ever needs to be hoisted, special attention should
be given to the following recommendations:
• Hoist the boat using a horizontal lifting bar only.
• Never attempt to lift the boat by means of a cable sling from
bow to stern lifting eyes.
• Hoist operator should slowly and smoothly lift the boat
without jerking to avoid damage to the lifting eyes.
Incorrect Hoisting
DO NOT use the ski pylon to hoist the boat.
Incorrect hoisting may invalidate the warranty on the
boat.
Use only a proper sized sling in the designated lifting rings
to hoist the boat.
NOTE: For boat houses, we highly recommend the use of a
lifting cradle. Cradle bunk design should mimic the bunk
design of the trailer.
© 2016 Skier’s Choice, Inc.
85 —
Page 87
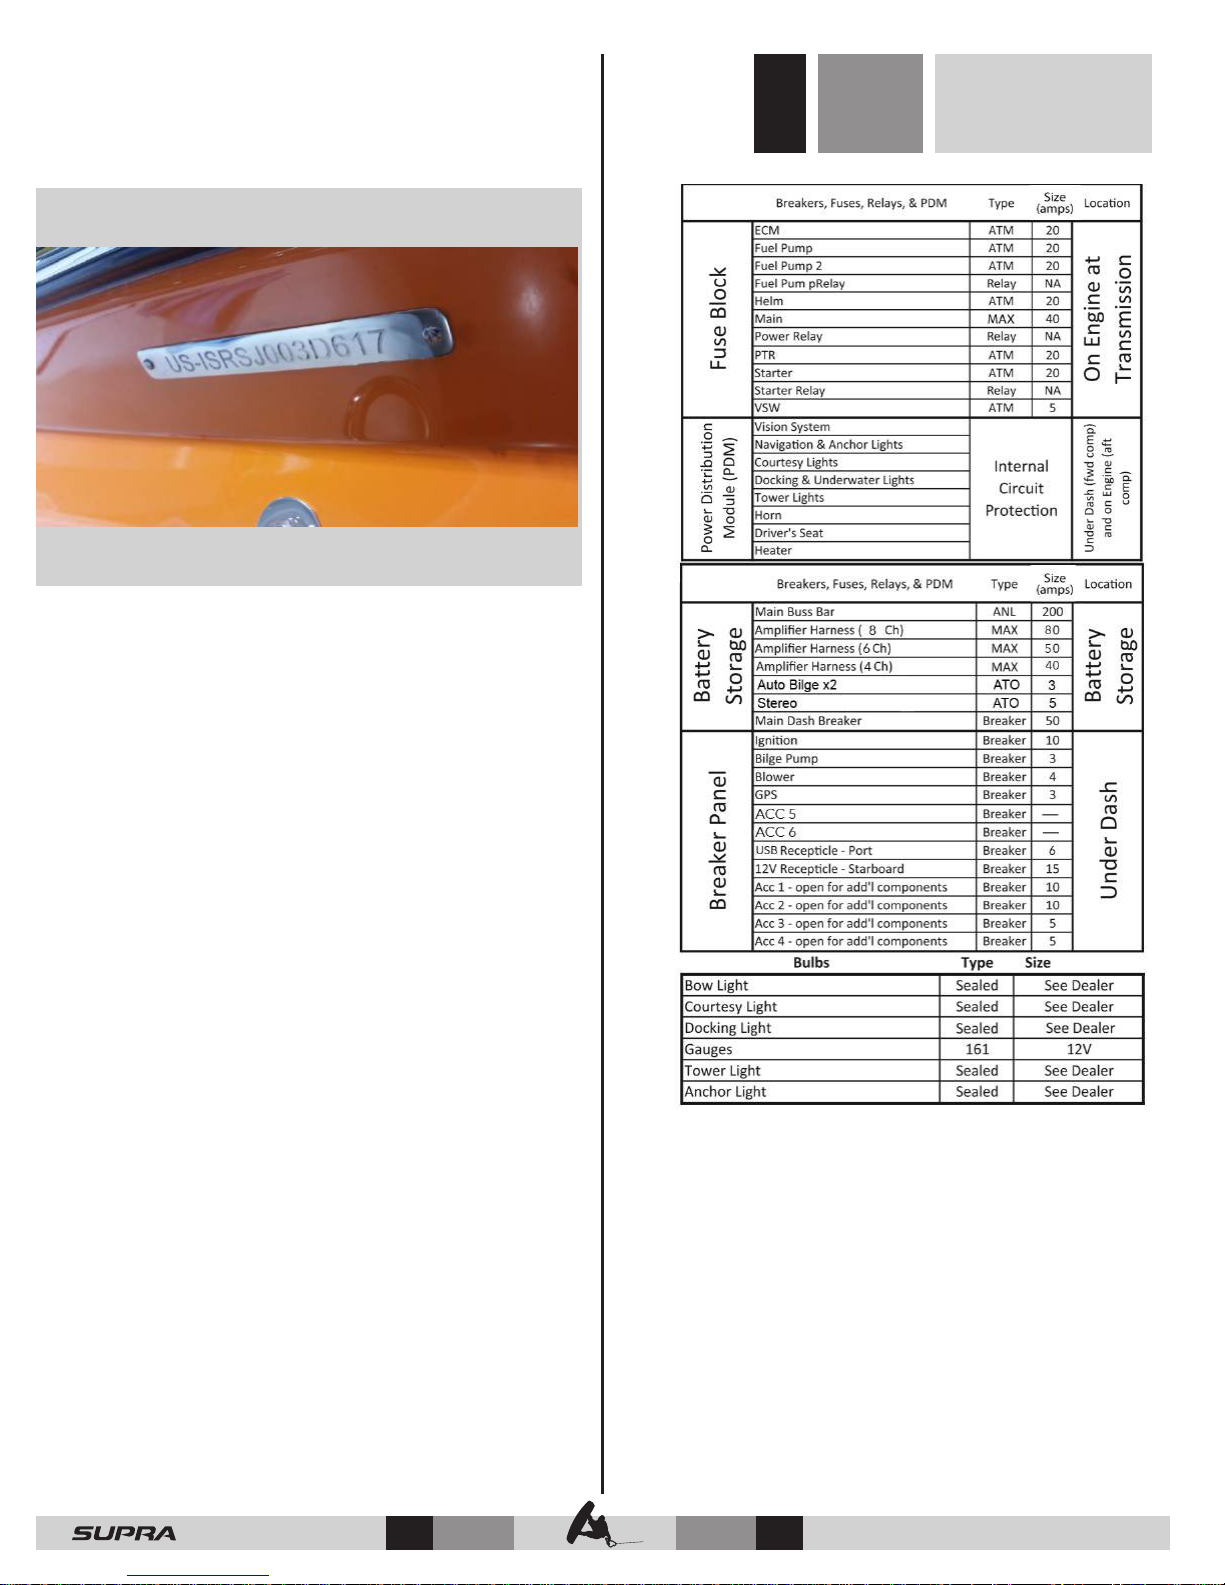
Identification Number
The hull identication number is located on the upper right
hand side of the transom below the rub rail.
Section 13
Technical Information
— 86
© 2016 Skier’s Choice, Inc.
Page 88
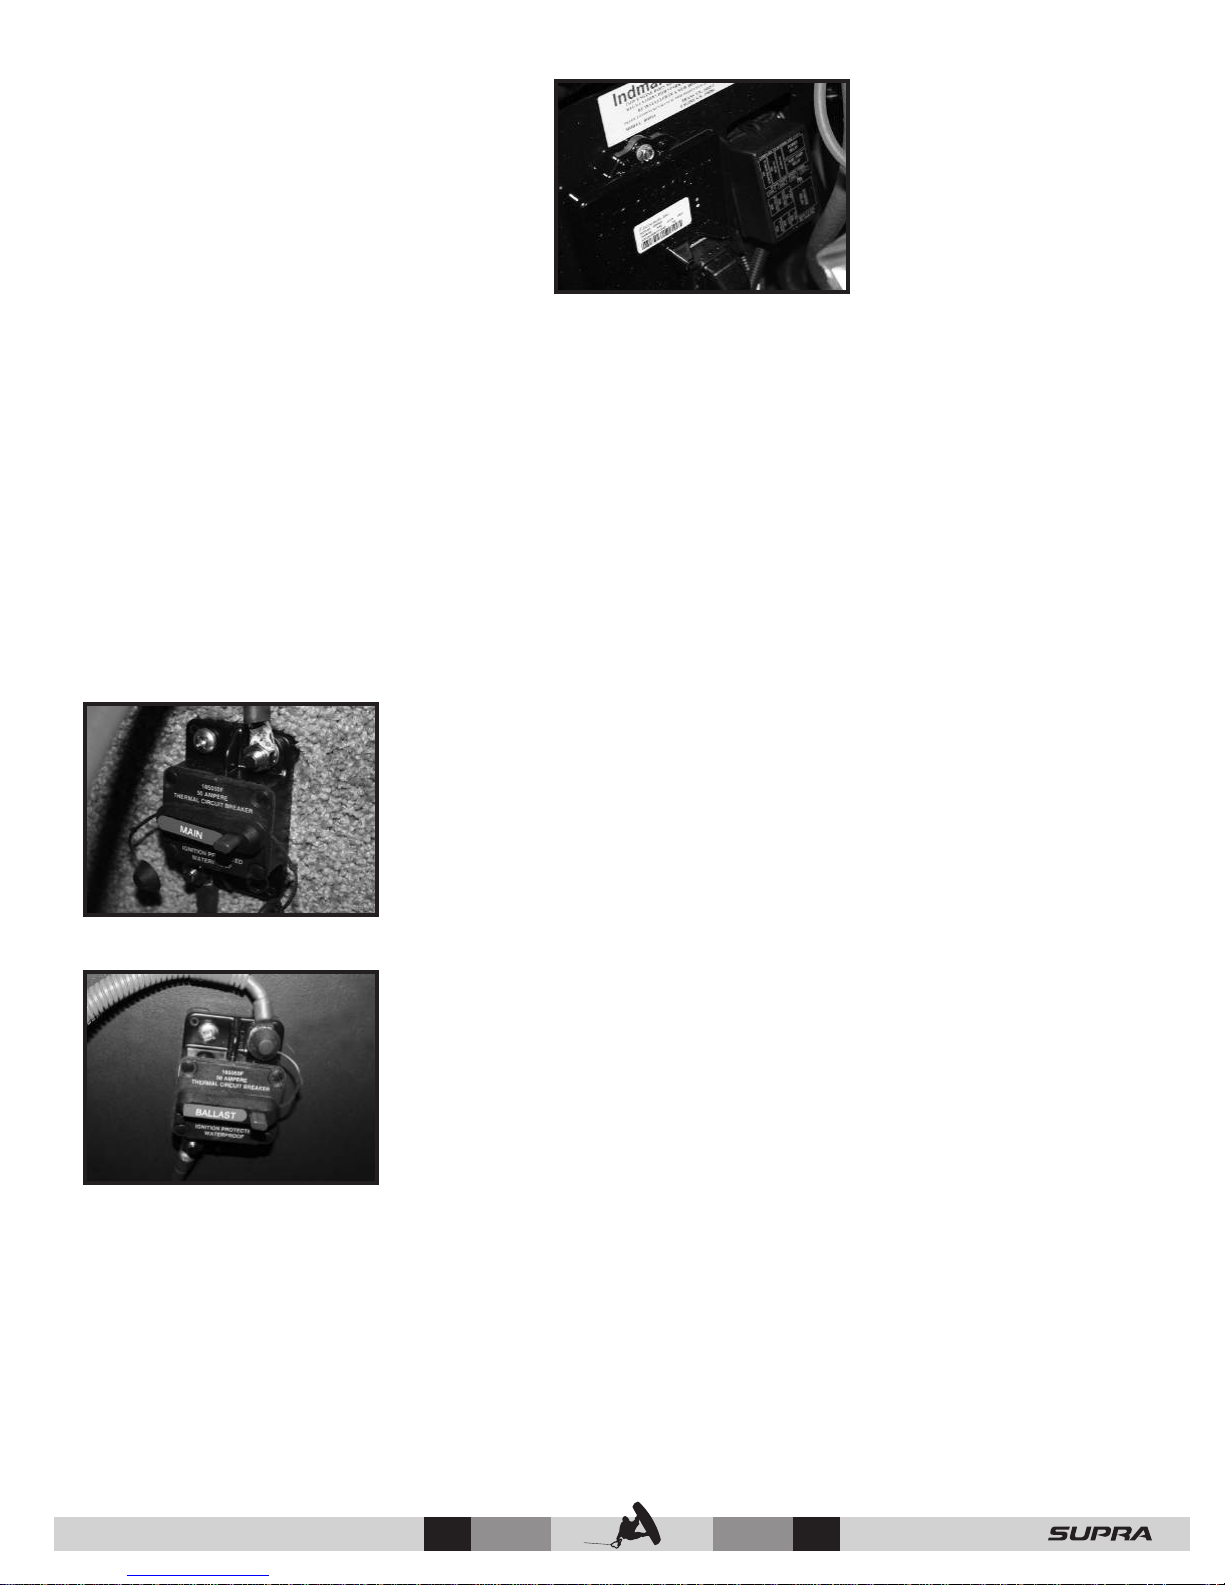
Fuse Panel - Top of Engine
The Power Distribution Module (PDM) has an internal circuit protection for the Vision system
and other components controlled through the Vision system. There are three PDM’s in the
2017 Supra models; two under the dash that controls the forward components on the Vision
system. The third PDM is located on the transom and controls the ballast, wake plate, and
underwater lights.
PDM Breaker
The power to each PDM is protected by its own circuit breaker. The
dash PDM has a breaker also under the dash. The circuit breaker for the
transom PDM is located inside the engine compartment.
To turn o the power to the PDM’s, manually press the red button and the circuit breaker
reset lever will ip down and the power to the PDM’s will be shut o. To reset the circuit
breaker, push the reset lever back up.
Main Dash Power-Circuit Breaker - Battery Connection
The power to the dash circuit is protected by a circuit breaker that is located in the
observer seat storage area near the battery.
To turn o the power to the dash, manually press the red button and the circuit breaker
reset lever will ip down and the power to the dash circuit will be shut o. To reset the
breaker, push the reset lever back up.
If all of the dash switches fail to work, reset the main dash power-circuit breaker.
Main Ballast Power-Circuit Breaker - Battery Connection
The power to the ballast pump circuit is protected by a circuit breaker that is located in
the engine compartment.
© 2016 Skier’s Choice, Inc.
© 2016 Skier’s Choice, Inc.
To turn o the power to the ballast pump, manually press the red button and the circuit
breaker reset lever will ip down and the power to the ballast circuit will be shut o. To
reset the breaker, push the reset lever back up.
87 —
Page 89
Section 14
Trailering Your Boat
Trailer & Towing
The trailer supplied with your Supra was designed especially
for the boat with your convenience in mind. Please be sure
that you have an appropriate tow vehicle before attempting to
trailer your boat. Your vehicle must be capable of towing 7,000
lbs. and must be tted with no less than a Class III (10,000 lb.
max.) trailer hitch.
Read the trailer towing section of your vehicle owner’s
manual before towing your trailer.
All Supra trailers require a 2” ball and a seven (7) round marine
grade trailer wiring connector. The standard height from the
ground to the top of the hitch ball should be about 20 inches.
With the trailer attached to the tow vehicle, the trailer should
stand approximately level.
Trailer Plug Wire Schematic
White: Ground
Green: Right Turn / Brake
Yellow: Left Turn / Brake
Brown: Running Lights
Blue: Reverse Lights
Prolong Trailer Life
The following guidelines will prolong the life of the boat
and trailer:
1. Always secure the boat to the trailer with tie-downs. Do not
place straps around fenders or lights.
2. Always verify that the winch hook is securely in the bow
eye, the strap is tight and the winch handle locked in place
before trailering.
3. Check the recommended pressure displayed on the side of
the tires and assure that it is maintained. Under-inated tires
could cause trailer sway and excessive tire wear.
4. Before use, please read all information supplied with the
trailer by the manufacturer (Bearing Buddy and hydraulic
brake actuator). Check wheel bearing grease.
5. Check wheel bearing lube.
6. See Trailer Owner’s Manual for Maintenance Schedule.
Inadvertent release of latch pin could result in injury.
— 88
© 2016 Skier’s Choice, Inc.
© 2016 Skier’s Choice, Inc.
Page 90
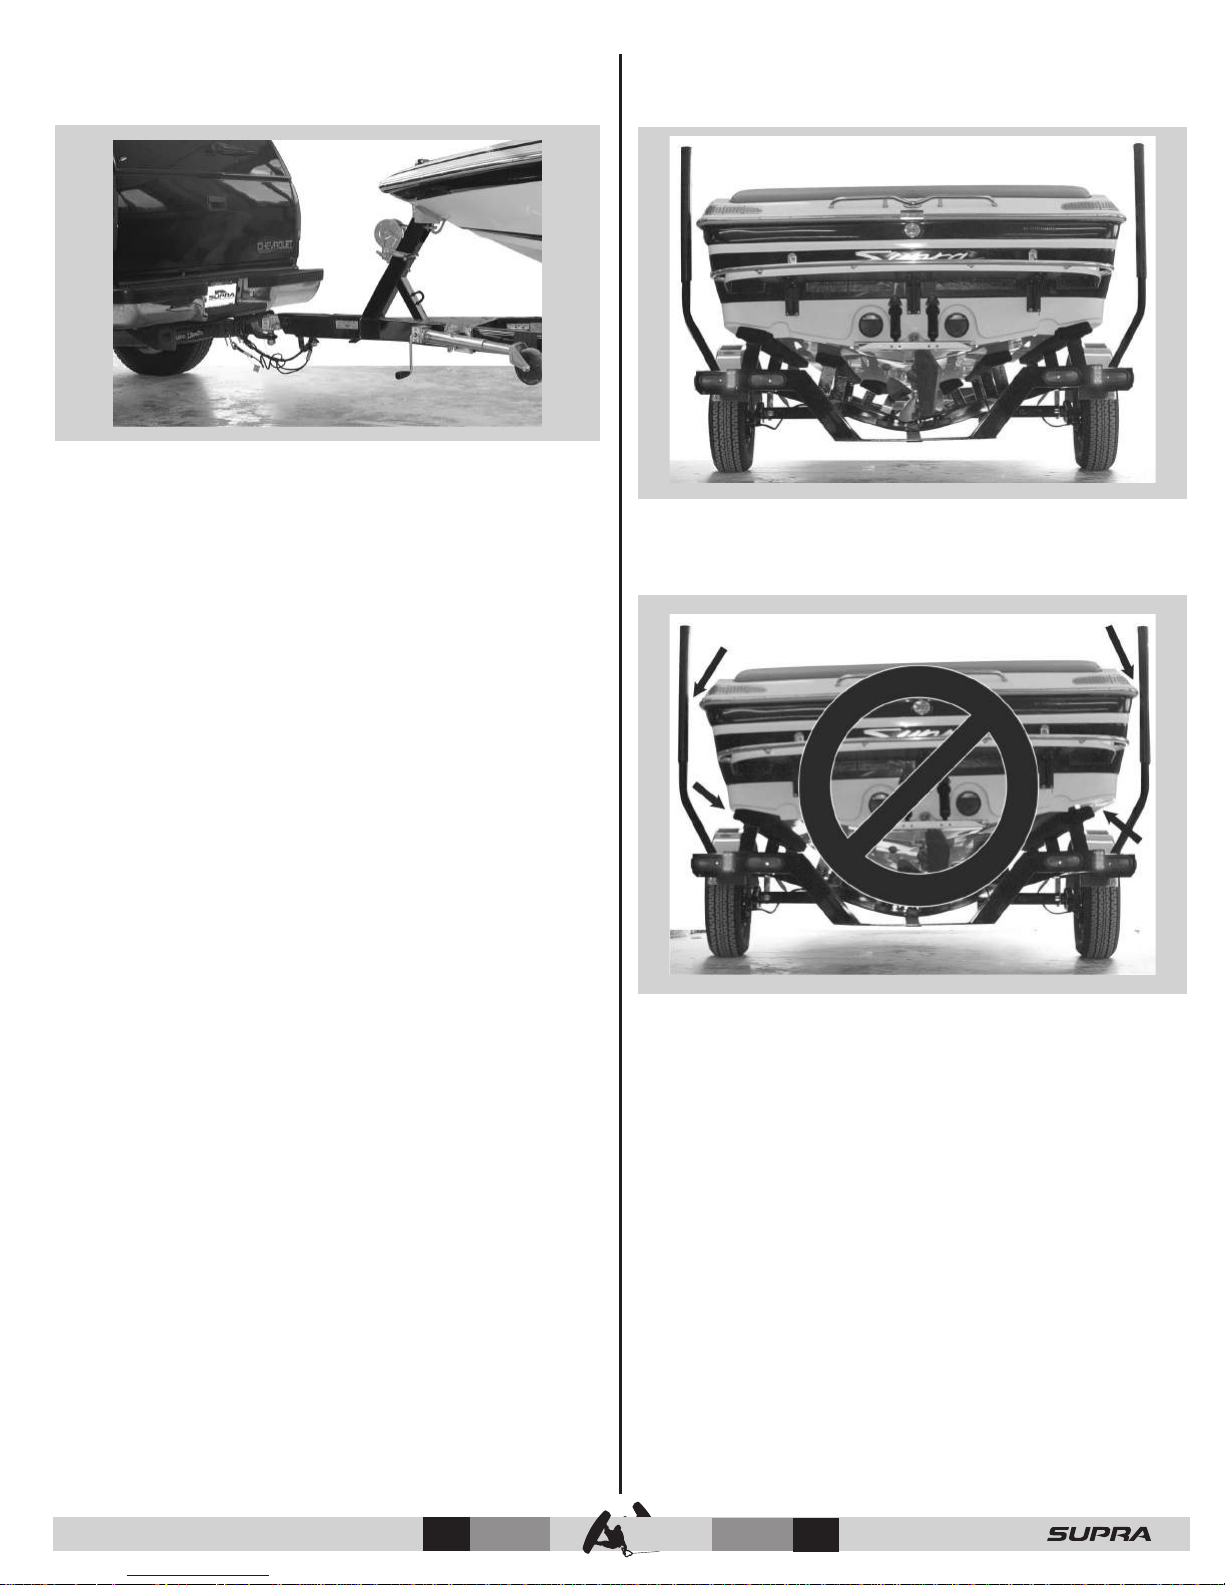
Connecting the Trailer
When connecting the trailer to your tow vehicle, use the
following procedure:
1. Raise the tongue with the trailer jack. Position the trailer
tongue directly over the 2” ball, and lower the jack until the
tongue goes all the way down over the ball.
2. Press down on the latch until it locks on the ball with a
“click.”
Trailer Alignment
Correct Alignment
When pulling the boat onto the trailer, be sure that it is centered
on the trailer.
Incorrect Alignment
NOTICE: If your hitch ball has an excessive flat spot on
top, the latch may not engage properly. If the latch does
not catch, check with your dealer or hitch installer before
trailering.
3. Insert the locking pin into the tongue. Lock pin hole is on
the side of the tongue.
4. When all weight is o the trailer jack, pull the jack lock pin
and rotate the jack to the horizontal position and re-lock
the pin.
5. Attach the safety cables to the tow vehicle hitch. Cross the
cables and wrap them around each other once or possibly
twice allowing just enough slack to permit tight turns of the
vehicle and trailer.
6. Plug the trailer lights connector to the vehicle harness.
7. Clip the brake lockout cable to the vehicle hitch.
The distance between the boat and the wheel runner board
should be equal on both sides.
© 2016 Skier’s Choice, Inc.
© 2016 Skier’s Choice, Inc.
89 —
89 —
Page 91
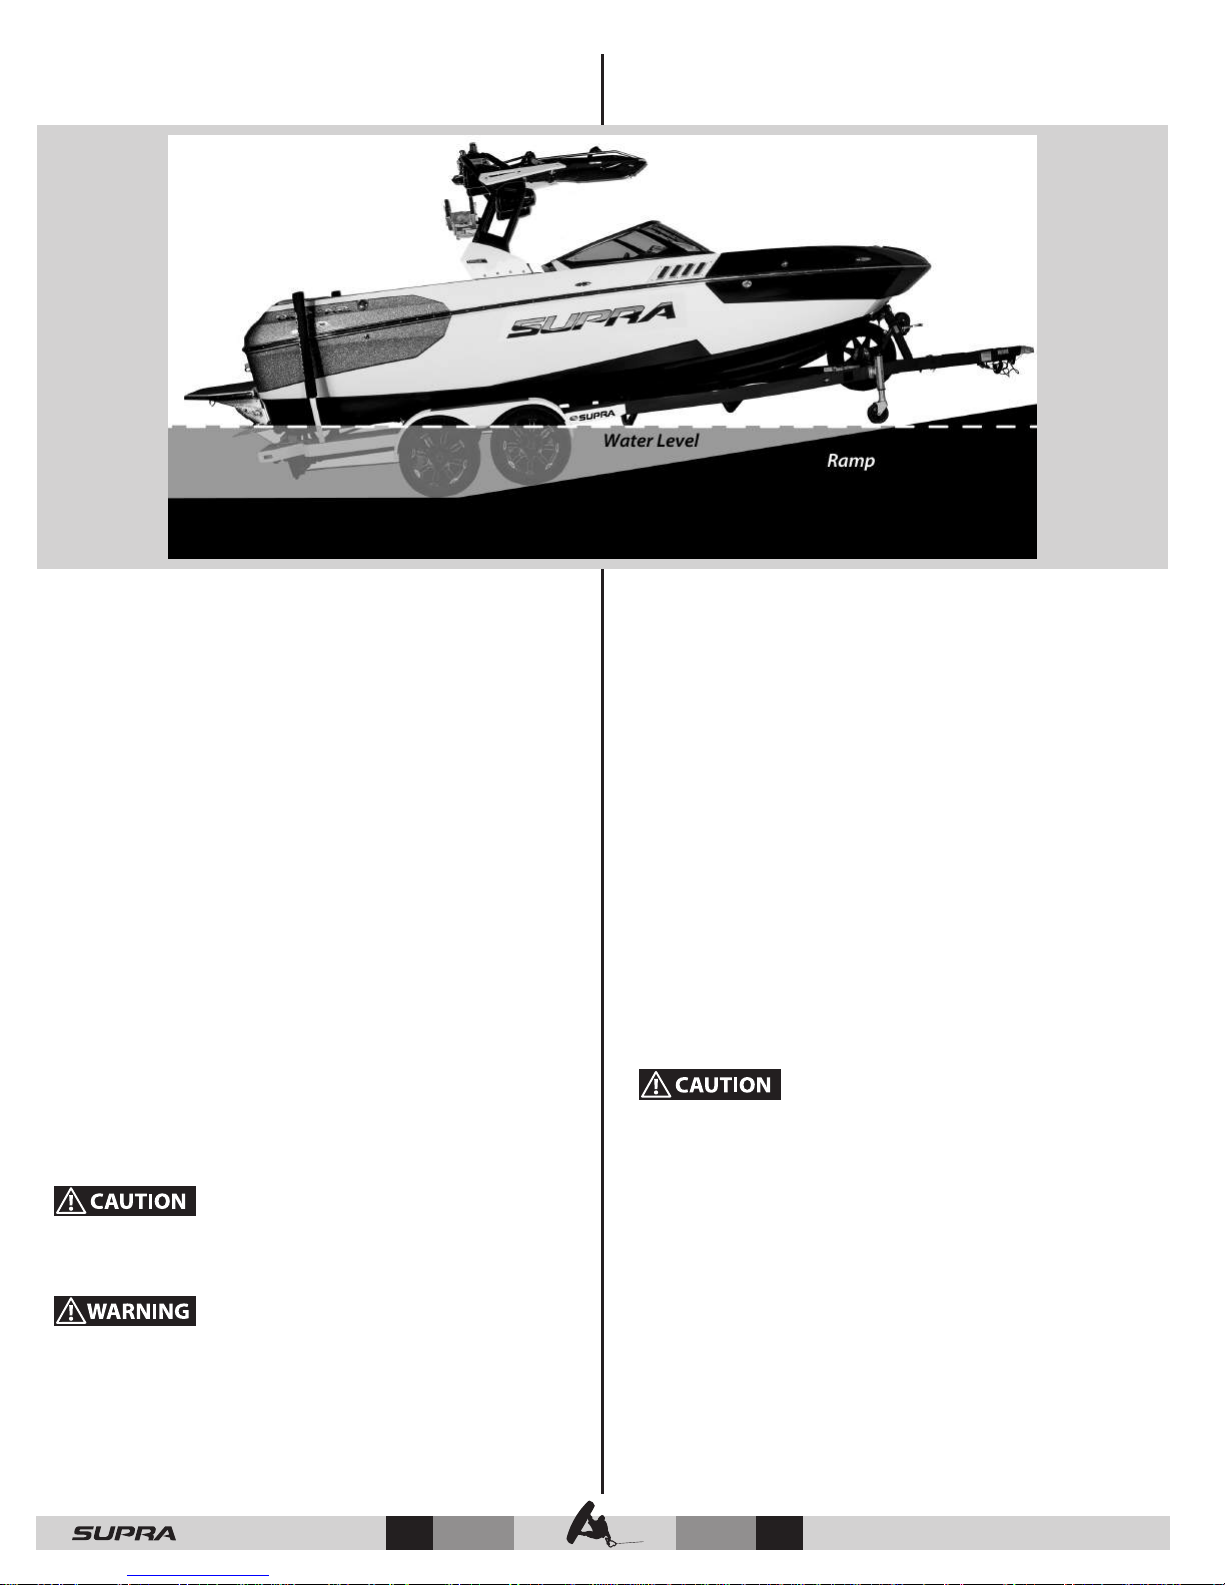
Unloading Procedure
Loading Procedure
To unload the boat, use the following procedure as a guide:
1. Make sure that all drain plugs are securely in place.
2. Unplug light cord before backing into the water.
3. With Bow Eye Hook fastened, back the trailer until the water
level is approximately 1 inch below the top of the trailer
fenders. NOTICE: Ramp slopes vary, so actual level of water
on trailer may be dierent. (NOTE: Caution on this page!).
4. Follow the cold start procedure recommended in this
manual.
5. After starting the engine, remove Bow Eye Hook.
6. With engine idling, center steering wheel, engage
transmission and slowly pull throttle into reverse. Ease back
on the throttle lever until the boat starts to move.
NOTE: DO NOT attempt to use excessive power to free the
boat from dry carpet runners. Power o of the trailer only
when the boat has oated free.
If the trailer is not submerged to the correct depth, the
bow of the boat could drop when powering o incorrectly,
possibly damaging the boat.
To load the boat on the trailer, position the trailer in the water
with approximately 1 inch of the top of the fender showing.
1. Idle/coast the boat onto the trailer using as little power as
possible, while keeping it centered between the guide poles.
2. Power slowly forward until the bow eye roller contacts.
3. Winch hook must be attached to bow eye and tightened
before trailering.
DO NOT Power onto the trailer during rough conditions!
Once correctly positioned on the trailer, switch off
ignition.
DO NOT OVER-POWER onto trailer or damage may
occur to the boat and/or the trailer!
The trailer must be positioned for the correct water depth
for loading or you may damage the boat. Varying ramp
angles require dierent procedures. In general, the steeper
the ramp, the more shallow the trailer should be positioned
in the water. Your local dealer can help you understand this,
should you require additional assistance.
Roll driver’s side window of tow vehicle down prior to
backing down ramp. Should the vehicle slip into the water,
the driver can escape through open window.
NOTE: Because your Supra is a true inboard, when backing
up, the stern will have a tendency to drift left or right
depending on propeller rotation.
— 90
© 2016 Skier’s Choice, Inc.
Page 92

Section 15
Limited Warranty
SKIER’S CHOICE 2017 SUPRA® BOAT LIMITED WARRANTY
Skier’s Choice, Inc. (“Skier’s Choice”) provides the following manufacturer’s limited warranty, subject to the remedies, conditions,
exclusions, and limitations set forth below, on all Supra® brand water sports boats sold as new by our authorized dealers. (“Covered
Boats”). Indmar Marine Engines provides a manufacturer’s limited warranty (the “Engine Warranty”) for the engine of each Covered
Boat. Boatmate Trailers provides a manufacturer’s limited warranty (the “Trailer Warranty”) for the trailer sold by our authorized dealers
with each Covered Boat. For specic information on the Engine Warranty and the Trailer Warranty, please refer to the individual Indmar
and Boatmate limited warranty policies. Exclusions and limitations apply.
Limited Warranty. Skier’s Choice warrants to the original retail purchaser (the “First Owner”) that the components and parts
manufactured by Skier’s Choice described below (the “Covered Components”) of each Covered Boat are free from any defects in material
and workmanship, under normal use and when operated and maintained according to Skier’s Choice’s instructions for the applicable
Warranty Periods (dened below). The Skier’s Choice warranty does not cover the engine and trailer sold with a Covered Boat, which
are separately warranted under the Engine Warranty and the Trailer Warranty, respectively.
Limited Five-Year Warranty Period on Covered Components. This Limited Warranty applies to Covered Components other than
the deck, hull, oor, and stringers for a period of ve years (the “Five-Year Warranty Period”) from the original date of purchase by the
First Owner (the “Original Purchase Date”), except that the VISION Touch System has a Limited Warranty for a period of three years.
Exclusions apply.
Limited Lifetime Period Structural Warranty. This Limited Warranty applies to the deck, hull, oor (excluding carpet), and stringers
for as long as the First Owner owns the Covered Boat (the “Lifetime Warranty Period”). Exclusions apply.
Limited One-Year Warranty Period on Gel Coat. This Limited Warranty applies to the gel coat for a period of one year (the “One- Year
Warranty Period”) from the original date of purchase by the First Owner (the “Original Purchase Date”). The gel coat warranty is not
transferable. Exclusions apply.
Warranty Transfer. The First Owner of a Covered Boat may assign and transfer (“Warranty Transfer”) the Covered Components Warranty
and the Structural Warranty to the second owner (the “Second Owner”) subject to the following conditions: 1) the sale or conveyance
by the First Owner occurs within ve years after the Original Purchase Date; 2) an Authorized Supra® Dealer inspects the Covered Boat
within 14 days after the sale or conveyance by the First Owner to the Second Owner; and 3) the Warranty Transfer fee in eect at the
time of the sale or conveyance from the First Owner to the Second Owner is paid to the inspecting Authorized Supra® Dealer. Skier’s
Choice may refuse to accept the Warranty Transfer if the dealer inspection reveals that the Covered Boat has been damaged or abused.
If the sale or conveyance by the First Owner occurs more than ve years after the Original Purchase Date, then this Limited Warranty
(the Structural Warranty) shall be void as of the date of transfer and shall not be transferable to the Second Owner. Only one Warranty
Transfer within the applicable ve year time period will be accepted by Skier’s Choice, and any Structural Warranty transferred to a
Second Owner will terminate ten years from the Original Purchase Date. This Limited Warranty immediately terminates without notice
if and when the Second Owner sells or transfers the Covered Boat to a subsequent owner, and this Limited Warranty shall then be null
and void. Warranty Transfer of the engine must be completed through Indmar. Warranty transfer of the trailer must be completed
through Boatmate Trailers.
If the Covered Boat is: 1) repossessed from the First Owner or the Second Owner; 2) purchased at auction (bank auction, online auction,
auction house, etc.); 3) sold to or purchased from a salvage yard; or 4) sold to or purchased from an insurance company that obtained
the Covered Boat as a result of an insurance claim then the Limited Warranty terminates and is null and void.
DISCLAIMER AND LIMITATION OF IMPLIED WARRANTIES
ALL OTHER WARRANTIES AND REPRESENTATIONS, EXPRESS OR IMPLIED, ARE SUPERSEDED BY THIS LIMITED WARRANTY. AND, SKIER’S
CHOICE DISCLAIMS, AND THE OWNER HEREBY EXPRESSLY WAIVES, TO THE MAXIMUM EXTENT ALLOWED BY APPLICABLE LAW, ANY AND
ALL OTHER WARRANTIES, CONDITIONS OR REPRESENTATIONS OF ANY KIND, INCLUDING, BUT NOT LIMITED TO, IMPLIED WARRANTIES
OF MERCHANTABILITY AND FITNESS FOR A PARTICULAR PURPOSE, OTHER THAN THOSE WARRANTIES WHICH ARE IMPLIED BY, AND
CANNOT BE EXCLUDED, RESTRICTED, OR MODIFIED UNDER APPLICABLE LAW. THE TERM OF ANY IMPLIED WARRANTIES THAT CANNOT
BE DISCLAIMED UNDER APPLICABLE LAW, INCLUDING, BUT NOT LIMITED TO, IMPLIED WARRANTIES OF MERCHANTABILITY AND
FITNESS FOR A PARTICULAR PURPOSE, SHALL BE LIMITED TO THE DURATION OF THE EXPRESS WARRANTY PERIODS STATED HEREIN.
SOME STATES DO NOT ALLOW THE EXCLUSION OF IMPLIED WARRANTIES AND/OR DO NOT ALLOW LIMITATIONS ON THE AMOUNT OF
TIME AN IMPLIED WARRANTY LASTS, SO THE ABOVE LIMITATIONS MAY NOT APPLY TO YOU. HOWEVER, IN THE EVENT THAT APPLICABLE
STATE OR COUNTRY LAW DOES NOT ALLOW EXCLUSION OF IMPLIED WARRANTIES BUT SETS FORTH THAT IMPLIED WARRANTIES MAY
BE LIMITED IN DURATION, THIS LIMITED WARRANTY LIMITS THE DURATION OF IMPLIED WARRANTIES TO THE TIME PERIOD PROVIDED
IN THIS LIMITED WARRANTY OR APPLICABLE STATE LAW, WHICHEVER IS SHORTER. THIS LIMITED WARRANTY GIVES YOU SPECIFIC LEGAL
RIGHTS. YOU MAY HAVE OTHER RIGHTS WHICH VARY FROM STATE TO STATE OR COUNTRY TO COUNTRY. THIS LIMITED WARRANTY DOES
NOT AFFECT THE RIGHTS YOU MAY HAVE UNDER LAWS IN OTHER COUNTRIES.
© 2016 Skier’s Choice, Inc.
91 —
Page 93

EXCLUSIONS
Skier’s Choice boats are manufactured from high-quality materials and components by skilled team members. Conditions outside of Skier’s
Choice control, however, require limitations and exclusions from coverage under this Limited Warranty. Therefore, claims arising from or
relating to the following are NOT covered by this Limited Warranty and Skier’s Choice disclaims any liability or obligation to the First Owner
or the Second Owner, and any other person or party, with respect to the following:
1. Defects in or damage to a Covered Boat caused by the engine, trailer, or any components or parts (including, but not limited to, the bilge
pump) not manufactured by Skier’s Choice. (Note: These excluded items may be covered by the Engine Warranty, the Trailer Warranty, or
separate warranty from the part or component manufacturer);
2. Defects in a Covered Boat that has been sold or transferred by the First Owner and the Warranty Transfer conditions have not been timely
satised;
3. Hardware or other components fastened or adhered to the hull, deck, oor, or stringers of the Covered Boat;
4. Normal maintenance and upkeep relating to the Covered Boat or any part thereof, including, but not limited to, alignment, adjustments,
connectors, tune-ups and wear items, such as, shaft packing, belts, hoses, lters, seals, gaskets, and strut bushing;
5. Damage to or malfunction of a Covered Boat, or any component thereof, resulting from lack of maintenance, improper maintenance,
impact, misuse, negligence, collision, allision, accident, or delay in repair;
6. Damage caused by re, theft, freezing, vandalism, explosion, lightning, wind, hail storms, ooding, natural disasters, or Acts of God;
7. Equipment installed, repaired or replaced by anyone other than an Authorized Supra® Dealer or the Skier’s Choice factory or factory
representative;
8. Damage caused by any dealer-installed or Owner-installed options or accessories;
9. Damage caused by use of the Covered Boat from: racing, speed or commercial competitions; performance demonstrations;
ski schools; rental, charter, or other commercial uses; or military or industrial purposes;
10. Damage caused by improper alteration or modication to the Covered Boat or any of its component parts or accessories,
including any damage caused by alteration, modication, repair, or replacement so as to increase the cubic inch capacity or
horsepower output of the engine and Covered Boat from what was originally manufactured;
11. Damage caused by use of improper or contaminated materials or substances, including, but not limited to fuel, lubricants, or coolants;
12. Damage caused by failure to timely comply with any recall or request for repair, including the failure to observe any
instructions regarding use or maintenance pending completion of recall repairs;
13. Damage caused by improper storage or support of the Covered Boat on davits, a hoist or cradling system, or boat lift of any kind;
14. Damage caused by failure to maintain the Covered Boat in accordance with the maintenance provisions in the Owner’s Manual;
15. Speed, range, fuel consumption and other performance characteristics of the Covered Boat because they are estimated and
may vary;
16. Damage to or defects in paints, varnishes, gel coat surfaces and colors, nish distortions, chrome plated or anodized nishes,
oor covers, and any other surface coatings;
17. Gel coat discoloration, blisters, bubbles, or fading, including, but not limited to, those which may result from the Covered
Boat being left in the water for long periods of time, or the failure to perform maintenance on the gel coat in a timely and
proper manner in accordance with the Owner’s Manual;
18. Upholstery cracks, mold or mildew, stains, fading, or tears resulting from use, the failure to perform maintenance on the upholstery in
a timely and proper manner in accordance with the Owner’s Manual, impact, misuse, negligence, delay in repair, use of
improper cleaners or conditioners;
19. Changes, revisions, or improvements made to the design, manufacture, options, accessories, or warranties of Skier’s Choice
boats from previous boats, including the Covered Boat;
20. Any Covered Boat purchased from a dealer in another country, where the primary use of the boat will require the boat to cross
an international border, except to the extent otherwise expressly provided in a separate written agreement between the
First Owner and Skier’s Choice.
21. Corrosion due to containments, environmental, or otherwise.
SOLE REMEDY
THE SOLE AND EXCLUSIVE REMEDY OF THE FIRST OWNER AND, IF APPLICABLE, THE SECOND OWNER, IS THE REPAIR OR REPLACEMENT,
AT THE OPTION OF SKIER’S CHOICE, OF THE DEFECTIVE COVERED COMPONENT PARTS OF A COVERED BOAT AS PROVIDED HEREIN. IN NO
EVENT, TO THE MAXIMUM EXTENT ALLOWED BY APPLICABLE LAW, SHALL SKIER’S CHOICE BE LIABLE FOR ANY INCIDENTAL, CONSEQUENTIAL,
SPECIAL, INDIRECT, PUNITIVE OR EXEMPLARY DAMAGES OR LOST PROFITS ARISING OUT OF THE USE OR INABILITY TO USE THE COVERED
BOAT OR ANY COVERED COMPONENT PART THEREOF, OR FOR ANY BREACH OF THIS LIMITED WARRANTY OR OTHERWISE. SOME STATES AND
COUNTRIES, HOWEVER, DO NOT ALLOW THE EXCLUSION OR LIMITATION OF INCIDENTAL OR CONSEQUENTIAL DAMAGES, SO THE ABOVE
LIMITATIONS OR EXCLUSIONS MAY NOT APPLY TO YOU.
Any Covered Component returned during the applicable Warranty Period to any Authorized Supra® Dealer will be repaired or replaced at
the sole option of Skier’s Choice’s provided that the following conditions apply:
1. Only the Covered Components that are declared defective upon examination by or for Skier’s Choice will be repaired or replaced
under this Limited Warranty;
2. Transportation of the Covered Boat or Covered Components to the Authorized Supra® Dealer, or, if necessary, the Skier’s Choice
factory, must be pre-paid by the Covered Boat Owner;
3. Notice of any claim or defect under this Limited Warranty must be provided to an Authorized Supra® Dealer no later than sixty (60)
days after the Owner becomes aware of the defect;
4. The Covered Boat was purchased at a dealership authorized by Skier’s Choice to distribute the boat model in the country in which
the sale to the First Owner occurred.
© 2016 Skier’s Choice, Inc.
© 2016 Skier’s Choice, Inc.
© 2016 Skier’s Choice, Inc.
92 —
Page 94

Notication of Claim. Notication of a claim or defect in a Covered Boat must be made during the applicable Warranty Period directly
to an Authorized Supra® Dealer within 60 days after the Owner becomes aware of the defect. Information needed for processing a
claim includes 1) name and address of the Owner; 2) serial number of the boat; 3) Original Purchase Date; 4) detailed explanation of the
defect; and (5) estimated repair cost. Repair or replacement cannot be made until all of this information is received by an Authorized
Supra® Dealer. If a Covered Boat has been at an Authorized Supra® Dealer for 15 days, or any warranty claim was not remedied in one
repair attempt, an Owner must notify Skier’s Choice directly. An Owner is responsible for providing Skier’s Choice written notice of any
warranty claims pending or discovered prior to the expiration of the Warranty Period.
Repair and Replacement. In case of a defective Covered Component for which a claim has been properly made during the applicable
Warranty Period, Skier’s Choice will repair or replace, at its sole discretion, the Covered Component within a reasonable time period of
receipt, unless otherwise required by law, by an Authorized Supra® Dealer, or, if necessary, the Skier’s Choice factory. Covered Components
replaced or repaired pursuant to this Limited Warranty shall not extend the original Warranty Period, unless otherwise required by law.
The repair or replacement of Covered Components will be made by Skier’s Choice without charge to the Owner for parts or labor. The
replacement or repair of the defective part or component as stated in this Limited Warranty shall be the sole and exclusive remedy of
the Owner and the sole liability of Skier’s Choice under this Limited Warranty and any implied warranties. Acceptance of any returned
component by an Authorized Supra® Dealer or Skier’s Choice shall not be deemed an admission that the component is defective.
SKIER’S CHOICE’S LIABILITY SHALL BE LIMITED SOLELY AND EXCLUSIVELY TO THE REPAIR OR REPLACEMENT OF THE COVERED BOAT OR
COVERED COMPONENT FOUND TO BE DEFECTIVE AND REPORTED DURING THE APPLICABLE WARRANTY PERIOD. IN NO EVENT, SHALL
SKIER’S CHOICE’S ULTIMATE LIABILITY EXCEED THE FAIR MARKET VALUE OF THE COVERED COMPONENT OR THE COVERED BOAT FOUND
TO BE DEFECTIVE AND REPORTED DURING THE APPLICABLE WARRANTY PERIOD. SOME STATES AND COUNTRIES, HOWEVER, DO NOT
ALLOW THE EXCLUSION OR LIMITATION OF LIABILITY, SO THE ABOVE LIMITATIONS MAY NOT APPLY TO YOU.
No third party beneciaries. This Limited Warranty does not create any right or benet for any third party and is for the sole benet
of the First Owner and, if applicable after a valid Warranty Transfer, the Second Owner.
OTHER LIMITATIONS
THE DEALER IS NOT THE AGENT OF SKIER’S CHOICE AND SKIER’S CHOICE DOES NOT AUTHORIZE THE DEALER, OR ANY OTHER PERSON,
TO ASSUME ON BEHALF OF SKIER’S CHOICE ANY LIABILITY, OBLIGATION OR EXPENSE INCURRED IN THE COURSE OF REPAIRING ITS
PRODUCTS OTHER THAN THOSE EXPRESSLY AUTHORIZED IN THIS LIMITED WARRANTY. THE DEALER MAY NOT EXTEND OR IN ANY
WAY CHANGE OR AMEND THIS LIMITED WARRANTY, NOR CAN THE DEALER MAKE OR ALTER THIS LIMITED WARRANTY OR MAKE ANY
REPRESENTATIONS ON BEHALF OF SKIER’S CHOICE.
No advice or communication of any nature by Skier’s Choice or its representatives shall modify or extend the terms or scope of this
Limited Warranty, nor can a Skier’s Choice representative make any representation on behalf of Skier’s Choice that in anyway modies
the terms or scope of this warranty, except as authorized in writing by the Chief Executive Ocer (“CEO”) or President of Skier’s Choice.
ANY ACTION FOR BREACH OF WARRANTY AGAINST SKIER’S CHOICE SHALL BE BARRED UNLESS IT IS COMMENCED WITHIN ONE YEAR
FROM THE DATE OF ACCRUAL OF SUCH CAUSE OF ACTION. SOME STATES OR COUNTRIES MAY NOT ALLOW THE APPLICABLE STATUTE
OF LIMITATIONS FOR BREACH OF WARRANTY TO BE REDUCED, SO THIS PROVISION MAY NOT APPLY TO YOU.
This Limited Warranty shall be modied in its application and enforcement to the extent restricted, prohibited, or modied by local
law to conform to applicable law.
The invalidity or unenforceability of any one or more of the provisions of this Limited Warranty herein shall not aect the validity and
enforceability of other provisions.
AUSTRALIAN CONSUMERS ONLY
Warranty claims under this Limited Warranty may be sent to Ride Australia Pty Ltd., 245 Princes Highway PO Box 1454 Nowra, NSW, Australia
2541 (Tel: +61 2 4422 4477) [email protected]
The benets to the consumer given by this Limited Warranty are in addition to other rights and remedies of the consumer under a law in
relation to the goods to which the warranty relates.
This Limited Warranty does not cover any expenses that you may incur claiming the warranty.
Our goods come with guarantees that cannot be excluded under the Australian Consumer Law. You are entitled to a replacement or refund
for a major failure and compensation for any other reasonably foreseeable loss or damage. You are also entitled to have the goods repaired
or replaced if the goods fail to be of acceptable quality and the failure does not amount to a major failure.
Skier’s Choice may be contacted at:
© 2016 Skier’s Choice, Inc.
© 2016 Skier’s Choice, Inc.
© 2016 Skier’s Choice, Inc.
Skier’s Choice, Inc.
1717 Henry G. Lane Street Maryville, TN 37801
Toll Free Tel: 1-800-970-3744
Local Tel: (865) 983-9924 Fax: (865) 983-9950
International Tel: +1 (865) 983-9924
Email: [email protected]
93 —
Page 95

Owner’s Responsibility
1. Before operating your Supra, it is necessary to read and fully
understand this Owner’s Manual and all other information
delivered with the boat.
2. It is the owner’s responsibility to take the boat to an
authorized Supra dealer to obtain warranty service.
3. It is the owner’s responsibility to properly operate and
maintain the boat in accordance with this manual and all
other information delivered with the boat.
4. The owner should keep maintenance records, should it be
necessary to show that required maintenance has been
performed on the boat.
Dealer’s Responsibility
1. The Dealer should provide the buyer with an adequate
orientation in the general operation of the boat and review
all systems and accessories included with the boat.
2. The Dealer should deliver a complete owner’s manual packet
with the boat consisting of Owner’s Manual, Registration,
Engine Manual, Stereo Manual, Supra Warranty and all
warranties for separately warranted items aboard the boat.
3. The Dealer should review all warranty information with the
buyer and assist in lling out warranty cards if necessary.
4. The Dealer should ensure that any information or obligation
from either Skier’s Choice, Inc. or from the dealership is clearly
understood by the buyer.
5. The Dealer should instruct the buyer in obtaining local
service and out-of-area service for a Supra boat.
Customer Assistance
The sta at Skier’s Choice, Inc. is concerned with your complete
satisfaction. This includes the prompt resolution of any problems
that may arise during the warranty period. Normally, problems
encountered may be eciently and eectively resolved by your
Supra Dealer. However, if a problem cannot be handled by the
Dealer or if a solution is not satisfactory to you as an Owner,
please follow these steps to get the matter resolved:
STEP ONE
Discuss the problem with a member of your Supra Dealer’s
management sta. It is most likely that the problem will be
resolved at this level.
STEP TWO
If the Dealer management does not resolve the problem to
your satisfaction, please have the problem and all action taken,
documented by the Dealer, then contact the factory Customer
Service Representative at Skier’s Choice, Inc.:
Skier’s Choice, Inc.
1717 Henry G. Lane Street
Maryville, TN 37801
Toll Free: 800-970-3744
Tel: (865) 983-9924 Fax: (865) 983-9950
Describe the original problem in detail to the Customer
Service Representative. Be prepared to furnish appropriate
documentation and the reasons why service by the Dealer
was unsatisfactory. If further action is required to resolve the
problem, the Customer Service Representative will dictate the
appropriate action.
STEP THREE
Finally, if after following these steps and providing
documentation and after obtaining necessary authorization
from the Customer Service Representative to take additional
action, the problem is still not resolved to your satisfaction,
the President of Skier’s Choice, Inc. will personally review
the problem and make a determination concerning nal
resolution.
Watersports Responsibility Code
Be aware that there are elements of risk in boating, skiing, and riding that
common sense and personal awareness can help reduce. Know your ability
level and stay within it.
To increase your enjoyment of the spor t follow the “Watersports Responsibility
Code”.
It is your responsibility to:
• Familiarize yourself with all applicable laws, the risks inherent in the sport, and
the proper use of equipment.
• Know the waterways where you will be skiing or riding. Do not ski or ride in
shallow water, near shore, docks, pilings, swimmers, or other watercraft.
• Always have a person other than the boat driver as an observer and agree on
hand signals before starting.
• Always wear a U.S. Coast Guard type III (PFD) vest.
• Read your owner’s manual and inspect your equipment prior to use.
• Ski or ride within your limits. Always ski or ride in control and at speeds
appropriate for you ability.
• Always turn ignition o when anyone is near watercraft power drive unit.
• Carbon Monoxide (CO) poisoning from engine exhaust may cause injury or
death. Never “Platform Drag” or touch a swim platform while the engine is
running.
• Do not operate watercraft, ski or ride under the inuence of alcohol or drugs.
• Water Sports Industry Association
— 94
© 2016 Skier’s Choice, Inc.
© 2016 Skier’s Choice, Inc.
Page 96

Watersports Safety Code
Before you get in the water: Skiing or riding instruction is recommended before use. Instruction will teach general safety guidelines and proper skiing or riding
techniques, which may reduce your risk of injury. For more information on skiing or riding schools, contact your dealer, Association, or local ski club.
• Know the federal, state and local laws that apply to your area.
• If you are not familiar with a waterway, ask someone who is, to tell you about any hidden dangers or things to avoid
• Whether you plan to be in a watercraft, or skiing/riding behind one it is important you are wearing a properly tted life jacket (PFD) approved by your country’s agency, USCG
Type III, ISO, etc.
• Inspect all equipment prior to each use, check bindings, ns, tube, attachment, tow rope and otation device. Do not use if damaged.
Watercraft Safety: A knowledgeable and responsible driver is the most important safety device on any watercraft.
• Never operate a watercraft, ski or ride under the inuence of alcohol or drugs.
• Only use water ballast and people for additional weight.
• Never exceed the passenger or weight limitations of the watercraft.
• Never allow passengers to hang outside the watercraft or towed device or sit on the gunwales or anywhere outside of the normal seating area.
• Never allow water to overow the bow or gunwales of the watercraft.
• Uneven weight distribution or additional weight may; aect the handling of the watercraft.
Carbon Monoxide: The exhaust from the engine on a watercraft contains Carbon Monoxide (CO) which is a colorless, odorless and poisonous gas. Excessive exposure
to CO can cause severe injury or death.
Follow this advice to avoid injury:
• Never “Platform Drag” by holding onto the boarding platform or be dragged directly behind the watercraft. This is where CO will be.
• Do not sit on the watercraft transom or boarding platform while the engine is running.
• Make sure the engine is properly tuned and running well. An improperly tuned engine produces excessive exhaust and CO.
• If you smell engine exhaust, do not stay in that position.
• Go to the United States Coast Guard’s website: www.uscgboating.org for more information on how to help protect yourself and others from the dangers of CO.
Tow Ropes: Tow ropes come in dierent lengths and strengths for dierent activities. Make sure any rope you are using is suited for skiing or riding and that it is in
good condition.
• Never use a rope that is frayed, knotted, unraveling or discolored from use or being left in the sun. If a rope breaks while in use, it can recoil at the skier/rider being towed or
into the watercraft where it might strike passengers. Replace tow ropes with any sign of damage.
• Never use a tow rope with elastic or bungee material to pull skiers or riders.
• Rope should be attached to the watercraft in an approved fashion with hardware designed for towing. Refer to you watercraft manual for instructions on proper tow rope
attachment.
• Always keep people and tow ropes away from the propeller, even when idling.
• If a tow rope should become entangled in a propeller, shut o the engine, remove the key and put it in your pocket before retrieving the rope.
Preparing to ski or ride: Always have a person other than the driver as an observer to look out for the skier/rider.
• BE sure the driver is aware of the experience and ability level of the skier/rider.
• The driver, observer and skier/rider need to agree on hand signals before skiing or riding. Signals should include READY, STOP, SPEED UP, and SLOW DOWN.
• Start the engine only after making sure that no one in the water is near the propeller.
• Turn the engine o when people are getting into or out of the watercraft, or in the water near the watercraft.
• Always make sure the tow rope is not wrapped around anyone’s hands, arms, legs, or other parts of the body.
• Start the watercraft and move slowly to remove slack until the tow rope is tight.
• When the skier/rider signals READY and there is no trac ahead, take o in a straight line. Adjust the speed according to the signals given by the skier/rider.
Skiing or Riding: The watercraft and skier/rider should always maintain a sucient distance from obstacles so a skier/rider falling or coasting and/or watercraft will
not encounter any obstacle.
• Do not use in shallow water or near shore, docks, pilings, swimmers, other watercraft, or any other obstacles.
• Use only on the water.
• Never attempt land or dock starts. This will increase your risk of injury or death.
• Always wear a properly tted U.S. Coast Guard Type III (PFD) or ISO approved Life Jacket.
• The faster you ski or ride, the greater your risk of injury.
• Never make sharp turns that may cause a slingshot eect on the skier/rider’s speed.
• Skier/Rider should be towed at an appropriate speed for their ability level.
Fallen skier or rider: Falling and injuries are common in skiing or riding.
• Circle a fallen skier/rider slowly to return the tow rope handle or pick up the fallen skier/rider.
• Put the watercraft in neutral when near a fallen skier/rider.
• Always keep the fallen skier/rider in view and on the driver’s side of the watercraft.
• Display a red or orange skier-down ag to alert other vessels that a skier/rider is down.
The Warnings and practices in the
Watersports Safety Code represent common
risks encountered by users.
The code does not cover all instances of
risk or danger. Please use common sense
and good judgement.
© 2016 Skier’s Choice, Inc.
© 2016 Skier’s Choice, Inc.
— 95
© 2016 Skier’s Choice, Inc.
95 —
 Loading...