

Page 1
1
D
GB
F
NL
E
P
UNIVERSAL
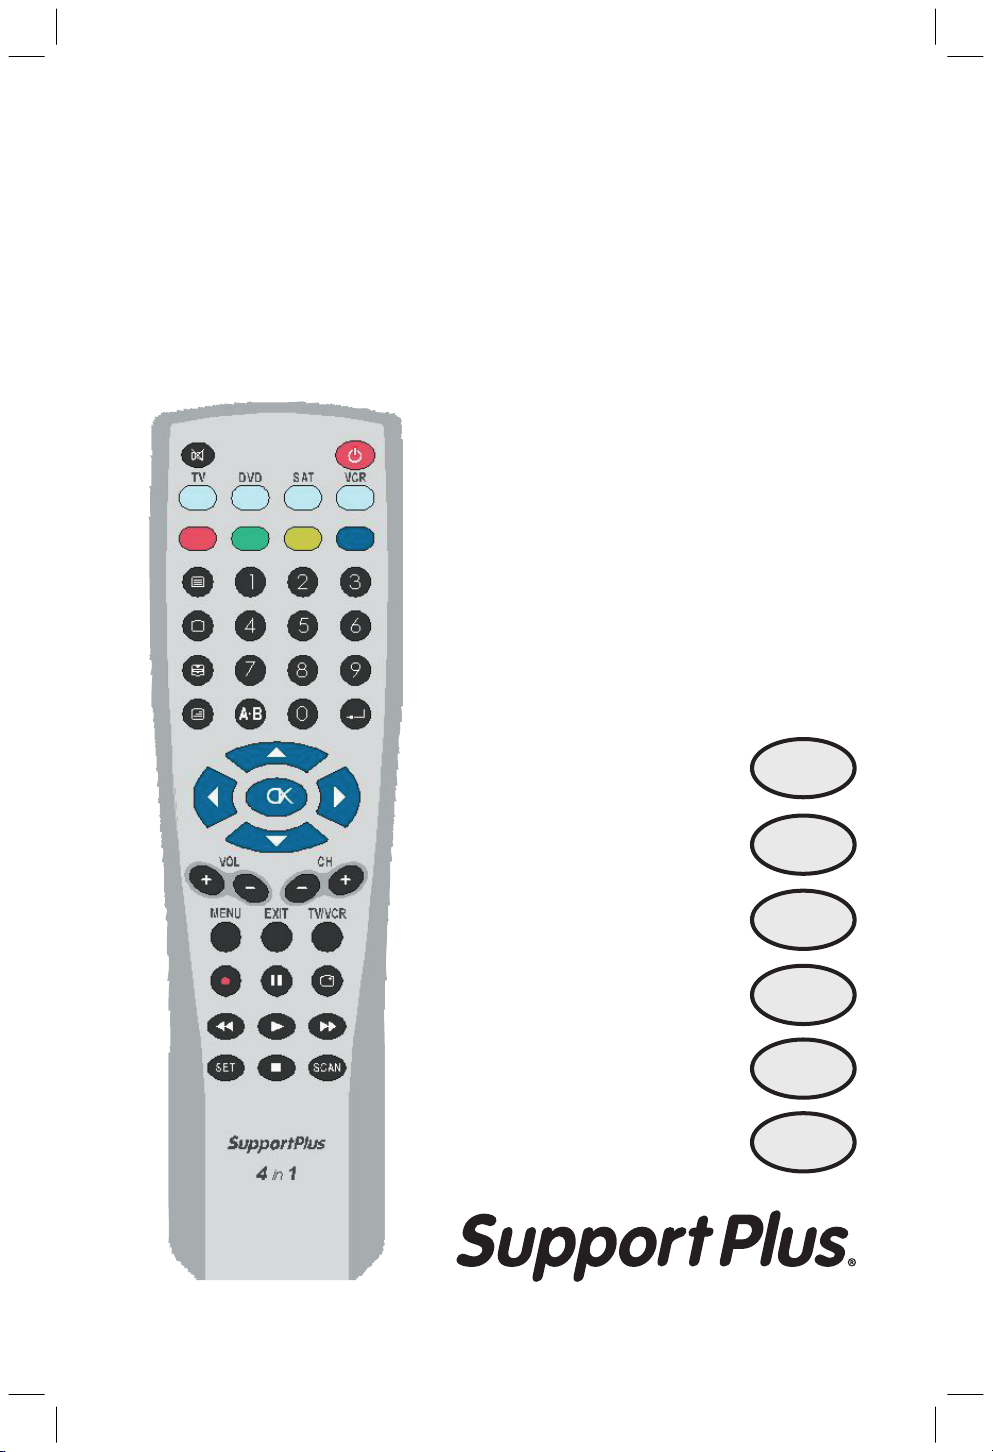
4 in 1
FERNBEDIENUNG
Page 2

2
3
BEDIENUNGSANLEITUNG
Wir danken Ihnen für den Kauf dieser Universalfernbedienung 4-in-1. Ihre neue Fernbedienung
enthält eine der größten Infrarot-Code-Bibliotheken für die Steuerung von 4 verschiedenen in
Europa erhältlichen Geräten.
Diese Fernbedienung ist vorprogrammiert, d.h. Sie müssen lediglich das Gerät, das gesteuert
werden soll (beispielsweise TV), sowie die dazugehörige 3-stellige Codenummer aus der
Markencodeliste (beispielsweise 001 unter Philips TV) eingeben. Nachdem Sie die Fernbedienung
konfiguriert haben, sind Ihre Einstellparameter dauerhaft gespeichert, auch wenn Sie die Batterien
herausnehmen.
Die Universalfernbedienung 4-in-1 eignet sich für die Steuerung praktisch aller gängigen Marken
von Fernsehgeräten (TV), DVD-Playern (DVD), digitalen und analogen Satellitenempfängern
und Kabelboxen (CBL/SAT) und Videorecordern (VCR).
Diese Universalfernbedienung 4-in-1 steuert alle wesentlichen Grundfunktionen Ihrer Geräte.
Bitte lesen Sie diese Bedienungsanleitung vor dem Einsatz Ihrer neuen Fernbedienung 4-in-1
genau durch.
Einstellverfahren:
Vergewissern Sie sich, dass 2 neue Batterien (Typ „AAA“) korrekt in Ihre neue Fernbedienung
eingelegt wurden.
www.supportplus.de
Um Ihre Fernbedienung für den Einsatz vorzubereiten, müssen Sie einen der folgenden Schritte
ausführen:
A. Einstellung mit Markencode:
1. Schalten Sie das Gerät, das Sie bedienen möchten (z.B. Fernsehgerät), ein.
2. Suchen Sie im hinteren Teil dieser Bedienungsanleitung nach dem Namen und der
3. Halten Sie die Taste SET gedrückt und betätigen Sie gleichzeitig die Gerätetaste (z.B. TV).
4. Geben Sie nun innerhalb von 10 Sekunden den 3-stelligen Gerätecode (z.B. 001 für Philips
5. Die LED erlischt, wenn der Code von der Fernbedienung akzeptiert wurde. Wenn die
Page 3

3
D
BEDIENUNGSANLEITUNG
Wir danken Ihnen für den Kauf dieser Universalfernbedienung 4-in-1. Ihre neue Fernbedienung
enthält eine der größten Infrarot-Code-Bibliotheken für die Steuerung von 4 verschiedenen in
Europa erhältlichen Geräten.
Diese Fernbedienung ist vorprogrammiert, d.h. Sie müssen lediglich das Gerät, das gesteuert
werden soll (beispielsweise TV), sowie die dazugehörige 3-stellige Codenummer aus der
Markencodeliste (beispielsweise 001 unter Philips TV) eingeben. Nachdem Sie die Fernbedienung
konfiguriert haben, sind Ihre Einstellparameter dauerhaft gespeichert, auch wenn Sie die Batterien
herausnehmen.
Die Universalfernbedienung 4-in-1 eignet sich für die Steuerung praktisch aller gängigen Marken
von Fernsehgeräten (TV), DVD-Playern (DVD), digitalen und analogen Satellitenempfängern
und Kabelboxen (CBL/SAT) und Videorecordern (VCR).
Diese Universalfernbedienung 4-in-1 steuert alle wesentlichen Grundfunktionen Ihrer Geräte.
Bitte lesen Sie diese Bedienungsanleitung vor dem Einsatz Ihrer neuen Fernbedienung 4-in-1
genau durch.
Einstellverfahren:
Vergewissern Sie sich, dass 2 neue Batterien (Typ „AAA“) korrekt in Ihre neue Fernbedienung
eingelegt wurden.
Um Ihre Fernbedienung für den Einsatz vorzubereiten, müssen Sie einen der folgenden Schritte
ausführen:
A. Einstellung mit Markencode:
1. Schalten Sie das Gerät, das Sie bedienen möchten (z.B. Fernsehgerät), ein.
2. Suchen Sie im hinteren Teil dieser Bedienungsanleitung nach dem Namen und der
Codenummer Ihrer Gerätemarke (z.B. Philips, 001, 004, 016...). Beachten Sie, dass die
Codes in der Spalte für die entsprechende Gerätegruppe (TV) erscheinen müssen.
3. Halten Sie die Taste SET gedrückt und betätigen Sie gleichzeitig die Gerätetaste (z.B. TV).
Die Gerätetaste TV an Ihrer Fernbedienung leuchtet auf und signalisiert, dass sich das Gerät
im Einstellmodus befindet.
4. Geben Sie nun innerhalb von 10 Sekunden den 3-stelligen Gerätecode (z.B. 001 für Philips
TV) ein. Wenn innerhalb von 10 Sekunden keine Eingabe erfolgt, wird der Einstellmodus
automatisch beendet.
5. Die LED erlischt, wenn der Code von der Fernbedienung akzeptiert wurde. Wenn die
Page 4

4
5
LED zweimal blinkt, kann dies bedeuten, dass ein falscher Code eingegeben wurde, und
die Fernbedienung bleibt im Einstellmodus. Sie müssen den korrekten Code aus der Liste
innerhalb der vorgegebenen Zeit neu eingeben.
6. Kontrollieren Sie die Funktion der Tasten an der Fernbedienung. Wenn die meisten Tasten
an Ihrer neuen Fernbedienung nicht einwandfrei funktionieren, probieren Sie einen anderen
3-stelligen Gerätecode (z.B. 004 ...) aus der Liste unter derselben Marke aus. Wiederholen
Sie die Schritte 3 bis 6, bis alle Grundfunktionen einwandfrei funktionieren. Sobald Sie den
entsprechenden Code eingegeben haben, ist das Gerät korrekt eingestellt.
Hinweis:
Um den Einstellmodus zu verlassen, drücken Sie die Gerätetaste (z.B. TV). Wenn Sie innerhalb von 10
Sekunden keine Taste betätigen, wird der Einstellmodus automatisch beendet.
Sie können mehr als ein Gerät an der neuen Fernbedienung einstellen. Bevor Sie Ihre neue Fernbedienung
im Alltag benutzen, drücken Sie bitte zunächst die entsprechende Gerätetaste, um sicherzustellen, dass die
Fernbedienung das richtige Gerät steuert. Andernfalls wird eventuell ein anderes als das von Ihnen gewünschte Gerät gesteuert.
B. Einstellung mit der Funktion Automatischer Suchlauf:
Wenn die Einstellung mit Markennamen und Codes erfolglos bleibt oder der Markenname für
Ihr Gerät in der Liste nicht aufzufinden ist, können Sie die Funktion „Automatischer Suchlauf“
verwenden, um den korrekten Code für Ihre Fernbedienung zu ermitteln.
C. Einstellung mit der Funktion Manueller Suchlauf:
Wenn die Einstellung mit Markennamen und Codes erfolglos bleibt, können Sie auch die
Funktion „Manueller Suchlauf“ verwenden, um den korrekten Code für die Bedienung Ihres
Geräts zu lokalisieren.
1. Schalten Sie das Gerät, das Sie bedienen möchten, ein. Sollte es sich um einen Videorecorder
2. Richten Sie die Fernbedienung auf Ihr Gerät. Drücken Sie kurz die Taste SET und die
3. Die Gerätetaste leuchtet permanent auf, und die Fernbedienung befindet sich im
4. Betätigen Sie die Taste POWER (EIN/AUS-Taste) etwa alle 1,5 Sekunden. (Wenn es sich
5. Sobald sich das gesuchte Gerät ausschaltet (oder reagiert), kontrollieren Sie die Funktionen
1. Schalten Sie das Gerät, das Sie bedienen möchten, ein. Sollte es sich um einen Videorecorder
handeln, legen Sie eine Videokassette ein.
2. Richten Sie die Fernbedienung auf Ihr Gerät. Drücken Sie die Taste SET und die Gerätetaste
(z.B. TV) gleichzeitig und halten Sie die Tasten 3 Sekunden lang gedrückt. Daraufhin blinkt
die Gerätetaste und signalisiert, dass der Automatische Suchlauf aktiviert wurde.
3. Das AUS-Signal wird automatisch von der Fernbedienung an das Gerät übermittelt (CodeScan). Sobald das Gerät (z.B. TV) ausgeschaltet wird, drücken Sie eine beliebige Taste
(außer der Taste SET), um den Automatischen Suchlauf zu stoppen.
4. Schalten Sie das Gerät mit der Taste „POWER“ wieder ein. Kontrollieren Sie die Funktion
der anderen Tasten auf der Fernbedienung. Wenn keine der Tasten funktioniert (was bedeuten
kann, dass Sie den Suchlauf nicht rechtzeitig gestoppt haben) oder die meisten Tasten nicht
einwandfrei funktionieren, können Sie den Suchlauf erneut starten (siehe Schritte 2-4), um
einen geeigneten Code zu lokalisieren.
Wenn die Tasten einwandfrei funktionieren, war die Einstellung erfolgreich. Drücken Sie die
Gerätetaste (z.B. TV) erneut, um den Code zu speichern und die Einstellung abzuschließen.
Hinweis:
Um den Automatischen Suchlauf zu unterbrechen, drücken Sie eine beliebige Taste (außer der Set-Taste).
Die LED-Lampe erlischt, und der Suchlauf wird automatisch beendet. Wenn innerhalb von 30 Sekunden
keine Taste betätigt wurde, wird der Suchlauf ebenfalls automatisch beendet.
Wenn die meisten Tasten an der Fernbedienung einwandfrei funktionieren, können Sie den
Hinweis:
Der Manuelle Suchlauf wird automatisch beendet, wenn innerhalb von 30 Sekunden keine Eingabe erfolgt.
Andere Funktionen
A. Anzeige des Gerätecodes:
Der Gerätecode, der in Ihrer neuen Fernbedienung eingestellt wurde, kann wie folgt aufgerufen
werden:
1. Drücken Sie die Taste SET und halten Sie diese gedrückt. Betätigen Sie die Zahlentaste „1“,
2. Drücken Sie wiederum die Taste SET und halten Sie diese gedrückt. Betätigen Sie
Page 5

5
C. Einstellung mit der Funktion Manueller Suchlauf:
Wenn die Einstellung mit Markennamen und Codes erfolglos bleibt, können Sie auch die
Funktion „Manueller Suchlauf“ verwenden, um den korrekten Code für die Bedienung Ihres
Geräts zu lokalisieren.
1. Schalten Sie das Gerät, das Sie bedienen möchten, ein. Sollte es sich um einen Videorecorder
handeln, legen Sie eine Videokassette ein.
2. Richten Sie die Fernbedienung auf Ihr Gerät. Drücken Sie kurz die Taste SET und die
Gerätetaste (z.B. TV) gleichzeitig (kürzer als 3 Sekunden - andernfalls wird der Automatische
Suchlauf gestartet). Lassen Sie dann beide Tasten los.
3. Die Gerätetaste leuchtet permanent auf, und die Fernbedienung befindet sich im
Einstellmodus.
4. Betätigen Sie die Taste POWER (EIN/AUS-Taste) etwa alle 1,5 Sekunden. (Wenn es sich
bei dem gesuchten Gerät um einen Videorecorder, DVD-Player, CD-Player, Verstärker,
Kassettenrecorder oder ein mit dem Anschluss AUX verbundenes Gerät handelt, können
Sie auch die Taste PLAY drücken.) Die Gerätetaste blinkt und signalisiert, dass der Modus
Manueller Suchlauf aktiviert ist.
5. Sobald sich das gesuchte Gerät ausschaltet (oder reagiert), kontrollieren Sie die Funktionen
der anderen Tasten an der Fernbedienung (drücken Sie jedoch nicht die Taste POWER andernfalls wird der nächste Code aufgerufen). Wenn die meisten Tasten nicht einwandfrei
funktionieren, drücken Sie die Taste POWER wiederum alle 1,5 Sekunden, um den nächsten
Code zu lokalisieren (der Manuelle Suchlauf wird fortgesetzt, siehe Schritte 4-5).
Wenn die meisten Tasten an der Fernbedienung einwandfrei funktionieren, können Sie den
Code speichern, indem Sie die Gerätetaste (z.B. TV) drücken, um den Manuellen Suchlauf
zu beenden.
Hinweis:
Der Manuelle Suchlauf wird automatisch beendet, wenn innerhalb von 30 Sekunden keine Eingabe erfolgt.
Andere Funktionen
A. Anzeige des Gerätecodes:
Der Gerätecode, der in Ihrer neuen Fernbedienung eingestellt wurde, kann wie folgt aufgerufen
werden:
1. Drücken Sie die Taste SET und halten Sie diese gedrückt. Betätigen Sie die Zahlentaste „1“,
um die 100er-Stelle des 3-stelligen Codes aufzurufen. Zählen Sie mit, wie oft die LED blinkt.
Wenn die LED nicht blinkt, ist die Ziffer NULL.
2. Drücken Sie wiederum die Taste SET und halten Sie diese gedrückt. Betätigen Sie
gleichzeitig die Zahlentaste „2“, um die 10er-Stelle des 3-stelligen Codes aufzurufen.
Page 6

6
7
3. Drücken Sie die Taste SET und halten Sie diese gedrückt. Betätigen Sie gleichzeitig die
Zahlentaste „3“, um die 1er-Stelle des 3-stelligen Codes aufzurufen.
Beispiel für Code 028:
a. Drücken Sie SET und „1“
b. Drücken Sie SET und „2“
c. Drücken Sie SET und „3“
Die LED blinkt nicht.
Die LED blinkt zweimal.
Die LED blinkt achtmal.
B. Funktion Reset/Löschen:
Um die Codes, die in die Fernbedingung eingegeben wurden, zu löschen, drücken Sie die Taste
SET und halten Sie diese gedrückt. Drücken Sie gleichzeitig die Taste „0“ länger als 3 Sekunden
und lassen Sie dann beide Tasten los. Die LED blinkt zweimal, und alle in die Fernbedienung
eingegebenen Daten werden gelöscht.
Hinweis: Aktivieren Sie diese Funktion bitte nicht, wenn Sie nicht alle Einstellungen löschen möchten.
C. Schreibschutz für Gerätecodes:
Um zu verhindern, dass die Gerätecodes versehentlich überschrieben/gelöscht werden, verfahren
Sie bitte wie folgt:
1. Drücken Sie die Gerätetaste für das Gerät (z.B. TV), für das die Einstellungen in der
Fernbedienung geschützt werden sollen.
OPERATION INSTRUCTIONS
Thank you for purchasing this 4 in 1 universal remote control. Your new remote control contains
one of the largest infrared code library for 4 different devices obtainable in Europe.
This remote control unit is preprogrammed, all you have to do is to choose the device that you wish
to control (for example TV) and it’s 3-digit code number from the brand code list (for example
001 under Philips TV). After you set up it will remember all your set up data permanently even
you remove the batteries later.
The 4 in 1 universal remote control is suitable for practically all common brands of television
set (TV), DVD player (DVD), digital and analogue satellite receiver and cable box (CBL/SAT),
video recorder (VCR).
This 4 in 1 universal remote control unit operates almost all the basic functions of your devices.
Please read these operation instructions before using your new 4 in 1 remote control.
Set up:
Make sure that 2 new batteries (type “AAA”) have been inserted correctly into your new remote
control unit.
To make your remote control ready for use, you need to carry out one of the following steps:
2. Drücken Sie gleichzeitig die Taste SET und die Taste "7". Lassen Sie dann beide Tasten
wieder los. Die LED blinkt zweimal, und der Code ist vor Überschreiben/Löschen
geschützt.
Hinweis:
Um den Schreibschutz aufzuheben, drücken Sie die Taste SET und halten Sie diese gedrückt. Betätigen Sie
gleichzeitig die Taste „8“. Lassen Sie dann beide Tasten los. Die LED blinkt zweimal, und der Schreibschutz
ist aufgehoben.
Service Adresse: European Distribution Center
Londoner Straße 11
D- 48455 Gildehaus
Germany
Tel. Nat. / internat.: 00800/ 7777 88 99
E-Mail: Service@SupportPlus.org
A. Set up by the Brand Code:
1. Switch on the device that you would like to control (e.g. TV set).
2. In the back section of this manual, find the name and code no of your device brand (e.g.
3. Hold down the SET key and actuate the device key (e.g. TV) at the same time. The TV
4. You must now enter the 3-digit device code (e.g. 001 for Philips TV) within 10 seconds. If no
5. The LED goes out if the code has been accepted by the remote control. If the LED flashes
Page 7

7
GB
OPERATION INSTRUCTIONS
Thank you for purchasing this 4 in 1 universal remote control. Your new remote control contains
one of the largest infrared code library for 4 different devices obtainable in Europe.
This remote control unit is preprogrammed, all you have to do is to choose the device that you wish
to control (for example TV) and it’s 3-digit code number from the brand code list (for example
001 under Philips TV). After you set up it will remember all your set up data permanently even
you remove the batteries later.
The 4 in 1 universal remote control is suitable for practically all common brands of television
set (TV), DVD player (DVD), digital and analogue satellite receiver and cable box (CBL/SAT),
video recorder (VCR).
This 4 in 1 universal remote control unit operates almost all the basic functions of your devices.
Please read these operation instructions before using your new 4 in 1 remote control.
Set up:
Make sure that 2 new batteries (type “AAA”) have been inserted correctly into your new remote
control unit.
To make your remote control ready for use, you need to carry out one of the following steps:
A. Set up by the Brand Code:
1. Switch on the device that you would like to control (e.g. TV set).
2. In the back section of this manual, find the name and code no of your device brand (e.g.
Philips 001, 004, 016…). Note the codes must be in the column for the corresponding device
group (TV).
3. Hold down the SET key and actuate the device key (e.g. TV) at the same time. The TV
device key on your remote control lights up, which means it is in the setting up mode.
4. You must now enter the 3-digit device code (e.g. 001 for Philips TV) within 10 seconds. If no
entry within 10 seconds, the setting up mode is automatically terminated.
5. The LED goes out if the code has been accepted by the remote control. If the LED flashes
twice, which means the code may be wrong, and the remote control remains in set-up mode,
you should enter the correct code from the list again in time.
Page 8

8
9
6. Check the function of the keys on remote control. If most keys on your new remote control
do not function correctly, try another 3-digit device code (e.g. 004…) from the list under
the same brand. Repeat steps 3 to 6 until all the basic functions operate correctly.Once you
satisfy the code, that means you have already got correct set up for this device.
Note:
To leave set-up mode, press the device key (e.g. TV). or if you do not actuate any keys within 10 seconds it
will be automatically terminated.
2. Point the remote control at your device. Press down and hold the SET key and press the de-
3. The device key lights up continuously and the remote control is then in setting-up mode.
4. Actuate the POWER key (ON/OFF key) about every 1.5 seconds. (If the device being sought
You may set up more than one device on the new remote control. Before you operate your new remote control normally, please press the requested device key first, so the remote control is surely at the proper device
status, otherwise it may control the wrong device which is not your requested.
B. Set up by Auto Search:
If setting up with brand name and codes is unsuccessful, or you can not find your brand name in
the list, you can use the “Auto Search” to establish the correct code for your remote control.
1. Switch on the device that you like to control. If it is a video recorder, insert a video cassette.
2. Point the remote control at your device. Press the SET and the device (e.g. TV) key simul-
taneously and hold them down for 3 seconds. Then the device key flashes, that means it is in
Auto Search now.
3. The OFF signal is automatically transmitted to the device from the remote control (code
scan). Once the device(e.g. TV) switches off, immediately press any key (except SET key)
to stop the Auto Search.
4. Switch the device on again by pressing the „POWER“ key. Check the function of the other
keys on the remote control unit. If all the keys do not function (that means you may not stop
the search in time), or most keys’ operation is not good enough, you can start the search again
(see steps 2–4) to find a suitable code.
If most keys function properly, that means your set up is successful, press the device key (e.g.
TV) again to save the code and finish the set up.
5. Once the searched device switches off (or reacts), test the functions of other keys (don’t
If you feel most of keys on the remote control work good enough, you can save the code by
Note:
The Manual Search will be automatically terminated if no entry within 30 seconds.
Other Functions
A. Display Device Code:
The device code, which has been set up in your new remote control, can be called up as follows:
1. Press the SET key and hold it down, now actuate number key “1” to display the 100th
2. Similarly, press the SET key and hold it down, at the same time actuate number key “2” to
3. Press the SET key and hold it down, at the same time actuate number key “3” to display the
Note:
To abort the Automatic Search, press any key (except set key). The LED lamp will go out and the search is
terminated. If no key pressed within 30 seconds, the search will automatically quit also.
C. Setting up by Manual Search:
If setting up with brand name and codes is unsuccessful, you can also use the “Manual Search” to
find the correct code for operating your device.
1. Switch on the device that you like to control. If it is a video recorder, insert a video cassette.
Example for Code 028:
a. Press SET and “1”
LED flashes 0 time, no flashes.
b. Press SET and “2”
LED flashes 2 times.
c. Press SET and “3”
LED flashes 8 times.
Page 9

9
2. Point the remote control at your device. Press down and hold the SET key and press the device key (e.g. TV) in a short time (less than 3 seconds, otherwise it goes to Auto Search), then
release the both pressed keys.
3. The device key lights up continuously and the remote control is then in setting-up mode.
4. Actuate the POWER key (ON/OFF key) about every 1.5 seconds. (If the device being sought
is a video recorder, DVD player, CD player, TUNER, TAPE or AUX, you may press the
PLAY key also.), the device key now flashes, that means it is in Manual Search mode.
5. Once the searched device switches off (or reacts), test the functions of other keys (don’t
press POWER key, in case it goes to next code) on the remote control. If most of them do not
function properly, press the POWER key about every 1.5 seconds again to call up the next
code (continues the Manual Search, see step 4-5).
If you feel most of keys on the remote control work good enough, you can save the code by
pressing the device key (e.g. TV) to finish the Manual Search.
Note:
The Manual Search will be automatically terminated if no entry within 30 seconds.
Other Functions
A. Display Device Code:
The device code, which has been set up in your new remote control, can be called up as follows:
1. Press the SET key and hold it down, now actuate number key “1” to display the 100th
position of 3-digit code. Count the numbers that the LED flashes. If the LED doesn’t flash,
that means the digit is ZERO.
2. Similarly, press the SET key and hold it down, at the same time actuate number key “2” to
display the 10th position of 3-digit code.
3. Press the SET key and hold it down, at the same time actuate number key “3” to display the
1st position of 3-digit code.
Example for Code 028:
a. Press SET and “1”
LED flashes 0 time, no flashes.
b. Press SET and “2”
LED flashes 2 times.
c. Press SET and “3”
LED flashes 8 times.
Page 10

10
11
B. Reset / delete function:
To delete the codes which have been set up in the remote control, press and hold down the SET
key, press the “0” key simultaneously for more than 3 seconds and then release the both pressed
keys. The LED will flash twice and all the set up data in the remote control are deleted.
NOTICE D’UTILISATION
Note:
Please don’t operate this function if you don’t want to delete all the settings.
C. Write-protection of device codes:
To protect the device codes from being inadvertently overwritten / deleted, you can carry out the
following:
1. Press the device key (e.g. TV) that you would like to protect on your remote control.
2. Press and hold down the SET key and press the “7” key at the same time. Then release
the both pressed keys, the LED will flash twice and the code is then protected from being
overwritten/deleted.
Note:
To cancel write protection, press the SET key and hold it down, and activate the “8” key at the same time,
then release the both pressed keys. The LED flashes twice and the protection has been cancelled.
Service Adresse: European Distribution Center
Merci d’avoir acheté cette télécommande universelle 4 en 1. Votre nouvelle télécommande
contient l’une des plus vastes bibliothèques de codes infrarouges pour 4 appareils différents qui
soient disponibles en Europe.
Cette télécommande est préprogrammée : il vous suffit de choisir l’appareil que vous voulez
piloter (par exemple TV pour téléviseur), et son numéro de code à 3 chiffres tiré de la liste de codes
des marques (par exemple 001 sous Philips TV). Après cette configuration, la télécommande se
rappellera en permanence de toutes les données configurées, même si vous sortez ses piles par la
suite.
La télécommande universelle 4 en 1 convient pour quasiment toutes les marques courantes de
téléviseurs (TV), de lecteurs de DVD (DVD), de récepteurs de satellite numériques et analogiques
et de boîte de raccordement (CBL/SAT), ainsi que de magnétoscope (VCR).
La télécommande universelle 4 en 1 gère pratiquement toutes les fonctions de base de
vos appareils. Veuillez lire cette notice d’utilisation avant de vous servir de votre nouvelle
télécommande 4 en 1.
Configuration :
Assurez-vous que 2 piles neuves (de type «AAA») ont été installées correctement dans votre
nouvelle télécommande 4 en 1.
Pour préparer votre télécommande à son utilisation, il faudra suivre l’une des séquences
d’opérations suivantes :
Londoner Straße 11
D- 48455 Gildehaus
Germany
Tel. Nat. / internat.: 00800/ 7777 88 99
E-Mail: Service@SupportPlus.org
A. Configuration par code de marque :
1. Mettez sous tension l’appareil que vous souhaitez piloter (par ex. le téléviseur).
2. Dans la dernière section de ce manuel, trouvez le nom et le numéro de code de la marque de
3. Restez appuyé sur la touche SET (configuration) et actionnez en même temps la touche de
4. Vous devez maintenant saisir le code d’appareil à 3 chiffres (par ex. 001 pour Philips
5. La DEL s’éteint si le code a été accepté par la télécommande. Si la DEL clignote deux fois,
Page 11

11
F
NOTICE D’UTILISATION
Merci d’avoir acheté cette télécommande universelle 4 en 1. Votre nouvelle télécommande
contient l’une des plus vastes bibliothèques de codes infrarouges pour 4 appareils différents qui
soient disponibles en Europe.
Cette télécommande est préprogrammée : il vous suffit de choisir l’appareil que vous voulez
piloter (par exemple TV pour téléviseur), et son numéro de code à 3 chiffres tiré de la liste de codes
des marques (par exemple 001 sous Philips TV). Après cette configuration, la télécommande se
rappellera en permanence de toutes les données configurées, même si vous sortez ses piles par la
suite.
La télécommande universelle 4 en 1 convient pour quasiment toutes les marques courantes de
téléviseurs (TV), de lecteurs de DVD (DVD), de récepteurs de satellite numériques et analogiques
et de boîte de raccordement (CBL/SAT), ainsi que de magnétoscope (VCR).
La télécommande universelle 4 en 1 gère pratiquement toutes les fonctions de base de
vos appareils. Veuillez lire cette notice d’utilisation avant de vous servir de votre nouvelle
télécommande 4 en 1.
Configuration :
Assurez-vous que 2 piles neuves (de type «AAA») ont été installées correctement dans votre
nouvelle télécommande 4 en 1.
Pour préparer votre télécommande à son utilisation, il faudra suivre l’une des séquences
d’opérations suivantes :
A. Configuration par code de marque :
1. Mettez sous tension l’appareil que vous souhaitez piloter (par ex. le téléviseur).
2. Dans la dernière section de ce manuel, trouvez le nom et le numéro de code de la marque de
votre appareil (par ex. Philips 001, 004, 016…). Notez bien que ces codes doivent figurer
dans la colonne du groupe d’appareils correspondant (TV).
3. Restez appuyé sur la touche SET (configuration) et actionnez en même temps la touche de
l’appareil (par ex. le téléviseur). La touche de l’appareil «téléviseur» de votre télécommande
s’allume, ce qui signifie que la télécommande est en mode de configuration.
4. Vous devez maintenant saisir le code d’appareil à 3 chiffres (par ex. 001 pour Philips
TV) dans un délai de 10 secondes. Si vous ne saisissez rien pendant 10 secondes, il est
automatiquement mis fin au mode de configuration.
5. La DEL s’éteint si le code a été accepté par la télécommande. Si la DEL clignote deux fois,
Page 12

12
13
ce qui signifie que le code est peut-être erroné, et si la télécommande reste en mode de
configuration, il vous faudra ressaisir dans les délais le code correct tiré de la liste.
6. Vérifiez le fonctionnement des touches de la télécommande. Si la plupart des touches de votre
nouvelle télécommande ne fonctionnent pas correctement, essayez un autre code d’appareil
à 3 chiffres (par ex. 004) tiré de la liste pour la même marque. Recommencez les étapes 3 à
6 jusqu’à ce que toutes les fonctions de base fonctionnent correctement. Dès que vous avez
trouvé le code approprié, cela signifie que vous avez effectué la configuration correcte pour
cet appareil.
Nota :
Pour quitter le mode de configuration, appuyez sur la touche de l’appareil (par ex. téléviseur). Autrement,
si vous n’appuyez sur aucune touche dans un délai de 10 secondes, vous quitterez automatiquement la configuration.
Vous pouvez configurer plus d’un appareil avec votre nouvelle télécommande. Avant d’utiliser normalement
votre nouvelle télécommande, veuillez appuyer d’abord sur la touche de l’appareil requis, afin de garantir
que la télécommande soit sur la position d’appareil adéquate ; sinon elle risque de piloter un appareil autre
que celui qui vous intéresse.
B. Configuration par Recherche automatique :
C. Configuration par Recherche manuelle :
Si la configuration de la télécommande par nom de marque et par codes échoue, vous pouvez vous
servir de la «Recherche manuelle» pour identifier le code adéquat pour piloter votre appareil.
1. Mettez sous tension l’appareil que vous souhaitez piloter. Si c’est un magnétoscope, insérez
2. Pointez la télécommande vers votre appareil. Appuyez et restez appuyé sur la touche SET,
3. La touche d’appareil reste allumée en permanence, et la télécommande se trouve alors en
4. Appuyez à peu près toutes les secondes 1,5 sur la touche «POWER» (touche de marche/
Si vous n’arrivez pas à configurer la télécommande par nom de marque et par codes, ou si vous ne
parvenez pas à trouver votre nom de marque sur la liste, vous pouvez faire appel à la «Recherche
automatique» pour identifier le code adéquat de votre télécommande.
1. Mettez sous tension l’appareil que vous souhaitez piloter. Si c’est un magnétoscope, insérez
une cassette vidéo.
2. Pointez la télécommande vers votre appareil. Appuyez simultanément sur la touche SET
(configuration) et sur la touche de l’appareil (par ex. TV). puis restez appuyé dessus pendant
3 secondes. La touche de l’appareil va clignoter, ce qui signifie qu’il est en Recherche
automatique.
3. Le signal OFF (éteint) est automatiquement transmis à l’appareil par la télécommande (lecture
de code). Dès que l’appareil (par ex. le téléviseur) s’éteint, appuyez immédiatement sur
n’importe quelle touche (sauf la touche SET) pour interrompre la Recherche automatique,
4. Remettez l’appareil sous tension en appuyant sur la touche «POWER» (alimentation).
Vérifiez le fonctionnement des autres touches de la télécommande. Si toutes les touches ne
fonctionnent pas (c’est-à-dire si vous n’avez pas cessé la recherche en temps voulu), ou si le
fonctionnement de la plupart des touches n’est pas satisfaisant, vous pouvez recommencer la
recherche (voir les étapes 2 à 4) pour trouver un code adéquat.
Si la plupart des touches fonctionnent correctement, cela signifie que votre configuration
a été couronnée de succès, appuyez à nouveau sur la touche d’appareil (par ex. TV) pour
sauvegarder le code et mettre fin à la configuration.
Nota :
Pour mettre fin à la Recherche automatique, appuyez sur n’importe quelle touche (sauf la touche SET). La
DEL s’éteindra et la recherche s’interrompra. Si vous n’appuyez sur aucune touche pendant 30 secondes, la
recherche sera également interrompue automatiquement.
5. Une fois que l’appareil recherché se met hors tension (ou réagit), testez les fonctions des
Si vous estimez que la plupart des touches de la télécommande fonctionnent de manière
Nota :
Vous quitterez automatiquement la Recherche manuelle si vous n’effectuez aucune saisie pendant une péri-
ode de 30 secondes.
Autres fonctions
A. Affichage du code d’appareil :
Le code d’appareil qui a été configuré sur votre nouvelle télécommande peut être affiché comme
suit :
1. Appuyez sur la touche SET et restez appuyé dessus, puis actionnez la touche numérique «1»
2. De même, appuyez sur la touche SET et restez appuyé dessus, et actionnez en même temps
Page 13

13
C. Configuration par Recherche manuelle :
Si la configuration de la télécommande par nom de marque et par codes échoue, vous pouvez vous
servir de la «Recherche manuelle» pour identifier le code adéquat pour piloter votre appareil.
1. Mettez sous tension l’appareil que vous souhaitez piloter. Si c’est un magnétoscope, insérez
une cassette vidéo.
2. Pointez la télécommande vers votre appareil. Appuyez et restez appuyé sur la touche SET,
puis appuyez très vite sur la touche d’appareil (par ex. TV) (en moins de 3 secondes la
touche de l’appareil, autrement elle passe sur Recherche automatique), et relâchez ces deux
touches.
3. La touche d’appareil reste allumée en permanence, et la télécommande se trouve alors en
mode de configuration.
4. Appuyez à peu près toutes les secondes 1,5 sur la touche «POWER» (touche de marche/
arrêt). (Si l’appareil recherché est un magnétoscope, un lecteur de DVD, un lecteur de CD,
un TUNER, un lecteur de cassettes TAPE ou AUX, vous pouvez également appuyer sur la
touche PLAY (lecture)), la touche d’appareil clignote maintenant, ce qui signifie qu’il est en
mode de Recherche manuelle.
5. Une fois que l’appareil recherché se met hors tension (ou réagit), testez les fonctions des
autres touches de la télécommande (n’appuyez pas sur la touche POWER si jamais il passe
sur le code suivant). Si la plupart des touches ne fonctionnent pas correctement, réappuyez
sur la touche POWER à peu près toutes les secondes 1,5 pour appeler le code suivant
(poursuivre la Recherche manuelle, étapes 4 et 5).
Si vous estimez que la plupart des touches de la télécommande fonctionnent de manière
satisfaisante, vous pouvez sauvegarder le code en appuyant sur la touche d’appareil (par ex.
TV) pour mettre fin à la Recherche manuelle.
Nota :
Vous quitterez automatiquement la Recherche manuelle si vous n’effectuez aucune saisie pendant une période de 30 secondes.
Autres fonctions
A. Affichage du code d’appareil :
Le code d’appareil qui a été configuré sur votre nouvelle télécommande peut être affiché comme
suit :
1. Appuyez sur la touche SET et restez appuyé dessus, puis actionnez la touche numérique «1»
pour afficher la 100ème position du code à 3 chiffres. Comptez le nombre de fois que la DEL
clignote. Si la DEL ne clignote pas, cela signifie que le chiffre est ZERO.
2. De même, appuyez sur la touche SET et restez appuyé dessus, et actionnez en même temps
Page 14

14
15
la touche numérique «2» pour afficher la 10ème position du code à 3 chiffres.
3. Appuyez sur la touche SET et restez appuyé dessus, et actionnez en même temps la touche
numérique «3» pour afficher la 1ère position du code à 3 chiffres.
Exemple pour le Code 028 :
a. Appuyez sur SET et sur «1»
b. Appuyez sur SET et sur «2»
a. Appuyez sur SET et sur «3»
La DEL clignote zéro fois, pas de clignotement.
La DEL clignote 2 fois.
La DEL clignote 8 fois.
B. Réinitialisation/ suppression de fonctions :
Pour supprimer les codes qui ont été configurés sur la télécommande, appuyez et restez appuyé
sur la touche SET, appuyez simultanément sur la touché «0» pendant plus de 3 secondes, puis
relâchez les deux touches. La DEL clignotera deux fois et toutes les données de configuration
contenues par la télécommande seront effacées.
Nota : N’utilisez pas cette fonction si vous ne souhaitez pas effacer toutes les configurations.
C. Protection d’écriture des codes d’appareil :
Pour éviter que les codes d’appareil ne soient «écrasés» ou supprimés par mégarde, vous pouvez
effectuer les opérations suivantes :
1. Appuyez sur la touche d’appareil (par ex. TV) que vous souhaitez protéger sur votre
télécommande.
2. Appuyez et restez appuyé sur la touche SET, puis appuyez en même temps sur la touche
«7». Puis relâchez ces deux touches, la DEL clignotera deux fois et le code sera alors protégé
contre tout «écrasement» et toute suppression.
GEBRUIKSAANWIJZING
Hartelijk dank voor de aanschaf van deze 4 in 1 universele afstandbediening. Uw nieuwe
afstandbediening bevat een van de grootste infrarood bibliotheken voor 4 verschillende apparaten
die in Europa verkrijgbaar zijn.
Deze afstandbediening is voorgeprogrammeerd. Het enige dat u hoeft te doen is het apparaat
te kiezen dat u wilt bedienen (bijvoorbeeld de TV) plus het 3-cijferige codenummer van de
merkcodelijst (bijvoorbeeld 001 onder Philips TV). Nadat u hem ingesteld hebt, worden alle
ingestelde data permanent bewaard, zelfs als u de batterijen later verwijdert.
De 4 in 1 universele afstandbediening is geschikt voor alle gangbare merken televisie (TV),
DVD-speler (DVD), digitale en analoge satellietontvanger en kanaaldecoder (CBL/SAT) en
videorecorder (VCR).
Met deze 4 in 1 universele afstandbediening kunt u bijna alle basisfuncties van uw apparatuur
uitvoeren. Gelieve deze gebruiksaanwijzing goed door te lezen alvorens uw nieuwe 4 in 1
afstandbediening te gebruiken.
Instellen:
Vergeet niet 2 nieuwe batterijen (type “AAA”) in uw nieuwe afstandbediening te plaatsen.
U maakt uw afstandbediening klaar voor gebruik door een keuze te maken uit A, B of C en de
stappen uit te voeren:
A. Instellen per merkcode:
Nota :
Pour annuler une protection d’écriture, appuyez sur la touché SET et restez appuyé dessus, puis appuyez en
même temps sur la touché «8» avant de relâcher ces deux touches. La DEL clignote deux fois et la protection a été annulée.
Adresse de service : European Distribution Center
Londoner Straße 11
D- 48455 Gildehaus
Germany
Tel. Nat. / internat.: 00800/ 7777 88 99
E-Mail: Service@SupportPlus.org
1. Zet het apparaat aan dat u wilt bedienen (bijv. de TV)
2. Achter in deze gebruiksaanwijzing vindt u naam en codenummer van het apparaatmerk (bijv.
3. Houd de SET-toets ingedrukt en activeer tegelijkertijd de apparaattoets (bijv. TV). De TV-
4. U moet nu binnen 10 seconden de 3-cijferige apparaatcode (bijv. 001 voor Philips TV)
5. Het LED-lampje gaat uit als de code door de afstandbediening geaccepteerd is. Als het LED-
Page 15

15
NL
GEBRUIKSAANWIJZING
Hartelijk dank voor de aanschaf van deze 4 in 1 universele afstandbediening. Uw nieuwe
afstandbediening bevat een van de grootste infrarood bibliotheken voor 4 verschillende apparaten
die in Europa verkrijgbaar zijn.
Deze afstandbediening is voorgeprogrammeerd. Het enige dat u hoeft te doen is het apparaat
te kiezen dat u wilt bedienen (bijvoorbeeld de TV) plus het 3-cijferige codenummer van de
merkcodelijst (bijvoorbeeld 001 onder Philips TV). Nadat u hem ingesteld hebt, worden alle
ingestelde data permanent bewaard, zelfs als u de batterijen later verwijdert.
De 4 in 1 universele afstandbediening is geschikt voor alle gangbare merken televisie (TV),
DVD-speler (DVD), digitale en analoge satellietontvanger en kanaaldecoder (CBL/SAT) en
videorecorder (VCR).
Met deze 4 in 1 universele afstandbediening kunt u bijna alle basisfuncties van uw apparatuur
uitvoeren. Gelieve deze gebruiksaanwijzing goed door te lezen alvorens uw nieuwe 4 in 1
afstandbediening te gebruiken.
Instellen:
Vergeet niet 2 nieuwe batterijen (type “AAA”) in uw nieuwe afstandbediening te plaatsen.
U maakt uw afstandbediening klaar voor gebruik door een keuze te maken uit A, B of C en de
stappen uit te voeren:
A. Instellen per merkcode:
1. Zet het apparaat aan dat u wilt bedienen (bijv. de TV)
2. Achter in deze gebruiksaanwijzing vindt u naam en codenummer van het apparaatmerk (bijv.
Philips 001, 004, 016 …). Let op, de codes dienen in de kolommen van de corresponderende
apparatengroep (TV) te staan.
3. Houd de SET-toets ingedrukt en activeer tegelijkertijd de apparaattoets (bijv. TV). De TVtoets op uw afstandbediening gaat branden, wat betekent dat de instelmodus geactiveerd is.
4. U moet nu binnen 10 seconden de 3-cijferige apparaatcode (bijv. 001 voor Philips TV)
intoetsen. Als u binnen 10 seconden geen code intoetst, wordt de instelmodus automatisch
beëindigd.
5. Het LED-lampje gaat uit als de code door de afstandbediening geaccepteerd is. Als het LEDlampje twee keer knippert, kan dat betekenen dat de code niet juist is. De afstandbediening
Page 16

16
17
blijft in de instelmodus staan en u moet nu opnieuw de correcte code van de lijst intoetsen.
6. Controleer of de toetsen op de afstandbediening de correcte functies uitvoeren. Indien de
meeste toetsen van uw nieuwe afstandbediening niet de correcte functies uitvoeren, probeer
dan een andere 3-cijferige apparaatcode (bijv. 004…) van de lijst onder hetzelfde merk.
Herhaal stap 3 tot 6 tot alle basisfuncties correct worden uitgevoerd Als dat het geval is, hebt
u het apparaat goed ingesteld.
C. Instellen via Handmatig Zoeken:
Indien het zoeken met merknaam en code niet gelukt is, kunt u ook gebruik maken van
“Handmatig Zoeken” om de correcte code te vinden voor de bediening van uw apparaat.
1. Zet het apparaat dat u wilt bedienen aan. Wanneer het een videorecorder is, doet u er een
Opmerking:
Als u de instelmodus wilt verlaten, drukt u op de apparaattoets (bijv. TV) of als u geen enkele toets activeert
binnen 10 seconden wordt deze automatisch beëindigd.
U kunt meer dan één apparaat instellen met de nieuwe afstandbediening. Voordat u uw nieuwe afstandbediening normaal bedient, verzoeken wij u eerst de vereiste apparaattoets in te drukken, zodat de afstandbedi-
ening zeker op de juiste apparaatstatus is ingesteld, anders bedient hij misschien het verkeerde apparaat.
B. Instellen via Automatische Zoekloop:
Indien instellen per merknaam en code niet het gewenste resultaat geeft, of u uw merknaam niet
kunt vinden in de lijst, dan kunt u de “Automatische Zoekloop” gebruiken om de correcte code
voor uw afstandbediening te zoeken.
1. Zet het apparaat dat u wilt bedienen aan. Wanneer het een videorecorder is, doet u er een
cassette in.
2. Richt de afstandbediening op uw apparaat. Druk de SET-toets en tegelijkertijd de
apparaattoets (bijv. TV) in en houd ze 3 seconden lang ingedrukt. Dan begint de apparaattoets
te knipperen, wat betekent dat hij op de Automatische Zoekloop staat.
3. Het OFF-signaal wordt automatisch doorgegeven aan het apparaat vanaf de afstandbediening
(codescan). Zodra het apparaat (bijv. TV) uitschakelt, druk dan meteen een willekeurige
toets in (met uitzondering van SET-toets) om de Automatische Zoekloop te stoppen.
2. Richt de afstandbediening op uw apparaat. Houd de SET-toets ingedrukt en druk de
3. De apparaattoets brandt nu voortdurend en de afstandbediening staat in de instelmodus.
4. Activeer de POWER-toets (AAN/UIT-toets) elke 1,5 seconden. (Als het apparaat dat u
5. Zodra het gezochte apparaat uitschakelt (of reageert), test dan de functies van de andere
Wanneer u merkt dat de meeste toetsen van de afstandbediening de juiste functies uitvoeren,
Opmerking:
Handmatig Zoeken wordt automatisch afgesloten als u binnen 30 seconden geen toets indrukt.
Andere functies
4. Zet het apparaat weer aan door op de AAN/UIT-knop te drukken. Controleer of de andere
toetsen op de afstandbediening de functies correct uitvoeren. Indien geen van de toetsen
werken (komt dat omdat u het zoeken niet op tijd gestopt hebt), of de meeste toetsen niet
goed genoeg werken. U kunt de zoekloop opnieuw starten (zie stap 2 – 4) om een geschikte
code te vinden.
Indien de meeste functies correct werken, is uw instelling gelukt. Druk nu de apparaattoets
(bijv. TV) opnieuw in om het instellen te beëindigen.
Opmerking:
Als u de Automatische Zoekloop wilt verlaten, drukt u een willekeurige toets in (met uitzondering van de
SET-toets). Het LED-lampje gaat uit en de zoekloop is beëindigd. Als u binnen 30 seconden geen toets indrukt, wordt de zoekloop automatisch beëindigd.
A. Weergave van de Apparaatcode:
De apparaatcode die ingesteld is op uw nieuwe afstandbediening, kan als volgt opgeroepen
worden:
1. Houd de SET-toets ingedrukt en activeer tegelijkertijd de getaltoets “1” om de 100ste positie
2. Houd de SET-toets ingedrukt en activeer tegelijkertijd de getaltoets “2” om de 10ste positie
Page 17

17
C. Instellen via Handmatig Zoeken:
Indien het zoeken met merknaam en code niet gelukt is, kunt u ook gebruik maken van
“Handmatig Zoeken” om de correcte code te vinden voor de bediening van uw apparaat.
1. Zet het apparaat dat u wilt bedienen aan. Wanneer het een videorecorder is, doet u er een
cassette in.
2. Richt de afstandbediening op uw apparaat. Houd de SET-toets ingedrukt en druk de
apparaattoets (bijv. TV) kort in (minder dan 3 seconden, anders wordt de Automatische
Zoekloop gestart), en laat daarna beide toetsen los.
3. De apparaattoets brandt nu voortdurend en de afstandbediening staat in de instelmodus.
4. Activeer de POWER-toets (AAN/UIT-toets) elke 1,5 seconden. (Als het apparaat dat u
zoekt een videorecorder, DVD-speler, CD-speler, TUNER, TAPE of AUX is, kunt u ook de
PLAY-toets indrukken.). De apparaattoets knippert nu, wat betekent dat Handmatig Zoeken
geactiveerd is.
5. Zodra het gezochte apparaat uitschakelt (of reageert), test dan de functies van de andere
toetsen van de afstandbediening (druk niet op de POWER-toets, omdat hij dan naar de
volgende code gaat). Wanneer de meeste niet correct functioneren, druk dan elke 1,5 seconde
de POWER-toets in om de volgende code op te roepen (gaat door met Handmatig Zoeken,
zie stap 4-5).
Wanneer u merkt dat de meeste toetsen van de afstandbediening de juiste functies uitvoeren,
kunt u de code opslaan door de apparaattoets (bijv. TV) in te drukken waarmee u Handmatig
Zoeken beëindigt.
Opmerking:
Handmatig Zoeken wordt automatisch afgesloten als u binnen 30 seconden geen toets indrukt.
Andere functies
A. Weergave van de Apparaatcode:
De apparaatcode die ingesteld is op uw nieuwe afstandbediening, kan als volgt opgeroepen
worden:
1. Houd de SET-toets ingedrukt en activeer tegelijkertijd de getaltoets “1” om de 100ste positie
weer te geven van een 3-cijferige code. Tel het aantal keren dat het LED-lampje knippert.
Indien het LED-lampje niet knippert, is het cijfer NUL.
2. Houd de SET-toets ingedrukt en activeer tegelijkertijd de getaltoets “2” om de 10ste positie
weer te geven van een 3-cijferige code.
Page 18

18
19
3. Houd de SET-toets ingedrukt en activeer tegelijkertijd de getaltoets “3” om de 1ste positie
weer te geven van een 3-cijferige code.
Voorbeeld voor Code 028:
a. Druk SET en “1” in.
b. Druk SET en “2” in.
a. Druk SET en “3” in.
LED-lampje knippert 0 keer, geen knippering.
LED-lampje knippert 2 keer.
LED-lampje knippert 8 keer.
B. Functie: opnieuw instellen / wissen
Als u de codes die u in de afstandbediening hebt ingesteld wilt wissen, houd u de SET-toets
ingedrukt en drukt u tegelijkertijd de “0” toets langer dan 3 seconden in. Daarna laat u beide
toetsen los. Het LED-lampje knippert 2 keer en alle ingestelde data van de afstandbediening zijn
gewist.
Opmerking: Gelieve deze functie niet te gebruiken als u niet alle instellingen wilt wissen.
C. Schrijfbescherming van Apparaatcodes:
Als u de apparaatcodes wilt beschermen tegen onopzettelijk overschrijven / wissen, kunt u de
volgende stappen uitvoeren:
1. Druk de apparaattoets (bijv. TV) die u wilt beschermen op de afstandbediening, in.
2. Houd de SET-toets ingedrukt en druk tegelijkertijd de “7” toets in. Laat daarna beide toetsen
los. Het LED-lampje knippert twee keer en de code is nu beschermd tegen overschrijven /
wissen.
Opmerking:
Als u de schrijfbescherming wilt opheffen, houd de SET-toets ingedrukt en activeert u tegelijkertijd de “8”
toets in. Daarna laat u beide toetsen los Het LED-lampje knippert twee keer en de bescherming is opgeheven.
MANUAL DEL USUARIO
Gracias por comprar este mando a distancia universal 4 en 1. Su nuevo mando a distancia
contiene una de las mayores bibliotecas de códigos infrarrojos para 4 aparatos diferentes que
puede obtenerse en Europa.
Este mando a distancia está programado, todo lo que tiene que hacer es seleccionar el aparato que
desea controlar (por ejemplo TV) y su número de código de 3 dígitos de la lista de códigos de
la marca (por ejemplo, 001 en el televisor Philips). Después de configurarlo, recordará todos sus
datos de configuración permanentemente, incluso si más tarde extrae las pilas.
El mando a distancia universal 4 en 1 es apropiado prácticamente para todas las marcas más
conocidas de televisores (TV), reproductores DVD (DVD), receptores de satélite digitales y
analógicos, cajas de cable (CBL/SAT) y grabadores de vídeo (VCR).
Este mando a distancia universal 4 en 1 controla casi todas las funciones básicas de sus aparatos.
Le rogamos lea estas instrucciones de funcionamiento antes de usar su nuevo mando a distancia
4 en 1.
Configuración:
Compruebe que se han colocado 2 pilas nuevas (tipo "AAA") correctamente en su nuevo mando
a distancia.
Para que su mando a distancia esté listo para ser usado, tiene que ejecutar uno de los pasos
siguientes:
A. Configuración por medio del código de marca:
1. Encienda el aparato que desea controlar (p. ej. el televisor).
2. En la última sección de este manual podrá localizar el nombre y el número de código de la
Service-adres: European Distribution Center
Londoner Straße 11
D- 48455 Gildehaus
Germany
Tel. Nat. / internat.: 00800/ 7777 88 99
E-Mail: Service@SupportPlus.org
3. Mantenga pulsada la tecla SET y pulse simultáneamente la tecla del aparato (p. ej. TV). Se
4. Seguidamente debe introducir el código del aparato de 3 dígitos (p. ej. 001 para televisor
5. El LED se apaga si el código ha sido aceptado por el mando a distancia. Si el LED parpadea
Page 19

19
E
MANUAL DEL USUARIO
Gracias por comprar este mando a distancia universal 4 en 1. Su nuevo mando a distancia
contiene una de las mayores bibliotecas de códigos infrarrojos para 4 aparatos diferentes que
puede obtenerse en Europa.
Este mando a distancia está programado, todo lo que tiene que hacer es seleccionar el aparato que
desea controlar (por ejemplo TV) y su número de código de 3 dígitos de la lista de códigos de
la marca (por ejemplo, 001 en el televisor Philips). Después de configurarlo, recordará todos sus
datos de configuración permanentemente, incluso si más tarde extrae las pilas.
El mando a distancia universal 4 en 1 es apropiado prácticamente para todas las marcas más
conocidas de televisores (TV), reproductores DVD (DVD), receptores de satélite digitales y
analógicos, cajas de cable (CBL/SAT) y grabadores de vídeo (VCR).
Este mando a distancia universal 4 en 1 controla casi todas las funciones básicas de sus aparatos.
Le rogamos lea estas instrucciones de funcionamiento antes de usar su nuevo mando a distancia
4 en 1.
Configuración:
Compruebe que se han colocado 2 pilas nuevas (tipo "AAA") correctamente en su nuevo mando
a distancia.
Para que su mando a distancia esté listo para ser usado, tiene que ejecutar uno de los pasos
siguientes:
A. Configuración por medio del código de marca:
1. Encienda el aparato que desea controlar (p. ej. el televisor).
2. En la última sección de este manual podrá localizar el nombre y el número de código de la
marca de su aparato (p. ej. Philips 001, 004, 016…). Tenga en cuenta que los códigos deben
estar en la columna para el grupo de aparato correspondiente (TV).
3. Mantenga pulsada la tecla SET y pulse simultáneamente la tecla del aparato (p. ej. TV). Se
iluminará la tecla TV de su mando a distancia, lo que significa que se encuentra en el modo
de configuración.
4. Seguidamente debe introducir el código del aparato de 3 dígitos (p. ej. 001 para televisor
Philips) en un plazo de 10 segundos. Si no se realiza ninguna entrada en un plazo de 10
segundos, se sale automáticamente del modo de configuración.
5. El LED se apaga si el código ha sido aceptado por el mando a distancia. Si el LED parpadea
dos veces, lo que significa que el código puede ser incorrecto y el mando a distancia
Page 20

20
21
permanece en el modo de configuración, debe introducir el código correcto de la lista
nuevamente en el tiempo establecido.
6. Compruebe el funcionamiento de las teclas del mando a distancia. Si la mayoría de las
teclas de su nuevo mando a distancia no funcionan correctamente, pruebe con otro código de
aparato de 3 dígitos (p. ej. 004…) de la lista, dentro de la misma marca. Repita los pasos 3 a
6 hasta que funcionen correctamente todas las funciones básicas. Una vez aceptado el código
correcto, el aparato se habrá configurado correctamente.
Nota:
Para salir del modo de configuración, pulse la tecla del aparato (p. ej. TV). o si no pulsa ninguna tecla en un
plazo de 10 segundos, lo abandonará automáticamente.
Puede configurar más de un aparato en el nuevo mando a distancia. Antes de utilizar su nuevo mando a distancia normalmente, pulse en primer lugar la tecla del aparato requerida, ya que el mando a distancia está
seguramente en el estado correcto del aparato, de lo contrario, puede controlar un aparato incorrecto, diferente al que Ud. deseaba.
B. Configuración mediante búsqueda automática (Auto
Search):
C. Configuración mediante Búsqueda Manual (Manual
Search):
Si la configuración con el nombre y los códigos de la marca no da resultado, puede usar también
la Búsqueda Manual ("Manual Search") para encontrar el código correcto para controlar su
aparato.
1. Encienda el aparato que desea controlar. Si se trata de un grabador de vídeo, introduzca una
2. Apunte con el mando a distancia hacia su aparato. Mantenga pulsada la tecla SET y pulse la
3. La tecla del aparato se ilumina fija y el mando a distancia se encuentra entonces en el modo
4. Pulse la tecla POWER (tecla ON/OFF) cada 1,5 segundos aprox. (Si el aparato buscado es
Si la configuración con el nombre y los códigos de la marca no da resultado o no puede encontrar
el nombre de su marca en la lista, puede usar la Búsqueda Automática („Auto Search“) para
establecer el código correcto para su mando a distancia.
1. Encienda el aparato que desee controlar. Si se trata de un grabador de vídeo, introduzca una
cinta de vídeo.
2. Apunte con el mando a distancia hacia su aparato. Pulse la tecla SET y la del aparato (p.
ej. TV) simultáneamente y manténgalas pulsadas durante 3 segundos. Después, la tecla del
aparato parpadeará, lo que significa que se encuentra en el modo de Búsqueda Automática.
3. La señal OFF se transmite automáticamente al aparato desde el mando a distancia
(exploración del código). Después de apagarse el aparato (p. ej. TV), pulse inmediatamente
cualquier tecla (excepto la tecla SET) para detener la Búsqueda Automática.
4. Encienda de nuevo el aparato pulsando la tecla „POWER“. Compruebe el funcionamiento
de las otras teclas en el mando a distancia. Si no funciona ninguna (lo que significa que no
puede detener la búsqueda dentro del tiempo fijado), o el funcionamiento de la mayoría de las
teclas no es lo suficientemente bueno, puede iniciar la búsqueda de nuevo (vea los pasos 2–4)
para encontrar un código apropiado.
Si la mayoría de las teclas funcionan correctamente, significa que su configuración es
correcta, pulse la tecla del aparato (p. ej. TV) de nuevo para memorizar el código y salir de la
configuración.
Nota:
Para cancelar la Búsqueda Automática, pulse cualquier tecla (excepto la tecla Set). El LED se apagará y se
finalizará la búsqueda. Si no se pulsa ninguna tecla en un plazo de 30 segundos, la búsqueda finalizará también automáticamente.
5. Una vez se apague (o reaccione) el aparato buscado, compruebe el funcionamiento de las
Si comprueba que la mayoría de las teclas del mando a distancia funcionan lo suficientemente
Nota:
La Búsqueda Manual se finalizará automáticamente si no se realiza ninguna entrada en un plazo de 30 seg-
undos.
Otras funciones
A. Visualización del código del aparato:
El código del aparato, que se ha configurado en su nuevo mando a distancia, puede llamarse del
modo siguiente:
1. Mantenga pulsada la tecla SET, después pulse "1" para visualizar la 100ª posición del
2. De modo similar, mantenga pulsada la tecla SET y simultáneamente, pulse la tecla "2" para
Page 21

21
C. Configuración mediante Búsqueda Manual (Manual
Search):
Si la configuración con el nombre y los códigos de la marca no da resultado, puede usar también
la Búsqueda Manual ("Manual Search") para encontrar el código correcto para controlar su
aparato.
1. Encienda el aparato que desea controlar. Si se trata de un grabador de vídeo, introduzca una
cinta de vídeo.
2. Apunte con el mando a distancia hacia su aparato. Mantenga pulsada la tecla SET y pulse la
tecla del aparato (p. ej. TV) en poco tiempo (menos de 3 segundos, de lo contrario entrará en
Búsqueda Automática), después suelte las dos teclas pulsadas.
3. La tecla del aparato se ilumina fija y el mando a distancia se encuentra entonces en el modo
de configuración.
4. Pulse la tecla POWER (tecla ON/OFF) cada 1,5 segundos aprox. (Si el aparato buscado es
un grabador de vídeo, reproductor DVD, reproductor de CD, SINTONIZADOR, PLETINA
DE CASSETTE o AUX, puede pulsar también la tecla PLAY.), seguidamente la tecla del
aparato parpadea, lo que significa que se encuentra en el modo de Búsqueda Manual.
5. Una vez se apague (o reaccione) el aparato buscado, compruebe el funcionamiento de las
otras teclas (no pulse la tecla POWER en el caso de que pase al código siguiente) en el mando
a distancia. Si la mayoría de ellas no funcionan correctamente, pulse la tecla POWER cada
1,5 segundos aprox. para llamar al código siguiente (continúe la Búsqueda Manual, vea los
pasos 4-5).
Si comprueba que la mayoría de las teclas del mando a distancia funcionan lo suficientemente
bien, puede memorizar el código pulsando la tecla del aparato (p. ej. TV) para finalizar la
Búsqueda Manual.
Nota:
La Búsqueda Manual se finalizará automáticamente si no se realiza ninguna entrada en un plazo de 30 segundos.
Otras funciones
A. Visualización del código del aparato:
El código del aparato, que se ha configurado en su nuevo mando a distancia, puede llamarse del
modo siguiente:
1. Mantenga pulsada la tecla SET, después pulse "1" para visualizar la 100ª posición del
código de 3 dígitos. Cuente los números en los que el LED parpadea. Si el LED no parpadea,
significa que el dígito es CERO.
2. De modo similar, mantenga pulsada la tecla SET y simultáneamente, pulse la tecla "2" para
visualizar la 10ª posición del código de 3 dígitos.
Page 22

22
23
3. Mantenga pulsada la tecla SET y simultáneamente, pulse la tecla "3" para visualizar la 1ª
posición del código de 3 dígitos.
Ejemplo para el código 028:
a. Pulse SET y "1"
b. Pulse SET y "2"
c. Pulse SET y "3"
el LED parpadea 0 veces, no parpadea.
el LED parpadea 2 veces.
el LED parpadea 8 veces.
B. Función reset / borrar:
Para borrar los códigos que se han configurado en el mando a distancia, mantenga pulsada la
tecla SET, pulse simultáneamente la tecla "0"durante más de 3 segundos y después suelte las dos
teclas. El LED parpadeará dos veces y se borrarán todos los datos de configuración en el mando
a distancia.
Nota: Por favor, no utilice esta función si no desea borrar todos los ajustes.
C. Protección contra escritura de los códigos de los aparatos:
Para proteger los códigos de los aparatos contra sobreescritura / borrado involuntario, puede hacer
lo siguiente:
1. Pulse la tecla del aparato (p. ej. TV) que desee proteger en su mando a distancia.
2. Mantenga pulsada la tecla SET y pulse simultáneamente al tecla "7". Después suelte ambas
teclas, el LED parpadeará dos veces y el código quedará protegido contra sobreescritura /
borrado.
MANUAL DE INSTRUÇÕES
Agradecemos a compra do comando à distância universal 4 em 1. O seu novo comando contém
uma das maiores bibliotecas com códigos infravermelhos para 4 aparelhos diferentes disponíveis
na Europa.
Este comando à distância está pré-programado, só precisa de escolher o aparelho que deseja
comandar (por exemplo TV) e o seu código de três dígitos da lista dos códigos de marcas (por
exemplo 001 na TV da Philips). Depois de configurado, ele fixará permanentemente todos os seus
dados de configuração, mesmo que remova mais tarde as suas pilhas.
O comando à distância 4 em 1 é adequado para praticamente todas as marcas comercializadas de
televisores (TV), leitores de DVD (DVD), receptores de satélite e por cabo digitais e analógicos
(CBL/SAT), e videogravadores (VCR).
Este comando à distância 4 em 1 comanda quase todas as funções básicas dos seus aparelhos.
Leia, por favor, este manual de instruções, antes da utilização do seu novo comando à distância
4 em 1.
Configuração:
Certifique-se de que foram inseridas 2 pilhas novas (tipo “AAA”) correctamente no seu
comando à distância.
Para que o seu comando à distância esteja pronto para ser utilizado, precisa de efectuar um dos
seguintes passos:
A. Configuração através do Código da Marca:
Nota:
Para cancelar la protección contra escritura, mantenga pulsada la tecla SET y pulse simultáneamente la tecla
"8", después suelte ambas teclas. El LED parpadea dos veces y la protección queda cancelada.
Dirección del Servicio Posventa: European Distribution Center
Londoner Straße 11
D- 48455 Gildehaus
Germany
Tel. Nat. / internat.: 00800/ 7777 88 99
E-Mail: Service@SupportPlus.org
1. Ligue o aparelho que pretende comandar (p. ex. televisor).
2. Na secção de trás deste manual encontra o nome e o código da marca do seu aparelho (p. ex.
3. Mantenha premida a tecla SET e accione a tecla de selecção do aparelho (p. ex. TV) ao
4. Introduza, agora, o código do aparelho de três dígitos (p. ex. 001 para um televisor Philips)
5. O LED apaga-se se o código for aceite pelo comando à distância. Se o LED piscar duas
Page 23

23
P
MANUAL DE INSTRUÇÕES
Agradecemos a compra do comando à distância universal 4 em 1. O seu novo comando contém
uma das maiores bibliotecas com códigos infravermelhos para 4 aparelhos diferentes disponíveis
na Europa.
Este comando à distância está pré-programado, só precisa de escolher o aparelho que deseja
comandar (por exemplo TV) e o seu código de três dígitos da lista dos códigos de marcas (por
exemplo 001 na TV da Philips). Depois de configurado, ele fixará permanentemente todos os seus
dados de configuração, mesmo que remova mais tarde as suas pilhas.
O comando à distância 4 em 1 é adequado para praticamente todas as marcas comercializadas de
televisores (TV), leitores de DVD (DVD), receptores de satélite e por cabo digitais e analógicos
(CBL/SAT), e videogravadores (VCR).
Este comando à distância 4 em 1 comanda quase todas as funções básicas dos seus aparelhos.
Leia, por favor, este manual de instruções, antes da utilização do seu novo comando à distância
4 em 1.
Configuração:
Certifique-se de que foram inseridas 2 pilhas novas (tipo “AAA”) correctamente no seu
comando à distância.
Para que o seu comando à distância esteja pronto para ser utilizado, precisa de efectuar um dos
seguintes passos:
A. Configuração através do Código da Marca:
1. Ligue o aparelho que pretende comandar (p. ex. televisor).
2. Na secção de trás deste manual encontra o nome e o código da marca do seu aparelho (p. ex.
Philips 001, 004, 016…). Nota: Os códigos devem estar na coluna para o grupo correspondente de aparelhos (TV).
3. Mantenha premida a tecla SET e accione a tecla de selecção do aparelho (p. ex. TV) ao
mesmo tempo. A tecla de selecção do aparelho TV no seu comando à distância acende, o que
significa que está no modo de configuração.
4. Introduza, agora, o código do aparelho de três dígitos (p. ex. 001 para um televisor Philips)
num espaço de 10 segundos. Se não for introduzido no espaço de 10 segundos, o modo de
configuração é automaticamente terminado.
5. O LED apaga-se se o código for aceite pelo comando à distância. Se o LED piscar duas
vezes, o que significa que o código pode estar errado, e o comando à distância permanecer no
Page 24

24
25
modo de configuração, deve introduzir novamente o código correcto da lista dentro do tempo
permitido para essa operação.
6. Verifique o funcionamento das teclas no comando à distância. Se a maioria das teclas no
seu novo comando à distância não funcionarem correctamente, tente um outro código de
aparelho de três dígitos (p. ex. 004…) da lista sob a mesma marca. Repita os passos 3 a 6 até
todas as funções básicas funcionarem correctamente. Uma vez inserido o código correcto,
isso significa que conseguiu a configuração correcta para este aparelho.
Nota:
Para sair do modo de configuração, prima a tecla de selecção do aparelho (p. ex. TV) ou se não accionar nenhuma tecla no espaço de 10 segundos, o modo de configuração será automaticamente terminado.
Pode configurar mais de um aparelho no novo comando à distância. Antes de utilizar normalmente o seu
novo comando à distância, prima primeiro a tecla de selecção do aparelho necessária para que o comando
à distância fique no seu estado de aparelho correcto, caso contrário pode comandar o aparelho errado, que
não era o pretendido.
B. Configuração através da Pesquisa Automática:
C. Configuração através da Pesquisa Manual:
Se a configuração através do nome e códigos da marca não for bem sucedida, também pode
utilizar a “Pesquisa Manual” para encontrar o código correcto para operar o seu aparelho.
1. Ligue o aparelho que pretende comandar. Se se tratar de um videogravador, insira uma
2. Aponte o comando à distância para o seu aparelho. Mantenha premida a tecla SET e prima a
3. A tecla de selecção do aparelho acende continuamente e o comando à distância está agora no
4. Accione a tecla POWER (tecla ON/OFF) quase todos os 1,5 segundos. (Se o aparelho que
Se a configuração através do nome e códigos da marca não for bem sucedida ou se não lhe for
possível encontrar o nome da marca na lista, pode utilizar a “Pesquisa Automática” para conhecer
o código correcto para o seu comando à distância.
1. Ligue o aparelho que pretende comandar. Se se tratar de um videogravador, insira uma
cassete de vídeo.
2. Aponte o comando à distância para o seu aparelho. Prima a tecla SET e a tecla de selecção do
aparelho (p. ex. TV) simultaneamente e mantenha-as premidas durante 3 segundos. Depois
a tecla de selecção do aparelho pisca, o que significa que está agora no modo de Pesquisa
Automática.
3. O sinal OFF é automaticamente transmitido ao aparelho a partir do comando à distância (localização do código). Logo que o aparelho (p. ex. TV) desligue, prima imediatamente qual-
quer tecla (excepto a tecla SET) para parar a Pesquisa Automática.
4. Ligue novamente o aparelho premindo a tecla “POWER”. Verifique o funcionamento das
outras teclas no comando à distância. Se todas as teclas não funcionarem (isso significa
que não pode parar a pesquisa a tempo) ou se a operação da maioria das teclas não for
suficientemente boa, pode começar novamente a pesquisa (consulte os passos 2–4) para
encontrar um código adequado.
Se a maioria das teclas funcionarem correctamente, isso significa que a sua configuração foi
bem sucedida, prima novamente a tecla de selecção do aparelho (p. ex. TV) para salvar o
código e concluir a configuração.
5. Logo que o aparelho pesquisado desligue (ou reaja), teste as funções de outras teclas (não
Se achar que a maioria das teclas no comando à distância funcionam suficientemente bem,
Nota:
A Pesquisa Manual será automaticamente terminada se não for efectuada nenhuma entrada no espaço de 30
segundos.
Outras funções
A. Mostrar o código do aparelho:
O código do aparelho, que foi configurado no seu novo comando à distância, pode ser chamado
da seguinte forma:
1. Prima a tecla SET e mantenha-a premida, agora accione a tecla numérica “1” para mostrar
Nota:
Para abortar a Pesquisa Automática, prima qualquer tecla (excepto a tecla SET). O LED apagar-se-á e a
pesquisa está concluída. Se não for premida nenhuma tecla no espaço de 30 segundos, a pesquisa é automaticamente abandonada.
2. De modo similar, prima a tecla SET e mantenha-a premida, ao mesmo tempo accione a tecla
Page 25

25
C. Configuração através da Pesquisa Manual:
Se a configuração através do nome e códigos da marca não for bem sucedida, também pode
utilizar a “Pesquisa Manual” para encontrar o código correcto para operar o seu aparelho.
1. Ligue o aparelho que pretende comandar. Se se tratar de um videogravador, insira uma
cassete de vídeo.
2. Aponte o comando à distância para o seu aparelho. Mantenha premida a tecla SET e prima a
tecla de selecção do aparelho (p. ex. TV) num curto espaço de tempo (inferior a 3 segundos,
caso contrário avança para a Pesquisa Automática), depois solte ambas as teclas premidas.
3. A tecla de selecção do aparelho acende continuamente e o comando à distância está agora no
modo de configuração.
4. Accione a tecla POWER (tecla ON/OFF) quase todos os 1,5 segundos. (Se o aparelho que
está sendo localizado for um videogravador, leitor de DVD, leitor de CD, rádio (TUNER),
leitor de cassetes (TAPE) ou auscultadores (AUX), também pode premir a tecla PLAY.),
a tecla de selecção do aparelho pisca agora, o que significa que está no modo de Pesquisa
Manual.
5. Logo que o aparelho pesquisado desligue (ou reaja), teste as funções de outras teclas (não
prima a tecla POWER, caso avance para o próximo código) no comando à distância. Se
a maioria delas não funcionarem correctamente, prima novamente a tecla POWER quase
todos os 1,5 segundos para chamar o código seguinte (continua a Pesquisa Manual, consulte
os passos 4-5).
Se achar que a maioria das teclas no comando à distância funcionam suficientemente bem,
pode salvar o código premindo a tecla de selecção do aparelho (p. ex. TV) para concluir a
Pesquisa Manual.
Nota:
A Pesquisa Manual será automaticamente terminada se não for efectuada nenhuma entrada no espaço de 30
segundos.
Outras funções
A. Mostrar o código do aparelho:
O código do aparelho, que foi configurado no seu novo comando à distância, pode ser chamado
da seguinte forma:
1. Prima a tecla SET e mantenha-a premida, agora accione a tecla numérica “1” para mostrar
a 100ª posição dos códigos de três dígitos. Conte o número de vezes que o LED pisca. Se o
LED não piscar, isso significa que o dígito é ZERO.
2. De modo similar, prima a tecla SET e mantenha-a premida, ao mesmo tempo accione a tecla
numérica “2” para mostrar a 10ª posição dos códigos de três dígitos.
Page 26

26
27
3. Prima a tecla SET e mantenha-a premida, ao mesmo tempo a tecla numérica “3” para mostrar
a 1ª posição dos códigos de três dígitos.
Exemplo para o Código 028:
a. Prima SET e “1”
b. Prima SET e “2”
c. Prima SET e “3”
O LED pisca 0 vezes, não pisca.
O LED pisca 2 vezes.
O LED pisca 8 vezes.
B. Função Redefinir / Apagar:
Para apagar os códigos que foram configurados no comando à distância, prima e mantenha premida a tecla SET, prima a tecla “0” simultaneamente durante mais de 3 segundos e, depois, solte
ambas as teclas premidas. O LED piscará duas vezes e todos os dados configurados no comando
à distância serão apagados.
Nota: Não opere esta função se não pretender apagar todas as configurações.
C. Protecção contra escrita de códigos de aparelhos:
Para proteger os códigos dos aparelhos de serem inadvertidamente sobrescritos / apagados, pode
efectuar o seguinte:
1. Prima a tecla de selecção do aparelho (p. ex. TV) que deseja proteger no seu comando à
distância.
2. Prima e mantenha premida a tecla SET, e prima a tecla “7” ao mesmo tempo. Depois
solte ambas as teclas premidas, o LED piscará e o código está, então, protegido contra ser
sobrescrito/apagado.
Nota:
Para cancelar a protecção contra escrita, prima e mantenha premida a tecla SET e accione a tecla “8” ao mesmo tempo, depois solte ambas as teclas premidas. O LED pisca duas vezes e a protecção foi cancelada.
Endereço de serviço: European Distribution Center
Londoner Straße 11
D- 48455 Gildehaus
Germany
Tel. Nat. / internat.: 00800/ 7777 88 99
E-Mail: Service@SupportPlus.org
Page 27

27
a. Press SET and 1
LED flashes 0 time, no flashes.
b. Press SET and 2
LED flashes 2 times.
c. Press SET and
3
LED flashes 8 times.
C. Reset / delete function:
To delete the codes which have been set up in the remote control, press and hold down the
SET key, press the “0
key simultaneously for more than 3 seconds and then release the both
pressed keys. The LED will flash twice and all the set up data in the remote control are
deleted.
Note: Please don’t operate this function if you don’t want to delete all the settings.
D. Write-protection of device codes:
To protect the device codes from being inadvertently overwritten / deleted, you can carry
out the following:
1. Press the device key (e.g. TV) that you would like to protect on your remote control.
2. Press and hold down the SET key and press the
7 key at the same time. Then release
the both pressed keys, the LED will flash twice and the code is then protected from being
overwritten/deleted.
Note: To cancel write protection, press the SET key and hold it down, and activate the 8 key at the
same time, then release the both pressed keys. The LED flashes twice and the protection has been
cancelled.
Device Brand Code List
TV
Brand
TV
Acme 004,010
Acura 010
ADA 015
ADC 002,006
Admiral 001,002,003,020,050,054,109,187,196,197
Adyson 004,186,210,213
Agashi 187,206,212,214
Agazi 003
Agb 124
Aiko 004,005,010
Aiwa 088,213
Akai 007,009,010,011,012,052,062,069,070,071,134,142,170,206,221
AKI 206
Akiba 012,212
Akito 026
Akura 003,012,016,072,191,206,212
TV
Liste der Gerätemarkencodes
Device Brand Code List
Liste des codes des marques d‘appareils
Apparaatcodelijst
Lista de códigos de la marca del aparato
Lista dos códigos de marca dos aparelhos
Page 28

28
29
Alba
004,010,012,028,029,054,063,069,087,163,170,184,187,195,
206,215,217
Albiral 038,206,207
Alkos 165
Allorgan 021,027,195,212,219
Allstar 052
Amplivision 004,209,214,228
Amstrad 003,010,012,014,031,069,070,072,075,109,124,226
Anam 010,066,110
Anglo 010
Anitech 003,010,016,044,110,183,184,224,231
Ansonic 010,015
Arc En Ciel 046,127,140,204,207
Arcam Delta 004
Aristona 016,052,170,195
Arthur Martin 159
Art-Tech 212
ASA 001,017,018,019,050,111
Asberg 044,052,182,187,195
Astra 010
Astro Sound 207,212
Asuka 003,004,012,212,214,218
Atlantic 004,021,022,052,170,182,197
Atori 010
Audiosonic 004,010,012,021,052,140,170
Audioton 004,182,231,233
Ausind 044,212
Autovox 001,003,004,021,044,058,102,126
Baird 140,198,200,206,232
Bang&Olufson 001
Barcom 210
Basic line 010,012,052,184,198,212
Bastide 004
Baur 077,119,133,142,170
Bazin 183,201,206,217
Beknteknik 228
Beko 008,035,084,214,228
Beon 052,170
Best 114,115
Bestar 052,116,228
Binatone 004
Black Star 130
Blacktron 212
Blackway 212
Blaupunkt 009,023,101,113,120,136,179
Blausonic 209
Blue sky 012,212,228
Blue star 121
Bondstec 130
Page 29

29
Boots 004,026
Boston 208,218
BPL 121
Brandt 023,037,046,047,127,128,140,204
Brion vega 001,052,058,170,208
Bristol 208
Britannia 004
Bruns 001,008,040,227
BSR 027,132,197,210,212,215
BTC 012
Bush
010,012,020,025,026,028,029,033,052,063,069,116,121,132,
133,140,168,
170,172
California 195
Capsonic 003,214
Carena 212,214
Carrefour 028
Cascade 010
Casio 201
Cathay 052,170
Centurion 052,170
Century 001,191
CGE 044,054,130,132,187,204
CGM 233,234
CIE 196,212,226
Cihan 214
Cimline 010,029,212,213
City 010
Clarivox 038,040,170
Clatronic 003,004,010,012,031,044,052,084,130,206,212,214
Cofadel 204
Colombia 228
Colombus 182
Concorde 010
Condor 004,022,052,084,182,184,187,211
Cont. Edison 204
Contec 004,010,028,030,031,211,212,217
Continental Edison 023,037,046,047,112,127,140
Cosmel 010
Crezar 182,234
Crosley 001,044,130,132
Crown 010,044,052,054,084,115,122,170,228
Cs Electronics 004,012,130
CTC 130
CTC Clatronic 015,187,207,210,212,226
Cybertron 012
Daewoo 004,010,052,059,095,116,196
Dainichi 012,212
Dansai 003,052,170,212
Dantax 035,149,162,213
Page 30

30
31
Datronic 196,211
Datsura 122
Dawa 195
Dayton 010
Daytron 196
De Graaf 007,020,034
Decca 004,011,026,031,052,124,170,229
Denko 206,214
Denver 211,212
Desmet 052,170,182
Digiline 213
Digital 212
Dixi 010,040,052,170
Domland 219
Domoh 182
DTS 010
Dual 004,090,126,127,132,140,161,195,197,206,207,211,219
Dual-Tec 004,010,132,197
Dumont 001,004,015,018,019
Dux 170,195
Dynatron 052,170
Elbe 038,109,158,180
Elcit 001
Electa 121
Electro Tech 010
Elektronska 209
Elin 004,017,019,052,170,181,197,198,233
Elite 012,022,052,179,184,197
Elman 015,132,207,209,213
Elsay 184,229
Elta 010
Emerson 001,128,142
Engel 207,227
Erres 016,052,170
Estel 207
Etron 010
Eurocom 209,212
Euro-Feel 003
Euroline 089,170
Euroman 196,206,212,214
Euromann 003,004,052,115
Europa 228
Europhon 004,015,026,052,073,124,132,209,234
Eurotronic 228
Expert 021,188,197,198
Fenner 010,116,184,191,195,212
Ferguson 036,037,038,051,053,082,096,112,128,164,170,232
Fidelis 182,211
Fidelity 004,020,069,096,097
Page 31

31
Filsai 217
Finlandia 007,020,111,129,181,198,200
Finlux
001,004,011,015,017,018,019,044,052,064,111,124,132,158,
168,170,181,
225
First Line 004,010,027,052,063,130,183
Fisher 001,004,007,019,028,030,040,041,084,132,195,200,211,227
Flint 052,149,183,184,187,196,214
Forgestone 096
Formenti 001,002,004,022,044,126,132,134,170,182
Fortress 001,002
France Concept 184
Frontech 003,010,020,050,069,119,130,183,184,191,213
Fujitsu 011,021,197,209,212
Funai 003,027,211,212
Galaxi 054,084
Galeria 196
Galway 184
GBC 010,028,132,233,234
GCM 195,212
GEC 004,011,042,050,052,124,133,142,170,186,198,224,229,231
Geloso 010,020,132,231
General Technic 010
Genexxa 012,050,052,212
Germanvox 234
Goldhand 231
Goldstar 004,010,013,020,052,085,094,130,132,170,172,210,223
Goodmans 003,010,011,028,029,052,069,094,112,116,128,154,170,230
Gorenje 084,115
GPM 012,210,212
Graetz 050,142,143,188
Granada
004,007,011,020,028,032,041,044,052,055,065,124,128,129,
134,135,139,
170
Grandin 010,012,121,170,184
Gronic 180,191,212
Grundig 009,018,044,092,102,117,118,136,137,185
GTT 187,211
Halifax 003,004
Hampton 004,183,234
Hanseatic 004,008,010,022,027,028,052,074,119,132,142,170
Hantarex 010,124
Harwood 186
HCM 003,004,010,075,121,200,211,234
Hemmerman 183,201
Hifivox 140,204
Higashi 206
Hinari 007,010,012,028,044,052,138,170,200,212,213,227,230
Hisawa 012,121,149,212
Page 32

32
33
Hitachi
004,011,017,020,024,028,034,042,045,046,047,048,049,050,
086,119,124,
132,133,139,140,141,142,143,145,186,224
Hitsu 206,212
Hornyphon 052
Hoshai 012,212,233
Huanyu 004,116
Hygashi 004
Hyper 004,010,130,132,233,234
Hypson 003,004,052,121,170,212,214
Ibervisao 188,207
Ibico 196
ICE 003,004,010,012,052,069,187,210,212
Imperial 044,050,052,054,084,130,132,187
Indesit 025,102
Indiana 052,170
Ingelen 050,188
Ingersol 010
Inno Hit 004,010,011,012,052,094,124,170,211,222
Innovation
003,010,062,068,069,088,104,108,112,116,155,157,169,172,
176,177,178
Interbuy 010,110,130
Interfunk 001,016,050,052,130,140,142,170
Intersound 182
Intervision 003,004,015,110
Irradio 010,012,052,069,170,212
Iskra 183,231
Isukai 012,212
ITC 004,132,184,204,233
ITE 209
ITL 196
ITS 012,052,069,121,212
ITT 010,050,062,133,134,135,142,143,144,188,220
JEC 165
Jet Point 199
JVC 028,052,069,082,189
Kaisui 004,010,012,121,212
Kamosonic 004
Kamp 004
Kapsch 021,050,188,197,200
Karcher 004,010,017,038,170
Kasai 212
Kendo 015,020,029,109,180,183,196,197,198,207,213
Kennedy 021,132,182,197,231
Kennex 182,233,234
Kerion 182,212
Kingsley 004
Kitt 212
Kneissel 175,180,182,196,212
Kolster 052,191,210,214
Page 33

33
Konka 012,206
Kontact 204
Korpel 052,170
Korting 001,022
Kotron 226
Koyoda 010
Kronne 180
KTV 004,210
Kuba 186,195
Kuro 122,200
Kyoto 038,217
Lavis 211
Lenco 010,233,234
Lenoir 004,010,196,199,208,211
Lesa 130,191
Leyco 003,011,027,052,170,214
LG 004,010,013,020,052,085,089,094,130,132,150,170,172,210,223
Liesenk 170
Liesenkotter 179,195
Life 003,010,062,068,069,088,104,108,112,116,155,157,169,172,
176,177,178
Lifetec
003,010,062,068,069,088,104,108,112,116,155,157,169,172,
176,177,178,
211,214
Loewe 098,099
Loewe Opta 001,052,170,190
Logik 031
Luma 020,021,052,142,170,197,198
Lumatron 020,021,052,142,170
Lux May 052
Luxor 004,020,048,078,094,102,133,139,142,147
Madison 182,212
Magnadyne 001,015,124,130,132,170,191
Magnafon 004,015,044,073,124,181,182,183,195,209
Magnum 003,010,062,068,069,088,104,108,112,116,155,157,169,172,
176,177,178
Mandor 003
Manesth 003,004,022,029,052,170,182,184,188,213
Marantz 052,170,187,195
Marech 182
Marelli 001
Mark 052,170
Marshall 212
Matsui 004,005,010,011,014,020,026,027,028,029,031,052,063,069,
092,124,148,
149,165,170,174,213,215
Matsushita 066
Mcmichael 042
Mediascreen 214
Mediator 016,052,170,195
Page 34

34
35
Medion 003,010,062,068,069,088,104,108,112,116,155,157,169,172,
176,177,178,
211
M-Electronic 004,010,017,019,037,050,052,069,110,111,116,140,170
Memorex 010
Memphis 010,011,114
Metz 001,076,081,136,152,153,218
Micromaxx 003,010,062,068,069,088,104,108,112,116,155,157,169,172,
176,177,178
Microstar 003,010,062,068,069,088,104,108,112,116,155,157,169,172,
176,177,178
Minerva 018,102,136,185
Minoka 052
Mitsubishi 001,028,031,052,055,056,061,099,102,136,171,192
Mivar 004,044,074,094,124,193
Motion 044
MTC 133
Multi System 170
Multitech 004,010,015,020,028,044,046,130,132,170,209,212,233
Murphy 004,019,134
NAD 142
Nagoya 207
Naonis 020,109
National 065,102,194
NEC 028,057
Neckermann 001,004,009,020,023,052,084,119,133,170
NEI 052,069,114,170,183,199,212
Nesco 130
New World 012
Newmar 182,183,209
Newtech 010,052
Nicamagic 004
Nikkai 003,004,011,012,052,114,165,170,186,205,211,212
Nikkei 233,234
Noblex 184,199,200
Nobliko 004,015,018,044
Nogamatic 140,204
Nokia 050,062,064,133,134,135,142,143,144,188,220
Nordic 212,213
Nordmende 025,037,046,047,050,052,058,112,127,128,140,204
Nordvision 170
Nordway 217
Nortek 233
Novatronic 183,187,212,234
Oceanic 050,142,143,188,220
Octan 195
Okano 084,187,233
Onceas 004,196,211
Onwa 070,196,212
Orbit 052
Page 35

35
Orion 010,014,022,027,029,031,052,063,076,096,100,124,143,148,
160,170,172,
213
Ormond 172
Orsow’e 209
Osaki 003,004,005,011,012,075,166
OSO 012
Osume 011,030
Otto Versand 002,004,009,022,028,052,077,112,119,121,122,132,133,140,
142,170
Pael 004,181,206
Palladium 004,013,084
Panama 003,004,010,166
Panasonic 050,065,066,067,068,102,125,142,143,152,153,194
Pathe Cinema 004,022,038,074,132,182,207,211,228
Pathe Marconi 023,038,046,047,127,140,204
Pausa 010
PCM 211
Perdio 005,011,022,182,209,213
Philarmonic 206
Philco 001,044,054,130,132,187
Philharmonic 004,166
Philips 001,004,016,039,042,044,052,089,090,096,112,116,132,142,
156,170,195,
219
Phoenix 001,052,170,182,195
Phonola 001,016,052,170,195,219
Pioneer 037,050,052,140,146,170,216
Plantron 003,052
Poppy 010,211
Prandoni 182,197,209,212
Prandoni-Prince 020,124,142
Precision 004,166
Prima 010,050
Prinz 048,186,195,217,230
Profex 010,044,142
Profilo 172
Profi-Tronic 052
Proline 011,016,052,063,184,213,214
Prosonic 043,108,162,170,172
Protech 003,004,010,015,052,114,130,132,133,166,170
Provision 170
Pye 016,052,069,170,195
Pygmy 208
Pymi 010
Quasar 130
Quelle 003,004,017,018,019,023,027,031,052,077,130,132,136,142,
151,170
Questa 028
Radiola 016,039,052,170,195
Page 36

36
37
Radiomarelli 001,124,130,191
Radionette 017,019,181,188
Radioton 206,211
Radiotone 008,052
Rank 018,028
RBM 018
RCA 032
Rediffusion 142
Revox 052,170,190
REX 003,020,021,050,109,158,197
RFT 001,008,040,227
R-Line 052,170
Roadstar 003,010,012,233,234
Robotron 001,227
RTF 001
Saba 001,037,046,047,050,059,112,124,127,128,140,142,143,204
Saccs 038
Sadec 212
Sagem 184
Saisho 003,004,010,014,029,031,096,124,183,213,215
Saito 207
Salora 020,048,050,094,108,109,119,122,129,132,133,135,139,142,198
Sambers 015,044,073,124,181,207,209,211
Samsung 003,004,010,011,031,052,084,091,094,105,106,161,166,170,
173,199
Sandra 004
Sandra Color 195,231
Sansui 052,183,196,212
Sanwa 188
Sanyo 004,007,011,017,019,028,030,031,032,040,041,044,074,128,
132,135,161,
200
SBR 016,042,096,170
Schaub Lorenz 050,142,143,188,220
Schneider 004,012,039,052,069,072,126,130,132,140,161,170
Schneider France 195,212,219
Scott 182
SEG 003,004,015,028,040,044,089,130,132,170
SEI 201
SEI-Synudyne 001,014,015,027,050,076,124
Seleco 020,021,028,050,109,132,158,197
Sencora 010
Senday 182
Sentra 165,205,212
Serino 184,212
Sharp 002,006,028,030,060,202
Shivaki 195,196
Shiwan 212
Shorai 027,212
Siarem 001,015,124,132,180,191
Page 37

37
Sicatel 038,207
Siemens 009,023,030,136,179
Sierra 016,052
Siesta 161
Silva 211,212,224
Silver 028
Singer 001,015,130,132,180,188,191,204,211
Sinudyne 001,014,015,027,029,076,132,170,201
Skantic 050,139,147
Sogera 022
Solavox 050,093,188
Soniko 214,217,233
Sonitron 007,135
Sonoko 003,004,010,052,170,211,212,214
Sonolor 007,050,188
Sontec 052,161,170,196,210,220
Sony 010,011,028,030,031,077,107,128,131,166,203
Sound&Vision 012,015
Soundcolor 211,212,214,215
Soundmaster 226
Soundwave 052,170
Standard 004,010,012,022,052,166,182,183,191,196
Starlight 170
Starline 228
Starlite 212
Starlux 196,226
Stenway 121,206,212
Stern 020,021,050,197
STM 221
Sunic Line 182
Sunkai 010,027,063,183,211,212,213
Sunwood 010,052
Superla 004
Supertech 119,212,233,234
Supertone 206,207
Supra 010,184,214
Susumu 012
Sutron 010
Sydney 004,166
Sysline 170
Sytong 212
Taisho 207,213
Tamashi 212
Tandberg 081,158
Tandy 002,004,011,012,049,050,166
Tashiko 004,020,028,042,057,129,166
Tatung 004,011,026,052,124,166,170,229
TCM 003,010,062,068,069,088,104,108,112,116,155,157,169,172,
176,177,178
Page 38

38
39
Teak 190
TEC 004,010,049,130,132,166
Technema 182
Technics 066,194
Technisat 040
Tecnema 022
Teinelsa 182,207
Teknant 211
Teleavia 023,037,046,112,127,140,204
Telefunken 023,036,037,051,052,053,079,080,102,103,112,127,128,140,
164,204
Telemeister 022
Teleopta 226
Teletech 010,089,114,130,170
Teleton 004,021,081,119,133,166,197
Televideon 022,182
Tennesee 233
Tensai 010,012,019,022,027,052,184,206,209,211,213,217
Tenson 182
Tesla 180,207
Tesmet 052
Tetran 182,197
Tevion 003,010,062,068,069,088,104,108,112,116,155,157,169,172,
176,177,178
Texet 004,166
Thomson 004,023,037,046,047,051,052,053,059,102,103,112,127,128,
140,164,167,
204
Thorn 011,019,036,038,055,082,096,112,128,142,165,170,232
Tokai 011,052,183,184,210,212,226
Tokyo 004
Tomashi 121,212
Top Vision 210
Toshiba 018,028,083,165,205
Towada 050,132
Trevi 199,233,234
Trident 166
Triumph 014,083,124,181,211,226
Tsoshi 212
Uher 021,022,044,050,052,181,184,190,195,197
Ultravox 001,004,015,130,132,134,182,183,191,198,201
Unic Line 182,183,212
Unic Radio 180,188,228
Uniden 212
United 089,170,228
Universum 003,017,019,052,084,103,111,115,123,130,132,170
Univox 038,188,191,195,207
Uranya 182,191,211
Utax 211
Vanguard 186,212
Page 39

39
Vestel 050,052,170,183,199
Vexa 010,170,212,231
Victor 028,052,066
Video System 052
Videologic 206
Videologique 004,012
Videosat 130
Videoton 184,217
Vidion 196
Visiola 004,180
Vision 022,052,182
Visorex 097
Vistar 049,188
Vortec 052,170
Voxson 001,020,044,050,052,109,189,197,208
Walkie 197
Waltham 004,038,049,139,166,217
Watson 022,052,170
Watt Radio 004,015,038,132,187,201,210,231
Wega 001,028
Wellfund 233
Weltblick 052,170,182
Westinghouse 182
Weston 132
White 182
White
Westinghouse
004,015,022,044,170
Xoceco 235,236
Xrypton 182
Yamishi 184,212
Yoko 003,004,010,012,052,166,170,183,212,224
Yorx 012,196,206
Zanussi 020,021,109,197
Zoppas 197
VCR
Brand
VCR
Adelsound
098
Adyson
099
Aiwa 001,002,003,004,017,100,101,102,103,104,105,106
Akai 003,005,006,007,008,009,063,102,105,113,121,145,146
Akiba 041,099
Akitan 107
Akura 003,013,041,099,102
Alba
004,014,015,016,017,019,041,099,101,103,104,105,107,108,
109,110,111,
113
Allorgan 073,145
VCR
Page 40

40
41
Allstar 114,115
Ambassador 019
Amstrad 002,022,023,099,101,108,116,117
Anitech 041,099,114
Anitsch 091
Ansonic 098
Aristona 115
ASA 025,026,086,106,115
Asuka 002,025,026,041,099,101,106,115,118
Audiosonic 108
AWA 106,108,119,120
Baird 002,003,005,014,027,028,045,101,102,108,121,122,123
Basic Line 004,014,019,041,099,103,108
Baur 026,032
Bestar 014,019,108
Black Panther 108
Black Panther
Line
014
Blaupunkt 026,029,030,031,032,039,071,115,125,126,127,128,129,130
Blue Sky 099,103,104,105,106
Bondstec 019,099
Brandt 066,067,102,131,132,133,134
Brinkmann 103,104
Brion vega 033,135
Broksonic 042
Bush
004,014,015,016,017,041,052,099,101,103,104,105,108,109,
110,113,136
Canon 137
Carena 103,115
Carrefour 138
Casio 101
Cathay 108
Catron 019
CGE 002,003,101,102
CGM 089
Cimline 004,041,099,103
Clatronic 019,099
Combitech 017,105
Condor 014,019,108
Crown 014,019,041,099,108,114
Daewoo 014,019,034,040,079,103,105,108,138
Dansai 041,099,108
Dansat 143
Daytron 014,108
De Graaf 026,035,115,122,139,140,141,147
Decca 002,003,026,101,102,104,115,142,143
Deitron 108
Denko 099
Diamant 106
Domland 103
Page 41

41
Dual 003,026,101,102,108,115
Dumont 002,026,035,045,101,115,122,144
Elbe 062,108,118
Elcatech 099
Elin 021,145
Elsay 099
Elta 041,099,108
Emerson 053,099,138
ESC 014,108,145
Etzuko 041,099
Ferguson 003,028,039,043,046,057,067,101,102,108,123,133,134,146
Fidelity 002,099,101,116,145
Finlandia 026,035,045,101,115,122,139,140,147
Finlux 002,003,005,026,035,045,050,061,101,115,122,144,147
First Line
004,025,034,035,041,061,099,103,104,106,108,120,136,138,
147,148
Fisher 044,045,118,122,141,149,150
Flint 004,103
Formenti-Pheonix 026
Frontech 019,114
Fujitsu 002,101
Funai 002,101
Galaxi 101
Galaxy 002
GBC 019,041
GEC 026,115
Geloso 041
General 019
General Technic 004,017,038,073,104
Genexxa 122
Goldhand 041,099
Goldstar 002,025,101,106
Goodmans
002,014,019,021,025,028,041,047,048,099,101,103,104,106,
108,115,129,136,145,151,152
Gradiente 142
Graetz 003,033,045,102,122,135,145
Granada 010,026,035,039,045,049,101,106,115,122,127,140,141,145,147
Grandin 002,014,019,025,041,099,101,103,106,108
Grundig
026,029,032,039,041,050,051,052,054,084,104,115,127,128,
129,133,153,154,155
Hanimex 105,107
Hanseatic 025,026,103,106,108,115
Harwood 099
HCM 041,052,099,114
Hinari
004,017,041,052,053,098,099,102,103,105,108,114,136,148,
152,156
Hisawa 004,103,105
Hitachi 002,003,026,035,037,098,101,102,115,122,129,139,144,145,147
Hornyphone 115
Hypson 004,041,099,103,105,108
Page 42

42
43
Impego 019
Imperial 002,101,145
Ingersoll 098,103,145
Inno Hit 014,019,021,026,041,099,108,114,145
Innovation 004,017,038,073
Interbuy 025,099,106
Interfunk 026,045,115,122
Internal 108
International 108
Intervision 002,101,103,104,106,108
Irradio 025,041,099,106,115
ITT 003,005,033,045,055,056,102,121,122,135,141,145,157
ITT/Nokia 082,085,088,089,090,092,140
ITV 014,025,106,108
JVC 003,056,057,058,059,060,102,132,142,143,157
Kaisui 041,099
Karcher 026,108
Kendo 004,005,006,014,019,034,063,099,103,104,106,113,121,146
Kenwood 003,102,118
Kimari 149
Kneissel 103,104,105,106
Korpel 041,099
Kuba 149
Kyoto 099
Lenco 014
Leyco 041,099,148
LG 002,025,101,106,108
Lifetec 004,017,038,073,103,104
Loewe 031,036,098,106,115,126,127,144,158,159
Loewe Opta 025,026,039
Logik 021,041,098,099,103,121,145
Luma 093
Lumatron 014,108
Luxor 005,045,047,061,099,120,121,122,140,141,149,151
M-Electronic 002
Magnasonic 045
Magnavox 115,129
Manesth 034,041,099,103,115,138
Marantz 026,039,047,062,103,107,115,118,127,151,160
Mark 108
Marquant 114
Maspro 162
Matsui 004,017,025,053,064,098,101,103,104,105,106,107,111,117,
145,148,156
Mediator 026,115
Medion 004,017,038,073,103,104,105
Melectronic 101,106,118
Memorex 002,010,025,044,045,101,106,122,140,141,149
Memphis 041,099
Page 43

43
Metz 030,031,032,039,084,115,125,126,127,128,153,158,159
Micormay 104
Micromaxx 004,017,038,073,103
Microstar 004,017,038,073
Migros 002,101
Minerva 032,039,128
Mitsubishi 002,026,057,061,115,119,120,143,162
Multitech 002,019,026,041,099,101,114,122
Murphy 002,101
NAD 096,122
National 029,031,126
NEC 003,057,062,102,106,118,122,143
Neckermann 003,026,033,053,102,115,127,135,156
NEI 026
Nesco 041,099,101,105
Neufunk 103
Nikkai 019,065,099,108
Nobliko 083,097
Nokia 003,005,010,021,033,045,055,102,108,113,115,121,122,135,
140,141,145,
147
Nordmende 003,056,057,066,067,102,131,133,134,143,157
Oceanic 002,003,010,101,102,115,121,122,140,141
Okano 004,063,099,103,104,108,113,114
Orion 004,015,017,048,053,064,098,103,104,105,107,109,110,148,
152,156
Orson 002,101
Osaki 002,025,041,099,101,106
Osume 136
Otake 109,110
Otto Versand 026,032,115
Palladium 003,025,039,041,063,098,099,102,103,106,113,127,145
Palsonic 099,101
Panasonic 029,030,031,038,076,125,126,158,159
Pathe Cinema 064,098,120
Pathe Marconi 003,102
Pentax 035
Penney 062
Perdio 002,101,103
Philco 062,099,118
Philips 012,026,039,054,056,077,115,127,129,160
Phonola 026,115
Pioneer 026,057,115,143,147
Portland 014,019,108
Prinz 002,101,148
Profex 041,114
Profitronic 115,145
Proline 002,052,101,133,134,136
Prosco 108
Prosonic 101,103,108
Page 44

44
45
Protech 115
Provision 108
Pye 026,115
Quartz 045
Quelle 002,026,027,032,033,039,045,053,115,127,135,156
Radialva 099,106,115,140
Radiola 026,115
Rank 102
RCA 094
REX 003,056,102,157
RFT 019,026,099,129
Roadstar 014,021,025,041,099,106,108,145
Royal 099,114
Saba 003,046,056,066,067,081,102,108,131,132,133,134,151,157
Saisho 004,017,041,053,064,098,103,104,111,148,156
Salora 005,045,055,061,120,121,122,141
Samsung 021,073,074,145,163
Samurai 019
Sansui 003,013,057,099,102,104,114,121,143
Sanwa 098
Sanyo 027,044,045,122,140,141,143,149
Saville 017,105,108,145
SBR 026,115
Scan Sonic 145
Schaub Lorenz 002,003,005,033,045,101,102,113,121,122,135
Schneider 002,004,014,019,025,026,034,041,099,101,106,108,115,145
Seaway 108
SEG 021,041,099,108,114,119,145
SEI-Sinudyne 026,098,115
Seleco 003,102,106,142,157
Semivox 103,138
Sentra 019,099,136
Sentron 041
Setron 099
Sharp 010,011,047,106,140,151
Shintom 041,045,099,122
Shivaki 025,106
Shorai 098,148
Siemens 025,032,039,045,050,106,115,122,127,128,150,155,160
Siera 115
Silva 025,106
Silver 108
Sinudyne 026,098,115
Solavox 019
Sonitron 149
Sonneclair 099
Sonoko 014,108
Sonolor 010,140
Sontec 025,106
Page 45

45
Sony 018,020,024,070,071,072,075,078,112,121,124,130,161,164
Sound Wave 103,106
Ssangyong 099
Standard 014,108
Starlite 106,122
Stern 108
Strong 013
Sunkai 004,103,104,107,108
Sunstar 002,101
Suntronic 002,101
Sunwood 041,099
Supra 106,145
Symphonic 099,101
Taisho 004,098,103,148
Tandberg 032,053,108
Tashiko 002,010,101,106,115,140,145
Tatung 002,003,026,101,102,103,104,105,115,120,140,146
TCM 004,017,038,073
Teac 100,101,102,106,108,115
TEC 019,099,108
Technics 029,031
Technisat 103,104
Teleavia 003,102,131
Telefunken 003,056,057,058,066,067,068,069,080,081,102,108,131,133,
134,157
Telemeister 095
Teletech 099,101,108,114
Tenosal 041,099
Tensai 002,025,041,098,099,101,106,114
Tevion 004,017,038,073,103,104
Thomson 003,012,056,057,058,067,080,081,102,132,133,134,157
Thorn 003,045,064,102,106,122
Tivo Hdd 012,078
TMK 087
Tokai 025,041,099,102,106,122
Tokiwa 099
Tonsai 041
Topline 104
Toshiba 003,026,034,056,061,102,115,120,129,138,157
Towada 041,099,114
Towika 041
Triumph 053,156
TVA 019
Uher 025,033,106,135,145
Ultravox 033,108,135
Unitech 021,145
United Quick Star 014,108
Universum 002,005,009,022,025,026,032,039,054,101,103,104,106,114,
115,116,121,
127,128,129,145
Page 46

46
47
Vector 062
Victor 057,058,142,143
Videon 004,017,038,073
Video 062
Watson 105,115
Weltblick 025,106
White 085,086
White
Westinghouse
033,085,086,135
Xenon 093
Yamishi 041,099,108
Yokan 041,099
Yoko 019,021,025,041,099,106,145
ZX 103
SAT/CABLE
Brand SAT CABLE
Akai 003,125
Alba
003,004,005,006,007,008,009,102,
133,
204
Aldes 007,010,011
Allantide 015
Allsat 012,014,055,125,205,206
Allsonic 010,029
Ampere 024
Amstrad 017,018,019,021,023,154,193
Andover
Cablevision
238
Ankaro 010,029,214
Anttron 004,009,014,206
Apollo 004
Arcon 017,024,025,027,056
Armstrong 021
ASA 200
Asat 125
AST 036
Aston 164
Astra
003,021,030,031,032,033,034,093,
196
Astro 009,011,029,040,041,042
Audioton 009,055
Aura 034
Austar 092,193,212
Axis 017,029,033,050
Barcom 025,196
Beko 204
Best 025,029,214
Blaupunkt 040
Boca 021,093
SAT/CAB LE
Page 47

47
Brain Wave 044
Brandt 136,137,138,145
Broadcast 043
Brunor 126
Bskyb 154
Bt Cable 240
BT Satellite 003,022,145
Bush
005,006,012,045,102,133,195,205,
206
Cabletime 241,242,243,244
Cambridge 003,046
Camundosat 047
Canal Satellite 203,222
Canal+ 140,174,222
Channel master 007
Chaparral 098
Citycom 005,052
Clatronic 044
Clemens Kamphus 015,083
Clyde Cablevision 245
CNT 011
Columbus 069
Commlink 010
Comtech 050,051
Condor 029
Connexions 039,047,048
Conrad 197
Contec 050,052
Cosat 055
Crown 021
Cryptovision 204 246
D Box-Df1 135,227,230
Daeryung 039
Dansat 012,014,205,206
D-Box 194,198
DDC 007
Decca 053
Delega 007
Delfa 193
DEW 050
Diamond 054
Diskxpress 025,048
Ditristrad 055
DNT 039,125
Dong Woo 092
Drake 056,128
Dynasat 031
Echostar
026,039,057,058,060,073,149,150,
151,
156,203,232
Page 48

48
49
EEC 015
Einhell 004,010,015,019,021
Elekta 011
Elrad 226
Elta 004,008,029,055,125
Emanon 004
Emme Esse 029,031,045,083,195,223
Ep Sat 005,204
Eurocrypt 196,204
Eurodec 062,063
Europa 022,193
Eurosat 021
Eurosky 021,029,031
Eurospace 061
Eurostar 008,021,080
Exator 003,004,009
Ferguson
005,012,014,045,062,064,065,066,
195,
204,205,206,207
Fidelity 017,019
Filmnet 226
Filmnet
Cablecrypt
247
Filmnet Comcrypt 247
Finlandia 005,196,204
Finlux
003,005,030,067,072,079,196,197,
204
Finnsat 050,062
Force 148
Foxtel 211,212
Fracarro 133,223
France
Satellite/TV
069
France Telecom 225
Freecom 004,068
FTE 022,024,051,087
Fuba
004,025,029,032,039,040,069,072,
122,
125,196,197,199,214
Galaxi 025
Galaxis
010,029,033,050,055,070,076,152,
153,
192,193,203,234
GEC 245
GMI 021
Goldbox 203
Goldbox-D+ 222,233
Goldstar 068
Gooding 075
Goodmans 005,074,204
Page 49

49
Granada 030,196
Grothusen 004,068
Grundig
005,009,040,045,075,077,086,124,
154,
195
017,075
G-Sat 014,015,206
Hanseatic 095
Hantor 004,044,092
Hanuri 011
Harting Und
Helling
015
Heliocom 024
High Performance 082
Hinari 007,008,014,206
Hirschmann
015,039,040,078,079,080,083,122,
129,
178,179,180,181,197,200
Hisawa 044
Hitachi 005,045,115,195,204
Houston 055
Humax 152,192,193,234
Huth 010,013,021,043,044,050,055,083
Imperial 102,133
Innovation
029,085,095,153,156,157,214,215,
216,
217
Intertronic 021
Intervision 055
Italtel-Stream 223,224
ITT/Nokia
005,030,045,048,079,115,122,194,
195,
196,197,198,199,200,201,204
Jerrold 237,250
Johansson 044
JSR 055
JVC 003,075
Kathrein
015,040,042,052,087,088,089,090,
098,
125,177
Kosmos 068,083,087,088
KR 009
Kreiselmeyer 040
Kyostar 004
Lasat 011,029,091,092,093,136,137,138
Lenco 004,022,068,094
Leng 044
Lennox 055
Leyco 003
LG 068
Life 137,153
Page 50

50
51
Lifesat 029,085,095,137,153,156,157,214,
215,
216,217,218,219
Lifetec 029,085,095,137,153,156,157
Lion 015,061
Lorraine 068
Lupus 029,214
Luxor 019,030,115,122,196,197,198,199
Macab 062
Manhattan 005,011,045,055,195,204
Marantz 125
Mascom 011,088
Maspro 005,045,064,075,098,129,195,207
Matsui 003,075,145
MB 095
Mediabox 203
Mediamarkt 021
Mediasat 033,203,222
Medion 029,085,095,137,153,156,157,214,
215,
216,217,218,219
Mega 125
Metronic 004,009,010,171
Metz 040
Micro Technology 015,034,061
Micromaxx 029,085,095,137,153,156,157,214,
215,
216,217,218,219
Microstar 029,085,095,137,153,156,157,214,
215,
216,217,218,219
Mimtech 096
Minerva 040,075
Mitsubishi 005,040,145,204
Mitsumi 093
Morgans 021,093,097,125
Movie Time 249
Multichoice 172
Multistar 087,092
Muratto 038,068
Navex 044
NEC 100,101
Network 014,206
Neuhaus 033,055,071
Nextwave 016,155
Nikko 021,194
Nimbus 096
Page 51

51
Nokia 005,030,045,048,079,110,111,122,
134,
135,194,195,196,197,198,199,200,
201,
202,203,204,222,227,230
Nordemende 004,005,007,011,062,065,123
Nordmende 204
Novis 044
Oak 251
Oceanic 015,054,061
Octagon 004,008,009,050
Okano 021,083,087
On Digital 186,202,210,229,230
Optex 052,055
Orbit 015,036
Orbitech 004,103
Origo 105,212
OSAT 009
Otto Versand 040
Oxford 003
Pace 005,012,014,040,045,064,074,099,
107,
112,130,154,186,189,191,195,204,
205,
206,207,208,209,210,211,212,213,
222
Pacific 054
Palcom 007,032,069,071
Palladium 021,075,077
Paltec 032
Panasonic 005,045,154,183,195,204
Panda 005,012,196,204,205
Patriot Worldsat 003
Philips 005,014,028,035,037,045,049,059,
075,
086,099,104,121,124,125,132,169,
170,
195,203,204,206,222,224,225
Phoenix 014,050,074,206
Phonotrend 010,055,083,193
Pioneer 203,222 017,252,253,255
Pk Sat 015
Polsat 173
Polytron 052
Predki 044
Premiere 055,140,198,203
Priesner 021
Profi 094
Promax 005
Prosat 006,007,010,102,133
Page 52

52
53
Protek 015,054
Proton 015
Provision 011
Ptt Telecom 047
Quadral 007,010,029
Quelle 019,040
Quiero 173
Radiola 125
Radix 039
Rainbow 009
RE 096
Rediffusion 101
Redpoint 033
Redstar 029
Revox 096
RFT 010,103,125
Roadstar 222
Ruefach 094
Saba 006,011,014,045,061,064,065,120,
127,
133,136,142,143,144,146,195,206,
207
Sabre 005,204
Sagem 062
Sakura 050,074
Salora 030,100,101,107,135,196,199 254
Samsung 004,027,078,203 252
SAT 007,017,036,038
SatBox 256
Satcom 043,095,106
Satec 014,045,195,206
Satford 043
Satmaster 043
Satpartner 004,009,011,044,068,083
Schneider 049
Schwaiger 013,014,052,054,089,095,137,144,
146,
147,152,155,157,168,206
Scientific Atlanta
Sts
235,236,248
Seemann 003,021,033,039
SEG 004,008,029,034,044,095,119,214
Seleco 055,223,226
Siemens 040
Silva 068
Skardin 033
Sky 154,182,190,191
Sky Digibox 224
Sky Digital 154
Page 53

53
Skymaster 010,095,148,156,158,159,160,161,
162
Skymax 015,125
Skyvision 055
Sony 020,154,203,204,233
SR 021,065,093
Star Trak 004
Starion 034
Starland 156
Starring 044
Stella 047
Str 222,228
Strong 004,009,029,048,051,081,133,203,
222,
228
Sumida 021
Sun/Moon/Star 184
Sunstar 021,093,107
Tandberg 062,225
Tandy 009
Tantec 005,045,064,069,071,195,204,207
Tatung 053,204
TCM 029,085,095,137,153,156,157
Techniland 043
Technisat 039,071,103,108,109,126
Teco 021,093
Telanor 007
Telasat 095
Tele+ 222,226
Tele+1 247
Telecom 047
Teledirekt 206
Telefunken 004,045,131,136,137,138,145,195
Teleka 009,021,027,039,088
Telemaster 011
Telemax 091
Telesat 095
Teleservice 022
Telestar 071
Televes 005,185,187,188,195,204
Telewire 055
Tevion 029,085,095,137,153,156,157,218,
219
Thomson 005,065,084,131,139,145,173,195,
203,
204,226,231
Thorens 054
Thorn 005,012,014,045,064,066,195,204
Tioko 052
Tonna 005,043,055,204
Page 54

54
55
Toshiba 204,229
TPS 141,175
Triad 015,036,038,068,113
Triasat 072
Triax 040,071,136,203
Tristar 051
Tudi 239
Uniden 114
Unisat 021,050
Unitor 025,044
Universum 040,067,075,079,200
Variostat 040
Vector 015,061
Ventana 125
Via Digital 135,139,231,232
Videoway 005
Visiopace 225
Visiosat 044,055,156,163,164,165,166,167
Vortec 004,027,078
V-Tech 036,038,104,115
Westminster Cable 240
Wevasat 005,015
Wewa 005,204
Winersat 044
Wisi 005,036,038,039,040,113,116,117,
118,
204
Wittenberg 017
Wolsey 082
Woorisat 011
Xsat 176
Zehnder 011,029,038,087,089,119
Zenith 190
Zodiac 009
Others 001,002,220,221
DVD
Brand DVD
Akai 010,034,064
CyberHome 042,068
Daewoo 070
Denon 005,036,058
Grundig 011
Harman/Kardon 050
Hitachi 009,025,030,043,063
Innovation 012,013,014
JVC 002,032,066
Kenwood 005,028,058
Labwave 023,048
Lasonic 067
DVD
Page 55

55
LG 016
Life 012,013,014
Lifetec 012,013,014
Linn 035
Loewe 011,039
Magnavox 056
Marantz 003,038
Medion 012,013,014,041
Metz 009,024
Micromaxx 012,013,014
Microstar 012,013,014
Mitsubishi 007
Mustek 069,071,072
NAD 027
Noname 045
Onkyo 015,029,065
Optimus 059
Panasonic 005,006,017,022,036,051,054,055,058
Philco 053
Philips 003,011,039,040,047,052
Pioneer 009,024,026,059,062
RCA 057,073
Samsung 008,030,063
Schneider 014
Sharp 012,013
Sherwood 044
Sony 004,031,046,060
SVA 074
TCM 012,013,014
Technics 005,036,037,058
Tevion 012,013,014
Thomson 001,033
Toshiba 003,049
Yamaha 005,036,058,061
Others 018,019,020,021
Page 56

www.supportplus.de
56
 Loading...