

Page 1
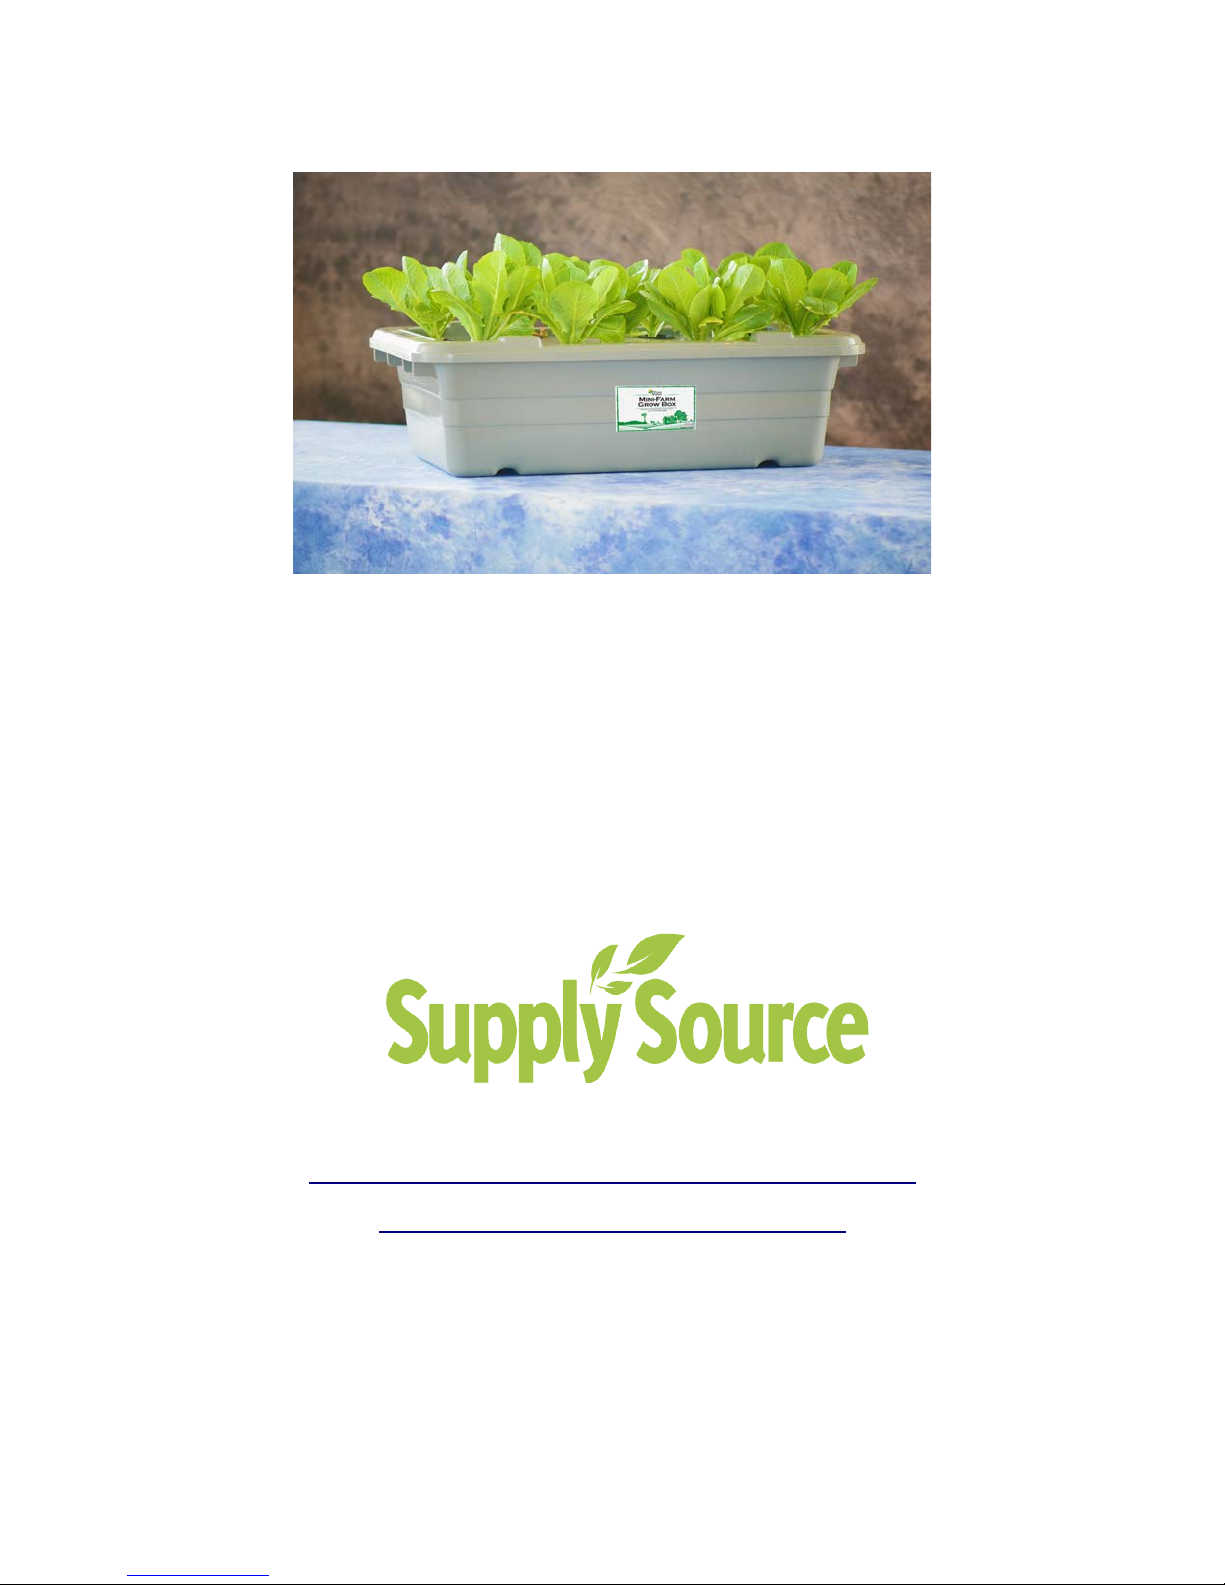
Mini-Farm Grow Box
Getting Started
User Guide
http://www.supplysource.com/
User-Guides_c_69.html
Supply Source Customer Service
1
1-888-959-6415
Page 2

Table of Contents
Food R is in g G row Box Assembly Instructions (Starter Kits)
Test the Water Flow Page 5
Plant a nd Lid Selection Guide Page 8
Intro d u ction to Plant Nutrients Page 11
Super Simple Plant Nutrient Instructions
Water Reservoir and Grow Box Start Up Instructions
Testing An d Adjusting Your Water PH Le vel
Page 3
Page 12
Page 13
Page 13
Unders ta nd i n g Plant Nutrient Basics
Plant N utr ient Mixes
Ad va nced Pl ant Nutrient Information
2
Page 16
Page 17
Page 18
Page 3
Getting Started User Guide
FOOD RISI NG GROW BOX ASSEMBLY IN STR UC TIONS (Starter Kits)
Congratulations on receiving your Food Rising Mini-Farm Grow Box! My name is Mike Adams,
and I developed this system based on the Non-Circulating Hydroponics principles taught by
Prof. B. Kratky at the Univ. of Hawaii. Here's a straightforward guide for assembling your grow
box. Free videos also demonstrate the full assembly if you'd prefer to watch a video guide. You
can find those videos at www.FoodRising.org. You do not need any tools to assemble this
system. :-) http://www.foodrising.org/Mini-Farm-Grow-Box-full-Assembly-
Instructions.html
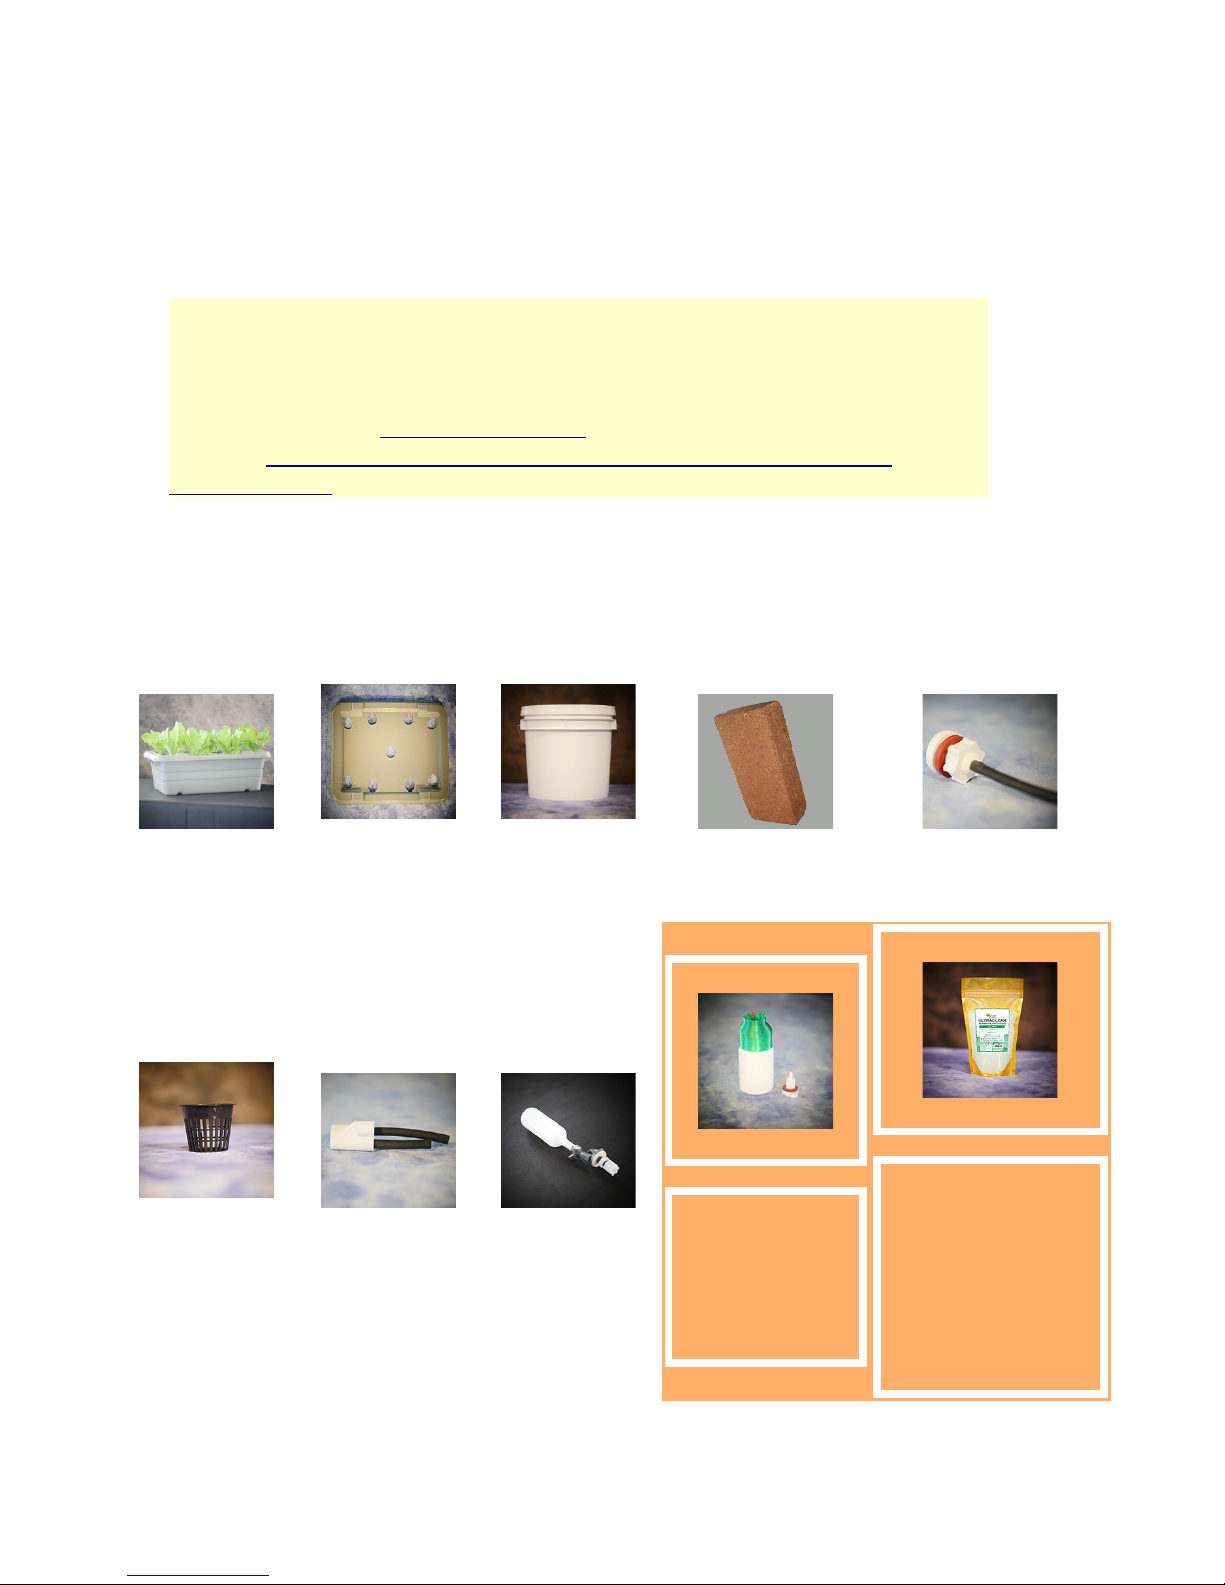
IDENTIFY THE PARTS:
This is everything you need to get started.
Grow bin (large
container bin)
Net pots (2, 4, 6
or 9 depending
on your kit)
Grow lid (with
precision-cut
holes in the lid)
Tube shutoff
clamp
3.5 gallon white
pail with lid (the
water reservoir)
Commercial
float valve
Coconut coir grow
media
Optional:
3D printed float
valve (Choose this
option for an
additional charge)
1/4" poly micro tubing
(5 ft.) drip line
BONUS:
UltraClean Super Plant
Food:
1 lb. of a specific
formula (such as
lettuce) and 1 lb. of
CalMag (which all
plants need)
3
Page 4

ASSEMBLE THE SYSTEM:
1) Install the float valve in the side wall of the grow bin, where a hole is pre-drilled for your convenience. You may
choose to install either the commercial float valve, or the 3D printed float valve. They both operate on the same
principles. Check FoodRising.org for a detailed article with photos that show you how to assemble the 3D printed
float valve. (We usually ship them already pre-assembled.)
2) Attach the 1/4" drip line to the external nozzle of the float valve. This provides a water source that feeds the grow
bin.
3) With a pair of scissors held at a 45-degree angle (or so), cut the other end of the 1/4" drip line, creating an
angled end that can be easily inserted into the pre-drilled hole in the 3.5 gallon pail.
4) Insert the angled end of the 1/4" drip line into the pre-drilled hole of the water reservoir, allowing the tubing to
extend approximately 2 inches into the reservoir. (The actual insertion depth is not very important.)
5) Unwrap the plastic of the coconut coir grow media. Place the coconut coir into a separate container or bin (such
as a small pail or bucket) and add a few inches of water to the bottom of the container until the coconut coir
expands and loosens. This will take 15 - 20 minutes for the expansion. Once it is fully expanded, you can loosen it
by hand to make loose coconut coir media. This is the media which will host your garden seeds.
6) Fill your net pots with coconut coir media. Compress it slightly, but not vigorously. The coconut coir should be
filled all the way to the top of the net pots, but should not be too tightly compressed. (Roots need loose media to
grow well.)
7) Place the net pots containing coconut coir into the holes of the grow box lid. They should fit snugly. Place the lid
to the side for now.
4
Page 5

TEST THE WATER FLOW:
The Mini-Farm Grow Box is a self-watering system. You never need to add water or nutrients to the grow
bin itself. Instead, you add water and nutrients to the water reservoir (the 3.5 gallon pail). If you wish, you
can use a larger pail or other container to create a larger water reservoir. One reservoir can feed water and
nutrients to 10+ grow bins! Before planting seeds, it is important to test the gravity flow of automatic
watering function of the grow box:
1) Confirm that you have the float valve installed with the correct orientation inside the grow bin. The float should
actuate vertically (up and down) when you gently lift it with your hand. This simulates the rising of the float as the
water level rises in the grow box.
2) Confirm you have the 1/4" drip line connected securely to the float valve nozzle, with the other end securely
inside the water reservoir (white pail).
3) Normally you will want to position the water reservoir a few inches higher than the level of the float valve of your
grow box. This allows the water to gravity flow down to the level of the float valve. To accomplish this, you may
place a 4" brick or a similar-sized object underneath the water reservoir (white pail).
4) Fill the white pail completely with water. You should now observe a slow trickle of water entering the grow box
through the tiny hole in the center of the float valve. This is the desired flow you want to see.
5) Check for leaks on both ends of the 1/4" drip line. You may see small, slow drips if either end is not securely
attached. If you notice small leaks, secure the drip line more securely. If you notice a leak on the 3D printed Float
Valve Receiver nozzle, check the nozzle for uniformity. Some nozzles print with "hanging filament" that must be
removed with a fingernail clipper or other small tool. (3D printing is not yet an exact science. Some parts still have
small artifacts of the melted filament printing process.)
TIP: You may also use the "compression fitting" to further secure the 1/4" drip line onto the external nozzle of the
Float Valve Receiver. Simply disconnect the 1/4" drip line from the nozzle, slide the compression fitting over the drip
line, reattach the drip line to the nozzle, then slide the compression fitting over the drip line where it attaches to the
nozzle. It should be a very snug fit and may be slightly difficult to push on.
5
Page 6
TIP: If you decide to drill your own hole for a larger water reservoir, use a drill bit with a diameter of 15/64". This is
a common size in many drill bit sets.
6) Allow the water to fill the grow bin until the float valve rises sufficiently to block the incoming water flow. At this
point, you should have approximately 2 or 3 inches of water in the bottom of the grow bin, and a much higher water
level in your water reservoir. Allow this state to remain for a few hours to make sure your float valve really is
blocking off the incoming water. If the water level does not rise higher in the grow bin, then you have confirmed the
float valve is working to block the incoming water, just as it is designed to do.
TIP: If you place your water reservoir too high, it will increase the gravity pressure of the water and may cause
excess water to be pushed into your grow bin. Do not raise the water reservoir higher than approximately 6" off the
level surface where your grow bin is also placed.
7) Now it's time to test the ability of the grow bin to RETAIN water when it is nearly full. Please fill the grow bin to
about 3" below the top of the bin and observe the outside of the float valve. Ideally, you will not see any water
leaking out of the float valve. This indicates the float valve is now blocking the water that's inside the grow box from
escaping out EVEN WHEN THE GROW BIN IS FULL OF WATER.
6
Page 7

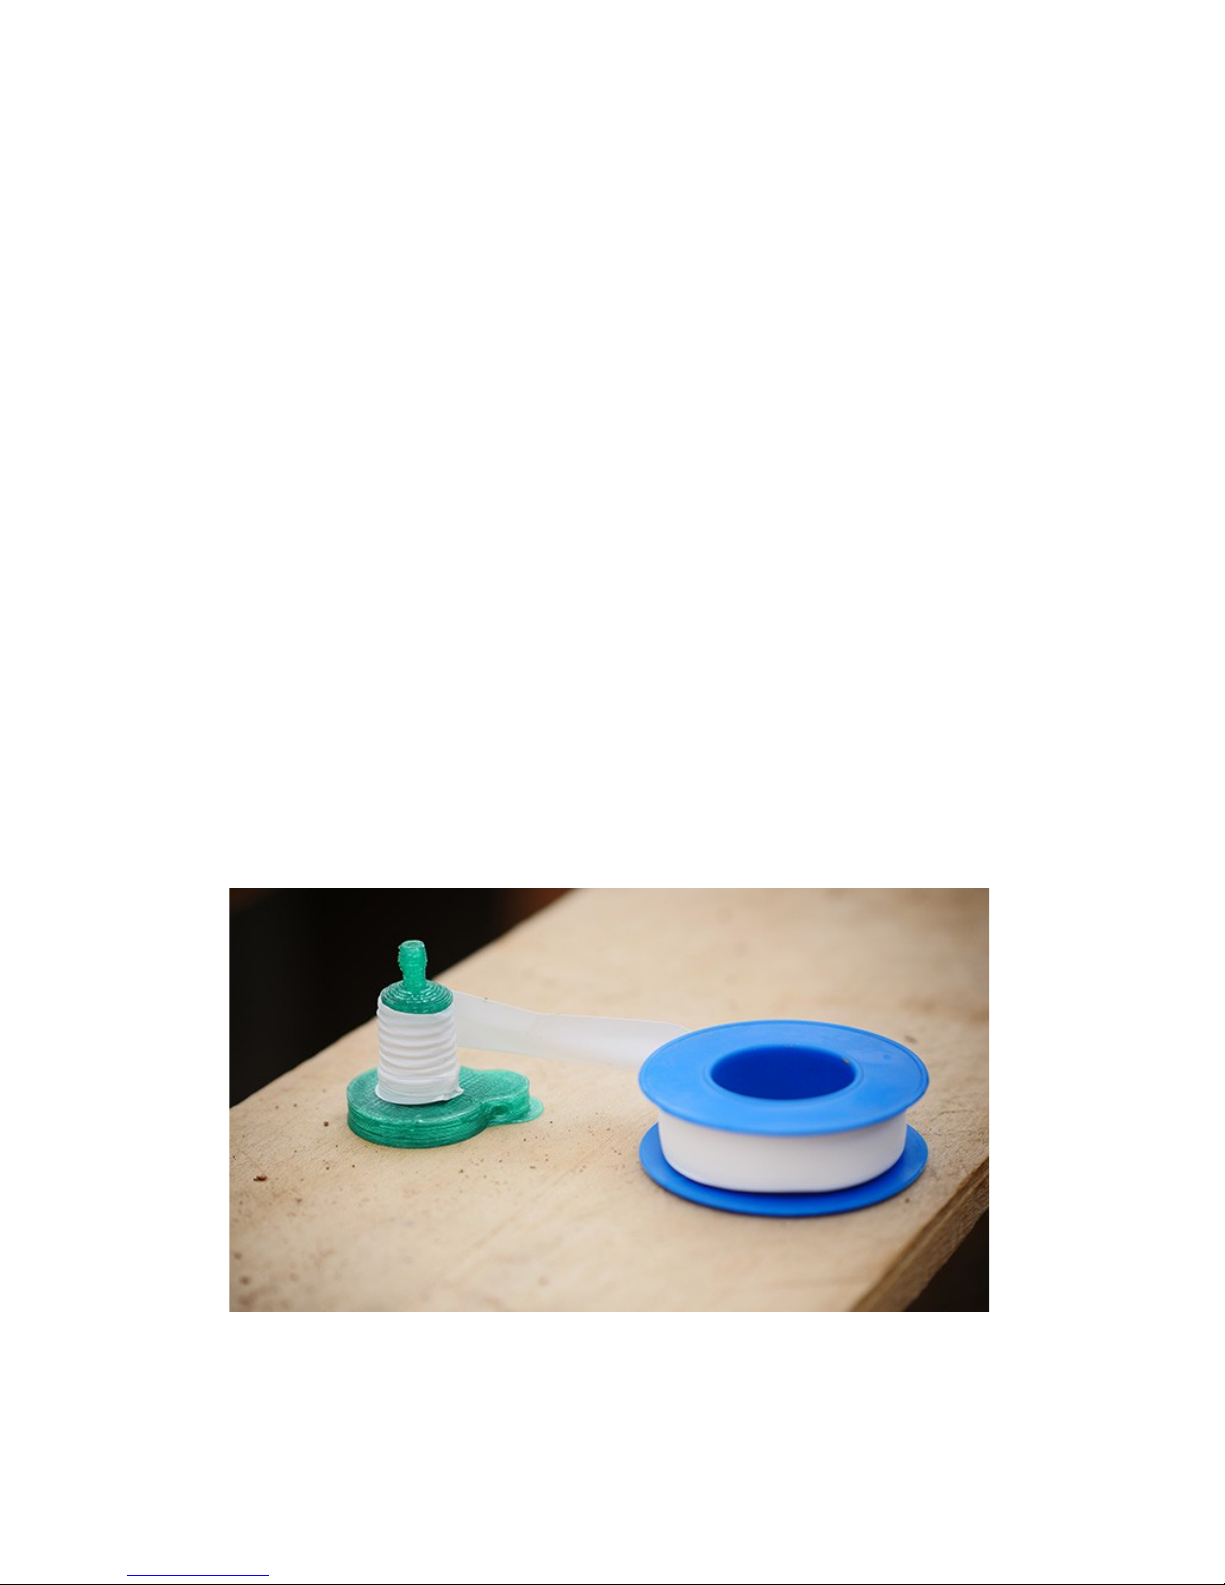
If you are using 3D printed parts, you may notice a slow drip of water escaping through the threads of the Float
Valve Receiver. The solution for this is to wrap the Float Valve Receiver threads with "thread tape." This is
commonly available at hardware stores and is used for plumbing pipe connections. The reason this is sometimes
needed is because of the imprecision of 3D printing: today's technology cannot yet print ultra-precise threads which
are 100% water tight by themselves. The thread tape "fills in the microscopic gaps" of the threads, creating a water-
tight connection.
8) You have now confirmed the full function of the grow system! If you used a high quality water source to begin
with, you may now add nutrients directly to the water in the grow bin (only needed once, at the beginning of each
new "crop") and also to the water reservoir.
TIP: Acquire a TDS meter (about $15 on Amazon.com) to test your water for Total Dissolved Solids (TDS) and
Electrical Conductivity (EC).
TIP: As a rule of thumb, you will add plant nutrients and CalMag formulas in about a 1:1 ratio to the water, aiming
for a TDS number of approximately 1200 - 1500. For more detailed instructions, see FoodRising.org for a
comprehensive guide on hydroponic nutrients for various plants.
9) You may now place the lid on the grow bin, making sure the bottom half inch or so of each net pot is immersed in
the water being held in the grow bin. This assures water reaches the coconut coir and allows your seeds to sprout.
Over time, as the water level drops in the grow bin, your plants will grow roots to follow the water down, extending
to the bottom of the grow bin where fresh water and nutrients are fed through the float valve.
10) You may now plant your favorite seeds! Make sure the system has adequate sunlight and watch Mother Nature
perform its food miracles!
TO LEARN MORE:
Visit FoodRising.org for videos, how-to articles and additional guides on plant nutrition.
You may also freely download 3D printable parts from the FoodRising.org website. Enjoy!
Have a suggestion on how we can improve the system? Email us at [email protected]
7
Page 8
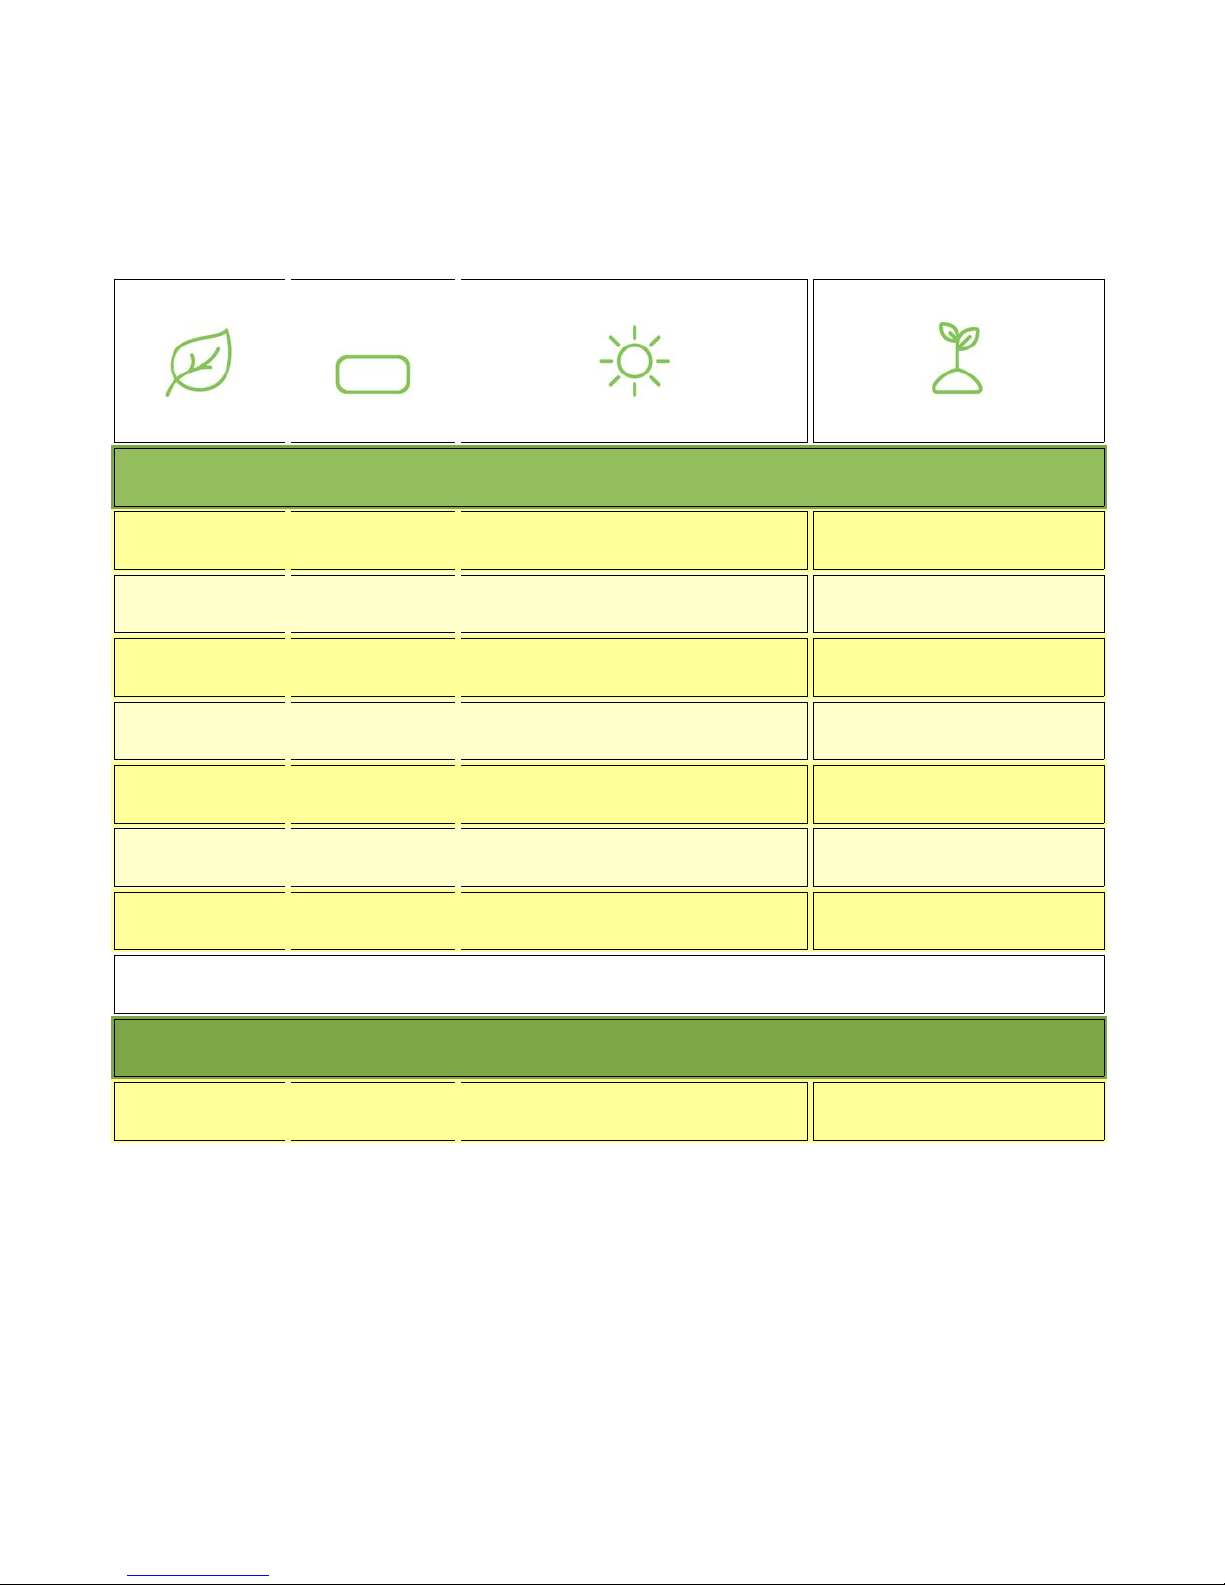
Plant and Lid Selection Guide
Plant Preferred Lid Ideal Temperature/Season(F) Sprout/Germination Time
Salad Pack
Arugula 9 holes 40°-55° 5-7 days
Cress 9 holes 55°-75° 2-7 days
Chicory 9 holes 45°-85° 7-10 days
Corn Salad 9 holes 50°-70° 7-14 days
Endive 9 holes 35°-85° 5-7 days
Lettuce 9 holes 40°-85° 7-14 days
Parsley 9 holes 70° 21 days
Tomato Pack
Tomatoes 2 holes 60°-95° 6-12 days
8
Page 9
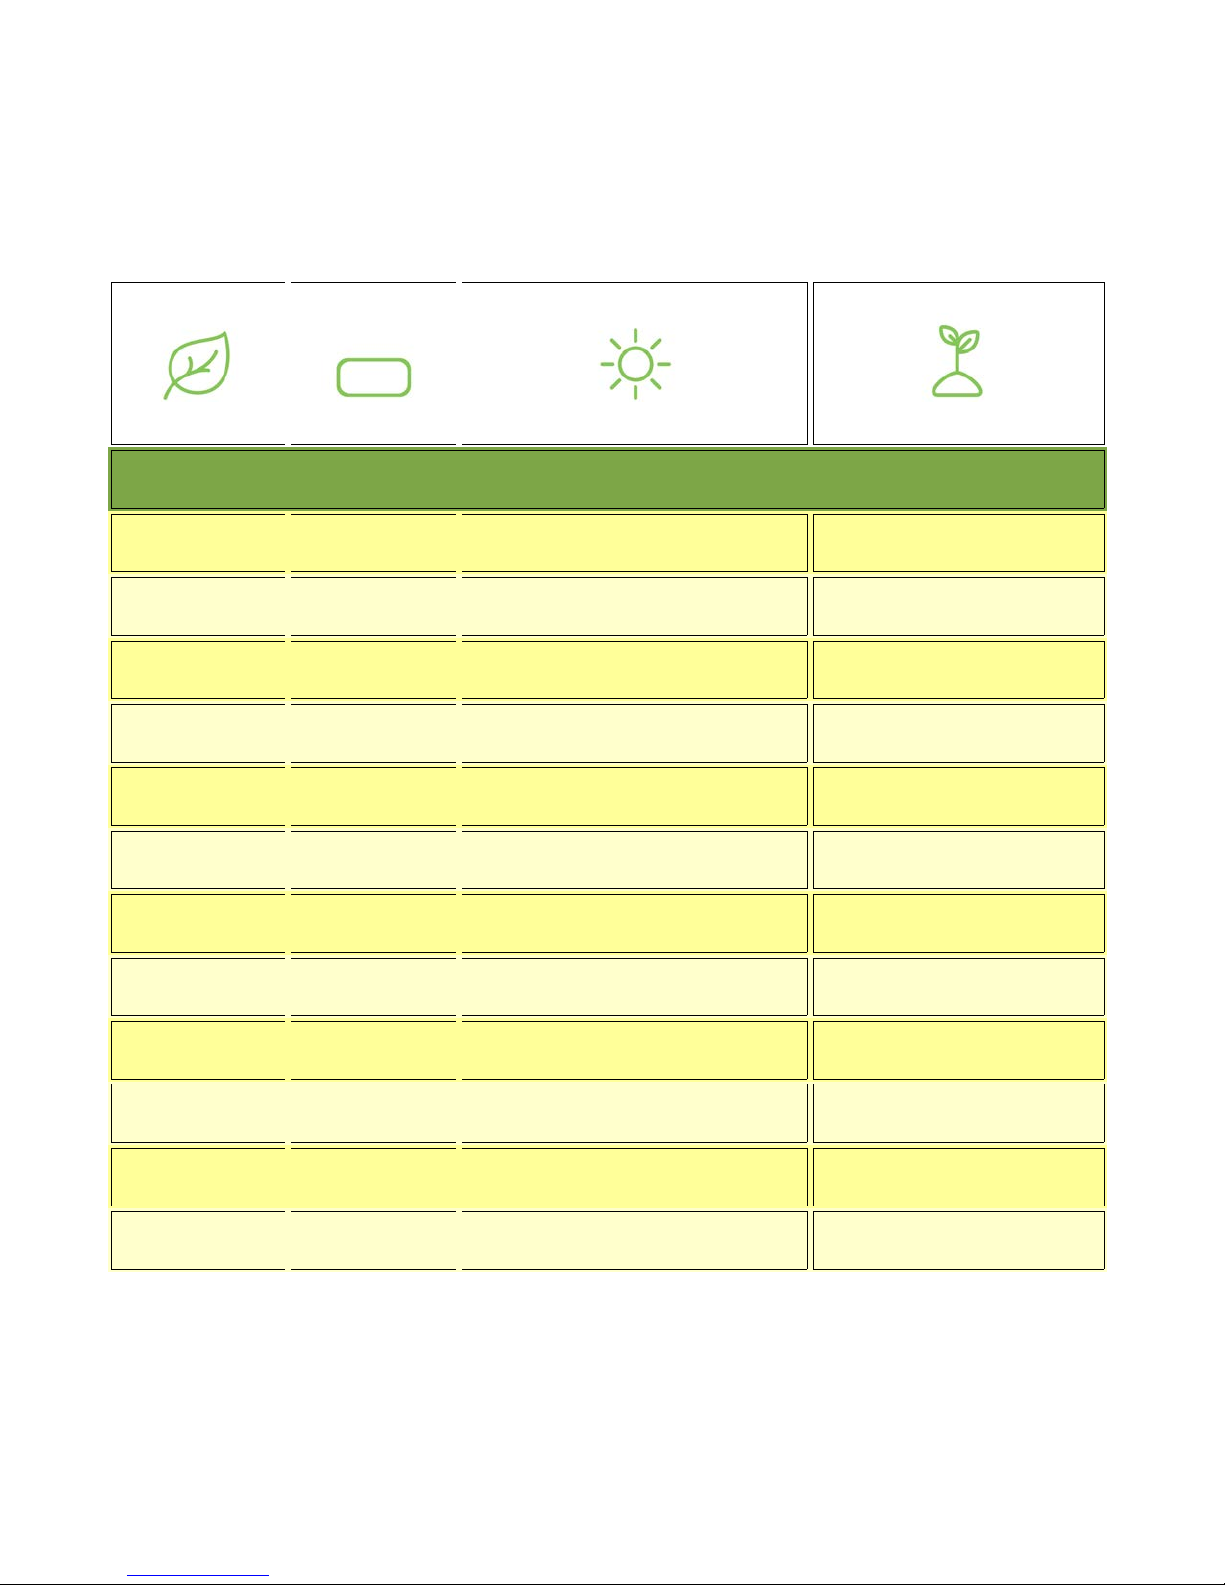
Plant and Lid Selection Guide - Continued
Plant Preferred Lid Ideal Temperature/Season(F) Sprout/Germination Time
Family Kitchen Herb Pack
Italian Basil 6 holes 50°-95° 5 days
Chives 6 holes 45°-95° 7-21 days
Cilantro 4 holes 60° 10 days
Dill 6 holes 60°-70° 21-25 days
Fennel 2, 4, 6 holes 50°-70° 12-18 days
Marjoram 2, 4, 6 holes 70° 8-14 days
Oregano 2, 4, 6 holes 70° 8-14 days
Parsley 6 holes 70° 21 days
Rosemary 2, 4, 6 holes 65°-85° 10-14 days
Sage 2, 4, 6 holes 60°-75° 21 days
Tarragon 2, 4, 6 holes 65°-85° 4-14 days
Thyme 2, 4, 6 holes 70° 21-28 days
9
Page 10
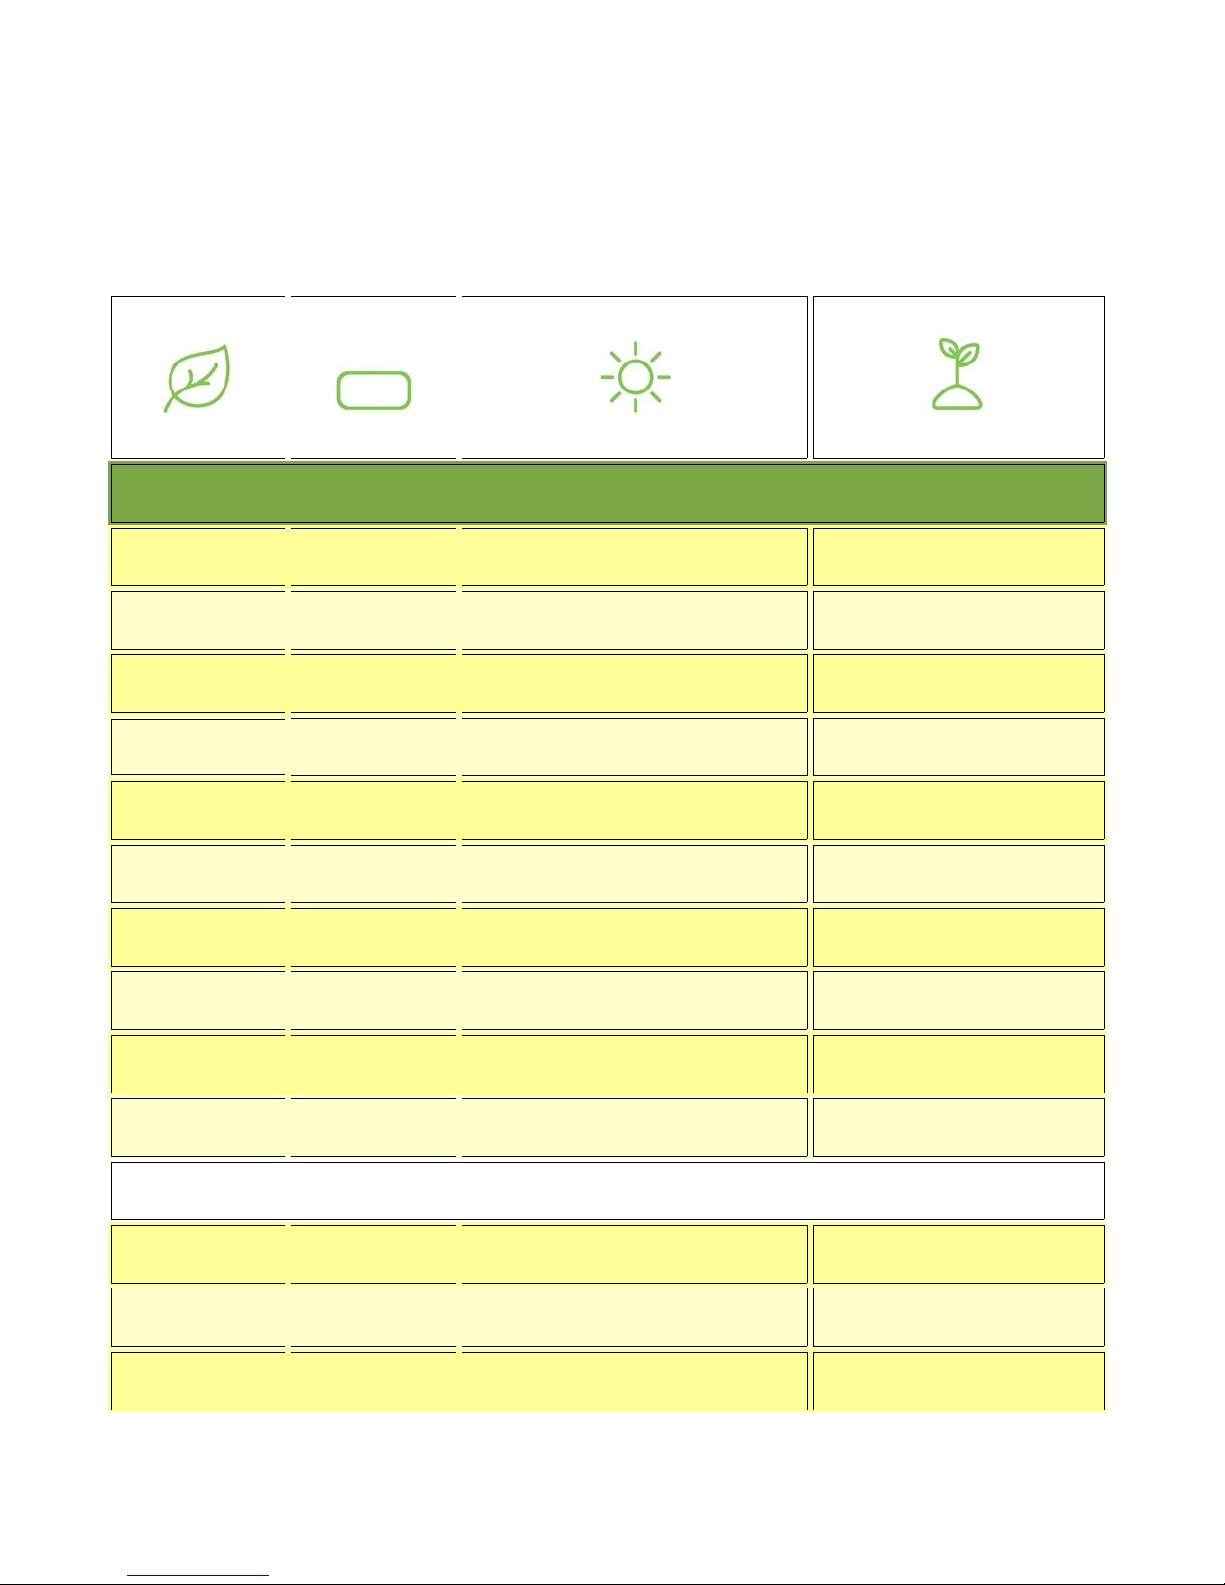
Plant and Lid Selection Guide - Continued
Plant Preferred Lid Ideal Temperature/Season(F) Sprout/Germination Time
Leafy Greens Pack
Amaranth 4 holes 60°-90° 3-4 days
Broccoli Raab 2 holes 45°-85° 4-7 days
Cabbage 2 holes 45°-85° 4-7 days
Collards
Kale 4 holes 45°-85° 4-7 days
Kohlrabi 4 holes 45°-85° 4-7 days
Leek 4 holes 45°-95° 4-7 days
Mustard Greens 6, 9 holes 45°-85° 4-7 days
Spinach 6, 9 holes 45°-75° 6-10 days
Chard 6, 9 holes 40°-95° 5-7 days
Cucumbers 2 holes 60°-105° 3-10 days
Strawberries 4 holes 65°-75° 2-8 weeks
4 holes 40°-85° 4-7 days
Peppers 2 holes 70°-90° 7-10 days
10
Page 11

Introduction to Plant Nutrients
Welcome to the Plant Nutrition Guide for the Food Rising Mini-Farm Grow Box.
My name is Mike Adams, and I developed this system based on the Non-Circulating Hydroponics principles
taught by Prof. B. Kratky at the Univ. of Hawaii.
I'm also the lab director at a Forensic Food Lab where I test food, supplements and water for heavy metal
contaminants such as lead, cadmium, mercury and arsenic. This lab runs an Agilent 7700X ICP-MS instrument
which can detect elements with precision of 1 part per billion. (That's 1/1000th of 1 part per million!)
In 2014, I conducted exhausted ICP-MS testing of off-the-shelf plant nutrition formulas purchased at common
retail stores, and I found that many of them were heavily contaminated with lead and cadmium. This concerned
me greatly, as I did not want to grow my food in a nutrient formula containing alarming concentrations of toxic
heavy metals. For the record, lead causes mental retardation and cadmium causes cardiovascular problems and
skin disorders.
Ultimately, I realized I would have to develop my own nutrient formulas using ultra-clean ingredients from the
cleanest sources in the world. This led to several months of testing raw material samples from many different
countries, including Israel, Canada, Denmark, the United States, Chile and many others.
By testing these raw materials using ICP-MS instrumentation, I was able to identify the cleanest sources of plant
nutrient materials available in the world today. I then combined these raw materials to create Ultra-Clean Super
Plant Food formulas which are extraordinarily low in toxic elements while boasting much higher levels of
beneficial nutrients that nearly all people need in higher concentrations (such as zinc, which boosts immune
function, and organic selenium, which is an anti-cancer mineral).
We specifically avoided using any raw materials from China, due to China's worsening pollution and
contamination problems.
The result is the world's cleanest plant nutrient formulas for hydroponics. By using these formulas correctly, you
can grow the world's most nutrient-rich plants while also avoiding toxic heavy metals that can damage your
health.
The food you grow using these formulas will have far higher concentrations of beneficial minerals than nearly all
store-bought produce. Even growing something as simple as lettuce can produce mineral-rich foods that can
substantially support and enhance your overall health by providing your body with the nutrients that are typically
missing in most other foods.
Everything you grow in these UltraClean Super Plant Food nutrients will be healthier, more mineral rich and
cleaner than plants grown in lower grade nutrients. You will also discover that this enhances the pest resistance,
disease resistance and drought resistance of the plants you're growing! Healthy minerals, after all, boost the
health of not just humans but also the food plants that humans consume. (Mineral deficiencies lead to disease in
all living systems, including plants, animals and humans.)
11
Page 12

SUPER SIMPLE PLANT NUTRIENT INSTRUCTIONS
UltraClean Super Plant Food mixes come as follows:
(http://www.supplysource.com/Ultraclean-Super-Plant-Food_c_50.html)
1. The plant mix, such as a "lettuce" formula. This plant mix contains the micro nutrients (trace minerals),
potassium nitrate, monopotassium phosphate and other key nutrients needed by your plant.
2. The CalMag mix. This contains just three nutrients: Calcium Nitrate, Magnesium Nitrate and Iron EDTA.
Rule of thumb: For every gallon of water you use in the system, you will add just slightly under 1
teaspoon of plant mix + 1 teaspoon of CalMag.
This rule of thumb will vary significantly if you are in a very hot, dry climate, in which case you will need to
add far more water than nutrients as your plants mature, due to the fact that your plants are transpiring a lot
of water but not using a proportionate quantity of nutrients.
This is why you need a TDS meter to monitor the ppm (parts per million) of your nutrients. Over time, you
will gain enough experience to almost never need the TDS meter, but for first-time growers, it is a very
valuable tool.
Recommended TDS meter at Amazon.com (about $10): http://www.amazon.com/gp/product/B00M19UR4W
12
Page 13

IN S TRUCTIONS FOR T H E 3.5 GALLON WATER RESERVO IR:
For the 3.5 gallon water reservoir (white pail), add water and nutrients as follows:
•Fill the pail 1/2 full with water.
•Add 3 level teaspoons of plant mix. Stir until dissolved.
•Add 3 levels teaspoons of CalMag mix. Stir until dissolved.
•Fill the remainder of the pail all the way full.
This will produce a water + nutrient mix with approximately 1200ppm of nutrients. A TDS tester may
show a higher number because it is measuring the 1200ppm of the nutrients PLUS the original ppm of
your water, added together.
IN S TRUCTIONS FOR T H E START OF TH E GROW BOX:
For the grow box bin, you will nearly fill it with water when you first start new seeds. (After that, the
automatic float valve will provide self-water function.) Follow these instructions for most seedlings:
•Fill the bin 1/2 full with water.
•Add 5 level teaspoons of plant mix. Stir until dissolved.
•Add 5 levels teaspoons of CalMag mix. Stir until dissolved.
•Fill the remainder of the bin until the water level is covering the bottom third of the net pots
when the grow box lid is attached. (The net pots must be partially submersed in water in order
to wick water to the plant seeds and early roots.)
This will produce a water + nutrient mix with approximately 1200ppm of nutrients. A TDS tester may
show a higher number because it is measuring the 1200ppm of the nutrients PLUS the original ppm
of your water, added together.
TEST ING AND AD J U STING YOUR WATER PH LEVEL
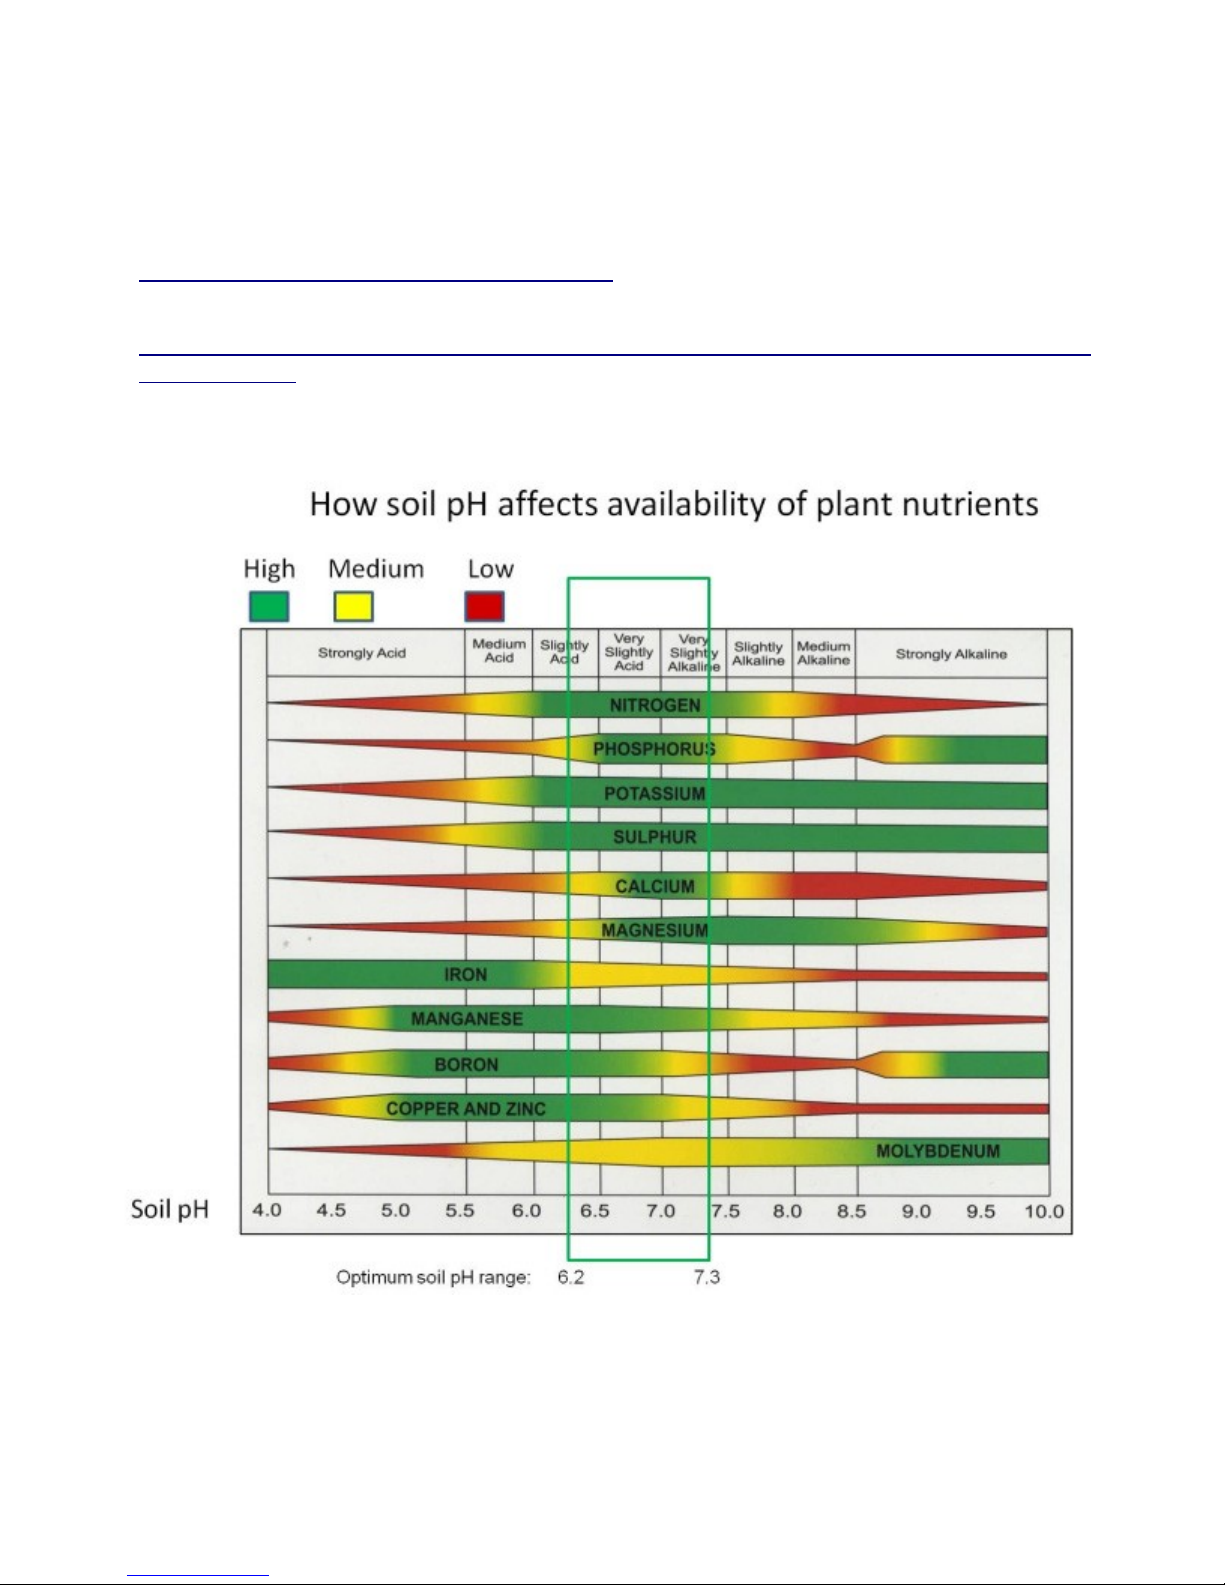
It's important to also measure and adjust the pH level of your water. Fortunately, it's very simple to do:
just acquire pH test strips (paper strips) from Amazon.com or any hydroponics supplier. Some people
prefer to use liquid pH testing drops, which are also readily available and very affordable. Most plants
will survive pH ranges from 5.5 - 7.5, but you'll get better results if you narrow the pH range to fit the
plants you're growing.
13
Page 14

Here's a list of pH ranges, found on SimplyHydro.com.
Note that this is the pH *after* you add plant nutrients.
Beans 6.0-6.5
Broccoli 6.0-6.5
Cabbage 6.5-7.5
Cantaloupe 6.5-6.8
Carrots 5.8-6.4
Chives 6.0-6.5
Cucumbers 5.8-6.0
Garlic 6.0-6.5
Lettuce 6.0-6.5
Onions 6.5-7.0
Peas 6.0-6.8
Pumpkin 5.0-6.5
Radish 6.0-7.0
Strawberries 5.5-6.5
Tomatoes 5.5-6.5
Here's how to adjust the pH to achieve the proper range:
•If your pH is too low, it's too ACIDIC, and you need to add baking soda to make it more alkaline
(to raise the pH level). Simply stir in a teaspoon of baking soda, one at a time, until you reach
the desired pH.
•If your pH is too high, it's too ALKALINE, and you need to add white vinegar to make it more
acidic (to lower the pH level). Simply stir in a teaspoon of white vinegar, one at a time, until you
reach the desired pH.
14
Page 15
Recommended pH testing products (very affordable)
General Hydroponics PH Test Indicator, 8-Ounce
http://www.amazon.com/General-Hydroponics-Test-Indicator-8-Ounce/dp/B003Y3F34I
Micro Essential Labs pHydrion Urine and Saliva ph test paper , 15 ft roll with dispenser and chart,
ph range 5.5-8.0 http://www.amazon.com/Essential-pHydrion-Saliva-dispenser-5-5-8-0/dp/B0001SR4NM
15
Page 16

UN D ERSTANDING P L ANT NUTRIENT BASICS:
All plants share common needs for specific nutrients and minerals. The three most common nutrients
used in conventional agriculture are:
N = Nitrogen. This is the "fuel" that plants use as an energy source.
P = Phosphorous. This minerals supports crucial plant physiology functions that keep it alive.
K = Potassium. Without potassium plants could not transport water or even succeed with
photosynthesis (converting sunlight into plant energy).
In conventional farming, these three nutrients are added to crops in large quantities. But trace minerals
are almost never added: molybdenum, boron, chromium, zinc, selenium and so on. As a result, most
conventional crops utterly lack the trace minerals which are also crucial for plant health and human
health.
Growing healthy plants requires more than just N, P and K. True plant health comes from a full spectrum
of nutrients, which includes trace minerals or "micro minerals" as they are sometimes called in
hydroponics.
FACT: The ocean is full of trace minerals. Sea water contains at least 92 elements. Every element has
a different function in human physiology. Some farmers use sea water concentrates on their crops to
boost plant health from the trace minerals.
PLANTS "EAT" MOLE CULES
Many of the nutritional molecules consumed by plants provide more than one element. A chemical
compound consists of chains of atoms bonded together through principles of chemistry such as
"covalent bonding." For example, the chemical compound "potassium nitrate" combines potassium and
nitrogen into a complex molecule.
Monopotassium Phosphate, similarly, is a simple combination of potassium and phosphate. The "mono"
simple means "one." This refers to the ratio of atoms in the chemical structure of the molecule.
Although this is a simplified explanation, when plant roots come into contact with these molecules, they
"eat" them by assimilating the elements that the molecules are made of. Plants "eat" potassium nitrate,
for example, to assimilate both the potassium and the nitrogen -- nutrients they need to survive and
grow.
Plants extract carbon from the air to create physical structures such as leaves, stems and roots. They
quite literally "grab" carbon molecules out of the air and convert them into physical objects that allow the
plant to grow. This is why plants are known to consume carbon dioxide. (CO2)
16
Page 17

PLANT NUTRIENT MIXE S
UltraClean Super Plant Food mixes come as follows:
1. The plant mix, such as a "lettuce" formula. This plant mix contains the micro nutrients (trace minerals),
potassium nitrate, monopotassium phosphate and other key nutrients needed by your plant.
2. The CalMag mix. This contains just three nutrients: Calcium Nitrate, Magnesium Nitrate and Iron
EDTA.
NOTE: All the nutrients in UltraClean Super Plant Food are water soluble. They are designed, in other
words, to almost completely dissolve in water and stay in solution. After adding them to a water
reservoir, you will need to vigorously stir the water to dissolve the nutrients. Over time, you may notice a
very small amount of un-dissolved nutrients (about 1% of the total nutrient mass) in the bottom of the
reservoir pail. This is normal and not a concern.
As a rule of thumb, you will typically use these formulas together in a 1:1 ratio for more common plants.
However, the ratios and concentrations of these nutrients varies considerably when growing plants that
bloom (such as strawberries or tomatoes). "Grow" and "bloom" cycles of plants have different nutrient
needs, which we will cover later.
Why is the CalMag separate from the general plant mix? Calcium and magnesium often need to be
added in ratios other than 1:1. Keeping the nutrient mixes separated allows you to control the ratios that
you add to the nutrients.
TIP: If you have multiple grow boxes connected to a single water reservoir, make sure you are growing
all the same type of plants. For example, if you are feeding your water reservoir lettuce mix plant
nutrients, you want to make sure all the grow boxes connected to that water reservoir are growing
lettuce, not something different such as green peppers.
TIP: Lettuce is the easiest crop to grow, and it's the crop we recommend you begin with. It's also the
most forgiving on nutrient concentrations and ratios.
HOW TO MIX THE NUTRIENTS FOR SE EDLINGS
Target TDS = 1200 + your original water source
Step 1) Measure the TDS of your source water. Using a TDS meter, find out the ppm (which means
the parts per million of Total Dissolve Solids) in your source water. A lower number is better, indicating
"cleaner" water.
Step 2) Add 1200 to that number. This gives you a "target" ppm of TDS in your final water.
Step 3) Add dry nutrients in small quantities in a 1:1 ratio of the plant formula and the CalMag
formula, until the ppm of your water reaches the target ppm. (Make sure you vigorously stir the water
as you are doing this to fully dissolve the nutrients.)
17
Page 18
HOW TO MIX NUTR I ENTS FOR MATU RE PL ANTS
Target TDS = 1500 + your original water source
Mature plants benefit from a higher nutrient concentration in the water. Use the same method
described above, but aim for 1500 ppm instead of 1200.
Advanced Plant Nutrient Information
The following plant nutrition guide offers detailed guidance on nutrient concentrations
and pH levels for different types of plants as well as their growth stages.
The plant nutrient recommendations below are based on adding nutrients to 10 gallons of water. Divide the
recommendations by 3 if you are using a 3.5 gallon pail (water reservoir) which ships with the systems.
Always test the ppm of your water + nutrient solutions to keep them within a proper range. Typically,
starting plants (sprouting seeds, or growing very young starts) should use a lower concentration of nutrients
such as 1200 ppm. Mature plants usually require higher concentrations, around 1500 - 1600 ppm.
18
Page 19

REVI EW:
ppm = parts per million. You can assess the parts per million of the nutrients in your water by
using a low-cost TDS meter purchased for about $10 - $15 from Amazon.com.
pH = Acid/Alkaline level. Low pH is more acidic. High pH is more alkaline. Most plants prefer a
pH between 6.0 and 7.0, but they can usually survive in a range of 5.5 to 7.5.
Units Conversion:
For the CalMag Plant Food, 1 tablespoon = 14 grams
For all plant fertilizer formulas (Lettuce, Strawberry, etc.), 1 tablespoon = 18 grams
LETTUCE:
pH target = 6.4 - 6.7 during growth stage / 6.0 - 6.5 during seeding stages
Lettuce Plant Food 8-15-36:
• Use 45 grams per 10 gallons of water during all stages of plant growth
CalMag Plant Food:
• Use 30 grams per 10 gallons of water during growth stage
• Use 40 grams per 10 gallons of water during bolting stage
TOM ATO:
pH target = 6.4 - 6.6 during growth stage / 6.1 - 6.3 during blooming (flowering) stage
Tomato Fertilizer 4-18-38:
• Use 45 grams per 10 gallons of water during all stages of plant growth
CalMag Plant Food:
• Use 30 grams per 10 gallons of water during growth stage
• Use 40 grams per 10 gallons of water during blooming stage
Potassium Nitrate:
• You may optionally add 2 grams per 10 gallons of water during the blooming stage to boost
nitrogen levels
19
Page 20

STRAWB ERRIES:
pH target = 6.5 - 6.8 during all stages of plant life
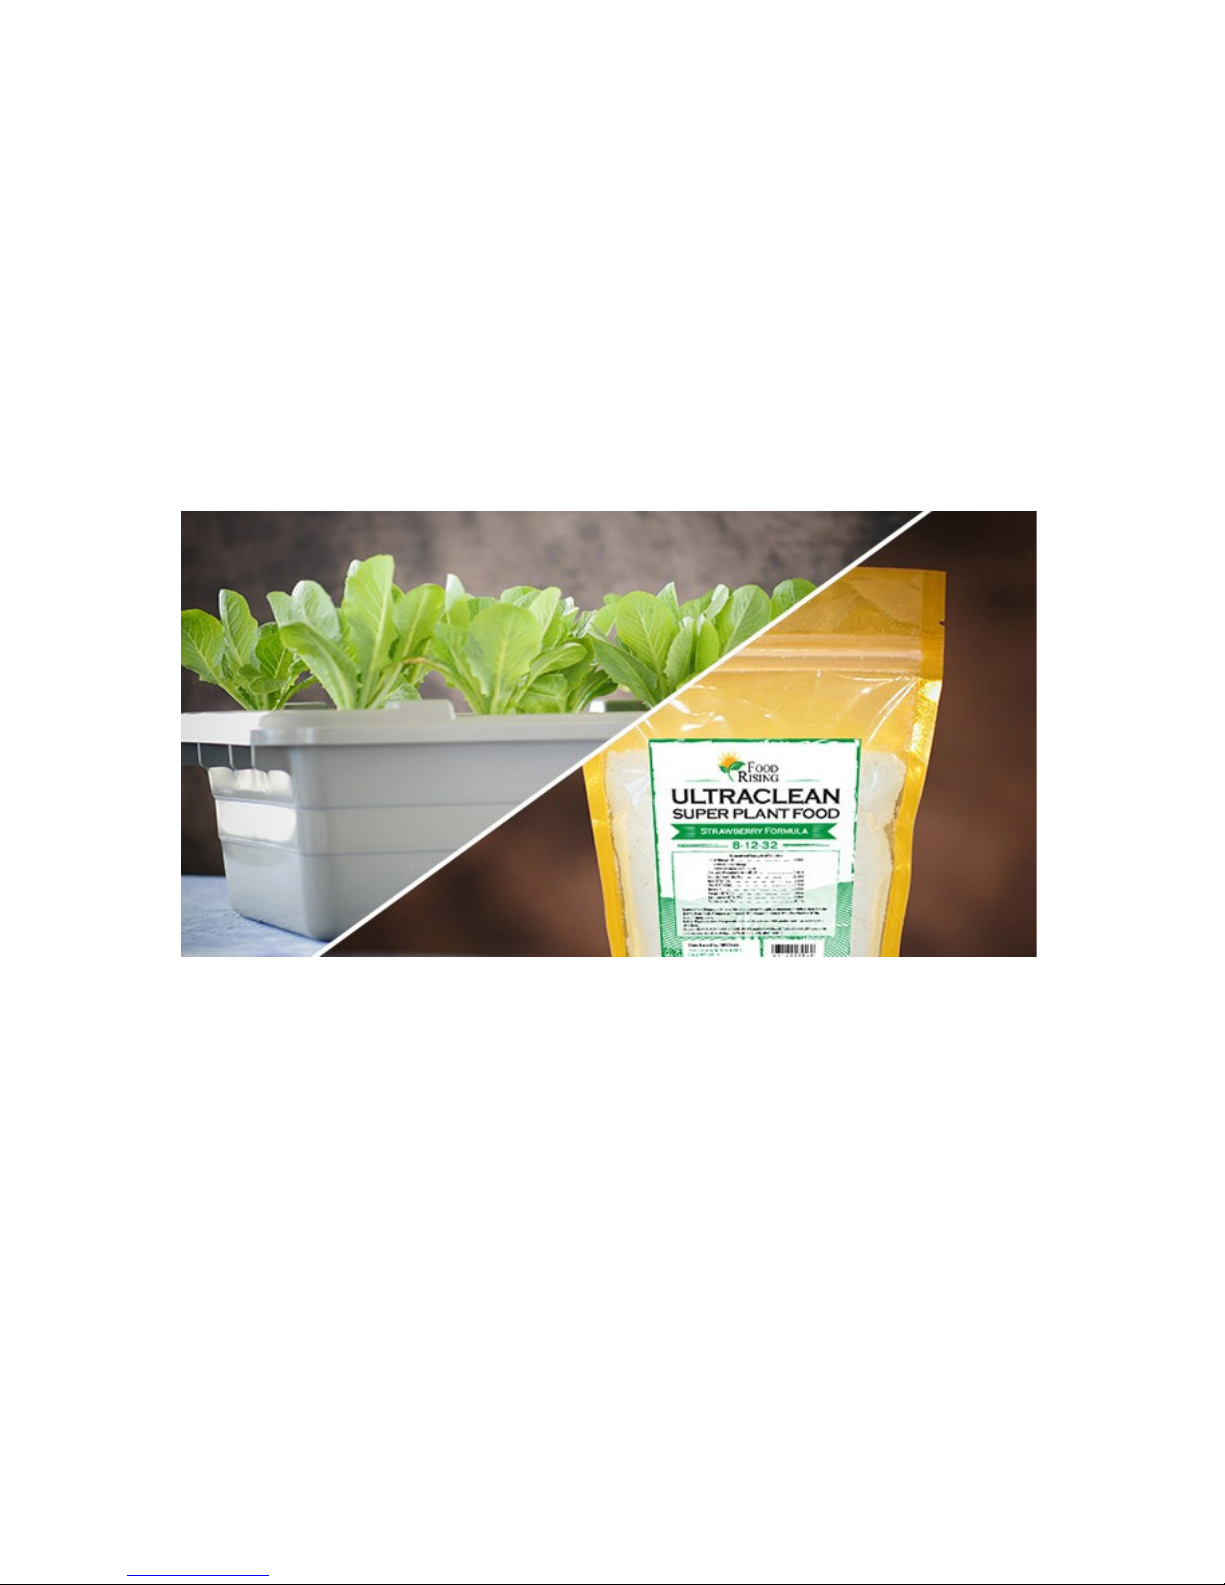
Strawberry Fertilizer 8-12-32:
• Use 11 grams per 10 gallons of water during growth stage
• Use 17 grams per 10 gallons of water during blooming stage
CalMag Plant Food:
• Use 12 grams per 10 gallons of water during growth stage
• Use 23 grams per 10 gallons of water during blooming stage
CUCUMBER:
pH target = 6.4 - 6.7 during all stages of plant life
Cucumber Fertilizer 8-16-36:
• Use 45 grams per 10 gallons of water during all stages of plant growth
CalMag Plant Food:
• Use 30 grams per 10 gallons of water during growth stage
• Use 40 grams per 10 gallons of water during blooming
Calcium Nitrate:
• You may optionally add 10 grams per 10 gallons of water during the blooming stage
PEPPERS:
pH target = 6.2 - 6.5 during growth stage / 5.8 - 6.2 during blooming stage
Pepper and Herb Fertilizer 11-11-40:
• Use 23 grams per 10 gallons of water during all stages
CalMag Plant Food:
• Use 30 grams per 10 gallons of water during growth stage
• Use 40 grams per 10 gallons of water during blooming stage
20
Page 21

HER B S:
pH target = 6.2 - 6.5 during growth stage / 5.8 - 6.2 during blooming stage
Pepper and Herb Fertilizer 11-11-40:
• Use 11 grams per 10 gallons of water during all stages
CalMag Plant Food::
• Use 14 grams per 10 gallons of water during growth stage
• Use 23 grams per 10 gallons of water during blooming stage
Additional Nitrogen::
• Recommended to add nitrogen for herbs. Can use either calcium nitrate or potassium nitrate
at around 2 grams per 10 gallons of water.
21
 Loading...