

Page 1
User's Manual of Intelligent Mower
S P M 0 8 - 3 2 0
Hangzhou Superman Intelligent Technology Co., Ltd.
Page 2

Welcome to use SPM08-320 Intelligent Mower ! When
you use the electric product, you should follow the basic
safety and protection principles. Before using the
Intelligent Mower, please read carefully all the safety
declarations, warnings and precautions in the manual.
Follow the manual closely to operate the machine. If you
don't read and follow the instruction, it could result in death
or serious injury to people or pets, or cause property
damage.
Important Guidance
Page 3

Safety Warning and Precaution…………………………………………………………1
Safety protection feature ……………………………………………………………3
Description of device…………………………………………………………………5
Product specification…………………………………………………………………7
Chapter one Intelligent navigation workstation and electrical fence line
installation
1.1 Constitution of Intelligent navigation workstation ………………………8
1.2 Choose installation site of Intelligent navigation workstation …………8
1.3 Install fence line …………………………………………………………10
1.4 Install Intelligent navigation workstation ………………………………14
Chapter Two Preparation before work of the Intelligent Mower
2.1 Outside integrity Check of the machine ………………………………17
2.2 Read the signs ……………………………………………………………17
2.3 Adjust the height of blade…………………………………………………17
2.4 Insert electric power supply fuse…………………………………………18
2.5 Clean the lawn ……………………………………………………………18
Chapter Three Intelligent automatic and remote operation
3.1 Power on the fence wires …………………………………………………19
3.2 Start-up debugging ………………………………………………………19
3.3 Remote operation…………………………………………………………20
Chapter Four Power supply use management
4.1 Applicable power supply…………………………………………………22
4.2 Automatic charge…………………………………………………………22
4.3 Manual-charge……………………………………………………………23
Chapter Five Possible malfunction & Troubleshooting
5.1 The Intelligent Mower can not be started ………………………………24
5.2 The walking path is blocked………………………………………………24
5.3 Unable to cut or unable to cut orderly……………………………………24
5.4 Intelligent Mower exceeding the fence in the process of running ……25
5.5 Charge failure ……………………………………………………………25
5.6 Unable to automatically return to charge ………………………………25
Chapter Six Attentions and Maintenance …………………………………25
6.1 The panel of the mower……………………………………………………26
6.2 Blades ……………………………………………………………………26
6.3 Exterior Shell ……………………………………………………………26
Chapter one Intelligent navigation workstation and electrical fence line
installation
Chapter Two Preparation before work of the Intelligent Mower
Chapter Three Intelligent automatic and remote operation
Chapter Four Power supply use management
Chapter Five Possible malfunction Troubleshooting
Chapter Six Attentions and Maintenance
&
Contents
Page 4

1. Read and follow all the safety and warning instructions in the manual, which, if
ignored, may cause death or serious injury, and device or functional damage.
2. Do not disassemble, repair or amend the intelligent grass mower, which may
cause fire, breakdown or death.
3. When the mower is working, guarantee all outsider, children and pets far away.
4. Do not treat the mower as toll and do not ride on it.
5. Do not let children or other inexperienced person operate the machine.
6. Do not try to invalidate the safety features and the device.
7. If the safety features or the device are broken or can't be operated, do not use it.
8. Do not damage the socket or lines. When components of the machine are broken
or loose, stop using the machine.
9. Do not use the mower on slopes greater than 20 degress or remote control it on
unstable slopes.
10. Before the mower works, check and clean all the fragments in the mowing area.
11. Insert the power keys when operating the machine. Keep a certain distance away
from the mower .
12. Keep hand and foot away from blade and other moving parts. Do not barefoot
when using the mower.
13 Draw the power key out before raising or adjusting the mower.
14. Do not raise or try to repair the mower and adjust the blade when the machine is
working.
15. When checking, amending the blade and adjusting the height of the blade, mask
yourself with thick gloves.
16. When fixing the fence or driving in a shear-pin, mask yourself with eye shield
and gloves.
17. The product is designed especially for private lawns or a spot of public ones .
Fol lo w the ins tructio ns to ope ra te the machine . Use the manufact ur es'
recommended accessories.
18. Use batteries and associated chargers applied to the device offered by the
manufacturer you can purchase them from local franchiser.
19. Do not dismount or change batteries, or strength shock, heat and burn the
batteries.
20. Use the labeled type of batteries in your mower. If you are not sure of the battery
type, require information to electric power manufacture.
21. Using improper voltage may cause damage to the motor and the user. Proper
voltage is listed on the label.
22. The charger is used indoor only. Do not use it in damping or wetting conditions.
1
Safety Warnings or precautions
Page 5
23. Do not dismount or amend any parts of the charger.
24. If the charger is damaged, to avoid danger, replace it by professional
maintenance man or equally people.
25. When the Intelligent navigation workstation is electrified, do not contact the
electric-induction-anode directly with metals.
26. If there is peculiar smell, sound or smoke around the charger, pull the power plug
out immediately.
27. It is forbidden to touch the charger and plug with wet hands.
28. Do not pull the line when pulling the plug. Seize the plug in case of breaking the
line.
29. Do not open the intelligent navigation electric socket in case of electric shock.
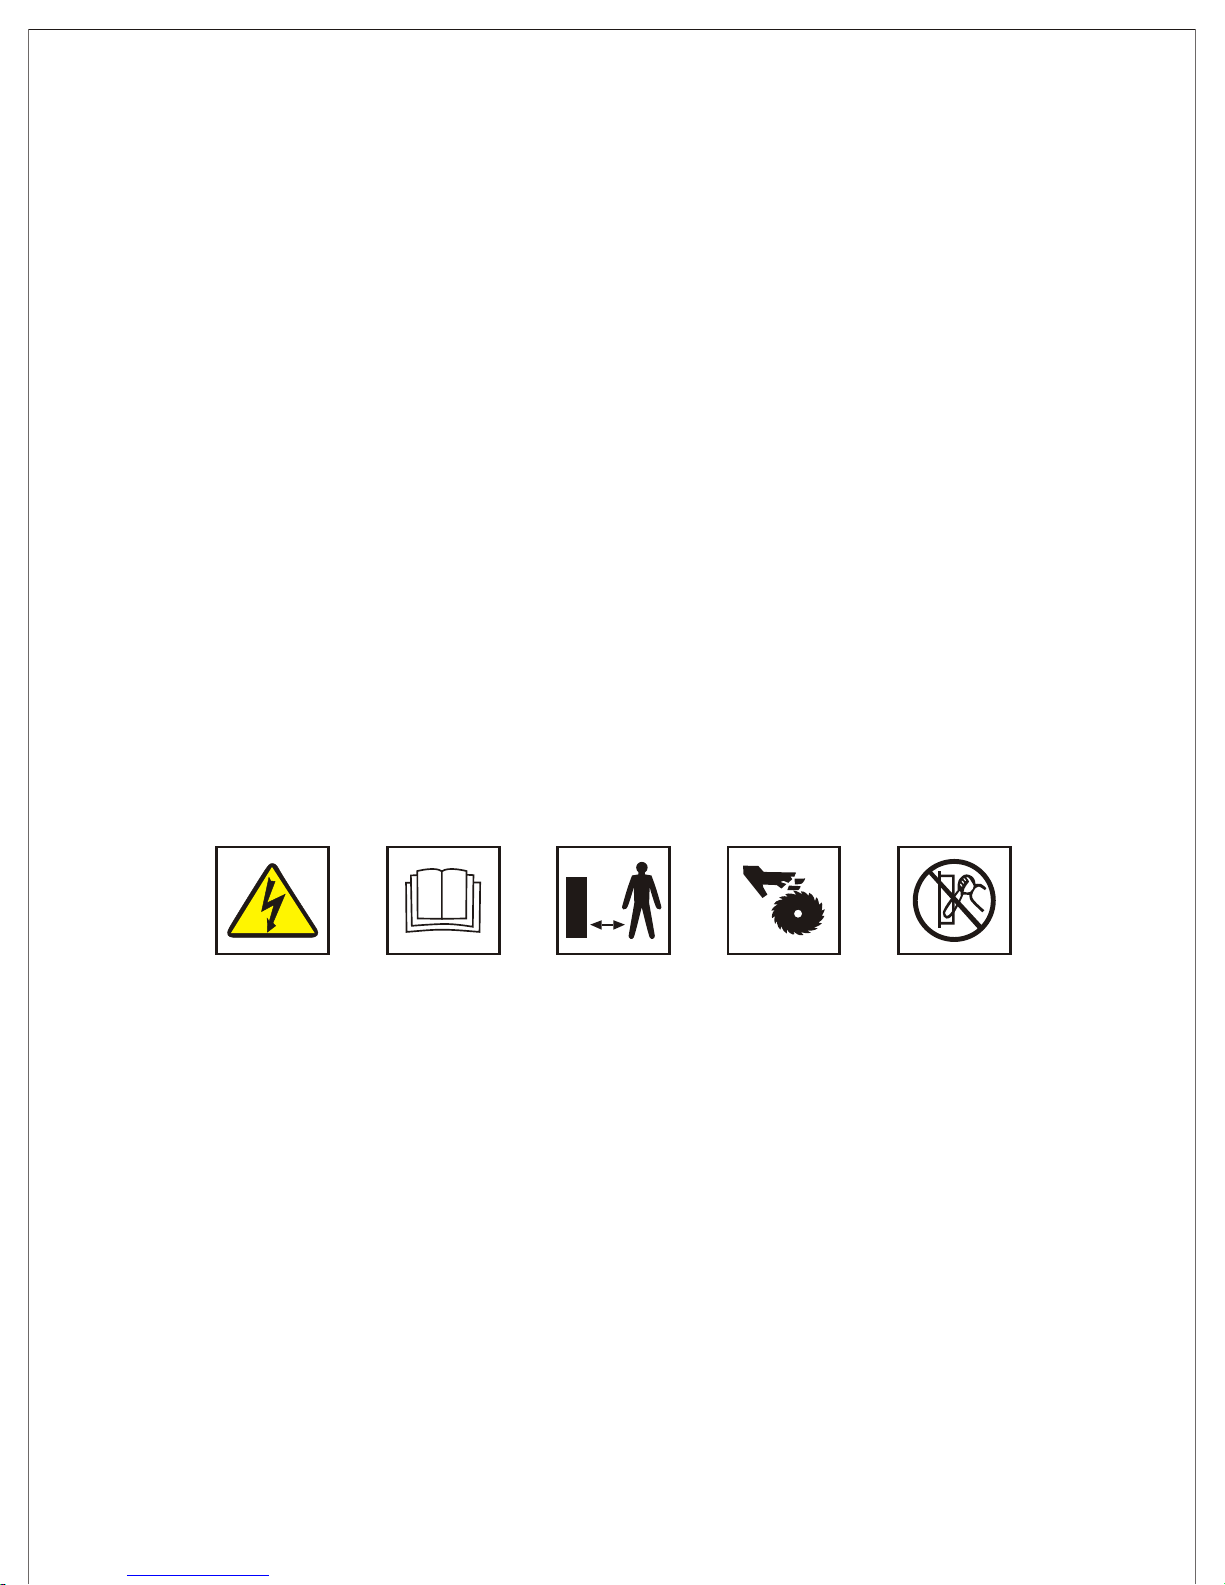
Preventable illustrations
1. Warning! This is a dangerous power tools. Operate it carefully and follow all the
safety declarations and warnings.
2. Please read the manual of the Intelligent mower carefully and follow all safety
declarations.
3. Keep children, pets and outsiders away from the machine.
4. Keep your hands and feet away from the sharp rolling blade.
5. It is forbidden to pry.
2
●Safety warnings and precaution
Page 6

1. Safety protection
The main engine is furnished with main power-control lock. Use the key to start up.
When finishing work, users must pull the key out and safe keep it, in case children or
other outsiders without safety operation acknowledge start the machine.
2. Tilt transmitter system
The machine is equipped with tilt transmitter. When the mower is working and the
front or the back is lifted greater than 20 degrees, the machine will stop working.
3. collision-protection sensor system
When the mower's collision-protection transmitter collides into hard fixed object or
other resistance, the sensor is started up. Then the mower will stop moving in the
direction and move backward to adjust its direction, thereby avoiding barriers and
resistance.
4. Emergency stop system
When the mower is working, switch off the power or press the power control button
of the remote controller in any condition, the mower will stop working and the blade
stop rolling.
5. electric-control charging system
The intelligent mower is equipped with charging control system, which controls the
charging process, avoid excessive charging and auto-navigation workstation
charging by lack of electric quantity, and then hold to next use.
6. electric fence control system
Use electric fence line as virtual wall to control preset working area, guarantee its
safety running, and finish mowing efficiently.
7. infrared detection system
The mower is equipped with infrared transmitting tube and receiving tube in the
front. When the working mower detected barrier within fifteen centimeters in the
front and eight centimeters above the ground, the intelligent mower will stop
forward, adjust its way and avoid the barrier.
8. Timing shutdown device
The intelligent mower preset default time. When the default time (charging time not
included) is up, it will stop working and make the sound of beep as warning. Then
the machine goes back to the navigation workstation to charge and wait for further
use. When the machine stops, you need to restart the intelligent machine to make it
work.
3
Safety features
Page 7

9. Lawn density detection system
When the smart grass mower works on dense area, electric current will increase.
The intelligent mower will adjust itself and choose to move slowly to avoid damage
to the motor.
10. Monitoring motor operation process
The mowing motor and driving motor is continually monitored during operation, in
case of over temperature. Because of the lawn problem or barriers came across by
the motor, electric current increases. When temperature increases, it will start
automatic protection and change its way. If the electric resistance is still big enough
to have the temperature keep high, the intelligent mower will stop itself to protect
the motor and make beep sound as warning and shut down power.
11. Warning signs
There are safety, warnings and precautions pasted on eye-catching parts of the
mower. Please pay attention to them and make sure you have completely understood
this information before operating the machine.
4
Page 8
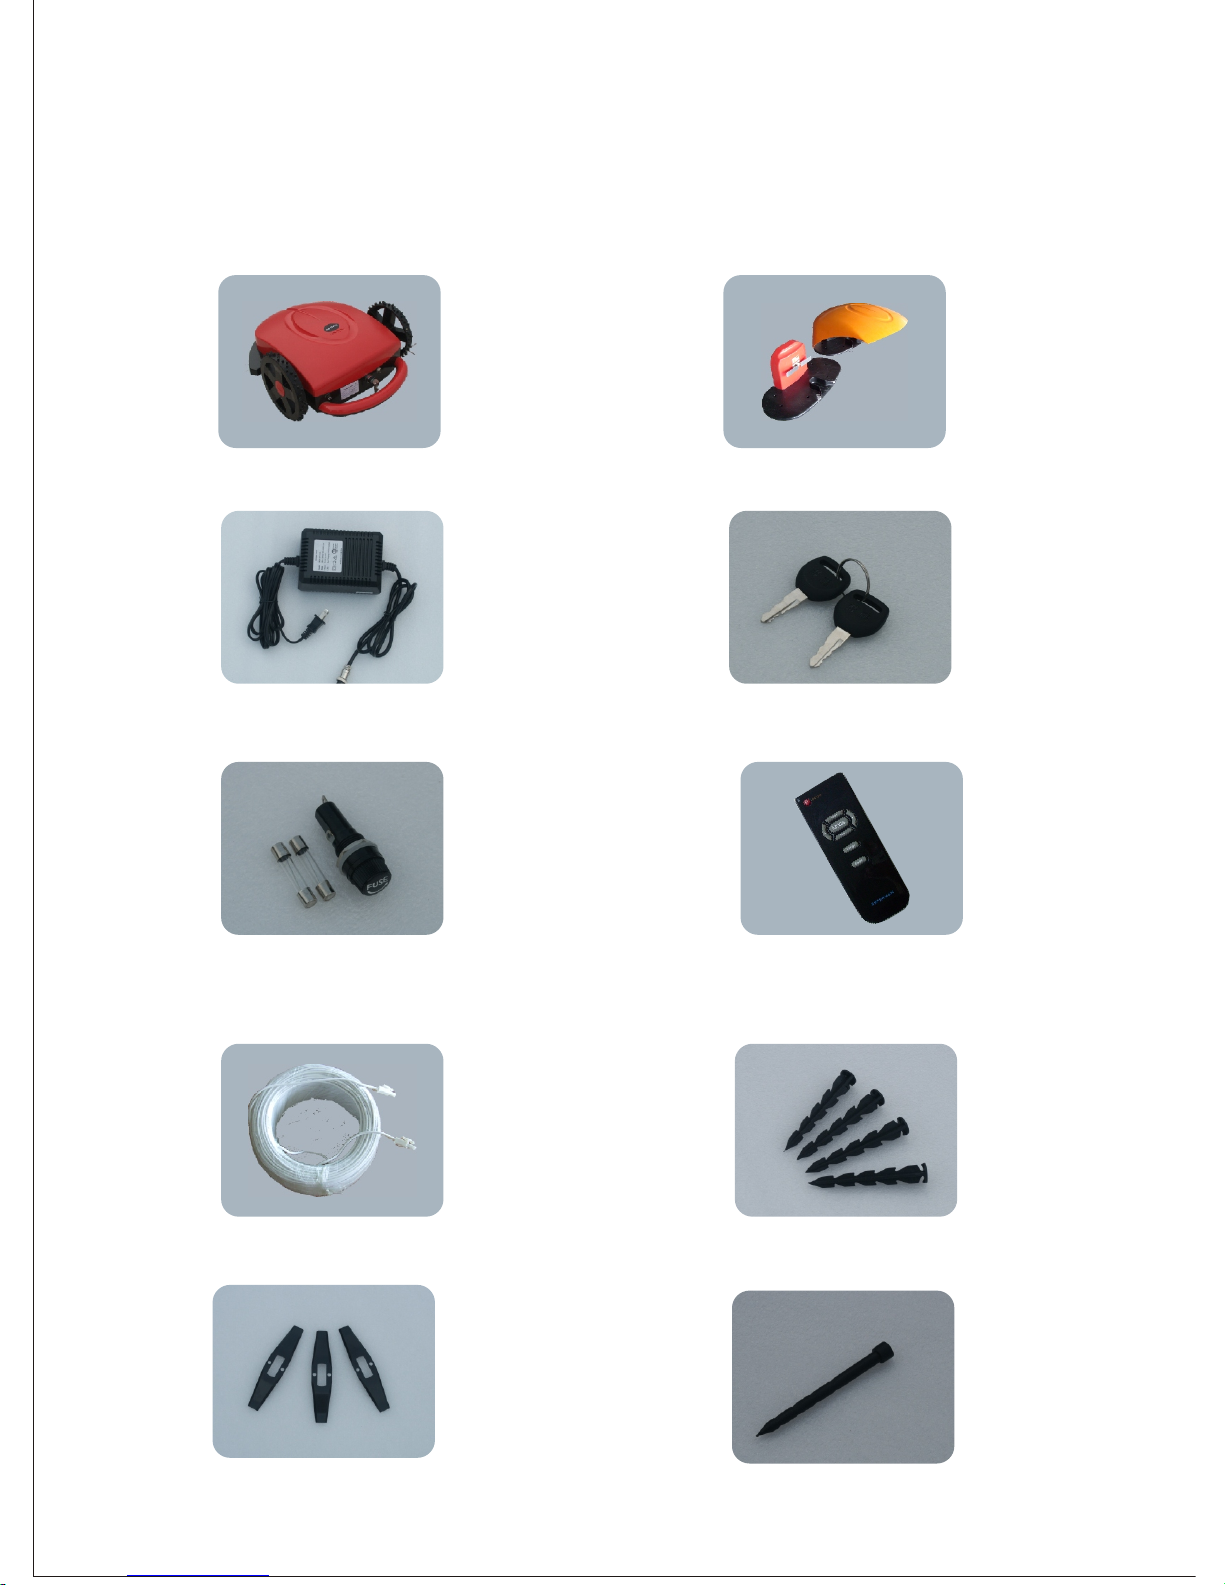
1.SPM08-320 Intelligent mower 2.Intelligent navigation workstation
3.Standard charger 4.Power key
5.Safety fuse 6.Remote controller
7.Electric fence line 8.Fence line Pegs
9.Blade 10.base-fixing pegs of the workstation
5
General description of devices
● Main Equipment Composition
Page 9
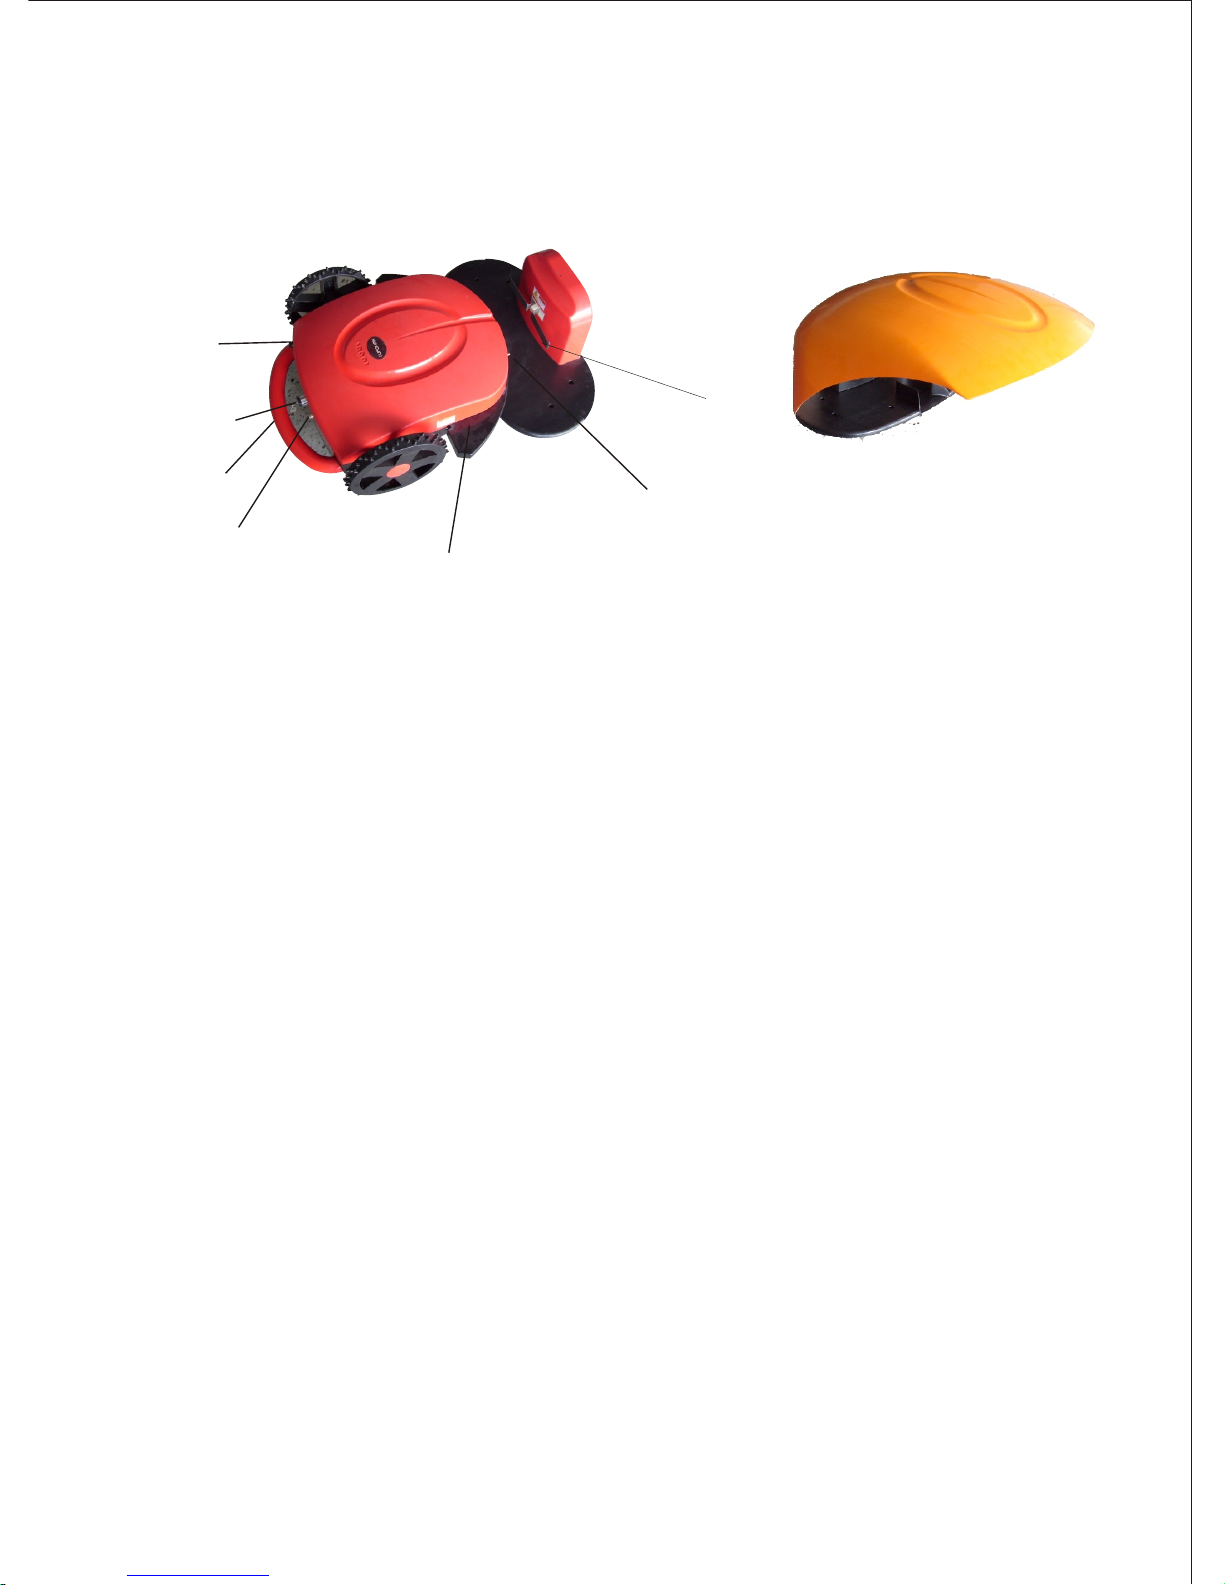
● The illumination of outer framework
E lectrode slice
Collision preventing bar
Charging pole
Charging faucet
Power key
Handle
Upcover of navigative workstation
Fuse
1 The Intelligent Mower use 24 voltage nickel-hydrogen chargeable battery.
2 The Intelligent Mower use advanced ranging and barrier-avoiding system.
3 The Intelligent Mower has electric collision-avoiding assistant system, which
helps to get away fast in hard conditions.
4 The Intelligent Mower use advanced map traversal. Therefore it can finish the
mowing within a short time.
5 The Intelligent Mower use automatic safety protection detection system, which
can shut down the machine in overload condition.
6 The Intelligent Mower use safe system design. It will shut down if lifted when
working.
7 The Intelligent Mower will go back to navigation workstation when lack of
power and return to continue mowing when the power is full.
8 The Intelligent Mower use battery safety protection system. When the battery
is overcharged or the temperature is high, it will stop charging.
9 The Intelligent Mower has infrared navigation function.
10 The Intelligent Mower has timer function. When the preset time is up, it returns
to the intelligent workstation to charge and wait for further use.
6
● General Character of SPM08-320 Intelligent Mower
Page 10

Products technological specifications
Main machine size: 590×572×239 centimeters
Main machine weight: 10.6 kilogram
Power source: 24 voltage nickel-cadmium battery
Power: 130 watt
Mowing width: 320 millimeters
Rotational speed of blade: 6000 revolution per minute
Noise: bellow 70 decibel
Electronic fence line controllable area: 1800 square meter
Mowing area: 500 square meters
Charge time: 8 hours
Working time: 2.5-3 hours
7
Page 11
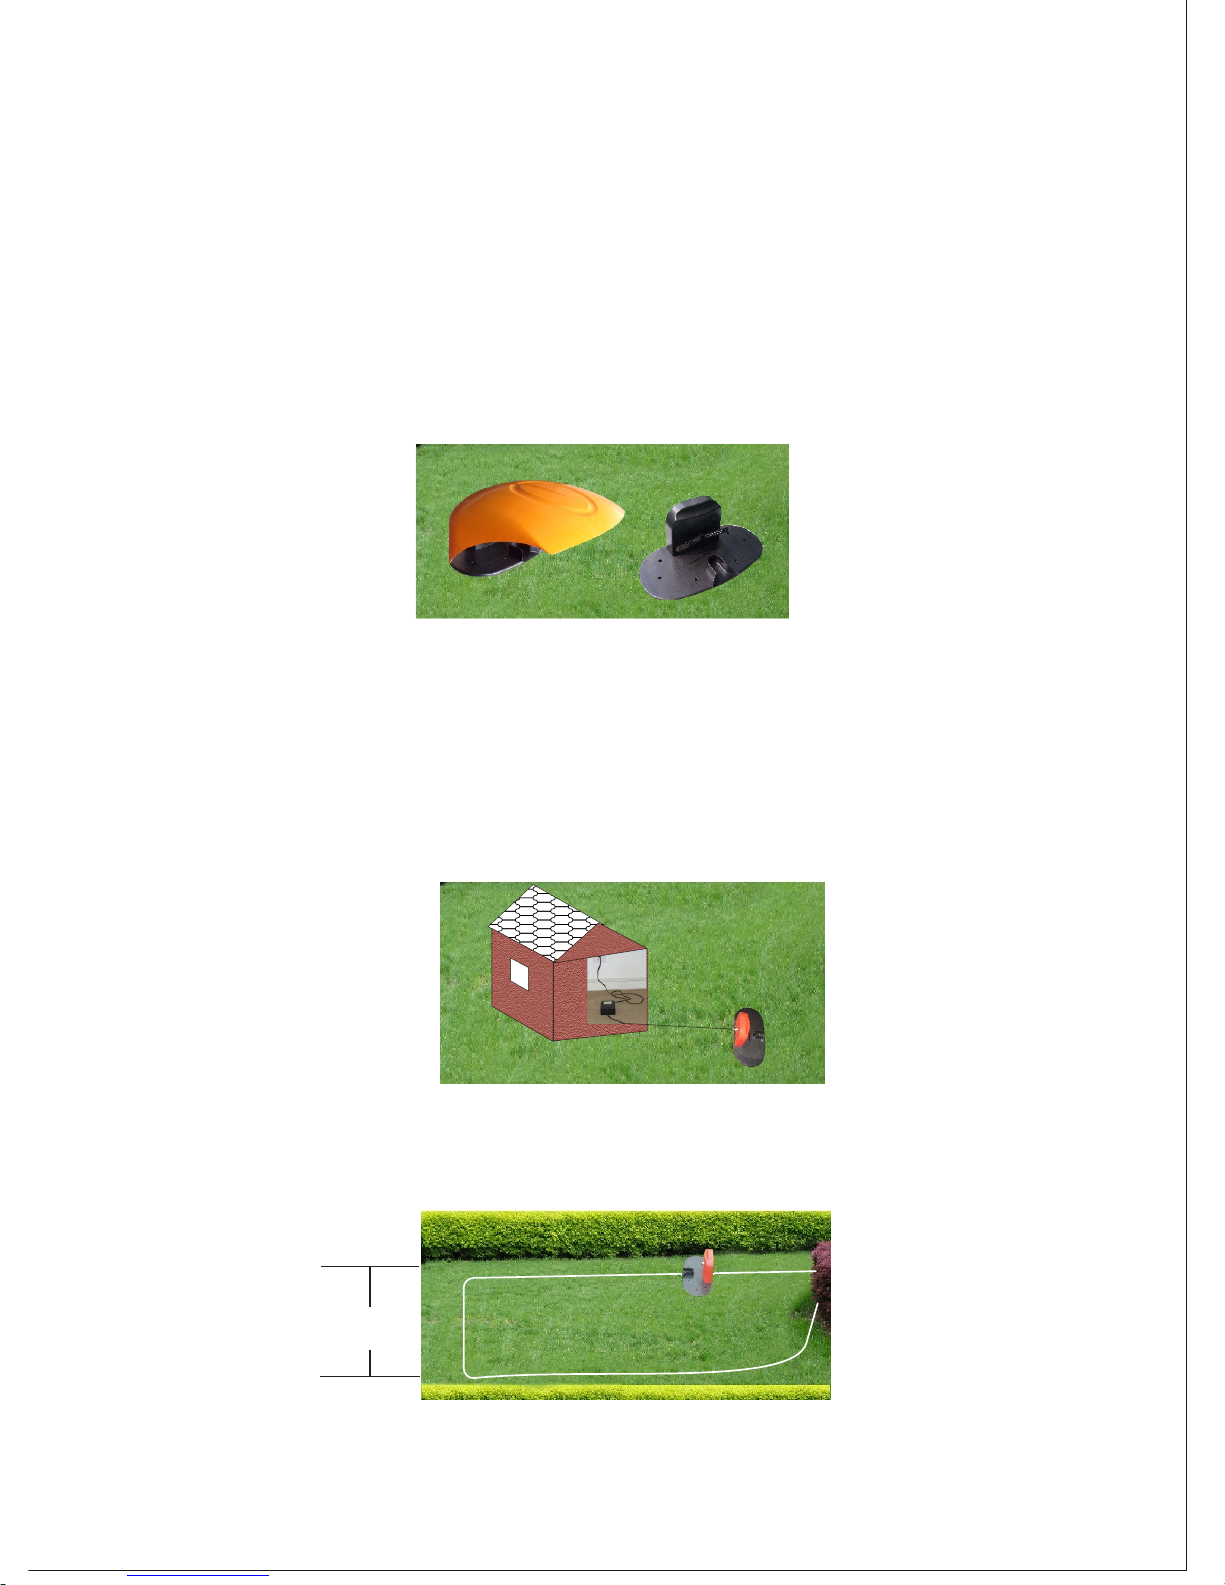
Chapter one Intelligent navigation workstation and
electrical fence line installation
1.1 Constitution of the intelligent navigation workstation
The intelligent navigation workstation have combinative mode. Except the
function of getting the mower charge, wait and supplying power to electric fence,
the cover of intelligent navigation workstation can shelter against rain, block sun
and prevent frostbite(see Figure 1.1).
Figure 1.1
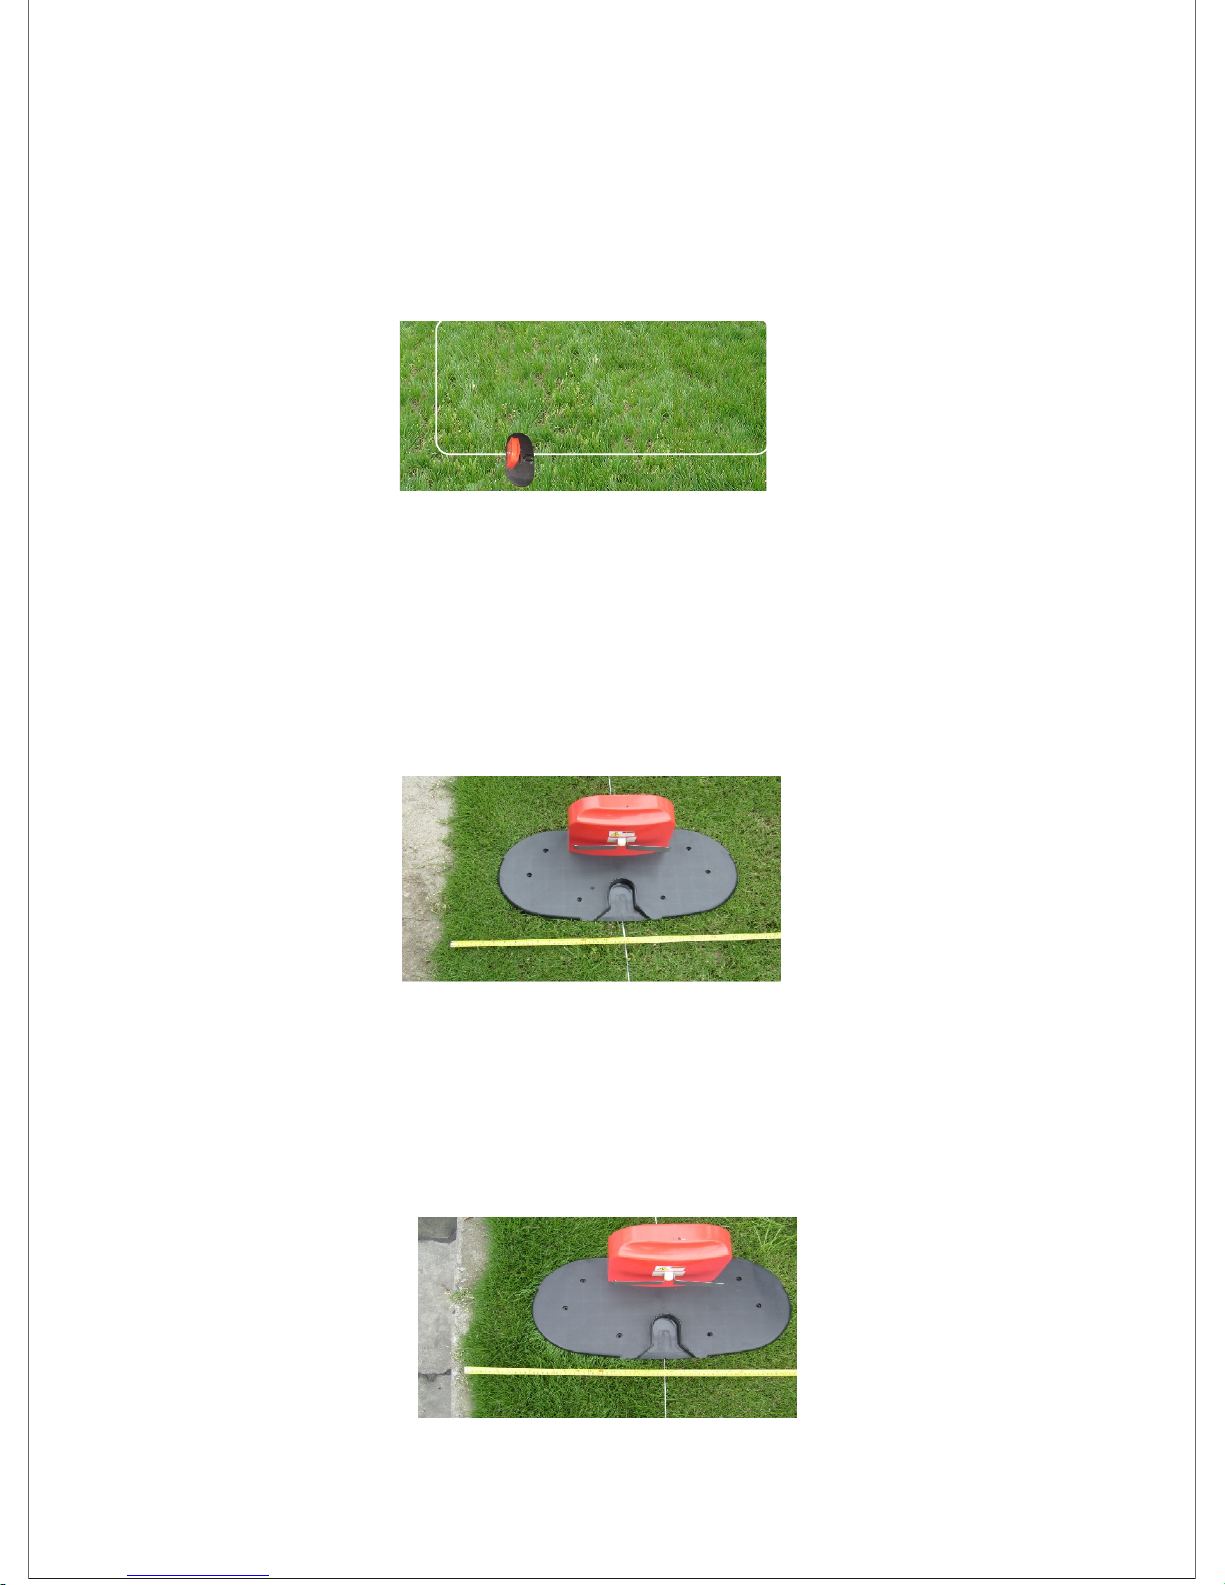
1.2 Choose the fix position of intelligent navigation workstation
To choose the best position, firstly it is based on your lawn and house. The position
must be even and convenient to use the power source in the house. The charger
must be dry and away from rain. The output line of the charger connect the input
port of the intelligent navigation workstation(see Figure 1.2).
Figure 1.2
1.2.1 To fix the intelligent workstation, it need to have an open lawn, the width of
which is no less than 3 meters (see Figure 1.2.1).
Figure 1.2.1
8
1.1 Constitution of the intelligent navigation workstation
1.2 Choose the fix position of intelligent navigation workstation
> 3 m
Page 12
1.
.2 T
he fi in
ositio
n of
he i
n
t li
g
t nav g
a
t
i
n wor
k
t
ion mu
s
t no
t hav
e
2 x g
p
t e
l e
n i o s
a
t
b rie
rs
or t
rees
wihin
2
et s
on the i e. he
r
n
t o
intlligen
t
n
avigat on
a
r
t m
e
r
s
d T f
o
f
e
i
w
or st
ation
mus
t
r
es
erv
e
a
t
leas
t
me
ters
a
s b
a
rr
ie
r f
ee
di
st
a
nceto
f
ix
the
v
ert
ica
l
k 2
-
r
fen
c
e
ine, s
o a to
uarant
e
e t
he a
ccu
r
y of
ar
gi g (
s
e
e F
ig re1.22)l
s g
a
c
ch n
u
. .
|
Fence L
i
e o m
et
ers
|
- n f
2 -
i u
re 1
2.2
F
g
.
1.
2
.
3 Th dist c
e
b
ween
th w
o kst i
o
n
an
d th la
wn
f
ri ge ep
e
n
s
on t
he
e an
e
t e
r at e
d d d
awn pl
a e an surro
und
ing gro
u
d
.
l
n d n
W en t
e lawn p an
e
is
on
t
he
s
e
ev
el
wit
h s rro
u
d
i
ng
g
ou
nd, oo e h
e
h h l am
l u n
r
c
h s
t
fi
p
oii
o
n o
fthe workttion
as olow
the ce
nter line o t
h
a
se
i
s
in t
e inner
x s
t
s a
f
l
:
f e
b
h
si
de o
f t
h law
f
ri
ge
y
0 c
en
t
i
et
s.
Se
e Fi
g
ur
e
.2.3
A)
e
n
d b
4
m
e
r ( 1
Figu
re 1.2
.
A
3
Whe
n t
h
e l
a
wn p a
n
e
s a
bo e t e su
rrou
ndi
n
g grou d y 3 c
entim
ete
rs
l
i
v h n b
,
c
h
oos
e t
e f
ix po
s
i
ti
on of the w r
ks
a
t
io a
s
ol ow the cen e
r l
i
n
o
f the b
a
se
sh
o
t n f l : t
e
i
i
n the inner s
id
e of t
h
e l
a
w fridg
e
y 5 c
e
nti e
t s
, which prev
en
s th m
o
w
er
n b 4
m er
t
e
to s
i
d tu n w
h
i ret
u
rn
s t
t e w
or s a
tion t
o charge, s el
t
e
r fro ai
n o
r wai
t
e- r
e
n t
o h
k t
h m r
i
t
e wo
r
s
tat
i
on a
ft
e
r f n
i
s
h n
g wo
k
, and climb u
p t
o
t
h
e workst
ato
n
n h k
i i
r
s
i .
(seeF
g
u
re 1
.
2.3 )
i
.B
F
g
u
re 1
.2.3 B
i
9
40cm
45cm
Page 13
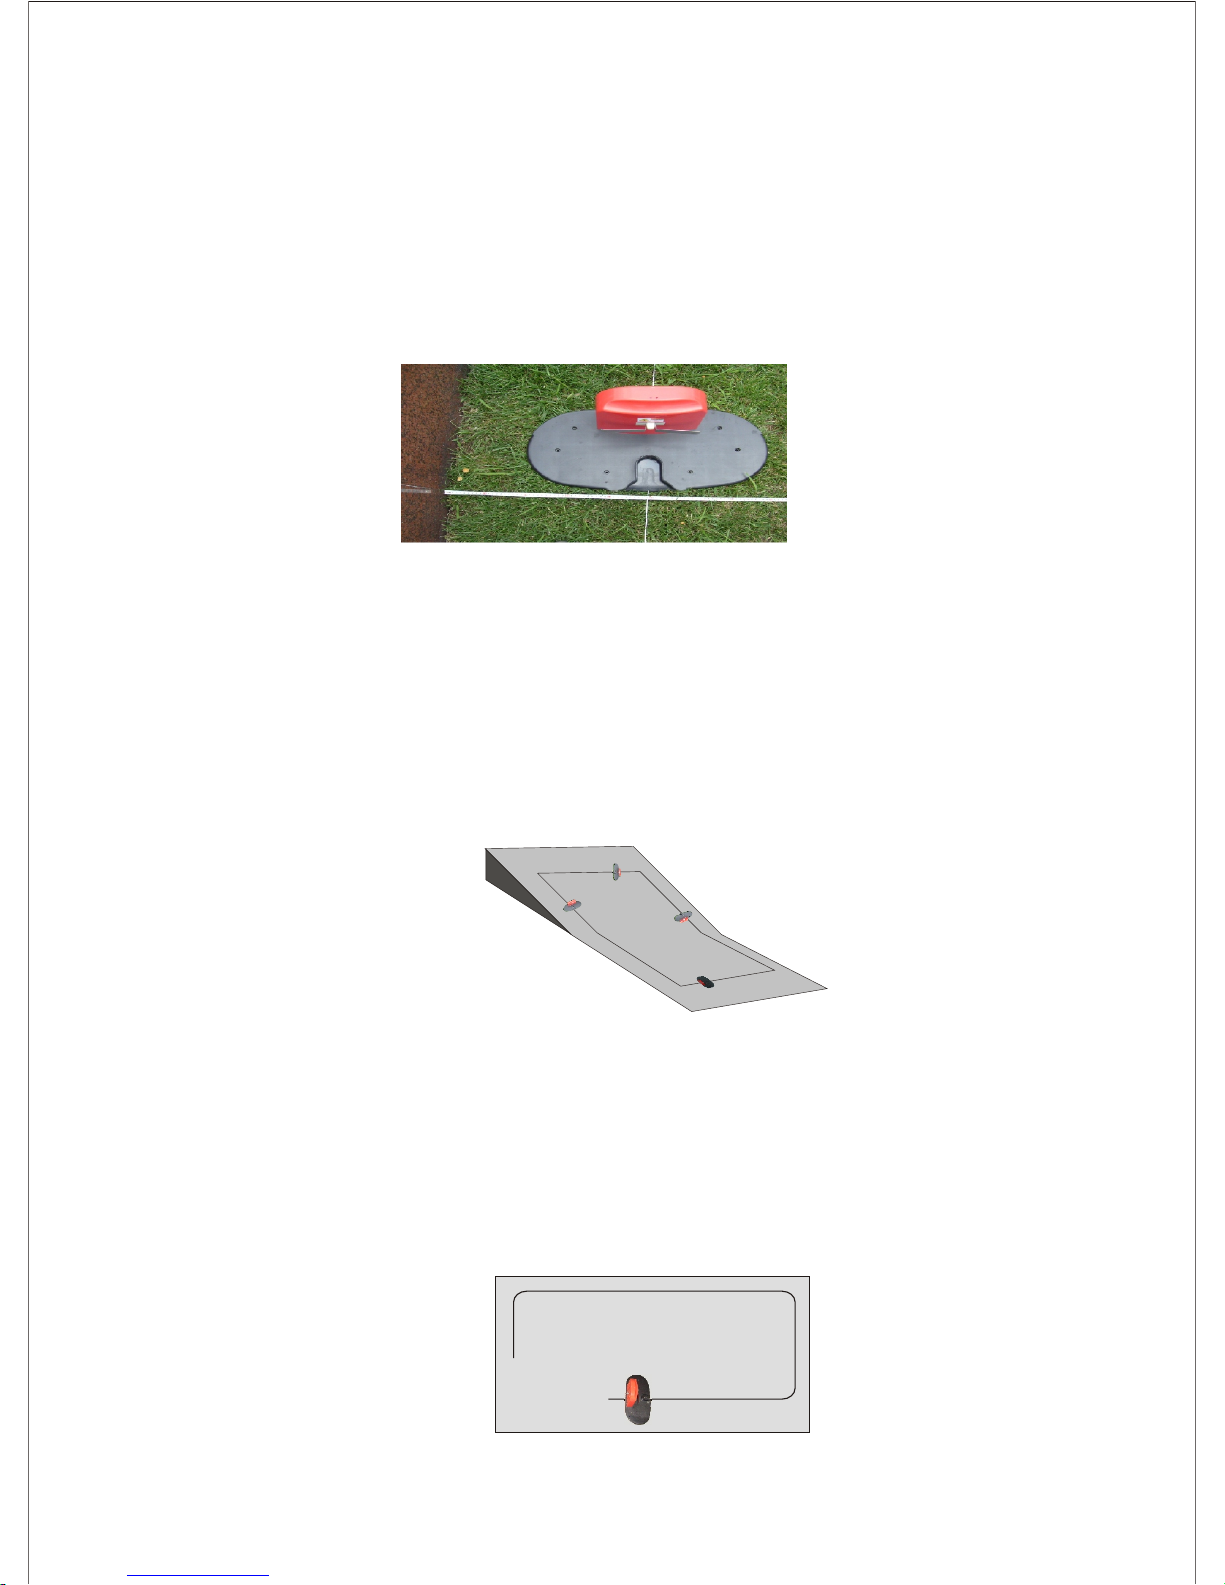
● When the lawn fridge is fixed wall, choose the fix position of the workstation as
follow: the center line of the base is in the inner side of the lawn fridge by 50
centimeters. After charging is over, the front of the mower will not get stuck and can
change direction when back to work.(see Figure 1.2.3 C)
Figure 1.2.3 C
1.2.4 The intelligent workstation cannot be fixed on slopes. Fixing the
workstation on slopes fails the mower back to station for charge. The charge post of
the main machine is easy to separate with anodes, which affects the charge effect. If
fixedon downslope, because of its inertia, it is not convenient to move back when
charging is over. The charge post of the main machine is difficult to depart from the
anode, therefore, make ti unable to stop and recharge.
(See Figure 1.2.4)
Figure 1.2.4
1.3 Install fence line
1.3.1 Open the wrapping bag and find the end of a thread with terminal. Pull the
thread out. Put the thread first from the position primarily selected to fix the
workstation, then along the edge of the lawn anti-clockwise (equipped standard
thread 100 meters long). Redundant thread is kept at the back of the workstation
for adjustment. (See Figure 1.3.1) You may buy the same type of thread to connect
onto it , if it is not long enough.
Figure 1.3.1
10
×
×
×
→
↑
↓
←
50cm
Page 14
e
r
b
l
f d
u
n
, d
o
b
nd A
t
t
e
n
ti
o
n
!
M
a
tch
ed 1
0
0 m
t
e s ca
e
, i re
d
a
n
t
no
t p
il
e u
p e
hi
i
a
f
h
p y
r s
e
r
w
o
r
k
n
g
S
ttion, c
u
t
o
f t e
roli
xit pa
t o
r
ca
tt it
.
.3.
A
u
s s
n
c
w n
n
c
he l e
i
s
1
2
d
j
t th
e di
ta
e be
t e
e t
h
e f
e
e lin
e a
n
d t a
wn dge.
At f r
t
us
s a
o
s t t
i
i f
e l n
e he
try t
o
e le s sher-
pin, s
a o ad
j
u
s
t
h
e po
s
i
t
o
n of f xing en
c
i
.
T
ea e
u
l
n
t m s a
he w k
a
f xi a
t
h
r
d
nds sho
d b
e k
eep 2
0 c
e i e
ter t t o
r s
tti
o
n
-
i
ng pl c
e
,
s
a n
e
e
. 3.2Ao s to c
on
ct f
nce line (
see F
igure 1
. )
F
i
e 1. g
u
r
3
.
2
A
● I w
d
m ve t
n
l
s
f t
he lan s
u
r
ro
unding g
r
oun
i
s a
t the sa
e l
e
l w
ith he la
w or
es
h
a
e c
e l
d a
t he i s
de of
n
dg t ncen
t
im
e
t r
s hi
g
h
e
r, f
e
n
i
n
e is f
ix
e
t
n
n
e
r
i
t
he la
w e
e
c i
e
r
h a
m
i s
t s
h
b
y 35 e
n
t
mte s, whic c
n o
w
the su
r
ro
und ng g
r
a s a
t he m
o
t and t
e
s s
l i
( e F
e 1.3
.
) i ti
l
I
ns
d
e
. s
e
i
g
u
r
2
B
gur
F
i e 1
.
3
.
2
B
● I
h
e
l w
r
i nt m s h
i
r
t n
l , nc
f t
a n s
ur oun
d
i
n
g
s 5 c
e
i e
t
e
r g
he
ha t
h
e wal f
ix-
fe
e or
r
i e
n
e s
d
d
t e i s
t
n
dge by
b
a r er
, t
h
f
e
nce li houl
be f
ix
e
a t
h n
n
e
r
ide o
f
he la
w e
0
en t
s
i
e s
t
o
l
i i on
n
s
t
ba4
c
t
ime
e
r , w
h
c
h pr
v
e
nt h
e c
l
s
on pro
tec
ti tra m
i
t
e
r
r and
r t s
ck w
h
m e s f e l n
e a
t bathe ch
a
g
e p
ost
o ge
t t
u hen t
e
ower m
e
t e
nc
i
n
d
ur
n
ck .
3
.
2
C(
s
e
e Fi
gu
r
e 1.
)
i
F
g
u
r
e 1.3
.
2
C
1
1
35cm
40cm
Page 15
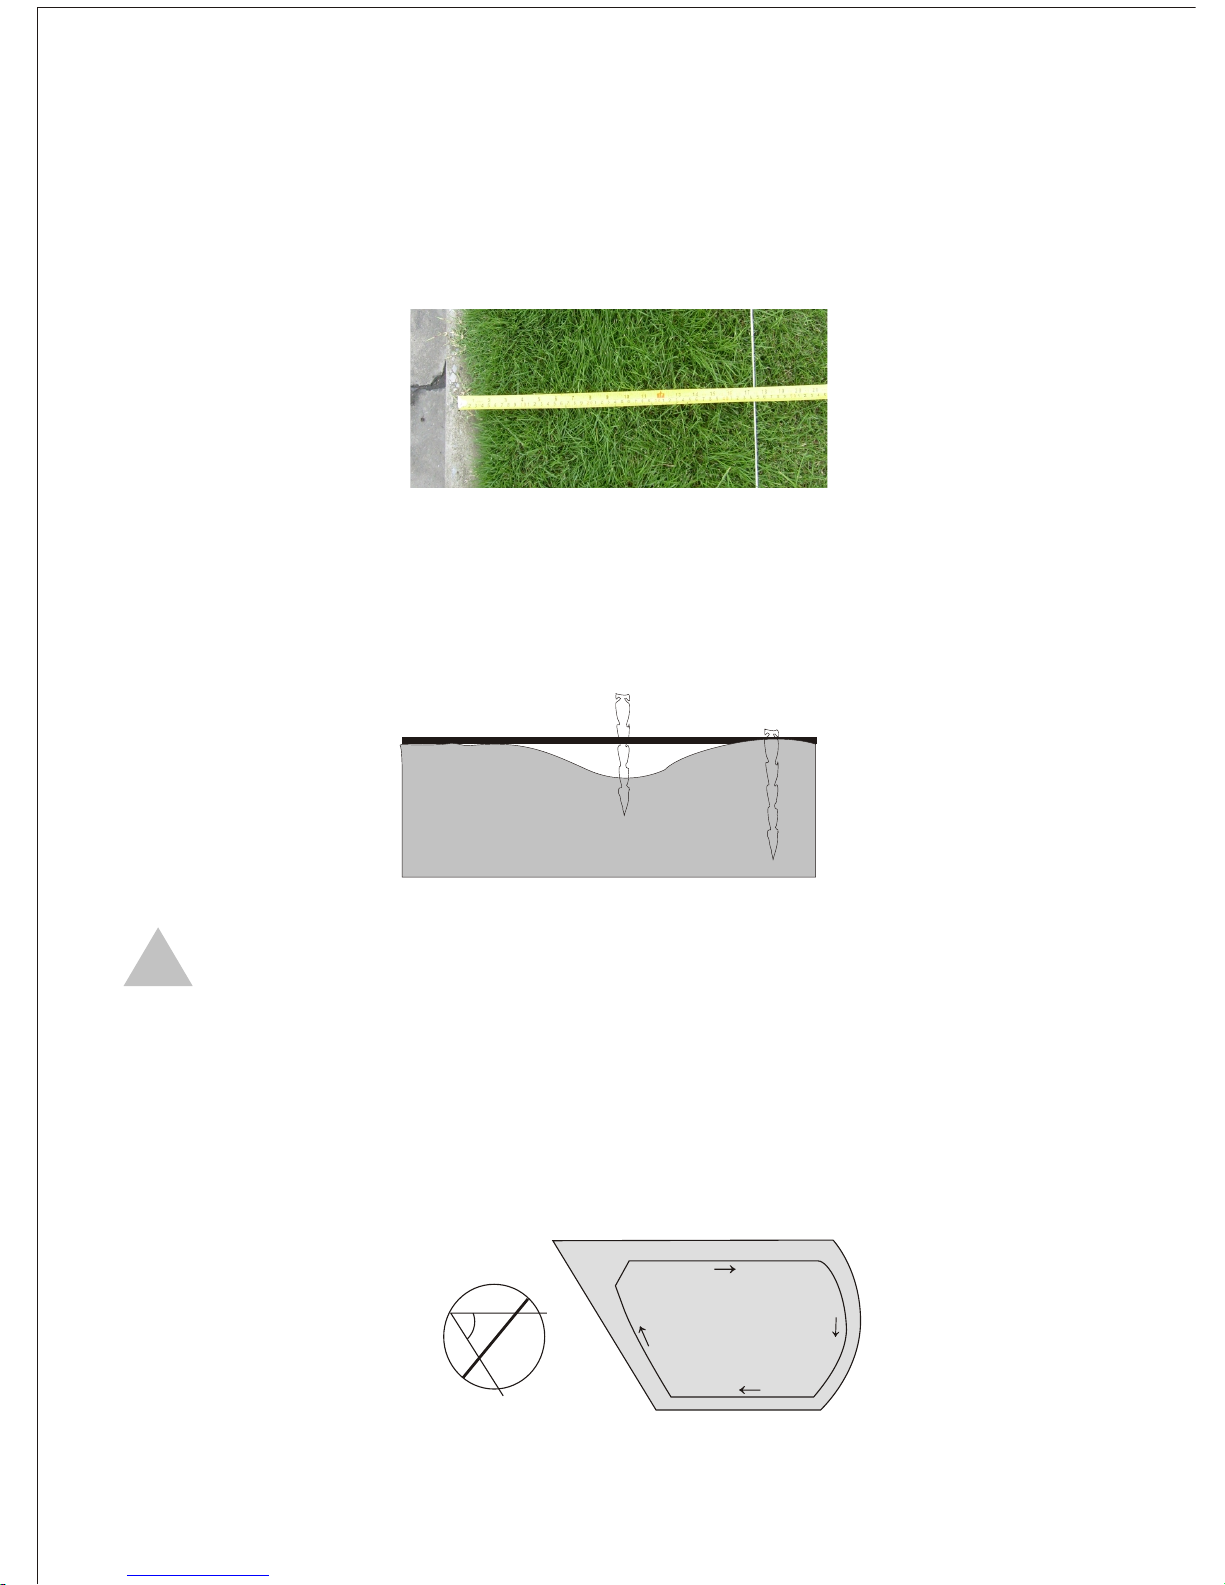
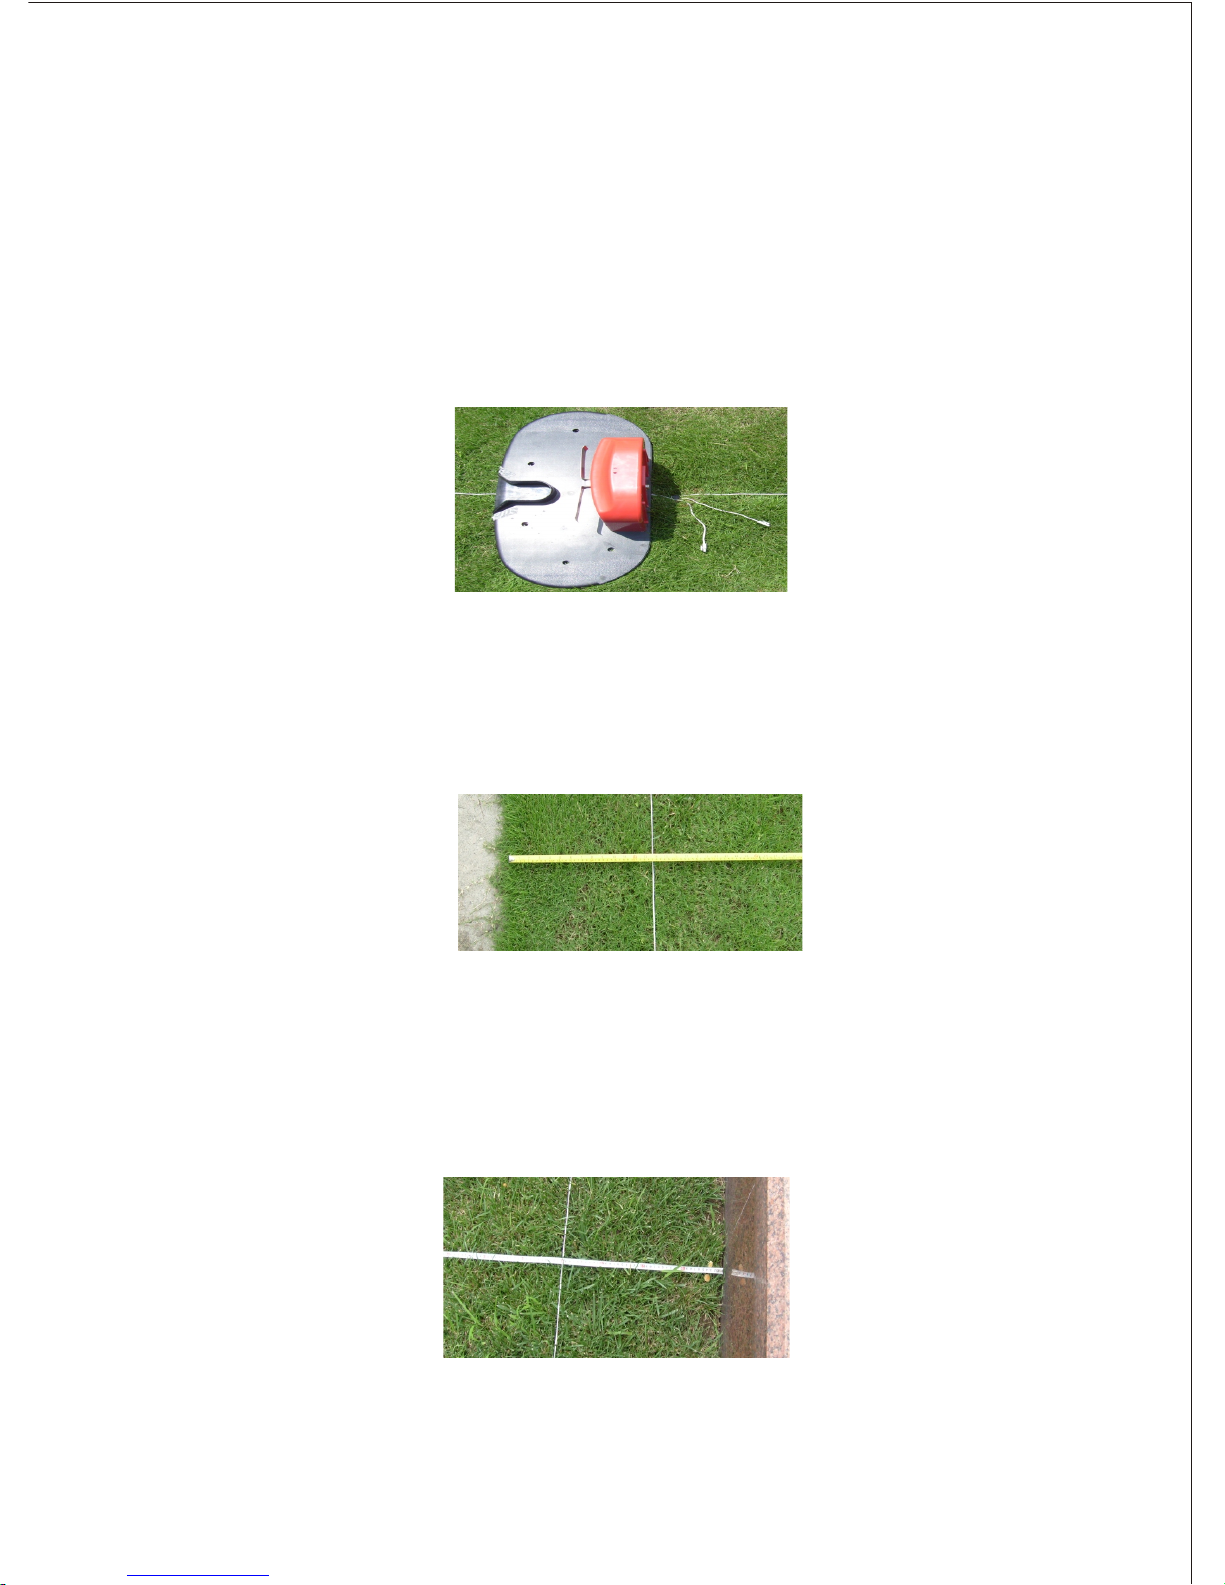
If the lawn surrounding is 3 centimeters lower than the lawn plane, fence line
should be fixed at the inner side of the lawn edge by 45 centimeters, which can
prevent the wheels of the mower fall down and cannot return if the earth is soft on
the edge.(see Figure 1.3. 2D)
Figure 1.3.2 D
1.3.3 Fix fence line
Use an irony hammer to fix the adjusted fence line one by one. Make the fence line
tight to the ground (see Figure 1.3.3). Generally fix the shear-pin every 2 meters.
However, you may adjust the density of the pin according to ground forms.
Figure 1.3.3
Warning! When fixing fence line shear-pin, use proper eye-shield, hand
guard measures, in case the shear-pin is broken or the hammer falls on the hand
wrongly when driving the shear-pin. Under extreme conditions, water the place to
soften the earth and then drive the pin in or avoid partial fence line.
1.3.4 fix the fence line at sharp turn
Mind not make acute angle when fixing the fence line. An acute angle turn may
cause the mower away from its way. You may adjust the angle wiring to avoid this
situation. (See Figure 1.3.4)
Figure 1.3.4
12
45cm
↓
↓
!
Less than90
Page 16
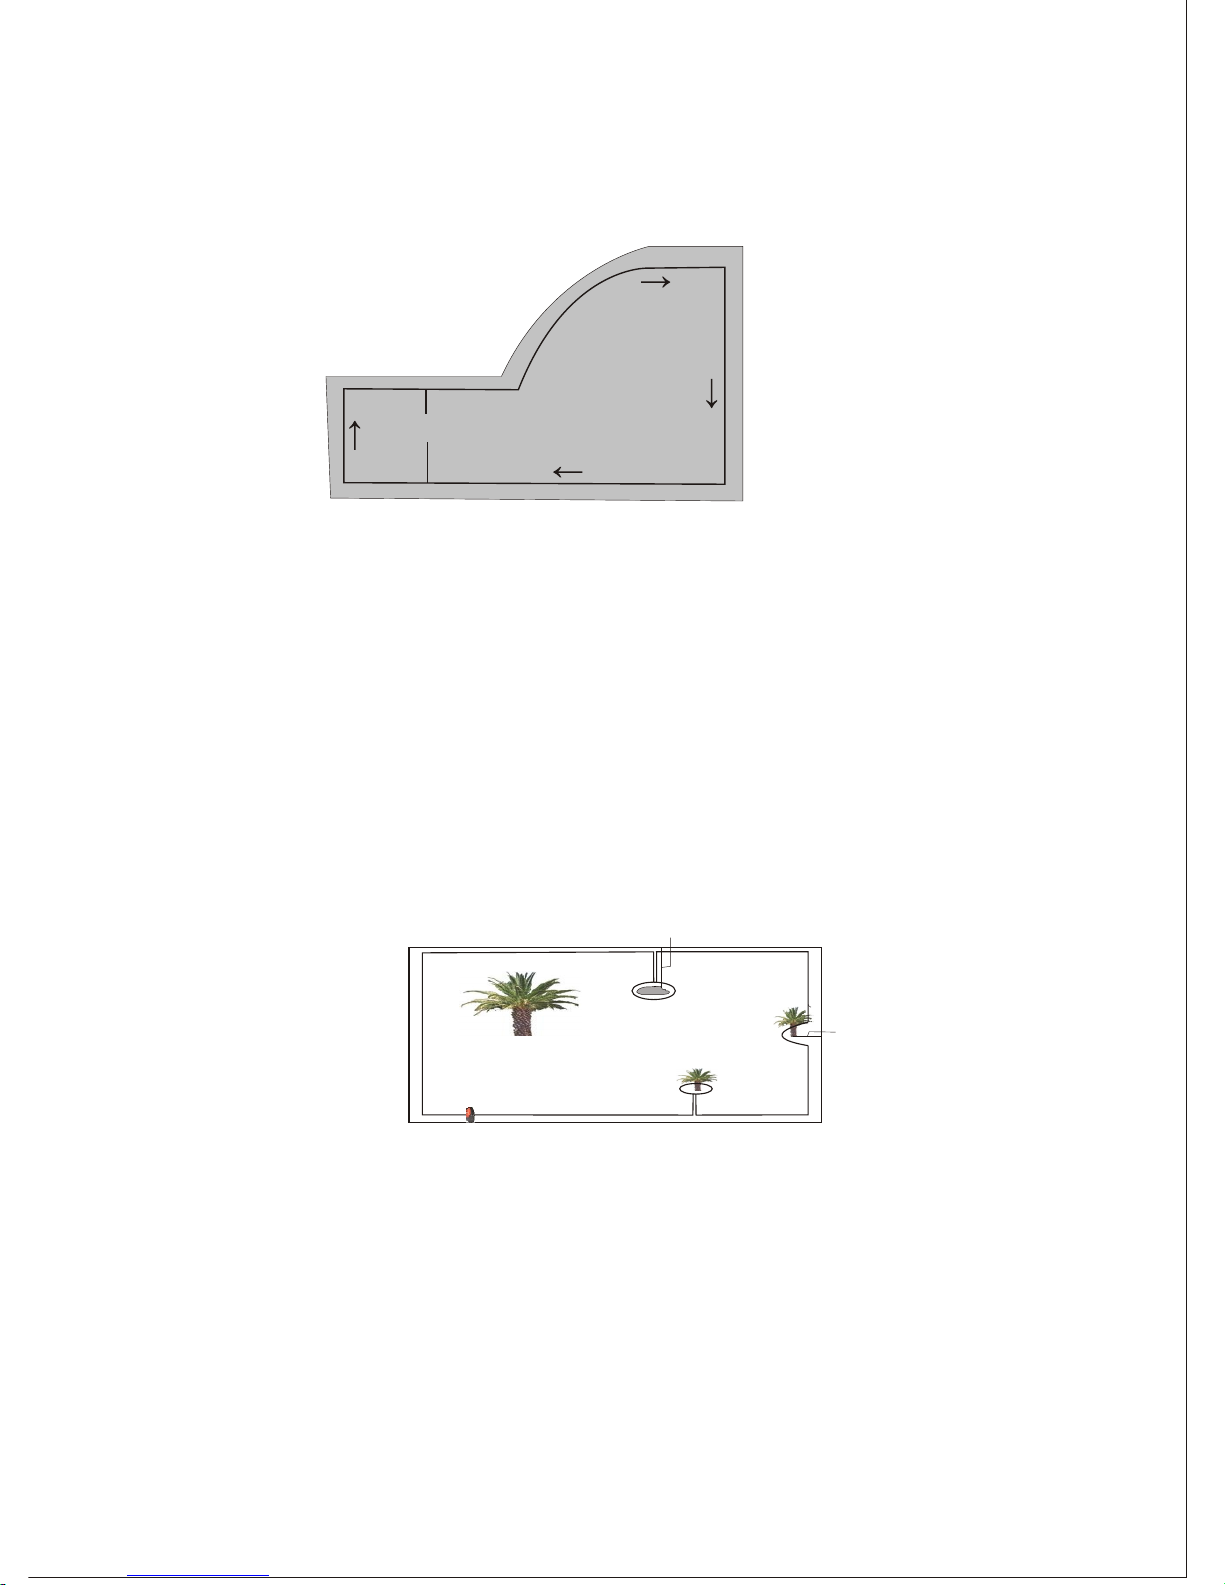
1.3.5fix the fence line at narrow ground
When fixing the fence, the least valid distance between two fence lines is 1.5
meters.(see Figure 1.3.5)
Figure 1.3.5
1.3.6fix the fence line when meeting immovable barrier
If the barrier is 5 centimeters higher than the ground and the barrier is kind of rigid,
such as trees, wire poles, fountains and so on, you may surround it as ringlike
island. The grass left on the lawn is no need to clean. To make the ringlike island,
pull out the nearest fence line to surround the barrier and fix them with shear-pin
by 40 centimeters from the barrier. There are 2 ways to fix the fence line excluding
the barrier. First, If the distance between the barrier and the edge of the lawn is less
than 1.5 meters, fix the fence line as ringlike peninsula to exclude the barrier.
Second, If the distance between the barrier and the edge of the lawn is more than
1.5 meters, use the ringlike island way.
(See Figure 1.3.6)
Figure 1.3.6
The above illustrations indicate:
1. Young trees are easily damaged by the mower. You need to surround it as ringlike
island.
2. If the distance between barrier and the edge is less than 1.5 meters, surround it as
ringlike peninsula.
3. If several big trees are together and allow collision from the mower, it is no need
to surround it.
13
≥1.5m
>1. 5m
<1. 5m
↓
→
↑
←
Page 17
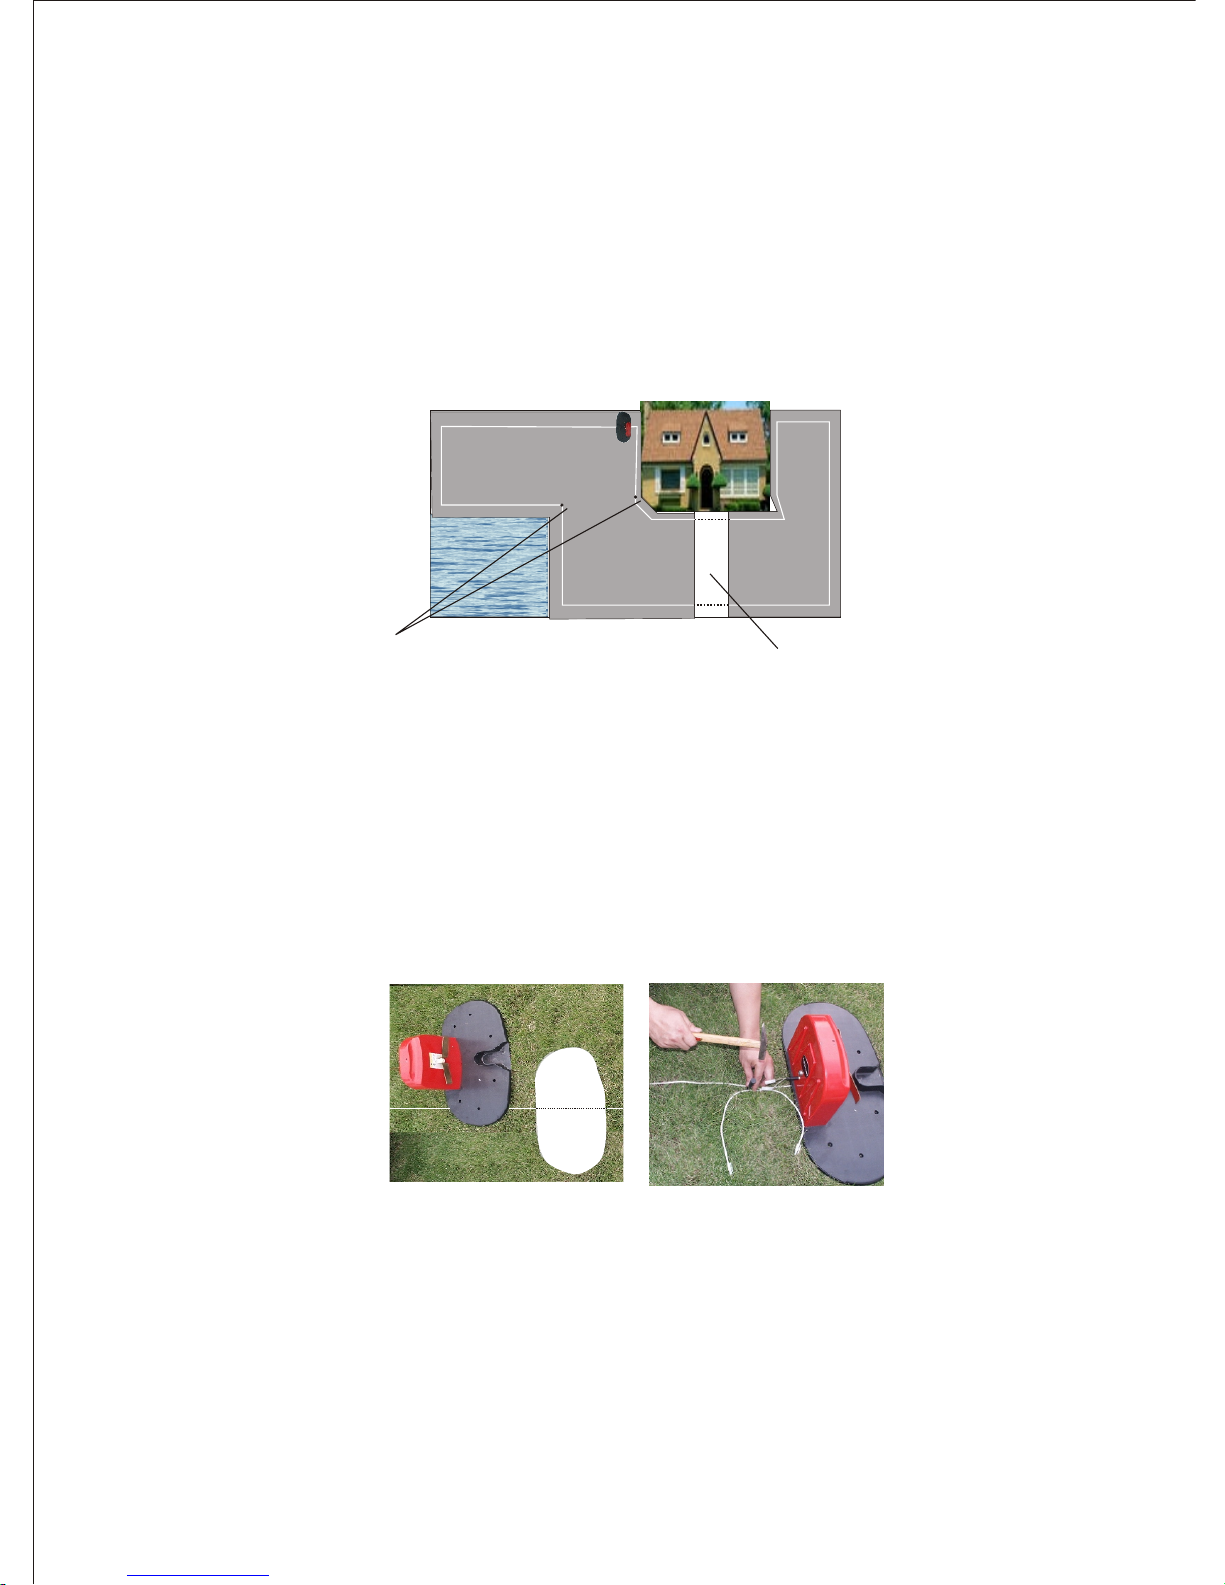
4. If the distance between barrier and the edge is more than 1.5 meters, surround it
as ringlike island.
1.3.7 fix the fence line when there are multi-area
As to multi-area lawn, if the sum area is within 1800 square meters, paths between
areas is at the same level with the lawn or less than 3 centimeters in height or more
than 2 meters width pathway, you may use fence line as ringlike island or peninsula
to surround it. The mower can cross through freely.
The width should not be less than 2m Flush with or higher than lawn(within 3 cm)
Figure 1.3.7
1.4 Install intelligent navigation workstation
1.4.1 Place the base of workstation on the pre-chosen place. Adjust its position
according to needs. Use a shovel to make signs alongside the brick of the base. Use
the shovel to clean the grass of the fix position. Then move the surface soft earth
away and make it even and solid. Try to make the surface of the base is at the same
level of the lawn. Put the base at the pre-chosen position, facing the fence line in the
anti-clockwise direction. Then adjust its position carefully.(see Figure 1.4.1 A)
Figure 1.4.1A Figure 1.4.1B
● The front fence edge must cross the bottom of the base to the back of the
workstation and have 20 centimeters free to connect the fence plug.
● The front fence line before the navigation station must have more than two
meters running vertically , and perpendicular to the center of the front
chassis, ensure return accurately to charge station.
14
← ←
↑
→
→
↓
Page 18
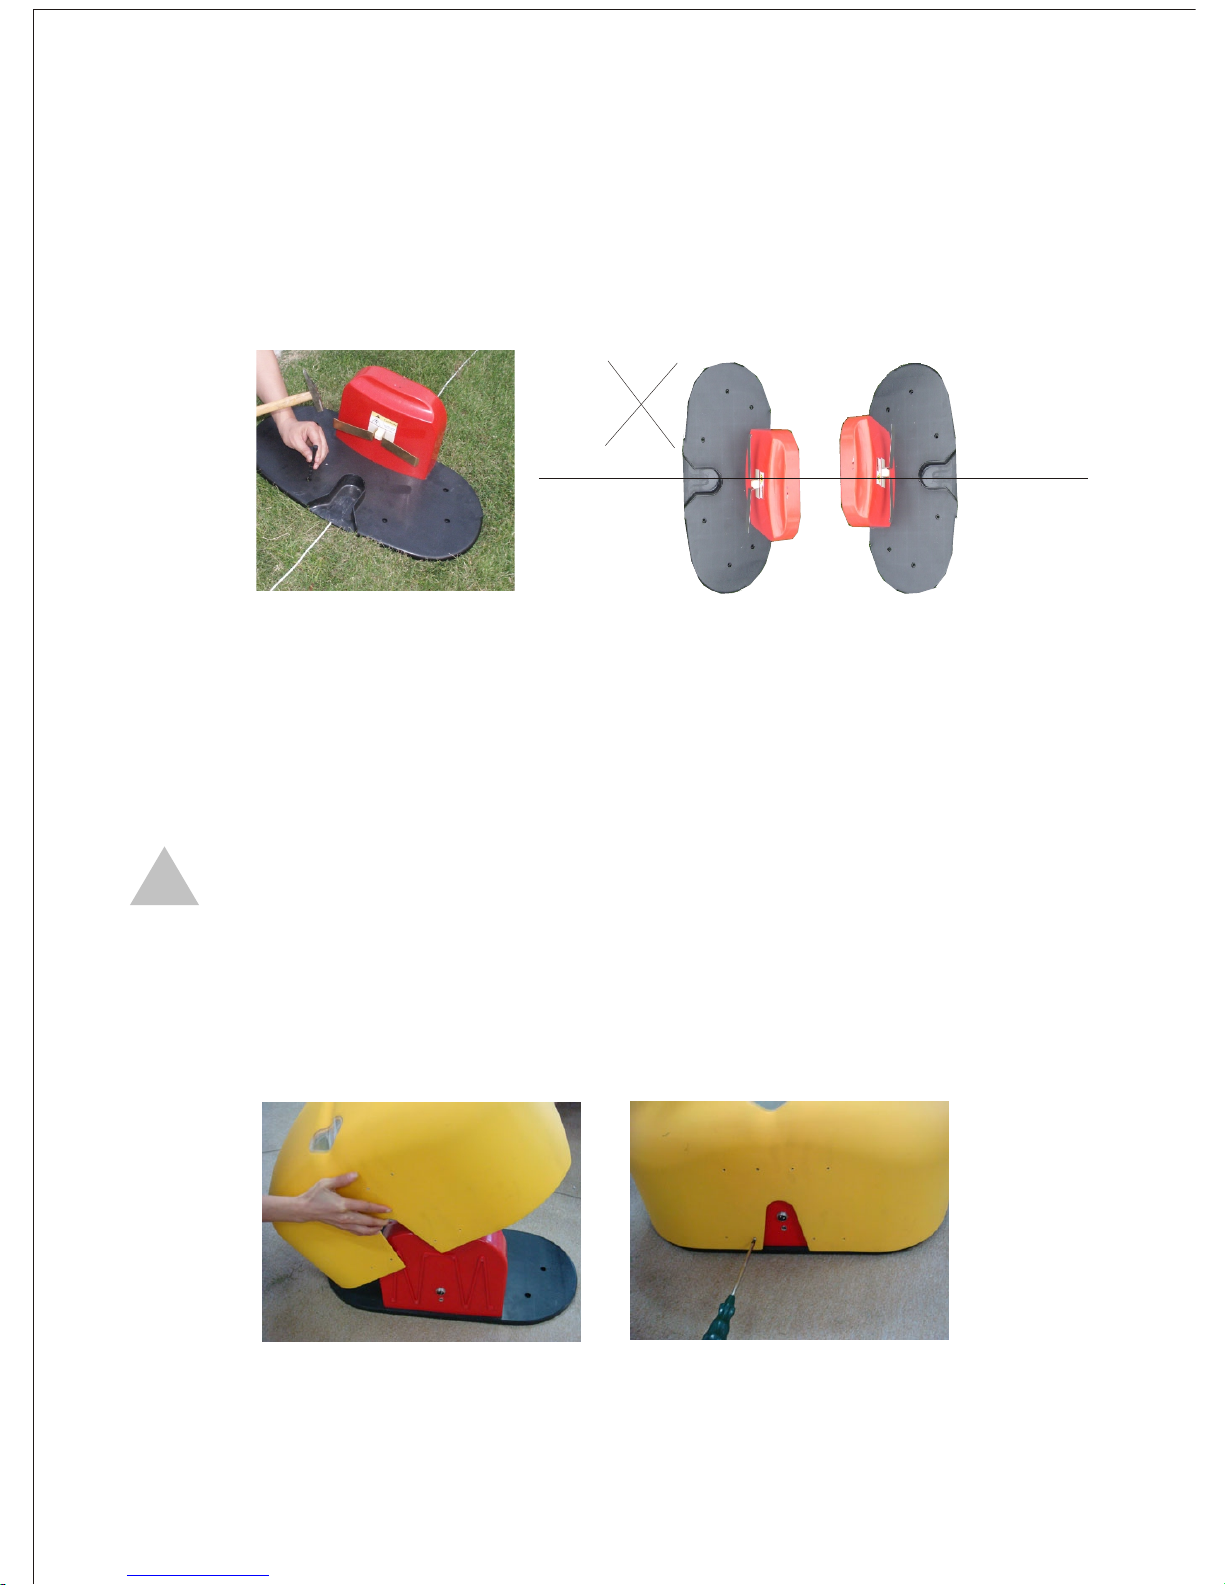
● The back end should be pulled to the back of the workstation. Use spear-pin
to fix the connection of the front and the back end. The back end should have
20 centimeters free to connect the fence plug.(see Figure 1.4.1 B)
1.4.2 Use the preset plastic spear-pin to fix the base of the intelligent navigation
workstation.(see Figure 1.4.2 A)
Figure 1.4.2 A Figure 1.4.2 B
Attention: The intelligent navigation workstation must be fixed on even solid
ground, facing the fence line in anti-clockwise direction (see Figure 1.4.2 B). There
are smooth path on the lawn for the mower to move on. The base must be stable, in
case of the mower's rolling over when climbing up to charge, wait or shelter from
rain.
Warning! It may cause damage to eyes and hands. When fixing, please
mask yourself with gloves and eye-shield measures in case of injury from the pine
broken down or the flying earth.
1.4.3 fix the cover of the intelligent navigation workstationFix the cover on the
base. Use screw to secure it from the back.(see Figure 1.4.3)
Figure 1.4.3
15
←
←
!
Page 19
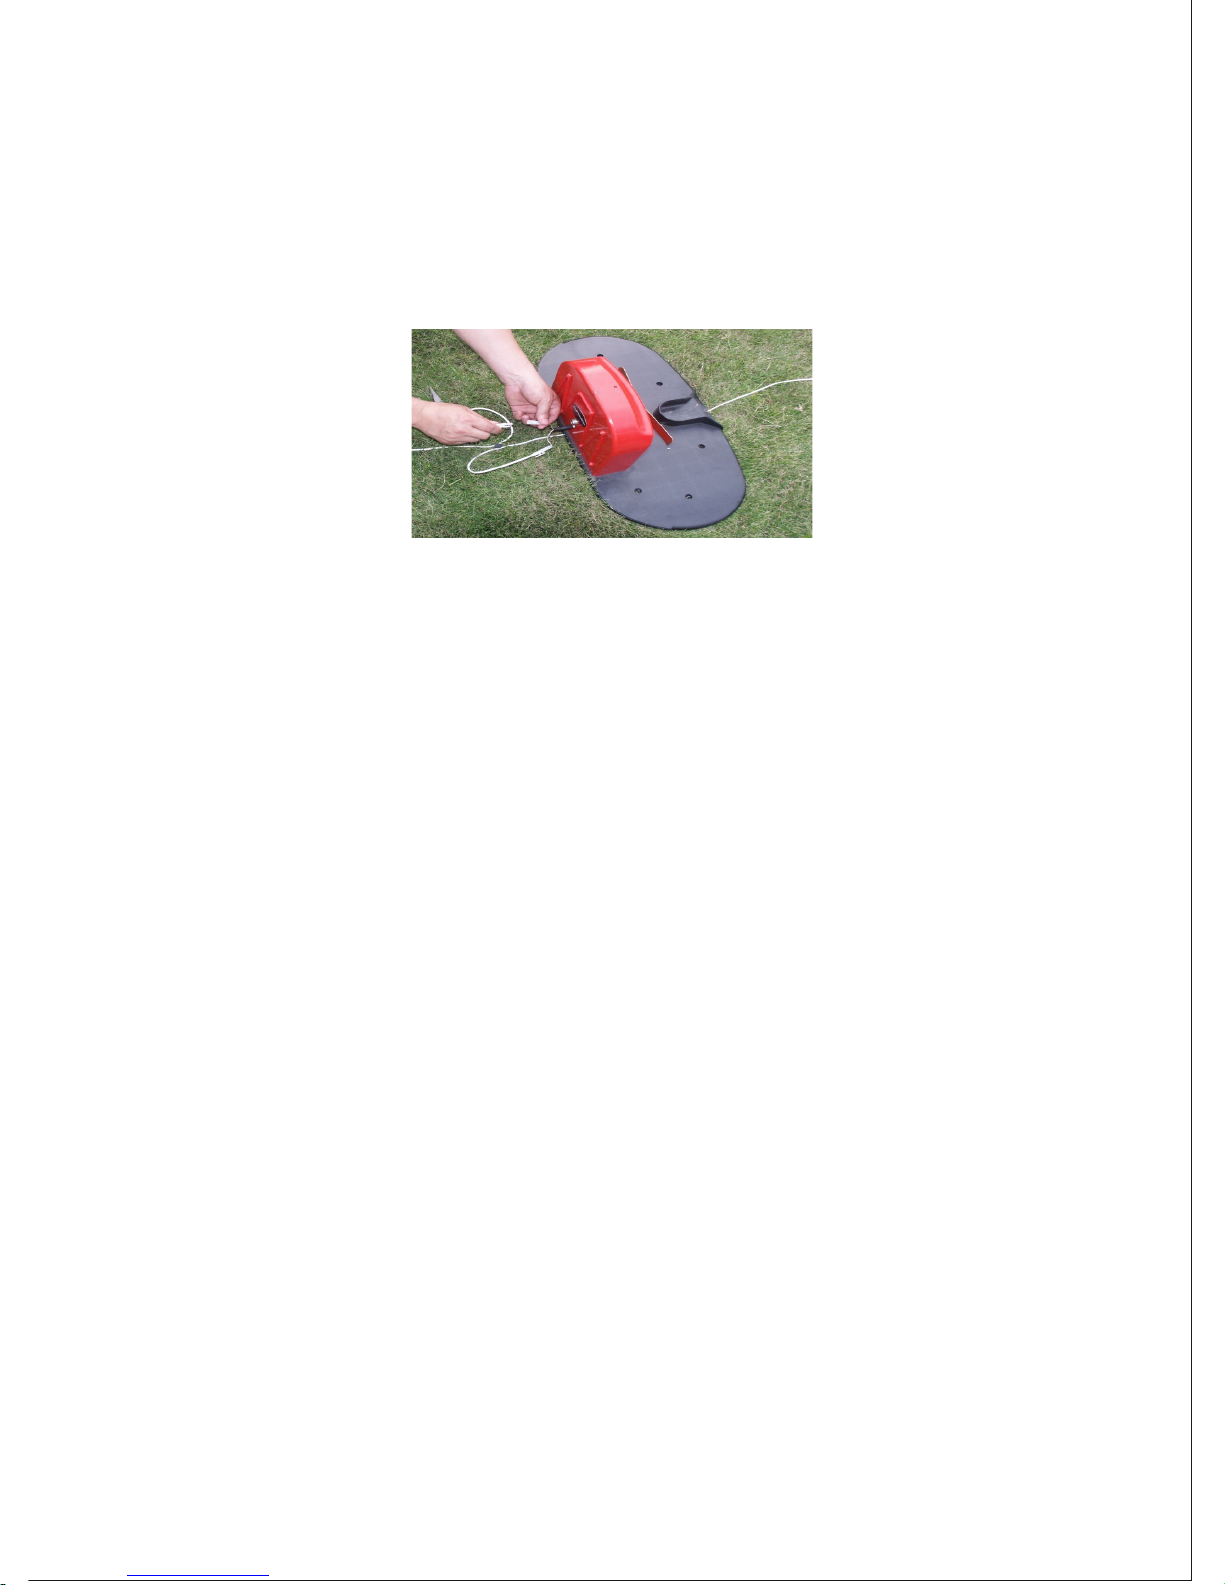
1.4.4 Connect the front and the back of the fence line to the fence plug for use.(see
Figure 1.4.4)
Figure 1.4.4
1.4.5 finish the fixture
Once you finish the fixture of the intelligent workstation and the fence line,
electrify the intelligent workstation, plug in the fence plug and test devices. If the
red light on the top of the intelligent navigation workstation is on, it means the
workstation is electrified. Plug the fence plug and the red light will be off, which
means the fence line is on work. If the red light is still on, it means the fence line is
not electrified and cannot work properly. If the red and green bi-colored light have
red light, it means it is charging; when it is green, it means it stops charging and the
fixture is successful.
16
Page 20
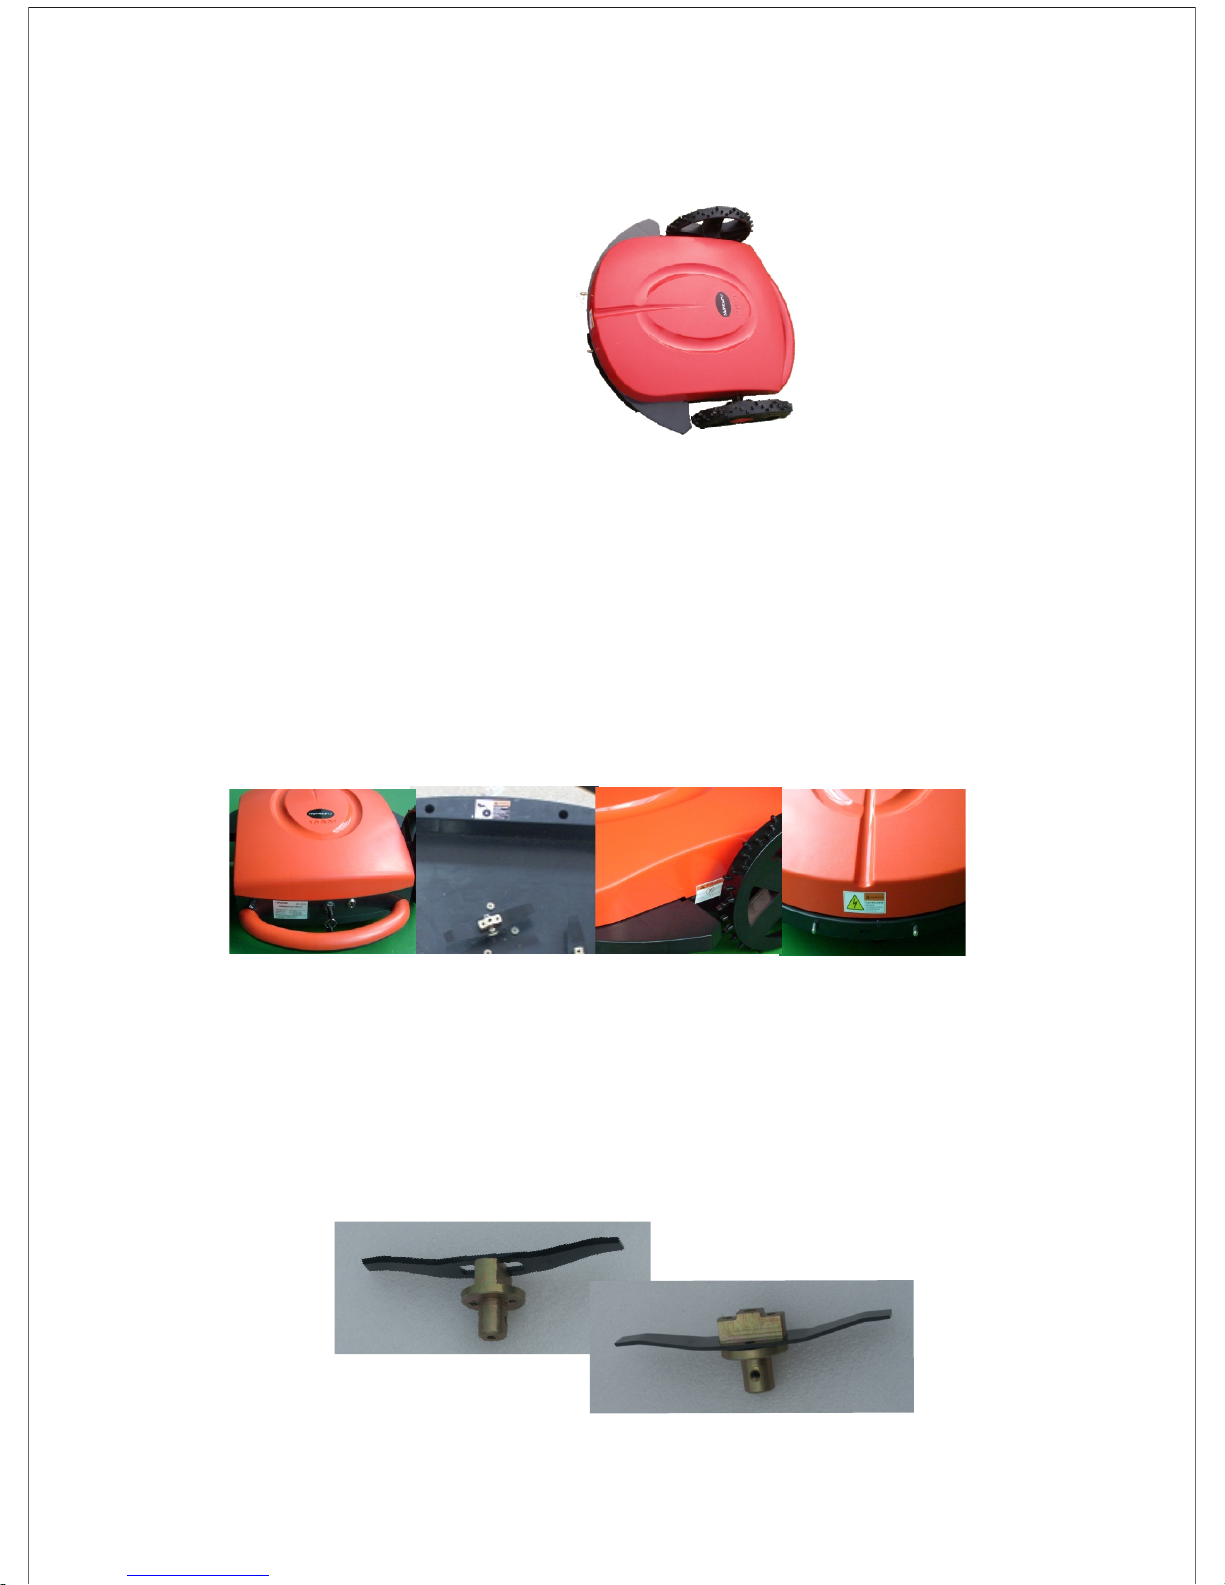
Chapter Two Preparation before work of theIntelligentMower
2.1 Outside Check of the machine
Figure 2.1
Check the exterior integrity of the Intelliget mower, to see whether there is
damage or defect on the external components, whether the collision-prevention
sensor bar is agile and running smoothly, and whether the recharging bar is fasten
and well installed.
2.2 Read the signs
Please read the various warning signs and nameplate content on the Intelligent
mower carefully. (As shown in Figure 2.2)
Figure2.2
2.3 Adjust the height of blade
Please adjust the position of blade according to the ideal height of your lawn. The
Intelligent Mower adjusts mowing height through the blade connector, the
connector has two levels of standard height settings, and the height of grass after
mowing is 4-5 cm and 5-6 cm respectively. (See Figure 2.3)
Figure 2.3
17
Cutting height4- 5cm
Cutting height5- 6cm
Page 21
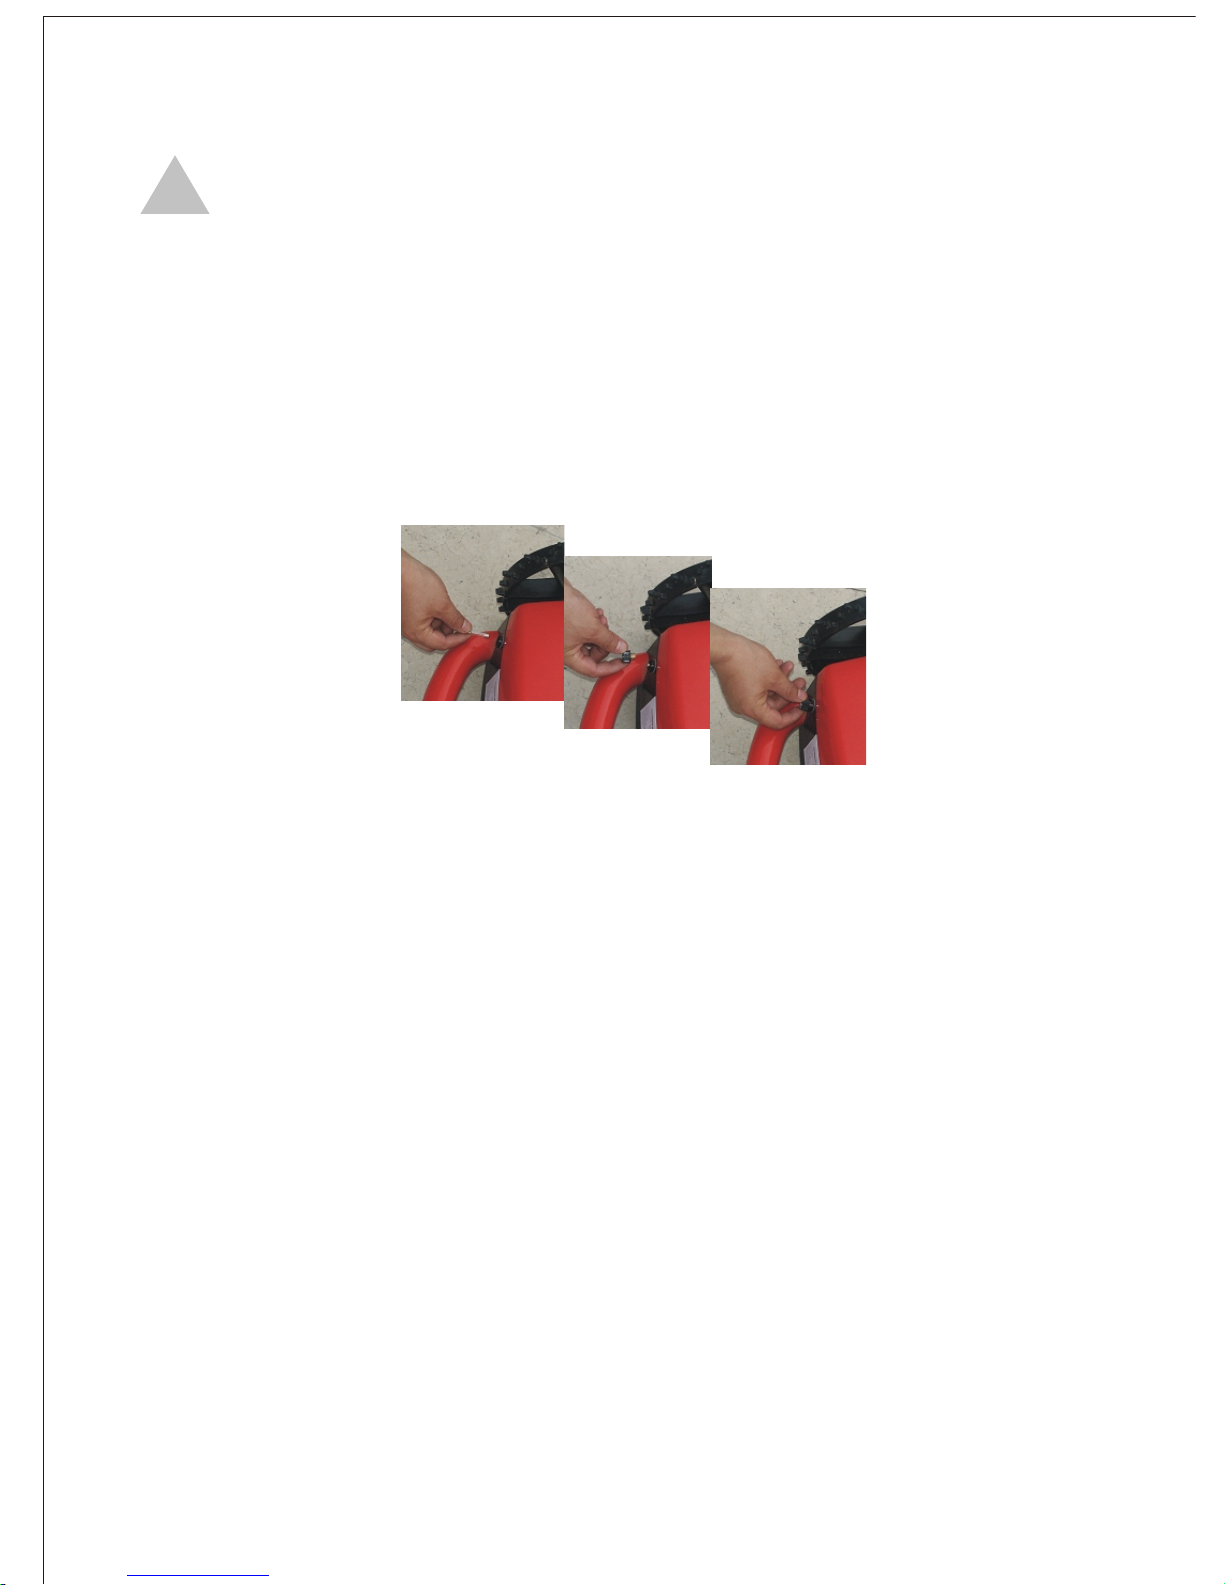
Warning! Serious injury may occur, before adjusting the mowing height,
please unplug the fuse and the key to general power supply, DO NOT try to adjust
the height when the machine is in operation. The blade is very sharp, please DO
wear the protect glove before replacing it.
2.4 Insert electric power supply fuse
Insert the fuse into the fuse box fixed on the back-end of the machine, any
direction will be OK. (As shown in Figure 2.4)
Figure 2.4
2.5 Clean the lawn
2.5.1 Measure the height of grass, the most appropriate native grass height for the
Intelligent Mower is less than 10 cm, if the grass grows too long and the mower can
not work properly, the drive wheel can easily be jammed or the blade connector may
get stuck by long grass, the Intelligent Mower will automatically stop. So please
clean the lawn before using the Intelligent Mower.
2.5.2 Check whether the lawn is flat, if there are holes on the ground; please fill
them before using the mower, to avoid the wheels felling in and the mower can not
move.
2.5.3 Clean sundries in the lawn, such as branches, little stones, and iron wires.
Keep your pets away.
2.5.4 During working, there may be small pieces swinging out and hurting people.
Please keep lookers and children away from the working area of the Intelligent
Mower.
18
!
Page 22
3.1 Power on the fence wires
Connect the power supply of the Intelligent navigation workstation to turn on
the top red light; insert the plug of fence wires to the back-end socket, the red light
will be turned off, the fence wires will work properly.
Warning! Serious injury or death may occur! The charger is connected to
civil electricity; high voltage may cause an electric shock. Keep hands dry when
inserting the plug, and check the integrity of wire in advance, to prevent the electric
shock incidences.
3.2 Start-up debugging
Insert the key to the general power switch lock, to turn on the power.
3.2.1 Send instructions to the Intelligent Mower via remote control, letting it
automatically charge itself, stop charging and return to work, to test its accuracy
and flexibility. Let the Intelligent Mower going around the fence wire to test the
reasonability of its installation. If there are any problems please adjust and test
again, after everything is right, turn off the power switch and stand by.
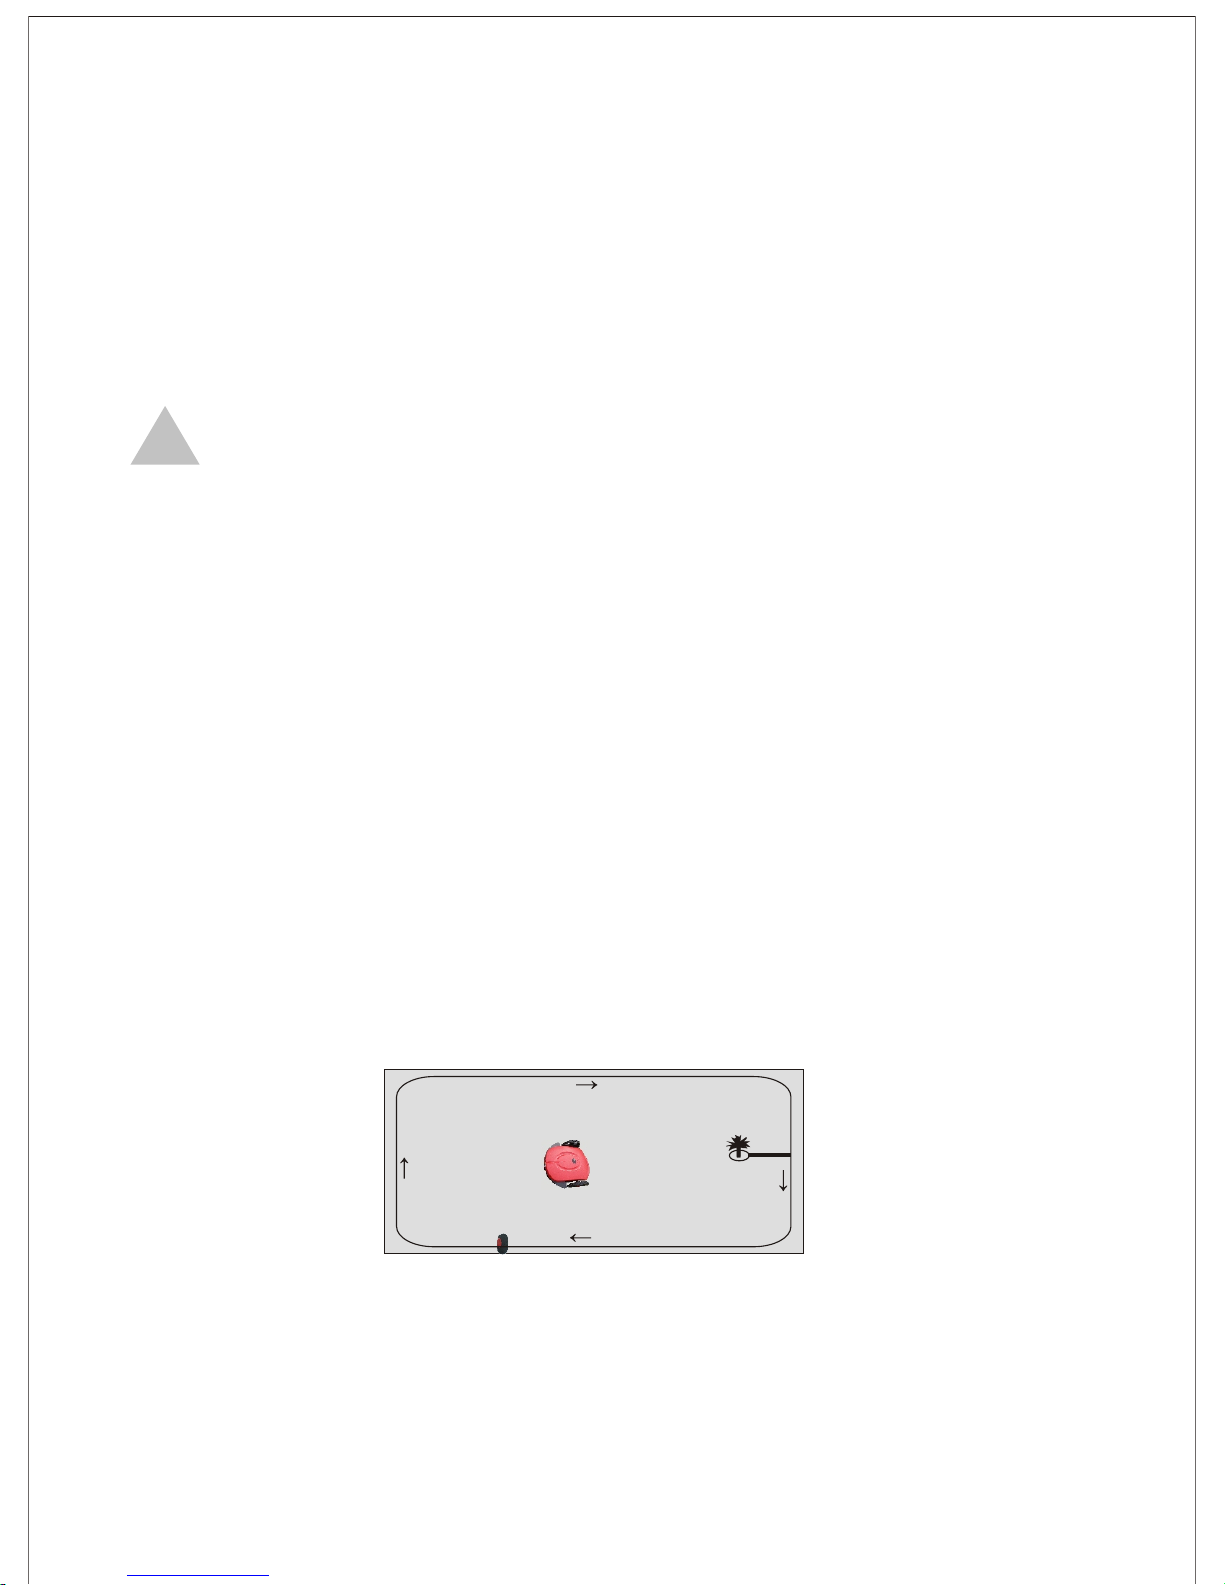
3.2.2 Correct the location of the Intelligent Mower, it is best to put it in the center of
the lawn. If there is Circular hill in the lawn, the location should be kept away from
the hill, to avoid the condition that after the Intelligent Mower changed its mowing
mode to circular scanning; it will trapped into a ring track and can not return to
normal work.(Please refer to Figure 3.2.2)
Figure 3.2.2
3.2.3 Turn on the mower. Turn the power key clockwise for one space to turn on the
power, the Intelligent Mower will automatically start.
19
Chapte r Three Inte lligent auto mati c and remote operation
!
Page 23
Warning! Serious injury or death may occur! During the automatic
operating of the Intelligent Mower, please take care of your children, pets and other
people away. It is STRICTLY PROHIBITED to let people or pets riding on the
machine or stops its route.
3.2.4 Automatic check and scan
Please note that the lawn can not be cleaned by the Intelligent Mower at first time,
actually parts of grass will be left un-cut, which is predictable and totally normal,
the grass will be cut when the mower finish its first mowing and return across the
lawn, after the whole job was done, you will appreciate the effect.
3.2.5 Automatic return to charge
When it comes to the default time, the Intelligent Mower will automatically return
to the Intelligent navigation workstation and charge, to prepare next mowing.
During the mowing process, if the battery is insufficient, it will also return to the
workstation. After fully charged, it will automatically go to the lawn and mow the
lawn.
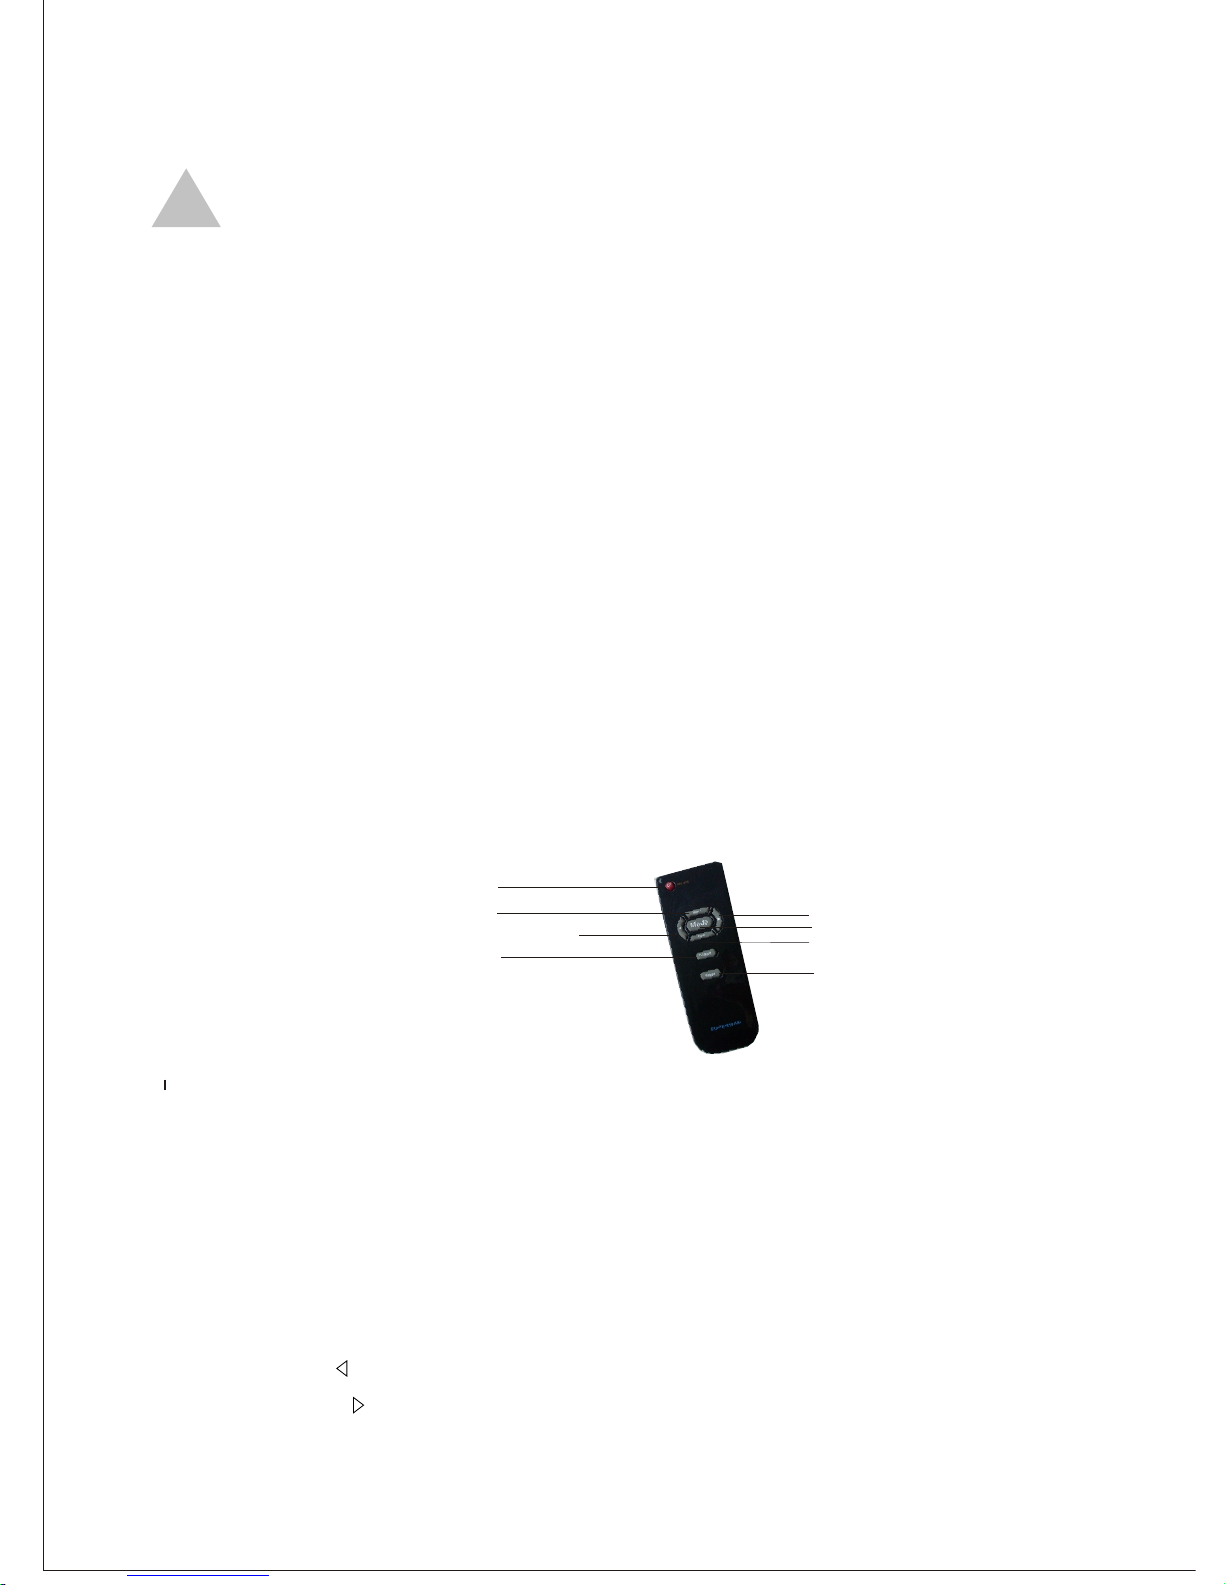
3.3 Remote operation
If you use remote controller to send instructions to the Intelligent Mower, the
buttons on the remote controller stand for different functions.(see Figure 3.3)
● Press once to turn on, and press again to turn off.
●Time: The default working time is continuous five hours (charging time is not
included) Press Time+ to add 2.5 hours, the working time will be 7.5 hours, press
Time- to minus 2.5 hours, which will be 2.5 hours. After time up, the Intelligent
mower will stop working automatically and return to the Intelligent navigation
workstation and charge itself, wait until next time of mowing.
●Mod: Mowing mode button. Press the button to switch between involution line
mode and beeline mode.
●Turn left button : press it to let the machine turn left.
●Turn right button : press it to let the machine turn right.
20
Figure 3.3
!
ON/OFF
Time+
Time-
Turn left button
Turn right button
Charge
Blade
Mode
©
Page 24

●Charge: during working, press the button , the machine will automatically return
to charge station. And if you want she to go back work, you have to pull the power
key out, and then move it out of charge station to the lawn and restart it manually.
●Blade: Mowing switch, if the blade didn't work, press the button to start the blade,
during mowing, press it to stop its work.
3.3.1 Supplementary mowing
During the automatically mowing, it can not be avoided to leave some blank or
unsatisfied parts, for which you can press the button on the remote controller to
instruct the mower for supplementary mowing.
3.3.2 Make simple patterns or words on the lawn
If you are interested, you can order the mower to make some simple patterns or
words on the lawn, like “Welcome” or “LOVE”. Leverage the height and number of
blades, send instructions via the remote controller to the mower; you can get various
beautiful patterns and clear banner words.
Note: the lawn may be broken by the Intelligent Mower. The lawn should be flat
and no barriers or bushes, its length andwidth should be more than 3 meters and 2
meters respectively. If you are not capable to operate the remote controller, please
do not make patterns or words.
Warning! Serious injury or death may occur! When you are adjusting
the height and number of blades, unplug the key to the general power and keep the
remote controller well, in case the mower is started unconsciously and cause danger.
21
!
Page 25
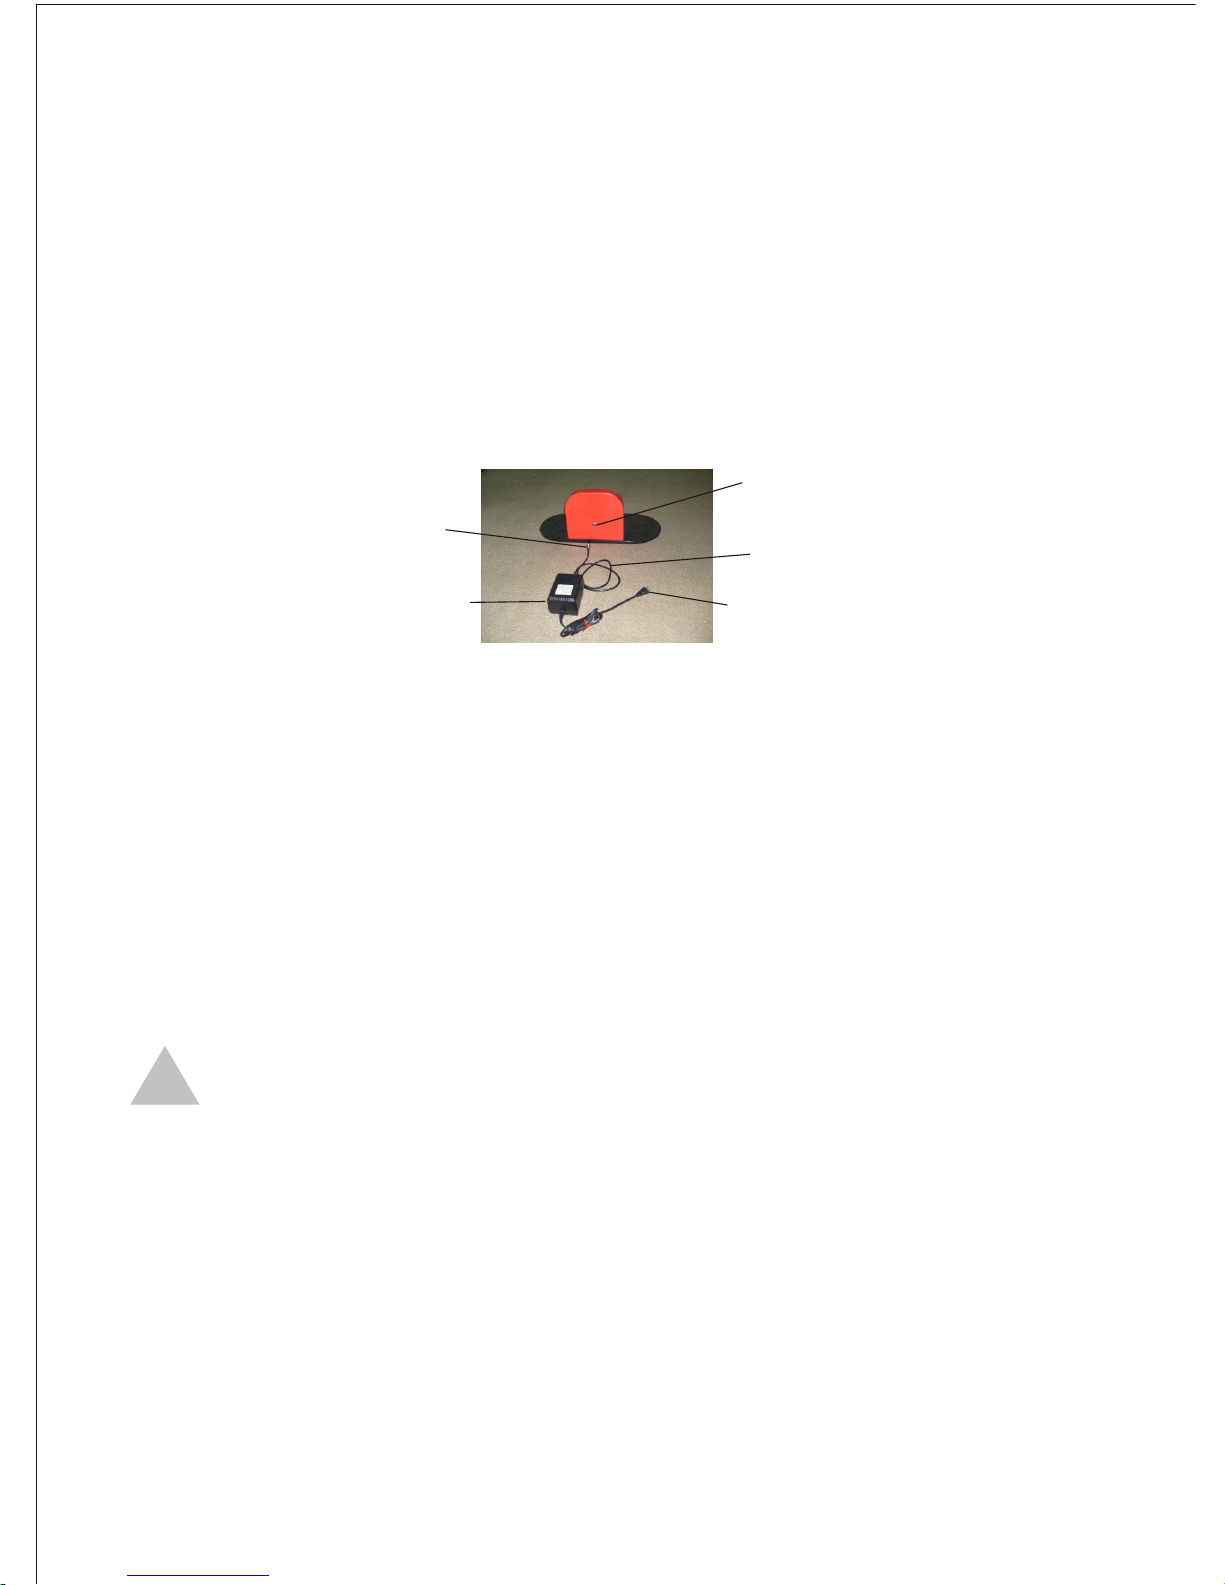
4.1 Applicable power supply
The standard charger with the Intelligent Mower can charge the rechargeable
battery in the machine. Connect the power cable of charger to eligible in-door
electric socket, and charge the battery by 110V~230V AC, the output is 24 V DC.
The output terminals are connected to the installed Intelligent navigation
workstation. (As shown in Figure 4.1 A)
Figure 4.1 A
The normal charging time is 8 hours, once finished, the Intelligent Mower will
automatically move backward for 10 cm to detach the front-end charging bar from
the electrode slices on the Intelligent navigating workstation, and make peep sound.
The light on the charger and intelligent navigating workstation will turn from red to
green, and stand by until next time. To ensure good performance and life time of the
battery, charging is an important aspect, special warning and power management
system is integrated into the Intelligent Mower in case of improper charge.
Warning! Electric shock is dangerous, injury or death may occur. The
charger of Intelligent Mower is only designed for the use in dry in-door places; DO
NOT left the charger at extreme wet place or exposure it to humidity. The charger
should be fixed at appropriate place inside the house, and connect the output cable
to the interface of Intelligent navigating workstation. If the electrodes are damaged,
it is prohibited to charge. Please strictly use suited charger to the Intelligent Mower,
and keep hands dry when inserting the plug.
22
Navigating station so ck et
Output cable plug
Output cable
Plug
Charg er
!
Chapter Four Power supply use management
Page 26
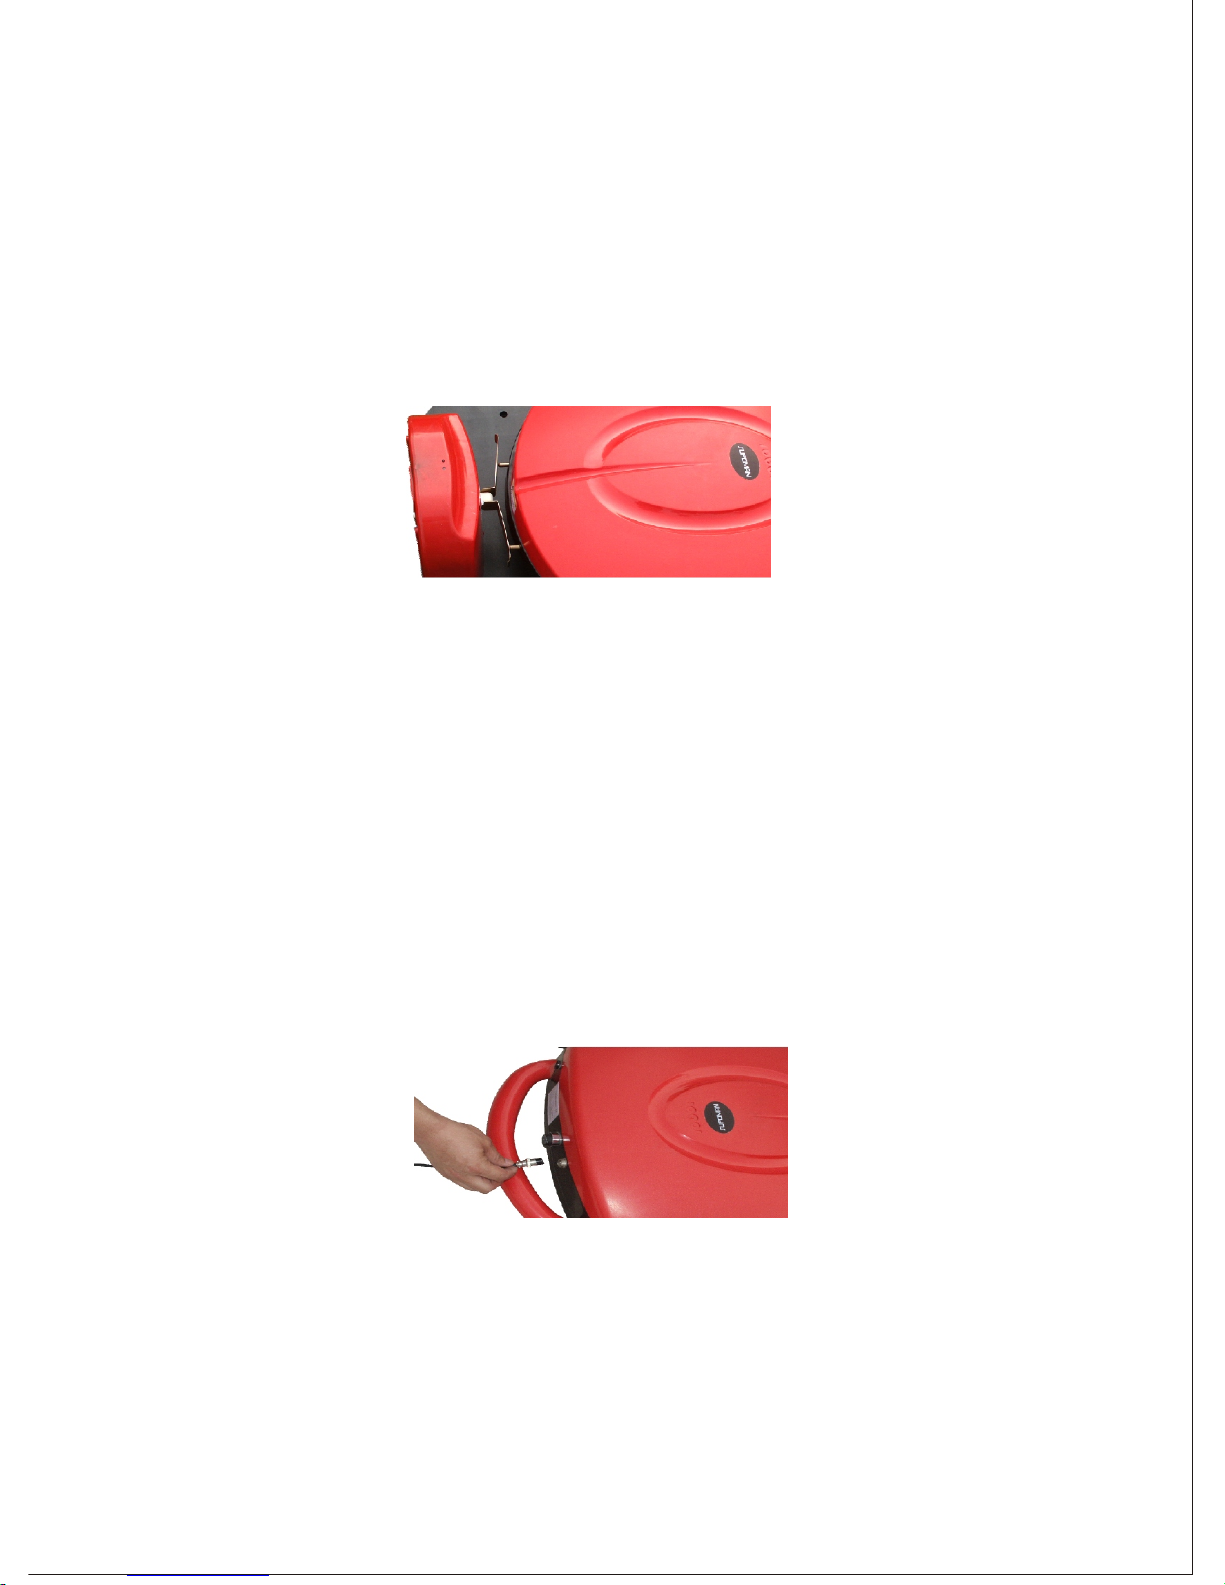
4.2 Automatic charge
During working, if battery insufficiency is inspected, the Intelligent Mower will
automatically return to the Intelligent navigating workstation. (See fig 4.2) Charging by
connecting the inductive charging bars and electrodes, after the battery is filled, it will
automatically return to the lawn and work.
Figure 4.2
Note: The exterior inductive charging electrode slices of the Intelligent navigating
workstation is 24 V DC, please DO NOT touch both slices or connect them by
conductor, in case of short circuit incident and danger.
4.3 Manual charge
If battery inefficiency is inspected, turn off the general power lock, manually connect
the plug of output cable of the charger to the interface at the back end of Intelligent
Mower, until the charger indicator turns from red to green, the battery is filled. Pull out
the plug and turn on the power lock via key, let it work again.
Figure 4.3
23
Page 27

5.1 The Intelligent Mower can not be started
The possible causes and simple resolving methods:
●The fuse is damaged. Rotate the screw nut out to check whether the fuse is OK, if
it's difficult to judge whether it is damaged, replace it with a new fuse and try again.
●If the battery was left aside for a long time; it will run out because of natural power
spoilage. Using manual way to connect the charging plug directly into the charging
socket at the back end of Intelligent mower, or move the intelligent mower to
workstation to charge , when the charger's light turned from red to green, which
express full charge ,then restart to work.
●The remote control is out of power and can not send signals. If remote controller
can not start the Intelligent Mower by direct booting, check whether its battery also
runs out of electricity, then change a battery and
Re-click the power button to start-up.
5.2 The walking path is blocked
The possible causes and simple resolving methods:
● the anti-collision sensing bar was stuck. Press on it with hands to test its
flexibility, then release to see if it can return to the former place. If you find it was
stuck by mess, use manual methods to remove it.
●It is blocked by obstacles. Take the Intelligent Mower apart from the obstacles
manually and reboot.
●for the first time to use it, if the grass is long and dense, in the process of mowing,
the blade will be entangled or the machine will be propped up so that it will be
unable to walk. Manually clutch the Intelligent Mower handlers, raise the rear
wheels and pull the mower out. After cutting the length of lawn by hand tools,
reboot to mow.
Warning! There's possibility that your hand will be cut when you check the
blade. So before you check it, you must pull out the key of power switch and wear
the glove.
5.3 Unable to cut or unable to cut orderly
The possible causes and simple resolving methods:
Long grass and the grass pieces are gathered beneath the board of the machine or the
blade was entangled by ropes. Lift the Intelligent Mower, remove or scrape the
attached stuffs with small branches other sundries, then reboot.
● If the blades are fallen, loose or damaged, use the equipped screwdriver to tighten
the loosen screws, and replace the damaged or lost blades by backup ones.
24
5.1 The Intelligent Mower can not be started
5.2 The walking path is blocked
5.3 Unable to cut or unable to cut orderly
!
Chapter Five Troubleshooting
Page 28

●If the blades stopped rotating. As lawn slope is greater than 20 degrees, or the front
wheels of the Intelligent Mower rushed to obstacles, automatic security system will
be activated to stop the blade. Remove the obstacles or slope and reboot.
5.4 Intelligent Mower exceed the fence in the process of running
The possible causes and simple resolving methods:
●The fence line is out of power. Check whether the red light of Intelligent
navigation workstation is on, if it is on, it is out of power and cannot send signal.
Pull out the plugs to find the causes, check whether the rope was drop off and the
plug was skidded off, and then re-insert it.
● the corner angle of the fence line is installed too small, so that the Intelligent
Mower crossed the line. Re-adjust the angle of fence line. It is required to be no less
than 90 degrees.
●The surrounding of lawn is the steep slope, for the installation of the fence line is
close to the edge, Intelligent Mower run out of line because of inertia. You need to
re-adjust the location of fence line, move it to the flat place.
5.5 Charge failure
The possible causes and simple resolving methods:
●The charging plug was not fully inserted into the socket of the smart mower.
Disconnect the charging plug on the mower, and re-connect it to continue charging.
●Power-cut in charging process. Pull out the charging plug, and re-plug to recharge
till the power-supply restores.
●The charging bars of the Intelligent Mower didn't contact the charging electrodes
of the Intelligent navigation workstations. When you find out the cause, push
forward the Intelligent Mower by manual way to make them fully contacted, or
filling the region below the wheels with soil to ensure that the Intelligent mower's
driving wheel and the plinth of the navigation workstations are at the same surface
level, to improve contacting conditions.
●The charging bars of the Intelligent Mower or the charging electrodes of the
Intelligent navigation workstations were dirty, so the electricity effect was affected.
Use brush or cloth to clean them up.
5.6 Unable to automatically return to charge
The possible causes and simple resolving methods:
●The area of lawn is too large, the path of fence line is too long, in the process of
searching the route back to the Intelligent navigation workstation, the power
consumption is too much so that the voltage is too low; make it unable to continue to
search. Take the intelligent mower back to the station for recharging.
●The power of the fence line is cut and no signals can be sent out, the Intelligent
Mower can not find the Intelligent navigation workstations for charging. Restore
electricity of the fence line or manually take the Intelligent Mower back to the
station to recharge.
25
5.4 Intelligent Mower exceed the fence in the process of running
5.5 Charge failure
5.6 Unable to automatically return to charge
Page 29

6.1 The panel of the mower
The mower's ground board needs to be checked, and if necessary in the operation, it
needs to be cleaned. Sometime, if there is coverage on the surface of the mower or
the grass pieces gathered in the machine's ground board, especially damp ground
and wet grass.
You can use small branches or other tools to remove the gathered grass, carefully
scrape the grass pieces below the machine. If necessary, it needs to be leaned on
other surfaces to better contact with the bottom areas. Take the blade off to make it
easier to clean the grass pieces.
Warning! Serious accidents may occur, before lifting the machine, DO
remove the key to the power and pull out the fuse, sharp blades may cut your hand,
remember to wear thick gloves when you touch the edge of the blade.
6.2 blades
Before the operation of machine, check whether the blades were damaged and if
they are damaged, replace the blades in time. Do not use damaged blades, Only use
good blades. It is undesirable to sharpen the blades with mechanical device,
because sharpening it in this way frequently will make the body blade lost balance.
if necessary ,contact with local dealer to obtain blades supplied by manufacturer.
6.3 Exterior Shell
Use wet cloth and dry brush to clean the surface of the machines; detergent can be
used, soak and pinch the cloth to wipe the surface, do not use sandblasting cleaning
method and do not use the garden hose or other hoses to wash it.
26
6.1 The panel of the mower
6.2 blades
6.3 Exterior Shell
Chapter Six Attentions and Maintenance
!
 Loading...