

User Manual
Supoin S10 Series Products
Addr:Room2401-2408,Block A, World Trade Square,
No.9 Fuhong Rd, Futian District, Shenzhen, China
Tel:+0086-755-25828560 82178516 Fax:+0086-0755-82281509
www.supoin.net
Shenzhen Supoin Technology Corp.

User Manual of S10 Series Products
Chapter 1 Introduction
1.1 Overview 02
1.2 Scope of Application 02
1.3 Technical Specifications 03
1.4 Battery Life (hours) 04
Chapter 2 Appearance and Hardware
2.1 Appearance 05
2.2 Functions of Keys 06
2.3 TF Card Slot and SIM Card Slot 07
Chapter 3 Use Instructions
3.1 PDA Desktop 08
3.2 Use Instructions for PDA Tools 09
3.2.1 Main Menu of PDA Device 09
3.2.2 Wi-Fi Setting 1 0
3.2.3 Bluetooth Setting(Optional) 11
3.2.4 Barcode 1D Setting 12
3.2.5 USB Setting 13
3.2.6 Serial Port Setting 14
3.2.7 Screen Setting 15
3.2.8 Sound Setting 16
3.2.9 Dormancy Setting 17
3.2.10 Lock Setting 18
3.2.11 On and off Setting of the Modular 19
3.2.12 Autorun Setting 20
3.2.13 Input Method Setting 21
3.2.14 Setting Information 22
3.2.15 Restore Factory 22
Chapter 3 Use Instructions
4.1.1 To ensure that the Supoin S10 does not fail, follow the following
precautions during use of the Supoin S10: 23
4.1.2 Pay attention to the following during use of the battery. 24
4.1.3 Cleaning the Supoin S10 24
4.2 Troubleshooting 25
Pag e 01
© Shenzhen Supoin Technology Corp. All
Rights Reserved.
This guide is prepared by Shenzhen Supoin
Technology Corp., according to the existing
information. The content in this document is
subject to update without notice.
Without written approval of Shenzhen
Supoin Technology Corp., no one shall copy,
extract, back up, modify, spread, or translate
any part of this document in any form or
method or use the whole or part of this
document for business purposes.
If you have any question, you are free to
send an email to service@supoin.com
Table of Contents
www.supoin.net
.................................... ... ... ... ... ... ... ... ... ... ... ... ... ... ... ... ... ... ... ... ... ..
.................................... ... ... ... ... ... ... ... ... ... ... ... ... ... ... ..
.................................... ... ... ... ... ... ... ... ... ... ... ... ... ... .
.................................... ... ... ... ... ... ... ... ... ... ... ... ... ... ... ... ..
.................................... ... ... ... ... ... ... ... ... ... ... ... ... ... ... ... ... ... ... ... .
.................................... ... ... ... ... ... ... ... ... ... ... ... ... ... ... ... ... .
.................................... ... ... ... ... ... ... ... ... ... .
.................................... ... ... ... ... ... ... ... ... ... ... ... ... ... ... ... ... ... ... ..
.................................... ... ... ... ... ... ... ... ... ... ..
.................................... ... ... ... ... ... ... ... ... ... ... ..
.................................... ... ... ... ... ... ... ... ... ... ... ... ... ... ... ... ... ... ...
.................................... ... ... ... ... ... ... ... ... ... ...
.................................... ... ... ... ... ... ... ... ... ... ... ... ... ... ... ..
.................................... ... ... ... ... ... ... ... ... ... ... ... ... ... ... ... ... ... ... ..
.................................... ... ... ... ... ... ... ... ... ... ... ... ... ... ... ... .
.................................... ... ... ... ... ... ... ... ... ... ... ... ... ... ... ... ... ...
.................................... ... ... ... ... ... ... ... ... ... ... ... ... ... ... ... ... ... .
.................................... ... ... ... ... ... ... ... ... ... ... ... ... ... ... ... .
.................................... ... ... ... ... ... ... ... ... ... ... ... ... ... ... ... ... ... ..
.................................... ... ... ... ... ... ...
.................................... ... ... ... ... ... ... ... ... ... ... ... ... ... ... ... ..
.................................... ... ... ... ... ... ... ... ... ... ... ... ... ..
.................................... ... ... ... ... ... ... ... ... ... ... ... ... ... ..
.................................... ... ... ... ... ... ... ... ... ... ... ... ... ... ... ... ..
.................................... ... ... ... ... ... ... .
.......................
.................................... ... ... ... ... ... ... ... ... ... ... ... ... .
.................................... ... ... ... ... ... ... ... ... ... ... ... ... ... ... ... ... ... ...

Pag e 03Pag e 02
Chapter 1 Introduction to S10 Series Products
S10 se ries pr oducts are in dus tri al g rad e handh eld te rmi nal s independently
res ear che d, d eveloped, designed an d pr oduced accordi ng t o the character ist ics
of each industry, and feat ure ergo nom ic design, com pac t size, ant i-s hoc k and
anti-fall desi gn, l ong standby time an d sta ble operation. Moreo ver, th e S10
series boasts IP 65- rated robustness aga ins t ad ver se environ men ts because it is
waterp roof, dustproo f, s hatter-resi sta nt, elec tro sta tic prevention and anti-high
and low te mpe rat ure .
1.1 Overview
Hello!
Thanks for choosing ou r S10 series product s.
Before use, please read the user manual carefully to learn
more about our products' fea tures. The products are subject
to upgrade from time to ti me, so please contact us f or the
latest version. This manual is fo r reference only.
Mainly used in th e fi eld s of sho es, clo the s, c han nel s, l ogi sti cs, dru g su per visi on
and etc.
1.2 Scope of Application
1.3 Technical Specifications
Product Model S10
CPU
S3C2416 ARM9 400MHz
Operating System
Memory
Display
Scanner
Symbologies
Reading Accuracy
Scan Depth of Field
Scan Angle
Scan Speed
Communication Transmission
Operating Environment
Dimensions (LxWxD)
Weight
Battery
Expansion
Vibration Motor
Charger Port
Keypad
Accessories
Programming Environment
Qualification
Windows Embedded CE 5.0
128MB ROM 128MB RAM
3.2-inch QVGA (240x320), TFT-LCD
1D Laser Scanner (Moto Se955)
All major 1D barcode
≥3mil
3.81 cm - 60.98 cm
47°± 3° (Standard)
114 ± 10 scans/sec.
Wi-Fi 802.11b/g
Operating Temp. -15℃ ~ 45℃;5 ~ 95% RH;
Drop Spec. 2.5-meter drops to concrete ground
191.8mm x 72 mm x 37.7 mm;
320 g (standard battery included)
3.7V 3200 mAh polymer lithium batteries
Slot Mini SD card, up to 32 GB, Micro SD slot
Built-in programmable vibration motor
1 (Charging interface at the bottom)
26-key
Uni ver sal adapt er Ba ttery, U SB Cabl e,
Touch pen, Hand strap, MicroSD (TF) Card of 4G
Microsoft Visual Studio 2005/2008;
Language:C++ / C# / VB.NET
CE, RoHS, IP65, ISO9001
www.supoin.net

Pag e 05Pag e 04
1.4 Battery Life (hours)
12
Continuous 1D scan +WI-FI(powermode=1)upload +sound
Continuous 1D scan +WI-FI(powermode=0)upload +sound
Dormancy and standby (WI-FI Off)
Dormancy and standby (WI-FI On)
11.24
About 300
About 100
7.5
Test Item
Continuous 1D scan+sound
S3C2416
Chapter 2 Appearance and Hardware
S10 handheld mobile t erm ina l
2.1 Appearance
Figure 1-1 View of Supoin S10
Delete key
Return key
Arrow key
User-defined
function keys
Enter key
USB & Charging Port
Battery cover
Scan head
special function keys
Power key
special
function keys
Scan key
www.supoin.net

Pag e 07Pag e 06
Pow er ke y: Lo ng pr ess t he ON/OFF button to po wer t he te rmi nal o n or of f. If you
want to leave your te rminal unu sed but pow ere d on for a long tim e, t ap t he red
ON/OFF but ton in the upper lef t co rne r of t he d isp lay area. Th en, the screen w ill
turn black, in dic ati ng tha t the ter min al has been in a standby state (shallow
dormancy). To make i t sta ndb y, tap t he red button again.
Res et k ey: If y ou w ant a pr ogram, circuit, etc. t o ru n in its ini tia l st ate , pr ess the
Res et button, which is a sm all red button on th e lower le ft of the A rro w bu tto n.
Note: Press ing t he Reset button of PXA 310 will re set t he te rmi nal , whi le pressing
this button o f S3C 2 416 s eries will turn it of f.
Scan key : Pre ss th e Sca n but ton to scan barc ode s.
Enter key: Pres s OK to exec ute the sele cte d function. It is equal to the ENTER
key, w ith t he de cim al key valu e of 13 .
Ret urn key: Press th is bu tto n to return or exit the c urr ent i nte rface. It is equal to
the ESC ke y, wit h the d eci mal key val ue 27
Delete key: It fu nct ion s the s ame as the Bac kspace b utton wh en yo u are t ypi ng a
bar cod e and c har acters. Its decimal ke y val ue is 8 .
Arrow ke y: Pr ess t he Ar row butto ns to m ove u p, do wn, l eft , and r igh t.
Up: Decimal ke y val ue 38
Down : Dec ima l value 40
Left: D ecimal ke y val ue 37
Right: Decimal key v alu e 39
User-defined func tio n ke ys: Function b utt ons , which ca n be de fin ed as
shortcut buttons by user prog ram s.
F1: Decimal key value 112
F2: Decimal key value 113
F3: Decimal key value 114
F4: Decimal key value 115
* and # (spe cia l func tio n keys): Pres s the * button to ent er ”.”, and th e #
button t o cha nge a n inp ut me tho d.
USB and Ch arg ing Por t: T hro ugh thi s port , yo u ca n use a USB cab le to connect
the terminal and a co mpu ter for dat a tr ans mis sio n, o r co nne ct t he term ina l to a
charge r for c har gin g.
Loudspeaker Or ifi ce: T he loudspeaker wi ll make a war nin g sound and tone
toward s an op era tio n error or ba rco de sc an.
Battery Co ver : Fix the ba tte ry c over.
2.2 Functions of Keys
Installing a TF Card:
Open t he batter y c ove r and r emo ve the bat ter y, and ins ert th e T F card int o the
slot on a lower par t of the back and push it inward. T hen you can c onn ect the
termin al wi th a co mpu ter v ia th e USB p ort t o sto re information in the TF card .
Installing a SIM Card :
The ins tal lat ion of a S IM card i s si mil ar to tha t of a TF c ard, but you should m ake
sure that the SIM card is properly loa ded and it has been regist ere d. Af ter
installing the SIM card, install the battery and make the ter min al rea d the SIM
card for d ial -up a cce ss an d dow nload, which will be detailed below.
2.3 TF Card Slot and SIM Card Slot
www.supoin.net

Pag e 09Pag e 08
Chapter 3 Use Instructions
The te rminal wil l be tu rne d on by pre ssi ng the pow er b utt on for 3 to 5 sec ond s
af ter putting in the ba tte ry ; the following interface will be displayed:
3.1 PDA Desktop
Then we wil l intr odu ce the so ftw are fu nct ion of S1 0 series devices in det ail ,
mainly on the use of P DA configuration tool.
Of all the th ree ind ica tin g lights i n the t op r igh t corner, the o ne in t he lef tmo st
will lig ht after turning on, th e middle on e will turn to red afte r plugging in
power, a nd turn to gre en a fte r the battery is fil led. Fo r example, the red ma rker
box in t he above pictur e di spl ays batter y level and s ign al s trength. Batte ry level
indicate: N orm al ab ove 3 0%; i nsu ffi cie nt 10%-30%; low power less than 10 %.
Note: you shall cha rge at onc e at low p owe r, pl eas e turn off the te rmi nal if you
can’t c harge im med iately, o the rw ise i t will ca use the batte ry can’t be c har ged
then.
Choose Star t > Programs, an d the following sho rtc ut will app ear : IE bro wse r,
Media Pla yer, Mic ros oft Wor dPad, Wi ndo ws Resource Ma nag er, Comma nd
Pro mpt , Synchronous and Remo te Deskto p Con nec tio n.
3.2 Use Instructions for PDA Tools
3.2.1 Main Menu of PDA Device
www.supoin.net

Pag e 11Pag e 10
Turn on/off the Wi-Fi module: Set whether the Wi-Fi module runs on startup
of the terminal.
A) An icon will appear in the taskbar after Wi-Fi access is enabled.
B) If "Run on Startup" is selected, the Wi-Fi module will be loaded automatically in the
boot process of your terminal.
3.2.2 Wi-Fi Setting
Turn ing O n/O ff Bluetooth
A) Open or close the wind ow of B lue tooth Manager
B) The blueto oth i con w ill a ppe ar in t he ta skbar af ter opening.
C) Double cli ck t he icon in the tas kbar ; the Bl uetooth Ma nag er w ind ow w ill
be activate d.
D) Click the in B lue tooth Ma nager wi ndo w, the wind ow will be min imized to
the taskbar.
E) Click “cl ose blu eto oth ”, qu it B lue too th Manager, t he i con in t he t ask bar
will disappear.
3.2.3 Bluetooth Setting(Optional)
www.supoin.net
Pag e 13Pag e 12
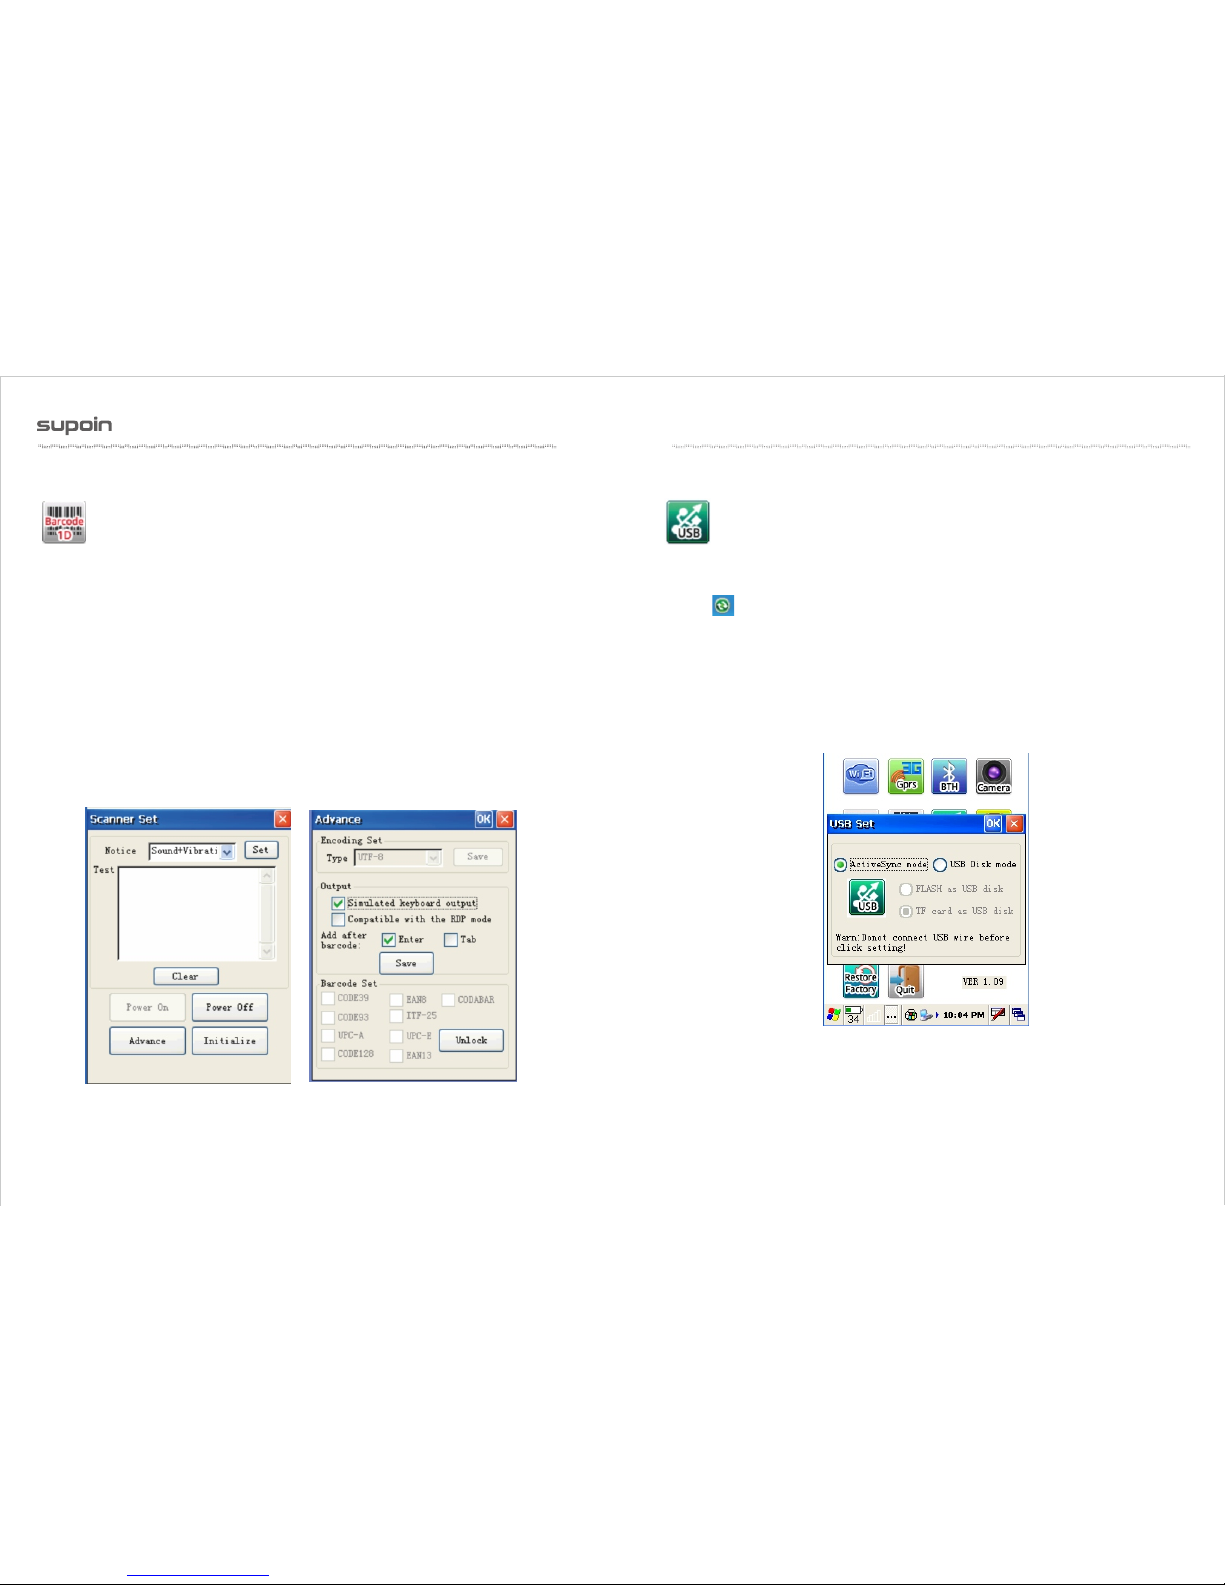
Open/close and various para met er setting of bar cod e 1D auto sca nni ng
tools
A) “Open s can hea d”: open t he autoscan f unc tio n, inpu t barc ode in the foc al
position of other a ppl ica tio n progr am. Afte r o pening this f unt ion , this fun cti on
will be autom ati cal ly la unc hed a t eac h boo t.
B) “Advanc e opt ion s”: s et th e cod e sys tem and output model of Ba rco de 1D.
C) “ The i nit ial iza tio n of scan head”: rest ore f actory s ett ing o f the s can h ead.
Note:
When y ou c lic k “open th e sc an head”, t he a uto scan f unc tion wi ll rema in scan
when y ou exi t the p rog ram , press th e s can button , a nd the focus of the cur ren t
input box wil l out put b arcode.
If you want to call API in t he program to achi eve the ba rcode output, yo u m ust
“sh ut down the scan hea d”, otherw ise it wil l hav e a impact on the pro gra m
bar cod e out put .
3.2.4 Barcode 1D Setting
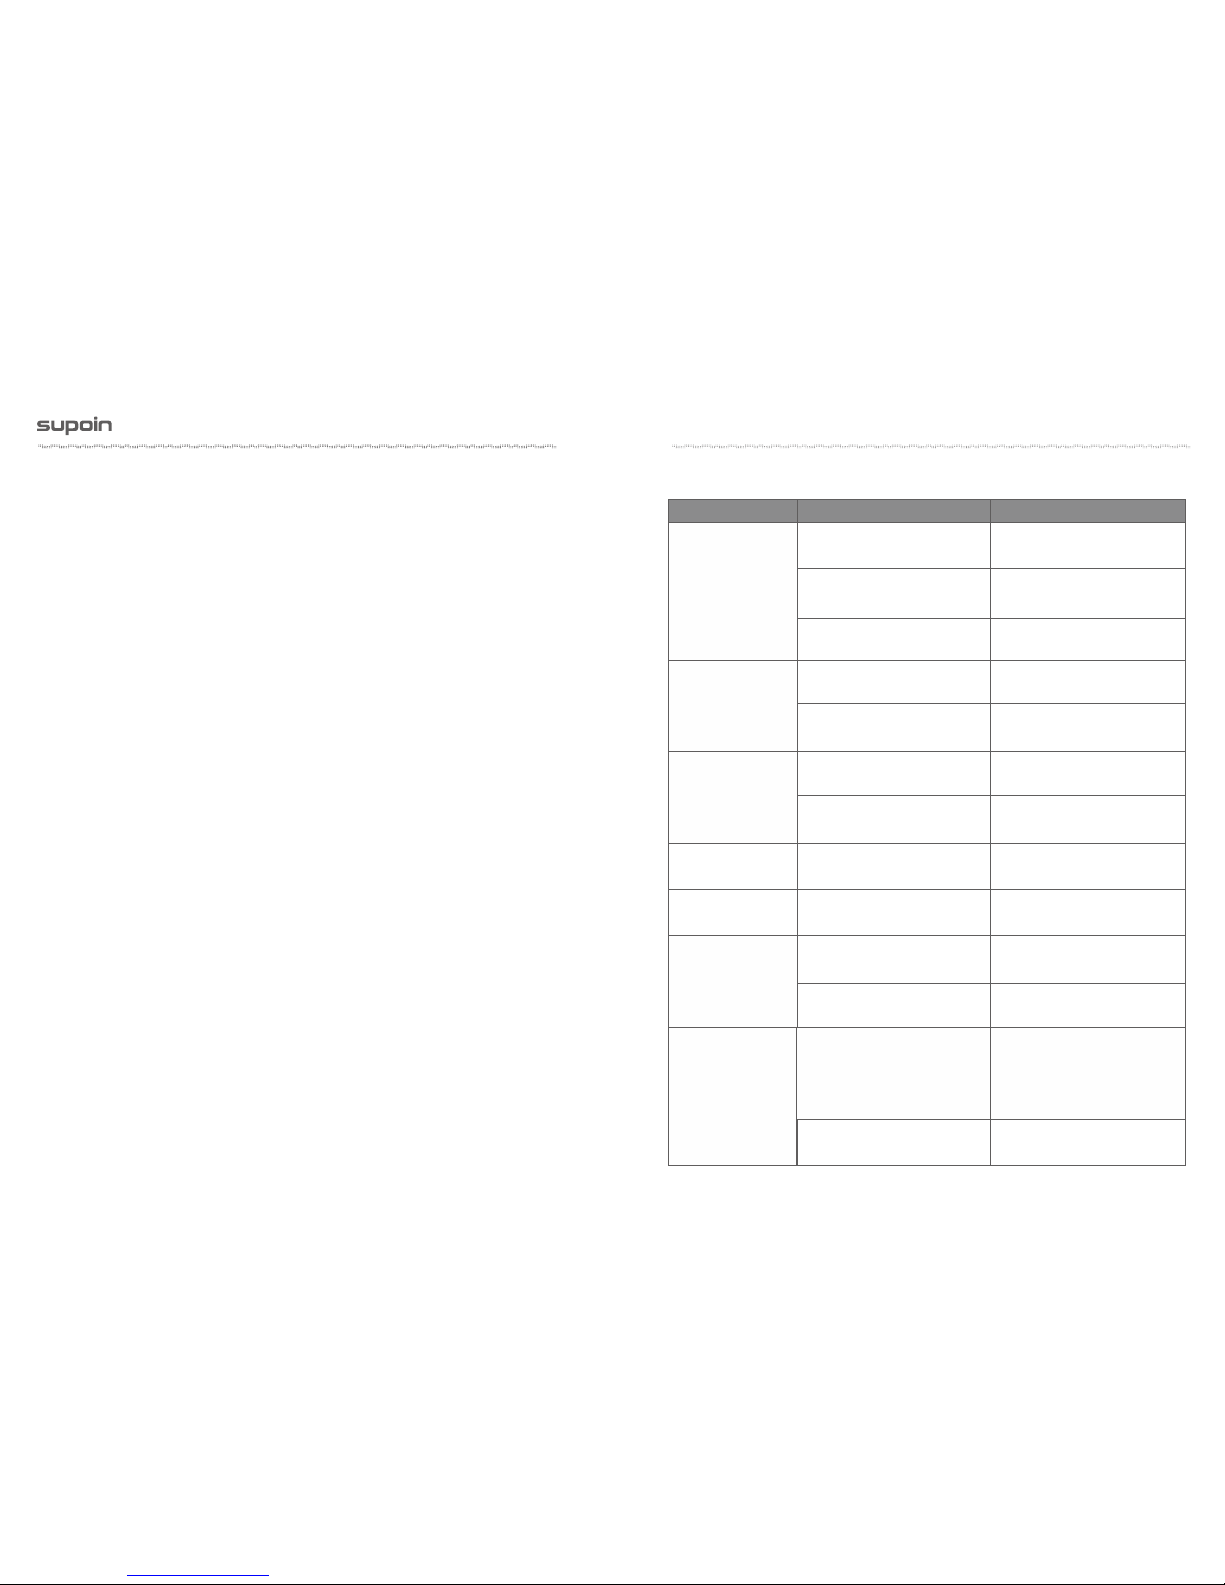
Set data synchronization or USB disc loading (note: this item is only existed in
2416 plan device, remember not to connect with the USB line before setting, or the
setting is invalid)
A) Synchronization: The PC shall install Microsoft ActiveSync, and the PC taskbar will
appear after connecting USB line, and then the data can be updated.
B) U Disc Mode
①Use FLASH as U disc: will be displayed as “local disc” in the PC.
②Use TF card as U disc: will be displayed as “movable disc” in the PC.
C) Operating Mode:
Step 1: Pull the USB line, and restart PDA.
Step 2: Set in the USB Set interface.
Step 3: Restart PDA.
3.2.5 USB Setting
www.supoin.net

Pag e 15Pag e 14
Se t t he app lic ati on mod e of t he ser ial , a nd it wil l c ome into forc e a fte r
res tar ting.(note: the devices of PXA310 plan has n o thi s fun cti on)
A) “Connect the BlueTooth devices” : con nec t bul eto oth p rin ter.
B) “ Out put deb ugg ing information”: out put the debugging i nfo rma tio n of t he
application progr am to P C through serial.
C)“Connect oth er se ria l d evi ces ”: us e t he cu sto miz ed serial tool wire to
connect other seria l dev ice s.
3.2.6 Serial Port Setting
Set the brightne ss an d cal ibr ati on of the screen.
A) Adjust the brightn ess t hro ugh s hif t the s cro ll bar.
B) Press the cen ter of “+”, and cl ick OK but ton to stor e the bri ght nes s after
finishing the setti ng.
3.2.7 Screen Setting
www.supoin.net

Pag e 17Pag e 16
Set the vo lum e and s oun ds
A) Adjust the volu me th rou gh sh ift t he sc rol l bar.
B) Set the sound plan of th e sys tem
3.2.8 Sound Setting
Set dormancy and w ake u p parameter of t he sy ste m
A)“Auto close screen” time: th e sc ree n wi ll clo se automa tic all y when the
system i s in id le st atu s, an d the t ime i nte rva l rea che s.
B)“Sys tem d orm anc y” ti me: the terminal wil l ent er into syste m dormancy when
the syst em is in idle st atu s, and the tim e interv al rea che s, at th is point, the
system is working in low pow er consumption, and most of the har dwa res are in
standby status.
C)“Allow powe r but ton to close scre en” : If the choice is sel ect ed, the screen
will be closed by press ing t he le ft up per b utt on of the device.
D)“Pro hib it dormancy when syn chronous”: If th e cho ice is selected, the s yst em
will no t en ter into dor man cy status wh en synchronizing d ata by plugg ing in USB
wire.
E)“Allow ke yboard to w ake u p sys tem” : if the choice is selected, any button c an
wake up th e syste m when the system is in close s tat us or d orm anc y, or on ly t he
power butto n in th e upp er le ft ca n wak e up th e sys tem.
3.2.9 Dormancy Setting
www.supoin.net

Set rele van t parameter wh en lo cki ng th e scr een
A)“Lo ck screen” : if the choice is s elected, t he s cre en w ill be lo cked
automa tic all y i f yo u p ress * and # key i n order, a p ict ure of a lo ck will ap pea r in
the scre en, a nd th en th e scr een will be unlocke d if yo u pre ss * an d # key in orde r.
B)“Close scr een when screen is l ock ”: if the choi ce is selecte d, the screen will
close autom ati cal ly wh en lo cki ng.
C)“OK button i s va lid when screen is l ock ”: i f th e ch oic e is sel ected, OK butto n
is va lid w hen l ock ing t he sc reen, but other button s are i nvalid.
3.2.10 Lock Setting
Set on or of f of each hardwa re mo dul ar in P DA
A) WI-FI: tu rn o n or turn off WI- FI modular, W I-F I Ma nag er icon wi ll a ppe ar
in the taskba r after tu rni ng on
B) GSM/3G Power: Turn on or turn off GS M Mod ula r or 3G M odu lar.
C) Barco de 1D : tur n on or t urn off the autosca n pro gra m of bar cod e 1D sc an he ad.
D) Barco de 2D: tu rn on or tur n off the autoscan pro gra m of barcode 2D sca n
head.
3.2.11 On and off Setting of the Modular
www.supoin.net
Pag e 19Pag e 18

Set the operatin g pro gra ms an d sho rtc uts of autorun.
A)”Deskto p sho rtc ut” : set u p sho rtcut in t he de skt op.
B)Star t menu sho rtcut”: set up shortcut in the star t men u.
C)“Delete s hor cut ”: al l sho rtc uts s ett ed in A a nd B.
D)“Publish aut oru n app”: p ubl ish app lic ati on progra m, whic h will auto run in
the boot after successful setting.
E)“Cancel auto run a pp”: c anc el au tor un software publishe d in D.
3.2.12 Autorun Setting
Set ”#” to c han ge th e inp ut me tho d
A) “Soft keyb oard”: allow”#” key to a ctivate t he in put p ane l of sof t key boa rd
B) “Keyb oard input letter”: allow”#” to ac tiv ate ke ybo ard to input letter.
C) “Pinyin input method” : all ow” #” to a cti vate Pinyin input meth od.
D) “Ha nd- writing in put met hod ”: allow”#” to ac tivate Chinese ha nd- wri tin g
input method.
3.2.13 Input Method Setting
www.supoin.net
Pag e 21Pag e 20

Display all informa tin o f the c urrent device.
3.2.14 Setting Information
Restore Factory setting (note: all data in the device will be emptied, please
operate carefully, this function is used under the circumstance of abnormal condition in
the customers device, and normal method can’t solve.)
A) For device of S3C 2146 plan, can restore by putting password in the interface.
B)For device of PXA310 plan, according to the indication of the interface, press F3 in the
boot, when ”Recover system?” appears in the top left corner, press [OK] key at once,
and then the system will appear ”Please wait……”, which means in the process of
restore factory, and the system will be restored successfully within about 3 minutes,
then please carry on touch calibration according to the indications.
3.2.15 Restore Factory
Pag e 22
Chapter 4 Precautions and Troubleshooting
4.1 Precautions for Supoin S10
Put the Supoin S10 and its components and accessories in the places where children
cannot reach.
Keep the Supoin S10 dr y. Rain, moisture and liquid contain acidic materials and will
corrode the circuit board.
Do not store or use the Supoin S10 in dusty or dirty places.
Do not store the Supoin S10 in a place that is too hot. High temperature will shorten
the service life of electronic components.
Do not store the Supoin S10 in a place that is too cold. When the temperature inside
the Supoin S10 rises, moisture is generated inside the Supoin S10, which may damage
the circuit board.
Do not try to disassemble the Supoin S10. Other wise, the Supoin S10 may be
damaged.
Do not touch the screen surface of the Supoin S10 by using a pen, a pencil or other
sharp articles in case the screen may be scratched.
Do not throw, beat or violently collide the Supoin S10. Otherwise, the components of
the Supoin S10 may be damaged and the Supoin S10 may be faulty.
Do not use strong chemical products or strong detergent to clean the Supoin S10. If
the Supoin S10 become dirty, clean the surface of the Supoin S10 by using a soft cloth
soaked with dilute glass detergent.
Please use the protective film to reduce wear as much as possible. The screen
protective film can improve the availability and durability of the screen.
4.1.1 To ensure that the Supoin S10 does not fail, follow the
following precautions during use of the Supoin S10:
Pag e 23
www.supoin.net
The area where the Supoin S10 is charged must keep away from scraps, inflammables
or chemical substances.
When you charge the battery of a mobile device, the temperature on the battery and
charger must be in the range 0° C to 40°C.
Do not use incompatible batteries or chargers, which may cause fire, explosion, leakage
or other hazards.
Do not disassemble, press, twist, pierce or cut the battery.
Do not make the battery short-circuited or contact the connecting terminal of the
battery by using metal or other conductive objects.
Do not insert other materials into the battery, contact the battery with water or other
liquid, or expose the battery in an open fire, explosive source or other sources of
danger.
Do not put or store the battery in the environment where the temperature is too high.
Do not put the battery in a microwave oven or a drying machine.
Do not put the battery into a fire.
If the battery leaks, do not let the liquid stain your skin or eyes. Otherwise, wash your
skin or eyes with lots of water and go to see the doctor immediately.
4.1.2 Pay attention to the following during use of the battery.
Pag e 24
www.supoin.net
Pag e 25
Shell
Clean the shell by using a cloth soaked with alcohol, including keys and space between
keys.
Display
You can clean the display screen by using a cloth soaked with alcohol. Do not let the
liquid gather around the screen. Otherwise, dry the screen by using a soft non-woven
cloth in case strip marks are left on the screen.
Scan lens
Clean the scan lens regularly by using lens paper or other articles suitable for cleaning
4.1.3 Cleaning the Supoin S10
Replace the battery.
Replace the battery.
The battery volume is too low
or the battery is not charged.
Charge the Supoin S10 or
replace the battery.
The battery is incorrectly
installed.
Correctly install the battery
The system breaks down.
Restore factory settings.
The battery fails.
The temperature of the
battery is too high or low.
Put the battery in normal
temperature.
The cable configuration is
incorrect.
Consult the system administrator.
The communication software is
incorrectly installed or configured.
Install or reinstall the ActiveSync
software to update the driver.
The system does not respond. Restart the system.
The volume is too low or is
disabled.
Adjust the volume.
The Supoin S10 is in the
inactive state.
After being inactive for a period
of time, the Supoin S10 is closed.
The battery is used up.
Too many applications are
installed on the Supoin S10.
Remove applications installed
on the Supoin S10.
After the power key
is pressed, the
Supoin S10 is
not powered on.
The relevant function is
not activated after a user
clicks a button or icon.
No sound can be
heard.
Battery charging
fails.
During data
communication, data
is not transmitted or
transmitted data is
incomplete.
The Supoin S10 is
closed.
The Supoin S10
responds at a low
speed.
Remove unused memos and
records. If necessary, save the
records on the host or increase
the storage capacity by using an
SD card.
Too many files are stored in
the Supoin S10.
Fault
Cause
Solution
4.2 Troubleshooting

The scan application is not
loaded.
Load iScan in the Supoin S10.
Reading a barcode fails.
Check that the barcode is
defective.
The cable is in poor contact. Replace the cable.
The cable is in poor contact. Replace the cable.
“Authentication fails” is
displayed.
The password of the WLAN
device is incorrect.
Charging fails.
The synchronization
software cannot be
connected.
An AP cannot be
connected.
The Supoin S10
does not decode
barcodes.
The battery volume is low.
If the scanner stops sending
out laser beam after you turn
on the switch, check the
battery volume.
Pag e 26
 Loading...