


Rolls Royce Style Kids Ride on Car
Installation and Operation Instructions
Please read this instruction manual carefully. It is
important to read and follow all of the steps during
assembly to ensure proper operation and safety of the
child. Please keep this manual for future reference.

Scan this QR Code to
view the Rolls Royce
Assembly Video

SPECIFICATIONS:
Car Type:
Rolls Royce Style
Battery Type:
6V7AH
Electric Motor:
12V30W(Drive) 12V8W(Steering)
Age Range:
2 – 5 Years
Max. Weight:
65 lbs
Product Size:
50”L x 34”W x 25”H
Avg. Speed:
2 – 3 MPH
Charging time:
8-12 hrs
Avg. Use Time:
1-2 Hrs (depending on use)
Remote Battery:
2 - AA (not included)
IMPORTANT!
• Assembly is required by an adult
• Keep small parts out of reach of young children. (To avoid choking potential)
• Adult supervision is recommended during operation by child to avoid injury.
• Charger connection should be performed by an adult.
• Battery must be charged for a minimum of 12 hours prior to first use of the car
to avoid damage to the battery.
• Keep all plastic bags out of the reach of young children.
• Please check the product regularly for any loose parts or wires to ensure
proper operation.
• Please retain instruction manual for future reference.
• Please make sure that the child uses caution to avoid falls and collisions
causing injury to the child or third party.
• Not recommended for children under the age of 2 yrs. Due to small parts that
could cause a choking hazard.
• Battery charger should be examined for damage prior to each use. It is
important to inspect the cord and both ends for damage. In the event there is
damage found, DO NOT USE THE CHARGER! Contact us for replacement
charger.
• Please retain packaging in the event it is necessary to return for repair.
• WARNING!! NOT TO BE USED ON STREETS or IN TRAFFIC.
PARTS LIST:
:
1
Car Body
8
Tail Pipe
14
Steering Bolt
2
Washer
9
Rear Spoiler
15
Rearview Mirrors
3
Bushing
10
Seat
16
Front Windshield
4
Wheel
11
Seat Screw
17
Hood Ornament
5
Seat
12
Steering Wheel
6
Tire Quick Connect
13
Steering Screw
ASSEMBLY INSTRUCTIONS:
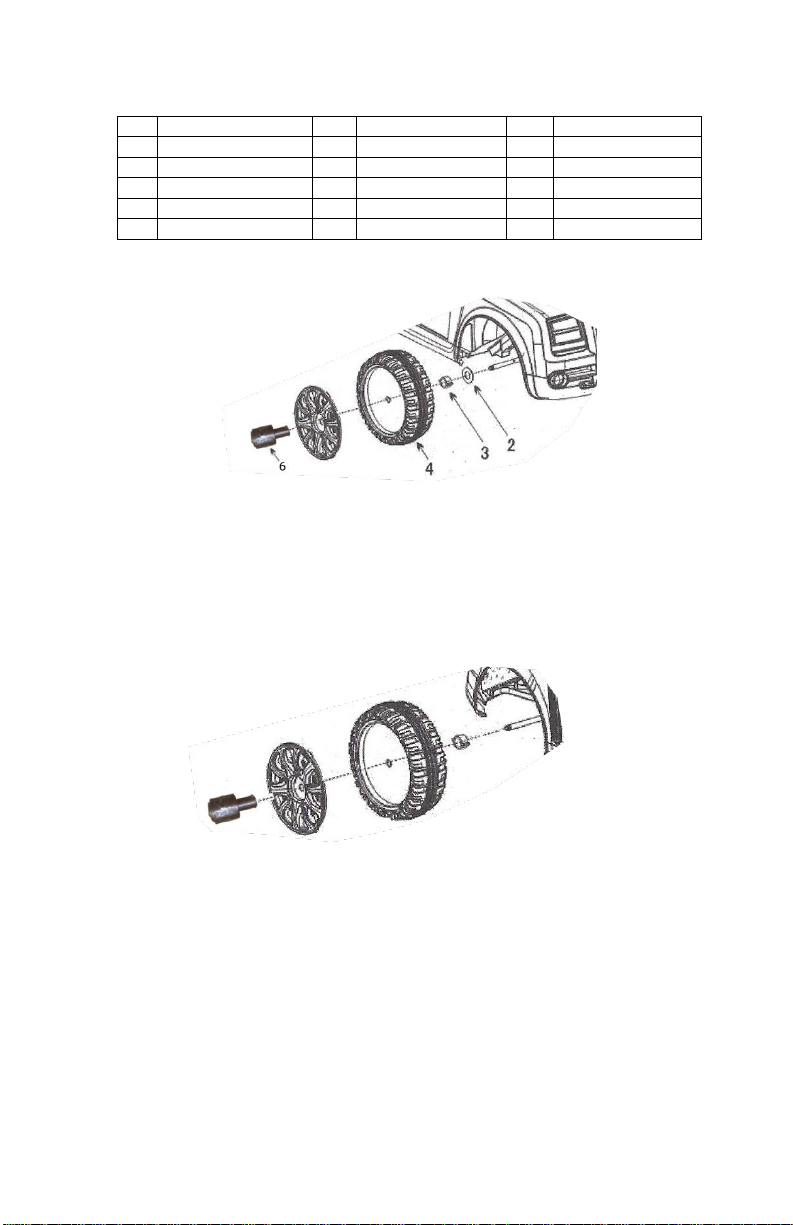
1. Installing the Front Wheels: Prior to installing the front wheels, locate the
brown wheel cap found on both ends of the front axle, press down on the
button located within the center of the wheel cap and hold to remove the
wheel cap from axle. Once wheel cap is removed, install washer (found in
parts package) followed by installing the bushing (found in parts package) into
the center of the wheel. Then, install the front wheel onto the front axle,
followed by the wheel cap by inserting the wheel cap into the center of the
wheel until you hear a click.
2. Installing the Rear Wheels: Prior to installing the rear wheels, locate the
brown wheel cap found on both ends of the rear axle, press down on the
button located within the center of the wheel cap and hold button to remove
the wheel cap from the axle. Once wheel cap is removed, install the bushing
(found in parts package) into the center of the wheel. Then, install the rear
wheel onto the rear axle, followed by the wheel cap by inserting the wheel cap
into the center of the wheel until you hear a click.

3. Installing Steering Wheel: Locate the music/horn wire at the end of the
steering wheel, and connect it to the power wire located on the steering rod.
Once wires are connected, remove screw and nut located on the steering
wheel column. Once screw and nut are removed, align hole on steering
column with the hole located on the steering rod. Insert screw through the
hole, followed by tightening the screw to the nut until tight.
4. Windshield Installation: To install the windshield into the body of the car, align
the tabs located at the bottom of the windshield with the holes located above the
dash board at the front of the car. Insert tabs into the holes, and push down until
you hear a click.

5. Installing Rearview Mirrors: Fit the tabs on the bottom of the Rearview Mirrors
into the slots on the side of the vehicle body towards the front of the door. Push
down until you hear a click.
6. Installing the Rear Spoiler: Locate the wire at the bottom of the rear spoiler.
Feed the wire through the open slot at the top of the rear of the car and
connect the wire to any of the 4 white slots located on the white power board.
Once connected place spoiler tabs into the open slots at the rear of the car
and push until you hear a click.
7. Installing Seat: Insert the seat into the 2 open holes located at the rear of the
car’s interior. To make sure seat is secure, screw 2 bolts into holes located at
the front of the seat on the left and right hand side.
8. Installing the Tailpipe: Fit the tailpipe into the slots located at the bottom rear
of the vehicle body. Push the tailpipe into the slot until you hear a click.

9. Hood Ornament: Insert the tabs located at the bottom of the hood ornament
into the slots located at the front of the vehicle hood.
Charging the battery: The charging port is located on the dash to the right of the
steering wheel. Plug the charger into the charging port first, then plug the charger
into wall outlet. BATTERY MUST BE CHARGED FOR A MINIMUM OF 12 HOURS
BEFORE INITIAL USE TO AVOID DAMAGE TO THE BATTERY.
REMOTE CONTROL BATTERY INSTALLATION: Open battery cover on the back of the
remote control. Install 2 AA Batteries as indicated inside the cover. Replace battery
cover and secure with screw.
Once battery is fully charged, disconnect from charger. Depress power button to turn on
the car. Once power is on, all lights light up, accompanied by the sound of the engine. (If

no sound is heard, turn up the volume) To allow child to operate the car, remote
control/manual switch has to be set to the manual position. To move the car forward,
forward/reverse switch has to be set to the forward position and to move the car
backward, the switch will need to be set to the reverse position. To operate the car using
the remote control, remote control/manual switch has to be set to the remote control
position.
The buttons found on the handlebars are for the horn and the on board music. There is a
MP3 interface located on the dash area with a volume knob to control the level of sound.
TROUBLE SHOOTING GUIDE:
Problem
Possible Cause
Possible Solutions
Car will not move
1. Battery voltage is low.
2. Screw on the wheels may
have come loose.
3. Battery connector may
have come apart or have a
bad connection.
4. Battery is damaged
5. Electrical box is damaged
6. Motor is damaged
Charge the battery
Re-tighten screws on
wheels.
Re-connect the battery
connector to the car
electrical connector
Replace battery
Replace motor
The battery will not
charge.
1. Battery connector may
have come apart or have a
bad connection.
2. Battery charger plugged
into a bad wall outlet.
3. Battery charger is
damaged.
Re-connect the battery
connector to the car
electrical connector
Try another wall outlet
Replace battery charger
Shortened battery life
Battery was not charged fully
Battery is old
Charge battery fully
Change battery
Some Noise and heat
when charging battery
Chemical reaction
Normal
Low Speed
Battery is old
Battery is low on charge
Weight limit exceeded
Uneven or uphill path
Change the battery
Charge the battery
Do not exceed max weight
limit
Noise coming from
motor/gearbox
Gear in motor/gearbox broken
Call for replacement motor
The car shakes when
moving
Bad Connection of the motor
wires
Possible motor failure
Reconnect wires
Call for replacement motor
If you are unable to solve a problem, please feel free to contact us.

IMPORTANT REMINDERS:
• Prior to first use of this electrical vehicle, please charge the battery for a
minimum of 12 hours. Failure to complete this step will cause permanent
damage to the battery.
• Do not operate on streets, roads, steep slopes, through ditches or in any
dangerous areas.
• Do not operate on slick surfaces, such as; marble, floor tile, ice.
• This product is limited to one rider. DO NOT OVERLOAD. Max weight 65
pounds!
• Do not switch forward to reverse while vehicle is in motion.
• Keep car, remote control, and charger away from water and/or rain to avoid
circuit damage
• Do not continue operation when car is stopped by an obstacle. Move car
away from obstacle prior to resuming operation.
• Do not use in or near water.
• Any liquid in the car may cause damage.
• Not for indoor use, may cause damage to furniture, walls, and other third
party.
• When remote control batteries are discharged, the car will become sluggish
and jitter, replace batteries.
• When not in use, please turn off power switch. If not using for an extended
period of time, please disconnect the battery.
CHARGING and BATTERY MAINTENANCE:
• IMPORTANT! Battery must be charged for a minimum of 12 hours prior to first
use of the car to avoid damage to the battery.
• When connecting the charger, please install the plug into the car prior to
plugging charger into the wall socket.
• Charging time for battery is 8-12 hours
• DO NOT EXCEED 20 hours when charging.
• Only use the battery supplied with this car to avoid damage to the car.
• Adult supervision is advised for connecting charger.
• Never reverse polarity of the battery + to red and – to black.
• Never short circuit battery! Do not touch red wires to black wires.
• For remote control: it is not recommended to use rechargeable batteries.
WARNING:
Please keep small parts away from children to avoid choking.
GENERAL MAINTENANCE:
1. It is important to recheck all parts and components that were installed
periodically to ensure proper operation.
2. For cleaning, simply wipe off with damp cloth.
3. Visual inspection and appropriate maintenance is necessary to
maintain the safety of your child.
4. Maintain the safety of your child.
 Loading...