

Page 1

®
SUPER
LSI MegaRAID Software
Confi guration Utility for the
LSI 1068 Controller
USER’S MANUAL
Revision 1.0
Page 2

The information in this User’s Manual has been carefully reviewed and is believed to be accurate.
The vendor assumes no responsibility for any inaccuracies that may be contained in this document,
makes no commitment to update or to keep current the information in this manual, or to notify any
person or organization of the updates. Please Note: For the most up-to-date version of this
manual, please see our web site at www.supermicro.com.
Super Micro Computer, Inc. ("Supermicro") reserves the right to make changes to the product
described in this manual at any time and without notice. This product, including software, if any,
and documentation may not, in whole or in part, be copied, photocopied, reproduced, translated or
reduced to any medium or machine without prior written consent.
IN NO EVENT WILL Super Micro Computer, Inc. BE LIABLE FOR DIRECT, INDIRECT, SPECIAL,
INCIDENTAL, SPECULATIVE OR CONSEQUENTIAL DAMAGES ARISING FROM THE USE
OR INABILITY TO USE THIS PRODUCT OR DOCUMENTATION, EVEN IF ADVISED OF THE
POSSIBILITY OF SUCH DAMAGES. IN PARTICULAR, SUPER MICRO COMPUTER, INC. SHALL
NOT HAVE LIABILITY FOR ANY HARDWARE, SOFTWARE, OR DATA STORED OR USED
WITH THE PRODUCT, INCLUDING THE COSTS OF REPAIRING, REPLACING, INTEGRATING,
INSTALLING OR RECOVERING SUCH HARDWARE, SOFTWARE, OR DATA.
Any disputes arising between manufacturer and customer shall be governed by the laws of Santa
Clara County in the State of California, USA. The State of California, County of Santa Clara shall
be the exclusive venue for the resolution of any such disputes. Supermicro's total liability for all
claims will not exceed the price paid for the hardware product.
FCC Statement: Refer to Supermicro's web site for FCC Compliance Information.
California Best Management Practices Regulations for Perchlorate Materials: This Perchlorate
warning applies only to products containing CR (Manganese Dioxide) Lithium coin cells. “Perchlorate
Material-special handling may apply. See www.dtsc.ca.gov/hazardouswaste/perchlorate”.
WARNING: Handling of lead solder materials used in this
product may expose you to lead, a chemical known to
the State of California to cause birth defects and other
reproductive harm.
Manual Revision 1.0
Release Date: Dec. 1, 2008
Unless you request and receive written permission from Super Micro Computer, Inc., you may not
copy any part of this document.
Information in this document is subject to change without notice. Other products and companies
referred to herein are trademarks or registered trademarks of their respective companies or mark
holders.
Copyright © 2008 by Super Micro Computer, Inc.
All rights reserved.
Printed in the United States of America
Page 3
Preface
About This Manual
This manual is written for system integrators, PC technicians and
knowledgeable PC users. It explain s how to confi gure and use the LSI Sof tware
RAID Confi guration Utility included with Supermicro motherboards.
Manual Organization
Chapter 1 Provides an overview on the LSI™ MegaRAID® Software Utility.
Chapter 2 provides an introduction to the LSI MegaRAID Software Utility settings.
It also details instructions on how to run the LSI MegaRAID Confi guration Utility .
Preface
Conventions Used in the Manual
Special attention should be given to the following symbols for proper installation and
to prevent damage done to the components or injury to yourself.
Warning: Important information given to prevent erroneous RAID confi gu-
ration and to ensure proper system setup.
Note: Additional Information given to ensure correct RAID confi guration
setup.
iii
Page 4

LSI MegaRAID Confi guration for the LSI 1068 Controller User's Manual
Contacting Supermicro
Headquarters
Address: Super Micro Computer, Inc.
980 Rock Ave.
San Jose, CA 95131 U.S.A.
Tel: +1 (408) 503-8000
Fax: +1 (408) 503-8008
Email: marketing@supermicro.com (General Information)
support@supermicro.com (Technical Support)
Web Site: www.supermicro.com
Europe
Address: Super Micro Computer B.V.
Het Sterrenbeeld 28, 5215 ML
's-Hertogenbosch, The Netherlands
Tel: +31 (0) 73-6400390
Fax: +31 (0) 73-6416525
Email: sales@supermicro.nl (General Information)
support@supermicro.nl (Technical Support)
rma@supermicro.nl (Customer Support)
Asia-Pacifi c
Address: Super Micro Computer, Inc.
4F, No. 232-1, Liancheng Rd.
Chung-Ho 235, Taipei County
Taiwan, R.O.C.
Tel: +886-(2) 8226-3990
Fax: +886-(2) 8226-3991
Web Site: www.supermicro.com.tw
Technical Support:
Email: support@supermicro.com.tw
Tel: 886-2-8228-1366, ext.132 or 139
iv
Page 5

Notes
Preface
Page 6

LSI MegaRAID Software Confi guration User's Manual
Table of Contents
Preface
About This Manual ....................................................................................................... 3
Manual Organization ..................................................................................................... 3
Conventions Used in the Manual .................................................................................. 3
Contacting Supermicro .................................................................................................. 4
Chapter 1 Introduction
1-1 Introduction to the LSI MegaRAID Software Utility for the LSI 1068 Controller ..
........................................................................................................................1-1
Features ..........................................................................................................1-1
Functions .........................................................................................................1-2
Drive Features .................................................................................................1-2
1-2 RAID Modes Supported by the LSI 1068 Controller ......................................1-3
SR Mode (Software RAID Mode) ....................................................................1-3
IT Mode (Initiator and Target Mode) ...............................................................1-3
To Activate RAID Modes ................................................................................. 1-3
1-3 RAID Level Review .........................................................................................1-4
Chapter 2 Confi guring the LSI MegaRAID Settings for the LSI 1068
Controller
2-1 Using the LSI MegaRAID Confi guration Utility ...............................................2-1
2-2 The LSI MegaRAID Utility Main Menu ............................................................ 2-2
2-3 Using Easy Confi guration Settings to Confi gure Arrays and Virtual Drives ..2-2
2-4 Using New Confi guration Settings to Confi gure a Selected Disk Drive ......... 2-8
2-5 Using New Confi guration Settings to Confi gure a Hotspare Drive ...............2-10
2-6 Selecting a Boot Drive .................................................................................. 2-12
2-7 Initializing a Disk Drive ..................................................................................2-14
2-8 Using the Objects Menu to Confi gure Device Settings ................................ 2-15
To View and Display Virtual Disk Drives in the System ...............................2-15
Initializing a Virtual Disk Drive ...................................................................... 2-16
Checking Data Consistency of a Selected Virtual Drive...............................2-17
Viewing and Updating the Parameters (or the Properties) of a Selected Virtual
Disk Drive ...................................................................................................... 2-18
Confi guring Global Hotspare Drives by Using the Objects Menu ................ 2-21
To Force a Drive Online or Offl ine ................................................................ 2-23
Viewing the Properties of a Physical Drive ...................................................2-24
Viewing and Updating the Properties of an Adapter .................................... 2-24
2-9 Rebuilding a Disk Drive by Using the Rebuild Menu ...................................2-25
Rebuilding a Physical Drive ......................................................................... 2-25
vi
Page 7

Table of Contents
Rebuilding an Virtual Drive by Using the Rebuild Setting ............................2-26
2-10 Checking Data Consistency of a Disk Drive ................................................. 2-27
Checking Data Consistency .........................................................................2-27
2-11 Clearing a Storage Confi guration.................................................................. 2-30
vii
Page 8

LSI MegaRAID Software Confi guration User's Manual
Notes
viii
Page 9

Chapter 1: Introduction to the LSI MegaRAID Software Utility
Chapter 1
Introduction
After you have installed hardware components, you must fi rst confi gure the LSI
MegaRAID Software Utility before you install an operating system and other software drivers.
Note: If you do not wish to confi gure LSI Software RAID settings, please
proceed with the OS installation. For OS installation instructions, refer to
related documents posted on our web site at www. supermicro.com.
1-1 Introduction to the LSI MegaRAID Software Utility
for the LSI 1068 Controller
The LSI Embedded MegaRAID Software Confi guration Utility adds RAID functional-
ity to enhance system effi ciency and data security by supporting RAID 0, RAID 1,
RAID 10 and RAID 5 (via I-Button). RAID 0 (striping) can greatly enhance hard disk
I/O performance by striping data across multiple drives. RAID 1 (mirroring) allows
data to be simultaneously written to multiple drives, thus increases data integrity.
RAID 10, combining RAID 0 and RAID1, provides superb system performance
and system security. When used with an I-Button, the LSI MegaRAID Utility also
supports RAID 5, which implements block-level striping with parity data distributed
across all disks, achieving greater data redundancy at a lower cost. By incorporating the LSI MegaRAID Software confi guration into our product design, Supermicro
offers the user the benefi ts of software RAID confi guration without the high costs
associated with hardware RAID applications.
The LSI Embedded MegaRAID Software Utility supports up to eight SAS or SATA
ports, providing an effi cient solution for data transfer, storage reliability and secu-
rity.
Features
The LSI MegaRAID Software supports the following features:
Support for BIOS Boot Specifi cation (BBS) (if available in the system BIOS)
•
Support for Interrupt 13 and Enhanced Disk Drive Specifi cation•
Option ROM size of up to 64 Kb•
Support for Power-On Self Test (POST) and run-time BIOS support for device •
removal and insertion (Plug & Play)
1-1
Page 10

LSI MegaRAID Confi guration for the LSI 1068 Controller User's Manual
Support for Post Memory Management (PMM) Specifi cation v. 1.01•
Support for Stop-On-Error during bootup•
48-bit LBA support for read, write, and fl ush cache functions•
Support for drive roaming•
Support for up to 2 Terabyte physical and logical drives•
Functions
The following functions are supported by the LSI MegaRAID Software Utility:
Support for BIOS Boot Specifi cation (BBS) (if available in system BIOS)
•
Support for Interrupt 13 and Enhanced Disk Drive Specifi cation•
Support for Enable/Disable BIOS Boot•
Support for Hot-plug and Hot Auto Rebuild (during a hot plug event and the •
physical drive is forced off-line)
Support for up to 2 Terabyte logical drives
•
Drive Features
The following Drive Features are supported by the LSI MegaRAID Software Utility:
Support for RAID 0, RAID 1, RAID 10 and RAID 5 (via I-Button)
•
Online mirror rebuilding•
Online consistency checks•
Array management software•
Error logging and notifi cation•
Automatic resume of rebuilding on restart•
Support for manual rebuilding•
Auto-confi guration support of newly-added physical drive•
1-2
Page 11

Chapter 1: Introduction to the LSI MegaRAID Software Utility
Support for global hotspare•
Array initialization support•
Logical drive available immediately after creation•
Stripe size of 64 Kb supported•
1-2 RAID Modes Supported by the LSI 1068 Controller
SR Mode (Software RAID Mode)
This is the default mode. To use this mode, please do the following:
Install a Software RAID Mode Driver in the OS.
•
Create RAID 0, RAID 1, and RAID 10 via the WebBIOS Utility so that the OS •
can detect the hard disk drives installed in the system.
Buy an I-Button (AOC-IButton68) from Supermicro to enable RAID 5 support.
•
(Please refer to http://www.supermicro.com/products/accessories/addon/AOC-IButton68.cfm for more information on the AOC-Button68.)
AOC-IButton68
IT Mode (Initiator and Target Mode)
This is a Non-RAID mode. To use this mode, be sure to fl ash an IT mode fi rm-
ware to the EEPROM and to install an IT Mode driver to the system OS. (See
the note below.)
To Activate RAID Modes
You can activate a RAID mode by pressing any key in the BIOS setup.
Press <CTRL> + <C> to activate the IT mode.
•
Press <CTRL> + <M> to activate the SR mode.•
Note: Different RAID modes require different fi rmwares and drivers. Be
sure to download the correct RAID mode driver before installing it to the
OS. For fi rmware downloads and assistance, please contact Supermicro
Technical Support at www.supermicro.com or Support@supermicro.com.
1-3
Page 12
LSI MegaRAID Confi guration for the LSI 1068 Controller User's Manual
1-3 RAID Level Review
To create a RAID storage confi guration, you will need to confi gure physical disk
drives into arrays fi rst. An array is a group of one ~ eight physical disks that is seen
as one large disk drive (logical drive) by the host computer system. Only one RAID
level can be assigned to an array.
•
A RAID 0 array consists of one ~ eight physical drives.
A RAID 1 array consists of two physical drives•
A RAID 10 array consists of four, six or eight physical drives.•
Warning: Do not use both SAS and SATA drives in the same array to
avoid system malfunctioning or decreasing Mean Time Between Failures
(MTBF).
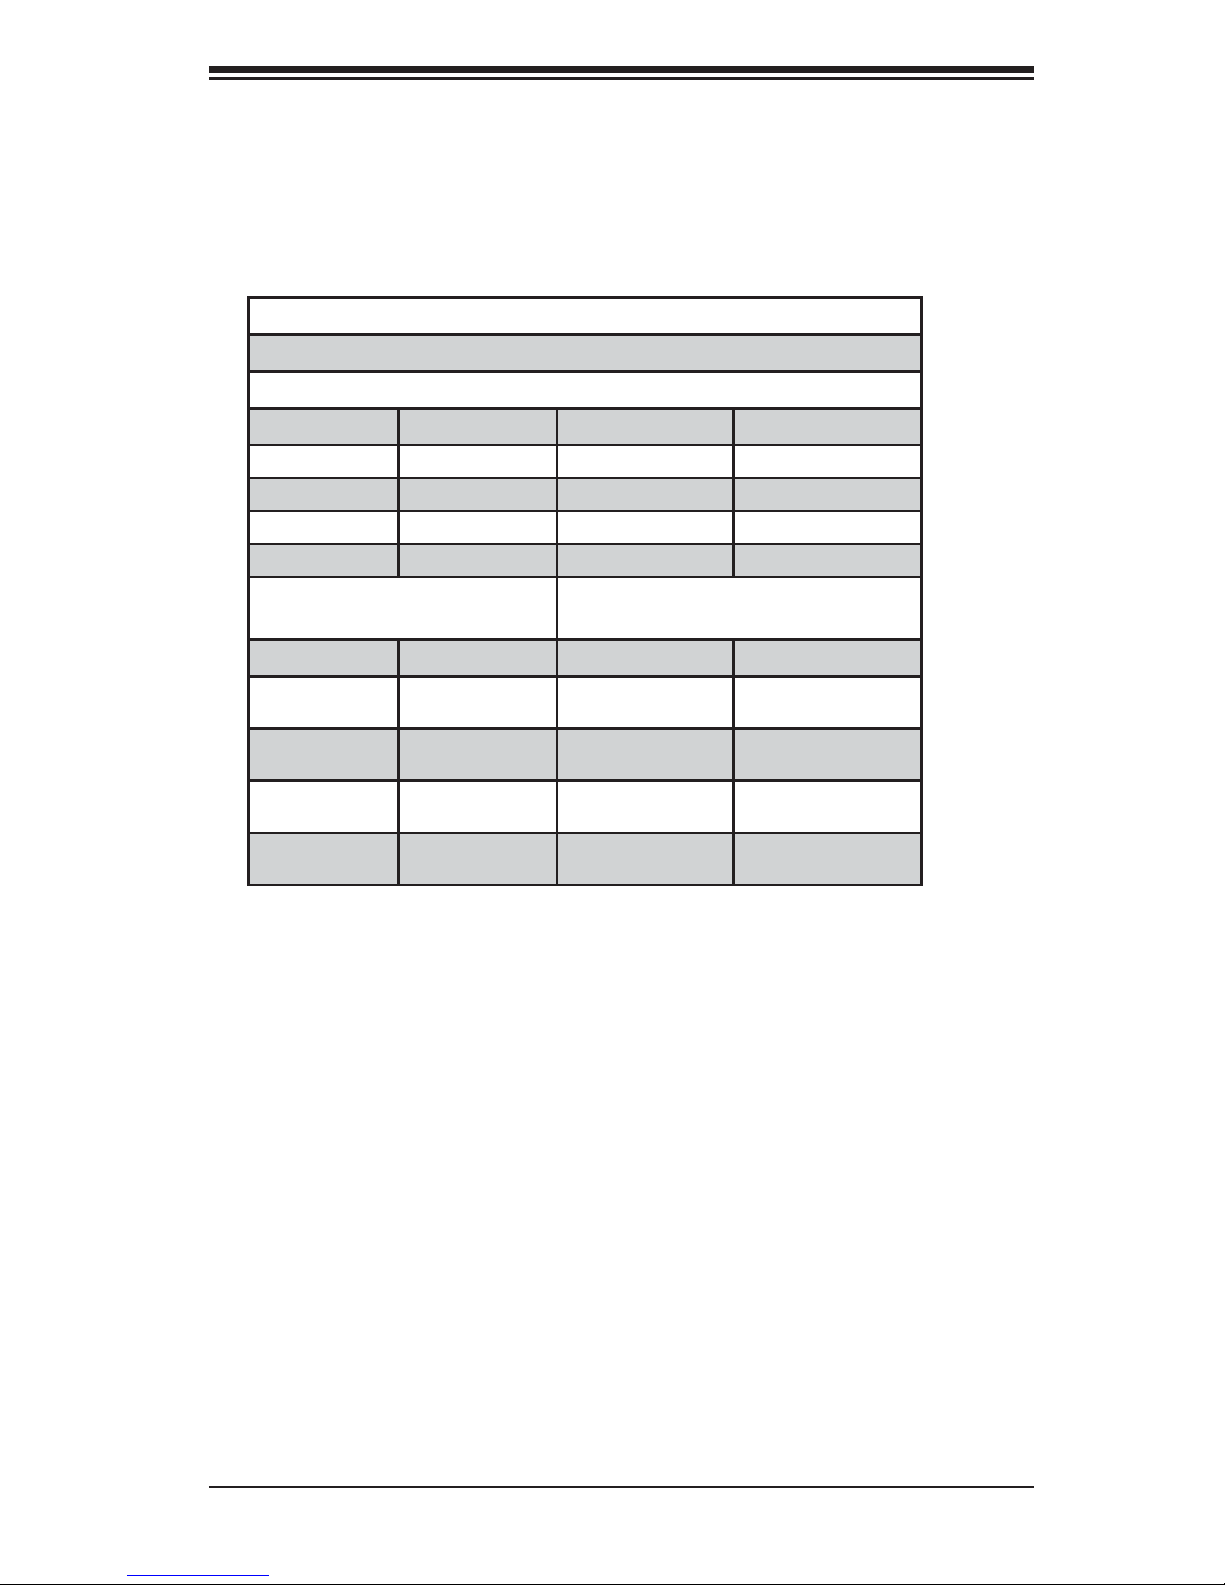
RAID 0 (Striping)
RAID 0 provides disk striping across all disk drives in an array. It does not provide
data redundancy, but it offers the best RAID performance.
RAID 0 Requires 1~8 Disk Drives
RAID 0 Example with 2 Disks
Disk Drive A Disk Drive B
Segment 1 Segment 2
Segment 3 Segment 4
Segment 5 Segment 6
Segment 7 Segment 8
RAID 1 (Mirroring)
RAID 1 creates a duplicate copy of data by copying all data from one drive to another. It provides data redundancy, but it doubles data storage capacity requirement.
RAID 1 Requires a minimum of 2 Disk Drives
RAID 1 Example with 2 Disks
Disk Drive A Disk Drive B
Segment 1 Duplicate copy of Segment 1
Segment 2 Duplicate copy of Segment 2
Segment 3 Duplicate copy of Segment 3
Segment 4 Duplicate copy of Segment 4
1-4
Page 13
Chapter 1: Introduction to the LSI MegaRAID Software Utility
RAID 10 (Striping + Mirroring)
RAID 10 combines RAID 0 and RAID 1 by fi rst breaking down data into smaller
segments and stripping these segments to each RAID1 set. Each RAID 1 set,
then duplicates its data to its mirrored drive.
RAID 10 provides the best RAID performance and best data security.
RAID 10 Requires 2, 4 or 6 Disk Drives
RAID 10 Example with 4 Disk Drives
Striping: Data Striping Across Drive A & Drive B
Drive A Drive B
Segment 1 Segment 2
Segment 3 Segment 4
Segment 5 Segment 6
Segment 7 Segment 8
Mirroring: Coping Data
from Drive A to Drive C
Mirroring: Copying Data from
Drive B to Drive D
Drive A Drive C Drive B Drive D
Segment 1 Duplicate Copy of
Segment1
Segment 3 Duplicate Copy of
Segment3
Segment 5 Duplicate Copy of
Segment5
Segment 7 Duplicate Copy of
Segment7
Segment 2 Duplicate Copy of
Segment2
Segment 4 Duplicate Copy of
Segment4
Segment 6 Duplicate Copy of
Segment6
Segment 8 Duplicate Copy of
Segment8
1-5
Page 14

LSI MegaRAID Confi guration for the LSI 1068 Controller User's Manual
Notes
1-6
Page 15
Confi guring the LSI MegaRAID Settings
Chapter 2
Confi guring the LSI MegaRAID Settings for the LSI
1068 Controller
This chapter provides confi guration instructions for the LSI Embedded
MegaRAID Software Utility. If you do not wish to confi gure LSI Software
RAID settings, please skip this section and go directly to the OS Installation. For OS installation instructions, please refer to our web site at www.
supermicro.com.
For system stability, please do not use both SAS and SATA drives in the
same array.
2-1 Using the LSI MegaRAID Confi guration Utility
Follow the steps indicated below to confi gure arrays and logical drives.
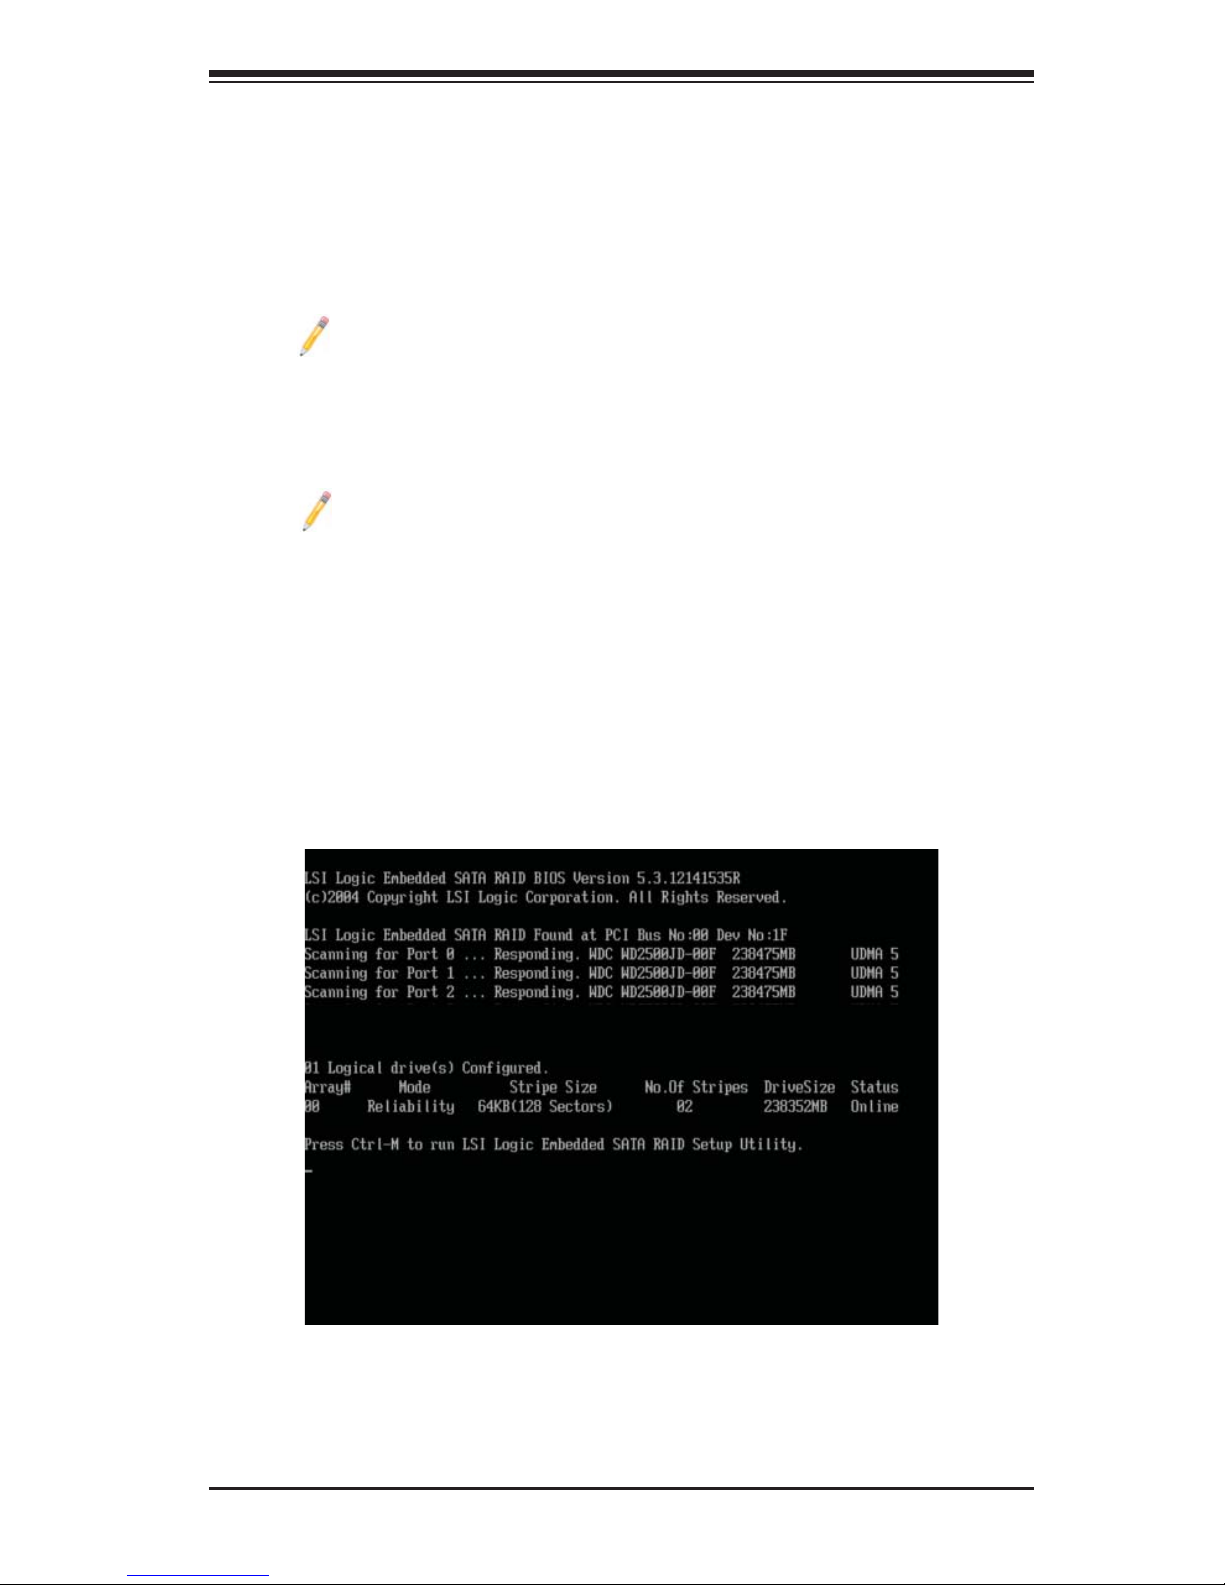
Power on the system.1.
When the screen as shown below displays, press <CTRL> and <M> to enter 2.
the LSI MegaRAID Confi guration Utility .
Once you are in the LSI MegaRAID Software Confi guration Utility, the LSI 3.
MegaRAID Main screen as shown on the next page will appear.
2-1
Page 16
LSI MegaRAID Confi guration for the LSI 1068 Controller User's Manual
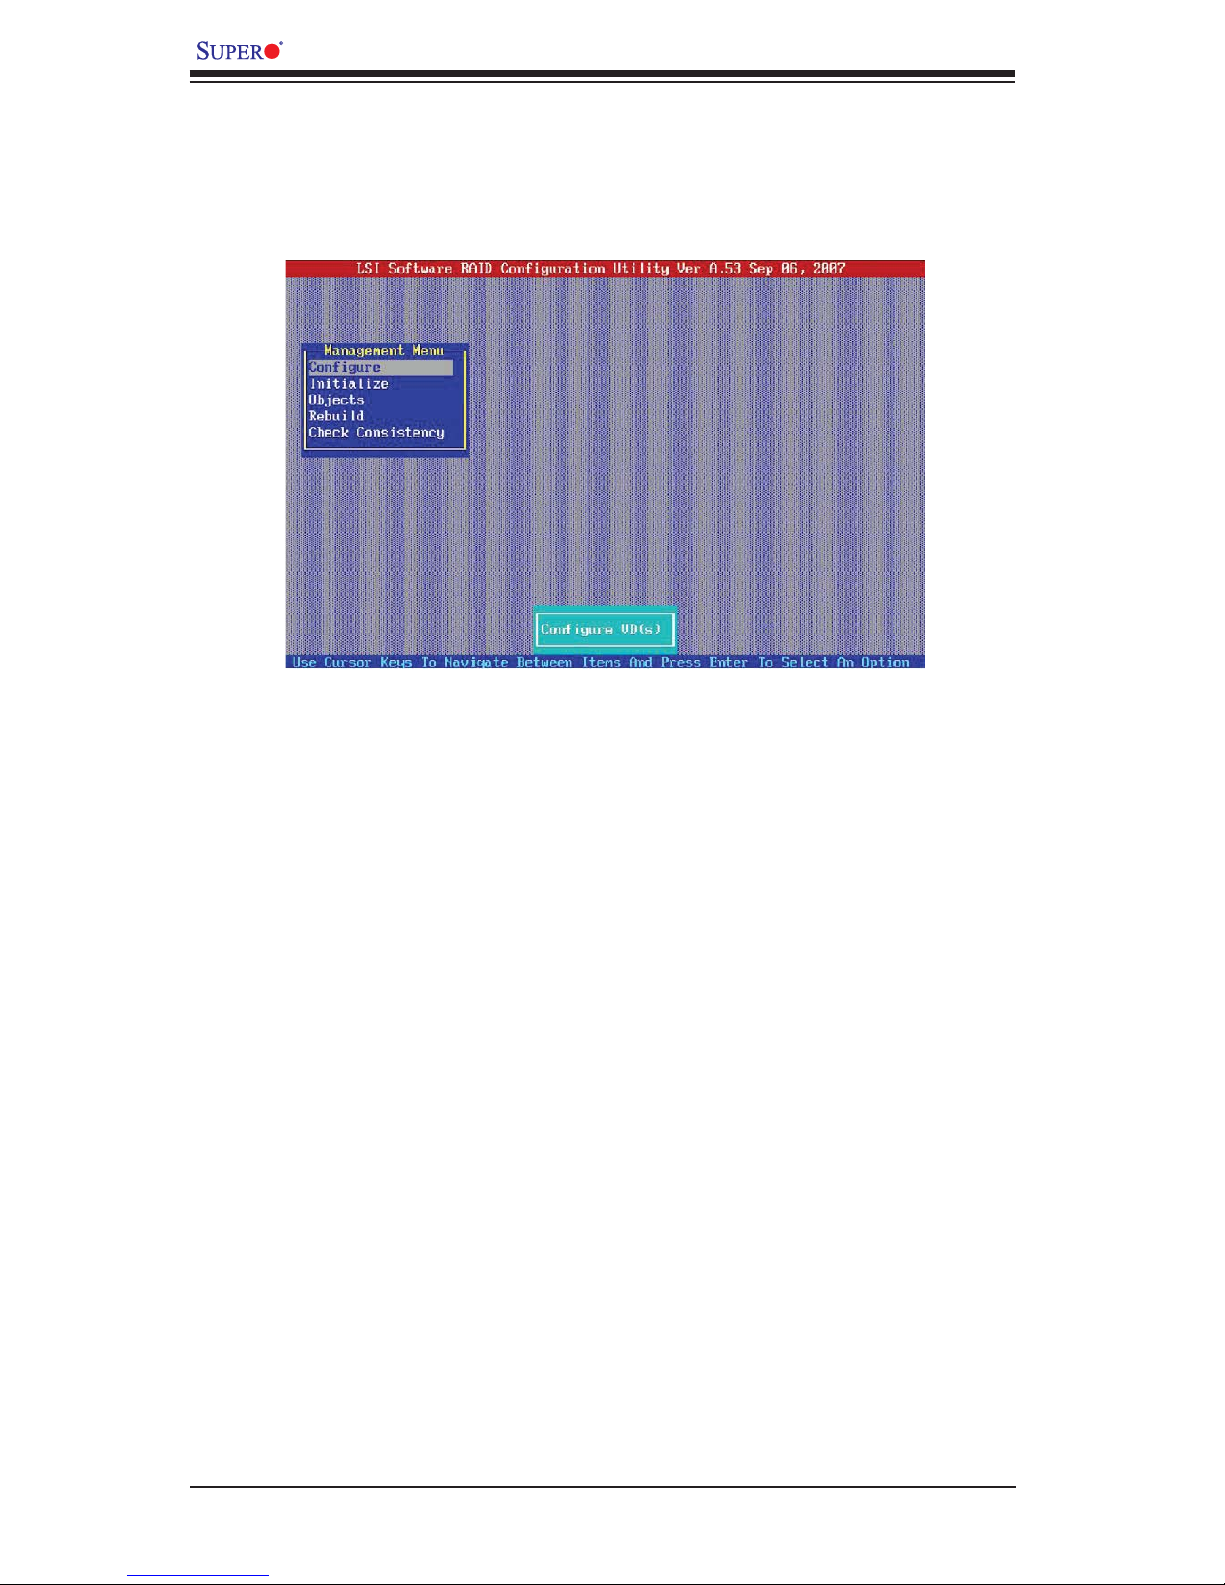
2-2 The LSI MegaRAID Utility Main Menu
When entering the LSI MegaRAID Utility, the following LSI MegaRAID Main Screen
appears:
The LSI MegaRAID Main Menu includes the following fi ve submenus: Confi guration,
Initialization, Objects, Rebuild, and Check Consistency. These submenus allow the
user to confi gure arrays and logical drives as desired.
2-3 Using Easy Confi guration Settings to Confi gure
Arrays and Virtual Drives
Easy Confi guration Settings allow you to check the properties of or assign an array
to a disk drive of your choice. You can also use these settings to confi gure a disk
drive as a virtual drive or a hotspare.
When the LSI MegaRAID Main Menu as shown above displays, use the arrow 1.
keys to select Confi gure and press <Enter>.
Use the up/down arrow keys to select Easy Confi guration and press <Enter> 2.
to view the physical drives in the system.
2-2
Page 17
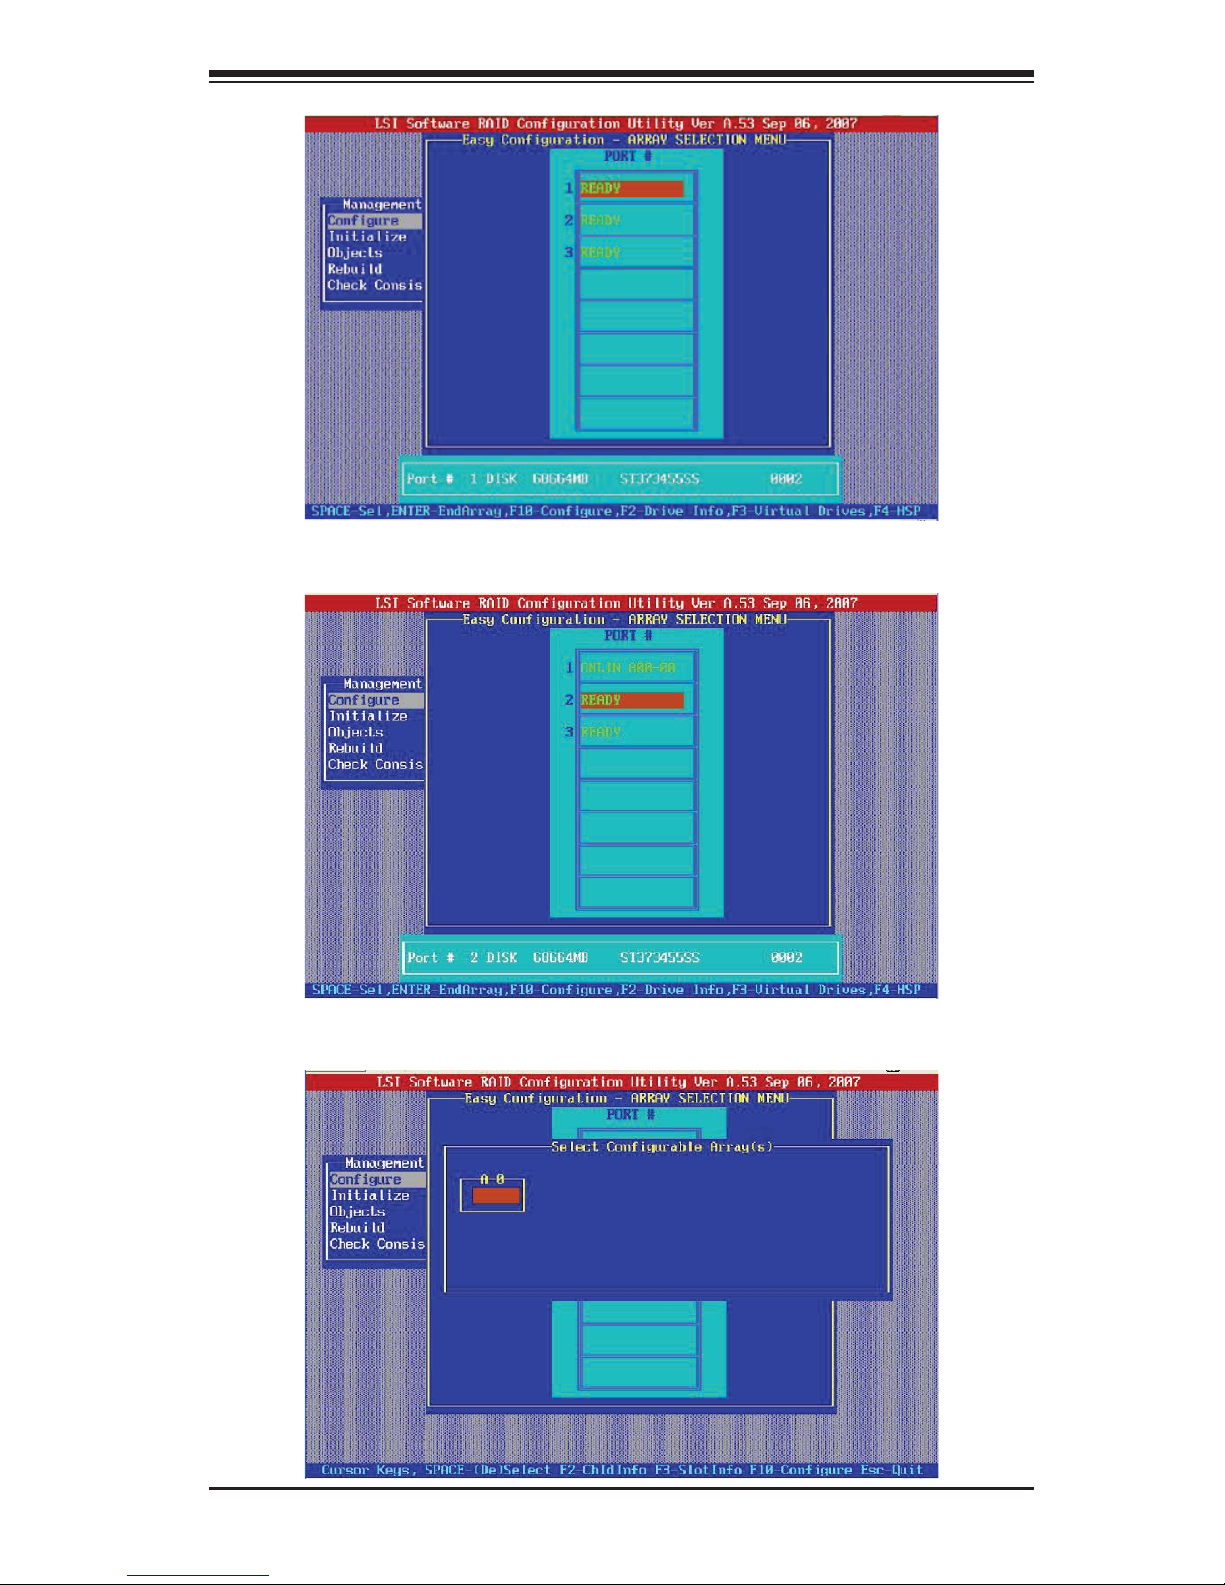
Confi guring the LSI MegaRAID Settings
The physical drives that are ready for confi guration will be displayed. Press 3.
<Spacebar> to select the drive you wish to confi gure the RAID settings.
When the physical drive you wish to assign an array to is selected, press 4.
<F10> to confi gure the array.
2-3
Page 18
LSI MegaRAID Confi guration for the LSI 1068 Controller User's Manual
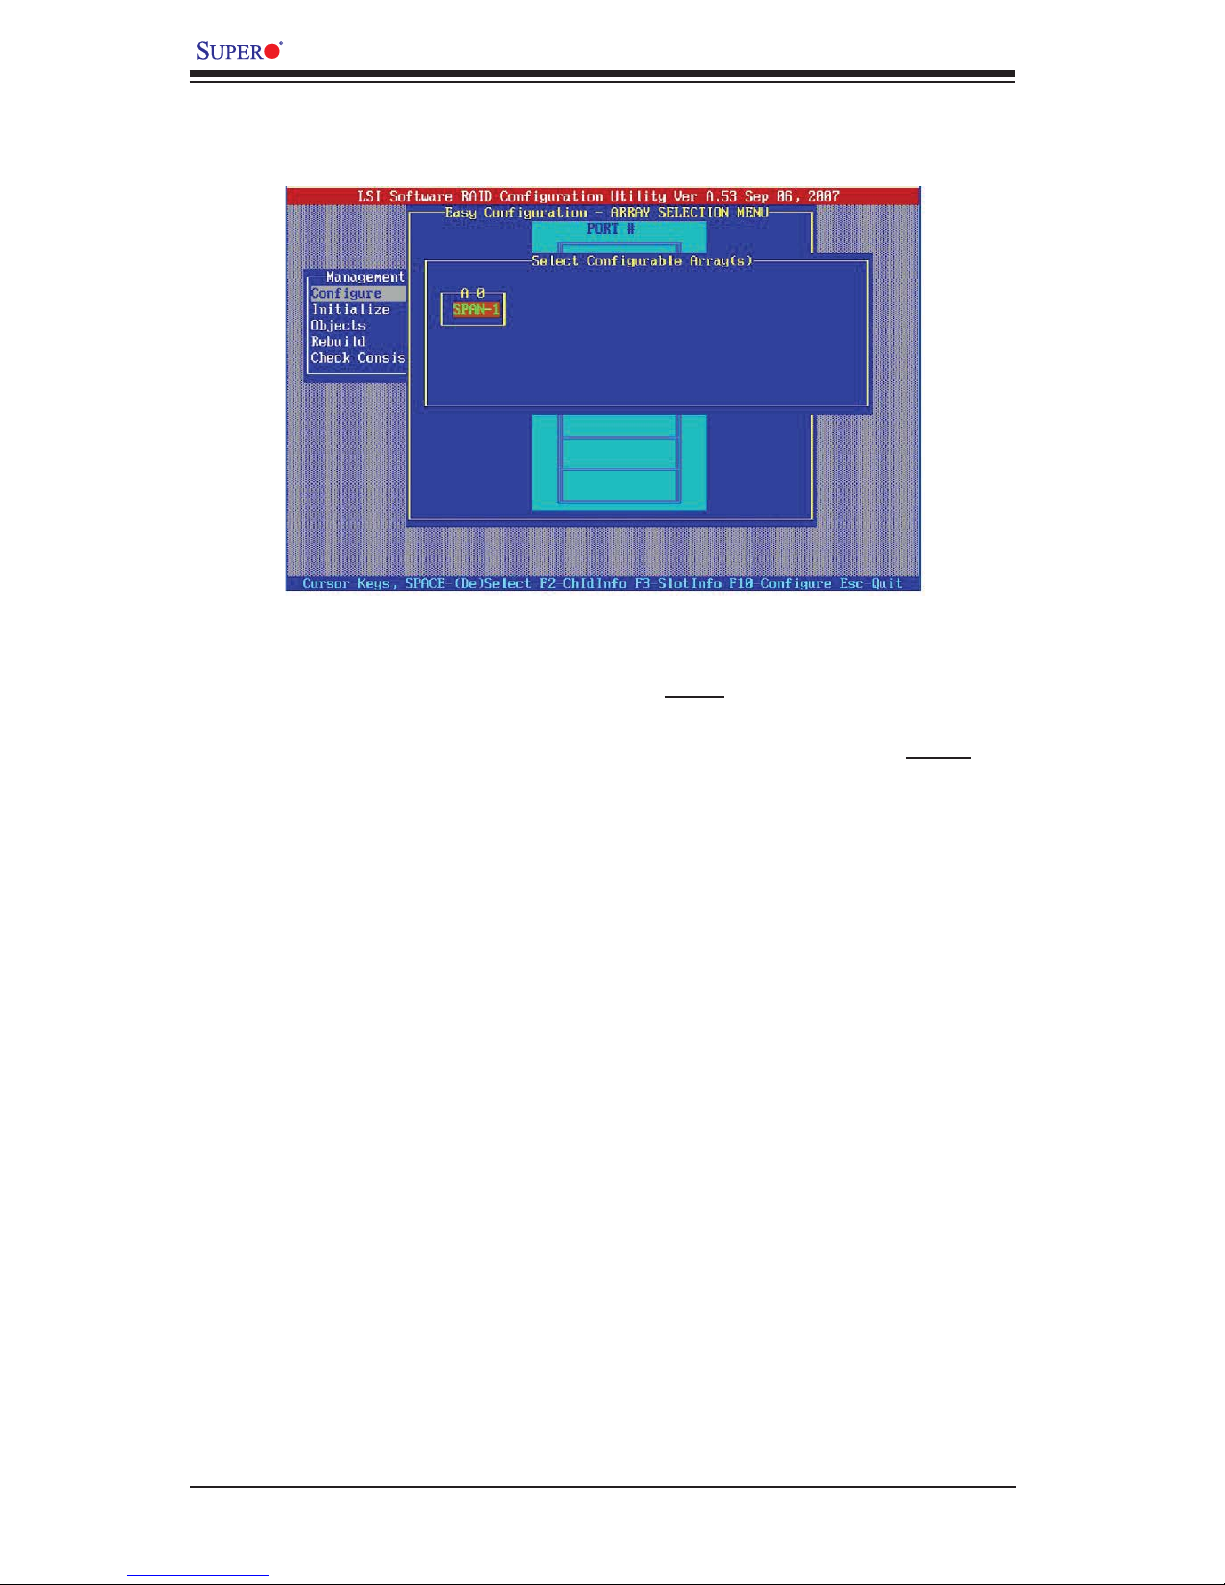
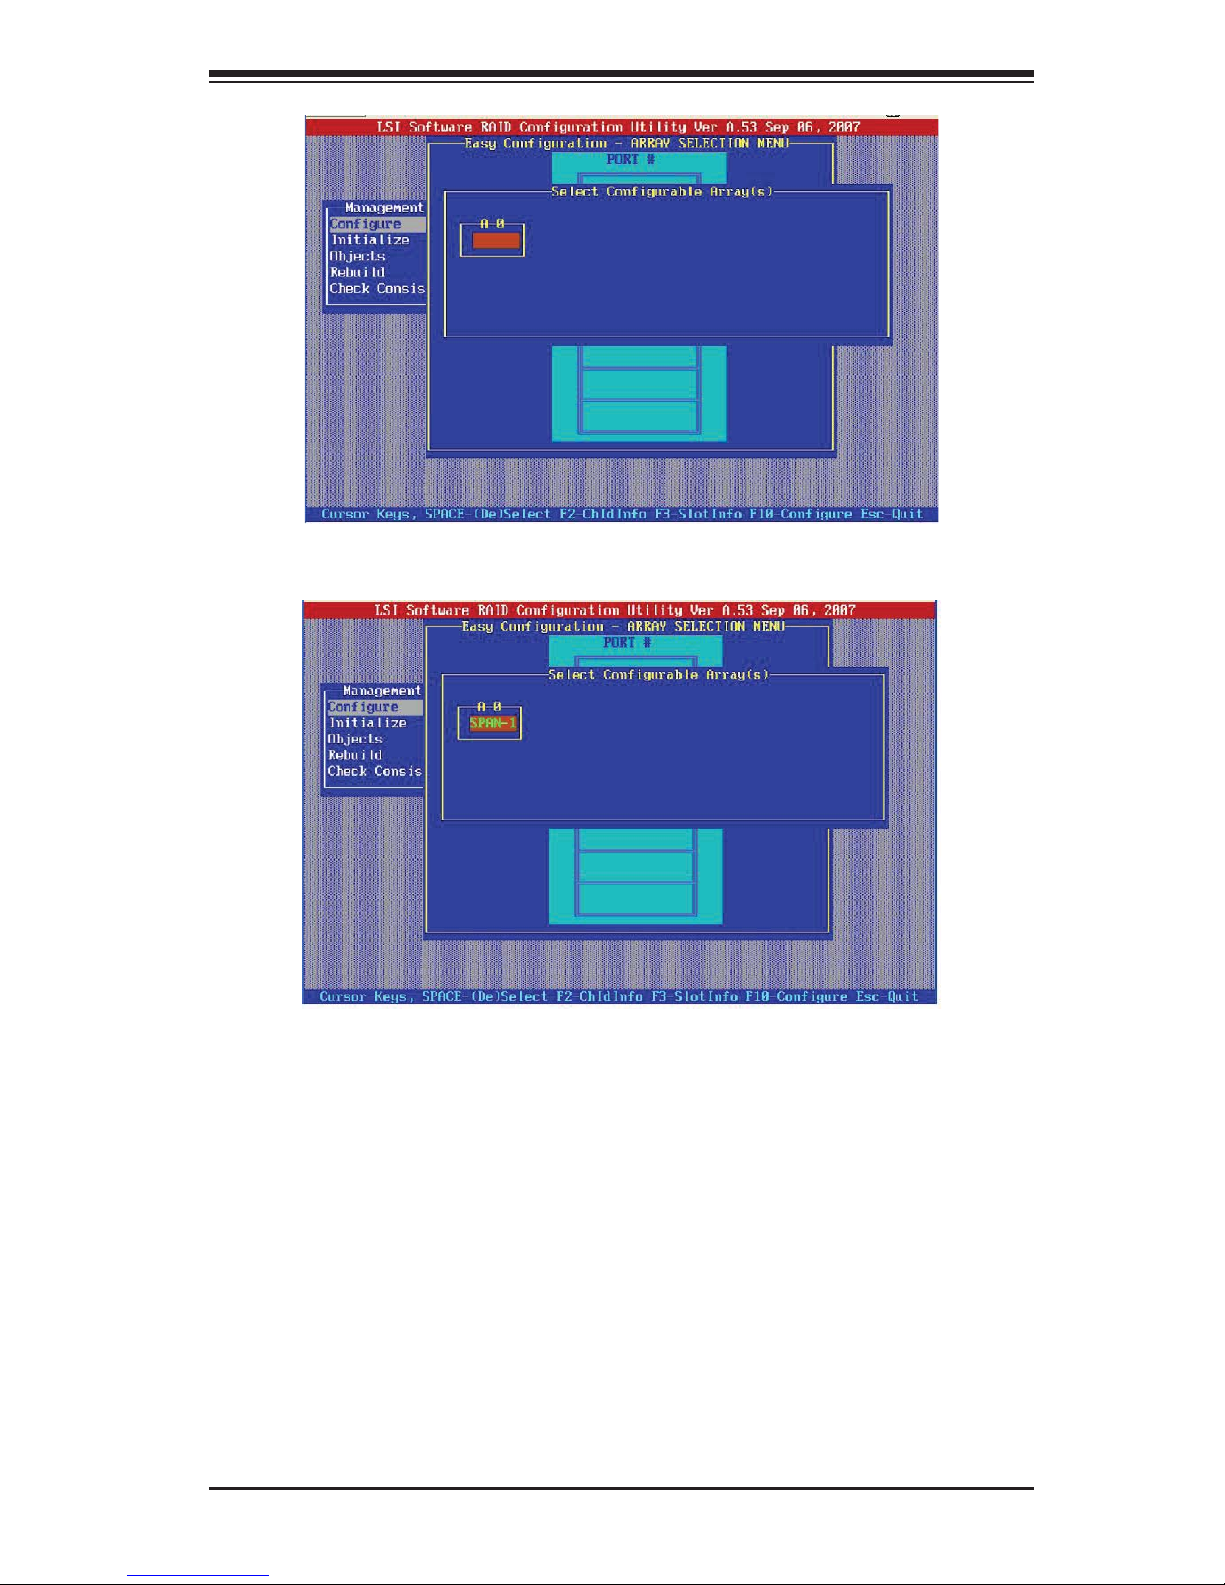
When the screen as shown above displays, press <Spacebar> to select the 5.
array setting (number).
Once the right array number appears, press <F10> to confi gure it.6.
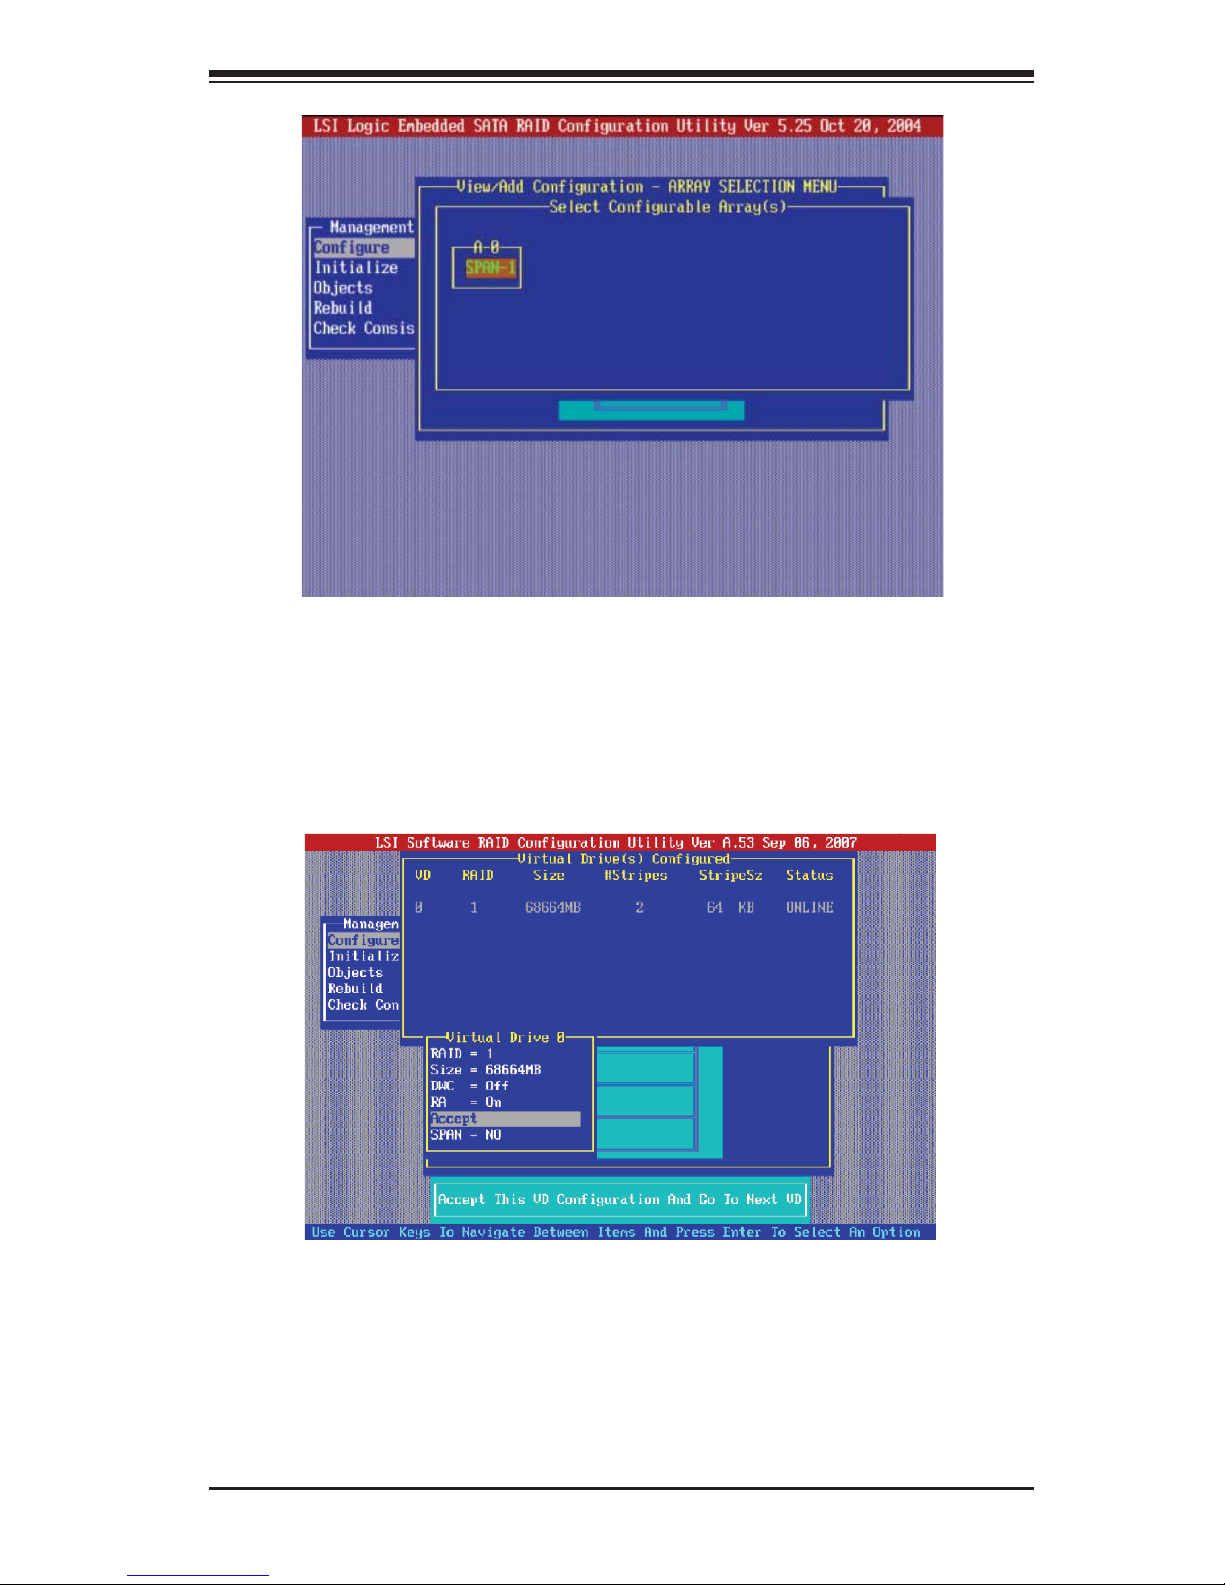
Use the Up/Down Arrow keys to highlight 7. Select RAID.
In the pop-up dialogue box, using the Up/Down Arrow keys, select 8. Accept and
press <Enter>.
When a message prompt appears, select Yes to confi gure the array.9.
2-4
Page 19
Confi guring the LSI MegaRAID Settings
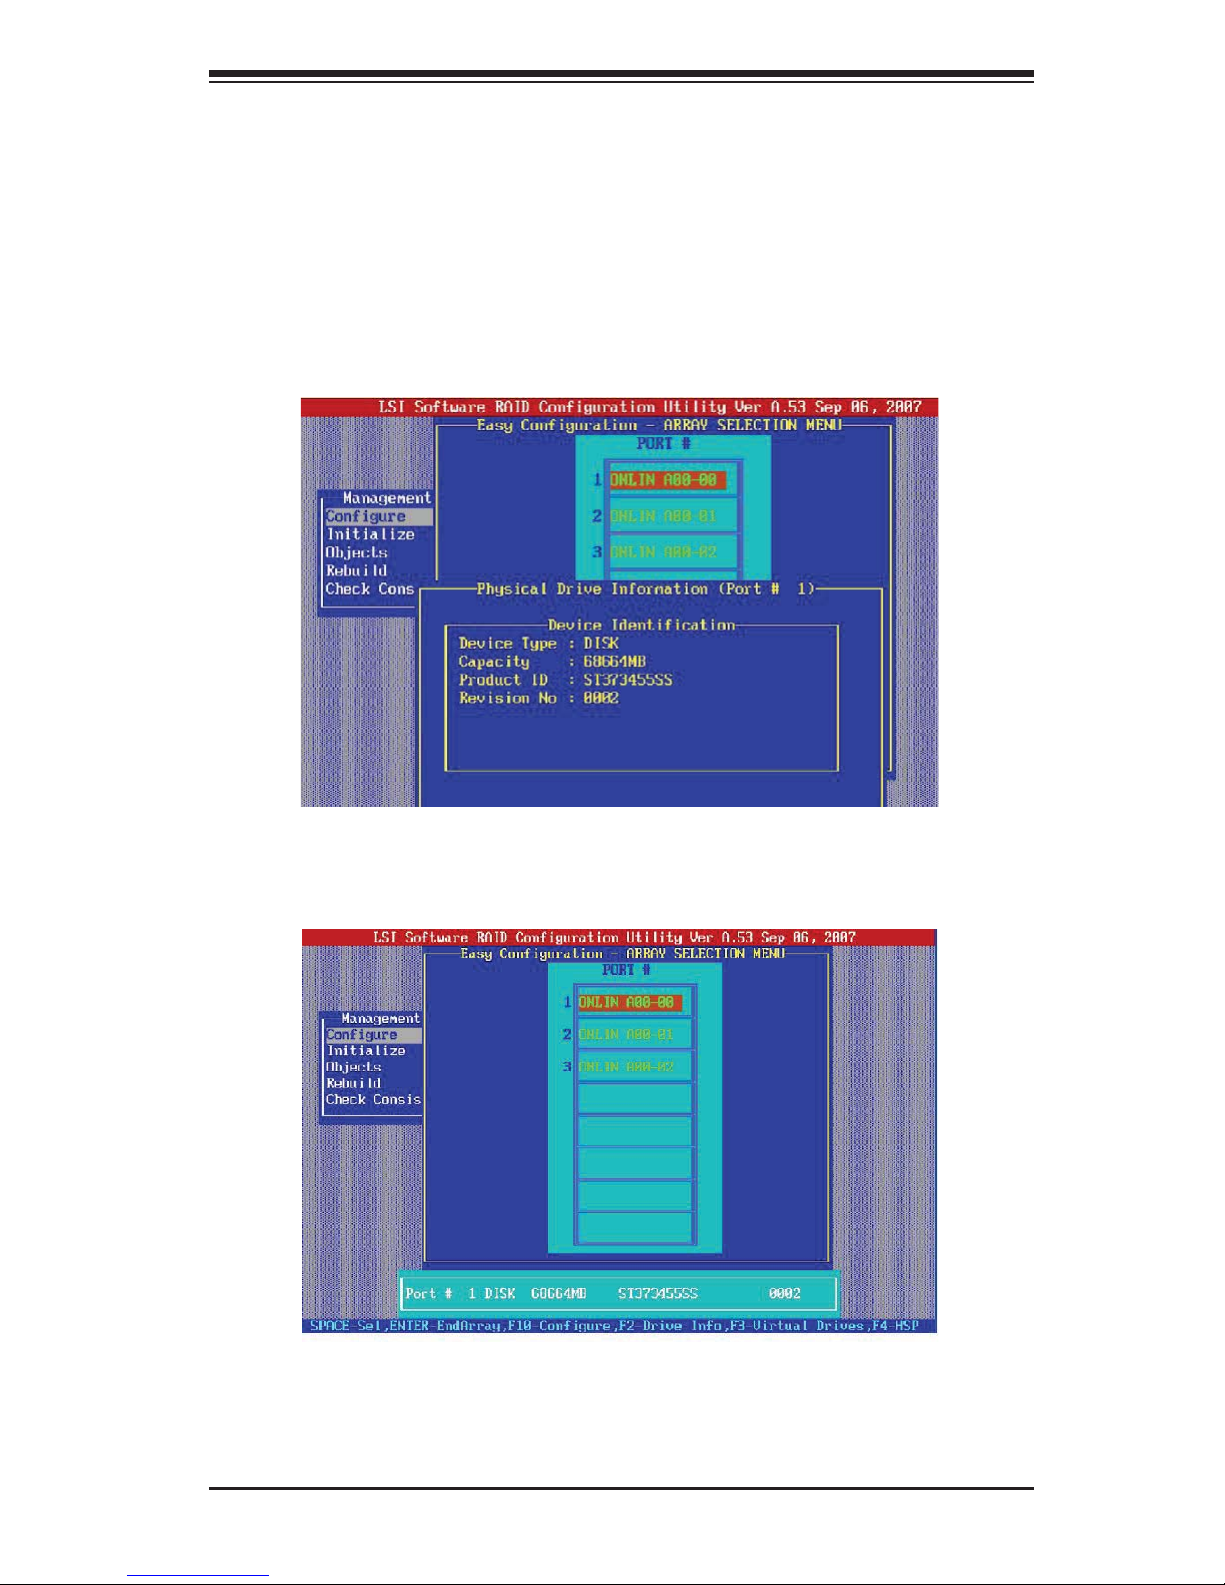
To Display Drive Information
From the LSI MegaRAID main menu, select Confi guration and press <Enter>.1.
Use the arrow keys to select Easy Confi guration and press <Enter> to view 2.
the drives available in the system. Press <Spacebar> to select the disk drive
you wish to confi gure.
When the disk drive is selected, press <F2> to display the disk drive informa-3.
tion as shown below.
To Confi gure a Virtual Drive
You can also confi gure a selected physical drive as a virtual drive by using 4.
the up/down arrow keys to select the drive and press <F3>.
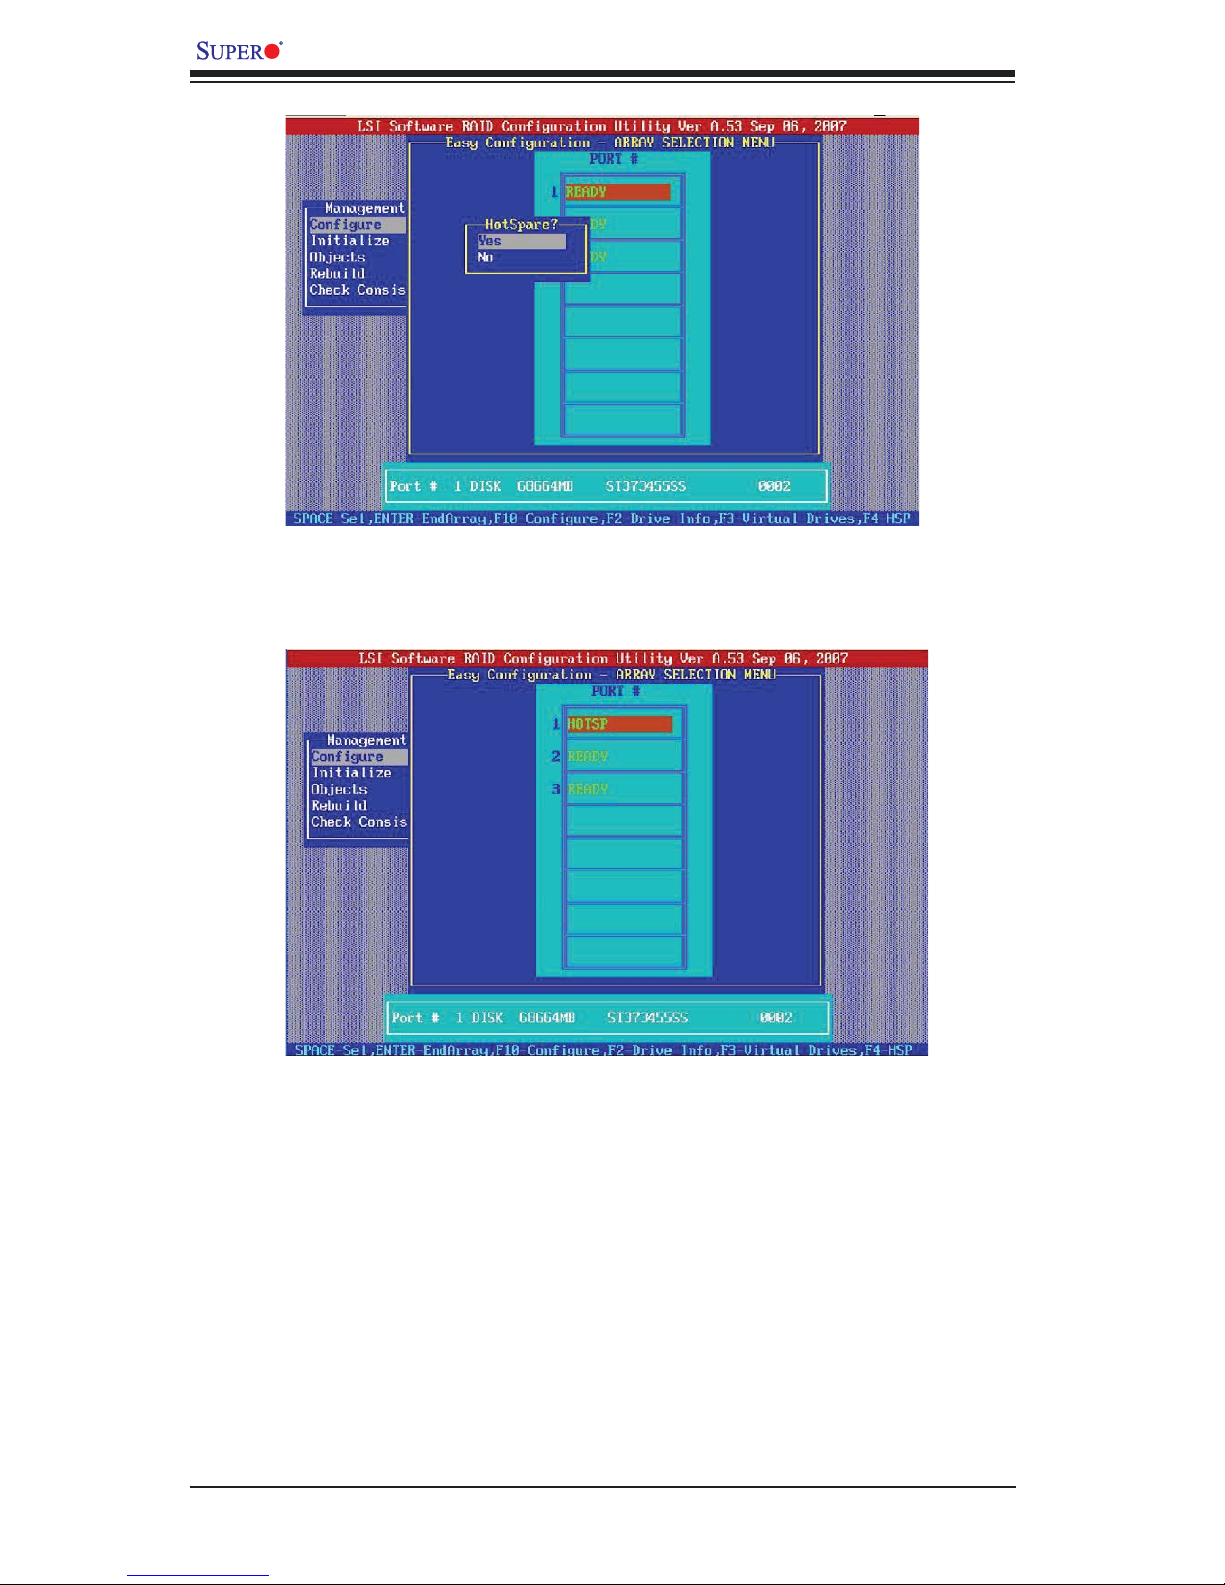
Using Easy Confi guration to Confi gure a Hotspare Drive
To confi gure the selected drive as a hotspare drive, press <F4>. The following 5.
screen appears:
2-5
Page 20
LSI MegaRAID Confi guration for the LSI 1068 Controller User's Manual
When prompted to confi rm whether you want to confi gure Hotspare, select 6.
Yes and press <Enter>. The drive selected will be confi gured as Hotspare as
shown in the screen below.
Using Easy Confi guration to Assign an Array
Select Confi gure from the LSI MegaRAID Main screen. 1.
Select Easy Confi guration from the Confi guration menu and press <Enter>.2.
When the screen showing the available disk drives displays, use the up/down 3.
arrow keys to select the drive you want to assign an array to.
When the drive you wish to assign an array to is highlighted as shown above, 4.
press <F10> to confi gure the array. A screen as shown below will appear:
2-6
Page 21
Confi guring the LSI MegaRAID Settings
When the screen above displays, press <Spacebar> to select the Array 5.
number.
Once the right Array number appears, press <F10> to confi gure it.6.
2-7
Page 22

LSI MegaRAID Confi guration for the LSI 1068 Controller User's Manual
2-4 Using New Confi guration Settings to Confi gure a
Selected Disk Drive
New Confi guration Settings allow the user to confi gure a selected disk drive. Be
careful when using this feature because it will erase existing RAID settings and
reconfi gure new settings for a disk drive selected. To confi gure a disk drive, follow
the steps below:
Select Confi gure from the LSI MegaRAID Main menu and press <Enter> to 1.
use the New Confi guration settings.
When a screen showing all drives that are available in the system appears, 2.
press <Spacebar> to select the drive you wish to confi gure the RAID setting.
After selecting the drive, press <F10> to confi gure it. The following screen will 3.
display.
When the array settings: A0 (:Array 0) and A1 (Array 1) appear, using the ar-4.
row keys, select the correct Array setting and press <Enter>.
2-8
Page 23
Confi guring the LSI MegaRAID Settings
Press <F10> to confi gure the array. 5.
Use the arrow keys to select the correct RAID level and press <Enter>.6.
When the dialogue box as shown on the bottom appears, using the arrow 7.
keys, highlight Accept and press <Enter> to confi gure the drive.
2-9
Page 24

LSI MegaRAID Confi guration for the LSI 1068 Controller User's Manual
2-5 Using New Confi guration Settings to Confi gure a
Hotspare Drive
New Confi guration Settings allow the user to clear an existing confi guration of a
selected drive or to confi gure a new RAID setting for this drive.
Select Confi gure from the LSI MegaRAID Main menu and press <Enter> to 1.
use the New Confi guration settings.
From the Confi guration Menu, select New Confi guration and press <Enter>. 2.
The following screen will appear:
When prompted to confi rm whether you want to proceed with this selection, 3.
use the arrow keys to select Yes or No and press <Enter>. The disk drives
that are available for confi guration will appear as shown below:
Warning: Please be careful when using this feature. It will erase existing
RAID settings and reconfi gure new settings for disk drives selected.
2-10
Page 25

Confi guring the LSI MegaRAID Settings
Use the up/down arrow keys to select the disk drive which you wish to confi g-4.
ure a new RAID setting with as shown above.
When the drive you wish to confi gure as a hotspare drive is selected, press 5.
<F4> and <Enter>. The following screen will display:
When prompted to confi rm whether you wish to confi gure a hotspare drive, 6.
select Yes and press <Enter>. A screen will display showing the selected
drive that has been confi gured as a hotspare drive as shown below:
2-11
Page 26

LSI MegaRAID Confi guration for the LSI 1068 Controller User's Manual
2-6 Selecting a Boot Drive
To select a disk drive as a boot drive, following the steps below.
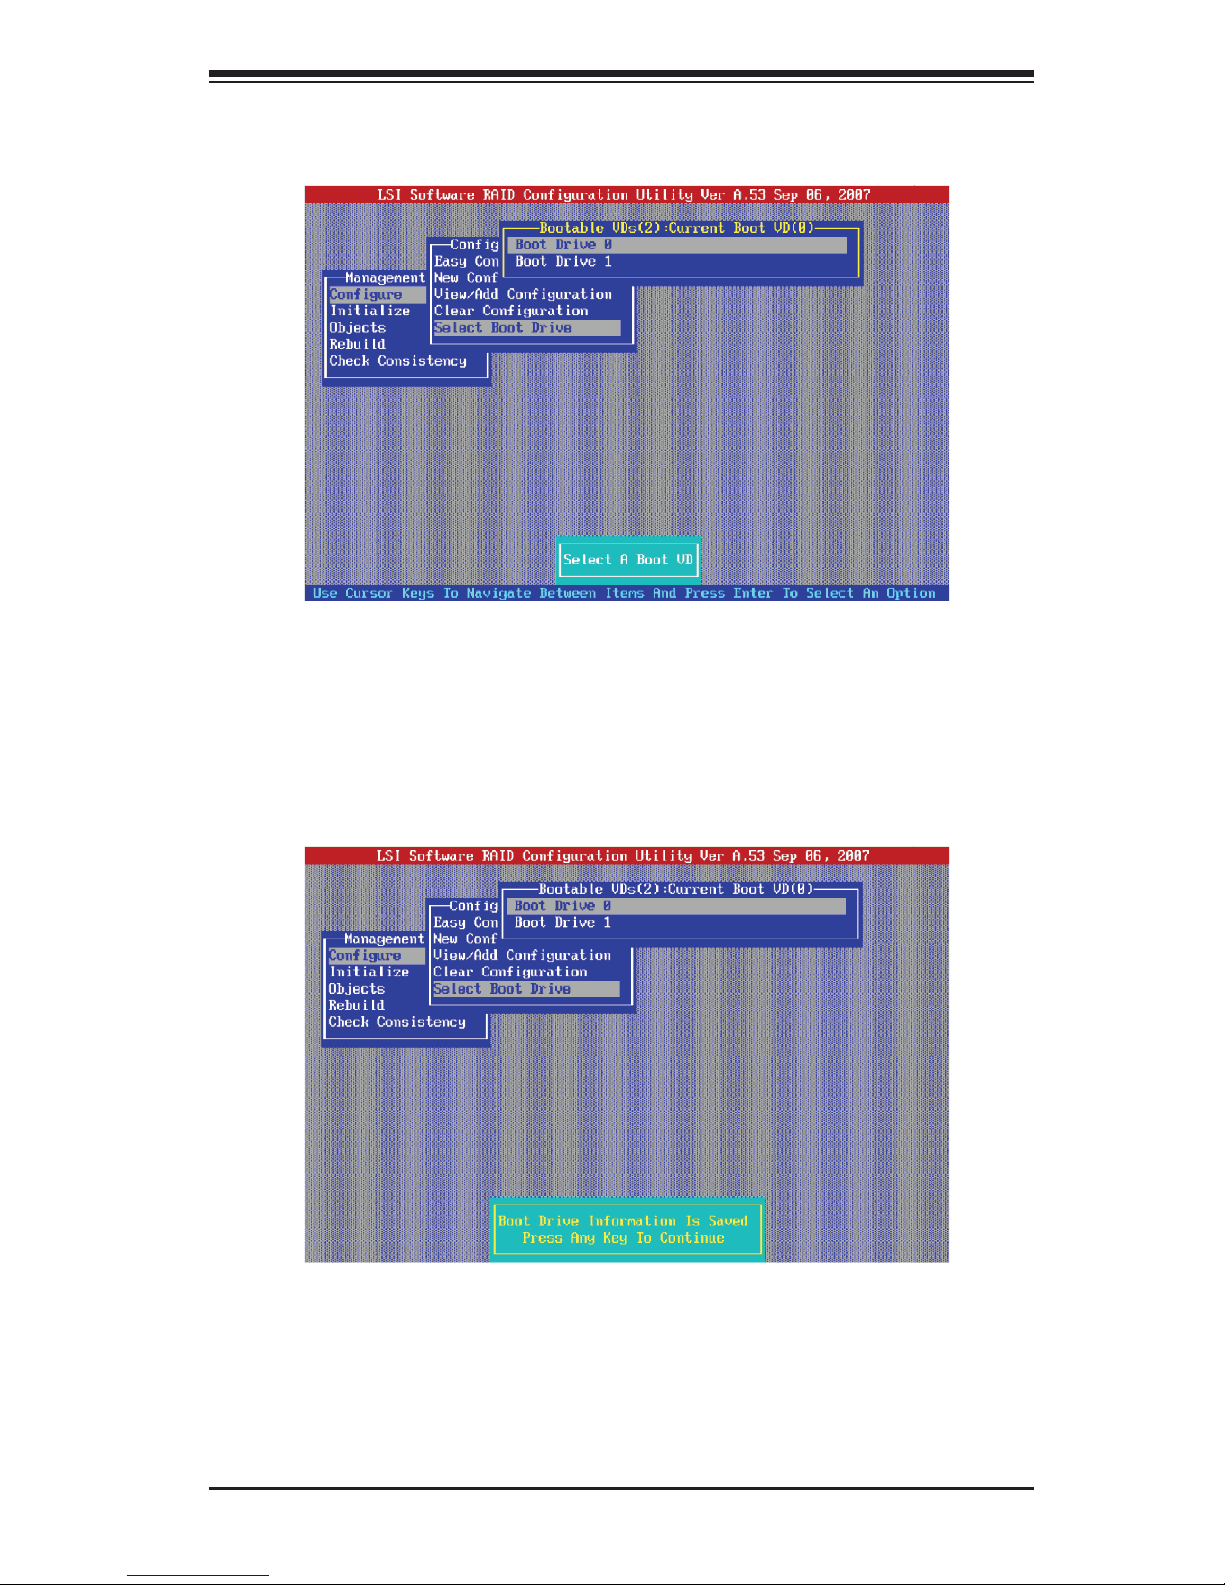
From the LSI MegaRAID Main menu, select Confi guration and press <Enter>.1.
When Confi guration Menu appears, use the down arrow key to select Select 2.
Boot Drive as shown below.
2-12
Page 27
Confi guring the LSI MegaRAID Settings
When the screen as shown above appears, press <Enter>, and the available 3.
boot devices will display as shown below.
Use the up/down arrow keys to select the disk drive you wish to confi gure as 4.
Boot Drive 0 and press <Enter>.
Repeat the step above to select your Boot Drive 1 as you wish.5.
When you have completed Boot Drive Selection, a message will appear, indicating
that the Boot Drive information is saved as shown below.
Press any key to continue with the RAID setup. 6.
2-13
Page 28

LSI MegaRAID Confi guration for the LSI 1068 Controller User's Manual
2-7 Initializing a Disk Drive
Warning: Please be careful when you initialize a disk because initializa-
tion will erase all data stored in the disk, including RAID settings, and
reformat the disk.
From the LSI MegaRAID Main menu, select Initialization and press <Enter>.
A pop-up dialogue box displays, indicating Initialization of Virtual Drives (VD) 7.
as shown in the screen below.
To proceed with initialization, press <Enter>. The following screen will display.8.
Use <Spacebar> to select a disk drive to be initialized.9.
Once the drive is selected, press <F10> to initialize the disk drive.10.
2-14
Page 29

Confi guring the LSI MegaRAID Settings
2-8 Using the Objects Menu to Confi gure Device
Settings
The Objects Menu allows the user to confi gure, initialize, view & update the pa-
rameters of a disk drive. This feature also allows you to confi gure the RAID level
and check the consistency of any disk drive. You can use this feature to confi gure
Global Hotspare drives as well.
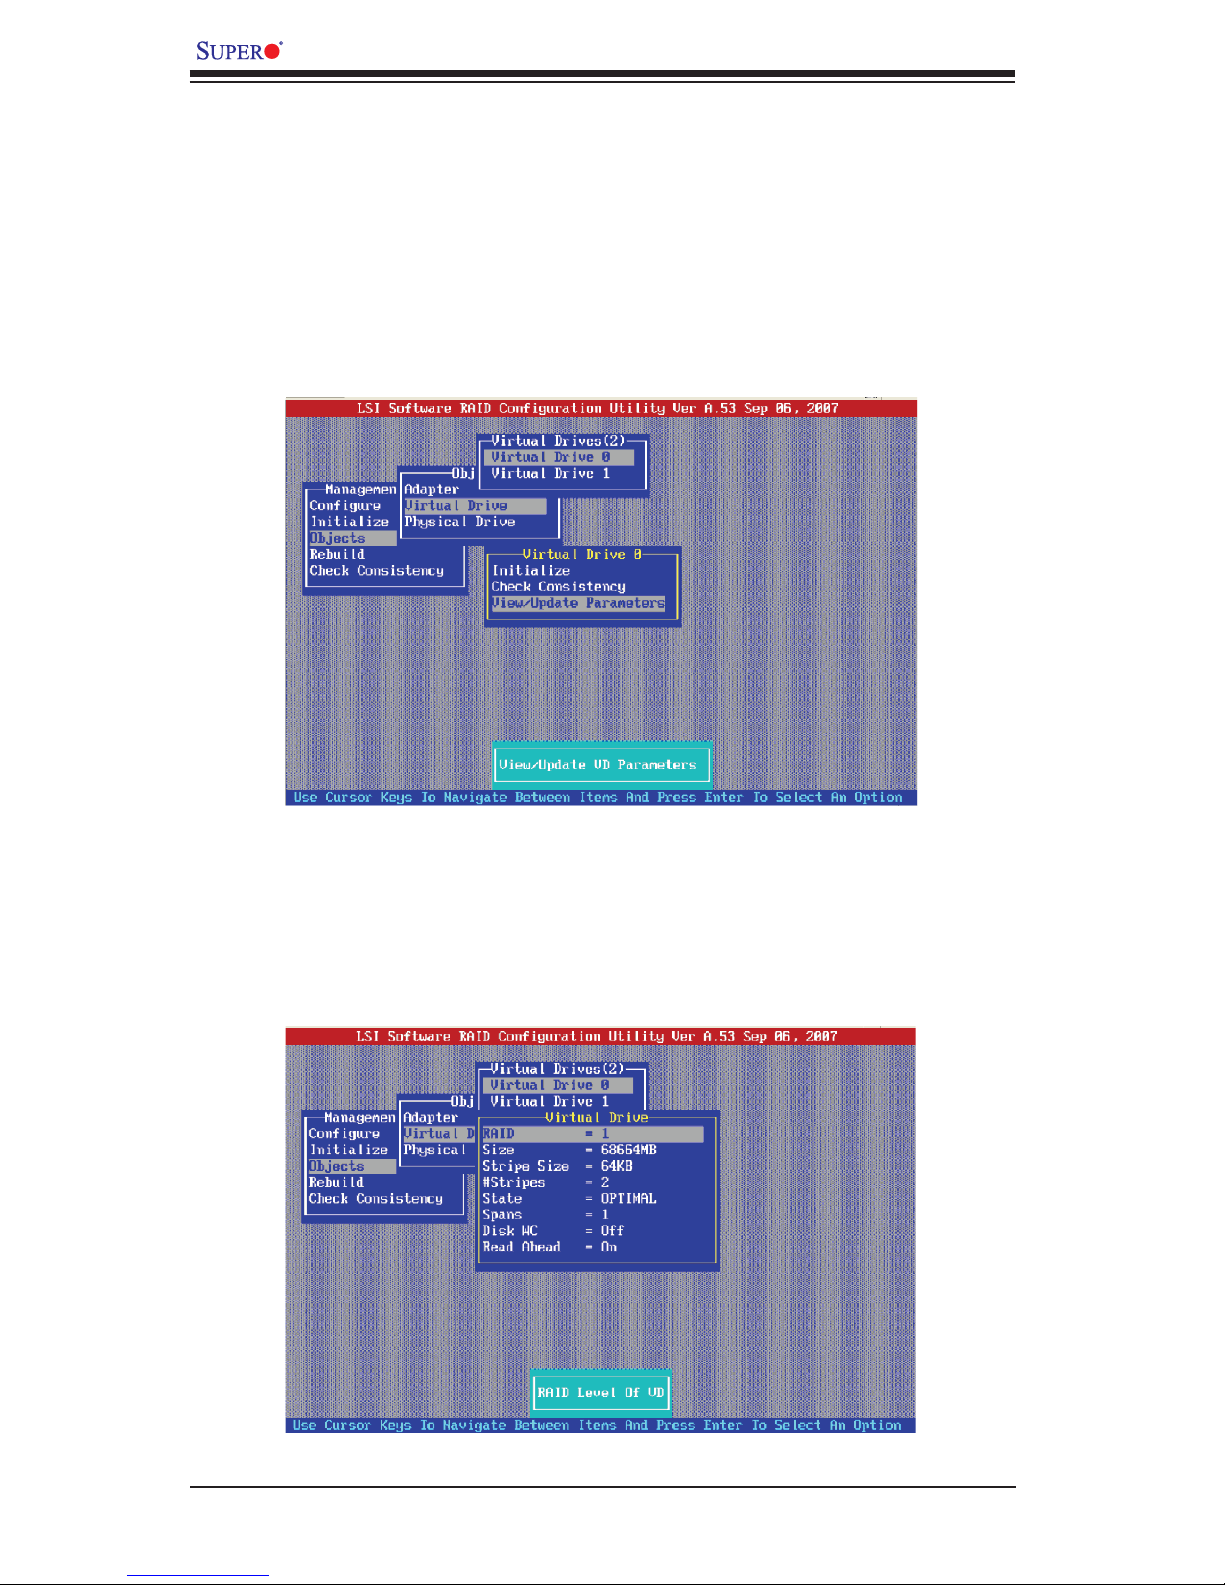
To View and Display Virtual Disk Drives in the System
Follow the steps below to view and display virtual disk drives.
From the LSI Main Menu, select Objects and press <Enter>.1.
From the Objects pop-up submenu, select Virtual Drive and press <Enter> as 2.
shown above. The available virtual drives will be displayed as shown below.
2-15
Page 30

LSI MegaRAID Confi guration for the LSI 1068 Controller User's Manual
Initializing a Virtual Disk Drive
When the available virtual disk drives display as shown above, use the up/3.
down arrow keys to select the virtual drive you wish to initialize and press
<Enter>. The following screen will appear:
From the Virtual Drive Pop-up submenu as shown above, select Initialize and 4.
press <Enter>. A popup dialogue box will appear to confi rm whether you wish
to initialize the virtual drive selected.
Warning: Please be careful when you initialize a disk because initialization will erase all data stored in the disk, including RAID settings, and
reformat the disk.
Use the up/down arrow keys to select No and press <Enter> to cancel
the selection. If you want to proceed with initialization, select Yes, and
press <Enter>. The virtual disk drive selected will be initialized and reformatted.
2-16
Page 31

Confi guring the LSI MegaRAID Settings
Checking Data Consistency of a Selected Virtual Drive
Follow Steps 1~2 on Page 2-15 to display all virtual disk drives in the system. 1.
When the screen as shown on the bottom of page 2-15 appears, use the up/2.
down arrow keys to select the disk drive you wish to check consistency with
and press <Enter>. The following screen will appear:
When the screen shown as above appears, use the up/down arrow keys to 3.
select Check Consistency from the virtual drive submenu, and press <Enter>.
A popup dialogue box will appear to confi rm whether you wish to check con-
sistency for the virtual drive selected.
Select Yes and press <Enter> to proceed with consistency check. Select No 4.
and press <Enter> to cancel the selection.
2-17
Page 32
LSI MegaRAID Confi guration for the LSI 1068 Controller User's Manual
Viewing and Updating the Parameters (or the Properties)
of a Selected Virtual Disk Drive
Follow Steps 1~2 on Page 2-15 to access all virtual drives available in the 1.
system.
When the screen shown on the bottom of Page 2-15 appears, use the up/2.
down arrow keys to select the virtual disk whose parameters you wish to
view/update, and press <Enter>. The following screen will appear:
Viewing the Parameters of a selected Virtual Drive
When the screen as shown above appears, select View/Update Parameters 3.
from the selected virtual drive submenu, and press <Enter>. A screen indicating the parameters and RAID settings of the virtual drive you have selected
will appear as shown below:
2-18
Page 33
Confi guring the LSI MegaRAID Settings
Updating the Parameters of a Selected Virtual Drive
When the parameters of the virtual drive you wish to update appears as 4.
shown above, use up/down arrow keys to select the item you wish to update
and press <Enter>.
Note: Some items are for display only. The item that allows updates will
display a update option submenu as shown below.
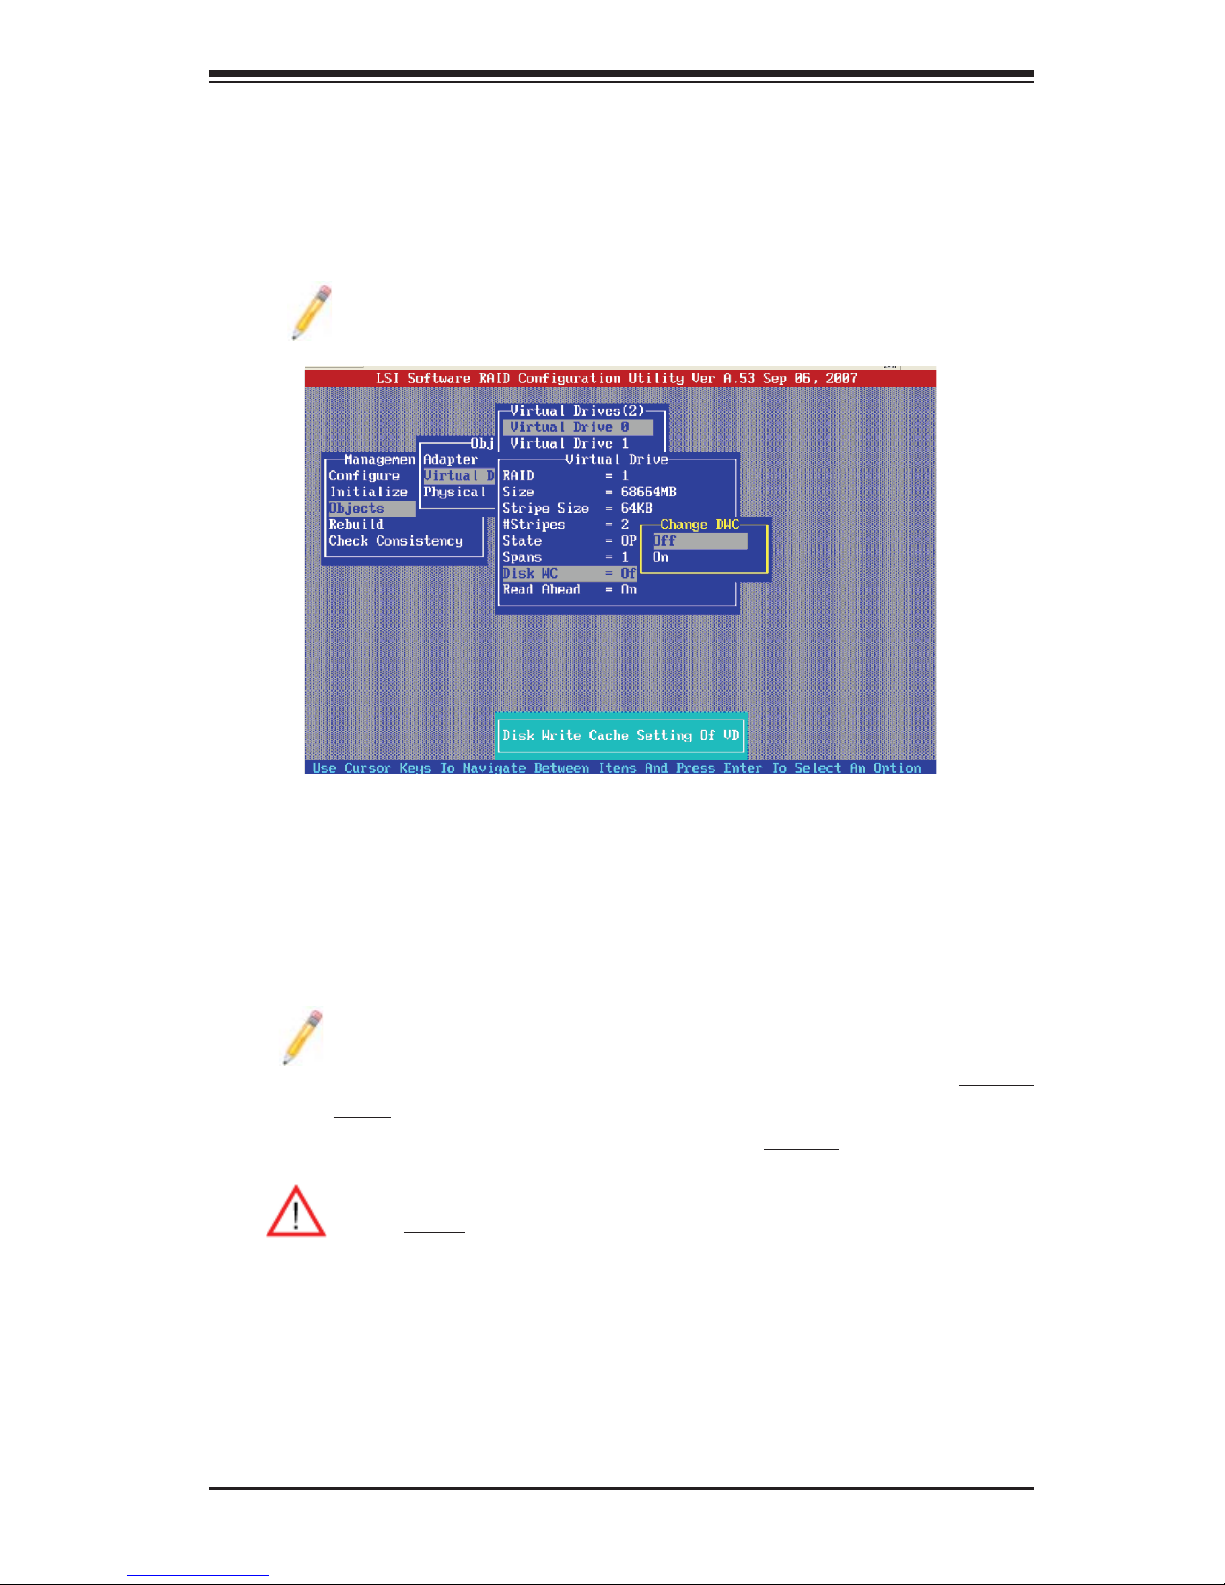
Updating the Disk Write-Cache Setting of a Selected Virtual
Drive
When the parameters of a selected virtual drive appears, use the up/down 5.
arrow keys to select Disk WC (Write-Cache) and press <Enter> as shown
above.
Notes: Any changes to the Disk Write-Cache setting will be applied to all
drives in the same array. When the Disk Write-Cache is On, a write transaction is considered complete when all data has been written to the disk
cache. When Disk Write-Cache is Off, the write transaction is considered
complete when the data has been written to the disk.
Warning: When Disk Write-Cache is On, data can be lost if a power failure
occurs before the cached data is written to the disk.
2-19
Page 34
LSI MegaRAID Confi guration for the LSI 1068 Controller User's Manual
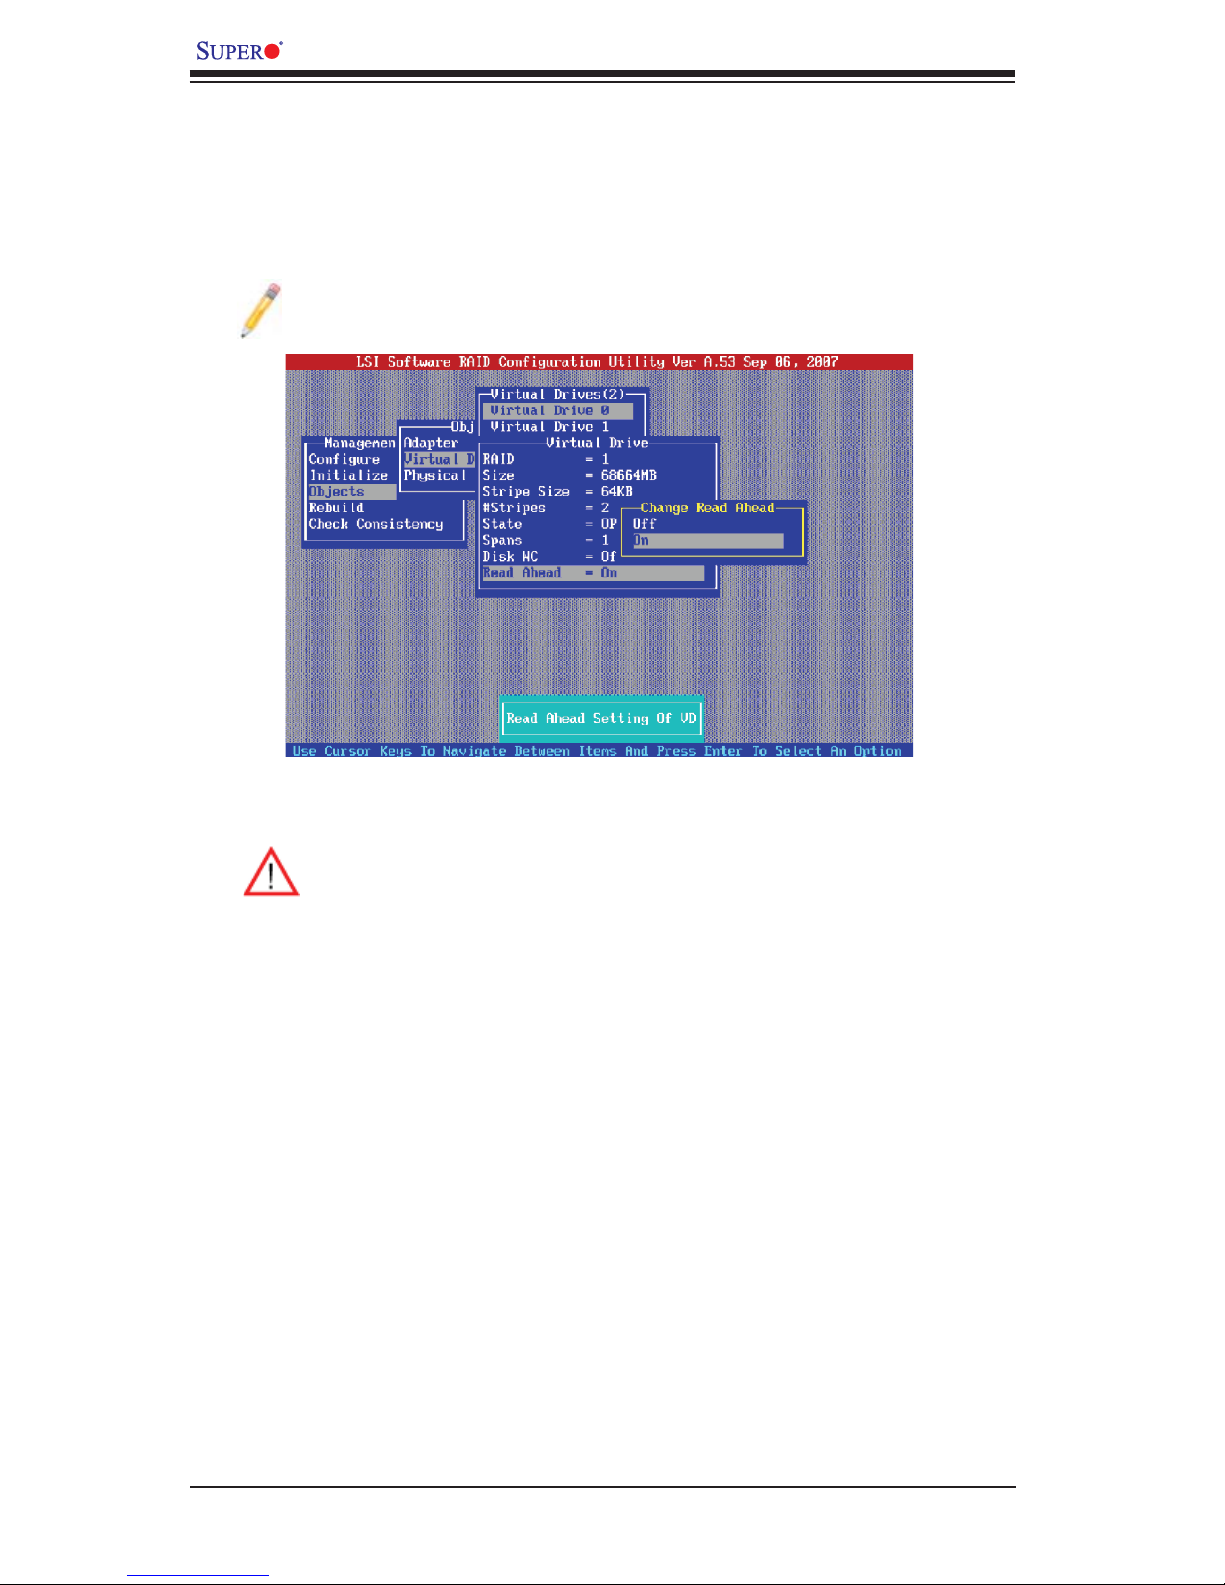
Updating the Read-Ahead Setting of a Selected Virtual Drive
When the parameters of a disk drive appears as shown on the previous page, 1.
use the arrow keys to select (Disk) Read-Ahead and press <Enter> as shown
above.
Notes: Any changes to the Disk Read-Ahead setting will be applied to all
drives in the same array.
Deleting a Virtual Disk Drive
Warning: Before deleting a virtual drive, be sure to back up all the data
you intend to keep.
The LSI MegaRAID Software allows you to delete any virtual drive defi ned in the
confi guration settings. Following the steps below to delete a specifi c virtual drive.
From the LSI MegaRAID Main Menu, select Objects and press <Enter>.1.
From the Objects submenu, select Virtual Drive and press <Enter>.2.
When the screen with all available Virtual Drives appears, select the virtual 3.
drive you wish to delete and press <Delete>.
When a dialogue box with a confi rmation message appears, select No and 4.
press <Enter> to cancel the selection. To delete the selected virtual drive,
Select Yes and press <Enter>.
2-20
Page 35
Confi guring the LSI MegaRAID Settings
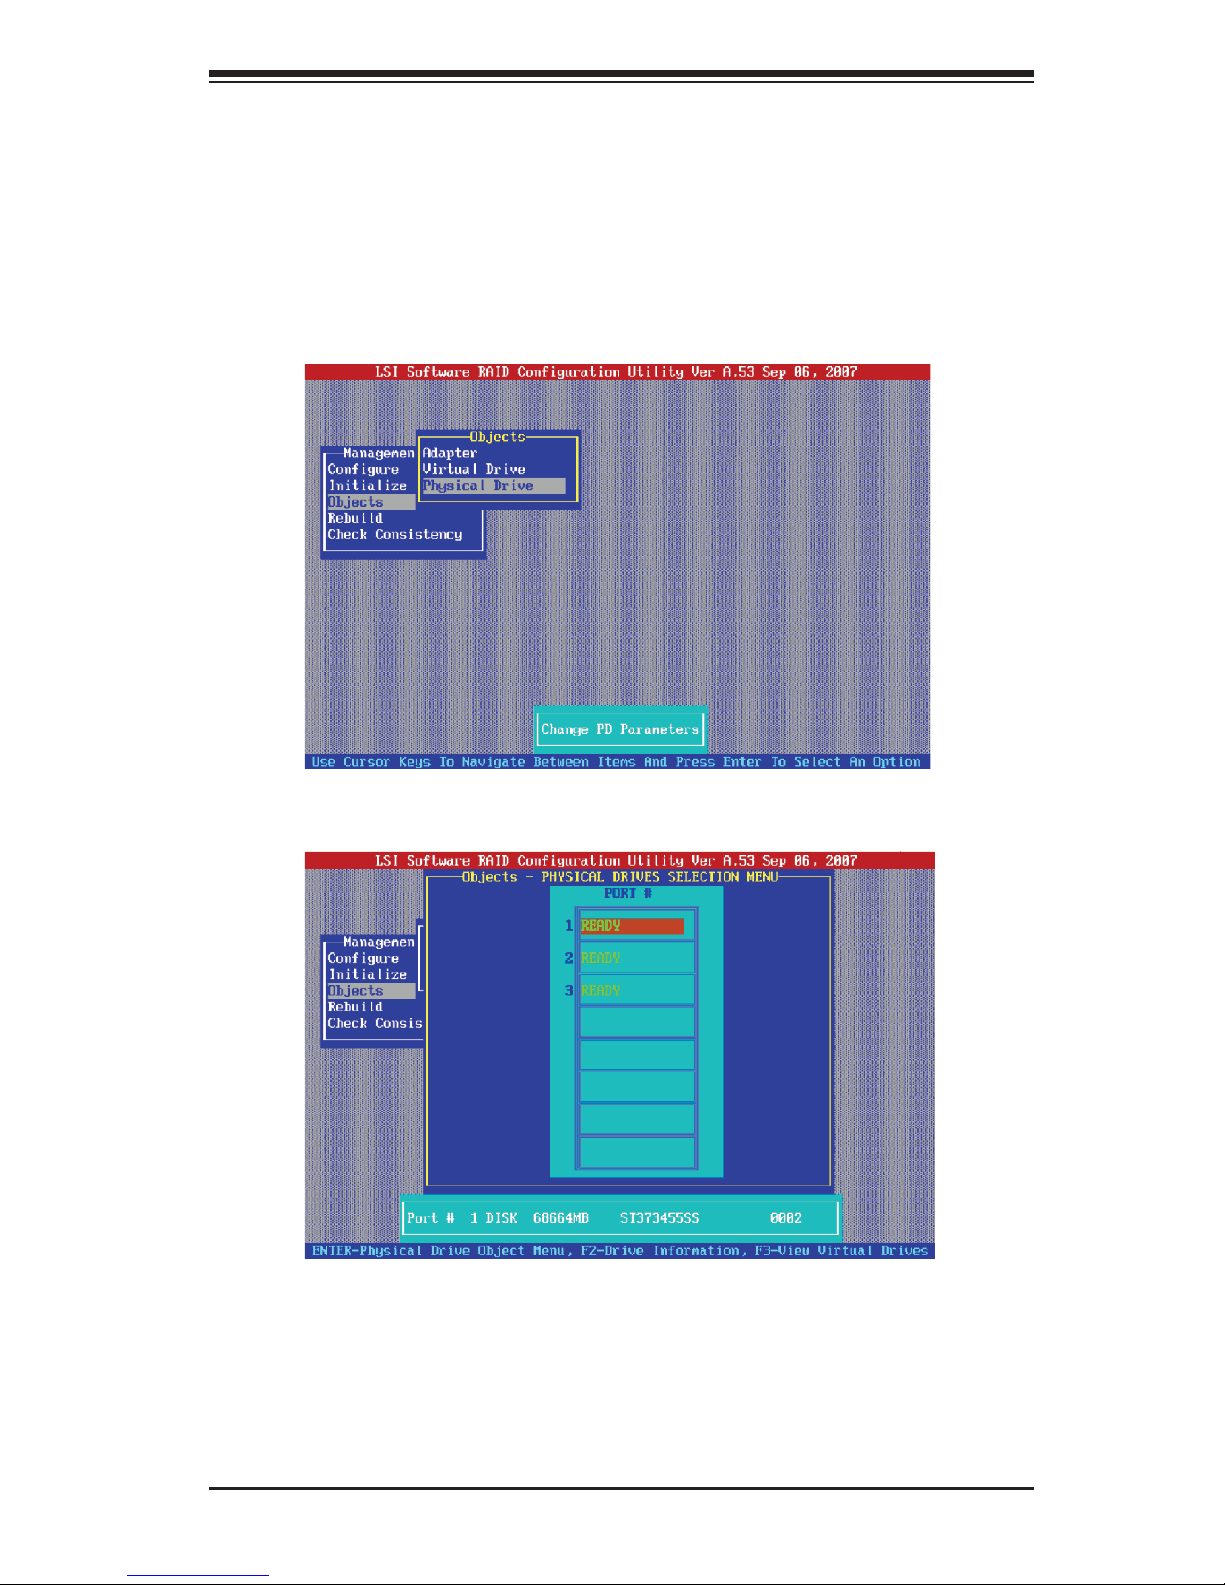
Confi guring Global Hotspare Drives by Using the Objects
Menu
Follow the steps below to confi gure Global Hotspare drives using the Object
Menus.
From the LSI Main Menu, select Objects and press <Enter>.1.
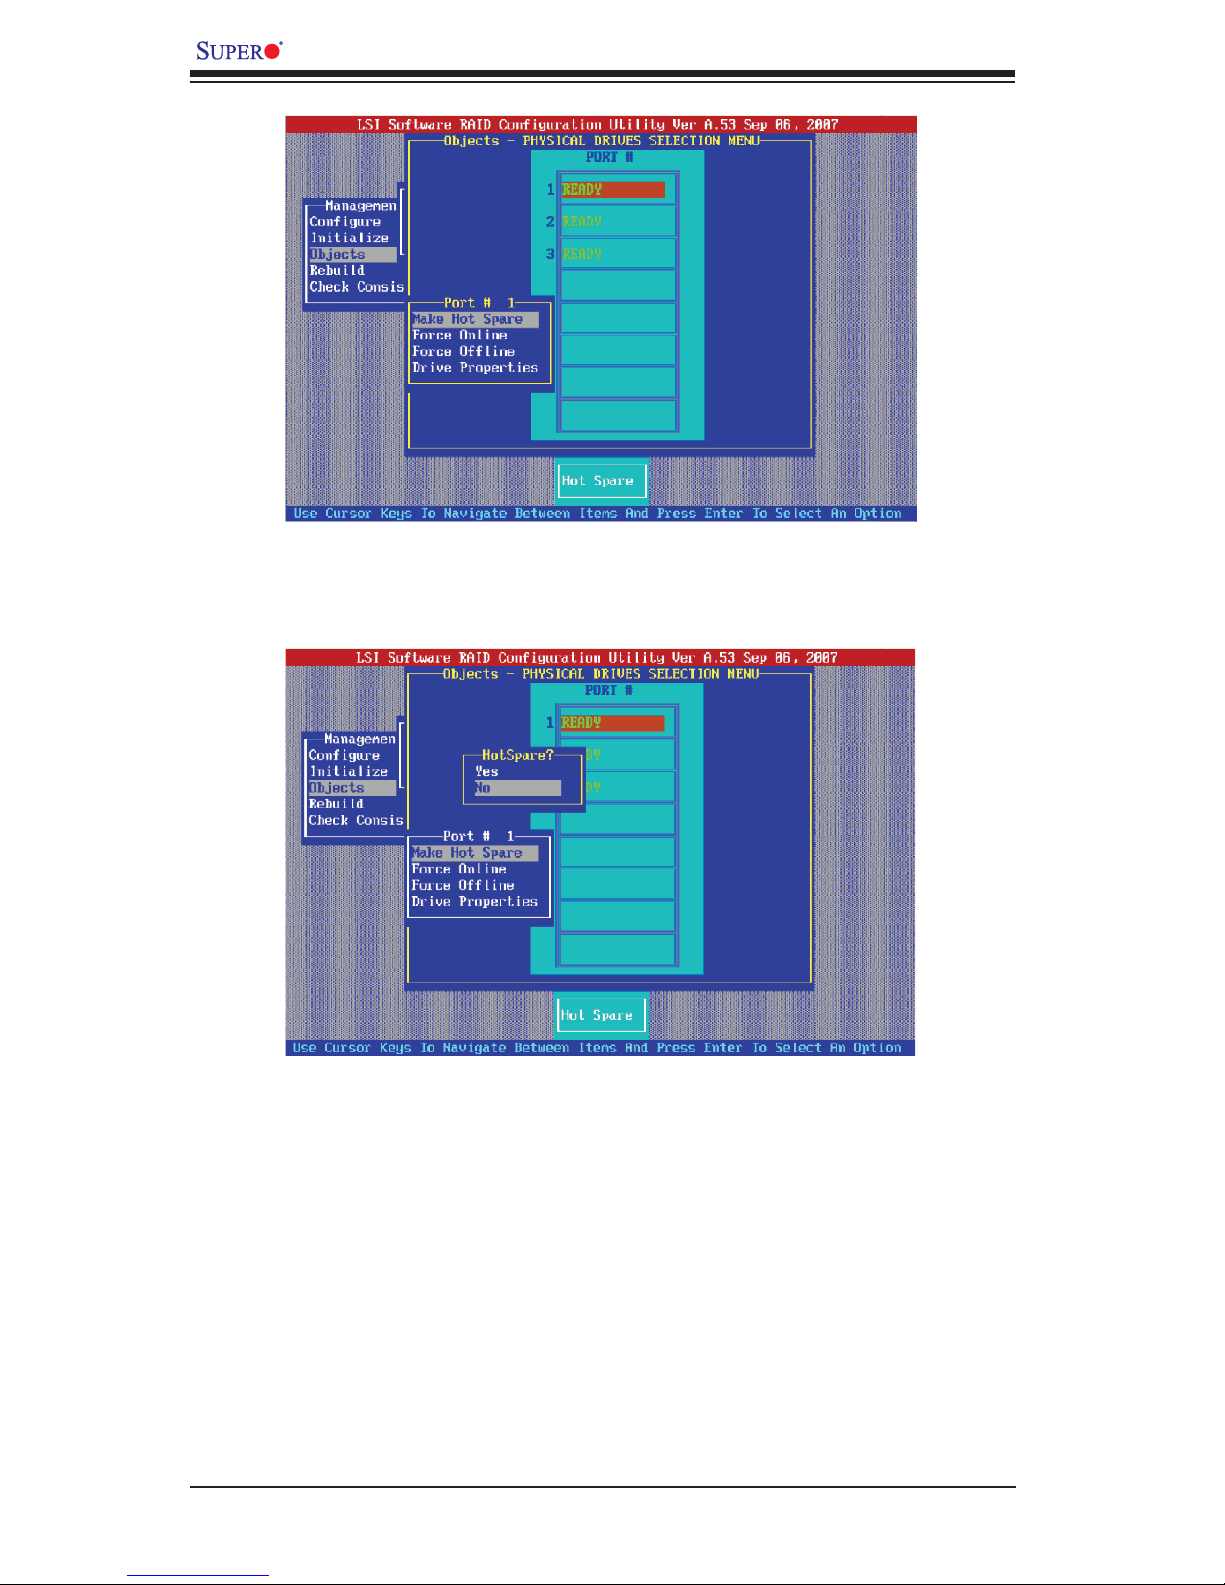
From the Objects submenu, select Physical Drive and press <Enter>. 2.
A screen will appear to display all drives that are available in the system. 3.
Using the arrow keys, select the drive that you wish to confi gure as hotspare 4.
and press <Enter>.
A screen with Confi guration Setting Options for the drive you have selected 5.
will appear. Using the arrow keys, select Make Hotspare and press <Enter>.
2-21
Page 36
LSI MegaRAID Confi guration for the LSI 1068 Controller User's Manual
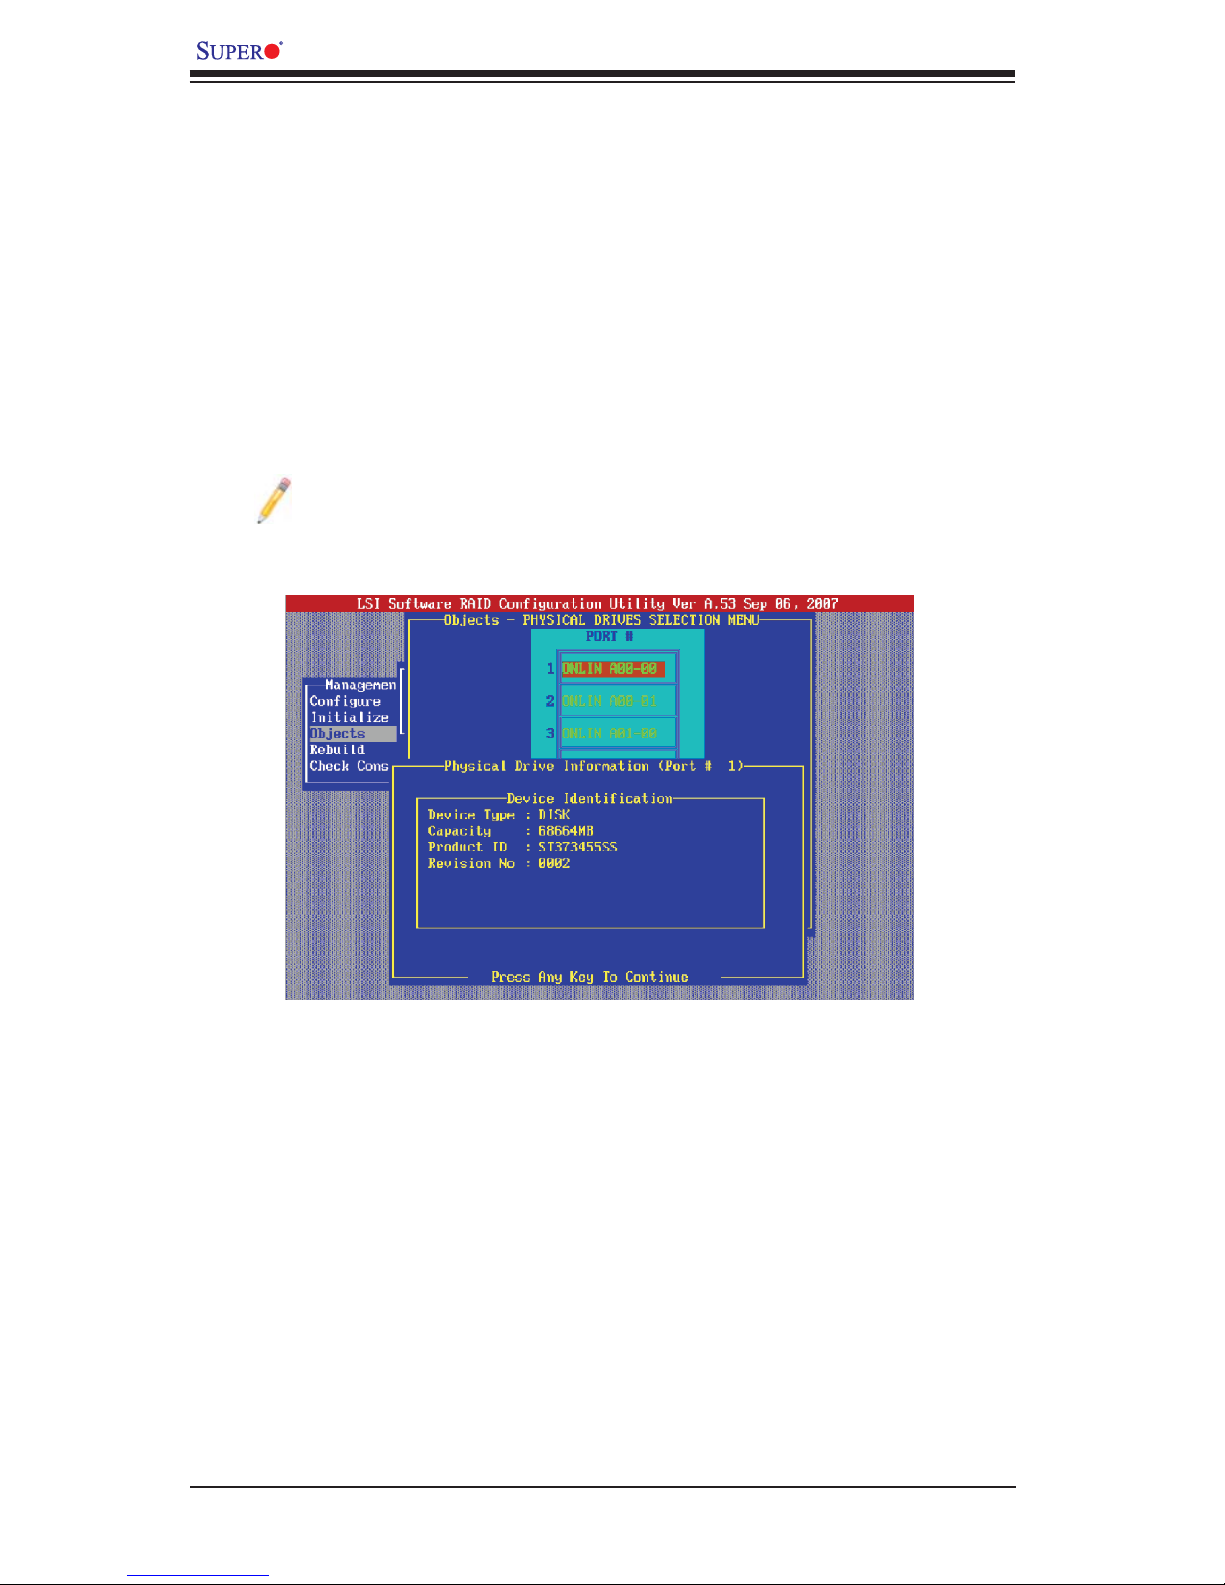
A screen with a dialogue box will appear, asking whether you wish to proceed 6.
with Hotspare confi guration. Select Yes and press <Enter> to make Global
Hotspare. Select No and press <Enter> to cancel the selection.
2-22
Page 37

Confi guring the LSI MegaRAID Settings
To Force a Drive Online or Offl ine
If a drive has gone offl ine due to power outage or other reasons, you can
use the Objects Menu to force it online. You can also force a drive in a
redundant array offl ine, so a hotspare drive can automatically replace it.
Please note that an auto rebuild will begin immediately when the LSI MegaRAID fi nds an available hotspare drive to replace the drive that is offl ine.
From the LSI MegaRAID Main Menu, select Objects and press <Enter>.1.
When the Objects submenu appears, select Physical Drive and press <En-2.
ter>.
When the screen of all available Physical Drives appears as shown on the 3.
bottom of Page 2-21, using the arrow keys to select the drive you wish to
force online or offl ine and press <Enter>.
A screen with Confi guration Setting Options for the drive you selected will 4.
appear. Using the arrow keys, select Online or Offl ine and Press <Enter>. If
you have selected Offl ine and pressed <Enter>, a screen similar to the one
shown below will appear.
Select Yes to proceed with the confi guration. Select No to cancel the selec-5.
tion.
2-23
Page 38
LSI MegaRAID Confi guration for the LSI 1068 Controller User's Manual
Viewing the Properties of a Physical Drive
From the LSI MegaRAID Main Menu, select Objects and press <Enter>.1.
When the Objects submenu appears, select Physical Drive and press <En-2.
ter>.
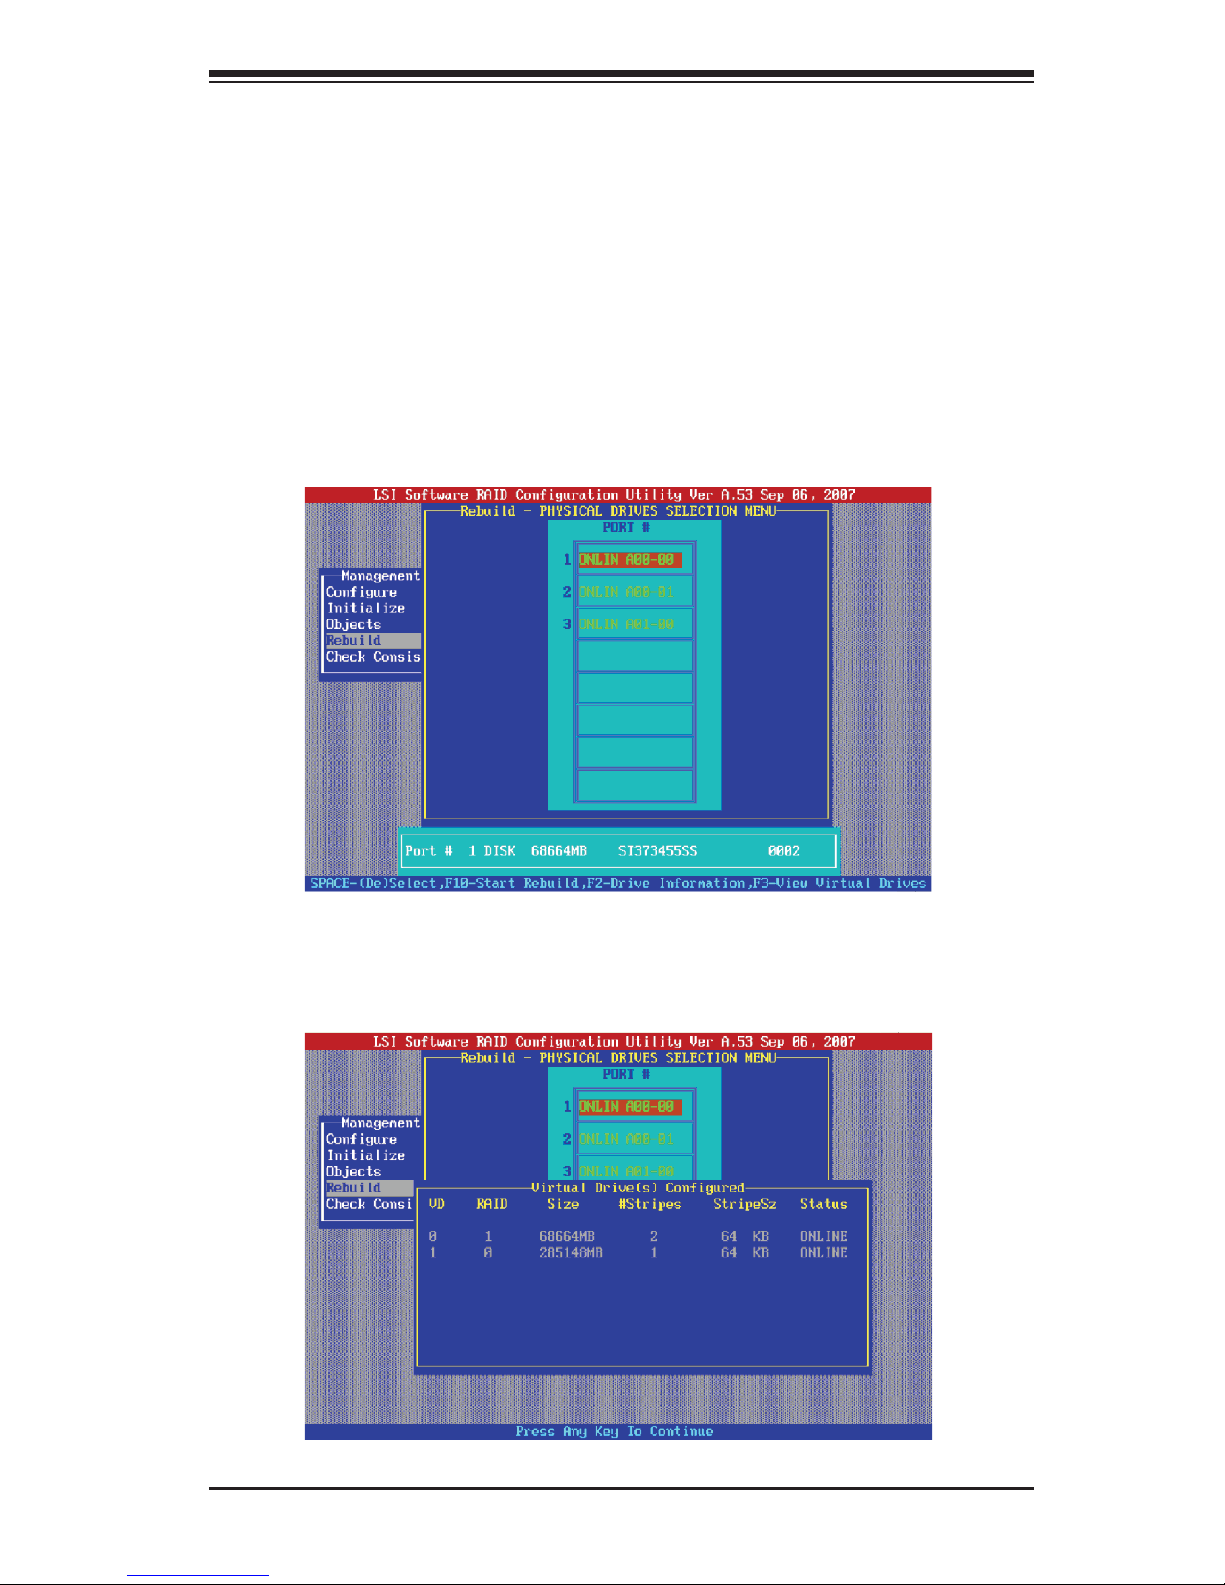
When the screen of all available Physical Drives appears as shown on Page 3.
2-21, using the arrow keys, select the drive whose properties you wish to
view and press <F2>. The properties of the drive you selected will appear as
follows.
Note: The properties (parameters) of a physical drive shown on the screen
are for display only. You cannot update or change the properties or parameters of a physical drive.
Viewing and Updating the Properties of an Adapter
From the LSI MegaRAID Main Menu, select Objects and press <Enter>.1.
When the Objects submenu appears, select Adapter and press <Enter>.2.
Select the adapter whose properties you wish to view/update and press <En-3.
ter>. The properties of the Adapter you selected will appear.
If you wish to change the value of a parameter (property), select the param-4.
eter and press <Enter>.
Type a different value for this parameter (property) and press <Enter>.5.
After you have fi nished all the changes, press <Esc> to return to the LSI 6.
MegaRAID Main screen.
2-24
Page 39
Confi guring the LSI MegaRAID Settings
2-9 Rebuilding a Disk Drive by Using the Rebuild Menu
The LSI MegaRAID Software allows you to rebuild a failed drive in a redundant array .
A failed drive can be rebuilt only when its physical presence can be detected, and
its size is greater than or equal to the defi ned size of the array. (A rebuild will not
be started if a failed drive's size is smaller than the defi ned size of the array.)
Rebuilding a Physical Drive
Follow the steps to rebuild a failed driving using the rebuild setting.
From the LSI Main Menu, select Rebuild and press <Enter>.1.
Using the up/down arrow keys, select the physical drive you wish to rebuild 2.
and press <Spacebar>. The information or properties of the selected drive will
appear as shown below:
2-25
Page 40
LSI MegaRAID Confi guration for the LSI 1068 Controller User's Manual
If the disk drive you have selected is the one you wish to rebuild, press 3.
<F10> and select Yes at the confi rmation prompt to start rebuilding the drive.
A graphic showing the progress of the rebuild will appear until it is complete.4.
When rebuilding is complete, a message indicating "Rebuilding of the drive 5.
you selected has completed successfully" will appear. The status of the rebuilt
drive will be changed from "failed" to "online."
Press <Esc> to return to the LSI MegaRAID Main menu.6.
Warning: Any rebuilding in progress will be aborted, and the disk drive
remains "failed," if you restart the rebuild. The rebuilding will start at 0%.
Rebuilding an Virtual Drive by Using the Rebuild Setting
Follow these steps to rebuild a failed virtual driving using the rebuild setting.
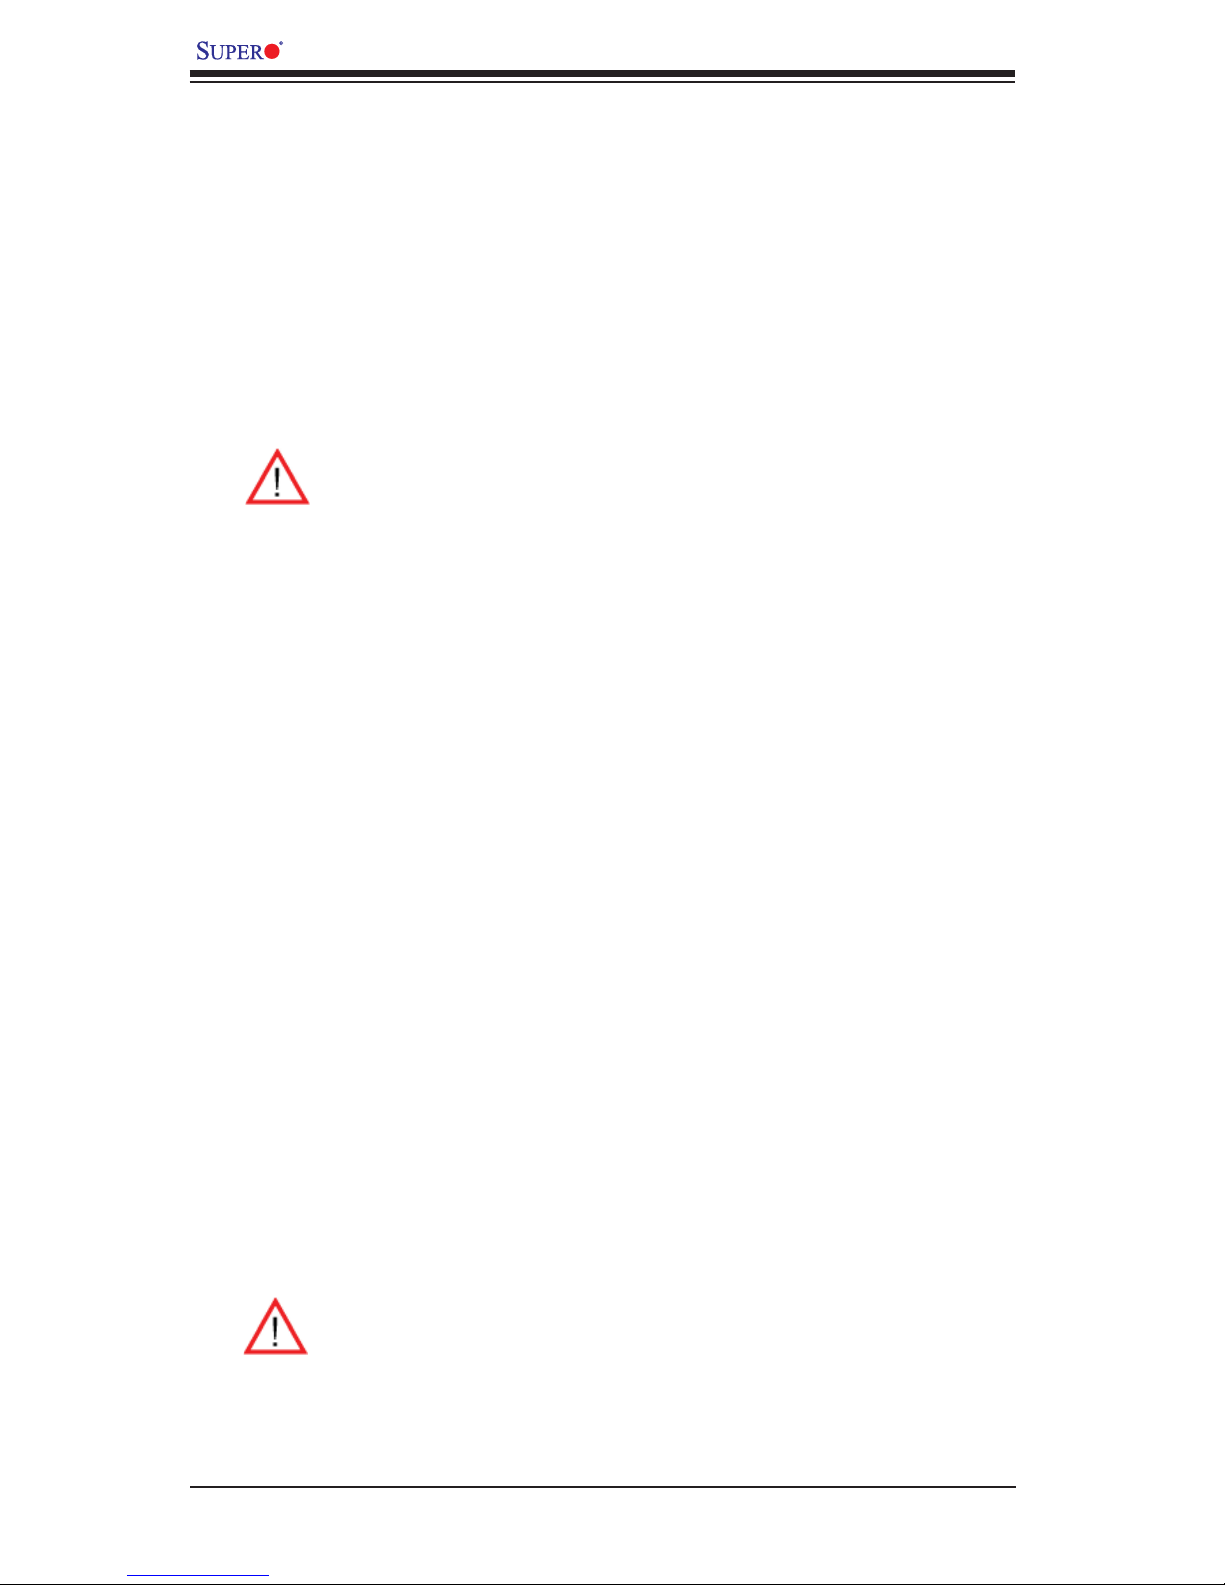
From the LSI Main Menu, select Rebuild and press <Enter>.1.
To view all virtual disk drives in the system, press <F3>. A screen will appear 2.
to show all the virtual drives in the system.
Using the up/down arrow keys, select the virtual drive you wish to rebuild and 3.
press <Spacebar>. The information or the properties of the selected virtual
drive will appear.
If the disk drive you selected is the one you wish to rebuild, press <F10> and 4.
select Yes at the confi rmation prompt to start rebuilding the drive. A graphic
showing the progress of the rebuild will appear until it is complete.
When rebuilding is complete, a message indicating "Rebuilding of the drive 5.
you selected has completed successfully" will appear. The status of the rebuilt
drive will be changed from "failed" to "online."
Press <Esc> to return to the LSI MegaRAID Main menu.6.
Warning: Any rebuild in progress will be aborted, and the disk drive remains "failed," if you restart the rebuild. The rebuild will start at 0%.
2-26
Page 41
Confi guring the LSI MegaRAID Settings
2-10 Checking Data Consistency of a Disk Drive
The LSI MegaRAID Software allows the user to check data consistency between the
source drive and its mirrored drive (the target drive) for RAID 1 or RAID 10 arrays.
Any differences found between these two drives will be automatically corrected if
you run Check Consistency.
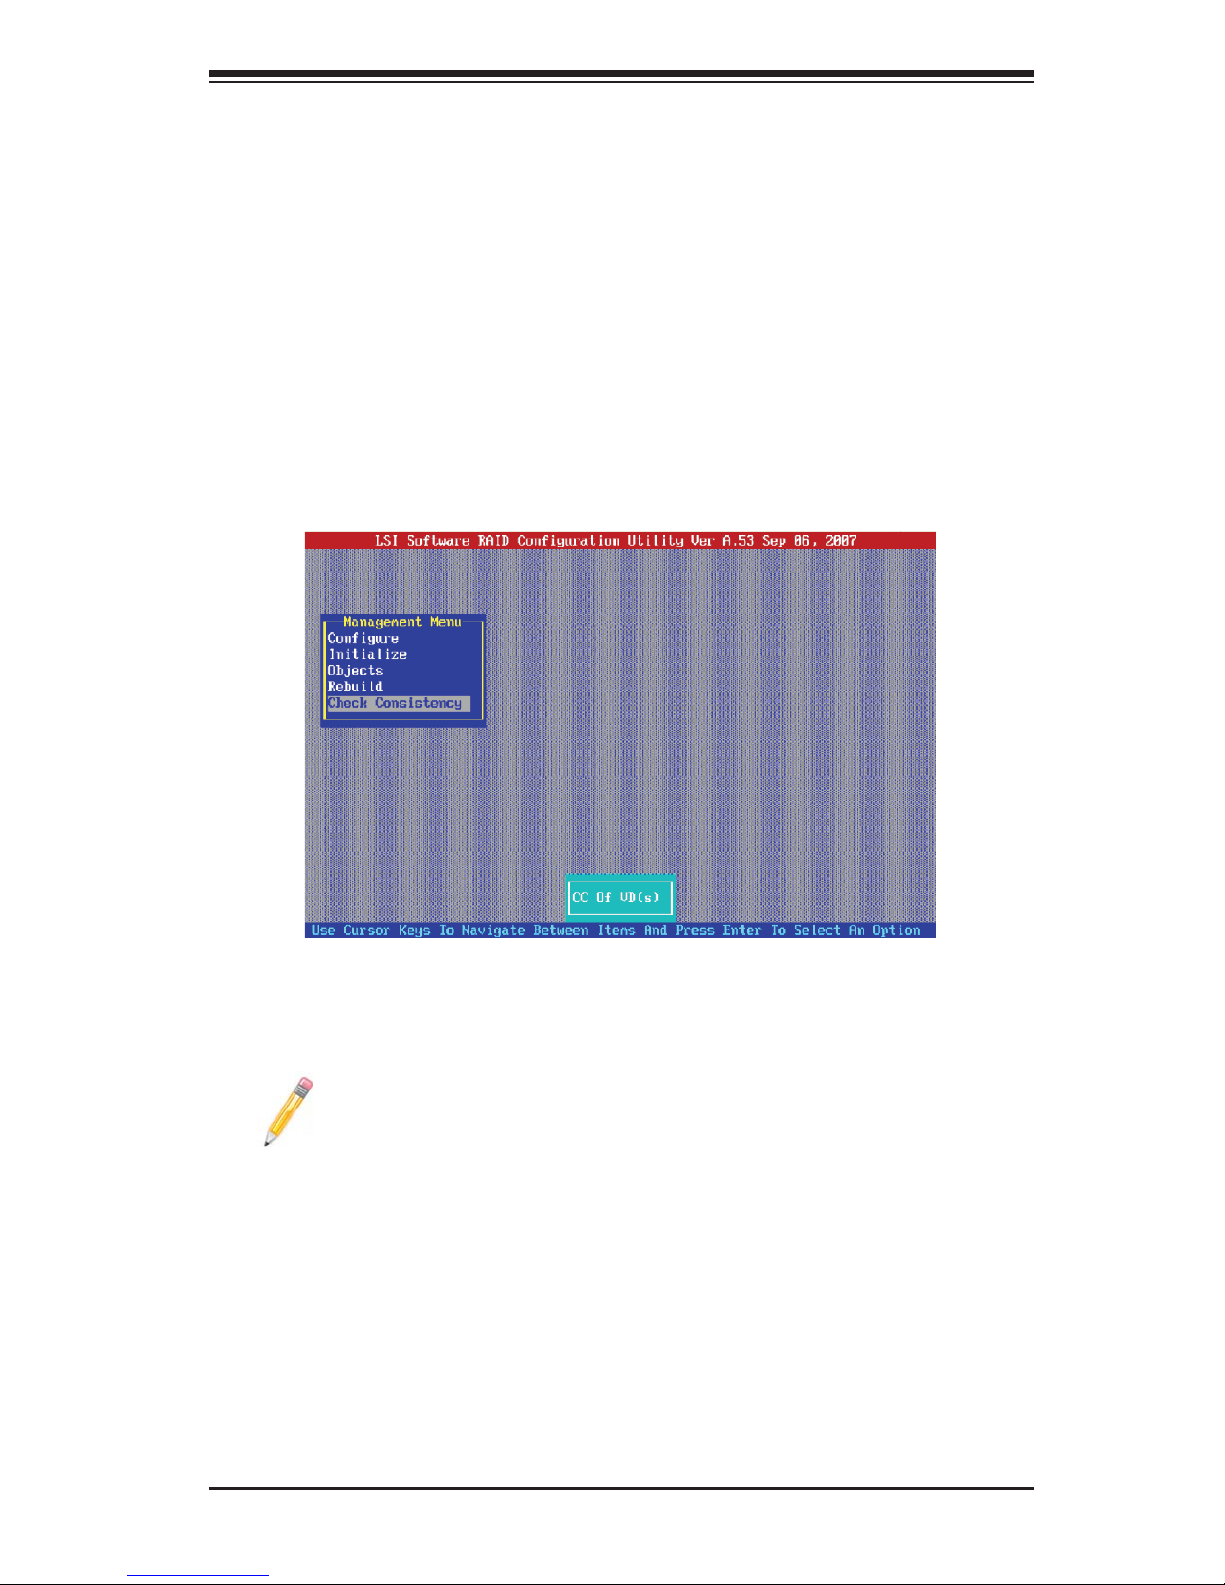
Checking Data Consistency
Follow the steps below to check data consistency between the source drive and
the mirrored drive for RAID 1 and RAID 10 arrays.
From the LSI Main Menu, select Check Consistency and press <Enter>.1.
A list of confi gured virtual drives will be displayed. Using the up/down arrow 2.
keys, select the virtual drive for which you wish to check data consistency
and press <Spacebar>.
Note: If a RAID 0 drive has been selected, a message will appear, indicating that Check Consistency cannot be performed. To continue, deselect
this drive, select a redundant drive and press <Spacebar> again.
2-27
Page 42

LSI MegaRAID Confi guration for the LSI 1068 Controller User's Manual
Once you have selected the correct redundant drive to check consistency, 3.
press <F10>. A screen with a confi rmation prompt will appear as shown
below:
At the prompt, select Yes and press <Enter> to proceed with the data consis-4.
tency check. A graphic showing the progress appears until it completes.
Note: If data inconsistency is found during Check Consistency, the LSI
MegaRAID will automatically fi x the error by writing the source data to
the mirrored (target) drive. When this occurs, the following message will
appear at the bottom of the screen:
The Data on the Drives is inconsistent. Repair Done!
However, if a media error is found on the source drive or a hard media
error is found on the mirrored (target) drive, a dialogue box will appear
with the following message:
2-28
Page 43

Confi guring the LSI MegaRAID Settings
Errors in Reading Sectors! Proceed Anyway (Y/N)?
Press <Y> to skip the bad sector (block) and continue with the consistency
checking for the remaining sectors.
Press <N> to abort the process of Check Consistency.
If you press <Esc> while Check Consistency is running, the following op-
tions will appear:
Stop:
• Select stop to stop checking consistency for the time being, allowing
it to be automatically resumed at a later time if Auto_Resume has been
enabled through the Adapter submenu in the Objects Menu.
Continue:
• Select Continue to start Check Consistency normally.
Abort:
• Select Abort to abort Check Consistency completely. If you restart
it, it will begin at 0% again.
2-29
Page 44

LSI MegaRAID Confi guration for the LSI 1068 Controller User's Manual
2-11 Clearing a Storage Confi guration
The LSI MegaRAID Software allows the user to clear a storage confi gura-
tion. Be sure to back up all the data you intend to keep before starting
this procedure.
Clearing a Storage Confi guration
Follow the steps below to clear a storage confi guration.
From the LSI Main Menu, select Confi gure and press <Enter>.1.
From the Confi guration submenu, select Clear Confi guration and press <En-2.
ter>.
When a confi rmation message appears, select Yes at the prompt and press 3.
<Enter> to proceed with Clearing Confi guration. If you do not wish to clear
confi guration, select No and press <Enter>.
Press <Esc> to return to the LSI MegaRAID Main Menu.4.
2-30
Page 45

(Disclaimer continued)
The products sold by Supermicro are not intended for and will not be used in life support systems, medical equipment, nuclear facilities or systems, aircraft, aircraft devices,
aircraft/emergency communication devices or other critical systems whose failure to perform be reasonably expected to result in signifi cant injury or loss of life or catastrophic
property damage. Accordingly, Supermicro disclaims any and all liability, and should buyer use or sell such products for use in such ultra-hazardous applications, it does so
entirely at its own risk. Furthermore, buyer agrees to fully indemnify, defend and hold Supermicro harmless for and against any and all claims, demands, actions, litigation, and
proceedings of any kind arising out of or related to such ultra-hazardous use or sale.
 Loading...