

Page 1
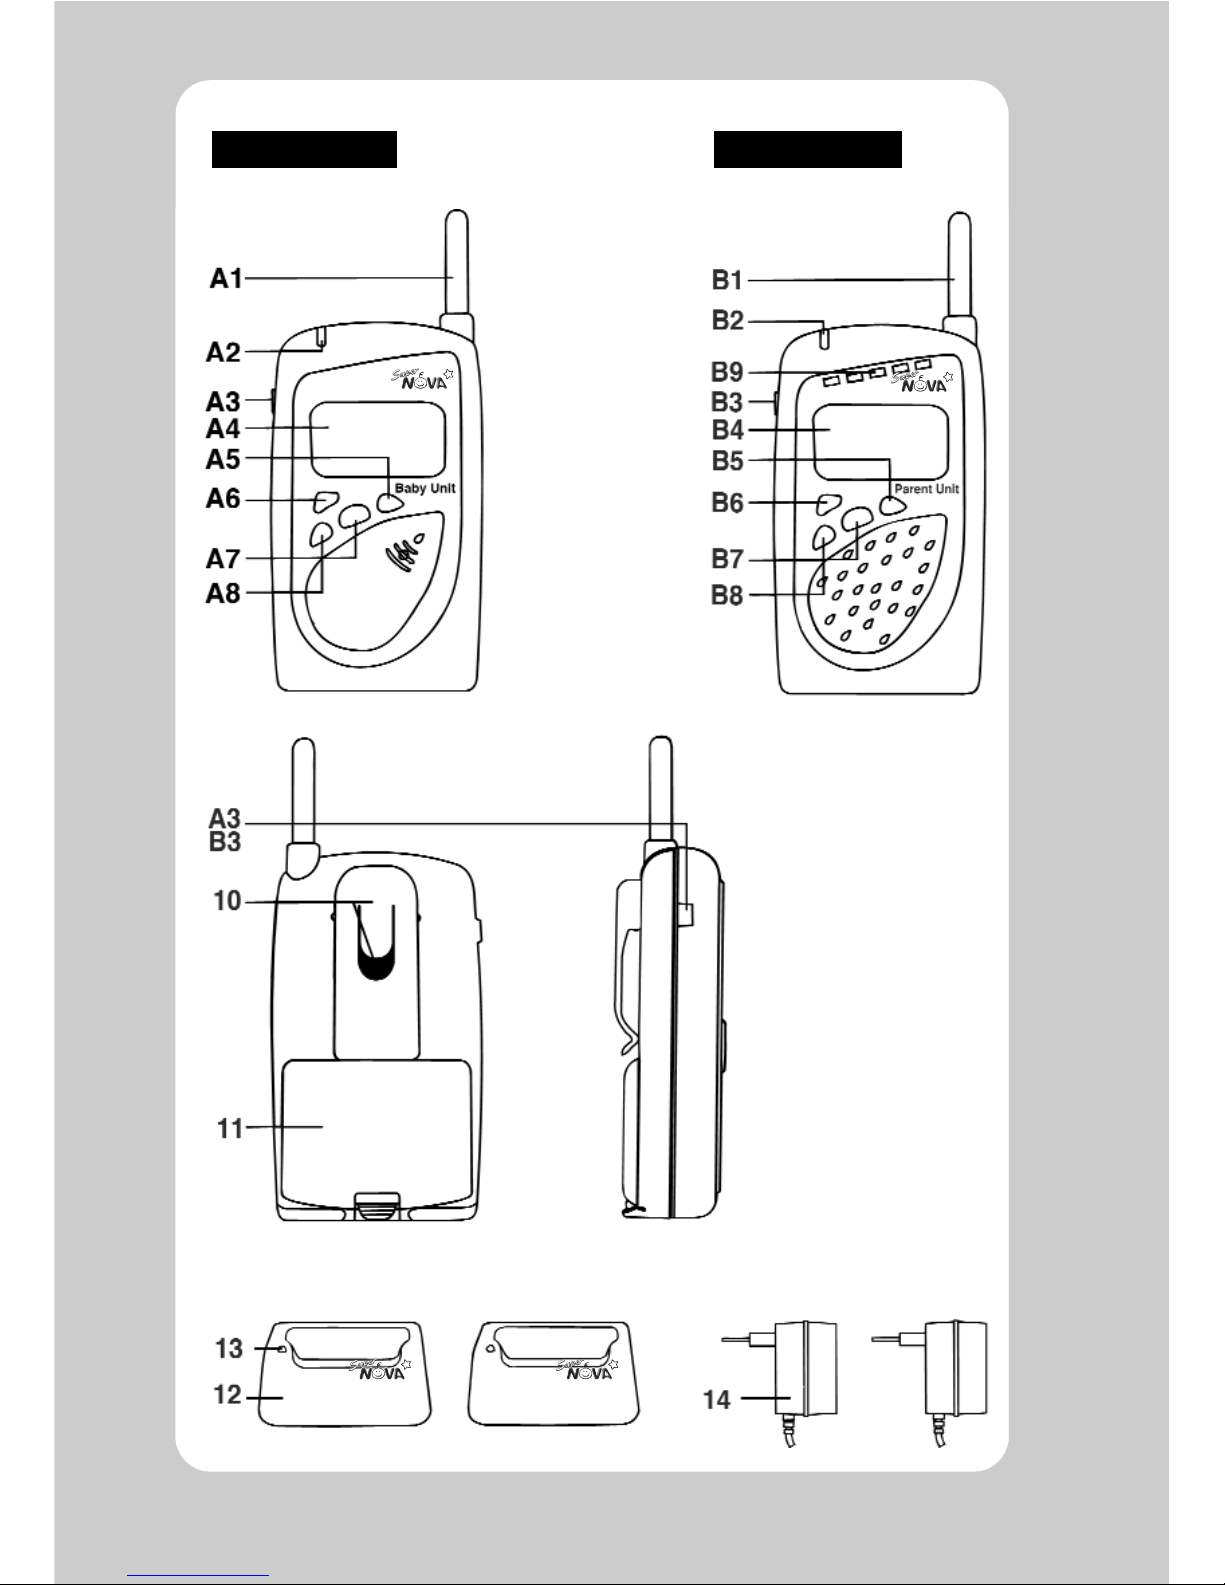
Baby Unit Parent Unit
Page 2

2
Thank you for choosing the SuperNOVA Digital Babycall, model FD-D3. This
is a quality product developed for optimal safety and comfort, based on new,
sophisticated technology. An electronic babysitter can never replace parental
care for a child, but it is a practical aid that will ease your worries. Please read
this user manual carefully and keep it in a safe place.
1. Install the battery packs (11) in the baby unit and the parent unit. Plug in the
adapters (14) in the chargers (12) and charge the batteries for 12 hours the
first time.
Check that the light indicator (13) lights red. If it is not on continuously or it
is difficult to make it light up, clean the charging contacts underneath the
unit and in the charger. This may even be required on new units due to oxidation during transport. Use a napkin moistened with window cleaner fluid.
The units may be used while being charged, but should then be allowed to
charge for 24 hours the first time.
2. Place the baby unit and the adapter cord out of reach of the child (around 1
– 1.5 m from the child). Place the front of the unit to face the child.
3. Turn on both units by pressing the On/Off buttons (A3 and B3).
The light indicators (A2 and B2) will now blink. Check that the display shows
the same channel (A/B) and digital code (1-15) on both units. Test the communication between the baby unit and the parental unit by whistling into the
baby unit. If there is a high screeching sound, increase the distance to the
baby unit or press the
▼
button (B8) of the parent unit several times.
4. Pull out the telescopic antenna and place the units in a vertical position.
Some noise during transmission may occur. This is due to local conditions,
physical barriers between the units etc.
5. The battery packs should be removed from the units if they are not to be
used for an extended period of time. Otherwise they will be completely discharged and ruined, or will require many hours of charging while the units
are off. The batteries must not be left discharged over a long period of time,
they should be charged at least once a month.
6. If you have any problems, r
ead the troubleshooting guide carefully before
you contact your dealer. This will provide answers to most questions.
Baby Unit
A1 Telescopic antenna .... must be pulled out fully when in use
A2 Light indicator ............ blinks every six seconds on standby; blinks rapidly
when activated
A3 On/Off button ............. switches power on or off
A4 LCD display ................ shows all information about the unit's status
A5
▲
key .......................... programming function for selecting channel,
sensitivity and digital code
A6 S key ........................... key for programming sensitivity
A7 M key .......................... key for programming channel and digital code
A8
▼
key .......................... programming function for selecting channel,
sensitivity and digital code
Congratulations!
Quick start
Legend
Page 3

3
Parent Unit
B1 Telescopic antenna .... should be pulled out when unit in use
B2 Light indicator ............ blinks every six seconds on standby;
blinks rapidly when activated
B3 On/Off button ............. switches power on or off
B4 LCD display ................ shows all information about the unit's status
B5
▲
key .......................... key for increasing volume
programming function for selecting channel and
digital code
B6 R key ........................... key for listening to other traffic
(see detailed instructions)
B7 M key .......................... key for programming channel and digital code
B8
▼
key .......................... key for decreasing volume
programming function for selecting channel and
digital code
B9 Light diodes ................ visual sound indicator
10 Belt clip and wall mount
11 Battery pack ............... NiMH rechargeable battery pack
12 Charger
13 Charging indicator ...... lights red during charging
changes to green when charging is complete
(see detailed instructions)
14 Adapter
Baby Unit
Channel A or B
Digital code number
0 = no digital code. 0 is only
visible when you switch codes
Battery level indicator
Symbol for microphone
sensitivity
Low sensitivity
High sensitivity
Indicator for transmission in
progress
Parent Unit
Channel A or B
Digital code number
0 = no digital code. 0 is only
visible when you switch codes
Battery level indicator
Symbol for speaker volume
No symbol = speaker and red
light diodes (B9) are switched
off
Status indicator:
Child is sleeping
Blinking symbol = out of
range or baby unit off
Changing symbols indicate
sounds from child
Signal strength indicator
LCD
symbols
Page 4

Note: If the battery symbol blinks in one unit and you hear an alarm every 5 –10
seconds, this means the battery must be recharged to continue operation. T
he
parent unit also gives a signal to indicate a weak baby unit battery but the
sound is softer. The battery symbol then blinks only on the baby unit.
1. The baby unit and parent unit must be set to the same channel, A or B.
If the units do not display the same channel, the channel on one of the units
must be switched. Press the M key (menu) and the channel indicator will
blink. Switch channels using the
▲
or ▼key, then press the M key again to
store your programming.
Note: Changed settings will be stored when the unit is turned off. If the unit
signals a weak battery, changes will not be stored.
2. T
he digital code must be the same for the baby unit and the parent unit,
1 – 15.
If not, switch codes on one of the units. This unit must then first be turned
off. Then press the M key, and while depressing it turn on the unit by pressing and releasing the On/Off button. The digital code number will then blink.
Then release the M key. Change the code using the
▲
or ▼keys (1 to 15).
Then press the M key to store the code. If the M key is not pressed, the unit
will automatically return to the original coding after 10 seconds.
Note: Code 0 should only be used if extra long range is required, but it does
not offer as good protection against interference as digital codes 1-15.
3. T
hen test the set by whistling into the baby unit and check that it can be
heard in the parent unit.
If no sound can be heard, check whether the parent unit displays the speaker symbol (no symbol = speaker and red light diodes (B9) are switched off).
If the symbol is not displayed or you want to adjust the volume, this is done
by simply pressing the
▲
key several times.
The red light diodes give you the option of visually monitoring the sound
level, regardless the volume setting, for example if you do not want to
disturb others or are in noisy surroundings.
4. Place the baby unit vertically close to the child, minimum 1- 1.5 m
.
The telescopic antenna must always be fully pulled out to ensure that the
parent unit is reached.
5. Place the par
ent unit vertically close to where you are.
Pull out the telescopic antenna if necessary.
6. Adjustable sensitivity on the baby unit's micr
ophone.
Press the S key (sensitivity) on the baby unit and the ear symbol will blink.
Use the
▲
or ▼keys to select high (two ear symbols) or low (one ear symbol)
sensitivity.
Press the S key to store the setting. Low sensitivity is recommended to
avoid interference from traffic (time-limited interference from another baby
monitor).
7. When the baby unit is out of r
ange, the parent unit emits an alarm.
This is due to safety considerations, because walls, particularly concrete
walls and roofs, may significantly reduce the range.
Metal plates (cars, caravans) may prevent signal reception. Placing the baby
and/or parent unit in a different location may help because radio signals are
reflected from objects or persons etc. Therefore, there will be areas where
communication is impossible even across short distances.
4
Detailed instructions
Page 5

5
When you press the R key on the parent unit you disable all coding for three
seconds. This enables you to listen to the channel if there is any traffic on it.
Alarm tones can be heard under the following circumstances:
From the Baby Unit:
The battery is discharged weak beep every 5-10 seconds
(the battery symbol blinks)
(also signalled by the parent unit)
From the Parent Unit:
The battery is discharged every 5-10 seconds
(the battery symbol blinks)
Parent unit out of range or baby unit not every 5-10 seconds
switched on, or different channels (the range symbol blinks).
• Both units may be used while being charged.
• Connect the chargers to the wall outlet using the adapters provided. Only
these adapters must be used.
• Place the baby unit and the parent unit in the chargers; the batteries will then
be charged.
The light indicator on the charger lights red during charging and switches to
green when the batteries are at full voltage (after around 4-6 hours), but they
should remain in the charger for a few hours more to get a full charge.
When the green light is on, the charger has gone into maintenance charging
mode. The batteries therefore will not be damaged, even if they remain in the
charger for a long time.
• The batteries may be recharged up to 500 times as long as they are used
properly, see Quick start, Item 5.
Note: Rechargeable batteries are consumable articles that gradually decline
as they are used. Extra batteries may be purchased from your dealer. Read
the troubleshooting chart if you have any problems.
• Two sets of environmentally friendly battery packs 3.6 V NiMH 550 mAh
• Transmission frequency: Two channels in the 40.665 – 40.695 MHz range.
• Working temperature: +5
O
C to +40OC. Storage temperature: -20OC to +40OC.
• Output power Baby Unit < 10 mW
The authorities have only allocated a restricted number of frequencies for baby
monitors and a very limited output power. There may therefore be disturbances
from other baby monitors while your baby unit has been activated by sounds
from your baby (traffic interference). This can often be recognized as crackling
and/or beeping in the speaker. If this happens, try to switch channels and
adjust the baby unit to low sensitivity to avoid it being activated by movements
or weak sounds from the baby.
Technical specifications
(we reserve the right to make changes)
General
Using the chargers and batteries
Page 6

6
If this does not help there is nothing that can be done about it, but it was
nevertheless sounds from your child that first activated your parent unit, so you
have not been wrongly signalled! Interference during transmission may thus
be expected because units within a certain area will often use the same frequency.
When your SuperNOVA is on standby you will not be disturbed by other baby
monitors unless they are adjusted to the same code and the same channel, in
contrast to other brands. You then simply chose your own personal combination
among the 15 digital codes and two channels, allowing 30 options (SDIPS). The
other code system (IPS) is permanently adjusted by the factory and is shown as
a number on a label in the battery compartment. The IPS code must be the
same for both units.
Bear in mind that radio signals may be blocked in areas with radio noise or
physical barriers. All electronic baby monitors transmit in a frequency range
where there may be disturbances, and they may from time to time fail without
any unit malfunction. This applies in particular where there are a number of
baby monitors within range of each other, if another unit is between your units
or close to your parent unit. The range is substantially reduced when the batteries become weaker.
The warranty is voided if the seal on the units is broken! The warranty does not
include the batteries. Please attach a copy of your purchase receipt if you wish
to complain about the product. The warranty lasts for two years from the date
of purchase. Both units must be sent for repair! Once they have been sent in,
a decision will be made as to whether to repair or replace them. Please ensure that the detailed description of the malfunction is as complete as possible.
Avoid descriptions such as "does not work", "works only intermittently" etc. All
complaints are as a general rule addressed and repaired, but if the description
is vague or incomplete, chances are the repairman will be unable to locate the
malfunction. A complete malfunction description may tell the repairman what
needs to be repaired even if the malfunction cannot be duplicated in the workshop. Please remember to state:
• The distance between the units
• Battery and/or mains current
• Whether the baby unit displays a transmission symbol
• If the malfunction appears after the unit has been on for a period of time –
how long?
• Any intermittent malfunctions – how often?
A complete description of the malfunction will ensure you have a fully functioning unit, and you will be just as happy with your NOVA quality product as thousands of others throughout Europe.
Enjoy the peace of mind your SuperNOVA Digital Babycall will give you!
Warranty
Page 7
7
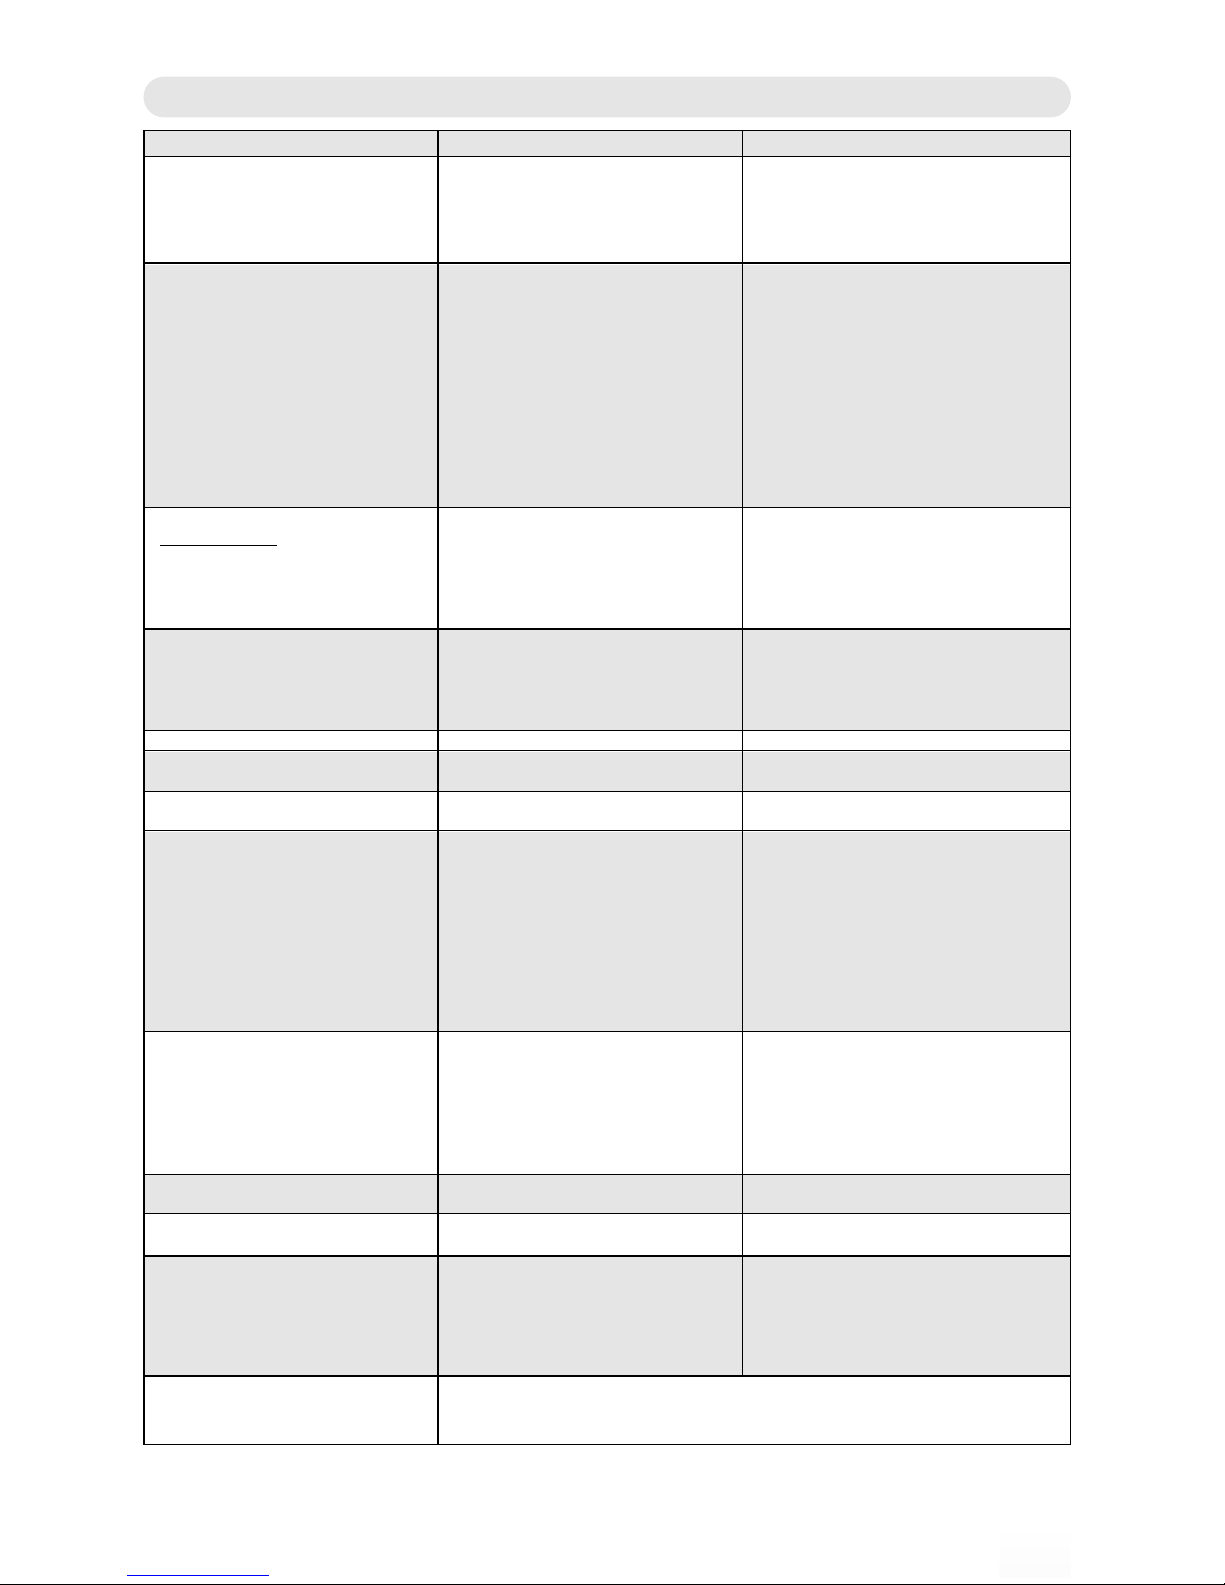
Problem
The indicator (2) does not light up.
The display goes out shortly after the
unit is switched on.
The charging indicator (13) on the
charger does not light or blinks red.
The batteries are not charged.
Also see abo
ve.
The charging indicator (13) on the
charger is on, but does not change
from red to green, even after 48
hours.
Grey baby unit display and poor
range.
No sound in the parent unit.
The speaker symbol is not displayed
in the parent unit.
No contact between the baby unit
and the parent unit.
The parent unit signals that the
range is exceeded.
Interference while transmitting.
Loud screeching/beeping sound.
Unit displays low battery even if the
charger switches to green.
Short range
It takes a long time from when the
baby starts crying until you can hear
it on the parent unit.
Possible cause
The unit is not switched on.
The batteries are discharged.
Poor contact between the unit and
the charger.
Poor contact between the battery
pack and the unit.
The adapter is not connected to the
charger.
The adapter is connected to a wall
outlet that does not work.
The batteries are completely
discharged.
Battery life is at an end
NOTE! Not covered by the warranty!
The batteries are completely
discharged, even if low battery is not
indicated.
The baby unit is too cold.
The volume has been turned down.
The volume has been turned down
completely.
The units are set to different digital
codes and/or channels.
Out of range.
The baby unit is not switched on.
The baby unit and the parent unit
are set to different channels.
The factory-set IPS code is different
on the units.
Too great distance between the
units.
Local conditions, interference.
Units are too close to each other.
Volume is too high.
Possible unit malfunction.
Ruined or spent batteries.
Antenna not pulled out.
Local conditions.
Solution
Press the On/Off button (3).
Recharge the batteries while the unit is
turned off. Remove the batteries for 30
seconds before switching the
unit on.
Clean the contacts underneath the unit
and in the charger. Use a napkin
moistened with window cleaner fluid.
NOTE! Do not press the contacts on the
charger down into the holes!
Clean and bend out the battery springs
inside the battery compartment.
Clean the battery pack contacts.
Plug the adapter into the wall outlet and
to the charger.
If the wall outlet has an On/Off switch,
this must be on.
Charge the batteries for two days while
the unit is off.
Purchase new battery packs from the
dealer.
Charge the batteries for at least 12
hours.
Take the baby unit into a place with room
temperature.
Adjust the volume.
Adjust the volume.
Set the same digital code and/or channel
on both units.
Reduce the distance. Local conditions
may reduce the range dramatically. Try
switching channels. Charge the batteries
for at least 12 hours.
Turn the baby unit on.
Check that they display the same letter,
A or B.
Check that the code on the round label
in the battery compartment is the same.
If not, contact the dealer.
Reduce the distance.
Move the units slightly.
Local conditions cannot be changed. Try
turning off light dimmers or other noise
sources.
Units rarely have a defect.
Increase the distance.
Adjust the volume.
Check battery in other unit. If OK there,
contact the dealer.
Check the batteries as mentioned above.
Pull out both antennas.
Other baby alarms in the vicinity may
reduce range dramatically. Try to switch
channels, or move the baby unit and/or
parent unit.
TROUBLESHOOTING CHART
This is entirely normal. The parent unit needs time to check that the correct baby
unit is trying to establish contact.
Other baby alarms may be near by, especially if the delay is very long.
 Loading...