


FRONTSCHEINWERFER | FRONT LIGHTS
V 07.17
DYNAMO
25
&
km/h
ANLEITUNG | MANUAL
DE | EN
HERZLICHEN GLÜCKWUNSCH | CONGRATULATIONS
Ich freue mich sehr, dass Sie sich für
dieses Supernova Hochleistungsprodukt
entschieden haben! Mein Entwicklungsteam hat keine Mühen gescheut und unsere
Testfahrer haben tausende Kilometer unter
widrigsten Bedingungen zurückgelegt, um
Ihnen ein Produkt zu bieten, an dem Sie
lange Freude haben werden. Ich wünsche
Ihnen allzeit gute Fahrt!
I am very happy that you have chosen
thi s Supernova high performance product!
My development team has spared no efforts
and our product testers have ridden thousands of kilometres in adverse conditions to
offer you a product you will enjoy for a long
time. I wish you a great ride at all times!
Marcus Wallmeyer, CEO & Chief Designer

INHALT | INDEX
ZULASSUNGEN | ROAD APPROVALS 4 – 7
LIEFERUMFÄNGE | PRODUCT CONTENT 8 – 11
WICHTIGE INFORMATION | IMPORTANT GENERAL INFORMATION 12 – 13
TECHNISCHE DATEN | TECHNICAL DATA 14 – 19
E3 PRO 2 / PURE 3 / TRIPLE 2 – INFORMATION 20 – 21
E3 PRO 2 / PURE 3 / TRIPLE 2 – INSTALLATION 22 – 23
V6s / V521s / V1260 – INFORMATION 24 – 25
V6s / V521s / V1260 – INSTALLATION BOSCH 26 – 29
LICHTAUSRICHTUNG | ADJUSTMENT 30 – 31
ALLGEMEINE HINWEISE | GENERAL INFORMATION 32 – 33
2 | 3

DYNAMO
Diese Scheinwerfer und wurden speziell für den Einsatz an Fahrrädern
These f ront lights and have be en developed for dyn amo use.
mit Dynamobetrieb entwickelt.

ZULASSUNGEN | APPROVALS
DYNAMO SCHEINWERFER
E3 PRO 2
K 730
E3 PURE 3
K 731
DYNAMO FRONT LIGHTS
E3 PRO 2
K 730
E3 PURE 3
K 731
4 | 5

25
km/h
Diese S cheinwerf er wurden spez iell für den Eins atz an E-Bikes bi s 25 km/h
These f ront lights have been developed for u se on e-bikes with speeds up to
(Pedelecs) entwickelt.
25 km/h (P edelecs).

ZULASSUNGEN | APPROVALS
E3 E-BIKE SCHEINWERFER
V6s
K 615
V126 0
K 870
V521s
K 1371
E3 E-BIKE F RONT LIGHT S
V6s
K 615
V126 0
K 870
V521s
K 1371
6 | 7

LIEFERUMFÄNGE | PRODUCT CONTENT
E3 PRO 2
Art. No. M-STK-BLK
E3 PURE 3
Art. No. N-P3S-MBLK
Art. No. N-P3S-MBLK-HBM
E3 TRIPLE 2
Art. No. NTR2-BLK
Inkl.
1 x Frontscheinwerfer mit Kabel
1 x Halterung
1 x Schrumpfschlauch Ø 6 mm, 8 cm
2 x Schrumpfschlauch Ø 4 mm, 20 cm
3 x Verbindungs-Quetschhülsen
5 x Kabelbinder
1 x Montageschraube M6
E3 PRO 2
Art. No. M-STK-BLK
E3 PURE 3
Art. No. N-P3S-MBLK
Art. No. N-P3S-MBLK-HBM
E3 TRIPLE 2
Art. No. NTR2-BLK
Incl.
1 x Front light and cable
1x Mounting
1 x Shrink tube Ø 6 mm, 8 cm
2 x Shrink tube Ø 4 mm, 20 cm
3 x Crimp sleeve
5 x Cable ties
1 x Installation screw M6
BATTERY

V6s Art. No. N-V6S-MBLK
V521s Art. No. Q-V521S-MBLK
V1260 Art. No. L-STK-EB1260R-BLK
Inkl.
1 x Frontscheinwerfer mit Kabel
1 x Halterung
1 x Schrumpfschlauch Ø 6 mm, 8 cm
2 x Schrumpfschlauch Ø 4 mm, 20 cm
3 x Verbindungs-Quetschhülsen
5 x Kabelbinder
2 x Montageschraube M6
1 x Selbstsichernde Mutter
2 x Unterlegscheibe
V6s HBM Art. No. N-V6S-MBLK-HBM
V521s HBM Art. No. Q-V521S-MBLK-HBM
Inkl.
1 x Frontscheinwerfer mit Kabel
1 x Halterung
1 x Schrumpfschlauch Ø 6 mm, 8 cm
2 x Schrumpfschlauch Ø 4 mm, 20 cm
3 x Verbindungs-Quetschhülsen
5 x Kabelbinder
V6s Art. No. N-V6S-MBLK
V521s Art. No. Q-V521S-MBLK
V1260 Art. No. L-STK-EB1260R-BLK
Incl.
1 x Front light and cable
1x Mounting
1 x Shrink tube Ø 6 mm, 8 cm
2 x Shrink tube Ø 4 mm, 20 cm
3 x Crimp sleeve
5 x Cable ties
2 x Installation screw M6
1 x Self-locking nuts
2 x Washer
V6s HBM Art. No. N-V6S-MBLK-HBM
V521s HBM Art. No. Q-V521S-MBLK-HBM
Incl.
1 x Front light and cable
1x Mounting
1 x Shrink tube Ø 6 mm, 8 cm
2 x Shrink tube Ø 4 mm, 20 cm
3 x Crimp sleeve
5 x Cable ties
8 | 9

LIEFERUMFÄNGE | PRODUCT CONTENT
V6s BOSCH HBM
Art. No. N-V6S-MBLK-BHBM
Inkl.
1 x Frontscheinwerfer mit Kabel
1 x Schrumpfschlauch Ø 6mm, 8cm
2 x Schrumpfschlauch Ø 4mm, 20cm
3 x Verbindungs-Quetschhülsen
5 x Kabelbinder
2 x 2-fach Verbinder
Optionale Produkte, passend zum verwendeten Antriebssystem, abhängig von der
Montagesituation.
Multimount HSOP
Art. No. L-HSOP-MBLK
FCL Rennradbrems- & HS33 Adapter
Art. No. L-FCL-MM-BLK
V6s BOSCH HBM
Art. No. N-V6S-MBLK-BHBM
Incl.
1 x Front light and cable
1 x Shrink tube Ø 6mm, 8cm
2 x Shrink tube Ø 4mm, 20cm
3 x Crimp sleeve
5 x Cable ties
2 x Double connector
Optional accessories, depending on drive
system and mounting position.
Multimount HSOP
Art. No. L-HSOP-MBLK
FCL road brake & HS33 adapter
Art. No. L-FCL-MM-BLK

Multimount CS
Art No. H-MM-BLK
Multimount TS
Art. No. M-TS-MM-BLK
HK Fender mount
Art. No. P-MMHK-MBLK
SUPERNOVA Lenkerhalter
Art. No. K-BM-2-BLK
Multimount CRC
Art. No. P-CRC-MBLK
Supernova Universal Lenkerhalter
31.8 mm: Art. No. R-UHM31.8-BLK
35 mm: Art. No. R-UHM35.00-BLK
Promax DA230 Vorbau
60 mm: Art. No: P-DA230STM-BLK-60
90 mm: Art. No: P-DA230STM-BLK-90
V6s BOSCH HBM Adapter
Art. No. P-BHBM-MBLK
Multimount CS
Art No. H-MM-BLK
Multimount TS
Art. No. M-TS-MM-BLK
HK Fender mount
Art. No. P-MMHK-MBLK
SUPERNOVA handlebar bracket
Art. No. K-BM-2-BLK
Multimount CRC
Art. No. P-CRC-MBLK
Supernova universal handlebar mount
31.8 mm: Art. No. R-UHM31.8-BLK
35 mm: Art. No. R-UHM35.00-BLK
Promax DA230 Stem
60 mm: Art. No: P-DA230STM-BLK-60
90 mm: Art. No: P-DA230STM-BLK-90
V6s BOSCH HBM adapter
Art. No. P-BHBM-MBLK
10 | 11

WICHTIGE INFORMATIONEN | IMPORTANT GENERAL INFORMATION
• Verwenden Sie niemals einen starken
Wasserstrahl, um den Scheinwerfer zu
reinigen. Einige Scheinwerfer haben
eine Lin se die mit einer Fe der nach
vorne gedrück t wird. Das Wasser wird
in das gedichtete Gehäuse gelangen
und nicht mehr abf ließen können.
• Rücklichter anderer Hersteller dürfen
nicht am Rahmen ge erdet sein.
• Das E3-Rü cklicht nie direkt am
Dynamo anschließen, immer am
Scheinwerfer.
• Die Garantie erlischt beim Öffnen
des Gehäuses.
• Scheinwerferkörper nicht mit dem
Kabelausgang nach oben montieren.
• Niemals direkt in das Licht schauen,
auch nicht in das Standlicht.
• Nur mit Was ser reinigen. S charfe
Reinigungsmit tel ( z.B. mit Alko hol )
trüben die Linse.
• Never us e a high-pressu re hose to
clean th e light. The len s is held in place
with a spr ing in some light s and the
press ure of a water jet c ould push it
back - wat er will get into th e sealed
housing and cann ot get out again.
• Rear lights of other manufacturers
must no t be grounded on t he frame.
• Never at tach the E3 re ar light direc tly
to the dy namo.
• The ele ctronics and the lens c an be
damage d by opening the housing of
the light.
• The warranty is void if the housing
is opened.
• Lamp-body should not b e assembled
with the cable-outlet on top.
• Never lo ok into the light. Even th e
stand light is dangerously bright.
• Only cle an the light with water - no t
with ag ressive cleaners or alcoh olcontaining fluids.

GÜLTIG FÜR ALLE SCHEINWERFER
• Um die korrekte Funktion und volle
Lebensdauer Ihres Scheinwerfers zu
gewährleisten, sollten ausschließlich
Supernova Rücklichter verwendet werden.
• Schließen Sie den Frontscheinwerfer
und das Rücklicht immer zweiadrig an
(Masse nie über den Rahmen leiten!).
• Bitte beachten Sie: Jeder Kurzschluss
im Kabel beeinträchtigt die Funktion des
Scheinwerfers sehr stark. Bei Nichtbenutzung des Rücklichtanschlusses sind
die Kabel zu isolieren.
• Das vollautomatische Frontscheinwerferund Rücklicht-Standlicht leuchtet 4 Min.
• Die Kabelausgänge müssen bei der
Montage nach unten zeigen, da sonst
Wasser eindringen kann!
VALID FOR ALL FRONT LIGHTS
• To ensure the correct function and to
preserve the longevity of the front light only
Supernova rear lights should be used.
• Always connect the front and rear light
with the 2-core wire (no mass connection to the frame!).
• Please note: Any kind of short circuit will
severely impair the function of the light.
Please always insulate unused cable
ends of the front light if the rear light is
not installed.
• The fully automated front and tail stand
light shines for 4 minutes.
• The cable exits have to point downwards
to keep the housings waterproof.
12 | 13

TECHNISCHE DATEN | TECHNICAL DATA
E3 PRO 2
Gemessener Lumenwert | Measured lumen value
Versorgungsspannung | Input voltage
Standlicht | Stand light
Linsentyp | Lens type
Leuchtmittel | Illuminant
L x B x H | L x W x H
Material | Material
Gewicht | Weight
Garantie | Warranty
BATTERY
Art. No. M-STK-BLK
205 lm
6 V / 3 W Dynamo (AC)
5 min
Terraflux 2
Power LED
69 x 40 x 40 mm
6061 Aluminium | Aluminum
110 g ohne Halter |
110 g without bracket
5 Jahre | 5 years
E3 PURE 3
BATTERY
Art. No. N-P3S-MBLK
Gemessener Lumenwert | Measured lumen value
Versorgungsspannung | Input voltage
Standlicht | Stand light
Linsentyp | Lens type
Leuchtmittel | Illuminant
L x B x H | L x W x H
Material | Material
Gewicht | Weight
Garantie | Warranty
205 lm
6 V / 3 W Dynamo (AC)
5 min
Terraflux 2
Power LED
49 x 41 x 41 mm
6061 Aluminium | Aluminum
90 g ohne Halter |
90 g without bracket
5 Jahre | 5 years
14 | 15
TECHNISCHE DATEN | TECHNICAL DATA
E3 TRIPLE 2
Gemessener Lumenwert | Measured lumen value
Versorgungsspannung | Input voltage
Standlicht | Stand light
Linsentyp | Lens type
Leuchtmittel | Illuminant
L x B x H | L x W x H
Material | Material 6061 Aluminium | Aluminum
Gewicht | Weight
Garantie | Warranty 5 Jahre | 5 years
BATTERY
640 lm
6 V / 3 W Dynamo (AC)
5 min
Triple LED
3 x Power XM-L2 LED
69 x 40 x 40 mm
125 g ohne Halter |
125 g without bracket
Art. No. NTR2-BLK

V6s
25
km/h
Art. No. N-V6S-MBLK
Gemessener Lumenwert | Measured lumen value
Eingangsspannung | Input voltage
Linsentyp | Lens type
Leuchtmittel | Illuminant
L x B x H | L x W x H
Material | Material
Gewicht | Weight
165 lm
6 V DC
Terraflux 2
Power LED
49 x 41 x 41 mm
6061 Aluminium | Aluminum
90 g ohne Halter |
90 g with out bracket
16 | 17
TECHNISCHE DATEN | TECHNICAL DATA
V521s
Gemessener Lumenwert | Measured lumen value
Eingangsspannung | Input voltage
Linsentyp | Lens type
Leuchtmittel | Illuminant
L x B x H | L x W x H
Material | Material
Gewicht | Weight
25
km/h
Art. No. Q-V521S-MBLK
205 lm
5-21 V
Terraflux 2
Power LED
49 x 41 x 41 mm
6061 Aluminium | Aluminum
75 g ohne Halter |
75 g without bracket

V1260
25
km/h
Art. No. L-STK-EB1260R-BLK
Gemessener Lumenwert | Measured lumen value
Eingangsspannung | Input voltage
Linsentyp | Lens type
Leuchtmittel | Illuminant
L x B x H | L x W x H
Material | Material
Gewicht | Weight
205 lm
12-60 V DC (max. 75 V)
Terraflux 2
Power LED
69 x 40 x 40 mm
6061 Aluminium | Aluminum
130 g ohne Halt er |
130 g without bracket
18 | 19

E3 PRO 2 / PURE 3 / TRIPLE 2 – INFORMATION
E3 PRO 2
Die Terraflux 2 Hybrid Linse bietet durch
ihre spezielle Leuchtcharakteristik sowohl
eine hervorragende Ausleuchtung bei
Nacht als auch ein auffälliges Tagfahrlicht
für Ihre permanente Sicherheit.
E3 PURE 3
Die Terraflux 2 Hybrid Linse bietet durch
ihre spezielle Leuchtcharakteristik sowohl
eine hervorragende Ausleuchtung bei
Nacht als auch ein auffälliges Tagfahrlicht
für Ihre permanente Sicherheit.
Da der Scheinwerfer immer an ist, können
zusätzliche USB Ladegeräte am Dynamo
nicht angeschlossen werden.
E3 PRO 2
With its special beam shape, the Terraflux
2 hybrid lens offers both, an excellent
illumination at night as well as a great
daytime running light for your permanent
safety.
E3 PURE 3
With its special beam shape, the Terraflux
2 hybrid lens offers both, an excellent
illumination at night as well as a great
daytime running light for your permanent
safety. Additional USB chargers cannot be
connected with the dynamo because there
is not enough energy left for both - the E3
PURE 3 and USB power.

E3 TRIPLE 2
Achtung! Nicht für den dt. Straßenverkehr
zugelassen.
Automatische Zuschaltung der zwei
Zusatz-LEDs ab 10-15 km/h.
Keine Zuschaltung der Zusatz-LEDs bei
Überspannungsschutz oder bei Nutzung
eines stromhungrigen Rücklichtes eines
anderen Herstellers.
E3 TRIPLE 2
Please note! Not road legal; will blind
oncoming traffic!
Automatic activation of the two additional
LEDs from 10-15 km/h (6.5 - 9 mph).
No activation of the two additional LEDs
if an overvoltage protection or a power
hungry rear light of another brand is used.
20 | 21

E3 PRO 2 / PURE 3 / TRIPLE 2 – INSTALLATION
E3 FRONTSCHEINWERFERAN ANTRIEB |
E3 FRON T LIGHT ON DRIVE
Schwar ze Kabel für 6 V AC
Dynamoanschluss |
Black ca bles for 6 V AC
dynamo connection
Blau/Rotes Kabel für
Rücklichtanschluss
(Infos: E3 Tail L ight Anleitun g) |
Blue/Red cable for tail light
connection (more info:
E3 Tail Light Ma nual)
– +
BATTERY
E3 PRO 2
Art . No. M-STK-BLK
E3 TRIPLE 2
Art . No. NTR2-BLK
Gleiche Installation für folgende
Scheinwerfer | Same installation for
following lights
E3 PURE 3
Art . No. N-PS3-MBLK
E3 PRO 2, E3 TRIP LE 2
E3 Tail Light 2
Art . No. M-STK-BLK
E3 Seat Post Tail Light 2
Art . No. M-STK-BLK
E3 Tail Light FR
Art . No. N-PS3-MBLK
E3 PURE 3
22 | 23

V6s / V521s / V1260 – INFORMATION
GILT FÜR ALLE SCHEINWERFER
• Niemals einen starken Wasserstrahl verwenden um den Scheinwerfer zu reinigen.
• Schließen Sie den Frontscheinwerfer und
das Rücklicht immer zweiadrig an.
• Die Kabelausgänge müssen bei der Montage nach unten zeigen!
RECHTLICHE INFORMATION
Nur für den Einsatz an Fahrrädern mit Tret
unterstützung bis 25 km/h zugelassen, die
über eine eigene Akkuladezustandsanzeige
und über eine automatische Motorabschaltung zur Vermeidung einer Tiefenentladung
des Akkus verfügen.
V6s
Der V6s ist für E-Bikes mit geregeltem 6 V
Ausgang ausgelegt. Die Elektronik ist nicht
dafür gemacht, um sie an Standard 6 V
Batterien anzuschließen, denn diese können
vollgeladen höhere Spannungen aufweisen.
FOR ALL FRONT LIGHTS
• Never use a high-pressure hose to clean
the light.
• Always connect the front and rear light
with the 2-core wire.
• The cable exits have to point downwards
to keep the housings waterproof.
LEGAL INFORMATION
-
Only road legal in Germany if installed on
bycicles with pedal assist up to 25 km/h,
that are equipped with a battery charge
indicator and that will switch off the motor,
to ensure that the lighting function is
available and to prevent a deep discharge
of the battery.
V6s
The V6s has been designed for use on
regulated 6 V e-bike systems. The light is not
designed to be connected to a 6 V battery,
because it would have a higher voltage when
fully charged.

ACHTUNG! Der Scheinwerferanschluss des
Bosch-Akkus der ersten Generation ist für
diesen Scheinwerfer nicht stark genug und
kann durch den Anschluss des E3 E-Bike beschädigt werden. Bosch Akkus der zweiten
Generation ab Ende 2013 sind geeignet. Der
Scheinwerfer wird von der Kontrolleinheit
des E-Bikes geschaltet. Für Brose Antriebe
ist der Scheinwerfer nicht geeignet.
WICHTIG: V1260
• Beim Anschließen des Scheinwerfers an
die Batterie auf die Polung achten: Rotes
Kabel = Pluspol (+) Schwarzes Kabel ist
Minuspol (-). Eine Verpolung beschädigt
den Scheinwerfer und lässt die Gewährleistung erlöschen.
• Der Scheinwerfer kann mit 12 - 60 V
Gleichspannung betrieben werden.
• Die Kabel des Rücklichtausgangs sind rot
(+) und blau (-) und liefern 6 V.
• Nur Supernova Rücklichter verwenden!
Alle anderen Rücklichter können die
Elektronik beschädigen!
• Bei Nichtbenutzung des Rücklichtan-
schlusses müssen die Kabel isoliert werden
PLEASE NOTE! The 6 V light port of the
Bosch e-Bike system of the first generation
is not strong enough to power this light and
can be damaged. 2nd generation Bosch
systems have been adapted to work with
Supernova lights. The light is switched on
and off with the main e-bike control unit.
The light is also not suitable for Brose bikes.
IMPORTANT: V1260
• When connecting the light please connect
correct polarity: Red cable=positive (+)
black cable=negative (-).
• An incorrect connection will damage the
light.
• The light can be used on 12 - 60 V direct
current (DC) .
• The rear light cables are red (+) and blue (-)
and are supplied 6 V DC and 100 mA current.
Higher currents will damage the light.
• Only use Supernova rear lights! All other
rear lights can damage the electronics.
• Always insulate loose cable ends on the
front light, if no rear light is installed.
24 | 25

V6s / V521s / V1260 – INSTALLATION BOSCH
E3 FRONTSCHEINWERFERAN ANTRIEB |
E3 FRON T LIGHT ON DRIVE
V126 0: Blau/Ro tes Kabel für
Rücklichtanschluss (6 V)
(Infos: E3 Tail L ight
Anleit ung) |
V126 0: Blue/Red c able for tail
light co nnection 6 ( V) (more info:
E3 Tail Light Ma nual)
–
+
A
Bosch Frontlicht-Anschlusskabel |
Bosch front light connection cable
Art. No: P-BC200F
B
25
km/h
V1260
Art . No. L-STK-EB1260R-BLK
Gleiche Installation für
folgende Scheinwerfer |
Same installation for
following lights
V6s
Art . No. N-V6S-MBLK
(Ohne Rücklichtanschluss |
without rear light cable)
V521s
Art. No. Q-V521s-MBLK
(Ohne Rücklichtanschluss |
without rear light cable)
–
Das BOSCH Anschlusskabel
+
( Art. P- BC200F ) muss ge sondert
bestellt werden. |
The BOSC H connector c able has to
be ordered separately
( art. P-B C200F ).
Bitte b enutzen Sie da s für Ihren
Antrieb kompatible Kabel-
Anschlussset. |
Please u se the correc t cable
connec tion set for yo ur drive syste m.
Energieversorgung | Power supply
z. B. Bosch Motor | e.g. for Bosch drives
V1260 nur an 12 V | V1260 only on 12 V
V6s /V521s V126 0
26 | 27

2 14 3
E3 E-BIKE V6s / V521s / V1260 – INSTALLATION BOSCH
A
2-fach Verbinder |
Double Connector
ACHTUNG! Kabelenden
nicht abisolieren. |
ATTENTION! Do not
remove insulation.
E3 E-BIKE V6s / V521s / V1260 Installation
B
Frontlicht Port | Front light port
1
2
WICHTIG! Kappe bündig zum Gehäuse ein-
pressen. Nicht tiefer! Empfohlenes Werkzeug:
Scotchlok™ Schneidklemmzange (E-9Y)|
IMPORTANT! Do not press the tap deeper than the
edge of the housing! Requested tool: Scotchlok™
IDC crimping pliers (E-9Y)
Bosch Frontlicht Anschlusskabel |
Bosch front light connection cable
Art. No: P-BC200F
WICHTIG!
Bitte prüfen Sie ob der Lichtanschluss auf 6 V
oder 12 V geschaltet ist oder ob er überhaupt
aktiviert ist. Das können Sie bei einem
Bosch-zertifizierten Händler tun. Falls vorher ein
Licht montiert war, können Sie sich an dessen
Spannung orientieren.
E3 E-BIKE V6s / V521s / V1260 Installation
IMPORTANT!
Please check if the light port is set to 6 V or
12 V or if it is activated at all. A Bosch-certified
service dealer can check this for you. If another
light was installed before, you can use it as
voltage reference.
28 | 29

LICHTAUSRICHTUNG | ADJUSTMENT
Scheinwerferhöhe |
Front light height
Hellster Bereich /
Halbe Mon tagehöhe |
Bright est area /
Half way poi nt
Entfe rnung zur Wand 5 m |
Distan ce to the wall 5 m
RECHTSGRUNDLAGE STVZO § 67, ABSATZ 3
„Fahrräder müssen mit einem nach vorn wirkenden Scheinwerfer für weißes Licht
ausgerüstet sein. Der Lichtkegel muss mindestens so geneigt sein, dass seine Mitte
in 5 Meter Entfernung vor dem Scheinwerfer nur halb so hoch liegt wie bei seinem
Austritt aus dem Scheinwerfer.“

EINSTELLEN DES LICHTES | ALIGNING THE BEAM
Bitte befolgen Sie die unten gezeigten Schritte um ein blendfreies, straßenzugelassenes Leuchtbild zu erhalten. | Please follow the steps below to achieve a beam that is
glare-free and compliant.
Mit dem Fahrrad frontal vor eine
1
Wand stellen mit 5 m Abstand.
Scheinwerferhöhe an der Wand
2
markieren.
Beleuchtung aktivieren und Fahrrad
3
gerade hinstellen.
Richten Sie das Licht so aus, dass der
4
hellste Punkt auf halber Montagehöhe liegt. Der blendfreie Bereich
sollte unterhalb der Montagehöhe
beginnen.
Place the bike 5 m away from a wall,
1
facing it.
Mark the installation height of the
2
light on the wall.
Activate the light and hold the bike
3
straight.
Adjust the light, so that the brightest
4
area is aimed at the halfway point.
The glare-free area should start below
the installation height.
30 | 31

ALLGEMEINE HINWEISE | GENERAL INFORMATION
PFLEGEHINWEISE
• Nie einen Hochdruckreiniger benutzen
• Reinigen Sie die Frontscheibe mit
Wasser und einem weichen Tuch
• Keine aggressiven Reinigungsmittel
verwenden (auch kein Alkohol!)
• Überprüfen Sie die Anzugsmomente
aller Schrauben regelmäßig
CARE INSTRUCTIONS
• Never use a high-pressure hose or
alcohol-containing fluids to clean
• Clean the frontglas with water
and a soft, clean cloth
• Do not use aggressive cleaning agents
(also no alcohol!)
• Check the mounting bolts from time
to time

GARANTIE & SERVICE
5 Jahre Garantie
Die Garantie erlischt bei unsachgemäß
durchgeführten Reparaturen und beim
Öffnen des Gehäuses. Registrierung und
Informationen finden Sie unter:
http://supernova-lights.com/service
Immer mehr Antriebshersteller arbeiten an
einer Kompatibilität zu unseren Produkten.
Daher gibt es regelmäßige Updates
der Anleitung. Bitte vergleichen Sie die
Versionsnummer auf der Titelseite mit
der aktuell online gestellten Version auf
unserer Webseite.
http://supernova-lights.com/download
Möge das Licht mit Ihnen sein!
WARRANTY & SERVICE
5 years warranty
The warranty is void if the housing is
opened and in case of unqualified repairs.
Registration and Information can be found at:
http://supernova-lights.com/en/service
More and more drive manufacturers work
with us to become Supernova-compatible.
This means that we will regularly update
this manual. Please compare the version
number on the cover with the latest
version on our website.
http://supernova-lights.com/en/download
May the light be with you!
32 | 33

SUPERNOVA DESIGN GmbH & Co. KG
Industriestr. 26 | 79194 Gundelfingen
Germany
+49 (0) 761 600 629 - 0
info@supernova-lights.com
www.supernova-lights.com
DE | EN

RÜCKLICHTER | REAR LIGHTS
V 07.17
DYNAMO
25
&
km/h
ANLEITUNG | MANUAL
DE | EN

HERZLICHEN GLÜCKWUNSCH | CONGRATULATIONS
Ich freue mich sehr, dass Sie sich für
dieses Supernova Hochleistungsprodukt
entschieden haben! Mein Entwicklungsteam hat keine Mühen gescheut und unsere
Testfahrer haben tausende Kilometer unter
widrigsten Bedingungen zurückgelegt, um
Ihnen ein Produkt zu bieten, an dem Sie lange Freude haben werden. Ich wünsche Ihnen
allzeit gute Fahrt!
I am very happy that you have chosen
thi s Supernova high performance product!
My development team has spared no efforts
and our product testers have ridden thousands of kilometres in adverse conditions to
offer you a product you will enjoy for a long
time. I wish you a great ride at all times!
Marcus Wallmeyer, CEO & Chief Designer

INHALT | INDEX
ZULASSUNGEN | ROAD APPROVALS 4 – 5
LIEFERUMFÄNGE | PRODUCT CONTENT 6 – 7
TECHNISCHE DATEN | TECHNICAL DATA 8 – 9
E3 RÜCKLICHTER | E3 TAIL LIGHTS 10
E3 TAIL LIGHT 2 – INSTALLATION 11 – 21
E3 TAIL LIGHT 2 – INSTALLATION BOSCH 22 – 25
E3 TAIL LIGHT 2 – KOMPATIBILITÄT | COMPATIBILITY 26 – 27
GOLDKONTAKTSTECKER | GOLD CONNECTORS (OPTIONAL) 28 – 31
HALTERUNGEN | MOUNTING OPTIONS 32 – 33
E3 TAIL LIGHT 2 – ALLGEMEINE HINWEISE | GENERAL INFORMATION 34 – 35
2 | 3

DYNAMO
25
km/h
Diese R ücklichter s ind für den Betr ieb an Gleichs pannung ausg elegt. Die 6 V M odelle
können an geeigneten E-Bike Anschlüssen, an unseren Dynamoscheinwerfern oder
am E3 E-Bike V1260 b etrieben wer den. Die 12 V Modell e sind für 12 V E-Bike
These r ear lights hav e been develop ed for direct c urrent (DC). The 6 V models can be
insta lled on suitable 6V e-bike port s, on our dynamo lights a nd on the E3 E-Bike V1260.
The 12V mode ls are intende d for 12V e-bike ports.
Anschlüsse ausgelegt.

ZULASSUNGEN | APPROVALS
E3 TAIL LIGHT 2 (6 V / 12 V)
seat po st mount (6 V) K 9 37
seat po st mount (12 V) K 13 52
Montage Sattelstütze
rack mo unt (6 V) K 915
Gepäckträgermontage
rack mo unt FR (6 V) K 915
rack mo unt FR (12 V) K 1351
Gepäckträgermont age,
Kabelausgang unten
E3 TAIL LIGHT 2 (6 V / 12 V)
seat po st mount (6 V) K 9 37
seat po st mount (12 V) K 13 52
vert ical insta llation on a se at post
rack mo unt (6 V) K 915
horizontal installation on a rack
rack mo unt FR (6 V) K 915
rack mo unt FR (12 V) K 1351
horizontal installation on a rack
cable exit below
4 | 5

LIEFERUMFÄNGE | PRODUCT CONTENT
E3 SEAT POST TAIL LIGHT 2
Art. No. N-TK2-S-BLK
E3 RACK MOUNT TAIL LIGHT 2
Art. No. N-TK2-BLK
E3 RACK MOUNT TAIL LIGHT 2-FR
Art. No. N-TK2FR-BLK
Inkl.
1 x Rücklicht mit Kabel
1 x Schrumpfschlauch Ø 6mm, 8cm
3 x Verbindungs-Quetschhülsen
5 x Kabelbinder
2 x Montageschraube M4
2 x Selbstsichernde Muttern
E3 SEAT POST TAIL LIGHT 2
Art. No. N-TK2-S-BLK
E3 RACK MOUNT TAIL LIGHT 2
Art. No. N-TK2-BLK
E3 RACK MOUNT TAIL LIGHT 2-FR
Art. No. N-TK2FR-BLK
Incl.
1 x Rear light and cable
1 x Shrink tube Ø 6mm, 8cm
3 x Crimp sleeve
5 x Cable ties
2 x Installation screw M4
2 x Self-locking nuts
BATTERY
&

Optionale Produkte, passend zum verwendeten Antriebssystem, abhängig von der
Montagesituation.
Seat Post Clamp für E3 Tail Lights
Art. No. N-SPC-31.6-BLK
Art. No. N-SPC-27.2-BLK
Optional accessories, depending on drive
system and mounting position.
Seat Post Clamp für E3 Tail Lights
Art. No. N-SPC-31.6-BLK
Art. No. N-SPC-27.2-BLK
6 | 7

TECHNISCHE DATEN | TECHNICAL DATA
E3 TAIL LIGHT 2
SEAT POST MOUNT
Standlicht | Stand light
Spannung | Voltage
Leuchtmittel | Illuminant
Leistung | Wattage
L x B x H |
L x W x H
Material | Material
Gewicht | Weight
Installation | Mounting
Garantie | Warranty
* Dynamobetrieb: Energieversorgung und Standlichtfunktion über E3 Dynamo Frontscheinwerfer |
Dynamo mode: Power supply and stand light function via E3 dynamo front light
Pedelecbetrieb: Energieversorgung über E-Bike-System | Pedelec mode: Power supply via E-Bike system
** Pedelec Version | Pedelec version
BATTERY
25
km/h
5 min *
6 V - Version/ 12 V - Version**
5 mm custom made LEDs
0.3 W
16 x 61.5 x 11.5 mm
6061 Aluminium | Aluminum
18 g
An allen runden Sattelstützen | All round seat posts
5 Jahre | 5 years
Art. No. N-TK2-S-BLK (6 V)
Art . No. N-TK2-S-V12-BLK (12 V)

Art. No. N-TK2-BLK (6 V)
E3 TAIL LIGHT 2 RACK
MOUNT & FR
Standlicht | Stand light
Spannung | Voltage
Leuchtmittel | Illuminant
Leistung | Wattage
L x B x H |
L x W x H
Material | Material
Gewicht | Weight
Installation | Mounting
Garantie | Warranty
* Dynamobetrieb: Energieversorgung und Standlichtfunktion über E3 Dynamo Frontscheinwerfer |
Dynamo mode: Power supply and stand light function via E3 dynamo front light
Pedelecbetrieb: Energieversorgung über E-Bike-System | Pedelec mode: Power supply via E-Bike system
** Pedelec Version | Pedelec version
BATTERY
25
km/h
5 min *
6 V - Version/ 12 V - Version**
5 mm custom made LEDs
0.3 W / 0.35 W
37 x 11.5 x 30.6 mm
6061 Aluminium | Aluminum
12 g
50 mm standard
5 Jahre | 5 years
Art. No. N-TK2FR-BLK (6 V)
Art. No. N-TK2-V12-BLK (12 V)
Art. No. N-TK2FR-V12-BLK (12 V)
8 | 9

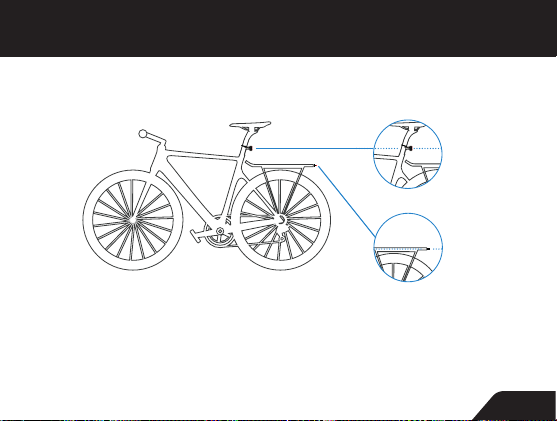
E3 RÜCKLICHTER | E3 TAIL LIGHTS
E3 TAIL LIGHT 2 R ACK MOUNT FR
50 mm
1 2
1:
Art. N o. N-TK2-BLK (6 V)
Art. N o. N-TK2- V12-BL K (12 V)
Rücklicht für Gepäckträgermontage
Tail light for r ack mount inst allation
Kabell änge = ~950 mm
Cable len ght = ~950 mm
2:
Art. N o. N-TK2FR-BLK (6 V)
Art. N o. N-TK2- S-V12- BLK (12 V)
Rücklicht mit Kabelausgang nach unten |
Tail light wit h cable exit bel ow
Kabell änge = ~950 mm
Cable len ght = ~950 mm
E3 SEAT PO ST TAIL LIGHT 2 E3 TAIL LIGHT 2 R ACK MOUNT
Art. N o. N-TK2-S-BLK (6 V)
Art. N o. N-TK2 FR-V12- BLK (12 V)
Rücklicht für Sattelstützdurchmesser |
Tail light for s eat post
Kabell änge = ~1300 mm
Cable len ght = ~1300 mm
E3 TAIL LIGHT 2 – INSTALLATION
ANBAUHÖ HE | INSTALLATON HEIGHT
E3 Seat Po st
E3 Rack mou nt
Das Rückl icht muss mind. 25 0 mm, max. 1200 mm
hoch übe r der Fahrbahn fe st montier t sein.
Es muss pa rallel zur Fahrb ahn ausgerich tet sein.
The rear l ight has to be ins talled at a minimal
height of 2 50 mm and a max. he ight of 1200 mm.
It has to be a ligned paral lel to the groun d.
10 | 11

E3 TAIL LIGHT 2 – INSTALLATION
E3 TAIL LIGHT 2 AN DYNAMO FRONTSCHEINWERFER |
E3 TAIL LIGHT 2 O N DYNAMO FRONT L IGHT
Schwar ze Kabel für 6 V AC
Dynamoanschluss |
Black ca bles for 6 V AC
dynamo connection
– +
BATTERY
E3 PRO 2
Art . No. M-STK-BLK
E3 TRIPLE 2
Art . No. NTR2-BLK
Gleiche Installation für folgende
Scheinwerfer | Same installation for
following lights
E3 PURE 3
Art . No. N-PS3-MBLK
A
S. 16–21
E3 Tail Light 2
Art . No. M-STK-BLK
E3 Seat Post Tail Light 2
Art . No. M-STK-BLK
E3 Tail Light FR
Art . No. N-PS3-MBLK
12 | 13

E3 TAIL LIGHT 2 – INSTALLATION
E3 SEAT PO ST TAIL LIGHT 2 AN V1260 SCHE INWERFER |
E3 SEAT PO ST TAIL LIGHT 2 ON V1260 SCHE INWERFER
Schwarz/rotes Kabel
für 12-60 V Akku anschluss
(nicht für D ynamo!)
(Infos: An leitung E3 Ser ie) |
Black /red cable for
12-60 V batte ry connec tion
(not for dy namo!)
(more inf o: Manual E3
Serie s)
E3 Seat Post Tail Light 2
Art. No. N-TK2-S-BLK (6 V)
E3 Tail Light 2 Rack Mount
Art. N o. N-TK2-BLK (6 V)
E3 Tail Light 2 FR
Art. No. N-TK2FR-BLK (6 V)
+
––+
V1260
Art . No. L-STK-EB1260R-BLK
A
S. 16–21
25
km/h
E3 Seat Post Tail Light 2
Vertikale Montage
z.B Sattelstütze | Vertical
installation e.g. on a seat post
14 | 15

E3 TAIL LIGHT 2 – INSTALLATION
A1
Den 8 cm Schrumpfschlauch über das Rücklichtkabel schieben. |
Place the 8 cm shrink tube over the rear light cable.
Anbringung Schrumpfschlauch | Installation shrink tube
Verbindungskabel |
Connector cableSchrumpfschlauch | Shrink tube

A2
Angaben in mm | Specifications in mm
E3 Tail Light 2
Rücklichtkabel |
E3 Tail Light 2 cable
Kürzen Sie das Rücklichtkabel und das Kabel der Supernova Frontlampe gegengleich
wie gezeigt und entfernen Sie die Ummantelung 6 mm breit. Das blaue Kabel verbindet
man mit dem Minuspol (-) des Rücklichtes. Das Metallkabel darf kein anderes Metall
berühren. Dazu sind 2,5 cm lange Schrumpfschläuche im Lieferumfang enthalten. |
Cut the rear light cable and the cable of the front light and strip 6 mm of the insulation
off, as shown in the drawing. If you are not installing the front light with a Supernova
rear light, please attach the red cable to the positive pole of the rear light (+) and the
blue cable to the negative pole (-). Mismatched cables will not work. The metal core
must not touch any other metal parts. Please use the 2.5 cm shrink tubes for this.
Verbindungskabel |
Connector cable
Schrumpfschlauch |
Shrink tube
Kabel kürzen und abmanteln | Shorten the cable and remove the insulation
16 | 17

E3 TAIL LIGHT 2 – INSTALLATION
A3
Crimp Reihenfolge | Crimping sequence
1.2.4.3.
Verbindungshülsen | Crimp sleeve
Stecken Sie jeweils ein Kabel des Frontscheinwerfers so in eine der beiden mitgelieferten Verbindungshülsen, dass der Kunststoffmantel des Kabels 2 mm in die
Hülse hineinragt. Pressen Sie dann die Hülse am äußersten Ende zusammen, um
den Kunststoffmantel des Kabels zu fixieren. Benutzen Sie für den Pressvorgang
eine Crimpzange oder eine möglichst stumpfe Kneifzange. Folgen Sie der in der
Zeichnung angegebenen Reihenfolge. |
Insert one stripped cable into each side of the crimp sleeve supplied so that the plastic insulation is inserted at least 2mm into the crimp sleeve as well. Crimp the sleeves
with a crimping tool or with blunt pliers in the order shown in the picture.
Crimpzange | Crimping tool
Verbinden der Kabel | Connect the cables
18 | 19

E3 TAIL LIGHT 2 – INSTALLATION
A4
1.
2.
80-130 °C (180-270 °F)
Nach dem Crimpen schieben Sie den Schrumpfschlauch über die Verbindungsstelle und schrumpfen den Schlauch vorsichtig mit einem Heißluftföhn.
Die Schrumpftemperatur liegt zwischen 80° und 130°C. |
After crimping, push the shrink tube over the connection and shrink it with a hot
air blower. The shrink temperature should be between 80-130°C (180-270°F).
Schrumpfschlauch befestigen | Shrink tube cover
20 | 21

E3 TAIL LIGHT 2 – INSTALLATION
z. B. Bosch Motor | e.g. for Bosch drives
BOSCH
E3 TAIL LIGHT 2 A N BOSCH ANTR IEB | E3 TAIL LIGHT 2 ON BO SCH DRIVE
BOSCH 6 V
– +
B
E3 Tail Light 2 Ra ck Mount
Art. N o. N-TK2-BLK (6 V)
E3 Tail Light 2 FR
Art. N o. N-TK2FR-BLK (6 V)
E3 Seat Po st Tail Light 2
Art. N o. N-TK2-S-BLK (6 V)
BOSCH 12 V
E3 Tail Light 2 Ra ck Mount
Art. N o. N-TK2- V12-BL K (12 V)
E3 Tail Light 2 FR
Art. N o. N-TK2 FR-V12- BLK (12 V)
A
E3 Seat Po st Tail Light 2
Art. N o. N-TK2- S-V12- BLK (12 V)
Bosch Rücklicht-Anschlusskabel |
Bosch rear light connection cable
Art. No: P-BC150R
Das BOSCH Anschlusskabel
( Art. P- BC150R ) muss geso ndert
bestellt werden. |
The BOSC H connector c able has to
be ordered separately
( art. P-B C150R ).
25
km/h
Energieversorgung | Power supply
Bitte b enutzen Sie da s für Ihren
Antrieb kompatible Kabel-
Anschlussset. |
Please u se the correc t cable
connec tion set for yo ur drive syste m.
22 | 23

E3 TAIL LIGHT 2 – INSTALLATION
BOSCH
A
1
ACHTUNG! Kabelenden nicht abisolieren. |
ATTENTION! Do not remove insulation.
M99 Tail Light Installation | M99 Tail Light installation
2
WICHTIG! Kappe bündig zum Gehäuse
einpressen. Nicht tiefer! Empfohlenes Werkzeug: Scotchlok™ Schneidklemmzange (E-9Y) |
IMPORTANT! Do not press the tap deeper
than the edge of the housing! Requested
tool: Scotchlok™ IDC crimping pliers (E-9Y)

B
Rücklicht Port | Tail light port
M99 Tail light Installation an Bosch | M99 Tail light installation on Bosch
Bosch Rücklichtkabel |
Bosch tail light cable
Art. No: P-BC150R
24 | 25

E3 TAIL LIGHT 2 – KOMPATIBILITÄT | COMPATIBILITY
E-BIKE:
GENERELL SIND ALLE ANTRIEBE MIT
DER PASSENDEN 6V / 12V SPANNUNG
GEEIGNET
DYNAMOS:
Wir können alle 6 V Dynamos mit 3 W
Nennleistung ohne Spannungsbegrenzung
empfehlen. Alle E3 Dynamo-Frontscheinwerfer haben einen Spannungsbegrenzer
integriert. Der Spannungsbegrenzer, der
bei manchen Nabendynamos mitgeliefert
wird, darf NICHT montiert werden.
RÜCKLICHTER:
Die Supernova Tail Lights sind perfekt auf
den E3 Frontscheinwerfer abgestimmt.
Das E3 Tail Light ist auch an einem 6 V
E-Bike Rücklichtausgang einsetzbar. Gegebenfalls wird hierzu noch der passende
Stecker benötigt! Durch die Integration
E-BIKES:
IN GENERAL, ALL DRIVE SYSTEMS WITH
THE SUITABLE 6V OR 12V POWER SUPPLY
CAN BE USED.
DYNAMOS:
We recommend any 6 V dynamo hubs with
3 W power output. All our dynamo lights
have an integrated voltage regulation. Do
NOT install the external voltage regulator
often provided with some dynamos.
TAIL LIGHTS:
The Supernova Tail Lights have been
designed to perfectly harmonize with the
front light. The E3 Tail Light can also be
connected to a 6 V e-bike port (suitable
connectors may be needed). By integrating
the stand light capacitor into the front
light, the tiny E3 Tail Light has stand light
without drawing too much power from the

des Standlichtkondensators in den E3
Dynamo Frontscheinwerfer verfügt das
E3 Rücklicht über eine Standlichtfunktion, ohne den Frontscheinwerfer zu
beeinträchtigen. Der Betrieb mit einem
Rücklicht eines anderen Herstellers kann
negative Auswirkungen wie zum Beispiel
ein verzögertes Einsetzen der Rücklichtbeleuchtung haben. Generell gilt: Rücklichter
mit Glühbirne haben einen zu hohen
Stromverbrauch und können die korrekte
Funktion des E3 beeinträchtigen.
ACHTUNG! DAS E3 TAIL LIGHT NUR AM
FRONTSCHEINWERFER BETREIBEN. NIE
DIREKT AM DYNAMO.
front light. Using a rear light of another
manufacturer may have negative side
effects like the rear light switching on later
than usual. In general, rear lights with
an incandescent bulb draw far too much
power and will keep the front light from
functioning properly.
PLEASE NOTE: ONLY USE THE E3 TAIL
LIGHT ON A FRONT LIGHT. DO NOT
CONNECT DIRECTLY TO DYNAMO.
26 | 27

GOLDKONTAKTSTECKER | GOLD CONNECTORS (OPTIONAL)
Vergoldete Steckverbinder mit Crimpröhrchen (Art. H161-GC)
Komplettset: 2 Stecker, 2 Buchsen, Schrumpfschläuche.
Benötigtes Werkzeug: Abisolier zange, Crimpzange und Heißluftföhn. |
Univer sal gold-co ated quick re lease conne ctors made i n Germany (Ar t. H161-GC).
With integrated crim p tube. Set of 2 male and 2 fema le connecto rs and shrink tub es.
Tools required: wir e stripper, crim p tool, hot air bl ower or suitable subst itutes.
Kabel auf gleic he Länge zusch neiden.
1
Der Stecker hat später eine
&
Gesam tlänge von ca . 40 mm. Kabel
2
auf 10 mm Län ge vom schwarze n
Schrumpfschlauch befreien. Die
Enden 5 mm weit abisolieren.
Cut the c ables to leng th (both the
same). Th e connector w ill have a
leng th of ca. 40 mm. Remove the
black s hrink tube from the cabl es
10 mm deep and strip 5 mm o ff the
insulation on each end.

Dicken Schrumpfschlauch weit auf
3
das Kabel schieben.
BITTE NICHT VERGESSEN!
Später ist es nic ht mehr möglic h.
Steckverbinder auf das Kabel schie-
4
ben. Auf die eine Li tze einen Ste cker,
&
auf die andere ein e Buchse. Das
5
Crimpröhrchen des Steckers zuerst
an der Außenseite zusammendrücken, dann n och einmal weit er innen.
Geeignetes Crimpwerkzeug verwenden.
Slide th e thicker shrink t ube far onto
the cab le.
PLEA SE DO NOT FORGE T THIS!
It won’t b e possible, la ter.
Slide the gold connectors onto the
cable s. Pair one male co nnector wit h
one fem ale. Crimp the crimp tube
near the edge fir st, then a lit tle bit
inwards . Use an appropr iate, blunt
crimping tool.
28 | 29

GOLDKONTAKTSTECKER | GOLD CONNECTORS (OPTIONAL)
18 mm-Schr umpfschlauch bis zum
6
Rand des drehbaren Lamellenteils
(„Schneebesen“) vorschieben; dann
den 28 mm Stecker bis knapp über
den Rand der Buchse schieben, da
er auch in Längsrichtung schrumpft.
Vorsichtig mit einem Heißluftföhn
erhit zen (oder sehr vo rsichtig mit
einem Fe uerzeug). 8 0 - 130° C
Schrumpftemperatur.
Slide th e thin 18 mm shrink tube o ver
the male c onnector so t hat it just
reach es the “eggbe ater” spring , then
slide th e 28 mm shrink tube on to the
female c onnector, let ting it overl ap
a litt le. Shrink them c arefully with a
hot air bl ower or very careful ly with a
lighter. The shrink temperature is
80 - 130° C (180 - 270° F).

Den dicken Schrumpfschlauch wie-
7
der nach vorne sc hieben, so das s die
Stecker umschrumpft sind.
Slide th e thicker shrink t ube back
over the Y-se ction so that p art of the
conne ctors is cove red and shrink i t.
Auf der anderen Seite wiederholen, mit
8
gleicher Ancrimpung von Stecker/ Bu ch se .
Beim Rüc klicht muß unbe dingt auf
die Polarität geachtet werden!
Repea t on the other side, with an
inver ted install ation of the mal e and
female c onnector s. When connecting
our rear light, t he polarit y must not
be mix ed!
30 | 31

HALTERUNGEN | MOUNTING OPTIONS

SATTELSTÜTZENKLEMME | SEAT POST CLAMP
Optionale Montage: Klemmschelle für 27,2 & 31,6 mm
Sattelstützen für feste Montage
Mounting option: Seat post clamp for 27.2 & 31.6 mm
seat posts
Art. No. N-SPC-27.2-BLK (27.2 mm)
Art. No. N-SPC-31.6-BLK (31.6 mm)
Z-REFLEKTOR | Z-REFLECTOR
Gepäckträgermontage (StVZO zugelassen)
Rack mounting (approved by German law)
Art. No. N-ZR1
32 | 33

E3 TAIL LIGHT 2 – ALLGEMEINE HINWEISE | GENERAL INFORMATION
PFLEGEHINWEISE
• Nie einen Hochdruckreiniger benutzen
• Reinigen Sie das Rücklicht mit
Wasser und einem weichen Tuch
• Keine aggressiven Reinigungsmittel
verwenden (auch kein Alkohol!)
• Überprüfen Sie die Anzugsmomente
aller Schrauben regelmäßig
CARE INSTRUCTIONS
• Never use a high-pressure hose or
alcohol-containing fluids to clean.
• Clean the Tail Light with water
and a soft, clean cloth
• Do not use aggressive cleaning agents
(also no alcohol!)
• Check the mounting bolts from time
to time

GARANTIE & SERVICE
5 Jahre Garantie
Die Garantie erlischt bei unsachgemäß
durchgeführten Reparaturen und beim
Öffnen des Gehäuses. Informationen finden
Sie unter:
http://supernova-lights.com/service
Immer mehr Antriebshersteller arbeiten an
einer Kompatibilität zu unseren Produkten.
Daher gibt es regelmäßige Updates
der Anleitung. Bitte vergleichen Sie die
Versionsnummer auf der Titelseite mit
der aktuell online gestellten Version auf
unserer Webseite.
http://supernova-lights.com/download
Möge das Licht mit Ihnen sein!
WARRANTY & SERVICE
5 years warranty
The warranty is void if the housing is
opened and in case of unqualified repairs.
Information can be found at:
http://supernova-lights.com/en/service
More and more drive manufacturers work
with us to become Supernova-compatible.
This means that we will regularly update
this manual. Please compare the version
number on the cover with the latest version
on our website.
http://supernova-lights.com/en/download
May the light be with you!
34 | 35

DE | EN
SUPERNOVA DESIGN GmbH & Co. KG
Industriestr. 26 | 79194 Gundelfingen
Germany
+49 (0) 761 600 629 - 0
info@supernova-lights.com
www.supernova-lights.com
 Loading...