

SUPERNOVA®
DV-41 | DIGITAL VACUUM GAUGE
OPERATING MANUAL

SPECIFICATIONS
Vacuum Reading Range 100,000 to 10 microns
Power Supply AC adapter (included) or three AA alkaline batteries
Dimensions 13" length x 11" width x 3.5" depth
Shipping Weight 2.7 lbs (1.2 kg)
Warranty 12 months
FEATURES
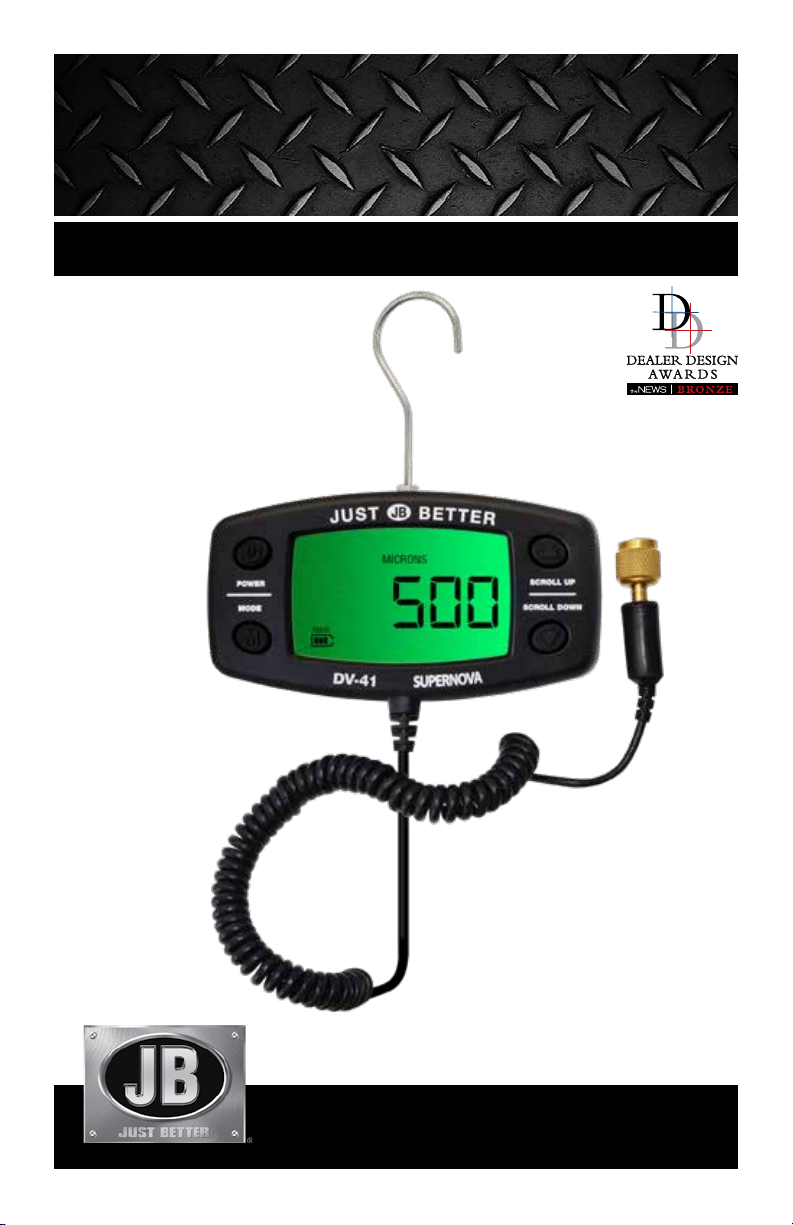
Hook
Display Screen
Power Button
Mode Button
Battery Status Indicator
M
Battery Cover (back)
Unit Selection
1/4" SAE Flare
Brass Fitting
with Flexible
5-ft Cord
Scroll Buttons
JB INDUSTRIES • DV-41 Operating Manual • 630.851.9444 • sales@jbind.com
2

OPERATING INSTRUCTIONS
Power Settings
To power on, press the POWER button once.
To power off, press and hold the POWER button for three seconds.
Main Menu Settings
To access the main menu user settings, press and hold MODE button for four seconds.
Alarm Settings
To enable the High Limit Alarm, hold the MODE button and press SCROLL UP.
To enable the Low Limit Alarm, hold the MODE button and press SCROLL DOWN.
To disable alarm, press POWER button once.
When alarm is sounding, press any button to turn off alarm.
Display Screen Start Up
Press POWER button once to power gauge on. If unit display does not light up, check for correct battery
installation. Startup display will show “JB”, “JUST BETTER”, a loading menu, followed by either the micron
value or the over range indicator “oooooo.”
The center bars in the loading menu move to indicate the unit is in initial warm up state. It may take up to 30
seconds for the unit to go into normal operation mode.
The unit will display “oooooo” when it is at atmospheric pressure, or at a pressure over 100,000 microns. This
indicates an over range condition. When the pressure is at or below 100,000 microns, the gauge will display
the value.
Note: The DV-41 is factory calibrated, field calibration is not required.
Loading Menu – Warm up mode Atmospheric Pressure –
Normal operation mode
JB INDUSTRIES • DV-41 Operating Manual • 630.851.9444 • sales@jbind.com
3

Battery Status Indicator
When the startup sequence is complete, the BATTERY STATUS INDICATOR will show current battery life status.
While the unit is on, the status is updated once every second. Battery status indicator is not visible if the DV-41
is connected to external power source (AC adapter).
Battery voltage status is as follows:
3.5v or above 3.0 ~ 3.5v 2.7 ~ 3.0v 2.4 ~ 2.7v 2.1 ~ 2.4v
When the battery voltage drops below 2.4 volts, the battery outline will flash and the unit will beep once per
minute to alert the low battery condition. When battery voltage falls below 2.1 volts, the shutdown timer is
activated. If voltage stays below 2.1 volts for thirty seconds, the DV-41 will beep once and power off. If power
is restored during this time, shutdown is canceled.
MENU SETTINGS
Accessing Main Menu and Sub Menu Settings
1. Press and hold MODE button for four seconds to access main menu settings.
2. Press SCROLL UP and SCROLL DOWN buttons to cycle through all available main menu options:
•
“UNIT”
•
“AL--LO”
•
“AL--HI”
•
“BEEP”
•
“HI RES”
•
“AU-OFF”
•
“B-LITE”
•
“VER ID”
3. To select a menu option, press the MODE button to access sub menu. Press the SCROLL UP and SCROLL
DOWN buttons to cycle through the sub menu options.
4. To select and store a sub menu option, press and hold the MODE button. Unit will display “STORED”, save
your selection and return to menu. Each time the DV-41 powers on, previously stored user settings will be
retrieved.
5. Press POWER button once to return to the main menu.
6. To exit main menu and return to normal operation mode, press the POWER button again.
Note: When scrolling through menu settings, the POWER button acts as the cancel/exit button.
JB INDUSTRIES • DV-41 Operating Manual • 630.851.9444 • sales@jbind.com
4

Unit Selection (UNIT)
When the alarm menu is active, a constant pressure value equivalent to 1000 microns is displayed using the
currently selected units (EG: 133.31 for Pascals). The current selection is shown at the top of the main display
screen.
Available unit selections are: Microns, PSIA, inHg, Pascals, Torr, mTorr and mBar.
Factory default setting is “MICRONS”.
To scroll the selection, use the SCROLL UP and SCROLL DOWN buttons.
To cancel, press the POWER button.
To select and store the setting shown, press the MODE button. When a setting is stored, you will be returned to
main menu selections. Press POWER to return to normal operation mode.
Low Alarm Setting (AL--LO)
The Low Alarm setting sets the pressure level where an alarm will be sounded. Setting a specific alarm level
selection DOES NOT make the alarm active; it specifies the pressure level BELOW which the alarm will sound
once the user enables the Low Limit Alarm (press MODE and SCROLL DOWN buttons to enable).
Available settings are: 50, 100, 250, 500, 1000, 1250, 1500, or 2000 microns.
Factory default setting is “500” microns.
Default values are listed in microns, however values will be displayed in the current units selected. For example,
if the user defined Unit Selection setting is Pascals, units displayed will be: 7, 14, 33, 66, 133, 166, 200, and
266 (The Pascal conversion of the 50 – 2000 micron values).
The “ALARM”, “LOW” icon will be displayed to indicate you are setting up the Low Limit Alarm.
To scroll the selection, use the SCROLL UP and SCROLL DOWN buttons.
To cancel, press the POWER button.
To select and store the setting shown, press the MODE button. When a setting is stored, you will be returned to
main menu selections. Press POWER to return to normal operation mode.
Low Limit Alarm
MODE and SCROLL DOWN buttons enable the Low Limit Alarm.
Low Limit Alarm can be enabled in all cases including when the pressure is in OVER RANGE except for when
the sensor is not connected.
An enabled Low Limit Alarm will display the “LOW”, “ALARM” icon on the main display screen, and will disable
the High Alarm setting.
If Low Limit Alarm is enabled and the pressure is less than or equal to the preset, user defined Low Alarm
setting limit value, the alarm will alert with a beep sound every second and “ALARM”, “LOW” icon will flash.
Beeping and flashing will continue even if the pressure rises above the Low Limit Alarm setting. Press any
button to turn off the alarm.
High Alarm Setting (AL--HI)
The High Alarm setting sets the pressure level where an alarm will be sounded. Setting a specific alarm level
selection DOES NOT make the alarm active; it specifies the pressure level ABOVE which the alarm will sound
once the user enables the High Limit Alarm (press MODE and SCROLL UP buttons to enable).
JB INDUSTRIES • DV-41 Operating Manual • 630.851.9444 • sales@jbind.com
5

Available settings are: 50, 100, 250, 500, 1000, 1250, 1500, or 2000 microns.
Factory default setting is “2000” microns.
The default values are listed in microns, however values will be displayed in the current units selected. For
example, if the user defined Unit Selection setting is Pascals, units displayed will be: 7, 14, 33, 66, 133, 166,
200, and 266 (The Pascal conversion of the 50 – 2000 micron values).
The “ALARM”, “HIGH” icon will be displayed to indicate you are setting up the High Limit Alarm.
To scroll the selection, use the SCROLL UP and SCROLL DOWN buttons.
To cancel, press the POWER button.
To select and store the setting shown, press the MODE button. When a setting is stored, you will be returned to
main menu selections. Press POWER to return to normal operation mode.
High Limit Alarm
MODE and SCROLL UP buttons will enable the High Limit Alarm ONLY IF the existing pressure is below the
preset, user defined High Alarm setting. If the existing pressure is higher than the preset, user defined High
Alarm Limit, the High Limit Alarm cannot be enabled. If the Low Limit Alarm is currently enabled, setting the
High Limit Alarm will disable the Low Limit Alarm even if the High Limit Alarm fails due to pressure readings
above the High Limit Alarm setting. An enabled High Limit Alarm will display the “HIGH”, “ALARM” icon on
the main display screen, and will disable the Low Alarm setting.
If High Limit Alarm is enabled and the pressure is greater than or equal to the preset, user defined High Alarm
setting limit value, the alarm will alert with a beep sound every second and the “ALARM”, “HIGH” icon will
flash. Beeping and flashing will continue even if the pressure drops below the High Limit Alarm setting. Press
any button to turn off the alarm.
Button-press Feedback (BEEP)
Key-press feedback determines whether an audible sound is heard each time a button is pressed.
Available settings are: ON, OFF. Factory default setting is “ON”.
To change the selection, use the SCROLL UP or SCROLL DOWN button. To cancel, press the POWER button.
To select and store the setting shown, press the MODE button. When a setting is stored, you will be returned to
main menu selections. Press POWER to return to normal operation mode.
Display Resolution (HI RES)
The display resolution menu allows you to select whether pressure will be shown at high resolution. High
resolution means that pressure is shown as-is, in one unit increments.
Available settings are: ON, OFF. Factory default setting is “OFF”.
When the setting is OFF, the reading display is rounded.
To change the selection, use the SCROLL UP or SCROLL DOWN button.
To cancel, press the POWER button.
To select and store the setting shown, press the MODE button. When a setting is stored, you will be returned to
main menu selections. Press POWER to return to normal operation mode.
Note: Even if high resolution display is ON, pressure values above 1000 microns will be rounded off according
to the current display pressure.
JB INDUSTRIES • DV-41 Operating Manual • 630.851.9444 • sales@jbind.com
6

Auto Shutdown (AU-0FF)
To conserve battery life, the DV-41 will power off after a period of inactivity (no button-press).
Available settings are: OFF, 10, 15, 30, 45, 60, or 90 minutes. Factory default setting is “30” minutes.
When Auto Shutdown is set to “OFF”, the DV-41 will not automatically power off.
To change the selection, use the SCROLL UP or SCROLL DOWN button.
To cancel, press the POWER button.
To select and store the setting shown, press the MODE button. When a setting is stored, you will be returned to
main menu selections. Press POWER to return to normal operation mode.
Note: Even if auto shutdown has been deactivated, a low battery condition will power off the DV-41.
Back Light Persistence (B-LITE)
Back Light Persistence determines the number of seconds that the back light will stay on after the last button
activity.
Available settings are: OFF, 10, 15, 30, 45, 60, or 90 seconds. Factory default setting is “10”.
To change the selection, use the SCROLL UP and SCROLL DOWN buttons.
To cancel, press the POWER button.
To select and store the setting shown, press the MODE button. When a setting is stored, you will be returned to
main menu selections. Press POWER to return to normal operation mode.
Note: While in the menu system, the back light will remain on unless it has been disabled by selecting “OFF”.
Version Information (VER ID)
The VER ID menu provides details regarding serial number and product/sensor firmware release versions. The
main CPU Firmware release version (EG: “Fr 1.87”) displays initially. Pressing SCROLL DOWN will display
the serial number (EG: “n12345”), and sensor CPU Firmware release version (EG: “Sr 6.45”). The POWER or
MODE button will return to menu selection.
MAINTENANCE
Cleaning Vacuum Sensor
1. Fill brass sensor fitting with a few drops of isopropyl alcohol.
2. Cover the opening with a finger and gently shake to allow alcohol to rinse the sensor.
3. Pour out alcohol and allow sensor to dry for 20 minutes before using gauge.
JB INDUSTRIES • DV-41 Operating Manual • 630.851.9444 • sales@jbind.com
7

PARTS LIST
PART NO. DESCRIPTION
DV-41 Digital vacuum gauge with AC adapter and carrying case
DV-40C AC adapter and carrying case only
DV-40AC AC adapter only
DV-40HK Hanging hook replacement
A34000D 1/4" QC x 1/4" access tee w/depressor
P511 Replacement gasket (6 pack)
P511-10 Replacement gasket (10 pack)
RETURN FOR REPAIR
Every effort has been made to provide reliable, superior quality products. However, in the event your instrument
requires repair, please contact JB Customer Service Department to obtain a Return Goods Authorization (RGA)
number. Ensure that all returned products are packed to avoid any damage in shipment. Paperwork should be
placed in a separate plastic bag and should include JB’s assigned RGA number, a description of the problem
and any customer assigned repair or purchase order number, if applicable.
Contact Customer Service for RGA number:
Products should be shipped with freight prepaid to:
JB Industries
800.323.0811 Toll
800.552.5593 Toll Fax
RGA#_________
601 N. Farnswor th Ave.
Aurora, IL 60505
630.851.9444 Tel
630.851.9448 Fax
WARRANTY
DV-41 Digital Vacuum Gauges are warrantied against defects in materials and workmanship for 12 months from
date of purchase. JB products are guaranteed when used in accordance with our guidelines and recommendations.
Warranty is limited to the repair, replacement, or credit at invoice price, (our option) of products which in our
opinion are defective due to workmanship and/or materials. In no case will we allow charges for labor, expense or
consequential damage. Repairs performed on items out of warranty will be invoiced on a nominal basis; contact
wholesaler for details. Additional product information available online at www.jbind.com.
WARNING: This product can expose you to chemicals including lead which are known to the State of California to
cause cancer and birth defects or other reproductive harm. For more information go to www.P65Warnings.ca.gov
JB INDUSTRIES
Part No. DV-41-308 0319
DV-41 Operating Manual • 630.851.9444 • sales@jbind.com
8
©2019 JB Industries, Inc.
 Loading...