

SuperMax FT 9950 Power Plus, AC 9200 Power Plus, 9400 Power Plus, 1X1 Power Plus User Manual

USER’S GUIDE

Please read the following recommended instructions carefully to avoid the risk of your physical
injury before the product is operated.
- Check the receiver's operation voltage : AC90-250V, 50/60Hz.
General Safety (Warning)
- Do not cover the receiver and keep a clear space around the receiver for sufficient ventilation.
- Keep a liquid away from the receiver.
- The receiver shall not be exposed to dripping or splashing and the objects that filled with
liquids such as vases shall not be placed on the receiver.
- Unplug the receiver from the wall outlet before cleaning.
- Use a soft cloth and a mild solution of washing-up liquid to clean the casing.
- Do not block the receiver's ventilation slots which are provided for ventilation and
protection against overheating.
-
Maintain the receiver in the free airflow
.
-Do not allow the receiver to be exposed to the hot, cold or humid condition.
- Do not use any cable and attachment that is not recommended as that may damage
your receiver.
- Unplug the receiver from the wall outlet and disconnect the cable between the
receiver and antenna when you will not use it for a long time.
- The wall outlet shall be placed near the receiver and shall be easily accessible
- Do not remove the cover to reduce the risk of electric shock.
1
- Do not attempt to service the receiver for yourself.
- Refer to a qualified service personnel for all technical supports.

Content
s
1. Overview
(1) The front of the digital receiver
(2) The back of the digital receiver
2. Remote control unit
3
3
4
3. M
enu Guide
3.1 Manager
(1) Channel Manager
(2) Event Timer
(3) USB Manager
3.2 Installation
(1) Dish Setup
(2) Positioner Setup
5
5
5
6
6
6
(3) Auto Scan
(4) Blind Scan
(5) Factory Reset
(6) Information
3.3 System Setting
(1) GUI
(2) Video
(3) Parental Lock
6
6
7
7
7
7
7
8
(4) Time
(5) Color setting
3.4 Interface
(1) Config
(2) Card
(3) CAM
(4) Ethernet
8
8
8
8
8
8
3.5 Utility
(1) Calendar
(2) Calculator
(3) Tetris
4. EPG (Electronic Program Guide)
5. Channel List information
6. Software upgrade by USB stick memory
8
8
9
9
10
2
7. Software upgrade by Serial (RS-232 cable)
8. Trouble shooting Guide
9. Specification
10
11
13
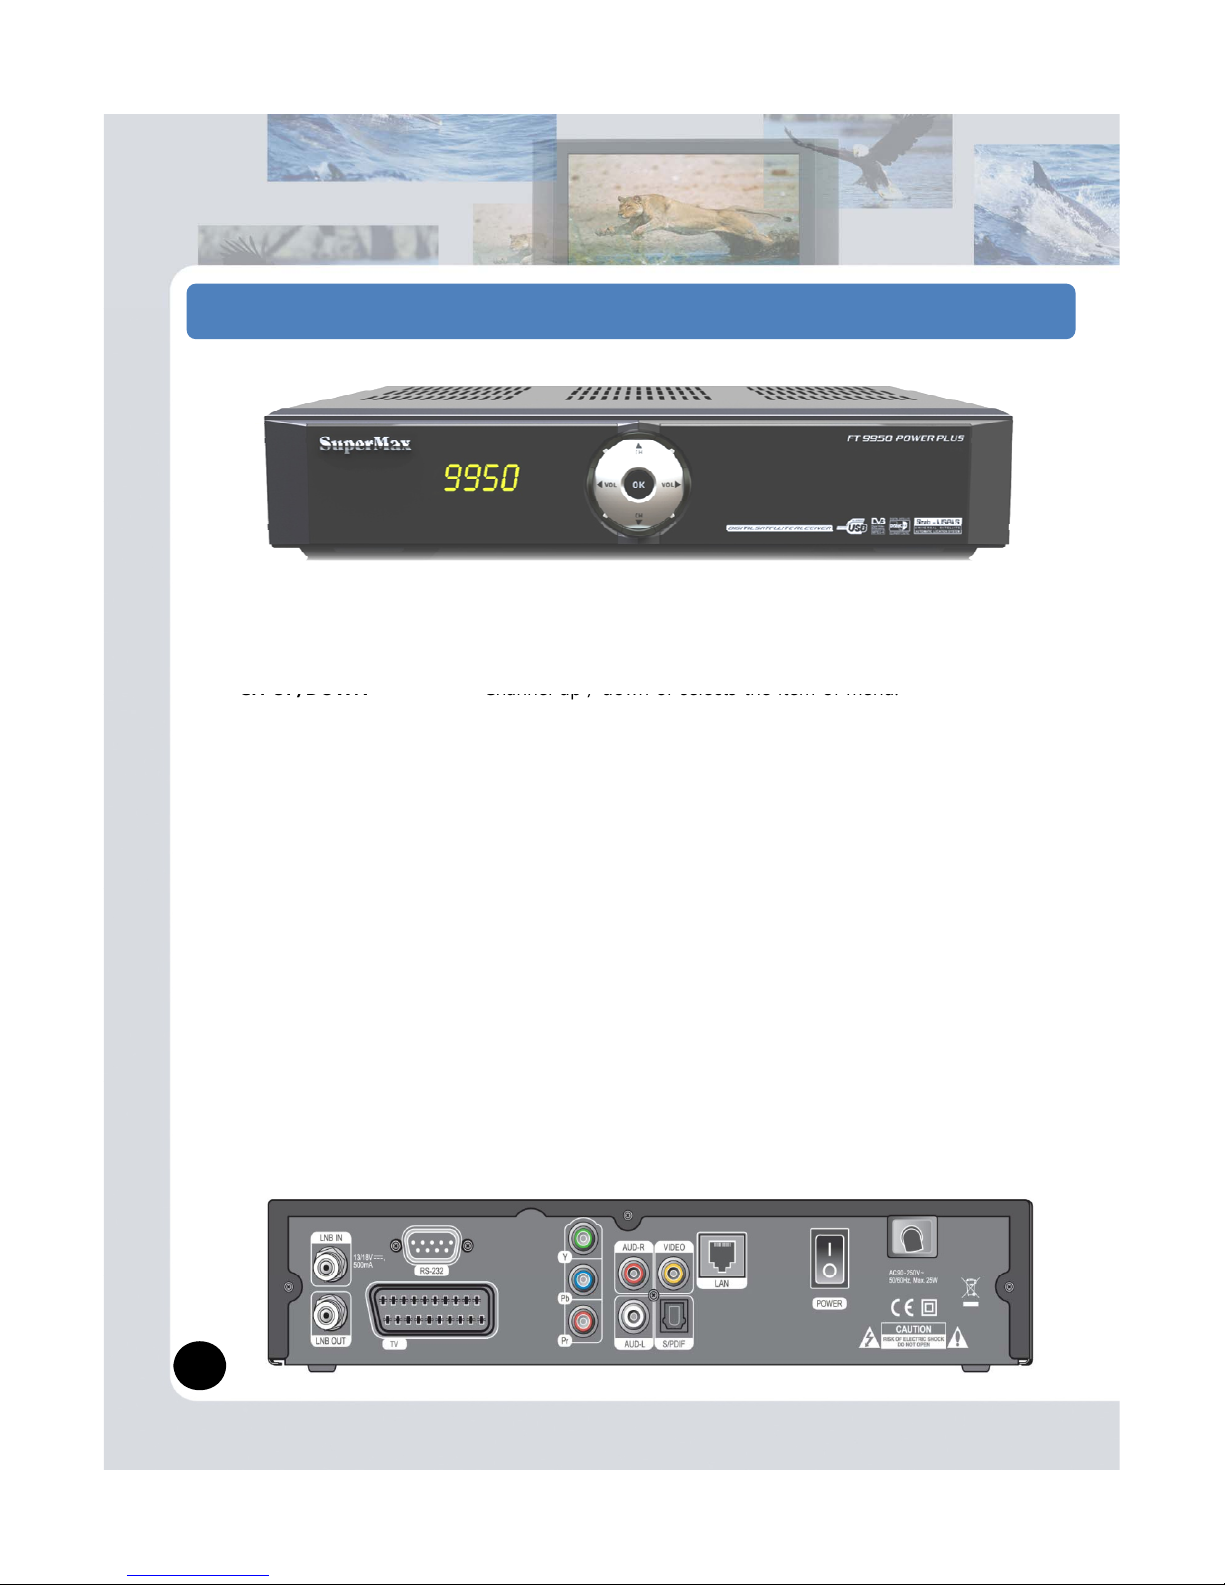
1. Overview
(1) The front of the digital receiver
STANDBY Switches the receiver power On and Standby.
VOL UP/DOWN Volume up / down or selects the item of menu.
CH UP/DOWN
Channel up / down or selects the item of menu.
USB Connects your USB devices to USB Port.
Firmware update, data transfer and Save recording files available.
Card Slot [Optional] Insert Smart Card to this slot.
CI Slot [Optional] Insert CAM to this slot.
(2) The back of the digital receiver
LNB IN Satellite broadcasting signal input socket.
LNB OUT Satellite broadcasting signal output socket through the LNB IN
socket for another digital receiver.
RS-232 Connects to personal computer for software upgrade.
TV SCART [Optional] Composite video output socket for the television set
TV OUT Connects to RF-Modulator Cable.
Y/Pb/Pr [Optional] Component video output socket for the television set.
VIDEO Composite video output socket for the television set(yellow).
AUDIO L/R
Stereo audio output socket for the television set or the audio
system(white/red).
S/PDIF [Optional] Dolby digital output socket for the audio system.
LAN [Optional] This is allows you to set network Configuration for network
applications.
3

STANDBY ( ) Switches between operation and standby
modes
SOURCE Switching among TV/AV/VCR mode
NUMERICAL BUTTONS (0~9) Used to enter a service
2. Remote Control Unit
number for service change or to specify values for menu
options
POSITIONER Control Diseqc1.2 or USALS miscellaneous
TUNING Control tuner signal miscellaneous
MUTE ( ) Mutes or un-mutes the audio temporarily
AUDIO Used to select alternative audio track and
audio channel (stereo, mono, etc)
SAVE
Saving each channels Audio volume.
BACK Recall
MENU Go to Menu
SAT Display Satellite list
EPG Electronic Program Guide
EXIT Exit
FAV Display Favorite channels list
INFO
Display channel detail information
TV/RADIO Switching TV / RADIO channel
COLOR KEYS (CA+, F+ …) Special functions
TELETEXT ( ) Enters the digital text service
SUBTITLE ( ) Displays the subtitle language list
SLEEP TIMER ( ) Sets the sleep timer
UHF RF-Modulator Channel control
COLOR Adjust Video color
MULTICH Multi feed
REWIND ( ) Reverse playback
PLAY/PAUSE( ) Play files or Pause
FORWARD ( ) Fast Forward
RECORD ( ) Starting channel record (PVR)
STOP ( ) Stop recording
Record List ( ) Display Record list
4
 Loading...