

Digital Satellite Receiver
Personal Video Recording
User's Manual
9300 USC


3
INDEX
INDEX ..................................................................................................................................................... 3
Precautions ............................................................................................................................................ 5
1. Important Safety Instructions ...................................................................................................... 5
2. Notice ......................................................................................................................................... 5
Before You Begin .................................................................................................................................. 7
1. Main Features ............................................................................................................................ 7
2. Accessories ................................................................................................................................ 8
Hardware Description ........................................................................................................................... 9
1. Front Panel Configuration .......................................................................................................... 9
2. Rear Panel Configuration ......................................................................................................... 10
3. Remote Control Unit ................................................................................................................. 11
Connections Diagram ......................................................................................................................... 14
1. Receiver to TV with RF ............................................................................................................ 14
2. Receiver to TV and VCR .......................................................................................................... 15
3. Receiver to Digital Audio Equipment ........................................................................................ 16
4. Connecting to Dish ................................................................................................................... 17
Guide of Functions ............................................................................................................................. 18
1. Selecting a Service ................................................................................................................... 18
1.1 Using CH UP/DOWN buttons .............................................................................................. 18
1.2 Using NUMERIC buttons
................................
.................................................................... 18
1.3 Using Service List ............................................................................................................... 18
2. Information Window .................................................................................................................. 18
3. Multi-Picture Display. ................................................................................................................ 18
4. Electronic Program Guide (EPG) ............................................................................................. 19
5. Satellite List .............................................................................................................................. 19
6. Favorite Group ......................................................................................................................... 19
7. Volume Control ......................................................................................................................... 19
8. Pause
................................
....................................................................................................... 19
9. Subtitle ...................................................................................................................................... 19
10. Audio Track .............................................................................................................................. 19

4
PVR (Personal Video Recorder) Function ........................................................................................ 20
1. Recording ................................................................................................................................. 20
1.1 Recording methods ............................................................................................................. 20
1.2 Instant Recording ................................................................................................................ 21
1.3 Recording Edit ..................................................................................................................... 21
1.4 Long Time Recording .......................................................................................................... 21
1.5 Pause during Recording ...................................................................................................... 22
2. Time Shifting ............................................................................................................................. 23
3. Playback (Play List) .................................................................................................................. 24
4. Bookmark ................................................................................................................................. 24
5. Trick mode ................................................................................................................................ 25
Guide of Main Menu ............................................................................................................................ 26
1. Configuration ............................................................................................................................ 26
1.1 Time Setting ........................................................................................................................ 26
1.2 Timer Manager .................................................................................................................... 26
1.3 UI (User Interface) Setting .................................................................................................. 27
1.4 Parental Control .................................................................................................................. 27
1.5 Language Setting ................................................................................................................ 28
1.6 A/V Output Setting .............................................................................................................. 28
2. Installation
................................
................................................................................................ 28
2.1 Dish Setting ......................................................................................................................... 28
2.2 Positioner Setting ................................................................................................................ 29
2.3 Service Search .................................................................................................................... 30
2.4 System Recovery ................................................................................................................ 31
2.5 System Information ............................................................................................................. 31
3. Utilities ...................................................................................................................................... 31
3.1 USB ..................................................................................................................................... 31
3.2 Data Transfer
................................
....................................................................................... 32
3.3 Recording Option ................................................................................................................ 32
3.4 Calendar .............................................................................................................................. 32
3.5 Calculator ............................................................................................................................ 32
3.6 Game ................................................................................................................................... 32
4. CA ............................................................................................................................................. 33
4.1 Conax smart card menu ...................................................................................................... 33
4.2 Smart card information ........................................................................................................ 33
5. Service List ............................................................................................................................... 34
5.1 Service List manager .......................................................................................................... 34
5.2 Service List Option .............................................................................................................. 35
Troubleshooting
................................
.................................................................................................. 36
Specifications ...................................................................................................................................... 37

5
Precautions
1. Important Safety Instructions
Read these instructions.
Keep these instructions.
Heed all warnings.
Follow all instructions.
Do not use this apparatus near water.
Clean only with dry cloth.
Do not block any ventilation openings. Install in accordance with the manufacturer’s instructions.
Do not install near any heat sources such as radiators, heat registers, stoves, or other apparatus
(including amplifiers) that produce heat.
Do not reverse the safety purpose of the polarized or grounding-type plug. A polarized plug has two
blades with one wider than the other. A grounding type plug has two blades and a third grounding
prong. The wide blade or third prong is provided for your safety. If the provided plug does not fit into
your outlet, consult an electrician for replacement of the obsolete outlet.
Protect the power cord from being walked on or pinched particularly at plugs, convenience
receptacles, and the point where they exit from the apparatus.
Only use attachments/accessories specified by the manufacturer.
Use only with the cart, stand, tripod, bracket, or table specified by the manufacturer, or sold with the
apparatus. When a cart is used, use caution when moving the cart/apparatus combination to avoid
injury from tip-over.
Unplug this apparatus during lightning storms or when unused for long periods of time.
Refer all servicing to qualified service personnel. Servicing is required when the apparatus has been
damaged in any way, such as power-supply cord or plug is damaged, liquid has been spilled or objects
have fallen into the apparatus, the apparatus has been exposed to rain or moisture, does not operate
normally, or has been dropped.
WARNING : To Prevent fire or shock hazard do not expose the set to rain or moisture.
2. Notice
Do not attempt to service this product by yourself. Do not remove the cover. Refer all serving to
qualified service agents.
These servicing instructions are for use by qualified service personnel only. To reduce the risk of
electric shock, do not perform any servicing other than that contained in the operating instructions
unless you are qualified to do so.
6
The apparatus shall not be exposed to dripping or splashing and that no objects filled with liquids,
such as vases, shall be placed on the apparatus.
The mains plug is used as the disconnect device. The disconnect device shall remain readily operable.
To reduce the risk of electric shock, do not remove
the cover (or back).
No user serviceable parts are inside.
Refer servicing to qualified service personnel.
The Lightning Flash with arrowhead symbol
within an equilateral triangle, is intended to
alert the user to the presence of un-insulated
"dangerous voltage" within the product
enclosure that may be of sufficient magnitude
to constitute a risk of shock to persons
The exclamation point within an
equilateral triangle is intended to alert
the user to the presence of important
operating and maintenance
(servicing) instructions in the
literature accompanying the product

7
Before You Begin
1. Main Features
Digital Satellite Receiver
Time Shifting with External USB 2.0 Devices (Max. 2 Hours)
Recording & Playback with External USB 2.0 Devices
Recording and Time Shifting Simultaneously
Recording and Playback Simultaneously
Event Recording by EPG
USB 2.0 Host Support(MP3 Player & JPEG Viewer)
Software & Channel Database Transfer via USB
MPEG-II Digital & Fully DVB Compliant
Blind scan
Multi-LNB Controlled by DiSEqC Control Version 1.0, 1.1, 1.2 and USALS
Multi-Satellite Search
Support EPG (Electronic Program Guide)
On-Screen Display with 65535 Color Full Resolution
Favorite Channel Groups
Powerful Channel Control by Favorites, Lock, Skip, Move and Delete
Multi-language Supported ( OSD & Menu )
Teletext Support
Maximum 10,000 channels Programmable
Multi-picture Display
Parental Lock / System Lock / Installation Lock
CVBS Video & Audio Output via RCA
CVBS, RGB Video & Audio Output via TV SCART

8
2. Accessories
NOTE : If any accessories listed above are missing, contact the sales representative where you
purchased this unit.
User's Manual
AAA size Batteries X2
Remote Control
RCA Cable
9
Hardware Description
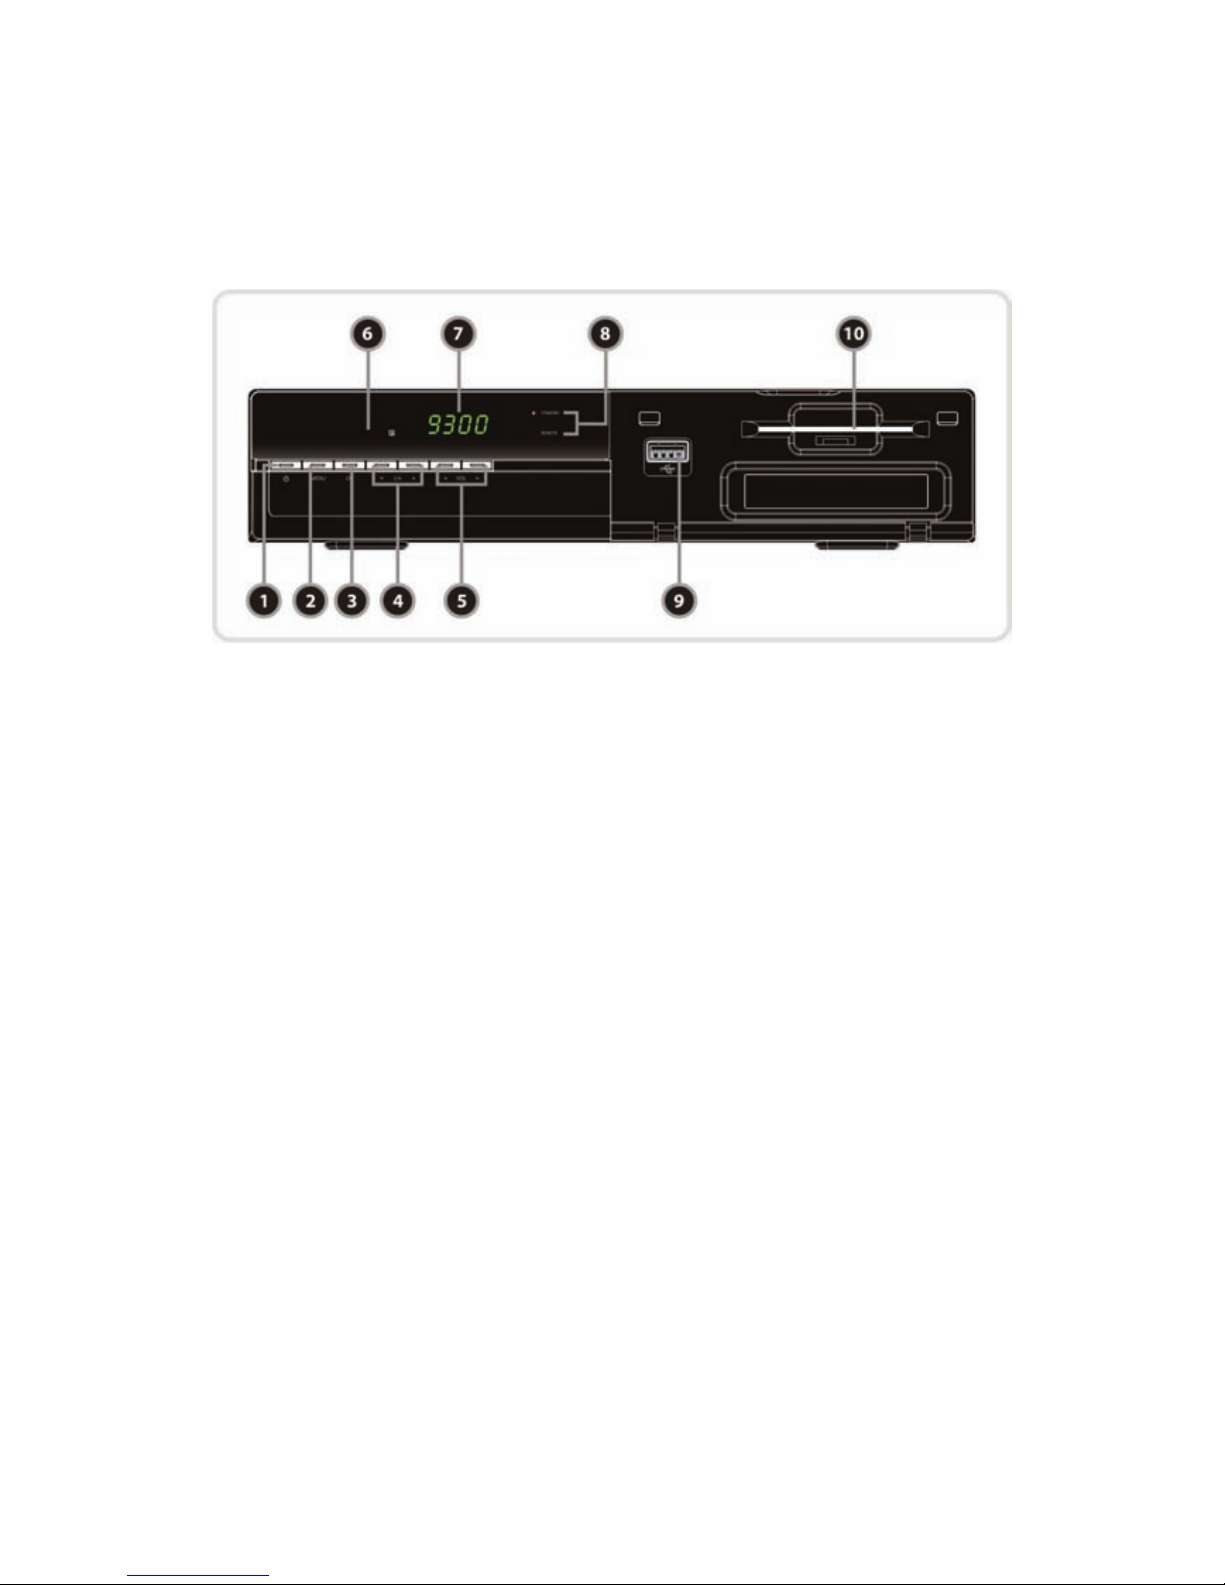
1. Front Panel Configuration
1. POWER BUTTON : Press to switch between STANDBY and POWER ON modes.
2. Menu BUTTON: Press to enter the main menu or to move to the previous menu.
3. OK BUTTON: Press to display the service list in non-menu mode and to select an item or confirm in
menu mode.
4. CH Up/Down BUTTON: Press to change services in normal mode or to move highlighted-bar in
menu mode.
5. Vol Up/Down BUTTON: Press to change audio volume in normal mode or to navigate menu in menu
mode.
6. Remote Sensor : Receives signal from remote controller.
7. Display : The 4-digit shows service number or menu state in normal mode. Show local time in
standby mode.
8. STANDBY Indication LED(RED) : The LED lights on in standby mode.
REMOTE Indication LED(GREEN) : The LED lights on when a key on the Remote Control is pressed.
9. USB (Front) : Use it when connecting to external USB storage device.
10. SMART Card Reader : Insert smart card for encrypted service access.
10
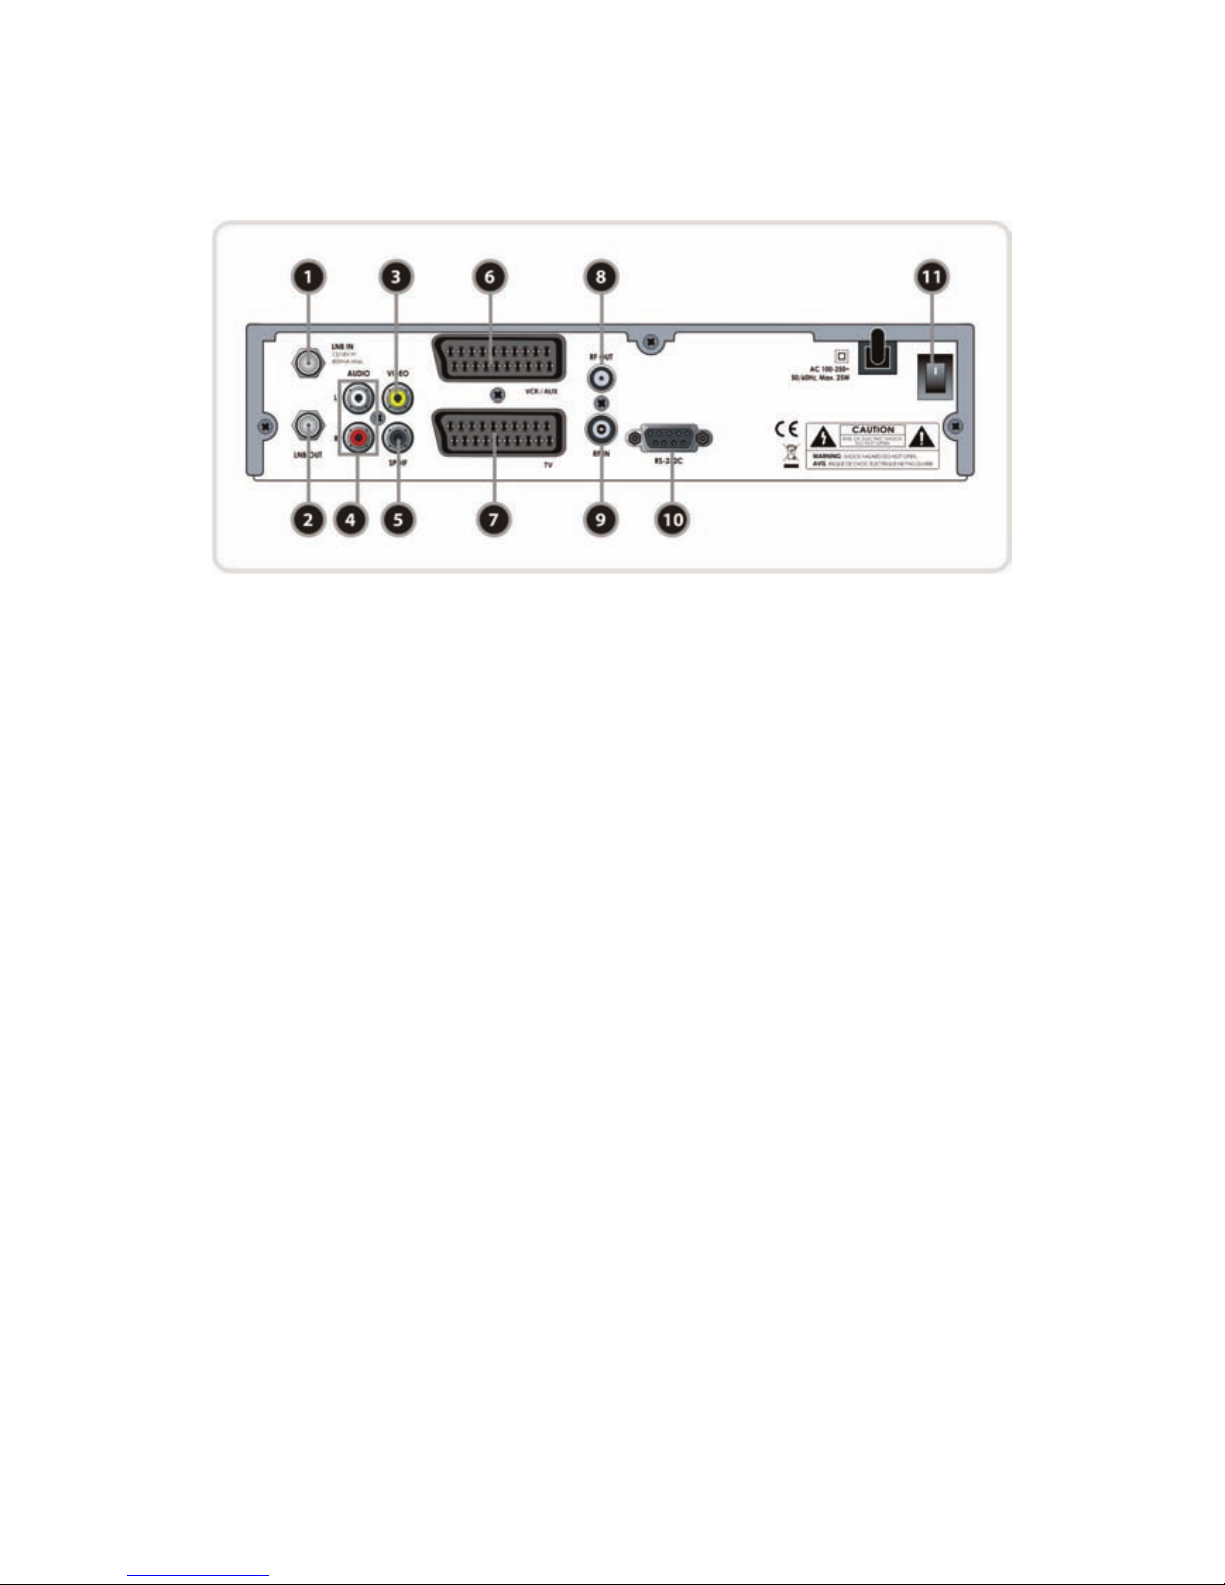
2. Rear Panel Configuration
1. LNB IN :
Use to connect a satellite antenna.
2. LNB OUT :
Use it when connecting to another STB for loop-through.
3. VIDEO :
Use to connect to video input of TV or VCR.
4. AUDIO L/R :
Use to connect audio left, right of TV or VCR.
5. SPDIF :
Use to connect SPDIF to digital audio equipment.( Optic)
6. VCR SCART:
Use to connect to the VCR via a SCART cable.
7. TV SCART:
Use to connect to the TV via a SCART cable.
8. RF OUT :
Use to connect to RF(ANT) input jack of TV.
9. RF IN :
Use to connect a general Aerial Antenna.
10. RS-232C :
Use it when connecting to your PC.
11. POWER:
Power switch
11
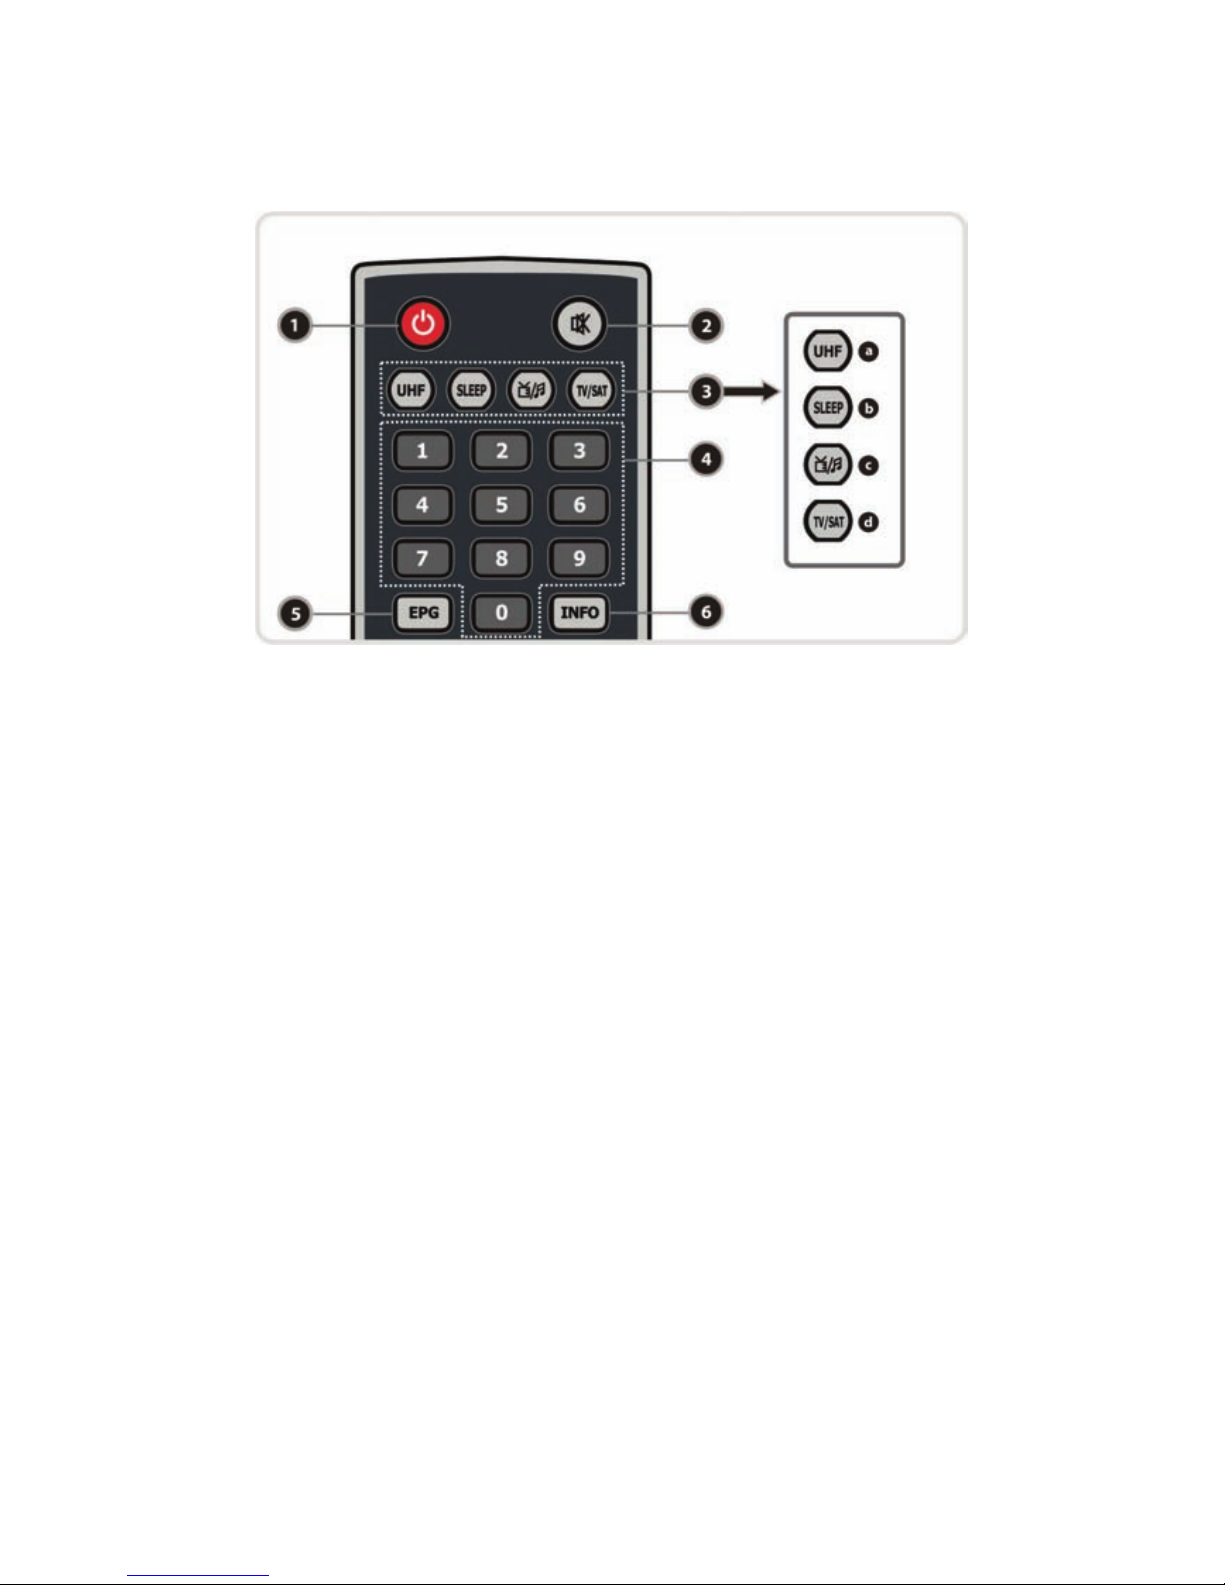
3. Remote Control Unit
1. POWER : Turns the STB On/Off.
2. MUTE : Turns the sound On/Off.
3. MODE
a. UHF : To adjust UHF ser vice.
b. SLEEP : To adjust sleep timer.
c. TV/STB : Toggles the TV output source between the cable input(STB mode) and UHF/VHF
antenna input(TV mode).
d. TV/RADIO : Switches between TV and Radio.
4. NUMERIC Keys : Controls the numerical operation and service numbers directly.
5. EPG(Electronic Program Guide) : Show the TV/Radio program guide.
6. INFO : Shows the information of the current program. If you press one more, detail information box
will be shown.
12
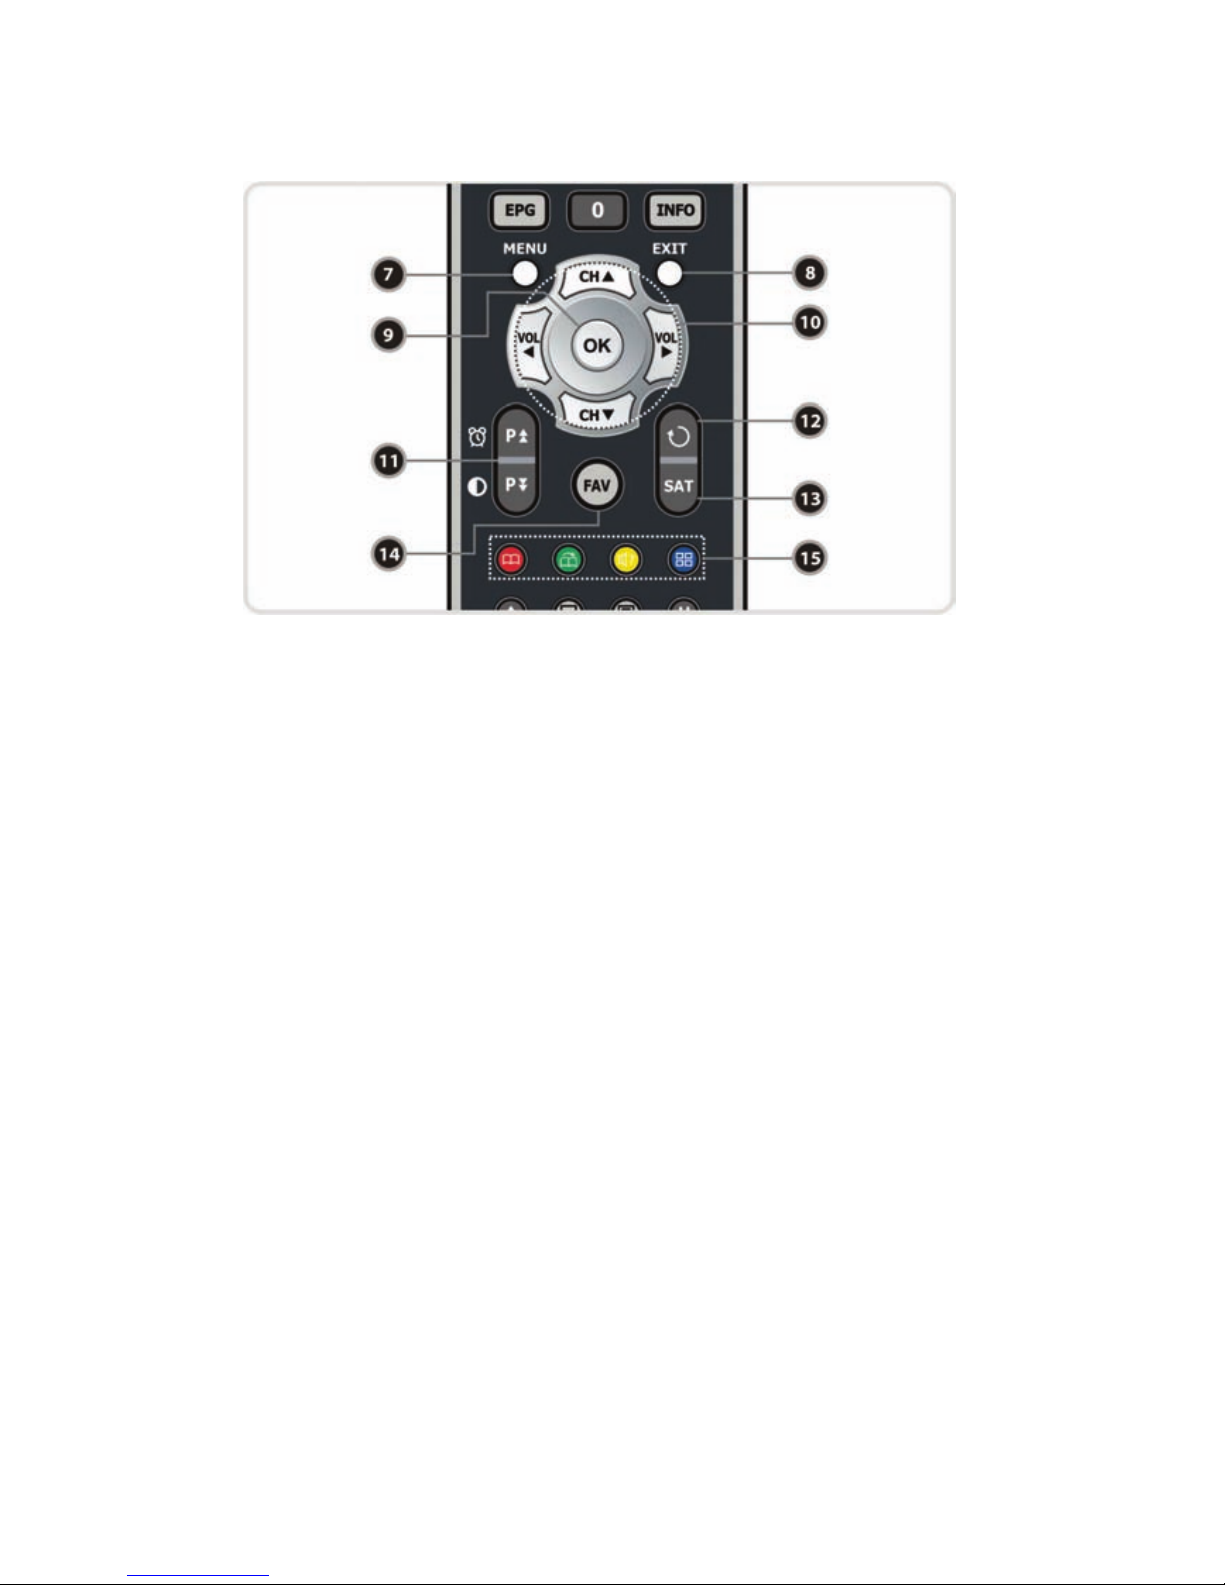
7. MENU : To enter the main menu or to move to the previous menu.
8. EXIT : Exit from the menu or pop-up window.
9. OK : Shows the service list in non-menu mode and select an item or confirm in menu mode.
10. ARROW : Moves the highlight bar for selecting options on the menus. And this key is used to change
services(UP/DOWN) or change audio volume(LEFT/RIGHT).
11. PAGE U P/DOWN : Move to the next or previous page if more than one page are available. PAGE UP
key is also used as hot-key to move to Timer Manager menu(Refer to Page 26, 1.2 Timer Manager).
And PAGE DOWN key is also used as hot-key to move to Picture Adjust window(Refer to Page 28 ,1.6
A/V Output Setting).
12. RECALL : Moves to previous service.
13. SAT : Shows the service list
14. FAV : To change the favorite groups.
15. COLOR Keys : Used for special function in menu. RED key is used to add or delete the current position
as a bookmark. GREEN key is used to go to the next bookmark position. BLUE key is used to display
multiple pictures.

13
16. PL AY L IST : To display recorded service list.
17. SUBTITLE : To show multilingual subtitle.
18. TELETEXT : To show the digital teletext.
19. PAUSE : This key is used to pause the video. Press once more to resume the video.
20. PREV FILE : To play the previous MP3 file in MP3 play mode.
21. NEXT FILE : To play the next MP3 file in MP3 play mode.
22. REWIND : Rewind when the progress bar is displayed. Start reverse playback. Change the speed of
reverse playback.
23. FAST FORWARD : Start fast forward or fast motion playback. Change the speed of forward playback.
24. RECORD : To start recording.
25. PL AY : Display the progress bar of playback when no progress bar is displayed. Start playback with
normal speed. Return to normal speed from trick mode.
26. STOP : To stop time shifting, play back or recording.
NOTE : When inserting batteries, make sure that the polarity (+/-) is correct.

14
Connections Diagram
1. Receiver to TV with RF
Connect the satellite antenna cable to LNB IN.
Connect the TV antenna to RF IN.
Connect the RF OUT to RF IN of TV.
Connect the VIDEO and AUDIO L, R to VIDEO IN and AUDIO L, R IN of TV.
Connect the TV SCART to SCART of TV.

15
2. Receiver to TV and VCR
Connect the satellite antenna cable to LNB IN.
Connect the TV antenna to RF IN.
Connect the RF OUT to RF IN of VCR.
Connect RF OUT of VCR to RF IN of TV.
Connect the TV SCART to SCART of TV.
Connect the VCR SCART to SCART of VCR.
Connect other jacks to the appropriate jacks of TV refer to above section, 1. Receiver to TV
with RF.

16
3. Receiver to Digital Audio Equipment
To get better quality audio, you can use digital audio via coaxial cable.
If you have a digital audio equipment, connect SPDIF to Digital audio input of the equipment.
Connect other jacks to the appropriate jacks of TV or VCR refers to above sections,
1. Receiver to TV with RF and 2. Receiver to TV and VCR.

17
4. Connecting to Dish
Using Single DISH : Connect the Satellite Antenna cable to LNB IN.
Using DiSEqC switch : Connect the cable of DiSEqC switch to LNB IN.
Using DiSEqC motor : Connect the cable of DiSEqC motor to LNB IN.

18
Guide of Functions
1. Selecting a Service
To select the desired service, you can use below methods.
1.1 Using CH UP/DOWN buttons
You can navigate between services using UP/DOWN buttons. Whenever you press the UP(DOWN)
button, current service will be changed to next(previous) service. You have to press UP or DOWN
button until find the service you want.
1.2 Using NUMERIC buttons
If you know the service number, enter the number directly using NUMERIC buttons.
1.3 Using Service List
To select the desired service in the service list, you should firstly
display the service list using OK button.
Use ARROW buttons to select a desired service and press OK
button.
In the Service List window, you can also use additional functions
with COLOR buttons.
Press RED button, you can sort the services by Alphabet,
Transponder, Group and CAS.
Press GREEN button, you can add the service to one of 10 favorites.
2. Information Window
If you want to view the current service information window press
INFO button. Then the Information window will appear.
This Information window is automatically displayed when
changing services. This window contains many items such as
service number, service name, scrambled service, Teletext, subtitle,
Dolby Digital symbol, duration time and so on.
Press INFO button once more, you can get more detailed
information.
3. Multi-Picture Display.
Press the BLUE button to display multiple pictures and RED
button display 9 or 12 multiple pictures option.

19
4. Electronic Program Guide (EPG)
Electronic Program Guide (EPG) helps you navigate through all the
possible viewing options.
The EPG supplies information such as program listings, start/end
times and detailed information about the program listings for all
available services. The availability and amount of these program
details will vary, depending on the particular broadcaster.
If you press EPG button, EPG menu will be displayed.
Press the ARROW buttons to move to other service or to see
previous/next guide.
Press EPG button once to view full EPG (Entertainment Program Guide) and press button twice to view
only selected EPG. Press button consecutively to go back and forth.
Press GREEN button to view next day EPG and RED button to view EPG for previous day.
Select the program by using the ARROW buttons then set the timer by pressing OK.
You can make a reservation for recording on EPG menu.
- Press RECORD button to reserve the event. This reservation can be checked under the Timer
Manager Menu.
- To cancel the reservation for recording by OK button at the appointed event.
- To edit the reservation for recording by RECORD button at the appointed event.
5. Satellite List
Select the SAT (satellite) button to view all satellite listings. Scroll through the various satellites using
the ARROW buttons, and select the appropriate satellite by pressing OK
6. Favorite Group
Select the FAV (favorite) button to view all favorite groups. Scroll through the various favorite group
using the ARROW buttons, and select the appropriate satellite by pressing OK.
7. Volume Control
To control audio volume while you are watching a service, press LEFT/RIGHT button to control
volume.
Volume control bar will be appeared in top of the screen.
When necessary, press MUTE button to turn audio sound on/off.
8. Pause
The PAUSE button is used to freeze the video. Press PAUSE button once more to resume the video.
9. Subtitle
To display Sub-title press SUBTITLE button on your remote control. Sub-title is based on the transmitted
data.
10. Audio Track
You can select the audio language list by pressing the AUDIO button. Use the ARROW buttons to choose
the audio track from the list than press OK to change.

20
PVR (Personal Video Recorder) Function
1. Recording
1.1 Recording methods
There are two types of recording method.
(Time Reserved Recording / Event Reserved Recording).
Time Reserved Recording :
- In Timer Manager you may set your time/program during
this process.
(Main Menu > Configuration > Timer Manager)
- Press GREEN button to activate the new timer edit screen.
- Timer Edit screen you may choose start date/time, duration,
service, mode, type (Recording/Play) and simply press Yes
button to reserve you recording schedule. Also, you must
set you start time and end time to minimum of 3 minutes;
start time must be present time.
Event Reserved Recording :
EPG screen choose the event you wish to reserve or record.
- During LIVE TV press EPG button to access EPG screen.
- Go to the event which you wish to view and then press OK.
The event will be reserved with BLUE play icon. This BLUE
play icon means that you want to just watch the event at
the reserved time.
BLUE play icon

21
- Press the OK one more time then the event will be reserved
with RED record icon. This RED record icon means that you
want to record the event at the reserved time.
- When you set an event for recording in EPG. It automatically
set in the Timer Event in Main Menu > Configuration >
Timer Manager.
1.2 Instant Recording
At anytime, you may press RECORD button to start you
recoding instantly.
1.3 Recording Edit
During recording, you may press RECORD button to edit
recording duration time. As it defaulted to 2 hours but you may
increase or decrease as you desire.
1.4 Long Time Recording
During long time recording process 4GB or more, additional files may be created every 4GB. (For
example; aaa.ts, aaa.ts1, aaa.ts2… and so on) You must remember not to erase any of duplicated file.
These files are only able to view with your PC not with receiver.
RED record icon

22
1.5 Pause during Recording
When PAUSE button is pressed during recording, only the live
video is paused, but recording is continued at the external
USB2.0 stroage device.
Press PAUSE button once again and event will resume from
the pause time.
During recording, press PLAY/TIMESHIFT button to show Play
bar screen.
While the Play bar is shown on your screen, you may use the
LEFT/RIGHT ARROW button to move (forward & backward)
freely within recorded time.
If you press STOP button, it will go to LIVE and you may press PREV FILE button to view recorded file
from the beginning.

23
2. Time Shifting
Press PAUSE button to pause the live TV but will continue to
record to external USB2.0 stroage device.
Press PAUSE button once again and event will resume from
the pause time.
While watching live TV, press PLAY/TIMESHIFT button to
show the play bar on your screen.
When the play bar is displayed on your screen, you may use
the LEFT/RIGHT ARROW buttons to move freely through
recorded times.
If you press STOP button while time-shifting, screen will be turned to live TV channel. You can also
use PREV FILE button to move to a start location of Time-shifted file.

24
3. Playback (Play List)
Press the PLAY LIST button to activate the Play List screen.
In Play List you may choose any of pre-recorded event(s) and
play it by pressing OK button.
In Play List screen, you may press RED button to choose the
event you wish to view in order listed in Play List. And, you
may press GREEN button to choose all event in the Play List.
In Play List screen, BLUE button to delete or rename already
recorded event.
In Play List screen, press RIGHT/LEFT ARROW button to
change other list. (MP3 Player, Image Viewer)
4. Bookmark
When Play bar is displayed, you may move to desired time and
book mark it by pressing the RED button. Bookmark(s) are
indicated with Green line on the play bar.
Also, you may press RED button to activate play bar to mark
your bookmark(s).

25
When the play bar is on, User can move / jump between the
bookmarks by pressing the GREEN button.
If you wish to delete any Bookmarks, go to that bookmark by
pressing green button, then press RED button to delete the
current bookmarks.
5. Trick mode
During play, press the FAST FORWARD button once to 2X
faster than regular playing speed and once more to 3X faster.
During play, press the REWIND button once to 2X faster than
regular paying speed.

26
Guide of Main Menu
To display the menu, press MENU button at any time. You can
select the sub menu using ARROW buttons. The selected sub
menu becomes highlighted. When you have selected the sub
menu you want, press the OK button. If you want to return to the
previous menu, press the MENU button. And if you want to exit
from the menu, press the EXIT button.
1. Configuration
1.1 Time Setting
Time Setting :
To set the current time, you can use two modes; Auto and
Manual.
Auto Time Setting
- Local Offset : Enter the offset value using the standardized
information of current service area.
- Daylight Saving : If you want to apply daylight saving,
select the country using ARROW buttons.
Manual Time Setting
- Date : Enter the calendar date by using ARROW buttons
then press OK to finish.
- Time : Enter the time by using the NUMERIC buttons.
Clock Mode :
Select the type of clock display(12 Hours or 24 Hours) using ARROW buttons.
Wake Up Mode :
Enter the time for the receiver to automatically power ON.
And you can choose one of Wake Up Mode as 'off' or 'Once' or 'Daily' or 'Weekly'.
- Wake Up Date : Select the date when STB is turn on. Press OK button to display calendar.
- Wake Up Days : Select a day of the week when STB is turn on.
- Wake Up Time : Enter the turn-on time of STB using NUMERIC buttons.
- Wake Up Service : Select the service when STB is turn on. Press OK button to display service list.
Sleep Mode :
- Sleep Date : Select the date when STB is turn off. Press OK button to display calendar.
- Sleep Days : Select a day of the week when STB is turn off.
- Sleep Time : Enter the turn-off time of STB using NUMERIC buttons.
1.2 Timer Manager
Insert a new timer entry or modify the existing timer entry.
To add new timer entry : Press GREEN button. Timer Edit
window will popup. You can set the specific start date, time,
duration and service for its reservation. And you can choose
one of Timer Modes as 'Once' or 'Daily' or 'Weekly'. You can
choose timer operation type as ‘Recording’ or just to 'Play'.
- If you choose 'Recording', it will start recording at that time.
- If you choose 'Play', it will change and tune to the service
that you wish to watch.

27
To modify existing timer entry : Choose the timer entry which you wish to modify and press OK
button.
To delete existing timer entry : Choose the timer entry that you want to delete and press RED
button.
NOTE : If you reserve one or more event through the EPG menu, the reserved event(s) will be
added to Timer Manager automatically.
1.3 UI (User Interface) Setting
OSD Transparency : Set a the OSD transparent type.
Info Box Position: Set the information window position.
Info Box Display Time: Set the display duration of volume bar
displayed on the screen after changing volume.
EPG OSD Type:
- Set ‘ Transparent’ : If you press EPG button, selected service
will be played in the background of EPG window.
- Set ‘ Picture in Graphic’ : If you press EPG button, selected
service will be played within the small box.
EPG Time Range : You can set the time range which is displayed at the same time in the EPG window.
Zapping Mode: You can set the zapping mode. Black screen means display the black screen when
channel changed. Freeze means display the last picture when change.
1.4 Parental Control
Access to services and programs is controlled by a 4-digit secret
code that is defined by the user. Whenever you attempt to
access parental control menu, the pop-up window will instruct
you to input a PIN code.(If necessary, you can change it.)
NOTE : The default PIN code is ‘0000’
Censorship : Set the parental guidance rating of highlighted
censorship classification. The parental level is given as agebased numbers.
Change Pin code : To change your PIN code, input the new
PIN code using NUMERIC buttons. To verify the new PIN code,
input the new PIN code again.
System : Set the access rights to system menu.
Installation : Set the access rights to Installation menu.
Configuration : Set the access rights to Configuration menu.
Edit Service : Set the access rights to Edit Service menu.

28
1.5 Language Setting
Menu Language : Select the desired menu language by using
the ARROW buttons.
NOTE : The Kind of languages can be changed depending
on the country sold. Available languages are
subject to change without prior notice.
Audio Language : Select the default language for audio when
changing services. If no other language is provided, then the
default language of current will be automatically selected.
Subtitle Language : Select the default language for subtitle when changing service.
1.6 A/V Output Setting
TV Type : Select the TV types.(PAL/NTSC/Auto) In Auto mode,
the STB is automatically selected as NTSC or PAL according to
the service played.
TV Aspect Ratio : Select the aspect ratio of TV which is
connected to STB.(4:3/16:9).
Display Format : Select the format which the video is to be
displayed on screen. (Letter Box/Pan Scan) In case of 16:9
mode, this option is not available.
Sound Mode : Set the audio mode which is output from the RCA jack. (Stereo/Mono/Left/Right).
RF Type : Select the RF type. (PAL G/I/K)
RF Service : Select a RF service. (21~69)
Picture Adjust : Adjust brightness, contrast and color of screen.
2. Installation
2.1 Dish Setting
Select the antenna and LNB settings for service search. The values that are set in this menu will be
available for selection in other service searching menus.
Satellite : Select the satellite which you want to search the service.
- Press the LEFT/RIGHT ARROW button to select the satellite.
- Select the wanted satellite name.
- If the desired satellite name is not listed then select User
Defined.
Frequency : Select frequency what you want to check the
signal.
LNB Power : Select the LNB power.
LNB Type : Select the LNB type.
LNB Frequency : Select the L.O. frequency that is set to
antenna.
- Use the LEFT/RIGHT buttons to select the LNB frequency.
- Loop-Through : If the required LNB frequency is not listed, then enter the frequency manually using
the NUMERIC buttons.
- When you select Universal in LNB type, both 9750 and 10600 are supported at the same time. And
LNB 22KHz setting is disabled.

29
LNB 22 Khz : When you use a dual LNB or two antennas connected to a 22 KHz tone switch box, make
22 KHz
DiSEqC 1.0 : If you use a DiSEqC 1.0 switch, select one of the DiSEqC inputs.
DiSEqC 1.1 : If you use a DiSEqC 1.1 switch, select one of the DiSEqC inputs.
Service Search : Press OK button to move to Service Search menu directly.
2.2 Positioner Setting
Satellite : Select the satellite which you want to search the Service.
- Press the LEFT/RIGHT ARROW button to select the satellite.
- Select the wanted satellite name.
- If the desired satellite name is not listed then select User Defined.
Frequency : Select frequency which you want to check the signal.
Positioner : Select the positioner
- None : (No Positioner)
- Using DiSEqC 1.2 :
Move : To move the dish, press LEFT/RIGHT button.
Positioner Command : To use various positioner command,
press OK button. Then, available positioner commands will
appear.
- Using USALS :
Move : To move the dish, press LEFT/RIGHT button.
Dish Longitude : Enter the longitude using the NUMERIC
buttons.
Dish Latitude : Enter the latitude using the NUMERIC
buttons.
Go To : Press OK button to rotate the dish to the configured
position.
Dish Setting : Press OK button to move to Dish Setting menu directly.
Service Search : Press OK button to move to Service Search menu directly.

30
2.3 Service Search
Satellite : Select the target satellite for search.
Search Mode : Select the following search mode.
Auto Search Mode
- Satellite : Press OK button to select the target satellite for search.
- Search Type : Select the search type.
- Network Search : You can select Off or On. When you select
‘On’, you can find more transponders using the home
network. As it refers to NIT during searching, if there is the
frequency information of other transponder, it searches the
other transponder besides the transponder that the user
inputs.
- Dish Setting : Press OK button to move to Dish Setting
menu directly.
- Positioner Setting : Press OK button to move to Positioner
Setting menu directly.
- Start Search : Press OK button to start search.
Manual Search Mode
- Frequency : Select the frequency from the list to search.
- Symbol rate : Enter the symbol rate using the NUMERIC
buttons.
- Polarity : Select the polarity. (Vertical/Horizontal)
- Search Type : Select the search type.
- Network Search : You can select Off or On. When you select
‘On’, you can find more transponders using the home
network. As it refers to NIT during searching, if there is the
frequency information of other transponder, it searches the
other transponder besides the transponder that the user
inputs.
- Start Search : Press OK button to start search
Dish Setting : Press OK button to move to Dish Setting menu directly.
Blind Search Mode
- Frequency : Set Auto to search whole frequency, Set Manual
to search only desired frequency.
-
Polarity :
Select the horizontal or vertical polarization you
wish to search.
- Search Type : Select the search type.
- Start Search : Press OK button to start search.
- Dish Setting : Press OK button to move to Dish Setting
menu directly.
Advanced Search Mode
- Frequency : Select the frequency from the list to search.
- Symbol rate : Enter the symbol rate by using the NUMERIC
buttons.
- Polarity : Select the polarity. (Vertical/Horizontal)
- Video PID : Enter the video PID using the NUMERIC buttons.
- Audio PID : Enter the audio PID using the NUMERIC buttons.
- PCR PID : Enter the PCR PID using the NUMERIC buttons.
- Start Search : Press OK button to start search.

31
2.4 System Recovery
System restore to factory default : This menu allows you to
restore the factory set values in case the user has encountered
some problems after changing any new parameters of service
data and others which may be in error. Press OK button to
erase all services and restore default setting.
System restore to stored position : This menu allows you to
restore the stored values including service data and system
parameters. Press OK button to restore all data.
Store system data : If you want to use system parameters and service data in the future, this menu
allows you to store current state. Press OK button to store current state.
2.5 System Information
This menu displays general information about the hardware and software version of your receiver.
3. Utilities
3.1 USB
MP3 Player : Stick the external USB memory into the provided
USB port on front panel. Once inserted, press OK button to
read external USB memory stick and choose the MP3 file from
the window you want to play.
Press INFO Button to show the ID3 tag information.
Image Viewer : You can display the image file that is in the
external USB memory stick on the screen. Select the image
file(JPEG format) and press OK button to display the image.
Playlist : You can play the recorded file that is in the external USB memory stick on the screen (Refer to
Play List)
Format : Before you use your USB external device, we recommend for you to format it by Format(USB)
menu.
NOTE : If you execute format, all data will be deleted.

32
3.2 Data Transfer
Transfer all System data to USB storage : If you want to
transfer and use BOTH of the current system parameters and
service data in the future, this menu will allow you to store
both data to your USB device. Press OK button to store current
data to external USB storage.
Transfer Service data to USB storage : If you want to transfer
and use ONLY the service data in the future, this menu allows
you to store current service data. Press OK button to store the
current service data to your external USB storage.
Data download from USB storage : This menu allows you to download the stored data from the
external USB storage to your STB. Press OK button to download data.
3.3 Recording Option
Recording Stop Message :
- Set ‘On’ : When you press STOP button in recording,
confirm window is displayed.
- Set ‘Off’ : When you press STOP button in recording, STB will
stop recording immediately with no message.
Time Shift(USB) :
You can adjust the time such as 30 Min / 60 Min / 120 Min.
In this case, time shifting function works automatically up to
time you set, if external USB device have enough space. If you
set ‘off’ this option, time shifting function never works.
3.4 Calendar
To display calendar, press OK button. Utilize ARROW buttons to
choose the date. If you press PAGE UP/DOWN button, you can
see past/next month of calendar.
3.5 Calculator
To use a calculator, press OK button.
3.6 Game
You can enjoy Games. (CAKEPIA, TETRS)
If you want to play the Game, select the Game with UP/DOWN buttons and press OK button.

33
4. CA
4.1 Conax smart card menu
To watch scrambled services, you need to have a appropriate
Conax smart card from the service providers.
- Insert a valid smart card into smart card slot.
- The message of ‘Smart card Initializing…’ will appear on the
screen.
- After message disappear, you can watch the service you
want.
4.2 Smart card information
You can view the current status of smart card.
- Select the slot what you want to view using ARROW
buttons. And press OK button.

34
5. Service List
5.1 Service List manager
Service List Manager menu will be appeared when press OK button.
You can select Edit Mode by press YELLOW button.
Lock Services : All service lists will be shown on left side of
window, right side will show make service to be lock. By using
ARROW and OK button you may move the chosen service to
right side window to lock service.
Move Services : All Service Lists will be shown on left window,
Service Lists for moving will be shown on right Window. Move
the Service to Right window by using ARROW and OK button,
then right window services will be moved to related location
when select desired location from the left window.
Delete Services : All service lists will be shown on left side of
window. By using ARROW and OK button you may select
services to be delete. And press GREEN button to delete the
selected services.
Skip Services : All service lists will be shown on left side of
window, right side will show make service to be skip. By using
ARROW and OK button you may move the chosen service to
right side window to skip service.

35
Set Favorite Services : Press FAV button to mark the favorite
group list. Once, favorite group is chosen, left side window will
show all service list marked and right side window will show
only the marked service list. Using ARROW and OK buttons
you may add any service to the favorite group or delete any
service from the favorite group.
Edit Services : All service lists will be shown on left side of
window. Move the highlighted bar to the service what you
want to edit its name and press OK button. Then you can see
the virtual keyboard. Using ARROW and OK buttons, you can
edit the service name.
5.2 Service List Option
Service List Preview :
- Setting ‘ON’
If you change service using ARROW buttons and press OK
button in the Service List, service will be played which you
want. But Service List still remains. To remove Service List on
screen, press OK one more time.
- Setting ‘OFF’
If you change service and press OK in the Service List,
service will be played. And Service List disappears at the
same time.
Service List Slide Popup :
- Setting ‘ON’
When you press RED or GREEN button in the Service List, pop-up window appears with slide-open
effect.
- Setting ‘OFF’
In the Service List, pop-up window is opened with no effect.
Lock Favorite Popup :
- Setting ‘ON’
If you press GREEN button to open Set Favorite menu, you must enter PIN code.
- Setting ‘OFF’
PIN code is not required.
View Only Filtered List :
- Setting ‘ON’
If you sort services with any category (A~Z, Transponder, Group or CAS) in the Service List, only
filtered services will be shown on the Service List.
- Setting ‘Off’
All services will be shown on the Service List. And filtered services are highlighted with yellow color.

36
Troubleshooting
Problem Solution
Does not display any message
on the front panel.
Check the main power cable and check that it is plugged into a
suitable power outlet.
Check you have switch the STB main power switch ON at the
rear of the STB.
No Picture
See ‘Does not display any message on the front panel’ above.
Check the video output port is firmly connected to the TV or
VCR.
If you are using the RF output, check that the RF lead is
connected firmly to the STB and TV/VCR.
Check that you have selected the correct channel or Video
Output on your TV.
If you are using the RF Output, check that you have correctly
tuned the UHF channel of the STB or TV.
Check the brightness level of the TV
Poor picture quality
See ‘No Picture’ above.
Check the signal level, if this is low then try adjusting the
alignment of your dish.
No Sound
See ‘No Picture’ above.
Check the volume level of the TV and STB.
Check the Mute status of the TV and STB.
Remote Control does not
operate
Point remote control directly towards the STB.
Check and replace batteries.
No or Bad Signal
Check the LNB ; Replace LNB if necessary.
Check the cable from the LNB.
Check the position of the dish; realign dish if necessary.
If you are using a DiSEqC 1.0 switch, check that you have
connected the LNBs to the correct connections on the switch.
Check the ‘Signal Level’ and the ‘Signal Quality’.

37
Specifications
Tuner & Channel Decoder
Input Connector
Loop through out
Frequency Range
Input Impedance
Signal Level
LNB Power
22KHz Tone
DISEqC Control
Demodulation
Input Symbol Rate
FEC Decoder
F-type, IEC 169-24, Female
F-type, IEC 169-24, Female
950MHz ~ 2150MHz
75Ω, unbalanced
-65 to -25dBm
13/18VDC, max.400mA
(22±2)KHz, (0.6±0.2)V
V1.0/1.2/USALS Compatible
QPSK
2 ~ 45 Ms/s
1/2, 2/3, 3/4, 5/6 and 7/8 with Constraint Length K=7
MPEG Transport Stream A/V Decoding
Tra n sport Stream
Profile Level
Input Rate
Video Formats
Video Resolution
Audio Decoding
Audio Mode
Sampling Rate
MPEG-II ISO/IEC 13818
MPEG-II MP@ML
Max. 15Mbit/s
4:3 LetterBox, 4:3 PanScan, 16:9
720 x 576, 720 x 480
MPEG/MusiCam Layer Ⅰ&Ⅱ
Stereo/Joint stereo/Mono
32KHz, 44.1KHz and 48KHz
Main System
Main Processor
Memory
Conexant Virgo
Flash-ROM : 2 MBytes
SDRAM : 32 MBytes
Audio / Video & Data IN/OUT
TV SCART
VCR SCART
RCA
S/PDIF
RS-232C
USB
RGB, CVBS Video, Audio L, R Output
CVBS Video, Audio L, R Output
RGB, CVBS, Audio L, R Input
CVBS Video Output, Audio L, R Output
Digital Audio Output (Coaxial)
9 pin D-SUB (Male) type, Transfer rate 115Kbps
USB 2.0 Host Support (5 Vdc 500 mA max)

38
RF Modulator
RF Connector
Frequency
Output Channel
TV Standard
Preset Channel
75Ω, IEC 169-2, Male/Female
470 ~ 860MHz
CH 21 ~ 69 for the Remodulator
PAL G/I/K Selectable by Menu
CH 36 (or TBD)
Software changeable by Menu
Front Panel
Slot
Buttons
Display
1 Smart Card Slot
1 USB Host Slot
7 Buttons (Power, Menu, OK, CH Up/Down, Vol Up/Down)
7-Segment
Power Supply
Input Voltage
Type
Power Consumption
Standby Power
Protection
AC 100 ~ 250V, 50/60Hz
SMPS
Max. 25W
Max. 8W
Separate Internal Fuse & Lighting protection
Physical Specification
Size (W x H x D)
Weight (Net)
Operating Temp.
Storage Temp.
260mm X 55mm X 210mm
1.2Kg
0°C ~ +45°C
-10°C ~ +70°C

39

Digital Satellite Receiver
9300 USC
V 11031Eng
 Loading...