


User's Guide
Network Video Recorder
Product Code: NI525A – Twister Super LoLux HD9 NVR


Contents
I
Contents
1 NVR Hardware - Super LoLux HD9 NVR ................... 11
1.1 Introduction ................................................................ 11
1.1.1 Product Description ..................................................... 11
1.1.2 Condition of delivery ................................................... 11
1.2 Package content .......................................................... 11
1.3 Server Overview .......................................................... 12
1.3.1 Front View ................................................................. 12
1.3.2 Rear View .................................................................. 12
1.3.3 Connections ............................................................... 12
1.4 Server Configuration ................................................... 13
1.4.1 Server Connections ..................................................... 13
Local Connection ......................................................... 13
Connection with Windows Remote Desktop ..................... 13
1.4.2 Change IP addresses in the camera network ................... 18
1.5 Configuration Settings Overview ................................. 19
1.6 Hardware Specifications .............................................. 20
2 NVR Software - General information ........................ 21
2.1 Architecture ................................................................ 21
2.2 Module overview ......................................................... 23
2.2.1 Administration services ................................................ 23
2.2.2 CameraManagement (SeeTec5_CM) .............................. 23
2.2.3 MultimediaDatabase (SeeTec5_MDB) ............................. 24
2.2.4 Extension services (SeeTec5_EXT, SeeTec5_AV,
SeeTec5_AVExport) ..................................................... 24
2.3 System requirements .................................................. 25
2.3.1 Client requirements ..................................................... 25
2.3.2 Server requirements ................................................... 25

Contents
II
3 NVR Software - Installation ..................................... 27
3.1 Installation information .............................................. 27
3.2 Standard installation ................................................... 28
3.3 Customized installation ............................................... 29
3.4 Distributed installation ................................................ 29
3.5 Update installation ...................................................... 32
3.5.1 Installing individual patches ......................................... 32
Installing patches for the SeeTec client or SeeTec
OfflineViewer for 32-bit operating systems ..................... 32
Installing patches for the SeeTec client or SeeTec
OfflineViewer for 64-bit operating systems ..................... 32
Installing patches for the SeeTec server for 32-bit
operating systems ....................................................... 32
Installing patches for the SeeTec server for 64-bit
operating systems ....................................................... 33
3.5.2 Adding or deleting components ..................................... 33
3.5.3 Installing a new complete version ................................. 33
3.6 License key .................................................................. 35
3.6.1 Requesting a license key .............................................. 35
3.6.2 Installing a license key ................................................ 36
3.7 Starting and stopping core services ............................ 36
3.7.1 SeeTec ServiceManager ............................................... 36
3.7.2 Starting the core services (without SeeTec
ServiceManager) ......................................................... 37
3.7.3 Stopping the core services (without SeeTec
ServiceManager) ......................................................... 37

Contents
III
3.8 Configuring encrypted communication in SeeTec 5 ..... 37
3.9 Access data ................................................................. 39
4 NVR Software - SeeTec client .................................. 41
4.1 File menu .................................................................... 41
4.1.1 Language selection...................................................... 41
4.1.2 Changing passwords .................................................... 41
4.1.3 Client configuration ..................................................... 42
Network tab ............................................................... 42
Client tab ................................................................... 43
User interface tab ....................................................... 44
Alarm suppression tab ................................................. 45
Input devices tab ........................................................ 45
4.1.4 Activating input devices ............................................... 45
Special cases and restrictions ....................................... 45
4.1.5 Changing profiles ........................................................ 46
4.1.6 Changing users ........................................................... 46
4.1.7 Change SeeTec Installation .......................................... 47
4.1.8 Add SeeTec Installation ............................................... 47
Assumptions .............................................................. 47
Limitations ................................................................. 47
Login......................................................................... 48
Settings ..................................................................... 49
User interface ............................................................. 49
4.2 Layer menu ................................................................. 50
4.2.1 Adding windows / layers .............................................. 50
4.2.2 Save local layer .......................................................... 50
4.2.3 Load local layer .......................................................... 51
4.2.4 Remove local layer ...................................................... 51

Contents
IV
4.2.5 Enabling / disabling fullscreen mode .............................. 51
4.2.6 Loading / restoring the user interface layout ................... 51
4.2.7 Restoring the default user interface ............................... 51
4.2.8 Keep aspect ratio ........................................................ 51
4.2.9 Frameless display ....................................................... 51
4.2.10 Hide status bar of cameras automatically ....................... 51
4.2.11 Camera overview, control, buttons, patrol, alarm list ....... 51
4.2.12 System events............................................................ 52
4.2.13 Search (Configuration Mode only) ................................. 52
4.3 Extras menu ................................................................ 53
4.3.1 Manual reference image comparison (Surveillance Mode
only) ......................................................................... 53
4.3.2 Image management (Configuration Mode only) ............... 54
4.3.3 Multi-configuration of video sources (Configuration
Mode only) ................................................................. 54
4.3.4 Image data multi-export to the client (Configuration
Mode only) ................................................................. 54
4.3.5 Image data multi-export to the server (Configuration
Mode only) ................................................................. 56
4.3.6 Status query for automated image data export ............... 57
4.3.7 Request Product ID (Configuration Mode only) ................ 57
4.4 Info menu ................................................................... 57
4.4.1 SeeTec 5 User's Guide ................................................. 57
4.4.2 Program .................................................................... 57
4.4.3 License ...................................................................... 57
4.4.4 System ...................................................................... 58

Contents
V
5 NVR Software - SeeTec Surveillance ........................ 59
5.1 General ........................................................................ 59
5.2 Configuration Mode ..................................................... 60
5.2.1 Adding hardware and saving images .............................. 62
Add new hardware component ...................................... 62
Add new hardware components by using the camera
configuration wizard .................................................... 62
Adding new hardware – Generic camera ......................... 64
Copying hardware ....................................................... 65
Changing settings ....................................................... 66
5.2.2 Time management ...................................................... 95
5.2.3 Maps ......................................................................... 96
5.2.4 Layers ....................................................................... 97
Generating layers ....................................................... 97
Create user-defined layers ........................................... 98
Generating layers with focus tiles .................................. 98
5.2.5 Web pages ................................................................. 99
Configuring websites ................................................... 99
5.2.6 Authorization Management ......................................... 100
Creating a new user .................................................. 100
Creating user groups ................................................. 100
Validity of groups ...................................................... 100
Rights management .................................................. 101
Password ................................................................. 104
5.2.7 User profiles ............................................................. 106
General ................................................................... 106
Image settings ......................................................... 108
5.2.8 Video classifications .................................................. 110
Existing video classifications ....................................... 110

Contents
VI
5.2.9 Alarm scenarios ........................................................ 111
Creating alarm scenarios ............................................ 111
General ................................................................... 111
Validity .................................................................... 113
Coloring ................................................................... 113
Test ........................................................................ 113
Server actions .......................................................... 115
Adding involved persons ............................................ 117
Enter text for message display .................................... 118
Play sound ............................................................... 118
Running external applications ..................................... 118
Visualization ............................................................. 118
Add alarm scenario by using the camera configuration
wizard. .................................................................... 119
Copying of alarm scenarios by using the camera
configuration wizard .................................................. 120
5.2.10 Buttons ................................................................... 121
Create button ........................................................... 121
Defining general settings for buttons ........................... 121
Selecting actions for Button ........................................ 121
5.2.11 Patrols..................................................................... 122
5.2.12 Server-controlled sequence ........................................ 123
Creating a sequence .................................................. 123
Adding a time or time range ....................................... 123
5.2.13 System Management ................................................. 125
Backup (MaxDB) ....................................................... 125
Manual backup ......................................................... 126
Work center calendar ................................................ 126
SMTP server ............................................................. 127

Contents
VII
E-mail Management .................................................. 127
SNMP server ............................................................ 128
NAT list ................................................................... 129
EBÜS interface ......................................................... 129
5.2.14 Event Management ................................................... 130
General ................................................................... 130
Automatic database purge .......................................... 130
Manual database purge .............................................. 130
System events.......................................................... 131
5.2.15 Server ..................................................................... 132
CameraManagement ................................................. 132
MultimediaDatabase .................................................. 132
Image data export .................................................... 133
5.3 Surveillance Mode ..................................................... 135
5.3.1 Map ........................................................................ 137
5.3.2 Camera overview ...................................................... 138
5.3.3 Flyout window .......................................................... 139
5.3.4 MPEG-4 / H.264 audio ............................................... 140
5.3.5 Patrol ...................................................................... 141
Start patrols ............................................................. 142
Pausing patrols ......................................................... 142
Stopping patrols ....................................................... 142
Switching positions ................................................... 142
Automatically repeating patrols ................................... 142
5.3.6 Digital zoom ............................................................. 142
5.3.7 PTZ control .............................................................. 143
Continuous control .................................................... 144
Absolute control ........................................................ 145

Contents
VIII
Controlling the camera by clicking on the camera image . 145
5.3.8 Button bar ............................................................... 146
5.3.9 Alarm list tab ........................................................... 146
5.3.10 Create, save, open and delete layers ........................... 148
Create temporary layer .............................................. 148
Save local layer ........................................................ 148
Load local layer ........................................................ 148
Remove local layer .................................................... 148
5.3.11 Automatic layer change ............................................. 148
5.3.12 Saving or loading the user interface ............................. 149
5.4 Report Mode .............................................................. 150
5.5 Archive Mode ............................................................. 153
5.5.1 Camera overview ...................................................... 154
Displaying camera recordings ..................................... 154
Displaying alarm details ............................................. 154
5.5.2 Player (old) .............................................................. 155
5.5.3 Player (new) ............................................................ 157
5.5.4 Extended alarm filters in the archive ............................ 158
5.5.5 SeeTec ISearch ........................................................ 159
Simple search ........................................................... 159
Expert mode ............................................................ 160
Write protection of recorded image data ....................... 161
5.5.6 Exporting image data ................................................ 162
Print image .............................................................. 162
Save image as file ..................................................... 162
Saving images as AVI file ........................................... 162
Exporting images (single camera) ............................... 163
Image data multi-export ............................................ 165

Contents
IX
6 NVR Software - SeeTec Administration .................. 167
6.1 General settings ........................................................ 167
6.2 Configure core services ............................................. 167
6.3 Configure management database (MaxDB) ............... 167
6.3.1 Backup the management database .............................. 168
6.3.2 Restoring management database backups .................... 168
6.3.3 Enlarging the storage space (adding volumes) .............. 169
6.3.4 Setting the MaxDB cache size ..................................... 169
6.4 Configure MultimediaDatabase .................................. 170
6.4.1 Adding zones to the MultimediaDatabase ...................... 170
Adding zones to the MultimediaDatabase ...................... 170
Adding zones to the MultimediaDatabase (network
storage) .................................................................. 171
6.4.2 Removing zones from the MultimediaDatabase .............. 172
6.4.3 Editing zones ............................................................ 172
6.5 Configure A/V export ................................................ 173
6.5.1 Enter a port ............................................................. 173
6.5.2 Using a primary or secondary FTP server ...................... 173
6.5.3 Select codec ............................................................. 173
7 NVR Software - General notes ............................... 175
7.1 Command line parameters ......................................... 175
7.2 Hot keys .................................................................... 176
7.3 Firewalls and SeeTec 5 .............................................. 177
7.4 User's Guides ............................................................ 177
8 NVR Software - Appendix ...................................... 179
8.1 SeeTec OfflineViewer ................................................ 179
8.1.1 Installation .............................................................. 179
8.1.2 Use ......................................................................... 179

Contents
X
8.1.3 Multiple layer ........................................................... 180
8.1.4 Play recordings ......................................................... 180
8.1.5 Save sequence as AVI file .......................................... 181
8.2 Sample alarm scenario configuration ........................ 181
8.2.1 Setting up Network I/O .............................................. 181
8.2.2 Creating and configuring alarm scenarios ..................... 182

NVR Hardware - Super LoLux HD9 NVR
11
1 NVR Hardware - Super LoLux HD9 NVR
1.1 Introduction
Dear customer,
Thanks a lot for choosing a high quality Super LoLux product.
1.1.1 Product Description
The Super LoLux HD9 NVR is a high performance network video recorder for smallscale video installations with up to 9 Super LoLux HD cameras. The Intel Atom
D525 1.8GHz Dual Core Processor offers powerful performance at real-time
recording of HD video streams with full resolution and maximum frame rates. The
system is equipped with a 2 TByte server hard disk. The integrated 4-Port PoE
switch delivers power for up to 4 IP Cameras which can be connected without any
extra switching hardware.
1.1.2 Condition of delivery
You receive a pre-configured and ready to use network video recording system.
The operating system Windows 7 and Super LoLux HD9 software is installed and
pre-configured. The build-in hard-disk includes two partitions. The first partition is
used for the operating system, VMS application software and other programs.
The second partition can be used as storage location for your video records.
1.2 Package content
1 Device Super LoLux HD9 NVR
1 Power supply
1 European power cord
1 CD – Documentation
NVR Hardware - Super LoLux HD9 NVR
12
1.3 Server Overview
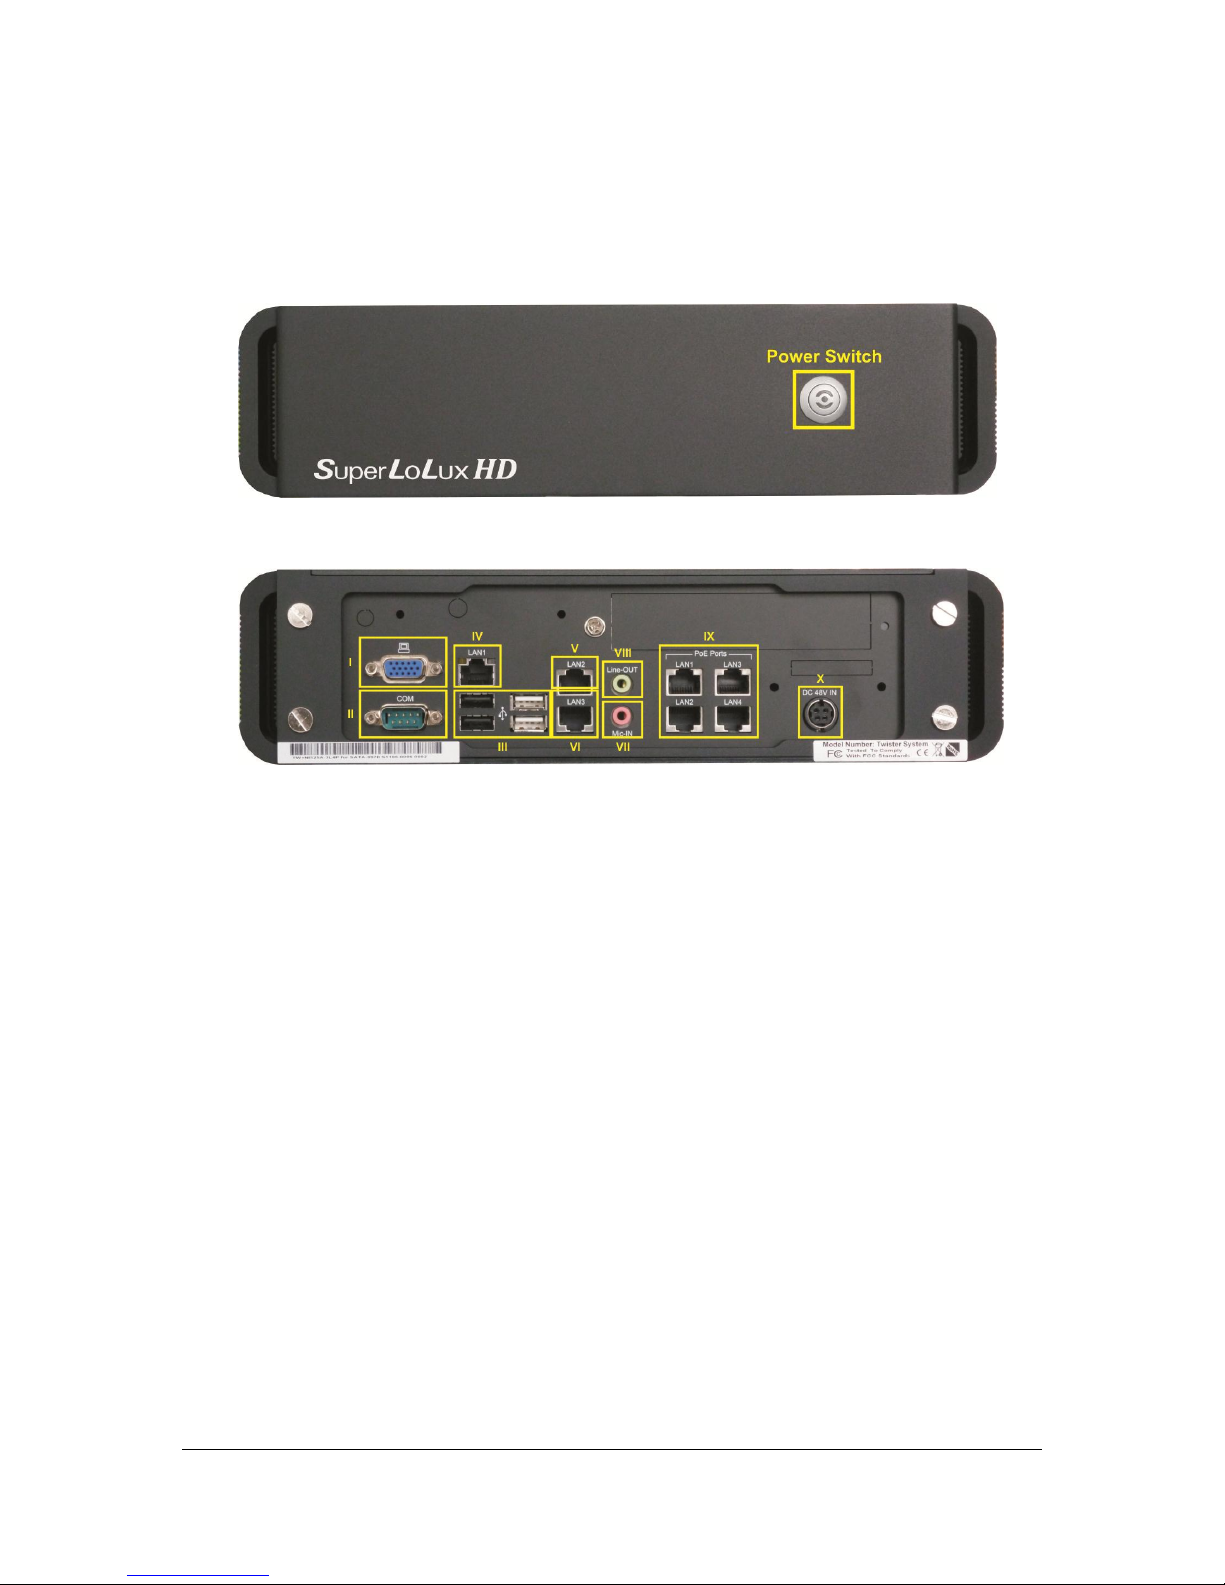
1.3.1 Front View
The power switch is located at the front.
1.3.2 Rear View
1.3.3 Connections
The following connectors are accessible on the back side:
I. VGA for monitor connection
II. Serial Port
III. USB Ports for USB device (keyboard, mouse )
IV. LAN-Device LAN1 (not used in factory default)
V. LAN-Device LAN2 (Client - Network)
VI. LAN-Device LAN3 (Camera - Network, bridged with the integrated PoE Ports)
VII. Audio Input
VIII. Audio Output
IX. PoE Ports for connecting PoE devices (Network-Cameras)
X. Power Supply connector
NVR Hardware - Super LoLux HD9 NVR
13
1.4 Server Configuration
Connect the power supply cable with the connection on the rear of the
Super LoLux HD9 NVR.
For server management please use one of the following options:
1.4.1 Server Connections
Local Connection
Connect monitor (I), mouse/keyboard (II) and a network cable at LAN2 (V)
Start the Server and login to Windows.
Use as user name: admin and Password: jvc.
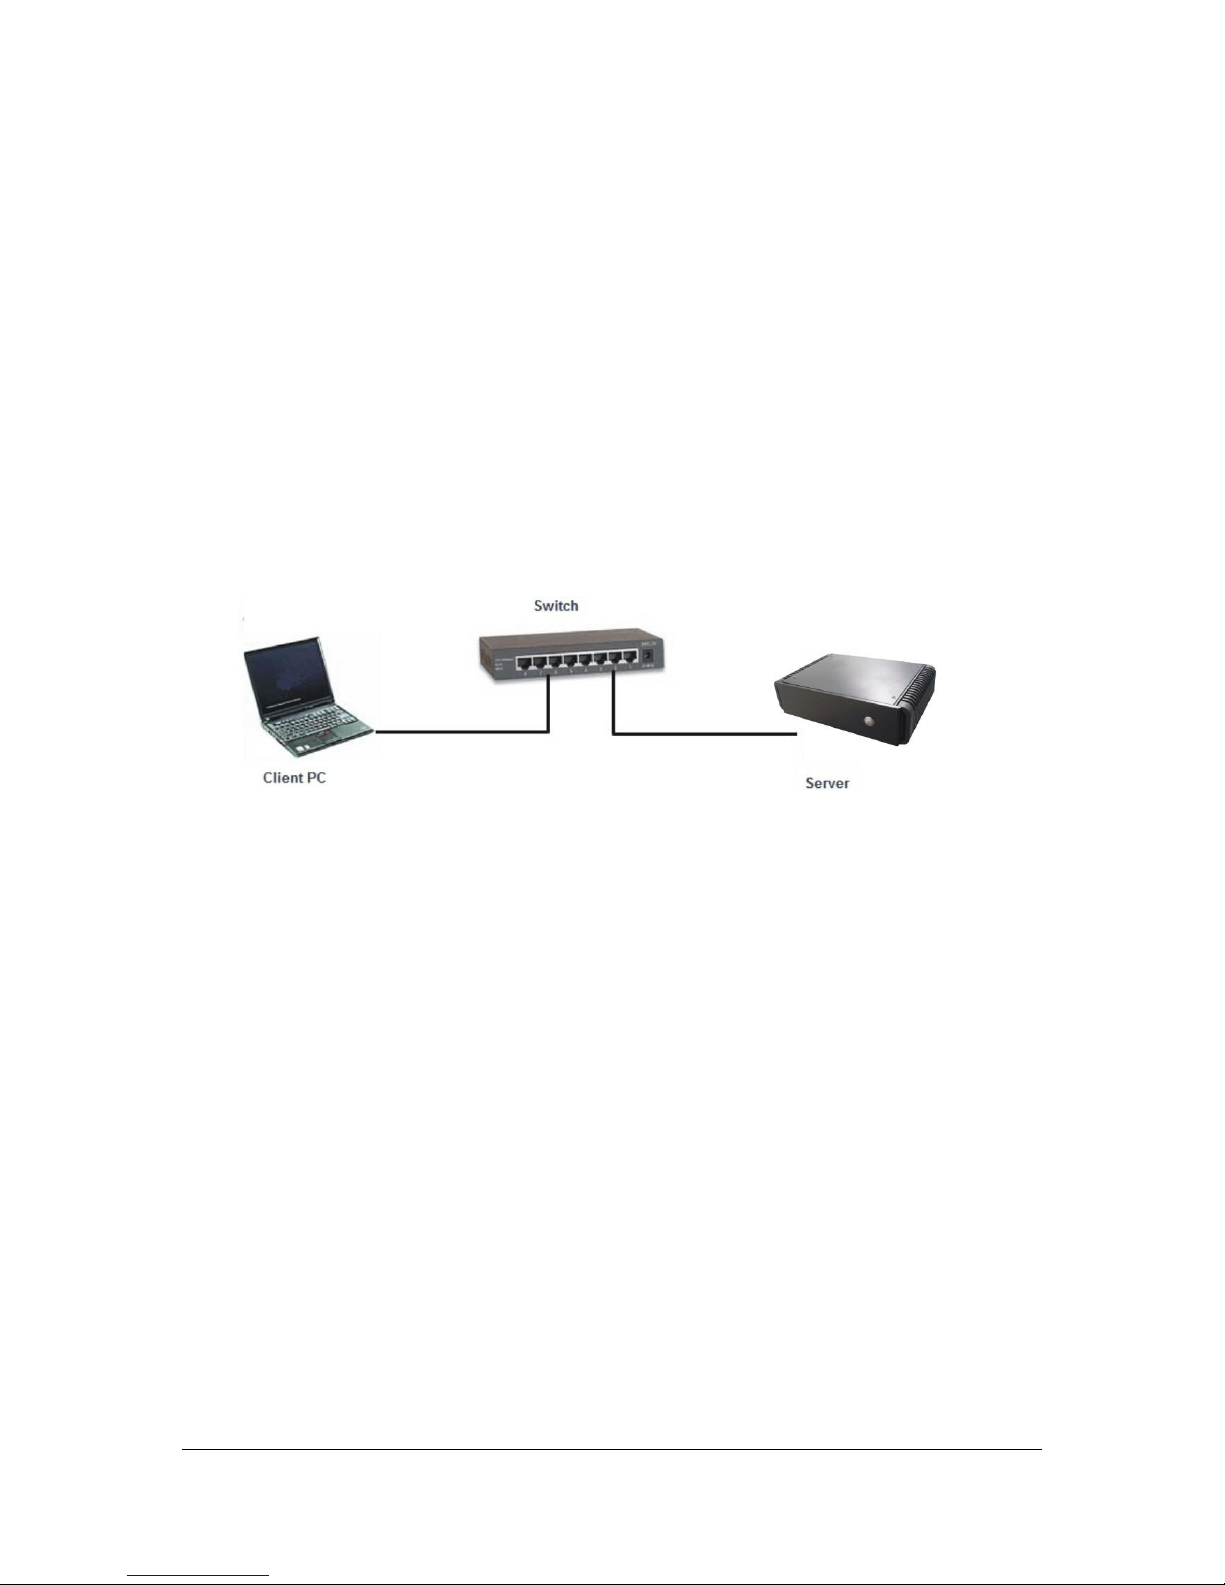
Connection with Windows Remote Desktop
Connect the Server with a network cable at LAN2 (V) and a Switch.
Connect a Client PC via the same Switch.
NVR Hardware - Super LoLux HD9 NVR
14
a) On LAN2 the Super LoLux HD9 NVR is configured with the IP address
192.168.2.100. Configure the Client PC with an IP address in the same
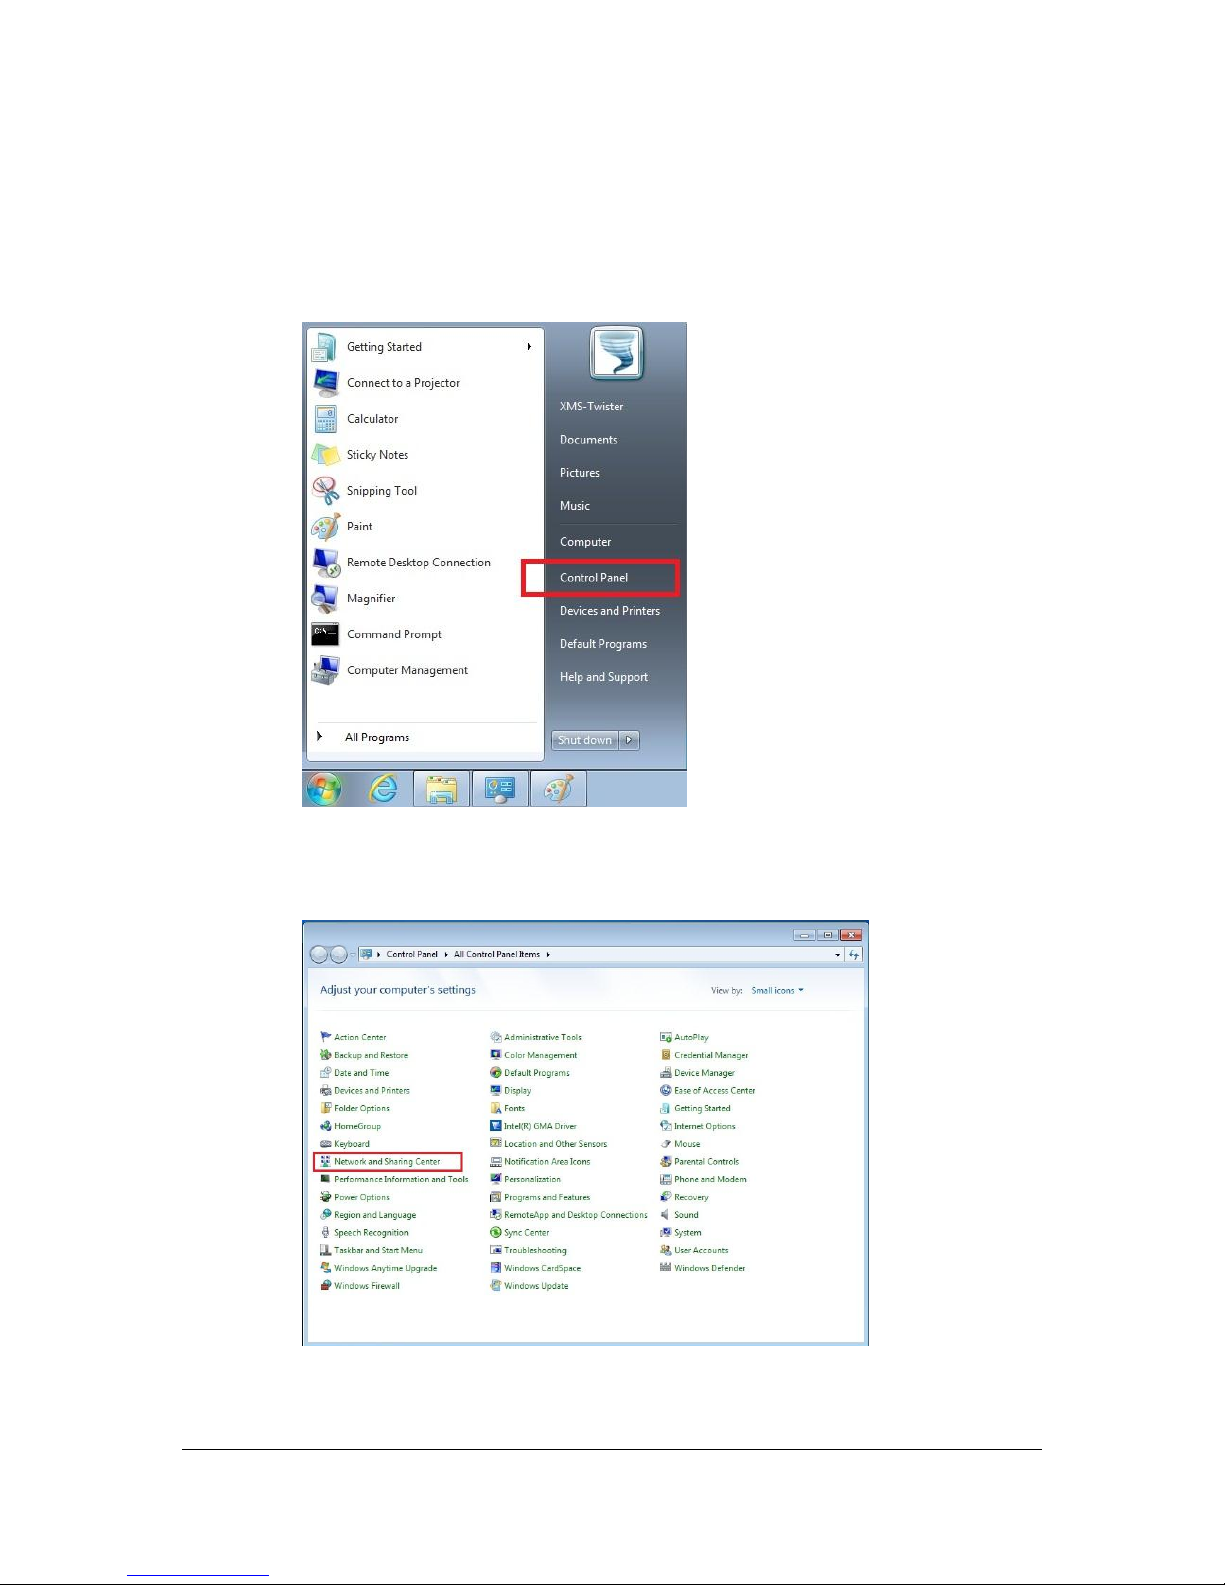
subnet. Open the “Control Panel” via “Start” button to access “Network and
Sharing Center”.
b) Select the „Network and Sharing Center“ option to access the “Network
Adapter Settings”.
NVR Hardware - Super LoLux HD9 NVR
15
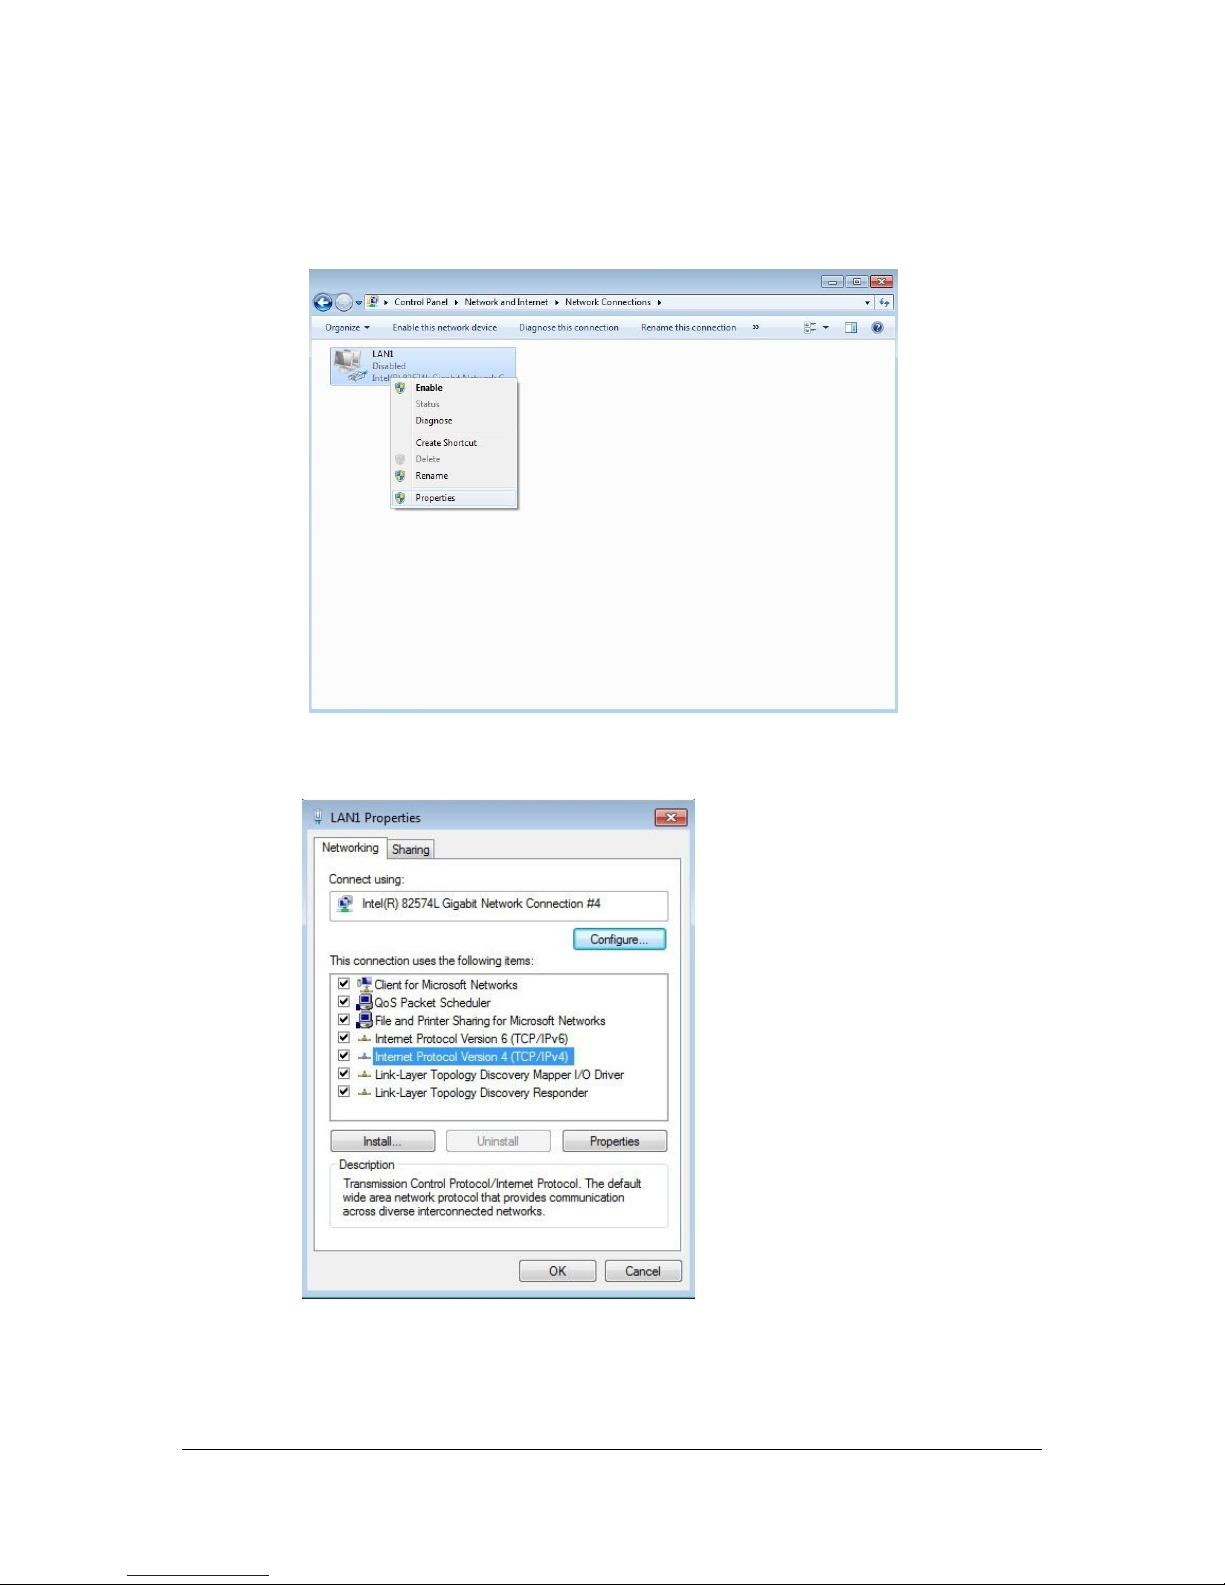
c) Open the „Change adapter settings“ option.
Right-click your Ethernet connection and choose “Properties”
d) Open „Internet Protocol Version 4 (TCP/IP)“.
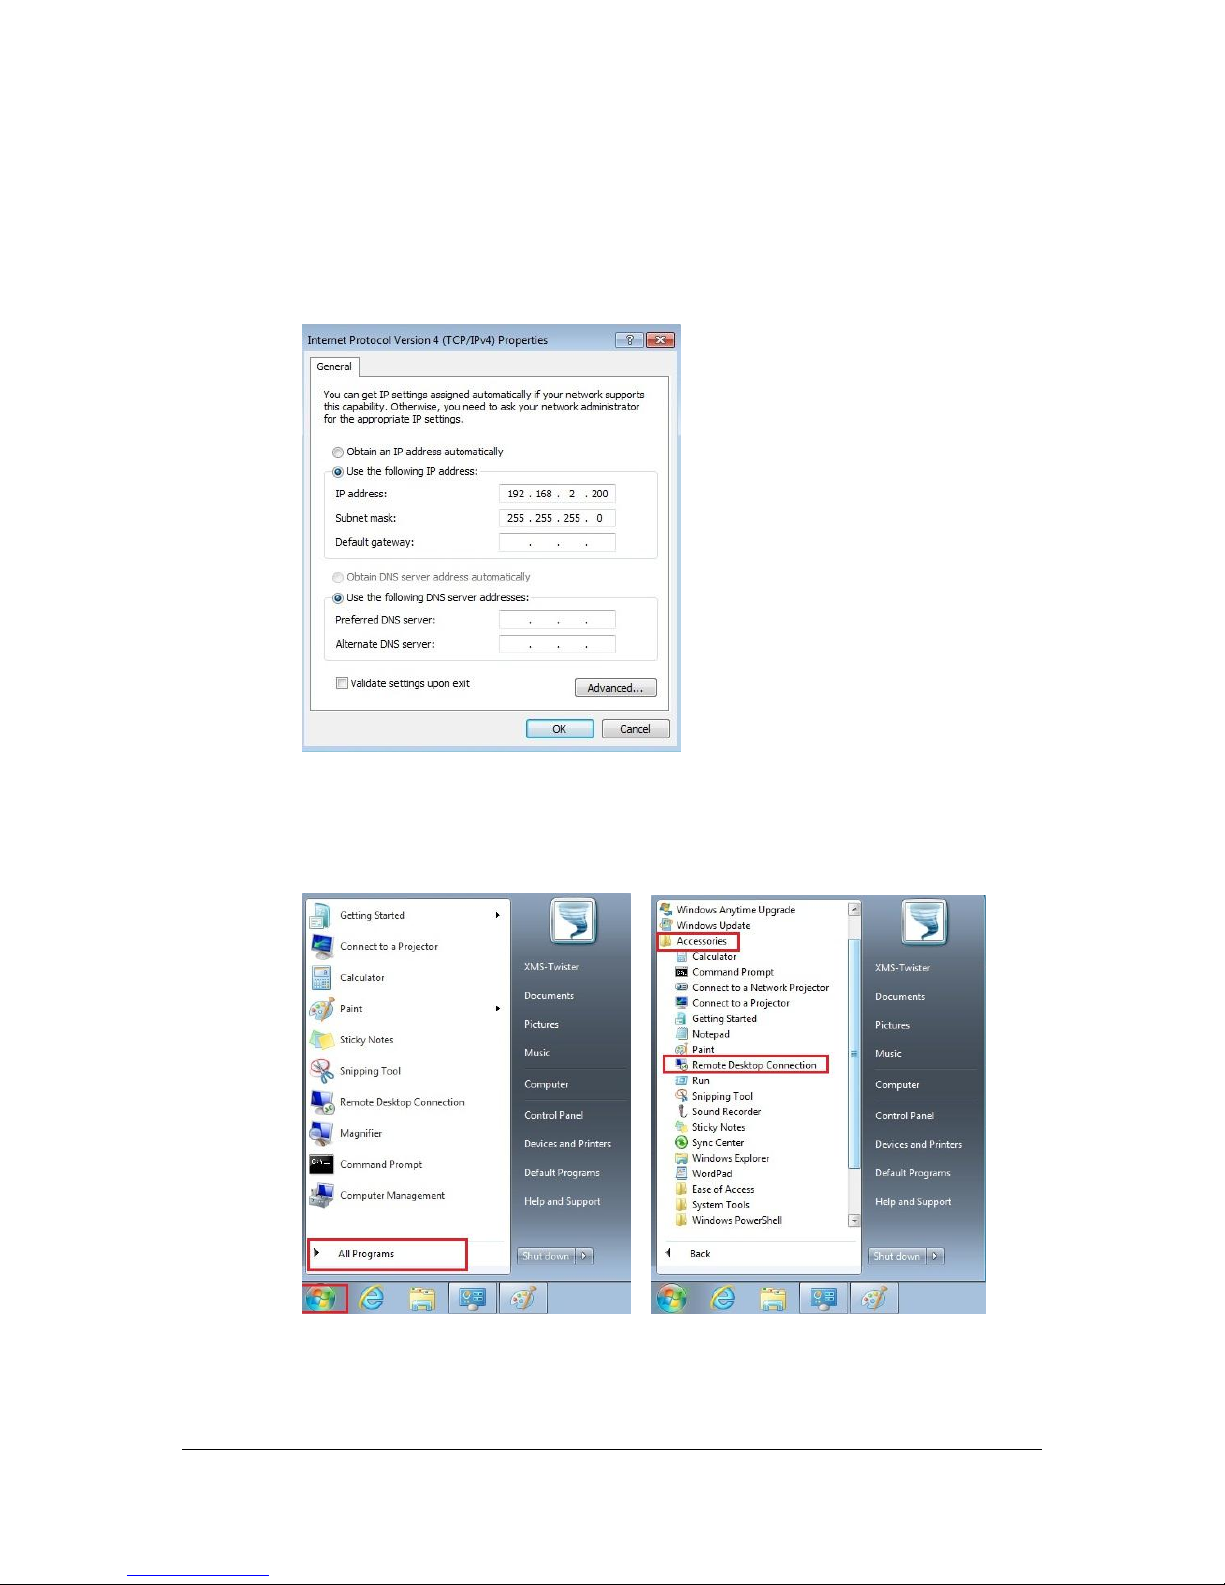
NVR Hardware - Super LoLux HD9 NVR
16
e) Assign an IP address in the same range like the Server 192.168.2.xxx
(1-99; 101 - 254)
Please note: Avoid the use of IP addresses which are already assigned to
other devices like your Internet Router or the Super LoLux HD9 NVR.
f) After changing the IP close all windows with press „OK“
Go back to the desktop and open the “Remote Desktop Connection” via
“Start” -> “All Programs” -> “Accessories”
NVR Hardware - Super LoLux HD9 NVR
17
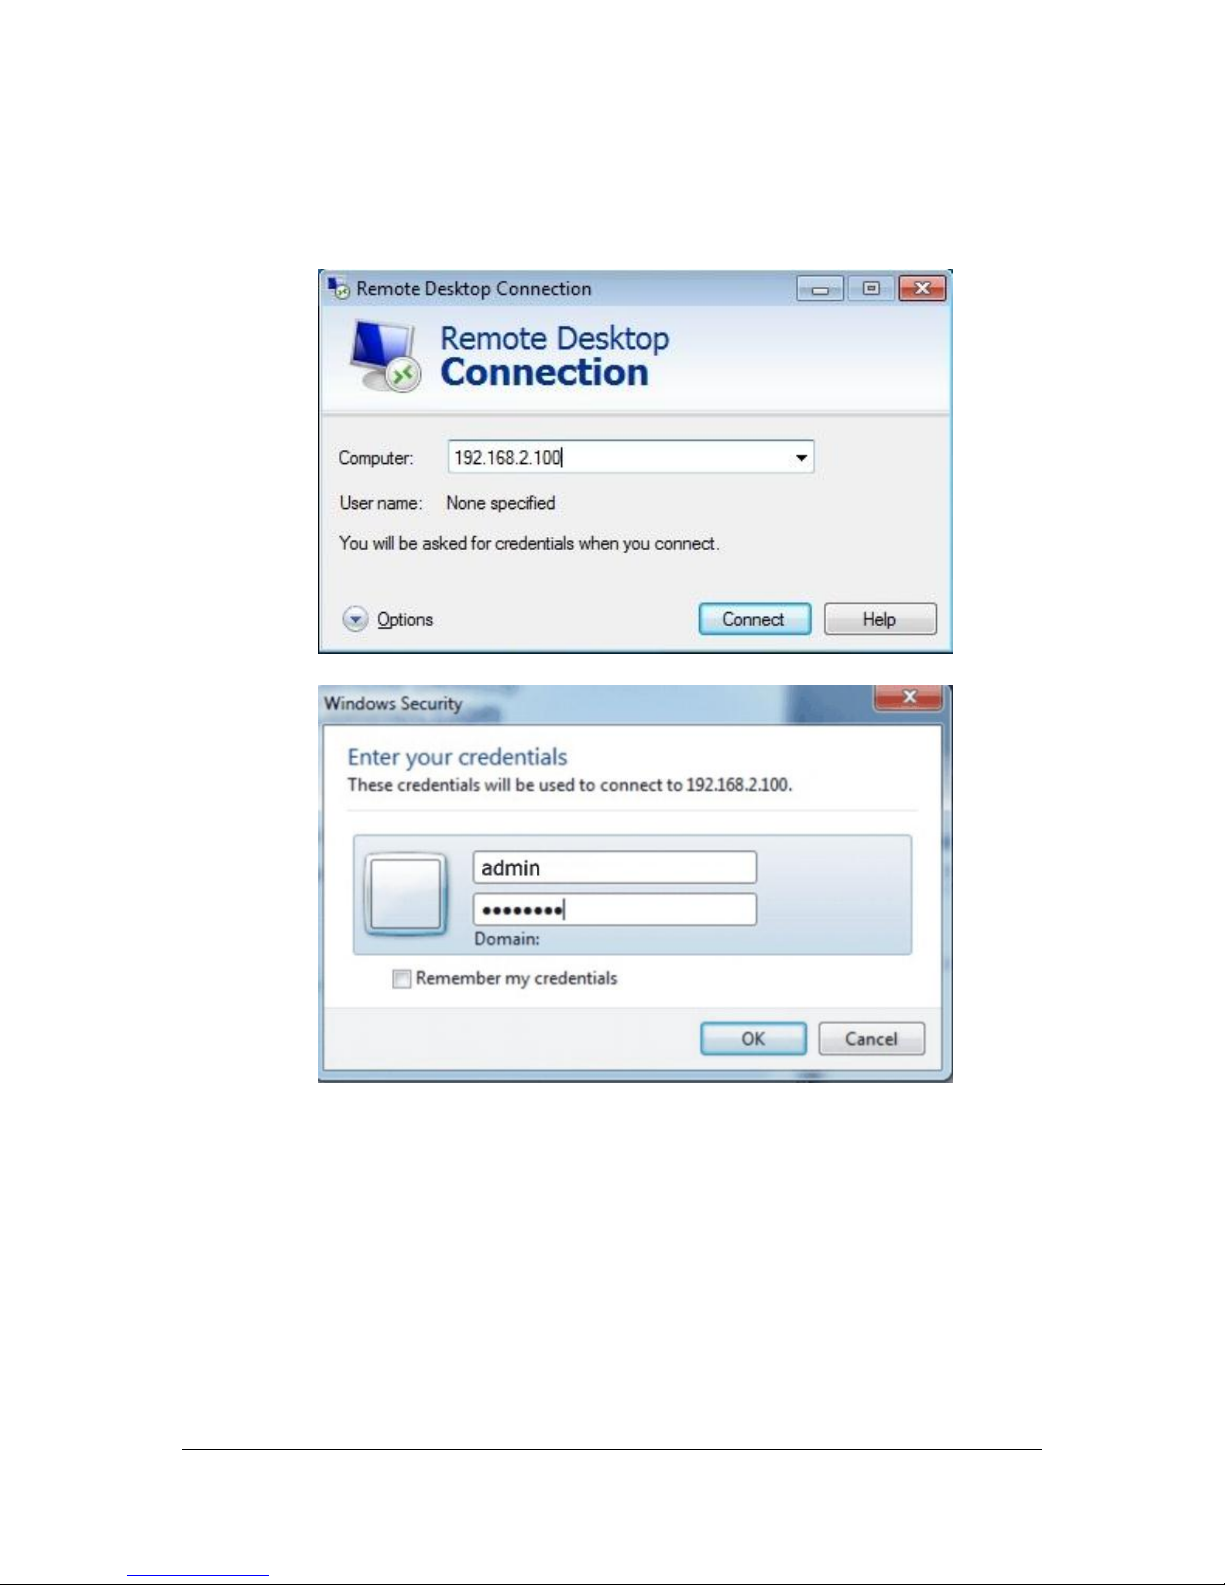
g) Type in the IP address of the Super LoLux HD9 NVR: 192.168.2.100.
Use as credentials User: admin and Password: jvc

NVR Hardware - Super LoLux HD9 NVR
18
1.4.2 Change IP addresses in the camera network
a) After the successfully established access to the server with one of previous
options you can configure the server. This server has a pre-installed Windows 7
Professional 32bit operating system. In factory default the operating system is
configured with optimal settings.
b) On the rear panel of your server you will find four PoE Ethernet Ports.
To configure these Ports, use the „Network Bridge“ in your Network Connections.
The IP address of the Network Bridge is configured as “DHCP” in Factory Default
conditions.
Assign an IP address in a different logical network range, e.g. 192.168.0.99.
Connected cameras should be in the same address range for example:
camera1: 192.168.0.100; camera2: 192.168.0.101 etc.
In case you need more Ethernet ports for your camera network you can connect a
switch on LAN3 Ethernet interface.
The network connection „PoE-Switch“ and „camera network“ are assembled to this
network bridge and should not be changed.
Please note that the cameras should be in a different IP address network range
than the server and clients.
Attention:
Do not apply changes to the operating system and other configurations.

NVR Hardware - Super LoLux HD9 NVR
19
1.5 Configuration Settings Overview
Username Server: admin
Password Server: jvc
Server IP address: 192.168.2.100
Server LAN Port: 2 (client network)
Camera network IP: DHCP (no IP address is configured)
Camera network LAN Port: 3

NVR Hardware - Super LoLux HD9 NVR
20
1.6 Hardware Specifications
SYSTEM
CPU Type: Intel Atom D525 1.8GHz (Dual Core Processor)
Graphics: Intel Luna Pier Refresh Pineview-D Integrated
Graphics Engine
Audio: Intel HD Audio Specification Rev1.0 compatible
System Memory: 2 GB DDR3 SO-DIMM socket
Operating System: Windows 7 Professional (32 bit)
INTERFACE
SATA: 2x SATA ports
LAN: 3x lntel 82583V 10/100/1000Mbps
PoE LAN: 4x Realtek 10/100 Mbps
PoE Controller: Microsemi 4-Port 802.3af PSE Manager
USB: 4x USB 2.0
HARD DISK
Storage Space: 1x HDD 2 TB
POWER SUPPLY
Power Source: AC Input 100-240V~ 2A, 50/60Hz
Consumption: max. 105 W
WORK ENVIRONMENT
Operating Temperature: 0~60°C
Operating Humidity: 5~95%@0~60°C, non-condensing
DIMENSION / WEIGHT / MATERIAL
Dimension: 75 x 300 x 200 mm (H x W x D)
Weight: 2.9 kg
Material: Aluminum
Colour: black

NVR Software - General information
21
2 NVR Software - General information
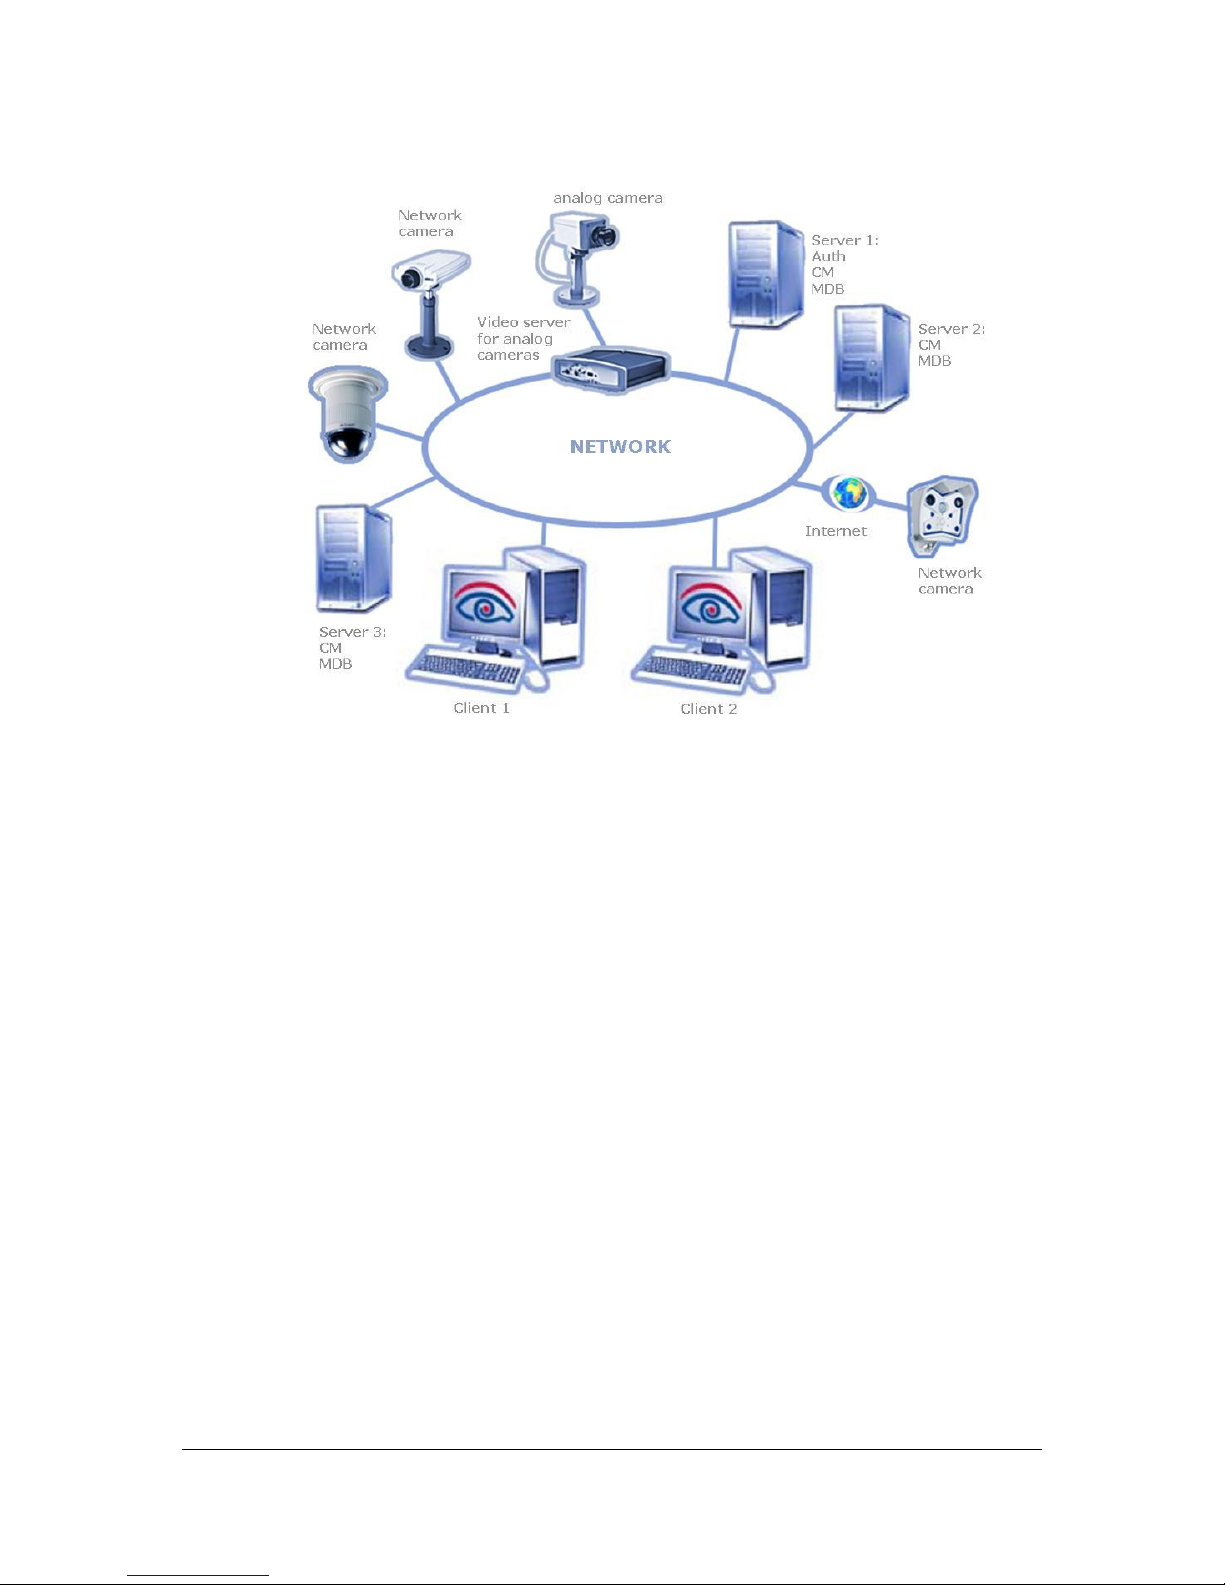
2.1 Architecture
SeeTec 5 features a modular and network-based approach. All functions are
organized in modules that communicate via TCP/UDP and enable the scalability of
the entire system through shared installation on different computers.
The most important system characteristics include:
Server services (32/64 bit) for Windows
®
XP Professional (SP3 or higher) /
Windows Vista® / Windows® 7 / Windows Server® 2003 (SP1 or higher) /
Windows Server® 2008
Client application (32/64 bit) for Windows
®
XP Professional (SP3 or higher) /
Windows Vista® / Windows® 7 / Windows Server® 2003 (SP1 or higher) /
Windows Server® 2008
Integration of hardware (video servers, network cameras, motion detectors,
etc.) by different manufacturers
Integration of several thousand cameras per installation
User and group management using Active Directory
®
integration
Comprehensive alarm scenarios
High-performance database management with a very high throughput
IPv6 support
Encrypted network authorization
NVR Software - General information
22
Abbildung 1: Example for an architecture overview with distributed server
functionality and Internet connection
See chapter Module overview (page 23).

NVR Software - General information
23
2.2 Module overview
2.2.1 Administration services
The services SeeTec5_ENT (SeeTec EntityManager), SeeTec5_EVT (SeeTec
EventManager) and SeeTec5_ALARM (SeeTec AlarmManager) provide powerful
services for the central management of the SeeTec Installation along with the
MaxDB database. If suitable hardware is used, up to 30 alarms per second can be
managed.
Applications with a large number of users or resources to manage require a
powerful user management that meets various criteria. SeeTec
AuthorizationManager (SeeTec5_AUTH) satisfies the following criteria to a great
extent and is thus an ideal solution for the management of large installations:
Encrypted and secure transmission of passwords via the network must be
ensured, especially for external Internet connections.
The client interface and functions available to the user need to automatically
adjust individually to the given user rights.
The system must allow for easy and transparent management of a large
number of different users (maybe with high fluctuation of employees).
Multiple users can often be grouped due to identical requirements with
respect to access permissions. SeeTec 5 provides a superordinate group
concept to reduce the required administration effort to a minimum.
Log-in authentication of a client must be performed quickly to avoid waiting
times for the user.
2.2.2 CameraManagement (SeeTec5_CM)
The management of all cameras involved is the core of each video surveillance
solution. Network cameras and video servers feature much higher complexity and
heterogeneity than analog technologies. Reasons for this include:
The analog signal is supplied in PAL to ensure a standard image format.
Network cameras of different manufacturers use different image formats
(JPEG, H.264, MPEG-4, and other proprietary formats). Some of these
formats must be processed differently by the software and also increase the
integration effort and render client visualization more complex.
The network infrastructure used can reach from basic local network
configurations up to broad Internet or VPN networks.
In comparison to older versions, CameraManagement better pursues the crossmanufacturer and cross-format integration of different hardware.

NVR Software - General information
24
Each CameraManagement module is able to manage up to 250 cameras, depending
on the required image rates and the operating system in use. Using the module on
multiple computers multiplies the number of cameras and can also support very
large installations with up to 5000 cameras. Compared to frame grabber cards of
analog systems, the performance in terms of image throughput is considerably
higher.
2.2.3 MultimediaDatabase (SeeTec5_MDB)
Even small installations with few cameras require the database to handle a level of
image throughput that cannot be fulfilled with traditional SQL databases such as
DB2 or Oracle.
For this reason, SeeTec has developed a dedicated MultimediaDatabase with
currently unmatched performance. Features of this database include:
Hardware and platform independent implementation (Java
®
). Use with
almost every hardware, from commercially available PCs up to midframe
systems.
The file-based approach supports the use of local file systems such as RAID
or SAN / NAS systems.
Throughput on a typical PC system with IDE boards amounts to approx.
30 MB/sec. Throughput can be extended to more than 50 MB/sec. if powerful
server hardware is used.
2.2.4 Extension services (SeeTec5_EXT, SeeTec5_AV,
SeeTec5_AVExport)
The SeeTec5_EXT service is used for connecting industry solutions and modules
(license plate recognition, point of sale connection, etc.).
The SeeTec5_AV service is required for the SeeTec motion detection.
The SeeTec5_AVExport service is responsible for transmitting an image or video
sequence in case of an alarm.

NVR Software - General information
25
2.3 System requirements
Performance requirements of SeeTec server services primarily depend on the video
volume transferred and/or the storage hardware used. Basically, Intel® processors
should be used because they deliver much better performance with SeeTec than
other comparable AMD processors.
Dimensioning of hardware for SeeTec client concerns primarily the processor type
and its performance. We recommend Intel® processors for optimal performance. At
least 512 MB free RAM must be available to the SeeTec client as socket. An
additional 25 MB RAM are recommended for each camera to be visualized.
Please take into account that the hardware requirements greatly depend on the
respective configuration.
2.3.1 Client requirements
Operating system (32 / 64 Bit):
Windows® XP Professional (SP3 or higher)
Windows Vista® (Home Premium, Professional, Ultimate)
Windows® 7 (Home Premium, Professional, Ultimate)
Windows Server® 2003 Standard, Enterprise (SP1 or higher)
Windows Server® 2003 R2 Standard, Enterprise (SP1 or higher)
Windows Server® 2008 Standard, Enterprise
Windows Server® 2008 R2 Standard, Enterprise
Computing power:
Pentium® 4 minimum (or comparable)
Main storage:
512 MB RAM min.
Hard-disk storage:
1 GB
Other:
Separate video card (avoid using integrated video cards if possible. Do not
use shared memory as performance would suffer considerably.
The client should feature a gigabit ethernet connection.
2.3.2 Server requirements
Operating system (32/64-bit):
Windows® XP Professional (SP3 or higher)
Windows Vista® (Home Premium, Professional, Ultimate)
Windows® 7 (Home Premium, Professional, Ultimate)
Windows Server® 2003 Standard, Enterprise (SP1 or higher)
Windows Server® 2003 R2 Standard, Enterprise (SP1 or higher)
Windows Server® 2008 Standard, Enterprise
Windows Server® 2008 R2 Standard, Enterprise

NVR Software - General information
26
Minimum hardware requirements for 32 bit operating systems:
Performance:
Intel® Dual Core CPU 2 GHz (or comparable)
Main storage:
2 MB RAM min.
Hard-disk storage:
20 GB min. + storage for image recording
Other:
At a minimum, the server must feature a gigabit ethernet connection.
Minimum hardware requirements for 64 bit operating systems:
Performance:
Intel® Dual Core CPU 2 GHz (or comparable)
Main storage:
4 MB RAM min.
Hard-disk storage:
20 GB min. + storage for image recording
Other:
At a minimum, the server must feature a gigabit ethernet connection.
Important
A maximum of 80 and 250 devices (cameras / Adam modules,
Network I/Os, etc.) can be configured per server on a 32 bit an 64
bit operating system, repectively. Depending on the configuration
(high resolution / image rate), this number can be lower.
The maximum number servers in a distributed installation is 250
servers.
The maximum number of camera in a system is 5000.

NVR Software - Installation
27
3 NVR Software - Installation
3.1 Installation information
Important
Since several VB scripts are used for installation, we recommend
deactivating any virus scanner during the installation procedure.
SeeTec 5 may not be installed on a compressed drive as this may
cause problems with the MaxDB. Also, do not compress drives with
an existing SeeTec 5 installation.
You are asked while installing, whether the ports used by SeeTec
should be opened in the Microsoft® Windows® Firewall. Confirm this
request with Yes. If you use the software firewalls of other
manufacturers, you must open the port manually, see also chapter
Firewalls and SeeTec 5 (page 177).
During the installation process DirectX is installed. If there is no
previous installation of DirectX, the system may reboot after
completing the installation. DirectX is required for joystick control as
well as MPEG-4 / H.264 display. If an error message is displayed
that DirectX could not be installed, you can install DirectX at later
point in time. You will find the setup file in the 3rdPartyTools
directory on SeeTec-DVD. Use that version only.
An error message may appear during DirectX installation on a
Windows Server® 2003, it can be ignored.
Software products of the company Symantec (Norton FirewallTM,
NortonTM Internet Security, etc.) should not be used on the
SeeTec 5 server because these programs interrupt the
communication between server services.
Use of webguards, behavior surveillance (e.g. of virus scanners), is
not supported.

NVR Software - Installation
28
3.2 Standard installation
The standard installation (= SeeTec Core Package) is suited for individual
workstations or host computers in distributed installation environments. It contains
the following modules:
SeeTec 5 client
SeeTec 5 server services
Installing the SeeTec 5 software
1. Insert the DVD-ROM into the DVD-ROM drive.
The Startup menu is displayed.
2. In this menu, select Install SeeTec 5 to install the SeeTec 5 software.
3. Optional: Change the path of the SeeTec Installation.
In 64-bit operating systems you can change the paths for the 32-bit and 64-bit
components.
4. Select Server and client installation in the dialog for choosing the setup
type to perform the standard installation.
5. Optional: Change the path of the administration database (MaxDB, database
for configuration and storage of system notifications). Select a path in the
SeeTec directory.
6. In the IP address/host name for server communication dialog in the
Found IP addresses/host names dropdown list, select the IP address that
the SeeTec services will connect to.
IPv6 addresses are currently not supported.
7. In the Default zone dialog, click on Configure zone.
8. In the Path field, select a path for the MultimediaDatabase (database for
image recording).
The default path for the MultimediaDatabase is: [SeeTec installation
directory]/re/md/mds/data.
9. Enter the size of the MultimediaDatabase in the Maximum size [GB] field.
10. If the zone is stored on a network drive, enter the complete UNC path.
11. If the network drive is protected by a user name and password, enter the
user name and password for accessing the drive under Network
authorization.
Note
Ensure that the user must be available on the local machine and the
domain and user name must be specified.

NVR Software - Installation
29
After the installation, you can create additional zones in the SeeTec Administration,
see chapter Configure MultimediaDatabase (page 170).
12. Optional: Configure the Windows® firewall for MPEG-4 usage.
13. Click on Install to start the installation.
3.3 Customized installation
With a customized installation you can install individual components on one
computer (for a distributed installation on multiple computers, see chapter
Distributed installation (page 29)):
SeeTec client
SeeTec OfflineViewer
Core services
CameraManagement and MultimediaDatabase
Important
In distributed installations, core services may only be installed on
one computer.
3.4 Distributed installation
Installation on multiple computers
A standard installation must be performed on the host computer first. See chapter
Standard installation (page 28).
1. Start the installation on the secondary server.
2. Select Custom in the dialog for choosing the setup type.
3. Optional: Change the path of the SeeTec Installation.
In 64-bit operating systems you can change the paths for the 32-bit and 64-bit
components.
4. Only install the CameraManagement and MultimediaDatabase components,
and optionally the client.
5. Under EntityManager, in the Host field, enter the IP address of the core
server.
Do not change the port.
6. In the IP address/host name for server communication dialog in the
Found IP addresses/host names dropdown list, select the IP address that
the SeeTec services will connect to.

NVR Software - Installation
30
IPv6 addresses are currently not supported.
7. In the Default zone dialog, click on Configure zone.
8. In the Path field, select a path for the MultimediaDatabase (database for
image recording).
The default path for the MultimediaDatabase is: [SeeTec installation
directory]/re/md/mds/data.
9. Enter the size of the MultimediaDatabase in the Maximum size [GB] field.
10. If the zone is stored on a network drive, enter the complete UNC path.
11. If the network drive is protected by a user name and password, enter the
user name and password for accessing the drive under Network
authorization.
Note
Ensure that the user must be available on the local machine and the
domain and user name must be specified.
After the installation, you can create additional zones in the SeeTec Administration,
see chapter Configure MultimediaDatabase (page 170).
12. Optional: Configure the Windows® firewall for MPEG-4 usage.
13. Click on Install to start the installation.
Note
For this type of installation, both installed services will not be
started automatically. You must start these services in the Control
Panel under Administrative Tools > Services or reboot your
computer.
For both servers to communicate and images to be displayed, a
continuous connection with an adequate bandwidth is necessary
between the main server and the distributed servers. The required
bandwidth depends on the image data that is to be transferred.
Additionally, a bandwidth of 64 kbit/s is required for server
communication.

NVR Software - Installation
31
Important
Should the connection to the administrative services be interrupted
and not restored immediately, all distributed servers are set to
emergency mode:
Standard recording of all cameras on the distributed server
continues.
The following restrictions apply for alarm recording:
For complex alarm scenarios, preconditions are not evaluated.
Within alarm scenarios, no outputs are mapped.
Alarms are not saved as alarm events, i.e. you cannot search
for alarms in the archive. However, the alarm recording is
displayed in the archive as alarm recording (= red time bar).
Alarm recordings are terminated only by the defined alarm
duration.
Recording gaps of 20 to 40 seconds occur when changing from
normal mode to emergency mode or back.

NVR Software - Installation
32
3.5 Update installation
Note
There are two ways to update the SeeTec 5 software:
Patches for a system update become available.
You have a complete version of the software.
3.5.1 Installing individual patches
Installing patches for the SeeTec client or SeeTec OfflineViewer for 32-bit
operating systems
1. Exit SeeTec Surveillance (= SeeTec client).
2. Extract the ZIP file of the patch in the directory C:\Program Files\SeeTec
and overwrite any existing files.
Installing patches for the SeeTec client or SeeTec OfflineViewer for 64-bit
operating systems
The 32-bit and the 64-bit version of the SeeTec client will always be installed on
64-bit operating systems. For this reason, you need to install the patches for the
SeeTec client for 32-bit operating systems (5.4.X_Client_XX.zip) and for 64-bit
operating systems (5.4.X_Client64_XX.zip). The patch for the SeeTec
OfflineViewer (5.4.X_OfflineViewer_XX.zip) always has to be unzipped in the
directory for the 32-bit components:
1. Exit SeeTec Surveillance (= SeeTec client).
2. Extract the patch of the 32-bit version of the SeeTec client in the directory
C:\Program Files (x86)\SeeTec and overwrite any existing files.
3. Extract the patch of the 64-bit version of the SeeTec client in the directory
C:\Program Files\SeeTec and overwrite any existing files.
4. Extract the patch for the SeeTec OfflineViewer in the directory C:\Program
Files (x86)\SeeTec and overwrite any existing files.
Installing patches for the SeeTec server for 32-bit operating systems
1. Stop the SeeTec5_ENT service under Control Panel > Administrative Tools >
Services or use the SeeTec ServiceManager (Stop all SeeTec services).
2. Extract the patches in the directory C:\Program Files\SeeTec and
overwrite any existing files.
3. Start the SeeTec5_CM service under Control Panel > Administrative Tools >
Services or use the SeeTec ServiceManager (Start all SeeTec services).

NVR Software - Installation
33
Installing patches for the SeeTec server for 64-bit operating systems
1. Stop the SeeTec5_ENT service under Control Panel > Administrative Tools >
Services or use the SeeTec ServiceManager (Stop all SeeTec services).
2. Extract the ZIP file of the patch in the directory C:\Program Files\SeeTec
and overwrite any existing files.
3. Start the SeeTec5_CM service under Control Panel > Administrative Tools >
Services or use the SeeTec ServiceManager (Start all SeeTec services).
Important
Some server components are only available as 32-bit components.
For 64-bit operating systems, extract the following patches in the
directory for 32-bit programs (C:\Program Files (x86)\SeeTec):
5.4.X_VersatileApplications_XX.zip
5.4.X_ApplicationGateway_XX.zip
3.5.2 Adding or deleting components
1. Restart the installation, see chapter Standard installation (page 28).
2. Select Change program in the dialog for choosing the setup type.
3. Select the components that you want to add or delete.
In the Windows® Control Panel, go to Programs and Features and select the
SeeTec 5 software. Then, add or delete the desired functions by using the
Uninstall/Change button.
Note
Ensure that the SeeTec installation medium is located in the same
path as the initial installation.
3.5.3 Installing a new complete version
1. Perform a backup of the MaxDB database.
2. Backup the directory conf of your current SeeTec Installation.
3. Stop the SeeTec5_ENT service under Control Panel > Administrative Tools >
Services or use the SeeTec ServiceManager (Stop all SeeTec services).
4. Uninstall the current version in the Control Panel under Add or Remove
Programs. All image and configuration files will be maintained.

NVR Software - Installation
34
5. Copy the new license key to the conf directory of the existing SeeTec
installation folder.
6. Install the new complete version in the directory of the older version.
Note
If you perform an update to a newer SeeTec version, all
configuration settings will be maintained.

NVR Software - Installation
35
3.6 License key
In order to allow for flexible scaling of your surveillance system, the number of
managed cameras and the client functionality are bound to a license key.
3.6.1 Requesting a license key
If you are setting up a new system and did not purchase the SeeTec.key license
key from a SeeTec distributor, you can request a license key over the Internet.
1. In your web browser, go to http://www.seetec.eu/support/licensing/.
2. Click on the New License link.
3. Enter your installation number (INR), the Product ID, and your personal
data.
You can request the Product ID in the Configuration Mode in the Extras menu.
You will find the INR on your invoice and on the back of the DVD cover.
4. Then, click on Submit.
The license key will be sent to the e-mail address you have stated in the
corresponding form field.
Note
A license key is only valid for the current and the previous versions.
Note that updates to a new SeeTec version, extensions of the
SeeTec software features and functionalities as well as changes to
the server hardware all require a new license key. You can obtain
the new key at http://www.seetec.eu/support/licensing (link named
Update Licence).
Without a license key, the system will run a 30-day demo mode. In
this mode you can test all software features.
You can request the license key only once. If you made changes to
the system that make a new license key necessary, please contact
your distributor or SeeTec AG.
License type (Demo, Probox, Enterprise) is also displayed along with
license information in the menu Info and in main window of
SeeTec Surveillance.

NVR Software - Installation
36
3.6.2 Installing a license key
1. Save the old SeeTec.key license key in the C:\Program Files\SeeTec\conf
directory.
2. Copy the new SeeTec.key license file to this directory.
Note
If you are using a demo license, its remaining duration is displayed
each time when starting the SeeTec Surveillance.
3.7 Starting and stopping core services
3.7.1 SeeTec ServiceManager
The SeeTec ServiceManager allows you to start and stop the SeeTec services.
The SeeTec ServiceManager is installed automatically during the installation of the
server services. You can start it via the Start menu.
1. Click on File > Settings to determine the behavior of the
SeeTec ServiceManager (Send to system tray upon program start,
Show balloon tip for status changes).
2. Define the wait time between stopping and restarting services (default
15 seconds).
3. Additionally, you can also select Show SeeTec services that are not installed.
The following functions are available in SeeTec ServiceManager:
Restart all SeeTec services
Stop all SeeTec services
Start all SeeTec services
The status of services is also displayed:
green = Service has started.
red = Service has stopped.
yellow = Start or stop of service is in progress.
black = Service is not installed.
Click right on service to restart or stop an individual service.
A multiple selection is also possible. Press and hold the CTRL key and click once on
the respective services.

NVR Software - Installation
37
3.7.2 Starting the core services (without SeeTec
ServiceManager)
1. Open the Services window and start the service named MaxDB: SEETEC.
2. Start the SeeTec5_CM service.
3. Wait for about 10 seconds before starting SeeTec Surveillance.
All other required SeeTec services will be started automatically.
3.7.3 Stopping the core services (without SeeTec
ServiceManager)
1. Open the Services window and stop the service named SeeTec5_ENT.
All other SeeTec services are also terminated.
2. Stop the MaxDB: SEETEC service.
3.8 Configuring encrypted communication in
SeeTec 5
Communication between SeeTec server and SeeTec clients can take place by
corresponding license via TripleDES encryption.
To configure the encrypted communication, proceed as follows:
First, create a key pair.
1. Execute the following file with Windows® administrator rights:
<SeeTec installation directory>\tools\generateKey\generateKey.bat
2. Provide your information in the next dialog and confirm with Yes.
Example:
What is your first and last name?
[Unknown]: John Doe
What is the name of your organizational unit?
[Unknown]: IT
What is the name of your City or Locality?
[Unknown]: Philippsburg
What is the name of your State or Province?
[Unknown]: Baden-Wuerttemberg
What is the two-letter country code for this unit?
[Unknown]: DE
Is CN=John Doe, OU=IT, O=SeeTec, L=Philippsburg, ST=Baden-Wuerttemberg,
C=DE correct?
[No]: YES

NVR Software - Installation
38
The generated key pair is stored in the directory conf of the SeeTec Installation
(file: keystore).
For distributed installations, this file must be copied to the conf directory on all
SeeTec servers. Distribution to SeeTec server should take place via secured
communication paths.
If a firewall is used, then additionally, the ports 60011 and 60012 should be
activated. The key is transferred via these ports from the SeeTec server to the
SeeTec clients and to SeeTec server services. You can change these ports in SeeTec
Administration.
Configuration effort is not required for SeeTec clients. As soon as the keystore file
is available, an encrypted connection is set up automatically between SeeTec server
and SeeTec client.
3. To activate the encrypted communication, all SeeTec services must restart
on all participating SeeTec servers.
Note
Encrypted communication between SeeTec server and SeeTec client
is activated when the file keystore is saved in the conf directory of
the SeeTec installation.
To disable encrypted communication, delete this file and restart
SeeTec services.
Login via Windows® Active Directory® is not possible for encrypted
communication.
User name and password of SeeTec Administrator is requested
for SeeTec Administration for encrypted communication.
Encrypted communication between the camera and the SeeTec
server is also possible for many cameras. To this, take note of the
whitepaper for motion recognition/SSL configuration of the camera.

NVR Software - Installation
39
3.9 Access data
By default, the SeeTec 5 software features an administrator user who will have full
access to the entire system.
Starting SeeTec Surveillance
1. In the start menu under All Programs > SeeTec > SeeTec 5, click on SeeTec
Surveillance.
2. In the User name field, enter the following user name: administrator.
User name can also be optionally saved.
3. In the Password field, enter the following password: pass.
4. Optional: Save the password.
5. Optional: Enter a comment in the Comment field.
The comment will be stored in the management database. You can display the
comment in Report Mode when searching for user events.
6. Optional: Activate the Log in user automatically option.
You will immediately be logged on to SeeTec 5 when SeeTec Surveillance is
started again.
7. Click on OK.
Important
Change your password immediately after starting the system for the
first time in order to avoid unauthorized access to the software. A
secure password (optional) is at least 8 characters long and contains
at least one upper, one lower case character and one number.
All user names and passwords are CASE-SENSITIVE, i.e. a
distinction will be made between upper and lower case letters.
There is no "back door" to the SeeTec 5 system.
If you forget the administrator password and you have no user
assigned to the administrator group, you will be unable to access
the system.
While logging in via NAT, you must activate the option Use NAT for
server selection.
You must deactivate this option to login without NAT, see chapter
NAT list (page 129).

NVR Software - Installation
40
Note
When the option Log in user automatically is activated, then user
name and password are saved.
If automatic login is used, entering a comment is not possible.
To switch off the option Log in user automatically, do the following:
1. Log on.
2. Click on Change user in File menu.
3. Change the settings in the following dialog.

NVR Software - SeeTec client
41
4 NVR Software - SeeTec client
The SeeTec client is available as 32-bit version and 64-bit version. When the client
is installed on a 64-bit operating system, both client versions will be installed
always. The link in the start menu always connects to the 32-bit client.
1. To start the 64-bit version of the SeeTec client, double-click on the file
SeeTec 5.exe in the C:\Program Files\SeeTec directory.
The 64-bit version of the SeeTec client is subject to some restrictions. A list with
these restrictions can be found here:
http://seetec.eu/fileadmin/01DL/manuals/seetec5_64Bit_Client_restrictions_EN.pdf
4.1 File menu
Surveillance Mode, Archive Mode, Report Mode, Configuration Mode
See chapter General (page 59).
Important
The following settings must be configured for each client and for
each Windows® login profile.
4.1.1 Language selection
1. In the File menu, select Language selection.
2. Select the desired language.
3. Click on OK.
The selected language will be used after the client is restarted.
4.1.2 Changing passwords
1. In the File menu, select Change password.
2. Enter your new Password.
3. Confirm your new Password.
4. Click on OK.
Note
You cannot change your password in Configuration Mode.
In Authorization Management, you can withdraw the user right to
change the password.

NVR Software - SeeTec client
42
4.1.3 Client configuration
1. In the File menu, select Client configuration to change the client settings:
Only the SeeTec administrator can open Client configuration.
Important
The following settings must be configured for each client and for
each Windows® login profile.
Network tab
The Timeout for server requests option is used to increase request times in
Archive Mode. Consequently, no timeout will occur and no red beam will be
displayed in the player when performing large requests in Archive Mode.
The UDP or TCP port for image transmission determines the protocol and the port
used to transmit image streams of the cameras from the SeeTec server to the
client.
If you use multiple independent SeeTec 5 systems, you can automatically connect
the client to a backup server on network failure.
1. Enable the Automatically connect to backup server on network failure
option.
2. In the Name field, enter the name or the IP address of the backup server.
3. In the Port field, enter the port of the backup server.
4. Limit the Bandwidth when accessing servers with narrow-band connections.
First, double-click on the corresponding CameraManagement to select it.
5. In the following dialog, you can limit the maximum bandwidth using the
Max. bandwidth in kbit/s field.

NVR Software - SeeTec client
43
Client tab
Suppress warning on
time difference to server
If there is a time lag of more than 10 seconds
between client and server, a message is
displayed at login. You can suppress this
message here.
Delete entities without
confirmation in
Configuration Mode
If this option is selected, the respective entity
(camera, time template, alarm, button, etc.) is
deleted without prior notification if you click on
Delete in Configuration Mode.
Do not display warnings
in case of different
streaming settings in
Configuration Mode
Different settings for Standard recording and
Alarm recording can result in recording losses
during MPEG-4/H.264 recording. If this is the
case, a warning message is displayed in
Configuration Mode. You can suppress this
message here.
Use optimized JPEG mode
Enable this option to use all available CPU
cores for the display of Motion JPEG images.
Microsoft® .NET Framework 3.5 (or higher)
must be installed.
Maximum number of
alarms in Archive Mode/
Maximum number of
events in Report Mode
You can specify the maximum number of
displayed alarms in Archive Mode and the
maximum number of displayed events in
Report Mode.
Alarm handling
Select Start most recent alarms first or
Start older alarms first to determine which
alarms will be displayed first when processing
the Alarm list.
Stop low priority alarms
when a new alarm is
activated
Here you can further adapt the behavior of the
alarm handling for low priority alarms, see
chapter General (page 111).

NVR Software - SeeTec client
44
User interface tab
Start client in fullscreen
mode
Enable this option to start the client in
fullscreen mode.
Note
The fullscreen mode can also be enabled / disabled by using the
ESC key.
Use multiple timelines
Select whether you want to use the old or the
new player interface in Archive Mode. If this
option is selected, the new interface is used.
Use current live layer for
archive
If this option is selected, all open cameras,
layers (also temporary layers) and maps are
displayed immediately when you change to
Archive Mode.
Limit the number of
flyout windows to
Limiting the number of flyout windows can
prevent excessive load on the client. If the
specified maximum is reached, the oldest
flyout window is replaced by the newest one.
Background color of
cameras
If the image of a camera does not fill the layer
because of its aspect ratio, you have the option
to change the background color.
Fullscreen mode
Select how the windows and layers are
displayed in full screen mode.
You can adjust the Camera frame, the Status
bar, UI elements and Tabs.
Thumbnails
Select whether a thumbnail of the camera
should be displayed in the camera overview.
Press and hold the CTRL key and move the
mouse to the desired camera in the camera
overview.
The thumbnail of the camera can also be
displayed on the map.
The thumbnail size only applies to thumbnails
in the camera overview and on the map.

NVR Software - SeeTec client
45
Alarm suppression tab
You must first create a new alarm group in order to suppress alarms in
Surveillance Mode.
1. Click on New alarm group.
2. Add all alarms belonging to the group.
3. Finally, define under which circumstances no alarms are to be displayed by
selecting the respective checkbox if the alarm should be suppressed (digital
input open or closed).
Input devices tab
See chapter Activating input devices (page 45).
4.1.4 Activating input devices
In the Client configuration under Input devices, all input devices including
joysticks are displayed that are connected and available to the respective system
before the startup of the SeeTec client.
Any device combination is supported. Any device can be configured independent of
another device.
Special cases and restrictions
Jog dial and shuttlewheel are supported for the Axis control unit T831x in
Archive Mode.
Up to 112 virtual buttons can be configured for the Axis control unit T8312.
To do so, activate the Virtual buttons activated option. The control unit
has nine keys. If you wish to configure key 56, press keys 5 and 6 in quick
succession and select the desired action. In the Timeout (ms) field, enter
the time range in which the two buttons must be pressed.
The Videotec DCZ control unit is supported with the following restrictions:
Only 32 of the 38 buttons can be used.
Only the outer jog dial is available in the Archive mode.
Note
Each joystick requires calibration once. This must be done in the
Windows® Control panel.
PTZ control is only available if you select the PTZ control option in
the Camera configuration.

NVR Software - SeeTec client
46
1. To enable and configure joystick control, go to the Client configuration,
select the Input devices tab and in the device list, select the joystick that
you want to configure.
The right side of the dialog lists the joystick functions.
2. Select the option Device enabled.
3. Optional: Select the option Z axis enabled (hardware-dependent).
4. To assign a function to a joystick button, press the joystick button and select
the desired action from the dropdown list.
4.1.5 Changing profiles
1. In the File menu, select Change profile.
2. Select the desired profile and click on OK.
Note
You cannot change the profile in Configuration Mode.
In addition, there must be at least two existing profiles (user
and group profile) to be able to change the profile.
4.1.6 Changing users
1. In the File menu, select Change user.
2. Enter information for the new user.
3. Click on OK.
Note
You cannot change the user in Configuration Mode.

NVR Software - SeeTec client
47
4.1.7 Change SeeTec Installation
If you have installed multiple independent SeeTec servers, then you can connect to
another SeeTec server:
1. Select Change SeeTec Installation in the File menu.
2. In the Computer name field, enter the computer name or the IP address of
the SeeTec server.
3. Enter the port of the SeeTec server in the Port field (default: 60000).
Note
Connection to another SeeTec server is not possible if you are in
Configuration Mode!
To setup connection to multiple installations simultaneously, see
chapter Add SeeTec Installation (page 47).
4.1.8 Add SeeTec Installation
You can setup connections to multiple SeeTec Installations by clicking on Add
SeeTec Installation to access multiple SeeTec Installations simultaneously
(= SeeTec Multi Installation Login).
Assumptions
The same SeeTec version must be installed on all servers to be connected.
Each server must support SeeTec Multi Installation Login. You must have a
license for SeeTec Multi Installation Login.
Limitations
The following functions are not available when multiple servers are connected:
In File menu: Change user, Change profile, Change SeeTec
Installation, Change password
Multiple image data export in Archive Mode (available also in
Configuration Mode)
Joystick buttons: Joystick can only be used as PTZ control device.
In menu File > Client configuration: Automatically connect to backup
server on network failure, Alarm suppression

NVR Software - SeeTec client
48
Note
If connection to SeeTec Installation is interrupted, (due to network
problems etc.), SeeTec client tries to reconnect cyclically.
A maximum of 15 SeeTec Installations, with 100 cameras, each can
be connected.
The following functions are simultaneously available only for one SeeTec
installation:
Menu File: Report Mode, Configuration Mode
Menu Info: System, Program, License
If you have logged on to multiple SeeTec Installations and open one of the menus
mentioned above, a selection dialog appears, in which you must choose the desired
SeeTec Installation. Then the chosen menu of the selected SeeTec Installation is
opened.
Login
1. Login to server with your user name and password.
2. Select File > Add SeeTec Installation.
3. Enter the host name and the IP address and the port of the server (default:
60000).
4. Select the SeeTec Installation you want to connect to from the selection
dialog.
Multiple selection can be made.
5. Optional: You can add one more SeeTec server via Create new SeeTec
Installation. Enter the host IP address and the port of the SeeTec server
(default: 60000).
6. Confirm by clicking the OK button.
7. Enter the user name and the password for each SeeTec Installation selected
previously.
8. Optional: You can activate NAT support and use Windows®
Active Directory® login.
You can accelerate the login by saving user name and password. When you activate
Log in user automatically, all information is saved and you can login directly
after confirming by clicking on OK.

NVR Software - SeeTec client
49
Settings
You can configure the following settings for each server via File > Client
configuration:
Network tab: Bandwidth limitations
User interface
You can again disconnect individual SeeTec Installations in File menu (Close
connections) or delete them entirely from the selection dialog (Delete SeeTec
Installations).
In the Camera overview, all servers to which the client is connected are
displayed. You can carry out the following actions by right-clicking on the respective
server:
Close this connection.
Close all connections except the selected connection.
Delete this connection. The connection is no longer displayed in selection
dialog.
Change user for this connection.

NVR Software - SeeTec client
50
4.2 Layer menu
Important
The following settings must be configured for each client and for
each Windows® login profile.
4.2.1 Adding windows / layers
If multiple monitors are connected to a PC, you can add multiple SeeTec windows.
1. In the Layer menu, select Add window and open the new window.
There are several ways to display the desired layer in the new window:
Temporary layer:
Right-click into the new window and select the Add layer menu.
Alternatively, select Add layer in the Layer menu. Use Drag and Drop to
add cameras, maps and web pages from Camera overview to the new
layer.
Predefined layer, map or camera:
Use Drag and Drop to add cameras, maps or layers from the Camera
overview to the new window.
Note
You can also save temporary layers. See chapter Save local layer
(page 50). If you want to make the layers available permanently
when starting SeeTec 5 surveillance, all required layers must be
created in Configuration Mode and must be assigned to a
corresponding profile.
The user-defined layers allow you to define the number of rows and
columns in the layer, see chapter Layers (page 97).
Right-click to close the current layer or all open layers in the current
window. You can also save the temporary layer.
Layers permanently assigned in the profile cannot be closed.
4.2.2 Save local layer
1. Right-click on the tab of a temporary layer and select Save layer as local
layer to save the temporary layer. See chapter Adding windows / layers
(page 50).
2. In the following dialog, enter a name for the layer in the Name field.

NVR Software - SeeTec client
51
4.2.3 Load local layer
1. To load the layer, right-click on an opened layer or camera and under Load
local layer select the layer that you want to open. You can also open the
desired layer under Layer > Load local layer.
4.2.4 Remove local layer
1. To remove a local layer, open Layer > Remove local layer and select the
layer that you want to remove permanently from the system.
4.2.5 Enabling / disabling fullscreen mode
1. The fullscreen mode can be enabled / disabled by using the ESC key.
4.2.6 Loading / restoring the user interface layout
In the Layer menu, you can load and save the user interface layout. You can
display or hide the following fields: Camera overview, Control, Buttons, Patrol,
Alarm list. You can also Restore default user interface.
If you do not want all fields displayed, enable the field that you wish to be
displayed in the Layer menu.
1. To save the user interface layout, select Save user interface in the View
menu.
Your settings are saved for the current session. To restore settings, select Load
user interface.
4.2.7 Restoring the default user interface
1. In the View menu, click on Restore default user interface.
4.2.8 Keep aspect ratio
1. Select this option to view the camera image in the original aspect ratio.
4.2.9 Frameless display
1. Enable this option to display cameras and layers without frames.
4.2.10 Hide status bar of cameras automatically
If the option Hide status bar of cameras automatically is enabled, the status
bar (icons for digital zoom, PTZ, audio, camera name, date, time, current recording
status) is displayed only on mouseover.
4.2.11 Camera overview, control, buttons, patrol, alarm list
Here you can customize the view and hide panes that are not required.

NVR Software - SeeTec client
52
4.2.12 System events
Display the system events field by using the System events option, see chapter
System events (page 131).
4.2.13 Search (Configuration Mode only)
1. Display the search window to perform a well-directed search for elements.
You can search for the following elements.
Camera video servers
Cameras
Buttons
Profiles
Video walls
Time ranges
Maps
Layers
In the left column, the result of your search is displayed. If you click on a result, all
elements are displayed in the right column of the search window that are linked to
the result.

NVR Software - SeeTec client
53
4.3 Extras menu
4.3.1 Manual reference image comparison (Surveillance
Mode only)
The reference image comparison allows you to spot changes of the camera
alignment.
Note
Only a SeeTec administrator can perform this step.
1. Open the reference image comparison.
2. Select a camera.
3. Right-click in the Reference image field and select Create reference
image to create a reference image.
4. Right-click in the Reference image field and select Delete reference
image to delete the reference image.
The Current layer field displays the current camera image.
5. Click on Mark camera as changed or Mark camera as unchanged.
6. If you are not sure whether the camera image changed, select the Display
difference only option to highlight the changes.
Searching for changes can be done automatically.
7. To search for changes automatically, enable Computer aid and set a
threshold value on the right side.
If the Threshold value is exceeded, the camera is automatically marked as
changed.
You can also stop the automatic comparison whenever the threshold is exceeded.
After performing a reference image comparison, you can have a report created by
clicking on the printer icon. The report dialog opens after the automatic comparison
is completed.
8. Select which information to include in the report and then click on Print
report.

NVR Software - SeeTec client
54
4.3.2 Image management (Configuration Mode only)
Image management allows you to use your own icons for buttons, cameras, maps,
layers, web pages, or digital input.
Supported image formats are JPG, GIF, PNG, and BMP.
1. Open image management and click on Add.
2. In the dialog, select the icon to import.
The icon will be adjusted automatically and will be shown as a thumbnail.
3. Click on Save to make icon available in the system.
4.3.3 Multi-configuration of video sources (Configuration
Mode only)
1. In order to perform changes on multiple cameras at a time, select Multiconfiguration of video sources.
2. A window appears in which you can select the cameras to edit by clicking
with the mouse or by using the CTRL key and the mouse.
If you select cameras from different manufacturers, you can only edit those options
that are identical for all camera types.
3. Change the values you want to adjust and confirm your selection by clicking
on the gray field containing the value in question.
The field is now displayed in green.
4. You can apply your changes by clicking on Execute.
5. To finish multi-configuration, click on Close.
4.3.4 Image data multi-export to the client (Configuration
Mode only)
With multi-export, you can save recorded image data from several cameras at the
same time locally on your client PC.
Important
For an export, enter a temporary path in the MultimediaDatabase
configuration.
For an automated export, ensure that the export path is available
on the SeeTec client. For an export to a directory on the SeeTec
server, see chapter Image data multi-export to the server
(Configuration Mode only) (page 56).

NVR Software - SeeTec client
55
1. For secondary installations only:
In the MultimediaDatabase dropdown list, select the MultimediaDatabase
from which you want to export image data.
2. Mark the cameras (by clicking with the mouse or by using the CTRL key and
the mouse) from which you want to export image data.
3. Enable the Export standard recording checkbox to export the recording of
the standard recording.
4. Enable the Export alarm recording checkbox to export the recording of the
alarm recording.
5. Use the From and To fields to set the export time range.
6. In the Password field, enter a password for encrypting the image data.
7. Optional: Enable the Use bandwidth limitation checkbox to limit network
traffic while the image data is transferred to the client.
8. Click on Select to select the location.
9. Enable the Create subdirectories for user, camera name and time
checkbox to create the following folder structure in the export directory:
<SeeTec user name>\<camera name>\<start time of export (YYYY-MMDD time)>
10. Optional: Activate Split export into several directories and select the size
of the export file.
The exported files will be split automatically to fit on a CD, DVD, etc.
11. Start export by clicking on Export.
12. To finish multi-export, click on Close.
The installation files for the SeeTec OfflineViewer are located in <SeeTec
installation directory>\tools\OfflineViewer. During export, the SeeTec
OfflineViewer installation file and a CD/DVD burning program (Totally Free Burner)
are also copied to the export directory.

NVR Software - SeeTec client
56
4.3.5 Image data multi-export to the server (Configuration
Mode only)
With multi-export, you can save recorded image data from several cameras at the
same time locally on your SeeTec server.
Important
For an export, enter a temporary path in the MultimediaDatabase
configuration.
For an automated export, ensure that the export path is available
on the SeeTec server.
1. For secondary installations only:
In the MultimediaDatabase dropdown list, select the MultimediaDatabase
from which you want to export image data.
2. Mark the cameras (by clicking with the mouse or by using the CTRL key and
the mouse) from which you want to export image data.
3. Enable the Export standard recording checkbox to export the recording of
the standard recording.
4. Enable the Export alarm recording checkbox to export the recording of the
alarm recording.
5. Use the From and To fields to set the export time range.
6. In the Password field, enter a password for encrypting the image data.
7. Click on Select to select the location on the server.
8. Enable the Create subdirectories for user, camera name and time
checkbox to create the following folder structure in the export directory:
<SeeTec user name>\<camera name>\<start time of export (YYYY-MMDD time)>
9. Optional: Activate Select time for export and select a date and a time.
The export will be executed at the selected time.
10. Optional: Activate Split export into several directories and select the size
of the export file.
The exported files will be split automatically to fit on a CD, DVD, etc.
11. Start export by clicking on Export.
12. To finish multi-export, click on Close.

NVR Software - SeeTec client
57
The installation files for the SeeTec OfflineViewer are located in <SeeTec
installation directory>\tools\OfflineViewer. During export, the SeeTec
OfflineViewer installation file and a CD/DVD burning program (Totally Free Burner)
are also copied to the export directory.
4.3.6 Status query for automated image data export
The recorded image data can be exported automatically every day, see chapter
Automated image data export (page 133). All failed exports are listed in the Status
query for automated image data export window. You can restart or delete the
failed exports.
1. In the MultimediaDatabase field, select the MultimediaDatabase for which
you want to display the failed exports.
In the Export status group box, you can see all canceled exports, the start time of
the export, the camera name, the target directory, the date of the exported image
data and the reason for export cancelation.
2. In the Export status group box, select the canceled exports.
3. Select Export again or Delete for the selected exports.
4. Click on Apply.
4.3.7 Request Product ID (Configuration Mode only)
To order a license key after a new installation or a hardware change you need the
Product ID of your system. The product ID is generated by using the Request
Product ID menu.
4.4 Info menu
Viewing information about program version, users, host name, and port.
4.4.1 SeeTec 5 User's Guide
You can open the SeeTec 5 User's Guide by pressing F1.
4.4.2 Program
You will receive information about the program version and the logged-in user. You
can also verify the host name and port of the SeeTec services.
4.4.3 License
Your license information is displayed in License information (e.g. maximum
number of cameras, concurrent client connections or the license's validity time
range).

NVR Software - SeeTec client
58
4.4.4 System
The following system information can be displayed by using the System menu:
System environment (operating system, architecture, Java
TM
version)
SeeTec license
Logged on SeeTec clients (IP address of the client PCs)
The SeeTec administrator sees the following information about the logged in SeeTec
clients:
SeeTec user name
SeeTec user profile
SeeTec type of client

NVR Software - SeeTec Surveillance
59
5 NVR Software - SeeTec Surveillance
5.1 General
Almost all SeeTec 5 settings and the presentation of image data can be performed
through a client (SeeTec Surveillance). This client is the central control and
display unit of the surveillance system and is used for the configuration of all
SeeTec 5 services.
Since all settings can be accessed through a single application, the administrator
effort is reduced (less physical travel or use of multiple individual software
modules).
Individual modes are listed in the main menu in the File menu and can be selected
if the respective rights are assigned to the logged-in user. If this is not the case,
these functions are not displayed.
Due to the service-based approach, you do not need to start the SeeTec
Surveillance to record image data. The recording process is launched
automatically when the server is started.
The client features four different modes, providing the user with a clear and task
oriented perspective:
Surveillance Mode
This mode enables the display of Live image data and / or incoming alarms
and supports camera control.
Archive Mode
This mode is used to view and export recorded image and event data.
Report Mode
In this mode, you can display and assess different events (alarm events,
user logon and logoff, etc.).
Configuration Mode
The Configuration Mode is used to configure all settings that are to be
used and executed by services.

NVR Software - SeeTec Surveillance
60
5.2 Configuration Mode
In Configuration Mode, all hardware- and software-related settings of your
network-based video surveillance system are performed.
At the bottom of the client screen, you will find help texts for all tasks and steps
you perform in Configuration Mode with detailed information on individual fields
and procedures.
Administrator view
Component overview
User view
Help text
Abbildung 2: Configuration Mode overview
Starting Configuration Mode
You need to have administrator rights and the SeeTec Enterprise client type to
access Configuration Mode.
1. In the File menu, select Configuration Mode.

NVR Software - SeeTec Surveillance
61
Administrator view:
This tree element shows all software functions and all included components by
category. It is only displayed in Configuration Mode.
Component overview:
This overview will change according to the component selected from the
Administrator view and will guide you through the configuration of individual
components.
User view:
This tree element will be displayed in Surveillance Mode and Archive Mode and
allows you to map the organizational structure of your corporate resources. Only
those cameras and maps are displayed for which the logged-in user has the
appropriate access rights.
You can create new folders with the right mouse button, and you can file included
hardware components to the respective directory using Drag and Drop.
Help texts:
This field contains explanations for each component selected in the Administrator
view to support the administrator in setting up the surveillance system.
Note
In the Layer menu, you can display the search window to perform a
well-directed search for elements.
In the left column, the result of your search is displayed. If you click
on a result, all elements are displayed in the right column of the
search window that are linked to the result.

NVR Software - SeeTec Surveillance
62
5.2.1 Adding hardware and saving images
The Hardware dialog lists all components presently installed, e.g. cameras, video
servers or input / output devices.
Network cameras consist of a camera unit and a video server unit. For this reason,
the Hardware dialog always shows the video server followed by a camera, which is
appended below. Consequently, the settings of a network camera are also listed
separately as video server settings and as camera settings. In the video server
settings, all connection-specific parameters are defined. The camera settings
feature all settings related to image quality and image storage.
Add new hardware component
1. Click on Hardware.
2. In the component overview, click on New.
3. Enter the name of the hardware component that you want to add.
4. In the Manufacturer dropdown list, select the manufacturer of the
hardware component.
5. In the Type dropdown list, select the type.
6. Optional: Activate the Use authorization checkbox and enter the user
name and password for accessing the hardware component.
7. In the Host (IP address or name) field, enter the IP address or the host
name.
8. For distributed installations:
Select the CameraManagement server in the CameraManagement server
dropdown list.
9. For distributed installations:
Select the MultimediaDatabase in the MultimediaDatabase dropdown list.
10. Confirm with OK.
Add new hardware components by using the camera configuration wizard
The camera configuration wizard enables a simplified camera configuration. You can
adapt common configuration settings.
1. Click on Hardware.
2. In the component overview, click on New.
3. Enter the name of the hardware component that you want to add.
4. In the Manufacturer dropdown list, select the manufacturer of the
hardware component.
5. In the Type dropdown list, select the type.

NVR Software - SeeTec Surveillance
63
6. Optional: Activate the Use authorization checkbox and enter the user
name and password for accessing the hardware component.
7. In the Host (IP address or name) field, enter the IP address or the host
name.
8. For distributed installations:
Select the CameraManagement server in the CameraManagement server
dropdown list.
9. For distributed installations:
Select the MultimediaDatabase in the MultimediaDatabase dropdown list.
10. Click on Wizard.
The camera wizard will be opened.
The following configuration options depend on the camera you want to configure.
You can display the camera in the browser and go back to the previous
configuration option at any time by using the buttons.
11. Under General, you can specify which data will be displayed in the camera
image.
12. Optional: Rotate the image and enable the digital inputs and outputs of the
camera.
13. Click on Next.
14. Optional: If you have enabled the digital inputs and outputs of the camera,
you can adapt the entries for the Name for CLOSED, Name for OPENED,
Icon, Dead time (s) and Hold time (s) fields of the inputs and outputs
during the following steps.
15. Click on Next.
16. Select the settings for the standard recording.
17. Click on Next.
18. Optional: Select the settings for the alarm recording, if they differ from the
standard recording.
19. Click on Next.
20. Optional: Enable the camera's motion detection and the desired number of
motion detection windows. Note that you have to configure the motion
detection windows directly on the camera. Specify the dead time.
The dead time is the time at which no other incoming signal is accepted after the
first incoming signal.
21. Click on Next.
A summary of your configuration will be displayed.
22. To create the new camera, click on Finish.

NVR Software - SeeTec Surveillance
64
Note
The Select an IP installer button opens the previously selected IP
installer program of the camera manufacturer.
Adding new hardware – Generic camera
With the generic video driver, you can use cameras that are not integrated in the
SeeTec software.
The functionality is limited to displaying and recording the live image. The video
parameters must be configured directly on the camera, e.g. resolution and frame
rate.
SeeTec does not give any warranty for trouble-free operation of cameras connected
via the generic video driver.
1. Click on Hardware.
2. In the component overview, click on New.
3. Enter the name of the hardware component that you want to add.
4. In the Manufacturer dropdown list, select the Generic Video option.
5. In the Type dropdown list, select the Generic video driver option.
6. Optional: Activate the Use authorization checkbox and enter the user
name and password for accessing the camera.
7. In the Host (IP address or name) field, enter the IP address or the host
name.
8. For distributed installations:
Select the CameraManagement server in the CameraManagement server
dropdown list.
9. For distributed installations:
Select the MultimediaDatabase in the MultimediaDatabase dropdown list.
10. Confirm with OK.
The configuration is the same as for a camera that is integrated in the SeeTec 5
system. For a generic camera, you additionally need to configure the following
settings under Hardware > Camera > Video settings:
11. In the Streaming mode dropdown list, select the streaming mode.
12. In the Transmission mode dropdown list, select the transmission mode.
13. Enter the URL for collecting the image stream.

NVR Software - SeeTec Surveillance
65
Note
Make sure that the IP address within the URL matches the IP
address of the camera with the generic video driver.
Copying hardware
An existing camera or similar hardware component can be used as a template for
adding cameras.
The cameras must be of the same type as the camera used as a template.
1. Select the camera in the component overview.
2. Click on Copy.
The copy wizard will be opened.
3. Select the number of copies.
4. Change the camera name.
5. In the Address range, enter the IP address of the first copied camera.
The IP addresses are incremented automatically by using the number of copies.
6. For distributed installations:
Select the CameraManagement server in the CameraManagement server
dropdown list.
7. For distributed installations:
Select the MultimediaDatabase in the MultimediaDatabase dropdown list.
8. Optional: Select the settings that you want to copy from the camera used as
a template.
9. Confirm with OK.

NVR Software - SeeTec Surveillance
66
Changing settings
1. Select the hardware component and click on Edit. Alternatively, double-click
on the hardware.
Depending on the hardware, you can perform or modify the following settings:
IP camera / video server configuration
General
Note
Except the camera type itself, you can basically change each setting
later.
1. Optional: Change the name of the camera in the Name field.
2. Only for Axis, Arecont Vision, Panasonic BD and Basler cameras recording
with MPEG-4/H.264:
The RTSP port (Real-Time Streaming Protocol) is used to transmit control
signals (default: 554).
3. Click on Browser to open the camera in your default browser. This way you
can check if your input in the Host and Port fields is correct.
4. Only for cameras supporting SSL connections:
Select whether the camera sends images to the SeeTec server without
encryption (HTTP port) or with encryption (HTTPS port). For HTTPS
communication, you need to generate an SSL certificate for the camera.
The API version is automatically detected.
5. If you are unable to use your existing API version, contact us for a list of
possible API and camera firmware version combinations.
6. For cameras that support various Capture modes:
Select the Capture mode of the camera.
Depending on the setting the camera has different frame rates and resolutions. It is
possible that the camera restarts and is not available for a couple of minutes.
7. If you are using a distributed installation (combination of multiple SeeTec
servers), enter the CameraManagement server that will manage the
camera.
8. Enter the access data for the camera in the Authorization group box.
Depending on the camera manufacturer, the user must have administrator rights.

NVR Software - SeeTec Surveillance
67
MPEG-4 / H.264 audio settings
1. For analog video servers:
Select the Camera that will send an audio stream.
2. Enter the Audio codec to be used.
3. Activate the Audio option in the Video settings dialog or in the Video
profiles dialog for multi-streaming.
If you want a user in Surveillance Mode to listen to the audio stream, you must
be assigned the corresponding right in Authorization Management.
Note
You can only receive audio streams from the camera, intercom
functionality is not possible.
Digital input / output
1. Enable digital inputs in the Digital inputs dialog to process incoming signals
on the video server.
2. Enable digital outputs in the Digital outputs dialog to change the state of
the digital outputs.
Note
For digital inputs, you need to specify actions in the Alarm
scenarios dialog that are to be applied when a signal is received.
You may add a digital input to the Map to graphically display the
current input status (open or closed). In the Image field, you can
determine the Icon that will be displayed.
You can change the digital output status using either the button or
an alarm scenario (Server dialog).
Digital inputs
1. Activate the digital inputs.
2. In the Name for CLOSED and Name for OPENED fields, enter a unique
name.
To prevent the evaluation of every single signal for several signals in short
intervals, which would lead to an unnecessary use of the event database, you can
specify a duration in seconds in the Dead time field after which a new signal is
accepted as an event.

NVR Software - SeeTec Surveillance
68
Digital outputs
1. Activate the digital outputs.
2. In the Name for CLOSED and Name for OPENED fields, enter a unique
name.
3. In the Hold time (s) field, enter the time at which the output is opened or
closed (0 = infinite).
Enable virtual cameras
Virtual camera configuration is only available for specific camera models.
1. Activate the virtual camera feature to display and store multiple image
details from one camera as individual cameras.
Enabling the virtual camera feature creates several virtual cameras.
The number of virtual cameras depends on the camera model. The camera
configuration is the same as for a regular camera.
Selecting the image detail is further explained in the chapter Selecting virtual
camera cropping (page 73).
Camera configuration
Note
The following options can only be configured if the camera provides
the corresponding interfaces.
If fields are grayed out, the setting must be carried out directly on
the camera!
General
The name of the camera specified in the Name field and the selected Icon are
displayed in Surveillance Mode. You can add more icons in the Extras > Image
management menu.
The Camera type and Camera ID fields are relevant for analog video servers
only. Change the information in these fields only if you previously changed the
information on the video server as well.
If the camera features an ImmerVision lens, activate the ImmerVision
Panamorph lens checkbox to rectify the camera image.

NVR Software - SeeTec Surveillance
69
Note
There is an exceptional case with respect to camera type:
You can redirect control signals of a video encoder to another
camera with connected PTZ control unit. An independent RS-485port of video encoder is required per redirection.
Configure the redirection of a video encoder's control signals as follows:
1. Select the PTZ option or the respective PTZ protocol as Camera type in the
video encoder (= camera 1).
2. Connect a fixed camera (= camera 2) with a PTZ control unit.
This camera is to be controlled via the video encoder's PTZ function.
3. Select the External PTZ option as Camera type for Camera 2.
4. Select camera 1 in the External control device field.
In doing so, you select the video encoder for which you have selected PTZ as
Camera type.
The control signals will be redirected from Camera 1 to Camera 2 via the RS-485
port of the video encoder. Thus you can control Camera 2 as usual. You can still
display or record a live image of Camera 1.
5. Optional: By using the Title and Date and time options, you can display a
title or the date and time in the camera image.
Date and time information is transmitted directly by the camera, not by the SeeTec
server (optional, depends on the camera type).
The Pan / Tilt mode only applies to PTZ cameras, see chapter PTZ control
(page 143). Additionally, you can set the control Sensitivity for continuous control.
6. If a camera is mounted upside down or on a sloping surface, rotate the
camera image.
The Invert arrow keys, Control camera and Position camera options are only
relevant for PTZ (pan / tilt / zoom) cameras.
In Surveillance Mode, all PTZ cameras are controlled using the PTZ control panel.
Since this can cause discrepancies if cameras are mounted upside down, the
directions of the arrow keys can be inverted using the Invert arrow keys option.
If the Control camera and Position camera options are disabled, the user will no
longer be able to control the camera with the PTZ control panel and / or move to
preset positions in Surveillance Mode.
See chapter PTZ control (page 143).

NVR Software - SeeTec Surveillance
70
If you are using the timeshift buffer, the camera images will be cached on the
SeeTec client before they will be displayed. This helps normalize the fluctuations in
live display with regard to time gaps between individual images. This is mainly the
case with cameras that have a narrow bandwidth connection. The buffer size is
variable (0-1000 ms).
The Action on inactivity is only relevant for PTZ cameras. If Action on inactivity
is enabled, use the Edit button to select an Action that will be triggered after the
specified time in the Timeout (s) field passes (camera is no longer
controlled / camera will not move to PTZ preset positions):
Start or stop alarm recording
Move to preset position
Open or close digital output
The Action on start of video-streaming is triggered when a user has the camera
in Surveillance Mode on top, i.e. the user is viewing the current live image of this
camera. As an action, you can specify an output to be opened or an alarm
recording to be started, for instance. The Action on stop of video-streaming is
triggered when the current camera is closed or another layer is brought on top.
If more than one user is viewing the same camera, the first user will trigger the
start action. The last user to close this camera triggers the stop action.
If a camera is no longer available in the network, you can trigger an Action on
network failure:
7. Click on Edit to select the desired action (open / close digital outputs, start /
stop alarm recording).
When the action is executed, a dead time of one hour will be started as well. The
dead time is the time at which no other action is executed after the first action. No
other action is executed even if the camera is accessible again.
Image recording
All information in the image recording, e.g. the MultimediaDatabase to be used or
the required amount of hard disk space on the camera etc. is configured here.
To avoid overwriting sensitive image data, standard recordings and alarm
recordings are processed separately.
Note
Standard recordings are indicated by a green dot at the lower right
border of the camera image in Surveillance Mode. During an
alarm recording the dot will turn red.

NVR Software - SeeTec Surveillance
71
MultimediaDatabase servers
If you are using multiple MultimediaDatabases, this selection list is used to specify
for each image source on which computer image data is to be stored.
The Info button displays all image settings of the standard and alarm recording as
well as the load of the MultimediaDatabase for this camera.
Standard recording:
As a rule, you can enable or disable the standard image recording.
During the Recording time range you manage the standard image recording
duration (24 / 7, weekdays only, weekends only, etc.). The time range is defined
through a template that is created using the Time management option. The
default is set to continuous recording.
1. Optional: In the Record only if field, set the standard image recording to
start only if a digital input is opened or closed. Select the input by clicking on
the Edit button.
2. Also, define the size of image store during standard recording.
This value represents the storage reserved in the MultimediaDatabase. If the
available storage space for images has been used up, the most recent recording will
overwrite the oldest recording (loop recording).
3. Optional: Enter a time limit in the Days and Hours fields.
If the storage is not sufficient, loop recording is used where the oldest record is
deleted and replaced by the current recording. If there is more storage available
than required, surplus storage is not used for recording.
Important
If the actual memory requirement is larger than the size you
specified in the MultimediaDatabase, the MultimediaDatabase stops
recording and notifies you via e-mail / SNMP if you configured an email or SNMP server under System Management.
Alarm recording
To record the alarm, you first have to define an alarm scenario so that a camera
only starts recording image data in case of an alarm, see chapter Alarm scenarios
(page 111). The validity for an alarm is defined with a time template in the alarm
scenario.
1. Select the Activated checkbox to enable or disable an alarm recording.
2. Enter a pre-alarm duration (3600 s max.) in the Pre-alarm duration (s)
field to record a certain time range of an alarm recording before the alarm
was triggered.

NVR Software - SeeTec Surveillance
72
This time range can be specified in an Alarm scenario as the maximum pre-alarm
duration. If standard recording is enabled, the pre-alarm duration from the
standard recording is transferred to the alarm recording. If standard recording is
disabled, the images for the pre-alarm duration are buffered in the SeeTec
installation directory and transferred to the alarm recording when the alarm
scenario starts.
You can control manual alarm recordings by using the Start and Stop buttons or,
in Surveillance Mode, by right-clicking in a camera image. In case you forget to
stop an alarm recording, the recording process is automatically terminated after the
maximum post alarm duration in order to avoid continuous alarm recording.
Important
The maximum post alarm duration does not have any impact on
alarm recordings that are triggered by an alarm scenario.
3. Define the size of image store during alarm recording in the Size of image
store during alarm recording field.
This value represents the storage reserved in the MultimediaDatabase. If the
available storage space for images has been used up, the most recent recording will
overwrite the oldest recording (loop recording).
You can also specify an additional time limit. If the storage is not sufficient, loop
recording is used where the oldest record is deleted and replaced by the current
recording. If there is more storage available than required, surplus storage is not
used for recording.
Data Aging
With Data Aging, you can reduce the storage space of the video data by configuring
the time from which on the frame rate of older recordings will be reduced
automatically.
1. Activate Data Aging for standard recording and / or alarm recording.
2. Enter a time limit in the Time limit (days) field.
3. Enter the frame rate in the Frame rate (fps) field.
When the recorded images are older than specified in the time limit, they will be
reduced to the specified frame rate for Motion JPEG recordings.
For MPEG-4/H.264 recordings, all P-frames will be deleted independently from the
specified frame rate.
Example:
You record 20 images per second with an I-Frame distance of one second. Data
Aging reduces the frame rate to one image per second, because all P-Frames are
deleted.

NVR Software - SeeTec Surveillance
73
Tracking data and audio recordings are always deleted.
4. You can set the time for the Data Aging search under Server >
MultimediaDatabase > General in the Time of Data Aging search field.
The Data Aging search is performed once a day. If the MultimediaDatabase service
is unavailable at this time, the storage space of the images of the previous day,
that should be reduced, will not be reduced at a later point either.
Selecting virtual camera cropping
Note
The Image detail option is available to virtual cameras only.
1. Select the aspect ratio to be used for the virtual camera (4:3, 16:9 or
arbitrary).
2. To get a current camera image for configuration, click on Reload image.
3. Select an image detail for the virtual camera.
You can also move the image detail afterwards.
4. To change the position of the image detail, use the X and Y coordinates.
5. To change the size of the image detail, use the Width and Height values.
Important
The resolution selected in the Video settings dialog is used for the
display on the client as well as for the recording, see chapter Video
settings (multi-streaming disabled) (page 74).
Example:
The virtual camera image is about half the size of that of a 5
megapixel camera. The resolution of the virtual camera is
2.5 megapixels.
Because the resolution selected in the Video settings is 640x480,
the resolution for this virtual camera is scaled down automatically.

NVR Software - SeeTec Surveillance
74
Video settings (multi-streaming disabled)
1. MPEG-4 / H.264 streaming only (configure the audio settings in the MPEG4 / H.264 audio menu):
Activate Audio, if the camera audio stream is to be transferred and
recorded.
If you want a user in Surveillance Mode to listen to the audio stream, he must be
assigned the corresponding right in Authorization Management.
2. Select the desired Streaming mode (Motion JPEG, MPEG-4 or H.264)
and a Transmission mode.
The transfer modes depend on the camera type and the differences are as follows:
Motion JPEG:
HTTP Server Push: Communication between the SeeTec server and the
camera and the image transfer from the camera to the SeeTec server occurs
via port 80 (TCP) or HTTPS encrypted (port 443, TCP). The ports may be
changed.
MPEG-4/H.264:
RTP over Unicast (default): Communication between the SeeTec server
and the camera occurs via TCP port 554 (= RTSP port). The image transfer
from the camera to the SeeTec server occurs via a negotiated UDP port.
RTP over Multicast: Communication between the SeeTec server and the
camera occurs via TCP port 554 (= RTSP port). The image transfer occurs
via a multicast address that is communicated by the camera. RTP over
Multicast should only be used if third party systems and the SeeTec server
access the camera at the same time.
RTP over RTSP over HTTP / RTP over HTTP / TTS over HTTP: Communication
and image transfer occurs via an HTTP tunnel (port 80 TCP). This setting is
recommended in case of a poor network connection between the SeeTec
server and the camera. The drawbacks of this transfer method are possible
latency times because faulty data needs to be transferred repeatedly.

NVR Software - SeeTec Surveillance
75
For Motion JPEG / MxPEG streaming the following applies (standard and
alarm recording):
1. Use Frame rate and Resolution to determine how many images per second
are saved and the size of the images.
Use the Compression (%) field to change the actual image size (size in KB) and
resolution of image details in percent. The higher the compression percentage, the
smaller the image size. However, the resolution of image details will decrease in
individual frames. We recommend setting the compression to at least 50 % since a
lower image compression ratio could lead to server overload when writing the
images in the MultimediaDatabase.
For MPEG-4 and H.264 streaming the following applies (standard and
alarm recording):
1. Use Frame rate and Resolution to determine how many images per second
are saved and the size of the images.
The I-Frame distance (s) value represents the distance in seconds between two
full screens. Only image changes are transferred between full screens.
2. In the Bandwidth control dialog, use the options Constant bit rate or
Variable bit rate to select whether a constant or a variable bit rate is
requested from the camera.
3. Define the maximum Bandwidth that is to be provided for the camera to
SeeTec server connection.
By default, the image stream is compressed to 4096 kbit/s.
Different settings for Standard recording and Alarm recording during MPEG-4 /
H.264 streaming can result in a several seconds delay when switching from
standard to alarm recording (this is camera-dependent). This may mean that there
is no recording taking place during this period.
4. Change the settings for alarm recording only if you explicitly require a
different resolution or bit rate in case of an alarm and the loss of recorded
time is negligible.

NVR Software - SeeTec Surveillance
76
Important
MPEG-4 / H.264 streaming is manufacturer-specific and is not
supported by all cameras.
The frame rate is not indicated on Panasonic cameras. To limit the
image stream, change the bandwidth setting in Camera
configuration > Image storage.
For a client side display of MPEG / H.264 streaming, the screen
saver must be disabled.
Always keep the video card drivers updated that are installed on the
client.
If the alarm recording values specified for Resolution,
Compression, I-Frame distance or Bandwidth are different from
those of standard recording, then videostreaming must be restarted. This can lead to a recording outage of at least one I-Frame
distance.
Video profiles (multi-streaming enabled)
When you enable multi-streaming, the Video settings menu is automatically
renamed to Video profiles.
Note
To disable multi-streaming, delete all profiles except the default
profile. With a request during the deletion of the last profile, you can
restore the video setting layer.
1. Click on the New button to create a new video profile.
2. Click on the Edit button to edit a video profile.
3. Click on the Delete button to delete a video profile.
The number of profiles depends on the number of image streams that the camera
can transfer simultaneously.
Different profiles are used mostly for MPEG-4/H.264 streaming. For example, you
can request a high quality image stream for recording and a low quality stream for
live view on the client that has a connection with narrow bandwidth to the SeeTec
server.

NVR Software - SeeTec Surveillance
77
Video profile - Base profile
The Base profile cannot be deleted. The name of the basic profile cannot be
changed.
The basic profile is used for image recording.
Important
The basic profile is used for image recording.
The other profiles are used for display on the client.
1. Select at least one video classification. The video classification determines
which video profile is used in Surveillance Mode for the various modes
(Normal, Selected, Alarm), see chapter Video classifications (page 108).
Note
You can edit video classifications (name, additional video
classifications) in the Video classifications option.
If no video classification was selected in the user or group profile, the default profile
is used for live view. Thus, only one profile can be selected as default.
2. MPEG-4 / H.264 streaming only (configure the audio settings in the MPEG-
4 / H.264 audio menu):
Select the Activate audio for this profile checkbox, if the camera audio
stream is to be transferred and recorded.
If you want a user in Surveillance Mode to listen to the audio stream, he must be
assigned the corresponding right in Authorization Management.
If you want the profile to be permanently fetched from the camera, select the
Permanently fetch profile from camera (increases network traffic)
checkbox. This has the advantage that the live image is displayed immediately in
Surveillance Mode. The drawback is an increased network traffic because the
image stream is requested continuously and not on demand.
3. Select the desired Streaming mode (Motion JPEG, MPEG-4 or H.264)
and a Transmission mode.

NVR Software - SeeTec Surveillance
78
The transfer modes depend on the camera type and the differences are as follows:
Motion JPEG:
HTTP Server Push: Communication between the SeeTec server and the
camera and the image transfer from the camera to the SeeTec server occurs
via port 80 (TCP) or HTTPS encrypted (port 443, TCP). The ports may be
changed.
MPEG-4/H.264:
RTP over Unicast (default): Communication between the SeeTec server
and the camera occurs via TCP port 554 (= RTSP port). The image transfer
from the camera to the SeeTec server occurs via a negotiated UDP port.
RTP over Multicast: Communication between the SeeTec server and the
camera occurs via TCP port 554 (= RTSP port). The image transfer occurs
via a multicast address that is communicated by the camera. RTP over
Multicast should only be used if third party systems and the SeeTec server
access the camera at the same time.
RTP over RTSP over HTTP: Communication and image transfer occurs via an
HTTP tunnel (port 80 TCP). This setting is recommended in case of a poor
network connection between the SeeTec server and the camera. The
drawbacks of this transfer method are possible latency times because faulty
data needs to be transferred repeatedly.
For Motion JPEG / MxPEG streaming the following applies (standard and
alarm recording):
1. Use Frame rate and Resolution to determine how many images per second
are saved and the size of the images.
Use the Compression (%) field to change the actual image size (size in KB) and
resolution of image details in percent. The higher the compression percentage, the
smaller the image size. However, the resolution of image details will decrease in
individual frames. We recommend setting the compression to at least 50 % since a
lower image compression ratio could lead to server overload when writing the
images in the MultimediaDatabase.
For MPEG-4 and H.264 streaming the following applies (standard and
alarm recording):
1. Use Frame rate and Resolution to determine how many images per second
are saved and the size of the images.
The I-Frame distance (s) value represents the distance in seconds between two
full screens. Only image changes are transferred between full screens.
2. In the Bandwidth control dialog, use the options Constant bit rate or
Variable bit rate to select whether a constant or a variable bit rate is
requested from the camera.

NVR Software - SeeTec Surveillance
79
3. Define the maximum Bandwidth that is to be provided for the camera to
SeeTec server connection.
By default, the image stream is compressed to 4096 kbit/s.
Different settings for Standard recording and Alarm recording during MPEG-4 /
H.264 streaming can result in a several seconds delay when switching from
standard to alarm recording (this is camera-dependent). No recording takes place
during this period.
4. Change the settings for alarm recording only if you explicitly require a
different resolution or bit rate in case of an alarm and the loss of recorded
time is negligible.
Important
MPEG-4 / H.264 streaming is manufacturer-specific and is not
supported by all cameras.
The frame rate is not indicated on Panasonic cameras. To limit the
image stream, change the bandwidth setting in Camera
configuration > Image storage.
For a client side display of MPEG / H.264 streaming, the screen
saver must be disabled.
Always keep the video card drivers updated that are installed on the
client.
If the alarm recording values specified for Resolution,
Compression, I-Frame distance or Bandwidth are different from
those of standard recording, then videostreaming must be restarted. This can lead to a recording outage of at least one I-Frame
distance.

NVR Software - SeeTec Surveillance
80
Video profile - additional profile
In the Name field, you can change the profile name later on.
1. Select at least one video classification. The video classification determines
which video profile is used in Surveillance Mode for the various modes
(Normal, Selected, Alarm), see chapter Video classifications (page 108).
Note
You can edit video classifications (name, additional video
classifications) in the Video classifications option.
If no video classification was selected in the user or group profile, the default profile
is used for live view. Thus, only one profile can be selected as default.
2. MPEG-4 / H.264 streaming only (configure the audio settings in the MPEG-
4 / H.264 audio menu):
Select the Activate audio for this profile checkbox, if the camera audio
stream is to be transferred and recorded.
If you want a user in Surveillance Mode to listen to the audio stream, he must be
assigned the corresponding right in Authorization Management.
If you want the profile to be permanently fetched from the camera, select the
Permanently fetch profile from camera (increases network traffic)
checkbox. This has the advantage that the live image is displayed immediately in
Surveillance Mode. The drawback is an increased network traffic because the
image stream is requested continuously and not on demand.
3. Select the desired Streaming mode (Motion JPEG, MPEG-4 or H.264)
and a Transmission mode.

NVR Software - SeeTec Surveillance
81
The transfer modes depend on the camera type and the differences are as follows:
Motion JPEG:
HTTP Server Push: Communication between the SeeTec server and the
camera and the image transfer from the camera to the SeeTec server occurs
via port 80 (TCP) or HTTPS encrypted (port 443, TCP). The ports may be
changed.
MPEG-4/H.264:
RTP over Unicast (default): Communication between the SeeTec server
and the camera occurs via TCP port 554 (= RTSP port). The image transfer
from the camera to the SeeTec server occurs via a negotiated UDP port.
RTP over Multicast: Communication between the SeeTec server and the
camera occurs via TCP port 554 (= RTSP port). The image transfer occurs
via a multicast address that is communicated by the camera. RTP over
Multicast should only be used if third party systems and the SeeTec server
access the camera at the same time.
RTP over RTSP over HTTP: Communication and image transfer occurs via an
HTTP tunnel (port 80 TCP). This setting is recommended in case of a poor
network connection between the SeeTec server and the camera. The
drawbacks of this transfer method are possible latency times because faulty
data needs to be transferred repeatedly.
For Motion JPEG / MxPEG streaming the following applies (standard and
alarm recording):
1. Use Frame rate and Resolution to determine how many images per second
are displayed and the size of the images.
Use the Compression (%) field to change the actual image size (size in KB) and
resolution of image details in percent. The higher the compression percentage, the
smaller the image size. However, the resolution of image details will decrease in
individual frames. We recommend setting the compression to at least 50 % since a
lower image compression ratio could lead to server overload when writing the
images in the MultimediaDatabase.

NVR Software - SeeTec Surveillance
82
The following applies to MPEG-4 / H.264 streaming:
1. Use Frame rate and Resolution to determine how many images per second
are displayed and the size of the images.
The I-Frame distance (s) value represents the distance in seconds between two
full screens. Only image changes are transferred between full screens.
2. In the Bandwidth control dialog, use the options Constant bit rate or
Variable bit rate to select whether a constant or a variable bit rate is
requested from the camera.
3. Define the maximum Bandwidth that is to be provided for the camera to
SeeTec server connection.
By default, the image stream is compressed to 4096 kbit/s.
Camera positions
Under Camera positions you can determine positions for cameras with control.
The cameras will later move to these positions by the push of a button.
Complete the following steps to configure a new preset position:
1. Move the camera to the desired position using the PTZ control panel, see
chapter Surveillance Mode (page 135).
2. Set the zoom factor.
3. Click on New.
The New camera position dialog will appear.
4. In this dialog, specify any given name for the preset position. The name may
not contain spaces and/or special characters.
5. Click on OK.
Image data export
The Image data export stores the image data with encryption. The image data
can be viewed with the SeeTec OfflineViewer on a PC without SeeTec Installation.
The installation files for the SeeTec OfflineViewer are located in <SeeTec
installation directory>\tools\OfflineViewer. During export, the SeeTec
OfflineViewer installation file and a CD/DVD burning program (Totally Free Burner)
are also copied to the export directory.
Alternatively, you can incorporate exported image data in an existing SeeTec
Installation by creating a directory (Hardware, Manufacturer: SeeTec, Type
Archive). See chapter Configuring the SeeTec archive (page 94).

NVR Software - SeeTec Surveillance
83
Automated image data export
1. Select the track that you want to export automatically (Standard recording
and / or Alarm recording). Specify the time range to export using a time
template. Use the Time management dialog to create a Time template.
2. Specify the Time of export, the Password for encryption and the Export
path using the
Server > MultimediaDatabase > Image data export > Automated
image data export option.
Manual image data export
1. Select the recording you want to export (standard and/or alarm recording).
2. Use the From and To fields to set the Time range of the export.
3. In the Password field, enter a password for encryption.
If the Use password from MDB option is selected, the password from the
Server > MultimediaDatabase > Image data export > Manual image data
export option is used.
4. In the Path field, enter the complete path for export.
Note
Ensure that the path is available on the PC on which the SeeTec
client is installed.
5. Optional: Activate Select time for export and select a date and a time.
The export will be executed at the selected time.
6. To start the export, click on Export.
Important
Ensure that for an export, a temporary path is given in the
MultimediaDatabase configuration.

NVR Software - SeeTec Surveillance
84
Image data export
In the Image data export dialog, enter the information for sending e-mails and/or
uploading to FTP in an alarm scenario.
In order to export videos or single images, adjust the following settings:
1. Activate the Display camera name and time to display the camera name
and the time in the exported data.
2. Optional: Activate the Reduce resolution checkbox to reduce the resolution
of the video.
3. Optional: Activate the Maximum length (s) checkbox to limit the export
time range.
This means that not the entire alarm recording but only a recording with the
specified length is attached to the e-mail.
4. Select or deselect export with reduced frame rate under Video.
The Reduce frame rate option only applies for MPEG-4/H.264 recordings. If this
option is selected, only the I-frames of the image recording will be exported. Motion
JPEG recordings are always exported with full frame rate.
5. In the Single image sequences, you can specify whether the frame rate
should be reduced. Enter a value in the Maximum frame rate (fps) field.
The full frame rate of the alarm recording is not used when exporting as a single
image sequence.
6. Activate the Create ZIP file checkbox to send single images in a ZIP folder.
Important
Select the codec for video export in the SeeTec Administration
and configure the FTP server.
Start the SeeTec5_AVExport that is required for the export
process.
You can restart or delete the failed automated exports in
Configuration Mode by clicking on the Extras menu and the
Status query for automated image data export option.

NVR Software - SeeTec Surveillance
85
A/V export
In the A/V export tab, you can enter information for sending e-mail or FTP
uploading in an alarm scenario.
In order to export videos or single images, adjust the following settings:
1. Activate the Display camera name and time checkbox to display the
camera name and the time in the exported data.
2. Optional: Activate the Reduce resolution checkbox to reduce the resolution
of the video.
3. Optional: Activate the Maximum length (s) checkbox to limit the export
time range.
Video settings
1. Select or deselect export with reduced frame rate.
This option only applies for MPEG-4/H.264 recordings. If the Reduce frame rate
option is activated, only the I-frames of the image recording will be exported.
Motion JPEG recordings are always exported with full frame rate.
Single image sequences
1. Select or deselect frame rate reduction and enter the frame rate in the
Maximum frame rate (fps) field.
2. Select whether single images should be sent in a ZIP folder.
SeeTec motion detection
If the camera does not provide integrated motion detection functions, you can
activate SeeTec motion detection. However, we recommend using the camera
motion detection whenever possible in order to keep the system load of the SeeTec
servers to a minimum.
1. To enable motion detection, click on Edit to determine the number of areas
to be monitored.
Different areas are required if various alarm scenarios are to be triggered for each
individual area.
2. Enter an area name in the Name field.
3. Enter the dead time of the area in the Dead time (s) field.
The dead time is the time at which no other incoming signal is accepted after the
first incoming signal.
4. Use the mouse to highlight the area of the camera image for motion
detection (left mouse button to select, right mouse button to cancel the
selection).

NVR Software - SeeTec Surveillance
86
5. Use the Start test and Stop test buttons to check your settings.
All amplitudes above the threshold line in the test field are recognized as motion.
6. To precisely set motion detection sensitivity, move this line up or down.
Important
The SeeTec motion detection feature can only be enabled and
configured if the camera delivers single frames, i.e. if the
Streaming mode Motion JPEG is selected in the General dialog
of the Camera configuration screen.
The motion detection feature only delivers suitable results for
motion detection in internal spaces.
For each active motion detection process, approx. 400 MHz of CPU
power are required on the SeeTec server.
Because the mapping of SeeTec motion detection to the video
stream is not unique when multi-streaming is enabled, the following
applies:
When multiple profiles use JPEG and are permanently active,
one of these is selected for motion detection.
If there is no additional profile, the basic profile is used,
provided it uses JPEG.
Motion detection of the server
Note
Use the motion detection of the server only if the camera does not
have integrated motion detection.
1. Activate the motion detection.
2. Optional: In the Video analysis module field, select the video analysis
module that is to be used for motion detection.
3. Only with multi-streaming enabled:
Select the profile in the Profile dropdown list.
4. In the Areas field, enter a name for the area that is to be created.
5. Click on the + button to create the area.
6. Click on the camera image to create a vertex for the area of the motion
detection.
7. With every further click, you create another vertex.

NVR Software - SeeTec Surveillance
87
8. You exit the creation of an area by double-clicking.
9. Enter the dead time in the Dead time (s) field.
The dead time is the time at which no other incoming signal is accepted after the
first incoming signal.
10. Use the Start test and Stop test buttons to check your settings.
All amplitudes above the threshold line in the test field are recognized as motion.
11. To set the threshold value for triggering the motion detection to be more
precise, move the line up or down with the Threshold value slider.
12. To adjust the sensitivity of the motion detection, move the line up or down
with the Sensitivity slider.
Note
Areas are not required for motion detection. If no area has been
created, the entire camera image is used for motion detection.
To remove an area, select it in the list and click on the – button.
Camera motion detection
Camera motion detection is only available for specific camera models. For all other
cameras with motion detection, you must add an input in the SeeTec Network I/O
field, see chapter Sample alarm scenario configuration (page 181).
1. Access your camera with a web browser and specify the windows you want
to use for motion detection, see Appendix (page 179).
2. Enable the corresponding number of windows.
3. Enter a name in the Name field.
4. Enter the dead time in the Dead time (s) field.
The dead time is the time at which no other incoming signal is accepted after the
first incoming signal.
Important
If the Unattended Object detection mode is set for a Sony camera,
the corresponding dead time should be greater than the Release
time minus the Detection time. Otherwise, more than one
notification per detection is triggered.

NVR Software - SeeTec Surveillance
88
Tampering
For camera models that support this feature, you can activate or deactivate the
notifications in case of Tampering or VideoLoss by clicking on Tampering.
You can use the notification to start an alarm scenario or to send an e-mail.
Furthermore, an entry will be made in the Windows® application protocol.
Note
If you disable the Send notification in case of tampering or
Send notification in case of video loss checkboxes, no
notifications will be sent in case of tampering or video loss. The
alarm scenario that is triggered by the tampering or video loss will
be disabled.
Video gateway / Multicast
1. If an intelligent image evaluation is executed by a via:sys box from viasys |
Intelligent Video GmbH, enable the Video gateway and specify the Port.
Through this port, camera images are forwarded from the SeeTec server to the
via:sys box.
1. Select the Activated checkbox to enable multicast streaming.
2. Specify the desired multicast IP address and the Port, if the image has to
be delivered via multicast to the client.
3. Enter the TTL value for multicast.
Privacy masking
Mask sensitive areas or movements in the image to prevent users from viewing
these areas. Masking is displayed depending on the user rights in Surveillance
Mode and Archive Mode.
Important
MOBOTIX cameras are supported only for Motion JPEG streaming.
1. Select Activated for privacy masking.
2. Select a Method from the privacy masking parameters.

NVR Software - SeeTec Surveillance
89
Static objects:
With this method, you can mask single areas of the camera image. To change the
Mask color, click on the color icon below and select the color. Additionally, you can
enter a value for Transparency (%). To create a mask, hold down the left mouse
button and drag a mask. You can select the shape (rectangle, circle, etc.) by
clicking the right mouse button.
Moving objects:
With this method, you can mask all moving objects or persons. For example, if a
person in the image stops moving, masking is immediately canceled.
In the Additional settings dialog, specify how long the object will be masked after
it has stopped moving (= Masking duration), which pixel size will be used for
masking (= Masking) and how sensitively the system reacts to a moving object (=
Sensitivity) by using sliders. Activate the Black/white checkbox to display the
mask in black and white.
Office mode:
For the Office mode, a reference image needs to be specified first. Click on Load
reference image. All differences to the specified reference image are displayed
with masking.
The Clear history button deletes all older masks in Archive Mode if you
previously deleted and created new masks.
Important
Masking only affects users that do not possess the privacy masking
right in Authorization Management. The mask is not displayed
for other users.
Administrators may enable and disable masks by right-clicking in
the camera image in Surveillance Mode.
The mask is not exported during image export.

NVR Software - SeeTec Surveillance
90
Configuring an input / output device
1. Create a new hardware.
2. Enter a name in the Name field.
3. In the Manufacturer dropdown list, select the manufacturer (Beckhoff,
Advantech or Axis).
4. In the Type dropdown list, select the type.
5. In the Host (IP address or name) field, enter the IP address or the host
name.
6. For distributed installations:
In the CameraManagement server dropdown list, select the
CameraManagement server that will manage the device.
7. Confirm with OK.
Edit input / output devices
1. To modify the device (change the names of digital inputs and outputs) select
it in the Component overview and click on Edit.
2. In the General menu, you can change the name of the device in the Name
field.
The API version is automatically detected.
3. If you are unable to use your existing API version, contact us for a list of
possible API and camera firmware version combinations.
4. In the Host field, you can change the IP address.
5. In the CameraManagement server dropdown list, select the
CameraManagement server.
Defining digital inputs or outputs
1. Define the number of digital Inputs and/or Outputs in the respective menu
by clicking on Edit.
For Beckhoff devices, the maximum number of inputs / outputs is 32. For
Advantech and Axis devices, the number of inputs and outputs varies depending on
the type.
2. Activate the inputs and outputs that you require.
3. Enter a name and confirm it by clicking on OK.

NVR Software - SeeTec Surveillance
91
Note
To be able to address Beckhoff PLCs in the SeeTec software, a
special program needs to be installed on the PLC by SeeTec.
You may add a digital input to the Map to graphically display the
current input status (open or closed). In the Image field, you can
determine the Icon that will be displayed.
Configuring SeeTec Network I/O
This device type enables you to carry out all network-based input and output
operations via TCP or HTTP.
1. Create a new hardware.
2. Enter a name in the Name field.
3. In the Manufacturer dropdown list, select the SeeTec option.
4. In the Type dropdown list, select the SeeTec Network I/O option.
5. In the Host (IP address or name) field, enter the host name.
6. For distributed installations:
Select the CameraManagement server that will manage the device.
7. Confirm with OK.
8. In the General menu under Valid IP addresses, you need to specify the IP
addresses or IP address ranges from which to accept input operations.
This specification is not mandatory. You can list any given number of address
masks separated by commas (without spaces). Within an address mask, use of the
wildcard characters * and - is allowed. If no address mask is assigned, every
incoming connection is accepted.
Example:
10.0.8.9-23,10.0.8.7,192.*.*.*
In this example, three IP address masks were defined to restrict IP access:
The address mask 10.0.8.9-23 permits connections from all IP addresses between
10.0.8.9 and 10.0.8.23.
The address mask 10.0.8.7 permits connections from this single IP address.
The mask 192.*.*.* accepts connections from the entire subnet starting with 192.

NVR Software - SeeTec Surveillance
92
Configuring network outputs
With the Edit button, you can define any number of network outputs.
1. Select the Activated checkbox to enable the output.
2. Enter a name in the Name field.
Available protocols are TCP and HTTP.
3. Select a Protocol.
4. Enter the IP address to which the output will establish a connection.
You can assign multiple outputs to the same IP address.
5. Specify a Port.
6. Optional: Enter a User and a Password.
7. Enter a Text in ASCII or hexadecimal (HEX) format, that will be
transferred.
Examples:
Abbildung 3: Output configuration
Output 1:
A TCP connection to 10.0.8.11:4711 is opened and immediately
closed again.
Output 2:
A TCP connection to 10.0.1.125:25000 is opened with a user
name and a password (admin/admin). 3 bytes (65 32 fa, HEX)
are transferred before the TCP connection is closed.
Output 3:
An HTTP-GET connection on 10.0.4.33:80 responds to URL
/axis-cgi/com/ptz.cgi?pan=63 (pan command for an Axis
camera).

NVR Software - SeeTec Surveillance
93
Configuring network inputs
By using the Edit button, you can define any number of inputs.
1. Select the Activated checkbox to enable the input.
2. Enter a name in the Name field.
Incoming signals can be processed as follows:
The SeeTec server passively waits for a connection request of an unknown
network device while the permitted IP address ranges are checked.
The SeeTec server actively establishes a network connection (with the HTML
or TCP Protocol) using Connect to and Port for addressing. The
connection is maintained continuously, and incoming data are interpreted,
i.e. they are compared to the content of the Text field. If the text field is
empty, any incoming byte is considered an input trigger. The Dead time (s)
is the time at which no other incoming signal is accepted after the first
incoming signal. Optionally, a User and Password may be assigned.
Optional: You can also filter for control characters. In the dropdown list,
select the control character you want to filter. Select User-defined to enter
a user-defined control character.
Examples:
Abbildung 4: Input configuration
Input 1:
The SeeTec server waits for an incoming HTTP connection on
Port 12000. After the signal is received, no other signals will be
processed for the duration of the Dead time (s) specified
(5 seconds).
Input 2:
The SeeTec server waits for the Alarm! value on Port 13000
transferred via HTTP connection and then closes the connection.
Input 3:
The SeeTec server connects to the network device at
10.0.4.33:8080 via TCP and reports the input trigger as soon as
the byte sequence entered in the Text field is received. The
connection is maintained until the network device terminates the
connection.

NVR Software - SeeTec Surveillance
94
Creating a TCP alarm port
1. Use Edit to add an input.
2. Activate the input.
3. Enter a name in the Name field.
4. Enter a port in the Port field.
5. Enter the dead time in the Dead time (s) field.
The dead time is the time at which no other incoming signal is accepted after the
first incoming signal.
6. Leave all other settings unchanged.
Abbildung 5: Configuring a TCP alarm port
Note
The software does not feature an auto increment function for
automatically populating the port information. Enter a Port, rightclick on the Port field and confirm the auto increment prompt with
Yes.
Configuring the SeeTec archive
With the Archive, you can integrate exported image data in SeeTec 5 and access it
in Archive Mode.
1. Create a new hardware.
2. Enter a name for the archive in the Name field.
3. In the Manufacturer dropdown list, select the SeeTec option.
4. In the Type dropdown list, select the Archive option.
5. To modify the archive, select it in the Component overview and click on Edit.
General
6. In the General menu, specify the CameraManagement server and the
MultimediaDatabase server that will manage the archive images.
Note
Make sure that the exported image data is available on the
according SeeTec server.

NVR Software - SeeTec Surveillance
95
7. Enter the Path where the image data is located on the server.
8. Click on Update path.
The Cameras not verified field now displays cameras that are located in the
specified path.
9. To verify the cameras, enter the password in the Password field that was
used to encrypt the image data and click on Add password.
The cameras are now displayed in the Cameras verified field.
10. If you used different passwords, enter them one after the other.
The cameras are now displayed as <camera name>[archive] in Archive Mode.
5.2.2 Time management
Time Management creates time templates that are similar to a timetable to
chronologically coordinate the standard image recording of one single or several
cameras as well as the validity of events.
Creating time templates
1. Create a new time template and specify a name.
2. Edit the time template with the Edit button or double-click the time
template.
White areas indicate that the recording was stopped. Blue areas depict recording
times.
3. To specify a time range, click into the time template.
4. Select entire time ranges or weekdays by clicking on the upper and lower
edge to do this faster.
5. In the System Management dialog, in the Work center calendar, you
can specify the days to be treated independent of normal weekdays in time
templates.
These days are displayed in the time template as holidays.
Note
Please remember:
White area -> function is disabled
Blue area -> function is enabled
If a camera already references a time template and this template is
deleted, the camera starts continuous recording.

NVR Software - SeeTec Surveillance
96
5.2.3 Maps
To obtain an overview of the premises to be monitored and/or the installation
location of the cameras, you can insert maps in the following formats: BMP, JPG,
JPEG, GIF, and PNG.
Generating maps
1. Create a new map.
2. Enter a name in the Name field.
3. Click on the Edit button to edit the map.
4. Click on the Background image button and select a background image for
the map.
5. In the Icon dropdown list, select an icon for the map.
6. Select the desired object (camera, button,…) from the list.
7. Add the selected object with Drag and Drop at the desired location on the
map.
You can freely turn and scale the symbol you have just added.
8. For the icons added to the map, you can select Always display text.
Otherwise, the texts are only displayed during mouseover.
Note
You can place cameras, buttons, digital inputs, layers, web pages
and other maps on the map, but you cannot insert video servers.

NVR Software - SeeTec Surveillance
97
5.2.4 Layers
You can display multiple cameras in one window by defining layers. Cameras, web
pages or maps are then added to the layers using Drag and Drop. The user
interface can be customized to meet your specific requirements. The following layer
formats are available:
1x1, 1x2, 1x3, 2x1, 2x2, 2x3, 3x3, 3x4, 3x5, 4x4, 4x5, 4x6, 5x7
and
1+2, 1+3, 1+5, 1+6, 1+8, 1+12, 2+8, 4+9
All layers can be assigned to a user or group profile and will be available when the
program is started.
Note
You can also generate layers directly in Surveillance Mode or
Archive Mode. To do so, select Layer / Add layer. Select the
desired layer format.
These layers are only temporary, but can be stored. See chapter
Save local layer (page 50).
Generating layers
1. Create a new layer.
2. Enter a name in the Name field.
3. In the Type dropdown list, select the type.
4. Click on OK.
5. Click on Edit to edit the newly created layer.
6. You can now Drag and Drop cameras, web pages or maps from the user
view into the new layer.
7. Confirm with OK.
8. In the profiles, assign the layer to the respective user or group profile, if the
layer is to be displayed when the client starts.

NVR Software - SeeTec Surveillance
98
Create user-defined layers
1. Create a new layer.
2. Enter a name in the Name field.
3. In the Type dropdown list, select the User defined type.
4. Click on OK.
The layer editor will be opened.
5. In the layer editor, adapt the number of rows and columns.
You can create a maximum of 64 tiles.
6. Click on Next.
7. Optional: Press and hold the left mouse button to select multiple tiles. Click
on Connect or Disconnect to connect or disconnect the selected tiles.
8. Click on Finish.
9. Click on Edit to edit the newly created layer.
10. You can now Drag and Drop cameras, web pages or maps from the user
view into the new layer.
11. Confirm with OK.
12. In the profiles, assign the layer to the respective user or group profile, if the
layer is to be displayed when the client starts.
Generating layers with focus tiles
You can select a tile as a focus tile in any layer. When you double-click on a camera
within a layer with a focus tile, the camera image will be displayed in the focus tile.
When you double-click on a camera within a layer without a focus tile, the camera
image will be displayed in a flyout window.
1. Create a new layer.
2. Enter a name in the Name field.
3. In the Type dropdown list, select the desired type of layer.
4. Click on OK.
5. Click on Edit to edit the newly created layer.
6. You can now Drag and Drop cameras, web pages or maps from the user
view into the new layer.
7. To create a focus tile, select a tile by right-clicking on an empty tile. Select
the Select as focus tile option.
8. Confirm with OK.
9. In the profiles, assign the layer to the respective user or group profile, if the
layer is to be displayed when the client starts.
 Loading...