

Page 1

User guide
Z258c
This is the Internet version of the user's guide. © Print only for private use.
Page 2
Congratulations on your purchase of the Sony Ericsson Z258c.
For additional phone content, go to www.sonyericsson.com/
cn/fun. Register now to get free online storage and special
offers at www.sonyericsson.com/cn/myphone. For product
support, go to www.sonyericsson.com/cn.
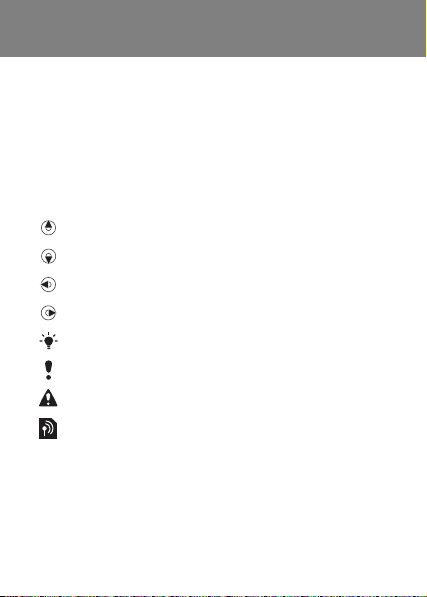
Instruction symbols
The following instruction symbols appear in this User guide:
> Use the navigation key to scroll and select.
Press the navigation key up.
Press the navigation key down.
Press the navigation key to the left.
Press the navigation key to the right.
Tip
Note
Warning
Indicates that a service or function is network- or
subscription-dependent. All menus or functions may
not be available in your phone. Consult your network
operator for more information.
This is the Internet version of the user's guide. © Print only for private use.
2
Page 3
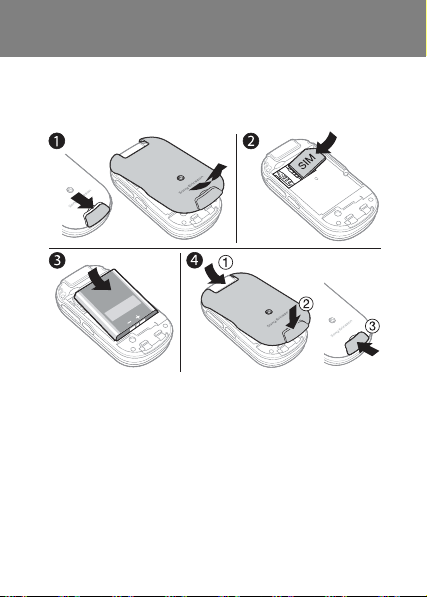
Prepare the phone
Always turn off your phone and detach the charger before you
insert or remove the SIM card.
To insert the SIM card and battery
1 Remove the battery cover by sliding the battery release
latch down.
2 Slide the SIM card into its holder with the contacts facing
down.
3 Insert the battery with the label side up and the connectors
facing each other.
4 Slide the battery cover into place and close the battery
release latch
This is the Internet version of the user's guide. © Print only for private use.
.
3
Page 4

Charge the battery
Your phone battery is partly charged when you buy it.
It may take 30 minutes for the battery icon to appear on the
screen.
Non-USB Charger
(old type)
USB Charger (new type)
A AC adapter
A1 AC adapter
connector
A2 AC adapter USB
socket
BUSB cable
B1 USB cable connector
B2 USB cable plug
This is the Internet version of the user's guide. © Print only for private use.
A1
A
B1
B
A2
B2
4
Page 5

Using the USB charger
To connect the charger and charge the battery
1 Connect the USB cable plug to the AC adapter USB socket,
as shown in the above illustration. The USB cable is supplied
with your phone.
2 Connect the USB cable connector to your phone. Press
a key to view the charging status on the screen. It takes
approximately 2.5 hours to fully charge the battery.
To remove the charger
1 Charge your battery until the battery icon indicates a full
charge.
2 Tilt the USB charger connector upwards to remove it.
This is the Internet version of the user's guide. © Print only for private use.
5
Page 6

Note:
1 The USB cable for the new USB charger shown in the
illustration on page four (Part. B in the new-type charger
illustration) is only intended for charging your phone. Do
not use it for transferring data.
2 The USB cable for the USB charger shown in the
illustration (Part. B in the new-type charger illustration)
is only intended for connection to the AC adapter (Part. A
in the new-type charger illustration) to charge your phone.
It must not be used for connection to a PC.
3 Sony Ericsson strongly recommends that you use only
Sony Ericsson branded original batteries, the part of power
supply device in accordance with YD/T 1591-2006
specifications of Communications Industry Standards of P.
R. China (Part A in the new-type charger illustration) and
the USB cable supplied with your phone to charge the
phone. The use of third-party products may decrease the
performance of your phone and/or pose a risk to your
health or safety.
4 Sony Ericsson recommends that you never mix the use the
new USB charger and the old non-USB charger. The phone
with new-type charger in box cannot be charged with the
old-type charger, and vice versa. The use of both the
chargers may decrease the performance of your phone
and/or pose a risk to your health or safety.
You can use the phone during charging. You can charge the
battery for more or less than 2.5 hours. Interrupted charging
will not damage the battery.
This is the Internet version of the user's guide. © Print only for private use.
6
Page 7
Turn the phone on
To turn on the phone
1 Press and hold down .
2 Enter your PIN if requested.
To correct mistakes, press
.
3 Select OK.
4 Select a language.
5 At first start-up, select Yes to use the setup wizard to make
a phone setup. Select No to use the setup wizard later.
After you have turned the phone on and entered
your PIN, the name of your operator appears on the
screen. This view or screen is called standby. You can now
make and receive calls.
To turn off the phone
• Press and hold down .
To use the setup wizard
• From standby select Menu > Settings > General > Setup
wizard > Basic setup.
This is the Internet version of the user's guide. © Print only for private use.
7
Page 8

SIM card
The SIM (Subscriber Identity Module) card, which you
get from your network operator, contains information
about your subscription. Always turn off your phone
and detach the charger before you insert or remove
the SIM card.
You can save contacts on the SIM card before removing if
from your phone. Contacts may also be saved in the phone
memory. See Contac ts on page 19.
PIN code (SIM card lock)
The PIN (Personal Identification Number) code is a SIM card
lock that protects your subscription, but not the phone itself.
If the card is locked, you have to enter the PIN code when you
turn on your phone. Each PIN digit appears as *, unless it
starts with emergency number digits, for example, 112 or 911.
You can call an emergency number without entering a PIN.
If you enter the wrong PIN three times in a row, the following
message appears: PIN blocked. To unblock, enter your
PUK code provided by your network operator.
To unblock your SIM card, see Loc ks on page 42.
This is the Internet version of the user's guide. © Print only for private use.
8
Page 9
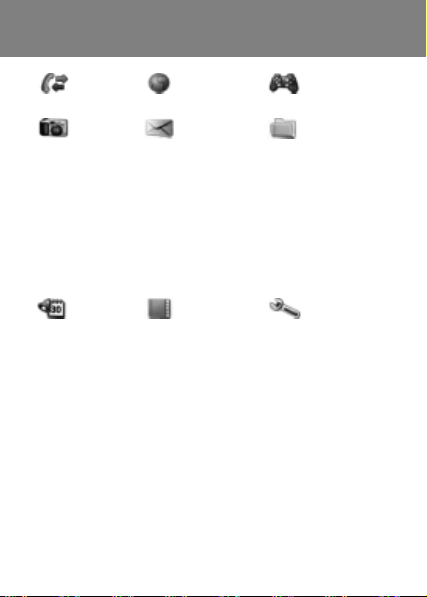
Menu overview
Calls Internet Games
Camera Messaging File manager
Write new
Inbox
Call voicemail
Drafts
Outbox
Sent messages
Saved messages
Templates
Settings
Camera album
Pictures
Ringtones
Themes
Bookmarks
Games
Applications
Other
Organizer Contacts Settings
Online services
Alarm
Applications
Calendar
Tasks
Notes
Calculator
Timer
Stopwatch
Some menus and icons described in this document may vary
depending on operator, network or subscription. Some options
may vary when the default settings are changed.
This is the Internet version of the user's guide. © Print only for private use.
Options
New contact
General
Sounds & alerts
Display
Calls
Connectivity
9
Page 10
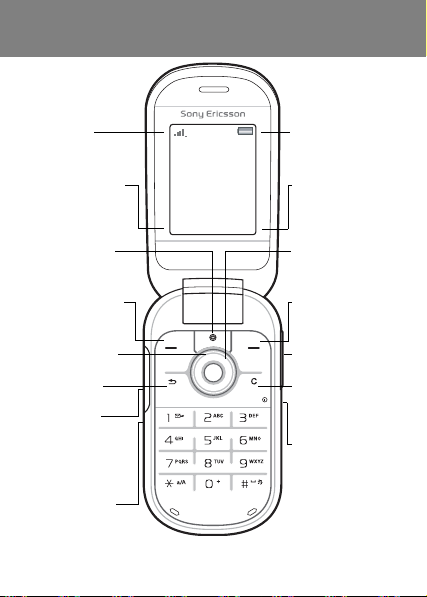
Phone overview
Network
coverage
Function for
left selection
key
Internet key Navigation key
Left selection
key
Camera key
Back key
Charging
(USB
connector)
Microphone
This is the Internet version of the user's guide. © Print only for private use.
Calls Menu
Battery status
Function for
right selection
key
Right sele ction
key
Volume
buttons
C key (Clear)
On/off key
Infrared port
10
Page 11
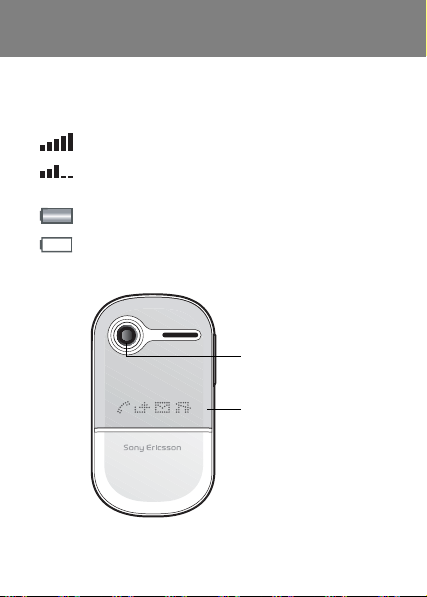
Network coverage
The network bars show the strength of the GSM network. Move
to another location if you have network problems. No netw.
coverage means you are out of range.
= Good network coverage
= Average network coverage
Battery status
= The phone battery is fully charged
= The phone battery is empty
The outside
Camera lens
Icon display
This is the Internet version of the user's guide. © Print only for private use.
11
Page 12
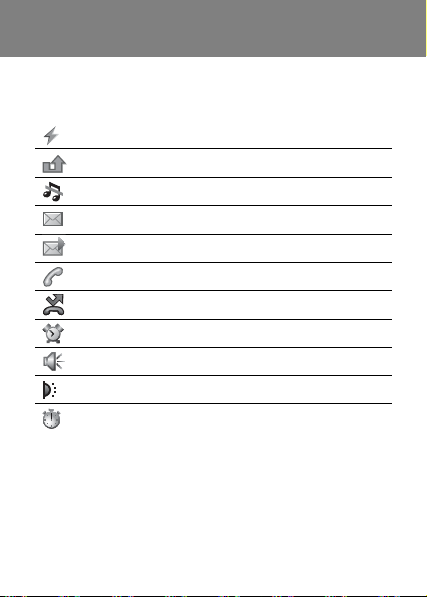
Icons
These icons may appear in your phone.
Icon Description
Battery charging, appears with battery icon.
You have missed a call. See Calling on page 17.
The phone is set to silent.
You have received a new text message.
You have received a new picture message.
Ongoing call.
Divert calls is activated.
An alarm is activated.
The loudspeaker is on.
The infrared port is activated.
The stopwatch is activated.
This is the Internet version of the user's guide. © Print only for private use.
12
Page 13

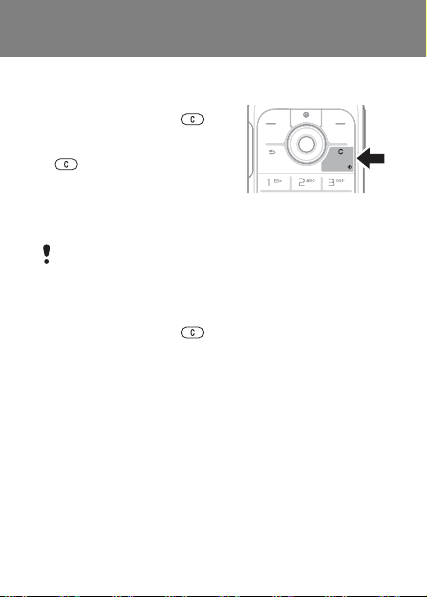
Shortcuts
From standby you can use the navigation keys to go directly
to a function:
• Press to start the camera.
• Press to write a message.
• Press to go to your contacts.
To change a standby shortcut, go to Menu
General > Shortcuts. The camera shortcut cannot be
>
changed.
To navigate the menus
• From standby select Menu and press
, , or .
• Press to go back one step
in the menu.
• Press and hold down to return to
standby.
• Press or to move between tabs.
To delete items
• Press .
To set the phone to silent
• Press and hold down to set silent mode on or off.
To view tips and tricks
• From standby select Menu > Settings > General > Setup
wizard > Tips and tricks.
This is the Internet version of the user's guide. © Print only for private use.
> Settings
13
Page 14

Messaging
Your phone supports various messaging services.
See Ent eri ng text on page 31 for instructions on how to
enter text and numbers.
Text messages
You need a service centre number from your network
operator to be able to send text messages.
To view and set the service centre number
1 From standby select Menu > Messaging > Settings
> Text message > Service centre.
2 If there is no number, select New ServiceCentre, enter the
number including the international “+” prefix and country/
region code. Select Save.
To write and send a text message
1 From standby select Menu > Messaging > Write new
> Text message.
2 Write the message and select Continue. (To save the
message for later, press and select Yes to save in
Drafts).
3 Select Enter phone no., enter the number and select OK.
4 Select Send.
Picture messages
Picture messages can contain enhanced functionality
with text, sound and pictures.
You need the correct Internet (MMS) settings in your phone.
Go to www.sonyericsson.com/cn and request a text
message with the settings or contact your network operator.
This is the Internet version of the user's guide. © Print only for private use.
14
Page 15

To create and send a picture message
1 From standby select Menu > Messaging > Write new
> Picture msg.
2 Select More and select an item to follow your message.
3 Write the message and select OK > Continue.
4 Select Enter phone no., enter the number and select OK.
5 Select Send.
To save an item in a picture message
1 In the message, select More > Save items.
2 Select an item and where to save it.
To delete all sent messages
1 From standby select Menu > Messaging > Sent messages.
2 Select More > Delete all msgs > Yes.
Automatic download
Select how to download your picture messages.
To select a download option
1 From standby select Menu > Messaging > Settings
> Picture message > Auto download.
2 Select an option:
• Always – automatic download.
• Ask in roaming – ask to download when not in home network.
• Not in roaming – do not download when not in home network.
• Always ask – ask to download.
• Off – new messages appear in the inbox as icons. Select
the message and select View to download.
This is the Internet version of the user's guide. © Print only for private use.
15
Page 16

Receiving messages
To view and save a message from the inbox
1 From standby select Menu > Messaging > Inbox.
2 Scroll to a message and select View. If you want to save
the message, select More > Save message > Saved
messages (SIM card) or > Templates (phone).
To delete messages from the inbox
1 From standby select Menu > Messaging > Inbox.
2 Select More > Delete all msgs > All > Yes to delete all
messages. To delete one message, scroll to the message and
select More > Delete > Yes.
This is the Internet version of the user's guide. © Print only for private use.
16
Page 17

Calling
Your phone must be on and within range of a network.
To make a call
1 From standby enter the area code and phone number.
2 Select Call.
To make an emergency call
• From standby enter 112 (the international emergency
number) and select Call.
You can make emergency calls without a SIM card
and without entering a PIN.
To make an international call
1 From standby press until a + sign appears.
2 Enter the country/region code, area code (without the first
zero), phone number and select Call.
To end a call
• Close the phone or select End call.
To answer a call
• When the phone rings, select Answer.
To reject a call
• When the phone rings, select Busy.
To view missed calls
• When Missed calls: is displayed, select Yes. To call back,
scroll to a number and select Call.
This is the Internet version of the user's guide. © Print only for private use.
17
Page 18

To turn the loudspeaker on during a call
• Select More > Turn on speaker.
Do not hold the phone to your ear when using the
loudspeaker. This could damage your hearing.
To change the ear speaker volume during a call
• Press or .
To turn off the microphone during a call
• Press and hold down . To resume, press and hold
down again.
Call list
You can view information about recent calls.
To call a number from the call list
1 From standby select Calls and scroll to a tab.
2 Scroll to the name or number and select Call
To add a number to contacts
1 From standby select Calls and scroll to a tab.
2 Scroll to the number and select More > Save number.
3 Select a contact or select New contact.
4 Enter the contact information and select Save.
To delete a number from the call list
1 From standby select Calls and scroll to a tab.
2 Scroll to the number and select More > Delete entry
> Yes.
This is the Internet version of the user's guide. © Print only for private use.
.
18
Page 19

Contacts
In Contacts you can save contact information with name,
numbers, addresses, picture, ringtone, title, personal
information and birthday.
See Ent eri ng text on page 31 for instructions on how to
enter text and numbers.
To add a contact
1 From standby select Menu > Contacts.
2 Scroll to and select New contact > Add.
3 Enter the name and select OK.
4 Scroll to New number: and select Add.
5 Enter the number and select OK.
6 Scroll to and select the contact type.
7 Select Save.
Enter the + sign and country/region code with all phone
numbers. They can then be used abroad or at home.
To call a phone contact
To call a contact written in Chinese characters
1 > Contacts. Then enter the entire multi-letter name pinyin
of Chinese contacts you want to call.
2 When the contact is highlighted, press or to select
a number > Call.
To call a contact written in Latin characters
1 > Contacts. Scroll to, or enter the first letters or all letters
of the contact you want to call (a maximum of 10 letters).
2 When the contact is highlighted, press or to select
a number > Call.
Note: Phone supports Chinese and English contacts mixed
search. When a contact is written in Latin characters, the entered
letter can reach the Latin contact you want to call; when a
contact is written in Chinese characters, the entered letter can
reach the pinyin of Chinese contact you want to call.
This is the Internet version of the user's guide. © Print only for private use.
19
Page 20

To delete a contact
1 From standby select Menu > Contacts.
2 Scroll to the contact and press .
To edit a contact
1 From standby select Menu > Contacts.
2 Scroll to the contact and select More > Edit contact.
3 Scroll to the contact information and select Edit.
4 Enter information or select a picture or ringtone.
5 Confirm and select Save.
To send all contacts
• From standby select Menu > Contacts > Options
> Advanced > Send all contacts and select a transfer
method.
To copy contacts between the phone and the SIM card
1 From standby select Menu > Contacts > Options
> Advanced.
2 Select Copy to SIM or Copy from SIM.
3 Select Copy a number or Copy all.
4 To copy one contact, select the contact.
When copying all contacts to the SIM card, all existing SIM
card information is replaced.
To check memory status for your contacts
• From standby select Menu > Contacts > Options
> Advanced > Memory status.
This is the Internet version of the user's guide. © Print only for private use.
20
Page 21

Speed dialling
Speed dialling lets you select nine contacts that you can dial
quickly by pressing numbers 1-9.
To add contacts to speed dial numbers
1 From standby select Menu > Contacts > Options
> Speed dial.
2 Scroll to a position number and select Add.
3 Select a contact.
To speed dial
• From standby enter the number (1-9) and select Call.
My number
You can view and edit your own phone number.
To view your own phone number
• From standby select Menu > Contacts > Options
> Special numbers > My numbers.
This is the Internet version of the user's guide. © Print only for private use.
21
Page 22

Camera
Your phone has a digital camera to take pictures to save or
send. Use infrared or picture messages to send a picture to
another phone or to a computer. Camera pictures are saved
in JPEG format in the Camera album.
To take pictures
1 From standby press to start the camera.
2 Select Capture to take the picture.
3 Press to save and take another picture or select
More > Delete to delete the picture.
To use the zoom
• Use or to zoom.
To adjust the brightness
• Use or to adjust the brightness.
To use the camera options
1 When the camera is activated select More.
2 Select an option:
• Picture size – select between two sizes.
• Night mode – enhance picture quality in poor lighting.
• Self-timer – the picture is taken a few seconds after you
press Capture.
• Effects – select different effects for your picture.
• White balance – adjust colours to lighting conditions.
• Picture quality – select picture quality.
• Shutter sound – select different shutter sounds.
This is the Internet version of the user's guide. © Print only for private use.
22
Page 23

To view your pictures
1 From standby select Menu > File manager > Camera
album.
2 Scroll to a picture and select View.
You can use a USB cable to exchange pictures between
your phone and a computer. For more information go to
www.sonyericsson.com/cn.
To send a picture
1 From standby select Menu > File manager > Camera
album.
2 Scroll to a picture and select More > Send. Select
a transfer method.
To use a picture
1 From standby select Menu > File manager > Camera
album and scroll to a picture.
2 Select More > Use as and select how to use the picture.
See also File manager on page 27 and Infrared on
page 38.
This is the Internet version of the user's guide. © Print only for private use.
23
Page 24

www.sonyericsson.com/cn
Sony Ericsson Mobile Communications AB
SE-221 88 Lund, Sweden
EN/LZT 108 9558 R2A
Printed in XXX
This is the Internet version of the user's guide. © Print only for private use.
Page 25

Internet
You need the correct Internet settings in your phone.
If settings are not in your phone, you can:
• Get them in a text message from the network operator.
• On a computer, go to www.sonyericsson.com/cn and
request a text message with the settings.
To select an Internet profile
• From standby select Menu > Settings > Connectivity
> Internet settings > Internet profiles. Select a profile.
To start browsing
1 From standby select Menu > Internet.
2 Select More for options:
• Go to – go to predefined pages or bookmarks, enter
a Web address or show previously visited pages.
• Tools – add a bookmark, save a picture, refresh page
content, send a link or make a call when browsing.
• View – select full content or text only.
• Advanced – select options such as show pictures, allow
cookies, clear cookies, clear cache and Internet status.
To stop browsing
• When you browse, select More > Exit browser.
This is the Internet version of the user's guide. © Print only for private use.
25
Page 26

Calendar
You can set and send appointments with reminders.
To add an appointment in the calendar
1 From standby select Menu > Organizer > Calendar.
2 Scroll to and select a date. Select New appointm.
3 Enter the details to confirm the appointment.
To set reminders options
1 From standby select Menu > Organizer > Calendar
> More > Advanced > Reminders.
2 Select an option. Select Always for a reminder to display
even if the phone is off or in silent mode.
To view a calendar week
• From standby select Menu > Organizer > Calendar
> More > View week.
To send an appointment
1 From standby select Menu > Organizer > Calendar and
select a date.
2 Scroll to an appointment, select More > Send and select
a transfer method.
To find an appointment
1 From standby select Menu > Organizer > Calendar
> More > Advanced > Find.
2 Enter the search string and select OK.
This is the Internet version of the user's guide. © Print only for private use.
26
Page 27

More functions
File manager
To move a file
1 From standby select Menu > File manager.
2 Open a folder, scroll to a file and select More > Move.
3 Select a folder or select New folder, name the new folder
and select OK.
4 Select Paste.
To rename a file
1 From standby select Menu > File manager.
2 Scroll to a file and select More > Rename.
3 Enter a new name select OK.
Some files cannot be renamed.
To select several files
1 From standby select Menu > File manager and open
a folder.
2 Scroll to a file and select More > Mark.
3 Select Mark several or Mark all. To select files, scroll and
select Mark or Unmark.
To view the memory status
• From standby select Menu > File manager > More
> Memory status.
If the memory is full, delete some content. Scroll to
a file or a folder and select
This is the Internet version of the user's guide. © Print only for private use.
More > Delete.
27
Page 28

Profiles
Some phone settings are adapted to different situations, for
example, the ring volume may be adapted to suit a meeting.
To select a profile
• From standby select Menu > Settings > General > Profiles
and select a profile to use.
To view and edit a profile
1 From standby select Menu > Settings > General > Profiles
and select a profile.
2 Select More > View and edit.
Alarm
The alarm rings even if the phone is off or set to silent.
To set the alarm
1 From standby select Menu > Organizer > Alarm > Alarm.
2 Enter the time and select Save.
To set the recurrent alarm
1 From standby select Menu > Organizer > Alarm >
Recurrent alarm.
2 Enter the time and select Continue.
3 Select the week days and select Done.
To turn the sounding alarm off
• Press any key. To snooze the alarm, press Snooze.
To set the alarm signal
• From standby select Menu > Organizer > Alarm
> Alarm signal and select a signal.
This is the Internet version of the user's guide. © Print only for private use.
28
Page 29

Tasks and Notes
To add a new task
1 From standby select Menu > Organizer > Tasks
> New task.
2 Select Task or Phone call. Enter details and confirm each
entry. Select Yes to use the reminder option.
To make a note and save it in a list
1 From standby select Menu > Organizer > Notes.
2 Scroll to New note and select Add.
3 Enter the note and select Save.
Calculator
To use the calculator
1 From standby select Menu > Organizer > Calculator.
2 Press or to select ÷ x - + .% =.
Timer
To use the timer
1 From standby select Menu > Organizer > Timer.
2 Enter the hours, minutes and seconds.
3 Select Start.
Stopwatch
To use the stopwatch
1 From standby select Menu > Organizer > Stopwatch.
2 Select Start.
3 To view a new lap time, select New lap.
This is the Internet version of the user's guide. © Print only for private use.
29
Page 30

Ringtones, sounds and alerts
Your phone has melodies that can be used as ringtones.
To select a ringtone
• From standby select Menu > Settings > Sounds & alerts
> Ringtone and select a ringtone.
To set the ring volume
1 From standby select Menu > Settings > Sounds & alerts
> Ring volume.
2 Press or to set a volume and select Save.
To set the vibrating alert
1 From standby select Menu > Settings > Sounds & alerts
> Vibrating alert.
2 Select an option.
To set sounds and alerts options
1 From standby select Menu > Settings > Sounds & alerts.
2 Select an option:
• Increasing ring – select an increasing ringtone.
• Message alert – select message notification.
• Key sound – select a key press sound.
Language
To change the phone menu language
• From standby select Menu > Settings > General
> Language > Phone language and select a language.
This is the Internet version of the user's guide. © Print only for private use.
30
Page 31

Time and date
To set the time and date
1 From standby select Menu > Settings > General
> Time & date
2 Select Time or Date.
3 Enter the time or date and select Save.
Call time and cost
To check the call time and cost
• From standby select Menu > Settings > Calls
> Time & cost > Call timers.
Themes
Use themes to change the appearance of the screen.
To set a theme
1 From standby select Menu > Settings > Display
> Themes.
2 Scroll to a theme and select Set.
Entering text
There are two input methods you can use to enter text;
multitap or predictive text input.
By using predictive text input you only have to press
each key once. Continue writing a word even if it appears
to be wrong. The phone uses the dictionary to recognize
the word when all letters are entered.
This is the Internet version of the user's guide. © Print only for private use.
31
Page 32

To enter text using multitap
• Press – until the letter appears.
• Press to add a space.
• Press to enter punctuation marks.
Multitap input only applies when latin characters are
selected as input language.
To enter text using predictive text input
• For example, to write the word “Land”, press , ,
, .
• If the word or punctuation mark is the one you want, press
to accept and add a space. To accept without adding
a space, press .
• If the word or punctuation mark is not the one you want,
To add a word to the dictionary
1 When you write, select More > Spell word.
2 Enter the word using multitap and select Insert.
How to use the keys
• Press and hold down to change the input method.
• Press to shift between upper case and lower case
• Press and hold down to change the writing language.
• Press to delete characters. To delete a whole word,
• Press and hold down
This is the Internet version of the user's guide. © Print only for private use.
or to view alternatives.
press
letters.
press and hold down .
– to enter numbers.
32
Page 33

Chinese input
This mobile phone has different input methods for entering
Chinese characters:
• Stroke input
• Pinyin input
You can use these methods, for example, to enter Chinese
names and Chinese short messages.
Switching between Chinese input methods
In the Chinese editing mode, you can select and switch quickly
to another input method by pressing and holding .
General instructions
Regardless of which input method you choose, your phone
has a function to speed up the entry of Chinese characters.
Whenever you enter a stroke or a Pinyin letter, a candidate
row of the most frequently used characters containing that
stroke or relating to that letter appears at the bottom of the
screen.
If the character you want is not displayed in the candidate row, press to present another candidate row. Continue pressing until the character you want is displayed.
Alternatively, you can enter the next stroke or Pinyin letter and
a new set of characters will immediately be displayed in the
candidate row. To go back to the previous row, press . To
select a character in the candidate row, press the navigation
key or press and hold the key corresponding to the number
above the character you want to enter.
This is the Internet version of the user's guide. © Print only for private use.
33
Page 34

Stroke input
A Chinese character is built up of strokes. There are more
than 30 basic strokes, which are grouped into 5 stroke
categories. Each category is represented on the keypad by
one of the keys - . The Wild Card key , is used
when you are not sure of which stroke to use.
Stroke categories
The 5 stroke categories are defined in the table below:
Number
Stroke
Basic
Key
Category
This is the Internet version of the user's guide. © Print only for private use.
Stroke
Stroke
Name
Over
Lift
Down
Down-Hook
Short
Slope Down
Long
Left Slope
Over Slope
Short
left Slope
Dot
Right Slope
DownCurved-Over
Character
王 十 在 七 天
海 红 牡 状 习
中 业 上 门 丑
小 水 打 子 承
直 真 质 草
八 九 丹 风 片
香 千 匕 后 丢
而 页 面 学 殷
六 学 雷 心 性
人 火 又 送 林
四 西 酉 酸
34
Page 35

Number
Stroke
Basic
Key
Category
This is the Internet version of the user's guide. © Print only for private use.
Stroke
Stroke
Name
Down-Over
Left SlopeOver
Left SlopeDot
Down-Lift
Right SlopeHook
Down-OverHook
Down-OverCurvedHook
Down-OverLeft Slope
Down-OverDown-Hook
Down-OverDown
Over-Hook
Over-Down
Over-DownHook
OverLeft Slope
Over-DownOverLeft Slope
Character
山 巨 屯 母 凶
么 去 公 约 能
女 要 好 巡 巢
衣 以 饭 收 长
我 或 民 成 伐
心 必 思 忘
电 也 毛 兄 孔
专 传 转
马 与 张 号 费
鼎 鼐
写 字 皮 通 免
口 已 户 书 骨
力 习 也 同 永
又 之 登 多 社
及 极 廷 建
35
Page 36

Number
Stroke
Basic
Key
Category
Stroke
Stroke
Name
OverLeft SlopeCurvedHook
Over-DownOver-Hook
Over-DownOver-Down
CurvedHook
Over-DownCurvedHook
Over-DownOver
Over-DownLift
Character
阿 队 陈 那 部
乃 透 鼐 隽 杨
凸
狗 豹 家 逐 狂
乙 九 瓦 飞 风
投 沿 船 凹
话 计 认 讯
? (Wild card key)
Components
The basic building units of Chinese characters are components
that are made up of strokes. After entering the first two strokes
of the desired charac ter, the component and character cand idates
that started with that stroke are displayed in the candi date row.
This is the Internet version of the user's guide. © Print only for private use.
36
Page 37

Using components is a fast method for entering complex
characters.
The smaller candidates surrounded by dotted frames are
components, and the bigger candidates without dotted
frames are characters.
For example, to enter “信息”
1 Enter “ ”, “ ” and “ ”.
2 Move the cursor to “ 信 ”, press .
3 Move the cursor to “ 息 ”, press again to select “ 息 ”.
Example of using the wild card key
The wild card key , is used to supplement unclear strokes
in entering characters. If you want to enter “ 互 ”, but you only
know that “ 一 ” is the first and the last stroke of the character
and that the total number of strokes is four, enter , ,
, . The character is displayed in t he candidate r ow.
Pinyin input
Press the keys containing the required Pinyin letters, and the
phone will make various proposals on the screen, according
to the pronunciation rules of Mandarin.
Below is the key mapping of Pinyin letters on the keypad.
Number Key Pinyin Letter
a b c
d e f
g h i
j k l
This is the Internet version of the user's guide. © Print only for private use.
37
Page 38

Number Key Pinyin Letter
m n o
p q r s
t u ü
w x y z
On the keypad, the letter ü is replaced by v.
For example, to enter “
1 Press , , .
2 When “xin” is highlighted, press or and select
“ 信 ”, then press .
(If you want to enter any of the other suggested Pinyin
combinations, scroll up or down to the desired
combination, then press ).
3 Press again to select “ 息 ”, When “ 息 ” is hi ghlighted.
Input punctuation, symbols and smilies
Under any Chinese input mode, press , to see the table
of punctuation marks, symbols and smilies. Use the navigation
key to make a selection. Press to enter a space into the
text.
信息
”
Infrared
Use the infrared port to exchange files such as pictures and
ringtones with other phones or infrared devices.
To turn on infrared
• From standby select Menu > Settings > Connectivity
> Infrared port > On.
This is the Internet version of the user's guide. © Print only for private use.
38
Page 39

To connect two devices using infrared
1 Turn on infrared in both devices.
2 Make sure the infrared ports are facing each other with
a maximum distance of 20 cm (8”).
To transfer a picture using infrared
1 From standby select Menu > File manager > Camera
album.
2 Scroll to a picture and select More > Send and select Via
infrared.
Diverting calls
Divert calls, for example, to an answering service.
To divert calls
1 From standby select Menu > Settings > Calls > Divert
calls.
2 Select a call type, a divert option and select Activate.
3 Enter the phone number and select OK.
To cancel a call divert
1 From standby select Menu > Settings > Calls > Divert
calls.
2 Select a call type, a divert option and select Deactivate.
This is the Internet version of the user's guide. © Print only for private use.
39
Page 40

Voicemail
Callers can leave a voicemail message when you cannot
answer. You can get your voicemail number from your network
operator.
To enter your voicemail number
1 From standby select Menu > Messaging > Settings
> Voicemail number.
2 Enter the voicemail number and select OK.
To call your voicemail service
• From standby press and hold down .
Multiple calls
When call waiting is activated, you can handle multiple
calls. A short sound indicates a second call.
To activate call waiting
• From standby select Menu > Settings > Calls > Manage
calls > Call waiting > Activate.
To answer a second call
• Select Answer. The ongoing call is put on hold.
To reject a second call
• Select Busy and continue with the ongoing call.
To make a second call
1 Select More > Add call. The ongoing call is put on hold.
2 Enter the number and select Call.
This is the Internet version of the user's guide. © Print only for private use.
40
Page 41

To switch between two calls
• Select More > Switch calls.
To join two calls
• Select More > Join calls.
To end calls
1 Select End call.
2 Select No to end both calls or Yes to end one call and
retrieve the call on hold.
This is the Internet version of the user's guide. © Print only for private use.
41
Page 42

Locks
SIM card lock
To unblock your SIM card, you need to enter your PUK
(Personal Unblocking Key) and PIN code, supplied by
your network operator.
To unblock your SIM card
1 When PIN blocked. To unblock, enter your PUK code
provided by your network operator. is displayed, enter
your PUK and select OK.
2 Enter a new four-to-eight-digit PIN and select OK.
3 Re-enter the new PIN to confirm and select OK.
To turn the SIM card lock on
1 From standby select Menu > Settings > General > Security
> Locks > SIM protection > Protection and select On.
2 Enter your PIN and select OK.
To edit your PIN
1 From standby select Menu > Settings > General > Security
> Locks > SIM protection > Change PIN.
2 Enter your PIN and select OK.
3 Enter a new four-to-eight-digit PIN and select OK.
4 Re-enter the new PIN and select OK.
This is the Internet version of the user's guide. © Print only for private use.
42
Page 43

Phone lock
The phone lock protects the phone against unauthorized use.
You can change the phone lock code (0000 by default) to any
four-digit code.
If the phone lock is set to
enter your phone lock code when you insert a different
SIM card.
To set the phone lock
1 From standby select Menu > Settings > General > Security
> Locks > Phone protection > Protection.
2 Scroll to an option, enter your code and select OK.
To edit your phone lock code
1 From standby select Menu > Settings > General > Security
> Locks > Phone protection > Change code.
2 Enter the current code and select OK.
3 Enter a new code and select OK.
4 Re-enter the new code and select OK.
If you forget your new code, you have to take your phone
to your local Sony Ericsson retailer.
To unlock the phone
• Enter your code and select OK.
This is the Internet version of the user's guide. © Print only for private use.
Automatic, you only need to
43
Page 44

Troubleshooting
You can correct most problems yourself. For more support go
to www.sonyericsson.com/cn, see the Important information
guide or contact your network operator.
Remove the SIM card before handing your phone in for
repair.
The phone turns itself off
Restart the phone or do a master reset.
To restart the phone
1 Turn the phone off and remove the battery cover.
2 Remove the battery and put it back in place.
3 Replace the battery cover and turn the phone on.
To perform a master reset
1 From standby select Menu > Settings > General > Master
reset.
2 Select Reset settings to delete your changes to settings
or Reset all to delete your changes to settings, all contacts,
messages, personal data, and content you have downloaded,
received or edited.
3 Select Continue.
This is the Internet version of the user's guide. © Print only for private use.
44
Page 45

I cannot turn the phone on
• Attach the charger (make sure the power icon on the charger
is facing upwards) and charge the phone for 2.5 hours.
Some menu options appear in grey
A service is not activated or your subscription does not support
the function.
• Contact your network operator.
The phone is working slowly
• Delete unwanted content and restart the phone.
No indication of charging
• The battery is empty or has not been used for a long time.
It may take up to 30 minutes before the battery icon appears
on the screen.
I cannot use Internet or send picture messages
You need a phone subscription that supports data
transmission, and the correct Internet settings.
• Go to www.sonyericsson.com/cn or contact your network
operator.
What do these error messages mean?
Insert SIM
Your SIM card is not inserted correctly or may be damaged
or dirty. Try one or more of the following:
• Remove the SIM card and insert it correctly.
• Clean the connectors on the SIM card and phone with
a soft brush, a cloth or a cotton bud.
• Check if the SIM card is damaged.
This is the Internet version of the user's guide. © Print only for private use.
45
Page 46

Insert correct SIM card
• Check that you are using the correct operator SIM card.
If not, contact your network operator.
Wrong PIN
You have entered your PIN code incorrectly.
• See Phone lock on page 43.
PIN blocked. To unblock, enter your PUK code provided by
your network operator.
The SIM card is blocked.
• Unblock. See SIM card lock on page 42
PUK blocked
• Contact your network operator.
Phone locked
The phone is locked.
• Unlock. See Phone lock on page 43.
Phone lock code:
The phone lock code is required.
• Enter the correct code. See Phone lock on page 43.
Codes do not match
Appears when changing a security code.
• Confirm the new code by entering it twice.
Emerg. calls only
You are within range of a network but are only allowed to use
it for emergency calls.
• Contact your network operator if the problem persists.
No netw. coverage
There is no network within range.
• Contact your network operator if the problem persists.
This is the Internet version of the user's guide. © Print only for private use.
46
Page 47

Declaration of Conformity
We, Sony Ericsson Mobile Communications AB of
Nya Vattentornet
SE-221 88 Lund, Swe den
declare under our sole responsibility that our product
Sony Ericsson type AAB-1022092-BV
and in combinat ion with our accessories, to which this declaration rela tes
is in conformity with th e appropriate stan dards 3GPP TS 51. 010-1, EN
301 489-7 and EN 6095 0, following the provisio ns of, Radio Equipment
and Telecommunication Terminal Equipment directive 99/5/EC with
requirements co vering EMC direc tive 89/336/EEC, an d Low Voltage
directive 73/23/EEC.
Lund, June 2007
Shoji Nemoto, Head of Product B usiness Group GSM/UMTS
We fulfil the requirements of the R&TTE Directive (99/5/EC).
This is the Internet version of the user's guide. © Print only for private use.
47
Page 48

FCC Statement
This device complie s with Part 15 of the FCC ru les.
Operation is subject to t he following t wo conditions:
(1) This device may not cause harmful interference, and
(2) This device must accept any interference received,
including interference that may cause undesired
operation.
Sony Ericsson Z258c
GSM 900/1800/190 0
This User guide is pub lished by Sony Ericsso n Mobile Communic ations
AB or its local affil iated compan y, without any w arranty. Improv ements
and changes to this User guide nec essitated by typo graphical erro rs,
inaccuracies of current information, or improvements to programs and/or
equipment, may be made by Sony Ericsson Mobile Communications AB
or its local affiliated company at any time and without notice. Such
changes will, howe ver, be incorporate d into new editions of this User
guide. All rights reserv ed.
© Sony Ericsson Mobile Communications AB, 2007
Publication numb er: EN/LZT 108 9558 R2A.
Please note: Som e of the services in t his User guide are no t supported
by all networks. Th is also applies to the G SM Internationa l Emergency
Number 112. Please contact your network operator or service provider if
you are in doubt whether you can use a particular service or not. Please
read the Guid elines for safe an d efficient use an d the Limited warra nty
chapters before you use your mobile phone. All illustration s are for
illustration only an d may not accurately depict the actual pho ne.
The Predictive Text Technology is used under license from Zi Corporation.
Note: Sony Ericsson advised users to back up their personal data information.
All illustrations are for illustration only and may not accurately depict
the actual phone.
Some products may display a 17-digit number when y ou press *#06#.
The first 15 digits are the IMEI number, and the last 2 digits are software
update number.
Talk and standby times depend on several different conditions such as
signal strength, operating temperature, application usage patterns, features
selected and voice or data transmissions when the mobile phone is being
used. The stand-by time for this battery is up to 300 hours.
This is the Internet version of the user's guide. © Print only for private use.
48
 Loading...