

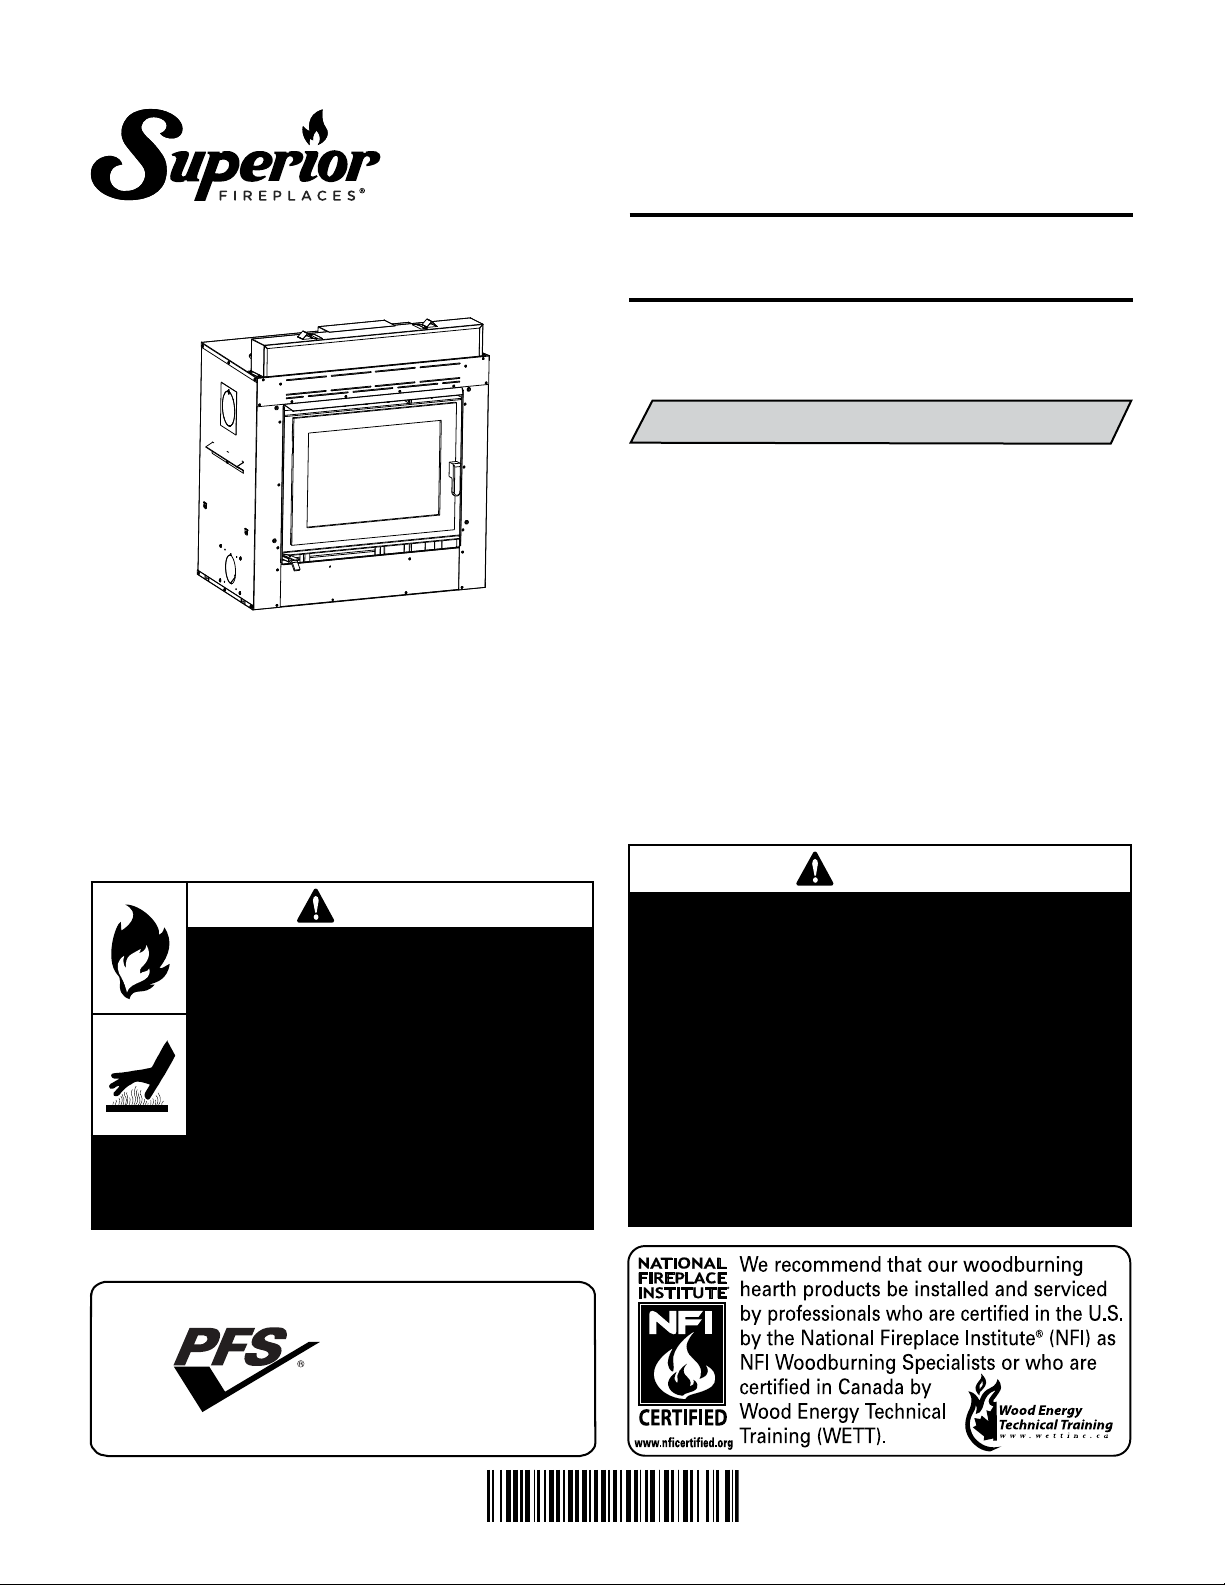
Superior WRT3920WS, 900881-00 Installation And Operation Instructions Manual
SAVE THESE INSTRUCTIONS
CUS
P900881-00
FOR FUTURE REFERENCE
INSTALLATION AND
OPERATION INSTRUCTIONS
WRT3920WS
EPA Wood-Burning Fireplace
P/N 900881-00 REV. NC 02/2018
MODELS
WRT3920WS
This installation manual will enable you to obtain a safe, efficient
and dependable installation of your fireplace system. Please read
and understand these instructions before beginning your installation.
Do not alter or modify the fireplace or its components under any circumstances. Any modification or alteration of the fireplace system,
including but not limited to the fireplace, chimney components and
accessories, may void the warranty, listings and approvals of this system
and could result in an unsafe and potentially dangerous installation.
An French manual is available upon request. Order P/N 900881-01.
Ce manuel est disponible en francais, simplement en faire la demande. Numéro
de la pièce 900881-01.
WARNING
• Hot! Do not touch! The glass and
surfaces of this appliance will be hot
during operation and will retain heat
for a while after shutting off the appliance. Severe burns may result.
• Carefully supervise children in the
same room as appliance.
•
If small children are present in the home, it is
recommended that this appliance be fitted with
an adjustable safety gate or barrier screen.
Listed to standards:
ULC-S610 and UL-127
Report # 14-181
EPA Cert. No. 111-17
IHP wood-burning fireplaces are designed for use as a supplemental
heater. They are not intended for continuous use as a primary heat
source.
WARNING
• The fireplace cannot be operated without a
door. Consult your dealer to select the correct
replacement door.
• The fireplace is equipped with a blower, electrical connection must be made prior to fireplace
installation
• Important! To assure proper alignment of glass
doors: Install this fireplace in a square and
plumb condition, using shims as necessary at
sides and/or bottom.
• Install the fireplace only as described in these
instructions.
IMPORTANT! GENERAL SAFETY
PRECAUTIONS. READ AND
UNDERSTAND THESE SAFETY
RULES BEFORE YOUR FIRST FIRE.
WARNING
THE FIREPLACE MUST BE OPERATED WITH THE DOORS FULLY
OPENED OR DOORS FULLY CLOSED.
IF THE DOORS ARE LEFT PARTLY
OPENED, GAS AND FLAME MAY BE
DRAWN OUT OF THE FIREPLACE
OPENING, CREATING RISKS OF
BOTH FIRE AND SMOKE.
WARNING
Use care when selecting window
treatments for windows located
near the fireplace. Avoid using
combustible flowing window
treatments such as curtains on
nearby windows that are of sufficient length to be blown in front
of an open flame when the window
is opened.
Keep any combustible furniture,
materials or decorative pillows
at least 48" (1219 mm) from the
front fireplace opening.
WARNING
Be careful adding wood fuel to
the fire or handling fireplace tools
such as shovels, tongs or pokers.
WARNING
Never modify or alter your fireplace
system in any way. To do so may
create a potential fire hazard and
void the limited warranty
, listings
and approvals of this system.
WARNING
WARNING
NEVER use gasoline, gasolinetype lantern fuel, kerosene,
charcoal lighter fluid, naphtha,
engine oil or similar liquids to
start or “freshen up” a fire in this
fireplace. Keep any flammable
liquids a safe distance from the
fireplace at all times.
WARNING
THIS FIREPLACE HAS NOT BEEN
TESTED WITH AN UNVENTED
GAS LOGS OR A FIREPLACE
INSERT. TO REDUCE RISK OF
FIRE OR INJURY, DO NOT INSTALL
AN UNVENTED GAS LOG SET OR
FIREPLACE INSERT OR OTHER
PRODUCTS NOT SPECIFIED FOR
USE WITH THIS FIREPLACE.
WARNING
Never leave children unattended
when there is a fire burning in the
fireplace.
WARNING
To avoid the risk of damaging
fireplace materials and increasing the risk of fire, do not use the
fireplace to cook or warm food.
WARNING
Never leave your fireplace unattended while it is burning.
IMPORTANT
When burning wood, use SOLID
NATURAL DRY WELL-SEASONED
WOOD ONLY. Hardwoods are recommended (soft woods tend to burn
very quickly).
• DO NOT burn treated wood,
charcoal, coal, trash, cardboard, driftwood, woods dipped
in tar, Christmas tree greens,
pitch, pine tar, creosote, chemical chimney cleaners, flame
colorants, polystyrene packaging, wood products with synthetic binders (i.e. plywood).
Plywood, lumber and other
misc. materials can produce
abnormally high temperatures,
sputtering and smoking fires
and may contain hazardous
chemicals to treat insects and
fungus.
• Burning unapproved fuels can
produce excessive temperatures, beyond the design capabilities of the fireplace and may
produce excess sparks or may
contain hazardous chemicals.
Burning unapproved fuels can
result in a chimney fire, a house
fire, personal injury, death or
loss of property.
The bottom refractory can be
cracked by excessive abuse such
as tossing heavy logs onto the
grate or gouging with fireplace
tools. Exercise caution when
adding wood to your fireplace.
WARNING
Neither the manufacturer nor the
seller warrants “smoke free”
operation nor are we responsible for inadequate system draft
caused by mechanical systems,
general construction conditions,
inadequate chimney heights,
adverse wind conditions and/or
unusual environmental factors
or conditions beyond our control.
WARNING
Always ensure that the air inlet to
the fireplace is free from debris
and any other obstructions that
can block the entrance of air.
LOCATING THE NAME PLATE
The name plate has been attached to a chain located
inside the front opening below the door. To locate it,
simply place your hand into the center of the opening
and slide it to the right. Locate the chain and pull on
it to access the name plate.
2

CONGRATULATIONS!
PARTS REQUIRED
When you purchased your new fireplace, you joined the ranks of thousands of individuals
whose answer to their home heating needs reflects their concern for aesthetics, efficiency
and our environment. We extend our continued support to help you achieve the maximum
benefit and enjoyment available from your new fireplace.
Thank you for selecting a IHP fireplace as the answer to your home supplemental heating needs.
TABLE OF CONTENTS
Safety Rules ......................................Page 2
Locating the Name Plate ...................Page 2
Introduction ......................................Page 3
Parts Required .................................Page 3
Optional Equipment ...........................Page 3
Operating The Fireplace ....................Page 4
Catalytic Combustor ..........................Page 4
Catalytic Bypass Gauge .....................Page 4
Combustion Control .........................Page 4
Starting And Maintaining A Fire ........Page 6
Refueling For Best Performance .......Page 6
Smoking – Causes And
Troubleshooting ..............................Page 6
Important Cautions ...........................Page 6
Smoke Detector ...............................Page 7
Carbon Monoxide Monitor ................Page 7
Dealing With A Chimney Fire .............Page 7
Achieving Clean Burns ......................Page 7
Well Seasoned Fuel ...........................Page 8
Maintaining Your Fireplace ...............Page 8
Catalytic Combustor ..........................Page 8
Refractory Installation .......................Page 11
Disposing of Ashes ...........................Page 11
Door Removal ...................................Page 12
Door Adjustment ...............................Page 12
Glass Care ........................................Page 12
Fireplace Installation ........................Page 13
Optional Cast Facade Installation ......Page 14
Hearth Extension Requirements .......Page 14
Cold Climate Installations ..................Page 14
Framing Dimensions .........................Page 15
Nailing Flanges .................................Page 16
Facing ..............................................Page 16
Fireplace Blower ................................Page 17
Hot Air Ducting Installation ..............Page 17
Central Forced Air Kit ........................Page 18
Outside Air Kit ...................................Page 19
Draft Requirements ...........................Page 20
Chimney System ...............................Page 20
Offset Chimney Installation ...............Page 22
Angled Wall Radiation Shield ............Page 24
Chimney Support Installation ............Page 25
Chimney Chase And
Multiple Terminations......................Page 25
Chimney Adaptor ..............................Page 25
Masonry Application Instructions .....Page 26
Installation Accessories ....................Page 27
Replacement Parts ...........................Page 28
Specifications ....................................Page
Clearance to Combustibles ...............Page 28
Chimney Components Lists ..............Page 29
Safety/Listing Label ...........................Page 31
Warranty ...........................................Page 33
Product Reference Information .........Page 34
THE FIREPLACE
INTRODUCTION
The WRT3920WS wood-burning fireplace is
an energy efficient, heat circulating, closed
combustion fireplace. You will receive a lifetime
of comfort and enjoyment from your fireplace
provided it is installed, maintained and oper
ated properly.
•
Please read these instructions and retain
this manual for future reference.
•
Before beginning the fireplace installation,
consult the local authorities to obtain your
building permit and check your local building
codes. Install the fireplace only as described
in these instructions and using only IHP
components.
• This fireplace has been tested for CAN/ULC
S610-M87 and ANSI/UL 127 under report
number 3151759. It has also been tested
for EPA 40 C.F.R Part 60, section 60.532(b).
Certificate number
•
The WRT3920WS fireplace is NOT intended
111-17
for use with a gas log set. Do not use a
fireplace insert or any other product with
this fireplace unless it is specified by IHP
for use with this appliance. Failure to follow
these instructions will void the certification
and the warranty of the fireplace and may
result in an unsafe installation.
• These appliances are designed to provide
supplemental heat to the immediate area
only. Therefore, it is advisable to have an
alternate heat source when installed in a
dwelling.
• These appliances are NOT approved for
Manufactured Home installations.
CAUTION: BURN UNTREATED WOOD
ONLY. OTHER MATERIALS SUCH AS
WOOD PRESERVATIVES, METAL FOILS,
COAL, PLASTIC, GARBAGE, SULPHUR OR
OIL MAY DAMAGE THE CATALYST.
CAUTION: DO NOT OPERATE WITHOUT
THE CATALYTIC COMBUSTOR IN PLACE.
28
CAUTION: NEVER BURN WITH THE BYPASS OPENED EXCEPT FOR FIRE STARTUP AND WHEN RELOADING THE STOVE.
.
Fireplace Model WRT3920WS
• 6” diameter chimney* - Model ASHT+,
S-2100+, HT6000+, HT6103+ or AC manufactured by Security Chimneys® only.
• 6” diameter chimney ** - Models DuraTech
/ DuraTech DTC manufactured by DuraVent®
only, including:
- Chimney lengths
- Elbows (where necessary)
- Associated components as per these
installation instructions
OR
• 7” diameter chimney* - Model ASHT and
HT6103 manufactured by Security Chimneys® only.
6” and 7” Chimneys Includes:
- Chimney lengths
-
- Elbows (where necessary)
- Associated components as per these
installation instructions
• Decorative Door (included in the fireplace)
• Blower (Included w/Fireplace)
• Outside Air Kit (Included w/Fireplace)
OPTIONAL EQUIPMENT
Order Separately - See Pages 27 through 30
• Additional Equipment (optional)
- AC Chimney Starter Section
AC Chimney
- Chimney Adaptor 7 inch (6AW7*)
(If you choose to use 7 inch ASHT
HT6103
- Forced Air Kit
- Cast Facade Kit
- Blower Speed Control (VRUW)
- Blower Thermodisc Heat Switch
Control (VTU)
*
*
chimney)
u
uNot tested under EPA certification. If
installed, this appliance no longer quali
fies for EPA certification. Check with local
authorities having jurisdiction for require
ments in your area.
Available from Security Chimneys
*
Available from DuraVent
**
*
and
®
*
or
-
-
3
®
®
OPERATING THE FIREPLACE
USE SOLID NATURAL WOOD FUEL
Fuel -
This appliance is designed to burn dry
ONLY.
seasoned natural wood only (see Page 8 for a
list of prohibited fuels). Failure to burn proper
fuels only will void the certification and the
warranty of the appliance. Hardwoods
preferred to softwoods since the energy content
of wood is relative to its density. Hardwoods
will result in a longer burning fire and less
frequent refueling.
A moisture content of 15% to 20% (seasoned)
is recommended. Wood that has been cut and
split and let to dry under a cover for a period
of one year will usually meet that criteria. The
required drying time will vary depending on the
climate. Wood that is packed tight together will
take longer to dry. Seasoned wood is darker in
color than wet wood and will have visible cracks
in the grain on the ends.
Excessively wet wood
are
will be difficult to burn and will result in lower
efficiency, increased creosoting and plugging
of the catalytic combustor.
wood will burn well but will also have higher
emissions and shorter burning time.
Excessively dry
DO NOT OVERFIRE THIS HEATER
Catalytic Combustor
This fireplace is equipped with a catalytic combustor. Unburned by-products of the wood fire
are burned as they pass through the combustor
resulting in less pollution, reduced creosote and
higher efficiency. In order to have the catalyst
working, temperatures of the flue gases entering
the combustor have to be higher than 500° F
(260° C). That is why the unit is equipped with
a CAT bypass damper that allows the draft air
to bypass the catalytic combustor. Opening the
CAT bypass damper control increases the draft
allowing the unit to achieve proper operating
temperatures during a cold start-up. It also
provides more draft to prevent smoke spillage
when the door is opened.
Catalytic CAT Bypass Gauge
To determine when to close the CAT bypass,
the unit is equipped with a gauge (see Figure
1). Once you can see the gauge needle in the
catalytic combustor operating range, you may
push to close the CAT bypass lever, about 15-30
minutes after initial light-off.
When the catalyst light-off conditions are
achieved, the combustor will keep on going
until it runs out of smoke. Note that the catalyst
does not need to be glowing to be working, it
can work very well at temperatures well below
the 538° C (1000° F) level at which it will begin
to glow. The best way to see if the catalyst is
active is to take a look at what is coming out
of the chimney. If the catalytic combustor is
working you will see some white water vapor
coming out, compared to a more brown/gray
smoke when the CAT bypass is opened. Do
not burn any chemical chimney cleaner; it can
make the catalyst inactive.
COMBUSTION CONTROLS
Primary Air Control
There is no flue damper in the fireplace. As is
common with air tight stoves, the combustion
air control sets the flow of air entering the firebox. This allows for a more precise control of
the fire. The combustion air control is located
below the door on the left side. The main source
of air (primary air) entering the firebox can
be diminished by moving the air combustion
control from left to right. The primary air is
fully opened when the air control is completely
moved to the left.
Attempts to achieve heat output rates that
exceed heater design specifications can result
in permanent damage to the heater.
First Fires
The first five or six fires should be small fires
of short duration (about 30 to 60 minutes).
This will help cure the refractory bricks.
the first few fires of this appliance there may
be some odor and smoke due to the curing of
the paint, dust accumulation and burning off of
lubricants used in the manufacturing process
It may set off a smoke alarm located in the same
room. For this reason the room should be well
ventilated for the first few fires.
During
.
See Detail A
This wood heater has a manufacturer-set minimum low
burn rate that must not be altered. It is against federal
regulations to alter this setting or otherwise operate
this wood heater in a manner inconsistent with the
operating instructions in this manual.
Thermometer
Detail A
Figure 1
This manual describes the installation and operation of the IHP model WRT3920WS catalytic equipped
wood heater. This heater meets the 2020 U.S. Environmental Protection Agency’s certified to comply
with 2020 particulate emission standards using crib wood. Under specific test conditions this heater
has been shown to deliver heat at rates ranging from 10,900 to 35,600 Btu/hr.
4
NOTE: DIAGRAMS & ILLUSTRATIONS ARE NOT TO SCALE.
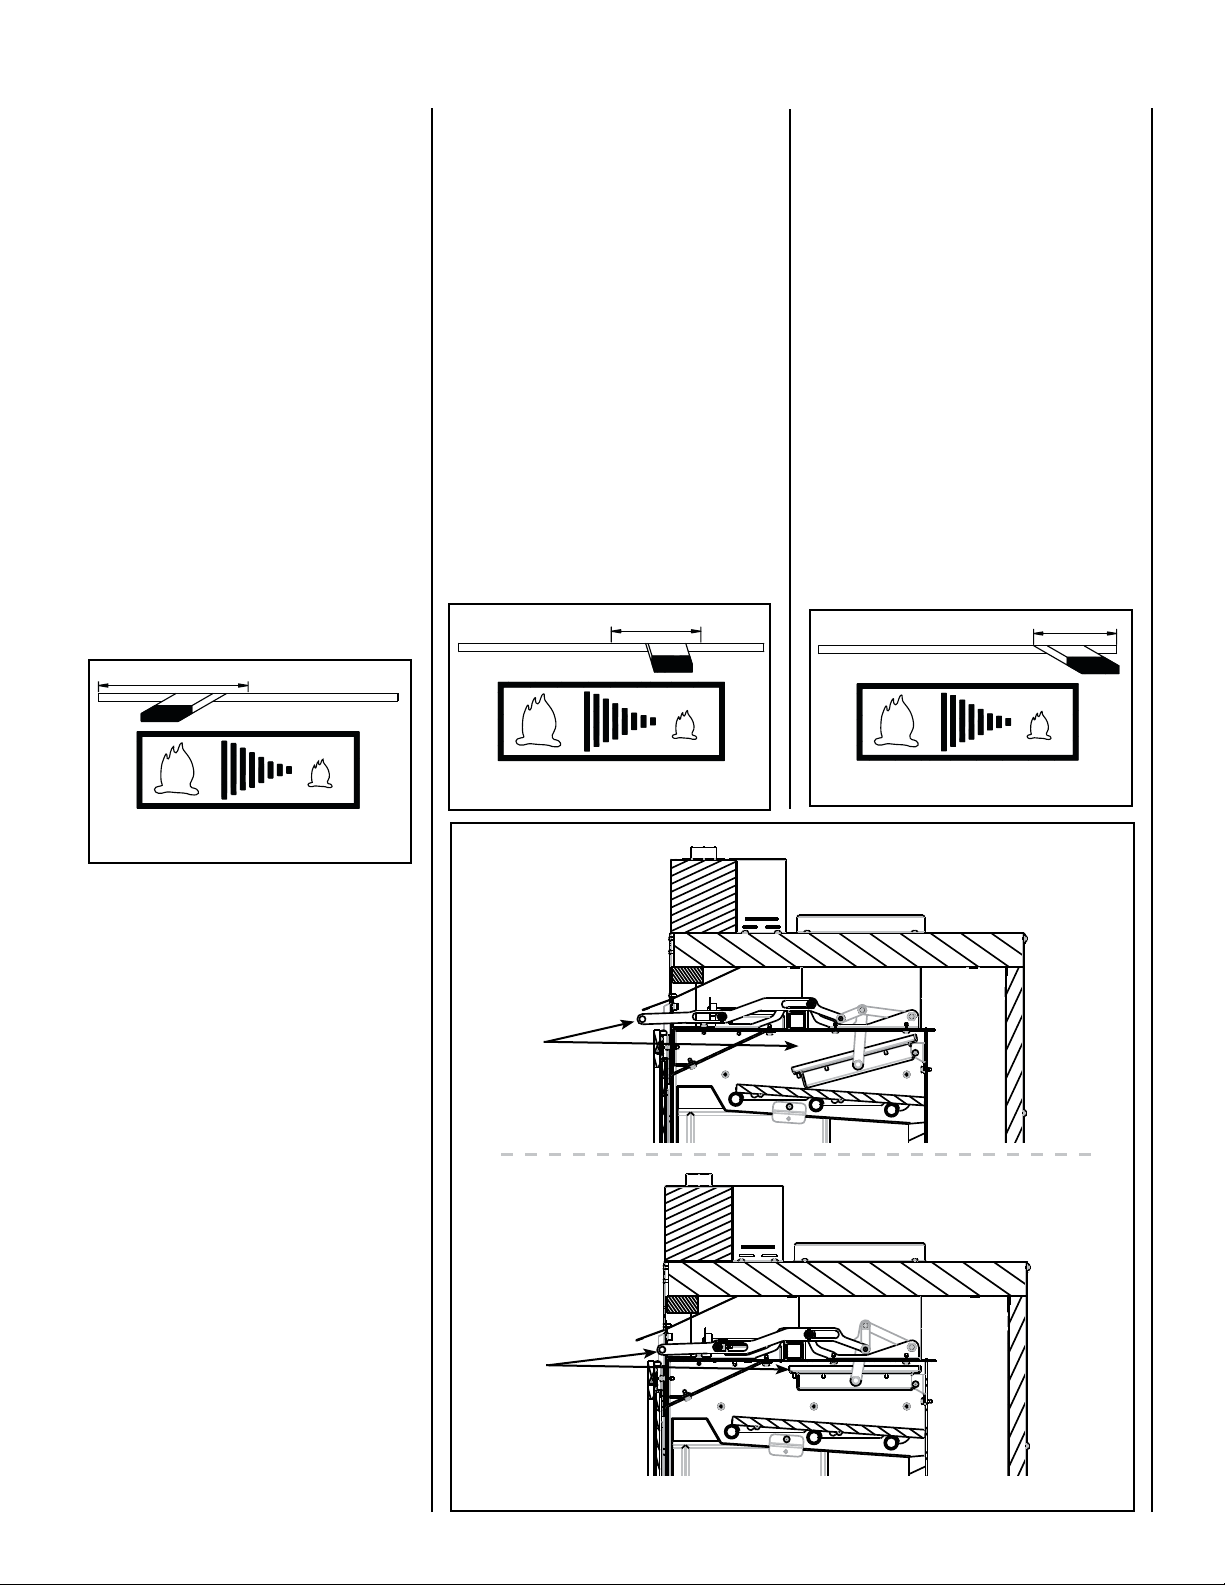
The combustion air control should be in the
closed position when the fireplace is not in use.
This will minimize air leakage up the chimney.
The combustion air control and the CAT bypass
damper control must be opened before opening
the door to minimize the possibility of back
draft coming into the room.
Accelerated Combustion
The maximum heat output for the WRT3920WS
fireplace is achieved by burning with the door
closed and the combustion air opened. By this
method, the WRT3920WS fireplace can produce
the maximum BTU of heat per hour. However,
it will be necessary to reload with wood every
one or two hours. This is the least efficient
method of burning the WRT3920WS fireplace.
Use caution when firing with the combustion
air control wide open. Only burn cord wood
in this manner. Small dry pieces of softwood
and construction scraps will burn very intensely
using this method and may damage the firebox.
Medium Combustion
This is the recommended mode of operating
the WRT3920WS fireplace and should be the
one normally used since it will deposit the least
amount of creosote on the glass and in the
chimney. The combustion air control must be
3/4 closed. The precise setting will depend on
many factors, including chimney length and the
moisture content of the wood.
For instance, a long chimney will necessitate
closing the damper more. To obtain the proper
combustion, close the damper completely, then
open it about 1/4” to 1/2” (6.4mm to 13mm).
Two medium size pieces of wood should be
burning on a bed of hot coals. The heat output
will be approximately 25,000 BTU per hour and
the loading time will be about every 3-4 hours.
Softwoods may be burned using this method
but the burn time will be substantially reduced.
Slow Combustion
When the air combustion control is completely
closed, the fireplace is in a slow combustion phase.
If the hearth is hot enough, slow combustion will
not extinguish the fire, but there will be a noticeable change in the flame pattern. The flames will
be slow and may appear dirty if the wood is too
wet (moisture content of 20% and more). Do not
allow the wood to burn without flame, since this
will produce excessive creosote in the unit.
Creosote may accumulate on the glass door.
This method of burning should be used only
after operating the WRT3920WS fireplace with
the air control opened to produce a hot fire for
about an hour or at medium pace for at least
three (3) hours. Slow combustion can be used
at night in order to reduce the heat output and
to prolong the burn. The loading time will be
between 6-8 hours.
Figure 2 - Accelerated Combustion
Figure 3 - Medium Combustion
Open
Closed
Figure 4 - Slow Combustion
Figure 5 - CAT Bypass
NOTE: DIAGRAMS & ILLUSTRATIONS ARE NOT TO SCALE.
5

STARTING AND MAINTAINING A FIRE
Step 1. Place several crumpled up balls of
newspaper in the firebox. Place small dry pieces
of kindling on top of the paper, criss-crossing
the kindling so that there are air spaces in
between. The kindling should be placed at the
center of the firebox so as to allow for sufficient
air circulation.
Step 2. Adjust the primary air control into the
OPEN position. Light the newspaper. Leave the
door partially opened to facilitate the start-up.
Step 3. Once kindling fire is well established,
cord wood can be added. You may set the
primary air control to the desired level (see
Primary Air Combustion Control section for
proper operation of the air controls). Close the
door and maintain an accelerated combustion
air set up in order to achieve combustor lightoff conditions.
Step 4. When the fire is burning well, and you
can see the gauge needle in the catalytic combustor operating range, close the CAT bypass
damper control by pushing the control rod in. It
takes about 15–30 minutes with the CAT bypass
opened to reach proper light-off temperatures
for the catalytic combustor.
Step 5. Set the primary control to the desired
burn level. The fireplace will automatically go
to that level after the fire is fully established.
The unit will burn best with 2-3 pieces of cord
wood spaced 1 to 2 inches apart and allowing
air to get under the fuel. Criss-crossing or arranging the fuel so that air can get underneath
will help the fire to get started easily. The unit
should be operated with the air control fully open
long enough to get the cord wood well ignited.
REFUELING FOR BEST PERFORMANCE
To refuel the fireplace at the end of a burn cycle
when only hot embers remain and flames are
gone (not enough heat to maintain catalyst
operating temperatures):
Step 1. Open the CAT Bypass fully (see Figure 5).
Step 2. Completely open the air control level.
See Figure 2.
REFUELING: During the refueling and
rekindling of a cool fire, or a fire that has
burned down to the charcoal phase, operate
the stove at a medium to high firing rate for
about 10 minutes to ensure that the catalyst
reaches approximately 500°F.
6
Step 3. Open the door about 1” and wait 5
seconds until the air flow has stabilized. Then
open the door completely, put the logs in and
close the door.
Step 4. Set the air control to the desired burn
level. Open the CAT bypass damper for 10 minutes before closing it. It will ensure sufficient
temperatures for combustor light-off.
To refuel the
WRT3920WS fireplace when the
unit is still hot (some burning fuel remaining
or a glowing combustor)
A. Open the air control and the CAT bypass
completely.
B. Open the door about 1” and wait 5 seconds
until the air flow has stabilized. Load the fuel,
close the door and CAT bypass (temperatures
within the firebox should be enough to
maintain catalytic operation).
C. Set the air control to the desired burn level.
NOTES:
• For spectacular fire and optimization of the
fireplace efficiency, we recommend that the
wood load be placed as far back as possible.
• It may be necessary to turn off any blower(s)
in operation during the refueling process in
order to minimise smoking in the room. It
is recommended to wait 15 to 30 minutes
before turning the blower back on to ensure
successful rekindling.
SMOKING –
CAUSES AND TROUBLESHOOTING
To reduce the likelihood of smoke coming
into the room when opening the door, set the
combustion air controls to the left (“Accelerated Combustion”) and open the CAT bypass
before opening the door. Your fireplace has
been designed and tested to provide smoke
free operation.
As the fire burns, air goes up the chimney.
This air must be replaced through the outside
air duct. When operating the fireplace, open a
nearby window temporarily to check if there is
adequate replacement air supply. Occasionally,
there may be a small amount of smoking upon
lighting the fire, until the chimney heats up but
this should not last. If the fireplace continues
to smoke it is probably for one of the following reasons:
A. The door is partially opened - When you
open the door, open them completely.
B. Negative pressure in the house
As the fire burns, air goes up the chimney.
This air must be replaced through leakage
into the house or through the outside air duct
(included with fireplace). When operating the
fireplace, open a nearby window temporarily
to check if there is adequate replacement air
supply.
C. Fans operating (e.g.: range hood)
These fans draw air out of the house and
may actually cause a negative pressure in the
house. Turn off all fans and open a nearby
window to determine if this is the cause of
the problem.
NOTE: DIAGRAMS & ILLUSTRATIONS ARE NOT TO SCALE.
D. Wet wood
Wet or tarred wood will smoulder and smoke
instead of burning properly. Your dealer can
help you determine if you have properly
seasoned wood for burning.
E. Dirty or blocked chimney
Check to make sure the chimney is clear and
clean. If dirty call a certified chimney sweep
or use a properly sized chimney brush to
clean.
F. Chimney not long enough
The minimum chimney height is twelve
(12) feet (3.7 m) not including the fireplace
height. The chimney must extend at least
three (3) feet (915 mm) above its point
of contact with the roof and at least two
(2) feet (610 mm) higher than any roof or
wall within ten (10) feet (3 m) of it. When
installed with offsets, the minimum chimney
height is fifteen (15) feet (4.6 m). Additional
height will increase draft and will decrease
the tendency to smoke.
G. Poor chimney draft
With no fire, there should be sufficient draft to
exhaust cigarette smoke introduced under the
baffle. Chimneys installed against an outside
wall without protection or a basement installa
tion may generate back draft problems which
will cause start-up problems. To prevent this,
open a nearby window, roll up a piece of paper
and light it. Then, hold it in the upper part of
the firebox to warm up the chimney. Wait until
the draft is sufficient, then start the fire.
H. Blower for forced air kit operating - Make
sure that the blower is at the “off” position
when you open the fireplace door for reloading.
IMPORTANT CAUTIONS
A. Do not block any hot air vents from the
fireplace as this will cause the fireplace
to overheat.
B. Never use gasoline, gasoline-type lantern
fuel, kerosene, charcoal lighter fluid, or
similar liquids to start or ‘freshen up’ a fire
in this fireplace. Keep all such liquids well
away from the fireplace while it is in use.
C. Do not burn coal. The sulphur in coal will
corrode the firebox.
D. Do not burn driftwood which has been in the
ocean or salt water. The salt will corrode
the firebox and chimney.
E. Do not operate the unit with the door partly
open since this may cause smoke to be
drawn into the room.
F. Do not burn wood in the area in front of the
andirons.
G. Do not abuse the unit by burning paper, or
cardboard or construction material such as
pressed wood, plywood or lumber. Wood
protectors, metallic paper, coal, plastic,
waste, sulphur and/or oil will damage the
fireplace.
H. Do not allow the wood to smoulder or burn
without flame, since this will produce
excessive creosote in the unit
increased particulate emissions.
as well as
-

SMOKE DETECTORS RECOMMENDED
OK
Since there are always several potential sources
of fire in any home, we recommend installing
smoke detectors. If possible, install the smoke
detector in a hallway adjacent to the room
(to reduce the possibility of occasional false
activation from the heat produced by these
appliances). If your local code requires a smoke
detector be installed within the same room, you
must follow the requirements of your local code.
Check with your local building department for
requirements in your area.
CARBON MONOXIDE MONITOR RECOMMENDED
Carbon Monoxide Poisoning: Early signs of
carbon monoxide poisoning are similar to the
flu with headaches, dizziness and/or nausea.
If you have these symptoms, obtain fresh air
immediately. Some people are more affected
by carbon monoxide than others, including
pregnant women, people with heart or lung
disease or anemia, those under the influence
of alcohol, and those at high altitudes.
It is against federal regulations to operate
wood heaters in a manner inconsistent with
the operating instructions in the manual.
Dealing With a Chimney Fire
Regular chimney maintenance and inspection
can prevent chimney fires. If you have a chimney
fire, follow these steps:
1. Close the fireplace door and the combustion
air controls.
2. Alert your family of the possible danger.
3. If you require assistance, alert your fire
department.
4. If possible, use a dry chemical fire extinguisher, baking soda or sand to control the
fire. Do not use water as it may cause a
dangerous steam explosion.
5. Check outside to ensure that sparks and hot
embers coming out of the chimney are not
igniting the roof.
6. Do not use the fireplace again until your
chimney and fireplace have been inspected
by a qualified chimney sweep or a Fire
Department Inspector.
ACHIEVING CLEAN BURNS
Check the exhaust after engaging the catalyst
(see Figure 6). Large amounts of smoke indicate
an improper burn setting (either too high, or too
low of a temperature to operate the catalyst).
Adjust and recheck in 5 to 10 minutes.
Figure 6
WHAT DOES “WELL-SEASONED” MEAN?
When a tree is cut down, the wood is green,
full of sap and moisture. This moisture content
can exceed 80%, which must be reduced to
less than 20%. Wood properly seasoned is
then capable of generating the heat the stove
was designed to provide.
Green wood does not burn easily. Attempting to
burn green wood often results in a lot of smoke
and very little fire. Time is the most important
factor in seasoning wood. Ideally the moisture
content should be reduced to 11-20%. NOTE:
The use of a firewood moisture meter is rec
ommended to ensure the firewood contains
less than 20% moisture.
Seasoning Guide
Softwoods - 6 months to 18 months
Hardwoods - 12 months to 24 months
Logs that are 5” diameter across or larger should
be split in half, three pieces if over 8 inches, and
four pieces when over a foot across. If a tree
has been dead for 2 - 4 years it still needs to
be cut, split, and seasoned for 6 to 24 months
depending on the wood.
8 Ft.
8'
(2.4M)
Figure 8
Prohibited Fuels
This heater is designed to burn natural wood
only. Higher efficiencies and lower emissions
generally result when burning air dried seasoned
hardwoods, as compared to softwoods or to
green or freshly cut hardwoods. DO NOT BURN:
• Garbage;
• Lawn clippings or yard waste;
• Materials containing rubber, including tires;
• Materials containing plastic;
• Waste petroleum products, paints or paint
thinners, or asphalt products;
• Materials containing asbestos;
• Construction or demolition debris;
• Railroad ties or pressure-treated wood;
• Manure or animal remains;
• Salt water driftwood or other previously salt
water saturated materials;
• Unseasoned wood;
• Christmas tree branches;
• Paper products, colored paper, cardboard,
plywood, or particleboard;
• gasoline;
• naphtha;
-
• engine oil;
• flammable liquids;
• solvents;
• grease; or
• coal
The prohibition against burning these materials
does not prohibit the use of fire starters made
from paper, cardboard, saw dust, wax and
similar substances for the purpose of starting
a fire in an affected wood heater.
Burning these materials may result in release
of toxic fumes or render the heater ineffective
and cause smoke.
materials may overheat the fireplace, causing
damage to the unit, a fire or even possibly ignit
ing a chimney fire if the chimney is creosoted.
Burning unapproved fuel, resulting in excessive
pollutants being emitted, may be prohibited and
subject to a fine or other penalty by the authority
having jurisdiction in your area.
Intense firing with these
Standard
Cord of
Wood
(1.2M)
4 Ft. (1.2M)
4'
4 Ft.
4'
-
NOTE: DIAGRAMS & ILLUSTRATIONS ARE NOT TO SCALE.
7
MAINTAINING YOUR FIREPLACE
Have your product inspected at least once
a year by a qualified service technician to
ensure gaskets, air tubes, baffles, and venting are in good repair to ensure proper performance. Have degraded items replaced
by a qualified service technician.
This wood heater needs periodic inspection
and repair for proper operation. Consult the
owner’s manual for further information. It is
against federal regulations to operate this
wood heater in a manner inconsistent with
the operating in this manual.
Creosote - Formation and Need for Removal
When wood is burned slowly, it produces tar
and other organic vapors, which combine
with expelled moisture to form creosote. The
creosote vapors condense in the relatively
cool chimney flue of a slow-burning fire. As
a result, creosote residue accumulates on the
flue lining. When ignited this creosote makes
an extremely hot fire.
The chimney shall be inspected at least twice
a year during the heating season to determine
when a creosote buildup has occurred.
When creosote has accumulated it shall be
removed to reduce the risk of a chimney fire.
When the creosote accumulation is large, a
creosote fire in the chimney can damage the
chimney and overheat the surrounding wood
framing. Creosote formation in a chimney can
be minimized by making sure there is always
visible flame burning, avoid smouldering fires
and by proper refuelling techniques.
Chimney Maintenance
Regular chimney inspection and maintenance
combined with proper operation will prevent
chimney fires. Keep your chimney clean. Do
not allow more than 1/16” (1.6 mm) creosote
build up in your chimney.
The amount of creosote will depend on variables
such as frequency of use and type of fire. We
recommend that you:
A. Initially inspect the chimney system weekly.
From this, you will learn how often it will be
necessary to clean your chimney.
B. Have your chimney cleaned by a qualified
chimney sweep. If you wish to clean it
yourself, we recommend using a stiff plastic
or non-metallic brush. If a metal brush is
used, its size should be slightly smaller than
the flue to avoid damaging the chimney. Do
not use a brush that will scratch the stainless
steel interior of the chimney.
C. Do not expect chemical cleaners to keep
your chimney clean. The rain cap can be
removed for inspection and/or cleaning of
the chimney.
Before performing chimney sweep, open
the CAT bypass and remove the combustor.
Remove dust accumulation after chimney
sweep and put the combustor back in place.
CATALYTIC COMBUSTOR
This fireplace is designed with a catalytic combustor which will reduce pollution emissions
and creosote build up while improving thermal
efficiency. In order to optimize and maintain
the combustor performance, it is important to
visually check the combustor at least 3 times
during the heating season to determine if physical degradation has occurred.
Catalytic combustors require little maintenance.
Cleaning the combustor once a year, preferably
when your flue system is serviced, is sufficient
for most users.
WARNING
To prevent damage to your combustor, do not:
• Drop the combustor (which is
fragile compared to the rest of
the unit – so handle with care)
• Run water or compressed air
through the combustor
• Try to clean the combustor with
any sharp tool
The combustor supplied with this heater is
a Healthy Hearth Combustor. Consult the
catalytic combustor warranty also supplied
with this wood heater. Warranty claims
should be addressed to:
The packaging of the combustor must be
robust enough to protect against any ship
ping damage that may occur.
Healthy Hearth LLC
31375 Riverside Drive #214
Lake Elsinore, CA 92530
Phone # 951-264-8725
-
Catalyst Monitoring
It is important to periodically monitor the
operation of the catalytic combustor to ensure
that it is functioning properly and to determine
when it needs to be replaced. A non-functioning
combustor will result in a loss of heating efficiency, and an increase in creosote and emissions. Following is a list of items that should
be checked on a periodic basis:
• Combustors should be visually inspected at
least three times during the heating season
to determine if physical degradation has
occurred. Actual removal of the combustor
is not recommended unless more detailed
inspection is warranted because of decreased
performance.
If any of these conditions exists, refer to Cata-
lyst Troubleshooting section of this owner’s
manual.
• This catalytic heater is equipped with a temperature probe to monitor catalyst operation.
Properly functioning combustors typically
maintain temperatures in excess of 500°F,
and often reach temperatures in excess of
1,000°F. If catalyst temperatures are not in
excess of 500°F, refer to Catalyst Troubleshooting section of this owner’s manual.
• You can get an indication of whether the catalyst is working by comparing the amount of
smoke leaving the chimney when the smoke
is going through the combustor and catalyst
light-off has been achieved, to the amount of
smoke leaving the chimney when the smoke
is not routed through the combustor (CAT
bypass mode).
8
NOTE: DIAGRAMS & ILLUSTRATIONS ARE NOT TO SCALE.
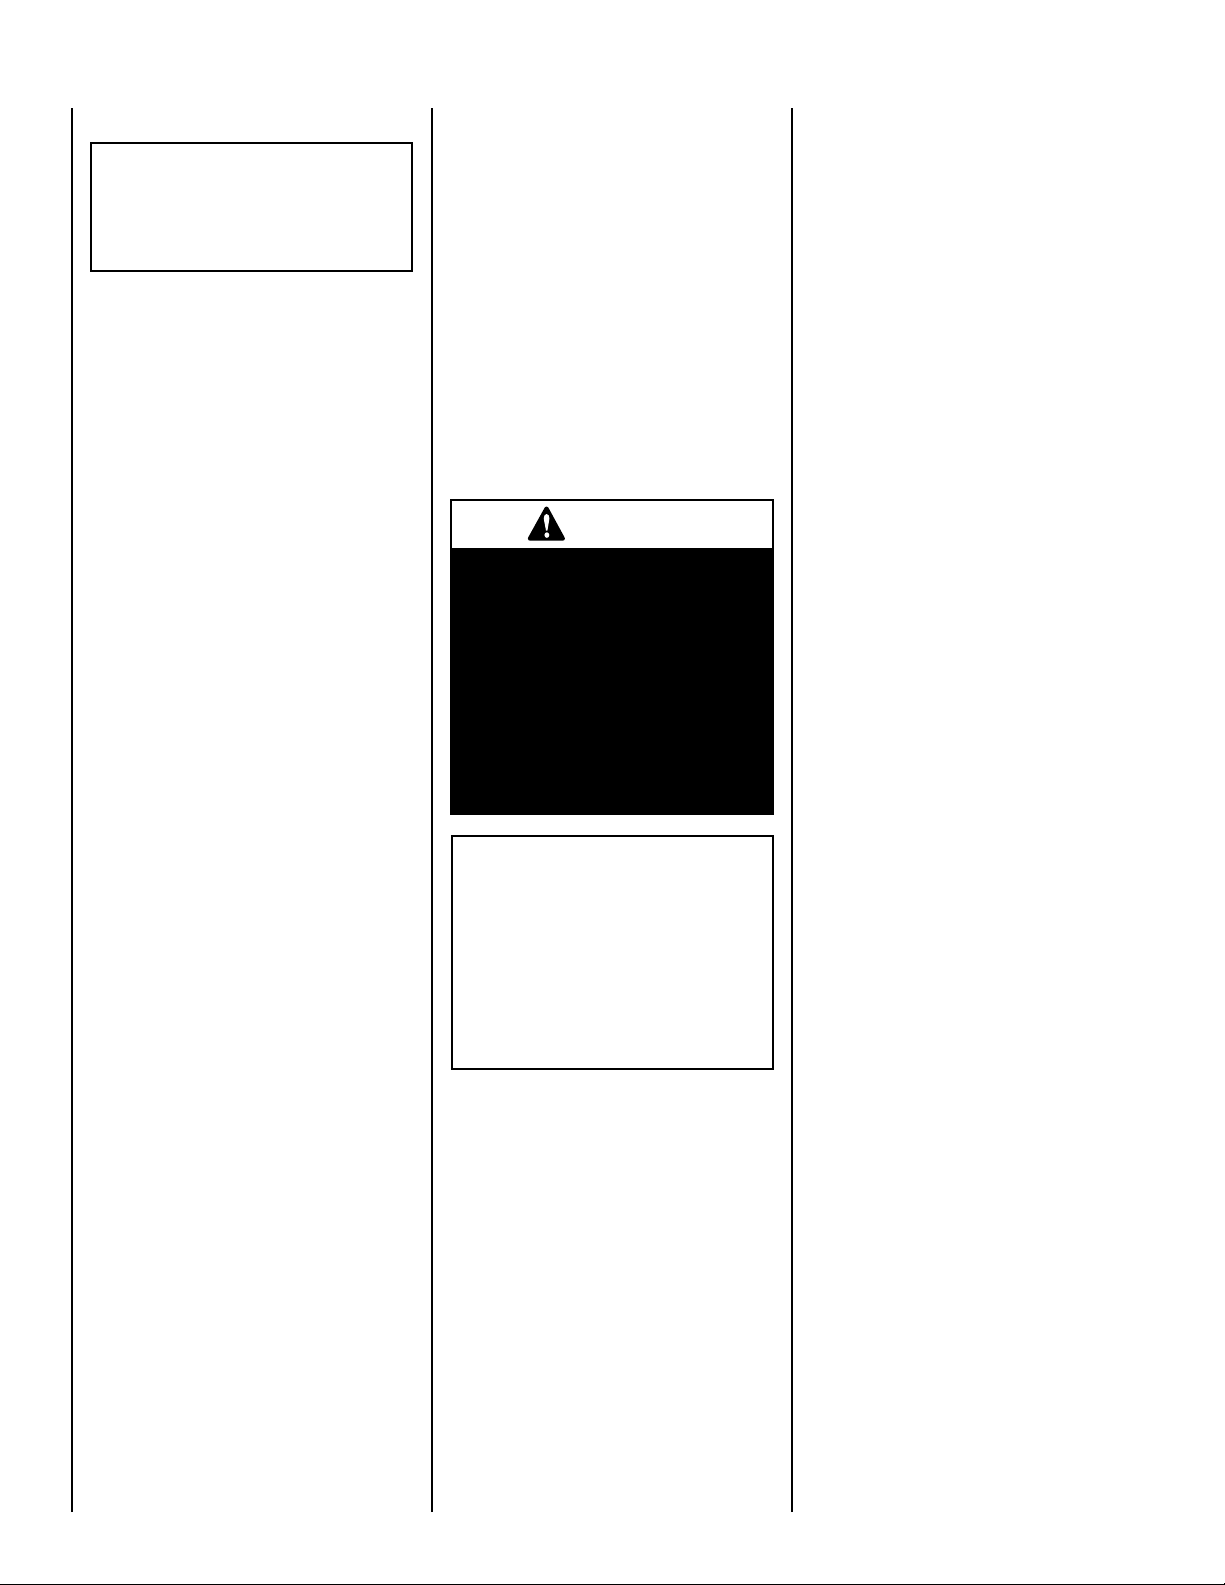
Cleaning Procedure (see Figure 9A):
Tools required: (2) 9/16” wrenches, #2 square
drive bit/driver
With catalyst bypass in closed position, remove
(2) baffle boards from firebox.
1. Using (2) 9/16” wrenches, loosen and
remove the bolt and nut that connects the
linkage arm to the catalyst bypass box
2. Loosen (3) square drive screws mounting
bypass assembly hinge bracket to back of
firebox.
3. In an upward and forward pulling motion,
remove assembly from mount and drop
between the front and middle burn tube.
4. Installation is reverse of disassembly.
NOTE: Ensure bypass assembly is sealed to
ceiling of firebox upon reinstallation. Adjust
ment can be made by loosening (3) mounting
screws and sliding the hinge bracket up or down
to create better seal and then retightening.
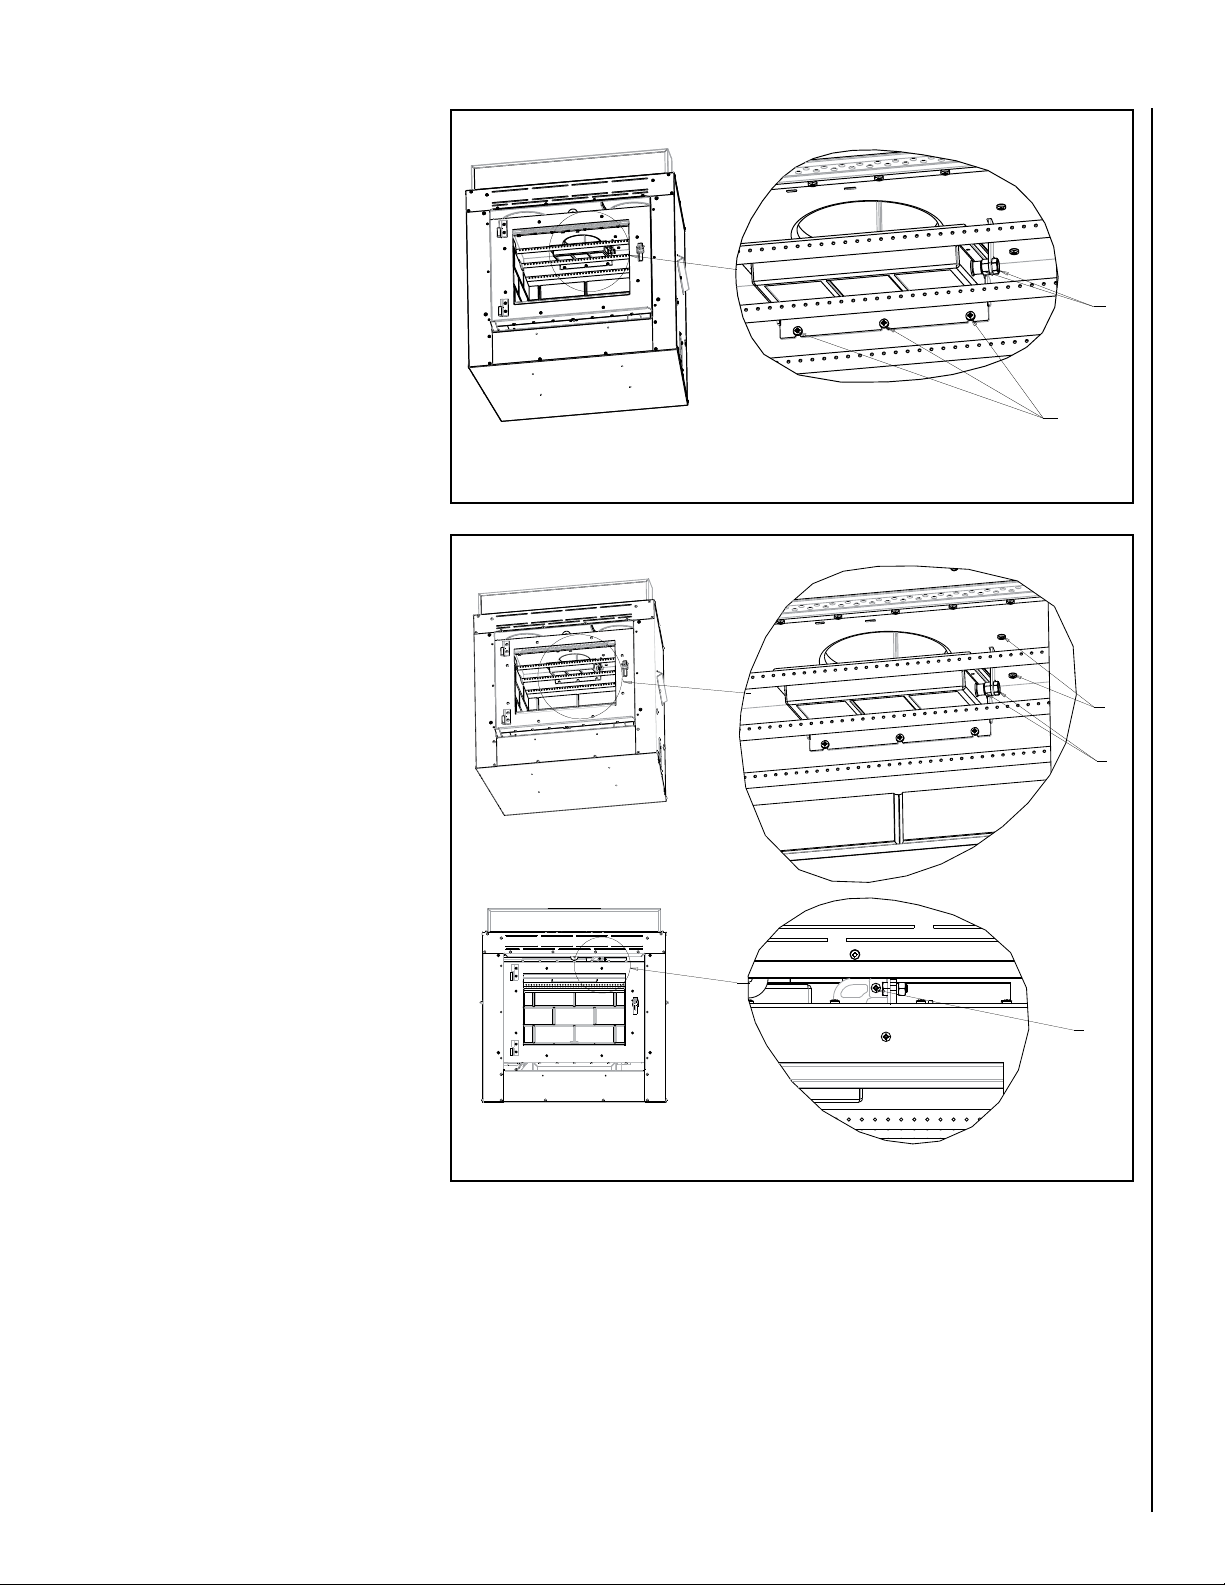
Catalyst Bypass linkage replacement
(see Figure 9B):
Tools required: (2) 9/16” wrenches, #2 square
drive bit/driver
With catalyst bypass in closed position, remove
(2) baffle boards from firebox. Place catalyst
bypass in open position.
1
2
Figure 9A - Cleaning Procedure
-
2
1
1. Using (2) 9/16” wrenches, loosen and remove
the bolt and nut that connects the linkage
arm to the catalyst bypass box
2. On ceiling of firebox, adjacent to linkage arm,
locate and remove (2) square drive screws.
3. Outside of unit, just left of bypass engage-
ment lever, remove (1) square drive screw.
Linkage assembly is now free to remove from
above the firebox. Lift linkage assembly up,
while turning clockwise until linkage arm is
removed from slot in firebox. Assembly can
now be removed while on its side.
Installation is reverse of disassembly.
3
Figure 9B - Catalyst Bypass Linkage Replacement
NOTE: DIAGRAMS & ILLUSTRATIONS ARE NOT TO SCALE.
9

CATALYTIC COMBUSTOR TROUBLESHOOTING GUIDE
Problem Condition Solution
Ash Build-up on Combustor Surface Normal Ash, a fluffy light gray powder, and soot, accumulate on the com-
bustor surfaces in normal use. Ashes accumulate as a result of the
smoke being burned within the combustor and carried out of the
firebox by the chimney draft. Soot is the result of previous creosote
deposits having been burned off or foreign materials being burned
in the firebox. This is normal and will be eliminated during the next
burn.
Combustor Clogging Creosote Combustor should be cleaned (see Page 11). Do not use air pres-
sure or sharp objects to clean combustor.
Broken Combustor Crack or Break The combustor is manufactured from a ceramic material and there-
fore can crack or break. However, the combustor will still function if
cracked. If combustor is broken into pieces and dis-lodged from the
housing, it will need to be replaced.
Combustor Malfunction Not Working The combustor should last a minimum of 10,000 hours of opera-
tion. The combustor will lose catalytic capability over time. When
you see continuous smoke coming from the chimney, the combustor should be cleaned. If the smoking persists, the combustor
should be replaced.
Combustor Problem Thermal Erosion This combustor does NOT experience thermal erosion. “Not ap-
plicable.” Applies to honeycomb combustors only.
Combustor Problem Thermal Cracking This combustor does NOT experience thermal cracking. “Not ap-
plicable.” Applies to honeycomb combustors only.
Combustor Problem Combustor Peeling This combustor does NOT experience combustor peeling. “Not
applicable.” Applies to honeycomb combustors only.
Reduced Combustor Performance Combustor Clogging or Fatigue Signs of combustor fatigue include reduced heat output and slug-
gish performance. Inspect and clean combustor. Replacement
may be required. Monitor performance and smoke coming from
chimney.
Combustor not glowing Late stage of burn Combustor does not need to be glowing to be working. Check
smoke exiting chimney to help determine if combustor is working
properly.
Appliance burning too hot or fast Doors are not properly closed. Close doors securely. Check door gasket.
Excessive draft Adjust primary air control to lower setting.
Back-puffing or sudden internal ignitions Operating technique Open bypass and primary air control before opening to reload and
keep it open a few minutes after reloading.
Burn rate too low Open air damper to allow for hotter burn.
Chimney down draft In high wind areas, a specially designed wind cap may be neces-
sary.
Combustor or louvered housing plugged Clean combustor / louvered housing of accumulated fly ash.
Appliance Smokes Operating technique Open bypass and air damper prior to reloading appliance.
Blocked Chimney Examine chimney and vent pipe for blockage and creosote accumu-
lations. Check spark arrestor screen on your cap, if you have one.
Blocked outside air duct Check the outside air inlet for blockage caused by snow, debris, or
insects.
10
NOTE: DIAGRAMS & ILLUSTRATIONS ARE NOT TO SCALE.
Healthy Combustor - Unused
Combustor Problem - Broken Combustor
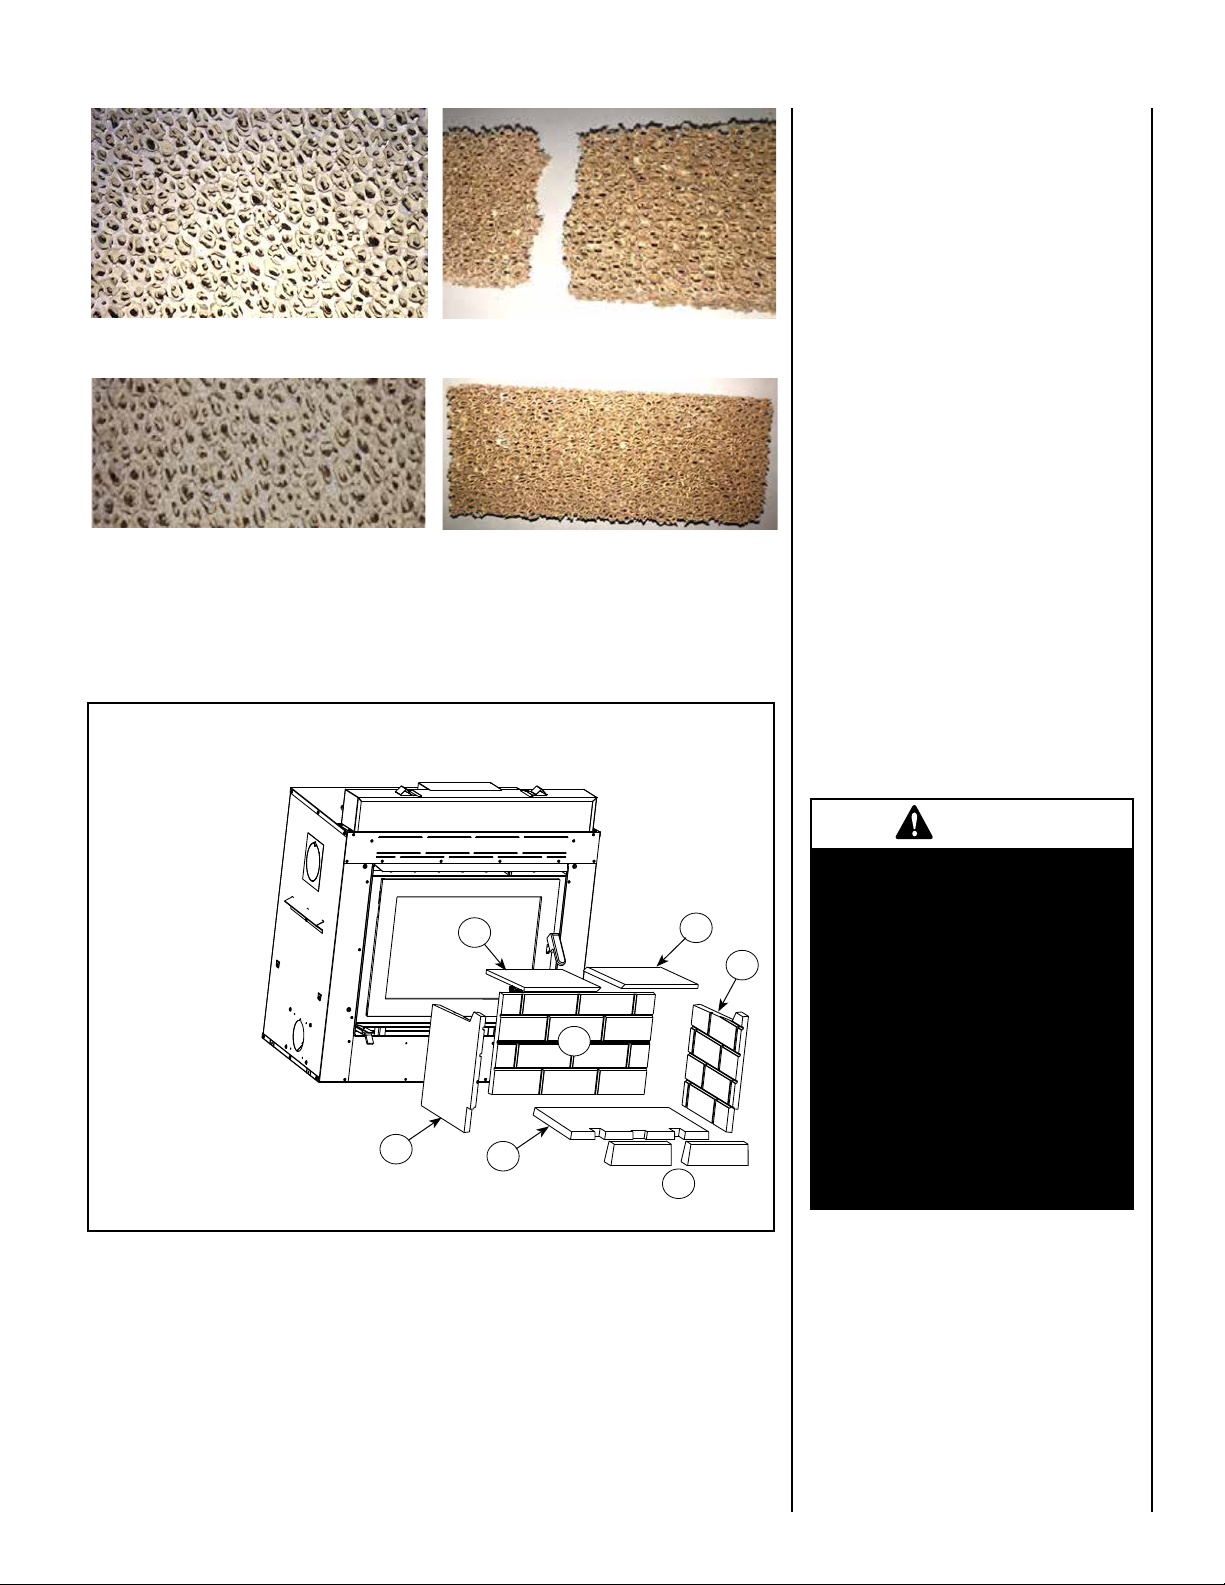
The intense heat of the fire will normally cause
hairline cracks in the refractory. These cracks
can be minimized by proper curing as described
in “First Fires”. They will not normally diminish the effectiveness of the refractory. If large
cracks develop, then the refractory should be
replaced. To replace the refractory bricks, follow
these steps (see Figure 10):
1. Remove the bottom refractory
2. Remove the front refractories
3. Remove the left side refractory
4. Remove the right side refractory
5. Remove the back refractory
6. Remove the front ceramic baffle
7. Remove the rear ceramic baffle
To install the new refractories, follow the above
steps in reverse.
DISPOSING OF ASHES
Combustor Problem - Ash, a fluffy light grey powder,
and soot, accumulate on the combustor surfaces in
normal use. In extreme situations combustor can
become clogged and should be cleaned.
REFRACTORY REPLACEMENT
1. Bottom Refractory
2. Front Refractories
3. Left Side Refractory
4. Right Side Refractory
5. Back Refractory
6. Left Ceramic Baffle
7. Right Ceramic Baffle
3
Figure 10
Combustor Problem - Cracked Combustor
6
7
5
1
2
Whenever ashes get 3 to 4 inches deep in your
firebox, and when the fire has burned down and
cooled, remove excess ashes. Leave an ash bed
approximately 1 inch deep on the firebox bottom
to help maintain a hot charcoal bed.
Remove ashes only when the fire is out and
the ashes are cold (24 to 48 hours after the
fire is out).
Do not leave the ashes in the house as they give
off carbon monoxide and other toxic gases.
WARNING
Disposal of Ashes: Ashes should
be placed in a steel container
with a tight fitting lid and moved
outdoors immediately. The
4
closed container of ashes should
be placed on a non-combustible
floor or on the ground well away
from all combustible materials,
pending final disposal. If the
ashes are disposed of by burial
in soil or otherwise locally dispersed, they should be retained
in the closed container until all
cinders have thoroughly cooled.
NOTE: DIAGRAMS & ILLUSTRATIONS ARE NOT TO SCALE.
11
 Loading...