

Page 1
OUTDOOR DECORATIVE GAS FIREPLACE
CU
DANGER
DANGER
P/N 506009-24 REV. NC 03/2014
INSTALLATION INSTRUCTIONS
OUTDOOR DECORATIVE GAS FIREPLACE
This appliance is only for use with the type of gas
indicated on the rating plate. This appliance is
not convertible for use with other gases, unless a
certified kit is used.
INSTALLER: Leave this manual with the appliance.
CONSUMER: Retain this manual for future reference.
INSTALLATEUR: Laissez cette notice avec l'appareil.
CONSOMMATEUR: Conservez cette notice pour consulation ultérieure.
WARNING: DO NOT store or use gasoline or other
flammable vapors or liquids in the vacinity of this or
any other appliance.
CARBON
MONOXIDE
HAZARD
• This appliance can produce carbon monoxide
which has no odor.
P506009-24
MODELS
VRE4336ZEN VRE4342ZEN
VRE4336ZEP VRE4342ZEP
A French manual is available upon request. Order Form Number
506009-25.
Ce manuel d’installation est disponible en francais, simplement en
faire la demande. Numéro de la pièce 506009-25.
WARNING: Improper installation, adjustment, alteration, service
or maintenance can cause injury or property damage. Read the installation, operating and maintenance instructions thoroughly before
installing or servicing this equipment.
MONOXYDE
DE CARBONE
• Cet appareil peut
produire du monoxyde
de carbone, un gaz
inodore.
WARNING: For
Outdoor Use Only.
DANGER
IF YOU SMELL GAS:
1. Shut off gas to appliance.
2. Extinguish any open flame.
3. If odor continues, keep away from the appliance and immediately call your gas supplier
or your fire department.
• Using it in an enclosed
space can kill you.
• Never use this appliance in an enclosed
space such as a camper, tent, car or home.
PFS Report No. 14-020
S
• Son utilisation dans un
espace clos peut vous
tuer.
Avertissement:
Pour utilisation à
l'exérieur seulement.
• Ne jamais utiliser cet
appareil dans un espace clos, tel qu'une
caravane, tente, voiture
ou à la maison.
DANGER
SI VOUS UNE ODEUR DE GAZ:
1. Coupez l'admission de gaz de l'appariel.
2. Éteindre toute flamme nue.
3. Si l'odeur persiste, éloignez-vous de
l'appareil et appelez immédiatement votre
fournisseur de gaz ou le service d'incendie.
1
Page 2

Accessories
Wall Switch
Fireplace
Weatherproof
Enclosure
Optional Drain Pan
TABLE OF CONTENTS
Packaging .........................................page 2
Introduction ......................................page 2
Massachusetts Requirements ...........page 3
General Information ..........................page 3
Location ............................................page 4
Pre-Installation Notes .......................page 4
Assembly Steps ................................page 4
Waterproofing The Fireplace ............page 4
Appliance Clearances ........................page 5
Clearance Specifications ...................page 6
Fireplace Installation .........................page 7
Routing Gas Line ..............................page 7
Fireplace Specifications .....................page 8
Framing Specifications ......................page 9
Field Wiring .......................................page 10
Connecting Gas Line ........................page 11
Installing The Logs ............................page 12
Checking Appliance Operation ..........page 13
Firebox Finishes ................................page 13
Accessories And Components ..........page 14
Gas Conversion Kits .................. page 15
This installation manual will help you obtain a
safe, efficient, dependable installation for your
appliance.
This manual is part of a set of two supporting
this product. Refer to manual 506010-20 for
Care And Operations.
Please read and understand these
instructions before beginning your
installation.
3 - three (3) bags of volcanic stone, envelope
is located in the firebox area.
4 - Electrical kit containing the wall switch
components, battery holder, box and cover
(see Field Wiring Page 10).
INTRODUCTION
These outdoor gas fireplaces are designed for
exterior applications. These appliances must
be installed outdoors.
The VRE43 Series Outdoor Gas Fireplace
is designed for outdoor use. It may also be
installed in screened porches and lanais that
meet these minimum requirements:
Minimum porch area - 96 square feet
Minimum ceiling height - 7 feet 8 inches
A minimum of two (2) walls can be screened
but must be open to outside ventilation.
Minimum screen area - 64 square feet
Minimum screen top height - 6 feet 8 inches
Refer to Outdoor Space definition below and
Clearance Specifications on Page 6.
AN OUTDOOR SPACE IS DEFINED AS FOLLOWS PER ANSI Z21.97-2012:
Outdoor spaces - An appliance is considered
to be outdoors if installed with shelter no more
inclusive than:
(a) With walls on all sides, but with no over-
head cover;
(b) Within a partial enclosure which includes an
overhead cover and no more than two side
walls. These side walls may be parallel, as in a
breezeway, or at right angles to each other; or
(c) Within a partial enclosure which includes an
overhead cover and three sidewalls, as long
as 30% or more of the horizontal periphery
of the enclosure is permanently open.
TYPICAL INSTALLATION
These appliances are designed to operate on
natural gas or propane. An electronic intermittent pilot ignition system provides safe,
efficient operation. A battery pack is required
to operate these units (2 "D" batteries).
These appliances comply with National Safety
Standards and are tested by PFS Corporation
(Report No. 14-020) and listed by ANSI Z21.97
(2012) in USA and to CSA 2.41 (2012) in
Canada, as outdoor gas fireplaces.
The Installation must conform to local codes or,
in the absence of local codes, with the National
Fuel Gas Code, ANSI Z223.1/NFPA 54, or the
Natural Gas and Propane Installation Code, CAN/
CGA B149.1; or Propane Storage and Handling
Code, B149.2, as applicable.
The appliance, when installed, must be electrically grounded in accordance with local codes or,
in the absence of local codes, with the National
Electrical Code, ANSI/NFPA 70, or the Canadian
Electrical Code, CSA C22.1.
DO NOT ATTEMPT TO ALTER OR MODIFY
THE CONSTRUCTION OF THE APPLIANCE OR
ITS COMPONENTS. ANY MODIFICATION OR
ALTERATION MAY VOID THE WARRANTY,
CERTIFICATION AND LISTINGS OF THIS UNIT.
Solid fuels shall not be burned in this appliance.
WARNING
An LP-cylinder not connected for
use shall not be stored in the vicinity of this or any other appliance.
2
PACKAGING
The assembled outdoor gas fireplace is packaged with the following:
1 - the logs are packaged in a carton located
within the firebox.
2 - one envelope containing the literature pack-
age which consists of the Care and Operation
manual and Installation Instructions.
Figure 1
NOTE: DIAGRAMS & ILLUSTRATIONS NOT TO SCALE.
Page 3
MASSACHUSETTS REQUIREMENTS
These appliances may be installed in the
following USA locations with the following
requirements:
Installation of these appliances are approved
for installation in the US state of Massachusetts if the following additional requirements
are met -
• Installation and repair must be done by a
plumber or gas fitter licensed in the Commonwealth of Massachusetts.
• The exible gas line connectors shall not
exceed 36 inches (92 centimeters) in length.
• The individual manual shut-off must be a
t-handle type valve.
GENERAL INFORMATION
NOTE: Installation and repair should be per-
formed by a qualied service person. The appliance should be inspected annually by a qualied
professional service technician. More frequent
inspections and cleanings may be required due
to yard care, insects, etc. It is imperative that
the control compartment and burners of the
appliance be kept clean.
Provide adequate clearances around air openings and adequate accessibility clearance for
service and proper operation. Never obstruct
the front openings of the appliance.
These appliances are designed to operate on
natural or propane gas only.
All Models -
All models have a manually modulated gas valve.
Input is shown in Table 1:
Gas Pressure - All Models
Tables 2 and 3 show the appliances' inlet and
manifold gas pressure.
Inlet Gas Supply Pressure
(all models)
Fuel # Minimum Maximum
Natural Gas
Propane
5.0" WC
(1.24 kPa)
11.0" WC
(2.74 kPa)
10.5" WC
(2.61 kPa)
13.0" WC
(3.23 kPa)
Table 2
Manifold Gas Supply Pressure
(all models)
Fuel # Low High
Natural
Gas
Propane
2.2" WC
(0.55 kPa)
6.3" WC
(1.57 kPa)
3.5" WC
(0.87 kPa)
10.0" WC
(2.49 kPa)
Table 3
Test gauge connections are provided on the front
of the gas control valve identified IN for the inlet
and OUT for the manifold side. A 1/8" NPT Test
gauge connection is provided at the inlet and
outlet side of the electronic gas control valve.
The appliance and its appliance main gas
valve must be disconnected from the gas
supply piping system during any pressure
testing of that system at test pressures in
excess of 1/2 psi (3.5 kPa).
The appliance must be isolated from the gas
supply piping system by closing its equipment
shutoff valve during any pressure testing of
the gas supply piping system at test pressures equal to or less than 1/2 psi (3.5 kPa).
Orifice Sizes - Sea Level To High Altitude
(All Models)
These appliances are tested and approved
for installation at elevations of 0-4500 feet
(0-1372 meters) above sea level, using the
standard burner orifice (See Table 4 ). For
elevations above 4500 feet, contact your gas
supplier or qualified service technician. Install
the appliance according to the regulations of
the local authorities having jurisdiction and, in
the USA, the National Fuel Gas Code NFPA 54 /
ANSI Z223.1 - latest edition or , in Canada, the
CAN/CGA-B149.1 and .2 codes - latest edition.
Burner Orifice Sizes
Elevation 0-4500 feet ( 0-1372 meters)
Model Nat.Gas
VRE4336
VRE4342
drill size (inches)
#28 (.1405") #47 (.0785")
#28 (.1405") #47 (.0785")
Propane
drill size (inches)
Table 4
WARNING
PROPANE TANKS ARE AT PRESSURES
THAT WILL CAUSE DAMAGE TO VALVE
COMPONENTS. VERIFY THAT THE
TANKS HAVE STEP DOWN REGULATORS TO REDUCE THE PRESSURE TO
SAFE LEVELS.
BTU Input (BTU/Hr)
Model No. Input Rate (BTU/Hr)
Natural Gas
VRE4336ZEN 50,000 to 39,500
VRE4342ZEN 50,000 to 39,500
Propane Gas (LP)
VRE4336ZEP 46,000 to 37,000
VRE4342ZEP 46,000 to 37,000
Table 1
3
Page 4
ASSEMBLY OUTLINE
Before You Start
Check your inventory list to be sure you have
all the necessary parts supplied in good usable
condition. Check also for any concealed damage.
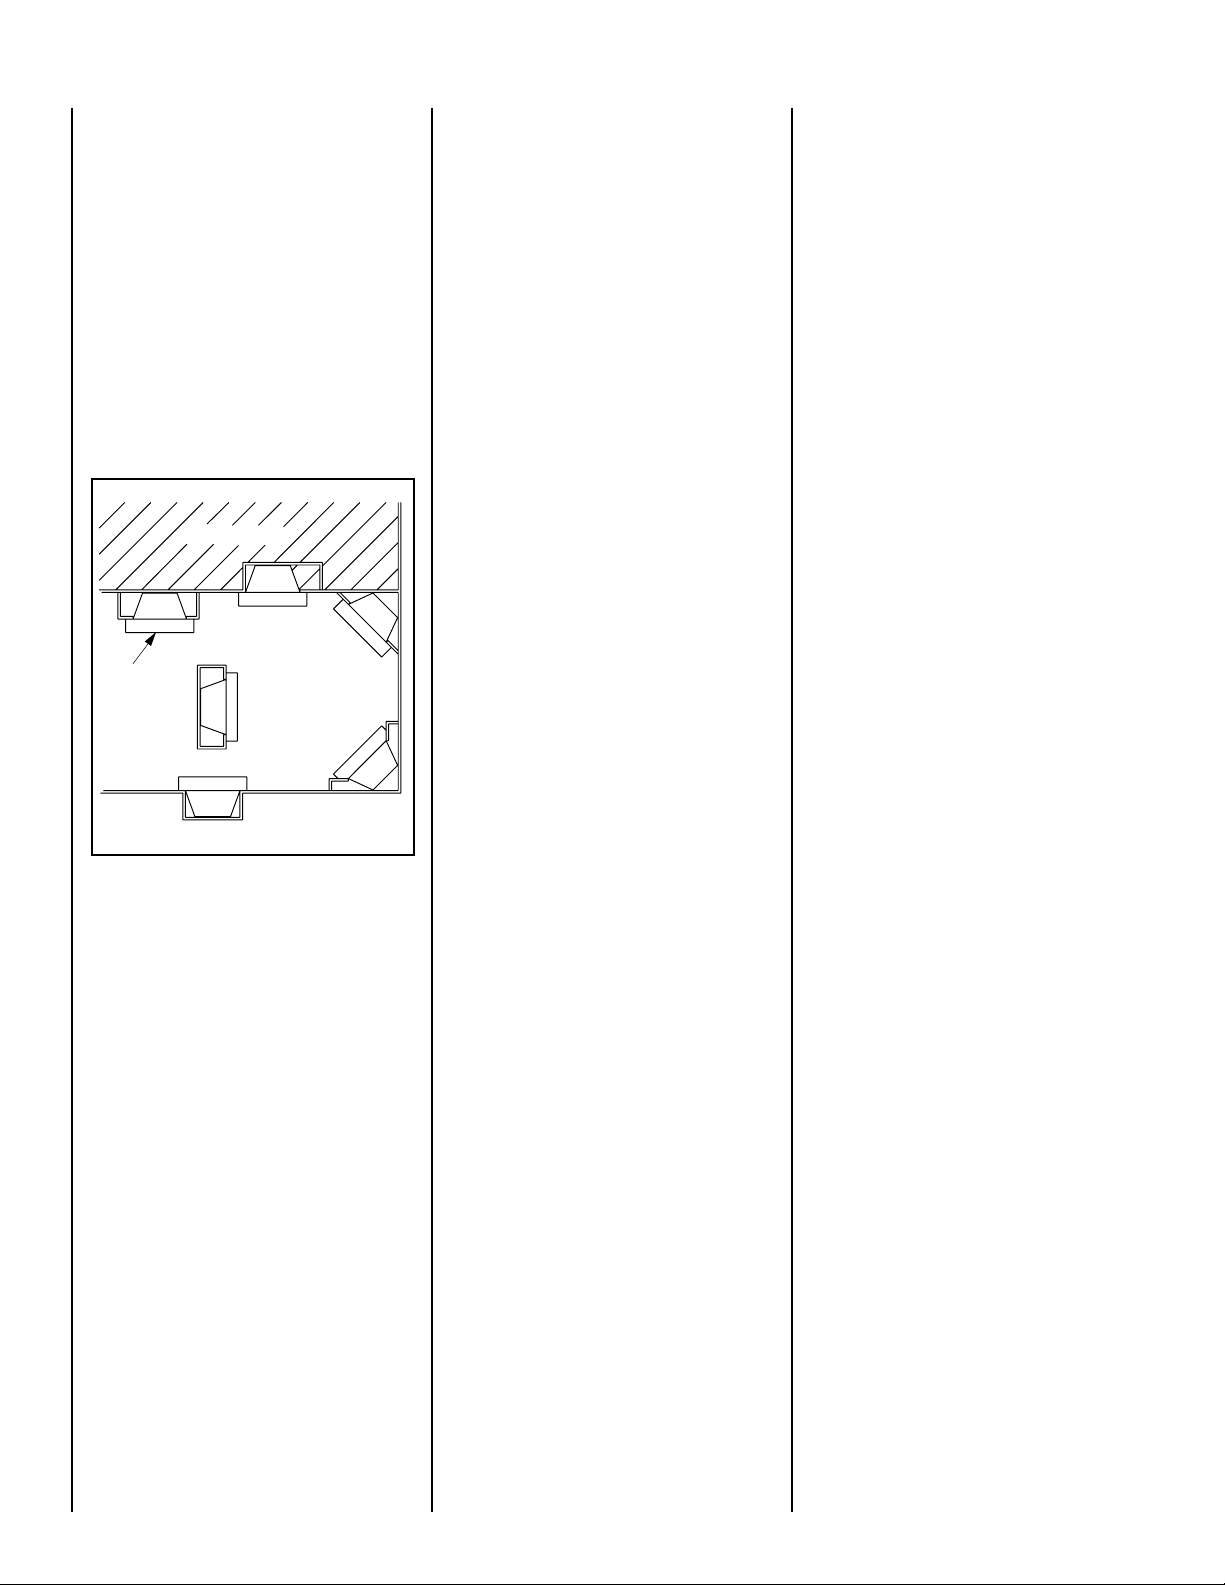
LOCATION OF FIREPLACE
Carefully select the proper location for any
obstructions, clearance to side wall(s), air
availability, location and aesthetics. With proper
pre-planning, a slight adjustment of a few inches
can save considerable time and expense later
during construction and assembly. See Figure
2 for some examples.
LIVING SPACE
Optional
Hearth
Extension
Figure 2
When choosing a location, care must be taken
to avoid places where ooding or running water
may be a problem.
Identify the desired location for the battery
pack/ON/OFF switch junction box location. This
should be easily accessible and convenient for
use and high enough on the wall to be protected
from water and drifted snow.
Do not use this appliance if any part has been
under water. Immediately call a qualified service technician to inspect the appliance and to
replace any part of the control system and any
gas control that has been under water.
Ne pas se servir de cet appareil s'il a été plongé
dans l'eau, complètement ou en partie. Appeler
un technicien qualifié pour inspecter l'appareil et
remplacer toute partie du système de contrôle et
toute commande qui ont été plongés dans l'leau.
If it is evident that the burner is damaged, the
burner must be replaced with one specified by
the manufacturer before the appliance is put
into operation.
PATIO
Carefully consider the position of the fireplace
opening with respect to the location of adjacent
or nearby stairwells, doors, windows, walkways
and over hanging trees, patios and wires.
When locating the fireplace, consideration must
be given to combustibles and final finishing.
See Figure 18 and confine the final location of
combustible finish materials to the "Safe Zone".
Also refer to Clearance Specifications on page 6.
Consider the effects of heat when locating any
object in front of or near the fireplace opening.
PRE-INSTALLATION NOTES
The fireplace may be installed directly on a
combustible oor or raised on a platform of an
appropriate height. Do not place the fireplace
on vinyl or other soft oor coverings. It may,
however, be placed on at wood, plywood,
particle board or other hard surfaces.
Position the electrical junction box as detailed
in LOCATION OF FIREPLACE. (The umbilical
cord is 9 feet long).
Be sure the fireplace rests on a solid continu-
ous oor or platform with appropriate framing
for support.
The fireplace may be positioned and then the
framing built around it, or the framing may be
constructed and the fireplace positioned into
the opening.
Usually, no special oor support is needed for
the fireplace, however, to be certain:
1. Estimate the total weight of the fireplace
system including surround materials such
as brick, stone, etc., to be installed. Shipping
weights for the fireplace may be found on
page 8.
2. Measure the square footage of the oor
space to be occupied by the system, surrounds and hearth extensions.
3. Note the decking construction, i.e. 2 x 6’s,
2 x 8’s or 2 x 10’s, single or double joists,
type and thickness of oor boards.
4. Use this information and consult your local building code to determine if you need
additional support.
If you plan to raise the fireplace and hearth
extension, build the platform assembly then
position fireplace and hearth extension on
top. Secure the platform to the oor to prevent
possible shifting.
ASSEMBLY STEPS
NOTE: The following steps represent the normal
sequence of installation. Each installation is
unique, however, and might require a different
sequence.
1. Position firebox prior to framing or into
prepared framing (non-combustible framing is recommended).
2. Position the electrical junction box as
detailed in LOCATION OF FIREPLACE.
(The umbilical cord is 9 feet long).
3. Waterproof the fireplace or install the
optional drip pan (see Waterproong The
Fireplace and Figure 3 on page 5 ).
4. Plumb gas line. (Gas connections should
only be performed by an experienced,
licensed/certified tradesman.)
5. Complete the installation, finish wall material, surround and hearth extension to your
individual taste.
6. Assemble and attach optional accessories.
Study the three dimensional illustration (Fig-
ure 1 ) to get a general idea of each element
of your fireplace system.
WATERPROOFING THE FIREPLACE
Although the fireplace is designed to operate
safely outdoors, rain may enter the hearth area,
condensation and can cause water to collect
inside the fireplace bottom.
To prevent water collection, the builder must
provide a means to drain water from under
the fireplace by building or installing a water
collector of the builders choice, before positioning the fireplace in its location.
Special care must be taken when the fireplace is
installed against an exterior wall. The enclosure
surrounding the fireplace on the sides and back
must be treated as an exterior wall.
Innovative Hearth Products (IHP) provides an
optional drain pan to assist weatherproofing
the fireplace.
H4651 DPSS36 Drain Pan for VRE4336, H4652
DPSS42 Drain Pan for VRE4342.
4
NOTE: DIAGRAMS & ILLUSTRATIONS NOT TO SCALE.
Page 5
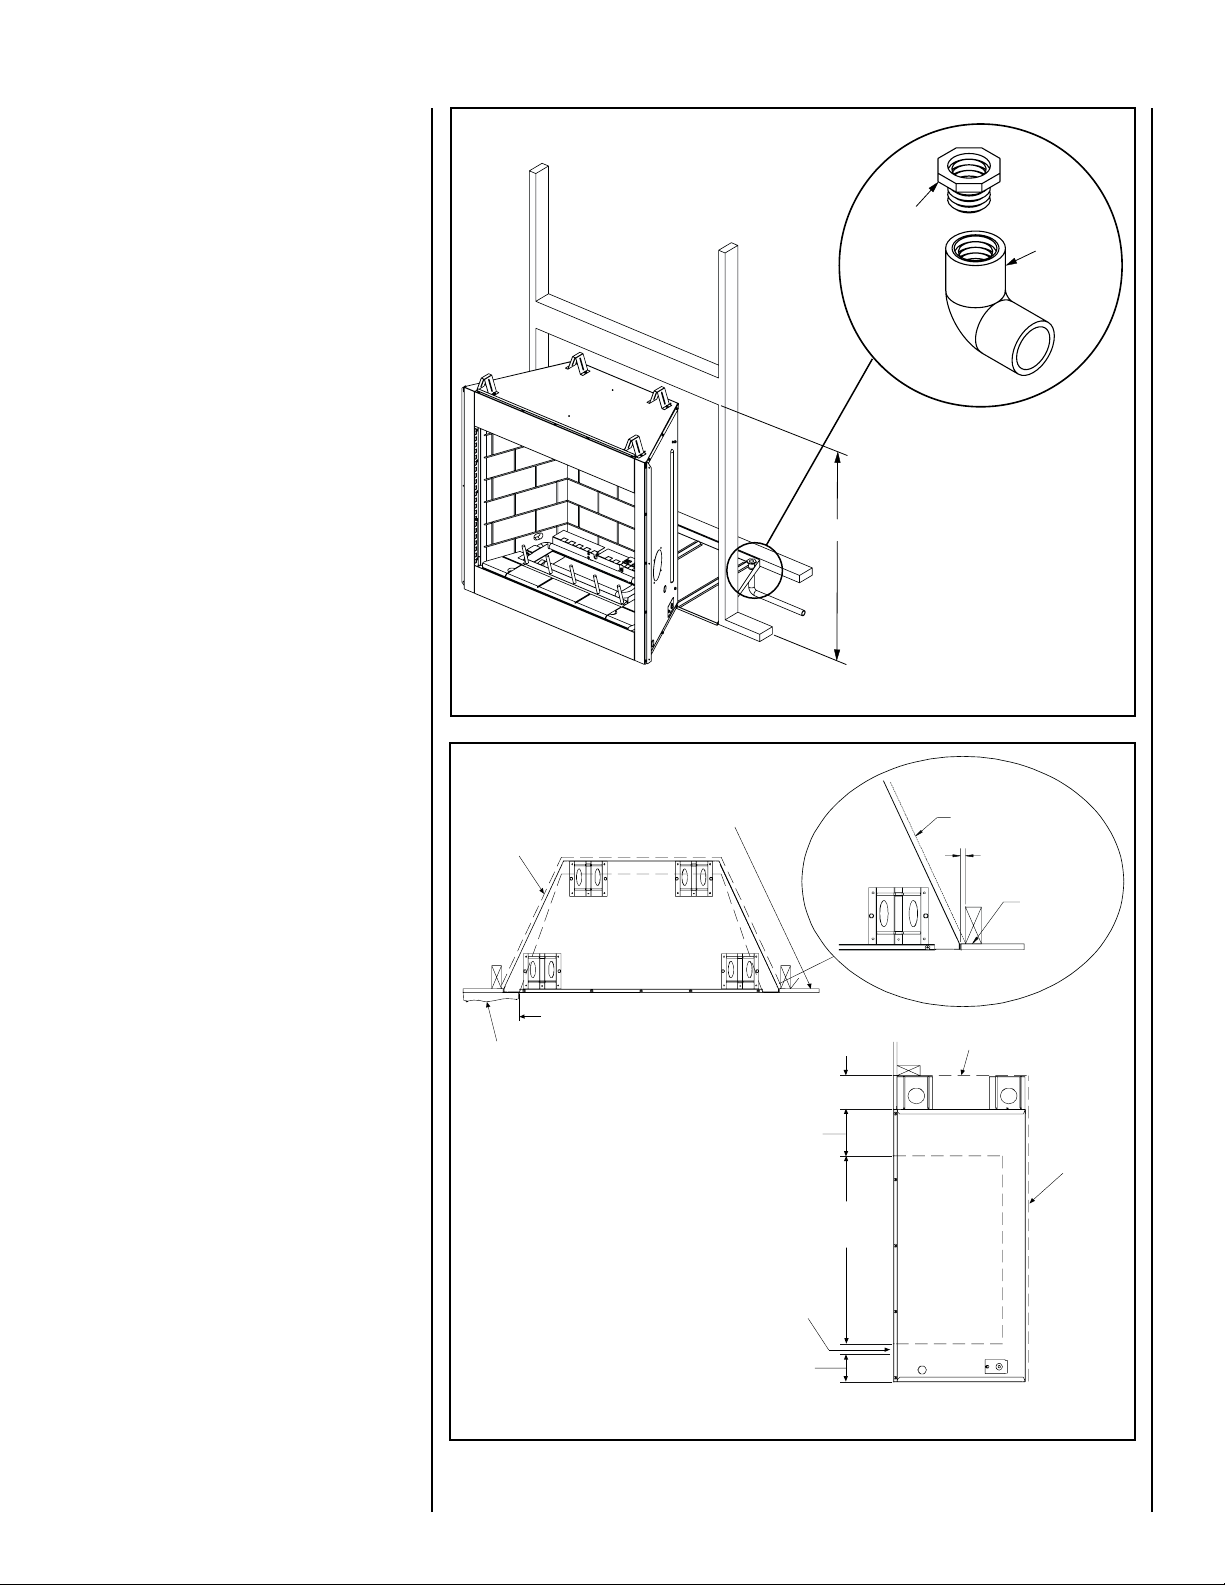
When Planning for the installation of the fire-
47 1/4
Drain Connector Detail
Threaded
Reducer
3/4 x 1/2
(PVC)
Threaded
Elbow 3/4
@ 90
º
(PVC)
1/2” Airspace Clearance
To Sides And Back
No Material Within
The Face Opening
Noncombustables
May Overlap The Face
Combustable Materials
Allowed Flush With
The Face Front
No Combustables
Below The Top Spacers
Noncombustable
Material Only
Only
Noncombustable
Material May
Overlap The
T
op Face
Do NOT Overlap
Material Within
The Face Opening
1/2”
Airspace
Clearance
To Back
TOP VIEW
SIDE VIEW
5”
Combustible Material
May Overlap The
Face Bottom Up To 2”
Below The Face Opening
No Material
Allowed in
This Area
1/2” Clearance
1/2” Airspace Clearance
To Sides And Back
Nailing Flange May
Make Direct Contact
With Combustible
Framing
place, the framing height must be increased
from 46-1/2" to 47-1/4", when installing the
drain pan. An additional space below the
fireplace will also be required to plumb a
drain line.
Step 1. Seal all joints, gaps and corners around
the bottom of the drain pan before
positioning the fireplace on its location
(Figure 3 ).
Step 2. On the exposed drain hole, install a PVC
threaded coupling reducer, 3/4" x 1/2"
going from the top of the pan down
through the hole. Apply a siliconebased sealant around the base and
threads before installation.
Step 3. Holding the reducer coupling with a
wrench, thread a 3/4", 90 degree, PVC
elbow to the reducer until it is tight to
the metal.
Step 4. Add additional piping to route the drain
to an appropriate location.
NOTE: To assure proper drainage, the replace
must be installed on a leveled surface.
CLEARANCES
Minimum clearance to combustibles for the
fireplace is as follows; sides and back – 1/2"
(13mm), combustible oor – 0" (0mm), adjacent wall 6" (152mm), ceiling – 50" (1270mm).
Refer to Figure 4 on this page and Figure 18
on page 13 for more detail.
NOTE: Clearance behind the nailing ange for
both replace models is 1/2" (13mm).
NOTE: Adjacent wall considerations are for an
adjacent wall to only a single side. Walls should
not be placed at the minimum distance on both
sides of the replace. Allow at least 4 feet on
one side of the replace.
Figure 3
Figure 4
5
NOTE: DIAGRAMS & ILLUSTRATIONS NOT TO SCALE.
Page 6

CLEARANCE SPECIFICATIONS
FP
= FIREPLACE OPENING
X
= AIR SUPPLY INLET
= AREA WHERE FIREPLACE IS NOT PERMITTED
FP
(See Note 2)
D
L
A
H
M
X
J or K
I
G
F
FP
FP
FP
FP
FP
B
B
B
A = 2 in. . . . . . . . . . clearances above grade,
veranda, porch, deck or
balcony.
B = 12 in. . . . . . . . . . clearances to window or door
that may be opened, or to
permanently closed window.
36 in. . . . . . . . . . vinyl windows or siding.
D = 47 in. . . . . . . . . . vertical clearance to unventi-
lated soffit or to ventilated soffit
located above the fireplace.
60 in. . . . . . . . . . vinyl clad soffits.
F = 9 in. . . . . . . . . . clearance to outside corner.
G = 6 in. . . . . . . . . . clearance to inside corner.
48 in. . . . . . . . . . vinyl windows or siding.
H = 3 ft. (Canada). not to be installed above a gas
meter/regulator assembly within
3 ft (914 mm) horizontally from
the center line of the regulator.
I = 3 ft. (USA)
6 ft. (Canada)
clearance to service regulator
vent outlet and electric service.
J = 9 in. (USA)
12 in. (Canada)
clearance to non-mechanical air
supply inlet to building or the
combustion air inlet to any other
appliance.
K = 3 ft. (USA)
6 ft. (Canada)
clearance to a mechanical air
supply inlet.
L* = 54 in. . . . . . . . . . clearance above paved sidewalk
(See note 1) or a paved driveway located on
public property.
M** = 47 in. . . . . . . . . . clearance under veranda, porch,
deck, balcony or overhang.
Not allowed: . . . . . . vinyl.
P = 92 in.
* A fireplace shall not open directly above a sidewalk or paved
driveway which is located between two single family dwellings
and services both dwellings.
* * Only permitted if veranda, porch, deck or balcony is fully open
on a minimum of 2 sides beneath the floor, or if the screened
porch guidelines are followed.
Note 1: Local codes or regulations may require different clearances.
Note 2: Fireplaces
in an alcove space (spaces open only on one
side and with an overhang) are permitted with the dimensions
specified for vinyl or non-vinyl siding and soffits. 1) There must
be a 3 ft minimum between terminations or between the
fireplace and termination. 2) All mechanical air intakes within
10 ft of the top of the fireplace opening must be a minimum of
3 ft below the top of the fireplace opening.
3)
All gravity air intakes within 3 ft of the fireplace must
be a minimum of 1 ft below the face top opening.
This fireplace is approved for installation in screened porches with the
following guidelines:
Minimum porch area - 96 sq ft
Minimum ceiling height - 92 in.
Minimum of two walls must be screened or open
Minimum top of screen height, side walls - 6 ft 8 in.
Minimum screen area - 64 sq ft
Note: There may be some odor and small amounts of soot associated
with burning the fireplace in a screened porch. Ensuring good cross
draft ventilation and routine maintenance of the fireplace will maximize
comfort and cleanliness.
. . . .
. . . .
Q = 72
in.
C = 72 in. . . . . . . . . . clearance below an
opperable window.
.
. . . .
C
P
G
Q
A
6
NOTE: DIAGRAMS & ILLUSTRATIONS NOT TO SCALE.
Page 7

Right Side
Front Corner
Of Fireplace
Framing
3-3/4"
(95 mm)
1-3/4"
(44 mm)
FIREPLACE INSTALLATION
Step 1. Frame these appliances as illustrated in
Figures 7 through 9. All framing details must
allow for a minimum clearance to combustible
framing members, as shown in Figure 4 on
page 5. Also refer to Fireplace Specifications
on Page 8. Headers may be in direct contact
with the appliance top spacers but must not be
supported by them or notched to fit around them.
All construction above the appliance must be
self supporting. DO NOT USE THE APPLIANCE
FOR STRUCTURAL SUPPORT.
NOTE: The framed depth from a framed wall,
must always be measured from a nished
surface. If a wall covering such as durrock is
to be attached to the rear wall, then the depth
must be measured from the wall surface. It is
important that this dimension be exact.
NOTE: Non-combustible framing members are
not required, but are recommended.
Step 2. Level the firebox by checking the top
edge of the firebox. Shim if necessary.
Step 3. The fireplace should be secured to the
side framing members, using the full length
nailing ange located on both sides of the
fireplace. Use 8d nails, or screws.
IMPORTANT: UNDER NO CIRCUMSTANCES
SHALL THE FIREBOX TOP SPACERS BE REMOVED OR MODIFIED. THE HEADER MAY BE
IN DIRECT CONTACT WITH THE TOP SPACERS
BUT MUST NOT BE SUPPORTED BY THEM OR
NOTCHED TO FIT AROUND THEM.
Step 4. Identify the desired location for the
battery pack/ON/OFF switch junction box. This
should be easily accessible and connivent
for use. Avoid installing where the opening
could be blocked by snow, bushes, etc. Also,
considerations need to be made to avoid water
infiltration. The electrical junction box must be
positioned within range of the electrical umbilical cord (9 feet). Route the umbilical cord to
the box to ensure proper length. Secure the
umbilical cord per appropriate local and national
electrical codes.
ROUTING GAS LINE
Route a 1/2" (13 mm) gas line along the inside
of the right side framing as shown in Figure
5. Gas lines must be routed, constructed and
made of materials that are in strict accordance
with local codes and regulations.
All appliances are factory-equipped with a
exible gas line connector and 1/2" shutoff
valve. (See Figure 12 on page 11).
Figure 5
NOTE: An addiional inlet has been provided on
the left side (see Figure 6 ).
7
NOTE: DIAGRAMS & ILLUSTRATIONS NOT TO SCALE.
Page 8

FIREPLACE SPECIFICATIONS
BC
C
Top View
1 (25)
7-1/16
(179)
20
(508)
Top Stand-Off
Spacers (4
places)
To p of Firebox
Opening
Dimensions - Inches (millimeters)
Dimensions - Inches (millimeters)
Model No.A
Model A B C
36” Model
VRE4336
42” Model
VRE4342
Model
Model Ship. Wt. Shipping Volume
36” Model
VRE4336 200 lbs
42” Model
VRE4342 230 lbs
37
(940)
43
(1092)
200 lbs
230 lbs
41-3/4
(1061)
47-3/4
(1213)
37
(940)
43
(1092)
Weight And Volume
Ship. Weight (lbs)
41-3/4
(1061)
47-3/4
(1213)
Shipping Volume
35 Cu. Ft.
35 Cu. Ft.
38 Cu. Ft.
38 Cu. Ft.
23-1/2
23-1/2
(597)
(597)
29-1/2
(749)
29-1/2
(749)
5
(127)
28-1/2
(724)
5-3/4
(146)
Figure 6
A
B
Front View
Bottom of
Firebox
Opening
5-3/4
(146)
41-5/16
(1049)
34-1/4
(870)
1-3/4
11-15/16
(303)
Gas Line
Access (Both Sides)
4-3/8
(111)
Right Side View
Access Opening for
Umbilical Cord -
Right Side Only
2
(51)
8-1/4
(210)
Left Side Gas Inlet
8
NOTE: DIAGRAMS & ILLUSTRATIONS NOT TO SCALE.
Page 9

FRAMING SPECIFICATIONS
Opening VRE4336 VRE4342
A 42-3/4" (1086) 48-3/4" (1238)
B 46-1/2" (1181) 46-1/2" (1181)
C 23-9/16" (599) 29-9/16" (751)
D 11-1/4" (286) 14-1/4" (362)
E 63-1/2" (1613) 69-1/2" (1765)
F 31-3/4" (807) 34-3/4" (883)
G 20-1/2"( 521) 20-1/2"( 521)
H 44-3/16" (1122) 49-1/8" (1248)
Table A - This Table Corresponds To Figures 7,8 and 9
Corner
Figure 8
Installation
H
Back Wall Of
Chase/Enclosure
Including Finishing
Materials If Any
D
F
G
C
A
E
Rough Framing Face
(Unfinished Shown)
Figure 7
B*
A
* Increase Framing Height By 3/4”
When Using Optional Drain Pan
Header
Parallel Installation
Rough Framing Face
(Unfinished Shown)
C
A
Figure 9
Figures 7, 8 and 9 Correspond To Table A.
Back Wall Of
Chase/Enclosure
Including Finished
Materials - If Any
G
NOTE: DIAGRAMS & ILLUSTRATIONS NOT TO SCALE.
9
Page 10

BROWN
BROWN
BLACK
WEATHER
SEAL
COVER
REMOTE
WALL
SWITCH
REMOTE WALL SWITCH
D-CELL BATTERIES
BATTERY
WALL SWITCH BOX
WALL SWITCH BOX
BLACK
BLACK
IGNITER MODULE - 3V
RED
PILOT
IN
OUT
VENT
LO
HI
TH
TP
TH
TP
IN
ORANGE
BLACK
GREEN
BLACK JUMPER
HIGH LIMIT
SWITCH
UMBILICAL CORD (9 Feet)
NOTES:
1. If any of the original wire as supplied must be replaced, use Type AWM 105°C - 18 gage wire ONLY.
2. Electrical Rating: 3V DC.
CAUTION: label all wires prior to disconnection when servicing controls. Wiring errors can cause
improper and dangerous operation. Verify proper operation after servicing.
Schematic Representation Only
ELECTRONIC GAS CONTROL VALVE - DEXEN
PILOT TUBE
(THTP)
(TP)
(TH)
PILOT BURNER
IGNITER-SENSOR
ASSEMBLY
PILOT SENSOR CABLE
SPARK WIRE CABLE
FLAME
SENSOR
IGNITER
ROD
FIELD WIRING
Switch
Cover
Weather Seal
Orient Batteries Vertically
To Fit Within Box
CAUTION: Label all wires prior to disconnection when servicing controls. Wiring errors
can cause improper and dangerous operation.
Verify proper operation after servicing.
Refer to Figure 10 for the wiring schematic
for these fireplaces.
This fireplace is completely wired internally.
On the right hand side of the fireplace, at the
rear, are four (4) wires required to connect the
Battery and switch for operation.
Two brown wires are for the connection of the
switch. These are labeled SW and SW. A black
and red pair are for connection to the battery
pack. These are labeled (+) and (–).
These wires are for low voltage current. An
electrical box has been provided to contain both
the switch and battery pack. Mount the box in
an appropriate location within the length of the
wiring provided. Feed all four wires through one
of the lower inlets to the box. Connect the switch
wires to the switch and the corresponding (+),
(–) to the battery holder.
ELECTRONIC IGNITION WIRING DIAGRAM
Figure 10
Install two D-cell batteries (not provided) and
test the switch before closing the switch box
(refer to Figure 11 ). The igniter should spark
to the pilot when the switch is on.
Figure 11
10
NOTE: DIAGRAMS & ILLUSTRATIONS NOT TO SCALE.
Page 11

CONNECTING GAS LINE
Access
Cover
Control
Valve
Refractory
Cover
Gas Flex Line Connector
Gas
Stub
1/2" x 3/8" Flare
Shut-Off Valve
3/8" Flex Tubing
3/8" NPT x 3/8"
Flare Fitting
3/8" Nipple
3/8" Union
3/8" Close Nipple
3/8" Shut-Off Valve
1/2" x 3/8"
Reducer
Gas
Valve
Codes require a shut-off valve mounted in the
supply line. Figure 12 illustrates two methods
for connecting the gas supply. The ex-line
method is acceptable in the U.S., however,
Canadian requirements vary depending on
locality. Installation must be in compliance
with local codes.
These appliances are equipped with a gas ex
line for use (where permitted) in connecting the
unit to the gas line. A gas ex line is provided
to aid in attaching the direct vent appliance to
the gas supply. The gas ex line can only be
used where local codes permit. See Figure 12
for ex line description. The ex line is rated
for both natural and propane gas. A manual
shut off valve is also provided with the ex line.
The gas control valve is located under the
refractory cover in front of the burner.
To access the valve, lift out the center refractory
and remove the access cover (see Figure 13 ).
The control valves have a 3/8" (10 mm) NPT
thread inlet port.
Figure 12 - GAS CONNECTION
Secure all joints tightly using appropriate
tools and sealing compounds (ensure propane
resistant compounds are used in propane
applications).
Turn on gas supply and test for gas leaks, using a gas leak test solution (also referred to as
bubble leak solution). NOTE: Using a soapy
water solution (50% dish soap, 50% water)
is an effective leak test solution but it is not
recommended, because the soap residue that
is left on the pies/fittings can result in corrosion over time. Never use an open flame to
check for leaks.
A. Light the appliance (refer to the lighting
instructions label in the control compartment
or in the Care and Operation Instructions).
B. Brush all joints and connections with the
gas leak test solution to check for leaks. If
bubbles are formed, or gas odor is detected,
turn the gas control knob to the “OFF” position. Either tighten or refasten the leaking
connection and retest as described above.
C. When the gas lines are tested and leak free,
be sure to rinse off the leak testing solution.
Figure 13 - VALVE ACCESS
11
NOTE: DIAGRAMS & ILLUSTRATIONS NOT TO SCALE.
Page 12

WARNING
DO NOT OPERATE THE FIREPLACE
FOR ANY EXTENDED PERIOD OF TIME
WITHOUT THE VOLCANIC STONE IN
PLACE. THE PAN CAN OVER HEAT AND
MAY WARP AND THE FIREPLACE MAY
SHUT OFF AUTOMATICALLY.
INSTALLING THE LOGS
After verifying that the fireplace operates
properly, replace the cover and set the bottom
refractory components in place.
Use two (2) bags of volcanic stone to fill the
bottom of the burner tray to completely cover
the burner tube. Level the volcanic stone evenly.
Place the rear log approximately centered as
shown in Figure 14.
Rear Log
Figure 14
Place the base log approximately as shown in
Figure 15.
The remaining logs can be placed across the
rear and base log approximately as shown in
Figure 16. The exact position of these logs is
not critical. Due to the nature of an outdoor
environment, the ame will never be strictly
controlled. You may need to reposition the
logs to get the effect you find most desirable.
A more detailed description is provided in the
Care and Operation manual.
CAUTION: LOGS GET HOT WHILE THE FIREPLACE IS IN OPERATION. DO NOT ATTEMPT
TO ADJUST OR MOVE THE LOGS WHILE THE
FIREPLACE IS HOT.
Figure 15
Top Left Log
Base Log
Top Center Log
Top Right Log
12
Figure 16
NOTE: DIAGRAMS & ILLUSTRATIONS NOT TO SCALE.
Page 13

CHECKING APPLIANCE OPERATION
ELECTRONIC
Pilot
Hood
Sensor
Igniter
6" Minimum
For Combustible
Materials
12" Max.
3-3/4" Max.
See Note
29" Min.
Wall
Switch
5"
Min.
Note: The Area Above The Face To The Top Of The Spacers
Must Be Non-Combustable Materials
With gas line installed run initial system checkout before installing any additional accessories. Follow the lighting instructions provided
in the Care and Operation Instructions.
NOTE: Lighting Instructions are also found on
the literature tag tied to the gas piping next
to the gas valve. To access the tag, open the
lower control compartment door (refer to
Figure 13 - Valve Access ).
When first lighting the appliance, it will take
a few minutes for the line to purge itself of
air. Once purging is complete, the pilot and
burner will light and operate as indicated in
the instruction manual. Subsequent lighting
of the appliance will not require such purging.
Inspect the pilot ame (remove logs, if necessary, handling carefully).
After the logs have been placed and the fireplace
has been checked for proper ame presentation, use the remaining volcanic stone to fill in
voids and spaces. Remember, you may need
to access the high/low ame control beneath
the refractory cover.
Carbon Monoxide Poisoning: Early signs
of carbon monoxide poisoning are similar
to the flu with headaches, dizziness and/
or nausea. If you have these signs, obtain
fresh air immediately. Turn off the gas supply to the appliance and have it serviced by
a qualified professional, as it may not be
operating correctly.
FIREBOX FINISHES
There are a wide variety of "finished looks" for
your outdoor fireplace, from formal wall decor
with elaborate mantels to rustic wood paneling
or warm brick facings.
Only noncombustible materials like marble,
stone, tile, brick, etc. may overlap the top
and sides of the front facing. Seal all joints
between the black facing and wall surrounds
to prevent air intrusion. Use noncombustible
caulking materials only to seal the metal facing
to the surround material on the finished wall.
See Figure 18.
CAUTION: DO NOT BLOCK THE FACE OPENING ON THESE FIREBOXES. DOING SO MAY
CREATE A POTENTIAL FIRE HAZARD.
Electronic Appliance Checkout
To light the burner, turn ‘ON’ the remote wall
switch. The battery will energize a spark that
will light the pilot. The pilot ame will engulf the
sensor and open the main valve. Within seconds
the main burner will light. Ensure the igniter
lights the pilot. The pilot ame should engulf
the sensor as shown in Figure 17.
Figure 17
Figure 18 Clearances To Combustibles
13
NOTE: DIAGRAMS & ILLUSTRATIONS NOT TO SCALE.
Page 14

INSTALLATION ACCESSORIES
AND COMPONENTS
Drain Pan
The drain pan is used with the appliance.
Drain Pan
Cat. No. Model Description
H4651 DPSS36 Drain Pan (36)
H4652 DPSS42 Drain Pan (42)
14
NOTE: DIAGRAMS & ILLUSTRATIONS NOT TO SCALE.
Page 15

Remove Tube
Regulator
Orifice
Remove Clip
Shutter
Opening
GAS CONVERSION KITS
WARNING
This conversion kit shall be installed by a qualified service agency in
accordance with the manufacturer’s instructions and all applicable codes
and requirements of the authority having jurisdiction. If the information in
these instruction is not followed exactly, a fire, explosion or production of
carbon monoxide may result causing property damage, personal injury
or loss of life. The qualified service agency is responsible for the proper
installation of this kit. The installation is not proper and complete until the
operation of the converted appliance is checked as specified in the manufacturer’s instructions supplied with the kit.The qualified service agency
performing this installation assumes responsibility for this conversion.
AVERTISSEMENT
Cette trousse de conversion doit être installée par un technicien agréé,
selon les instructions du fabricant et selon toutes les exigences et tous les
codes pertinents de l’autorité compétente. Assurez-vous de bien suivre
les instructions dans cette notice pour réduire au minimum le risque
d’incendie, d’explosion ou la production de monoxyde de carbone pouvant
causer des dommages matériels, des blessures ou la mort. Le tecnicien
agréé est responsable de l’installation de cette trousse. L’installation n’est
pas adéquate ni complète tant que le bon fonctionnement de l’appareil
converti n’a pas été vérifié selon les instructions du fabricant fournies avec
la trousse. Le fournisseur de service qualifié ayant réalisé l'installation
assume les responsabilités liées à la conversion.
In Canada:
THE CONVERSION SHALL BE CARRIED OUT
IN ACCORDANCE WITH THE REQUIREMENTS
OF THE PROVINCIAL AUTHORITIES HAVING
JURISDICTION AND IN ACCORDANCE WITH
THE REQUIREMENTS OF THE CAN/CGA-B149.1
AND .2 INSTALLATION CODE.
LA CONVERSION DEVRA ÊTRE EFFECTUÉE
CONFORMÉMENT AUX RECOMMANDATIONS
DES AUTORITÉS PROVINCIALES AYANT
JURIDICTION ET CONFORMÉMENT AUX
EXIGENCES DU CODE D'INSTALLATION CAN/
CGA-B149.1 ET .2.
Gas conversion kits are available to adapt your
appliance from the use of one type of gas to
the use of another. These kits contain all the
necessary components needed to complete the
task including labeling that must be affixed to
ensure safe operation.
Step 1. Turn off the gas supply to the appliance.
Step 2. Carefully remove the logs. Exercise
care so as not to break the logs.
Step 3. Refer to Figure 19.
Remove the burner assembly with attached
venturi tube.
Natural to Propane Gas Conversion Kits
Model No. Unit Type Cat. No.
VRE4336 GCK-DB078P H4916
VRE4342 GCK-DB078P H4916
Propane to Natural Gas Conversion Kits
Model No. Unit Type Cat. No.
VRE4336 GCK-DB140N H4915
VRE4342 GCK-DB140N H4915
Figure 19
Electronic Appliances
Step 4. Dexen Electronic Valves - See Figure
20 and the instructions provided with the kit.
Remove and discard the two pressure regulator
mounting screws. Remove the pressure regulator and diaphragm. Discard all removed components. Ensure the rubber gasket installed on
the back of the replacement pressure regulator
is properly positioned. Install the new pressure
regulator using the new screws supplied with
the kit. Tighten screws to 25 In. lb. torque.
NOTE: Natural gas regulators are identied with
a blue dot. Propane regulators have a red dot.
Step 5. See Figure 21 and replace the pilot
orifice as follows: Remove pilot hood assembly
by grasping the hood and pulling the assembly
straight up. Under the hood is the pilot orifice.
With caution and using a magnetic screwdriver,
undo the pilot orifice and remove it from the
assembly. Carefully replace the orifice with the
one provided with the kit. Press the pilot hood
back over the assembly. The orientation should
be aligned as shown in Figure 21. Exercise ex-
treme care to prevent damage to or breakage
of the igniter assembly.
NOTE: Propane pilot orices are identied with
a countersink in the head. Natural gas orices
do not have this countersink. See Figure 21.
Kit part numbers are listed here and the following steps detail the conversion procedure.
15
NOTE: DIAGRAMS & ILLUSTRATIONS NOT TO SCALE.
Page 16

Step 6. (Refer to Figure 19 on page 15 )
ELECTRONIC PILOT
Pilot
Hood
Sensor
Igniter
PROPANE
NATURAL
A. Remove the orifice from the manifold with
a 1/2" deep throat socket. See the following
table for orifice sizes for natural and propane
models. Figure 22 illustrates the orifice. Use
pipe joint compound or Teon tape on all
pipe fittings before installing (ensure propane
resistant compounds are used in propane applications, do not use pipe joint compounds
on are ttings).
B. Retrieve the burner and slide the venturi tube
over the orifice. Secure the burner in place with
the clip shown in Figure 19.
Step 7. Reassemble the remaining components
by reversing the procedures outlined in the
preceding steps.
Ground
(TP)
Gas Outlet
To Burner
Figure 20
Pilot Stage
Terminal
TP
Burner Stage
Terminal
TH
TP
TH
Regulator
Mounting Screw
Pressure-Tap
(Inlet)
HI
LO
VENT
IN
OUT
Pressure-Tap
(Manifold)
Pilot Gas
Outlet
PILOT
IN
Supply
Gas
Inlet
Burner Orifice Sizes
Elevation 0-4500 feet ( 0-1372 meters)
Model Nat.Gas
drill size (inches)
VRE4336
VRE4342
#28 (.1405") #47 (.0785")
#28 (.1405") #47 (.0785")
Propane
drill size (inches)
IHP reserves the right to make changes at any time, without notice, in design, materials,
specifications, prices and also to discontinue colors, styles and products. Consult your
local distributor for fireplace code information.
Printed in U.S.A. © 2014 IHP LLC
P/N 506009-24 REV. NC 03/2014
16
Figure 22
NOTE: If the igniter is damaged, a replacement kit is available, order Catalog
Number 87L54.
Figure 21
NOTE: DIAGRAMS & ILLUSTRATIONS ARE NOT TO SCALE.
1508ElmHillPike,Suite108•Nashville,TN37210
P506009-24
 Loading...