

Superior O-360 SERIES, IO-360 SERIES, Vantage Engine O-360 SERIES, Vantage Engine IO-360 SERIES Overhaul Manual
Page 1
O-360 & IO-360 SERIES ENGINES
OVERHAUL MANUAL
621 South Royal Lane, Suite 100 / Coppell, TX 75019 / 800-277-5168
Manual P/N SVOHM01 Revision A, March 2005
www.superiorairparts.com
Page 2

THIS
PAGE
INTENTIONALLY
LEFT
BLANK
© March 2005 Superior Air Parts Inc.
Page 3

Overhaul Manual
O-360 and IO-360 Series Engines
Manual Number SVOHM01
Revision History
Revision
Letter
A 08/31/04 Initial Release All
Effective
Date
Description
Pages
Revised
© March 2005 Superior Air Parts Inc.
iii
General Information
Page 4

Overhaul Manual
O-360 and IO-360 Series Engines
THIS
PAGE
INTENTIONALLY
LEFT
BLANK
© March 2005 Superior Air Parts Inc.
iv
General Information
Page 5

Overhaul Manual
O-360 and IO-360 Series Engines
SAFETY ADVISORY
WARNING: BEFORE MATERIALS CALLED OUT IN THIS PUBLICATION ARE USED, KNOW THE
HANDLING, STORAGE AND DISPOSAL PRECAUTIONS RECOMMENDED BY THE
MANUFACTURER OR SUPPLIER. FAILURE TO COMPLY WITH THE
MANUFACTURERS' OR SUPPLIERS’ RECOMMENDATION CAN RESULT IN PERSONAL
INJURY.
The user must know the manufacturer or supplier information and keep to the procedures,
recommendations, warnings and cautions set forth for the use, handling, storage, and disposal of materials.
The WARNINGS used in this manual inform the user about dangerous materials or equipment that can
cause injury; they do not replace the manufacturer's instructions.
This Safety Advisory has all the warnings included in this manual.
WARNING: OPERATION OF A DEFECTIVE ENGINE WITHOUT A PRELIMINARY EXAMINATION CAN
CAUSE FURTHER DAMAGE TO A DISABLED COMPONENT AND POSSIBLE INJURY TO
PERSONNEL. MAKE SURE THOROUGH INSPECTION AND TROUBLESHOOTING
PROCEDURES ARE ACCOMPLISHED. THIS WILL HELP TO PREVENT INJURIES TO
PERSONNEL AND/OR DAMAGE TO THE EQUIPMENT.
WARNING: FUEL IS TOXIC AND FLAMMABLE. DO NOT BREATHE VAPORS. USE INA A WELL
VENTILATED AREA FREE FROM SPARKS, FLAME, OR HOT SURFACES.AVOID EYE
AND SKIN CONTACT. PUT ON SPLASH GOGGLES, SOLVENT-RESISTANT GLOVES,
AND OTHER PROTECTIVE GEAR. IN CASE OF EYE CONTACT, FLUSH WITH WATER
FOR 15 MINUTES AND SEEK MEDICAL ATTENTION. IN CASE OF SKIN CONTACT,
WASH WITH SOAP AND WATER.
WARNING: HOT OIL MAY CAUSE BURNS TO EYES AND SKIN. PUT ON SPLASH GOGGLES AND
INSULATED GLOVES, AND OTHER PROTECTIVE GEAR. IN CASE OF EYE CONTACT,
FLUSH WITH WATER FOR 15 MINUTES AND SEEK MEDICAL ATTENTION. IN CASE OF
SKIN CONTACT, WASH WITH SOAP AND WATER.
WARNING: ENGINE OIL IS HAZARDOUS AND MAY CAUSE INJURY TO SKIN AND EYES. PUT ON
PERSONNEL PROTECTIVE GEAR.
WARNING: USE THE CORRECT PERSONAL PROTECTION. HEATED PARTS WILL CAUSE BURNS.
WARNING: WHEN YOU USE COMPRESSED AIR TO CLEAN OR DRY PARTS, MAKE SURE THAT
THE PRESSURE IS NOT MORE THAN 30 PSI. DO NOT DIRECT THE AIRSTREAM AT
PERSONNEL OR LIGHT OBJECTS. PUT ON GOGGLES OR A FACE SHIELD TO
PROTECT YOUR EYES. IF YOU GET AN EYE INJURY, GET MEDICAL ATTENTION.
WARNING: LUBRICANTS ARE TOXIC AND FLAMMABLE. DO NOT BREATHE VAPORS. BEFORE
YOU USE, READ THE MATERIAL SAFETY DATA SHEET (MSDS) FROM THE
MANUFACTURER OR SUPPLIER. USE IN A WELL VENTILATED AREA FREE FROM
SPARKS. WEAR PROTECTIVE GEAR. IN CASE OF EYE CONTACT, FLUSH WITH
WATER FOR 15 MINUTES AND SEEK MEDICAL ATTENTION. IN CASE OF SKIN
CONTACT, WASH WITH SOAP AND WATER.
WARNING: USE THE CORRECT PERSONAL PROTECTION. POLISHING WILL CAUSE LOOSE
PARTICLES THAT CAN GET IN YOUR EYES.
© March 2005 Superior Air Parts Inc.
v
General Information
Page 6

Overhaul Manual
O-360 and IO-360 Series Engines
WARNING: PUT ON SAFETY GOGGLES WHEN INSTALLING OR REMOVING SAFETY WIRE.
WARNING: USE THE CORRECT PERSONAL PROTECTION EQUIPMENT TO AVOID INJURY.
ENSURE AREA IS FREE OF MOVABLE OBJECTS THAT COULD IMPACT BY
PROPELLER AIR BLAST.
WARNING: ADHESIVE SEALANT IS TOXIC AND FLAMMABLE. DO NOT BREATHE VAPORS.
AVOID EYE AND SKIN CONTACT. USE PROTECTIVE GEAR. IN CASE OF EYE
CONTACT, FLUSH WITH WATER FOR 15 MINUTES AND SEEK MEDICAL ATTENTION.
IN CASE OF SKIN CONTACT, WASH WITH SOAP AND WATER.
WARNING: SOLVENT IS TOXIC. USE IN WELL-VENTILATED AREA. PREVENT EYE AND SKIN
CONTACT AND DO NOT BREATHE VAPORS. IN CASE OF EYE CONTACT, FLUSH
WITH WATER FOR 15 MINUTES AND SEEK MEDICAL ATTENTION. IN CASE OF SKIN
CONTACT, WASH WITH SOAP AND WATER.
WARNING: DO NOT INSTALL THE IGNITION HARNESS “B” NUTS ON THE SPARK PLUGS UNTIL
THE PROPELLER INSTALLATION IS COMPLETED. FAILURE TO COMPLY COULD
RESULT IN BODILY INJURY WHEN THE PROPELLER IS ROTATED DURING
INSTALLATION.
WARNING: IF ONE SURFACE IS POLISHED TO UNDERSIZE, ALL CORRESPONDING SURFACES
MUST BE POLISHED TO THE SAME SIZE.
WARNING: PLACE A SUITABLE STAND UNDER THE AIRCRAFT TAILCONE IF NEEDED BEFORE
REMOVING THE ENGINE. THE LOSS OF WEIGHT MAY CAUSE THE AIRCRAFT TAIL
TO DROP.
WARNING: DO NOT DAMAGE THE NITRIDED SURFACES OF THE CRANKSHAFT.
WARNING: USE CORRECT PERSONAL PROTECTION. SOME CHEMICAL SOLUTIONS CAN CAUSE
EYE, SKIN, AND LUNG DAMAGE. FOLLOW THE MANUFACTURER’S INSTRUCTIONS
FOR EACH STRIPPING SOLUTION.
WARNING: USE THE CORRECT PERSONAL PROTECTION. USE OF A HAMMER CAN CAUSE
LOOSE PARTICLES THAT CAN GET IN YOUR EYES.
WARNING: DO NOT ROTATE ENGINE OR CRANKSHAFT BEFORE REMOVAL OF TIMING
LOCATOR PINS.
WARNING: TO PREVENT THE POSSIBILITY OF SERIOUS BODILY INJURY OR DEATH, BEFORE
MOVING THE PROPELLER DO THE FOLLOWING:
VERIFY ALL SPARK PLUG LEADS ARE DISCONNECTED. •
•
VERIFY MAGNETO SWITCHES ARE CONNECTED TO MAGNETOS AND THAT THEY
ARE IN THE “OFF” POSITION AND “P” LEADS ARE GROUNDED.
•
THROTTLE POSITION “CLOSED.”
•
MIXTURE CONTROL “IDLE-CUT OFF.”
•
SET BRAKES AND BLOCK AIRCRAFT WHEELS. ENSURE THAT AIRCRAFT TIE
DOWNS ARE INSTALLED AND VERIFY THAT THE CABIN DOOR LATCH IS OPEN.
•
DO NOT STAND WITHIN THE ARC OF THE PROPELLER BLADES WHILE TURNING
THE PROPELLER.
vi
© March 2005 Superior Air Parts Inc.
General Information
Page 7

Section
Chapter
General Information
Sub-Section
Revision History i
Safety Advisory iii
Table of Contents v
List of Figures ix
List of Tables xi
Overhaul Manual
O-360 and IO-360 Series Engines
TABLE OF CONTENTS
Page Number
01 00 00 Introduction
02 00 00 Description and Operation
04 00 00 Airworthiness Limitations
72 00 03 Testing and Fault Isolation
About This Manual 1
Related Publications 1
Obtaining Service Information 1
Abbreviations 1
Consumable Materials List 3
General Description 1
Continued Airworthiness 1
Model Designations 1
Engine Components General Description 3
Specifications 3
Features and Operating Mechanisms 16
Mandatory Replacement Time 1
Mandatory Inspection Intervals 1
Other Mandatory Intervals or Procedures 1
Distribution of Changes to Airworthiness 1
General 1
Troubleshooting 1
04 Special Procedures
Prior to Break-In Start-Up
Break-In Ground Run
Break-In Flight Operation
© March 2005 Superior Air Parts Inc.
General Break-In Procedures 1
Special Tools and Equipment 1
Break-In Procedures 1
Post Break-In Procedures 2
1
1
1
vii
General Information
Page 8

Overhaul Manual
O-360 and IO-360 Series Engines
Chapter
TABLE OF CONTENTS (cont’d)
Page Number
Section
Sub-Section
05 Engine Removal
06 Engine Disassembly
07 Cleaning
Degreasing
Decarbonizing
Scratch and Corrosion Removal
Accessory Mounts
Fuel Injector and Primer Nozzles
Screens and Filters
Accessories
General 1
Removal 1
Preservation 1
General 1
Disassembly Materials 1
Parts for Discard 1
Special Tools and Equipment 1
General Disassembly Procedures 2
Disassembly 2
General 1
Tools and Materials 1
Cleaning Instructions 1
Preservation and Corrosion Prevention 4
1
2
2
2
3
3
3
© March 2005 Superior Air Parts Inc.
viii
General Information
Page 9

Section
Chapter
72 00 08 Inspection and Check
Sub-Section
General 1
Materials and Tools 1
General Inspection Procedures 2
General Non-Destructive Testing 2
Accessory Housing 3
Crankcase Assembly 3
Cylinder Head 6
Cylinder Head Dimensional Inspections 6
Cylinder Barrel Inspections 6
Cylinder Barrel Dimensional Inspections 7
Cylinder Assembly Inspection 7
Piston Inspections 7
Piston Dimensional Inspections 7
Valve Rockers 11
Pushrod Inspection 11
Valve Springs Inspection 11
Crankshaft 13
Crankshaft Counterbore Face Inspection 13
Camshaft Inspection 14
Connecting Rods Inspection 14
Overhaul Manual
O-360 and IO-360 Series Engines
TABLE OF CONTENTS (cont’d)
Page Number
09 Engine Assembly
10 Engine Installation
© March 2005 Superior Air Parts Inc.
General 1
Fits, Clearances and Torque Values 1
Materials Required for Assembly 1
Special Tools and Equipment 1
Engine Assembly 2
Engine Accessory Assembly Installation 46
Storage After Assembly 58
General 1
Preparing Engine for Service 1
Installation of Engine 1
ix
General Information
Page 10

Section
Chapter
72 00 11 Fits and Clearances
Sub-Section
General 1
Service Limits 1
Overhaul Manual
O-360 and IO-360 Series Engines
TABLE OF CONTENTS (cont’d)
Page Number
12 Preservation and Storage
13 Repair
Repair 1 – Threaded Area Repair and Stud Replacement
Repair 2 – Nick and Scratch Repair
Repair 3 – Crankshaft or Crankpin Repair
Repair 4 – Painted Parts
Repair 5 – Crankshaft Oil Seal Surface
Repair 6 – Cylinder Interior Surface
Repair 7 – Cylinder Head Cooling Fins
Repair 8 – Valve, Valve Seat, and Valve Guide
Repair 9 – Spark Plug Threaded Insert
Repair 10 – Rocker Bushing Replacement
Repair 11 – Connecting Rod Bushing Replacement
14 Testing
Appendix A Assembly In Process Quality Inspections
General 1
Temporary Storage 2
Indefinite Storage 3
Returning an Engine to Service After Storage 3
General 1
Repair Procedures 1
General 1
Special Tools and Equipment 1
Engine Installation and Testing Procedures 1
Engine Storage After Testing 1
5
7
9
11
13
15
17
19
27
29
31
© March 2005 Superior Air Parts Inc.
x
General Information
Page 11

Overhaul Manual
O-360 and IO-360 Series Engines
LIST OF FIGURES
Figure
02-00-00.1 Engine Model Number Designation 02 00 00 1
02-00-00.2 O-360 Engine Front View 6
02-00-00.3 O-360 Engine Left Side View 7
02-00-00.4 O-360 Engine Top View 8
02-00-00.5 O-360 Engine Rear View 9
02-00-00.6 IO-360 Engine Front View 10
02-00-00.7 IO-360 Engine Left Side View 11
02-00-00.8 IO-360 Engine Top View 12
02-00-00.9 IO-360 Engine Rear View 13
02-00-00.10 Ignition Wiring Diagram 14
02-00-00.11 Oil System Schematic 15
72-00-08.1 Reserved 08 -
72-00-08.2 Accessory Housing 4
72-00-08.3 Crankcase Bearing and Flange Surfaces 5
72-00-08.4 Cylinder Assembly 8
72-00-08.5 Piston Assembly 9
72-00-08.6 Piston Rings and Lands 10
72-00-08.7 Valve Train 12
72-00-08.8 Camshaft Assembly 15
Chapter
Section
Page
Sub-Section
72-00-09.1 Crankcase Bearing Retention Dowel 09 4
72-00-09.2 Crankshaft Bearing and Oil Pressure Relief Valve 5
72-00-09.3 Crankshaft Assembly 6
72-00-09.4 Crankshaft Thrust and Slinger Clearance 7
72-00-09.5 Crankcase Assembly 8
72-00-09.6 Connecting Rod and Piston Assembly 12
72-00-09.7 Connecting Rod Installation 13
72-00-09.8 Camshaft Assembly 14
72-00-09.9 Main Bearing Reference Marks 15
72-00-09.10 Main Bearing Installation 16
72-00-09.11 Crankcase Attaching Hardware 17
72-00-09.12 Crankcase Attaching Hardware (cont’d.) 18
72-00-09.13 Sealant Compound and Silk Thread Application 19
72-00-09.14 Crankcase Halves Assembly 20
xi
© March 2005 Superior Air Parts Inc.
General Information
Page 12

Overhaul Manual
O-360 and IO-360 Series Engines
LIST OF FIGURES (cont’d.)
Figure
72-00-09.15 Cylinder Valve Train and Spring Assembly 72 00 09 22
72-00-09.16 Piston Assembly to Connecting Rod 23
72-00-09.17 Cylinder Assembly and Head Oil Drain Line 25
72-00-09.18 Piston Assembly with Ring Compressor Tool 26
72-00-09.19 Cylinder Base Nuts Sequence of Tightening 27
72-00-09.20 Idler Gear and Tachometer Shaft Assemblies 30
72-00-09.21 Idler Gear and Tachometer Shaft Assemblies (cont’d.) 31
72-00-09.22 Accessory Drive Gear Arrangement 32
72-00-09.23 Accessory Housing 35
72-00-09.24 Oil Pump Assembly 36
72-00-09.25 Accessory Housing Gasket Trimming 37
72-00-09.26 Inner Cylinder Cooling Baffle 39
72-00-09.27 Oil Sump and Induction System 40
72-00-09.28 Oil Level Gage 41
72-00-09.29 Induction System 42
72-00-09.30 Intake Tube Assembly 43
72-00-09.31 Vacuum Pump Drive 45
72-00-09.32 Fuel Pump 47
72-00-09.33 Propeller Governor Adapter 49
72-00-09.34 Propeller Governor Oil Line 50
72-00-09.35 Oil Filter Assembly 51
72-00-09.36 Fuel Priming System 53
72-00-09.37 Carburetor Installation 54
72-00-09.38 Fuel Injection Servo Installation 55
72-00-09.39 Fuel Injection Manifold Installation 56
72-00-09.40 Magneto and Adapter Installation 59
72-00-09.41 Starter Ring Gear Alignment 60
72-00-09.43 Alternator Installation 61
Chapter
Section
Page
Sub-Section
72-00-13.1 Cylinder Interior Resurface Crosshatch 15 16
72-00-13.2 Cooling Fin Removal Maximum 18
72-00-13.3 Valve Seat Dimensions 23
72-00-13.4 Valve Guide Dimensions 24
72-00-13.5 Valve to Seat Fit Acceptable Criteria 25
© March 2005 Superior Air Parts Inc.
xii
General Information
Page 13

Overhaul Manual
O-360 and IO-360 Series Engines
LIST OF TABLES
Table
Section
Chapter
01-00-00.1 Abbreviations 01 00 00 2
01-00-00.2 Consumable Materials 3
02-00-00.1 Manufacturer’s General Specifications 02 00 00 3
02-00-00.2 Accessory Drive Specifications 4
02-00-00.3 Manufacturer’s Physical Specifications 4
02-00-00.4 Engine Accessories 4
02-00-00.5 Illustrated Views of the Engine 5
72-00-03.1 Special Tools and Equipment 72 00 03 1
72-00-03.2 Abnormal Operating Procedures 1
72-00-03.3 Engine Will Not Start 2
72-00-03.4 Rough Idling 2
72-00-03.5 Engine Not Able To Develop Full Power 2
72-00-03.6 Rough Engine Operation 3
72-00-03.7 Low Power & Engine Runs Rough 3
72-00-03.8 Low Oil Pressure On Engine Gage 3
72-00-03.9 High Oil Temperature 4
72-00-03.10 Excessive Oil Consumption 4
Page
Sub-Section
72-00-05.1 Equipment and Materials List 05 1
72-00-06.1 Disassembly Materials 06 1
72-00-06.2 Discard Parts 1
72-00-06.3 Special Tools and Equipment 3
72-00-07.1 Equipment Required for Cleaning 07 1
72-00-07.2 Materials Required for Cleaning 1
72-00-08.1 Inspection Materials 08 1
72-00-08.2 Special Tools and Equipment 1
72-00-09.1 Assembly Materials 09 1
72-00-09.2 Special Tools and Equipment 2
72-00-10.1 Equipment and Materials List 10 1
xiii
© March 2005 Superior Air Parts Inc.
General Information
Page 14

Overhaul Manual
O-360 and IO-360 Series Engines
LIST OF TABLES (cont’d)
Table
Section
Chapter
72-00-11.1 Dimensional Limits 72 00 11 1
72-00-11.2 Torque Limits 3
72-00-11.3 Backlash and End Clearance Limits 4
72-00-11.4 Valve Spring Dimensional Limits 4
72-00-11.5 Crush Type Gasket Tightening Angles 4
72-00-12.1 Storage Materials 14 1
72-00-13.1 List of Repairs 13 2
72-00-13.2 List of Materials 2
72-00-13.3 List of Equipment 3
72-00-13.4 List of Repair Codes 3
72-00-13.5 Reserved -
72-00-13.6 Consumable Materials for Paint Procedures 11
72-00-13.7 Exhaust Valve Seat Standard and Oversize Dimensions 20
72-00-13.8 Intake Valve Seat Standard and Oversize Dimensions 20
72-00-13.9 Exhaust Valve Guide Standard and Oversize Dimensions 21
72-00-13.10 Intake Valve Guide Standard and Oversize Dimensions 21
Page
Sub-Section
© March 2005 Superior Air Parts Inc.
xiv
General Information
Page 15

Overhaul Manual
O-360 and IO-360 Series Engines
INTRODUCTION
About This Manual
The purpose of this Overhaul Manual is to
provide the necessary instructions for major
repair and replacement of Superior Vantage
O-360 and IO-360 series engines. Maintenance
information may be found in the Maintenance
Manual, SVMM01.
The information in this publication is based on
data available at the time of publication and is
updated, supplemented, and automatically
amended by Service Bulletins and Publication
Revisions that are issued by Superior Air Parts
Inc.
This manual is divided into separate sections
relating to the general and specific overhaul
instructions required for the engine. These
general and specific instructions are generally
organized and numbered per the
recommendations of the General Aviation
Manufacturers Association (GAMA). In this way,
information may be located in a conventional
manner to aid in both accuracy and timeliness.
Page numbering is organized within each
section. The section number (e.g., 72-00-01) is
displayed in the right hand section of the footer
on each page. The page number is displayed in
the center of the footer on each page.
Superior Air Parts has made clear and accurate
information available for those who maintain,
own and repair the Vantage O-360 and IO-360
Series Engines. Superior Air Parts values your
input regarding revisions and additional
information for our manuals. Please forward
your comments and input to:
Superior Air Parts
Attn: Engineering Department
621 South Royal Lane Suite 100
Coppell, Texas 75019
Related Publications
The following are related engine and accessory
publications.
O & IO-360 Installation and Operation Manual,
SVIOM01
O & IO-360 Maintenance Manual, SVMM01
O & O-360 Illustrated Parts Catalog, SVIPC01
Unison Master Service Manual, F-1100
Unison Autolite Manual, L-1710A
Precision RSA-5 Service Manual, 15-338
Precision MA-4-5 Manual, MSAHBK-1
Champion Aerospace Service Manual, AV-6R
Kelly Aerospace Service Manual, OE-A2
Obtaining Service Information
All Vantage Series Engine manuals and service
information may be downloaded at:
www.superiorairparts.com
All Vantage Series Engine manuals and service
information may be purchased by contacting:
Superior Air Parts
621 South Royal Lane, Suite 100
Coppell, Texas 75019
or call: 972-829-4600
Accessory Information may be obtained at:
www.championaerospace.com
www.unisonindustries.com
www.skytecair.com
www.precisionairmotive.com
www.aeroaccessories.com
www.kellyaerospace.com
Abbreviations
A list of abbreviations used in this manual is
shown in Table 01-00-00.1 below.
© March 2005 Superior Air Parts Inc.
1
01-00-00
Introduction
Page 16

Overhaul Manual
O-360 and IO-360 Series Engines
Table 01-00-00.1 • Abbreviations
Abbreviation Definition
AMS Aerospace Material Standard
Assy Assembly
BTC / BTDC Before Top Center / Before Top Dead Center
CHT Cylinder Head Temperature
DIA Diameter
F Fahrenheit
Fig. Figure
Ft-Lb Foot-Pounds
IAW In Accordance With
I.D. Inside Diameter
In-Lb Inch-Pounds
Lb Pounds
No. Number
NPT National Pipe Thread
O.D. Outside Diameter
Oz. Ounce
P/N Part Number
Prop Propeller
PSI Pounds per Square Inch
RPM Revolutio ns Per Minute
SAE Society of Automotive Engineers
TIR Total Indicator Reading
UNF Unified National Fine
° Degree
© March 2005 Superior Air Parts Inc.
2
01-00-00
Introduction
Page 17
Overhaul Manual
O-360 and IO-360 Series Engines
Consumable Materials List
Refer to Table 01-00-00.2 below for consumable
materials used during repair of the Vantage O360 and IO-360 series engines.
Table 01-00-00.2 • Consumable Materials
Material Source
Acetone or Methyl Ethyl Ketone (MEK) Commercially Available
Assembly Grease – Lubriplate No. 105 Commercially Available
Cleaning Solvent Comm ercially Available
Copper Based Anti-seize, Fel-ProTM C5-A Commercially Available
Fuelube
Isopropyl alcohol Commercially Available
LoctiteTM 271, P/N 27183 Commercially Available
LoctiteTM No. 2 Gasket Sealant P/N 30514 Commercially Available
Lubricating Oil, SAE 10 Commercially Available
Lubricating Oil, SAE 50 Commercially Available
Mineral Oil (MIL-L-6082), SAE 50 weight Commercially Available
PermatexTM, P/N 27100 Commercially Available
PliobondTM #20 Commercially Available
Pre-Lube Mixture – approx. 15% pre-lubricant
(STPTM brand or equivalent) plus 85% SAE 50
straight weight mineral oil
Preservative oil mix (MIL-C-6529, type 1 plus
MIL-L-6082)
RTVTM 102 Silicon Sealant General Electric
Safety Wire (0.032) Type 304 Stainless Steel,
P/N MS20995 C32
Safety Wire (0.041) Type 304 Stainless Steel,
P/N MS20995 C41
SilasticTM 140 Sealant Commercially Available
Silk thread, size 00 (100% Silk) Commercially Available
STPTM High Viscosity Oil Treatment Commercially Available
TitesealTM No. 2 Gasket and Joint Compound
P/N T2-01
Phthalate resin-type enamel AMS3125C or
equivalent MIL-E-7729 Randolph Black (#303)
Toluene or equivalent AMS3180 (or equivalent
Federal Spec TT-T-548)
Zinc Chromate Primer Commercially Available
TM
NOTE:
Equivalent substitutes may be used.
Ohio Industrial Lubricants
Locally Prepared Mixture
Locally Prepared Mixture
Commercially Available
Commercially Available
Commercially Available
Commercially Available
Commercially Available
© March 2005 Superior Air Parts Inc.
3
01-00-00
Introduction
Page 18

Overhaul Manual
O-360 and IO-360 Series Engines
THIS
PAGE
INTENTIONALLY
LEFT
BLANK
© March 2005 Superior Air Parts Inc.
4
01-00-00
Introduction
Page 19
Overhaul Manual
O-360 and IO-360 Series Engines
DESCRIPTION AND OPERATION
General Description
Superior Vantage Engines are four-cylinder,
horizontally opposed, air-cooled, direct drive
powerplants incorporating a wet sump, bottom
mounted induction, bottom exhaust with either
carbureted or port injected fuel systems.
Provisions exist for both front and rear mounted
accessories. All engine components will be
referenced as they are installed in the airframe.
Therefore, the “front” of the engine is the
propeller end and the “rear” of the engine is the
accessory mounting drive area. The oil sump is
on the “bottom” of the engine and the cylinder
shroud tubes are on the “top”. The terms “left”
and “right” are defined as being viewed from the
rear of the engine looking toward the front.
Cylinder numbering is from the front to the rear
with odd numbered cylinders on the right side of
the engine. The direction of crankshaft rotation
is clockwise as viewed from the rear of the
engine looking forward unless otherwise
specified. Accessory drive rotation direction is
defined as viewed from the rear of the engine
looking forward.
Continued Airworthiness
Vantage Engines discussed in this document
must be installed and operated in accordance
with the limitations, conditions and operating
procedures described in the Installation and
Operation Manual (SVIOM01). They must also
be maintained in accordance with this manual
and the applicable Overhaul Manual
(SVOHM01) and other Instructions for
Continued Airworthiness. The engine’s time
between overhaul (TBO) period is initially
defined as 1000 hours. A TBO extension
program is in process.
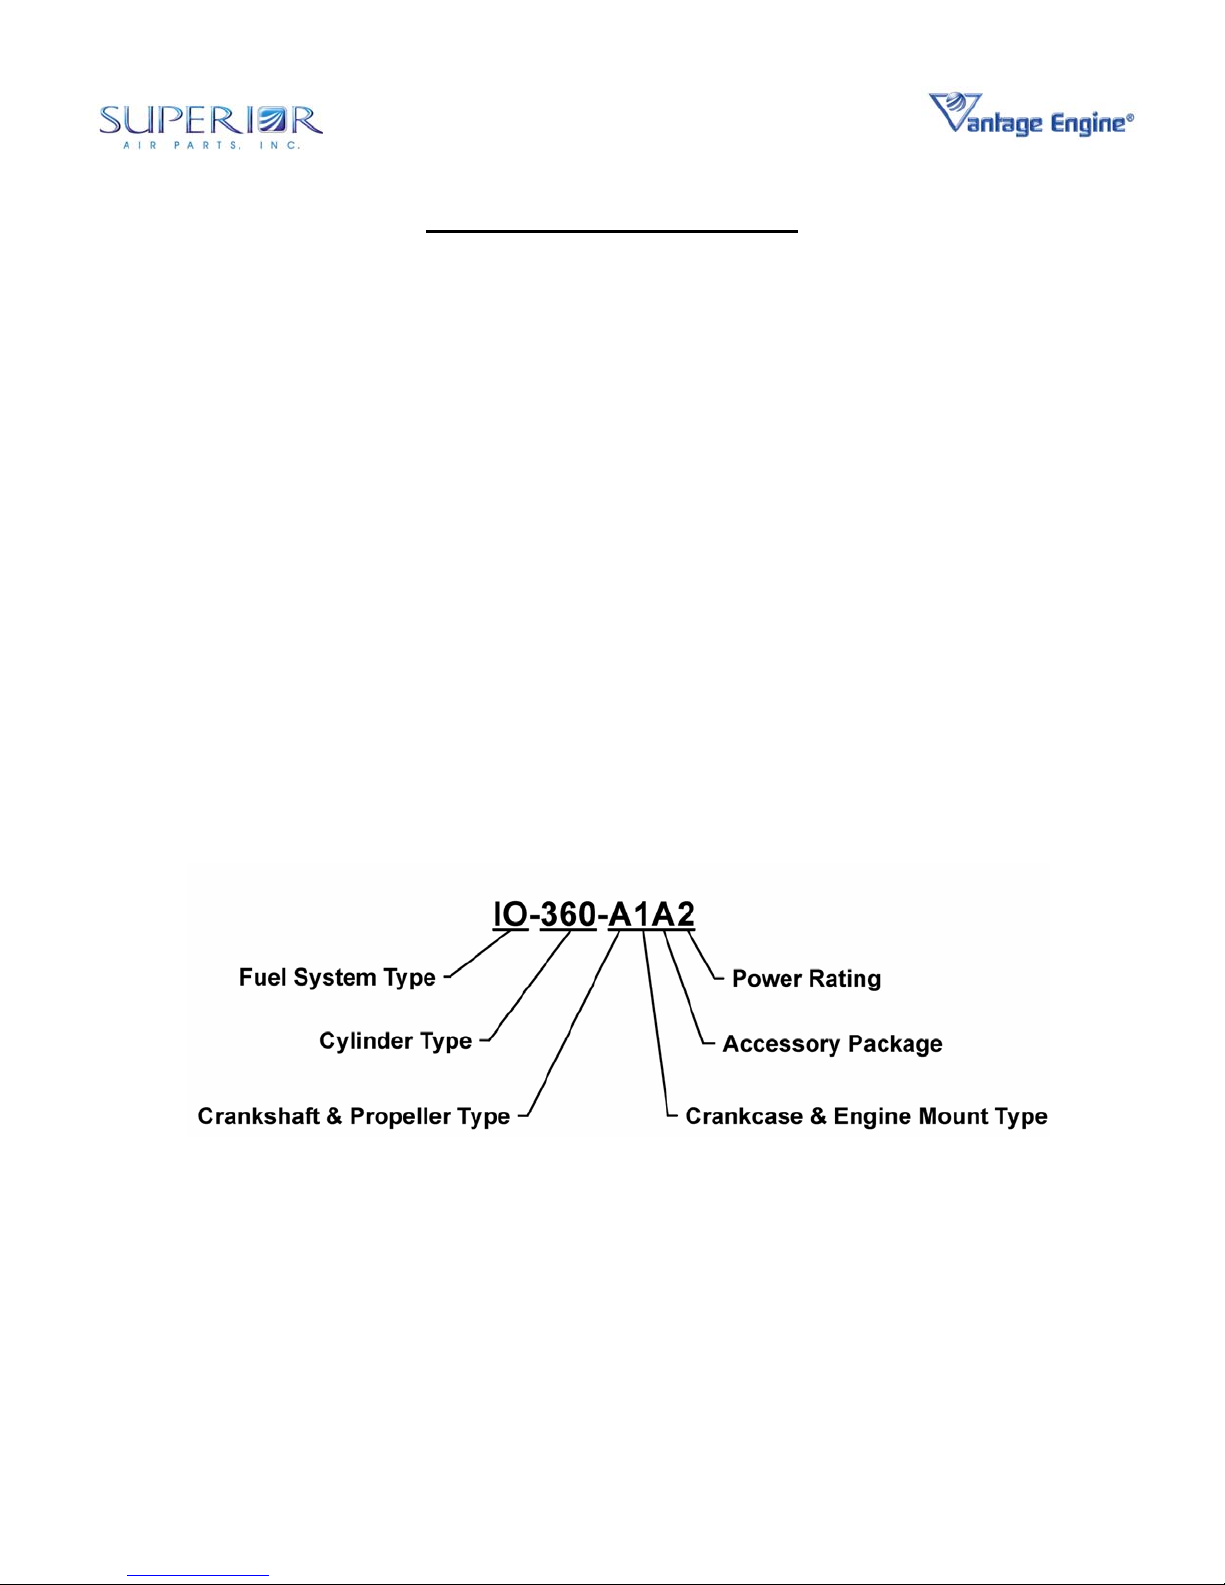
Model Designations
The model number designation is defined in a
way that the digits of the model number can
easily identify the basic configuration of the
engine as described in Figure 02-00-00.1.
Figure 02-00-00.1 • Engine Model Number Designation
© March 2005 Superior Air Parts Inc.
1
02-00-00
Description and Operation
Page 20

Overhaul Manual
O-360 and IO-360 Series Engines
Fuel System Type
IO Denotes Port Fuel Injection System and “opposed cylinder” arrangement.
O Denotes a carbureted system and “opposed cylinder” arrangement.
Cylinder Type
360 Parallel valve cylinder, 361 cubic inches.
Model Suffix
1st Digit Crankshaft & Propeller Type
A Fixed-Pitch, Thin-wall front main
B Constant-Speed, Thin-wall front main
D Constant-Speed, Heavy-wall front main
E Fixed-Pitch, Solid front main
2nd Digit Crankcase & Engine Mount Type
3rd Digit Accessory Package
4th Digit Power Rating: Piston Compression Ratio
Denotes detail engine configuration
C Fixed-Pitch, Heavy-wall front main
1 #1 Dynafocal Mount
2 #2 Dynafocal Mount
3 Conical Mount
Fuel System Ignition System
Carbureted (O-360) Fuel Injected (IO-360)
A Unison Magnetos Precision Carburetor Precision Fuel Injection
1* - 2 8.5:1 180
* For Future Use
Cylinder Type
360
CR HP
© March 2005 Superior Air Parts Inc.
2
02-00-00
Description and Operation
Page 21

Overhaul Manual
O-360 and IO-360 Series Engines
Engine Components General Description
The O-360 and IO-360 series engines are aircooled, four cylinder, horizontally opposed,
direct drive engines. See Table 02-00-00.1 for
Manufacturer’s General Specifications.
The complete engine includes the following
components and assemblies:
Crankcase Assembly
Crankshaft Assembly
Camshaft Assembly
Valve Train Assembly
Cylinder Assemblies
Connecting Rod Assemblies
Oil Sump Assembly
Intercylinder Baffles
Starter
Lubrication System (Includes Oil Filter)
Accessory Drive
Ignition System (Includes Spark Plugs)
Fuel System
Starter Support Assembly
Oil Gage
Induction System
Accessories
NOTE: Complete engine does not include outer
cylinder baffles, propeller governor, and airframe
to engine control cables, attaching hardware,
hose clamps, vacuum pump, exhaust system, or
fittings. Fuel pump is included, unless otherwise
specified, on carbureted engines. Alternator
may be included, if specified.
Specifications
The manufacturer’s physical specifications are
listed in Table 02-00-00.2 and are applicable to
the O-360 and IO-360 series engines.
Accessory Drive Specifications are provided in
Table 02-00-00.2 and is also applicable for both
O-360 and IO-360 models. Table 02-00-00.3
lists Physical Specifications for the engines and
Accessories are provided in Table 02-00-00.4.
The Model Specification Data (MSD) provides
more specific information by engine type and is
available from Superior Air Parts, Inc.
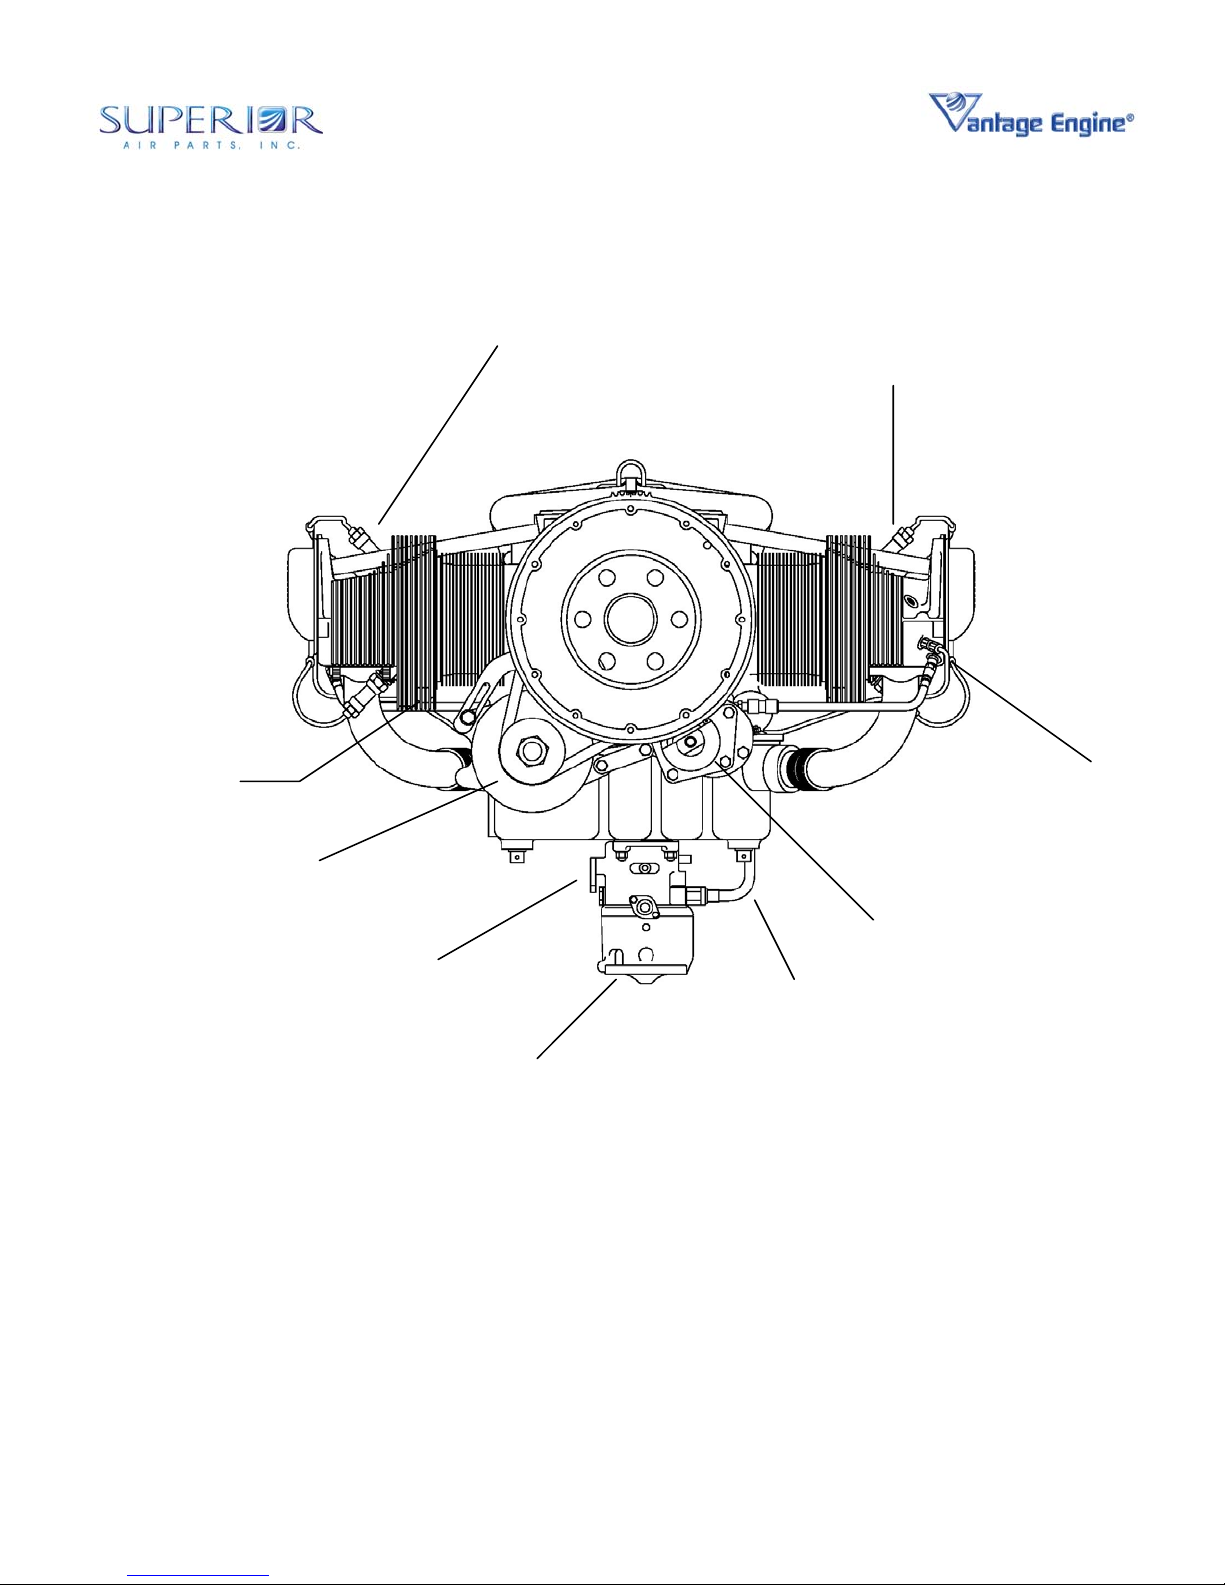
Illustrated views of the O-360 and IO-360
engines identifying key components and subassemblies are provided in Figures 02-00-00.1
thru 02-00-00.9 of this section and are listed
Table 02-00-00.5 for convenience. Figure 0200-00.10 illustrates the engine wiring diagram
and Figure 02-00-00.11 illustrates the oil system
schematic.
Table 02-00-00.1 • Manufacturer’s General Specifications
Model O-360 and IO-360
Rated Power Hp 180
Rated Speed, RPM RPM 2700
Bore, inches In 5.125
Stroke, inches In 4.375
Displacement cubic inches In
Compression Ratio 8.5:1
Firing Order 1-3-2-4
Spark timing °BTDC 25
Propeller drive ratio 1:1
Propeller drive rotation
(viewed from rear)
© March 2005 Superior Air Parts Inc.
3
3
361.0
Clockwise
02-00-00
Description and Operation
Page 22

Overhaul Manual
O-360 and IO-360 Series Engines
Table 02-00-00.2 • Accessory Drive Specifications
Accessory
Starter 16.556:1 Counter-Clockwise
Alternator (not included) 3.250:1 Clockwise
Tachometer 0.500:1 Clockwise
Magneto 1.000:1 Clockwise
Vacuum Pump (not included) 1.300:1 Counter-Clockwise
Propeller Governor (not included) 0.866:1 Clockwise
Fuel Pump (if furnished) 0.500:1 Plunger Operated
Table 02-00-00.3 • Manufacturer’s Physical Specifications
Model
O-360-Axxx 24.6 33.4 32.8 288
O-360-Bxxx 24.6 33.4 32.8 291
O-360-Cxxx 24.6 33.4 32.8 291
O-360-Dxxx 24.6 33.4 32.8 294
O-360-Exxx 24.6 33.4 32.8 295
IO-360-Axxx 24.0 33.4 32.8 290
IO-360-Bxxx 24.0 33.4 32.8 293
IO-360-Cxxx 24.0 33.4 32.8
IO-360-Dxxx 24.0 33.4 32.8 296
IO-360-Exxx 24.0 33.4 32.8 297
Height
(In)
Table 02-00-00.4 • Approved Engine Accessories
Drive
Ratio
Width
(In)
Direction of
Rotation
Length
(In)
Weight
(Lb)
293
Model
O-360
IO-360
© March 2005 Superior Air Parts Inc.
Left
Magneto
Unison
4371
Unison
4371
Right
Magneto
Unison
4371
Unison
4371
Fuel
System
Precision
MA-4-5
Precision
RSA-5
Fuel Pump
(if furnished)
Aero Acc.
AF15472
Aero Acc.
AF15473
4
Starter
SkyTec
149-12LS
SkyTec
149-12LS
Spark Plug
Harness
Unison
M4001
Unison
M4001
Alternator
(if furnished)
Kelly Aerospace
ALY8520LS
Kelly Aerospace
ALY8520LS
02-00-00
Description and Operation
Page 23

Overhaul Manual
O-360 and IO-360 Series Engines
Table 02-00-00.5 • Illustrated Views of the Engine
Engine View Figure Number Location
O-360 Engine Front View Figure 02-00-00.2 p. 7
O-360 Engine Left Side View Figure 02-00-00.3 p. 8
O-360 Engine Top View Figure 02-00-00.4 p. 9
O-360 Engine Rear View Figure 02-00-00.5 p. 10
IO-360 Engine Front View Figure 02-00-00.6 p. 11
IO-360 Engine Left Side View Figure 02-00-00.7 p. 12
IO-360 Engine Top View Figure 02-00-00.8 p. 13
IO-360 Engine Rear View Figure 02-00-00.9 p. 14
Ignition Wiring Diagram Figure 02-00-00.10 p. 15
Oil System Schematic Figure 02-00-00.11 p. 16
© March 2005 Superior Air Parts Inc.
5
02-00-00
Description and Operation
Page 24
Overhaul Manual
O-360 and IO-360 Series Engines
SPARK P LUG
SPARK PLUG
CHT PROBE LOCATION
(TYPICAL EACH HEAD)
ALTERNATOR & BELT NOT
PROVIDED WITH ENGINE
THROTTLE LEVER
FUEL LINE
CARBURETOR
Figure 02-00-00.2 • O-360 Engine Front View
STARTER
PRIMING
SYSTEM
© March 2005 Superior Air Parts Inc.
6
02-00-00
Description and Operation
Page 25
Overhaul Manual
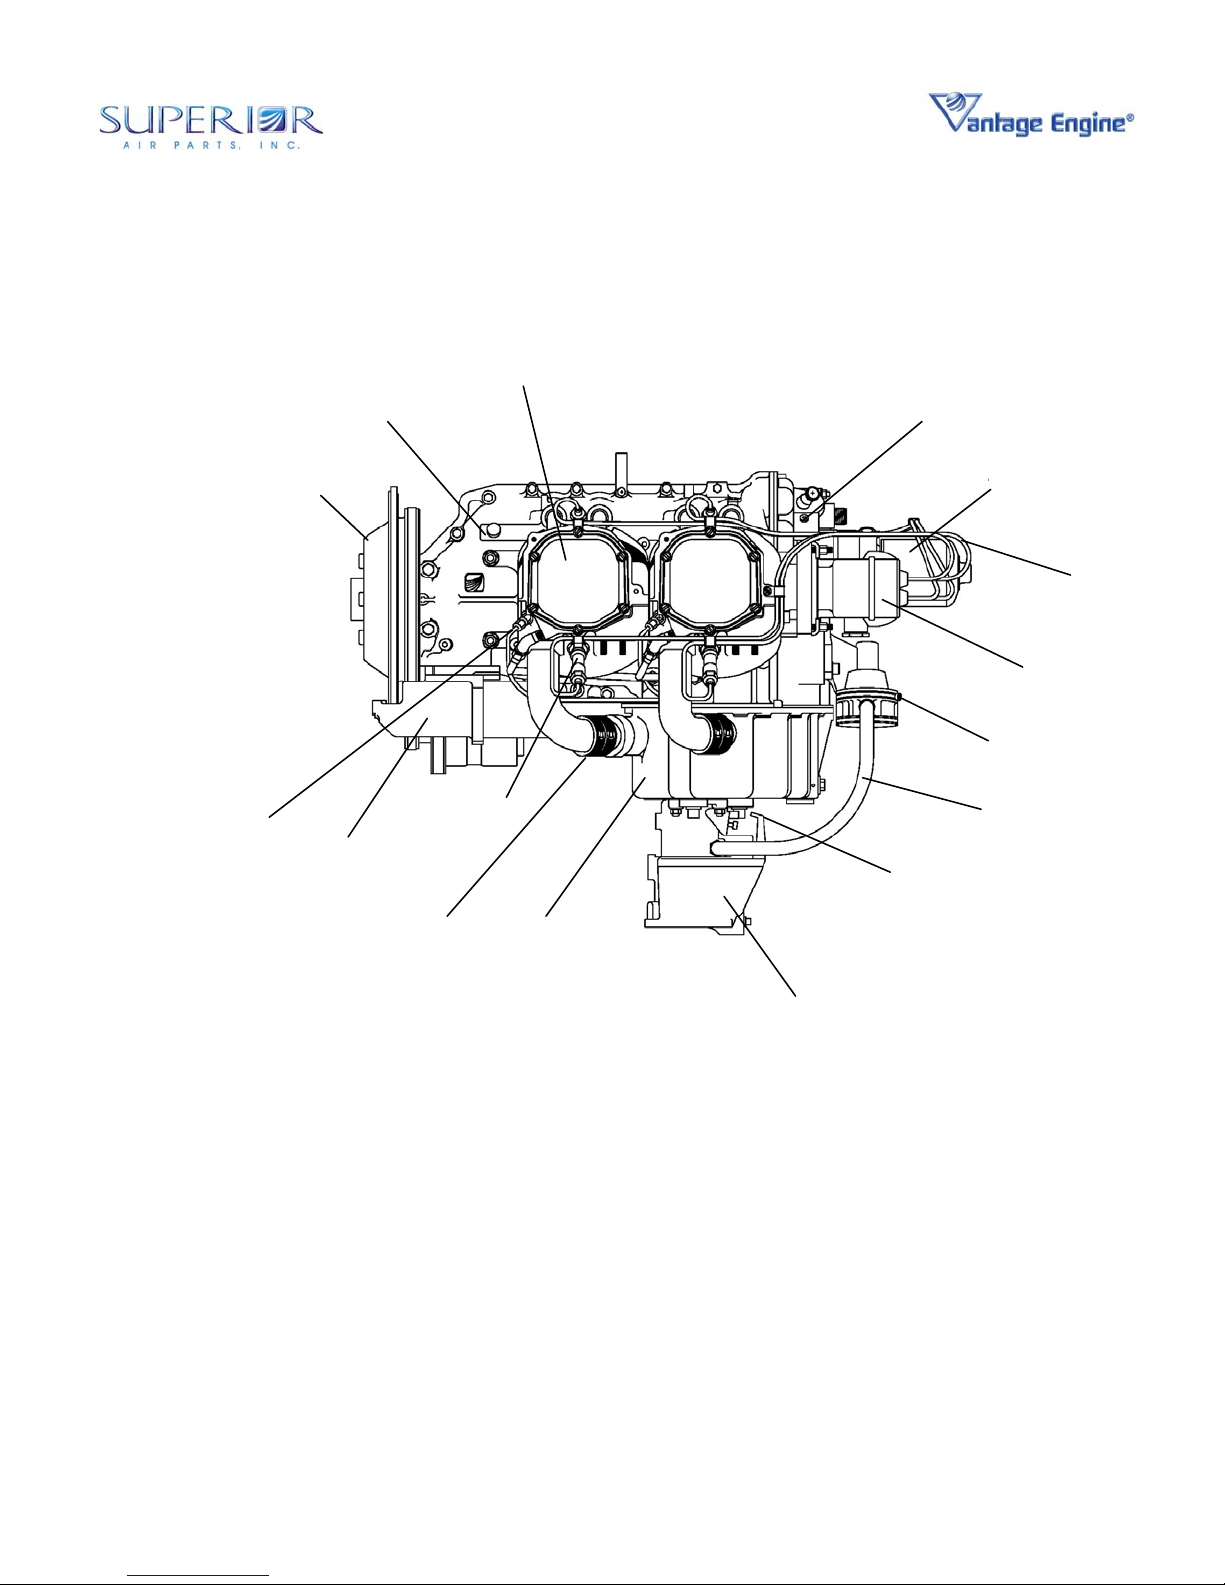
O-360 and IO-360 Series Engines
CYLINDER
CRANKCASE
ASSEMBLY
ASSEMBLY
ACCESSORY
HOUSING
STARTER SUPPORT
ASSEMBLY
PRIMING
SYSTEM
STARTER
INDUCTION
SYSTEM
SPARK P L U G
OIL SUMP
ASSEMBLY
CARBURETOR
MIXTURE
LEVER
OIL FILTER
FUEL
PUMP
FUEL
LINE
HARNESS
MAGNETO
Figure 02-00-00.3 • O-360 Engine Side View
© March 2005 Superior Air Parts Inc.
7
02-00-00
Description and Operation
Page 26
Overhaul Manual
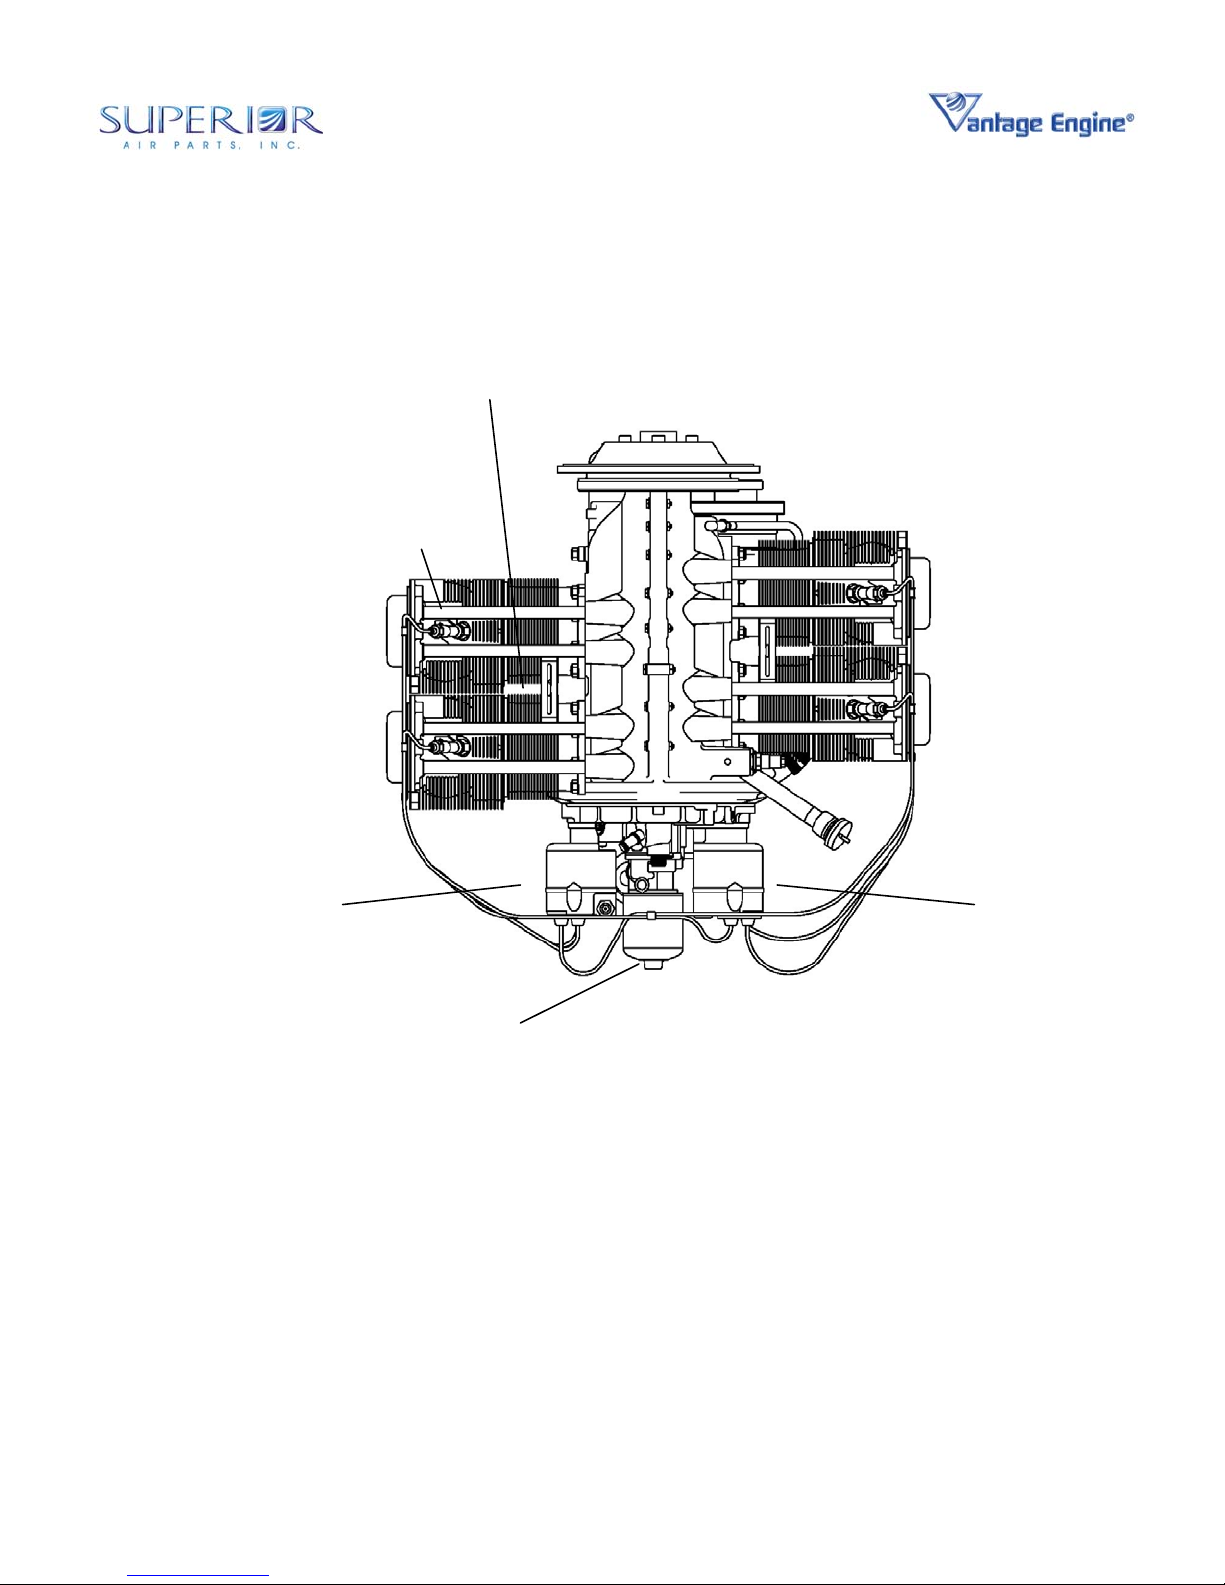
O-360 and IO-360 Series Engines
INTER-CYLINDER BAFFLE
SPARK P L U G
MAGNETO
OIL FILTER
Figure 02-00-00.4 • O-360 Engine Top View
8
© March 2005 Superior Air Parts Inc.
MAGNETO
02-00-00
Description and Operation
Page 27
Overhaul Manual
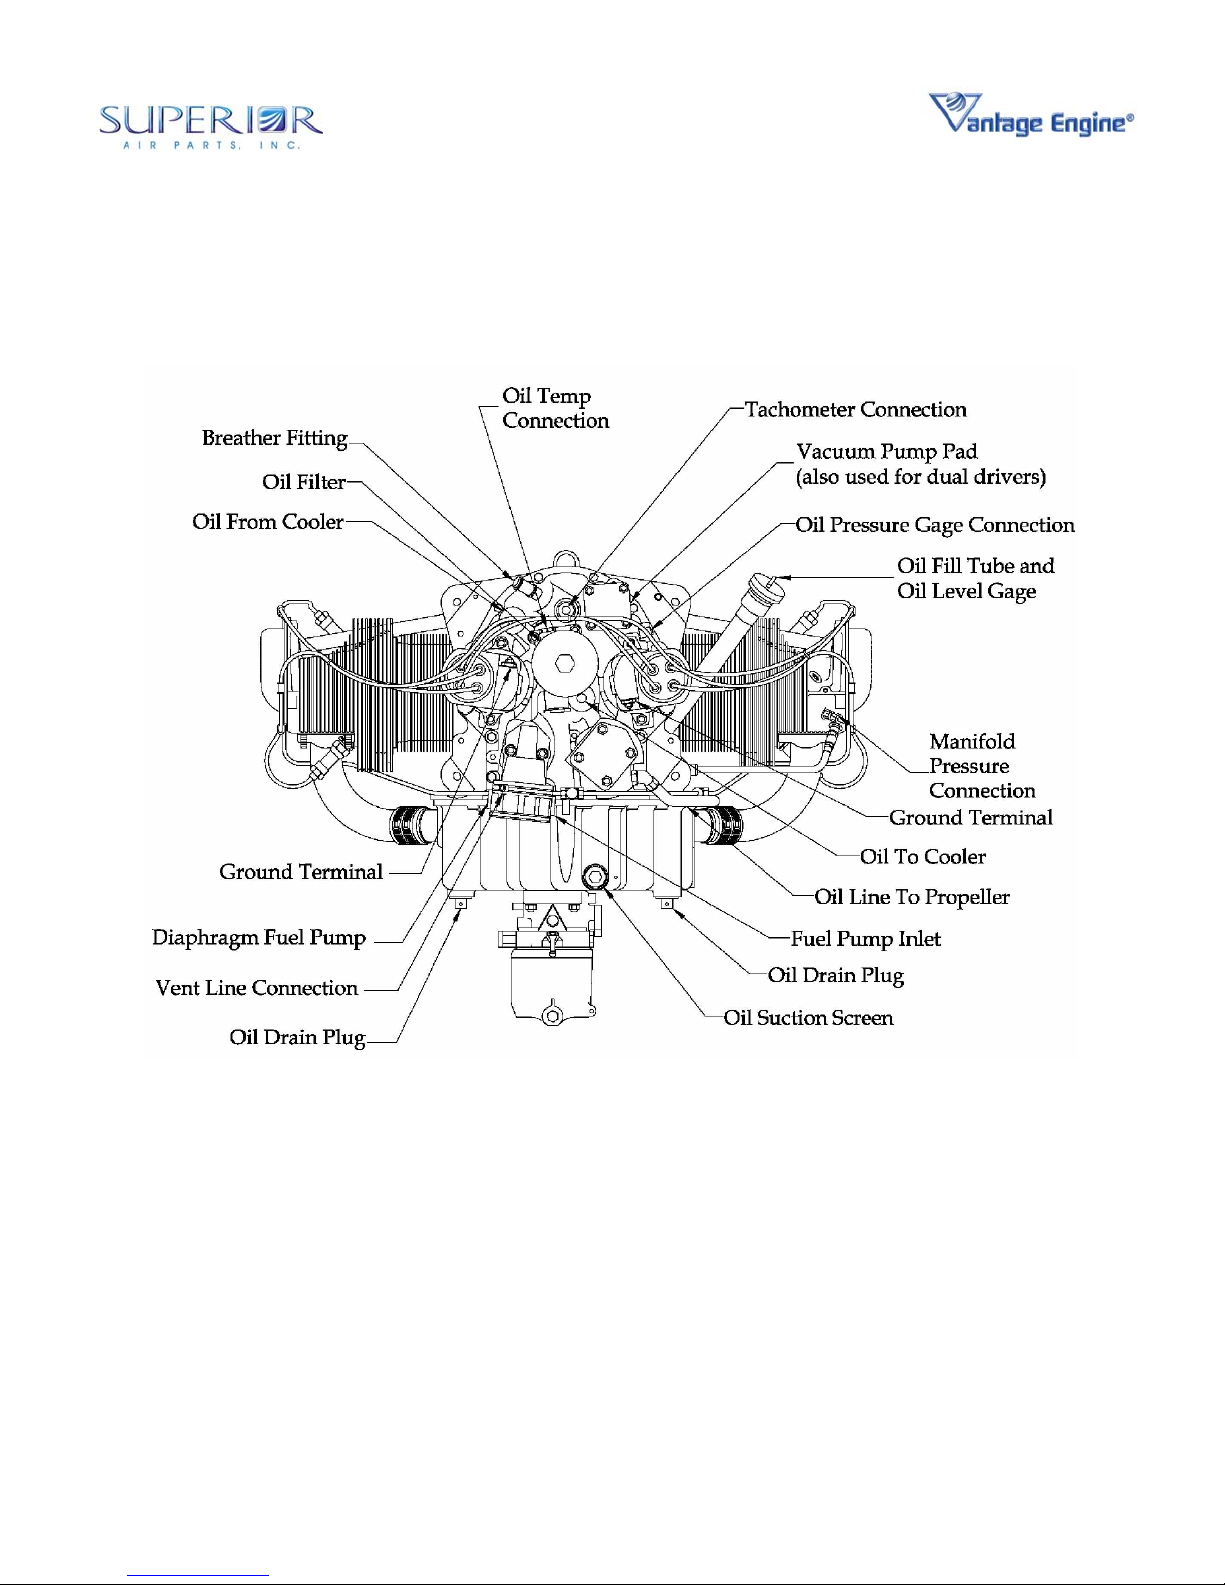
O-360 and IO-360 Series Engines
Figure 02-00-00.5 • O-360 Engine Rear View
© March 2005 Superior Air Parts Inc.
9
02-00-00
Description and Operation
Page 28
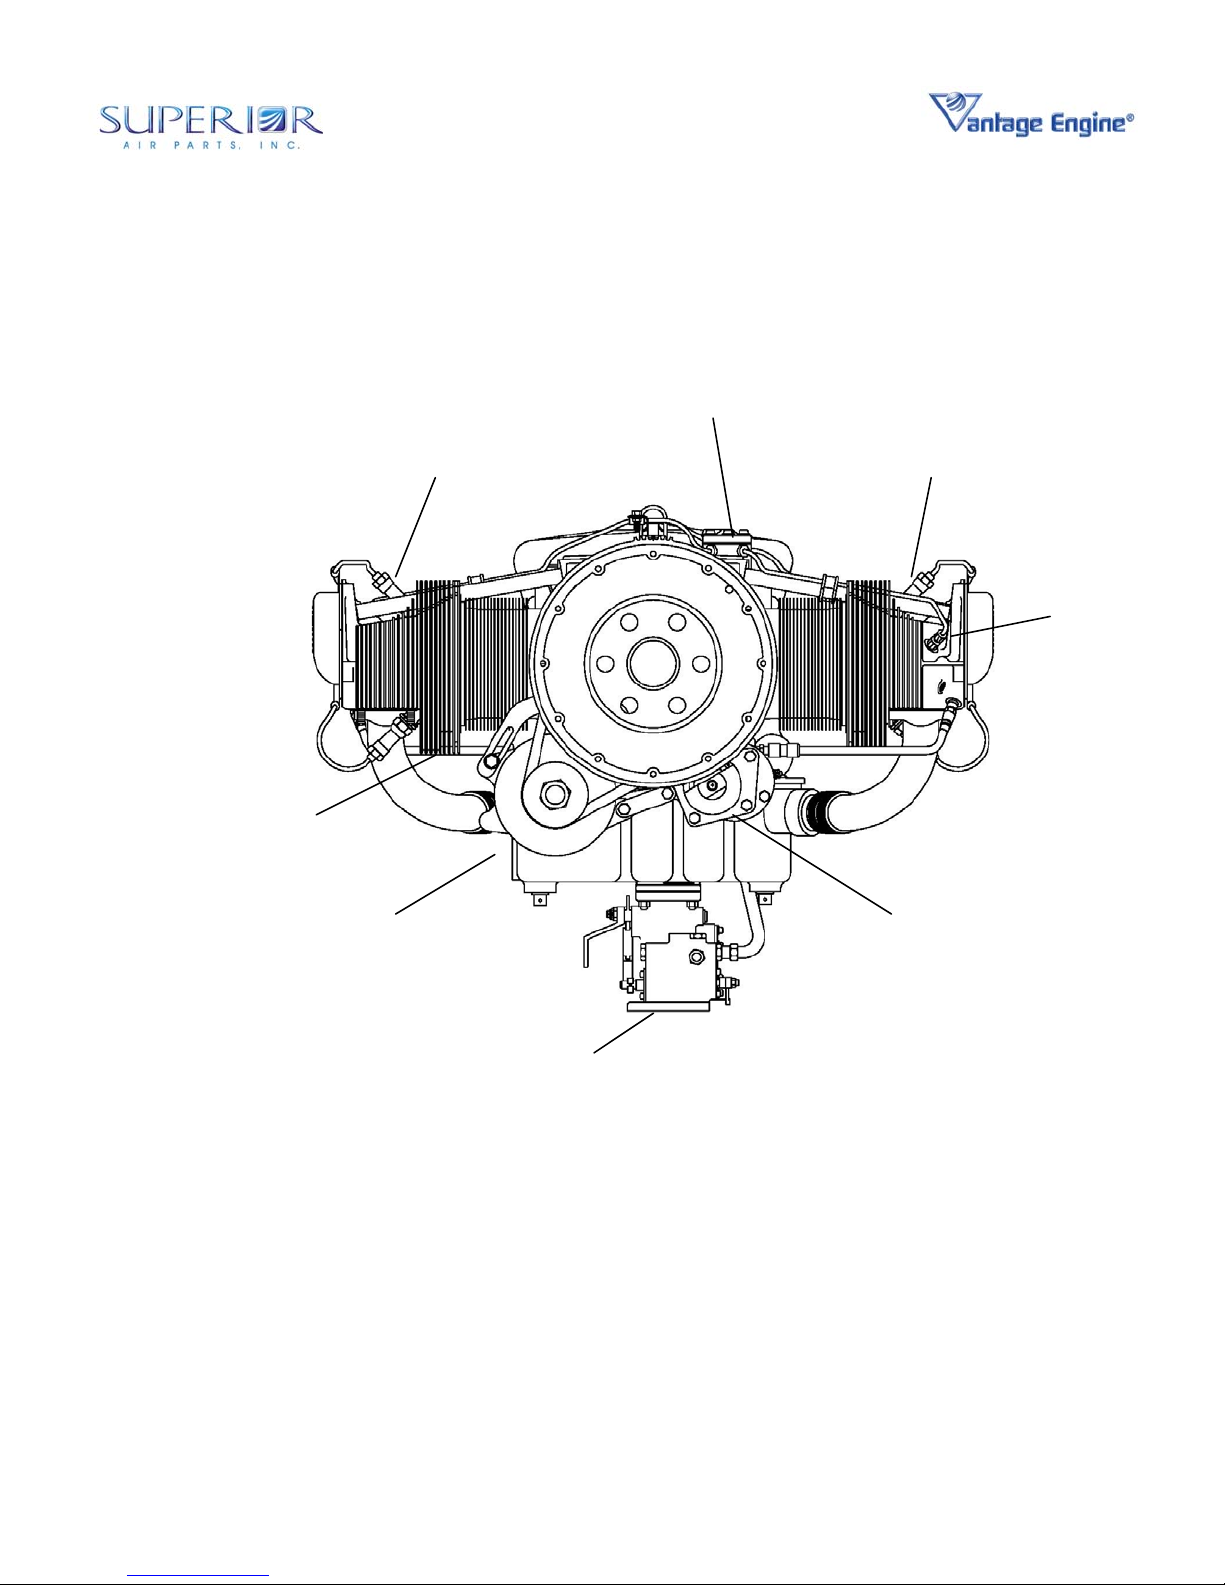
Overhaul Manual
O-360 and IO-360 Series Engines
FUEL INJECTION
MANIFOLD
CHT PROBE LOCATION
(TYP ICAL EAC H H EAD)
NOT PROVIDED WITH ENGINE
SPARK PLUG
ALTERNATOR & BELT
STARTER
SPARK PLUG
FUEL
INJECTOR
Figure 02-00-00.6 • IO-360 Engine Front View
© March 2005 Superior Air Parts Inc.
FUEL INJECTION
SERVO
10
02-00-00
Description and Operation
Page 29
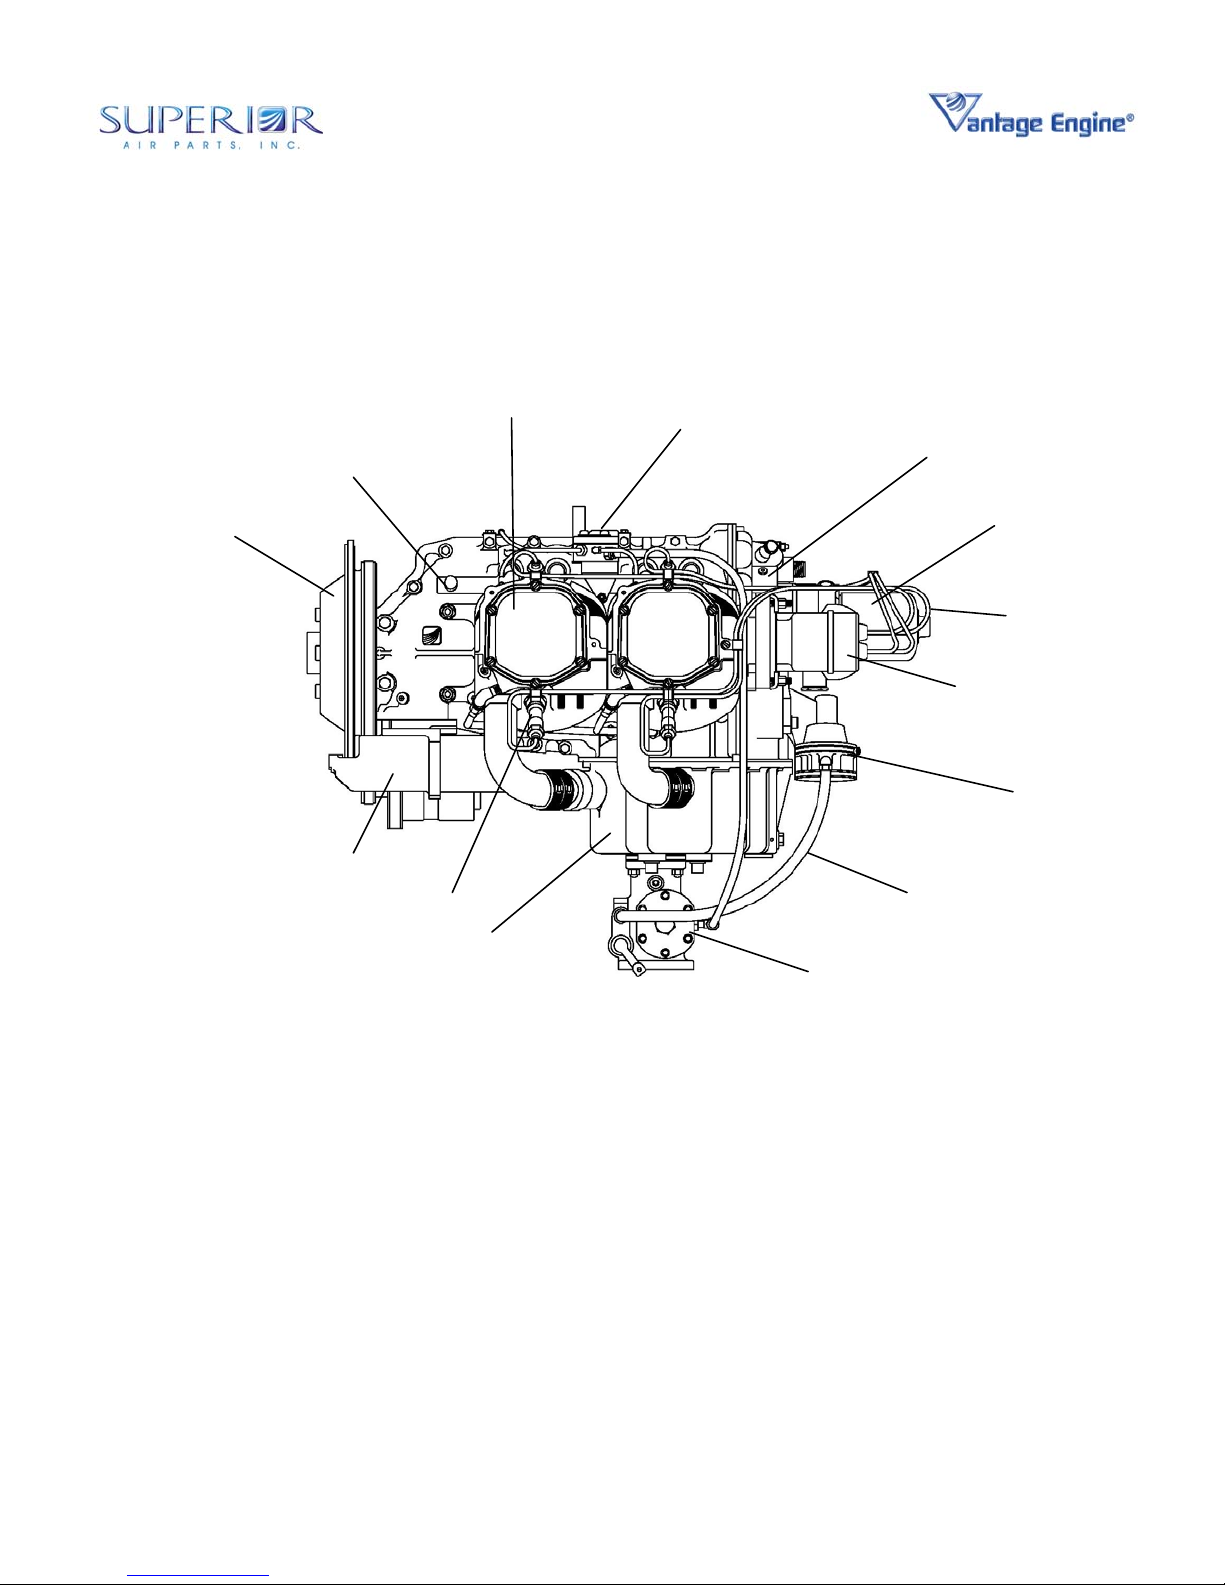
Overhaul Manual
O-360 and IO-360 Series Engines
STARTER SUPPORT
ASSEMBLY
CRANKCASE
ASSEMBLY
STARTER
SPARK PLUG
OIL SUMP
CYLINDER
ASSEMBLY
FUEL INJECTION
MANIFOLD
ACCESSORY
FUEL INJECTION
SERVO
HOUSING
FUEL LINE
OIL FILTER
WIRING
HARNESS
MAGNETO
FUEL PUMP
Figure 02-00-00.7 • IO-360 Engine Left Side View
© March 2005 Superior Air Parts Inc.
11
02-00-00
Description and Operation
Page 30

Overhaul Manual
O-360 and IO-360 Series Engines
FUEL INJECTION
MANIFOLD
FUEL INJ ECTIOR
Figure 02-00-00.8 • IO-360 Engine Top View
© March 2005 Superior Air Parts Inc.
12
02-00-00
Description and Operation
Page 31

Overhaul Manual
O-360 and IO-360 Series Engines
Figure 02-00-00.9 • IO-
© March 2005 Superior Air Parts Inc.
360 Engine Rear View
13
02-00-00
Description and Operation
Page 32

Overhaul Manual
O-360 and IO-360 Series Engines
Figure 02-00-00.10 • Ignition Wiring Diagram
© March 2005 Superior Air Parts Inc.
14
02-00-00
Description and Operation
Page 33

Overhaul Manual
O-360 and IO-360 Series Engines
Figure 02-00-00.11 • Oil System Schematic
© March 2005 Superior Air Parts Inc.
15
02-00-00
Description and Operation
Page 34

Overhaul Manual
O-360 and IO-360 Series Engines
Features and Operating Mechanisms
Crankshaft - The crankshaft is made from high
quality, aerospace grade steel. All bearing
journal surfaces are nitrided. There are 3 kinds
of crankshafts: thin-wall, thick-wall, and solid
front mains which can be identified by looking at
the center of the front of the crankshaft or prop
oil cavity. The thin-wall and thick-wall
crankshafts are each available as fixed-pitch or
constant-speed. Fixed-pitch versions have a
plug installed in the inner diameter of the front
main, or prop oil, cavity which prevents escape
of oil out the front, since there isn’t a prop
governor or constant-speed prop for the oil
pressure to act upon.
Cylinders - Millennium
exclusively. These air-cooled cylinders are
manufactured by screwing and shrinking the two
major parts, head and barrel, together. The cast
heads are made from a special aluminum alloy.
All barrels are made from forgings produced to
aerospace specifications. They are internally
choked and honed to allow optimal operating
conditions for the rings and pistons at operating
temperatures.
Pistons - The pistons are made from an
aluminum alloy. The piston pin is a full floating
type with a plug located in each end of the pin.
The piston is a 3-ring type with 2 compression
rings and 1 oil control ring.
®
Cylinders are used
Connecting Rods - The connecting rods are
made from aerospace grade, high quality steel.
They have replaceable bearing inserts in the
crankshaft ends and bronze bushings in the
piston ends. The bearing caps on the
crankshaft ends are retained by two bolts with
self locking nuts per cap. Caps are tongue and
groove type for improved alignment and rigidity.
Camshaft - Valve Operating Mechanism - The
camshaft is located above and parallel to the
crankshaft. The camshaft actuates hydraulic
lifters that operate the valves through pushrods
and valve rockers.
Crankcase - The crankcase is made from
aerospace grade, stabilized structural aluminum
alloy. The assembly consists of two reinforced
aluminum alloy castings fastened together by
means of studs, bolts, and nuts. The main
bearing bores are machined for use with
precision type main bearing inserts.
Accessory Housing - The accessory housing is
made from an aluminum casting and is fastened
to the rear of the crankcase and the top rear of
the sump.
Oil Sump - The sump incorporates an oil drain
plug, oil suction screen, mounting pad for
carburetor or fuel injector, the intake riser, and
intake pipe connections.
Cooling System – Superior Vantage Engines
are designed to be air-cooled. Baffles are
provided to build up air pressure and force the
air between the cylinder fins. The air is
exhausted to the atmosphere through the rear of
the cowling.
Induction System - The distribution of the air to
each cylinder is through the center zone of the
induction system. This is integral with the oil
sump.
Fuel Systems
Carbureted
are equipped with a float type carburetor The
MA-4-5 carburetors are of the single barrel float
type equipped with a manual mixture control and
an idle cut-off.
Fuel Injected
equipped with a direct cylinder injected RSA-5
fuel injector. The fuel injection system
schedules fuel flow in proportion to airflow. Fuel
vaporization takes place at the intake ports. The
RSA fuel injection system is based on the
principle of measuring airflow and using the air
pressure in a stem type regulator, converting the
air pressure into a fuel pressure. The fuel
pressure (fuel pressure differential), when
applied across the fuel metering section (jetting
system), makes fuel flow proportional to airflow.
- Superior Air Parts O-360 engines
- IO-360 series engines are
© March 2005 Superior Air Parts Inc.
16
02-00-00
Description and Operation
Page 35

Overhaul Manual
O-360 and IO-360 Series Engines
Lubrication System - The full pressure wet
sump lubrication system is supplied by a gear
type pump. It is contained within the accessory
housing.
Priming System - A manual primer system is
provided on all engines using a carburetor. Fuel
injected engines do not require a manual
priming system, relying instead on the fuel
injectors for priming.
Ignition System - Dual ignition is furnished by
two Unison magnetos with two spark plugs per
cylinder.
Electrical System – Engines may be furnished
with an alternator, if provided for in the model
specification. If an alternator is furnished,
installation brackets, hardware and belt are
provided. Alternators are available in either 12
or 24 volt systems and a range of amperages.
© March 2005 Superior Air Parts Inc.
17
02-00-00
Airworthiness Limitations
Page 36

Overhaul Manual
O-360 and IO-360 Series Engines
THIS
PAGE
INTENTIONALLY
LEFT
BLANK
© March 2005 Superior Air Parts Inc.
18
02-00-00
Airworthiness Limitations
Page 37

Overhaul Manual
O-360 and IO-360 Series Engines
AIRWORTHINESS LIMITATIONS
The Airworthiness Limitations Section is FAA
approved and specifies maintenance required
under sections 43.16 and 91.403 of the Federal
Aviation Regulations unless an alternate
program has been FAA approved. This section
is part of the type design of the O-360 and IO360 engine series pursuant to certification
requirements of the Federal Aviation
Regulations.
Mandatory Replacement Time
Subject to additional information contained in
FAA Approved Mandatory Service Bulletins
issued after the date of certification, the O-360
and IO-360 engine series do not contain any
components having mandatory replacement
times required for type certification.
Mandatory Inspection Intervals
Subject to additional information contained in
FAA Approved Mandatory Service Bulletins
issued after the date of certification, the O-360
and IO-360 engine series do not contain any
components having mandatory inspection
intervals other than 100 and 500 hour
inspections of magnetos as required by Unison
Slick Service Bulletin SB2-80C.
Other Mandatory Intervals or Procedures
Subject to additional information contained in
FAA Approved Mandatory Service Bulletins
issued after the date of certification, the O-360
and IO-360 engine series do not have any
inspection-related or replacement time-related
procedures required for type certification.
Distribution of Changes to Airworthiness
Limitations
Changes to this Airworthiness Limitations
Chapter constitute changes to the type design of
the O-360 and IO-360 engine series and require
FAA approval pursuant to Federal Aviation
Regulations. Such changes will be published in
FAA Approved Mandatory Service Bulletins.
Superior Vantage Engine Service Bulletins may
be obtained by writing to:
Superior Air Parts
621 South Royal Lane, Suite 100
Coppell, Texas 75019
or call: 972-829-4600
or on the web at www.superiorairparts.com
© March 2005 Superior Air Parts Inc.
1
04-00-00
Airworthiness Limitations
Page 38

Overhaul Manual
O-360 and IO-360 Series Engines
THIS
PAGE
INTENTIONALLY
LEFT
BLANK
© March 2005 Superior Air Parts Inc.
2
04-00-00
Airworthiness Limitations
Page 39

Overhaul Manual
O-360 and IO-360 Series Engines
TESTING AND FAULT ISOLATION
General
This section provides the Fault Isolation
procedures. Review all probable causes given.
The engine electrical diagram and engine oil
system schematic are provided as an additional
aid in determining probable cause. Testing is
limited to continuity checks of the ignition wiring
harness.
Table 72-00-03.1 • Special Tools and Equipment
Item Vendor
Electrical Tester Commercially Available
Table 72-00-03.2 • Abnormal Operating Procedures
Special tools and equipment are listed in
•
Table 72-00-03.1.
•
The Fault Isolation procedures are listed in
Table 72-00-03.2.
•
The engine ignition diagram is provided in
Figure 02-00-00.10.
•
The engine oil system is provided in Figure
02-00-00-11.
Symptom Table
Engine will not start 72-00-03.3
Rough Idling 72-00-03.4
Engine Not Able to Develop Full Power 72-00-03.5
Rough Engine Operation 72-00-03.6
Low Power and Engine Runs Rough 72-00-03.7
Low Oil Pressure On Engine Gage 72-00-03.8
High Oil Temperature 72-00-03.9
Excessive Oil Consumption 72-00-03.10
Troubleshooting
WARNING
ENGINE WITHOUT A PRELIMINARY
EXAMINATION CAN CAUSE FURTHER
DAMAGE TO A DISABLED COMPONENT
AND POSSIBLE INJURY TO PERSONNEL.
MAKE SURE THOROUGH INSPECTION AND
TROUBLESHOOTING PROCEDURES ARE
ACCOMPLISHED. THIS WILL HELP TO
PREVENT INJURIES TO PERSONNEL
AND/OR DAMAGE TO THE EQUIPMENT.
WARNING
EYES AND SKIN. PUT ON SPLASH
GOGGLES, INSULATED GLOVES, AND
OTHER PROTECTIVE GEAR. IN CASE OF
EYE CONTACT, FLUSH WITH WATER FOR
15 MINUTES AND SEEK MEDICAL
ATTENTION. IN CASE OF SKIN CONTACT,
WASH WITH SOAP AND WATER.
: OPERATION OF A DEFECTIVE
: HOT OIL MAY CAUSE BURNS TO
WARNING
FLAMMABLE. DO NOT BREATHE VAPORS.
USE IN A WELL-VENTILATED AREA FREE
FROM SPARKS, FLAME, OR HOT
SURFACES. PUT ON SPLASH GOGGLES,
SOLVENT-RESISTANT GLOVES, AND
OTHER PROTECTIVE GEAR. IN CASE OF
EYE CONTACT, FLUSH WITH WATER FOR
15 MINUTES AND SEEK MEDICAL
ATTENTION. IN CASE OF SKIN CONTACT,
WASH WITH SOAP AND WATER.
NOTE
: FUEL IS TOXIC AND
: The Fault Isolation sequence is in order of
approximate ease of checking, not
necessarily in order of probability.
© March 2005 Superior Air Parts Inc.
1
72-00-03
Testing and Fault Isolation
Page 40

Overhaul Manual
O-360 and IO-360 Series Engines
Table 72-00-03.3 • Engine Will Not Start
Probable Cause Correction
No Fuel Fill with fuel
Excessive Priming Leave ignition "Off" and mixture control in "Idle
Cut-Off", open throttle and clear cylinders by
cranking a few seconds. Turn ignition switch
"On" and proceed to start.
Defective ignition wire Check with electric tester, and replace any
defective wires.
Dead battery Replace battery.
Malfunction of magneto breaker Clean points. Check internal timing of
magnetos
Lack of sufficient fuel flow Disconnect fuel line and check fuel flow
Water in fuel injector or carburetor Drain fuel injector or carburetor and fuel lines.
Internal failure Check oil screens for metal particles. If found,
complete overhaul of the engine may be
required.
Table 72-00-03.4 • Rough Idling
Probable Cause Correction
Incorrect idle mixture Adjust mixture
Leak in the induction system Tighten all connections in the induction system.
Replace any damaged parts.
Incorrect idle adjustment Adjust throttle stop to obtain correct idle.
Uneven cylinder compression Check condition of piston rings and valve seats
Faulty ignition system Check entire i gnition system
Table 72-00-03.5 • Engine Not Able To Develop Full Power
Probable Cause Correction
Leak in the injection system Tighten all connections and replace damaged
parts.
Throttle lever out of adjustment Adjust throttle lever.
Improper fuel flow Check strainer, gage and flow at the fuel inlet.
Restriction in air scoop Examine air scoop and remove restrictions.
Improper fuel Drain and refill tank with proper fuel
Faulty ignition Tighten all connections. Check system with
tester. Check ignition timing.
Internal Timing Check rocker arm motion as engine is rotated
on nose stand.
© March 2005 Superior Air Parts Inc.
2
72-00-03
Testing and Fault Isolation
Page 41

Overhaul Manual
O-360 and IO-360 Series Engines
Table 72-00-03.6 • Rough Engine Operation
Probable Cause Correction
Broken engine mount Replace or repair mount.
Mounting bushings worn Install new mounting bushings.
Unstable compression Check compression.
Table 72-00-03.7 • Low Power & Engine Runs Rough
Probable Cause Correction
Mixture too rich; indicated by sluggish engine
operation, red exhaust flame at night. Extreme
cases indicated by black smoke from exhaust
Mixture too lean; indicated by overheating or
back firing
Leaks in induction system Tighten all connections. Replace damaged
Defective spark plugs Clean and gap or replace spark plugs.
Improper fuel Drain and refill tank with proper grade.
Magneto breaker points not working properly Clean points. Check internal timing of
Defective ignition wire Check wire with electric tester. Replace
Defective spark plug terminal connectors Replace connectors on spark plug wire.
Readjustment of fuel injector or carburetor may
be required by authorized personnel.
Check fuel lines for dirt or other restrictions.
Readjustment of fuel injector or carburetor may
be required by authorized personnel.
parts.
magnetos.
defective wire.
Table 72-00-03.8 • Low Oil Pressure On Engine Gage
Probable Cause Correction
Lack of oil Add to proper level.
Air lock or dirty relief valve Clean relief valve.
Leak in line Inspect gasket between accessory housing and
crankcase.
High oil temperature See Table 72-00-03.9, “High Oil Temperature”.
Defective pressure gage. Replace defective gage.
Stoppage in oil pump intake passage Check line for obstruction. Clean suction
strainer.
3
© March 2005 Superior Air Parts Inc.
Testing and Fault Isolation
72-00-03
Page 42

Overhaul Manual
O-360 and IO-360 Series Engines
Table 72-00-03.9 • High Oil Temperature
Probable Cause Correction
Insufficient air cooling Che c k air inlet and outlet for deformation or
obstruction.
Insufficient oil supply Fill to proper level with specified oil.
Low grade of oil Replace with oil conforming to specifications.
Clogged oil lines or strainers Remove and clean oil strainers.
Excessive blow-by Check condition of engine rings. Replace if worn
or damaged.
Failing or failed bearing Examine sump for metal particles. If found,
engine overhaul may be required.
Defective temperature gage Replace gage.
Table 72-00-03.10 • Excessive Oil Consumption
Probable Cause Correction
Low grade of oil Fill tank with oil of proper weight and grade.
Failing or failed bearings Check sump oil for metal particles.
Worn piston rings Install new rings.
Incorrect installation of piston rings I nstall new rings.
Failure of rings to seat on new cylinders Use mineral base oil. Climb to cruise altitude at
full power and operate at 75% cruise power
setting until oil consumption stabilizes. See
Break-In Procedures, Special Procedures
Section of this manual.
Oil siphoned from engine in flight Insure that oil filler cap is tight and that o-ring is
in good condition. Insure that breather hose exit
is cut and located to avoid creating a vacuum in
the breather hose.
© March 2005 Superior Air Parts Inc.
4
72-00-03
Testing and Fault Isolation
Page 43

Overhaul Manual
O-360 and IO-360 Series Engines
SPECIAL PROCEDURES
General Break-In Procedures
This section provides the Break-In Procedures
to achieve satisfactory ring seating and long
cylinder life. On all new Vantage engines, after
top overhaul or major engine overhaul, break-in
is critical.
NOTE
: Refer to the engine warranty. Violation
of these procedures will void the
engine's warranty.
Special Tools and Equipment
•
Standard aviation shop tools are required.
•
Engine test stand.
•
The aircraft can be a suitable test stand for
running-in cylinders.
Break-In Procedures
WARNING
ENGINE WITHOUT A PRELIMINARY
EXAMINATION CAN CAUSE FURTHER
DAMAGE TO A DISABLED COMPONENT
AND POSSIBLE INJURY TO PERSONNEL.
MAKE SURE THOROUGH INSPECTION AND
TROUBLESHOOTING PROCEDURES ARE
ACCOMPLISHED. THIS WILL HELP TO
PREVENT INJURIES TO PERSONNEL
AND/OR DAMAGE TO THE EQUIPMENT.
Prior to Break-In Start-Up
•
Engine oil sump should be filled with 100%
straight weight mineral oil. Use MIL-L-6082,
specific grade depending on ambient
temperature. Refer to chapter 72-00-13 for
fluid requirements.
•
Engine must be pre-oiled and oil pressure
obtained prior to start-up.
•
To pre-oil an engine, do the following:
1. Attach pressure-oiling equipment to one
2. Engine baffles and seals must be in
3. Verify accuracy of instruments required
: OPERATION OF A DEFECTIVE
end of the main gallery and force oil
through the galley at 35 psi until oil flows
from the opposite galley with the plug
removed from the front end of the
opposite galley.
good condition and properly installed.
for engine operation.
CAUTION
: BREAK-IN OF AN ENGINE IN
FRIGID CONDITIONS CAN LEAD TO
CYLINDER GLAZING AND FAILED BREAK-IN
DUE TO LOW OIL TEMPERATURE. IT IS
RECOMMENDED THAT OIL TEMPERATURE
BE MAINTAINED BETWEEN 180° AND 190°F.
Break-In Ground Run
Flight propeller may be used if test club is
•
not available.
•
Head aircraft into the wind.
•
Start engine and observe oil pressure. Oil
pressure should be indicated within 30
seconds. If this does not occur, shut down
engine and determine cause.
•
Run engine just long enough to confirm all
components are properly adjusted and
secured. There must be no fuel and/or oil
leaks.
•
Install cowling.
•
Operate engine at 1000 -1200 RPM until oil
has reached minimum operating
temperature 120 °F.
•
Check magneto drop at normal RPM.
•
If engine is equipped with a controllable
pitch propeller, cycle only to a 100 RPM
drop.
•
Shut down engine and check for fuel and/or
oil leaks and repair any discrepancies.
•
At no time should cylinder head temperature
be allowed to exceed recommended
maximum cruise limit of 430°F.
Break-In Flight Operation
•
Perform normal pre-flight and run-up in
accordance with the Installation and
Operation Manual, SVIOM01 (remember:
cycle controllable pitch prop to only a 100
RPM drop). Keep ground runs to a
minimum.
•
Conduct normal take-off at full power, full
rich mixture, to a safe altitude.
NOTE:
In certain geographic locations and
weather conditions (eg; high density
altitudes) “Full Rich” operation may
not be practical. In this event,
substitute the requirement of “Full
Rich” as discussed in this chapter with
the “richest practical setting”.
© March 2005 Superior Air Parts Inc.
1
72-00-04
Special Procedures
Page 44

Overhaul Manual
O-360 and IO-360 Series Engines
NOTE
: Verify the crankcase breather and vent
lines are correctly installed and
positioned. Excessive oil discharge
through the breather can often be
directly related to an improperly installed
or restricted breather line.
•
Maintain shallow climb. Use caution to not
overheat the cylinders. Should overheating
occur, reduce power and adjust mixture
appropriately.
•
Monitor RPM, oil pressure, oil temperature
and cylinder temperature.
•
During the first hour of operation, maintain
level flight at 75% power. Vary the power
setting every 15 minutes during the second
hour between 65-75%.
•
Avoid long descents at cruise RPM and low
manifold pressure (could cause ring flutter).
•
Continue flying at 65-75% power and full
rich mixture on subsequent flights, while
monitoring RPM, Oil Pressure, Oil
Temperature, Cylinder Head Temperature
and oil consumption. Continue until oil
consumption stabilizes and cylinder head
temperatures drop (and stabilize). These
are indications that the piston rings have
seated and the cylinders are broken in.
•
At no time should cylinder head temperature
be allowed to exceed recommended
maximum cruise limit 430°F.
•
After landing, check again for any fuel
and/or oil leaks, or other discrepancies, and
repair as required.
Post Break-In Procedures
•
After break-in, drain all mineral oil. Examine
this oil for foreign matter or metal particle
content.
•
Fill with ashless dispersant of the
appropriate grade for the expected normal
operating conditions and ambient
temperature.
© March 2005 Superior Air Parts Inc.
2
72-00-04
Special Procedures
Page 45

Overhaul Manual
O-360 and IO-360 Series Engines
ENGINE REMOVAL
General
This section contains engine removal
procedures.
Equipment and Materials to accomplish removal
procedures are listed in Table 72-00-05.1.
NOTE:
Removal
• Remove the engine from the airframe as
NOTE:
•
•
•
•
•
•
•
•
•
•
•
•
NOTE: Standard aviation shop tools
are required.
Table 72-00-05.1
Equipment and Materials List
Item Vendor
Engine Stand
Engine Hoist
Protective Covers for
Open Lines or Ports
Commercially
Available
Commercially
Available
Commercially
Available
follows:
Identify each item as the item is
disconnected from the engine to aid in
reinstallation.
Turn all cockpit switches and fuel selector
valves to OFF.
Remove aircraft cowling as required.
Disconnect the battery ground cable.
Disconnect the start cable.
Remove engine baffles as required.
Remove air intake ducting and heat ducting
as required.
Remove engine exhaust system as required.
Disconnect and remove the “B” nuts from
the spark plugs.
Tag and disconnect the engine wiring
bundles from all applicable components.
Remove all clamps attaching engine wire
bundles to engine components and route
bundles clear of the engine.
Drain the engine oil from the sump. Replace
drain plug and tighten.
Remove propeller in accordance with the
airframe manufacturer’s instructions.
•
Consult the airframe manufacturer for
engine to airframe connections.
WARNING
: PLACE A SUITABLE STAND
UNDER THE AIRCRAFT TAILCONE IF
NEEDED BEFORE REMOVING THE ENGINE.
THE LOSS OF WEIGHT MAY CAUSE THE
AIRCRAFT TAIL TO DROP.
•
Attach a hoist to the engine lifting eye
bracket and relieve the weight from the
engine mounts. Only the lifting eye bracket
installed on the backbone of the crankcase
should be used to hoist the engine.
•
Remove the engine mounts and engine as
follows:
1. Loosen and remove the engine mounts
bolts in accordance with manufacturer’s
instructions.
2. Hoist the engine vertically out of the
nacelle and clear of the aircraft.
NOTE:
Hoist the engine slowly and make sure
that all wires, lines, and hoses have
been disconnected.
3. Install the engine onto a transportation
stand, dolly, or an engine shipping
container base.
•
Install protective covers/plugs on any
remaining open fuel, oil/hydraulic lines, and
electrical leads and exhaust ports.
Preservation
•
If the engine is to be stored for longer than
30 days, refer to the Preservation and
Storage section of this manual for
procedures and materials.
© August 2004 Superior Air Parts Inc.
1
72-00-05
Engine Removal
Page 46

Overhaul Manual
O-360 and IO-360 Series Engines
THIS
PAGE
INTENTIONALLY
LEFT
BLANK
© March 2005 Superior Air Parts Inc.
2
72-00-05
Engine Removal
Page 47

Overhaul Manual
O-360 and IO-360 Series Engines
DISASSEMBLY
General
This section contains disassembly procedures.
When necessary, disassembly illustrations are
also provided. All item number references in the
text are specific to this manual and the figures
cited.
Table 72-00-06.1 • Disassembly Materials
Description Source
Penetrating Oil Commercially Available
Parts for Discard
Parts to be discarded are listed in Table 72-00-06.2.
Table 72-00-06.2 • Discard Parts
Disassembly Materials
The materials required for disassembly are listed
in Table 72-00-06.1.
NOTE:
Equivalent substitutes may be used.
Nomenclature
All Engine Oil, Air and Fuel Hoses
Gaskets, Oil Seals, and O-Rings
Bearing Inserts (Connecting Rod and Crankshaft)
Piston Rings and Piston Pins
Stressed Bolts and Fasteners
Intake and Exhaust Valves, Valve Guides and Valve Keepers
Crankshaft Gear Attaching Bolt
Connecting Rod Nuts and Bolts
All Lockwashers, Circlips, Retaining Rings, Locktabs and Locknuts
Counterweight Bushings in Crankshaft and Counterweights (if applicable)
Counterweight Washers (if applicable)
Vermatherm (Oil Temperature Bypass Valve)
Special Tools and Equipment
Special tools and equipment required for
disassembly are listed in Table 72-00-06.3.
NOTE:
Standard reciprocating engine aviation
shop tools and equipment are used
unless otherwise specified.
© March 2005 Superior Air Parts Inc.
1
72-00-06
Engine Disassembly
Page 48

Overhaul Manual
O-360 and IO-360 Series Engines
Table 72-00-06.3 • Special Tools and Equipment
Nomenclature Source
Compressor, Piston Ring Commercially Available
Expander, Piston Ring Commercially Available
Puller, Slide Hammer-Medium Commercially Available
Compressor, Valve Spring Bar Commercially Available
Intercylinder Baffle Tool Commercially Available
Puller, Valve Guide Commercially Available
Puller Set, Oil Seal Commercially Available
Stand, Vertical Nose Support Commercially Available
Tool, Hydraulic Tappet Removal Commercially Available
General Disassembly Procedures
• Place engine in horizontal position on a
transfer cart.
WARNING
: ENGINE OIL IS HAZARDOUS
AND MAY CAUSE INJURY TO SKIN AND
EYES. PUT ON PERSONNEL PROTECTIVE
GEAR.
Remove the oil drain plug and drain the oil
•
from the engine, if not previously drained.
•
Remove the starter ring gear support.
•
Perform visual inspection during
disassembly and immediately after
disassembly. All individual parts should be
laid out in an orderly manner as they are
removed.
•
All loose studs, cracked baffles, and loose or
damaged fittings should be tagged to
prevent being overlooked during regular
inspection.
•
Tag all components and parts as they are
removed. Bag loose assemblies or attaching
hardware.
•
Prior to starting the component or parts
disassembly phase, engine may be placed
on a vertical nose support stand.
Disassembly
WARNING
: FUEL IS TOXIC AND
FLAMMABLE. DO NOT BREATHE VAPORS.
AVOID EYE AND SKIN CONTACT. USE
PROTECTIVE GEAR. IN CASE OF EYE
CONTACT, FLUSH WITH WATER FOR 15
MINUTES AND SEEK MEDICAL ATTENTION.
IN CASE OF SKIN CONTACT, WASH WITH
SOAP AND WATER.
WARNING
: PUT ON SAFETY GOGGLES
WHEN INSTALLING OR REMOVING SAFETY
WIRE.
Removal of Carburetor and Priming System
(1) Remove engine fuel lines (30, Figure
72-00-09.37) and all attaching
hardware.
(a) Remove engine fuel priming system
attaching hardware clamps, (25, 30,
45 Figure 72-00-09.36) screws (35)
and nuts, (40). Disconnect tube (1,
5, 10, 15) coupling nuts at cylinder
head and attaching tee tubes (20).
(2) Remove the carburetor on O-360 series
engines as follows.
(a) Remove nuts (1, Figure 72-00-
09.37), lockwashers (2) and flat
washers (3) from studs four places.
(b) Remove carburetor (7) from studs
and discard gasket (4).
(c) Remove elbow (5) and discard o-
ring (6).
© March 2005 Superior Air Parts Inc.
2
72-00-06
Engine Disassembly
Page 49

Overhaul Manual
O-360 and IO-360 Series Engines
Fuel injection system removal
(1) Remove engine fuel injection manifold
tubing clamps (70, 75 Figure 72-00-
09.39), nuts (85), and screws (80).
(2) Disconnect injector tubing (55, 60), eight
places at fittings (40), elbow (25), and
injector nozzle assembly (90). Re move
nozzle assemblies (90) four places.
(3) Remove fuel manifold bracket (1)
retaining nuts, washers, (5) and bolts
(10). Remove manifold (15) retaining
bolts (25) and washer (20).
(4) Disconnect and remove fuel hoses (30,
35, Figure 72-00-09.38). Remove nuts,
(25) lockwashers (20), and flat wa shers
(15) from studs. Remove injector se rvo
assembly (10) and remove gasket and
spacer (5).
Magneto and harness removal
(1) Unscrew ignition wiring harness leads
(5, 10, Figure 02-00-00.10) from the top
and bottom spark plugs (50). Remove
harness attaching caps (5), two places,
from the magneto. Remove spark plugs
(50) from cylinder.
(2) Remove magneto (15, Figure 72-00-
09.40) attaching nut (30), washer (25),
and clamp (20). Remove the magneto
(15) and discard gasket (10). Remove
the adapter (5) and gasket (1). Remove
cotter pin (40), nut, and washer.
Remove magneto gear (35) and install
nut back on threads to prevent damage
to drive shaft threads.
Oil level gage housing Removal
(1) Unscrew the oil gage (10, Figure 72-
00-09.28) and remove the oil gage
housing (5). Discard seals (15, 20).
Fuel pump removal (as required)
(1) Remove fuel pump screws (15,
Figure 72-00-09.32) and washers
(10). Remove fuel pump (5) and
gasket (1). Remove elbows (25, 30)
and discard o-rings (20).
Oil filter and Adapter removal
(1) Unscrew the oil filter (40, Figure 72-
00-09.35). Remove the vernatherm
(temperature control valve) (35).
Remove screws (30), washers (15,
20), and nut (25) that secure the oil
filter adapter (10) to the accessory
housing. Discard gasket (5).
Remove cooler bypass plug (55),
and discard gasket (50).
Vacuum pump or cover removal
(1) Remove the vacuum pump (or
cover) attaching nuts (40, Figure 7200-09.31), lockwashers (35) and flat
washers (30). Remove pump (or
cover (20) as appropriate) and
discard gasket (15). Remove
adapter assembly (25). Discard
gasket (10) and remove vacuum
gear (1) and thrust washer (5) from
housing. Remove oil seal (55) and
discard.
Propeller governor removal (as required)
(1) Remove the propeller governor oil line.
Remove any clamps. Remove elbows
(10, 15) and any attaching hardware, as
required, to allow hose removal, discard
o-ring (20).
(2) Remove the cover nuts (30) as required,
(Figure 72-00-09.33), lockwashers (25),
and flat washers (20). Remove cover
(65) and discard gasket (60). Remove
retaining ring (55) and thrust washer (5).
Remove adapter nuts (30), lockwashers
(25), and flat washers (20). Remove
propeller governor adapter (15).
Discard gasket (10). Tag and save
thrust washer (5). Remove gear shaft
(1) from housing.
Accessory Housing Assembly Removal
(1) Remove the accessory housing
assembly by removing the bolts (15,
Figure 72-00-09.23), lockwashers
(10), and flat washers (5). Remove
bolt (20), washer (10), and nut (25)
two places. Remove accessory
housing (40) and gasket (35).
Remove fuel pump plunger (1,
Figure 72-00-09.24).
(a) Remove nuts (90) and washers
(85) to remove oil pump housing
assembly (80). Remove oil
pump drive shaft (115) and
impeller gears (105, 110).
© March 2005 Superior Air Parts Inc.
3
72-00-06
Engine Disassembly
Page 50

Overhaul Manual
O-360 and IO-360 Series Engines
Idler gears and shaft removal
(1) Remove idler gears (15,20, Figure
72-00-09.20). Remove idler shaft
mount screws (5) and nut (10).
Remove idler shafts (1) from
crankcase.
Starter and alternator attaching hardware
removal
(1) Remove starter mount bolt (15,
Figure 72-00-09.42), nuts (20),
lockwashers (10), and flat washers
(5). Remove starter (1) from
crankcase.
(a) Remove alternator mount bolt
(10, Figure 72-00-09.43) and
washer (5) to loosen drive belt.
Remove cotter pin (45), slotted
nut (40), support bolt (25), and
shims (35). Remove cotter pin
(45), slotted nut (40), shims
(35), and support bolt (30).
Remove bolts (20, 90) and flat
washers (15, 85) from strut
bracket (80). Remove strut
support (80) and remove
alternator.
(b) Remove alternator bracket (55)
by removing bolts (60) and lock
plate (50). Remove bolt (75),
flat washer (70), and adjusting
link (65). Visually inspect
hardware and bag for reuse if
not damaged.
Oil sump and induction disassembly
(1) Remove screws (25, Figure 72-00-
09.29), lockwashers (20), and flat
washers (15) from intake pipe flange
(10). Discard gaskets (1).
(2) Remove clamps (35), intake hoses (30),
and intake tubes (5) from oil sump
assembly.
(3) Remove oil screen plug (85, Figure 72-
00-09.27), discard gasket (80), and
remove oil suction screen (75). Inspect
for debris.
(4) Remove bolts (15,20), flat washers (25,
30), lockwashers (25), and nuts (35)
from sump assembly flange. Discard
gasket (11) and remove intake
connection pipes (12) from sump
assembly.
Cylinder drain tubes removal
(1) Loosen hose clamps (85, Figure 72-00-
09.17) on hose (80) at drain nipple (75).
Slide away from drain nipple (75).
Loosen gland nut at cylinder head fitting
and remove tube assembly (90) from
cylinder.
Intercylinder cooling baffle removal
(1) Remove the intercylinder cooling baffles
(1, Figure 72-00-09.26) using
intercylinder baffle tool. Turn the baffle
retaining hook (10) so that it disengages
the retainer (5). Remove the baffle (1)
and hook (10) from between the
cylinders.
Cylinder removal
(1) Remove the valve cover screws (130,
Figure 72-00-09.15) and cover (125)
and discard gasket (120). Rotate the
crankshaft to place the piston of the No.
1 cylinder at top center of the
compression stroke.
NOTE:
CAUTION
SUPPORTED TO PREVENT DAMAGE TO THE
ROD AND CRANKCASE. SUPPORT EACH
With the piston in this position both
valves will be closed and the piston
extended away from the crankcase to
avoid damage when the cylinder is
removed.
(2) Remove the valve rocker shaft caps
(20), the valve rocker shaft (15), valve
rocker arms (5), and the exhaust valve
stem cap (115) from cylinder assembly.
Remove the pushrod (1) by grasping the
rod end and pulling it through the rod
tube (40). Remove nut (60), spring (55),
and lockplate (50). Pull rod tube
through cylinder head and discard tube
seals (35, 45).
(a) Remove cylinder assembly by
: THE CONNECTING ROD MUST BE
removing nuts from cylinder base.
Remove cylinder by pulling straight
away from crankcase. As the
cylinder is being pulled away, hold
the piston to prevent damaged.
Discard cylinder base seal.
© March 2005 Superior Air Parts Inc.
4
72-00-06
Engine Disassembly
Page 51

Overhaul Manual
O-360 and IO-360 Series Engines
CONNECTING ROD WITH HOLD DOWN
PLATES TOOL OR RUBBER BANDS (OR
DISCARDED CYLINDER BASE SEALS)
LOOPED AROUND THE CYLINDER BASE
STUD.
(3) Remove the piston pin (35, Figure 72-
00-09.6) using a piston pin drive tool.
Drive pin (35) from piston to remove
piston (30) from the connecting rod (5).
NOTE:
NOTE:
CAUTION
THROUGH THE GUIDES.
CAUTION
OR SCORE PISTONS WHEN REMOVING THE
RINGS.
Removal of the remaining cylinders
and pistons may be done in any
sequence, but less turning of the
crankshaft is involved if the cylinders
are removed in firing order 1-3-2-4.
(4) Compress valve springs (90, 95, Figure
72-00-09.15) with spring compressor
tool, while supporting cylinder, far
enough to remove the valve cylinder
keys (105, 110).
If the valve keys are stuck in the spring
seat, a light blow with a leather mallet
on top of the compressor tool will
release keys.
: DO NOT DRIVE THE VALVES
(a) Remove upper valve spring seats
(95, 100), inner and outer springs
(85, 90), and lower valve spring
seats (75, 80) from rocker box.
Keep parts for each valve (65, 70)
separate. Hold valves by the stems
to keep them from dropping out of
the cylinder and remove cylinder
from the holding block. Reach
inside and remove valves. If valves
are difficult to remove, push valves
back in and clean carbon from
stems.
: BE CAREFUL NOT TO SCRATCH
(b) Using the piston ring expander tool,
remove the rings (40, 45, Figure 7200-09.6) from all pistons. Remove
the rings in order starting with the
top ring and work down.
(5) Remove and disassemble the hydraulic
lifter assembly.
CAUTION
TAPPET ASSEMBLY TOGETHER DURING
ALL OVERHAUL OPERATIONS. ALL
COMPONENT PARTS ARE TO BE
REASSEMBLED WITH THEIR ORIGINAL
MATING PARTS AND EACH ASSEMBLY
REINSERTED IN ITS ORIGINAL LOCATION.
Crankcase Disassembly
NOTE:
: MAINTAIN THE PARTS OF EACH
(a) Using hydraulic tappet tool, remove
the pushrod socket (30, Figure 7200-09.15) by placing heavy grease
on ball end of the "T". By inserting
the ball end in the tappet and
withdrawing, the socket will adhere
to the grease.
(b) Using the hollow end of the tool,
push it over the plunger and
withdraw the plunger. If the tool is
not available, remove the pushrod
socket with fingers or by using
needle nose pliers. Insert a piece of
wire bent at a right angle into the
plunger between the plunger and
the lifter body. Turn 90 degrees to
engage a coil of spring and draw out
the plunger assembly.
(1) Remove nuts (25, 45, 70, 85, Figure 72-
00-09.11 and 72-00-09.12), bolts (5, 30,
55, 90, 95), and washers (15, 20, 35,
40, 60, 65, 80). Draw or pull the thrubolts (1) from the crankcase using
cylinder base nuts and washers and/or
spacers.
(2) Separate crankcase using care not to
allow camshaft to fall to floor. Caution
should be used to keep the right case
thru-studs from becoming misaligned
when separating the crankcase halves
(60, Figure 72.00-09.5).
Carefully pull crankshaft nose seal
from crankcase forward on crankshaft
to aid in crankcase half separation.
© March 2005 Superior Air Parts Inc.
5
72-00-06
Engine Disassembly
Page 52

Overhaul Manual
O-360 and IO-360 Series Engines
(3) Remove the bearing inserts (5, 10,
Figure 72-00-09.2), lifter bodies (20),
and camshaft. Remove and discard oring seals (10, 75).
NOTE:
Crankshaft Disassembly
Place each lifter body in its proper
location in a cleaning basket. The
lifter bodies must be assembled in
their original locations if reused.
(4) Remove all threaded plugs and discard
oil seals.
(1) With the crankshaft firmly supported at
the front and rear main bearing journals
(or secured on a nose stand), remove
rod nuts (15, Figure 72-00-09.6).
Remove the rods (5) by tapping on the
rod bolts (10) with a soft hammer.
Discard the connecting rod bearing (1),
bolts (10), and nuts (15).
NOTE:
Maintain each cap and rod as an
assembly. Rods and caps are not
interchangeable.
(2) To remove the crankshaft gear (5,
Figure 72-00-09.3), flatten the lockplate
(10) and remove screw (15). Tap the
gear lightly with a soft mallet or brass
drift. Remove the crankshaft oil seal
and discard.
© March 2005 Superior Air Parts Inc.
6
72-00-06
Engine Disassembly
Page 53

Overhaul Manual
O-360 and IO-360 Series Engines
CLEANING
General
Cleanliness of the aircraft engine is crucial to its
optimum performance. This section provides
information on materials, tools, and guidelines
for cleaning.
After the initial visual inspection of internal
engine parts, it is necessary to thoroughly clean
the engine components for detailed inspection.
Since this visual inspection is made during and
after disassembly, the components should be
cleaned afterwards and tagged to facilitate
further non-destructive inspection methods.
This identification procedure will also help
prevent these components from being
overlooked.
It is important to remember to visually inspect an
engine prior to cleaning. Residue from the
engine’s operation can provide information as to
hidden defects or other dangerous conditions.
Tools and Materials
For tools required during cleaning, refer to Table
72-00-07.1. For consumable materials required
during cleaning, refer to Table 72-00-07.2.
Table 72-00-07.1
Equipment Required for Cleaning
Item Vendor
Brush (soft and stiff
bristles)
Immersing tank
Scraper (wood)
Grit blaster
NOTE: Equivalent substitutes may be used.
Cleaning Instructions
Two (2) processes are used in cleaning engine
parts; degreasing to remove dirt and sludge (soft
carbon) and the removal of hard carbon by
decarbonizing, brushing or scraping and grit
blasting.
Commercially
Available
Commercially
Available
Commercially
Available
Commercially
Available
CAUTION
ABRASIVES WITH THE GRIT BLASTING
EQUIPMENT.
Degreasing
Degreasing is accomplished by immersing or
spraying the part in solution of white furnace oil
(38-40 specific gravity) or another suitable
solvent such as Varsol or Perm-A-Chlor.
Item Vendor
Cleaning solvent or degreaser
such as white furnace oil,
Varsol, or Perm-A-Chlor
Decarbonizing solutions such
as Gunk, Penetrol, Carbrax,
Super-Chemco, or Gerlach #70
Isopropyl Alcohol
Aerosol electrical contact
cleaner
Lubricating Oil (SAE 20)
Corrosion preservative oil
Abrasive cloth (crocus cloth)
NOTE
WARNING
PROTECTION. SOME CHEMICAL
SOLUTIONS CAN CAUSE SKIN, EYE AND
LUNG DAMAGE. FOLLOW THE
MANUFACTURER'S INSTRUCTIONS FOR
EACH CLEANING SOLUTION.
CAUTION
DEGREASING SOLUTIONS CONTAINING
CAUSTIC COMPOUNDS OR SOAP ARE
USED, EXTREME CARE MUST BE
EXERCISED. THESE COMPOUNDS IN
: DO NOT USE SAND OR METALLIC
Table 72-00-07.2
Materials Required for Cleaning
Commercially
Available
Commercially
Available
Commercially
Available
Commercially
Available
Commercially
Available
Commercially
Available
Commercially
Available
: Residue from the solvent washing must
be captured and contained to prevent
contamination of the surrounding
environment.
: USE THE CORRECT PERSONAL
: IF ANY WATER-MIXED
© March 2005 Superior Air Parts Inc.
1
72-00-07
Cleaning
Page 54

Overhaul Manual
O-360 and IO-360 Series Engines
ADDITION TO BEING POTENTIALLY
DANGEROUS TO ALUMINUM AND
MAGNESIUM, MAY BECOME IMPREGNATED
IN THE PORES OF THE METAL AND CAUSE
OIL FOAMING WHEN THE ENGINE IS
RETURNED TO SERVICE. WHEN USING
THESE WATER-MIXED SOLUTIONS ALWAYS
THOROUGHLY RINSE THE PART IN CLEAN
BOILING WATER. REGARDLESS OF
METHOD OR SOLUTION USED ALWAYS
COAT AND SPRAY ALL PARTS WITH
LUBRICATING OIL IMMEDIATELY AFTER
CLEANING IN ORDER TO PREVENT
CORROSION.
CAUTION
PROTECTION. HEATED PARTS WILL CAUSE
BURNS.
Decarbonizing
Decarbonizing is usually accomplished by
immersion of the part in a decarbonizing solution
(usually heated). Decarbonization solutions
such as Gunk, Penetrol, Carbrax, SuperChemco, Gerlach No. 70 or any suitable
solution. Refer to the above caution for watersoluble decarbonizers. Remove hard carbon
deposits after degreasing by brushing, scraping
or grit blasting. After cleanin g, rinse the parts in
petroleum solvent, dry, and remove loose
particles by blowing the particles out with
compressed air. Use a shop air supply with an
appropriate water trap.
Decarbonizing solutions will usually remove
most of the enamel from machined surfaces. All
remaining enamel should be removed by grit
blasting particularly in the narrow areas between
cylinder cooling fins.
Valve seats may be left unprotected during
decarbonizing processes. This will facilitate the
reconditioning of the valve seat in later
procedures.
CAUTION
EXERCISED WHEN USING A
DECARBONIZING SOLUTION. IT IS
RECOMMENDED THAT THE USE OF HEATED
SOLUTIONS BE AVOIDED UNLESS THE
OPERATOR IS THOROUGHLY FAMILIAR
WITH THE PARTICULAR SOLUTION BEING
USED. IN ADDITION THE OPERATOR IS
: USE THE CORRECT PERSONAL
: EXTREME CAUTION SHOULD BE
STRONGLY ADVISED AGAINST IMMERSING
STEEL AND MAGNESIUM PARTS IN THE
SAME DECARBONIZING TANK, BECAUSE
THIS PRACTICE OFTEN RESULTS IN
DAMAGE TO THE MAGNESIUM PARTS FROM
CORROSION.
CAUTION
SURFACES. MASK ALL MACHINE
SURFACES PLUG ALL DRILLED OIL
PASSAGES TO PREVENT DAMAGE OR
ENTRY OF FOREIGN MATTER.
CAUTION
AIR TO CLEAN OR DRY PARTS, MAKE SURE
THAT THE PRESSURE IS NOT MORE THAN
20 PSI. DO NOT DIRECT THE AIRSTREAM
AT PERSONNEL OR LIGHT OBJECTS. PUT
ON GOGGLES OR A FACE SHIELD TO
PROTECT YOUR EYES. THIS WILL HELP
PREVENT INJURIES TO PERSONNEL OR
DAMAGE TO THE EQ UIPMENT. IF YOU GE T
AN EYE INJURY, SEEK MEDICAL ATTENTION
CAUTION
BRUSHES OR METAL SCRAPERS ON ANY
BEARING, MACHINED OR CONTACT
SURFACES.
CAUTION
THE PISTON RING GROOVES. USE A
WOODEN SCRAPER.
Scratch and Corrosion Removal
Remove corroded or pitted surfaces on the fillets
at the edges of crankshaft main and crankpin
journal surfaces, and thrust bearing races by
polishing with crocus cloth or other mild abrasive
material. Refer to the Fits and Clearances
section of this manual for limits.
Shallow or small scratches, minor abrasions, or
pitting on gears or screwed fittings may be
dressed out with a fine abrasive (crocus) cloth,
small file, or polishing stone. Refer to the Fits
and Clearances section of this manual for limits.
Accessory Mounts
Clean mounting pads and studs by wiping with a
clean cloth moistened with solvent. Use care to
remove sludge and debris from around the
bases of the studs.
: DO NOT DAMAGE MACHINED
: WHEN YOU USE COMPRESSED
: DO NOT USE WIRE BRISTLE
: DO NOT USE GRIT BLASTING ON
© March 2005 Superior Air Parts Inc.
2
72-00-07
Cleaning
Page 55

Overhaul Manual
O-360 and IO-360 Series Engines
NOTE:
WARNING
WELL-VENTILATED AREA. PREVENT EYE
AND SKIN CONTACT AND DO NOT
BREATHE VAPORS. IN CASE OF EYE
CONTACT, FLUSH WITH WATER FOR 15
MINUTES AND SEEK MEDICAL ATTENTION.
IN CASE OF SKIN CONTACT, WASH WITH
SOAP AND WATER.
Fuel Injector and Primer Nozzles
Remove the nozzle. Submerge in a cleaning
solvent such as Stoddard Solvent or MEK or
equivalent. Allow soaking for several hours.
Remove from solvent and dry with dry and clean
compressed air. Ultra-sound cleaning methods
may also be used.
WARNING
WELL-VENTILATED AREA. PREVENT EYE
AND SKIN CONTACT AND DO NOT
BREATHE VAPORS. IN CASE OF EYE
CONTACT, FLUSH WITH WATER FOR 15
MINUTES AND SEEK MEDICAL ATTENTION.
IN CASE OF SKIN CONTACT, WASH WITH
SOAP AND WATER.
WARNING
AIR TO CLEAN OR DRY PARTS, MAKE SURE
THAT THE PRESSURE IS NOT MORE THAN
30 PSI. DO NOT DIRECT THE AIRSTREAM
AT PERSONNEL OR LIGHT OBJECTS. PUT
ON GOGGLES OR A FACE SHIELD TO
PROTECT YOUR EYES. IF YOU GET AN EYE
INJURY, GET MEDICAL ATTENTION.
CAUTION
CLEAN OR DISASSEMBLE FUEL OR AIR
BLEED NOZZLES.
Use care to not force debris into drilled
areas, passages, ports, or threaded
receptacles.
: SOLVENT IS TOXIC. USE IN
: SOLVENT IS TOXIC. USE IN
: WHEN YOU USE COMPRESSED
: DO NOT USE A SHARP TOOL TO
Screens and Filters
A. Fuel system filters
(1) Fuel screens may be soaked and
rinsed in clean solvent and dried
with compressed air.
B. Oil system filters
(1) Oil screens may be soaked and
rinsed in clean solvent and dried
with compressed air.
(2) Disposable external oil filter
elements are not cleaned.
C. Air induction system filters
(1) Foam air filters may be rinsed in
clean solvent then washed with mild
detergent and water and reinstalled.
Paper air filter elements are not cleaned
WARNING
WELL-VENTILATED AREA. PREVENT EYE
AND SKIN CONTACT AND DO NOT
BREATHE VAPORS. IN CASE OF EYE
CONTACT, FLUSH WITH WATER FOR 15
MINUTES AND SEEK MEDICAL ATTENTION.
IN CASE OF SKIN CONTACT, WASH WITH
SOAP AND WATER.
WARNING
AIR TO CLEAN OR DRY PARTS, MAKE SURE
THAT THE PRESSURE IS NOT MORE THAN
30 PSI. DO NOT DIRECT THE AIRSTREAM
AT PERSONNEL OR LIGHT OBJECTS. PUT
ON GOGGLES OR A FACE SHIELD TO
PROTECT YOUR EYES. IF YOU GET AN EYE
INJURY, GET MEDICAL ATTENTION.
Accessories
Refer to the various manufacturers’ manuals for
information regarding the cleaning of these
components.
: SOLVENT IS TOXIC. USE IN
: WHEN YOU USE COMPRESSED
NOTE: Under normal conditions, the shield
and screen are NOT removed from the
nozzle assembly. If removal is
necessary, both must be thoroughly
cleaned prior to reassembly. The
shield must have a tight fit on the
body.
© March 2005 Superior Air Parts Inc.
3
72-00-07
Cleaning
Page 56

Overhaul Manual
O-360 and IO-360 Series Engines
Preservation and Corrosion Prevention
A. Upon conclusion of visual inspection
and all cleaning operations, rinse parts
with petroleum solvent. Dry and remove
any loose particles by air blast. Apply a
liberal coating of preservative oil to all
surfaces.
B. For parts that will be repainted, do the
following:
(1) Be sure that the part is thoroughly
degreased, clean, and dry.
(2) Prime and paint in accordance with
Repair section.
© March 2005 Superior Air Parts Inc.
4
72-00-07
Cleaning
Page 57

Overhaul Manual
O-360 and IO-360 Series Engines
INSPECTION AND CHECK
General
The inspection of engine parts consists of three
(3) categories: visual, structural, and
dimensional. Visual and structural inspections
deal primarily with structural defects. The
dimensional checks are concerned with the size,
shape, and fit of a given part. Upon successful
completion of inspection, coat all steel parts with
preservative oil.
Visual inspections should precede all other
inspections. No cleaning operation should be
permitted until a complete initial visual
inspection is made of the part in question.
Residue from the engine’s operation can provide
additional information as to hidden defects or
other dangerous conditions. Refer to the
Cleaning section of this manual.
Structural inspections will include checking
flatness, out-of-roundness, and passageway
clearance. They may also include magnetic
particle and dye penetrant procedures as well as
eddy-current, ultra-sonic, or other nondestructive testing methods.
For dimensional inspections, refer to the tables
set forth in the Fits and Clearances section of
this manual.
For repairs required prior to a final inspection or
dimensional check of a part, refer to th e Repairs
section of this manual.
The use of a recording form is recommended
during the inspection procedures. The form
should be prepared so that all inspection and
subsequent repair and reassembly procedures
can be noted as they are completed. This
usage will also help prevent the omission of
components during the inspections and will
provide a place to record findings and comments
resulting from the inspections.
Materials and Tools
Materials required for inspection are listed Table
72-00-08.1. Special tools and equipment
required for inspection are listed Table 72-00-
08.2.
Table 72-00-08.1
Inspection Materials
Item Source
Magnetic base oil
Preservative oil
Dye penetrant and
developer
Acetone
Mineral Spirits
SAE #10 lubricating oil
(check fuel nozzle flow)
NOTE: Equivalent substitutes may be used.
Table 72-00-08.2
Special Tools and Equipment
Item Source
Calipers and
micrometers: ID and OD
10X Magnifying Glass
Machinist’s Ruler
Small Flashlight
Vee Blocks
Dial Indicator
Spring Tension Tester
Magnetic Particle
Inspection Equipment
NOTE: Equivalent substitutes may be used.
Commercially
Available
Commercially
Available
Commercially
Available
Commercially
Available
Commercially
Available
Commercially
Available
Commercially
Available
Commercially
Available
Commercially
Available
Commercially
Available
Commercially
Available
Commercially
Available
Commercially
Available
Commercially
Available
© March 2005 Superior Air Parts Inc.
1
72-00-08
Inspection and Check
Page 58

Overhaul Manual
O-360 and IO-360 Series Engines
General Inspection Procedures
All journal surfaces must be checked for galling,
scores, misalignment, and out-of-round
condition. Pins and shafts must be inspected for
straightness.
Examine gears for evidence of pitting and
excessive wear. This evidence is of special
importance when found on the involute of the
gear teeth. Deep pit marks in this area are
reason to reject the part. Bearing surfaces of all
gears may have minor abrasions dressed out
with fine abrasive cloth but should be free from
deep scratches.
Excessively worn or mutilated threads should be
rejected. Small defects (such as slight nicks or
burrs) may be dressed out with a small file, fine
abrasive cloth (crocus cloth), or oil stone. If
distortion, galling, or mutilation resulting from
over tightening is discovered, the part must be
replaced.
Inspection of highly stressed areas for corrosion
is necessary. These areas are susceptible to
pitting and can cause failure of the part. The
following are components requiring particular
attention with respect to this issue: the fillets at
the edges of crankshaft main and crankpin
journal surfaces, and thrust bearing races. If
pitting is discovered in these areas and cannot
be removed by polishing with crocus cloth or
other fine abrasive, the part must be replaced.
For polishing procedures, see the Repairs
section of this manual.
Inspect all threaded inserts, fasteners, studs,
fittings, plugs, etc., for condition of threads.
General Non-Destructive Testing
All parts must be thoroughly clean and dry prior
to the start of the test and again upon
completion of the test procedures. Refer to
Cleaning section of this manual. It is important
to carefully consider the results of the test to
provide accurate interpretation.
All Ferro-magnetic steel parts should be
inspected using a magnetic particle inspection
method, such as MIL-STD-1949, performed by
appropriately qualified personnel. This
inspection is especially effective when used on
highly stressed parts such as keyways, gear
teeth, splines, roots of threads, small holes, and
fillets.
NOTE:
NOTE:
Tests using the dye penetrant method must be
thoroughly cleaned of all penetrant and
developer residue upon completion of the test.
Any oils or other fluids used for other nondestructive procedures must be thoroughly
cleaned from the part upon completion of the
test.
NOTE:
Perform the magnetic particle
inspection strictly in accordance with
the manufacturer’s guidelines. Failure
to do so can result in erroneous
readings and the reuse of critical
components with hidden damage that
may cause engine failure.
Care must be taken to prevent
overheating or burning of the part as a
result of the applied electricity during
this test.
Upon completion of any cleaning
procedure, be sure to coat all steel
parts with preservative oil. Do not
handle cleaned parts any more than
necessary prior to their reassembly
into the engine as this handling
reintroduces dirt and corrosive
substances to the parts.
© March 2005 Superior Air Parts Inc.
2
72-00-08
Inspection and Check
Page 59

Overhaul Manual
O-360 and IO-360 Series Engines
Accessory Housing
Initially inspect accessory housing as illustrated
in Figure 72-00-08.2. Remove all accessories
(magnetos, pumps, valves, etc.) for separate
inspection.
•
Obvious
excessive
damage
Visually inspect accessory housing.
(1) Inspect accessory housing flange and
drive pad surfaces.
•
Deep scratches Reject
•
Minor scratches
(2) Inspect accessory case threaded and
drilled areas and passages.
•
Worn or
mutilated,
distorted, galled
•
Slight nicks or
burrs
•
Obstructions or
plugs
Crankcase Assembly
Perform initial inspection of crankcas e assembly
per Figure 72-00-08.3.
•
Obvious
excessive
damage or
wear
(1) Inspect all crankcase bearing bores
and journals, saddle supports, support
webs, tang slots, and flange surfaces.
•
Deep scratches Reject
•
Fretting, heavy
wear, flat spots
Reject
Blend/hand
polish per
Repair No.2
Reject
Blend/hand
polish per
Repair No.1
See Cleaning
section of this
manual
Reject
Reject
Blend/hand
•
Minor scratches
polish per
Repair No.2
•
Misalignment of
mating surfaces
•
Out of round
conditions on
Reject
Reject
journals
(2) Inspect crankcase threaded studs and
drilled holes and passages.
•
Worn,
mutilated,
distorted, or
Reject/See
Repair No. 1
galled
•
Slight nicks or
burrs
Blend/hand
polish per
Repair No.1
NOTE:
Surfaces may be checked visually and
by feel for roughness, flaking, and
pitting of races and for scoring on the
outside of the bearing races. Shafts,
pins, etc., may be checked using vee
blocks and dial indicators.
NOTE:
Aluminum surfaces can withstand
considerable scratching and light
scoring without harming the engine
integrity or performance provided
these problems fall within the limits set
forth in the Fits and Clearances
section of this manual.
NOTE:
Fretting on the saddle supports in the
crankcase has a frosted appearance
and tiny pit holes. This usually
indicates a change in the size of the
bearing saddles that can be sufficient
to cause an excessively tight
crankshaft bearing fit.
© March 2005 Superior Air Parts Inc.
3
72-00-08
Inspection and Check
Page 60

Overhaul Manual
O-360 and IO-360 Series Engines
Figure 72-00-08.2 • Accessory Housing
© March 2005 Superior Air Parts Inc.
4
72-00-08
Inspection and Check
Page 61

Overhaul Manual
O-360 and IO-360 Series Engines
Figure 72-00-08.3 • Crankcase Bearing and Flange Surfaces
© March 2005 Superior Air Parts Inc.
5
72-00-08
Inspection and Check
Page 62

Overhaul Manual
O-360 and IO-360 Series Engines
Cylinder Head
Initially inspect cylinder head. Refer to Figure
72-00-08.4.
Obvious
•
excessive
damage to
Reject
cylinder head
Visually inspect cylinder head.
(1) Inspect cylinder head valve seats.
•
Loose, scored,
or pitted valve
Reject
seats
(2) Inspect cylinder for loose or damaged
studs.
•
Loose or
damaged studs
Reject
NOTE:
Loose or damaged studs must be
replaced with oversized studs using
0.003, 0.007, or 0.012 inch.
(3) Inspect cylinder head spark plug
helical coil inserts.
• Loose or
damaged
Reject
inserts
NOTE:
Loose or damaged helical coil inserts
must be replaced with oversized
insert. See Repair No. 1.
(4) Inspect cylinder rocker box covers,
intake and exhaust ports.
•
Nicked, scored
or dented
mounting pads
Blend/hand
polish per
Repair No.2
(5) Inspect cylinder head cooling fins for
cracks.
•
Fin adjacent to
the exhaust
port flange
•
Physically
damaged,
broken, or bent
See Repair
No.10
See Repair
No.10
fins
Cylinder Head Dimensional Inspections
Inspect the rocker shaft bushings.
•
Check the ID of the rocker
shaft bushings a minimum
of two (2) positions, 90
degrees apart. Several
check locations are
Refer to
Fits and
Clearances
preferred.
Cylinder Barrel Inspections
Visually inspect cylinder barrel for general
condition. Refer to Figure 72-00-08.4.
•
Cracks. Reject
Visually inspect cylinder barrel cooling fins.
Blend with
hand grinder
•
Notches and nicks
or file. See
Repair No.
10
Visually inspect cylinder barrel skirt.
•
Bent, cracked, or
broken
Reject
Visually inspect cylinder barrel mounting flange.
Blend with
•
Nicks
file or crocus
cloth. See
Repair No. 2
Visually inspect cylinder barrel interior.
•
Minor scoring or
corrosion
•
Deep scoring or
pitting
Repair by
honing. See
Repair No. 9
Reject
Visually inspect cylinder barrel interior.
•
Glazing or possible
barrel wear
Repair by
honing. See
Repair No. 9
© March 2005 Superior Air Parts Inc.
6
72-00-08
Inspection and Check
Page 63

Overhaul Manual
O-360 and IO-360 Series Engines
Cylinder Barrel Dimensional Inspections
Visually inspect cylinder barrel dimensions.
Refer to Figure 72-00-08.4.
Fit between piston
•
skirt and cylinder
Maximum taper of
•
cylinder walls
Maximum out of
•
roundness
Bore diameter
•
NOTE:
All cylinder barrel diameter
measurements must be taken at a two
(2) locations, 90 degrees apart at the
plane specifically being measured.
Cylinder Assembly Inspection
Perform a fluorescent dye penetrant inspection
of the cylinder head.
•
Cracks Reject
Piston Inspections
Visually inspect piston general condition. Refer
to Figures 72-00-08.5 and 72-00-08.6.
•
Inspect the top of
the piston for
excessive pitting,
cavities or surface
distortion.
•
Inspect the piston
lands, piston pin
holes, and bosses
for excessive wear
or damage.
•
Inspect the piston
ring in grooves
clearances in
excess of limits.
Refer to Fits
and
Clearances
Refer to Fits
and
Clearances
Refer to Fits
and
Clearances
Refer to Fits
and
Clearances
Reject
Reject
Refer to Fits
and
Clearances
Piston Dimensional Inspections
Inspect pistons for correct dimensions. Refer to
Figure 72-00-08.5.
•
Side clearance
between piston and
ring
Refer to Fits
and
Clearances
NOTE:
These pistons are ground with a slight
taper from the skirt to the head. The
exception is the lands between the top
compression and oil control rings,
which are ground parallel. The
clearance on wedge type compression
rings must be measured with ring flush
to outside edge of piston as shown in
Figure 72-00-08.6 in order to obtain a
true check of the side clearance.
Inside diameter of
•
piston pin hole
Refer to Fits
and
Clearances
NOTE:
No pitting or corrosion is permitted in
this area.
Clearance between
•
piston skirt and
cylinder and piston
diameter at top and
Refer to Fits
and
Clearances
bottom
© March 2005 Superior Air Parts Inc.
7
72-00-08
Inspection and Check
Page 64

Overhaul Manual
O-360 and IO-360 Series Engines
Figure 72-00-08.4 • Cylinder Assembly
© March 2005 Superior Air Parts Inc.
8
72-00-08
Inspection and Check
Page 65

Overhaul Manual
O-360 and IO-360 Series Engines
Figure 72-00-08.5 • Piston Assembly
© March 2005 Superior Air Parts Inc.
9
72-00-08
Inspection and Check
Page 66

Overhaul Manual
O-360 and IO-360 Series Engines
Figure 72-00-08.6 • Piston Rings and Lands
© March 2005 Superior Air Parts Inc.
10
72-00-08
Inspection and Check
Page 67

Overhaul Manual
O-360 and IO-360 Series Engines
Valve Rockers
Inspect valve rocker for damage. Refer to
Figure 72-00-08.7.
•
Check for damaged,
badly worn, pitted or
scored tips and rod
sockets.
•
Check rocker bushing
ID at two (2) locations
90° apart. Refer to Fits
and Clearances.
Pushrod Inspection
Inspect pushrods for wear, fit, and alignment.
Refer to Figure 72-00-08.8.
•
Inspect for excessive
wear or damage.
•
Rod must be straight
within 0.010 inch
Reject
Replace
bushing per
Repair
No. 13
Reject if in
excess
Reject if in
excess
Valve Springs Inspection
Check valve springs using a spring tester. Refer
to Figure 72-00-08.7.
•
Reference spring load
and deflection limits in
Fits and Clearances
Replace if
weak
section of this manual.
© March 2005 Superior Air Parts Inc.
11
72-00-08
Inspection and Check
Page 68

Overhaul Manual
O-360 and IO-360 Series Engines
© March 2005 Superior Air Parts Inc.
Figure 72-00-08.7 • Valve Train
12
72-00-08
Inspection and Check
Page 69

Overhaul Manual
O-360 and IO-360 Series Engines
Crankshaft
NOTE:
Visually inspect the shaft.
Visually inspect the bearing surfaces.
Dimensionally inspect the bearing surfaces.
Visually inspect the ID of the forward end of the
shaft.
Measure the run-out of the crankshaft center
main bearings and flange by supporting the
crankshaft on a flat surface in vee blocks on the
front and rear main bearing.
A magnetic particle inspection should
be performed whenever the crankshaft
is removed from the engine.
•
Scoring, galling,
pitting, corrosion,
Reject
cracks
•
Scoring, scratching,
etching
•
Refer to Fits and
Clearances of this
manual
•
Deterioration of the
cadmium plating
Reject
Reject if
beyond
acceptable
limits
See Repair
No. 7
Reject if run-
•
Measure run-out of
the crankshaft
center main bearing
out exceeds
limits of the
Fits and
Clearances.
Reject if run-
•
Measure run-out of
crankshaft prop
flange
out exceeds
limits of the
Fits and
Clearances
Crankshaft Counterbore Face Inspection
Inspection of the counterbored gear mounting
flange surface.
•
Fretting, galling, scoring,
pitting
•
Check threads in gear
Reject
retaining hole for nicks or
burrs Check for hole depth
by measuring with a gear
retaining bolt threaded all
the way in. Compare the
See
Repair
No. 8
exposed length of the bolt
with the thickness of the
gear and lockplate.
•
Inspect dowel for damage,
out of roundness. Refer to
Replace
Repair No. 4.
•
Inspect pilot diameter of the
counterbore for size and
damage. The diameter
should not exceed 2.1262
Repair
inches at any place. Refer
to Repair No. 4.
CAUTION
: IF THE DOWEL MUST BE
REMOVED, BE CAREFUL NOT TO DAMAGE
THE CRANKSHAFT HOLE. DRILL A 1/8 INCH
DIAMETER HOLE THROUGH THE CENTER
OF THE DOWEL. FILL THE HOLE WITH OIL
AND INSERT A PIECE OF 1/8 INCH
DIAMETER DRILL ROD IN THE HOLE.
STRIKE THE END OF THE DRILL ROD WITH
A SHARP BLOW. THE RESULTING
HYDRAULIC PRESSURE SHOULD FORCE
THE DOWEL OUT.
NOTE:
If the crankshaft requires repairs other
than those specified above, measure
the crankshaft counterbore face. If the
crankshaft measures more than the
minimum dimension shown, the
surface may be reworked to the
dimensions shown (do not plate the
surface). The surface must be true
within 0.001 inch T.I.R. The surface
finish must be held to 45 to 90
microns.
© March 2005 Superior Air Parts Inc.
13
72-00-08
Inspection and Check
Page 70

Camshaft Inspection
Visual inspection.
Entire shaft for fretting,
•
galling, scoring,
pitting, cracks, pitting,
or other damage
Cam lobes for
•
indications of distress,
surface irregularity, or
feathering along the
edges.
NOTE:
If the hydraulic lifter bodies have been
rejected for spalling, inspect the
corresponding cam lobe(s).
Dimensional inspection.
NOTE:
Refer to Fits and Clearances section
of this manual.
•
Runout at center
bearing in excess of
0.001 T.I.R.
•
Difference between
camshaft bearing
journals and
crankcase bore 0.002
minimum to 0.004 in.
maximum
Connecting Rods Inspection
Overhaul Manual
O-360 and IO-360 Series Engines
Visual inspection.
•
Inspect bore in large
Reject
Reject
Reject
Reject if
outside
end of connecting rod.
•
Inspect bushing bore
in small end of
connecting rod.
•
Check connecting rod
parallelism. Refer to
Fits and Clearances.
Refer to Figure 72-00-
08.13
•
Check connecting rod
squareness. Refer to
Fits and Clearances.
Refer to Figure 72-00-
08.15.
Replace or
repair if
tolerances
are outside
the limits
Replace
bushing per
Repair
No 11
Replace rod
if tolerances
are outside
the limits
Replace if
tolerances
are outside
the limits
© March 2005 Superior Air Parts Inc.
14
72-00-08
Inspection and Check
Page 71

Overhaul Manual
O-360 and IO-360 Series Engines
Figure 72-00-08.8 • Camshaft Assembly
© March 2005 Superior Air Parts Inc.
15
72-00-08
Inspection and Check
Page 72

Overhaul Manual
O-360 and IO-360 Series Engines
THIS
PAGE
INTENTIONALLY
LEFT
BLANK
© March 2005 Superior Air Parts Inc.
16
72-00-08
Inspection and Check
Page 73

Overhaul Manual
O-360 and IO-360 Series Engines
ENGINE ASSEMBLY
General
This section has the procedures and illustrations
necessary to assemble the Vantage O-360 and
IO-360 series engine.
Fits, Clearances and Torque Values
Fits, clearances and torque values to be
established during repair or assembly are listed
in the applicable paragraph so that the unit can
be assembled without reference to another
section of the manual.
Table 72-00-09.1 • Assembly Materials
Material Source
Acetone or Methyl Ethyl Ketone (MEK) Commercially Available
Assembly Grease – LubriplateTM No. 105 Commercially Available
Cleaning Solvent Commercially Available
Copper Based Anti-seize, Fel-ProTM C5-A Commercially Available
Fuelube
LoctiteTM 241, P/N 27183 Commercially Available
LoctiteTM No. 2 Gasket Sealant P/N 30514 Commercially Available
Oil, Aviation Grade (Mineral, Non-detergent) Commercially Available
PermatexTM, P/N 27100 Commercially Available
Pre-Lube Mixture – approx. 15% STPTM and 85% Aviation Mineral Oil Mixed Locally
RTVTM 102 Silicon Sealant Commercially Available
Safety Wire (0.032 in.) Type 304 Stainless, P/N MS20995 C32 Commercially Available
Safety Wire (0.041 in.) Type 304 Stainless, P/N MS20995 C41 Commercially Available
Silk Thread #50 (100% Silk) Commercially Available
STPTM High Viscosity Oil Treatment Commercially Available
TitesealTM No. 2 Gasket and Joint Compound P/N T2-01 Commercially Available
Special Tools and Equipment
Special tools and equipment required for
assembly are listed in Table 72-00-09.2 below.
NOTE:
TM
Equivalent substitutes may be used for
listed items.
NOTE:
Materials Required for Assembly
Materials required for assembly are listed in
Table 72-00-09.1 below.
NOTE:
NOTE: Standard reciprocating engine aviation
NOTE:
Limits followed by a letter “T” indicate
“tight”, i.e., interference fit. An
example is the valve guide in the
cylinder head. Where no “T” exists,
the fit is a clearance dimension.
Equivalent substitutes may be used for
listed items.
Commercially Available
shop tools and equipment are used,
unless otherwise specified.
Unless otherwise specified, all gaskets
are installed dry.
© March 2005 Superior Air Parts Inc.
1
72-00-09
Engine Assembly
Page 74

Overhaul Manual
O-360 and IO-360 Series Engines
Table 72-00-09. 2 • Special Tools and Equipment
Description Source
Compressor, Valve Spring & Bar Commercially Available
Piston Ring Expander Commercially Available
Puller Set, Oil Seal Commercially Available
Puller, Slide Hammer – Medium Commercially Available
Puller, Valve Guide Commercially Available
Socket, Connecting Rod Nut Commercially Available
Stand, Engine Commercially Available
Tool, Crankcase Separating Commercially Available
Tool, Intercylinder Baffle Commercially Available
Cylinder Base Wrenches, 3/4” and 9/16” Commercially Available
Piston Ring Grinder Commercially Available
Piston Ring Compressor Commercially Available
Nose Seal Installation Tool Commercially Available
Snap Ring Pliers Commercially Available
Engine Assembly
WARNING
WHEN INSTALLING OR REMOVING SAFETY
WIRE.
WARNING
FLAMMABLE. DO NOT BREATHE VAPORS.
BEFORE YOU USE, READ THE MATERIAL
SAFETY DATA SHEET (MSDS) FROM THE
MANUFACTURER OR SUPPLIER. USE IN A
WELL-VENTILATED AREA FREE FROM
SPARKS. WEAR PROTECTIVE GEAR. IN
CASE OF EYE CONTACT, FLUSH WITH
WATER FOR 15 MINUTES AND SEEK
MEDICAL ATTENTION. IN CASE OF SKIN
CONTACT, WASH WITH SOAP AND WATER.
NOTE:
: PUT ON SAFETY GOGGLES
: LUBRICANTS ARE TOXIC AND
Unless otherwise specified, all torque
loads listed for nuts, bolts, and screws
are for use with pre-lube oil.
Crankcase Inspection and Preparation for
Assembly.
(1) Place crankcase halves on workbench.
Check for handling damage. Inspect for
slight nicks and burrs surface finish, split
lines, bearing and cam bores, mating
surfaces, and tappet bores.
(2) Inspect studs for thread damage, bent
condition.
(3) Inspect tang slots for deformation.
Install center and aft main bearings in
case halves.
(4) Check front main bearing retention
dowel installation for correct height of
0.070-0.090 in. Refer to Figure 72-00-
09.1.
WARNING
AIR TO CLEAN OR DRY PARTS, MAKE SURE
THAT THE PRESSURE IS NOT MORE THAN
30 PSI. DO NOT DIRECT THE AIRSTREAM
AT PERSONNEL OR LIGHT OBJECTS. PUT
ON GOGGLES OR A FACE SHIELD TO
PROTECT YOUR EYES. IF YOU GET AN EYE
INJURY, GET MEDICAL ATTENTION.
(5) Inspect oil galleys in each crankcase
: WHEN YOU USE COMPRESSED
half to ensure they are clean and that
© March 2005 Superior Air Parts Inc.
2
72-00-09
Engine Assembly
Page 75

Overhaul Manual
O-360 and IO-360 Series Engines
they properly intersect. Compressed air
may be used.
WARNING
FLAMMABLE. DO NOT BREATHE VAPORS.
BEFORE YOU USE, READ THE MATERIAL
SAFETY DATA SHEET (MSDS) FROM THE
MANUFACTURER OR SUPPLIER. USE IN A
WELL-VENTILATED AREA FREE FROM
SPARKS. WEAR PROTECTIVE GEAR. IN
CASE OF EYE CONTACT, FLUSH WITH
WATER FOR 15 MINUTES AND SEEK
MEDICAL ATTENTION. IN CASE OF SKIN
CONTACT, WASH WITH SOAP AND WATER.
(6) Apply a light coat of pre-lube oil to main
(7) Using a feeler gage, check thrust and
(8) Repeat steps 6 and 7 in the left
(9) Lightly lubricate camshaft bore journals
(10) Check threaded areas of crankcase
(11) Install piston cooling nozzle, if furnished,
NOTE:
: LUBRICANTS ARE TOXIC AND
bearings (5, Figure 72-00-09.2). Install
crankshaft (25, Figure 72-00-09.3) in
right crankcase half.
slinger clearances. Clearances must be
within limits per Fits and Clearances
section of this manual. Rotate
crankshaft 360 degrees to ensure
adequate cheek to case clearance and
record. Refer to Figure 72-00-09.4.
crankcase half and record clearances.
and temporarily install the camshaft and
rotate in each crankcase half. Using
feeler gage measure and record end
clearance in each half. Clearances must
be within limits per Fits and Clearances
section of this manual.
halves. Install external pipe plugs using
Titeseal™ thread sealant. Torque plug
(40, Figure 72-00-09.5) to 40 in-lbs.
using Locktite™ (95, Figure 72-00-09.5)
torque nozzle to 100 in-lbs.
Plug(s) MS27769-1 may be used in
place of piston nozzle(s) as required
by the engine model. Torque plug(s)
to 40 in-lbs.
Crankshaft Inspection and Preparation for
Assembly
(1) Visually inspect crankshaft for handling
damage. Check bearing, slinger and
thrust face surfaces.
(2) Measure and record main journal
dimensions with micrometer.
Dimensions must be within limits per
Fits and Clearances section of this
manual.
(3) Measure and record rod journal
dimensions with micrometer.
Dimensions must be within limits per
Fits and Clearances section of this
manual.
Crankshaft Front Oil seal Installation
1. Remove spring from new front oil seal (15,
Figure 72-00-09.2). Apply pre-lube oil
mixture to the crankshaft propeller flange
and I.D. of oil seal. Install oil seal with flat
side out to prop flange. Use tool to carefully
stretch seal over flange.
2. Re-install the spring in seal (15) groove.
3. Clean oil from the prop flange.
4. Apply oil to crankshaft and front oil seal (15)
at their fit locations.
5. If required, apply pre-lube and install the
propeller flange bushings (50, 55, 60, Figure
72-00-09.3). Pull through with puller tool.
Refer to Figure 72-00-09.3 for bushing
positions.
6. Install and secure the crankshaft to a vertical
support stand.
WARNING: LUBRICANTS ARE TOXIC AND
FLAMMABLE. DO NOT BREATHE VAPORS.
BEFORE YOU USE, READ THE MATERIAL
SAFETY DATA SHEET (MSDS) FROM THE
MANUFACTURER OR SUPPLIER. USE IN A
WELL VENTILATED AREA FREE FROM
SPARKS. WEAR PROTECTIVE GEAR. IN
CASE OF EYE CONTACT, FLUSH WITH
WATER FOR 15 MINUTES AND SEEK
MEDICAL ATTENTION. IN CASE OF SKIN
CONTACT, WASH WITH SOAP AND WATER.
© March 2005 Superior Air Parts Inc.
3
72-00-09
Engine Assembly
Page 76

Overhaul Manual
O-360 and IO-360 Series Engines
Figure 72-00-09.1 • Crankcase Bearing Retention Dowel
© March 2005 Superior Air Parts Inc.
4
72-00-09
Engine Assembly
Page 77

Overhaul Manual
O-360 and IO-360 Series Engines
Figure 72-00-09.2 • Crankshaft Bearing and Oil Pressure Relief Valve
© March 2005 Superior Air Parts Inc.
5
72-00-09
Engine Assembly
Page 78

Overhaul Manual
O-360 and IO-360 Series Engines
Figure 72-00-09.3 • Crankshaft Assembly
© March 2005 Superior Air Parts Inc.
6
72-00-09
Engine Assembly
Page 79

Overhaul Manual
O-360 and IO-360 Series Engines
Figure 72-00-09.4 • Crankshaft Thrust and Slinger Clearance
© March 2005 Superior Air Parts Inc.
7
72-00-09
Engine Assembly
Page 80

Overhaul Manual
O-360 and IO-360 Series Engines
Figure 72-00-09.5 • Crankcase Assembly
© March 2005 Superior Air Parts Inc.
8
72-00-09
Engine Assembly
Page 81

Overhaul Manual
O-360 and IO-360 Series Engines
Connecting Rod Assembly Inspection
(1) Visually inspect the rod assembly (5,
Figure 72-00-09.6) for handling damage,
defects, and corrosion.
(2) Inspect the bore finish. This must be
smooth and free of burrs.
(3) Verify correct rod part number.
(4) Verify the serial number match for each
rod and cap assembly.
(5) Verify and record each rod assembly
weight.
NOTE:
Subassembly of Connecting Rods to
Crankshaft
Difference in rod assembly weights
must not exceed 2 grams in opposing
pairs.
(6) Check each piston pin (35) in each rod
(5) for fit. The pins must slide freely
through the rod.
(1) Visually inspect the rod bolts and nuts
(10, 15 Figure 72-00-09.6). Lightly
lubricate bolt shanks and threads with
pre-lube oil.
(2) Verify bearing part number and size for
crankshaft and model application.
(3) Install the connecting rod bearing shell
(1) in each rod and cap (5).
(4) Apply pre-lube oil to the bearing shell
(1).
(5) Apply pre-lube oil to the rod bearing
journals of crankshaft.
(6) Insert 2 rod bolts through each rod cap.
Begin with the lowest serial number rod
cap and install it to the crankshaft with
its matching rod (5) at the #1 (most
forward) rod location.
(a) Install with serial numbers in same
plane and down towards oil sump.
Refer to Figure 72-00-09.7.
(b) Install the nuts with flat side to
connecting rod. Refer to Figure 7200-09.7. Tighten moderately to
check fit prior to torque.
(7) Tighten each rod nut to bolt (10,15,
Figure 72-00-09.6) evenly to 480 in-lb.
torque.
(8) Rotate each connecting rod (5) after
torque to check for smooth and free
rotation.
(9) Measure and record connecting rod to
crankshaft side clearance. Clearance
must be within limits per Fits and
Clearances section of this manual.
WARNING: LUBRICANTS ARE TOXIC AND
FLAMMABLE. DO NOT BREATHE VAPORS.
BEFORE YOU USE, READ THE MATERIAL
SAFETY DATA SHEET (MSDS) FROM THE
MANUFACTURER OR SUPPLIER. USE IN A
WELL-VENTILATED AREA FREE FROM
SPARKS. WEAR PROTECTIVE GEAR. IN
CASE OF EYE CONTACT, FLUSH WITH
WATER FOR 15 MINUTES AND SEEK
MEDICAL ATTENTION. IN CASE OF SKIN
CONTACT, WASH WITH SOAP AND WATER.
Installation of Crank Gear to Crankshaft
(1) Inspect the crank gear (5, Figure 72-00-
09.3), bolt (15), and lockplate (10) for
defects.
(2) Lightly lubricate with pre-lube crank bolt
threads and install the gear (5) to
crankshaft with bolt (15) and new
lockplate (10). Ensure that the gear (5)
fits evenly in crank recess, aligns with
dowel, and sits flat when torqued.
Tapping the gear with a soft aluminum
or brass drift will help ensure the seal is
properly seated. Torque crankshaft gear
bolt (15) to 204 in-lb. Attempt to insert a
pointed 0.001 in. feeler gage or piece of
shim stock between the gear and the
crankshaft at each of the three scallops.
There is no allowable clearance
between crankshaft and gear. Bend
lockplate (10) tab up to secure bolt
head.
WARNING: LUBRICANTS ARE TOXIC AND
FLAMMABLE. DO NOT BREATHE VAPORS.
BEFORE YOU USE, READ THE MATERIAL
SAFETY DATA SHEET (MSDS) FROM THE
MANUFACTURER OR SUPPLIER. USE IN A
WELL VENTILATED AREA FREE FROM
SPARKS. WEAR PROTECTIVE GEAR. IN
CASE OF EYE CONTACT, FLUSH WITH
WATER FOR 15 MINUTES AND SEEK
MEDICAL ATTENTION. IN CASE OF SKIN
CONTACT, WASH WITH SOAP AND WATER.
© March 2005 Superior Air Parts Inc.
9
72-00-09
Engine Assembly
Page 82

Overhaul Manual
O-360 and IO-360 Series Engines
Assembly of Case and Crankshaft Assembly
(1) With crankcase halves lying on bench
with interior sides up, ensure that center
and rear main bearings (5, Figure 72-
00-09.2) are installed and lubricated
with pre-lube.
(2) Lubricate tappet bore holes and tappet
bodies (20) (shank) and install bodies in
case.
(3) Apply cam pre-lube liberally to tappet
(20) faces and camshaft lobes. (5,
Figure 72-00-09.8). A moly-graphite
grease is recommended.
(4) Place camshaft (5) on bench beside
case halves.
(5) Clean mating surfaces of both case
halves including nose seal area with fast
dry solvent.
(6) Clean nose seal OD with fast dry
solvent.
(7) Place front main (10, Figure 72-00-09.2)
bearing temporarily in place in the left
crankcase half making sure the bearing
is properly seated on the 2 locator
dowels.
NOTE:
WARNING
FLAMMABLE. DO NOT BREATHE VAPORS.
BEFORE YOU USE, READ THE MATERIAL
SAFETY DATA SHEET (MSDS) FROM THE
MANUFACTURER OR SUPPLIER. USE IN A
WELL-VENTILATED AREA FREE FROM
SPARKS. WEAR PROTECTIVE GEAR. IN
CASE OF EYE CONTACT, FLUSH WITH
WATER FOR 15 MINUTES AND SEEK
The front main bearing (10), unlike the
center and rear main bearings, splits
on the horizontal centerline of the
engine.
(8) Use a felt marker to trace on the front
bearings halves at the intersection
between the crankcase parting flanges
and the bearing. Make a vertical
reference mark on both the bearing half
and each case half at a convenient point
along the line of intersection. This
locates the bearing both radially and
axially. Make two parallel marks across
both bearing shells at their intersection
for alignment reference. Refer to Figure
72-00-09.9.
: LUBRICANTS ARE TOXIC AND
MEDICAL ATTENTION. IN CASE OF SKIN
CONTACT, WASH WITH SOAP AND WATER.
(9) Remove front main bearings. Lubricate
bearing surfaces liberally with pre-lube
oil and fit to crankshaft aligning the two
parallel marks. Refer to Figure 72-00-
09.10.
(10) Install two 3/8 in. bolts with their
corresponding flat washers through the
right case half and install 2 O-rings (10,
Figure 72-00-09.11).
(11) Install 2 O-rings (75) on rear through
studs of right case half.
(12) Lubricate crankshaft main bearing
journals and cam bores with pre-lube oil.
(13) Lay out crankcase assembly hardware
per Figure 72-00-09.11 and 72-00-09.12
together with appropriate hand tools.
- STOP -
PERFORM IN-PROCESS QUALITY
INSPECTION #1. REFER TO APPENDIX A.
(14) Assure that case mating surfaces are
clean and dry.
WARNING
AND FLAMMABLE. DO NOT BREATHE
VAPORS. AVOID EYE AND SKIN CONTACT.
USE PROTECTIVE GEAR. IN CASE OF EYE
CONTACT, FLUSH WITH WATER FOR 15
MINUTES AND SEEK MEDICAL ATTENTION.
IN CASE OF SKIN CONTACT, WASH WITH
SOAP AND WATER.
(15) Apply an even, thin coat of approved
(16) When using RTV 102 the coating must
: ADHESIVE SEALANT IS TOXIC
sealant to the backbone and breastbone
surfaces of the left case half only and to
the front nose seal bore (both case
halves) as well as the nose seal OD.
not be too thick. A thin translucent
coating is sufficient. Wipe off any
excess on the inside and outside edges.
Refer to Figure 72-00-09.13. Because
this sealant will dry quickly when applied
this thinly, it is important to proceed
quickly until case halves are together
and snug. A helper is required during
this assembly process.
© March 2005 Superior Air Parts Inc.
10
72-00-09
Engine Assembly
Page 83

Overhaul Manual
O-360 and IO-360 Series Engines
(17) Lay a single line of silk thread on the
RTV sealant at the centerline of the
sealing surface and loop the inside of
each bolt hole. The tail of the thread
should extend beyond the mating
surface approximately 0.25 in. to the
accessory gasket surface at the rear,
the nose seal surface at the front and
the sump gasket surface at the bottom.
Refer to Figure 72-00-09.13.
(18) A helper places the left case half up to
the crank assembly with the connec ting
rods protruding through their appropriate
cylinder holes and allows the assembler
to align the front main bearing inserts
with the dowels in the crankcase. The
helper uses light pressure against case
half as the assembler adjusts front main
bearing until it snaps in place.
NOTE:
NOTE:
Using a tool to gently lift up on bearing
while holding case half-tight to
crankshaft will aid in determining if
bearing is properly seated. When
properly seated, the bearing and case
will move slightly up and down
together as the front of the bearing is
pried up and down.
(19) With the left case half and bearing
properly seated, the helper places a tool
inserted through the #4 connecting rod
piston pin hole. The case is rotated to
wedge the tool against the case half.
Firm pressure is maintained on
crankcase. Refer to Figure 72-00-
09.14.
It is imperative that the helper
maintains constant pressure on the left
case half throughout the assembly
process until case halves are snugged
together. Enough case assembly
hardware must be installed to not
allow the front main bearing to shift
from the locating dowels.
(20) Check thread and nose seal (15, Figure
72-00-09.2) for proper placement.
(21) Install camshaft in left case half and
have helper hold in place.
(22) Mate the right case half to the left case
half by carefully aligning rear through
studs and front 3/8 in. nose bolts.
NOTE:
WARNING
FLAMMABLE. DO NOT BREATHE VAPORS.
BEFORE YOU USE, READ THE MATERIAL
SAFETY DATA SHEET (MSDS) FROM THE
MANUFACTURER OR SUPPLIER. USE IN A
WELL VENTILATED AREA FREE FROM
SPARKS. WEAR PROTECTIVE GEAR. IN
CASE OF EYE CONTACT, FLUSH WITH
WATER FOR 15 MINUTES AND SEEK
MEDICAL ATTENTION. IN CASE OF SKIN
CONTACT, WASH WITH SOAP AND WATER.
NOTE: Care should be taken not to
push out the 3/8 in. nose bolts (5,
Figure 72-00-09.11) causing the orings (10) to fall out.
(23) Ensure that nose seal is properly in
place.
(24) Install backbone bolts (30), breastbone
bolts (90, 95), and nose bolts (5) with
appropriate hardware. Snug all
uniformly. Check for free case to crank
rotation.
: LUBRICANTS ARE TOXIC AND
(25) Lightly lubricate shank and threads of
the ½ in. Dia. through bolts (1, Figure
72-00-09.12), with pre-lube oil. Install
using a soft faced (dead blow) hammer
as far as possible. Finish installation
with sufficiently sized ball-peen hammer
or equivalent using a nut or threaded
cap to protect the threads and thru-bolt
end. Thru bolts are properly installed
when an equal number of threads
protrude from each case half.
© March 2005 Superior Air Parts Inc.
11
72-00-09
Engine Assembly
Page 84

Overhaul Manual
O-360 and IO-360 Series Engines
Figure 72-00-09.6 • Connecting Rod and Piston Assembly
© March 2005 Superior Air Parts Inc.
12
72-00-09
Engine Assembly
Page 85

Overhaul Manual
O-360 and IO-360 Series Engines
Figure 72-00-09.7 • Connecting Rod Installation
© March 2005 Superior Air Parts Inc.
13
72-00-09
Engine Assembly
Page 86

Overhaul Manual
O-360 and IO-360 Series Engines
Figure 72-00-09.8 • Camshaft Assembly
© March 2005 Superior Air Parts Inc.
14
72-00-09
Engine Assembly
Page 87

Overhaul Manual
O-360 and IO-360 Series Engines
Figure 72-00-09.9 • Main Bearing Reference Marks
© March 2005 Superior Air Parts Inc.
15
72-00-09
Engine Assembly
Page 88

Overhaul Manual
O-360 and IO-360 Series Engines
Figure 72-00-09.10 • Main Bearing Installation
© March 2005 Superior Air Parts Inc.
16
72-00-09
Engine Assembly
Page 89

Overhaul Manual
O-360 and IO-360 Series Engines
Figure 72-00-09.11 • Crankcase Attaching Hardware
© March 2005 Superior Air Parts Inc.
17
72-00-09
Engine Assembly
Page 90

Overhaul Manual
O-360 and IO-360 Series Engines
Figure 72-00-09.12 • Crankcase Attaching Hardware (cont’d.)
© March 2005 Superior Air Parts Inc.
18
72-00-09
Engine Assembly
Page 91

Overhaul Manual
O-360 and IO-360 Series Engines
Figure 72-00-09.13 • Sealant Compound and Silk Thread Application
© March 2005 Superior Air Parts Inc.
19
72-00-09
Engine Assembly
Page 92

Overhaul Manual
O-360 and IO-360 Series Engines
Figure 72-00-09.14 • Crankcase Halves Assembly
© March 2005 Superior Air Parts Inc.
20
72-00-09
Engine Assembly
Page 93

Overhaul Manual
O-360 and IO-360 Series Engines
Cylinder Assembly Inspection
(1) Verify cylinder part number and serial
number.
(2) Visually inspect general condition of
cylinder for handling or shipping
damage.
(3) Verify the valve, spring, and key (65, 70,
85, 90, 105, 110, Figure 72-00-09.15)
installations.
(4) Visually check threaded holes for thread
integrity and helical coil insert if
required. Ensure the absence of foreign
matter.
WARNING
WELL-VENTILATED AREA. PREVENT EYE
AND SKIN CONTACT AND DO NOT
BREATHE VAPORS IN CASE OF EYE
CONTACT, FLUSH WITH WATER FOR 15
MINUTES AND SEEK MEDICAL ATTENTION.
IN CASE OF SKIN CONTACT, WASH WITH
SOAP AND WATER.
(5) Wipe cylinder bores clean with lint-free
(6) Inspect piston (30, Figure 72-00-09.6)
NOTE:
(7) Clean piston pins (35) with fast dry
NOTE:
: SOLVENT IS TOXIC. USE IN
rag saturated with fast dry solvent.
part number and weight.
Piston weight differences should not
exceed 2 grams in opposing pairs.
solvent and check fit to each piston.
Piston pins are a push fit with light
lubrication. Refer to Figure 72-00-
09.16.
(8) Verify piston ring (40, 45) part numbers.
(9) Check ring gaps of compression rings
(45, Figure 72-00-09.6) and oil control
ring (40) with feeler gauge. End gap at
1”-4” from flange and gap at top of
piston stroke must be within limits per
Fits and Clearances section of this
manual.
(10) Insert piston rings, one at a time in their
respective grooves.
(11) Using a ring expander, install rings to
piston with the lower ring first, then
middle and top.
NOTE:
NOTE:
Numbers on the ring face indicate top
of the piston or up.
(12) Check side clearance of each ring.
Piston compression ring (45) in top
groove is 0.0025 to 0.0055 in. Piston
compression ring (45) in 2nd groove is
0.000. to 0.0040 in. Piston oil control
ring (40) in 3rd groove is 0.0020 to
0.0040 in.
Side clearance is checked with ring in
its respective groove and flush with
outside edge of piston.
© March 2005 Superior Air Parts Inc.
21
72-00-09
Engine Assembly
Page 94

Overhaul Manual
O-360 and IO-360 Series Engines
Figure 72-00-09.15 • Cylinder Valve Train and Spring Assembly
© March 2005 Superior Air Parts Inc.
22
72-00-09
Engine Assembly
Page 95

Overhaul Manual
O-360 and IO-360 Series Engines
Figure 72-00-09.16 • Piston Assembly to Connecting Rod
© March 2005 Superior Air Parts Inc.
23
72-00-09
Engine Assembly
Page 96

Overhaul Manual
O-360 and IO-360 Series Engines
Cylinder Assembly Installation to Engine
(1) Lubricate the rings and ring grooves on
the piston with straight weight, non-
detergent (mineral) aviation grade oil.
(2) Stagger the ring gaps as follows: Top
ring gap is at approximately the 10
o’clock position, 2nd ring gap is at
approximately 2 o’clock; and the oil
control ring gap is at approximately 11
o’clock.
WARNING
FLAMMABLE. DO NOT BREATHE VAPORS.
BEFORE YOU USE, READ THE MATERIAL
SAFETY DATA SHEET (MSDS) FROM THE
MANUFACTURER OR SUPPLIER. USE IN A
WELL-VENTILATED AREA FREE FROM
SPARKS. WEAR PROTECTIVE GEAR. IN
CASE OF EYE CONTACT, FLUSH WITH
WATER FOR 15 MINUTES AND SEEK
MEDICAL ATTENTION. IN CASE OF SKIN
CONTACT, WASH WITH SOAP AND WATER.
NOTE:
(3) Lubricate the cylinder bores, piston pins
(4) Lubricate the cylinder base o-ring (5,
(5) Lightly lubricate cylinder deck studs and
(6) Rotate the engine so that the #1
: LUBRICANTS ARE TOXIC AND
Oil control expander spring is installed
in piston groove underneath the oil
control ring and with its split line 180°
from the ring gap.
and piston pin bushing in connecting rod
with straight weight, non-detergent
(mineral) aviation grade oil.
Figure 72-00-09.17) with oil and install
over the cylinder base.
through bolts with pre-lube oil.
connecting rod is at the top of the
stroke. Install the #1 piston to the #1
connecting rod with the piston pin.
Refer to Figure 72-00-09.16.
NOTE:
WARNING
WHEN INSTALLING OR REMOVING SAFETY
WIRE.
Ensure that piston is installed with ring
gaps towards the top of the engine.
(7) Slide the ring compressor tool over the
piston and rings far enough to allow the
cylinder bore to fit over the piston top.
(8) Install cylinder #1: Position the top of
cylinder facing the top of the engine
over the piston. Push on until the ring
compressor is pushed off the piston skirt
and can be removed at notch over the
connecting rod. Continue to slide the
cylinder over the cylinder base studs
until flush with the case deck. Refer to
Figure 72-00-09.18.
(9) Secure the cylinder assembly with the
cylinder base nuts (15, 20, Figure 7200-09.17) as required and tighten to
snug.
(10) Continue process with cylinders #2, then
#3, and #4 in that order. Rotate the
case and crank so that the connecting
rod of the cylinder to be installed is at
top dead center.
(11) Torque the large cylinder hold down
nuts (15, Figure 72-00-09.17) to 600 inlbs. Torque the small hold down nuts
(20) to 300 in-lbs. Do this in the
sequence shown in Figure 72-00-09.19.
(12) Torque all crankcase assembly
hardware in accordance with Fits and
Clearances Table 72-00-11.2. Do this in
the sequence shown in Figure 72-00-
09.19.
: PUT ON SAFETY GOGGLES
(13) Torque slotted 0.38 in. nut (85) to 300
in-lbs. Install safety wire (0.041 in.) at
accessory location by cam gear.
(14) Torque the three, drilled-shank, 0.25 in.
belly bolts (95) and slotted nuts (100) to
55-60 in-lbs. Install safety wire (0.032
in.).
© March 2005 Superior Air Parts Inc.
24
72-00-09
Engine Assembly
Page 97

Overhaul Manual
O-360 and IO-360 Series Engines
Figure 72-00-09.17 • Cylinder Assembly and Head Oil Drain Line
© March 2005 Superior Air Parts Inc.
25
72-00-09
Engine Assembly
Page 98

Overhaul Manual
O-360 and IO-360 Series Engines
Figure 72-00-09.18 • Piston Assembly with Ring Compressor Tool
© March 2005 Superior Air Parts Inc.
26
72-00-09
Engine Assembly
Page 99

Overhaul Manual
O-360 and IO-360 Series Engines
Figure 72-00-09.19 • Cylinder Base Nuts Sequence of Tightening
© March 2005 Superior Air Parts Inc.
(Left Side Shown)
27
72-00-09
Engine Assembly
Page 100

Overhaul Manual
O-360 and IO-360 Series Engines
Installation of Idler Shafts and Gears and
Internal Gear Timing
(1) Install 2 each idler shafts (1, Figure 72-
00-09.20) with 3 bolts (5) and one nut
(10). Torque the bolts (5) and nut (10)
in accordance with the torque
specifications per the Fits and
Clearances section of this manual.
Safety the nuts and bolts with 0.032 in.
safety wire to idler shaft flange holes.
Refer to Figure 72-00-09.21.
WARNING
WHEN INSTALLING OR REMOVING SAFETY
WIRE.
WARNING
FLAMMABLE. DO NOT BREATHE VAPORS.
BEFORE YOU USE, READ THE MATERIAL
SAFETY DATA SHEET (MSDS) FROM THE
MANUFACTURER OR SUPPLIER. USE IN A
WELL-VENTILATED AREA FREE FROM
SPARKS. WEAR PROTECTIVE GEAR. IN
CASE OF EYE CONTACT, FLUSH WITH
WATER FOR 15 MINUTES AND SEEK
MEDICAL ATTENTION. IN CASE OF SKIN
CONTACT, WASH WITH SOAP AND WATER.
NOTE:
: PUT ON SAFETY GOGGLES
(2) Inspect idler gears and for handling
damage, burrs, and general condition.
: LUBRICANTS ARE TOXIC AND
(3) Apply pre-lube oil to idler shafts (1) and
gear bushing (25).
(4) Highlight with a marker the timing
marks on the camshaft, crank gear, and
fuel pump drive idler gear (15).
(5) Place the left-hand idler gear (fuel
pump drive idler gear) over the left idler
shaft aligning its timing marks with the
corresponding timing marks on cam
and crank. Rotate cam and crank as
needed to align with marks on the idler
gear. See Figure 72-00-09.22.
(6) Install the right hand idler gear (20) on
the right side idler shaft.
It is not necessary to align timing
marks on this gear.
(7) Check gear backlash of both idler gears
with feeler gauge or dial indicator.
Backlash limits must be within limits
specified in Fits and Clearances section
of this manual.
(8) Install tachometer shaft assembly (15,
Figure 72-00-09.8) with retaining ring
(25) in camshaft (5) at gear end.
- STOP -
PERFORM IN-PROCESS QUALITY
INSPECTION #2. REFER TO APPENDIX A.
Cleaning, Inspection, and Installation of
Hydraulic Plunger and Cup Assembly
(1) Visually inspect and clean hydraulic
plunger assemblies (25, Figure 72-00-
09.15) with fast dry solvent.
WARNING
WELL-VENTILATED AREA. PREVENT EYE
AND SKIN CONTACT AND DO NOT
BREATHE VAPORS. IN CASE OF EYE
CONTACT, FLUSH WITH WATER FOR 15
MINUTES AND SEEK MEDICAL ATTENTION.
IN CASE OF SKIN CONTACT, WASH WITH
SOAP AND WATER.
(2) Depress hydraulic plunger piston with
WARNING
FLAMMABLE. DO NOT BREATHE VAPORS.
BEFORE YOU USE, READ THE MATERIAL
SAFETY DATA SHEET (MSDS) FROM THE
MANUFACTURER OR SUPPLIER. USE IN A
WELL-VENTILATED AREA FREE FROM
SPARKS. WEAR PROTECTIVE GEAR. IN
CASE OF EYE CONTACT, FLUSH WITH
WATER FOR 15 MINUTES AND SEEK
MEDICAL ATTENTION. IN CASE OF SKIN
CONTACT, WASH WITH SOAP AND WATER.
(3) Apply a light coat of pre-lube oil to the
(4) Insert plunger, small tube end first, into
(5) Insert tappet cup or socket (30) into
: SOLVENT IS TOXIC. USE IN
thumb to ensure proper spring action.
(a) If unit does not compress, use blunt
end of a 3/32 in. diameter rod to
dislodge check ball allowing trapped
air, oil, or solvent to escape.
(b) Remove rod and try depressing
piston again.
: LUBRICANTS ARE TOXIC AND
OD of each plunger.
tappet body in crankcase. Refer to
Figure 72-00-09.15.
tappet body on top of plunger assembly.
© March 2005 Superior Air Parts Inc.
28
72-00-09
Engine Assembly
 Loading...