

Superior SUP-1.5B, SUP-6.5WF, SUP-6WE, SUP-8WE, SUP-10WE Installation Manual And Owner's Manual
Installation Guide
and Owner’s Manual
SUP-1.5B, SUP-1.5B, SUP-6.5WF
SUP-6WE, SUP-8WE, SUP-10WE
Indicates a potentially hazardous situation, which, if not avoided,
could result in death or serious injury.
Indicates a potentially hazardous situation, which, if not avoided,
may result in minor or moderate injury.
Information
Step-by-step Instructions
FOR YOUR SAFETY
If you smell gas:
1. Open windows.
2. Don’t touch electrical switches.
3. Extinguish any open flame.
4. Immediately call your gas supplier.
Do not store or use gasoline or other
flammable vapors and liquids in the
vicinity of this or any other appliance.
Improper installation, adjustment, alteration,
service or maintenance can cause injury or
property damage.
Refer to this manual.
For assistance or additional information
consult a qualified installer, service agency
or the gas supplier.
SUP-1.5B
SUP-2B
SUP-6.5WF
SUP-8WE
SUP-6WE
SUP-10WE

- 2 -
Table of Contents
Free-Standing Model for Floor Installation (ONLY) ....................................................................................... - 3 -
Clearances ........................................................................................................................................................... - 3 -
Refrigerator Dimensions .................................................................................................................................... - 4 -
Gas Connection .................................................................................................................................................. - 4 -
Testing LP Gas Safety Shutoff ......................................................................................................................... - 5 -
Electrical Connection.......................................................................................................................................... - 5 -
Refrigerator Removal ......................................................................................................................................... - 5 -
Importance of Leveling a Refrigerator ............................................................................................................. - 6 -
Electric Operation (110V) .................................................................................................................................. - 7 -
Thermostat ........................................................................................................................................................... - 7 -
Food Storage Compartment .............................................................................................................................. - 8 -
Frozen Food Storage Compartment ................................................................................................................ - 8 -
Ice Making ............................................................................................................................................................ - 8 -
Defrosting ............................................................................................................................................................. - 9 -
Cleaning ............................................................................................................................................................... - 9 -
Position the Storage Racks ............................................................................................................................. - 10 -
Shut off – Storage Procedure ......................................................................................................................... - 10 -
Periodic Maintenance ....................................................................................................................................... - 11 -
Check all connection in the LP gas system .................................................................................................. - 11 -
Check burner flame .......................................................................................................................................... - 12 -
Check the LP gas pressure ............................................................................................................................. - 12 -
Inspect the flue baffle ....................................................................................................................................... - 12 -
Trouble Shooting ............................................................................................................................................... - 14 -
Superior Spare Parts ........................................................................................................................................ - 14 -
- 3 -
Installation Guide
Free-Standing Model for Floor Installation (ONLY)
The room must be well ventilated and not used in a bedroom. Further the room should have a window
(which can be opened) or a door to the outside.
For best performance at high ambient temperatures there must be a free air circulation over the cooling
unit at the rear of the refrigerator. Ensure that there is a free space of at least 4” inches (100 mm)
above the refrigerator and that the exhaust opening on the top of the refrigerator is not covered in any
way.
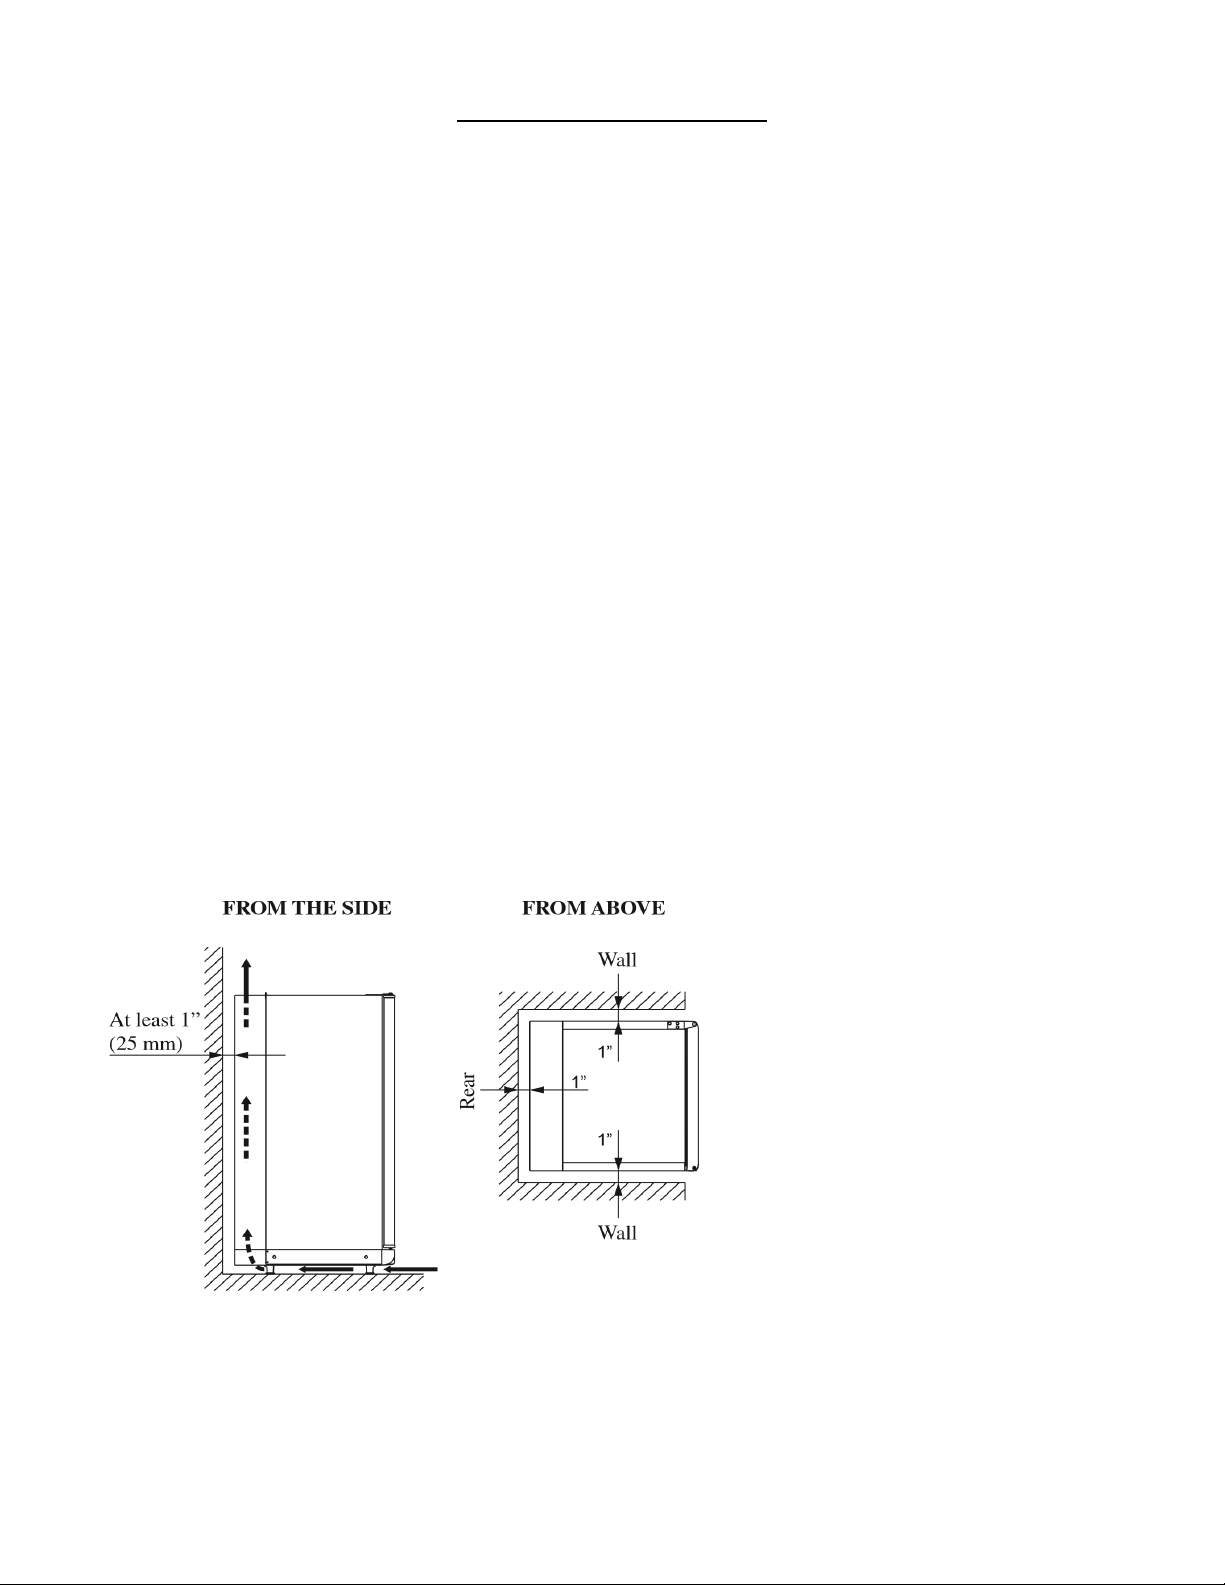
Do not place the refrigerator in a space where air circulation is restricted. A clearance of at least 1-inch
(25 mm) should be left between the rear and sides of the refrigerator and the surrounding walls.
This freestanding refrigerator requires accessibility to the rear for servicing the appliance. Accessibility
can be obtained by using a certified Flexible Metal Gas Connector. which would allow the refrigerator to
be moved without disrupting the gas supply. Use the feet on the refrigerator to adjust its position.
NOTE: For optimal performance the refrigerator must be level.
Clearances
Minimum clearances in inches to combustible materials are:
Top:
3.96” (Min 100mm)
Side:
1”
Rear/Back:
1”
Bottom: The feet must be in place to
ensure free air circulation.
NOTE: DO NOT install the appliance directly on carpeting. Carpeting must be removed or protected by
a metal or wood panel beneath the appliance, which extends at least the full width and depth of the
appliance.

- 4 -
Height
Installation Guide
Refrigerator Dimensions
Gas Connection
Hook up to the gas supply line is accomplished at the manual gas shutoff valve, which is furnished with
a 3/8” SAE (UNF 5/8” -18) male flare connection. A backup wrench must be used when tightening
gas supply fitting.
All completed connections should be checked for leaks with a noncorrosive leak detector.
The gas supply system must incorporate a pressure regulator to maintain a supply pressure of 11
inches water column.
When testing the gas supply system at test pressures in excess of 1/2 psi, the refrigerator and its
individual shutoff valve must be disconnected from the gas supply piping system. When testing the gas
supply system at pressures less than or equal to 1/2 psi, the appliance must be isolated from the gas
supply piping system by closing its individual manual shutoff valve.
In case detailed instructions on the installation and connection to the gas supply are required, contact
your dealer or distributor.
EXPLOSION HAZARD
Never use an open flame to check for gas
leaks. Failure to heed this warning could
cause an explosion resulting in death or
severe personal injury.
Dimension Reference

- 5 -
Installation Guide
Testing LP Gas Safety Shutoff
The gas safety shutoff must be tested after the refrigerator is connected to the LP gas supply.
To test the gas safety shutoff, proceed as follows:
1. Start the refrigerator according to the instructions for Gas Operation; section “Operation
Instructions”. See Figure #1
2. Check that the gas flame is lit. This can be observed through the flame indicator (B).
3. Close the gas valve by turning the knob (E) back to “OFF” position.
4. Wait for one minute.
5. Remove burner cover plate, one screw at the burner. Open the gas valve by turning the
knob (E) to position “GAS” without pushing the buttons (A) and (C). Apply a non-corrosive
commercial bubble solution to the burner jet.
6. No bubbles should appear at the opening of the burner jet. The presence of bubbles
indicates a defective gas safety shutoff, and service is required.
7. If no bubbles were present at the burner jet, the gas safety valve is working properly. Rinse
jet thoroughly with fresh water before proceeding. Be careful not to damage the burner jet.
8. Replace the burner cover plate and turn the knob (E) back to “OFF”.
9. Start the refrigerator by following the instructions for Gas Operation, section “Operation
Instructions”.
10. Normal operation of the burner should return. Allow the burner to operate for a minimum of
5 minutes.
Electrical Connection
120 V AC Connection
The refrigerator is equipped with a three-prong (grounding) plug for your protection against shock
hazards and should be plugged directly into a properly grounded three prong receptacles. DO NOT cut
or remove the grounding prong from this plug. The cord should be routed to avoid direct contact with
the burner cover, flue cover or any other components that could damage the cord insulation.
Refrigerator Removal
Before working on the refrigerator, make sure the AC voltage leads are disconnected. Shut off the gas
supply. Disconnect the gas supply line at the rear of the refrigerator. Always use a backup wrench
when loosening and tightening this connection. Cap the gas supply line and remove the refrigerator.
Replacement is the reverse of removal. Check all connections for gas leaks.
 Loading...