

Page 1
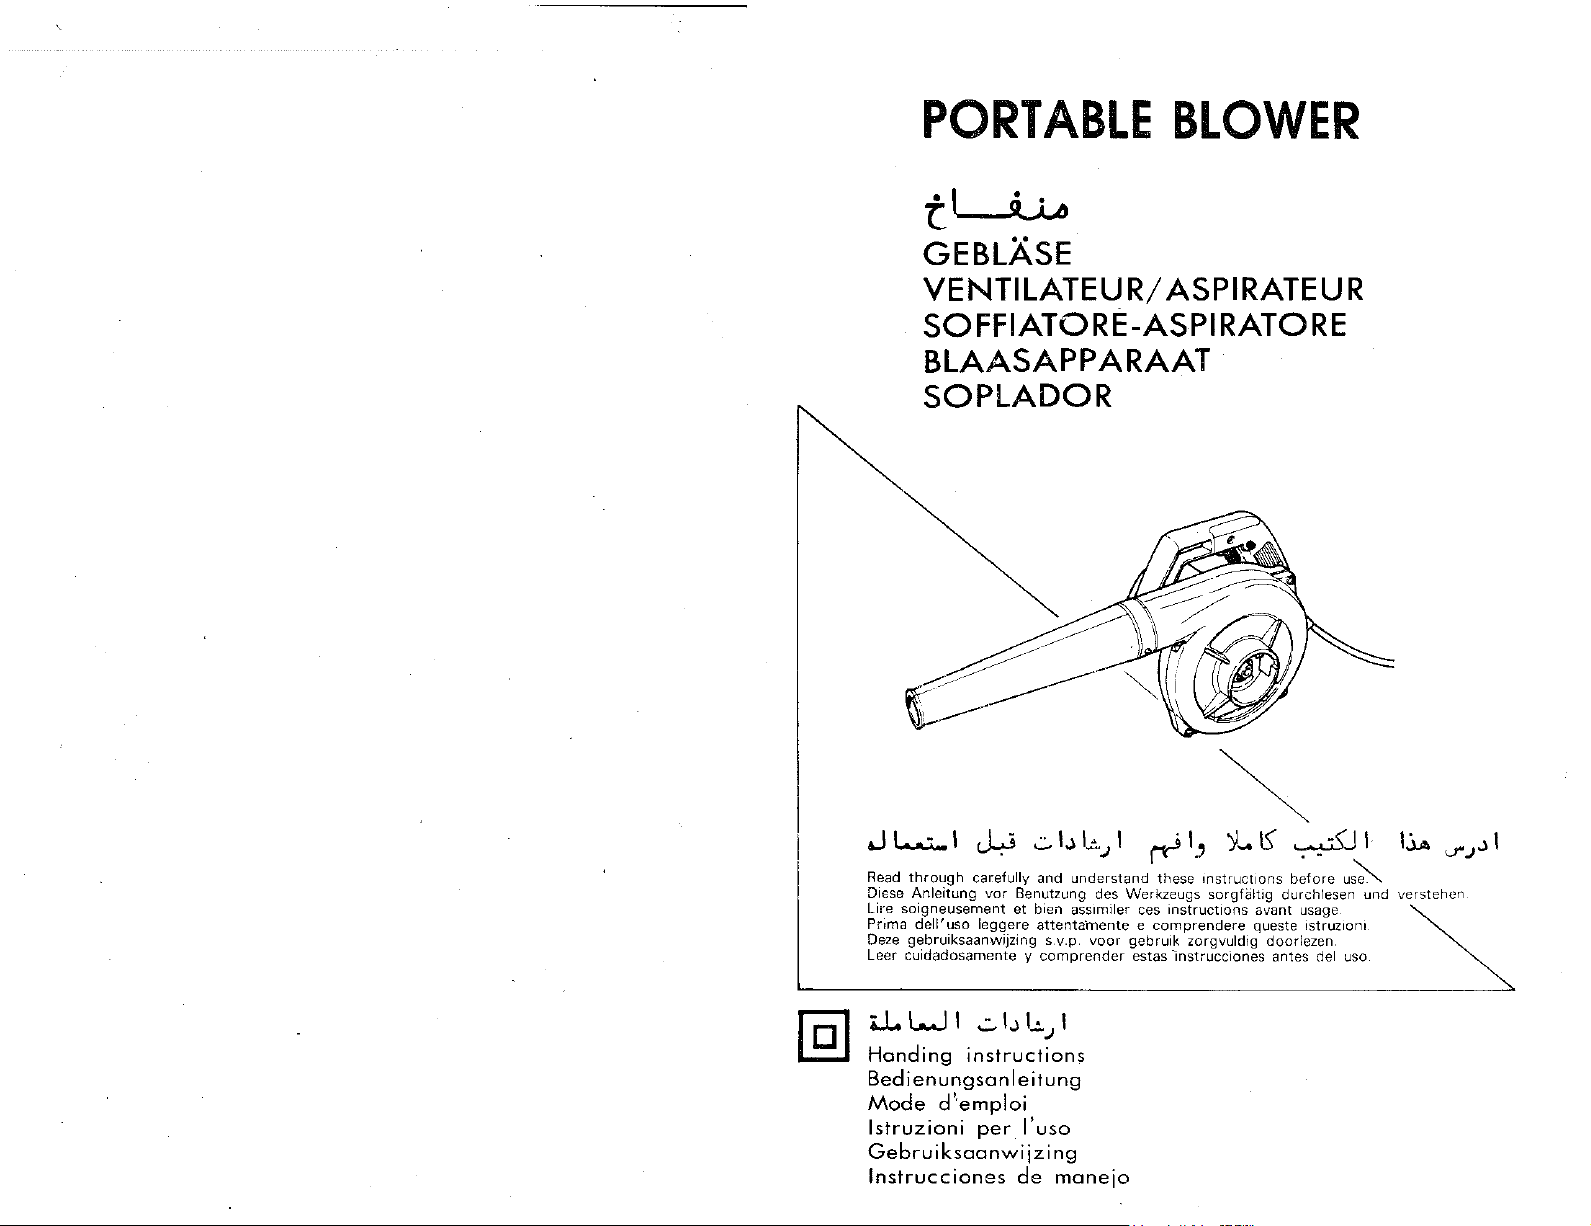
PORTABLE
BLOWER
t~
GEBLASE
VENTILATEUR/
ASPIRATEUR
SOFFIATORE-ASPIRATORE
BLAASAPPARAAT
SOPLADOR
~
.J
l.......:i_l
Read
through
Diese
Anleitung
Lire
soigneusement
Pr1ma
dell'uso
Deze gebruiksaanwijzing s.v.p.
Leer cuidadosamente y
~
..::..l
..
d..:.)
carefully
leggere attenta·mente e
and
vor
understand
Benutzung des Werkzeugs sorgfi:iltig durchlesen und verstehen
et bien ass1miler ces
voor
comprender
~
1.,
Y~
these
1nstruct1Dns
instructions
comprendere
gebruik zorgvuldig doorlezen
estas
lnstrucciones
IS'
~J
before
u~
avant
usage
queste istruZIOnl
antes del usa
I
I.).,.
J"J.)
I
iJ..
WI
Handing
Bedi
enungsan I eitung
Mode
lstruzioni
Gebruiksaanwijzi
lnstrucciones
..::..I.J
instructions
d'emploi
per
1.!-J
l'uso
de
I
ng
manejo
Page 2

Specifications
Voltage (by areas)•
Input
Full-load Speed 13000/min
Wind
Pressure
Wind Velocity 2.3m3/min
Output
We1ght
(without cord) 1.8kg
*Be
sure
to
check
the
nameplate
General
1.
2.
3. Keep
4. Store idle tools. When
5.
6.
7. Wear proper apparel.
B.
9.
10. Secure
11.
12. Maintain
13.
14. Remove adjusting keys and wrenches.
15.
16.
operational
Keep
benches
power
or
safe distance
be Stored in
reach
safer at the rate
ment
jewelry
gloves and
working
dust mask
yank
from
It's
hands
balance at
all
ance.
changing accessories.
servicing; when changing accessories such
blades, bits, cutters, etc.
habit
wrenches are removed
it
in
off
used
for
work
invite
Avoid
dangerous environment.
tools
wet
Don't
Use
Use
Don't
Don't
times,
Disconnect tools. When
on.
Avoid
tool
when plugging in.
Outdoor
use
to
locations.
children
from
dry,
of
children.
force
right
tool.
to
do
the
to
get c'aught in moving parts. Rubber
footwear
outdoors.
safety
if
cutting
abuse cord. Never carry
it
to
disconnect
heat,
oil
and sharp
work.
safer than using
to
operate
overreach. Keep proper
all times.
tools
and clean
Follow
of
checking
accidental starting.
with
use
outdoors,
outdoors
precaution•
area clean. Cluttered areas and
accidents.
rain.
Don't
use
And
keep
away.
work
high
tool.
It
for
which
Don't
job
of
a heavy
glasses
with
operation
Use
clamps
your
tool.
with
for
instructions
to
finger
on
extension cords. When
use
only
and
so
power
work
All
visitors should be
area.
not
in use, tools should
or
locked-up place-out
will
do
the
it
was
designed.
force small
duty
No
loose
are recommended when
most tools. Also face
is
dusty.
from
receptacle. Keep cord
edges.
or
a vise
hand and
care. Keep tools sharp
best and safest
for
not
see
thC~t
keys and adjusting
from
tool
Don't
switch.
extension cords suitable
marked.
on
Don't
tool
area
well
lit.
job
better
tool
or
tool.
clothing
tool
by
to
hold
it
frees
footing
perform-
lubricating and
in
use, before
before
carry plugged-
Be
sure switch
(110V. 115V. 120V. 127V. 220V. 230V. 240V)
335W"
400mmAq
product as it
expose
in damp
kept
of
and
attach-
or
or
cord
work.
both
and
Form
turning
tool
is
subject
to
change by areas.
17.
Do
not
use
than those specified
18. Never
explosive matei-ials.
19.
To
ensure the deSigned operational
power
screws.
20. Do
less
the
21.
Use
the nameplate: otherwise, the finish may be
spoiled and
motor
event
overload.
of
Use
22. Consult
23.
24. This
replacement
Standard
or
o Dust Bag.
Standard accessories
out
notice.
1.
By
the
switch
when
at
as
the
continuous
the
stopPer is disengaged and
OFF
when
2.
An
bag
will
blower.
maximum
power
use
tools.
not
power
your
power
only
tool
touch
an
in
power tools near
Do
not
movable parts
source
has
tool
at
lower
working
authorized Service Agent
tool
failure.
orginal replacement parts.
should
of
carbon brushes.
acceuory
pulling the trigger and pushing
will
remain in
trigger is released,
operation.
the
trigger
excessively large
reduce the dust collecting
Frequently
dust cellecting eff-iciency.
is
empty
Application•
o Cleaning
equipment located in
is
factories and
o Cleaning facilities and
is
cigarette-making plants, spinning mills, etc.
o Cleaning devices and
o
Blowing
power
other
operation.
distribution
builDings.
equipment
f'V
tools
for
applications
the Handling Instructions.
remove installed covers or
been disconnected.
efficiency
only
are
By
released.
volume
power
equipment
inflammable
or
accessories
input
than specified on
reduc;ed
be ciisassembled tor·
subject
to
the
ON position even
promoting
pulling
the
the
switch
of
dust in
efficiency
the
dust
panels and
plants, substations,
in
in
repair shops.
other
integrity
un·
due
in
the
change
with-
the
stopper,
efficier.t,
trigger again,
is
turned
the
dust
of
bag
to
ensure
other
lumbermills,
or
of
the
to
Page 3

Prior
to
operation
1.
Ensure
that
the
power
conforms
the
2. Ensure
position.
receptacle
position,
mediately,
3.
from
sufficient
sion cord should be
4.
Mounting
and
1.
2.
{1)
(2)
Maintenonc•
1.
sure
of
ly.
2.
consumable parts. Since
carbon
a
worn
keep carbon brushes clean and ensure
slide freely
3. Replacing a carbon brush:
screwdriver.
removed.
4. Maintenance
of
winding
with
to
the
product
Extension
the
Mount
dust
bag
Mounting
Insert
notch provided on
nozzle
1.
Fig.
To
dismount
procedures
When using the
Mounting
Mount
ing
the
mounting
Mounting
Insert
nozzle
port.
indicated
Inspecting the
Regularly inspect all
that
the
screws be loose, retighten
Failure
Inspecting
The
brush
carbon
to
Disassemble the brush cap
The
the
power
oil or water.
power
nameplate.
that
the
If
the
plug
while
the
the
power
inviting
serious accident.
cord.
power source, use an extension cord
thickness and rated capacity.
the
and
the
in
and
they
motor
brush
or
motor
does
When
nozzle and
dismounting
the Nozzle:
pin
located inside the nozzle
the
direction
the nozzle,
in
reverSe.
Blower
the
Dust Bag:
the
dust
same procedures described above
of
the
the· Nozzle:
the
pin
into
the
fully
turn
by
the
and
insp•ctlon
mounting
are
properly
to
do
so
the
carbon
employs
could
with
near
the
within
the
The
carbon brush can then be easily
of
unit
tool.
not
source
requirements specified on
power
switch
is connected
power
switch
tool
will
start
the
work
kept
as
short
dust
bag.
the
the
blast
port,
indicated
for
dust
bag on the blast
nozzle. {Fig. 2)
located on the inside
notch
t>rovided
the
nozzle
arrow
in
Fig. 3.
screws:
mounting
tightened. Should any
could
result
brushes: (Fig. 4)
carbon
an
in
limit'.
motor:
excessively
motor
is
result
a new one when
'wear
brush holders.
the
winding
Exercise due care
become damaged
to
be
is
in the
to a power
is
in the ON
operating im-
area
is
The
as
practicable.
nozzle
and
fully
by
the
follow
the
collection:
port,
on
the
in
the
screws and en-
them
immediate-
in
serious hazard.
brushes
which
trouble,
it
In
additin,
with
a minus-head
the
very
to
ensure
and/or
utilized
OFF
removed
of
exten-
into
the
turn
the
arrow
above
follow-
for
of
the
suction
direction
are
worn
replace
becomes
always
that
they
"heart"
the
wet
PRECAUTIONS
1.
Beware
welded
distribution
blower
Leave adequate
blower.
nozzle
2.
Do
not
It
is dangerous
the
floor,
to
switch
3. Do
4.
in
6.
not
If
the
the
motor
internal
may also
Never
Prevent
Never use
laquer, paint, benzene, thinner, gasoline,
or
other
Also,
the
blower,
fire.
or
lit
ciqarette
5. Avoid sources
Avoid
high heat such as heaters. Doing so
cause
Have
using
it
If
the
sticky_
regularly
agent.
Adhesion
sucked
blades.
7. Do
.Solvents such as gasoline, thinner, benzine,
carbon
oil containing
plastic
crack
such
solvent.
soft
water.
NOTE
Due
to
and
development,
subject
CAUTION:
Continuous running
exceed
30
ON
USING
of
parts.
attached.
if a lit
discoloration
not
cloth
to
electric
When cleaning
panel, etc., do
to
get
close
Be sure
blades may be damaged. The
for
dust
in
tetrachloride,
tool's
foam
to
leave
the
etc.,
while
off
the
obstruct
air
outlet
speed will rise
overheat
obstruct
flammable
Therefore
placing
the
blower
inspected
minutes.
air
fire
and explosion.
the
cigarette
it
may
butts
of
the
blower
sticky
particles,
of
sticky
may
damage
wipe
plastic
chloric
parts.
Wipe
lightly
continuing
change
of
is used
THE
shock when cleaning
to
the
between
use
the
blower
on.
to
leave
it
is
power
first.
the
air
outlet
or
intake
abnormally
and be damaged.
outlet
and intake.
blower
or
explosive
butt
cause
be
careful
sucked in.
heat.
blower
or
deformation.
regulary
dust
particles.
to
have
by
an
authorized
particles
the
parts
alcohol, ammonia and
annex may damage and
Do
not
plastic
dampened
program
the
spcifications
without
prior
machine should
BLOWER
the
welds
not
welded
the
blower
the
still
if
where
is sucked
internal
not
near sources
inspected when
clean or
motor
with
wipe
parts
notice.
of
allow
part.
weld and
with
blower
on. Be
and intake.
obstructed,
and
motor
there
substances.
damage
to
let
blow
the
blower
service
that
break
solvent
them
with
with
soapy
of
research
herein are
not
the
the
on
sure
the
is
into
any
of
may
are
the
with
a
.
a
Page 4

PARTS
ARE
SUBJECTTO
POSSIBLE
MODIFICATION.
WITHOUT
NOTICE
DUE
TO
IMPROVEMENTS
Page 5

1
Housing
2 Brush Holder
Ell
Tapping Screw
3
4
Stator Ass'y
5 Brush Terminal
Ell
Tapping Screw
7
8
Armature
9 Ball Bearing (608ZZC3)
10
Bearing Lock
11
Washer (E)
Casing
12
13
Cord Armor
14
Cord Ass'y
15
Ell
Washer (S)
16
17
Cord Clip
18
Ell
19
Ell
20
Switch
Dust Bag Ass'y
21
22
Connector
Handle Cover
23
24
Fan
25
Nut M6
26
Casing Cover
27
Nozzle Ass'y
28
Nozzle
29
Holder
30
Washer
31
Brush Cap
32
Carbon Brush
33
Dust Bag
34
Clip
35
Name Plate
36
Ell
37
Nut M4
38
Name Plate
39
Washer 81x 1
40
Washer
Ass'y
Tapping Screw
Tapping Screw
Tapping Screw
Tapping Screw
X
10
M3
M5x40
M5x
32
M4x
16
M4x
18
M4x
22
1
81x
0.5
1
1995.12
Page 6

2
4
CD
:ID
®
®
®
®
])
])
®
!]l
jJ)
·•!P
1)
(jJ
The
pin
located
Nozzle
Notch
Blast
port
Notch
Blast
port
Dust
bag
Suction
Notch
Pin
Nozzle
Suction
Wear limit
No.
port
port
of Carbon
~nglish
inside
the
brush
nozzle
Arabia
.....
~,
u~JJI
.;
•I.!._;
~
w..;
w..;
~
I.J""-'
I.J""-'
~~
..;,...
,_,.
~.l
.....
_,.;
~.;
i..:..;;J
~.;
i..:..;;J
~
i..:..;;J
~.;
,_,.
~.l
.....
_,.;
i.>..:;j
.l.>
~J
( \
(~
(I
(t
(o
(1
(v
(A
(~
(
\.
(\\
(n
(II
(\t
 Loading...