

Page 1
Hang for easy reference.
®
Monarch
®
1115
®
Labeler
Operating Instructions
TC1115OI Rev. BE 12/07 ©2006 Paxar Americas, Inc.
a subsidiary of Avery Dennison Corp. All rights reserved.
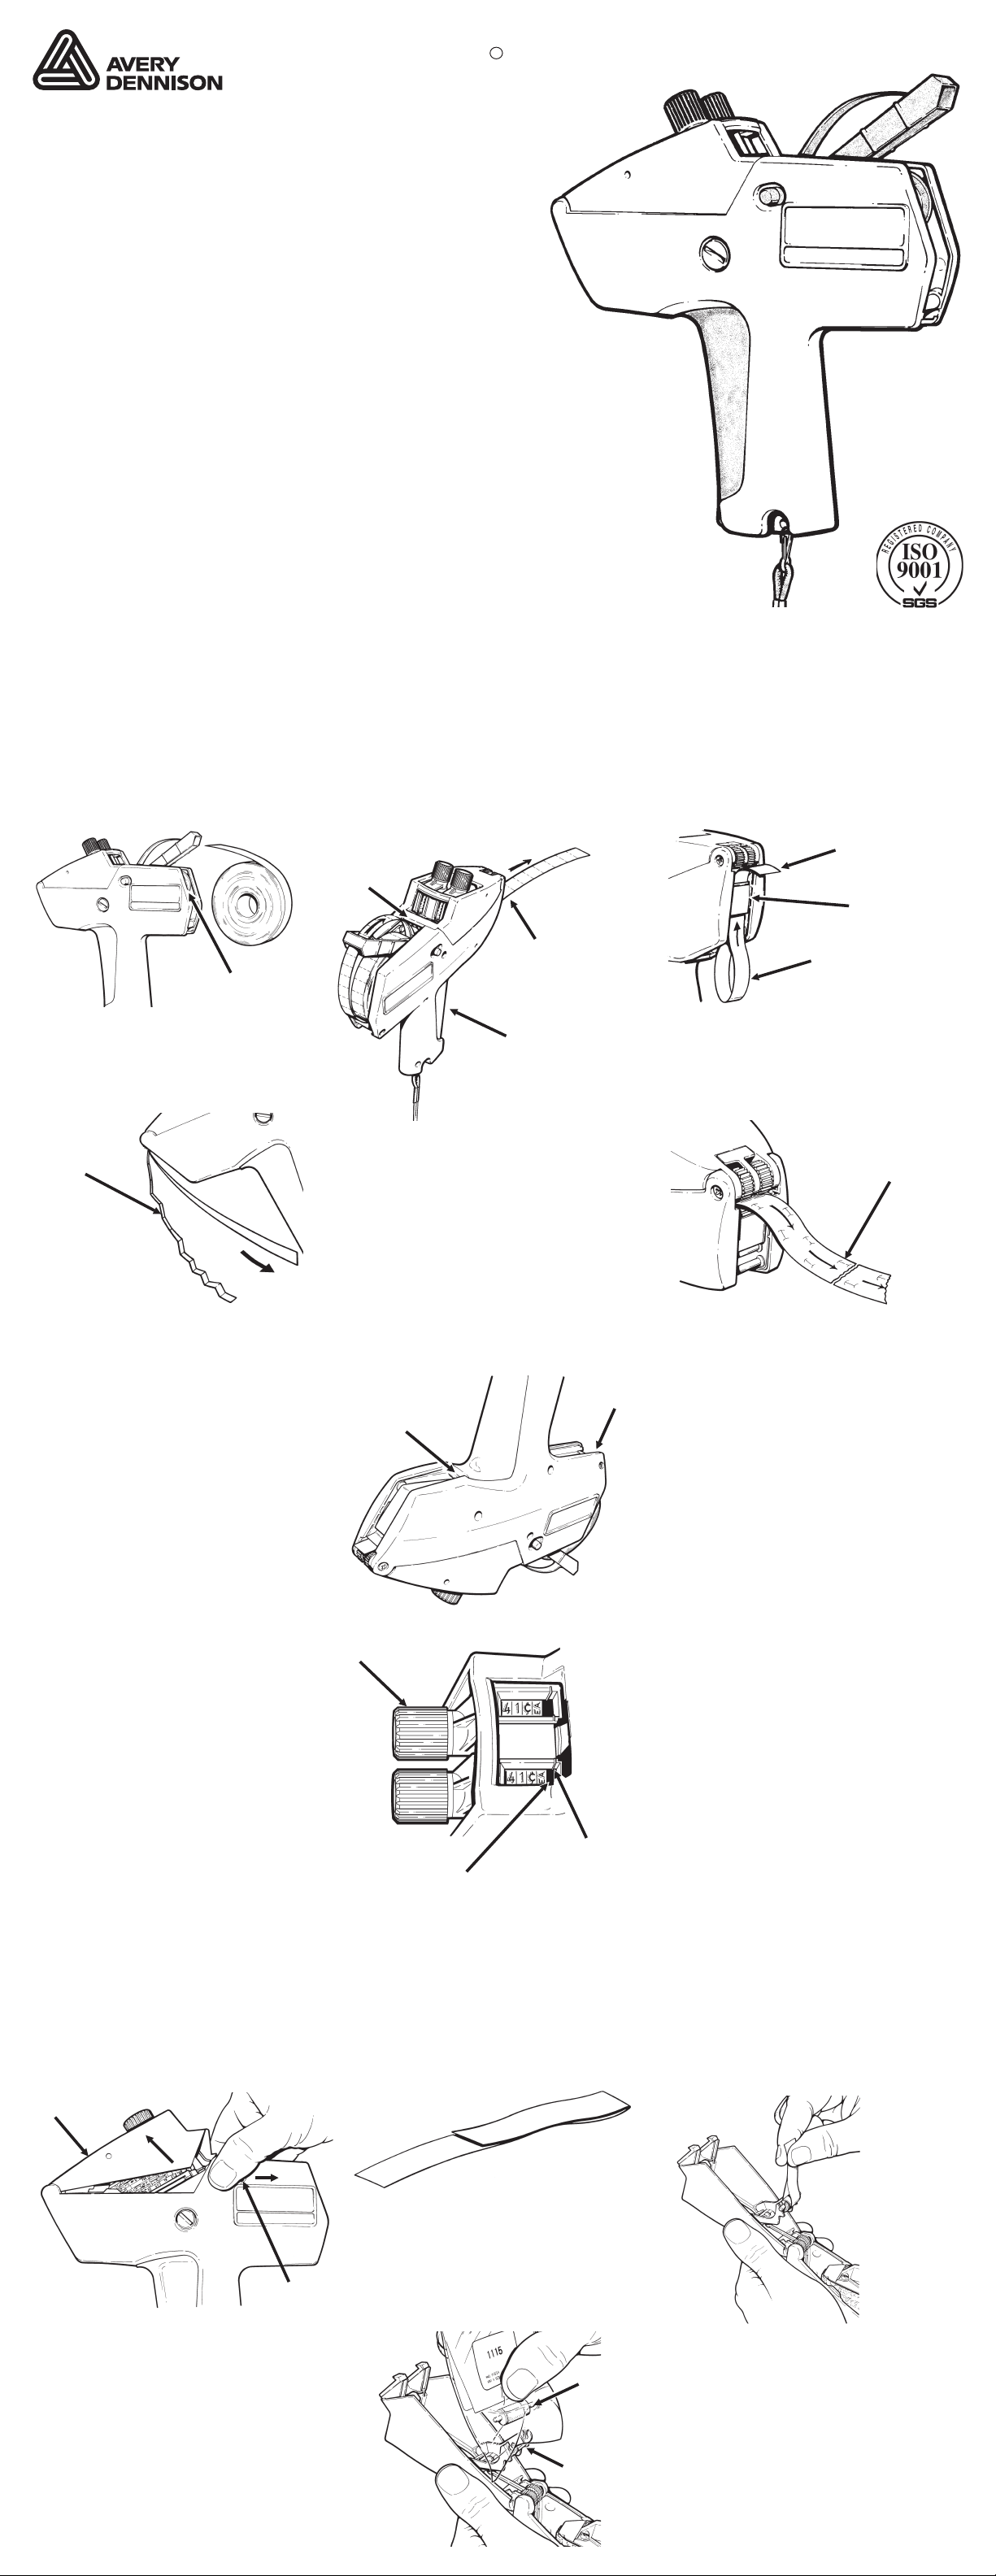
LOADING LABELS
Slide label roll between hubs.
1
Discard first fourteen labels
and backing paper.
Hub
Pull backing paper to the end of the
4
operating lever, separating labels from
backing paper.
2
wheels until about twelve labels come out.
Brake
Wheels
LOADING LABELS & SETTING PRINT BANDS
Squeeze operating lever and feed
label strip over spring and under brake
Label Exit
Operating
Lever
Feed label strip up under plate until
3
label roll until loop is removed.
5
strip as shown.
two labels come out. Rewind
Label Exit
Plate
Loop
Tear backing paper evenly
between cuts, close to the end of the
Discarded
Labels
Hold labeler upside down and while
6
squeezing operating lever, feed
backing paper into slot. Squeeze operating
lever eight times until backing paper comes
through the rear exit.
Slot
Backing
Paper Exit
Backing
Paper
If backing paper does not become
7
taut and exit at rear: Turn labeler
upside down, squeeze operating lever and
pull backing paper out of slot. Repeat
steps, 4, 5, and 6.
SETTING PRINT BANDS
Pull the knob until the
1
indicators point to
the desired band.
Turn the knob untill the indicators
2
point to desired character or blank.
Set all bands and push the knob
3
in all the way.
INKING
Move two latch buttons toward
1
label roll and swing top cover
away from print head.
Top Cover
Knob
Blank Print
Positions
Fold a piece of scrap backing
2
paper.
Indicator
Print a sample label to insure
4
information is correct.
If the character prints UPSIDE
5
DOWN, turn the band until you can
read the characters correctly. The desired
character may be coated with ink.
Insert folded backing paper
3
between ink roll and carrier.
Pull to snap old ink roll free.
Latch
Button
Cut off end of ink roll package.
4
Using package to protect fingers,
slide carrier into package and snap new ink roll
into carrier.
Cap
End
Carrier
Snap top cover closed.
5
INKING
Page 2
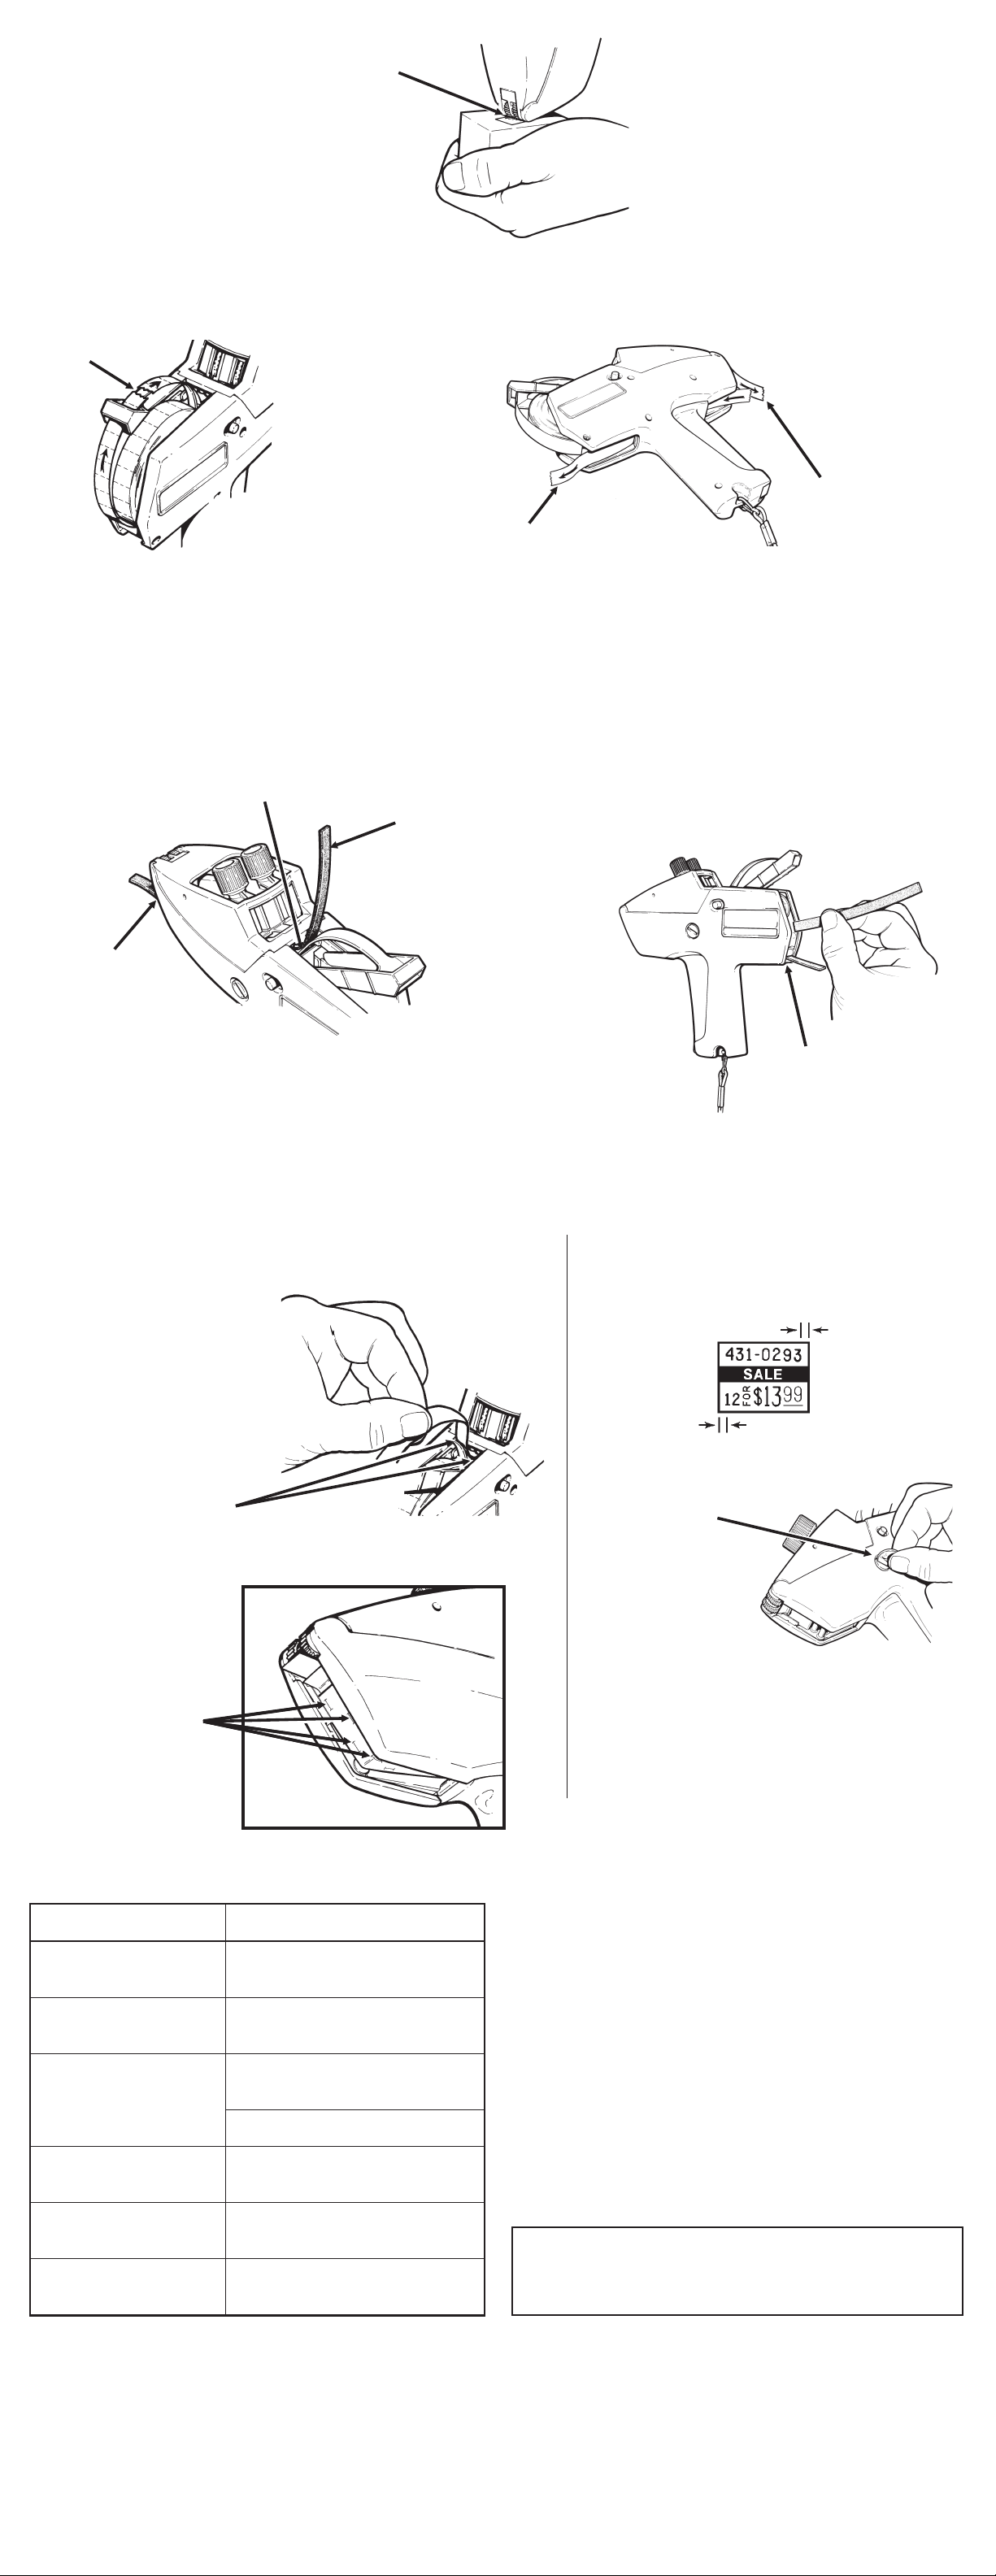
OPERATION
Squeeze and release operating lever.
1
Pull labeler to apply label.
3
(Gentle wiping motion.) DO NOT POUND labeler when
Black
Rollers
Place black rollers on item to
2
be labeled.
applying labels.
REMOVING SUPPLIES
Tear label strip at label roll as
1
shown and pull label roll from
between hubs.
Tear
MAINTENANCE
With label roll removed, check
1
label track and backing paper
track for stray labels.
Brake
Wheels
Tear backing paper strip.
2
Pull label strip from labeler.
Pull Strip
Clear label track by squeezing
2
operating lever and feeding label
removal strip under brake wheels and out
front of labeler.
Removal
Strip
Squeeze and release operating
3
lever until backing paper is free
to be pulled out.
Tear Backing
Paper
To clear backing paper track:
3
a. Insert label removal strip in end of
track to loosen stray labels.
b. Insert label removal strip as
shown, using corner to remove stray
labels.
Front
Exit
End of
Track
OPERATION, REMOVING SUPPLIES & MAINTENANCE
LUBRICATION PRINT ADJUSTMENT
If adhesive buildup occurs, lubricate as shown
with labels loaded.
Monarch lubricant is recommended.
Print location is correct when extreme
1
right-hand and left-hand characters are located
as shown.
Approx. 1/16 inch (1.6 mm)
Approx. 1/16 inch (1.6 mm)
Lubricate:
One drop each side of label
chute between spring and
backing paper.
Lubricate:
One drop each spot on
backing paper (total of
four drops). Spread
with finger.
DO NOT OVER
LUBRICATE!
TROUBLESHOOTING
Trouble Remedy
Place small coin in feedwheel button slot.
2
Feedwheel
Button Slot
Push feedwheel button IN COMPLETELY
3
and turn slightly clockwise if print is too far left or
slightly counterclockwise if print is too far right.
Adjustment made without completely depressing button
are temporary.
Repeat steps 2 and 3 until print is correctly
4
located.
Characters not printing.
Bands not inked.
Labels feed slowly or
hesitantly.
Labels will not feed. Reload per instructions. Use
Print incorrectly located. Follow Print Adjustment
Printing smeared or
distorted.
Printing too light. Squeeze operating lever harder
Check ink roll per Inking
instructions.
Follow Lubrication and
Maintenance Instructions.
correct supplies.
Follow Maintenance instructions.
instructions.
Print several labels (15 to 25) to
use up excess ink.
during operation.
Visit www.paxar.com for sales, service, supplies, information, and telephone
numbers of our locations throughout the world.
Warranties
Product warranty statements may vary from country to
country. Please contact the authorized PAXAR/Monarch
representative in your country for details.
TOLL FREE:
1-800-543-6650 (In the U.S.A.)
1-800-263-4650 (In Canada)
LUBRICATION, PRINT LOCATION, & TROUBLESHOOTING
 Loading...