

Page 1
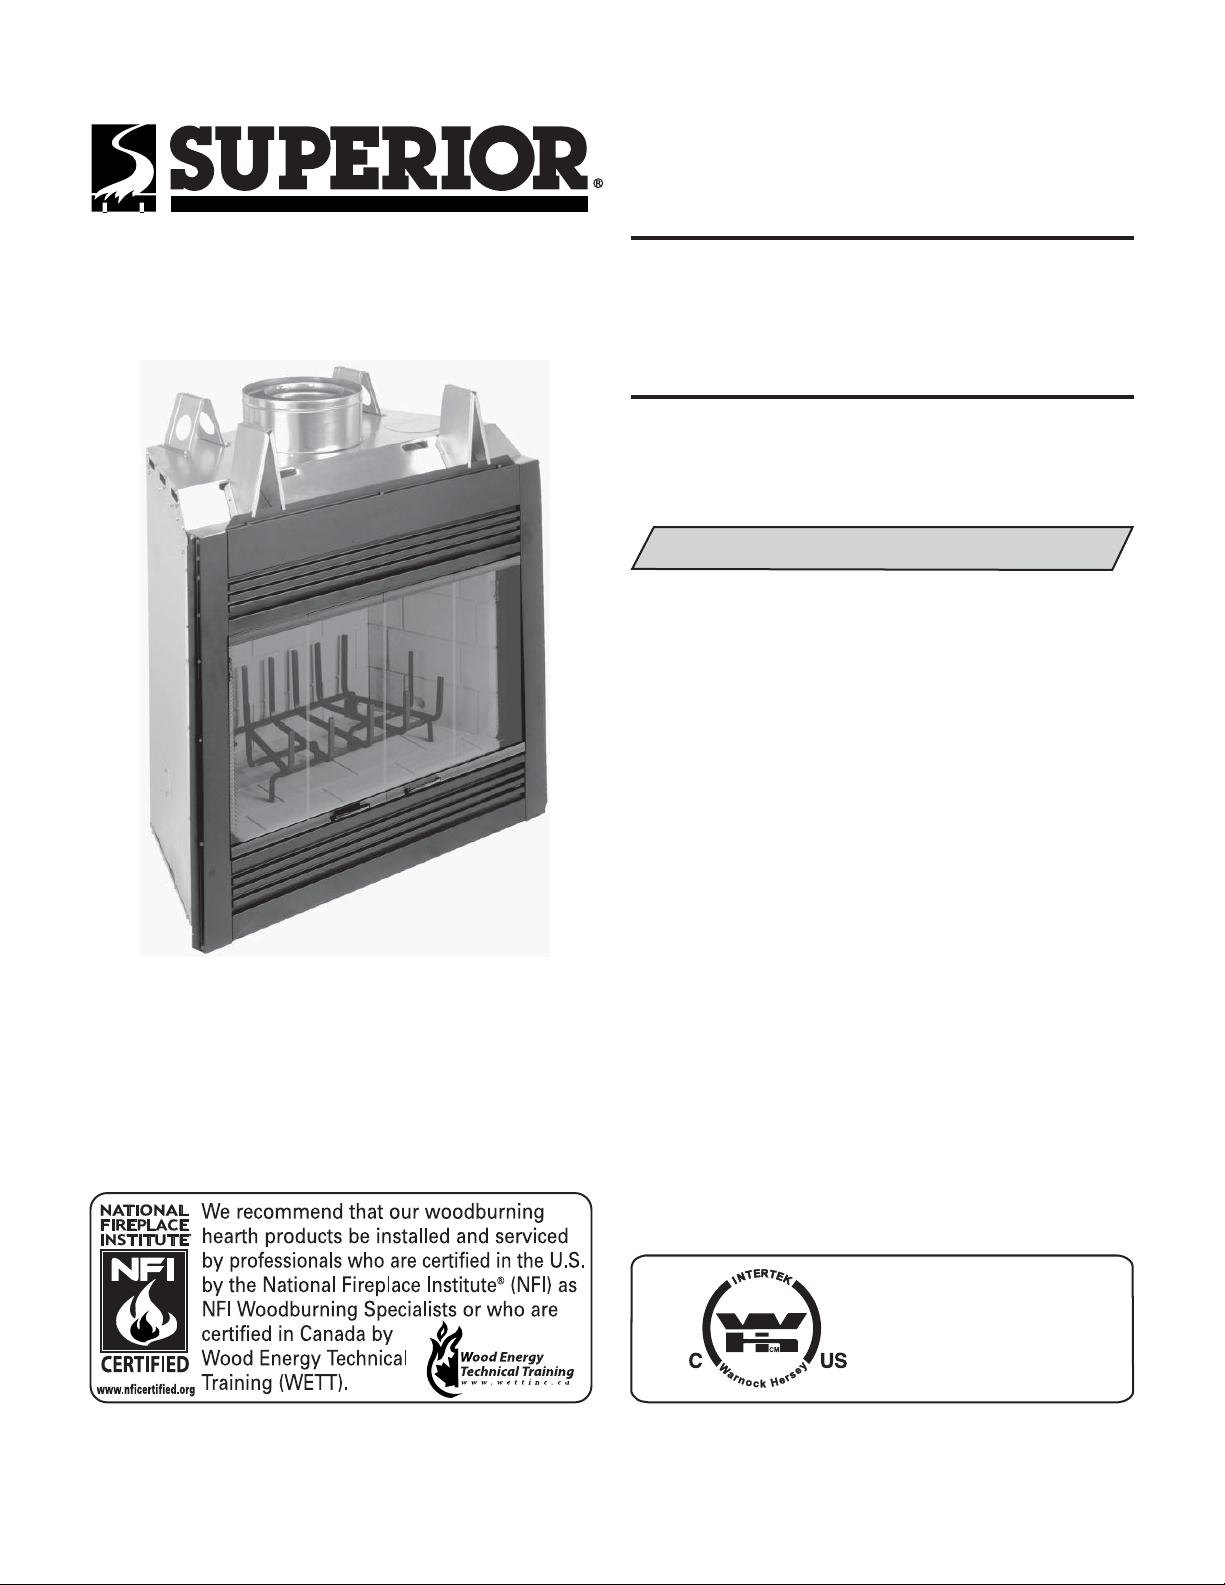
HOMEOWNER'S CARE AND
OPERATION INSTRUCTIONS
WOOD BURNING FIREPLACES
MODEL HCD36MH
36" Wood Burning Fireplaces
P/N 725,038M REV. A 03/2006
MODELS
HCD36MH
The information contained in this manual applies to all model fi replaces
identifi ed on this page. This information will help you obtain safe and
dependable service from your fi replace system. Keep this document in
a safe place for future reference.
RETAIN THESE INSTRUCTIONS
FOR FUTURE REFERENCE
Before you start your fi rst fi re, read this Care and Operations Manual
carefully to be sure you understand your fi replace system completely.
Failure to follow these suggestions could result in hazardous operation
or fi replace malfunction, creating a serious potential for personal injury
and/or property damage.
If you have any questions regarding the safe use or operation of your
fi replace, contact your local distributor or your contractor/builder.
Most chimney systems will require onsite completion after placement of
the manufactured home.
WH Report No.
J20051034-231
Page 2

CONGRATULATIONS!
In selecting this SUPERIOR Wood Burning Appliance you have chosen the fi nest and most
dependable fi replace to be found anywhere. Its a beautiful, prestigious alternative to a
masonry wood burning fi replace. Welcome to a Family of tens of thousands of satisfi ed
SUPERIOR Fireplace Owners.
Please carefully read and follow all of the instructions found in this manual. Please pay
special attention to the safety instructions provided in this manual. The Homeowner's
Care and Operation Instructions included here will assure that you have many years of
dependable and enjoyable service from your SUPERIOR product.
TABLE OF CONTENTS
General Safety Precautions .................Page 2
General Information ............................Page 2
Fuels ...................................................Page 3
Gas Logs .............................................Page 3
Disposal of Ashes ...............................Page 3
Softwood vs Hardwood .......................Page 3
Starting a Fire ......................................Page 4
Damper Control ...................................Page 4
Glass Door Operating Safety
Precautions and Instructions ............Page 4
Combustion Air ...................................Page 5
Refractories ........................................Page 6
Maintenance Guidelines ......................Page 6
Twice a Year Check-Up ........................Page 6
Creosote Formation and Removal .......Page 6
Troubleshooting ..................................Page 6
Warranty .............................................Page 7
Product Reference Information ...........Page 7
Accessory Components ......................Page 7
Replacement Parts ..............................Page 8
GENERAL SAFETY PRECAUTIONS
IMPORTANT! READ AND UNDERSTAND BEFORE YOUR FIRST
FIRE.
WARNING
To avoid the risk of damaging
fi replace materials and increasing the risk of fi re, do not use the
fi replace to cook or warm food.
1.
NEVER LEAVE CHILDREN UNATTENDED
WHEN THERE IS A FIRE BURNING IN
THE FIREPLACE.
2 When burning wood, use SOLID NATURAL
DRY WELL-SEASONED WOOD ONLY. Hardwoods are recommended (soft woods tend
to burn very quickly).
2
• DO NOT burn treated wood, charcoal, coal,
trash, driftwood, woods dipped in tar, Christmas tree greens, pitch, pine tar, creosote,
chemical chimney cleaners, fl ame colorants,
polystyrene packaging, wood products with
synthetic binders (i.e. plywood). Plywood,
lumber and other misc. materials can produce abnormally high temperatures, sputtering and smoking fi res and may contain
hazardous chemicals to treat insects and
fungus.
• When using newspapers to start a wood
fi re, remove (and do not burn) the colored
comic or ad sections. The colored inks may
contain lead and can produce toxic gases.
• If Artifi cial Logs are burned it is required that
the logs are UL safety listed (see labeling or
documention provided with logs). Read and
follow the log manufacturer's instructions. Do
not treat artifi cial logs (made from sawdust
and wax) the same way you treat real natural
wood logs. Use only one at a time.
• IMPORTANT: Burning unapproved fuels can
produce excessive temperatures, beyond
the design capabilities of the fi replace and
may produce excess sparks or may contain
hazardous chemicals. Burning unapproved
fuels can result in a chimney fi re, a house fi re,
personal injury, death or loss of property.
3. NEVER use gasoline, gasoline-type lantern
fuel, kerosene, charcoal lighter fl uid, or
similar liquids to start or “freshen up” a fi re
in this fi replace. Keep any fl ammable liquids
a safe distance from the fi replace.
4. Keep the chimney damper open while any fi re
or smoldering embers are present .
5. Never block or restrict the room air intake grille
across the bottom front or the warm air outlet
grille across the top front of the fi replace.
6. Use care when selecting window treatments
for windows located near the fi replace. Avoid
using combustible fl owing window treatments such as curtains on nearby windows
that are of suffi cient length to be blown in
front of an open fl ame when the window is
opened.
7. With the fi re burning, close the protective
mesh screens to keep sparks and embers
INSIDE the fi rebox.
8. Keep any combustible furniture or decorative
pillows at least 36" (914 mm) on the sides
and 60" (1524 mm) to the front (from the
fi replace opening).
NOTE: DIAGRAMS & ILLUSTRATIONS ARE NOT TO SCALE.
9. Never leave your fi replace unattended while
it is burning.
10.Be careful adding wood fuel to the fi re or
handling fi replace tools such as shovels,
tongs or pokers.
11. Never modify or alter your fi replace system in
any way. To do so may create a potential fi re
hazard and void the Limited Warranty.
12.The bottom refractory can be cracked by
excessive abuse such as tossing heavy logs
onto the grate or gouging with fi replace
tools. Exercise caution when adding wood
to your fi replace.
13.Fireplace Inserts - Contact your dealer or
distributor for a list of LHP fi replace inserts
approved for installation into your fi replace.
DO NOT install a fi replace insert from any
another manufacturer.
14. If you are using your fi replace as a “decora-
tive appliance,” such as with a permanently
installed gas log set, the fi replace damper
must be permanently fi xed in the open
position.
15.Always ensure that an adequate supply
of replacement combustion air from the
outside of the house is accessible to the fi re
to support normal combustion. Fireplaces
consume large volumes of air during the
normal combustion process. In the event the
home is tightly sealed with modern energy
effi cient features, the optional combustion
air kit may not provide all the air required
to support combustion. The manufacturer is
not responsible for any smoking or related
problems that may result from the lack of
adequate combustion air.
16.Neither the manufacturer nor the seller
warrants “smoke free” operation nor are
we responsible for inadequate system draft
caused by mechanical systems, general construction conditions, inadequate chimney
heights, adverse wind conditions and/or
unusual environmental factors or conditions
beyond our control.
17.Always ensure that the air inlet to the fi replace
is free from debris and any other obstructions
that can block the entrance of air.
GENERAL INFORMATION
1. The all-steel, multi-wall fi rebox is the heat
center of the system. It is well insulated for
safe clearance to combustibles.
2. The hearth fl oor and sidewalls of the fi rebox
are lined with a brick pattern reinforced
refractory for the look of authenticity and
to provide safety.
3. The metal chimney sections extending from
the fi rebox top to beyond your roof are two
walled and air-cooled. The inner passage, or
fl ue, provides the exit for smoke and gases.
4. The fl ue damper is a two position (fully open
or fully closed) mechanism operated by a
handle found at the center top of the fi replace
opening. It must be open when fi re is present
so smoke and gases can escape. It should
be closed only when the fi re is completely
out – keeping room air from being lost up
the fl ue.
Page 3
5. Closed screens prevent fi re, sparks and
embers from popping out of the fi rebox
while a fi re is burning. Pull screens back
when adding wood to the fi rebox.
6. Why use a fuel grate? Besides positioning
the fi rebed properly, it protects the refractory
fl oor, back and sides of the fi replace. Further,
it ensures a proper fl ow of combustion air
into and around the fi rebed. The grate must
be used at all times when burning. Your
warranty may be voided without the use
of this grate.
7. Remember, your fi replace is not intended to
heat your entire home. Their unique designs
are intended for architectural, decorating and
aesthetic considerations. Using this fi replace
to heat large areas may lead to overfi ring and
void your warranty.
FUELS
Never Use Coal in Your Fireplace
Your fi replace system is not designed to be
used with coal derivative products. The combustion process of certain types of coal can
deposit corrosive materials in the fi replace and
chimney system which can lead to premature
product failure. Never use coal as a fuel in this
fi replace system.
DECORATIVE GAS LOG SETS
If your fi replace system was installed with a gas
line, you may wish to install one of two types of
gas log sets. This fi replace has been tested and
approved for use with a decorative gas appliance
incorporating an automatic shut-off device and
complying with the Standard for Decorative Gas
Appliances for installation in vented fi replaces,
ANSI Z21.60 (latest edition).
Decorative gas appliances may be installed in
these fi replaces. Installation must be in accordance with the national Fuel Gas Code, ANSI
Z223.1-latest edition for compliance with the
revised U.L. 127 Standard.
CAUTION
When using a decorative gas
appliance, the fi replace damper
must be set in the fully open
position.
WARNING
This fi replace has not been tested
with an unvented gas log set. To
reduce risk of fi re or injury, do
not install an unvented gas log
set into this fi replace.
Prior to installing any gas log set, refer to the
fi replace installation instructions for verifi cation
of mantel heights and placement of combustible
materials around the fi rebox opening.
Wood Fuel Pointers
Wood is a wonderful renewable fuel source.
Normally it burns clean, leaving only a minimum
of waste ash, provides comforting heat and can
provide a variety of aromas and visual images.
You will want to know which woods are best for
use. Sometimes you may want a quick, short fi re
to offset a morning chill. Soft woods are preferable in this case. Other times you would want
more slow burning and a uniform heat output.
Hardwoods are preferable for this use.
The amount of heat available from the logs will
be about equal on a weight basis. However,
logs are generally not weighed so the amount
of heat will depend on:
1. The type of wood used.
2. How dry it is.
3. How many logs you put in.
4. The size of the logs.
The last statement means that one big log weighing 10 pounds has as much heating potential
as 10 pounds of twigs. However, air cannot get
at the solid log to feed the fi re so the solid log
will burn slowly. While you would get the same
amount of heat out of either fi re, the smaller the
pieces of wood and the more air space around
them, the faster the fi re will burn.
DISPOSAL OF ASHES
Ashes should be placed in a metal container with
a tight fi tting lid. The closed container of ashes
should be placed on a noncombustible fl oor or
on the ground, well away from all combustible
materials, pending fi nal disposal.
If the ashes are to be disposed of by burial in soil
or other wise locally dispersed, they should be
retained in the closed container until all cinders
have thoroughly cooled.
SOFTWOOD VS HARDWOOD
Softwoods contain about 15 percent highly
fl ammable resin which generates creosote soot
in the chimney fl ue. Burning softwood exclusively may not be as desirable nor as safe as
burning denser hardwoods. Many experienced
fi re-builders use small amounts of softwood
kindling and newspaper in conjunction with
starting a fi re with split hardwood logs. Here
are some guidelines to remember:
1. Softwoods produce fast warming and shorter
fi res. Hardwoods burn less vigorously, have
shorter fl ames and produce steady, glowing
coals.
2. As a general rule, denser woods contain more
potential heat per pound. Most softwoods
offer moderate heat value per pound.
NOTE: DIAGRAMS & ILLUSTRATIONS ARE NOT TO SCALE.
3. Different woods vary widely in fl ame heights,
fl ame intensities, smoke characteristics
and in sparking. Most hardwoods do not
spark.
4. Most freshly cut “green” wood will not burn
well and will smoke. Green wood can be from
10 to 40 percent less effi cient than air-dried
seasoned wood.
5. Moisture and resin found inside unseasoned
wood cells will build up pressure under heat
and explode as sparks.
6. Most wood needs to be seasoned 9 to 12
months to reduce the moisture content and
produce good steady fi res. When moisture
content is reduced from 60 to 20%, the gain
in heat potential is nearly 7%.
7. Proper storage of wood, especially during
seasoning, is essential. We recommend that
you:
a. Never store wood on the ground. This
will cause rotting and insect infi ltration. Raise wood on fl at rock or scrap
wood.
b. Stack wood loosely to allow air circula-
tion.
c. Store wood where it will not be exces-
sively exposed to weather, such as
under a tarp or under a roof.
d. Do not stack wood directly against the
walls of your home.
8. Be a knowledgeable wood buyer. There is a
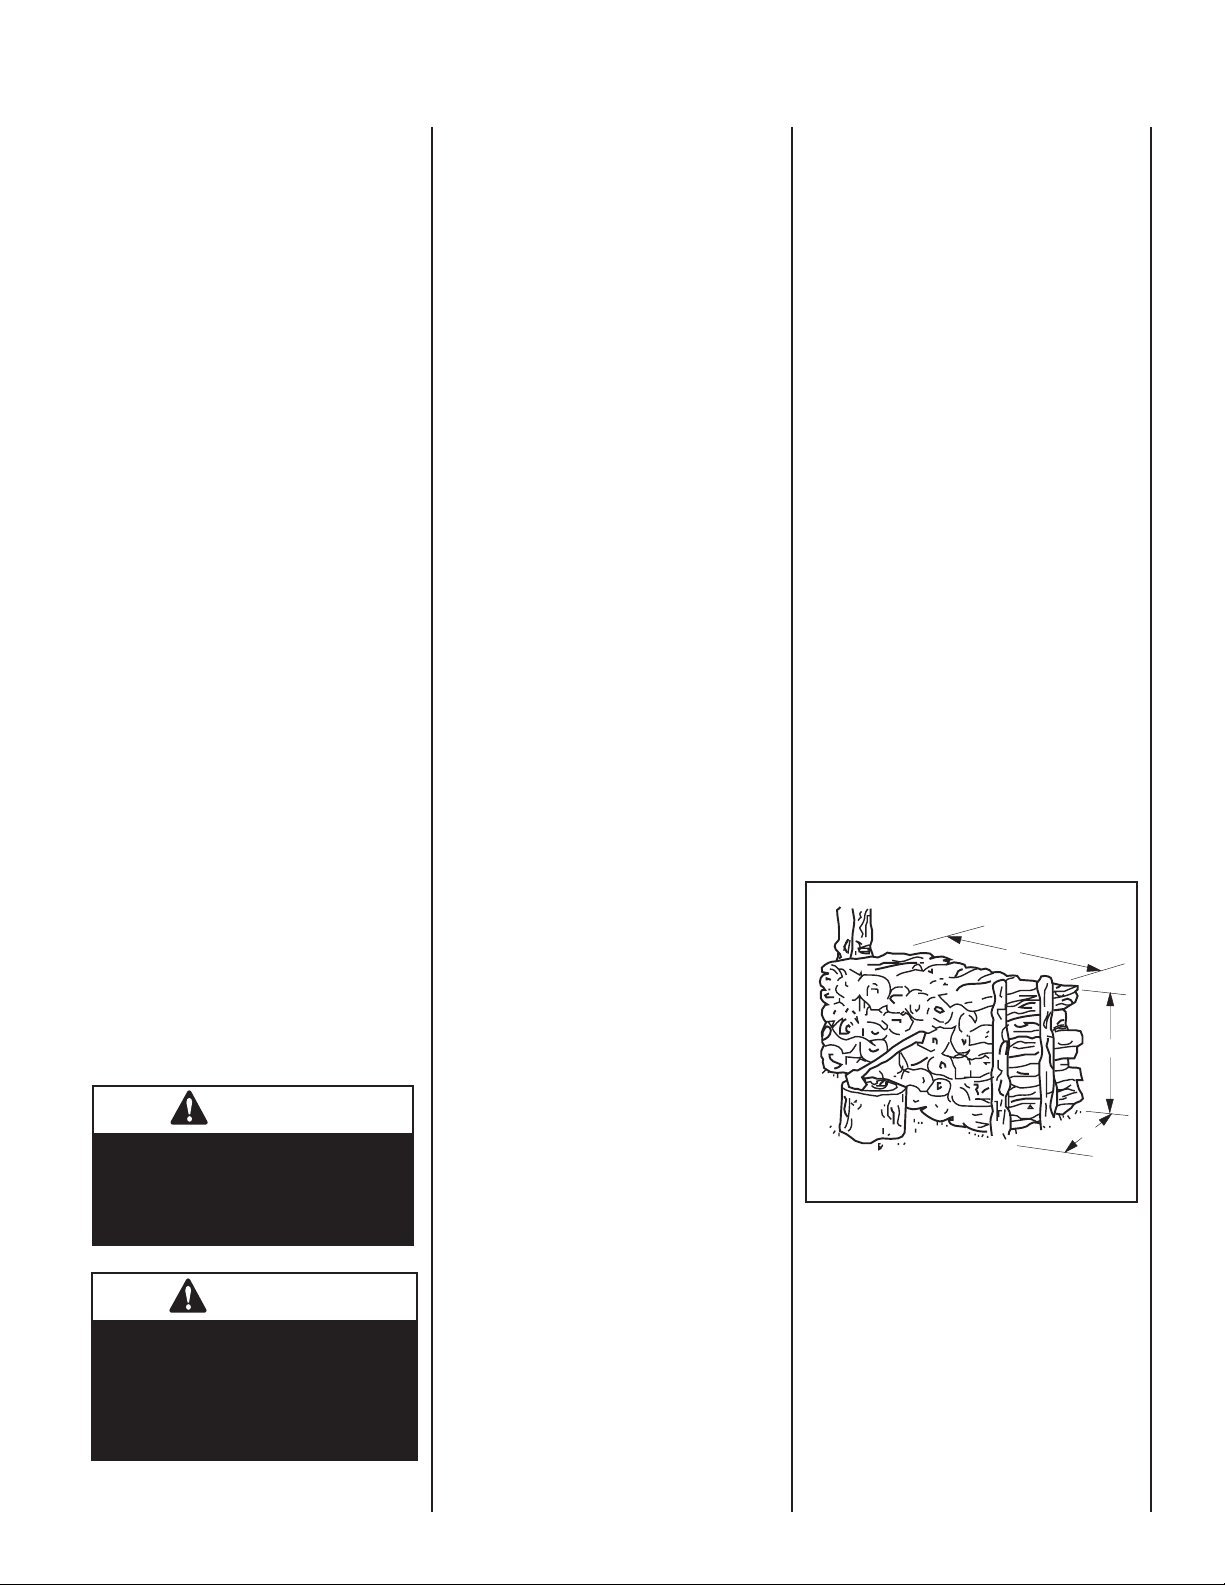
difference in cord sizes. A standard cord stack
of logs is 4 ft. high by 8 ft. long by 4 ft.
deep or the equivalent of this cubic footage,
(Figure 1).
Standard
Cord of
Wood
8'
4'
4'
Figure 1
A face cord is the same height and length as a
standard cord but the depth is only the length
of the logs (12, 18 or 24 inches). A face cord
can contain as little as 25% of the wood found
in a standard cord.
If you buy by the ton, remember that wood
becomes lighter as it dries. When buying green
or wet wood, ask for some extra poundage to
allow for the extra water you will be getting.
3
Page 4
9. When comparing woods of the same moisture content and same species, we fi nd most
woods have approximately the same heating
potential per pound.
However, most wood is sold by volume, not
by weight. To determine the best heating
source, look at the density of various wood
types. (Density is the weight for a given size.
The higher the density, the more potential
heat output. A standard cord has a volume of
128 cubic feet. This fi gure also includes the
air space between and around the wood. The
actual volume in a standard cord is between
60 and 100 cubic feet; depending on how
tightly the wood is packed.
Assuming that you are comparing two
standard cords of different species but the
same volume and moisture content, the
denser species will provide more BTU’s.
The table of wood species/densities reveals
more helpful guidelines.
HARDWOODS DENSITY
Alser, Red .41
Ash .49-.60
Aspen .38-.39
Basswood, American .37
Beech, American .64
Birch .55-.65
Butternut .38
Cherry, Black .50
Chestnut, American .43
Cottonwood .34-.40
Elm .60.63
Hackberry .53
Hickory, Pecan .60.66
Hickory, True .69-.75
Honey locust .66 (est.
Locust, Black .69
Magnolia .48-.50
Maple .48-.63
Oak, Red .59-.67
Oak, White .64-.88
Poplar .42
Sassafras .42
Sweet gum .52
Sycamore, American .49
Tanoak .64 (est.
Tupelo .50
Walnut, Black .55
Willow, Black .39
SOFTWOODS DENSITY
Bald cypress .46
Cedar .31-.47
Douglas Fir .46-.50
Fir .32-.43
Hemlock .40-.45
Larch, Western .52
Pine .39-.59
Redwood .35-.40
Spruce .35-.41
Tamarack .53
4
STARTING A FIRE
1. To start a fi re in a the fi replace properly, fi rst
check the operation of the fl ue damper.
2. To prevent smoking at start-up, close any
window located near the fi replace when fi rst
lighting a fi re. The closed windows may be
reopened once a chimney draft is drawn in
the fi replace.
3. The grate in the fi rebox should be centered
on or over the bottom hearth so your fi re
can breath properly. Crumble and twist
plenty of newspapers UNDER the grate and
criss-cross some small dry kindling sticks
on top of the paper or on the bottom of the
grate.
4. Build a pyramid of three split logs (split will
start much faster). Arrange the uneven wood
to provide plenty of air space between.
5. Now, light the paper at both sides of the
fi rebox.
6. Close the screens to prevent the escape of
sparks and embers.
7. Close the damper only when your fi re is
completely out and ashes are cold. Keep
closed when fi replace is not in use to prevent
unnecessary loss of heated or cooled air.
DAMPER CONTROL
This fi replace is fi tted with a manually controlled
chimney damper. The chimney damper should
be closed when the fi replace is not in use to
prevent cold air from entering the home through
the chimney system.
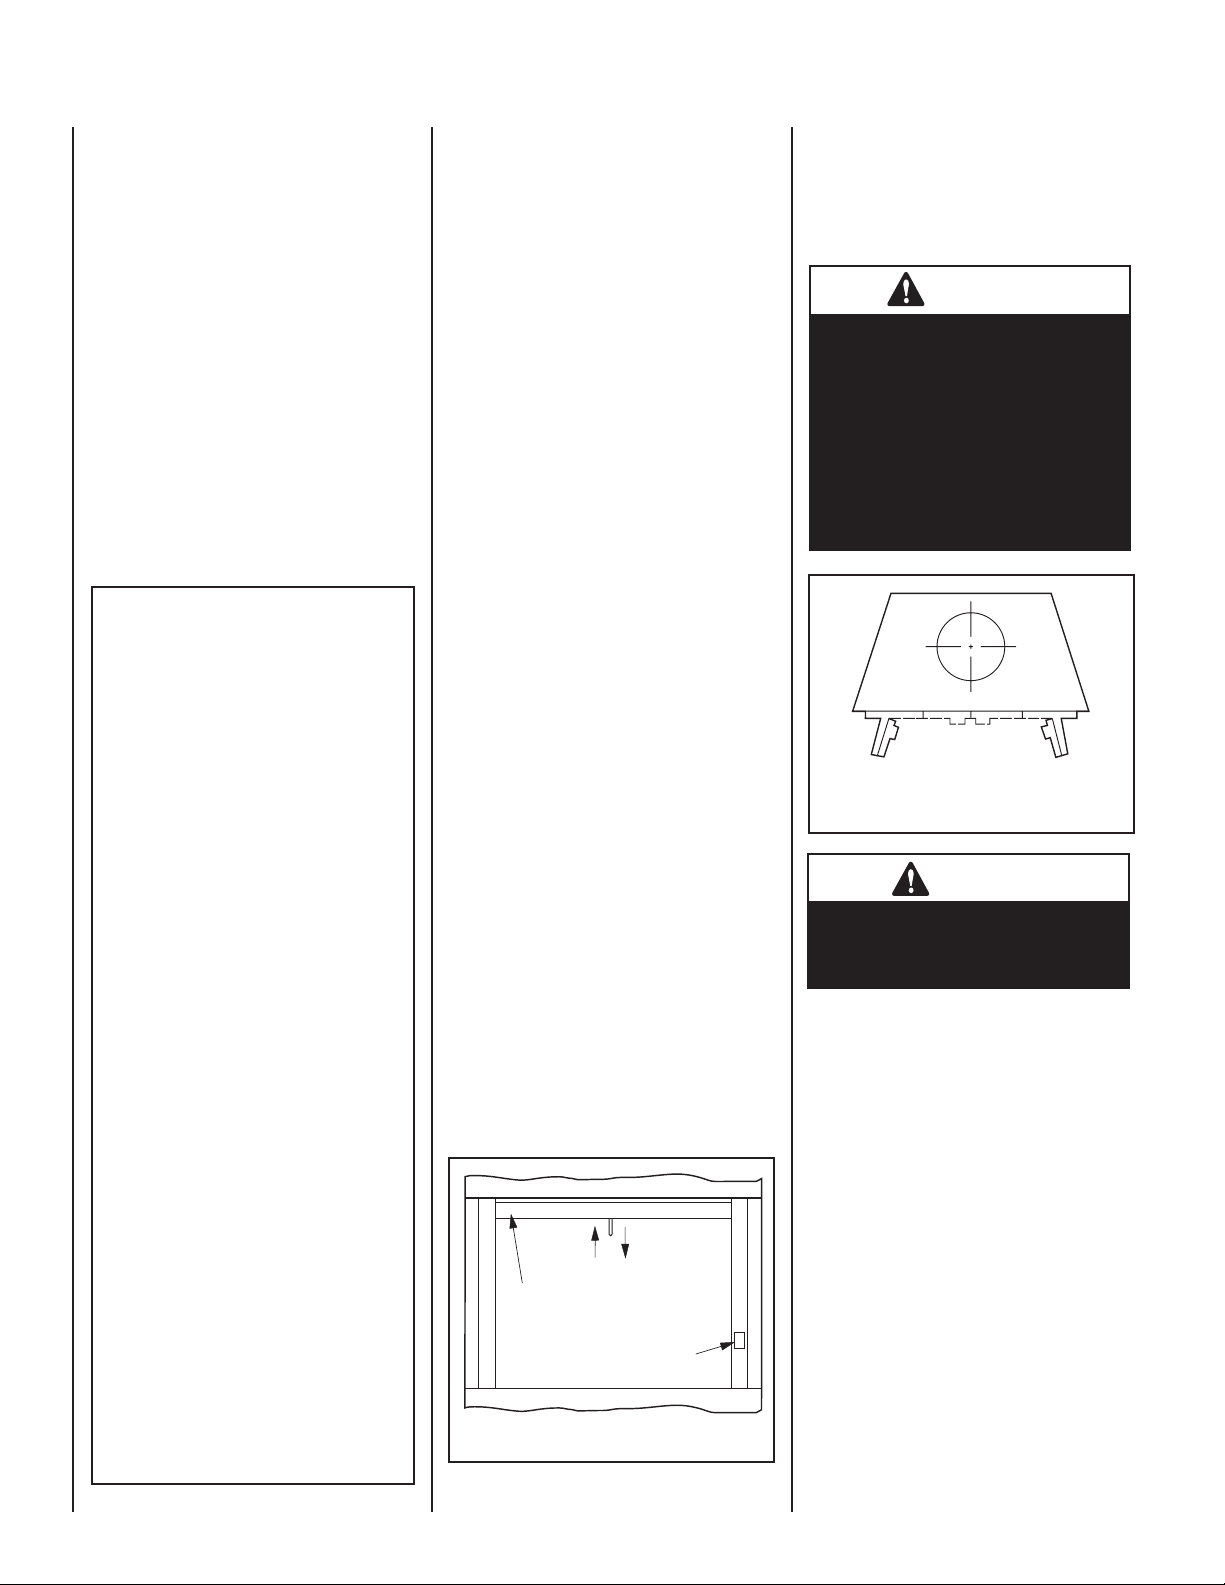
The damper is controlled through the use of a
control lever located within the fi rebox opening at the top center in front of the fi rebox
lintel (Figure 2). The control lever snaps into
place at either extreme of its range of motion.
When locked in position all the way Down (to
the front), the damper is Open. When locked
in position all the way Up (to the rear), the
damper is Closed.
The appliance fl ue damper must always remain
open when operating.
Damper
Closed
Lintel
Figure 2
NOTE: DIAGRAMS & ILLUSTRATIONS ARE NOT TO SCALE.
Damper
Open
Combustion
Air Actuator
GLASS DOOR OPERATING SAFETY
PRECAUTIONS AND INSTRUCTIONS
These fireplaces are equipped with glass
doors. Only use the doors provided with this
fi replace.
WARNING
Your fi replace is equipped with
glass doors, it should be operated with the doors fully open or
fully closed. If the doors are left
partially open, gas and fl ames
may be drawn out of the opening, creating risks of both fi re
and smoke. Refer to Figure 3 for
proper operating conditions.
Glass Doors
Glass Doors
Fully Open or
Fully Open or
Fully Closed
Fully Closed
(Bi-Fold Doors)
Figure 3
(Bi-Fold Doors)
CAUTION
If a smoking condition exists,
glass doors should be closed
during fi replace operation.
Care and Cleaning of Your Glass Doors
Never clean the glass when the doors are hot.
Do not use ammonia or ammonia based glass
or household cleaner to clean the glass or the
door frame. An ammonia based cleaner will
damage the fi nish of the glass door.
Clean the glass doors by wiping with a damp
towel followed by a clean dry towel to remove
streaks.
Remove stubborn stains from the glass with a
mild soap solution and a towel dampened with
clean water. Dry with a clean dry towel.
• The fi re must always be confi ned within the
boundaries of the fuel grate.
• The fi replace screens must always be closed
whenever the fi replace is being used.
• Never slam the glass door since it could
cause the glass to break.
• Do not build excessively large or hot fi res
— scorching or discoloring of the solid
brass or plated brass trim may occur.
Page 5
• Extreme temperature changes can cause
glass breakage — do not build a hot fi re and
close the glass doors if the doors are cold.
• If the tempered glass pane becomes
scratched or chipped, it creates a weakness in
the glass which can cause the glass to break
when heated. Replace the entire glass door
as an assembly by contacting your nearest
dealer.
CAUTION
Glass, metal frames, handles and
other components of the fi replace
get hot. Use handles and wear
thermal insulating gloves or other
effective protection or tool to open
and close the doors or screens.
WARNING
Be aware that safety glass is
unpredictable when hot and
may break, expelling hot glass
into the room. Advise all family
members to remain well away
from the fi replace when operating with doors closed to avoid any
possible personal injury.
IMPORTANT
Plated polished brass glass
doors may have a plastic covering over all brass pieces for
protection during shipping and
handling. The plastic covering
should be removed after installation of the fi replace before its
use. Under the plastic covering
is a protective lacquer coating
which should not be removed. In
some instances, if it is removed,
irreversible damage to the brass
fi nish could occur. Refer to the
following for specifi c information on plated polished brass.
Please understand that the heat
of the fi re will cause the protective lacquer fi nish to slightly
change to a light caramel color.
Do not be alarmed as this is a
normal occurrence.
IMPORTANT
The lacquer coating on the polished brass glass doors can be
damaged or removed causing
corrosion and/or tarnish. To
help protect the solid brass; use
a non-acidic wax and avoid the
over-spray of acidic/alkali based
glass cleaners on the brass
pieces. If the solid brass begins
to turn black, all the protective
coating should be removed and
the metal re-polished, either
by hand or professionally. Subsequently, the fi nish will not be
as “bright” or lustrous without
the protective coating. Solid
polished brass will acquire a
patina over years of use. This
is a normal occurrence and can
be polished.
COMBUSTION AIR
A proper amount of combustion air is important
for your fi replace. Fireplaces consume large
amounts of oxygen. It is important to allow
an adequate supply of air. This fi replace is
equipped with an outside air kit, to provide suffi cient amounts of combustion air from outside
of the house or structure in which it is installed.
With the outside combustion air kit closed, the
fi re may draw from an outside air source and
pull air in through the chimney. This may cause
smoke spillage into the room.
Smoke spillage often occurs when a fi re is fi rst
started, until the fi replace and the chimney has
had the opportunity to “come up to temperature”
and to begin to function normally. If smoke
spillage problems persist, a window may be
opened just a crack to allow the proper fl ow
of combustion air to the fi replace.
Your fi replace is equipped with an outside
combustion air kit, keep it open at all times
when fi re is burning and close when fi re is out
to prevent cold air intrusion.
Combustion Air Control
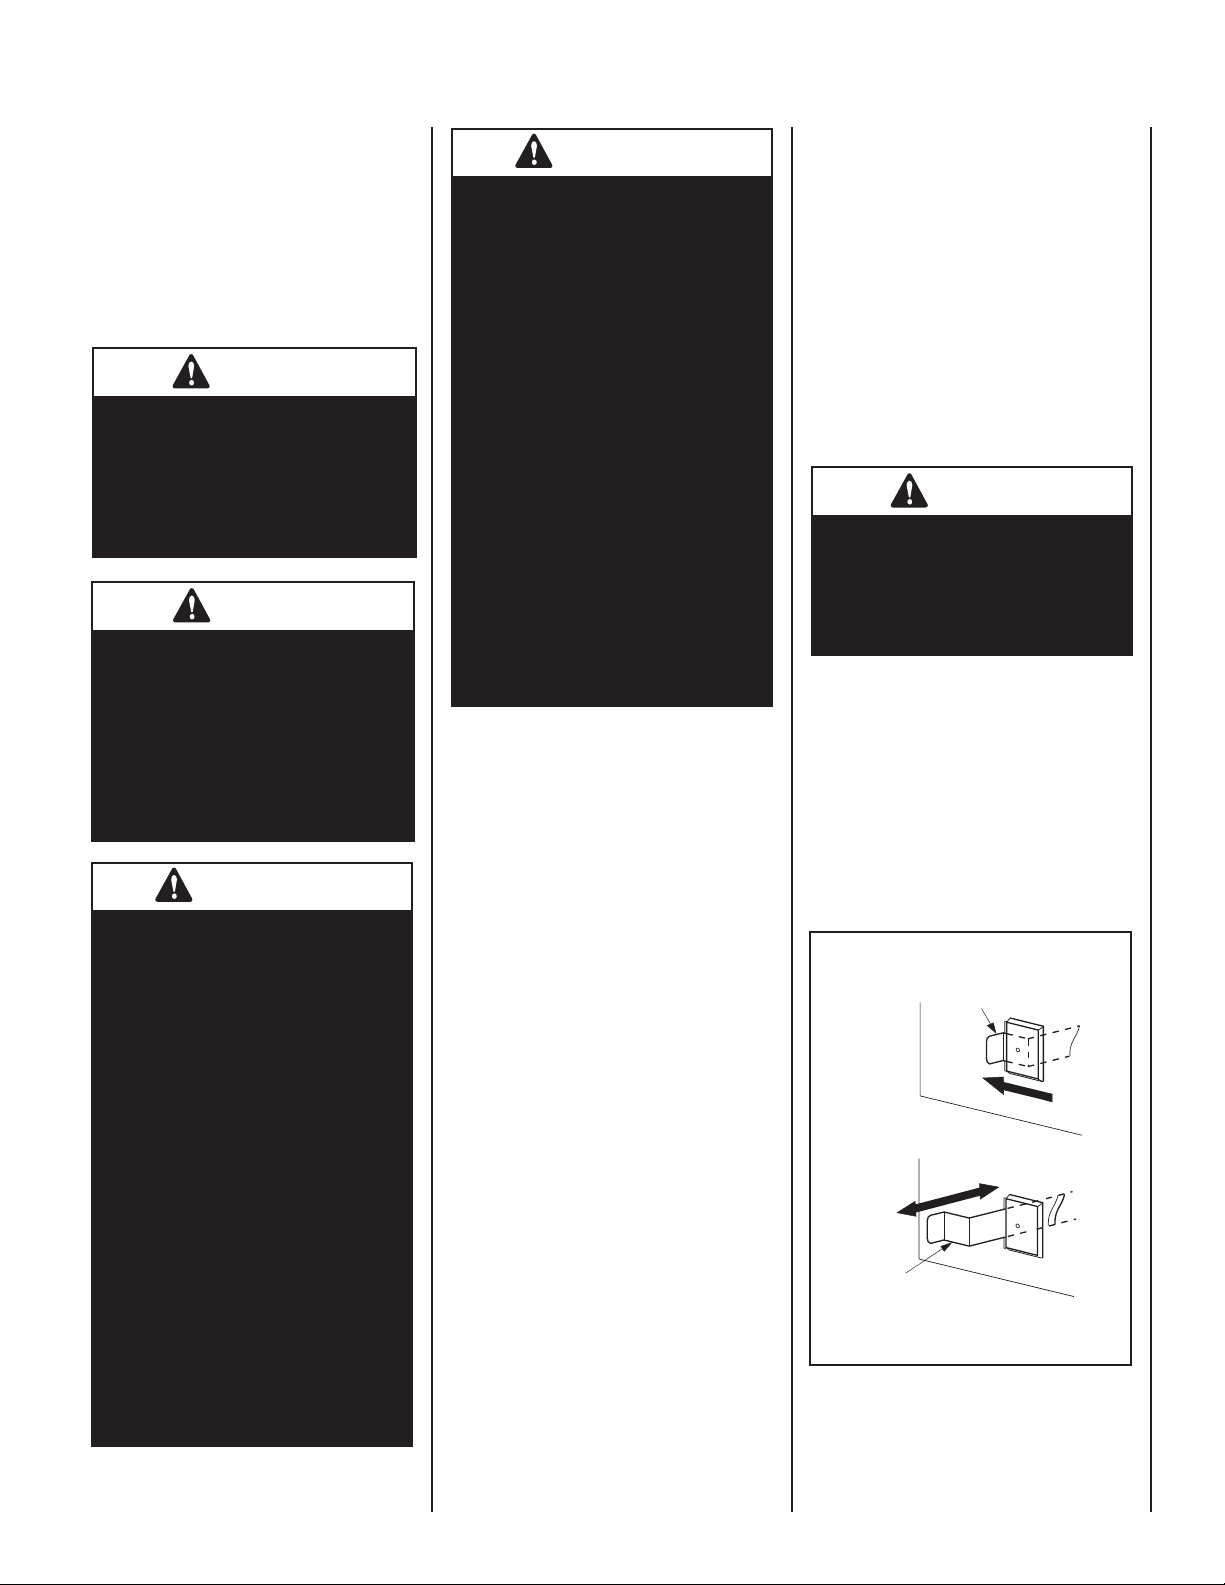
The actuator for combustion air system is standard on all fi replaces but must not be operated
if the complete system is not installed. See
Figure 4 and refer to Figure 2.
If you have reason to believe that you do not
have a complete outside combustion system,
contact your distributor to have your fi replace
inspected for the presence of the complete
system before you use the combustion air
actuator. DO NOT assume that you have this
system in place because you have an actuating
lever present on your fi replace front face.
WARNING
Do not operate the combustion
air gate actuator unless a complete outside combustion air
vent system has been installed
with your Fireplace.
To provide outside combustion air to your
fi replace while it is in operation, locate the
combustion air actuator along the right side of
the fi replace opening behind the screen.
To operate, push the end of the actuator to the
left as shown in Figure 4, until it "pops" free of
its "locked" position. Pull the actuator forward
to open the combustion air door, and push it
back to close.
Air Gate Kit (purchased separately)
Combustion Air Actuator
Pull Forward to Open,
Push Back to Close
Figure 4
NOTE: DIAGRAMS & ILLUSTRATIONS ARE NOT TO SCALE.
5
Page 6
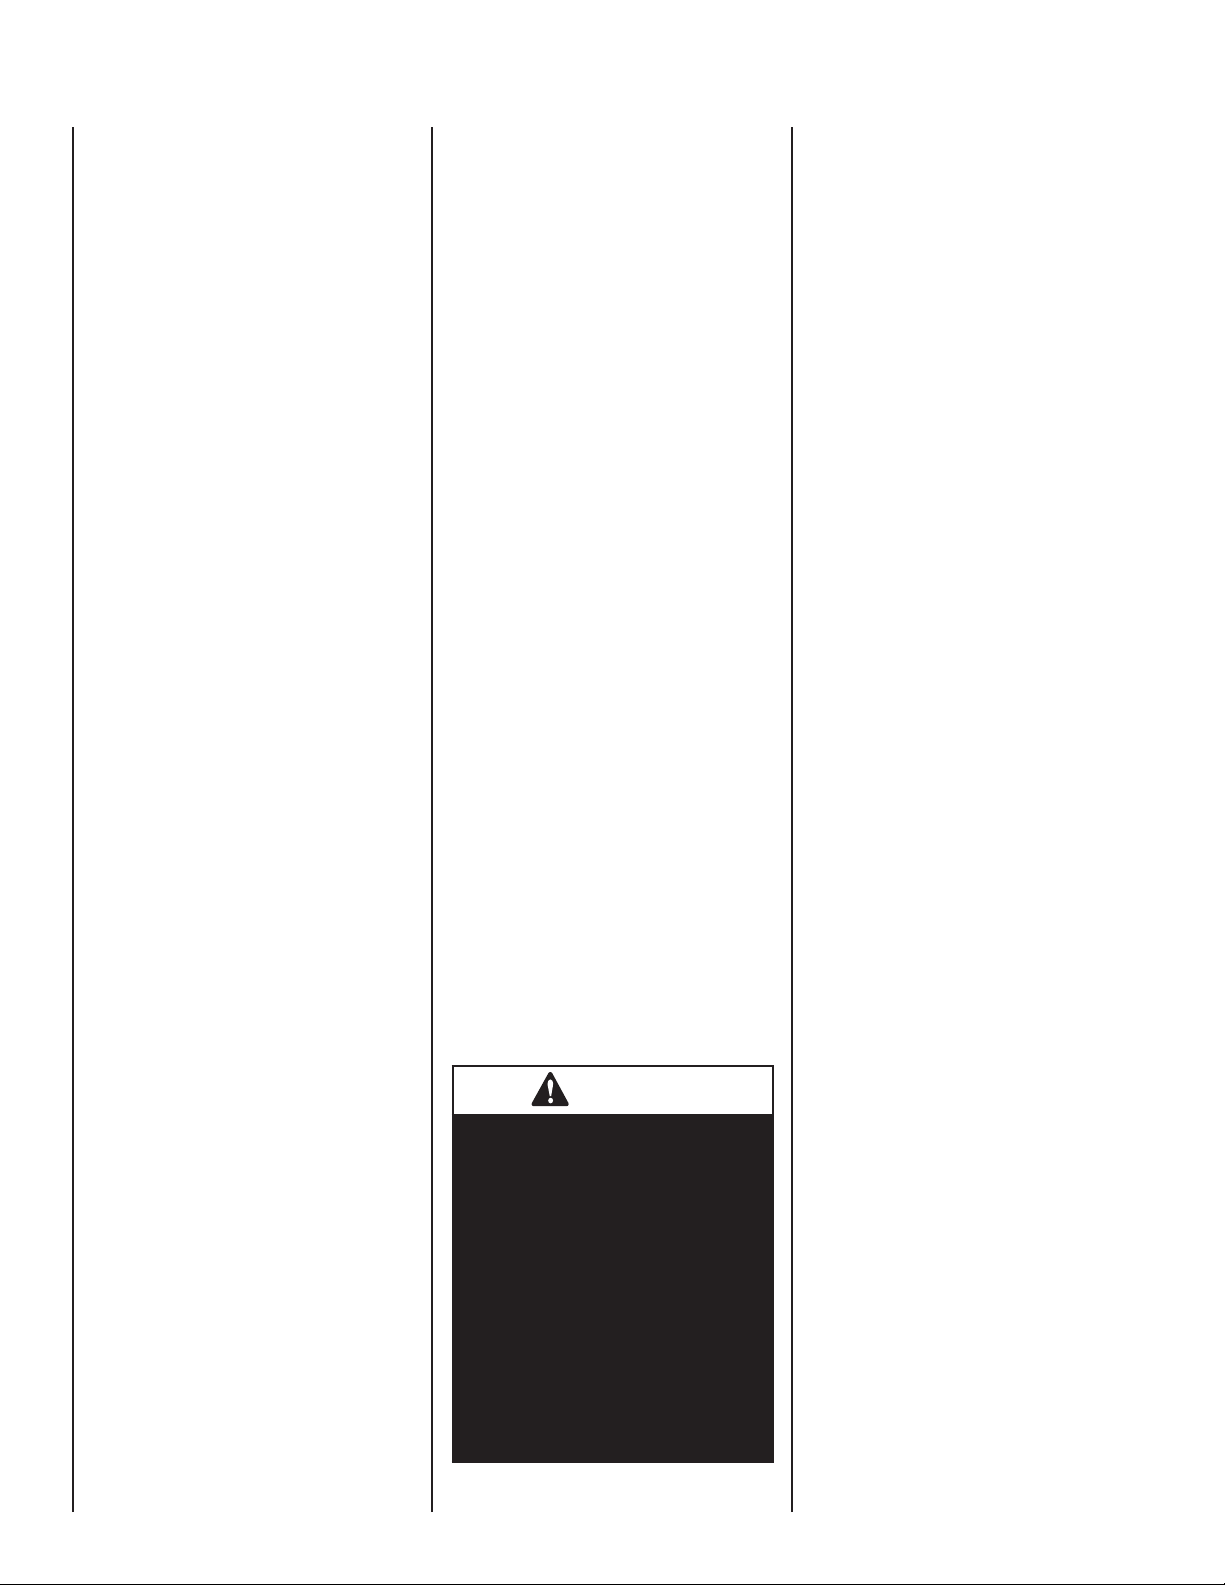
REFRACTORIES
TWICE A YEAR CHECK-UP
CREOSOTE FORMATION AND REMOVAL
All fi reboxes contain a furnace refractory fl oor,
sides and back. These refractories are reinforced
with steel, but can be broken by improper use.
Dropping logs on the bottom refractory and
building fi res directly against the refractories
can cause premature burnout of these components. It may easily be repaired or replaced
at costs far below repair and maintenance for
masonry fi replaces.
Proper care and “burn-in” of the fi rebox will
prolong the period of enjoyment without extensive maintenance. For the fi rst few uses,
build small fi res – not roaring infernos. The
materials used in the refractories contain and
absorb moisture. It is important to “cure” the
refractories by building only modest fi res. Under
normal usage, it is expected that hairline cracks
will appear in the refractory surface. These
hairline cracks do not affect the safe operation
of the fi replace.
Refractories should be replaced when:
1. The crack opens more than 1/4" (19 mm).
2. Pitting in the surface is extensive and pits
become deeper than 3/16" (4.76 mm).
3. Any piece of refractory larger than 2" (51
mm) in radius and 3/16" deep becomes
dislodged.
If conditions 1, 2 or 3 occur, the refractory
should be replaced.
MAINTENANCE GUIDELINES
Your fi replace is designed to operate trouble-free
with minimum maintenance. However, like any
fi ne appliance, it deserves and requires some
housekeeping attention.
Your fi replace will perform better – and certainly
look more attractive to family and friends – if
it is cleaned before each use. Before the fi rst
seasonal use in Autumn and after the last fi re
in Spring, it is important to inspect the fi replace
system carefully. We recommend at least two
complete fi replace inspections a year.
Before Each Use
1. Clean the fi rebox of excessive ashes. Some
owners prefer to leave a small layer to insulate
the cold refractory below the grate which
helps fi re starting.
This fi replace has a factory supplied grate
attached, it is permissible to remove the
grate for cleaning; however, the grate must
be re-attached to the fi replace before the
next burn.
2. Keep the fi replace screens clean so combus-
tion air fl ows freely.
3. Spot check the brick-like refractory for small
cracks. Heat from the fi re expands it slightly.
When it cools, it contracts.
6
Normally, twice a year, you should inspect your
fi replace following this list:
1. Inspect the opening in your chimney top
and remove any debris that could clog it.
The cap is usually held in place by four (4)
screws, which remove easily for checking
or cleaning the full length of the fl ue from
above. Remove the chimney top while
wearing gloves to guard against any sharp
metal edges.
2. Inspect the entire fl ue from the top down
for obstructions such as birds nests, leaves,
etc. This may be done by using a fl exible
handled chimney cleaning brush. If the
chimney contains offset/return elbows; a
soft brush cleaning from the top down to any
elbow and then from the fi rebox up to the
offset/return section is the proper method.
The beam from a powerful fl ashlight will
help in this inspection.
3. Look up from inside the fi replace (damper
open) to see any obstructions in the lower
fl ue area. If present, shut the damper and
glass doors (if installed) to seal the fi rebox
and contain any soot that might fall.
If your do not have glass doors installed, a
damp sheet covering the fi replace opening
and sealed with masking tape will do. Then
clean the fl ue from the top down (if an offset
system, clean per Step 2) using a proper size
chimney brush with fl exible pole sections.
Don’t open the doors or remove the sheet
until all soot has settled. Vacuum, don’t
sweep.
4. Check the metal fl ashing and seals around
your chimney. Seal any cracks or loose
nailhead openings to prevent roof leaks.
5. Clean the fi rebox thoroughly by using a soft
brush or equivalent.
WARNING
Continued overfi ring can permanently damage your fi replace
system. Some examples of
overfi ring are:
• Burning quantities of scrap
lumber, pine branches, paper
or cardboard boxes which exceed the volume of the normal
log fi re.
• Burning trash, chemicals or
chemically treated combustibles.
NOTE: DIAGRAMS & ILLUSTRATIONS ARE NOT TO SCALE.
When wood is burned slowly, it produces tar
and other organic vapors, which combine
with expelled moisture to form creosote. The
creosote vapors condense in the relatively
cool chimney fl ue of a slow-burning fi re. As
a result, creosote residue accumulates on the
fl ue lining. When ignited, this creosote makes
an extremely hot fi re.
The chimney should be inspected at least twice
yearly during the heating season to determine
if a creosote build-up has occurred.
If creosote has accumulated, it should be removed to reduce the risk of a chimney fi re.
If creosote build-up is found, do not use chemical chimney cleaners that are poured on a hot
fi re. The chemical cleaners can be dangerous
and generally only work on the fl ue section
nearest the fi re, leaving the rest of the fl ue
unaffected. It is best to take the time to clean
the fl ue as previously described or have the
chimney professionally cleaned by a qualifi ed
chimney sweep.
TROUBLESHOOTING
No Smoking Allowed
Your new fi replace is designed not to smoke if
properly installed and operated per our instructions. If you do experience a problem, here are
several things to check:
1. Remember – always check to ensure your
fl ue damper is in the open position before
lighting a fi re!
2. When lighting your fi re, a little smoke may
escape into the room – more likely if the
chimney is cold. To correct this, hold a
lighted newspaper up inside the fi rebox near
the open fl ue damper. This will turn around
any downdraft and clear the fl ue of cold air.
As your log fi re burns below, the updraft will
improve as the chimney heats up.
3. Is your fi re too far forward? Move it toward
the back with your poker. Keep the fi re well
within the confi nes of your fuel grate.
4. Keep your fi re up on the grate and the re-
fractory below free of excessive ashes. The
fi re needs plenty of air movement around
the logs.
5. If smoking occurs an hour or two after
lighting the fi re, perhaps your well-insulated
house is too airtight and there is scarcely any
way for replacement air to enter and feed the
fi re. Check to see if your outside combustion
air kit (if installed) is open. Check outside
to ensure no obstructions are in front of
exterior air entry. Open a window slightly,
open doors to one or two rooms and see if
this stops the smoking.
Page 7
6. Is a vent fan, exhaust hood or central heating/cooling system stealing combustion air from your
fi replace? If their volume is high enough, this can cause negative pressure and an unwanted downdraft – and smoking.
7. Is your wood fuel too wet or unseasoned?
Or does it contain some chemical substance that causes sputtering, smoking and toxic fumes?
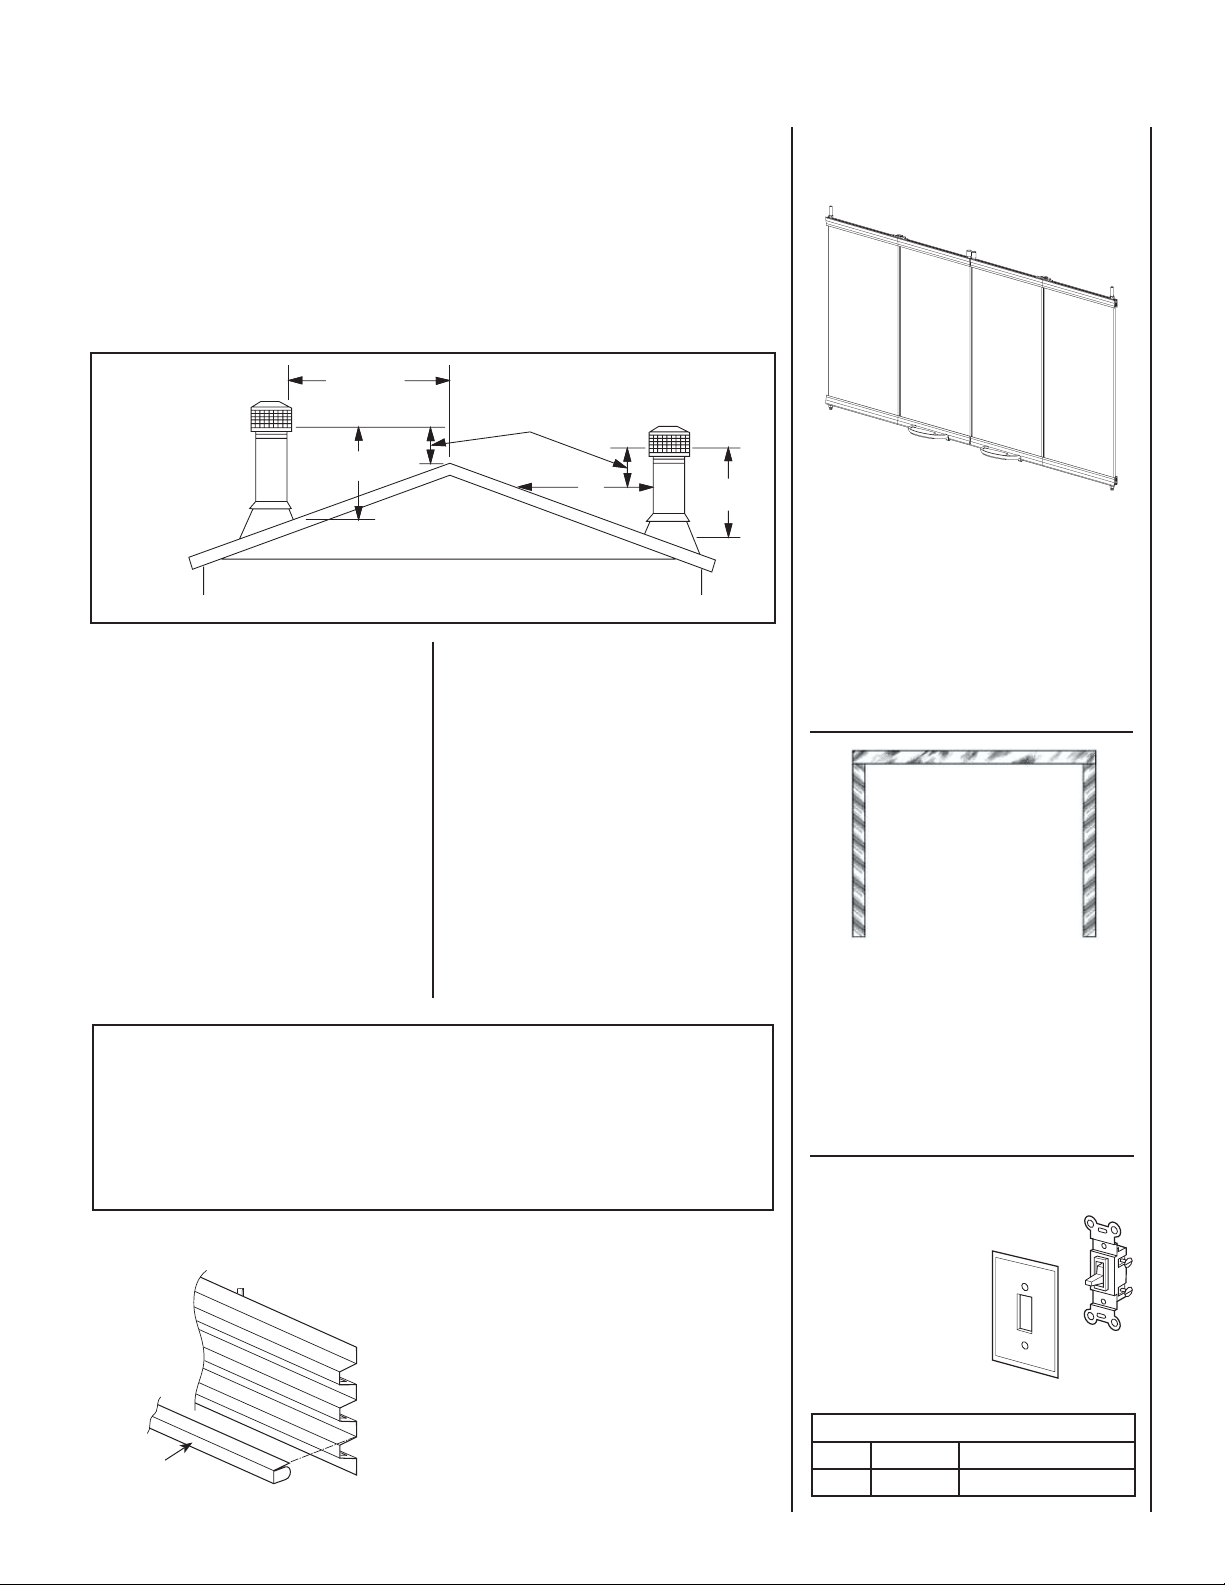
8. Figure 5 illustrates the correct height of your chimney top. It is unlikely that your installation
does not adhere to the installation instructions. However, if not correct, you could experience an
unusual downdraft. Usually, the best solution is to increase the chimney height. This may also be
necessary if nearby trees, adjoining roof lines or a hill is causing a downdraft condition.
9. Remember, your fi replace is not intended to heat your entire home.
Less Than 10'
2' Min.
3'
Min
10'
Min
3'
ACCESSORY COMPONENTS
Bi-Fold Doors 20M30 FDBD36-B
Figure 5
WARRANTY
• This fi replace is covered by a limited warranty
detailed separately from this document.
• Retain this manual. File it with your other
documents for future reference.
PRODUCT REFERENCE INFORMATION
REPLACEMENT PARTS
A complete parts list is found at the end of
this manual. Use only parts supplied from the
manufacturer.
Normally, all parts should be ordered through
your Superior distributor or dealer. Parts will be
shipped at prevailing prices at time of order.
If you encounter any problems or have any questions concerning the installation or application
of this system, please contact your distributor or
installer. For the number of your nearest Superior
dealer, please call 1-800-953-6669.
LHP
1110 West Taft Avenue
Orange, CA 92865
When ordering repair parts, always give the
following information:
1. The model number of the appliance.
2. The serial number of the appliance.
3. The part number.
4. The description of the part.
5. The quantity required.
6. The installation date of the appliance.
Your Fireplace's Model Number ________________________________________
Your Fireplace's Serial Number ________________________________________
The Date On Which Your Fireplace Was Installed ___________________________
Bi-Fold Doors
Your fi replace is fi tted standard with beautiful bi-fold
doors. Model FDBD36-B doors have a handsome
bright brass fi nish.
To ensure warranty and to prevent a potential
fi re hazard, do not use any other doors on these
appliances.
Brass Exterior Trim Kit 19M16 FETK36-B
Exterior Trim Kit
A decorative exterior trim kit is available for use with
this fi replace. This kit is designed to attach to the
fi replace front face around the fi rebox opening. It is
available in a beautiful bright brass fi nish to provide
a dramatic enhancement to the appeal of the fi replace
in the home. (ref. Form #750,113M)
Your Dealer's Name ________________________________________________
ACCESSORY COMPONENTS
Louver Kit
A decorative louver kit is available to enhance and
beautify the front face of your fi replace. This kit is
designed to attach directly to the fi replace front face
over the standard louvers. They are available in a
bright brass fi nish. (ref. Form #750,112M)
Brass Louver Kit 19M15 FLK36-B
Set of 6
Louvers
NOTE: DIAGRAMS & ILLUSTRATIONS ARE NOT TO SCALE.
ON/OFF Wall
Switch Kit
This ON/OFF wall switch kit
can be used in place of the
standard variable speed wall
switch (see Page 8). This
switch provides single speed
ON/OFF operation of the
blower. Install the ON/OFF
wall switch in a convenient
location near the fi replace.
White Wall Switch Kit
Cat. No. Model No. Description
85L87 FWSK ON/OFF Wall Switch Kit
7
Page 8
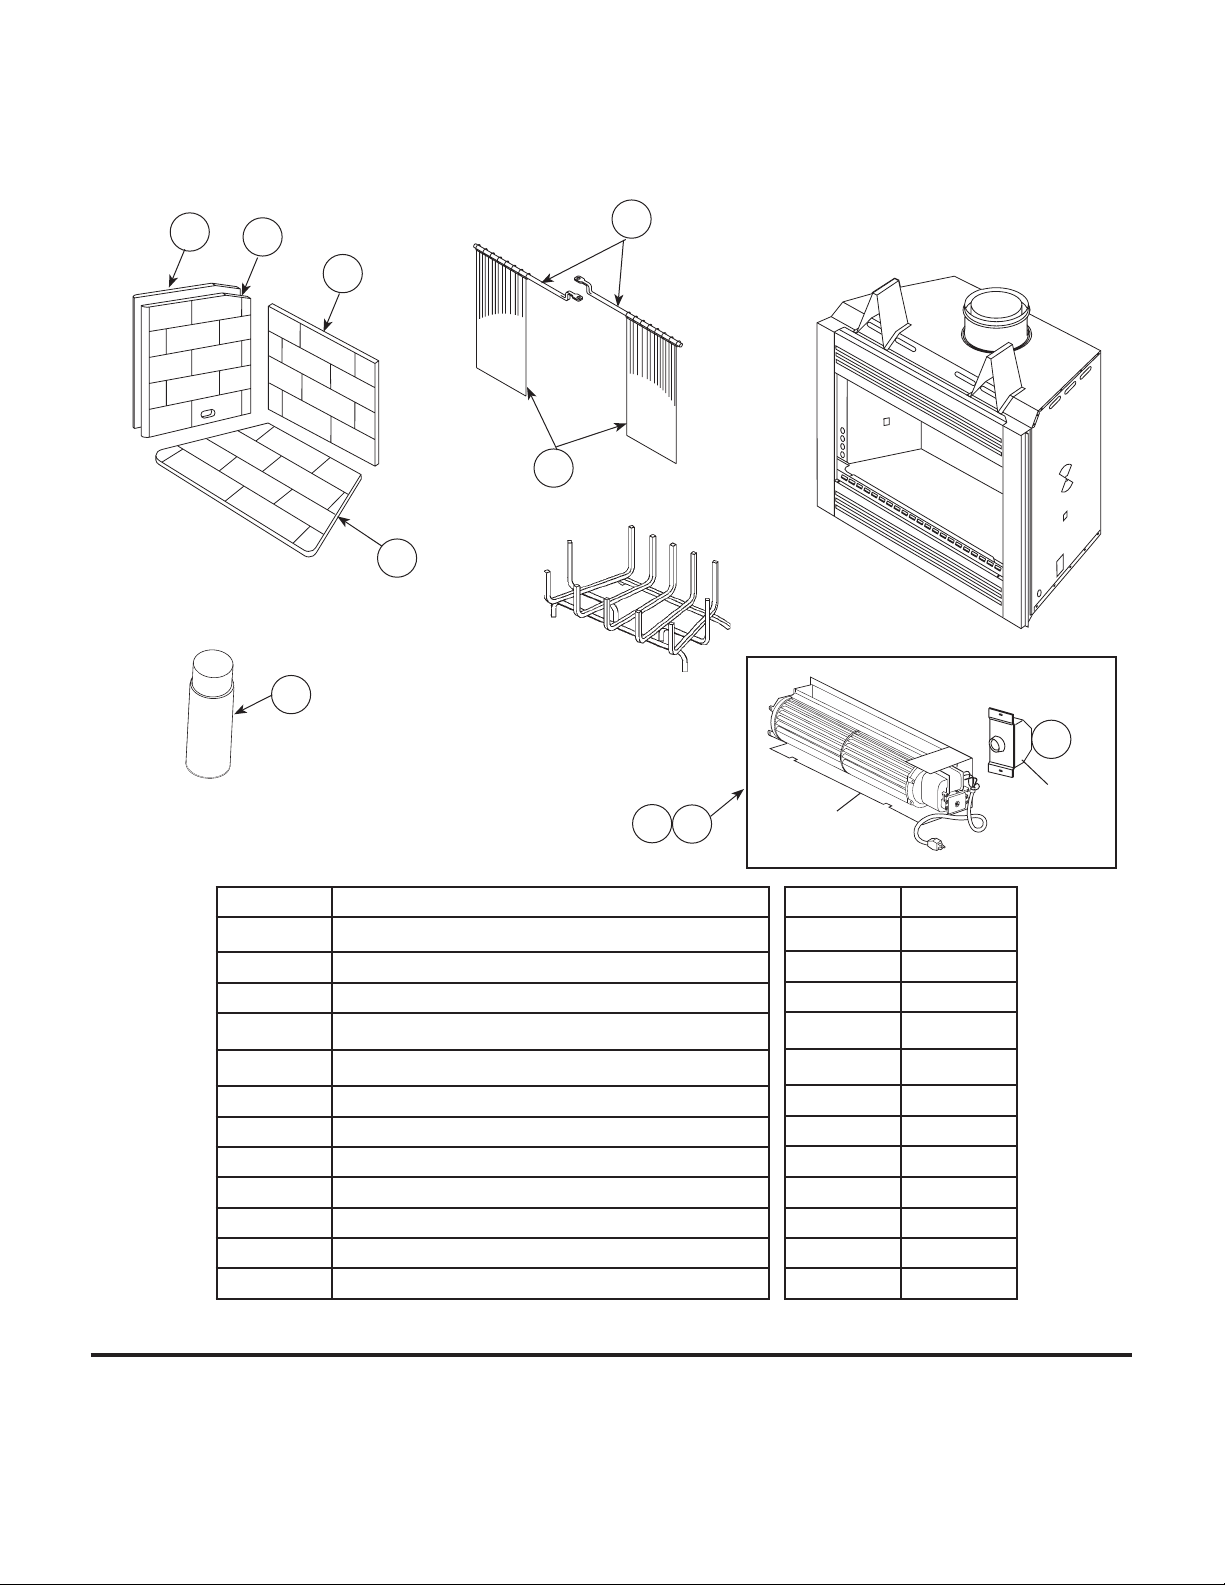
REPLACEMENT PARTS - MODEL HCD36MH
4
3
2
5
1
6
8
P
T
A
N
I
10
9
Blower
11
Variable Speed Wall
Mounted On/Off Switch.
Included w/FBK-200 Only
(or sold separately).
No Description
Fireplace Assembly
1. Firescreen
2. Rod, Screen
3. Refractory, Side, Right
4. Refractory, Side, Left
5. Refractory, Rear
6. Refractory, Bottom
7. Grate
8. Paint, Touchup, Black, FTPK-B
9. Blower, FBK-100, Single Speed (blower only)
10. Blower, FBK-200, Variable Speed (blower & wall rheostat)
11. Wall Rheostat (Variable Speed Wall Switch)
NOTE: DIAGRAMS & ILLUSTRATIONS NOT TO SCALE.
The manufacturer reserves the right to make changes at any time, without notice, in design, materials, specifi cations, prices and also to discontinue colors, styles and products. Consult your
local distributor for fi replace code information.
Printed in U.S.A. © 2006 by LHP
P/N 725,038M REV. A 03/2006
8
NOTE: DIAGRAMS & ILLUSTRATIONS ARE NOT TO SCALE.
Part No. Qty.
--
36L89 2
H3610 2
88L72 1
LB-98316B 1
LB-98317B 1
LB-98315B 1
87L26 1
H4353 1
80L84 1
80L85 1
045571H 1
LHP
1110 West Taft Avenue
Orange, CA 92865
 Loading...