

Page 1

Tablet PC
SM708
User manual
Content
Tablet PC ........................................................................................................................................... 1
SM708 ............................................................................................................................................... 1
User manual ...................................................................................................................................... 1
Content .............................................................................................................................................. 1
1 Introduction .................................................................................................................................... 3
1.1 Acknowledgement ............................................................................................................... 3
1.2 Announcements ................................................................................................................... 3
1.3 Safety Instruction ................................................................................................................ 3
1.4 Abbreviation/T erminology .................................................................................................. 4
2 T ablet PC Introduction ................................................................................................................... 5
2.1 Tablet PC Operation and Preparation .................................................................................. 5
2.2 Tablet PC Status and Reminder ..................................................................................... 5
3 Quick Start Guide ........................................................................................................................... 6
3.1 Keys Function ..................................................................................................................... 6
3.2 Startup and Shutdown ......................................................................................................... 6
3.3 Open and Close of the Screen ............................................................................................. 7
3.4 Usage of Touch Screen ........................................................................................................ 7
3.5 Main interface ..................................................................................................................... 8
3.6 V isit Application Procedures ............................................................................................. 11
3.7 USB Connection ............................................................................................................... 11
3.8 Words Input ....................................................................................................................... 12
3.9 Application Technique....................................................................................................... 13
4 Basic Setting ................................................................................................................................ 14
4.1 SIM Management .............................................................................................................. 14
4.2 Wireless and Internet ......................................................................................................... 16
4.3 Bluetooth ..................................................................................................................... 19
4.4 Data Usage Situation ......................................................................................................... 21
4.5 More .................................................................................................................................. 22
4 Language and Input Method ....................................................................................... 37
4.1
1
Page 2

4.16 Date and Time ................................................................................................................. 40
5 Multi-Media ................................................................................................................................. 42
5.1 Music ................................................................................................................................. 42
5.2 V ideo ................................................................................................................................. 43
5.3 Photo Gallery .................................................................................................................... 43
5.4 Camera .............................................................................................................................. 44
5.5 FM Radio .......................................................................................................................... 45
6 Communication Function ............................................................................................................. 47
6.1 Phone ................................................................................................................................. 47
7 Internet ......................................................................................................................................... 48
7.1 Browser ............................................................................................................................. 48
7.2 Email ................................................................................................................................. 48
8 GPS Function ............................................................................................................................ 51
2. Enter into setting interface, click
icon, enter into below picture 8.1 ........................ 51
9 Other Application Procedures ................................................................................................ ...... 53
9.1 Clock ................................................................................................................................. 53
9.2 Calculator .......................................................................................................................... 53
9.3 File Manager ..................................................................................................................... 54
9.4 Recorder ............................................................................................................................ 55
10 Troubles Shooting .......................................................................................................... ............ 56
4
2
Page 3

1 Introduction
1.1 Acknowledgement
Thanks for your purchase of our product. SM708 is high definition tablet PC. Its CPU is
MTK8382, which apply the Cortex-A7, dominant frequency is 1.2GHz, it is based on Android
4.4.2 operation system, and easy to expand the third application procedure.
The product is designed with vari ous functions, including WCDMA, WIFI, BT, GPS, FM,
voice call and so on. It is easy to achieve wireless communication and in ternet, you hav e access to
surf the internet anytime and anywhere; it is also built with high accuracy GPS module, so that it
can be used for navigating through installing map software. There are many sensors which offer
you brand-new operation and entertainment; besides, it has camera shooting, which leads
electronic consumption to enter into a fresh palm internet entertainment time.
The manual systemically introduces the functions, use techniques and announcements, please
read this manual carefully before your operation.
1.2 Announcements
Preventive maintainance
Please always keep the Tablet PC dry. To avoid the device short trouble, corrosion
fault and electric short, please prevent the device, battery and charger from water and
moisture, and don’t operate the device or charger by wet hand.
To avoid failure of device, battery and charger, please prevent the device, battery,
charger from violent shock or shake.
To avoid failure of device, battery and charger, please prevent the device, battery,
charger of all over heating or too cold circumstance
Never shock, throw, prod the Tablet PC, or drop, extrude, bend the Tablet PC.
Never disassemble the device and accessories arbitrarily, otherwise the device and
accessories are not in our company warranty scope.
1.3 Safety Instruction
Before the operation of the Tablet PC, please read this chapter and teach your kids about these
information. For further details, please refer to the safety instructions and announcement.
3
Page 4

Never use the Tablet PC when driving car, in order to ensure safe driving.
In the medical area, please abide by related rules and regulations. Please shut
down the Tablet PC when it is near to the medical area.
To avoid the wireless signal to interrupt the plane- controlled signal, please shut
down the Tablet PC or using airplane mode when you are boarding a flight,
To avoid electronic equipment failure, please shut down the Tablet PC in the
vicinage of high-accuracy electronic equipments.
Please don’t disassemble the Tablet PC and accessories. Only authorized agent has
access to service the Tablet PC.
Please keep the Tablet PC far away from magnetic equipments, the radiation of
Tablet PC may erase the data stored in the magnetic equipments.
Never use the Tablet PC in the vicinage of high temperature, inflammable gas
( gas station).
Protect the Tablet PC and accessories from kids reach scope, and avoid the kids to
use the Tablet PC without parents’ supervision.
Please comply with related rules and regulations, and respect others’ privacy and
legal rights while using the Tablet PC.
Please strictly adhere to related instructions in the manual when using USB cable
to ensure the safety of the Tablet PC or PC.
Never use the Tablet PC in bathroom or other humid environment, and please
protect the Tablet PC from liquid wash or wet.
1.4 Abbreviation/Terminology
Abbreviation/Terminology Full Name Description
Tablet PC
WIFI
T F
4
Mobile Internet Device Mobile Internet Terminal
Wireless Fidelity
TransFlash
Base on IEEE 802.11b standard
wireless LAN
Alternative name Micro SD,super
miniature memory card
Page 5

2 Tablet PC Introduction
2.1 Tablet PC Operation and Preparation
Battery Charging
If this navigator is first used, please use 5V adaptor to fully charge it.
1. Apply the power adptor to charge for Tablet PC.
2.2 Tablet PC Status and Reminder
Reminder icons
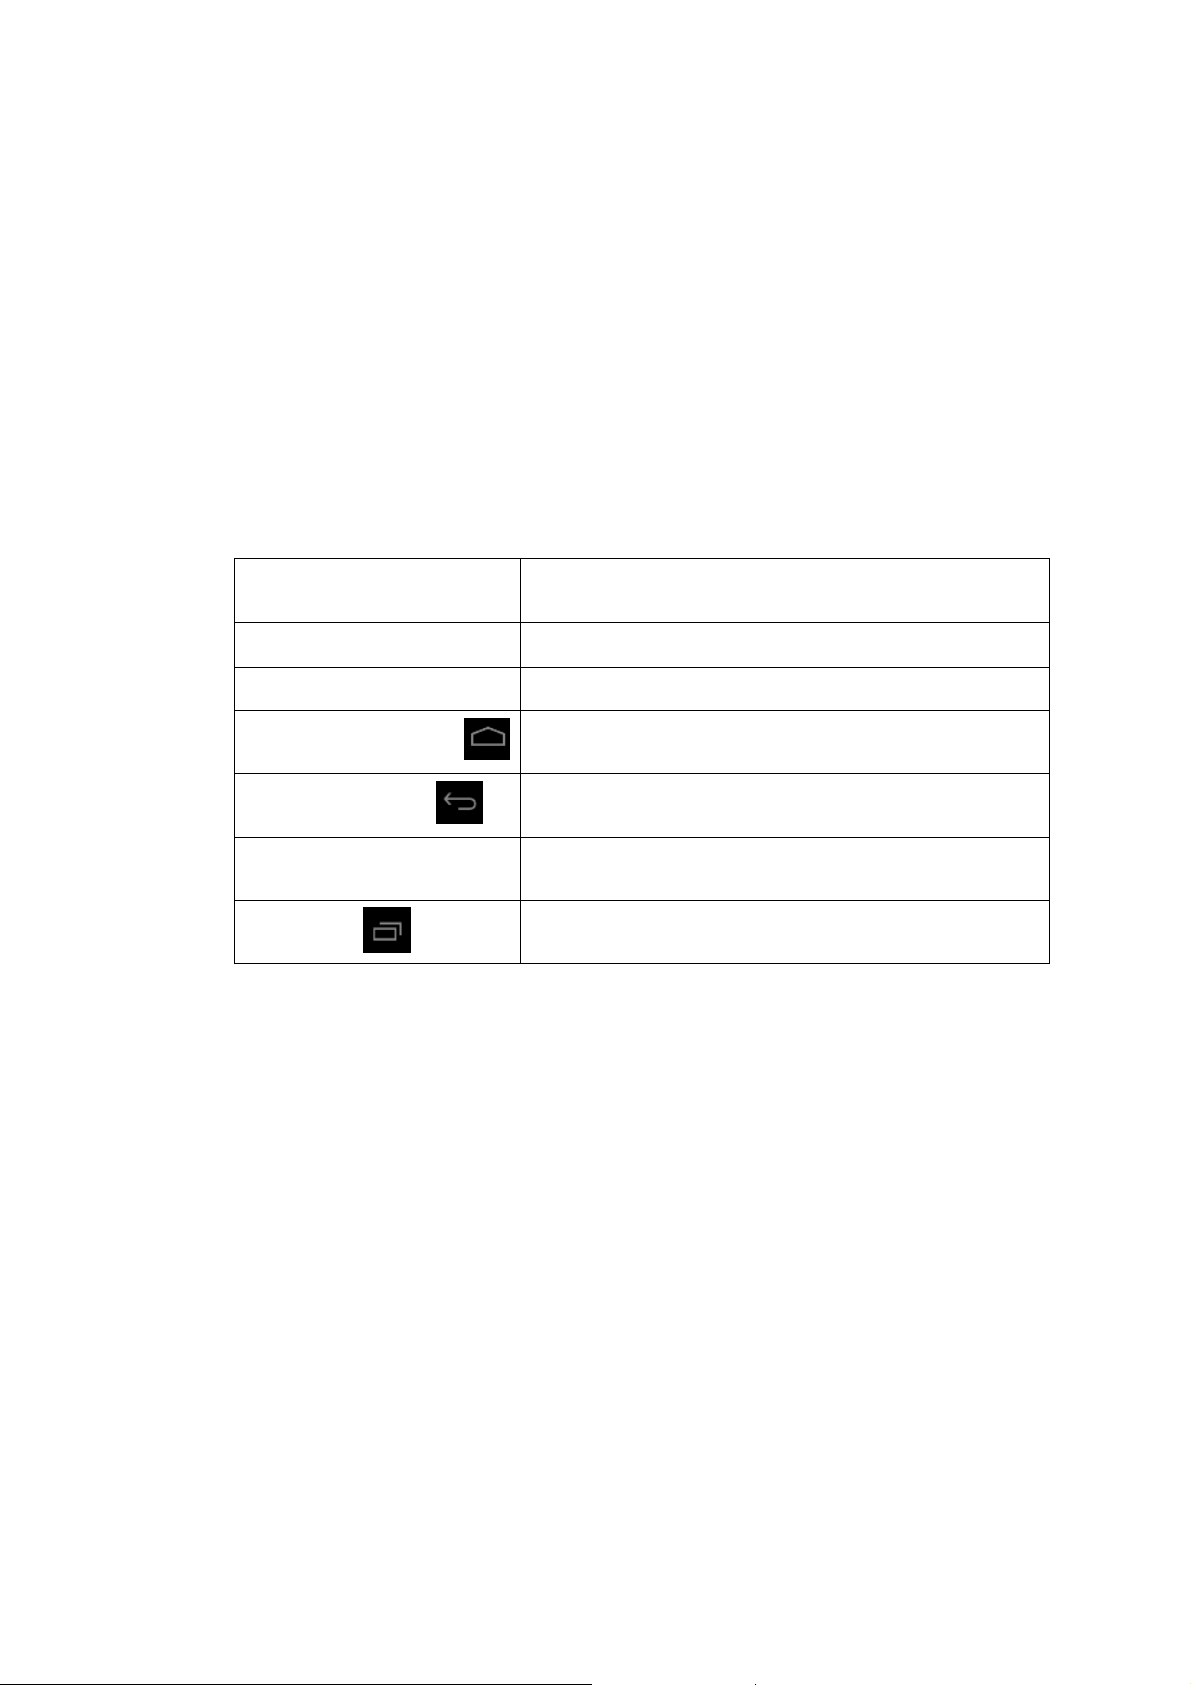
When some remind message appears in your reminder window, please click column and slip
the screen to open the reminder list. Choose the menu you need, and confirm the information.
Then you can close the reminder window through clicking the column to slide up. Please refer to
below status icons:
New email
USB connected
Return button
Setting button & Display
recently-used application
Current electric
volume.
Airplane Mode on
USB debugging connected
Downloading
Home button
WIFI connected, internet is
available
Reminder board
Reminder icons will work while receiving emails, WIFI is open, you can open the reminder
board to view the detailed information.
5
Page 6
Open the reminder board
When the reminder column shows new reminder icon, please hold the column and slip down
your finger, then the reminder board is opened.
3 Quick Start Guide
3.1 Keys Function
Keys Funcction Description:
Power button Short press to sleep/wake up, long press to startup and
shutdown.
Volume +(up) increase the volume
Volume -(down) decrease the volume
Click it in any interface will return to main interface.
HOME button (home)
Back button(back)
Menu button
Setting button
click it in any interface will return to previous menu
This button will display in menu interface.
Can set the system and other menus &display recently
browsed history
3.2 Startup and Shutdown
Startup
Long press POWER key for three seconds, you can enter into startup picture. The system
enters into screen lock status, please unlock it.
Shutdown
1. Long press POWER, it will popoup shutdown window.
2. Shutdowm window contains mute mode, airplane mode,reboot mode and shutdown
four options.
3. Click Shutdown is the last step.
6
Page 7

3.3 Open and Close of the Screen
Screen will be closed on its own when no operation happens.
1. Screen will be closed on its own if no operation happens for some time to save battery
power
2. When screen is open, press POWER key, the screen will be closed immediately.
Open the screen when it is closed.
If the screen is closed, short press POWER to open the screen. The screen will be locked
open it, it will show the picture as below picture, left slide to unlock and enter into camera, right
slide the unlock icon to unlock the screen.
Picture 3.1
3.4 Usage of Touch Screen
Tablet PC operating methods
There are below methods to view the main screen, menu and application procedure in your Tablet
PC.
Click
When you want to use the screen keyboard typing or choo se applicat ion in the main i nterface, you
only need to touch it by your finger.
Press on
If you want to open some item( textbox or the link in the webpage), or shortcut and main
procedure move, you can press on this item.
Quickly slide or slide
7
Page 8

search
Quickly slide or slide indicates make quick vertical or horizoncial movement by finger.
Pull
Before you pull, you need to hold the it with strenghth until you pull it into the position you want.
Rotate
For most pictures, you only need to retate the Tablet PC sidewise to change the screen direction
from horizoncial to vertical. For instance, when you are typing wods, and watching movies.
3.5 Main interface
Main interface as below picture 3.2, long press the blank and it will popup windows to set
wallpaper, folder, widgets, and shortcut.
Notice
column
Batty volume
time
Set the
system and
other
menus . &
display
recently
Picture 3.2
The extended home page
The home page can be extended beyond the wideness of screen to provide more space,
which you can put new-added shortcuts and widgets. Click the blank space in home page
then slide right or left to exten d to th e righ t or left of the screen. In the home page, there are
two extended pictures, as Picture 3.3.
Home
return
8
Page 9

Picture 3.3
The shortcut icons management in desktop application.
Create folder icon in desktop
1. Drag the icons need to be put together on one icon(can also overlay several
icons)as Picture 3.4.
2. Then click the overlayed icons, the applications can be folded, as Picture 3.5.
Click the unnamed folder in the black box, it will popup the hidden keyboard, the folder name
can be renamed (this is similiar with Apple IOS system), the icons position can be changed
through long press.
Picture 3.4
9
Page 10

Remove the icons in desktop
1. Long press the icons need to be remove, then on the right above of the screen, it
will appear
2. Drag the icon to the above of the remove icon, till the icon become red, then move
your finger to delete the icon.
Change the wallpaper of desktop
1. In home page, long press any blank space in main screen, it will popup a window
to change the wallpaper.
2. Click the gallery or wallpaper gallery to select the wallpaper.
Picture 3.5
icons.
10
Page 11

3.6 Visit Application Procedures
Click in right top of Picture 3.2, enter into main interface as Picture 3.6,
choose the application procedure you want to visit.
Return to
home page
Picture 3.6
3.7 USB Connection
Tablet PC storage configuration
Before transmitting documents, you have to conduct storage configuration for your Tablet PC:
1. Connect the Tablet PC and computer by USB cable, the reminder column will show the
remind information.
2. Open the reminder board; please view the Tablet PC status and reminder to learn how to
open the board.
3. In the reminder board, click the “USB Connected”, it will as below Picture 3.4, then
click “open USB storage configuration”.
4. Now the USB is connected successfully.
11
Page 12

Picture 3.7
Copy the document into memory card
1. Connect the Tablet PC to computer with USB cable.
2. As Tablet PC storage configuration, it is connected with computer successfully.
3. Open the “My computer” in your computer, check the items in “removable disc”.
4. Copy the documents you need into “removable disc”.
5. After copying finishes, click “shutdown the USB storage configuration” to uninstall.
Notice: When the Tablet PC is connected with USB cable, and you open the USB storage
configuration, you can’t view the memory card through the Tablet PC. Only after you detach
the USB cable, you can view the memory card in the Tablet PC.
3.8 Words Input
Use the screen keyboard
When you start the procedure or choose the words or numbers edition, it will show the screen
keyboard. The keyboard contains below typing options:
1. Android keyboard
2. Google Pinyin
Choose the typing method you want
1. Click Setting pocedure application.
2. Click Language and Keyboard.
3. In the text setting area will reveal all the installed words-typing methods in your Tablet
PC.
12
Page 13
①
4. Tick the typing method you want.
Use and switch of input method
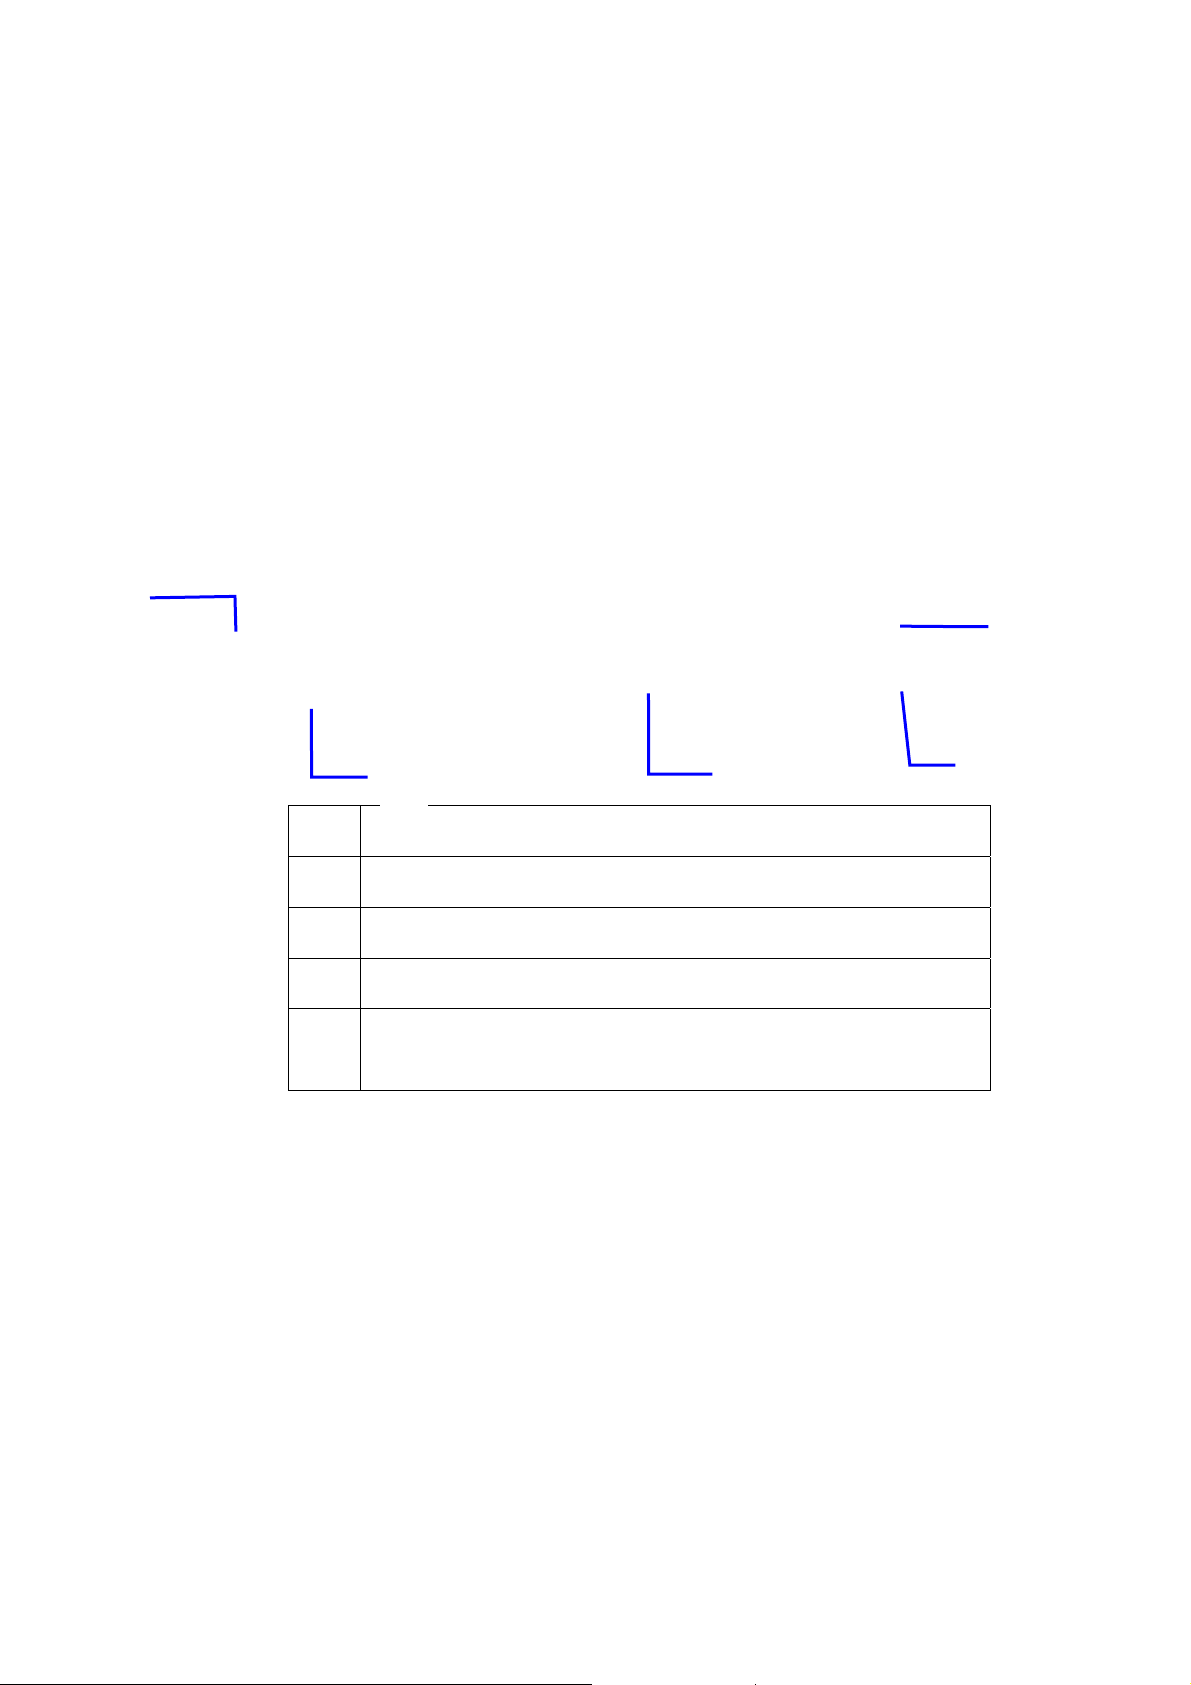
⑤
②
1 switch the capital and small letter
2 switch the mode of words input
3 click to insert the spa ce
4 click input to exec ute
5
delete the character in the left of cursor, click and hold to delete all the
characters in the left og the cursor.
3.9 Application T echnique
Enter widgets interface
In the application interface,click widgets on the above of screen, or slide the screen, it
will swtich into widgets interface. Long press any widget to create its shortcut, then
you can enter into the application through the shortcut ic on.
Picture 3.8
③
④
Create application shortcut icons in the desktop
In the application interface or widgets interface, long press any icon to switch into
desktop automatically, drag and hold the icon, you can move to any position in the
desktop.
Remind: If the target position has no space, the widget won’t be add in the main
13
Page 14

screen.
4 Basic Setting
4.1 SIM Management
4.1-1 Voice call
Click settings in main menu, choose SIM Management, as Picture 4.1
Picture 4.1
Click voice call, choose defaulted SIM card, as Picture 4.2
14
Page 15
Picture 4.2
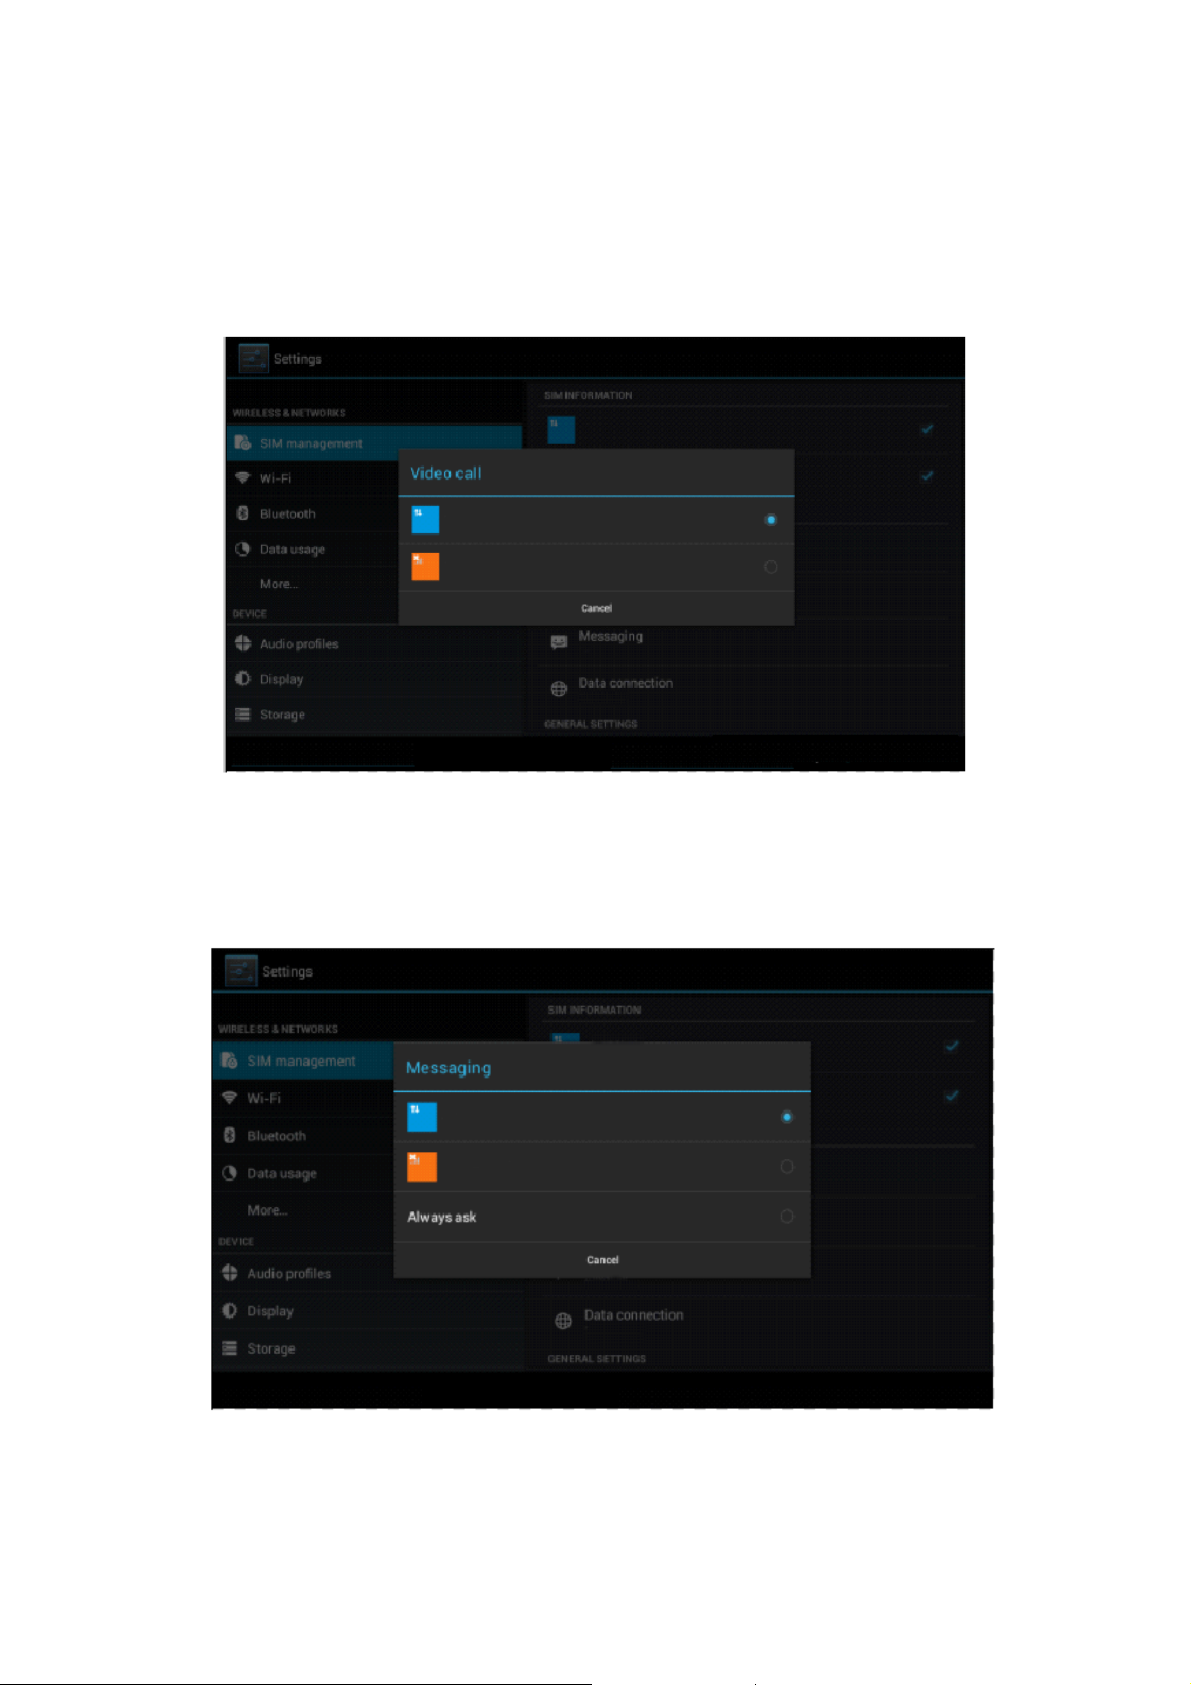
4.1-2 V ideo Call
Click settings in main menu, choose SIM Management, and click video call, choose defaulted
SIM card when makes video call, as Picture 4.3
Picture 4.3
4.1-3 Message
Click settings in main menu, choose SIM Management, click message, choose the defaulted SIM
card when sends message, as Picture 4.4
Picture 4.4
15
Page 16

4.1-4 Data Connection
Click setting application in main menu, choose SIM management, click data connection, choose
the defaulted SIM card, as Picture 4.5
Picture 4.5
4.2 Wireless and Internet
1. Connect Wi-Fi
1) In the main menu or interface, choose setting application procedure.
2) Click WLAN, open wifi, Tablet PC will automatically search the available Wifi
wireless internet. As Picture 4.6
3) Choose the Wi-Fi internet you want to connect, if it has password, it will popup the
password window, enter password, click connect.
16
Page 17

Picture 4.6
2. Add Network
1) Click
icon in right top, as Picture 4.7
Picture 4.7
2) Input network SSID, the wireless network name, click save.
3) Click user name already saved, click connect to use network, as Picture 4.8
17
Page 18

Picture 4.8
3. Network Notice
If you open Network Notice, when WIFI signal appears, the right bottom will
remind you available WLAN network, as Picture 4.6
4. Keep WI-FI on during sleep..
1. Click
icon in right top of Picture 4.8, select advanced.
2. Click Keep WI-FI on during sleep, as Picture 4.9
Picture 4.9
18
Page 19

4.3 Bluetooth
Bluetooth function operation
1. Click setting application in main menu interface, Click bluetooth and open it.
2. If somebody open bluetooth in your surroudings, click search device in right above,
then Tablet PC will automatically search the bluetooth device nearby. As picture 4.10
Picture 4.10
3. Click the available Bluetooth device, it will popup request window, enter into related
password, and match the device to connect.
4. After match successfully, choose the operation you want to, click
Picture 4.11.
to enter in to
19
Page 20

Picture 4.11
Bluetooth setting
1. Rename tablet
Click
icon in right top of Picture 4.10, as Picture 4.12, select rename tablet, you
can rename it as you want
Picture 4.12
2. Check visibility timeout
Select visibility timeout setting in Picture 4.12, choose the time you want to
set, as Picture 4.13(Note: check overtime setting is the time setting when
Bluetooth is checked)
20
Page 21

Picture 4.13
3 Disp lay the file you received
Choose display the file you received in Picture 4.12, you can view download and upload files.
4. Bluetooth advanced setting
Choose Bluetooth advanced setting in Picture 4.12, enter into Picture 4.14
Picture 4.14
1. File transmission,
Open file transmission service, Connect Bluetooth FTP and customer device to visit and operate
the file.
2. Bluetooth distance induction device
Open Bluetooth distance induction device, when two Bluet oo th devices distance is quite
far or connection is cut off, the Bluetooth will remind you with sound.
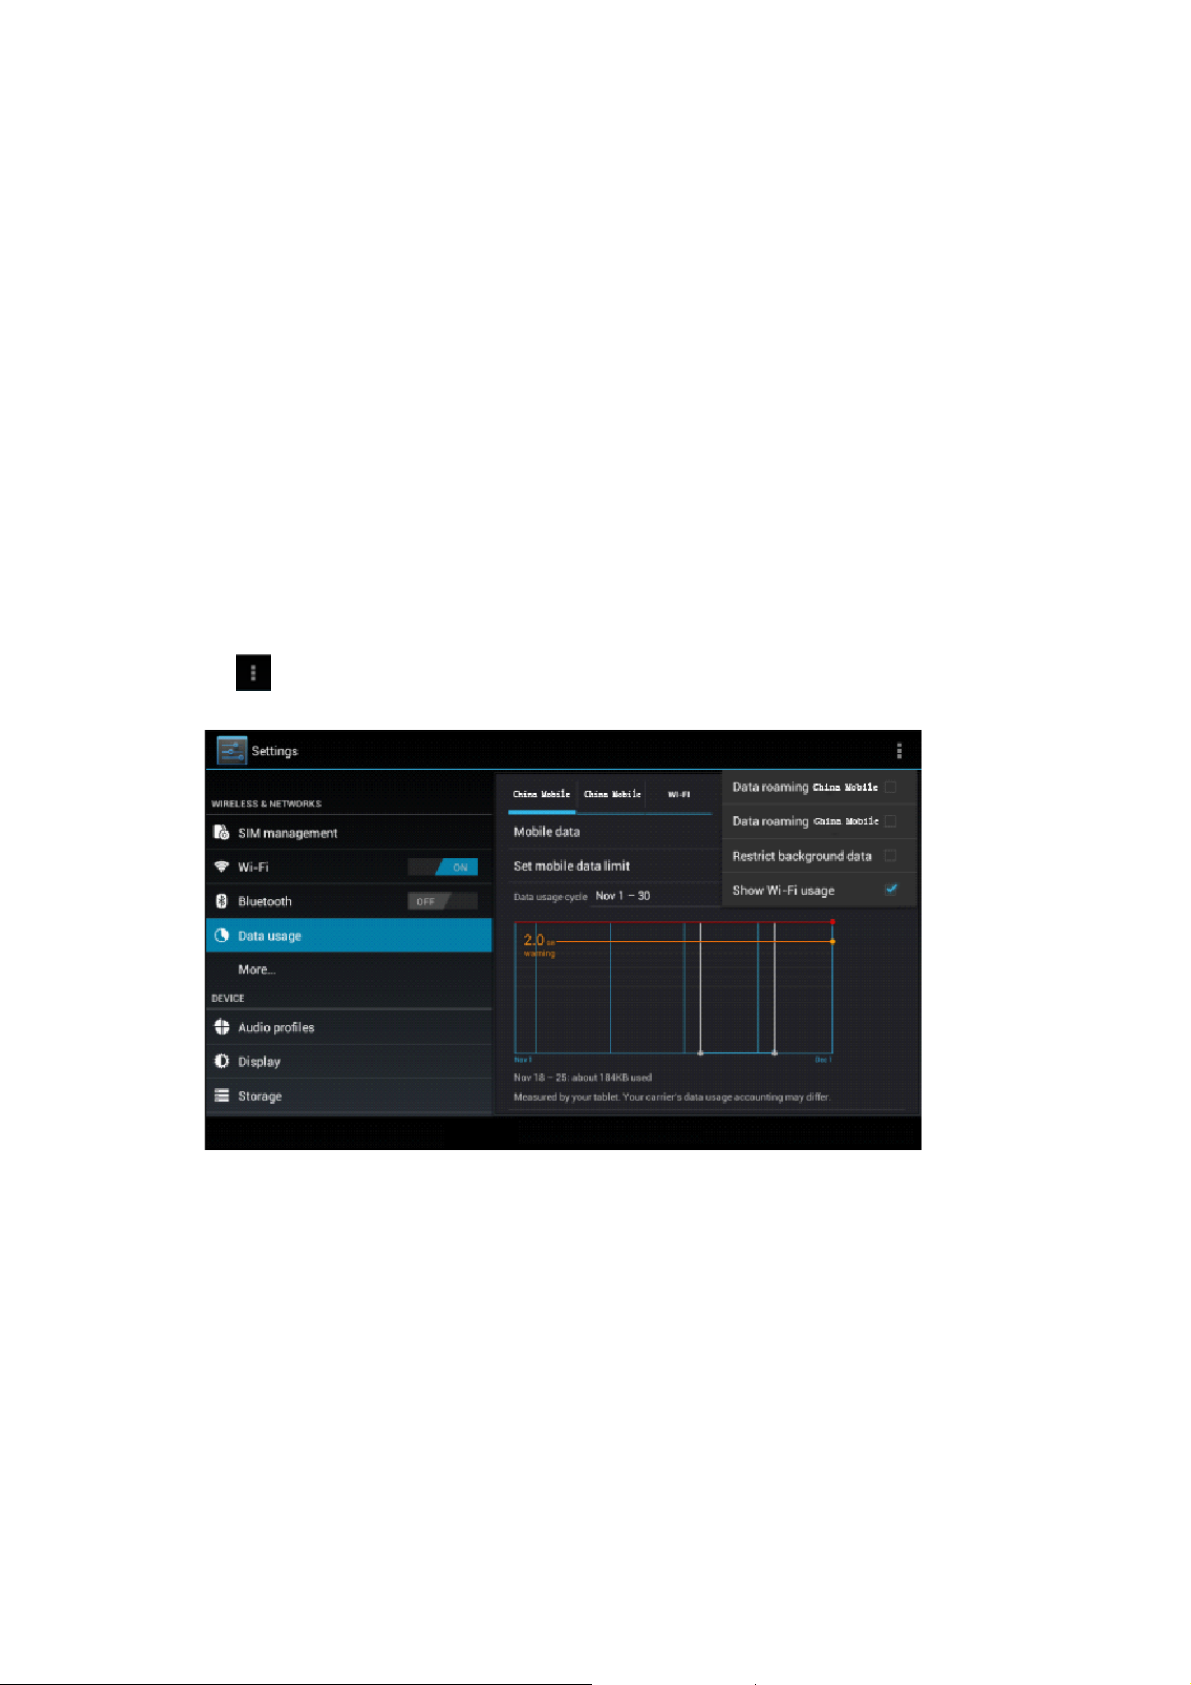
4.4 Data Usage Situation
Check SIM card data usage, as Picture 4.15
21
Page 22
Picture 4.15
Check WIFI data usage
Click icon in right top of Picture 4.15, click Data Usage, as Picture 4.16
Picture 4.16
4.5 More
4.5-1 Airplane Mode
Airplane Mode can turn off WIFI and GSM card function quickly, when airplane mode is
turned on, WIFI and GSM can’t get any signal, then airplane mode is turned off, WIFI and GSM
module will recover to previous state.
4.5-2 VPN
Open VPN, click add VPN network, as Picture 4.17. Input name and server address, then save.
22
Page 23

Picture 4.17
Click VPN, as Picture 4.18, input VPN user name and password, click connect.
Picture 4.18
4.5-3 Network sharing and portable hotspots
Portable WI-FI hotspots
1. Click setting application in main menu.
2. Click more when wifi is well connected, open network share and portable hotspot
23
Page 24

Picture 4.19
Picture 4.20
3. Click keep WI-FI hotspots on, choose open time.
4. Return to previous menu, open portable WLAN hotspots, click configure WI-FI
hotspots.
24
Page 25
Picture 4.21
5. Set passwords you want to, password should be more than 8 numbers.
4.5-4 Mobile Networks
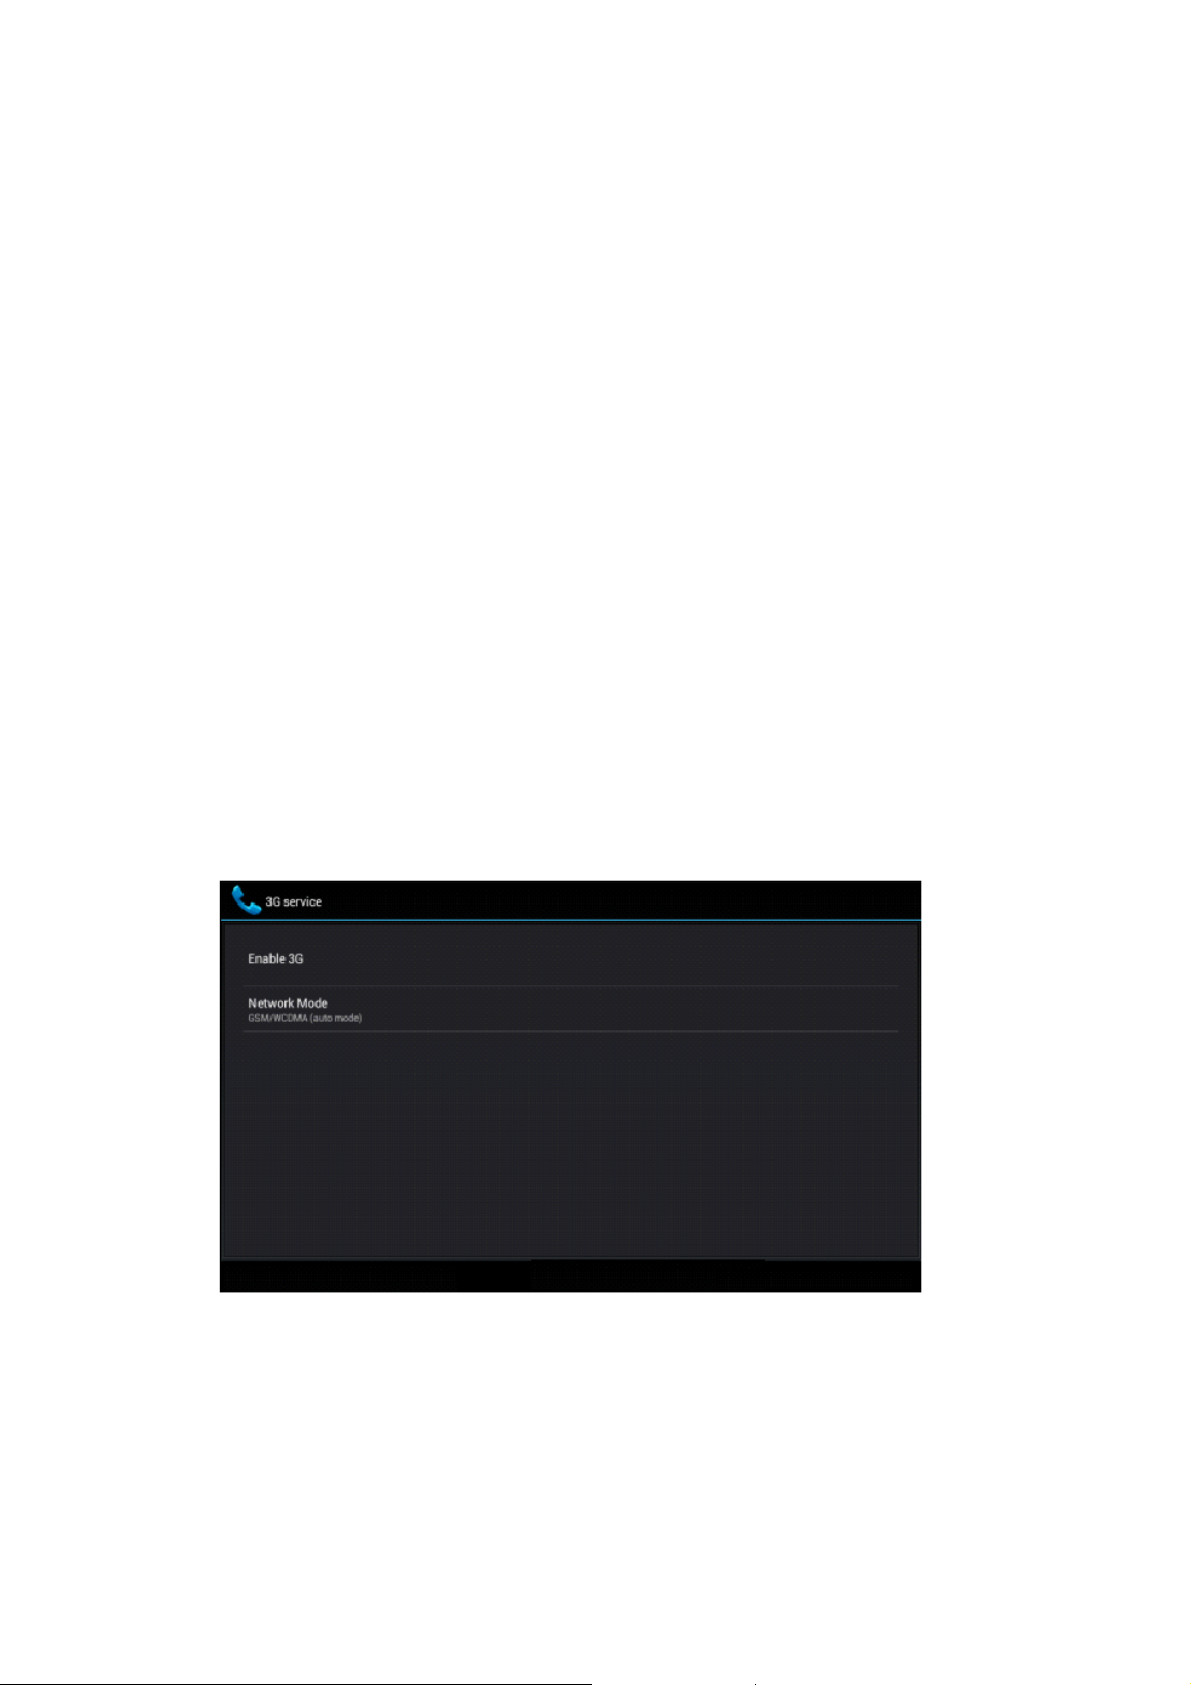
1. 3G service
Click 3G service, as Picture 4.22, choose available defaulted SIM card, GSM is 2G network,
WCDMA is 3G network.
Picture 4.22
2. Access Point Name( APN)
Click mobile network, as Picture 4.23
25
Page 26

Picture 4.23
Choose access points name (APN), choose SIM card you need to connect,
Choose connect type, as Picture 4.24
Picture 4.24
Remark: (CMWAP transmitters data through GPRS, the webpage it visit belongs to wap webpage,
and CMNET support www browse mobile phone network, it can also log in webpage in computer.
And the charges are also different.)
3. Network Operator
Click network operator, choose SIM card you need to connect, system will search available GSM
and WCDMA network, as Picture 4.25
26
Page 27

Picture 4.25
4.5-5 GPRS data prior mode
After Open GPRS data prior mode, systems will priority chooses your network.
4.6 Contextual Model
1. Open settings, click contextual model, as Picture 4.26,
Picture 4.26
27
Page 28

2. Click standard to enter into Picture 4.27
Picture 4.27
1. Vibrate
In picture 4.27, click vibrate, Tablet PC will vibrate when someone calls you.
2. Volume
In picture 4.27, click volume, you can set ringtone, notice, and alarm volume, as Picture 4.28
Picture 4.28
3. Voice call Ringtone
In picture 4.27, click voice call ringtone to choose voice call ringtone, as Picture
4.29
28
Page 29

Picture 4.29
4. Video call ringtone
In Picture 4.27, click video call ringtone to choose video call ringtone, as Picture 4.30
Picture 4.30
(Note: Except standard, silent, meet, outdoor are only for selection, they can’t be set.)
4.7 Display
4.7-1 Adjust the screen brightness
1 . Click Setting application procedure.
29
Page 30

2. Click display, choose brightness,
3. Drag the portlito to adjust the brightness volume.As Picture 4.31
Picture 4.31
4. Click OK after brightness is adjusted.
4.7-2 Wallpapers
1. Click setting application.
2. Click display, click wallpaper.
3. You can choose different wallpapers as you like—live wallpapers---gallery(user
defined)---wallpapers (system defect)---video wallpaper, as Picture 4.32
Picture 4.32
30
Page 31

4.7-3 Auto rotation
System is defaulted as open auto rotation, when it is turned off, system won’t rotate
Tablet PC screen by G-sensor.
4.7-4 Sleep
1. Click setting appliation.
2. Click display.
3. Click sleep.
4. Set the sleep time as you want, as Picture 4.33
Picture 4.33
4.7-5 Font size
Click font size to adjust the font size, as Picture 4.34
Picture 4.34
31
Page 32

4.8 Storage
Open setting function, click memory, click preferred install location, you can
choose isntall new application to choose preferred install location.
Check SD card and Tablet PC storage space.
1. Enter into setting application.
2. Click storage, check storage space.
1. Internal storage
(1) System storage
System storage is the spcae Tablet PC leave for system file, as
Picture 4.35. it can’t be viewed.
Picture 4.35
(2)Internal storage
Internal storage is Tablet PC local NAND storage, as Picture 4.36, if you need to check the
storage content, you can check it in main menu.
32
Page 33

Picture 4.36
2. SD card
You can check storage space, SD card available space, unmount SD card and erease
SD card, as Picture 4.37
Picture 4.37
Safely remove SD card
1.Click setting application 2.Click memory 3.Click uninstall SD card. Now you can remove SD
card safely.
Note: Removing SD card safely can protect SD card and increase its lifetime.
33
Page 34

4.9 Battery
Click setting function, select battery, you can view the battery situation, as Picture 4.38
Picture 4.38
4.10 Application program
1. Click setting application in Apps.
2. Select application, after enter, you can manage and delete installed application and
check system used storage space and left space. (As Picture 4.39)
Picture 4.39
34
Page 35

3. View internal storage used space and left space, as Picture 4.40
Picture 4.40
4. View the working device, used space and available space, as Picture 4.41
Picture 4.41
35
Page 36

4.11 Account and Sync
1. Select setting application, open account and sync
2. Click add an account, as Picture 4.42
Picture 4.42
4.12 Location service
Click setting, select location service, as Picture 4.43
Picture 4.43
36
Page 37

4.13 Security setting
Set locked screen, lock the touch screen by unlock icon or password to prot ect your Tablet
PC.
Note: After setting screen locked, you should enter the passcode each time when you startup
or screen is locked
Set unlocked picture
1. Click setting application in main interface, click safe.
2. Click locked the screen. Choose picture in text setting area.
3. Click next following the remind message.
4. The unlocked pattern board pop up, there are nine touch spots, connect 4
points from vertical, horizontal or diagonal direction. As Picture 4.10, move
your finger from the screen when finish. The system will record yous new
unlock pattern.
5. Click continue. When you see the reminder, enter the unlock pattern, then
click confirm.
Picture 4.44
4.14 Language and Input Method
Click setting, select language and input method, choose language to switch language, as
37
Page 38

Picture 4.45
Click setting, choose language and input, choose Android keyboard setting, click input
language, as Picture 4.56
Picture 4.46
Choose the language you want to change in the language list, as Picture 4.47
38
Page 39

Picture 4.47
Return to langauge and input method, click default, as Pictu re 4.48, select input method you
want to use
Picture 4.48
4.15 Backup and Reset
Connect WIFI and login your google account, choose backup my data, system will backup
your data into google server.
If you need to recovery factory reset, please click reset, as Picture 4.49, if you need to
39
Page 40

formulate NAND, please click reset tablet.
Picture 4.49
4.16 Date and Time
According to the preset, system will voluntorily apply the date, zone, and time provided by
internet.
Manual set date, time and zone
1. Click Setting application procedure.
2. Slide down the screen, then click date and time.
3. Turn off “auto setting of date and time”.
4. Turn off “auto setting zone’.
5. Click Zone Selecting, then choose the zone lists. Slide down the list to view more
zones.
6. Click Date setting, then click upper or down buton to adjust date, month, and year,
click setting when you finish selection.
7. Click Time setting, then click upper or d own button to adjust hour and minute, click
AM or PM to change morning or afternoon ( there is no such selection when you se
24-hour format). Click Setting to finish.
8. Click 24-hour format, switch between 12-hour or 24-hour formay, the time format you
choose will be used on the alarm clock.
9. Click date format setting, then choose the time format you want to show on Tablet PC.
40
Page 41

p
Picture 4.50
Note: If you use the time internet provided, you will not able to set the date, time and time zone.
4.17 Fixed-time Startup and Shutdown
1. Click Setting application procedure
2. Click fixed-tine startup and shutdown.
3. Operate as below Picture 4.51
Click it into
fixed-time
startu
Click it into
fixed-time
shutdown
setting
Turn on/off
fixed-time
startup
Turn
on/off
fixed-time
shutdown
Picture 4.51
41
Page 42
5 Multi-Media
5.1 Music
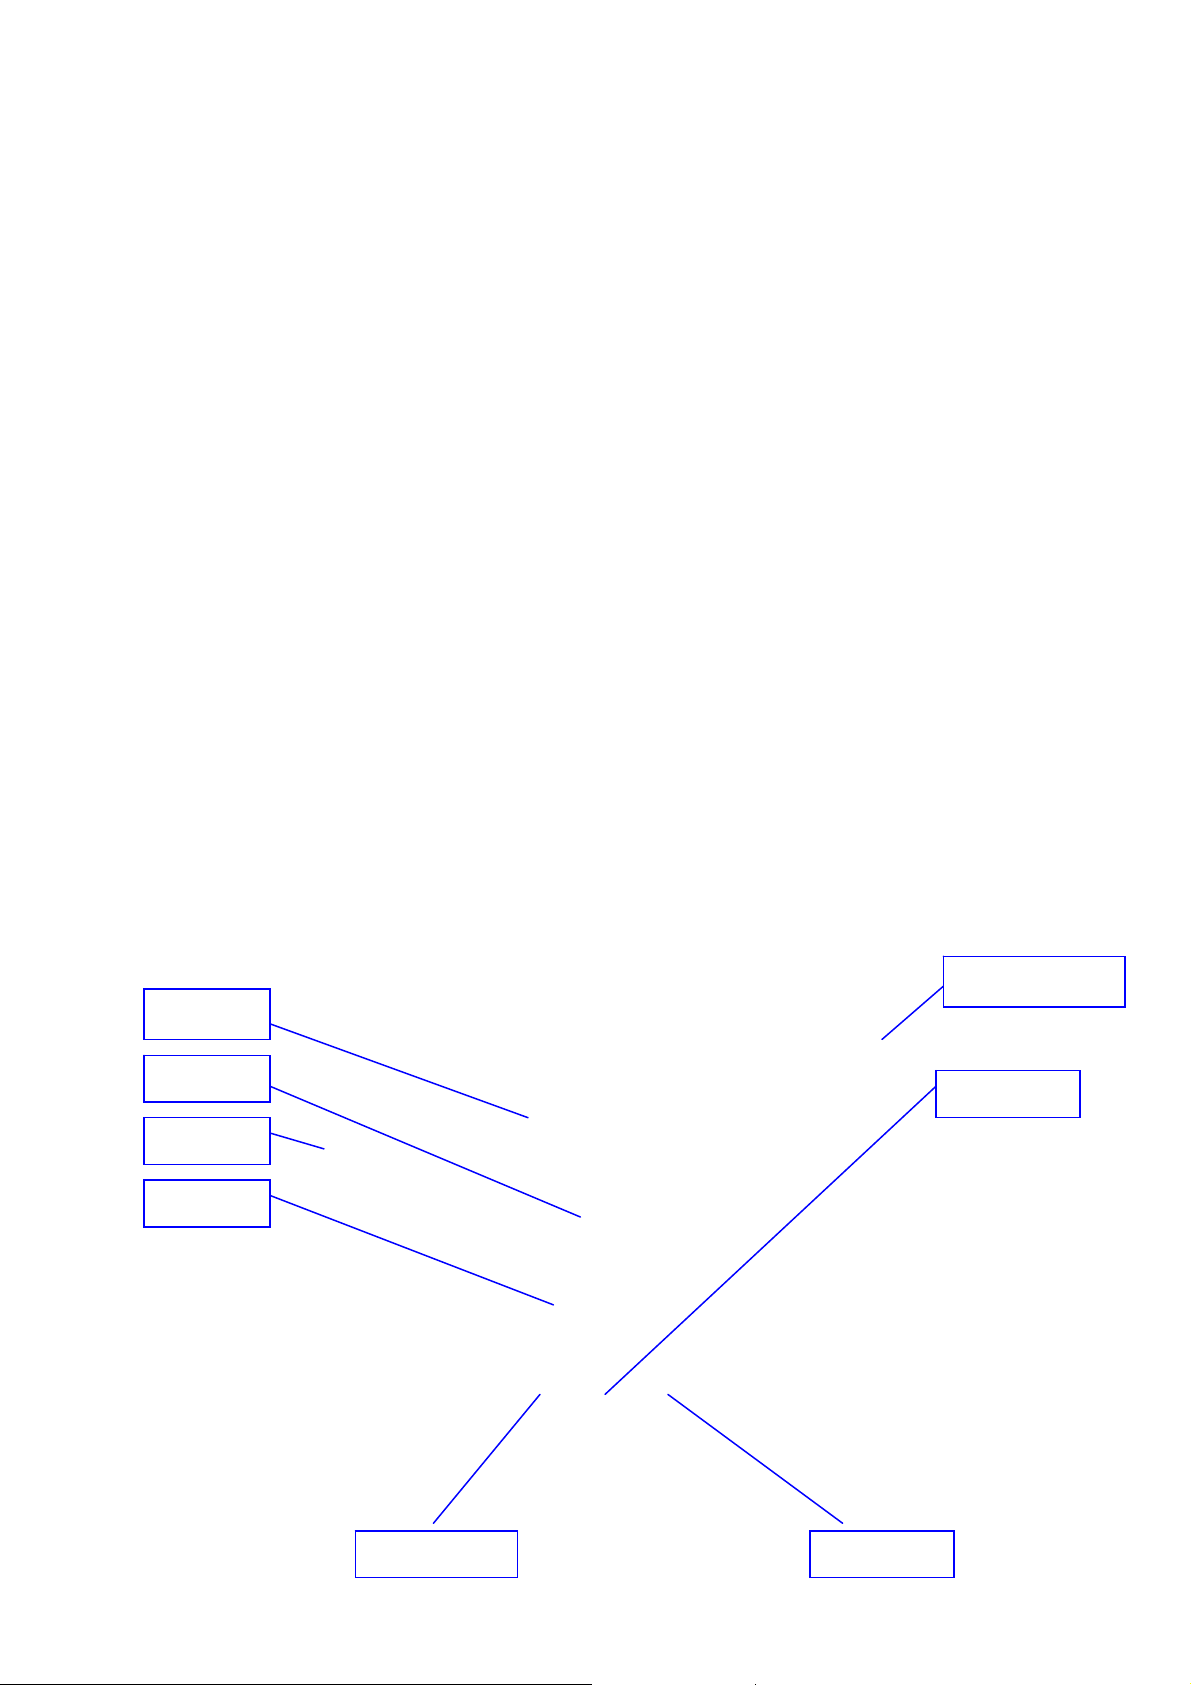
Enter into music player: in menu or desktop click music icon to enter into music player,
click the music you want to play, as Picture 5.1:
Album
Song name
Artist
Album
Picture 5.1
Picture 5.2
Random play
Pause/play
42
Next song Previous song
Page 43
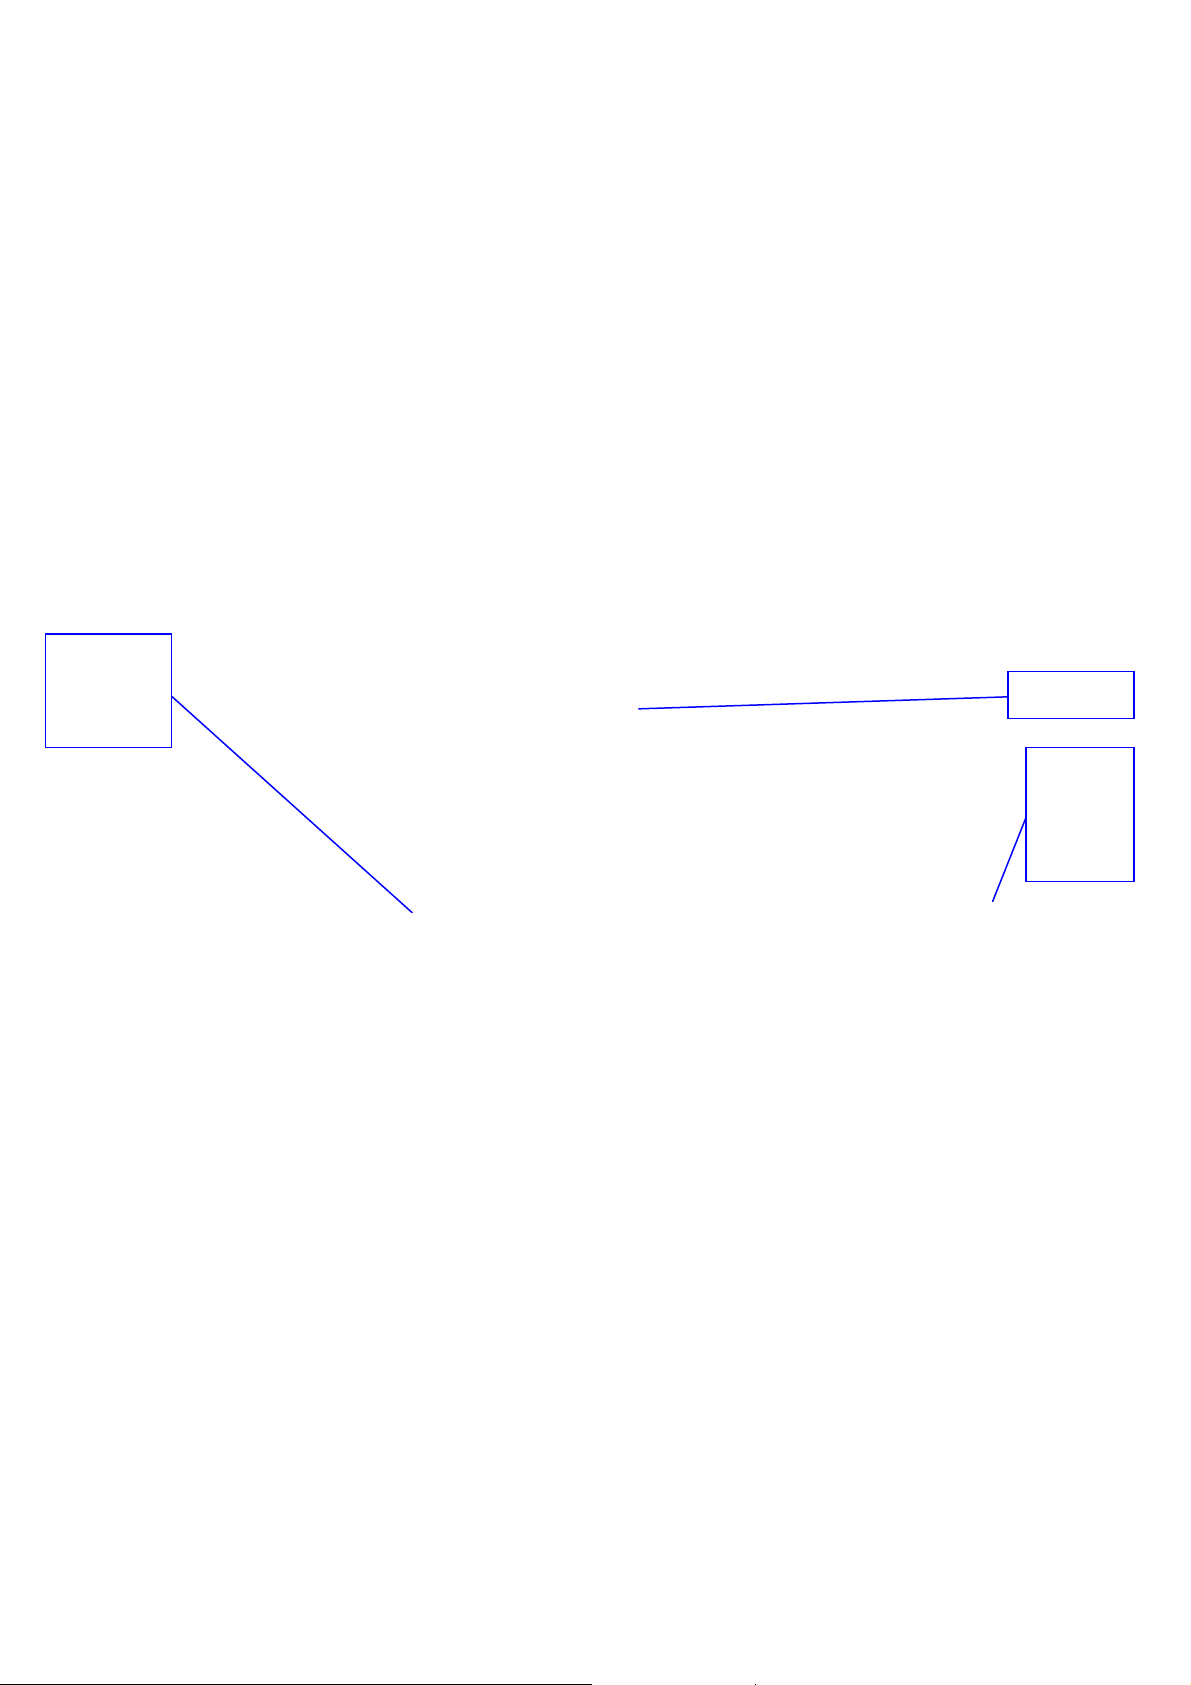
Adjust
play
progress
Drag the progress bar to adjust play progress.
Operation of music player button as Picture 5.2
5.2 Video
Enter video player: choose application in main menu, choose the video you want
to play.
Operation of video player button as Picture 5.3
Play/pause
5.3 Photo Gallery
Photo gallery application can auto search photos and video files in SD card, and photo
gallery will classify these photos and videos in folder. You can apply photo gallery to
view and edit photos, set the photos as wallpaper and watch the video.
View pictures
1. Click gallery application in main interface.
2. Enter into gallery, click the folder you want to view.
Choose
the
screen
mode
Picture 5.3
3. Click the picture you want to view, the system will play it in full screen mode
automatically.
4. The pictures can be zoom in and zoom out, put two fingers on the screen, the
separete the fingers(gather up the fingers, the picture will be zoom in) or
double click the screen.
43
Page 44

Note: when you browse the pictures, slide left or right to view more pictures.
Edit and set pictures
When check the pictures in full screen mode, click menu key to display menu
selection, you can choose the selection you need to edit and setting pictures.
Slide Show
1. Open a picture, use virtual key to click menu key, display menu selection.
2. Click slide show, it will auto loop play(or choose
picture folder)
Crop
1. Click menu key to display menu selection.
2. Then click crop, click and drag related area to adjust the cropper.
3. Click cropper and drag it inside and outside to adjust the image.
4. After adjust the size you want, click crop.
5. If you wish to give up to crop, click cancel to return to picture browse.
Edit
1. Click menu key, display the menu selection.
2. Click edit.
3. Adjust teh brightness, style, color, antialias setting in selection.
4. Click save.
5. If you want to give up edit, click return key, click not to return to picture
browse.
button in
5.4 Camera
In the main interface or desktop, click camera application procedure , enter into camera
Operation of camera ,Switch camera: choose Menu key, click switch front/back
camera, as Picture 5.4
44
Page 45
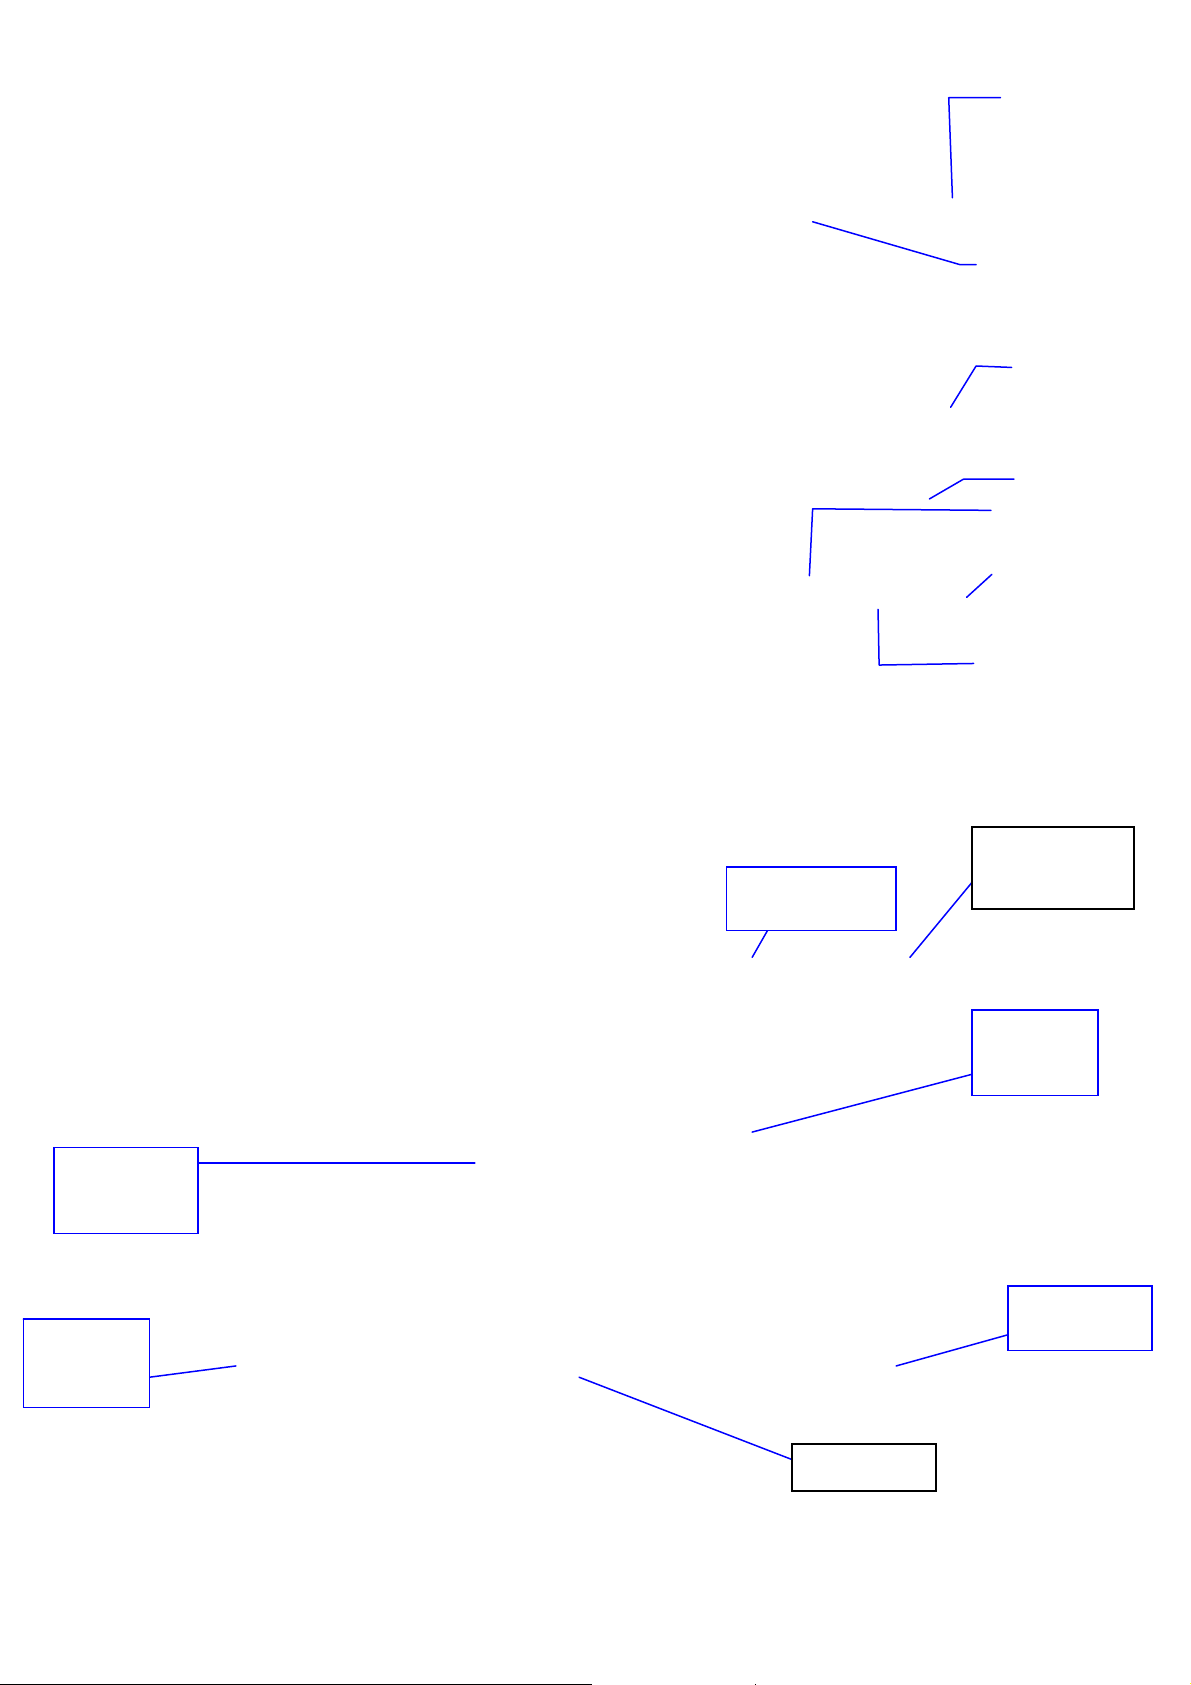
View the
pictures and
videos
Switch front/back
camera
Click it to take
pictures
Sub menu
Camera mode
Full screen play
Picture 5.4
camera shooting
mode
Current
frequency
Previous
channel
5.5 FM Radio
Click in the main interface or desktop to enter into FM radio interface:
Radio button operation instruction as Picture 5.5:
Open speaker
Enter into
channel list
Save
button
Next channel
Picture 5.5
Click search to search FM band, as Picture 5.6
45
Play/pause
Page 46

Picture 5.6
RDS setting: click Menu key in interface, click the munu button, and choose RDS
settings, enter into RDS setting as Picture 5.7, and choose the selection you want to
add
Picture 5.7
Save channels: Click button in the main interface to save the
channel, and the channel will be saved in channels list.
Note: You need to insert earphone as antenna when using FM radio, If no
antenna, your Tablet PC can’t search any frequency band.
46
Page 47
6 Communication Function
6.1 Phone
1 Click Phone application procedure
2 Operate as Picture 6.1
Call history
contact
Display
phone
numbers
Hide keypad
Picture 6.1
The area of
dial phone
Dial phone
numbers
Function
key
47
Page 48
7 Internet
7.1 Browser
In case of Wi-Fi or mobile internet is connected well (Please refer to Chapter 4.1 for wireless and
internet setting), click IE browser
Picture 7.1
Address
column
in the main menu or desktop to enter the IE interface, as
Save bookmark
menu
Picture 7.1
7.2 Email
Email application procedure contains email setting guide, you can add the external POP3 OR
IMAP email account of normal web email service provider (For instance, Yahoo, Gmail, Hotmail
and 163),as Picture 7.2
48
Page 49

a. Email Setting
Picture 7.2
1. After you click the sending email icon
which can help you to set.
2. Input your email address and password.
3. Click “Next step” button, choose your email type is POP3 or IMAP.
4. Click “Next Step” button to check whether the email box servicer can receive or
send emails
5. Input the email account and display the email subiject, and click finish.
6. If the email box is available, you will enter into your mail box automatically.
b. Delete the email account
You can delete setted POP3 or IMAP email account from your Tablet PC.
Click
。
1. Enter into your mail box.
2. Press Menu key.
3. Click Account
4. Press the account you want to delete.
5. Click confirm to remove.
, you can see the email setting guide,
49
Page 50
c. Send E-mail
1. Click
to display your mail box.
2. Click the inbox, it will refresh the new emails automatically; click it to read new
email.
3. Press Menu key. Menus will popup.
4. Click Edit
to enter into new email editing interface.
5. Input the receiver’s email address.
6. Input the subject and email content.
7. If you want to add attachment, click menu key, the menu popup.
8. Click “Attach file” (photo,music, video,contacts).
9. Click “send” to send the email out.
Click it and
Add
attachment
Picture 7.3
50
Page 51

8 GPS Function
8.1 GPS Navigation
1. Map of the third parties is required for Tablet PC internal GPS satellite signal
receiver positioning, after installation the device can accurately implement
traffic real-time navigation, meet the needs of outdoor navigation.
2. Enter into setting interface, click
icon, enter into below picture 8.1
Picture 8.1
When positioning successfully, the blue parts will turn to green color, and it shows the latitude,
longitude, height, speed, and the time of your location. As Picture 8.2
The value indicates the signal strength, the positioning time is relavant to time zone in your setting,
if the time is not inconsistent with real time in your location, please check the time zone in your
setting is correct or not.
51
Page 52

Value
Return
Picture 8.2
Signal
52
Page 53
9 Other Application Procedures
9.1 Clock
Click Clock procedure, enter into below interface as Picture 9.1. There are clock, picture, music
and homepage buttons.
Set alarm
Picture 9.1
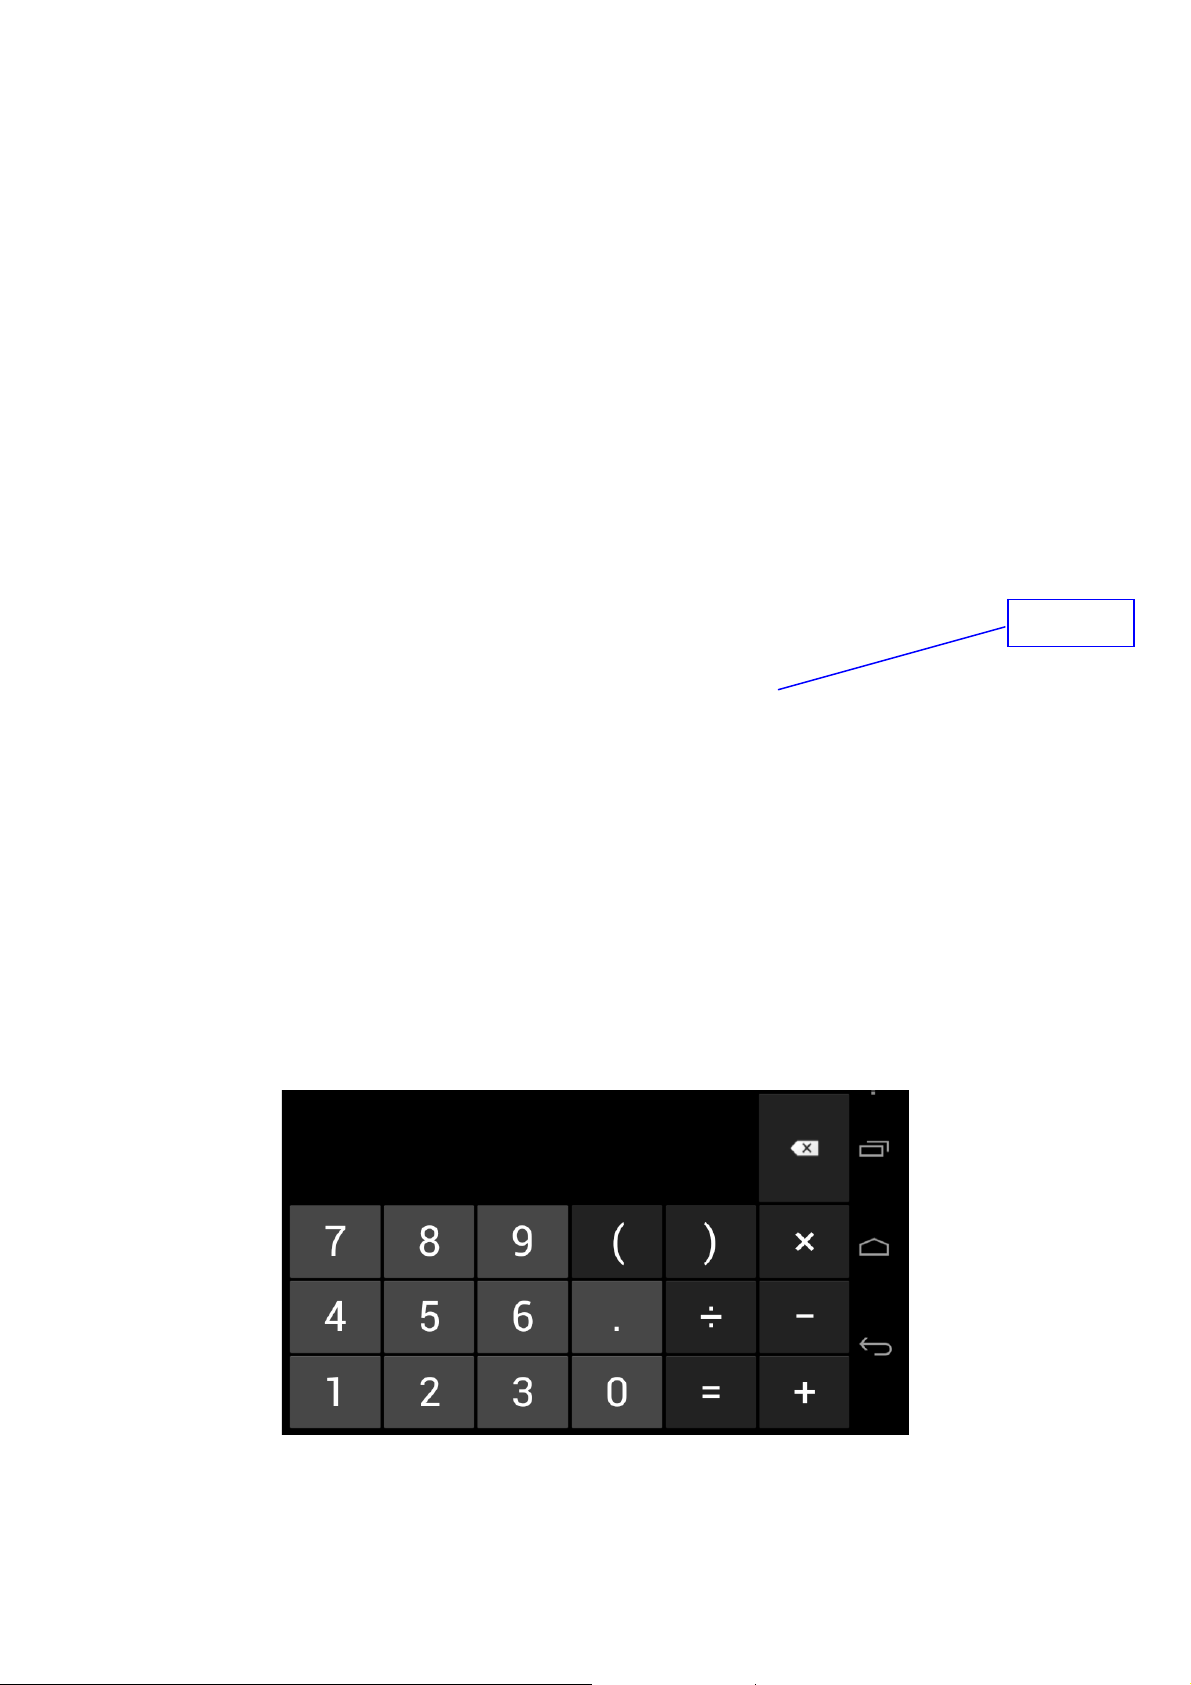
9.2 Calculator
Click . Enter into the basic board of calculator. Soft touch the numbers or operator in calulator
to calculate.
Pictuer 9.2
53
Page 54
9.3 File Manager
File manager will copy, cut, delete, rename the documents or the folder in the TF card, it also will
share the files, install apk etc.
RAM
External
SD card
In the main menu or desktop, click the document manager icon
manager.
Picture 9.3
to enter in to documents
Share file:choose any file, long press it, it will popup “share”, choose the share way you want in
the list
Picture 9.4
54
Page 55
Install apk file:Choose the file suffixed .apk in the file manager, you can install the third part
software as reminder.
Build new folder: Choose the menu you want to build the file, click icon in right top,
choose new folder, you can build new folder as reminder.
9.4 Recorder
In the main interface or desktop, click recorder icon to enter into record interface, click
record key to start record. Click Stop key to stop recording. Click Play key
to play the recorded sound. The system will auto remind you to use or abandon this record, please
choose it manually.
Play the record: choose the video player to play the recorded sound, choose the recorded sound in
the source manager, and click it to play.
Picture 9.8
55
Page 56

10 Troubles Shooting
1. The first startup of Tablet PC is slow
After the Tablet PC system upgraded, the first startup need to install the
pre-installed application softwares, the lead time is around 2-3 minutes, the
startup afterwards will be much quicker.
2. Tablet PC can’t connect Wi-Fi
Make sure the wireless router of internet service can work in normal.
Ensure the Tablet PC and wireless router in certain distance, and no wall or
other barrier between them.
Ensure the user name and password both correct.
3. Tablet PC feels hot
When many application procedures are used in meanwhile, or the brightness of
screen open to the lightest or under charging, Tablet PC may feel fever. It is
normal.
4. Email can’t be set or Registeration of application procedure.
Ensure your internet is well connected.
Make sure your email setting way is correct.
Keep your system time and local time consitent.
5. The system is abnormal and can’t work.
When you install some third party application procedure, it may cause abnormal
work, you can press Reset key(next to power port) to reset the system.
6. The webpage can’t be opened
Please keep the distance between from route to Tablet PC in effective
range.
Please restart WIFI and try again.
7. Tablet PC works terribly slow sometimes
It is normal phenomenon. Please turn off some application you don’t need
in advanced task management, or uninstall some third party application to release more system
resource.
56
Page 57

FCC RF Exposure Information and Statement
This device complies with part 15 of the FCC rules. Operation is subject to the
following two conditions: (1) this device may not cause harmful interference,
and (2) this device must accept any interference received, including interference that
may cause undesired operation.
NOTE: The manufacturer is not responsible for any radio or TV interference caused
by unauthorized modifications to this equipment. Such modifications
could void the user’s authority to operate the equipment. NOTE: This equipment has
been tested and found to comply with the limits for a Class B digital device, pursuant
to part 15 of the FCC Rules. These limits are designed to provide reasonable
protection against harmful interference in a residential installation. This equipment
generates uses and can radiate radio frequency energy and, if not installed and used in
accordance with the instructions, may cause harmful interference to radio
communications. However, there is no guarantee that interference will not occur in a
particular installation. If this equipment does cause harmful interference to radio or
television reception, which can be determined by turning the equipment off and on,
the user is encouraged to try to correct the interference by one or more of the
following measures:
- Reorient or relocate the receiving antenna.
- Increase the separation between the equipment and receiver.
-Connect the equipment into an outlet on a circuit different from that to which the
receiver is connected.
-Consult the dealer or an experienced radio/TV technician for help.
This smartphone meets the government’s requirements for exposure to radio waves.
The guidelines are based on standards that were developed by independent scientific
organizations through periodic and thorough evaluation of scientific studies. The
standards include a substantial safety margin designed to assure the safety of all
persons regardless of age or health.
FCC RF Exposure information and Statement the SAR limit of USA (FCC) is 1.6W/kg
averaged over one gram of tissue. Device type SM708 (FCC ID: Q6I-SUPERSM708) has
also been tested against this SAR limit. SAR information on this and other pad can be viewed
on-line at http://www.fcc.gov/oet/ea/fccid/. This device was tested for typical body-worn
operations with the back of the handset kept 0 mm from the body ,
To keep the device at least 0 mm away from your body to make sure the RF exposure level
compliant or lower to the reported level.
.The use of belt clips, holsters and similar accessories should not contain metallic components
in its assembly. The use of accessories that do not satisfy these requirements may not comply
with FCC RF exposure requirements, and should be avoided.
changes or modifications not expressly approved by the party responsible for compliance could
void the user's authority to operate the equipment.
 Loading...