

Page 1

7 inch Tablet PC /MID
15 BROWSER..............................................................24
SM708
TABLE OF CONTENTS
2 POWER BUTTON USAGE .......................................1
3 TOUCH-SCREEN NAVIGATION .............................3
4 U-Disk .........................................................................3
5 USING MICRO-SD CARD........................................4
6 GETTING STARTED.................................................5
7 DESKTOP...................................................................7
8 SCREEN LOCK..........................................................9
9 PRE-LOADED APPLICATIONS.............................10
10 STATUS AND NOTIFICATION AREA.................13
11 APPLICATION MANAGEMENT..........................15
Install Android Applications...................................15
Download Android Applications directly from a
16 CALENDAR ...........................................................25
Add Event ...............................................................26
17 CAMERA................................................................26
Take Pictures...........................................................27
T ake Videos.............................................................27
Single-motion Panorama.........................................28
18 CALCULATOR.......................................................29
19 MYRECORDER .....................................................29
20 EMAIL.....................................................................30
Add Email accounts................................................30
Email Inbox.............................................................31
Edit Email Accounts ...............................................33
Delete Email Accounts............................................34
21 FILE BROWSER ....................................................36
Website....................................................................16
Uninstalling Android Applications.........................17
12 WEATHER..............................................................18
13 CLOCK....................................................................19
Alarm ......................................................................19
14 APP MARKET ........................................................22
Download Applications...........................................22
App Market Function Menu ...................................23
Copy Media between Computer and Tablet ...........37
Connected to the local area network shared folders
.................................................................................38
Delete files ..............................................................39
22 MY MUSIC.............................................................39
Play Music ..............................................................39
Create Music Widget ..............................................41
The Operation with Music and Playlist..................41
Page 2

Sort by title or date added.......................................42
33 SETTINGS ..............................................................59
23 MY VIDEO .............................................................43
Play V ideo...............................................................43
Create V ideo Widget...............................................44
The Operation with Video.......................................44
The Operation with Playlist....................................45
24 MY PHOTO.............................................................46
The operation with picture list................................47
Slide show and settings...........................................47
Doodle.....................................................................48
Create Photo Widget...............................................49
25 Gallery .....................................................................49
The operation with photo and video list.................49
26 SCREEN CAPTURE ..............................................51
27 T ASK MANAGERMENT ......................................52
FREQUENTL Y ASKED QUESTIONS.......................73
BATTERY MANAGEMENT ......................................76
Charge battery.........................................................76
IMPORTANT SAFETY PRECAUTIONS...................77
Appendix : The optional parts and models...................78
Stopping Applications.............................................52
Uninstall Applications.............................................53
Install Applications .................................................53
28 WI-FI .......................................................................54
29 3G NETWORK .......................................................55
30 GPS..........................................................................57
31 PPPoE SETTINGS..................................................58
32 ETHERNET ............................................................58
System: Android 4.0
Proxessor: VIA8850
Edition: V01
DA42
Page 3
device to hibernate,or press the power button briefly to
1 OUTLOOK DESCRIPTION
2 POWER BUTTON USAGE
Turn On:
Press the power button and hold for 2
make the device to hiberna t e/ wake-up.
Airplane mode:
seconds →Tap
Silent mode:
seconds →Tap
Vibrate mode:
seconds →Tap .
Normal mode:
seconds →Tap .
Press the power button and hold for 2
Airplane mode.
Press the power button and hold for 2
.
Press the power button and hold for 2
Press the power button and hold for 2
seconds.
Turn Off:
seconds →tap
Reboot:
→Tap
Quickly Hibernate/wake-up:
and hold for 2 seconds →tap
Press the power button and hold for 2
Power off
Press the power button and hold for 2 seconds
reboot.
→tap
Hibernate to
1
OK.
Press the pow e r button
enable the
Force Off:
the power button for 5 se conds.
(Warning: Force off could lead to unpredictable
system errors!)
Reset:
It’s will clear the all data, Please be careful to use the
If device does not respond, press and hold
Press the reset button could be reset the device.
2
Page 4
function.
Note:
(
The current reset function can’t restart,
transfer cable. When ready for use, enter into the file
can only be turned off, so you need to press the power
button restart the device after reset
).
3 TOUCH-SCREEN NAVIGATION
The touch-screen allows for quick, easy and
convenient navigation for all applications.
Refer to the following method to operate the touch
screen by the finger pulp:
Quick tap & release on an item on the scree n.
Tap:
Touch & hold:
seconds, and then release to display an options window.
Finger slide:
screen and then release.
Touch and hold one place about 2
Touch & slide your finger across the
browser and switch to the USB folder to view it.
Remove U-Disk
Close all applications or documents which have
been opened on the U-disk. Tap
Storage →USB storage → Unmount this storage
device.
you can unplug the U-disk.
☆
short time, as this may cause damage to the U-disk.
When it displayed
Don’t insert and remove the U-disk repeatedly in a
Mount this device
→
Settings
and then
→
☆
To avoid scratching or c rushing, do not place
objects on the touch screen surface.
4 U-Disk
Insert U-Disk
Insert your U-disk into the device via USB host
3
5 USING MICRO-SD CARD
☆
The device supports maximum 32GB microSD card.
Insert your card into the microSD slot until it clicks into
place. It’s OK.
Remove microSD Card
4
Page 5
Close all applications or documents which have
been opened on the card. Tap
→
Settings →
the status of "off").
Turn the device on
Press the power button briefly.
→
Storage →SD card
When it displayed
card lightly; it is partially ejected a l lowing you to pull
the card out.
☆
Don’t insert and remove the U-disk repeatedly in a
short time, as this may cause damage to the card.
☆
We recommend usi ng major brands of memory cards
to avoid incompatibility.
Unmount this storage device.
Mount this device
and then press the
6 GETTING STARTED
Charge the device
Wi-Fi Network Setup
Since many features require a Wi-Fi connection,
we recommend you to set up your Wi-Fi network now.
1.Tap
2.Slide
The device automatically scans and lists all local
Wi-Fi Network found. A lock indicates secure
networks that require input of password to connect.
1.Tap the desired network which you wa nt to
connect
→
tap
Wi-Fi
→
enter the
Connect
→
Settings
switch to turn on.
Network Password
.
.
Wi-Fi
if applicable
☆
It is not recommended to use the device while
charging.
and then connect to the device to fully charge the
battery before use ( A full charge takes about 6 hours in
Plug the power adapter into an electrical wall outlet,
5
2.Tap
☆
If your Wi-Fi network is set as
to return to the Desktop screen.
hidden, it won’t be found by the auto
scan. Tap Add W i-Fi network and
6
Page 6

follow the prompts to add your network.
8. Screen capture.
7 DESKTOP
1. Back.
2. Home.
3. Recent Apps.
4. Menu.
9. Volume.
10. Wire less network
11. Battery Status.
12. Google search.
13. Voice sear ch
14. Add Widgets/Apps shortcuts or setting
wallpapers and more.
15. Tap to view the applications screen
Can make many personalized operation through
"add" icon
shortcuts, set wallpaper, add bookmarks, ema il acc ounts
and set up the shortcut.
Tap on any application icon to launch
☆
it.
Touch, hold and then slide icons to
☆
, such as, add widgets, application
5. USB debugging connected
6. USB connected
7. Current time.
7
reposition them on the screen.
Touch, hold and slide icons onto
☆
8
Page 7
to remove them from the
Desktop
screen.
9 PRE-LOADED APPLICATIONS
8 SCREEN LOCK
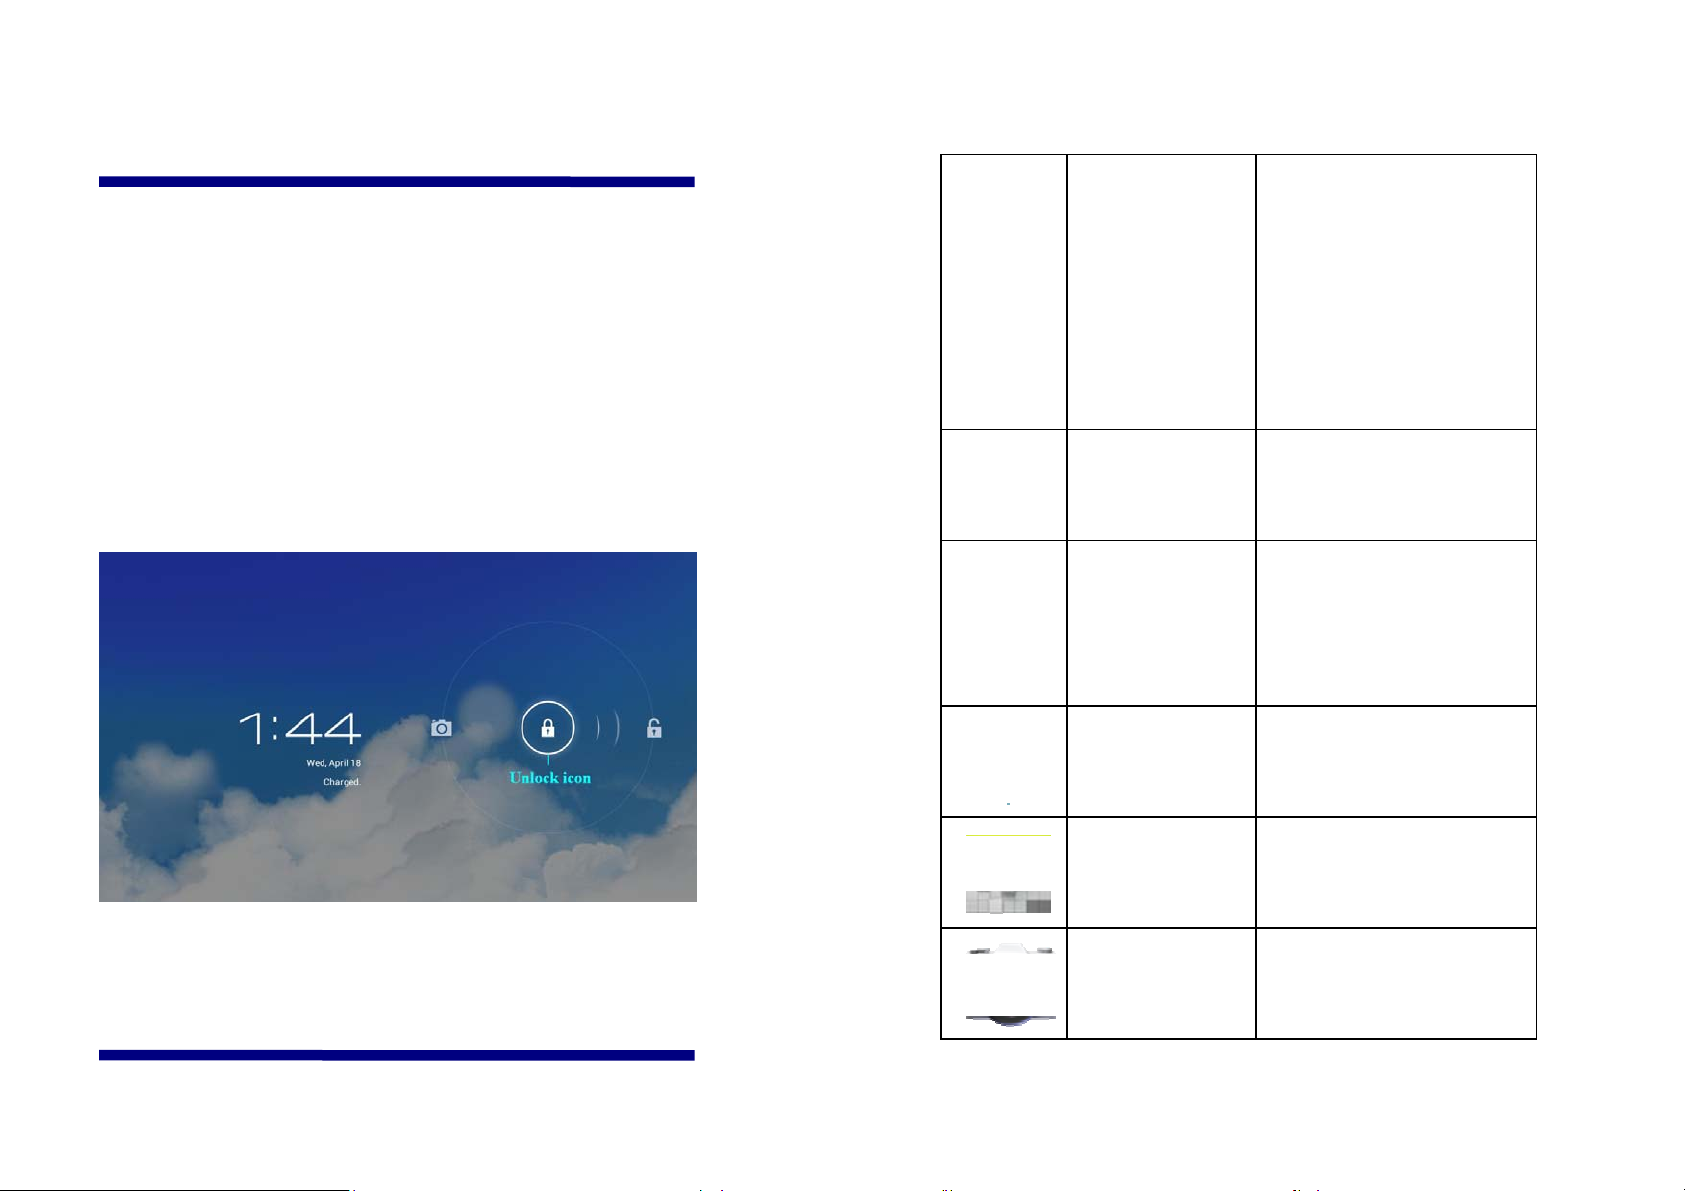
Can be set to automatically lock screen or quickly
press the power button to manually lock screen. The
system provides four lock screen style for users. You
can enter
switch.
Settings → Security →Lock Screen
Lock screen displays the following:
to
Set up the de gree of
temperature, weather
Weather
Clock
App Market
Browser
Access internet.
auto-refresh ra te, add
city and view the
city’s weather.
It can display the time
and set the alarm.
Downloaded
applications quickly &
easily.
Tap the unlock icon and drop it to the right unt il out of
the circle to unlock.
9
Calendar
Camera
Calendar.
10
Take normal photos,
panoramic photos and
Page 8
take video.
View and manage
My Photo
photo files.
Calculator
Email
File Browser
My Music
My Vide o
Do calculation.
Send/Receive em ail
using your existing
email addresses.
File manager
application for
viewing and managing
files and apps. Install
Android apps and
backup files to your
SD card.
Play and
manage audio files.
Play and
manage video files.
Gallery
Picture
Capture
Task
Manager
Voice search
Flash player
settings
Downloads
Play, view, a nd
manage video and
photo files.
Capture image of the
screen.
Application manager
for managing
processes.
Voice search.
Flash player settings.
View the downloads
and the downloading
progress.
11
12
Page 9
Search
Settings
Local search and
online search.
Multiple settings for
personalizing and
enhancing your
Device.
events.
To move an icon to the
☆
touch & hold the icon, and then release
it when it appears on the
Touch, hold and then slide icons to
☆
reposition them on the screen.
☆
Touch, hold and slide icons onto
them from the
Desktop
screen.
Desktop
Desktop
screen,
screen.
to remove
10 STATUS AND NOTIFICATION
AREA
On the
in the state bar to view more state information and
Desktop
screen, click the icons which are
Airplane
mode
Wi-Fi
Auto-rotate
screen
Brightness
Notifications
Switch airplane mode.
Access to Wi-Fi settings
interface.
Auto-rotate switch. The screen
will automatically rotate with
gravity induction after opening.
Set screen brightness.
Open or close the notification.
13
14
Page 10
Settings
Access to settings.
2.Tap the
1.Tap
File Browser
or and locate the folder in
application icon.
1 1 APPLICA TION MANAGEMENT
Install Android Applications
☆
There are many interesting and free Android
applications that can be found on the web. Such as
launch your web browser and do a search for “Android
applications”.
Purchased or free Android applications that you
have downloaded to your computer can be installed
quickly & easily on your Tablet using the
Browser or task manager
application.
File
which the .apk appli cation files were saved.
2.Tap on a
The application is installed and the application icon
is added to the
3.Tap
to return to the
Done
Download Android Applications directly fr om a
Website
You can download Android applications directly
from websites, and then install them on your device
.apk
Applications
Open
to launch the application now, or tap
→
file
File Browser
Install
screen.
.
screen.
1.Copy the
onto an SD card or USB device
your Device.
files which you want to install
.apk
15
→
insert or connect to
quickly and easily.
1.Tap the
16
browser
application icon to
Page 11
launch the internet.
12 WEATHER
2.Enter the desired website URL, and tap the
download
your device.
→
Downloads.
quickly and easily that you have installed.
link for the application you want to install on
3.After the downloading is completed, tap
Open the applications from app list.
Uninstalling Andr oid Applicati ons
You can also uninstall the Android applications
1.Tap
→
Settings
→
Apps
→
All
.
Tap the
General setting
You can set Temperature Unit(℃), Update
frequenc y .
About
View software version number and relevant legal
information.
Add city
You can add city to
weather information.
Weather
Weather
application icon.
and view the city’s
2.Tap the application you want to uninst all
3.Tap
.
to confirm the Uninstall.
OK
Uninstall
17
→
Select city
In the list of cities, click the city to view the
weather information. Select the city and tap
delete the city, tap
refresh the weather
to
18
Page 12
information.
You can make the weather displa yed on the
2.Tap
Set alarm
→
Add alarm
.
Desktop
through adding widget. The way is: tap
→
Widgets → Weather Widget.
13 CLOCK
Tap the
see the time and date.
Alarm
Clock
application icon. You can
3.Set up your alarm as desired.
4.Tap
5.Selected the alarm clock.
Shut Off Alarm Alert
When a scheduled alarm is activated, a pop-up
window with the alarm title appears.
Tap
Snooze
minutes.
ap
Dismiss
T urn Alarm on
1.In the Alarm list, find the desired a larm.
OK.
if you want to be reminded again in 10
to cancel the alert.
You can use your device as an alarm clock by
setting multiple alarms.
Add Alarm
1.Tap the
Clock
application icon.
19
2.Click the
3.After the
Edit Alarm
on the left.
change to , tap
20
Done
.
Page 13

1.Tap the
Clock
application icon
→
Click
2.Tap on the alarm you want to edit
desired edits.
3.After editing, tap
Delete Alarm
1.Tap the
Click
2.Tap on the alarm you want to delete.
.
OK.
Clock
.
application icon
→
make
→
14 APP MARKET
The App Market has many applications that you
can quickly and easily download to your Tablet.
Download Applications
1.Tap the
☆
The first time, it will prom pt “
“
Login
account, tap
your login information and then tap
” options. If you have not ye t registered an
Register
2.You can select applications from the default
App Market
. Otherwise, tap
application icon.
Register
Login
” and
Login
and enter
again.
3.Tap
Tap to return to the
Delete
→
OK
.
Desktop
screen.
21
Featured
random), or search by name.
the
App Market
group, by
3.Tap on an application
4.After the app is downloaded, tap
5.Tap
Open
Categories, Top
to launch now, or
screen.
22
(latest, hottest,
→
Download
Done
.
Install
.
to return to
Page 14

History
After downloading apps, tap on
the installed applications. You can add and/or view
comments from other users, launch apps, a nd uninstall
them.
App Market Function Menu
Tap to display the App Market Function
Menu.
Profile
Tap to access your profile information. You can
Change Password, C h ange Email and Save Password.
Tap
Logout
on the top right corner of
History
Profile
to manage
to exit
15 BROWSER
Users can connect to the Internet through browser.
Click the browser icon on the De sktop
and then you can open the Web browser.
,
your account.
About
Displays App st or e version and support
information.
23
24
Page 15
→
& sync
according to the prompts . After then you can use the
calendar. Don't need to add Exchange account if only
view the calendar .
Add account
Add Event
. Complete the setting
16 CALENDAR
Tap the
Calendar
application icon.
1.On the
you want to add an event.
2.Tap on the event time
3.In each field, enter the details of the related
activities.
4.Tap
Click the date time in the upper left to choose the
calendar you want, such as DAY,WEEK,MONTH and
AGENDA display mode.
☆
Dates with gray bars indicate scheduled events .
Done
Calendar
.
screen, tap on the date when
→
tap
.
For the first time using the
add an Exchange account. Enter account email address
and password. Enter the system
Calendar
Settings
, you need to
→
Account
25
17 CAMERA
26
Page 16
Tap the Camera application icon.
1. Click switch to video, and you can
Take Pictures
1. Click
take picture.
2.
Click conversion lens
2. Click
3.The picture will be saved.
4. Click the picture thumbnail to enter
to scan the picture.
switch to camera, and you can
take picture.
My Photo
take videos.
2. Click
3.The video will be saved.
4. Click the video thumbnail to play the video.
5. Click to exit the
the
Desktop
Single-motion Panorama
For capturing larger scenes, tap icon and
.
to begin and tap to stop.
Camera
and back to
5. Click
the
Desktop
Take Videos
27
to exit the
.
Camera
and back to
switch to single-motion panorama mode. In this mode,
the user starts an exposure and then slowly turns the
Camera to encompass as wide as a perspective needed.
The Camera assembles the f ull range of continuous
imagery into a single panoramic photo.
28
Page 17

Note:
You can tap
on the top left of the
2. Tap the record icon to start recording.
interface to choose the files are stored in the ROM,
SD card or USB storage.
18 CALCULATOR
1.Tap the Calculator application icon.
2.Tap the numbers and sign of operation to do the
calculation.
3.Tap
and hold
CLEAR
CLEAR
to clear the result one by one, tap
to clear all.
3. Tap the
4. Tap the play button to play the voice of
recording.
record icon to stop record.
20 EMAIL
☆
POP3 and SMTP accounts ar e supported.
Add Email accounts
You can enter one or more personal email
19 MYRECORDER
1. Tap the
29
recorder icon.
addresses that you would like to access through your
tablet.
1.Tap the
2.On the
Email
Account setup
application icon.
screen, enter your em ail
30
Page 18

address in the
Email address
entry field.
1.Tap the
Email
application icon.
3.Enter your email password in the
entry field
4.Tap
5.Manua l Setup
automatically populated based on your email account
provider
change the server settings, tap
necessary changes.
or select the parameter and server type ,and then Tap
Next
Done.
(i.e., gmail.com, etc)
6. According to the selected mailbox server, enter
.
7. Optional: Enter a name for the account.
8. Enter name for outgoing message → tap
Next
.
(optional)
: The server settings are
. However, if you need to
Manual Setup to
Password
make
2.If you set up only one email account, it opens
immediately. If you set up multiple accounts, they are
listed in the
3.Tap on the desired email account
Open Email Message
1.On the
2.For attachments, tap
application, or tap
3.To replay, tap
.
all
a. Tap in the Compose Mail entry field to enter
Accounts
Inbox
screen.
→
tap
Inbox
screen, tap on an email to open it.
Open
to save attachment to a SD card.
Save
to launch appropriate
Reply
or
Reply
.
☆
After setup, if you are unable to connect to a free
email account, check with your email provider to make
sure their servers support free accounts on Post Office
Protocol (POP) or Simple Mail Transfer Protocol
(SMTP).
Email Inbox
31
your reply message.
b. Tap Send to send immediately, Save as draft to
save without send or Discard to di scard without saving
or sending.
1.To delete the email immediately, tap
Delete
.
32
Page 19
Compose New Email Message
1.On the Inbox screen, tap .
1.Tap the
Email
application icon.
2.Enter the e-mail address in the recipient field. if
you want to add Cc or Bcc recipients, tap
, and then enter the recipient’s email
address.
1.Tap in the
desired subject title.
2.Tap in the
personal message.
Subject
Compose Mail
entry field to enter your
area to enter your
2.On the Inbox screen, tap
→
3.Set your desired preferences to customize your
email account.
4.Tap to return to the Inbox screen.
Delete Email Accounts
☆
If you have multiple accounts, delete the account
designated as the default account, the next email listed
will be automatically set as the default.
1.Tap the
Email
application icon.
→
settings
.
3.If desired, tap
4.When ready to send the email, tap
Edit Email Accounts
→
to attach a file.
33
2.On the
.
3.Click the account you want to delete .
4.In the pop-up
Inbox
screen, tap
Account options
→
Settings
window, tap
.
34
Page 20
Delete
21 FILE BROWSER
5.Tap
Set Default Email Account
You must always have one account designated as
the default account, so if you have multiple email
accounts, you can select any one as the default.
1.Tap the
2.On the Inbox screen, tap
3.Tap the desire account.
4.In the right settings list, tap
select it.
to confirm the deletion.
OK
Email
application icon.
→
Settings
Default Account
.
to
Tap the
view the files on all storage devices
SD card, USB device)
application on your tablet quickly & e a sily.
Use the icons across the top of the screen as
follows:
Internal Flash (ROM)
SD Card
File Browser
, and to install Android
application icon to
(Internal memory,
If you delete the account tha t was designated as the
default account, the next email listed is automatically
designated as the default.
35
USB Storage
Paste
Back to the previous folder
36
Page 21
Switch folder display mode.
1.Tap
GoTo
, select or to display the
Menu
Copy Media between Computer and Tablet
You can use the File Browser to copy files between
an external storage devic es and your computer. You can
first copy the desired f iles onto a SD card or USB
device.
The internal device storage is titled
☆
“ROM”, memory card “SD” and USB storage
device are titled “USB”.
The instructions below are for copying
☆
from an SD card or USB storage device into
the device. You can use the same method
contents of your storage device.
2.Tap and hold a folder/file and enter into the
multi-select mode, select the folder/file as desire
Copy
tap on the folder into which you want to copy the file
→
folders
.
3.Tap
tap
Connected to the local area network shared
GoTo
.
, select
Internal Memory
→
→
tap
to copy from the device to an SD card or
USB storage device, and then connect the
storage device to your computer to
transfer the files into the desired
folder on your computer.
37
You can view all of the LAN shared folders.
1.Connect to LAN.
2.Tap
→
Choose the mode used of sharing
Net share
→
Add new sharing point
→
Editor of
38
Page 22
network folder sharing
.
All/Albums/Artists/Directories/My Fa vorite s/U ser
3.After connect successfully, enter
sharing settings
directly.
Delete files
Tap and hold a folder/file and enter into the
multi-selection mode, select the folder/file as desired
→
tap
Delete
and open the list of shared folder
→
to confirm the deletion.
OK
network
22 MY MUSIC
Defined Playlists to play it.
3.To stop the music, tap the
4.When you are playing the music, you can tap
or to return to the previous screen.
Click
interface, It is shown as follows:
switch to the currently playing
Pause
icon.
Audio file formats supported: MP2, MP3,
☆
WAV, AAC, WMA.
Play Music
1.Tap the
2.Select an audio file from
My Music
application icon.
39
At this interface, you can do: view /download the
40
Page 23
lyrics, display album photo or spectrum, play / pause,
switch to the previous / next, loop and random operation
etc.
Create Music Widget
Can play the music quickly through the Music
Widget .
Tap
icon on the desktop, In the pop-up list
Switch to
click
Save.
→
click
Add music
display mode,
Enter a new name in the dialog box, and
→
If you want to delete the playlist, click
save.
Tap the playlist
→
tap
.
Save
→
Select
.
Music Widget
to enter the playlist interface →
select
click
Widgets
The Operation with Music and Playlist
Add playlist
1.Choose
2.Input the playlist name.
3.Tap
Rename or Delete playli st
1.In the
.
music and hold for switching to multi-select mode.
2.Select the music which you want to add to the list
(if you don’t want t o add, tap it again to cancel).
3.Tap
Delete music
Tap and hold on the music you want to delete
tap
Delete
Sort by title or date added
In the all song interface, click the
right, select
the "alphabetical" of the right hand, the songs interface
all song, album
Add to playlist
.
sort by title
, and
artist
, and then select a playlist.
in the pop-up list , then click
list, tap the
→
on the upper
41
42
Page 24
will be sorted quickly according to the first letter
(including the first letter of the pinyin)in the
4.Tap
Back button
or
to return to the
My
alphabetical list. If you select
songs will sorted by add date.
Sort by date added,
all
23 MY VIDEO
Video file formats supported:
☆
MPEG1/2/4
MotionJPEG. The largest video format is
supported 1080P(1920×1080) resolution.
Play V ide o
1.Tap the
H263、H264 VC1、RealVideo
、
My Video
application icon.
、
Video
Widget .
the pop-up list → Select
the screen with reverse / opposite direction can zoom in
screen.
Create Video Widget
Can quickly play the video through the Video
On the desktop tap
The Operation with Video
Zoom video sc reen
In the video player inte rface, drag two fingers on
icon, select
Video W idget
Widgets
.
in
2.Select the video from ROM, SD card or USB.
3.Tap screen and click the related icon to adjust the
video, (including volum e , pause/play, brightness, track,
subtitle, and display scale).
43
/ zoom out the video scree n.
Setting video display mode
Tap
"full screen, actual size, best fit" three modes.
icon,the video screen can be set as
44
Page 25
Audio track and subtitle switching
Tap and hold the video, →click the
option
or
In the video player interface, click
on the top right to switch
The Operation with Playlist
Classification of video list
In the root directory, click the
the top left to classify the video.
Switch display mode in the classification folder
In the classification folder, click
icon to set list display mode or album displa y
audio track
and
subtitle.
album (times
icon
and
) on
delete
delete the video.
button on the top right of the sc reen to send or
24 MY PHOTO
Photo file formats supported: JPG,
☆
JPEG, BMP, and PNG.
1.Tap the
2.Tap on the desired photo, to vie w individual
My Photo
application icon.
mode.
☆
can click
time or name.
In the classification folder, users
Send or delete the video in the list
to classify the video by
45
photo.
3.Click
corresponding photos.(including zoom in/zoom out,
share, rotate, trim, photos set to, adjust the current
display scale, showing details)
on the top right screen to operate the
46
Page 26
The operation with picture list
Classification of photo li st
1.Tap the
My Photo
application icon.
In the root directory, click the
Locations, people, or tags
the photo.
Delete the photo i n the list
Tap and hold the video →click the
on the top right of the sc reen to delete the photo.
Slide show and settings
Enter the slide’s setting
1.Tap the
2.In the root directory, click the
) on the top left to classify
My Photo
album (times,
delete
application icon.
on the top
button
Click the photo folder.
2.click
In the classification folder, users can
☆
click
color or name.
☆
Doodle
You can do doodle in
1. Open the picture.
2. Click the
3. In the doodle interface, user can choose the
→
slide show.
and classify the photo by time ,
My Photo
icon → Select
interface.
My Photo
.
right→
file size, slideshow speed,
setting.
3.In the settings interface, set the
Slide show
and
47
Filter photo by
slideshow mode
.
different doodle function, such as brush, shadow, FX,
board, or crop.
you choose the
4. After finish the doodle, click the
5. Click the
(
Gallery
Note
:
It will missing brush function if
)
icon
save
icon to return to picture
.
48
Page 27

browsing interface.
click on the photo thumbnails to open the photo, and
Create Photo Widget
Through the Photo Plug-ins can quickly open
the photos.
Tap
pop-up list
on the desktop, sele ct
→
Select
Photo Wid get.
Widgets
25 Gallery
The operation with photo and video list
in the
on the top right of the f older interface tap
to play slide.
Video:
video preview, enter the video preview interface, and
click the play button in the video preview to play
the video.
Delete the photos and vi deos in the list
On the top right of the screen, Tap
Tap
select album
In the classification folder, click on the
or
Select item
, then select the photo
icon
icon
→
Classification of photos and vide os li st
In the root directory, click the
Locations, people, or tags
the photos and vide os.
View, play the photos and videos
Photo:
In the classification folder,
) on the top left to classify
49
album (times,
or video which you want to delete, tap
Delete
☆
manages photos and videos in the
reading/writing storage
.
Gallery
only supports the display and
. To toggle the
50
→
default
Page 28

display of the storage area, go to
●Show screen capture icon in status bar.
Settings → storage → default
reading/writing storage
The device default storage area is SD
card.
to make changes.
26 SCREEN CAPTURE
You can capture a screen image by tapping
at any time.
After the images are saved, they can be viewed
through
My Photo
application.
27 TASK MANAGERMENT
Use PK Manager to manage applications and
widgets.
Stopping Applications
Android does not automatically stop applications
Tap the
icon to set options for a screen capture.
●
Select a delay timer to capture the screen
(
seconds).
●
Select the default storage device .
Screen Capture
51
application
after they are loaded, so you can manually stop the
applications as desired.
1.Tap the
icon.
2.Tap
Running
Task Manager
to display all running applications.
Application
52
Page 29

3.Tap on an application you want to stop
→
Force stop
OK
.
→
tap
28 WI-FI
Uninstall Applications
1.Tap the
icon.
2.Tap
3.Tap on an application you want to uninstall
tap
Uninstall
1.Tap
Install Application s
2.Tap the
to display all applications.
All
.
to confirm uninstall.
OK
Task Manager
Task Manager
Application
→
Application
Tap
Settings → Wi-Fi,
1.Slide the Wi-Fi switch to turn on Wi-Fi.
2.All the AP in the vicinity will be listed, click to
select the name you want to connect to AP;
3.If the AP is connected successful before, the AP
information will be saved in the pop-up window, select
"Connect" starts to connect, choose "forget" to remove
AP information;
4.If the AP is not encrypted, in the pop-up window,
select "Connect" Start Connection;
5.If the AP is encrypted, enter the password in the
enter into Wi-Fi settings.
icon.
3.Tap
4.Find and tap on an application you want to install
tap
Install
Install
to display all applications and folders.
.
53
→
pop-up window, and click "Connect" Start Connection;
6.When internet connections are successful, the
wireless connection icon will appear in the bottom
status bar .
54
Page 30

the name.
29 3G NETWORK
First of all, you nee d to buy 3G wireless network
card according to China Telecom, China Mobile or
China Unicom. For the currently supported 3G card
type, please refe r to
appendix.
Dongle in order to ensure normal 3G Internet access.
Please put the prepaid card into the USB 3G Dongle,
insert the USB 3G Dongle into the USB host transfer
cable and then insert OTG interface. It will be bright
We strongly recommend to buy the USB 3G
3G dongle suppor t list
or
Device number and APN:
information provided by operating agencies. (As in
China: If you use China Unicom and China Mobile's 3G
network card,
"*99#",
Telecom formats 3G on the card, phone number need to
fill in the column "T#777",
the name of column.)
China Unicom and China Mobile's 3G network card,
user and password fields are free to fill or not fill; if you
APN
User and Password:
device number
need to fill in the "cmnet"; if China
Please fill in the
field need to fill in
do not need to fill in
APN
If you use the sta ndard of
lights on the USB 3G Dongle, which indicate that it
could begin to connect the 3G network.
Tap
Settings → 3G network,
network
Device number, APN, user
”, in the popup dialog b ox, Fill the
Name:
In the popup dialog box, Name field enter
and
And tap “
password
Add 3G
name,
information.
55
use the standard of C hina Telecom's 3G network card,
user and password
Note:
: card).
If it does not work properly for entering the
password
above user and password. Please try to fill in (
ctnet@mycdma,
fields need to fill in(
password
: vnet.mobi) or (
user
user
: card,
:
user
: ctnet,
56
Page 31

password
: vnet.mobi), also you can ask to China
Telecom.
Click the connect after finishing filling, then you
will see the 3G symbol appearing at the bottom
of status bar , indicating the 3G network is connected,
and then you can get online .
30 GPS
GPS functionality requires the use of a USB
interface external GPS receiver. (It access to device via
the USB host transfer cable). Users need to download
31 PPPoE SETTINGS
Before using this feature, connect the USB network
card via the USB host transfer cable access to device.
1. Tap
2. Input name and password then click connect to
access the broadband network.
Settings
→
PPPoE settings
.
32 ETHERNET
Before using this feature, connect the USB network
card via the USB host transfer cable access to device.
When the USB network cable plugged int o the U SB
the navigation software and map from the internet,
through the SD card installation (please refer to the
Application Management section of this Use r Guide).
For the currently supported GPS receiver type, please
refer to Appendix.
57
network card, you will see the bottom of status bar ETH
symbol
1. Tap
2. The device c an automatically obtain IP address
to connect to the network. You can also choose to
appears
Settings
→
Ethernet
.
58
Page 32
manually set the IP address to get connected.
network
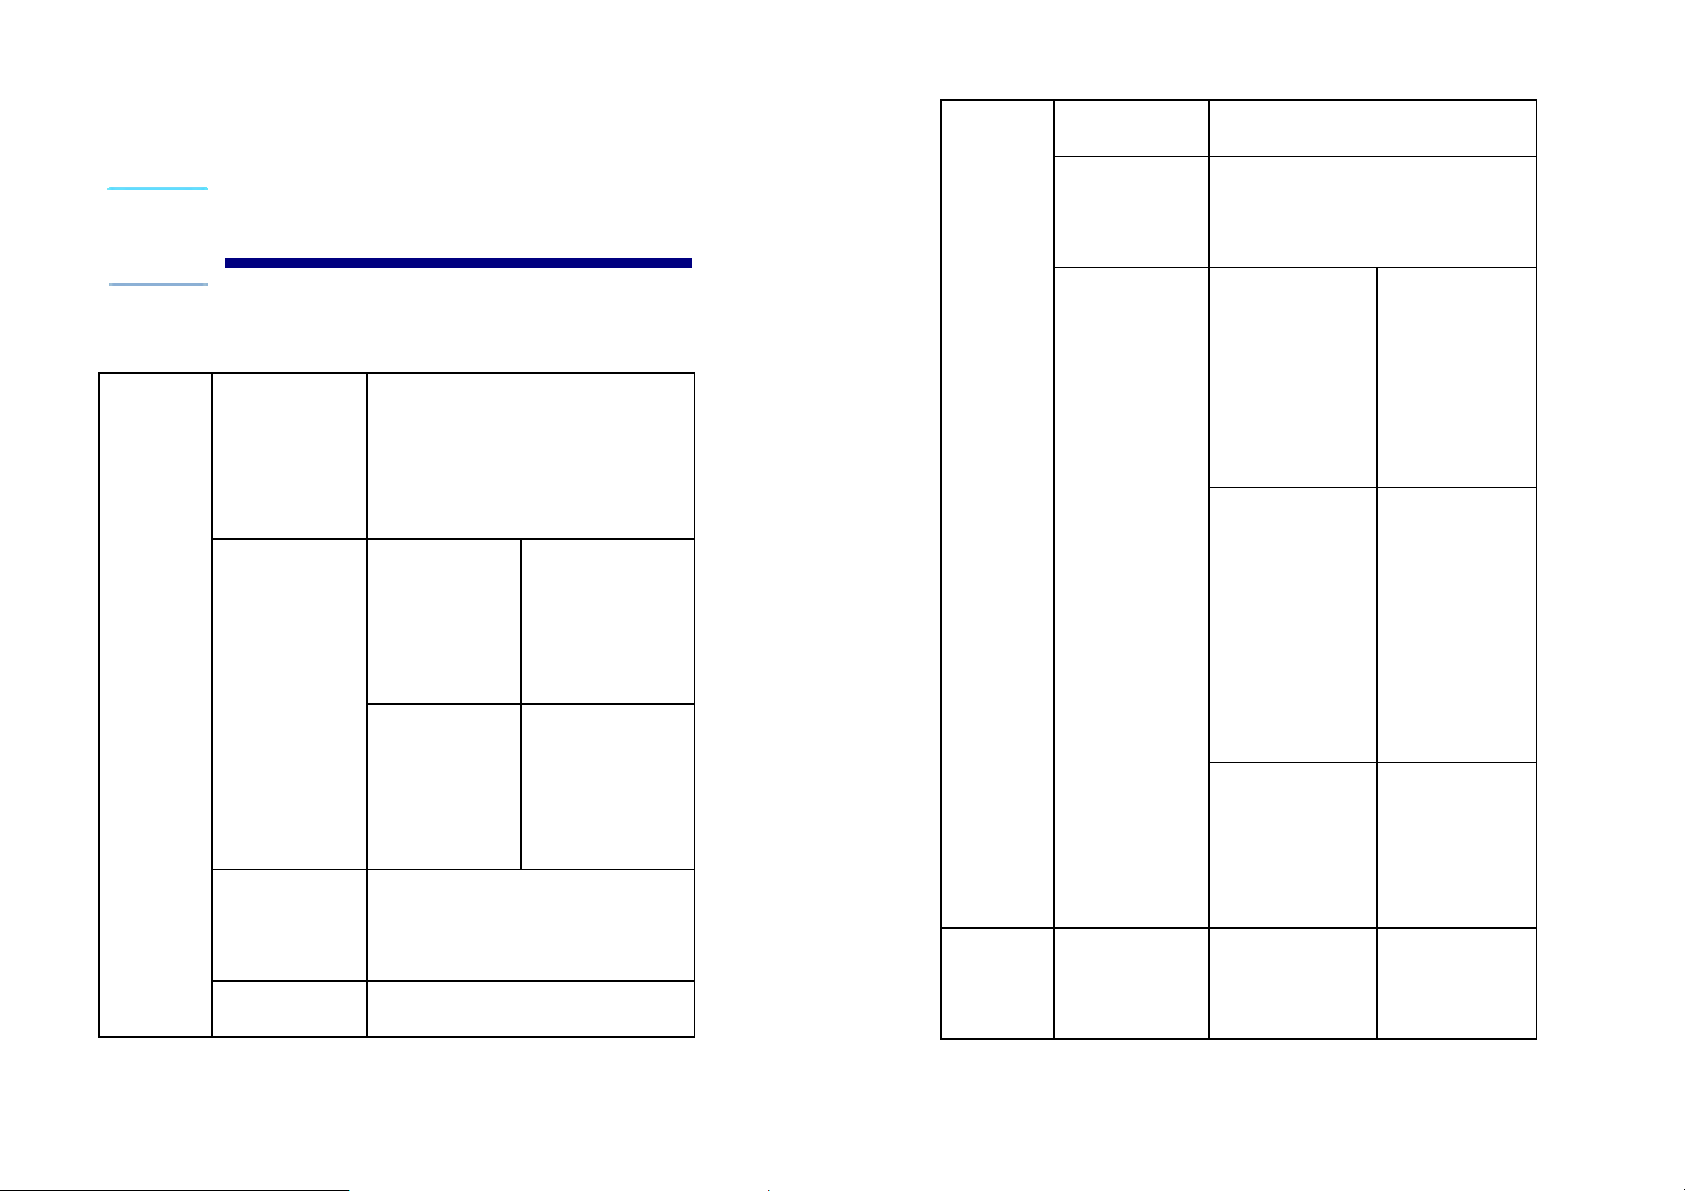
33 SETTINGS
Wirel
ess &
netwo
rks
Wi-Fi
Ethernet
PPPoE
Turn on /off Wi-Fi, Set up
& manage wireless access
points.
DHCP
Use Static
IP
Set up ADSL networ k
Automatic
assign IP
address
Manual
assign IP
address
Data
usage
More…
View of data usage
Disable all
Airplane
mode
VPN
Mobile
network
wireless
connection
s.
Add
Virtual
Private
Networks
(VPNs).
Set up
mobile
network
settings
Set up 3G network.
3G
59
Device Sound
60
Volumes
To adjust
the Media
Page 33
volume.
wallpaper
Default
notification
Vibrator
Touch
sounds,
screen lock
sound
Select
desired
ringtone
sound.
Turn
on/off
vibrator
Turn
on/off
operating
sounds.
Auto-rotat
e screen
Show
full-screen
gesture tip
Screen
timeout
Auto-rotate
switch.
Full-screen
gesture
prompts
Adjust the
delay
before the
screen
automatica
lly turns
Adjust the
screen
Display
Brightness
brightness
as desired.
Set up
Wallpaper
61
Storage
62
Font size
off.
Set the
system
font size
View,
Page 34
uninstall,
use data
Perso
nal
Battery
Apps
Account
& sync
and format
the internal
memory,
SD card
and USB
storage.
View the
usage of
the battery.
View an d
uninstall
application
s
Add sync
account.
Location
services
Google's
location
service
GPS
satellites
from
source
such as
Wi-Fi an d
mobile
network to
determine
your
approximat
e location
Let apps
use GPS to
pinpoint
your
location.
Let apps
63
64
Page 35
Let Google
it on.
Security
Location &
Google
search
Screen lock
Owner info
use your
location to
improve
search
results and
other
service.
Require a
numeric
PIN or
Make
passwords
visible
Device
administra
tors
Unknown
sources
View or
deactivate
device
administrat
ors
Allow
installation
of
non-Marke
password
Encrypt
tablet
to decrypt
your tablet
each time
you power
65
t apps.
Display
trusted CA
Trusted
certificates
credentials
66
Page 36
.
methods,
Language
& input
Install
from SD
card
Clear
credentials
Language
Install
certificates
from SD
card.
Remove all
certificates
.
Setting
system
language.
Spelling
correction,
personal
Syste
m
Backup &
Reset
Date &
Time
Factory
data reset
Automatic
date &
time
text to
speech
(TTS)
output, and
pointer
speed.
Erases all
data on
tablet.
Use
network
-provided
time
dictionary,
keyboard
and input
67
68
Set date
Set time
Set date
Set time
Page 37
Select time
zone
Select time
zone
touch &
hold delay,
and install
Use
24-hour
format
Select date
format
Choose
24-hour
format or
12-hour
format.
Select date
format.
Large text,
power
button
ends call,
Developer
options
web scripts
USB
debugging,
developme
nt device
ID, stay
awake,
allow
mock
locations,
HDCP
Accessibil
ity
auto-rotate
screen,
speak
passwords,
69
checking,
desktop
backup
password,
70
Page 38
strict mode
scale, don’t
enabled,
pointer
location,
show
touches,
show
screen
updates,
show CPU
usage,
Force GPU
keep
activities,
backgroun
d process
limit, and
show all
ANRs.
Status,
legal
informatio
n, model
rendering,
window
animation
scale,
transition
animation
71
About
tablet
72
number,
android
version,
kernel
version
and build
Page 39
number.
Q: Can I use any of my personal email addresses to
send/receive email?
A: The device supports POP3 and SMTP accounts.
Some free email accounts are not supported on mobile
FREQUENTLY ASKED
QUESTIONS
Android
Q: What Android OS version is on my Device?
A: 4.0.3
Basic Device Functionary
Q: Do I have to charge the batt ery before use?
A: You should charge the battery for at least 6 hours, but
you can use the device while it’s charging. Use the
included power adapter to charge; this device does not
devices. Check with your email provider to see if you
account is supported.
Media Cards
Q: Which media cards are compatible with my
Device?
A: micro SD cards.
Music
Q: What type of music files can I play on my device?
A: MP2, MP3, WAV, ,FLAC,APE,AAC, WMA
Q: How do I add music files to my device?
A: Copy the music files fr om your computer onto a SD
card or USB storage device, and then use the File
support charging via the USB cable.
Email
73
Browser application to copy the f iles into the device.
Photos
Q: What type of photo files can I view on my device?
74
Page 40

A: JPG, JPEG, BMP and PNG.
Q: How do I add photo files to my device?
A: Copy the photo files from your computer onto a SD
card or USB storage device, and then use the File
Browser application to copy the f iles into the device.
Video
Q: What type of video files can I play on my device?
A: Video file formats supported: MPEG1/2/4、H263
H264、VC1、RealV ideo、MotionJPEG.. The largest video
format is supported 1080P(1920×10 80) resolution.
Q: How do I add video files to my device?
A: Copy the video files from your computer onto a SD
card or USB storage device, and then use the File
、
BATTERY MANAGEMENT
The battery is not fully charged when you use the
device first time, so it is recommended that you charge
the battery for at least 6 hours before you use the device.
The rechargeable battery is designed and manufactured
to be used and recharged frequently. As with all
batteries, the capacity of the battery reduces each time it
is charged/depleted. Howe ver, you can still try to
prolong the battery’s lifetime by the suggestions as
below:
●
Use your tablet at least once a week.
●
Charge the battery reg ula rly and fully.
Browser application to copy the f iles into the device.
Wi-Fi
Q: Do I need a Wi-Fi adapter to connect to the
Internet?
A: No. The Wi-Fi adapter is built-in to the device.
:Inconsistent with the physical specifications,
Note
please prevail in kind.
75
long period of time.
from heat.
and then connect to the device to fully charge the
●
Never leave the battery fully dischar ged for a
●
Always keep the device and the batte ry away
Charge batter y
Plug the power adapter into an electrical wall outlet,
76
Page 41
battery before use ( A full charge takes about 6 hours in
Pay more attention to the point where the cord attaches
the status of "off").
☆
You cannot charge the battery using the USB cable.
When fully charge d, the battery icon displays as .
A fully discharged battery takes a pproximately 6 hours
to fully charge in the status of "off", but you can use the
device while plugged in when desired.
IMPORTANT SAFETY
PRECAUTIONS
Always follow these basic saf e ty precautions when
using your tablet. This will reduce the risk of fire,
to the device.
●
packaging. Using any other power adapter voids your
warranty.
●
damaged by your own is out of warranty.
cloth such as a camera lens cloth to c lean fingerprints or
dust on the screen.
Pleas use the AC adapter included in the device
Do not unassemble the de vice by yourself. Any
Cleaning your device
Treat the screen gently. Pls use soft, non-abrasive
Appendix : The optional parts and
electric shock, and injury.
●
●
sources.
●
don't put object on the power cord when make charging.
Do not expose this product to rain or moisture.
Keep the device out of direct sunlight and heat
Protect the power cord. Avoid being stepped or
77
models
Parts name Parts type
3G Wi rele ss
Network Card
78
TD-CDMA TD368
WCDMA
HUAWEI E220
HUAWEI E230
Page 42
HUAWEI
UW100
E160X
HUAWEI
E169G
HUAWEI
E1750
HUAWEI E173
HUAWEI W8
HUAWEI E153
HUAWEI
E153u6
VW718/719
CDMA2000
Central-day technology ND100 GPS Receiver
Central-day technology ND100S
FCC STATEMENT
1. This device complies with Part 15 of the FCC Rules.
Operation is subject to the following two conditions:
Bora 9380
AWIT-U8
RATE EC186
ZTE AC2736
SEV759
Alcatel AL720
ZTE MF190
ZTE MF110
ZTE MF210
SEW868
79
(1) This device may not cause harmful interference, and
(2) This device must accept any interference received,
including interference that may cause undesired
operation.
2. Changes or modifications not expressly approved by
the party responsiblefor compliance could void the
80
Page 43

user’s authority to operate the equipment
the separation between the equipment and receiver. -NOTE:
This equipment has been tested and found to comply
with the limits for a Class B digital device, pursuant to
Part 15 of the FCC Rules. These limits are designedto
provide reasonable protection against harmful
interference in a residential installati on. Thi s equipment
generates, uses and can ra diate radio frequency
energyand, if not installed and used in accordance with
the instructions, may cause harmfulinterference to radio
communications. However, there is no guarantee that
interference will not occur in a particular installation.
Connect the equipment into an outlet on a circuit
different from that to which the receiver is connected.
-- Consult the dealer or an experienced radio/TV
technician for help.
FCC Radiation Exposure Statement:
The device has been evaluated to meet general RF
exposure requirement. The device can be used in
portable exposure condition without RF striction.
If this equipment does cause harmful interference to
radio or television reception, which can be determined
by turning the equipme nt off and on, the user is
encouraged to try to correct the interference by one or
more of the following
-- Reorient or relocate the receiving antenna. -- Increase
81
82
 Loading...