

Page 1
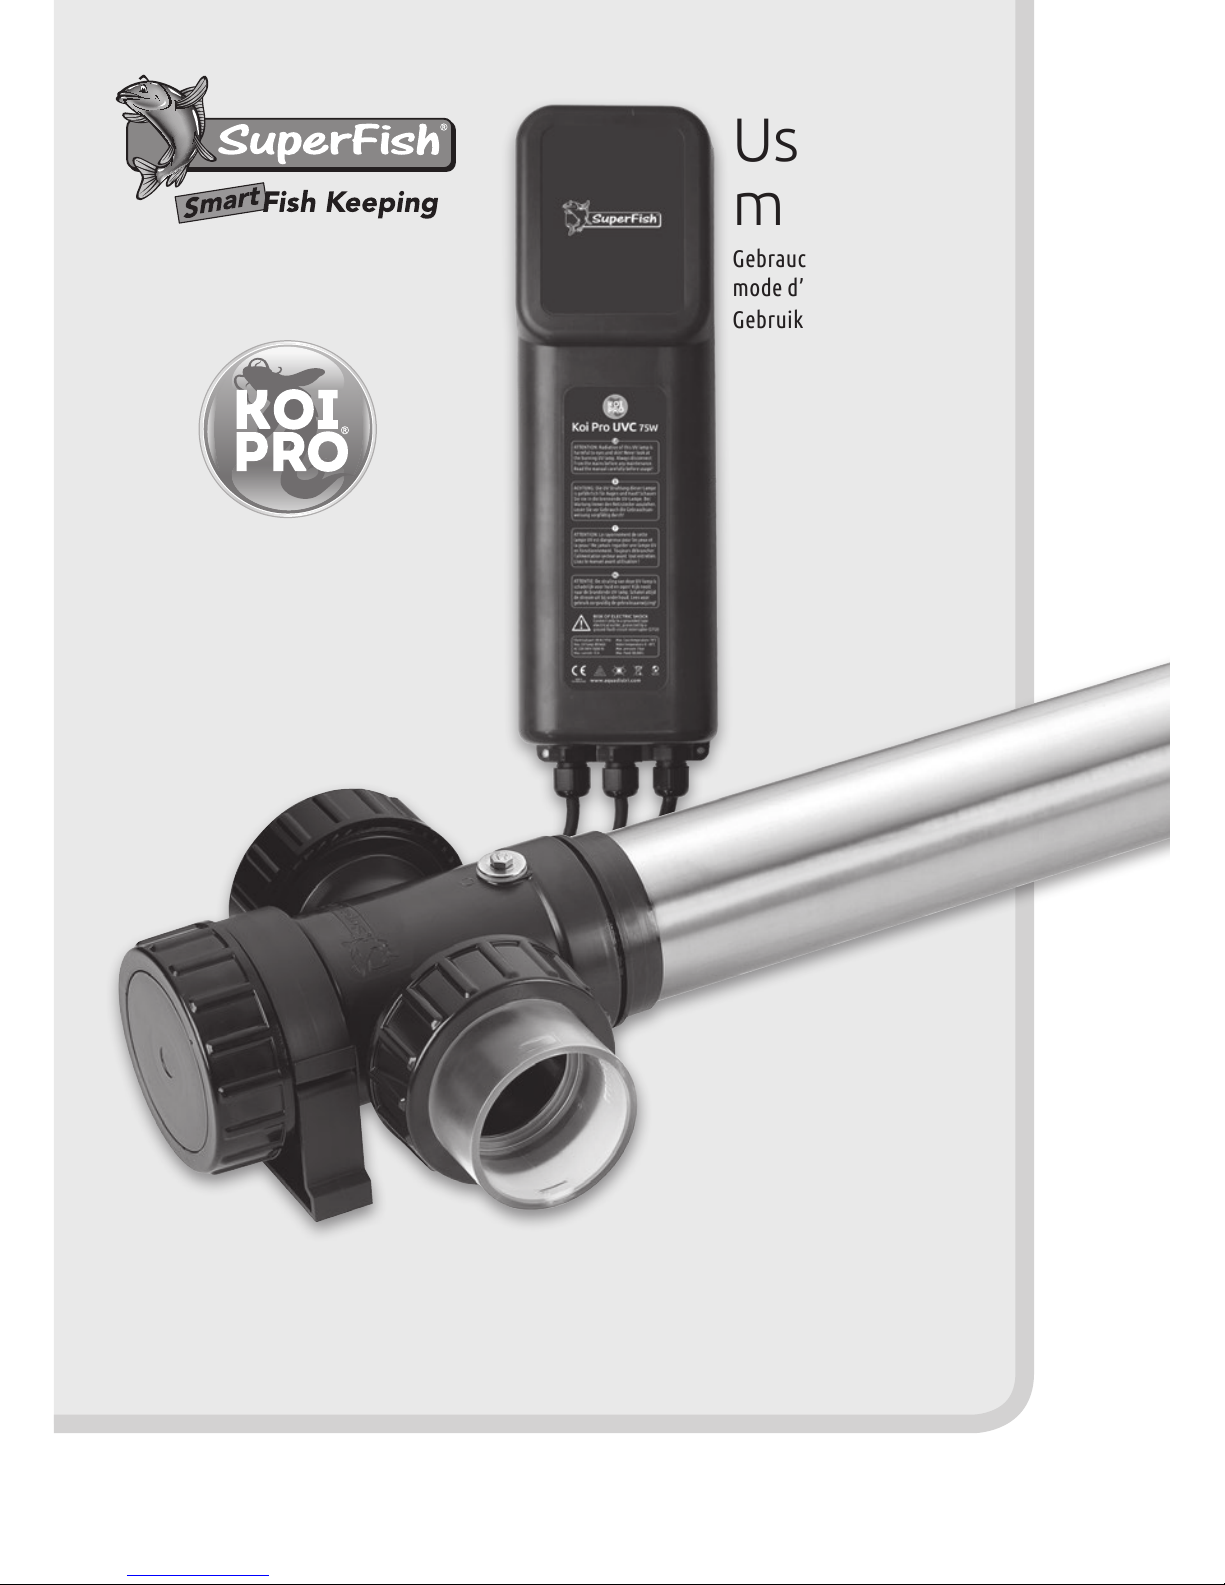
User
manual
Gebrauchsanweisung
mode d’emploi
Gebruiksaanwijzing
Koi Pro UVC
40 Watt 40,000 L • 75 Watt 75,000 L
Professional UVC clarier • Professionelles UVC-Gerät
Claricateur UVC professionnel • Professioneel UVC apparaat
Page 2
2
G
F
D
E
D
A
B
C
Triple
Head
outlet
Double
Head
inlet
ø50 mm
PVC
ø40 mm
Hose
Schlauch
Tuyau
Slang
ø32 mm
Hose
Schlauch
Tuyau
Slang
ø25 mm
Hose
Schlauch
Tuyau
Slang
B
D
A
C
Page 3
3
H
L
M
M
Q
J
K
P
C
N
T
M
R
L
B
Triple Head outlet
ø63
PVC
Hose/Schlauch/Tuyau/Slang
ø25 - ø32- ø40
S
ø50
PVC
U
E
Page 4

GB - SuperFish Koi Pro UVC 40 Watt 40,000 L/ 75 Watt 75,000 L
The Koi Pro UVC is a professional UVC clarier for large ponds. It ensures a clear
pond with healthy sh. The UV lamp produces ultraviolet light with a wavelength of
exactly 254 nm. The UV-C radiation kills almost all harmful bacteria, viruses and
fungi and keeps algae growth under control.
Safety
• Read this manual carefully before usage.
• Suitable for outdoor usage.
• This UVC should be only used for cleaning pond water and the water temperature should not
exceed 35°C. It should never be used for other liquids or chemicals.
• This UVC device produces harmful radiation, direct contact may be dangerous for eyes and skin.
• Never look at a burning UV lamp, switch of the power before any maintenance and when
opening the UVC clarier
• The device may only be connected to an electrical installation that meets the legal requirements.
A GFCI (30 mA) and earthed sockets are required. If in doubt always use a certied electrician to
install.
• Ensure voltage shown on the label match to the mains supply voltage.
• The UVC plug may only be connected to an earthed wall socket. Ensure that water cannot reach
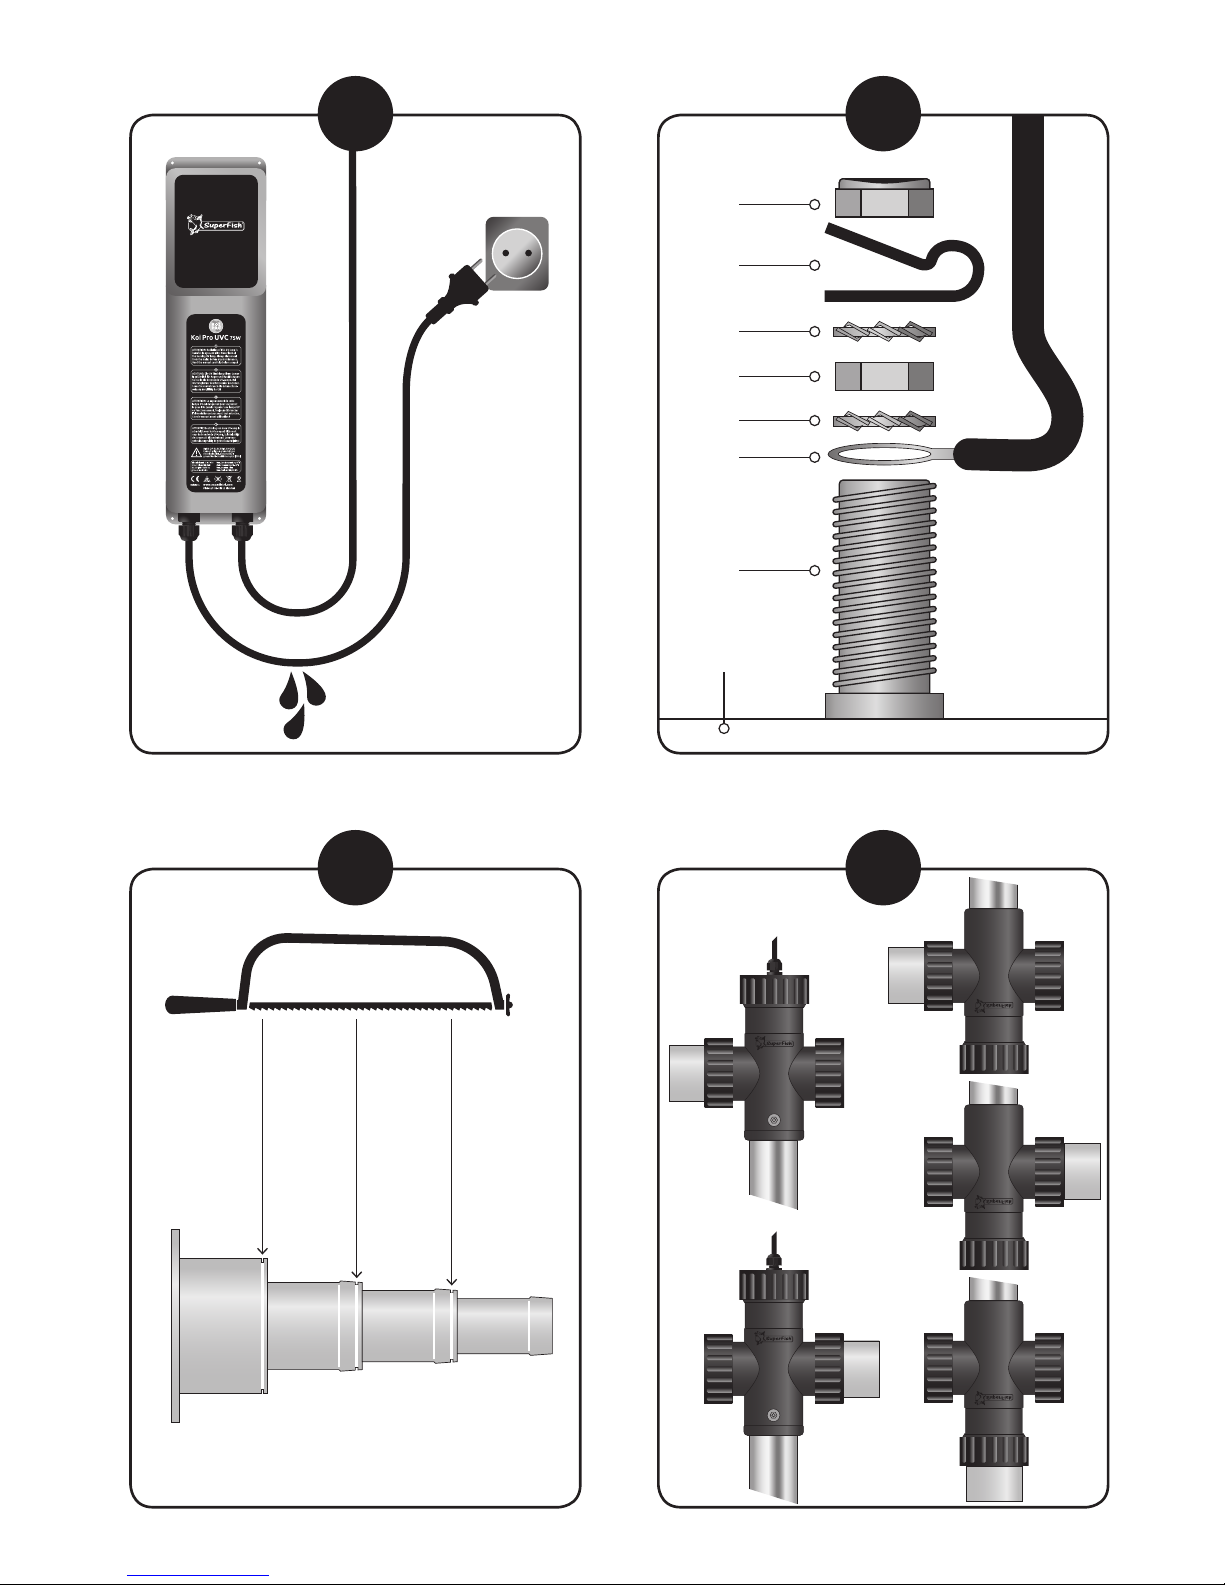
the socket (g. A).
• The UVC device, the electronic ballast and the plug must be installed in a dry place, spatter-free
and at least 2 meters away from the pond.
• Take great care using electricity in combination with water, do not operate with wet hands or plug
is wet. Never operate the clarier if there are people in the water.
• In the event of damage to the unit, quarts glass, cord or plug, do not use the unit and return the
unit to your dealer for repair or recycling.
• Unplug or switch o all appliances in the pond before carrying out maintenance. Be aware that
the lamp can remain hot for up to 10 minutes after being disconnected.
• The UVC device may only be connected if there is a sucient ow of water.
• The UVC device can withstand a maximum pressure of 3 bar.
• This appliance can be used by children aged from 8 years and above and persons with reduced
physical, sensory or mental capabilities or lack of experience and knowledge if they have been
given supervision or instructions concerning the use of the appliance in a safe way and
understand the hazards involved. Children may not play with the appliance. Cleaning and user
maintenance shall not be done by children without supervision.
Grounding the UVC device
• The grounding pin is located on the plastic part of the UVC on the inlet side.
• Ground the UVC device in the order shown below and in gure B.
• Slide the eye of the earthing cable (A) over the grounding pin (B) that is attached onto the
housing (C).
• Slide the rst toothed washer (D) over the grounding pin.
• Tighten the hexagon nut (E) onto the grounding pin.
• Slide the second toothed washer (D) over the grounding pin.
• Clip the strain relief clip (F) around the grounding cable approx. 10 cm from the metal eye (A).
• Slide the eye of the strain relief clip (F) over the grounding pin so that the grounding cable makes
a loop.
• Tighten the locknut (G) on the grounding pin (tighten carefully).
4
Page 5

5
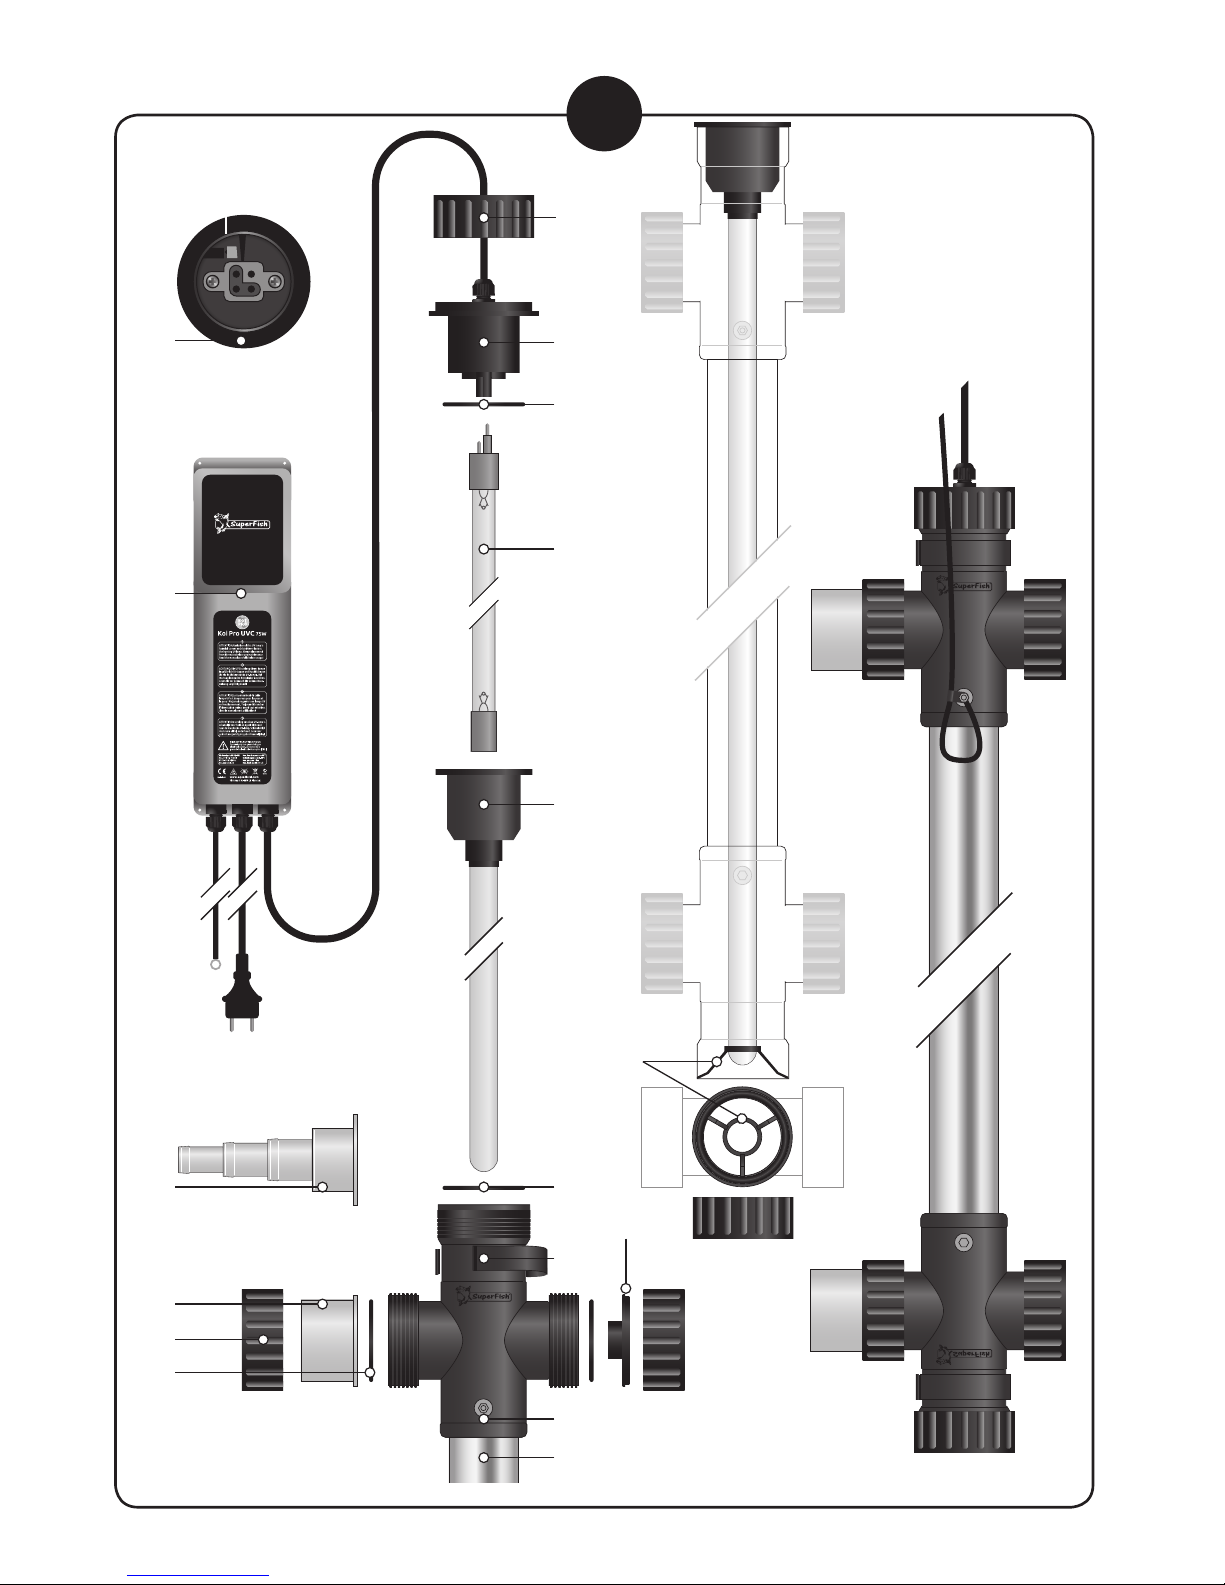
Installation (gures C-D-E)
The UVC device must be placed in a dry, well-ventilated area, not exposed to direct sunlight. The
best position is (if possible) behind the lter, take the accessibility for maintenance in mind.
• Carefully unpack the UV lamp (J) and insert the lamp into the lamp holder (L).
• Carefully slide the lamp and lamp holder into the quartz glass (K). Make sure that the microswitch is in the recess. The micro-switch is an extra security, it ensures that the UV lamp is always
switched o automatically when disassembling (in case you forgot to switch o the UV lamp).
• Make sure the O-ring (M) is placed in the right position.
• Tighten the lock nut (H) hand-tight onto the housing (C).
• Mount the pipe clamps (N) at the location where the UVC device should hang (take the length of
the cables into account).
• Mount the electronic ballast (P) at the desired location (take the length of the cables into account).
• When using pond hoses or when using ø50 mm PVC pipes, cut o the Multi-step couplings (S) to
the correct size (g. C). Use the already mounted ø63 mm couplings for ø63 mm pipes (T).
• The Double Head input and Triple Head output connection makes the UVC device easy to install
(g. D). Mount the couplings with the lock nuts (R) to the desired connections and close the other
connections with the cover plates (Q) and lock nuts. Make sure the O-rings (M) are placed
correctly.
• Place the device in the pipe clamps (N) and glue the couplings between the pipes or connect the
pond hoses with hose clamps to the couplings.
• Ensure that there is an adequate ow of water through the device and then insert the plug into
the appropriate socket. The transparent connection couplings (S or T) show whether the UV-lamp
(J) is lit. Check the whole assembly for possible leaks.
• Switch o the UVC device by pulling the plug out of the socket.
Maintenance
• Always disconnect from the mains supply before carrying out any maintenance!
• The UVC device should be cleaned twice a year. As soon as algae growth increases, check the UVC
and UV-lamp and clean or exchange as needed.
• The lamp is hot, wait 10 minutes after switch o before opening the unit.
• Ensure that the water is drained out of the UVC device.
• Undo the lock nut (H) and remove the lamp holder (L) with the UV lamp (J) and the quartz glass
(K) from the housing. If necessary, you can also replace the lamp.
• Clean the quartz glass outer face with a soft cloth and SuperFish UVC Clean carefully.
After cleaning, rinse quartz glass with clean tap water thoroughly and check for damage.
• The inside of the housing (C) can be cleaned with a brush, do NOT use any chemicals.
• Carefully slide the quartz glass into the housing, at the other end of the housing there is a
support (U), ensure that the tip of the quartz glass is in the support. If necessary, unscrew the
locknut at the other end of the housing and guide the quarter glass into the support with your
ngers.
• Check that the O-ring (M) is positioned correctly.
• Replace the lamp and lamp holder and tighten the lock nut(s).
• To avoid overheating, unplug the device from mains when no water is owing through the UVC
device.
• In the winter season, when the system is not used, the UVC device should be removed to avoid
the risk of freezing.
• The UV-lamp should be replaced yearly. Although the lamp may still burn, it no longer emits
enough UV radiation (maximum 8000 operating hours).
Page 6

6
D - SuperFish Koi Pro UVC 40 Watt 40,000 L/ 75 Watt 75,000 L
Der Koi Pro UVC ist ein professionelles UVC-Gerät für große Teiche. Es gewährleistet
einen klaren Teich mit gesunden Fischen. Die UV-Lampe erzeugt ultraviolettes Licht
mit einer Wellenlänge von genau 254 nm. Die UV-C-Strahlung tötet fast alle
schädlichen Bakterien, Viren und Schimmelpilze und beugt Algenwachstum vor.
Sicherheit
• Lesen Sie vor Gebrauch diese Gebrauchsanweisung sorgfältig durch.
• Geeignet für den Außeneinsatz.
• Dieses UVC-Gerät sollte nur für die Reinigung von Teichwasser, mit einer maximalen Wasser temperatur
von 35°C, verwendet werden. Nicht für andere Flüssigkeiten oder Chemikalien verwenden.
• Dieses UVC-Gerät erzeugt schädlichen Strahlung; direkter Kontakt ist möglicherweise
gefährlich für Augen und Haut.
• Schauen Sie nie in eine brennende UV-Lampe; das Gerät vor jeder Wartung und beim Önen
des Filters, in dem die UV-Lampe eingebaut ist, unbedingt abschalten.
• Das Gerät darf nur an eine Elektroanlage angeschlossen werden, die den gesetzlichen
Anforderungen entspricht. Ein Erdschlussschalter (30 mA) und eine Schukosteckdose sind
vorgeschrieben. Ziehen Sie im Zweifelsfall einen anerkannten Elektroinstallateur hinzu.
• Stellen Sie sicher, dass die Spannung auf dem Label mit der Netzspannung übereinstimmt.
• Schließen Sie das UVC-Gerät ausschließlich an eine geerdete Steckdose mit Schutzschalter an.
Stellen Sie sicher, dass kein Wasser in die Steckdose gelangen kann (Abb. A).
• Das UVC-Gerät, das elektronische Vorschaltgerät und der Stecker müssen an einem trockenen
Ort, vor Spritz wasser geschützt und mindestens 2 Meter vom Teich entfernt, installiert werden.
• Seien Sie vorsichtig bei der Kombination von Wasser und Strom. Nicht mit nassen Händen bedienen
oder wenn der Stecker nass ist. Das UVC-Gerät nie verwenden, wenn sich Menschen im Wasser
benden.
• Im Falle von Schäden an das Gerät, das Quarzglas, den Kabel oder den Stecker das Gerät nicht
mehr benutzen und zur Reparatur zurück zu Ihrem Händler bringen oder zur Entsorgung dem
Recycling zuführen.
• ACHTUNG: Vor der Durchführung von Wartungsarbeiten alle Geräte im Teich ausschalten und
Netzstecker ausziehen. Die Lampe kann bis zu 10 Minuten nach dem Ausschalten noch warm sein.
• Das UVC-Gerät darf nur bei ausreichender Wasserströmung eingeschaltet sein.
• Das UVC-Gerät kann einem maximalen Druck von 3 bar standhalten.
• Dieses Gerät kann von Kindern ab 8 Jahren sowie von Personen mit reduzierten physischen,
sensorischen oder mentalen Fähigkeiten oder Mangel an Erfahrung und/oder Wissen benutzt
werden, wenn sie beaufsichtigt oder bezüglich des sicheren Gebrauchs des Gerätes unterwiesen
wurden und die daraus resultierenden Gefahren verstanden haben. Kinder dürfen nicht mit dem
Gerät spielen. Reinigung und Benutzer-Wartung dürfen nicht durch Kinder ohne Beaufsichtigung
durchgeführt werden.
Erdung des UVC-Geräts
• Der Erdungsstift bendet sich auf dem Kunststoteil des UVC an der Seite des Einlass.
• Erden Sie das UVC-Gerät in der Reihenfolge, wie unten beschrieben und in Abbildung B gezeigt.
• Schieben Sie das Auge des Erdungskabels (A) über den Erdungsstift (B) am Gehäuse (C).
• Schieben Sie den ersten Zahnfederring (D) über den Erdungsstift.
• Ziehen Sie die Mutter (E) auf den Erdungsstift.
• Schieben Sie den zweiten Zahnfederring (D) über den Erdungsstift.
• Klemmen Sie den Zugentlastungsclip (F) um das Erdungskabel, etwa 10 cm vom Metallauge (A).
• Schieben Sie die Öse der Zugentlastungsklemme (F) über den Erdungsstift, sodass das
Erdungskabel eine Schleife bildet.
• Ziehen Sie den Sicherungsmutter (G) auf den Erdungsstift (vorsichtig festziehen).
Page 7

7
Installation (Abbildungen C-D-E)
Das Gerät muss in einem trockenen, gut belüfteten Raum aufgestellt werden und darf nicht
direktem Sonnenlicht ausgesetzt werden. Die beste Position ist (wenn möglich) hinter dem Filter,
wobei die Zugänglichkeit für Wartung zu berücksichtigen ist.
• Die UV-Lampe (J) vorsichtig aus der Verpackung nehmen und in die Lampenfassung (L) setzen.
• Schieben Sie die Lampe und den Lampenhalter vorsichtig in das Quarzglas (K). Achten Sie darauf,
dass der Mikroschalter in der Aussparung sitzt. Der Mikroschalter ist eine zusätzliche Sicherheitseinrichtung, die dafür sorgt, dass, sollten Sie vergessen, das Gerät abzuschalten, die UV-Lampe
bei der Demontage immer automatisch ausgeschaltet wird.
• Stellen Sie sicher, dass der O-Ring (M) richtig platziert ist.
• Die Sicherungsmutter (H) handfest auf das Gehäuse (C) drehen.
• Montieren Sie die Rohrschellen (N) an der gewünschten Stelle, an der das UVC-Gerät hängen soll
(berücksichtigen Sie die Länge der Kabel).
• Montieren Sie das elektronische Vorschaltgerät (P) an der gewünschten Stelle (berücksichtigen
Sie auch die Länge der Kabel).
• Schneiden Sie die Multi-Step-Kupplungen (S) bei der Verwendung von Teichschläuchen oder bei
Verwendung von PVC-Rohren mit einem Durchmesser von ø50 mm auf die richtige Größe (Abb. C).
Verwenden Sie die bereits montierten Kupplungen (T).
• Durch den Double-Head-Eingang und den Triple-Head-Ausgang lässt sich das UVC-Gerät einfach
installieren (Abb. D). Montieren Sie die Kupplungen mit den Sicherungsmuttern (R) an den
gewünschten Anschlüssen und schließen Sie die anderen Anschlüsse mit den Abdeckplatten (Q)
und den Sicherungsmuttern. Stellen Sie sicher, dass die O-Ringe (M) richtig platziert sind.
• Platzieren Sie das Gerät in den Rohrschellen (N) und kleben Sie die Kupplungen zwischen die
Rohre oder verbinden Sie die Teichschläuche mit Schlauchklemmen mit den Kupplungen.
• Stellen Sie sicher, dass ausreichend Wasser durch das Gerät ießt, und schließen Sie das
Netzkabel an. Durch die transparenten Verbindungskupplungen (S oder T) können Sie sehen ob
die UV-Lampe (J) leuchtet. Überprüfen Sie auch das Ganze auf eventuelle Leckage.
• Schalten Sie das UVC-Gerät aus, indem Sie den Stecker aus der Steckdose ziehen.
Wartung
• Trennen Sie das Gerät vor der Durchführung jeder Wartung vom Stromnetz!
• Das UVC-Gerät sollte zweimal jährlich gereinigt werden. Bei Steigerung des Algen wachs tums
überprüfen und reinigen Sie das Gerät und wechseln Sie die UV-Lampe nach Bedarf.
• Die Lampe ist heiß, warten Sie nach dem Ausschalten 10 Minuten, bevor Sie das Gerät önen.
• Lassen Sie zur Demontage das Wasser aus dem Gerät ab.
• Die Sicherungsmutter (H) losschrauben und den Lampenhalter (L) mit der UV-Lampe (J) und dem
Quarzglas (K) entfernen. Die UV-Lampe kann jetzt – wenn nötig – ausgewechselt werden.
• Reinigen Sie die Außenseite des Quarzglases vorsichtig mit einem weichen Tuch und mit
SuperFish UVC Clean. Spülen Sie das Quarzglas nach der Reinigung mit sauberem Leitungswasser
gründlich ab und überprüfen Sie es auf Beschädigungen.
• Die Innenseite des Gehäuses (C) kann mit einer Bürste gereinigt werden. Verwenden Sie dazu
absolut keine Chemikalien.
• Schieben Sie das Quarzglas vorsichtig in das Gehäuse. Am anderen Ende des Gehäuses bendet
sich eine Halterung (U), Stellen Sie sicher, dass sich die Spitze des Quarzglases in der Halterung
bendet. Falls erforderlich, lösen Sie die Sicherungsmutter am anderen Ende des Gehäuses und
führen Sie das Quarzglas mit den Fingern in die Halterung.
• Stellen Sie sicher, dass der O-Ring (M) richtig platziert ist.
• Setzen Sie die Lampe und Lampenhalter wieder richtig ein und drehen Sie die Sicherungsmutter(n)
wieder handfest auf.
• Um eine Überhitzung zu vermeiden schalten Sie das Gerät ab, sobald kein Wasser hindurch ießt.
• In der Wintersaison, wenn das System nicht verwendet wird, sollte das UVC-Gerät zur Vermeidung
eines Frostschadens deinstalliert werden.
• Ersetzen Sie die UV-Lampe jährlich. Die Lampe leuchtet zwar noch, jedoch ist die UV-Strahlung
gesunken, wodurch das Gerät nicht mehr voll funktionsfähig ist (bis zu 8000 Brennstunden).
Page 8

F - SuperFish Koi Pro UVC 40 Watt 40,000 L/ 75 Watt 75,000 L
Le Koi Pro UVC est un claricateur UVC professionnel pour les grands bassins. Il assure
un bassin clair avec des poissons en bonne santé. La lampe UV produit une lumière
ultraviolette d’une longueur d’onde de 254 nm. Le rayonnement UV-C tue pratiquement
toutes les bactéries et microbes nocifs et qui réduit la formation des algues.
Sécurité
• Convient pour un usage extérieur.
• Lisez ce manuel attentivement avant utilisation.
• L’appareil UVC produit des rayonnements nocifs, le contact direct peut être dangereux pour les
yeux et la peau.
• Ne jamais regarder une lampe UV en fonctionnement, couper l’alimentation avant tout
entretien et lors de l’ouverture de l’UVC.
• L’appareil doit uniquement être branché sur une installation électrique qui satisfait aux normes
légales. Un interrupteur de défaut de terre (30 mA) et une prise de courant avec mise à la terre
sont requis. En cas de doute, consultez toujours un installateur agréé.
• Assurez-vous que la tension est adaptée à votre installation.
• Utilisation exclusive pour l’eau de votre bassin pas pour d’autres liquides, produits chimiques et
autres substances. La température maximale de l’eau ne doit pas dépasser 35°C.
• L’appareil UVC doit être raccordé à une prise 3 conducteurs (mis à la terre). Assurez-vous d’aucune
possibilité de projection d’eau sur la prise électrique (g. A).
• L’appareil UVC, le ballast électronique et la prise doivent être installés dans un endroit sec, à au
moins 2 mètres du bassin.
• Apportez une grande attention: l’électricité et l’eau ne font pas bon ménage, ne manipulez pas
avec des mains ou prisesmouillées. Ne pas utiliser en cas de personnes dans l’eau.
• En cas de dommages sur l’appareil, le tube quartz, la prise ou le cordon ne jamais utiliser
l’appareil et renvoyer l’appareil à votre revendeur pour la réparation ou le recyclage.
• Débrancher ou éteindre tous les appareils dans le bassin avant de procéder à l’entretien. La lampe
peut encore rester chaude pendant 10 minutes après la désactivation.
• L’appareil ne doit être mis en service que si l’écoulement de l’eau est susant.
• L’appareil peut résister à une pression maximale de 3 bars.
• Cet appareil peut être utilisé par des enfants âgés de 8 ans et plus et des personnes ayant des
capacités ou un manque d’expérience et de connais sances physiques, sensorielles ou mentales
réduites si elles ont été formées et encadrées d’instructions concernant l’utilisation de l’appareil
en toute sécurité et de comprendre le risques encourus. Les enfants ne peuvent pas jouer avec
l’appareil. Le nettoyage et l’entretien de ne doivent pas être eectués par des enfants sans
surveillance.
Mise à la terre de l’appareil UVC
• La broche de mise à la terre est située sur la partie en plastique de l’UVC du côté entrée.
• Mettez le dispositif UVC à la terre dans l’ordre indiqué ci-dessous et à la gure B.
• Glissez l’œillet du câble de mise à la terre (A) sur la broche de mise à la terre (B) xée au boîtier (C).
• Faites glisser la première rondelle dentée (D) sur la broche de mise à la terre.
• Serrez l’écrou hexagonal (E) sur la broche de mise à la terre.
• Faites glisser la deuxième rondelle dentée (D) sur la broche de mise à la terre.
• Fixez le serre-câble (F) autour du câble de mise à la terre d’env. 10 cm de l’œillet (A).
• Glissez l’œillet serre-câble (F) sur la broche de mise à la terre de sorte que le câble de mise à la
terre forme une boucle.
• Serrez le contre-écrou (G) sur la broche de mise à la terre (serrez soigneusement).
8
Page 9

9
Installation (Figures C-D-E)
L’appareil doit être placé dans un endroit sec, bien ventilé et non exposé au soleil. La meilleure
position est (si possible) derrière le ltre, en tenant compte de l’accessibilité pour la maintenance.
• Retirez avec précaution la lampe UV (J) de l’emballage et Insérez la lampe UV dans le culot (L).
• Faites glisser avec précaution la lampe et le support de lampe dans le quartz en verre (K).
Assurez-vous que le micro-interrupteur soit opérationnel dans son renfoncement. Le microinterrupteur est une sécurité supplémentaire, il assure que la lampe UV est toujours éteinte
automatiquement lors du démontage (au cas où vous avez oublié d’éteindre la lampe UV).
• Assurez-vous que le joint torique (M) est placé dans la bonne position.
• Vissez l’écrou (H) à la main sur le boîtier.
• Montez les colliers de serrage (N) à l’emplacement souhaité ou l’appareil doit être suspendu
(garder à l’esprit la longueur des câbles).
• Montez le ballast électronique (P) à l’emplacement souhaité (garder à l’esprit la longueur des
câbles).
• Lors de l’utilisation de tuyaux de bassin ou de tuyaux en PVC de ø50 mm, coupez les raccords
Multi-step (S) à la taille appropriée (g. C). Utilisez les raccords déjà montés pour les tuyaux en
PVC de ø63 mm (T).
• La connexion d’entrée Double Head et de sortie Triple Head facilite l’installation du l’appareil UVC
(g. D). Montez les raccords avec les écrous (R) sur les connexions souhaitées et fermez les autres
connexions avec les plaques de recouvrement (Q) et les écrous bouchons. Assurez-vous que les
joints toriques (M) sont correctement placés.
• Placez l’appareil dans les colliers de serrage (N) et collez les raccords entre les tuyaux en PVC ou
connectez les tuyaux du bassin avec des colliers de serrage aux raccords.
• Assurez-vous que l’appareil a susamment d’eau et insérez ensuite la che dans la prise
appropriée. Les raccords transparents (S ou T) indiquent si la lampe UV (J) est allumé. Vériez
l’ensemble du montage an d’éviter le risque de fuites.
• Éteignez l’appareil UVC en débranchant la prise.
Entretien
• Toujours débrancher l’alimentation secteur avant d’eectuer tout entretien!
• L’appareil UV doit être nettoyé deux fois par an. Dès que les algues se développent vérier la
lampe et nettoyer la ainsi que le tube quartz si nécessaire.
• Si la lampe est chaude attendez 10 minutes avant intervention.
• Faites en sorte que l’eau puisse s’écouler hors de l’appareil.
• Desserrez l’écrou de blocage (H) et retirez le culot (L) avec la lampe UV (J) et le tube quartz (K) du
boîtier. Le cas échéant, vous pouvez maintenant aussi remplacer la lampe.
• Nettoyez l’extérieur du tube quartz avec un chion doux et SuperFish UVC Clean. Rincer
soigneusement le tube quartz après le nettoyage avec de l’eau propre du robinet et vériez si il
est abimé.
• L’intérieur du boîtier (C) peut être nettoyé avec une brosse, ne pas utiliser aucun produit chimique.
• Faites glisser avec précaution le verre de quartz dans le boîtier. À son autre extrémité, un support (U)
est prévu, assurez-vous que la pointe du tube quartz est bien dans le support. Si nécessaire,
dévisser le contre-écrou à l’autre extrémité du boîtier et guider le quart de verre dans le support
avec vos doigts.
• Assurez-vous que le joint torique (M) est correctement positionné.
• Remplacez le support de la lampe et la lampe et serrez l’écrou autobloquant(s).
• Pour éviter les surchaues, éteignez l’appareil UVC lorsque l’eau ne s’écoule pas à l’intérieur.
• En hiver, quand le système n’est pas utilisé, retirez l’appareil UVC pour éviter tout risque de gel.
• La lampe UV doit être changée tous les ans. Bien que la lampe fonctionne toujours, elle
n’émet plus susamment de rayons UV-C (maximum 8 000 heures de fonctionnement).
Page 10

NL - SuperFish Koi Pro UVC 40 Watt 40,000 L/ 75 Watt 75,000 L
De Koi Pro UVC is een professioneel UVC apparaat voor grote vijvers. Het zorgt voor
een heldere vijver met gezonde vissen. De UV-lamp produceert ultraviolet licht met
een golengte van exact 254 nm. De UV-C straling doodt vrijwel alle schadelijke
bacteriën, virussen en schimmels en houdt algengroei onder controle.
Veiligheid
• Lees voor gebruik zorgvuldig deze gebruiksaanwijzing.
• Geschikt voor buitengebruik.
• De UVC mag uitsluitend worden gebruikt voor het reinigen van de vijverwater, met een maximale
watertemperatuur van 35°C. Nooit gebruiken voor andere vloeistoen of chemische vloeistoen.
• Dit UVC-apparaat produceert schadelijke straling, rechtstreeks contact kan gevaarlijk zijn voor
de ogen en huid.
• Kijk nooit naar een brandende UV-lamp, schakel voor ieder onderhoud en bij openen van het
apparaat, altijd eerst de stroom uit.
• Het apparaat mag alleen aangesloten worden op een elektrische installatie die voldoet aan de
wettelijke normen. Een aardlekschakelaar (30 mA) is vereist. Raadpleeg bij twijfel altijd een
erkend installateur.
• Zorg ervoor dat het voltage op het label overeenkomt met de netspanning.
• Sluit UVC-apparaat uitsluitend aan op een stekkerdoos of stopcontact met randaarde en zorg
ervoor dat er geen water in de buurt van het stopcontact kan komen (afb. A).
• Het UVC-apparaat, elektronisch voorschakelapparaat en de stekker moeten in een droge ruimte,
spatvrij en op minimaal 2 meter afstand van de vijver worden gemonteerd.
• Wees voorzichtig met de combinatie water en elektriciteit, niet bedienen met natte handen of als
de stekker nat is. Het apparaat nooit gebruiken indien er mensen in het water zijn.
• Bij schade aan het apparaat, kwartsglas, snoer of stekker dit apparaat niet meer te gebruiken
maar bij uw dealer aanbieden ter reparatie of recycling.
• Voor het uitvoeren van onderhoudswerkzaamheden, alle apparaten in de vijver uitschakelen en
stekker uit het stopcontact trekken. De lamp is warm, wacht 10 minuten, na uitschakeling.
• Het UVC apparaat mag alleen ingeschakeld zijn als er voldoende waterdoorstroming is.
• Het UVC apparaat kan een maximale druk van 3 bar weerstaan.
• Dit apparaat kan worden gebruikt door kinderen van 8 jaar en ouder en personen met beperkte
fysieke, sensorische of geestelijke beperking, indien zij het product gebruiken onder begeleiding
of instructies hebben gekregen over het veilig gebruik van het apparaat en de gevaren inzien.
Laat kinderen niet met het apparaat spelen. Onderhoud en schoonmaken van het apparaat mag
alleen onder toezicht, door kinderen van 8 jaar en ouder gedaan worden.
Het aarden van het UVC apparaat
• De aardingspin bevindt zich op het kunststof gedeelte van de UVC aan de inlaat kant.
• Aard het UVC apparaat in de volgorde zoals hieronder en op afbeelding B aangegeven.
• Schuif het oog van de aardingskabel (A) over de aardingspin (B) op de behuizing (C).
• Schuif de eerste tandveerring (D) over de aardingspin.
• Draai de moer (E) op de aardingspin.
• Schuif de tweede tandveerring (D) over de aardingspin.
• Klem de trekontlastingsclip (F) om de aardingskabel op ca. 10 cm van het metalen oog (A).
• Schuif het oog van trekontlastingsclip (F) over de aardingspin, zodat de aardingskabel een lus
maakt.
• Draai de borgmoer (G) op de aardingspin en draai deze voorzichtig aan.
10
Page 11

11
Installatie (afbeeldingen C-D-E)
Het apparaat moet in een droge, goed geventileerde ruimte geplaatst worden en niet blootgesteld
aan direct zonlicht. De beste positie is (indien mogelijk) na het lter, houd hierbij rekening met de
bereikbaarheid voor onderhoud.
• Haal voorzichtig de UV-lamp (J) uit de verpakking en steek de lamp in de lamphouder (L).
• Schuif de lamp en lamphouder voorzichtig in het kwartsglas (K). Zorg dat de micro-switch in de
uitsparing zit. De micro-switch is een extra veiligheid die er voor zorgt dat de UV-lamp altijd
automatisch uitgeschakeld is bij demontage (mocht u vergeten zijn het apparaat uit te schakelen).
• Zorg dat de O-ring (M) juist zit.
• Draai de borgmoer (H) handvast op het behuizing.
• Monteer de buisklemmen (N) op de plaats waar het UVC apparaat moet hangen (houd hierbij
rekening met de lengte van de kabels).
• Monteer de elektronische ballast (P) op de gewenste plaats (houd ook hierbij rekening met de
lengte van de kabels).
• Zaag bij het gebruik van vijverslangen of bij gebruik van ø50 mm PVC leidingen, de Multi-step
koppelingen (S) op de juiste maat af (zie afb. C). Gebruik voor ø63 mm PVC leidingen de reeds
gemonteerde koppelingen (T).
• Door de Double Head ingang- en Triple Head uitgang-aansluiting is het UVC apparaat eenvoudig
te installeren (zie afb. D). Monteer de koppelingen met de borgmoeren (R) op de gewenste
aansluitingen en sluit de andere aansluitingen af met de afdekplaten (Q) en borgmoeren. Zorg
dat de O-ringen (M) goed zitten.
• Plaats het apparaat in de buisklemmen (N) en lijm de koppelingen vast tussen de leidingen of sluit
de vijverslangen met slangklemmen aan op de koppelingen.
• Zorg dat er voldoende water door het apparaat stroomt en steek daarna de stekker in het
stopcontact. Door de transparante aansluitkoppelingen (S of T) is te zien of de UV-lamp (J)
brandt. Controleer het geheel ook op eventuele lekkages.
• Schakel het UVC-apparaat uit door de stekker uit het stopcontact te trekken.
Onderhoud
• Neem de stekker uit het stopcontact vóór de uitvoering van onderhoud!
• Het UVC-apparaat moet tweemaal per jaar worden gereinigd. Indien de algengroei toeneemt,
controleer dan de UVC, maak deze schoon en vervang zo nodig de UV-lamp.
• De lamp is warm, wacht 10 minuten na het uitschakelen voordat u het UVC-apparaat opent.
• Zorg ervoor dat het water uit het UVC apparaat kan weglopen.
• Draai de borgmoer (H) los en haal de lamphouder (L) met de UV-lamp (J) en het kwartsglas (K)
voorzichtig uit de behuizing. Indien nodig kunt u nu ook de UV-lamp vervangen.
• Reinig de buitenzijde van het kwartsglas voorzichtig met een zachte doek en SuperFish UVC Clean.
Spoel het kwartsglas na reiniging goed af met schoon leidingwater en controleer op beschadigingen.
• De binnenzijde van de behuizing (C) kan gereinigd worden met een borstel, gebruik hiervoor
absoluut geen chemicaliën.
• Schuif het kwartsglas voorzichtig in de behuizing, aan het andere eind van de behuizing zit een
steun (U), zorg dat de punt van het kwartsglas in de steun zit. Draai eventueel, de borgmoer aan
het andere eind van de behuizing af en geleid met uw vingers het kwartglas in de steun.
• Controleer of de O-ring (M) juist zit.
• Plaats de lamp en lamphouder terug en draai de borgmoer(en) weer handvast aan.
• Voorkom oververhitting, schakel het UVC-apparaat uit wanneer geen water doorstroomt.
• In het winterseizoen, wanneer het systeem niet wordt gebruikt, moet het UVC-apparaat worden
verwijderd om schade door bevriezing te voorkomen.
• Vervang jaarlijks de UV-lamp. De lamp brandt wellicht nog wel, maar geeft niet meer de
juiste hoeveelheid UV-C straling af (maximaal 8000 branduren).
Page 12

12
G
F
D
E
D
A
B
C
Triple
Head
outlet
Double
Head
inlet
ø50 mm
PVC
ø40 mm
Hose
Schlauch
Tuyau
Slang
ø32 mm
Hose
Schlauch
Tuyau
Slang
ø25 mm
Hose
Schlauch
Tuyau
Slang
B
D
A
C
Page 13

133
H
L
M
M
Q
J
K
P
C
N
T
M
R
L
B
Triple Head outlet
ø63
PVC
Hose/Schlauch/Tuyau/Slang
ø25 - ø32- ø40
S
ø50
PVC
U
E
Page 14

14
GB - Important, clean you UVC 2x annually!
Dirt and calcication reduce the UV-light permeability. Descale your quartz glass twice a year, for a smooth, long-term
use. In areas with extremely hard water you may need to descale more often. Technical problems caused by scale are
not under warranty. For cleaning and descaling the quartz glass special SuperFish UVC Clean is available at your dealer.
Cleaning instructions: Disassemble the quartz glass carefully. Mix the cleaning uid in a large bucket with clean
tap water as instructed on the bottle. Submerge the quartz glass and let it stand for 24 hours. Remove the quartz glass
from liquid and rinse with clean tap water and re-assemble all parts.
Never use this product in the pond or allow it to come in direct contact with living organisms. In case of eye contact,
rinse immediately with abundant water and seek medical attention. Keep out of reach of children.
D- Wichtig, reinigen Sie Ihr UVC-Gerät 2 x jährlich!
Schmutz und Kalk im Quarzglas reduzieren die Lichtdurchlässigkeit. Entkalken Sie das
Quarzglas 2 mal jährlich, um eine reibungslose, langfristige Nutzung zu garantieren.
In Gebieten mit sehr hartem Wasser muss öfter gereinigt werden. Technische Probleme
durch Verkalkung fallen nicht unter die Garantie. Für die Reinigung und Entkalkung
Ihres Quarzglases ist der spezielle SuperFish UVC-Reiniger im Fachhandel erhältlich.
Reinigungshinweise: Demontieren Sie vorsichtig das Quarzglas. Den Reiniger in
einem großen Eimer mit sauberem Leitungswasser mischen, wie auf der Flasche
angegeben. Tauchen Sie das Quarzglas in diese Lösung und lassen Sie sie 24 Stunden
stehen. Nehmen Sie das Quarzglas aus der Flüssigkeit heraus und spülen Sie sofort
alles mit sauberem Leitungswasser ab und bauen Sie alles wieder zusammen.
Nie im Teich oder in der Nähe von lebende Organismen verwenden! Bei Kontakt mit
den Augen sofort mit reichlich Wasser spülen und einer Arzt aufsuchen, unzugänglich
für Kinder aufbewahren.
F - Important, Nettoyez votre UVC au moins 2 fois par an !
La saleté et le calcaire réduisent la performance de l’UV. Enlever le calcaire deux fois
par an pour augmenter sa durée de vie. Dans les régions ou l’eau est dure (calcaire) ce
nettoyage doit se faire plus régulièrement. Les dégâts causés par le Calcaire ne sont
pas sous garantis. An de nettoyer ou enlever le calcaire de votre tube quartz utilisez
SuperFish UVC Clean disponible dans votre magasin.
Utilisation : Démonter soigneusement le tube quartz. Mélangez notre anti-calcaire
UVC Clean avec de l’eau du robinet (dosage noté sur la bouteille) trempez le tube
quartz 24h. Retirez le tube quartz et rincez-le avec de l’eau propre et remontez l’ensemble.
Ne jamais utiliser dans le bassin ou en contact direct avec les organismes vivants!
En cas de contact avec les yeux, rincer à l’eau immédiatement et abondamment et
solliciter l’avis de médecins spécialisés. Tenir hors de portée des enfants
NL - Belangrijk, maak 2 keer per jaar uw UVC-unit schoon!
Vuil en kalkaanslag op het kwartsglas verminderen de doorlaatbaarheid van UV-licht. Ontkalk daarom 2 keer per jaar
het kwartsglas voor een probleemloos, langdurig gebruik. In gebieden met zeer hard water kan vaker schoonmaken
nodig zijn. Technische problemen door kalkaanslag vallen niet onder de garantie. Voor het schoonmaken en ontkalken
van uw kwartsglas is speciale SuperFish UVC Clean verkrijgbaar bij uw dealer.
Schoonmaakaanwijzingen: Demonteer voorzichtig het kwartsglas. Mix de schoonmaakvloeistof in een grote
emmer met schoon leidingwater volgens de gebruiksaanwijzing op de es. Dompel het kwartsglas onder en laat deze
24 uur staan. Verwijder het kwartsglas uit de vloeistof, spoel het af met schoon leiding water en alles weer monteren.
Nooit in de vijver of in direct contact met levende organismen gebruiken! Bij aanraking met de ogen, onmiddellijk met
overvloedig water afspoelen en deskundig medisch advies inwinnen. Buiten bereik van kinderen bewaren.
Page 15

15
GB - Warranty conditions
This warranty is valid for 2 year on materials and incorrect construction. Only units
with a fully lled in warranty slip and ocial till receipt showing date of purchase
will be considered. You must supply the entire unit with accessories in the event of a
warranty claim. We will inform you on receipt whether the unit will be repaired or
replaced. We accept no responsibility for damage as a result of incorrect use of the
unit. Please read the instructions on safety, usage and maintenance carefully.
Damage of cable or other parts due to dirt and/or wrong usage is not covered by this
warranty.
D - Garantiebedingungen
2 Jahre Werksgarantie auf Material- und Montage fehler. Nur Geräte mit vollständig
ausgefülltem Garantieschein und Kaufbeleg mit Kaufdatum fallen unter die
Garantie. Das Gerät ist jeweils komplett mit Zubehör einzureichen. Wir entscheiden
bei Erhalt, ob das Gerät repariert oder ausgetauscht wird. Wir haften nicht für
Schäden infolge des unsachgemäßen Einsatzes des Geräts.
Bitte lesen Sie die Hinweise zu Sicherheit, Gebrauch und Wartung sorgfältig.
Beschädigungen des Kabels oder anderer Teile durch Schmutz und/oder durch
eigenes Verschulden sind von der Garantie ausgeschlossen.
F - Conditions de garantie
2 ans de garantie d’usine sur les vices de matériau et de fabrication. Seuls les
appareils accompagnés d’un certicat de garantie dûment rempli et d’un bon de
caisse ociel avec la date d’achat entrent en ligne de compte pour la garantie. Vous
devez toujours présenter l’appareil complet avec tous les accessoires à la garantie.
Lors de la réception et de l’expertise, nous déterminons si l’appareil doit être réparé
ou remplacé. Nous rejetons toute responsabilité pour tout dommage consécutif à
l’utilisation ou à l’utilisation erronée de l’appareil.
Veuillez lire soigneusement les instructions de sécurité, l’utilisation et l’entretien.
Les bris de pièces, câble endommagé, prise coupée, le manque de nettoyage et / ou
de la mauvaise utilisation ne tombent pas sous le coup de la garantie.
NL - Garantievoorwaarden
2 jaar fabrieksgarantie op materiaal en montage fouten. Alleen apparaten met een
volledig ingevuld garantie bewijs en een ociële kassabon met aankoopdatum
komen voor garantie in aanmerking. U dient het apparaat altijd volledig met alle
toebehoren voor garantie aan te bieden. Wij bepalen bij ontvangst of het apparaat
wordt gerepareerd of vernieuwd. Wij aanvaarden geen aansprakelijkheid voor
schade als gevolg van gebruik of door verkeerd gebruik van het apparaat.
Lees de instructies over installatie, gebruik en onderhoud goed. Schade aan de kabel
of andere onderdelen als gevolg van vuil en/of verkeerd gebruik, valt niet onder de
garantie.
Page 16

www.aquadistri.com Vlietweg 8, NL-4791 EZ Klundert The Netherlands, info@aquadistri.com
Date of purchase/Kaufdatum/Date d’achat/ Aankoopdatum: _____-_____-_____
Dealer stamp/Händlerstempel/Sceau du poit de vente/Dealerstempel
MH
GB - Recycle information
The symbol of the barred bin printed on the product means that it must be collected
separately from other rubbish when it will not be anymore in use. The user, at the end of
the life of the product, will have to bring it to a proper rubbish collection centre for
electric and electrical devices. Alternatively he can return the used product to the seller
at the moment he buys a new unit, but only in proportion 1 to 1. A dierentiated refuse
collection is environmentally friendly and it helps the recycling of the materials, any
other collection procedure is unlawful and will be subject to the law in force.
D - Recycling-Information
Das Kennzeichen auf der Verpackung bedeutet, dass es getrennt von normalem Müll
gesammelt werden muss, wenn das Gerät nicht mehr nutzbar ist. Wenn das Produkt
kaputt ist, soll der Besitzer es zu einem Sammelpunkt für elektrische Haushaltgeräte
bringen. Oder wenn der Besitzer ein neues Gerät kaufen möchte, kann das Altgerät
beim Verkäufer hinterlassen werden; nur 1 zu 1 austauschbar. Getrenntes Sammeln ist
umweltfreundlich und hilft, alte Materialien neu nutzbar zu machen. Jede andere/
sonstige Weise der Verwertung ist nicht Rechtes.
F - Information de recyclage
Le symbole de la poubelle barrée indique que l’appareil doit être recyclé. L’utilisateur, à
la n du vie de l’appareil, doit le ramener à son revendeur qui doit lui le remettre à une
centre de recyclage des appareils électrique. Le recyclage est obligatoire et important
pour l’environnement, ne pas recycler peut être puni par la loi.
NL - Recycling informatie
Het symbool van de afvalbak geeft aan dat het product (als het niet meer wordt
gebruikt) niet in de afvalbak mag. Maar dat het op de speciaal hiervoor ingerichte
milieustraat/containerpark moet worden aangeboden voor recycling. Ook kunt u het
product, op het moment dat u een soortgelijk product koopt, achterlaten bij het
verkooppunt. Dit mag alleen op basis van 1 op 1. Door recycling kunnen grondstoen
weer opnieuw gebruikt worden, dit zorgt voor minder afval en is goed voor het milieu.
Elke andere manier van afvalver werking m.b.t. dit product is strafbaar.
 Loading...