

Page 1
Super Feeder® Manual
Although these installation instructions are for the CSF-3 cat feeder, basic operation is the same for all Super
Feeders. Download a pdf version of the current manual at www.Super-Feeder.com. We strongly suggest watching
our video which will be extremely helpful for assembly and operation of the Super Feeder on our website:
http://www.super-feeder.com/video.html.
Table of Contents
Parts and Hardware ............................................ 2
Installation and Setup ....................................... 3
Stand Assembly Instructions ...........................6
General Information .......................................... 7
Troubleshooting ................................................. 8
Warranty Information .....................................10
Email: info@super-feed.com
www.Super-Feeder.com
Find us on Facebook.
Revised August 7, 2013
Page 2
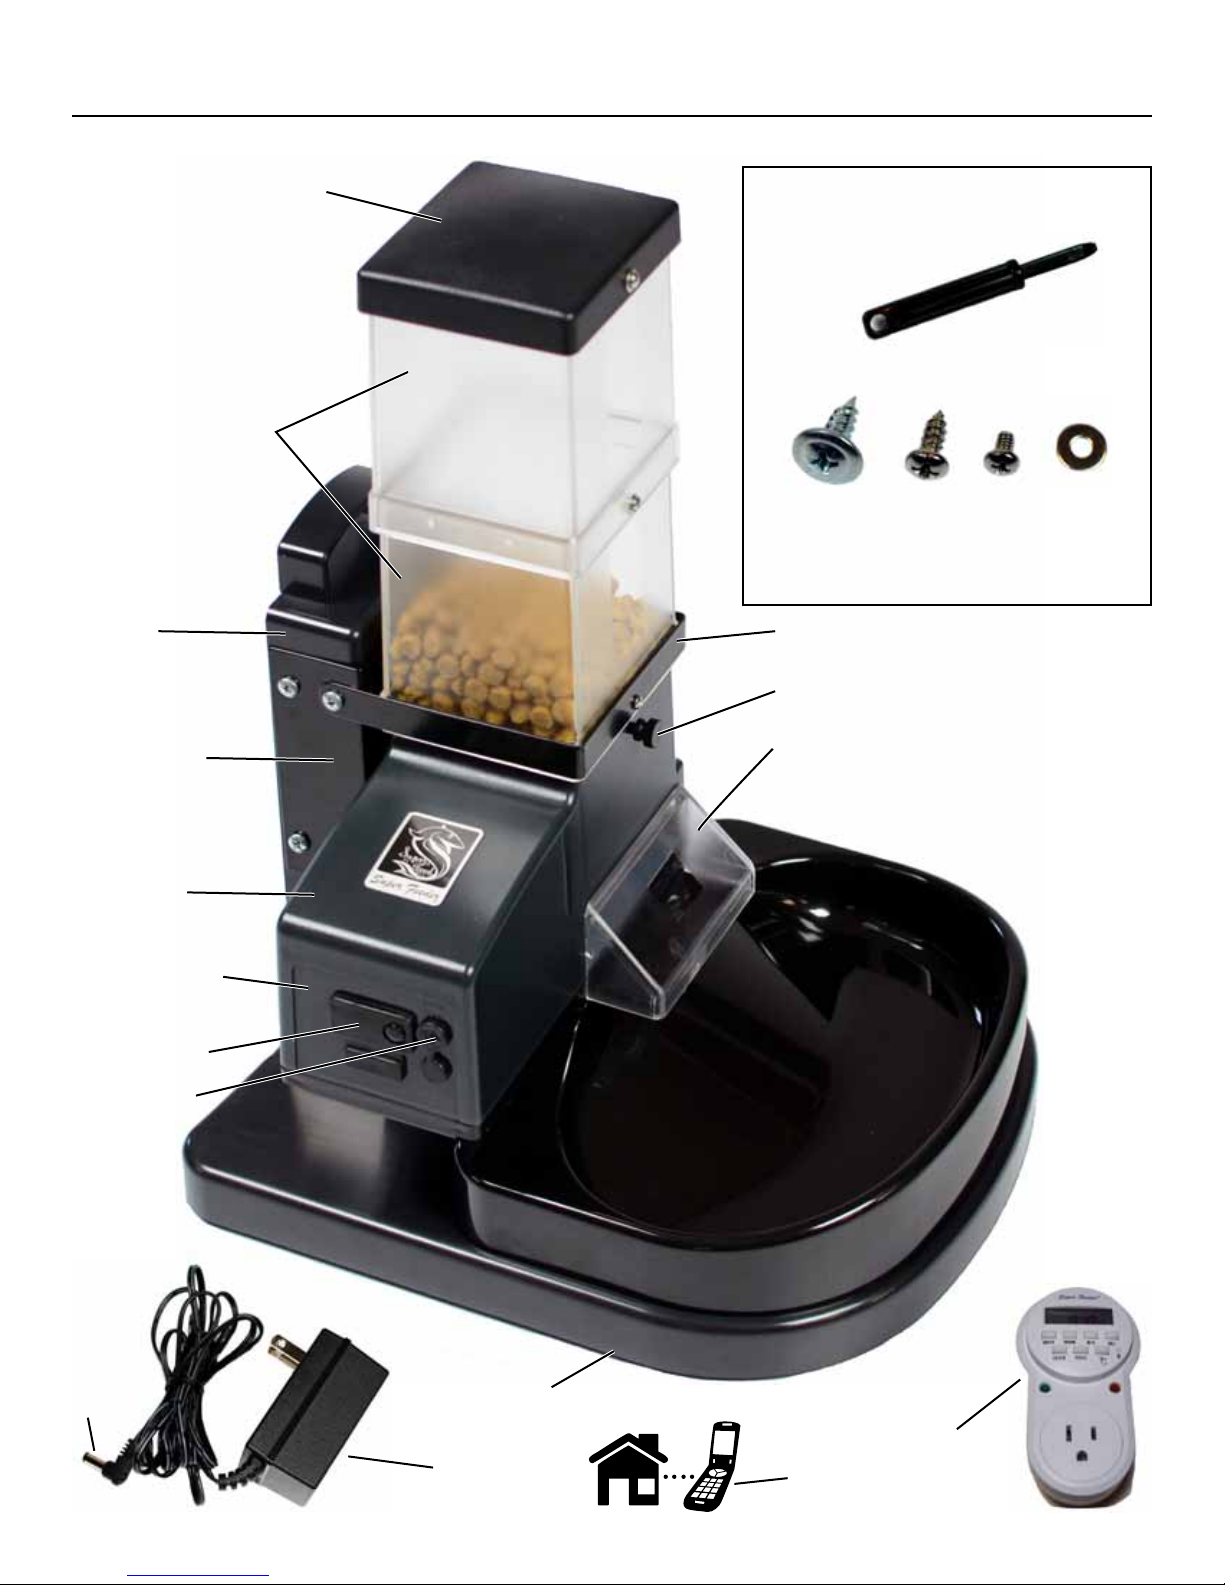
Super Feeder Parts and Hardware
Lid - ts feeder, clear
extensions and large
1.5 gallon (24-cup) black
hopper with CSF-3XL
Two 2-cup clear
extensions supplied
with basic feeder
Tower
“L” Bracket
Feeder hardware bag contents (not for
stand and bowl assembly):
{shipped inside the feeder,
open lid to nd bag}
Small adjustment screwdriver
A B C D
A - (Qty 4) - large 1/2" long head screws only
used for mounting feeder to wood mount
B - (Qty 4) - Small 3/8" long head screws
C - (Qty 6) - 4-40 3/16" long small screws
D - (Qty 5) - metal washers
Metal retaining strap
Food “volume” screw
Optional chute cover protective
device. Note: Does not snap in or out
(see instructions if ordered separately
and not factory installed)
Housing
Super Feeder
Control Panel
Rubber Plug
Feeder Jack
9-24 Volts
AC or DC
Power
Adapter
Plug
Page 2
Optional base/
mount and bowl
Power Adapter
(style may vary)
Timer of choice to
trigger feed cycle
or
Home Automation
System
Page 3
Super Feeder Installation
Please view our video which will be extremely helpful
for assembly and operation of the Super Feeder (http://
www.super-feeder.com/video.html).
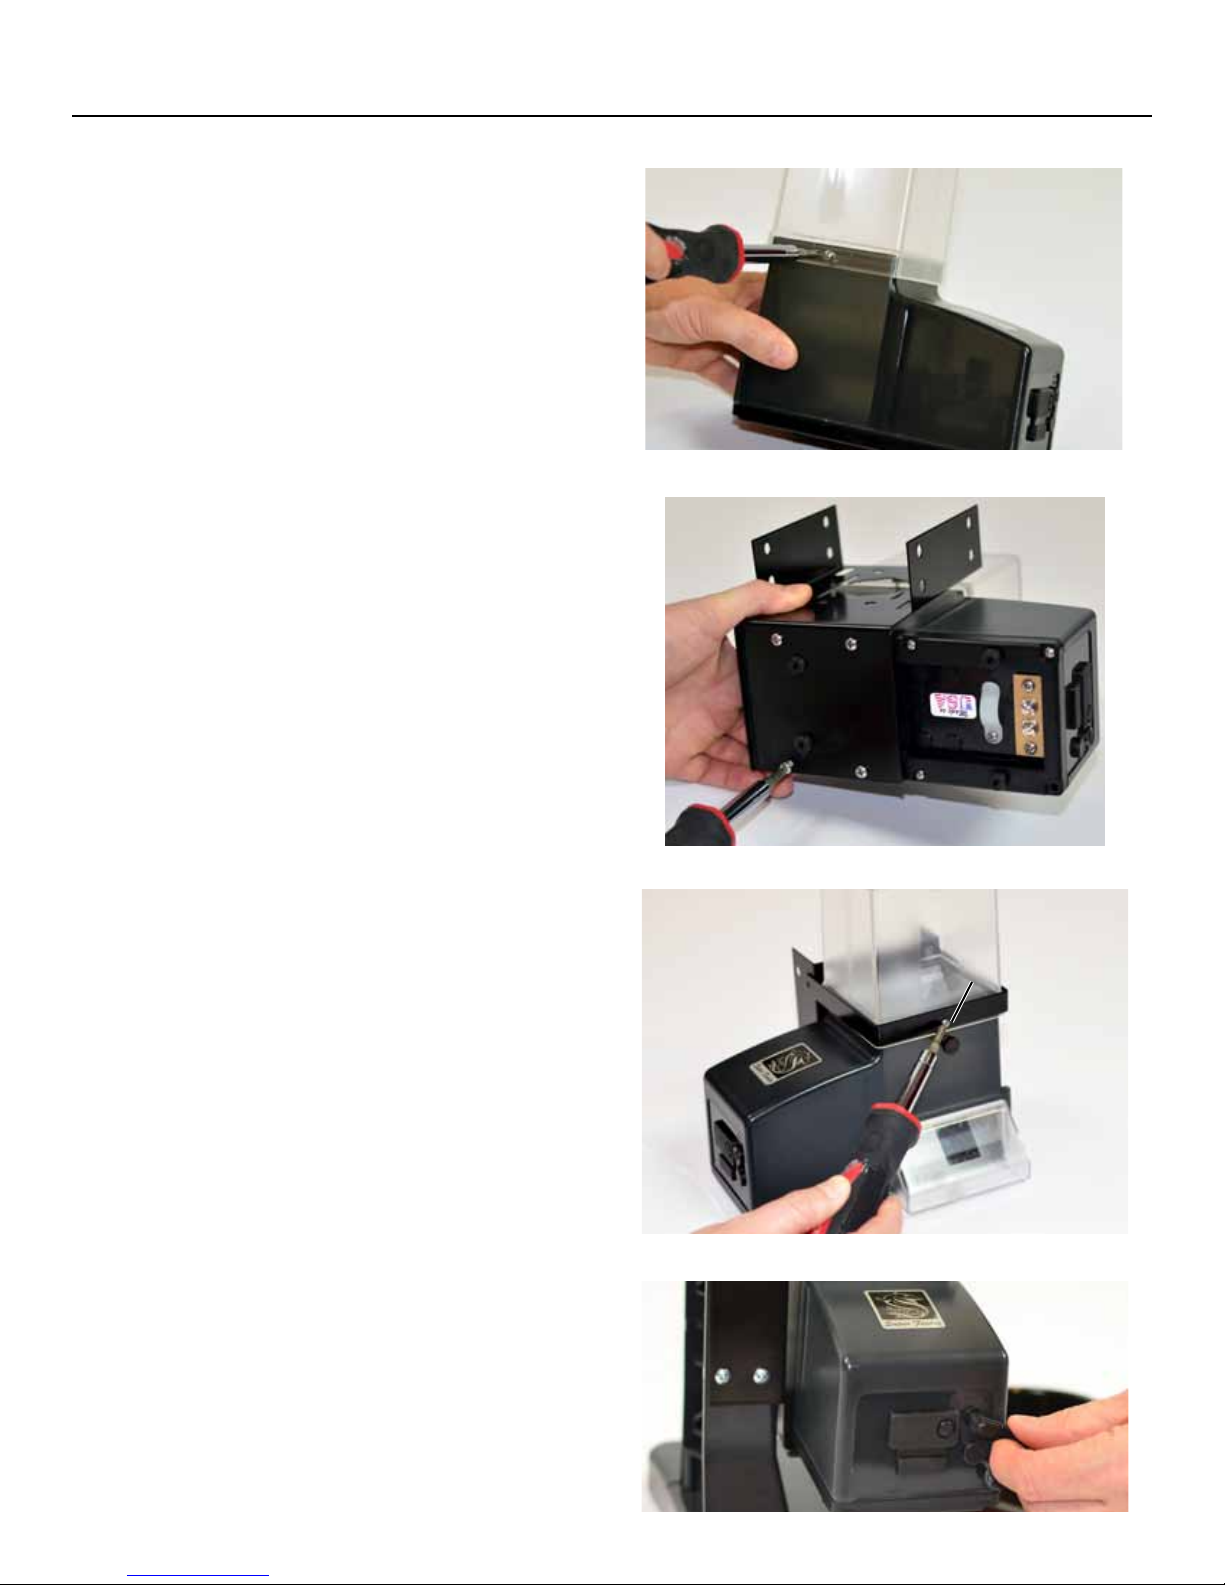
STEP 1
Install one clear extension on feeder and secure it with
one small 3/16" screw and washer on back side only,
opposite side of chute opening. All screws and washers
can be found in the feeder hardware bag. (See Fig. 1).
Note: Make absolutely sure the extensions and/or
hopper are rmly pressed together and each little screw
will protrude into the other part’s recessed half-moon
slot when screwed in.
STEP 2
Install the “L” bracket with four 3/8" long screws located
in feeder hardware bag (see Fig. 2).
STEP 3
Install metal retaining strap with one small 3/16" screw
and no washer on front side. Make sure the hole of the
metal strap is closest to the bottom of the strap. (See
Fig. 3)
Fig. 1
Fig. 2
STEP 4
Install “L” bracket and metal retaining strap to the
stand as directed by Super Feeder stand assembly
instructions, see page 6. For other stand mount of your
own, see page 5.
STEP 5
Plug power adapter plug into feeder jack. (See Fig. 4)
Plug power adapter directly into wall outlet, and feeder
should “dry” run for one cycle along with a steady
“power-on” green or blue light in housing (depending
on model).
STEP 6
Adjust black food “volume” screw so opening between
roller and gate is about the size of food, but so it does
not drop straight through. Turn food “volume” screw
clockwise to close gate more or counter-clockwise to
open gate more. (See Fig. 5)
Caution! Make sure volume screw is securely inserted
in housing at all times. If gate is fully opened, at rst sign
that the gate no longer moves back, then the screw no
longer serves its purpose. Remove it from the housing
Fig. 3
Hole toward bottom
Fig. 4
Page 3
Page 4

Super Feeder Installation, cont.
for safety since it may be loose. Small loose parts may
present a hazard for children and pets.
STEP 7
If you did not purchase the 1.5 gallon hopper, install
the second clear extension onto the rst extension and
nish lling your feeder with dry food. Some pieces may
initially fall through, but this is normal. en install the
lid. You may not need to install lid screws for indoor use.
If you do use screws, you do not need to take them out to
take o the lid. Simply squeeze front and back of upper
extension to remove lid.
If included, install the 1.5 gallon hopper on top of one
clear extension (only one recommended with large
hopper) of two supplied with basic feeder, securing it
with one small 3/16" screw and metal washer on each
side. Instructions are included with the large hopper.
(See Fig. 6)
STEP 8 - Feed cycle duration calibration
Open rubber plug to expose feed cycle duration control
and push reset button momentarily to activate feeder
(see Fig. 7). Activate a cycle a few times to settle the food
before ne tuning the feed cycle.
Fig. 5
Top view
Slide
Fig. 6
Screw holes
have no threads.
The screw will
create their own
threads.
Fig. 7
Roller
Volume gate
Optional Hopper
4-40 3/16" screw
& washer on
both sides
If not enough food was dispensed, with small adjustment
screwdriver, turn brass dial screw clockwise, then push
reset button again and note amount of food dispensed.
If too much food came out, turn brass dial screw
counter-clockwise. Approximately 1/4 turn will increase
or decrease the food cycle by 1 second. 10 full clockwise
turns will be the max cycle time available. (See Fig. 8)
If still not enough food is dispensed at maximum time
setting, turn the volume screw counter-clockwise and
try again. If still not enough, program extra feed cycles
with remote timer (timer of choice).
Note: e amount of food dispensed is determined
by the feeder’s adjustable feed cycle not by the remote
timer. When your timer of choice turns on at the
desired time, the feeder will only run the calibrated feed
cycle duration that your previously set. You must have
a minimum o-time (blue power light o or green
depending on model) of approx. 1-2 minutes on your
Fig. 8
Page 4
Page 5

Super Feeder Installation, cont.
timer or home automation system to reset the feeder
for the next feed cycle.
Note: When the rubber plug is closed, push the right
side labeled “push” for additional feed cycles while the
feeder is powered (no need to open rubber plug). (See
Fig. 9)
STEP 9
Aer installation is complete, see timer programming
sheet for your specic purchased timer. Any other timer
of your own can be used and programmed similarly.
Basically, the number of on-o cycles your timer has is
the number of feed cycles available.
Fig. 9
With wood stand or other mounts
For mounting the Super Feeder to a wood stand, use 2
large 1/2" head screws on each side (see Fig. 10).
For mounting to a pole, bend the mounting ears on
the “L” bracket out (see Fig. 11 and 12). ese ears
accommodate 3/4" to 2" diameter pipes. You will need
to supply you own hardware screws to mount the metal
retaining strap.
Fig. 10
Fig. 11
Mounting Ears
Fig. 12
Cable ties
Page 5
Page 6

Cat/Small Animal Stand Assembly Instructions
Assembly Parts
1 - Tower
4 - Large Head Screws
1 - Base
Step 1: Attach 4 rubber feet in designated areas.
8 - Small Black
Head Screws
4 - Rubber Feet
Available separately or with combos
Note: Hardware bag shipped on back of tower
Bowl Placement
A: Gently squeeze the top
portion of the feeder and
tower so that the feeder will
raise slightly.
B: Slide the
top bowl tabs
between and
under the
bracket.
Step 2: Use the 4 large head screws to attach the tower
to the base from the bottom.
Recommended placement of feeder is on hard surface
backed up to wall or next to walls in a corner.
Step 3: Attach feeder, bracket and strap assembly to
tower with 8 Small black head screws (4 on each side).
C: Slide the
bowl up against
the two back
tabs that are on
the stand.
D: Press down on
the bowl to press
t the two front
tabs on the stand
with the pins on
the front bottom
of the bowl.
Page 6
Page 7

General Information
Terminal strip underneath feeder may be used instead
of plug for direct bare wire hook-up to keep your pet
away from power adapter plug/wire. (See Fig. 13)
e Super Feeder is only approved for 9 to 24 volt AC
or DC. Any other power adapter with that voltage
range can be used. DO NOT power with higher voltage
because you will void the warranty.
You should place your Super Feeder so that its power
adapter and timer will be within reach of a suitable
power outlet and not easily accessible to your pet. If
you think that your pet may be capable of pulling the
cord’s plug out of the feeder’s jack, be sure to loop the
wire around and under the end of the feeder through
the plastic cable clamp located underneath the feeder.
(See Fig. 13)
If your pet is prone to chewing on the wire, or the feeder
is installed outdoors, you should use larger wire slipped
through 1⁄2" vinyl tubing or other protective device
(available at most lumber stores or purchased from
Super Feed) from the power adapter to the auxiliary
input power strip screws located underneath the feeder.
with gear box and electronics board all in one piece.
You can then submerge the whole upper housing in
soapy water for a while and ush it out under a faucet.
oroughly dry it and re-assemble the base while
holding the feeder upside down, making sure that the
slide shaker loop wire is resting against the bottom of
the slide so the slide will shake.
e shaking action of the distribution slide is primarily
designed to help expel food and prevent clogging. It
is also used to alert your pet at meal time like a slot
machine. If you want a quieter operation, you can
disable that feature as follows: Facing the chute outlet,
li slide, and using a thin small object, ip the trip-wire
loop underneath the slide forward and down (toward
you) and away from the bottom of the slide.
Note: You should not disable shaking action if using a
chute cover! Use the smallest food possible with the chute
cover. 1/4" round pellets are perfect and recommended!
Fig. 13
If planning on using the feeder outside, be sure to
keep the power adapter indoors or well sheltered and
to follow the remote timer manufacturer’s instructions
and recommendations. If you cannot keep the supplied
indoor power adapter and/or timer out of the weather,
outdoor power adapters and timers are also available
from us.
Cleaning information
It is highly recommended that you periodically
inspect and remove excess food residue that may have
accumulated on the slide at the chute’s outlet. Never use
sharp objects to clean parts of your feeder, especially the
special stick resistant and exible polypropylene slide.
A so dampened cloth works best to wipe o excess
food residue.
For a thorough cleaning of your Super Feeder, you may
clean the interior of your feeder by brushing the roller
with a tooth brush and wiping the inside parts with a
damp cloth. You may also remove the six small screws
retaining the base of the feeder. e base will come out
Wire clamp
Aux input/output
terminal strip
9-24 volts AC or DC
Page 7
Page 8

Troubleshooting
Problems with the assembly?
Unit does NOT run, does NOT run properly,
or does not trigger at programmed remote
timer time or when timer is manually
switched “OFF” and back “ON” again.
Some Super Feeders may have two internal
lights: One power light is blue instead of
green when feeder is powered, and a green
light, which will only be on while motor is
running. Also, the original feed adjustment
dial has been replaced by a multi-turn slotted
sha screw- type portion controller for ner
tuning of feed cycle time.
Use supplied plastic screwdriver to turn
dial or portion controller sha. Slotted sha
portion controller timing change:1 full turn =
4 seconds----1/4 turn = 1 second
Please view our video which will be extremely helpful for
assembly and operation of the Super Feeder (www.SuperFeeder.com/videos).
1. Conrm power light (steady green or blue depending on
model) illuminates when you plug the power adapter directly
into an outlet. If light not on, power adapter could be defective.
Also check for proper electrical connections. Try switching
wire connections under the feeder if using that alternate input
(terminal strip). If still not on, call or send an e-mail to possibly
return unit for service.
2. If power light is on, push reset switch and conrm that motor
runs. With power o, push reset switch for 5 seconds, then plug
power adapter directly into an outlet without timer. If it does
not run, contact us. If it runs, check timer for proper operation/
setting/programming.
3. Reset “o ” time not long enough (most common!). Make sure
feeder is at least o for a minimum of 1-2 minutes between feed
cycles to reset itself. If testing the feeder repeatedly, manually
void required “o” reset time between test cycles by pushing
the reset switch for 5 seconds with no power going to the feeder.
4. Feeder triggers/runs for just a split second. Make sure
feed cycle time duration adjustment is not turned all the way
down (very important). Turn dial or portion controller’s sha
clockwise as needed.
Unit runs but does not expel food properly.
Page 8
1. Clear extension and or large 1.5 gal. hopper low/empty. Fill.
2. Food packed. Loosen food. Do not stu kibbles in feeder.
3. Food too large. Crush or replace food with smaller size.
4. Feed time duration adjustment incorrect. Using supplied
small plastic screwdriver, turn portion controller’s dial or slotted
sha to the le or right in ne increments to achieve correct
timing for desired portion size.
5. Gate to roller gap too small. Rotate large black nylon screw
counterclockwise located above chute.
6. Slide does not shake. Check for proper shaking action (very
important). See page 7 of Super Feeder manual.
7. Cat food: If using chute cover on cat feeder, make sure
kibbles are not hung up inside feeder at chute opening. Clear
area and consider using smaller food (1/4" spherical kibbles
recommended). If the feeder is allowed to run that way for a
long time, the teeth on the roller will wear o prematurely.
8. Distribution roller surface worn out (all the small teeth
sheared o). Return for service or order new roller.
Page 9

Troubleshooting, cont.
Unit Expels too much food?
Animals chew on feeder wires
Food comes out but portions not accurate
enough (CSF-3 model)
1. Feeding time too long. Using the supplied small plastic
screwdriver, turn portion controller’s dial or slotted sha to
the le in ne increments to achieve correct timing for desired
portion size.
2. Gate opening too wide. Reduce gate to roller gap by turning
large black screw above chute opening clockwise.
Wires too exposed. Protect wires using exible vinyl tubing
or wire protective material found at Home Depot or Lowe’s or
oce supply place. Hide wires as much as possible. We also have
a wire protective Flex Guard available online.
Food type will dramatically aect portion accuracy with at
and/or large kibbles in any feeder. Best performance has been
shown using 1/4" diameter pellets from Science Diet Brand
or other uniformly shaped kibbles. You may ask about a slowdrive replacement power adapter for very small portions if the
distribution roller spins too quickly.
Pet knocks food out of feeder easily
Feeder very noisy
Hopper extensions loosened by pet or wild
animals if used outdoors
Install chute cover and/or tighten gate with black screw.Pet lis slide to get food out
Tighten/close gate with large black screw (more friction), mount
feeder bracket to wall or other item like play stand (mount
feeder either low on bowl or high up out of pet reach), or if
using plastic feeder mount, fasten base to larger plywood piece
that pets will stand on when eating.
Check for stuck kibbles between distribution slide and chute
opening and/or roller. You may also disable slide shaking
mechanism (check manual for directions)--not recommended
with pellets/kibbles larger than 1/4" thick by 3/8" long.
Make sure existing screws protrude into half-moon recesses of
inner extension or feeder. Use extra strap or wire at upper part
of upper extension (not Super Feeder Stand) and/or carefully
drill and install longer screws all the way through extensions,
or glue extensions with silicone sealant. Securely attach feeder!
For more up to date info, go to www.super-feeder.com/troubleshooting
Page 9
Page 10

Warranty Information
WARRANTY STATEMENT
We, at Super-Feed Enterprise, warrant our Super Feeders to be free from defects in material and workmanship for a period of 1 YEAR from the original
date of purchase by the original owner/purchaser. On claims submitted as outlined above, we will repair, or at our discretion replace without charge
any Super Feeder that has failed through defect in material and/or workmanship (timers and power adapters shall only be warranted for a period of 90
days from date of purchase). Any external timer can be used. Warranty does not cover any Super Feeder® or accessory if it is being or has been used for
any purpose other than its obvious original intent, has been damaged, altered, installed and/or operated contrary to instructions. We assume no other
liabilities or responsibilities other than listed herein. Missing/damaged parts must be reported within 14 days of purchase to qualify for replacements,
adjustments or refunds.
WARRANTY AND REPAIR PROCEDURES
We, at Super-Feed Enterprise, are dedicated to providing you with the ultimate automatic feeder and the quality support necessary to assure your utmost
satisfaction. For warranty repair, ship your product to us postage prepaid. You will be responsible for any damage incurred while in transit. We'll pay
for the return shipping back to you via 3-5 Day "Ground" shipping. If you desire any other mode of shipment, Express Mail as an example, you will
be responsible for the dierence in cost. Please include a brief statement regarding the problem along with your original purchase receipt, your name,
address and phone number for contact. You may also submit your E-mail address for easy correspondence. For non-warranty items, you will be charged
for repairs and shipping. You may obtain a quote from us before sending your product for repair. Payment for repairs must be via PayPal or Credit card.
Ship To: Super-Feed Enterprise, 9708 County Road 529a, Burleson, TX 76028 Ph: 682-710-7367
RETURN/REFUND POLICY
VERY IMPORTANT INFORMATION! Due to suspected exploitation of our past generous feeder return policy by some individuals without valid
claims, we will no longer accept ANY returns for refund if any Super Feeder and/or accessories ARE NOT IN THEIR ORIGINAL NEW-IN-THE-BOX
CONDITION." If you believe that the feeder will not work out for you when received, do not use it if you wish to return it for a refund of the feeder
price. If you are not sure that your food will work, ask us or send us a sample, and we will be more than happy to test it for you before you buy. We are
always ready to assist you with any issues you may have, but we must know about them rst. Other than a possible unfortunate and rare malfunction,
we know without a doubt that our product works exactly as disclosed, as well proven by thousands of past customers for the past 17 years. If your Super
Feeder® has been purchased from a source other than directly from us, you should contact the seller for return/refund policy. If purchased directly from
us or from our Amazon store, you may only be refunded not to include shipping and handling and also subject to limitations listed herein. You MUST
contact us for a possible return authorization number (RMA) and state reason for return and our inability to resolve your issues relating to the feeder.
For a full refund of the feeder price, product must be returned to us in its original packaging and new/unused condition (without damage or missing
parts) within 30 days of purchase. Any damaged items, if applicable, will also be assessed and deducted from the product price for refund. Absolutely
no refund for any item received by us past 30 days from date of purchase. Used or not, we will of course repair/replace items under disclosed warranty
terms as deemed necessary. If returned to us contrary to conditions listed herein and without our prior permission, the items will be returned to you.
With prior authorization, return to: Super-Feed Enterprise, 9708 CR 529A, Burleson TX 76028 (write authorization number on corner of shipping box)
Non-exchanged return of any unused dc or ac timer (low voltage dc/ac timer) will be assessed a re-stocking fee of $20.00 per timer if returned for
refund request
For assistance with return authorization, warranty and/or repair, call or fax: (682)710-7367 or e-mail info@super-feed.com Websites: http://www.superfeed.com or http://www.super-feeder.com
Cat Feeder: e Super Feeder® performance has been very well proven over many years of dependable service, and its performance has never been in
doubt when operated as recommended. If portion accuracy is extremely important to you, we recommend round (spherical) or slightly barrel shaped
¼" diameter kibbles as oered by Science Diet® brand or other common brands. e Super Feeder will not “count” kibbles. Our tests have shown that
an accuracy of +/- .1 to .2 ounce (weight) per portion can be achieved for every two cycles with recommended kibbles. Most cat food kibbles will work
very well by testing rst if portion accuracy is not of most importance. Flat and oddly shaped kibbles will never perform like recommended kibbles.
If you feel that you either cannot or would not be willing to switch to recommended kibble type if needed to achieve best portion accuracy, you
should not purchase the feeder. Performance is guaranteed as described with recommended kibbles! Our feeders were never intended for large
pets requiring large food, which we do not recommend. Please thoroughly review each product’s description and limitations before ordering. is
notice rescinds any other preceding return policies whether posted in the feeder’s manual or other locations. We cannot take responsibility for any
possible unusual pet's negative reaction to the feeder and/or uncanny and destructive nature of some pets or other animals, indoors or outdoors
for which we have no control and which do not constitute a valid reason for return. All feeders of this type emit some noise because of hard kibbles
being extracted from the feeder and falling into a bowl. If you must have a totally quiet feeder, you may consider not purchasing this feeder because you
will not be able to return it for that reason if you have used it. Like most feeders, if any possible noise is an issue, you should isolate it in a suitable place.
SAFETY REMINDER
All Super Feeders have been thoroughly tested and found to be extremely dependable in assisting in the feeding and care of your pets with timely meals;
however, as with any machine, the Super Feeder® should be monitored at regular intervals for proper operation. If you anticipate being away for an
extended period of time where a lack of food could cause harm or even death to your pet (s), you MUST make arrangements with someone to inspect
your feeder at regular intervals. Small loose parts may present a hazard for children and pets.
Terms are subject to change without notice. You may contact us rst for any possible updates/changes made to policy.
Page 10
 Loading...