

Page 1

WIRELESS REVERSE VIDEO SYSTEM
#99-521
BEFORE YOU INSTALL
If your wireless reverse video system contains a damaged or missing item,
does not perform as specified or requires warranty service, DO NOT
RETURN THIS PRODUCT TO THE STORE, PLEASE CALL OUR
TOLL FREE HELP LINE 1-800-268-3319 and our in-house technical
service team will help you.
Automotive video equipment installations can be difficult at times, even to
the most experienced of installation technicians. If you are not confident
working with electrical wiring, removing and reinstalling interior panels,
carpeting, dashboards or other components of your vehicle, DO NOT
RETURN THIS PRODUCT TO THE STORE, PLEASE CALL OUR
TOLL FREE HELP LINE 1-800-268-3319 and our in-house technical
service team will answer your installation questions.
If you have vehicle specific questions, contact the vehicle’s manufacturer, or consider
having the WIRELESS REVERSE VIDEO SYSTEM professionally installed.
WARNING: This device, as well as other wireless devices, may be subject to
interference. Interference may be caused by cell phones, Bluetooth headsets, WiFi
routers, power lines and other various electrical equipment, etc.
Make sure the parking brake is applied before installing your WIRELESS REVERSE
VIDEO SYSTEM.
PARTS LIST
1 - Back UP Camera
1 - 3” TFT LCD Monitor
1 - Monitor power cable with 12 Volt Adaptor
2 – License plate bolts
2 - Nuts
4 – Flat Washers
2 – Lock Washers
Page 2
2 – Wiring harness
1 – Test Light
2 – Quick Splices
INSTALLATION
The following instructions may not apply to all vehicles. It is meant to serve as a general
guide for installation. For questions regarding specific vehicle, contact your vehicle’s
manufacturer.
CAMERA INSTALLATION
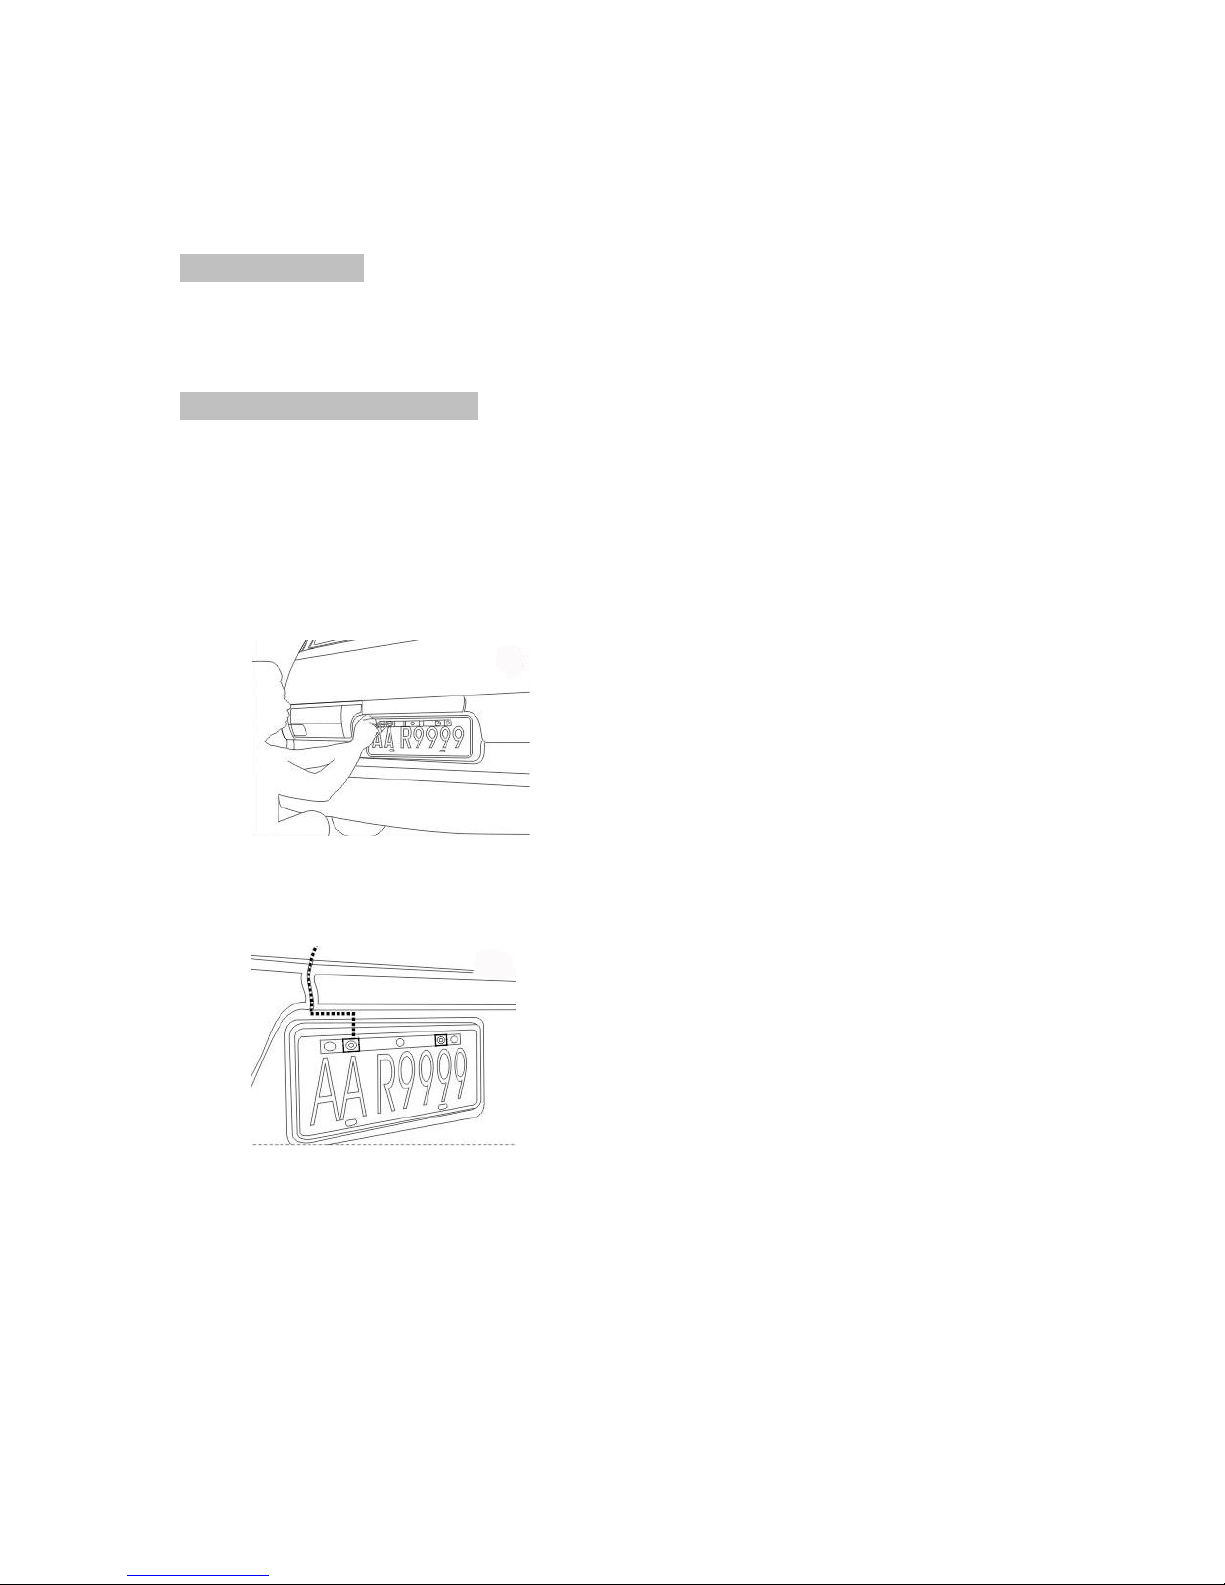
You may mount the camera using the license plate’s top or bottom mounting bolts or
screws, make sure that its field of view is not obstructed. You may mount the camera on
the top or bottom of the license plate.
1. Remove two rear license plate bolts/screws from the license plate bracket
2. Re-insert the bolts/screws through the camera’s mounting holes onto the license
plate bracket.
3. Find an access hole to the interior of vehicle, then route the camera’s power cord
to the reverse light. You may have to remove some of the interior trim panels.
4. With the parking brake applied, turn the ignition key to the ON position without
starting the vehicle and shift in to reverse gear, the reverse WARNING lights
should come on at the back of the vehicle. (You may need to apply the brake
pedal in order to shift in to reverse gear)
Page 3
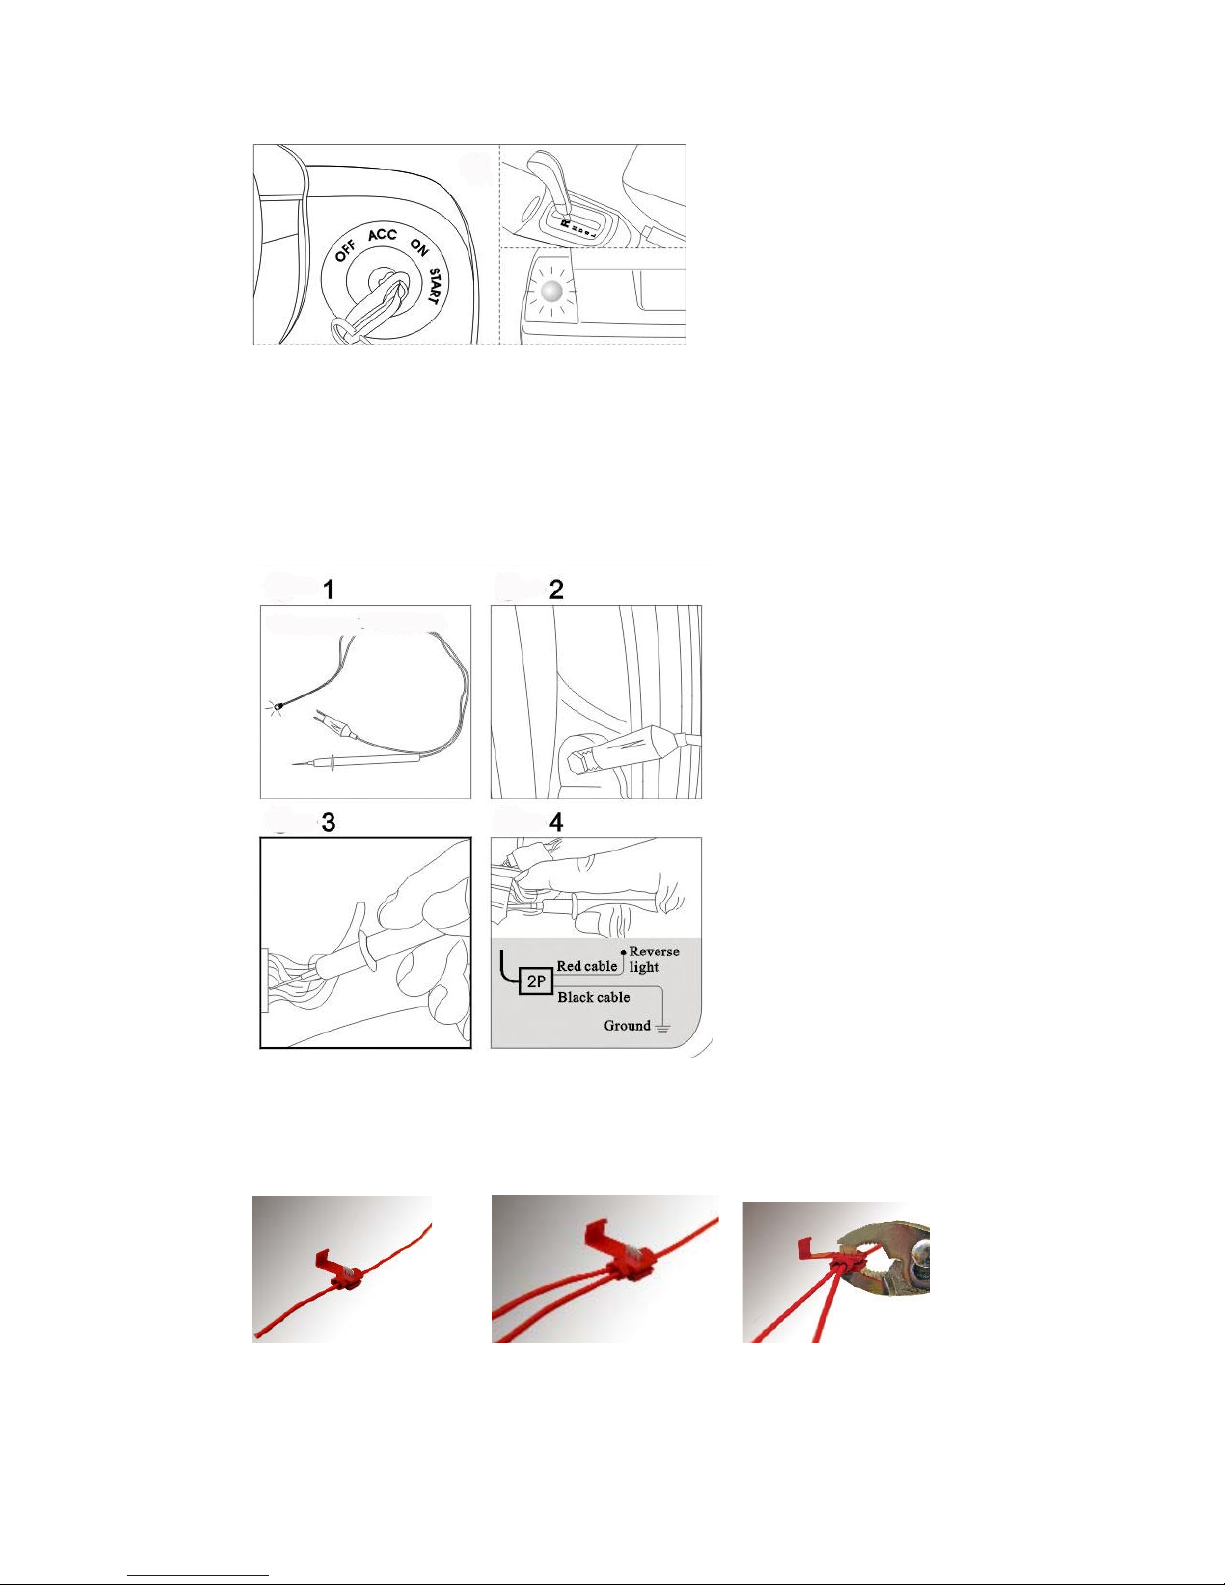
5. Use the test light provided in the kit, identify the power and ground wire to the
reverse light. Make sure the alligator clip on the test light is attached to a good
ground (For help in locating the vehicle’s reverse light circuit, contact your
vehicle’s manufacturer for vehicle specific wiring diagrams) If the test light
lights up, then the wire corresponding to that contact is the power wire. Connect
the red wire from the camera’s power cord to the power wire, and the black wire
to the ground wire.
Use the quick splices included in the package for wire connection Securely fasten
the wire to prevent it from being caught on any vehicle component such as the
trunk hinge. Never route the cable on the outside of the vehicle.
Insert the existing wire to be tapped Insert the wire to be attached Crimp tap with pliers then close lock
Page 4

6. Shift the gear lever in the Park position and turn the ignition key to the OFF
position.
FCC Statement:
1. This device complies with part 15 of FCC Rules. Operation is subject to the
following two conditions
(1) this device may not cause harmful interference, and
(2) this device must accept any interference received, including interference that
may cause undesired operation
2. Changes or modifications not expressly approved by the party responsible for
compliance could void the user’s authority to operate the equipment.
MONITOR INSTALLATION
There are two ways to supply the monitor with power, one uses a 12 Volt cigarette lighter
adaptor plugged into the vehicle’s cigarette lighter socket, the other uses a wiring harness
hard wired to the vehicle’s fuse box.
POWER CABLE WITH 12 VOLT CIGARETTE LIGHTER ADAPTOR
1. Place the monitor temporarily in an area that will not obstruct your vision but is
visible when reversing.
2. Route the power cord to the monitor so it can be plugged in to the cigarette lighter.
3. Secure the cord so it will not interfere with the safe operation of the vehicle and
plug it in to the cigarette lighter outlet.
4. Permanently mount the monitor by peeling off the protective cover at the bottom
of the stand.
HARD WIRED TO THE FUSE BOX
Please consider having the WIRELESS REVERSE VIDEO SYSTEM professionally
installed by using the wiring harness included in the kit to route the power cable to the
vehicle’s fuse box.
Check the system by starting the vehicle and placing the shift lever in the reverse position,
the monitor should be displaying the view of the camera.
Reinstall the trim panels that were removed during the camera and monitor installation.
FCC Statement:
This equipment has been tested and found to comply with the limits for a Class B digital
devices, pursuant to Part 15 of the FCC Rules. These limits are designed to provide
reasonable protection against harmful interference in a residential installation. This
equipment generates, uses, and can radiate radio frequency energy and, if not installed
and used in accordance with the instruction manual, may cause harmful interference to
radio communications. However, there is no guarantee that interference will not occur in
a particular installation. If this equipment does cause harmful interference to radio or
television reception, which can be determined by turning the equipment off and on, the
Page 5

user is encouraged to try to correct the interference by one of more of the following
measures:
• Reorient or relocate the receiving antenna
• Increase the separation between the equipment and receiver
• Connect the equipment into an outlet on a circuit different from that to which the
receiver is connected.
• Consult the dealer or an experienced radio/TV technician for help.
Warning: Changes or modifications not expressly approved by Superex Canada Ltd.
could void the user’s authority to operate the equipment
QUESTIONS? TOLL-FREE (1800) 268-3319
SUPEREX CANADA LTD., TORONTO M2H 3B8
Superex Canada warrants to the original purchaser of this product that should the product or any part thereof be proven defective in
material or workmanship within 1 year from the date of purchase, such defects will be replaced without charge for parts or labor.
To obtain replacement within terms of this warranty, the product should be delivered, transportation prepaid, to Superex Canada Ltd., 601
Gordon Baker Road, Toronto, Canada M2H 3B8, along with proof of date of purchase.
Superex Canada Ltd. assumes no obligation to pay the consumer a cash refund. This warranty does not cover the failure of, or damage to
the product that results from accident, alternation, abuse, misuse, neglect, or failure to follow operating instructions, nor does this warranty
cover damage caused by the use of any attachment not original equipment with the “Superex’s Wireless Reverse Video System”. Superex
Canada Ltd. disclaims any liability for any damages resulting from delay or loss of use and service, or repair, or for any incidental or
consequential damages arising our of this expressed warranty, or any implied warranty even though it may be caused by negligence or
other fault on the part of the distributor or others. The implied warranties on this product shall be in effect only for the duration of the
expressed warranty period as set forth above, and thereafter there shall be no warranties, either expressed or implied. Local laws may
very respecting the limitation on incidental, consequential or other damages, or the length of imp lied w arranties, so the above limitations
may not apply to you.
1 YEAR LIMITED WARRANTY
 Loading...