

Super Circuits PC335GDVR User Manual

Hi-Resolution Color DVR
Box Camera User Manual
Products: PC335GDVR
Camera With Optional Lens
Please read this manual before installing and using this camera and always follow instructions for proper use.
Save this manual away for future reference.
PC335GDVR_CM
ii
www.supercircuits.com
LEGAL NOTICE
Supercircuits products are designed to meet safety and performance
standards with the use of specic Supercircuits authorized accessories.
Supercircuits disclaims liability associated with the use of non-Supercircuits
authorized accessories.
The recording, transmission, or broadcast of any person’s voice without their
consent or a court order is strictly prohibited by law.
Supercircuits makes no representations concerning the legality of certain
product applications such as the making, transmission, or recording of video
and/or audio signals of others without their knowledge and/or consent. We
encourage you to check and comply with all applicable local, state, and federal
laws and regulations before engaging in any form of surveillance or any
transmission of radio frequencies.
Other trademarks and trade names may be used in this document to refer
to either the entities claiming the marks and names or their products.
Supercircuits, Inc. disclaims any proprietary interest in trademarks and trade
names other than its own.
No part of this document may be reproduced or distributed in any form or by
any means without the express written permission of Supercircuits, Inc.
© 2011 Supercircuits, Inc. All rights reserved.
11000 N. Mopac Expressway, Building 300, Austin, TX 78759
Sales/Support: 1.800.335.9777 | Fax: 1.866.936.7257

iii
Hi-Resolution Color DVR Box Camera User Manual
PRECAUTIONS
Precautions
• Do not install the camera in temperature condition or humidity that is
outside the specied operating range.
• Do not install the camera under unstable lighting.
• Do not touch the CCD element. If it is necessary to clean the element, use
a soft cloth moistened with alcohol to remove any dust build up.
• Do not drop the camera; protect it from physical shocks.
• Do not use the camera close to an gas or oil leak.
• Do not disassemble the camera.
• Never point the camera directly at intense light.
• Do not expose the camera to rain or spill beverage on it.

iv
www.supercircuits.com
TABLE OF CONTENTS
Table of Contents
SECTION 1 Features . . . . . . . . . . . . . . . . . . . . . . . . . . . . . . . . . . . . . . . . . . . . . . . . . 1
1.1 System options. . . . . . . . . . . . . . . . . . . . . . . . . . . . . . . . . . . . . . . . . . .4
SECTION 2 Installation . . . . . . . . . . . . . . . . . . . . . . . . . . . . . . . . . . . . . . . . . . . . . . 6
2.1 What’s in the box . . . . . . . . . . . . . . . . . . . . . . . . . . . . . . . . . . . . . . . . .6
2.2 What you need. . . . . . . . . . . . . . . . . . . . . . . . . . . . . . . . . . . . . . . . . . .6
2.3 Installing the camera . . . . . . . . . . . . . . . . . . . . . . . . . . . . . . . . . . . . .6
2.4 Aiming the Camera . . . . . . . . . . . . . . . . . . . . . . . . . . . . . . . . . . . . . . .9
SECTION 3 SETUP Menu (OSD) Usage . . . . . . . . . . . . . . . . . . . . . . . . . . . . . . . . . 10
3.1 SETUP menu options . . . . . . . . . . . . . . . . . . . . . . . . . . . . . . . . . . . . 11
SECTION 4 DVR Usage . . . . . . . . . . . . . . . . . . . . . . . . . . . . . . . . . . . . . . . . . . . . . . 20
4.1 Initial DVR setup for recording. . . . . . . . . . . . . . . . . . . . . . . . . . . . 21
4.2 Playing back recorded video. . . . . . . . . . . . . . . . . . . . . . . . . . . . . . 25
SECTION 5 Cleaning . . . . . . . . . . . . . . . . . . . . . . . . . . . . . . . . . . . . . . . . . . . . . . . . 27
SECTION 6 Specications . . . . . . . . . . . . . . . . . . . . . . . . . . . . . . . . . . . . . . . . . . . 28
APPENDIX A Troubleshooting . . . . . . . . . . . . . . . . . . . . . . . . . . . . . . . . . . . . . . . . . 30
APPENDIX B Dimensions . . . . . . . . . . . . . . . . . . . . . . . . . . . . . . . . . . . . . . . . . . . . . 32
1
Hi-Resolution Color DVR Box Camera User Manual
SECTION 1: FEATURES
SECTION1 Features
• High resolution 1/3” Sony® CCD image sensor
• C/CS lens mount (lens not included)
• Digital Noise Reduction (DNR)
• Wide Dynamic Range (WDR)
• Motion detection
• Auto white balance
• True Day & Night function
• Manual/DC drive lens support
• On screen Display (OSD) control
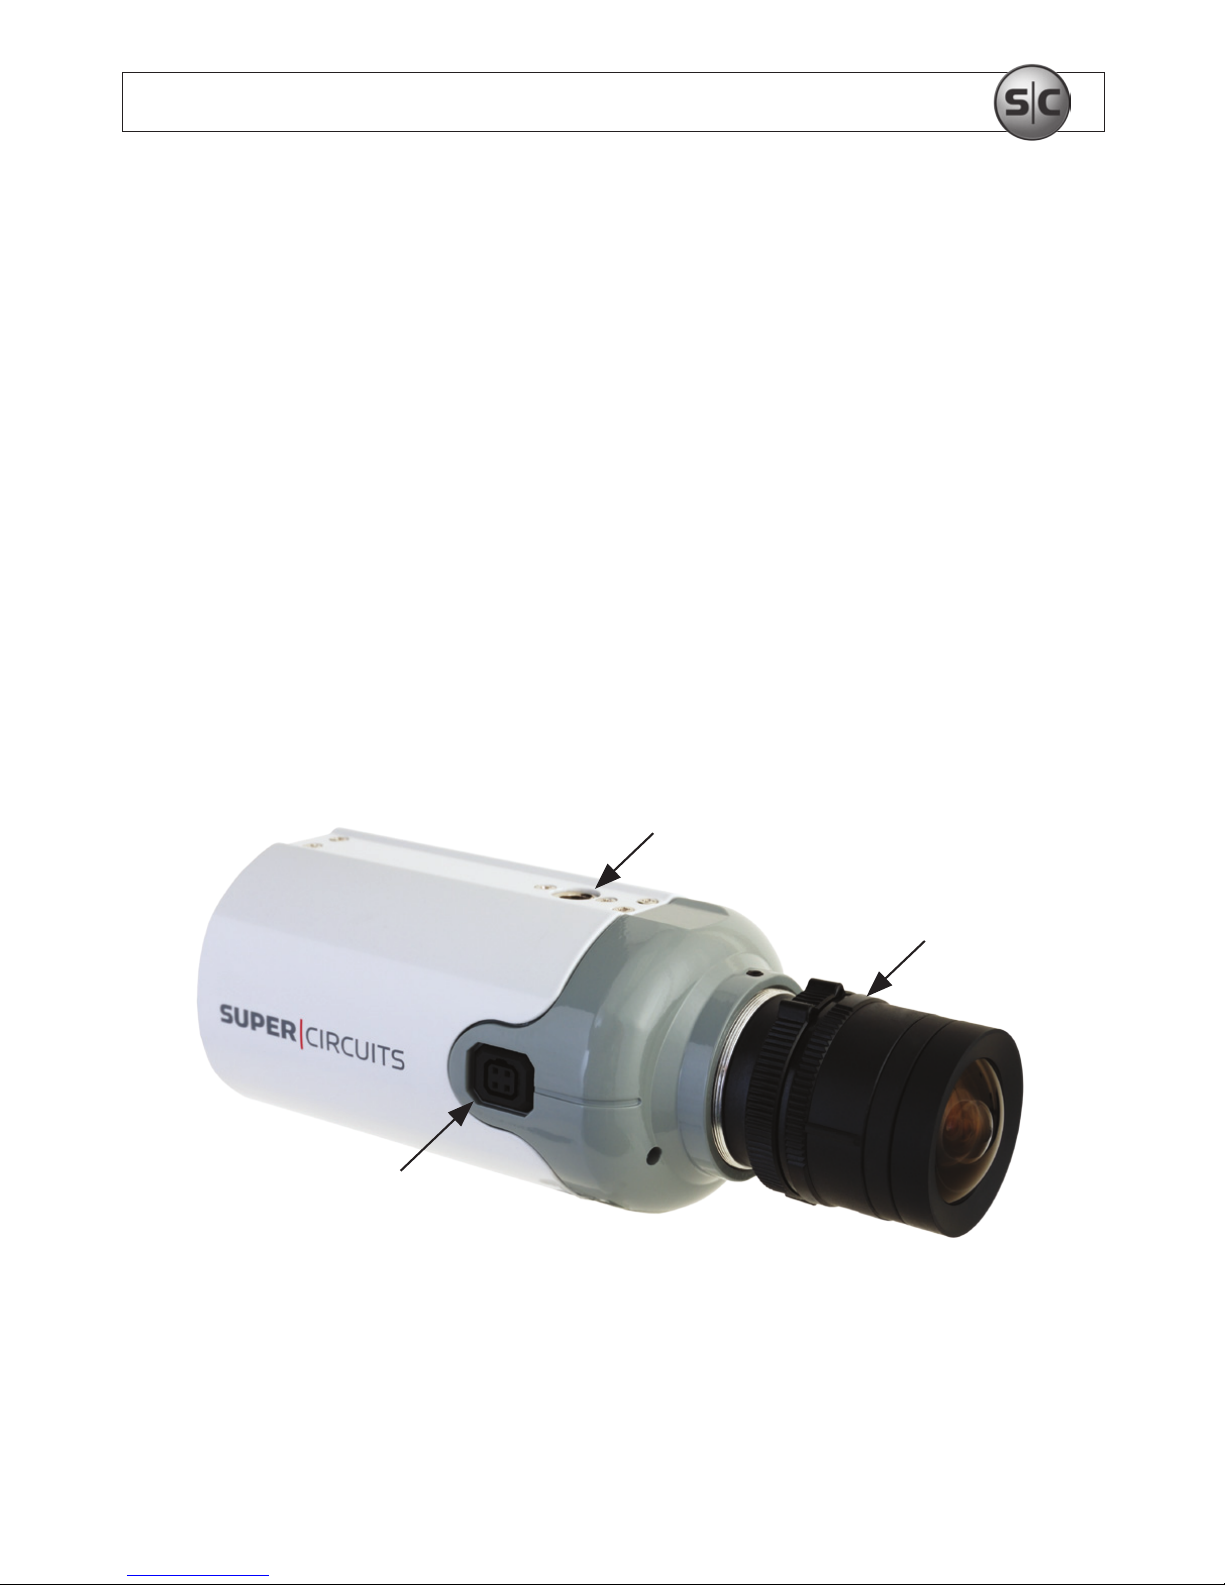
Mounting Bracket Connector
(top and bottom sides)
Auto-iris Lens Jack
C/CS Mount Lens
Optional Manual Lens
2
www.supercircuits.com
SECTION 1: FEATURES
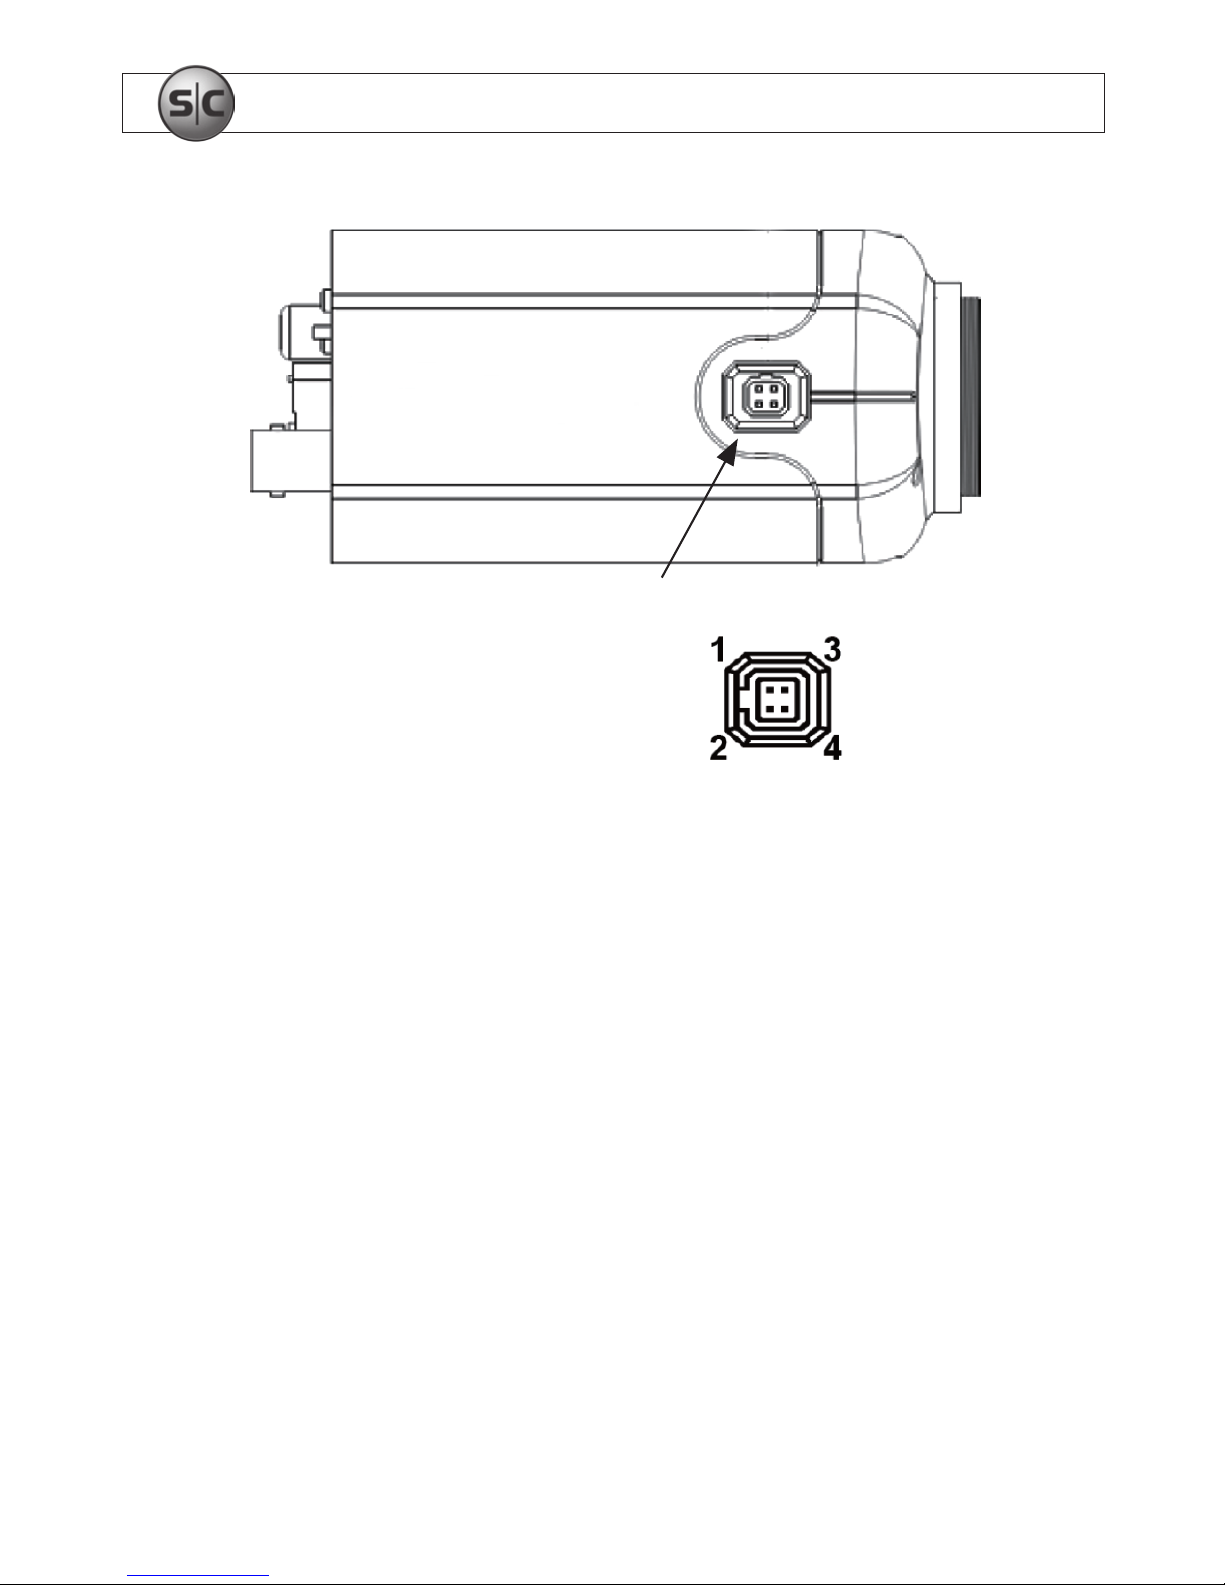
Auto-Iris Jack
Auto-IrisJackPin
Assignments
Pin DCDriver
1 - Control
2 + Control
3 - Drive
4 + Drive
3
Hi-Resolution Color DVR Box Camera User Manual
SECTION 1: FEATURES
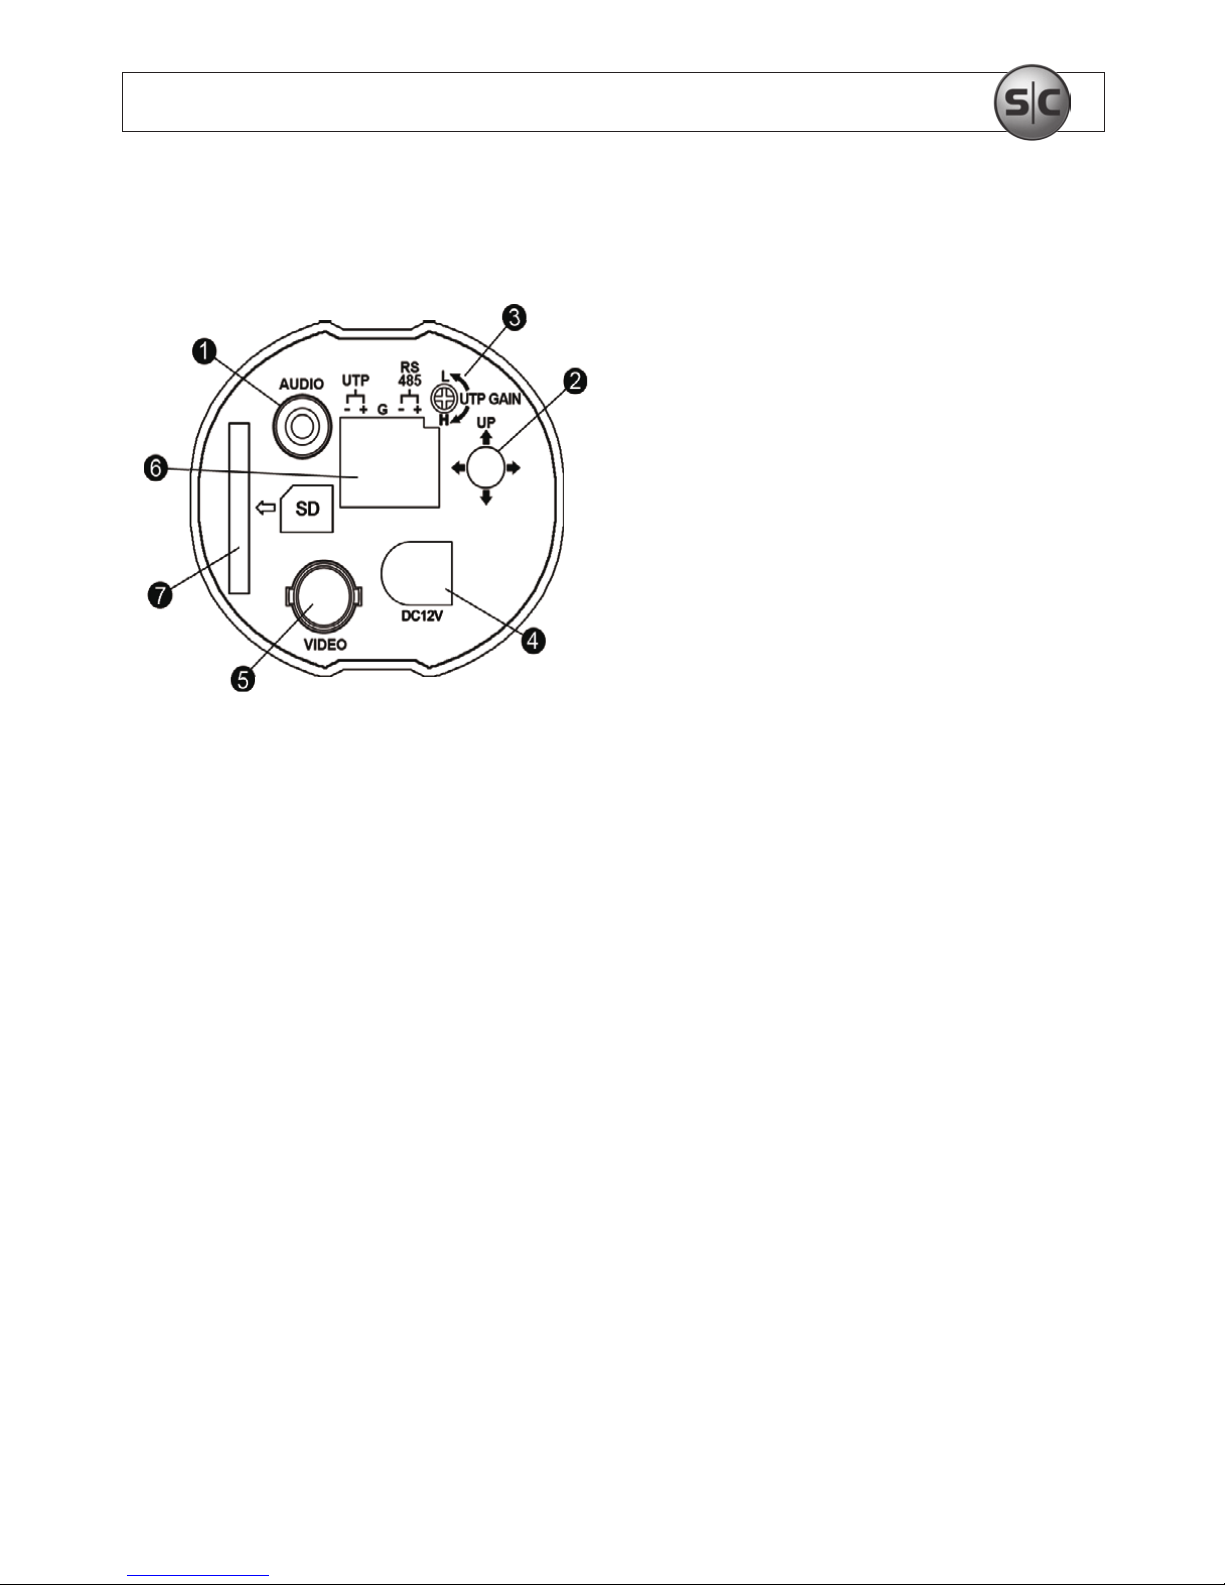
Back View
1 Audio
2 Function setup joystick
3 UTP Gain
4 12 VDC
5 Video
6 RS485 and UTP terminations
7 SD Card
* The camera will accept SD, MMC, and SDHC memory cards up to 32GB.
4
www.supercircuits.com
SECTION 1: FEATURES
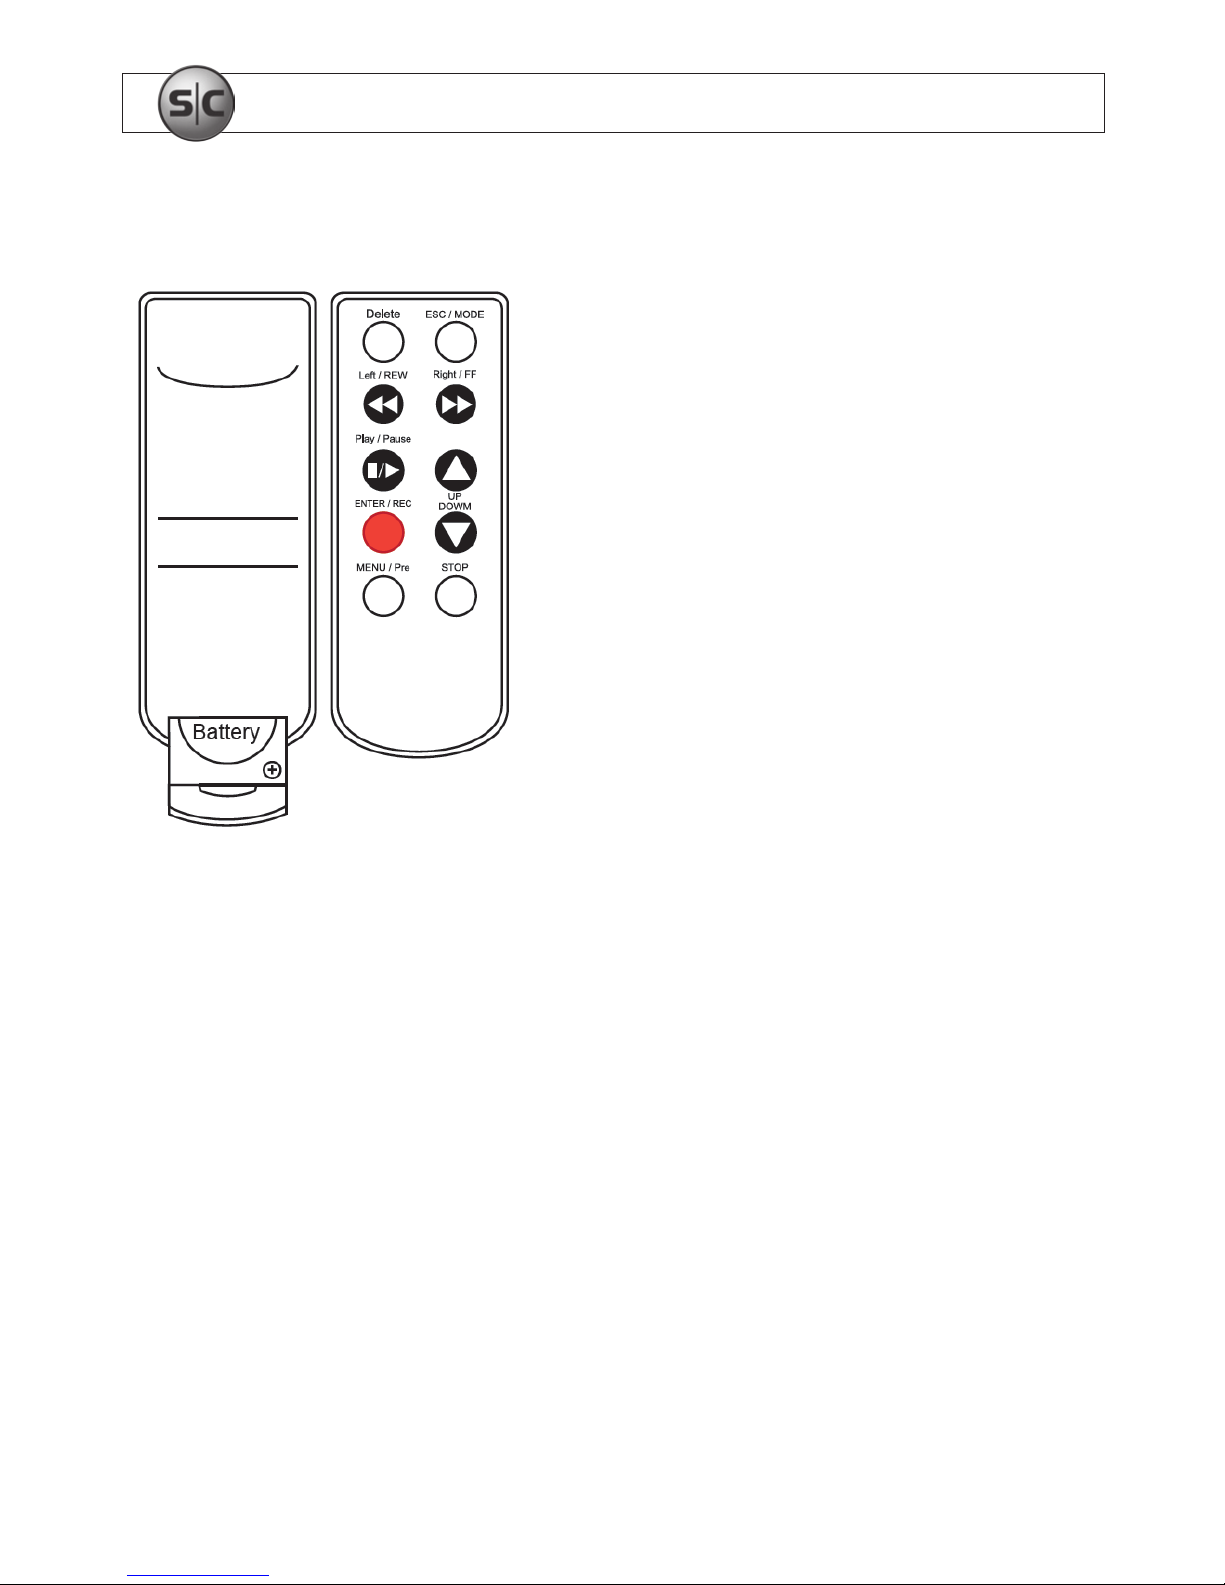
Remote Control
Delete Press to delete the le in the recordings list.
ESC / MODE Press to return to the previous menu and
quick playback.
Left / REW Press to move left in the mask area and 4
levels of fast backward playback.
Right / FF Press to move right in the mask area and
4 levels of fast forward playback.
Play / Pause Press to play or pause playback.
UP and DOWN Press to select an item and to increase or
decrease the volume during the playback.
ENTER / REC Press to conrm and start recording.
MENU / Pre Press to enter and exit a menu.
STOP Press to stop recording.
Install the Remote Control battery before use.
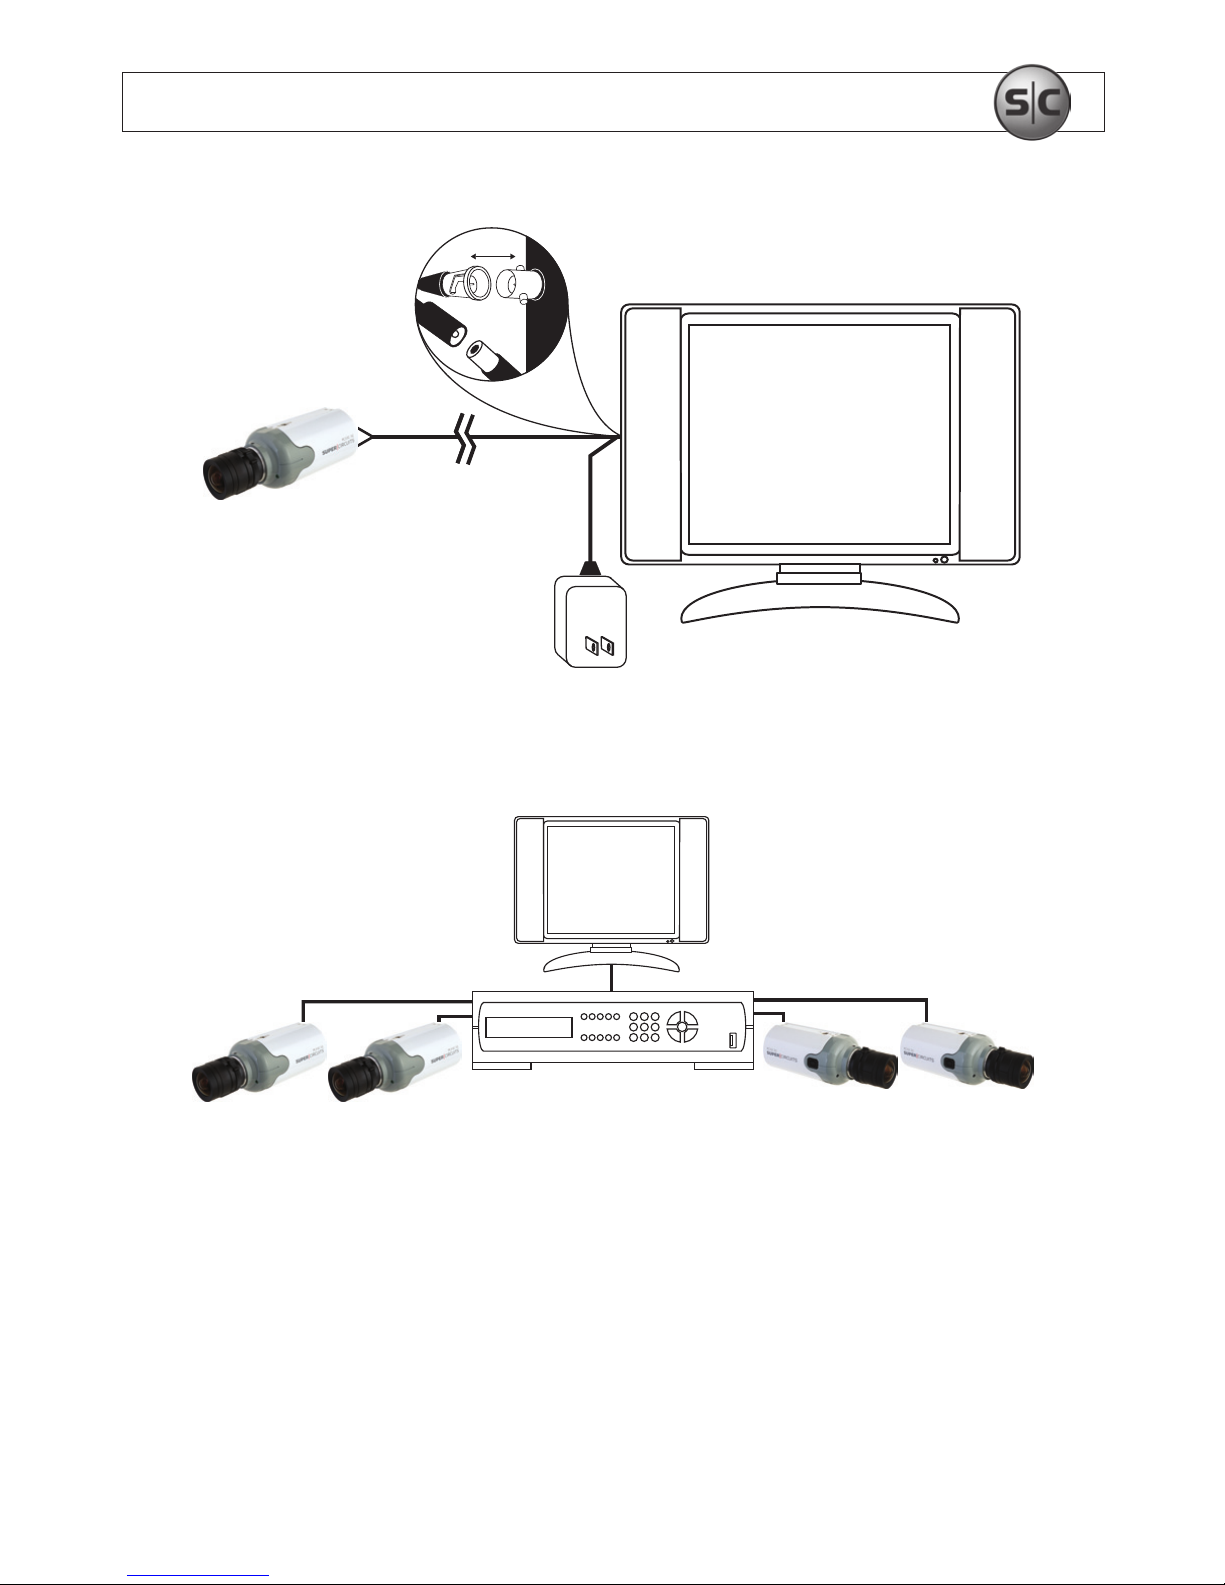
1.1 System options
The camera can connect directly to a CCTV monitor or to a DVR.
5
Hi-Resolution Color DVR Box Camera User Manual
SECTION 1: FEATURES
Connect
Multiple camera system with DVR and monitor
Multiple camera system with DVR and monitor

6
www.supercircuits.com
SECTION 2: INSTALLATION
SECTION2 Installation
2.1 What’s in the box
The camera package contains:
• Camera assembly
• Hex wrench
• Remote control
• Instruction manual
2.2 What you need
To install the camera, you will need:
• C/CS type lens
• Mounting bracket, such as a Supercircuits SKU MB14
• Hardware and tools to attach the mounting bracket to the mounting surface
• Video, audio, and power extension cable
• 12 VDC power adapter
2.3 Installing the camera
This procedure steps through the installation of a C/CS mount box camera using the
Supercircuits MB14 mounting bracket (sold separately). If you are using a dierent
mounting bracket, this procedure can serve as a general guideline for installing your
equipment.
7
Hi-Resolution Color DVR Box Camera User Manual
SECTION 2: INSTALLATION
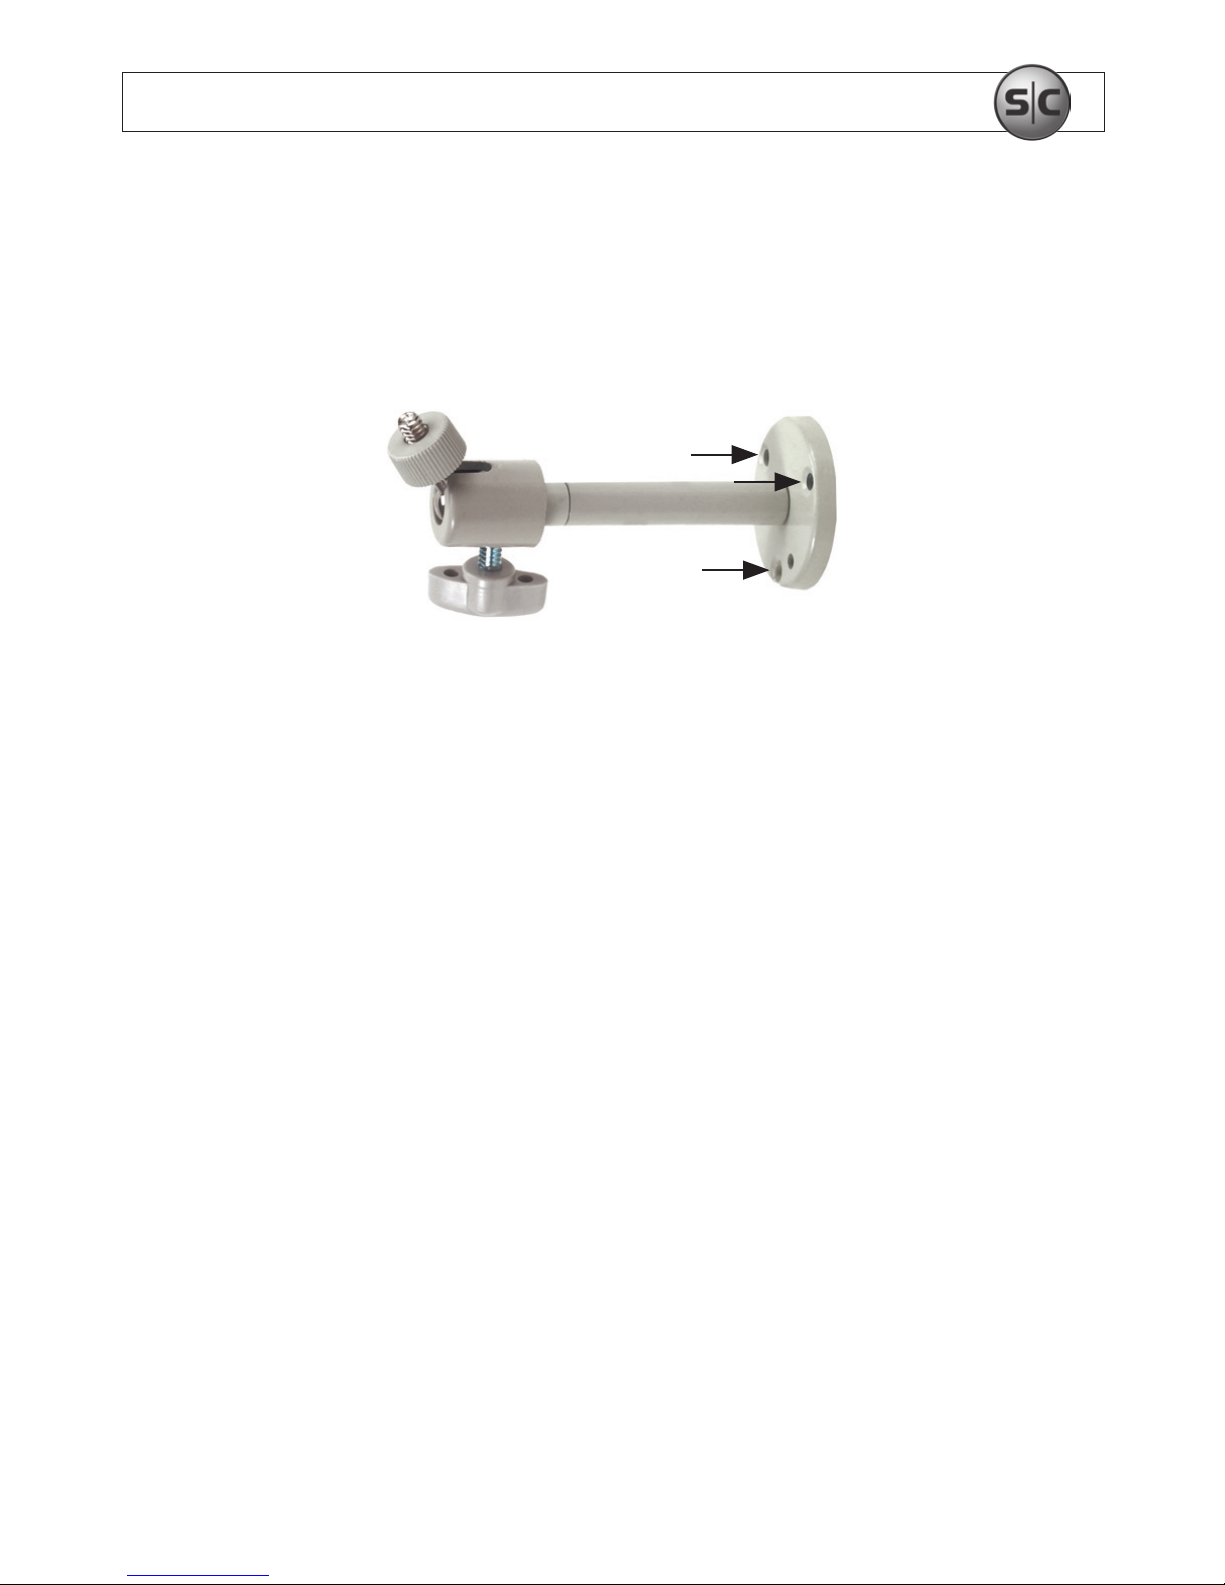
1. Using the bracket mounting plate as a template, mark the location of the mounting
screw holes on the mounting surface.
Camera attachment
screw
Mounting screw
locations
Directional
adjustment screw
Use the mounting bracket to mark holes for mounting screws
2. Drill mounting screw holes into the mounting surface.
3. Attach the bracket to the mounting surface.
4. Attach a lens assembly to the camera, if necessary. Use the instructions provided with
the lens.
5. If you installed an auto-iris lens on the camera, plug the lens cable into the AUTO
IRIS connector on the side of the camera.
6. Loosen the directional adjustment screw so that the camera attachment connection
moves freely.
 Loading...