

Page 1
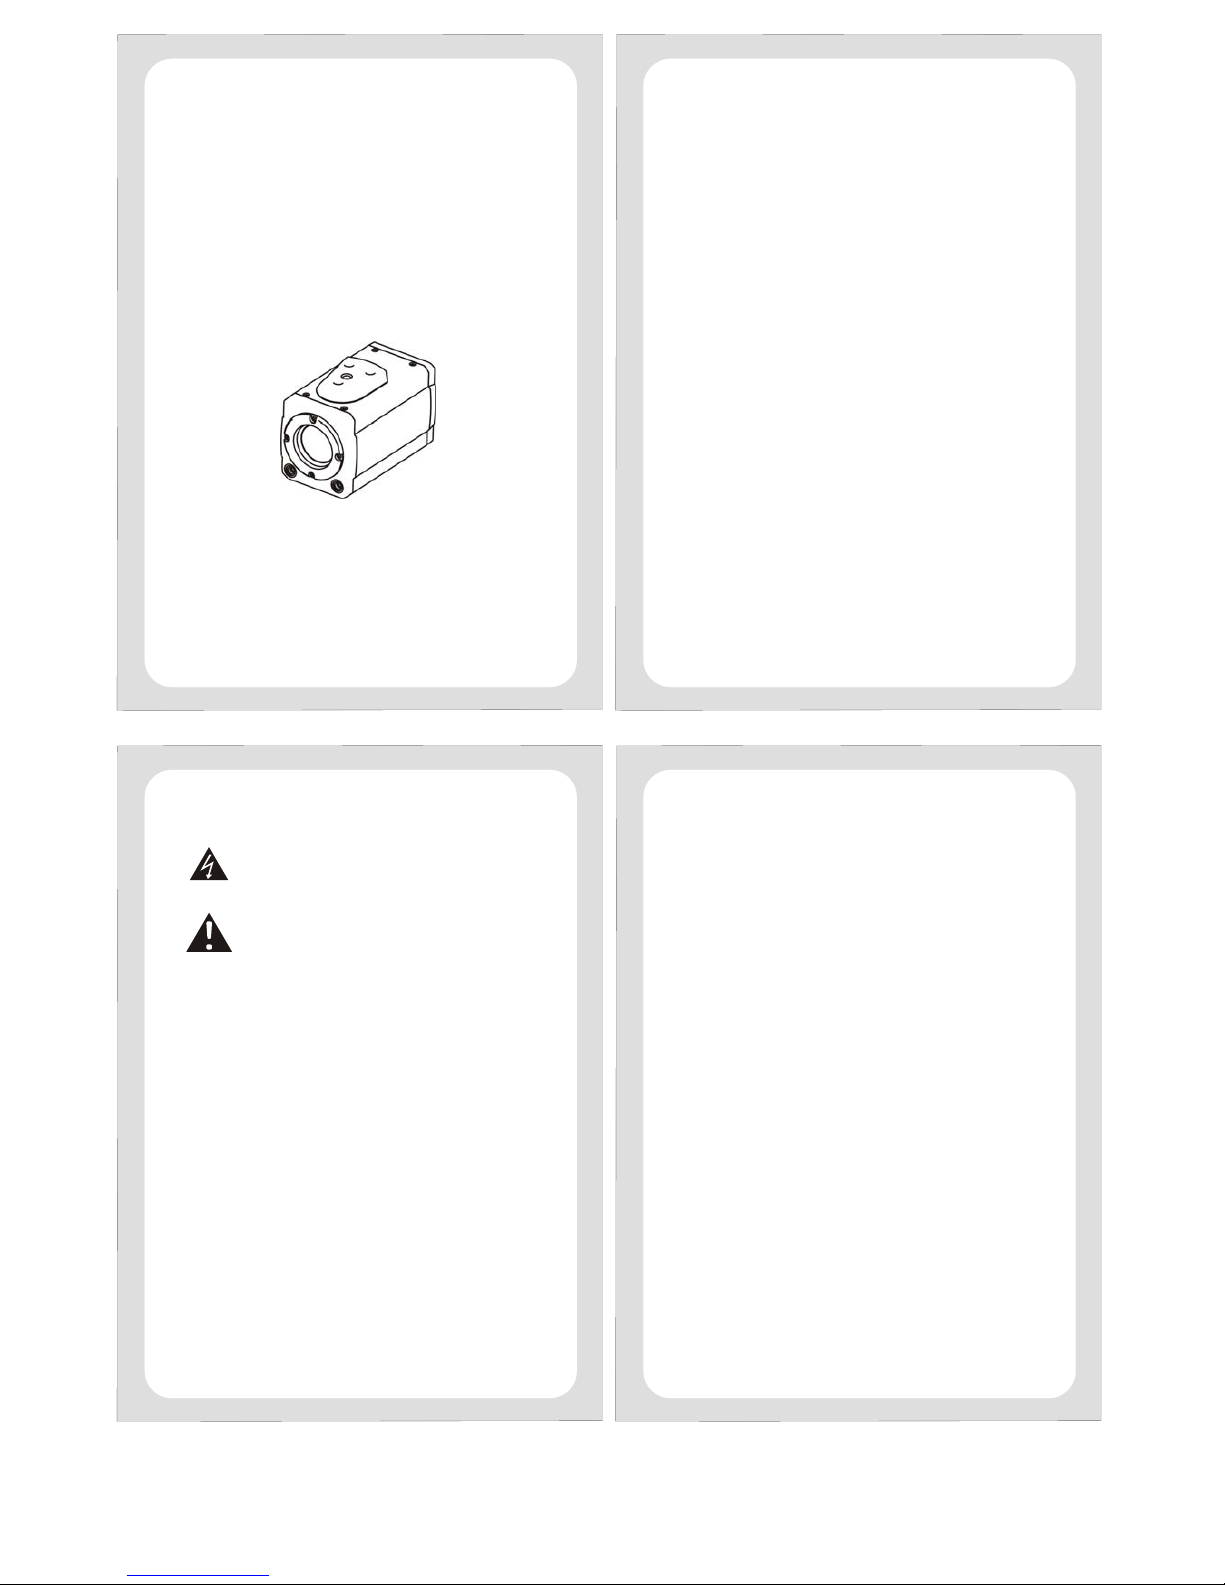
Thank you for purchasing our product.
Please read this User’s Manual before
using the product. Change without Notice
AUTO LENS CAMERA
User’s Manual
CONTENT TABLE
CONTENT TABLE……………………………………………………………. 2
SAFETY PRECAUTIONS…………………………………………………… 3
FCC STATEMENT…………………………………………………………….. 4
REAR PANEL………………………………………………………………… 5
FUNCTION SETUP………………………………………………………….. 6
MENU TREES………………………………….…………………………….. 7
MENU SETUP…..……………………………………………………………. 8
CAMERA SETUP………………………………………… ………................ 8
>FOCUS / ZOOM PAGE………………………………………………….. 8
>EXPOSURE PAGE ……………………………………………………… 9
>AWB PAGE.…………..………………………………………................. 10
>PICTURE PAGE ……..………………………………………………….. 11
>DAY/NIGHT PAGE …….……..……………………………………………12
REMOTE SETUP…………………………………………………………….. 13
DISPLAY SETUP ………………………….………………………………… 14
LOAD DEFAULT……………………………………………………………… 15
EXIT MENU …………………………………………………………………… 16
REMOTE CONTROLLER……….……………………………………………. 17
SPECIFICATIONS………………………………………..……..…………… 18
DIMENSION…………………………………………………………………… 19
2
1. Do not touch the imaging surface of sensor. Use soft cloth
moistened with alcohol to clean the surface if it is touched
accidentally.
2. Ensure the supply voltage is correct as specified for the particular
variant of camera before operation.
3. Do not expose the camera to rain, moisture or to temperature
outside the specified limit, without a suitable housing.
4. Avoid focusing directly on the sun
5. Do not attempt to service this unit yourself unless you are
authorized to do so. Opening cover may exposure you to
dangerous voltage or other hazards. Re fer all ser vicing to q ualified
personnel only.
3
SAFETY PRECAUTIONS
The lightning flash with arrowhead symbol, within an
equilateral triangle, is intended to alert the user to the
presence of insulated dangerous Voltage within the
product’s enclosure that may be sufficient magnitude
to constitute risk of electrical shock to persons.
The exclamation point within an equilateral triangle is
intended to alert the user to the presence of important
operation and maintenance (servicing) instructions in
the literature accompan
ying
the appliance.
WARNING
This device complies with Part 15 FCC Rules. Operation is subject to the
following two conditions:
(1) This device may not cause harmful interference.
(2) This device must accept any interference received including
interference that may cause undesired operation."
* Federal Communications Commission (FCC) Statement
WARNING
This Equipment has been tested and found to comply with the limits for a
Class B digital device, pursuant to Part 15 of the FCC rules. These limits
are designed to provide reasonable protection against harmful interference
in a residential installation. This equipment generates, uses and can
radiate radio frequency energy and, if not installed and used in accordance
with the instructions, may cause harmful interference to radio
communications. However, there is no guarantee that interference will not
occur in a particular installation. If this equipment does cause harmful
interference to radio or television reception, which can be determined by
turning the equipment off and on, the ser is encouraged to try to correct the
interference by one or more of the following measures:
- Reorient or relocate the receiving antenna.
- Increase the separation between the equipment and receiver.
- Connect the equipment into an outlet on a circuit different from that to
which the receiver is connected.
- Consult the dealer or an experienced radio/TV technician for help.
* You are cautioned that changes or modifications not expressly
approved by the party responsible for compliance could void your
authority to operate the equipment.
4
FCC STATEMENT
Page 2
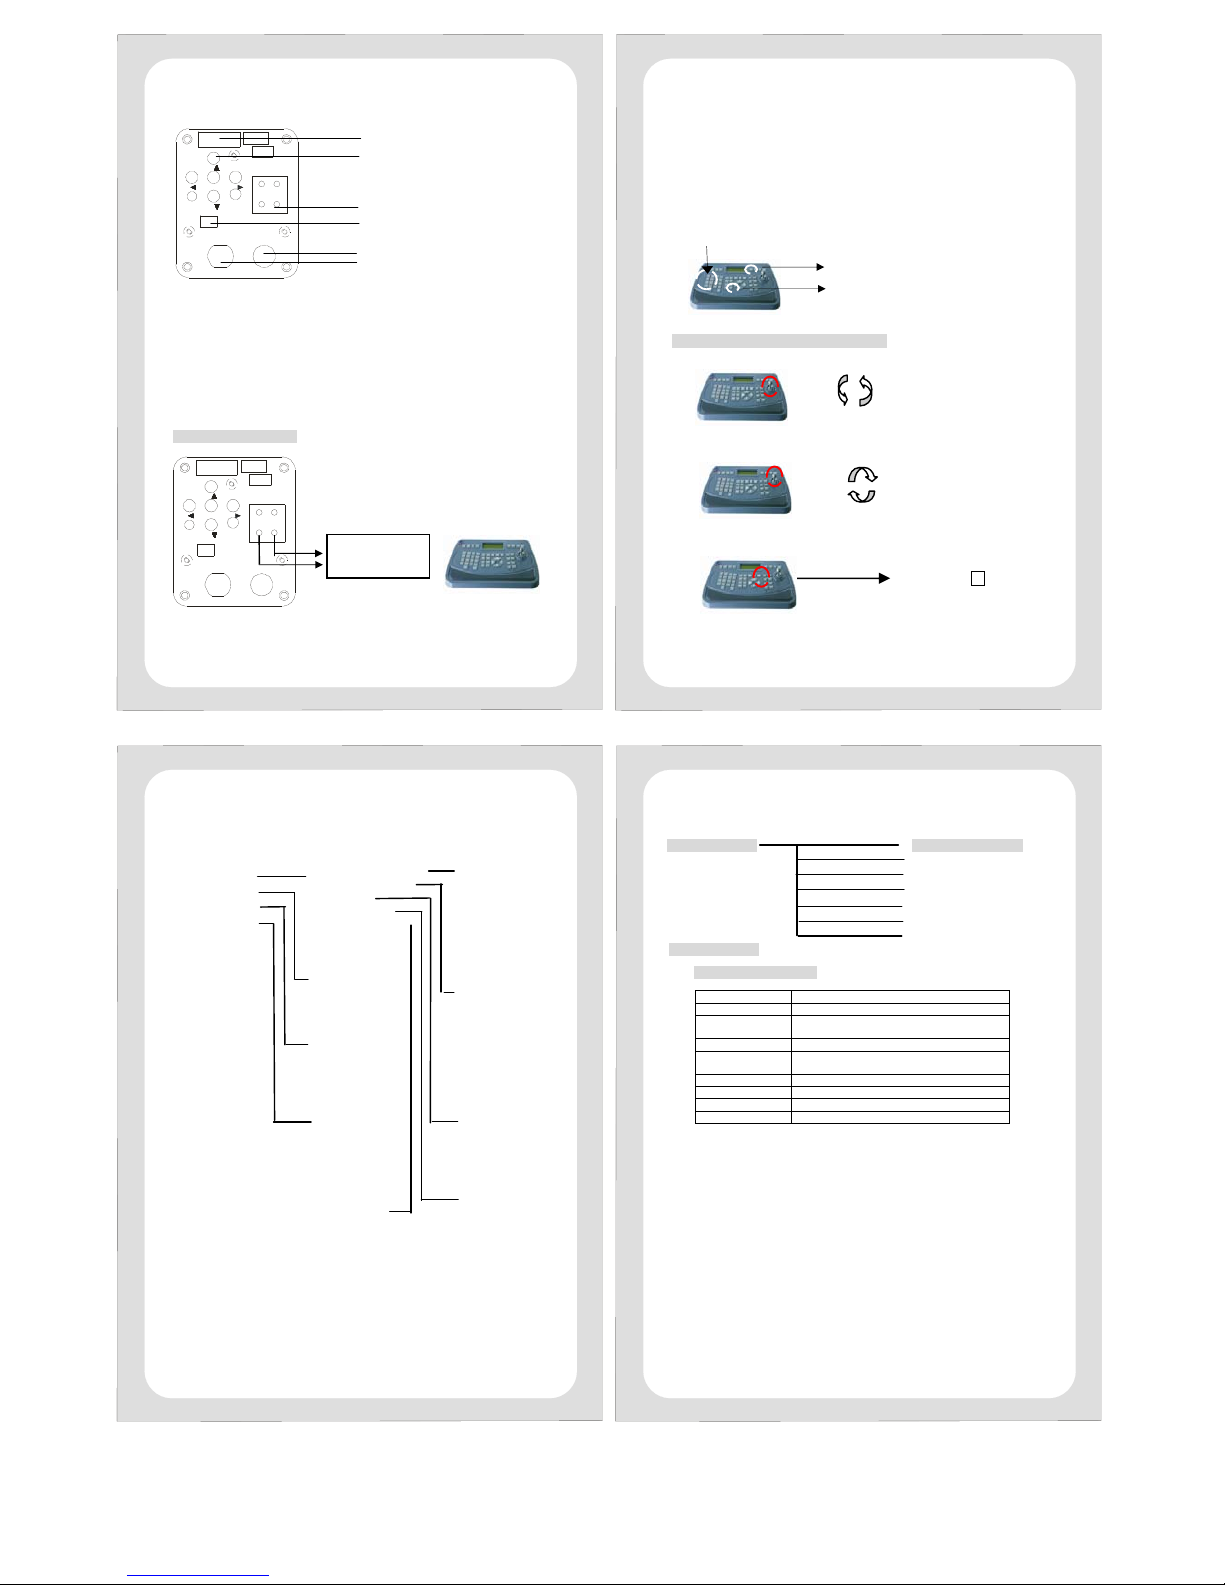
Menu : Press menu for 2 ~ 3 seconds, MENU OSD ON.
Direction button : Down / Left Right. N / F (Near / Far). T / W (TELE
/ WIDE)
RS 485 + - : RS 485 control port.
Termination : OFF / ON
DC 12 V / 1A : Power supply.
Video Out : Video out connector.
Pan / Til dry connector : NEAR, TELE, FAR, WIDE, MENU, GND.
Control cable connect
5
NEAR
FAR
WIDE
TELE
MENU
GND
DC 12V
VIDEO
Termination
ONOFF
PWR
F/
T/
P/MENU
N/
W/
RS485
-
+
NEAR, TELE, FAR, WIDE, MENU, GND.
Menu / Direction / Zoom / Focus buttons
RS 485 + RS 485 Termination OFF / ON
DC12V / 1A
Video Out (BNC)
RS 485 3 +, 4-.
A bare wire cable
or RJ 11 male.
NEAR
FAR
WIDE
TELE
MENU
GND
DC 12V
VIDEO
Termination
ONOFF
PWR
F/
T/
P/MENU
N/
W/
RS485
-
+
REAR PANEL FUNCTION SETUP
Call camera menu pop up:
Ex: One control keyboard from a CCTV manufactory in Taiwan.
1. Press numeric button (95) then preset button (preset) until 2 ~ 3
seconds after beep twice.
2. Press MENU button until 2 ~ 3 seconds after beep twice.
Function item move and values change:
6
95
Prese
MENU
Joystick moves up or down to
change item position.
Joystick moves left or right to
change function values.
Press ZOOM IN to enter each
function item.
( Main menu )
# In OSD MENU , camera will not to do AF adjustment
7
MENU TREE
CAMERA SETUP
REMOTE SETUP
DISPLAY SETUP
LOAD DEFAULT
EXIT MENU
FOCUS /ZOOM PAGE
EXPOSURE PAGE
AWB PAGE
PICTURE PAGE
DAY / NIGHT PAGE
LAST PAGE
EXIT MENU
ID
BAUD RATE
LAST PAGE
EXIT MENU
TITLE SET
TITLE DISPLAY
ZOOM SEAT
LAST PAGE
EXIT MENU
LOAD DEFAULT
CANCEL
COLOR MODE
NEGATIVE MODE
D/N MODE
CDS(AGC) LEVEL
AUTO IRIS LEVEL
MAX AGC
LAST PAGE
EXIT MENU
FOCUS MODE
NEAR LIMIT
AUTO ZOOM
ZOOM START
ZOOM SPEED
FOCUS SPEED
LAST PAGE
EXIT MENU
AE MODE
IRIS
SHUTTER
BACKLIGHT
BLC AREA
BLC LEVEL
FLICKERLESS
LAST PAGE
EXIT MENU
WB MODE
R-GAIN
B-GAIN
LAST PAGE
EXIT MENU
CHROMA GAIN
BRIGHTNESS
CONTRAST
SHARPNESS
MIRROR
LAST PAGE
EXIT MENU
CAMERA SETUP
>FOCUS/ZOOM PAGE
FUNCTION Values
FOCUS MODE AUTO / MANUAL / 1 PUSH
NEAR LIMIT 1 cm / 10 cm / 50 cm / 1M / 2 M / 3 M / 5M /
10M
AUTO ZOOM ON. / OFF.
ZOOM START 22X: 1X~20X
35X: 1X~30X
ZOOM SPEED 0~7
FOCUS SPEED 0~7 (Manual Focus Speed)
LAST PAGE Return to previous page
EXIT MENU EXIT MENU
1 PUSH: Just do auto focus one time after each zoom action.
NEAR LIMIT:
When the zoom is 1x, the nearest distance range of auto
focus.
For example:
When the object you are focusing is from 1 0M to li mitl ess, you
can then set the 10M to be the NEAR LIMIT.
Under auto focus, the camera will start focusin g from 10M, th e
auto focus range and focus time cost would be less than 1
CM NEAR LIMIT.
Auto Zoom ON:(Only available in auto focus mode.)
If object is out of focus for 10~ 15 seconds, lens will auto
zoom out and then auto focus again.
ZOOM START : You can set the ZOOM WIDE limit
If you set the ZOOM START be 2X , the ZOOM Lens wide limit
is 2X
8
MENU SETUP
CAMERA SETUP
REMOTE SETUP
DISPLAY SETUP
LOAD DEFAULT
EXIT MENU
FOCUS/ZOOM PAGE
EXPOSURE PAGE
AWB PAGE
PICTURE PAGE
DAY/NIGHT PAGE
LAST PAGE
EXIT MENU
Page 3
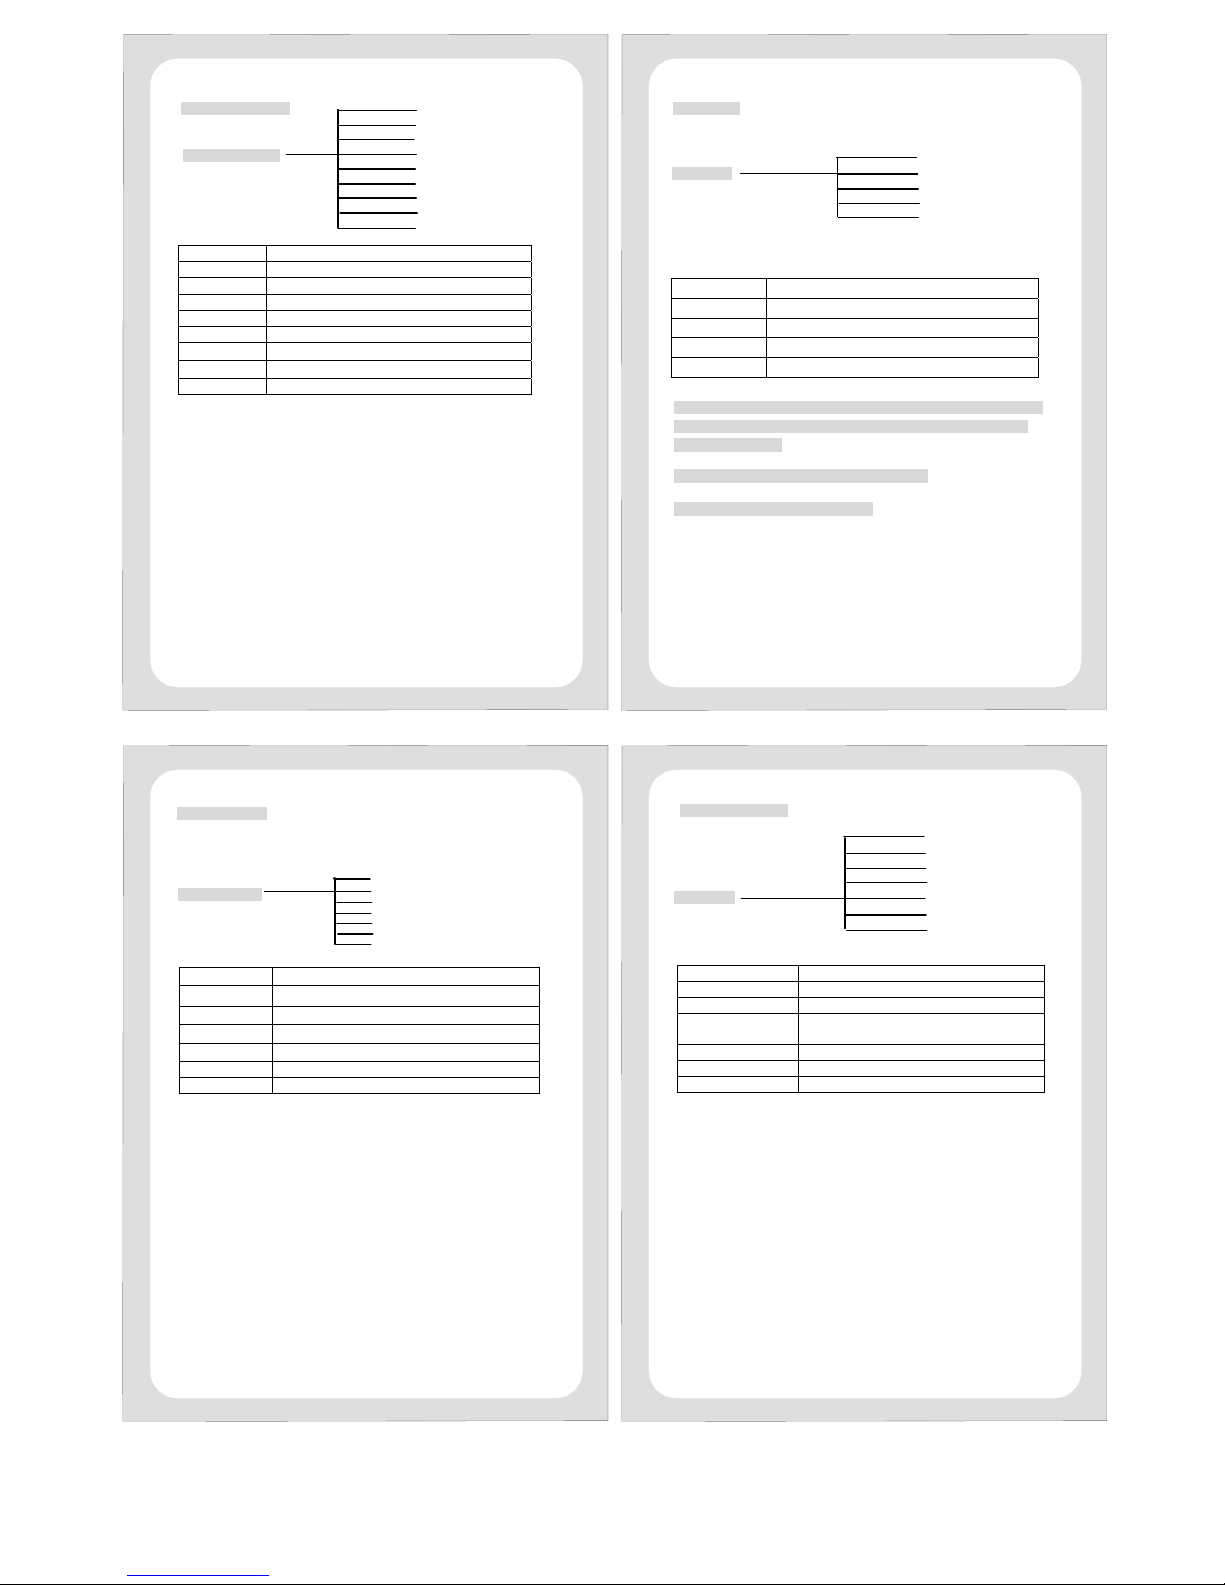
>EXPOSURE PAGE
AE MODE AUTO / SHUTTER / IRIS / MANUAL
IRIS AUTO / MANUAL
SHUTTER 1/60 (1/50)~1/100,000 second
BACKLIGHT ON / OFF
BLC AREA CETNER / LEFT / RIGHT / TOP / BOTTOM
BLC LEVEL LOW / NORMAL / HIGH
FLICKERLESS ON / OFF.
LAST PAGE Return to previous page
EXIT MENU EXIT MENU
AE Mode
Set on AUTO (Auto Iris):
SHUTTER will be set on AUTO, and IRIS is on auto mode.
Set on SHUTTER:
SHUTTER is adjustable, and IRIS is on auto mode. (This mode is
suggested to use in indoor.)
Set on IRIS:
IRIS is on Maximum mode, and SHUTTER is on auto mode. This mode is
suggested to use in outdoor.
Set on MANUAL:
SHUTTER and IRIS are all on manual mode.
In this mode, the buttons Focus Near / Far become to control IRIS
OPEN/CLOSE
FLICKERLESS MODE:
Flickerless function cannot work with backlight together.
9
WB MODE AUTO / MANUAL / INDOOR / OUTDOOR/AT-LOCK
R-GAIN 000 ~ 255
B-GAIN 000 ~ 255
LAST PAGE Return to previous page
EXIT MENU EXIT MENU
# When WB MODE is set be AT-LOCK , you can press camera button
“MENU” or remote “Zoom in” to adjust WB for one time , then the
camera WB will lock
# MANUAL: R-GAIN, B-GAIN can adjust by user
# INDOOR / OUTDOOR value is fixed.
10
AE MODE
IRIS
SHUTTER
BACKLIGHT
BLC AREA
BLC LEVEL
FLICKERLESS
MAX AGC
LAST PAGE
FOCUS PAGE
EXPOSURE PAGE
AWB PAGE
OTHERS PAGE
LAST PAGE
WB MODE
R-GAIN
B-GAIN
LAST PAGE
EXIT MENU
FOCUS PAGE
EXPOSURE PAGE
AWB PAGE
PICTURE PAGE
DAY/NIGHT PAGE
LAST PAGE
EXIT MENU
COLOR MODE
NEGATIVE MODE
D/N MODE
AGC LEVEL
AUTO IRIS LEVEL
MAX AGC
LAST PAGE
EXIT MENU
FOCUS PAGE
EXPOSURE PAGE
AWB PAGE
PICTURE PAGE
DAY/NIGHT
LAST PAGE
EXIT MENU
11
>PICTURE PAGE
FOCUS/ZOOM PAGE
EXPOSURE PAGE
AWB PAGE
PICTURE PAGE
NAY/NIGHT PAGE
LAST PAGE
EXIT MENU
CHROMA GAIN
BRIGHTNESS
CONTRAST
SHARPNESS
MIRROR
LAST PAGE
EXIT MENU
CHROMA GAIN 30~60
BRIGHTNESS 0~20
CONTRAST 50~200
SHARPNESS LOW / NORMAL / HIGH
MIRROR ON/ OFF
LAST PAGE Return to previous page
EXIT MENU EXIT MENU
>DAY / NIGHT PAGE
COLOR MODE ON / OFF
NEGATIVE MODE ON / OFF
D/N MODE AGC / DAY / NIGHT / CDS
AGC (CDS) LEVEL AGC:0 ~ -15 / 0 ~ +15
CDS: 0 ~ -50 / 0 ~ +15
AUTO IRIS LEVEL 0 ~ -25 / 0 ~ +25
AGC MAX 50 ~ 250
LAST PAGE Return to previous page
D / N mode (Day and Night mode):
-DAY: Force to day mode. (IR CUT ON)
-NIGHT: Force to night mode. (IR CUT OFF)
-AGC: Switch by AGC level.
(Only work on Auto / Shutter mode with BLC: OFF)
When you set the AGC to be high , the AGC MAX also need to set to
higher
-CDS: Switch by CDS level.
AUTO IRIS level: On auto IRIS mode, brightness is adjustable by this level.
PS. Color and negative function, only active in DAY mode.
>AWB PAGE
12
Page 4
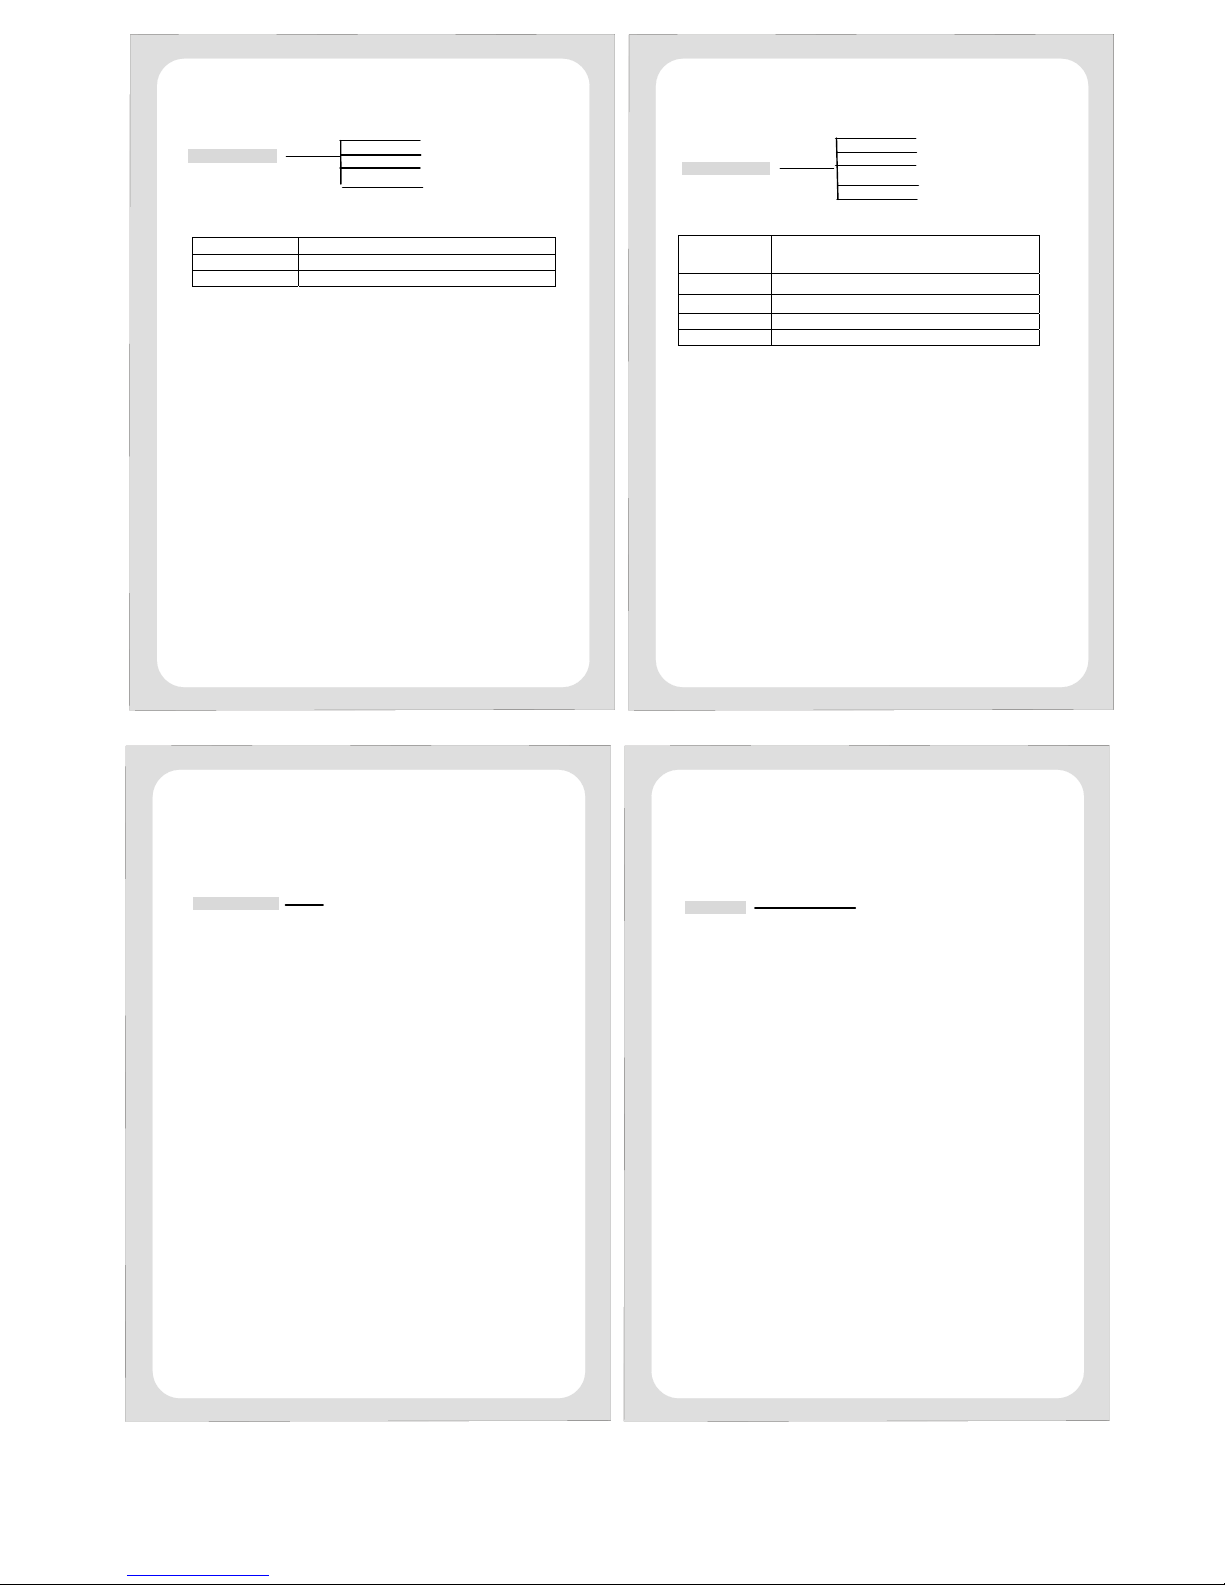
REMOTE SETUP
LOAD DEFAULT
CAMERA SETUP
REMOTE SETUP
DISPLAY SETUP
LOAD DEFAULT
EXIT MENU
ID
BAUD RATE
LAST PAGE
EXIT MENU
ID 1 ~ 255.
BAUD RATE 2400 / 4800 / 9600
LAST PAGE Return to previous page
# the PROTOCOL is PELCO-P and PELCO-D in Auto detect
13
DISPLAY SETUP
CAMERA SETUP
REMOTE SETUP
DISPLAY SETUP
LOAD DEFAULT
EXIT MENU
TITLE SET
TITLE DISPLAY
ZOOM SEAT
LAST PAGE
EXIT MENU
TITLE SET 0,1,2,3,4,5,6,7,8,9,A,B,C,D,E,F,G,H,I,J,K,L,M,N,O,P,
Q,R,S,T,U,V,W,X,Y,Z, - ; : ; / ; . ; , ;( )
TITLE DISPLAY ON / OFF
ZOOM SEAT ON / OFF
LAST PAGE Return to previous page
EXIT MENU EXIT MENU
CAMERA SETUP
REMOTE SETUP
DISPLAY SETUP
LOAD DEFAULT
EXIT MENU
CAMERA SETUP
REMOTE SETUP
DISPLAY SETUP
LOAD DEFAULT
EXIT MENU
LOAD DEFAULT
CANCEL.
EXIT MENU
Press menu button to Exit Menu
15
14
# That is for confirm to LOAD DEFAULT or Cancel
# Choose LOAD DEFAULT to load Default Settings.
# Choose CANCEL to back Main Menu.
16
Page 5
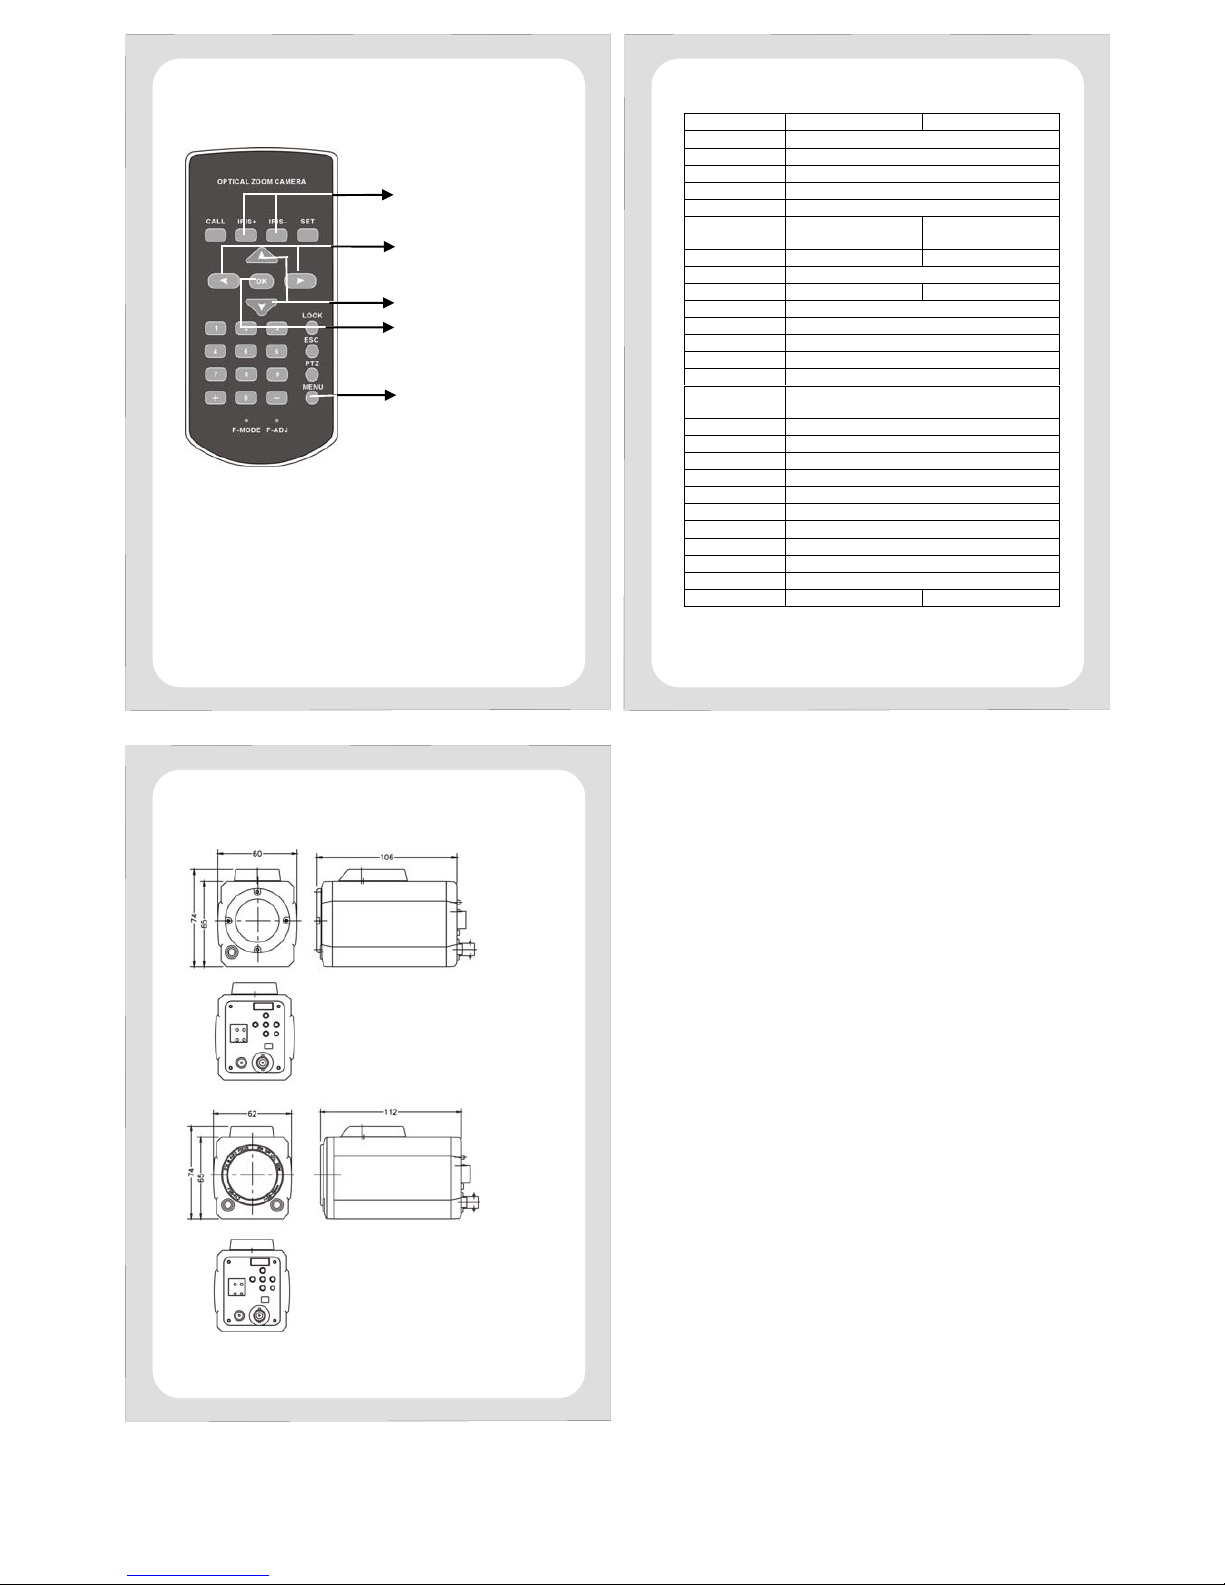
SPECIFICATION
Type 35x Zoom 22x Zoom
Pick up device 1/4" Interline transfer CCD
Signal System NTSC / PAL
Total Pixels NTSC:811(H)x508(V) / PAL:795(H)x596(V)
Horizontal Resolution 530 TV Lines
S/N Ratio More Than 48 dB
Lens
35X Zoom ( f=3.6mm~126mm,
F1.65~F4.2)
22X Zoom ( f=3.9mm~85.8mm,
F1.6~F3.7)
Minimum Illumination 0.5 Lux / F1.6 0.5 Lux / F1.6
Day/Night Function AGC / DAY / NIGHT / CDS
Zoom Speed Max. speed 10 sec./ wide Ætele Max. speed 4 sec./ wide Ætele
White Balance Auto / Manual
BLC Function ON/OFF
AGC ON/OFF (level setup)
Flickerless ON / OFF
Electronic Shutter Auto / Manual/Shutter / IRIS
Shutter Speed
NTSC: 1/60~1/100,000 sec.
PAL: 1/50~1/100,000 sec.
Focus Auto / Manual / one push
Preset Function 64
OSD For functions setting
Video Output 1.0Vp-p / 75 ohm composite
RS485 Control RS485 with2400, 4800, 9600
DC Power Source DC 12V
Operation Temperature -10°C~50°C (14 to122℉)
Storage Temperature -20°C~70°C (-4 to158℉)
Operation Humidity 10%~80% RH
Storage Humidity 10%~80% RH
Dimensions 62(W) x 112(D) x 74(H) mm 62(W) x 112(D) x 74(H) mm
18
DIMENSION
19
IRIS + / IRIS - : OPEN /CLOSE
ZOOM: IN / OUT
FOCUS: NEAR / FAR
ENTER
MENU: ENTER / EXIT
REMOTE CONTROLLER
17
22X Zoom
35X Zoom
 Loading...