

Page 1

MDVR81
Portable Digital Video Recorder
User Guide
V1.3
MDVR81_SM
170202
1
Page 2

REGULATORY STATEMENTS
FCC Certification
The United States Federal Communication Commission (FCC) and the Canadian Department of
Communications have established certain rules governing the use of electronic equipment. This
device complies with Part 15 of the FCC Rules. Operation is subject to the following two conditions:
(1) This device may not cause harmful interference, and
(2) This device must accept any interference received, including interference that may cause
undesired operation.
Part15, Class B
This equipment has been tested and found to comply with the limits for Class B digital devices,
pursuant to Part 15 of the FCC rules. These limits are designed to provide reasonable protection
against harmful interference in a residential installation. This equipment generates uses and can
radiate radio frequency energy and, if not installed and used in accordance with the instructions, may
cause harmful interference to radio communications. However, there is no guarantee that interference
will not occur in a particular installation. If this equipment does cause harmful interference to radio or
television reception, which can be determined by turning the equipment off and on, the user is
encouraged to try to correct the interference by one or more of the following measures:
Reorient or relocate the receiving antenna.
• Increase the separation between the equipment and receiver.
• Connect the equipment into an outlet on a circuit different from that to which the receiver is
connected.
• Consult the dealer or an experienced radio/TV technician for help.
Use of shielded cable is required to comply with Class B limits in Subpart B of Part 15 of the FCC rules.
Do not make any changes or modifications to the equipment unless otherwise specified in the manual.
If such changes or modifications should be made, you could be required to stop operation of the
equipment.
2
Page 3

READ THIS FIRST
Trademark Information
Other names and products may be trademarks or registered trademarks of their respective owners.
Product Information
• Product design and specifications are subject to change without notice. This includes primary
product specifications, software, software drivers, and user’s manual. This User Manual is a general
reference guide for the product.
• The product and accessories that come with your digital video MDVR81 may be different from
those described in this manual. This is because different retailers often specify slightly different
product inclusions and accessories to suit their market requirements, customer demographics, and
geographical preferences. Products very often vary between retailers especially with accessories
such as batteries, chargers, memory cards, cables, carrying cases/pouches, and language support.
Occasionally a retailer will specify a unique product color, appearance, and internal memory
capacity. Contact your dealer for precise product definition and included accessories.
• The illustrations in this manual are for the purpose of explanation and may differ from the actual
design of your MDVR81.
• The manufacturer assumes no liability for any errors or discrepancies in this user manual.
• For user manual and driver updates, refer to our website or contact your dealer.
3
Page 4

SAFETY PRECAUTIONS
interfaces. Changes or modifications not
Read and understand all Warnings and Cautions before using this product.
Warnings:
TO REDUCE THE RISK OF FIRE OR ELECTRIC SHOCK, DO NOT EXPOSE THIS PRODUCT TO RAIN OR
MOISTURE.
The connection of a non- shielded equipment interface cable to this equipment will invalidate the FCC
Certification or Declaration of this device and may cause interference levels which exceed the limits
established by the FCC for this equipment. It is the responsibility of the user to obtain and use a
shielded equipment interface cable with this device. If this equipment has more than one interface
connector, do not leave cables connected to unused
expressly approved by the manufacturer could void the user’s authority to operate the equipment.
• If the recharging operation doesn’t complete within the specified recharging time, stop further
charging immediately. Otherwise, acid leakage, overheating, smoke emission, bursting and/or
ignition can occur.
• Do not put the battery pack into a microwave oven or pressurized container. Rapid heating or a
disrupted seal can lead to acid leakage, overheating, smoke, bursting and/or combustion.
• If the battery pack leaks or emits a bad odor, remove it from any exposed flame. Otherwise, the
leaking electrolyte may catch fire and the battery pack may smoke, burst or combust.
• If the battery pack emits a bad odor, generates heat, becomes discolored or deformed, or in any
way appears abnormal during use, recharging or in storage, stop using it. A faulty battery pack can
leak acid, overheat, smoke, cause odor, burst, and/or combust.
WARNING: Handling the cord on this product or cords associated with accessories sold with this
product, will expose you to lead, a chemical known to the State of California to cause birth defects or
other reproductive harm.
Wash hands after handling.
4
Page 5

Cautions:
• Do not subject the battery pack to intense sunlight or high temperatures, such as in a car in hot
weather. Otherwise, acid leakage, overheating and/or smoke emission can occur, performance
may be diminished and its service life may be shortened.
• The battery pack incorporates built-in safety devices. Do not use it in a location where high levels
of static electricity may be present. Otherwise, the safety devices can be damaged, possibly
leading to acid leakage, overheating, smoke emission, bursting, and/or combustion.
• Recharge the battery at a temperature in the range of 32 °F to 113 °F (0 °C to 45 °C). Recharging at
temperatures outside this range can cause acid leakage and overheating, and may damage it.
• If any fluid leaking from the battery pack contacts your skin or clothing, wash it off immediately
with running water. Otherwise, injury can occur.
• Store the battery pack in a location where children cannot reach it. Make sure that children cannot
remove the battery pack from the battery charger or equipment.
• If you find rust, a bad odor, overheating and/or other irregularities when using the battery pack,
return it your supplier or vendor.
• To reduce the risk of fire or burns:
1. Do not open, disassemble, or service the battery pack.
2. Do not crush, puncture, short external contacts, or dispose of in fire or water.
3. Replace only with a battery pack designated for this product.
5
Page 6

CONTENTS
INTRODUCTION .................................................................................................................................................................................................. 7
GETTING TO KNOW THE MDVR81 ................................................................................................................................................................ 8
Parts Name and Functions ............................................................................................................................................ 8
Button Lock Function .................................................................................................................................................. 12
LED Indicators................................................................................................................................................................. 13
About the LCD Panel Display .................................................................................................................................... 14
PREPARING THE MDVR81 ............................................................................................................................................................................. 15
Insert / Remove Battery .............................................................................................................................................. 15
Camera & Power Adapter Connection ................................................................................................................... 16
Prepare SDHC Memory Card ..................................................................................................................................... 18
GETTING STARTED .......................................................................................................................................................................................... 20
Power On/Off the DVR ................................................................................................................................................. 20
About the Screen Language ..................................................................................................................................... 21
Date & Time Setting ...................................................................................................................................................... 21
Format SDHC Memory Card ...................................................................................................................................... 23
OPERATIONS ..................................................................................................................................................................................................... 25
Snapshot .......................................................................................................................................................................... 25
Play Picture ...................................................................................................................................................................... 26
Camera Setting .............................................................................................................................................................. 27
Record Video ................................................................................................................................................................... 29
Playback Video Clip ...................................................................................................................................................... 29
Record Setting ................................................................................................................................................................ 32
System Setting ............................................................................................................................................................... 34
TROUBLE SHOOTING ..................................................................................................................................................................................... 37
6
Page 7

INTRODUCTION
Thank you for purchasing the MDVR81!
The MDVR81 is an amazing new pocket size, highly portable surveillance device designed for covert
surveillance tool and as a personal DVR. It features A/V recording with advanced H.264 compression
and photo snapshots in JEPG format. A 2.5 inch LCD display is built into the DVR and a video output
connector is provided for an external monitor. On-screen menus and embedded software make set-up
and operation easy.
Other features include:
• IP65 waterproof design, super mini size: One 1-to-2 mini A/V output jack and one 3-in-one A/V
jack provides video, audio input and power; secure locking; waterproof design (rated IP65); small
size: 3.98” x 2.64” x 1.02” (101 mm x 67 mm x 26 mm)
• Worldwide video source and user friendly UI: Supports TV system (NTSC and PAL); OSD (On
Screen Display) menu
• Power saving: When connected to an external monitor, the built-in LCD display will turn-off.
• High Resolution and multiple recording frame rate: Supports D1 high resolution and H.264
advanced image protocol; supports 30, 25, 20, 15, 10 and 5 fps.
• Diverse application: Ideal for rescue activities, duty monitoring, recreation coaching, private
investigators, police officers, fire fighters, spying
7
Page 8
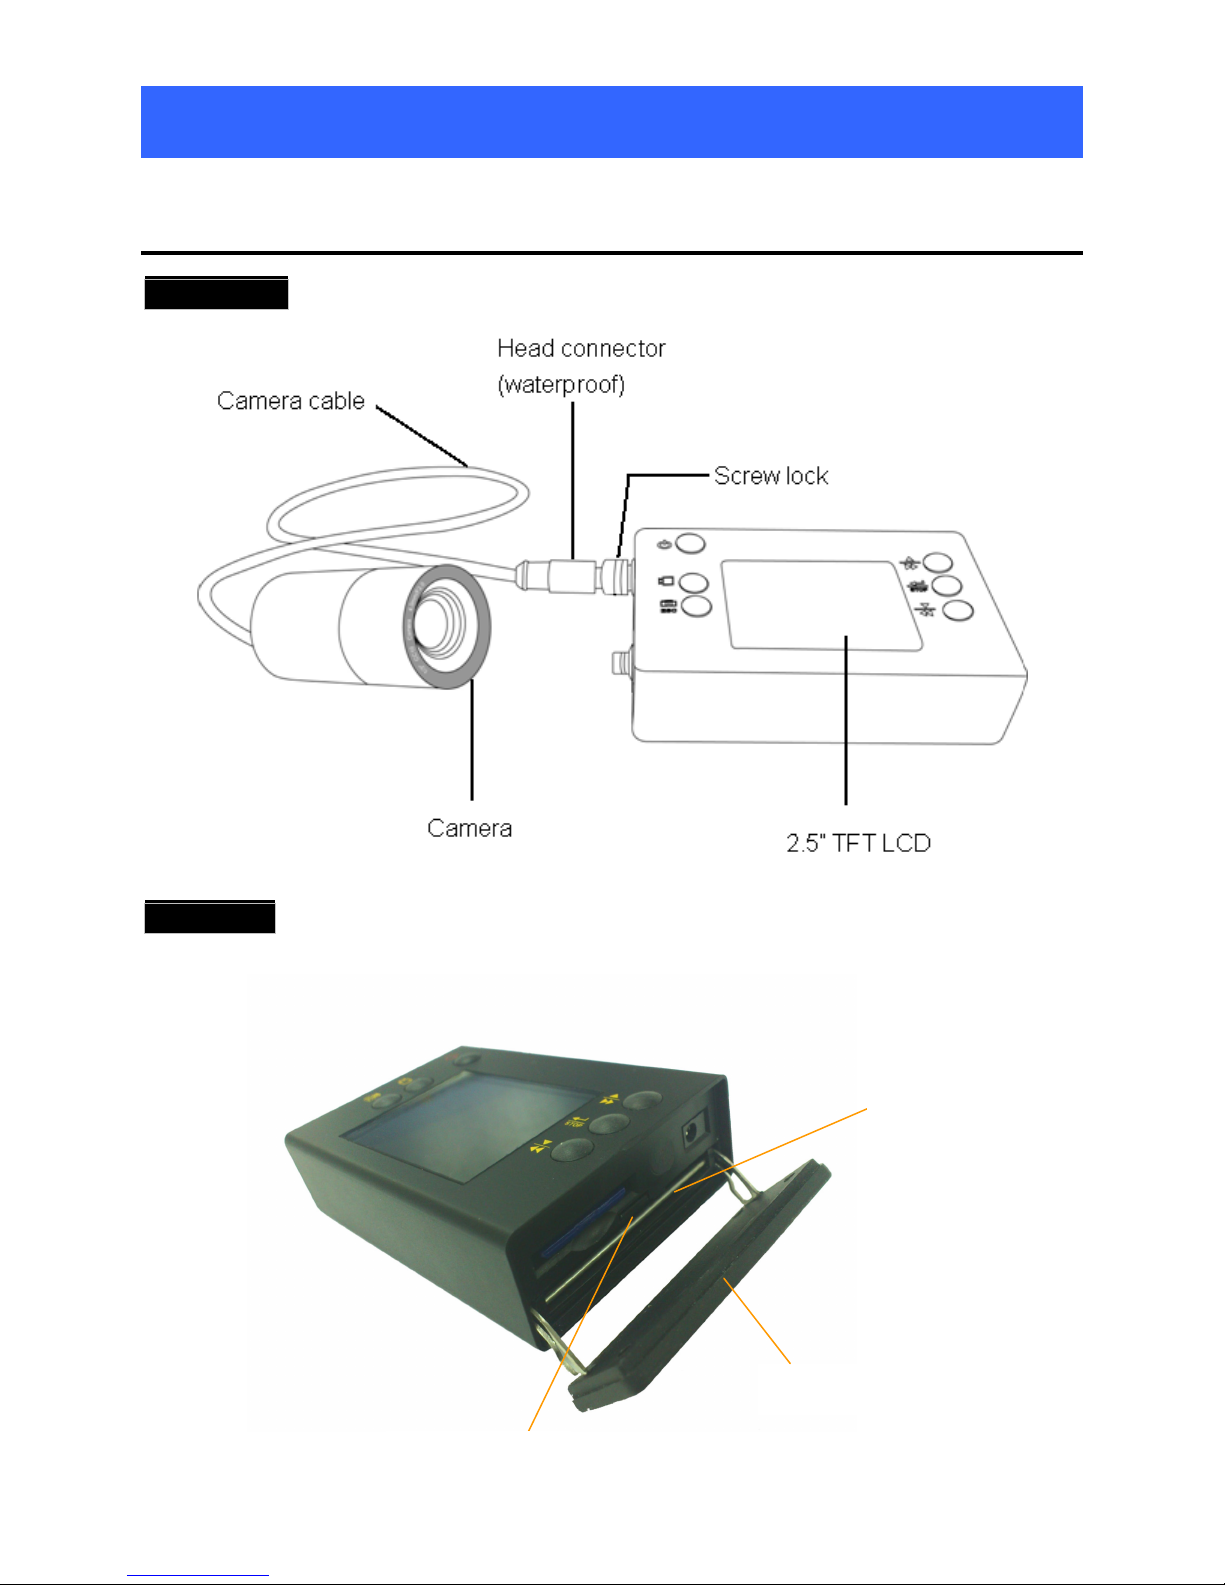
GETTING TO KNOW THE MDVR81
DC Input
Battery
Parts Name and Functions
Front View
Side View
SD Card Slot
Side Cover
Battery Lock
8
Page 9
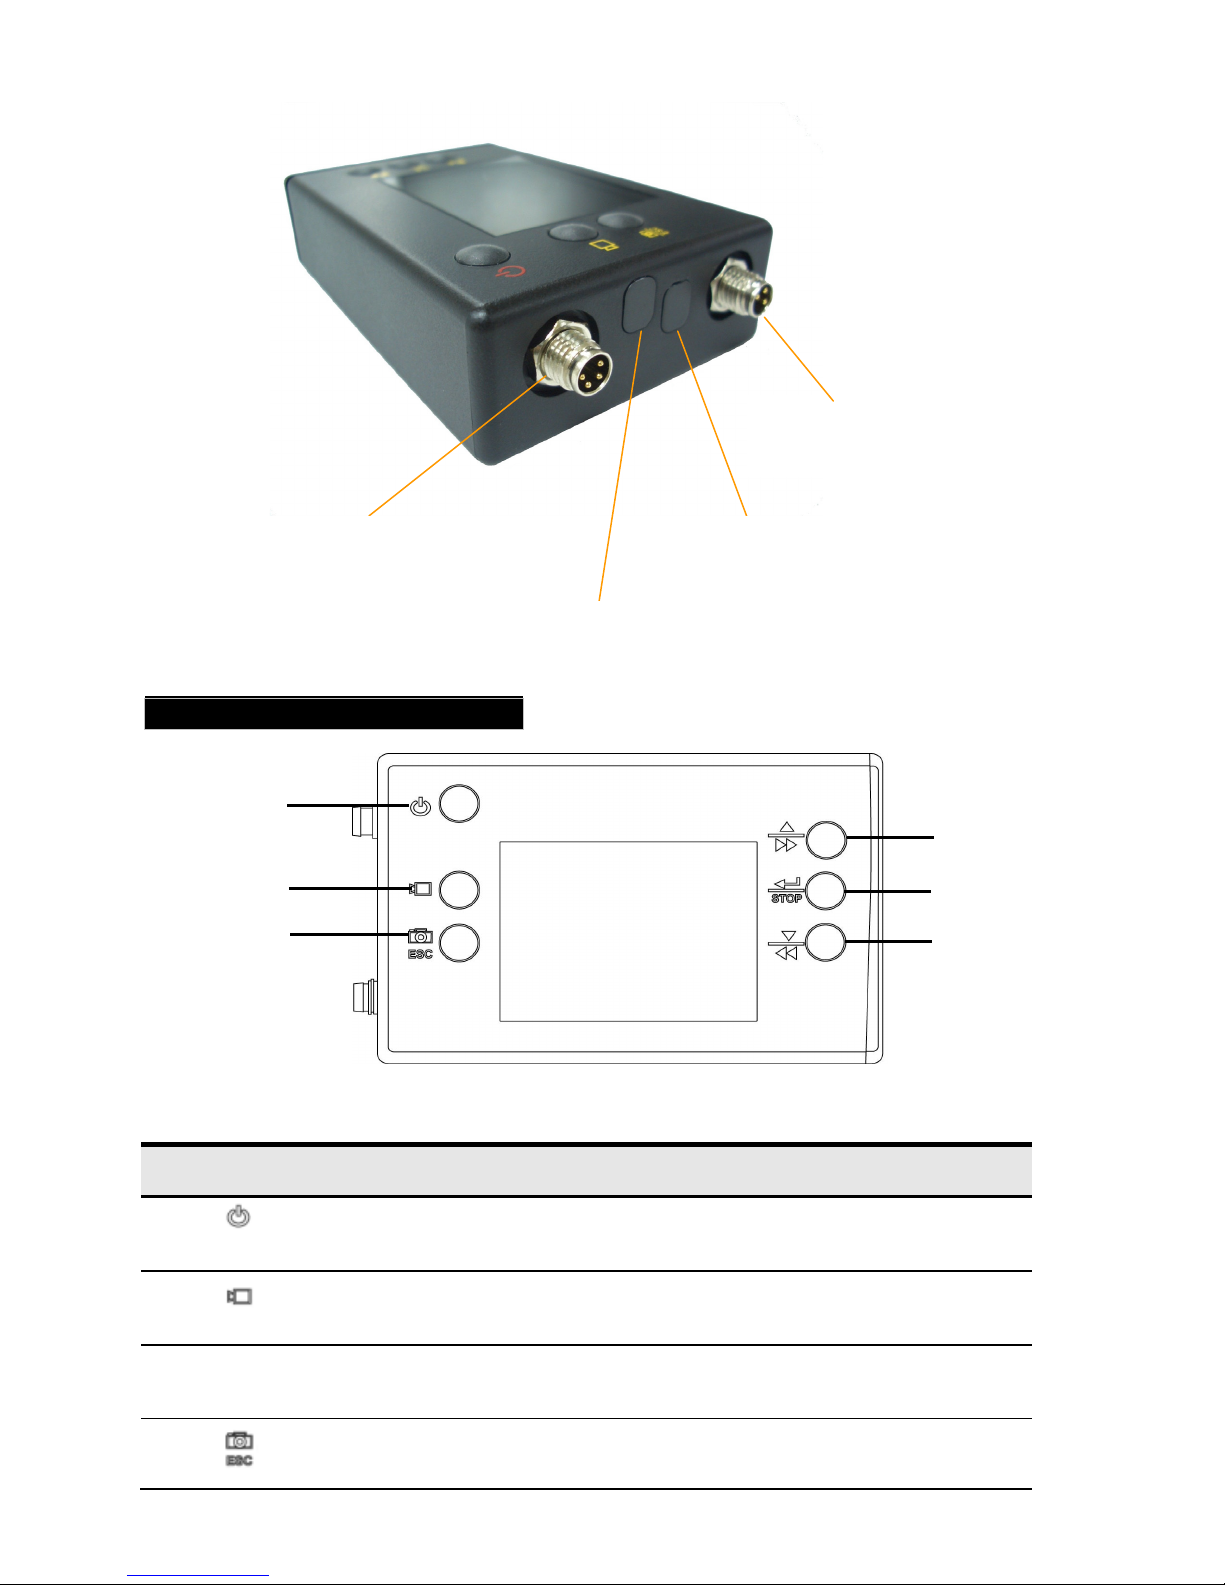
Audio/Video Input
LED Indicator
IR Receiver
(connect to camera)
Button Function Description
Audio/Video Output
(connect to display)
No. Icon State Description
N/A Press and hold the power button for 2 seconds to turn
on/off.
In Preview Mode Press to start recording.
In Play Mode Press to increase the volume.
In Preview Mode Press to take a snapshot.
9
Page 10
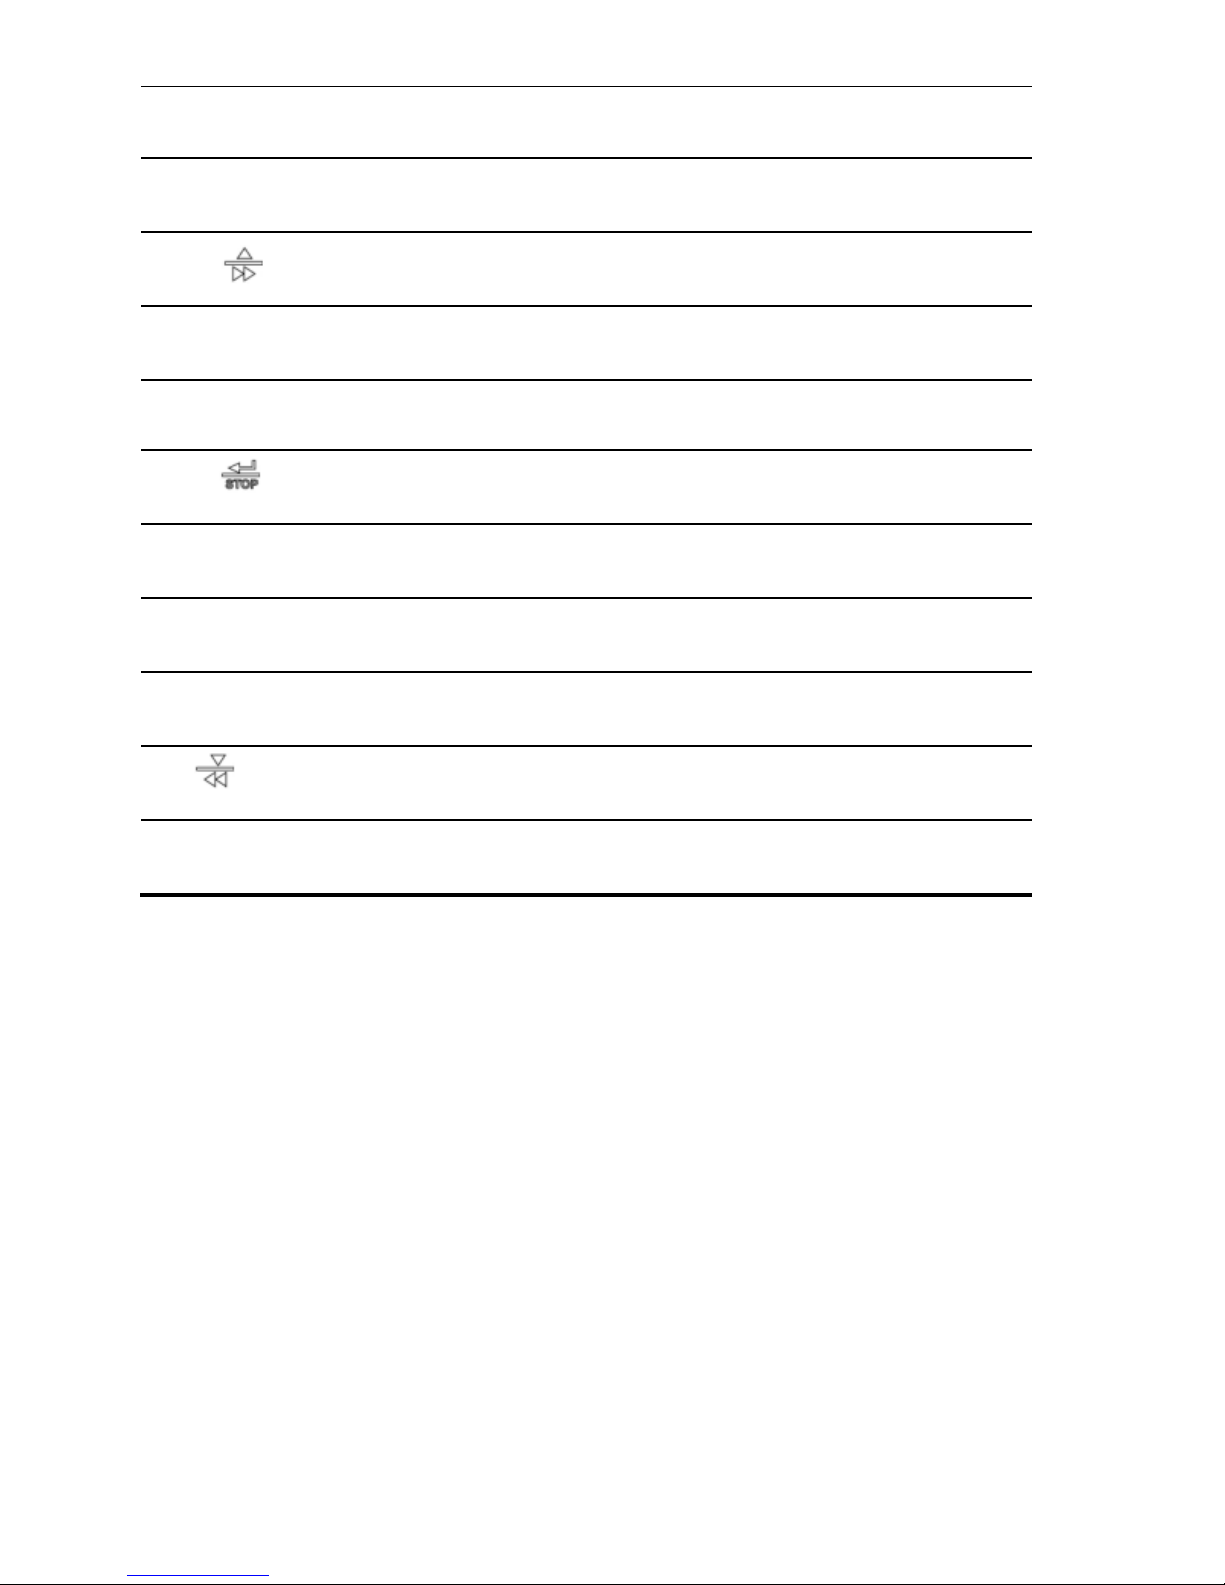
In Play Mode Press to decrease the volume.
PLAY with
In Menu Mode Functions as an ESC button.
In Preview Mode Press to play back the last recorded movie.
In Play Mode Toggle for fast forward function.
In Menu Mode Press to select items upward.
In Preview Mode Press to enter the Menu mode.
In Play Mode Press to stop playing back the last movie.
Menu select, Stop playing back selected movie.
In Menu Mode Press to confirm the selection.
In Rec. Mode Press to stop recording.
In Play Mode Toggling for fast backward.
In Menu Mode Press to select items downward.
10
Page 11
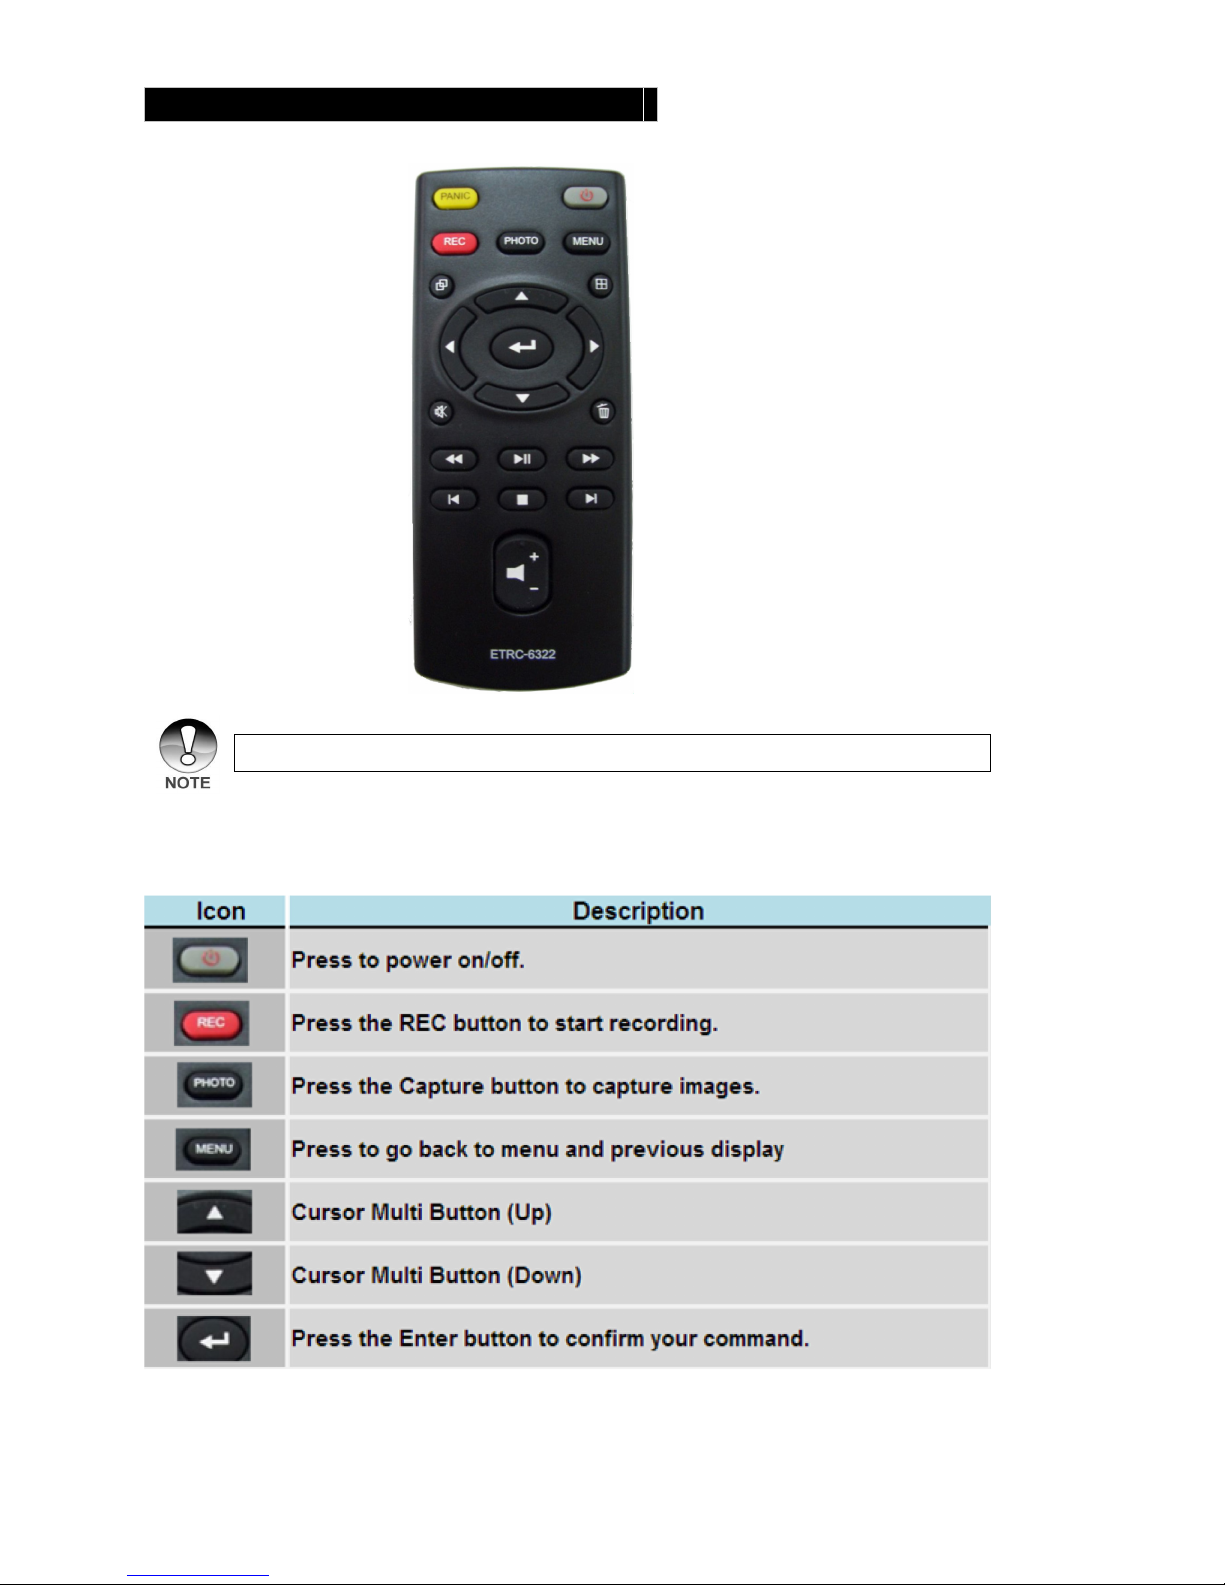
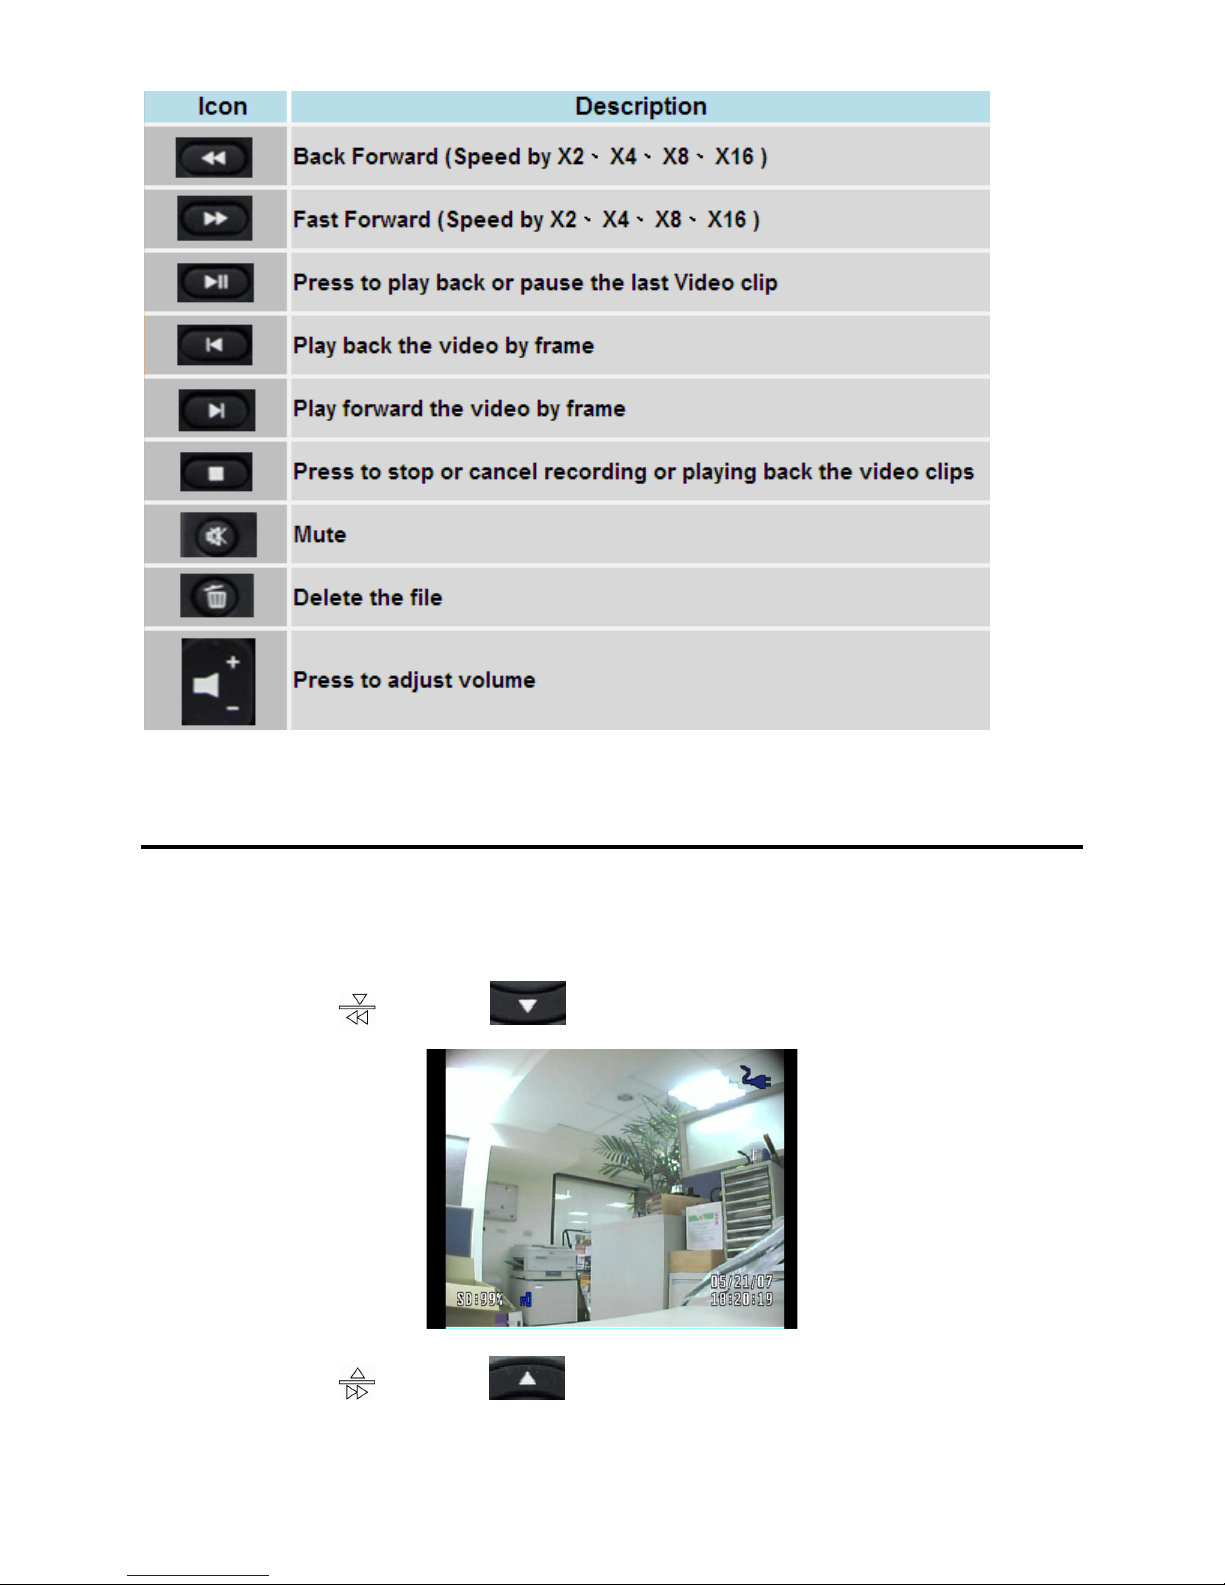
Remote Control Function Description
Charge the MDVR81 fully before using the remote control.
11
Page 12
Button Lock Function
1. In Preview and Pre-Alarm modes, follow the steps below to enable the button lock/unlock feature.
The key icon will be displayed at the left button on the screen. The color of the key icon depends
on the sequence of each press action:
Step 1: Press the
Step 2: Press the
12
button (or on the remote control) (blue).
button (or on the remote control) (green).
Page 13
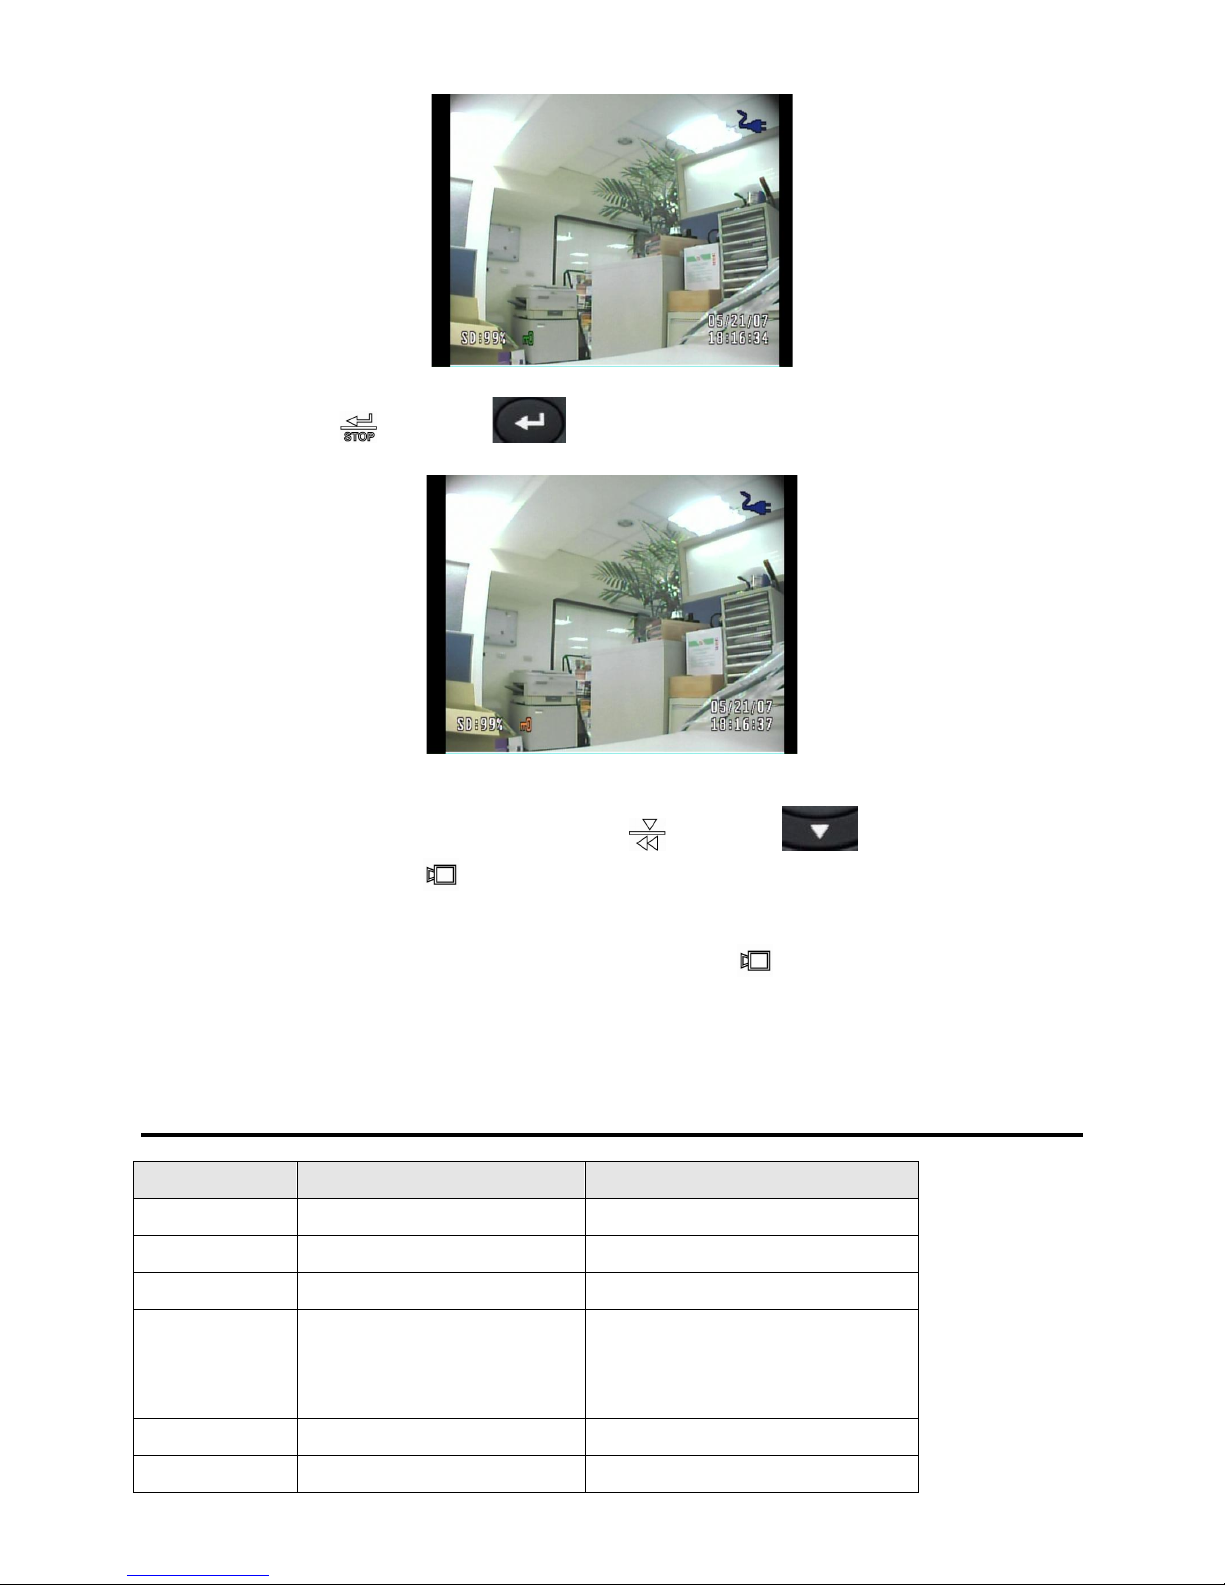
Step 3: Press the
button (or on the remote control).
Lock button function does not affect IR operation.
2. When the button lock function is activated, the
in Preview mode or the
button in Pre-Alarm mode can still be used; other buttons are
button (or on the remote control)
disabled.
3. If the Lock function is enabled under Pre-Alarm mode, the
Post Alarm and access Post-Alarm mode.
button can be used to trigger a
LED Indicators
Signal LED 1 (System) LED 2 (Battery)
GREEN
RED
RED/GREEN
RED blink
YELLOW
DARK
The system is in good operation
Recording -
Overwrite recording -
Error in system,
VIDEO LOSS
Storage error
- Charging
No power Full battery / no battery / no power
-
-
13
Page 14
About the LCD Panel Display
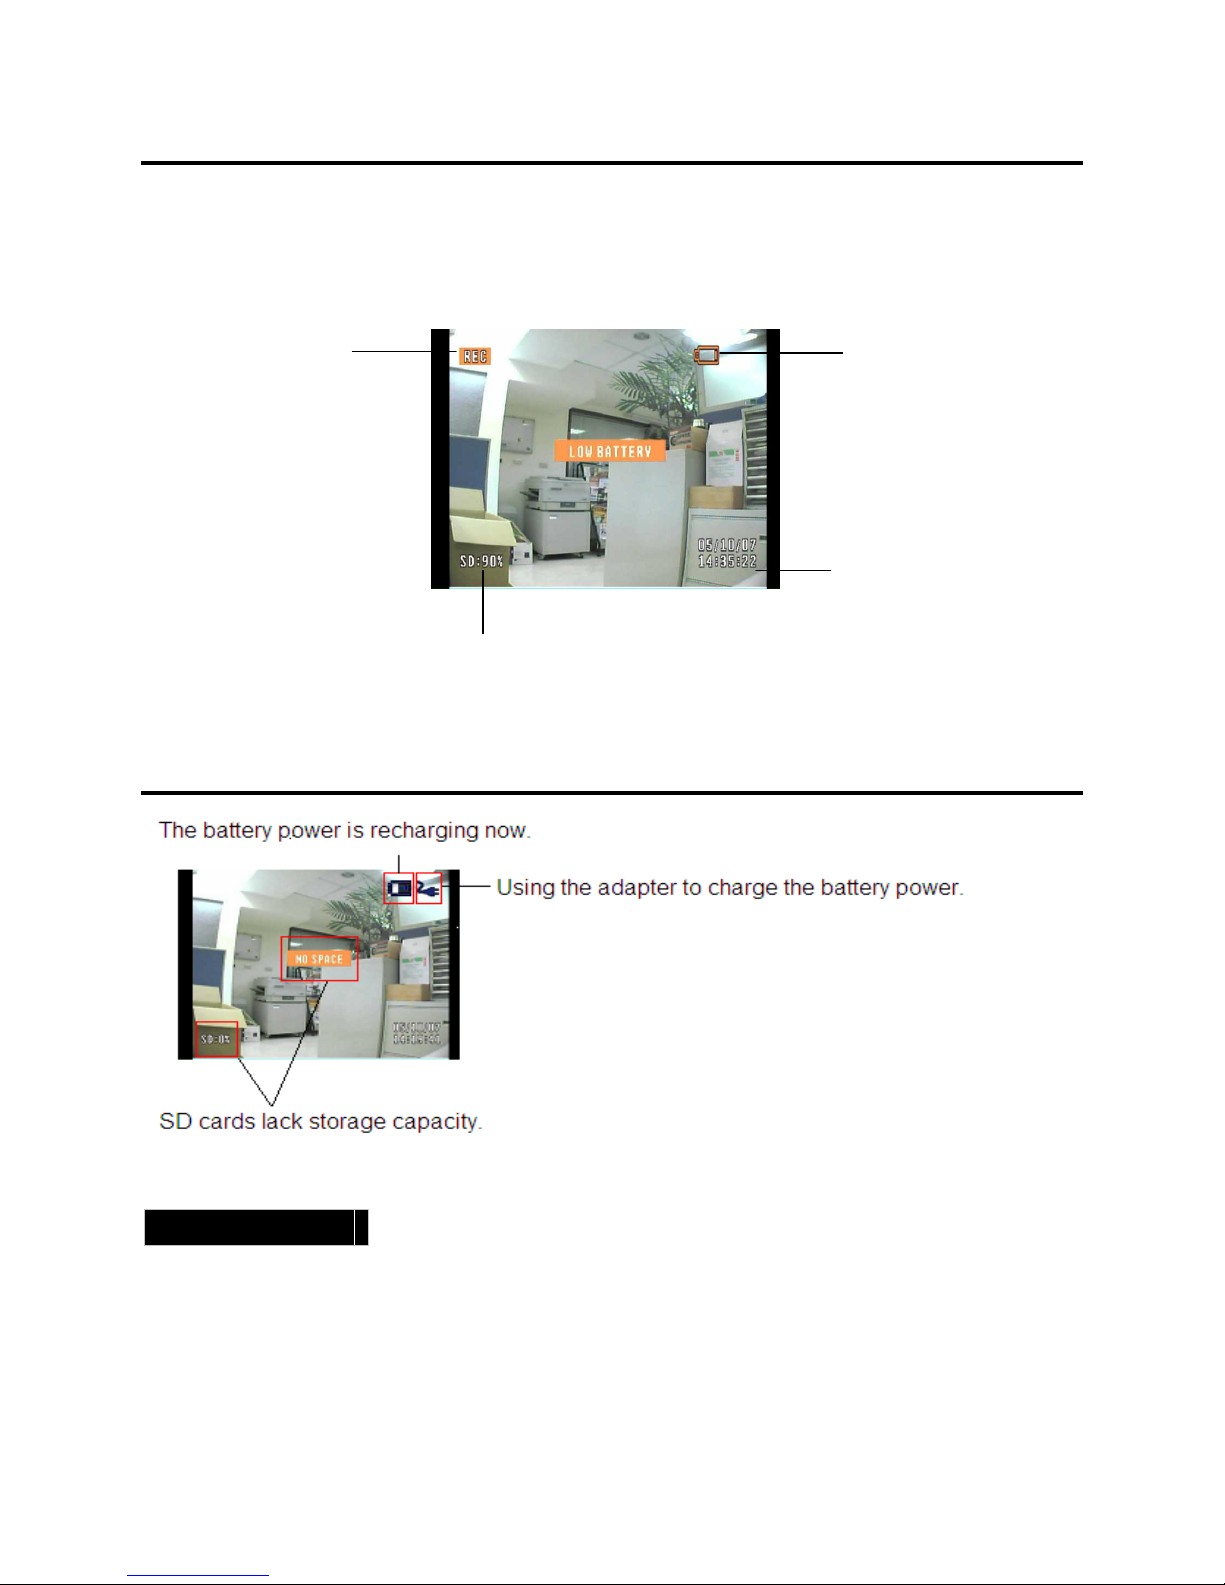
The MDVR81 is equipped with a 2.5" full color TFT LCD monitor to help you compose images, replay
recorded images/video clips or adjust menu settings. The mode icons, text and numbers displayed on
the monitor may very according to the current settings.
Recording status
Remaining storage for SD/SDHC card (in %)
LCD Display Information
Battery power status
Date and time
MM/DD/YY (05/10/07)
HH:MM:SS (14:23:42)
Recording status
• Without “REC” icon The MDVR81 is in preview mode.
• Red text “REC” icon The MDVR81 is recording.
• Blue text “PLAY ” icon The MDVR81 is in playback mode.
14
Page 15
PREPARING THE MDVR81
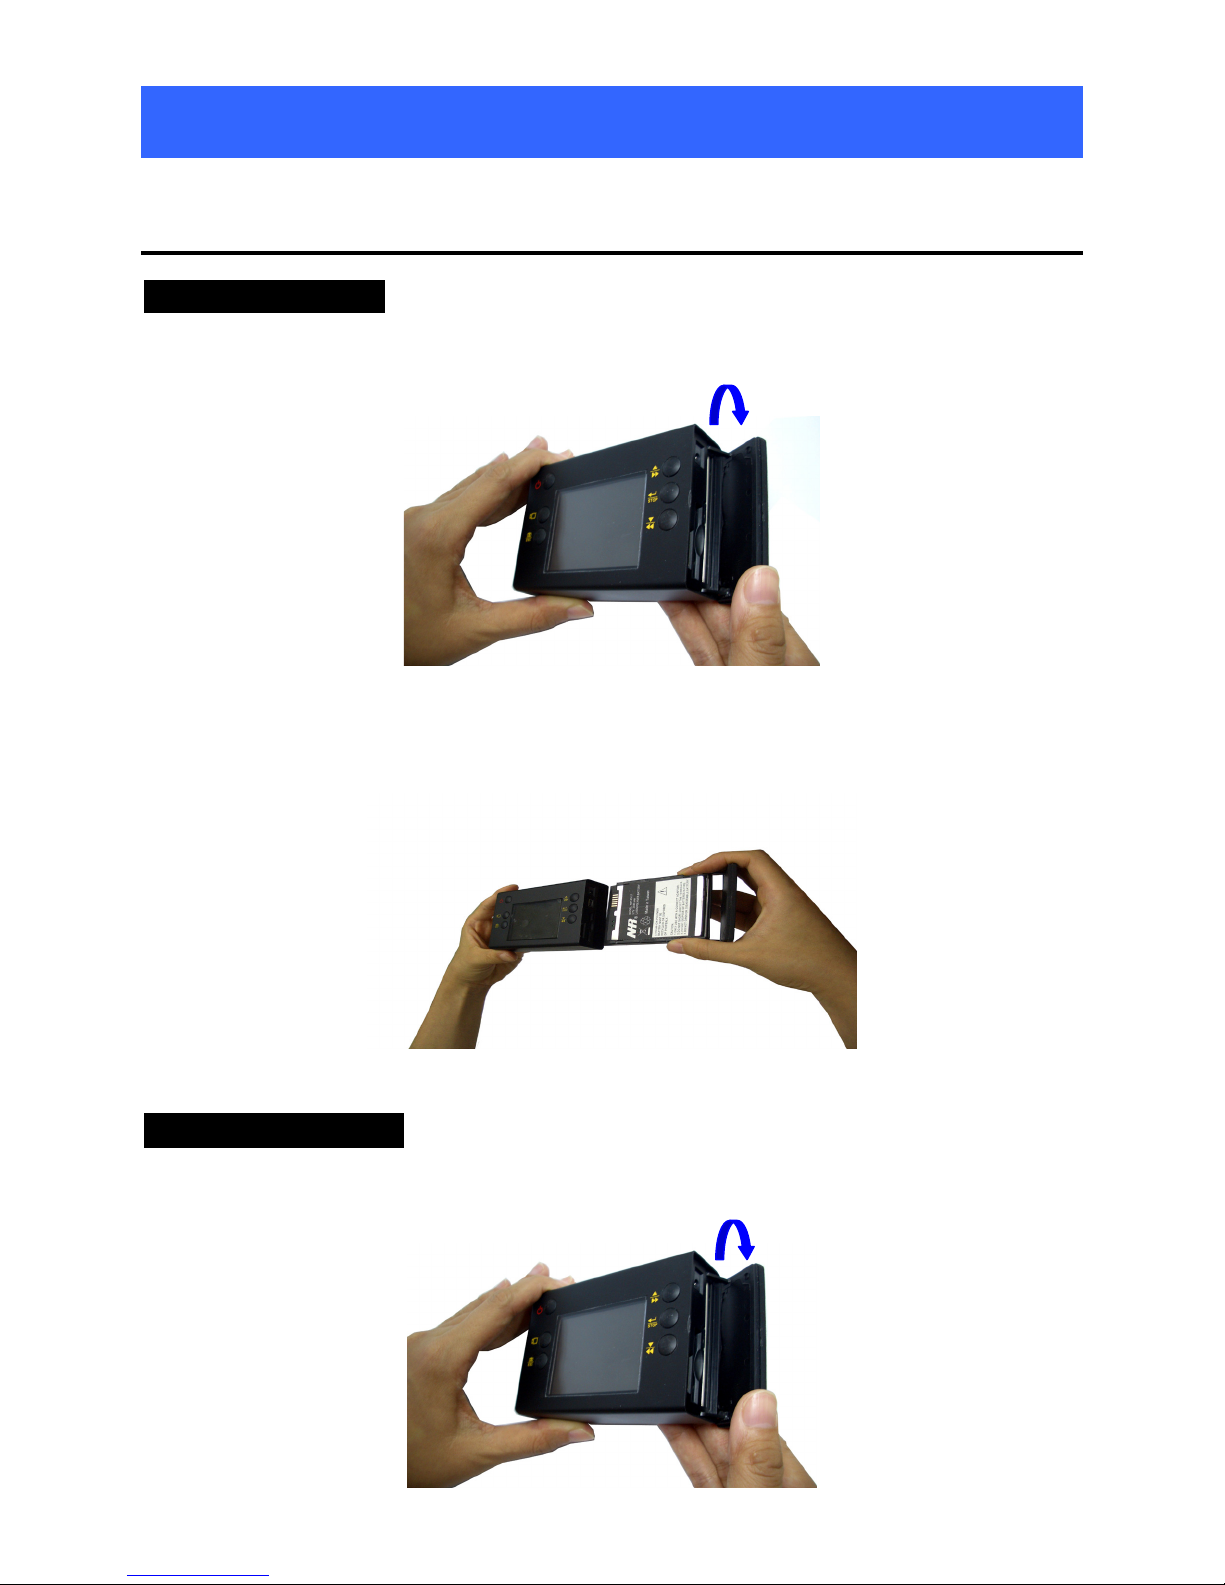
Insert / Remove Battery
Insert the battery
1. Open the side cover.
2. Place the battery downward on the battery bay.
3. Carefully insert the battery pack in the orientation shown below, then close the cover.
Remove the battery
1. Open the side cover.
15
Page 16
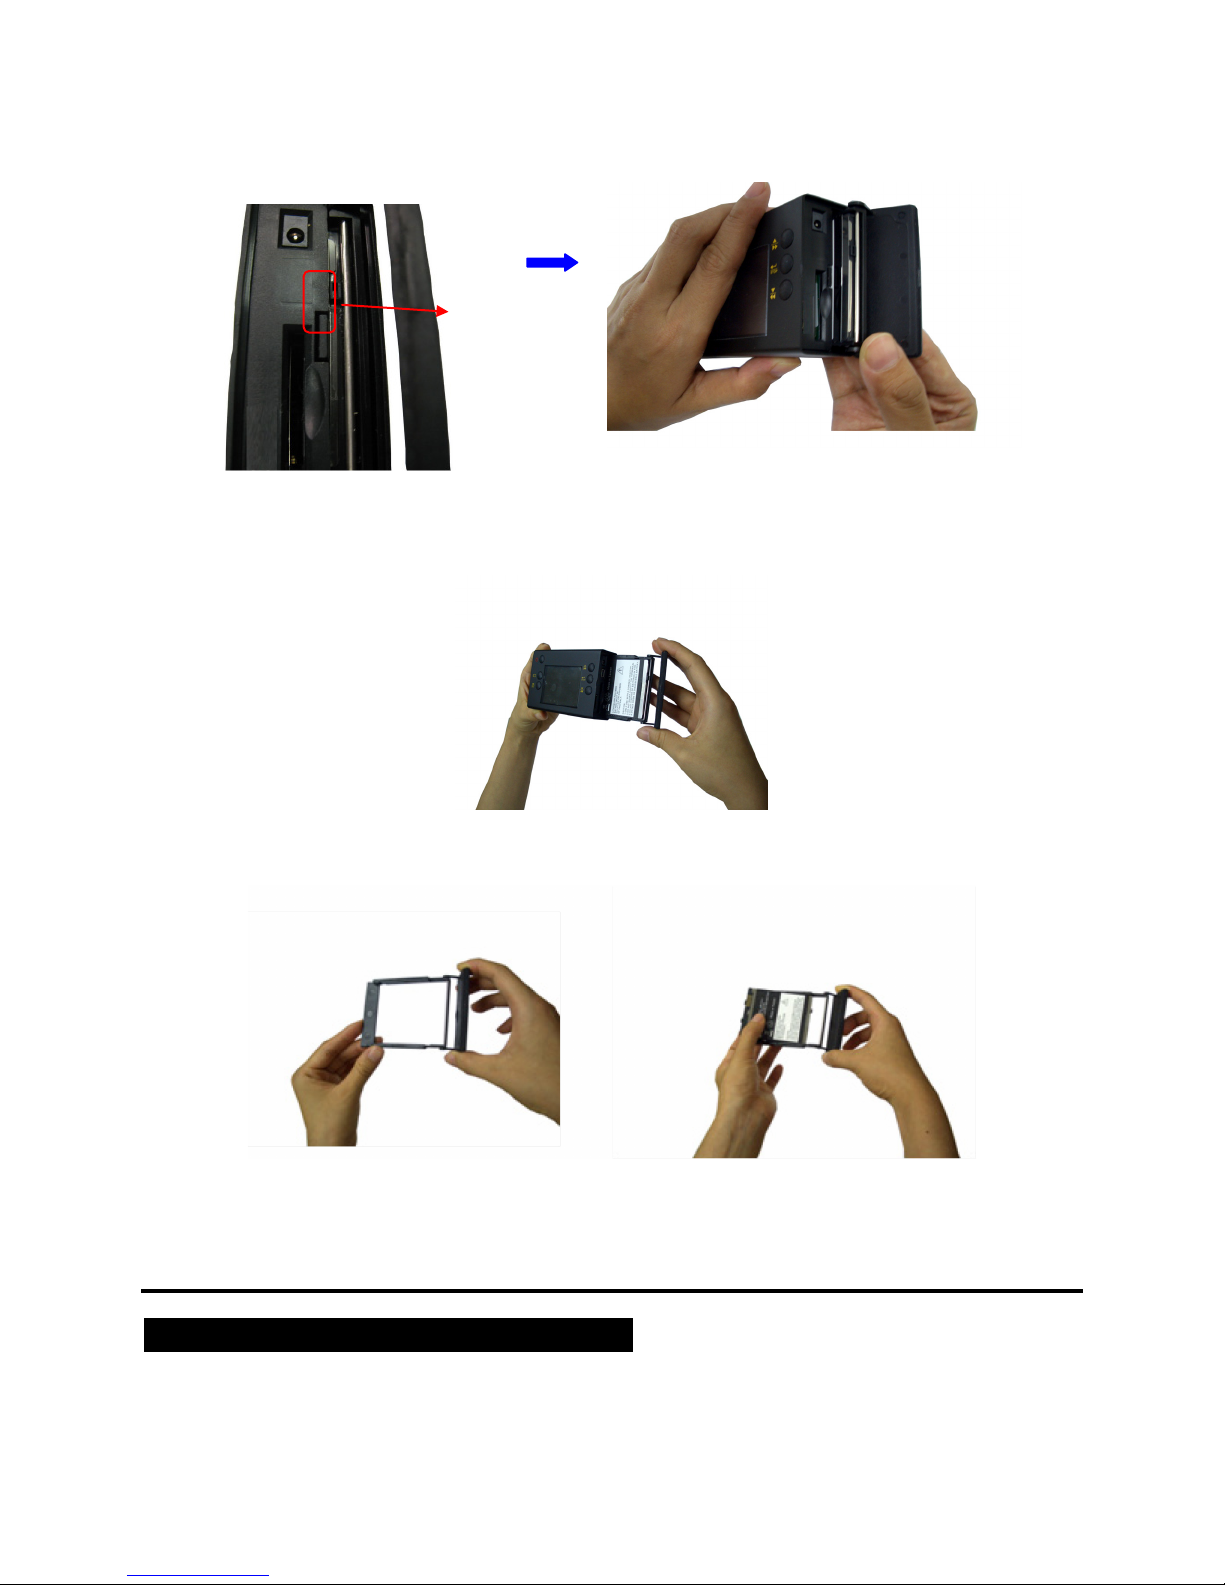
2. Press down the “battery lock” with a finger or thumb, then pull out the battery.
Battery lock
3. Pull the battery out of the battery bay.
4. Lift the battery from the battery bay as shown in the photo.
Camera & Power Adapter Connection
Attach the camera head to the MDVR81
1. Attach the camera connector to the head connector on the left side of the DVR.
16
Page 17
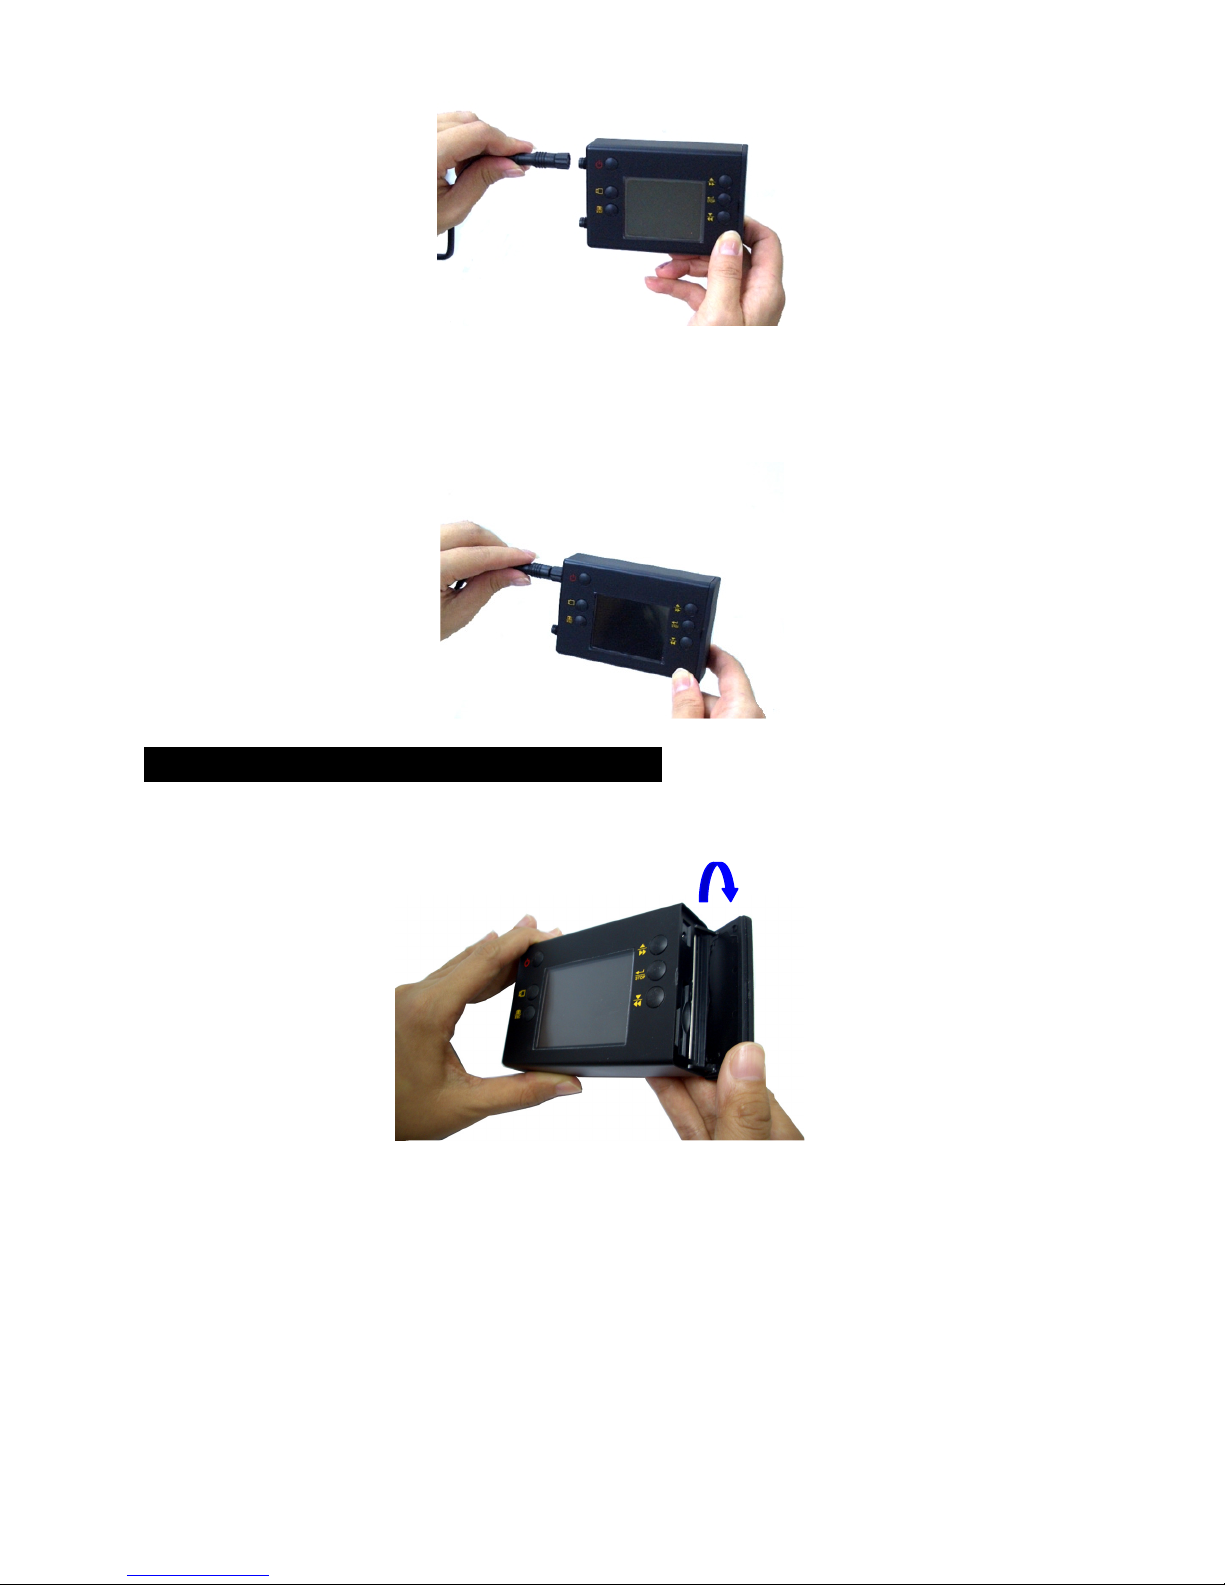
cause a battery charging failure.
2. Turn the lock screw clockwise.
To remove the camera head, turn the head connector lock screw counterclockwise.
Use power adapter to charge the battery
1. Open the side cover.
2. Plug in the power adapter.
NOTE: Do not pull out the battery. It will
17
Page 18
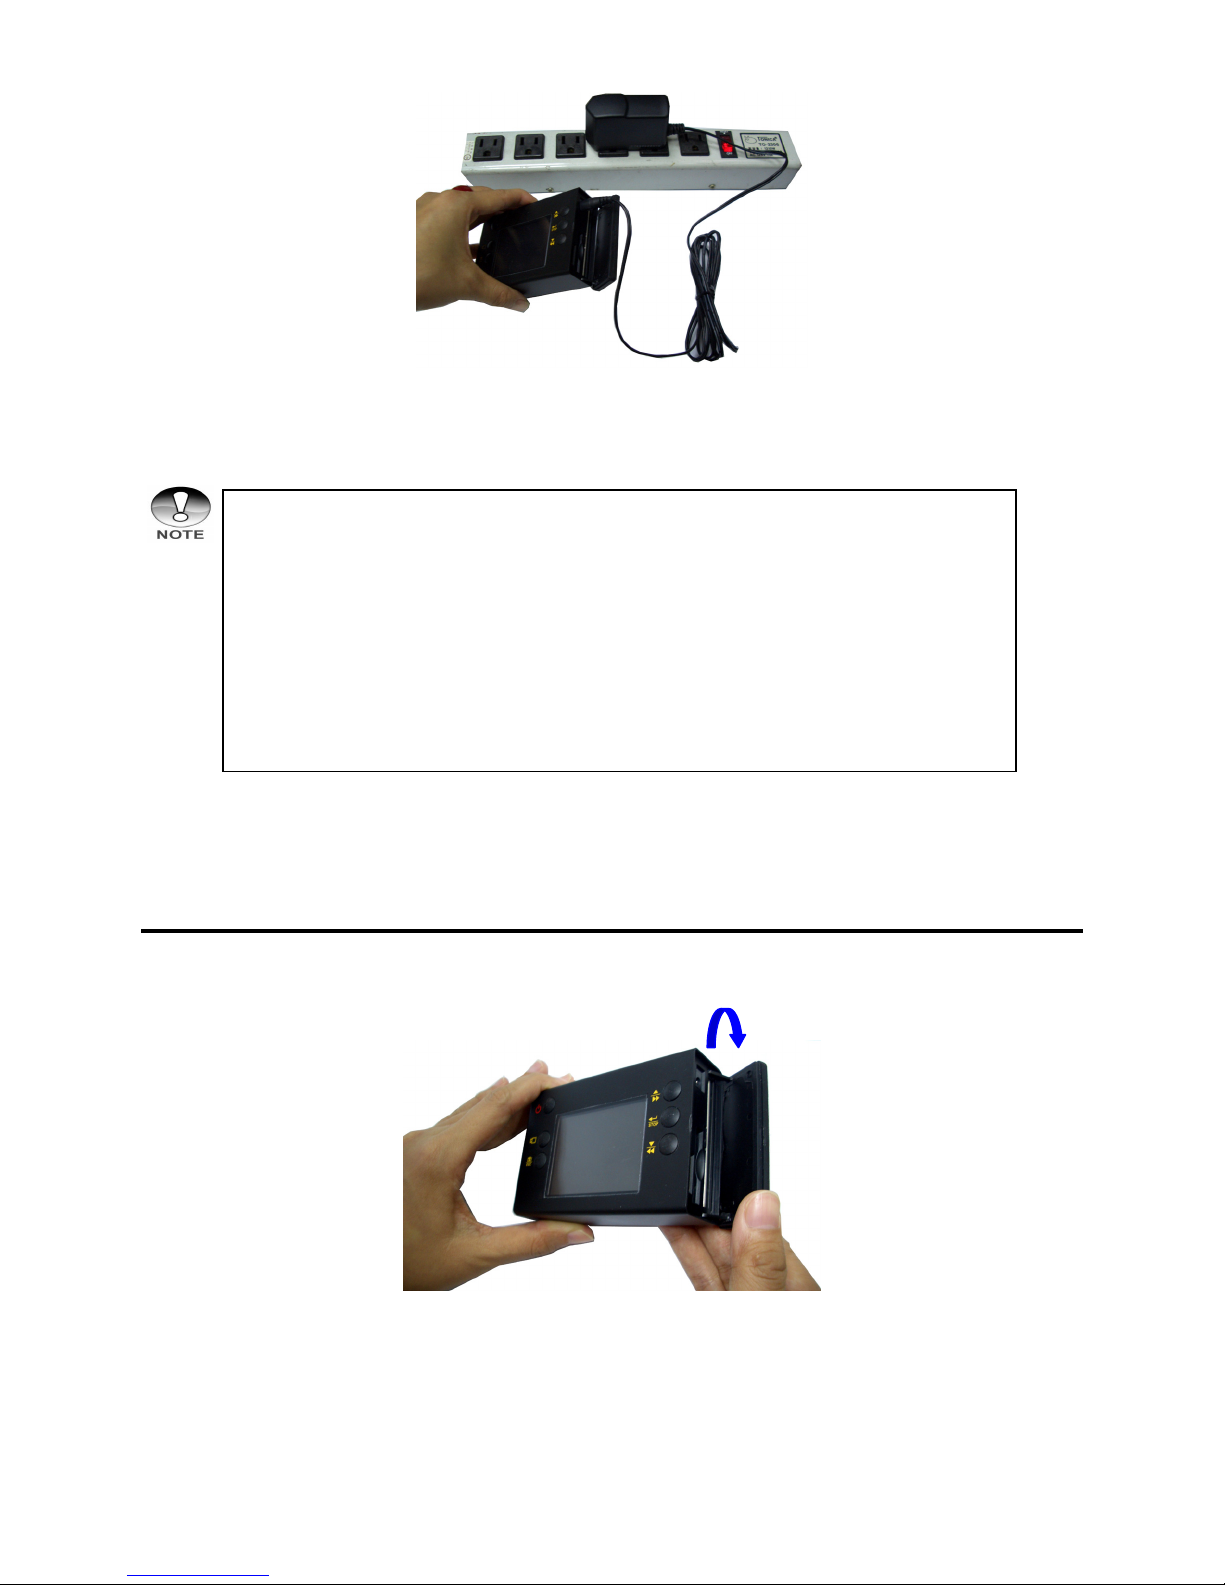
3. Press and hold the power button to turn on the MDVR81.
The LCD monitor will show the MDVR81 is charging.
• Turn OFF the power supply before attaching the camera head to the recorder
• When attaching the head connector, be sure the pins mate with the holes. If
the head connector is forced on, the camera connector pins could be bent and
other damage could be caused.
• The battery can be charged with the AC power adapter if you disconnect the
camera head from the recorder. A “VIDEO LOSS” message will appear on the
LCD monitor.
Prepare SDHC Memory Card
1. Open the side cover.
2. Insert the SDHC memory card into slot, then close the side cover.
18
Page 19

NOTE: A Toshiba or Kingston Class 10 SDHC card is recommended.
19
Page 20
GETTING STARTED
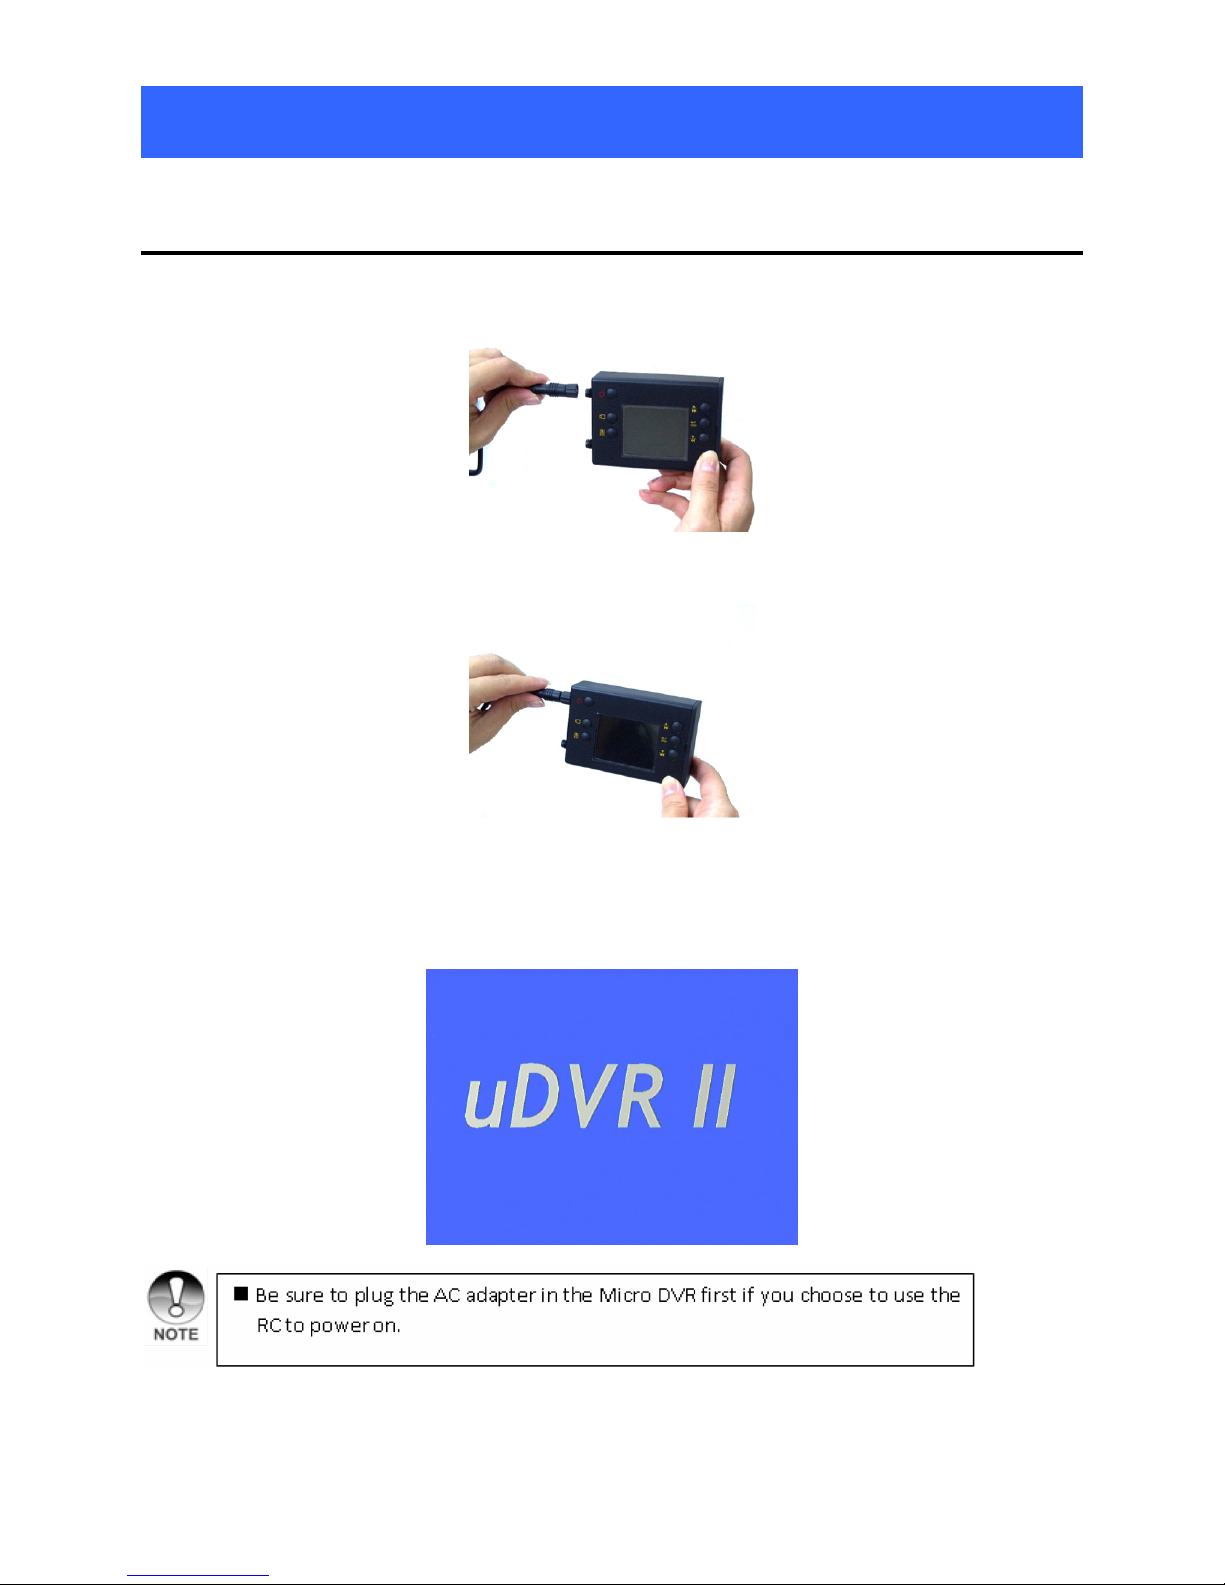
Power On/Off the DVR
1. Attach the camera connector to the head connector on the left side the MDVR81.
2. Turn the lock screw clockwise.
3. Press and hold the power button 2 or 3 seconds until the LED indicator lights red and the screen
appears.
To turn off the power, press and hold the power button.
20
Page 21
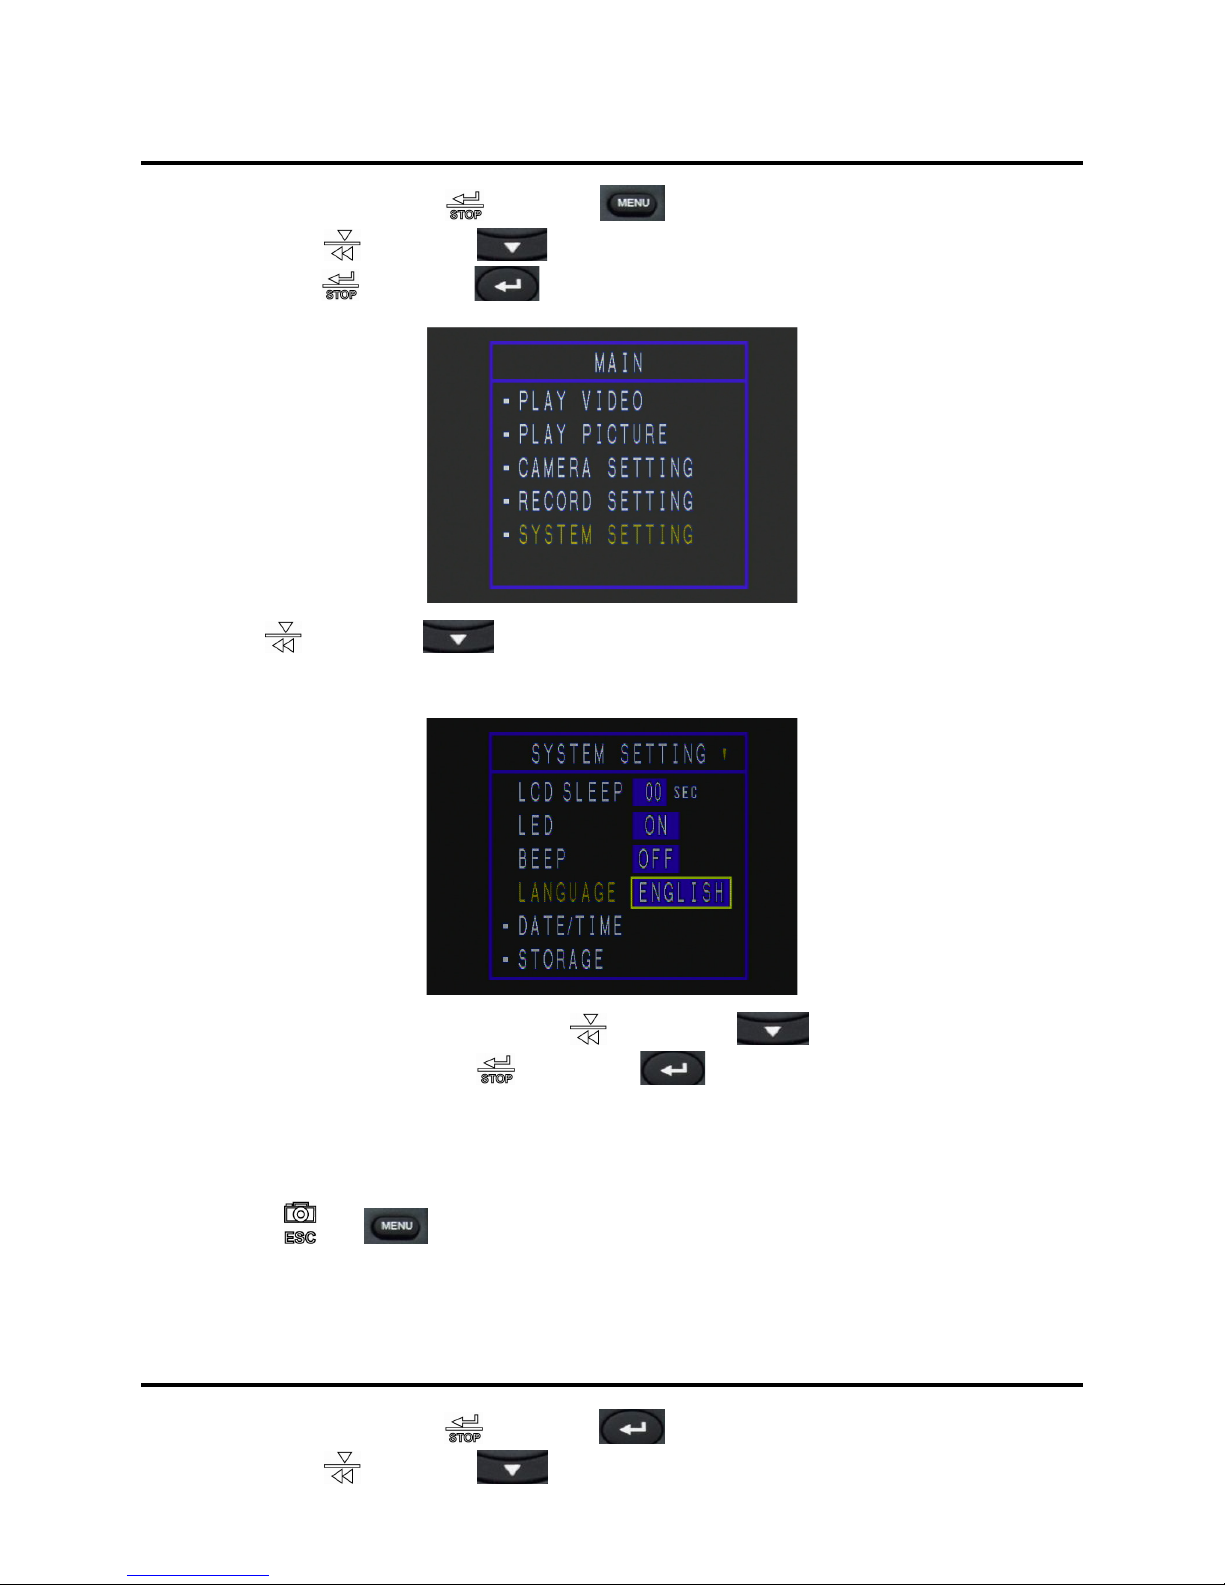
About the Screen Language
1. In preview mode, press the button (or on the remote control) to enter the [MAIN]
menu. Use the
then press the
2. Use the
language is English.
button (or on the remote control) to select the [SYSTEM SETTING],
button (or on the remote control) to access in menu items.
button (or on the remote control) to select [LANGUAGE]. The default
3. After completing the setup, use the button (or on the remote control) to
select [SAVE], then press the button (or on the remote control) to confirm.
The “SETUP SUCCESSFUL” message appears on the screen and you can immediately return to
the [MAIN] menu.
Press
(or on the remote control) to return to the preview mode.
Date & Time Setting
1. In preview mode, press the button (or on the remote control) to enter the [MAIN]
menu. Use the
button (or on the remote control) to select the [SYSTEM SETTING],
21
Page 22
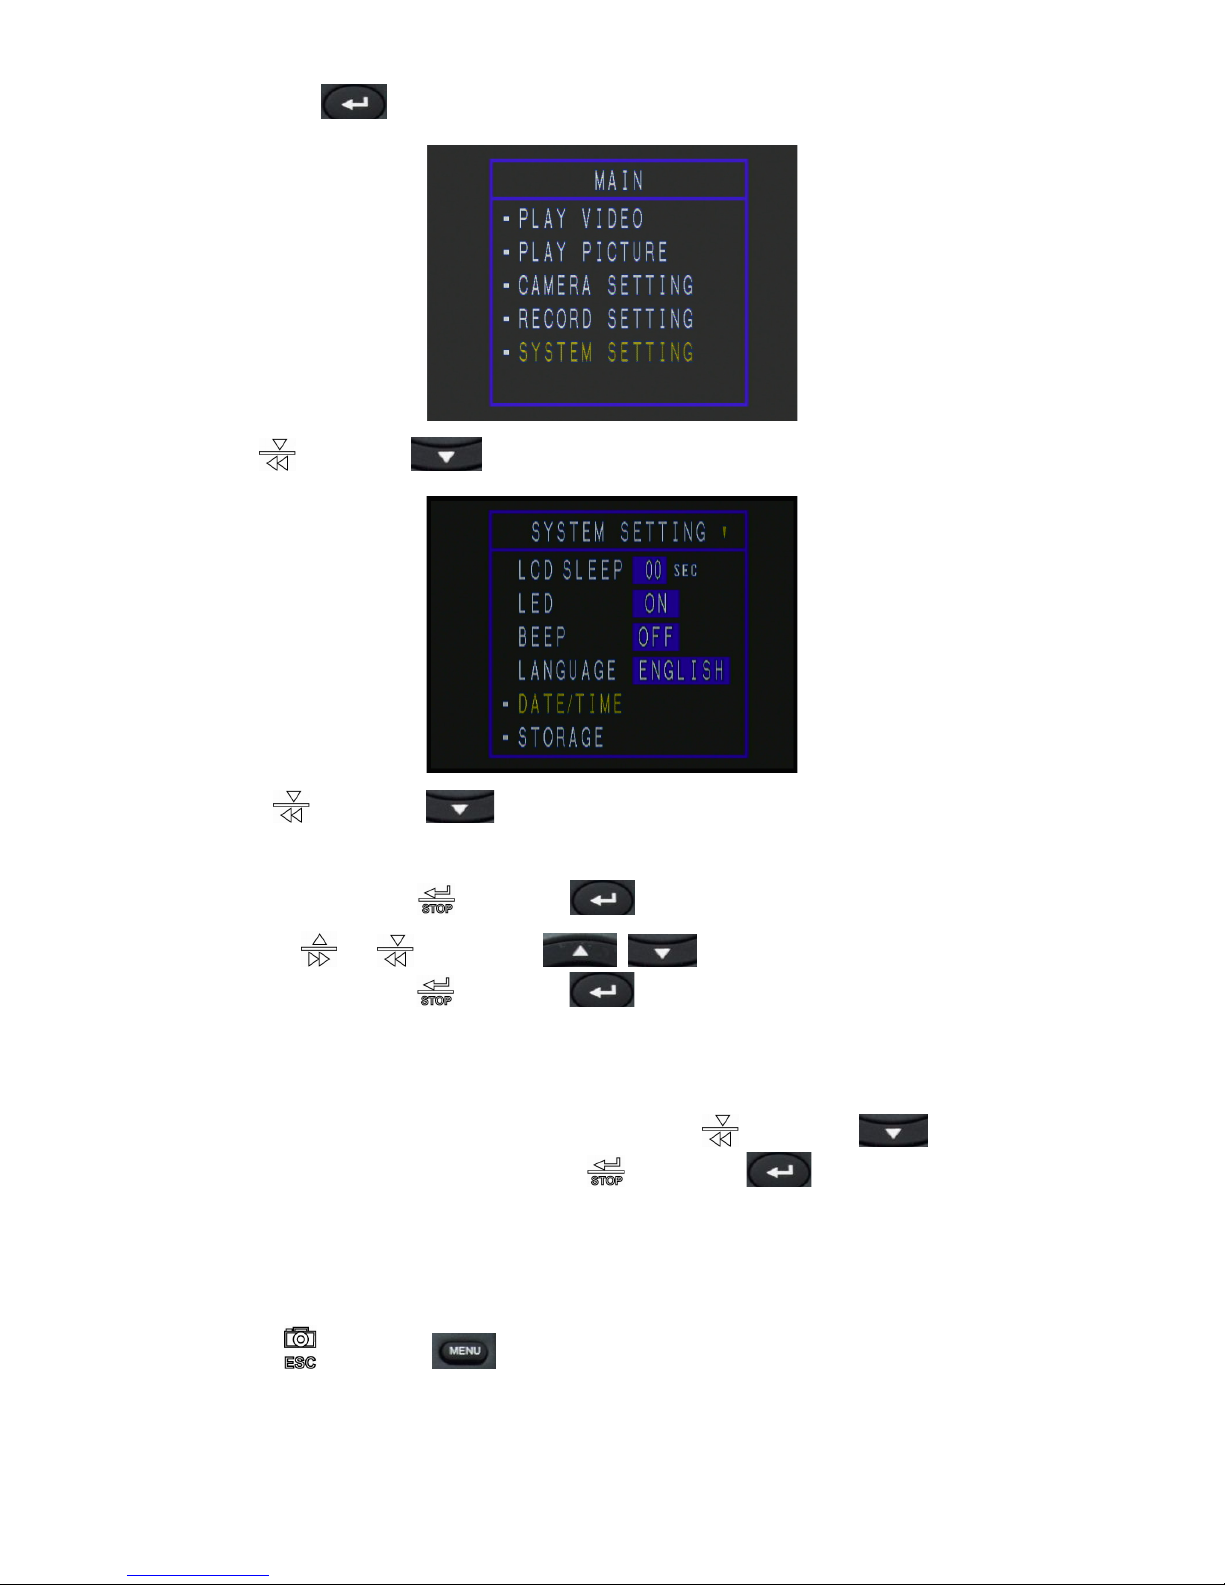
then press the button to access in menu items.
2. Use the
3. Press the
button (or on the remote control) to select the [DATE/TIME].
button (or on the remote control) to select [DATE ], [TIME] and [FO RMAT ]
you want to set.
For [DATE ], press the
Use the
value, then press the
in the next field.
button (or on the remote control) to set the first field.
or buttons (or on the remote control) to change the
button (or on the remote control) to confirm and continue
For more details on date types, refer to the “SYSTEM SETTING Menu - DATE/TIME”.
4. After completing the settings for each item, use the
control) to select [SAVE], then press the
confirm.
The “SETUP SUCCESSFUL” message appears on the screen. You can return to the [SYSTEM
SETTING] menu.
Press
button (or on the remote control) to return to the main menu.
22
button (or on the remote
button (or on the remote control) to
Page 23
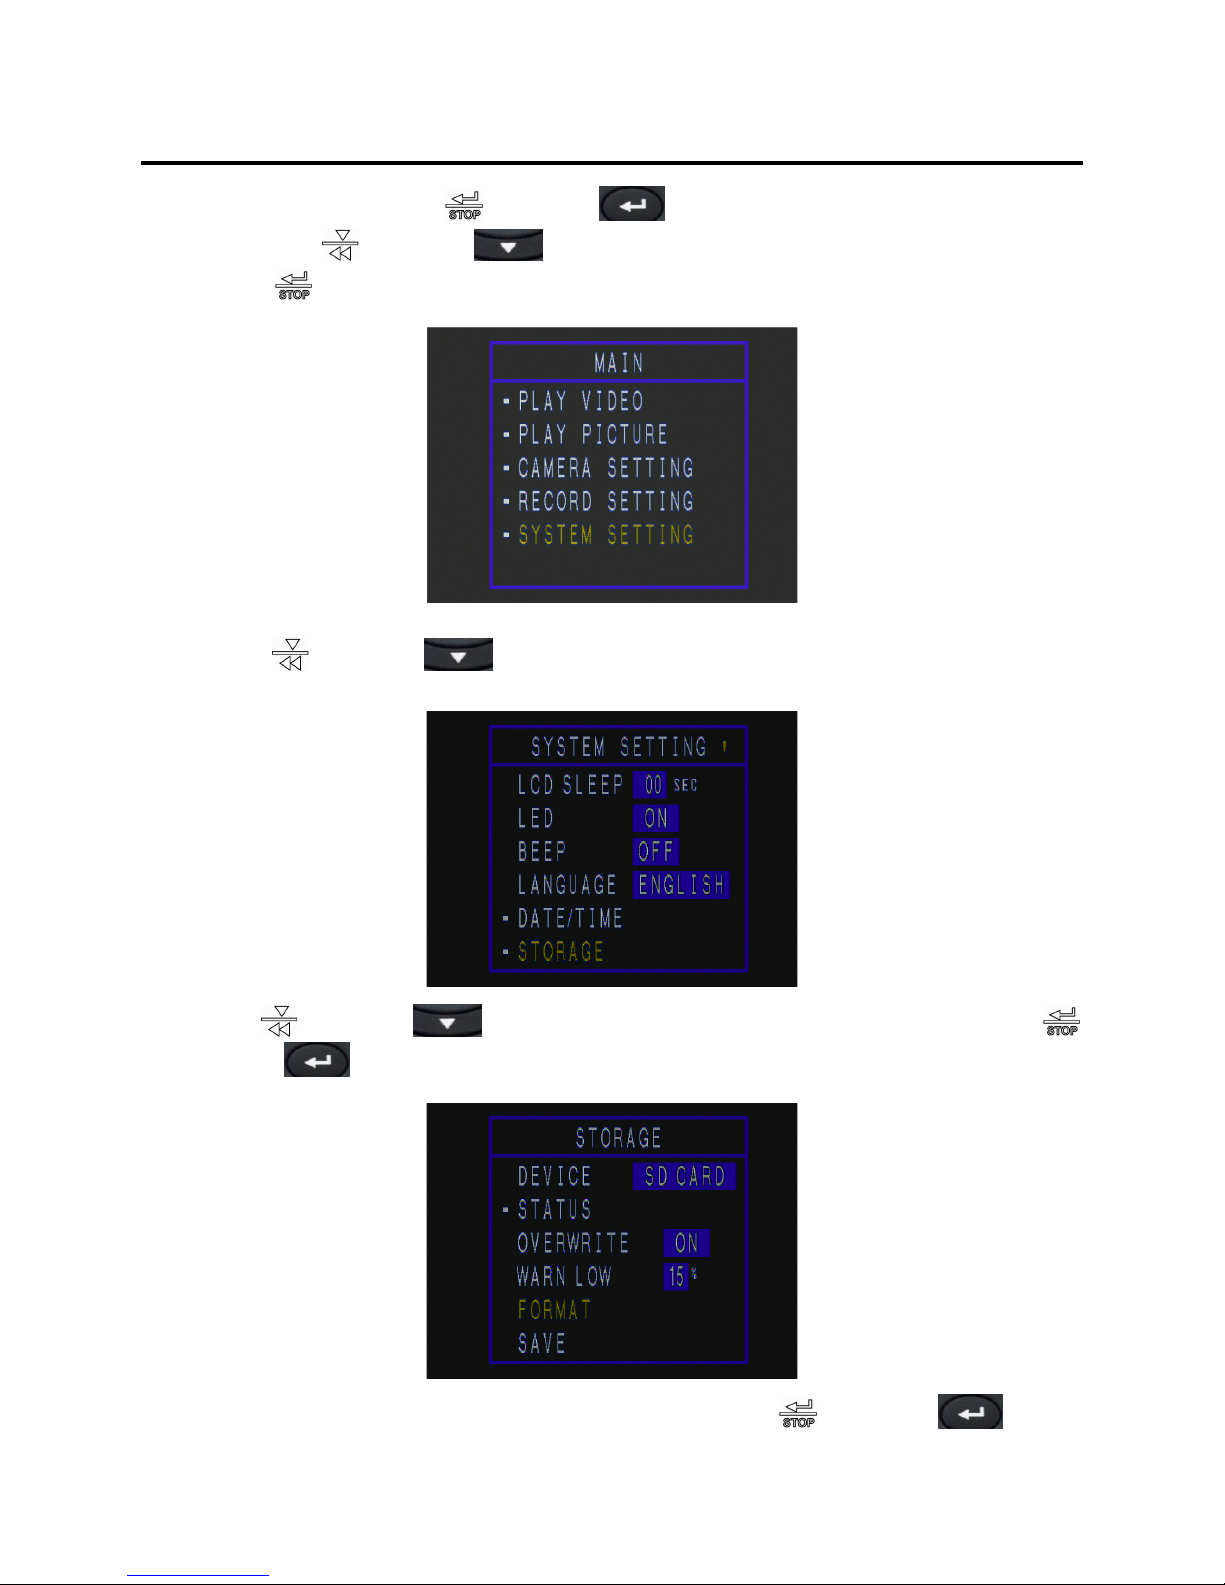
Format SDHC Memory Card
1. In preview mode, press the button (or on the remote control) to enter the [MAIN]
menu. Use the
press the
2. Press the
button (or on the remote control) to select [SYSTEM SETTING], then
button.
button (or on the remote control) to select [STORAGE].
3. Use the
button (or
4. When the query message appears on the screen, press the
remote control) to format your SDHC memory card.
button (or on the remote control) to select [FOR MAT], then press the
on the remote control).
button (or on the
23
Page 24
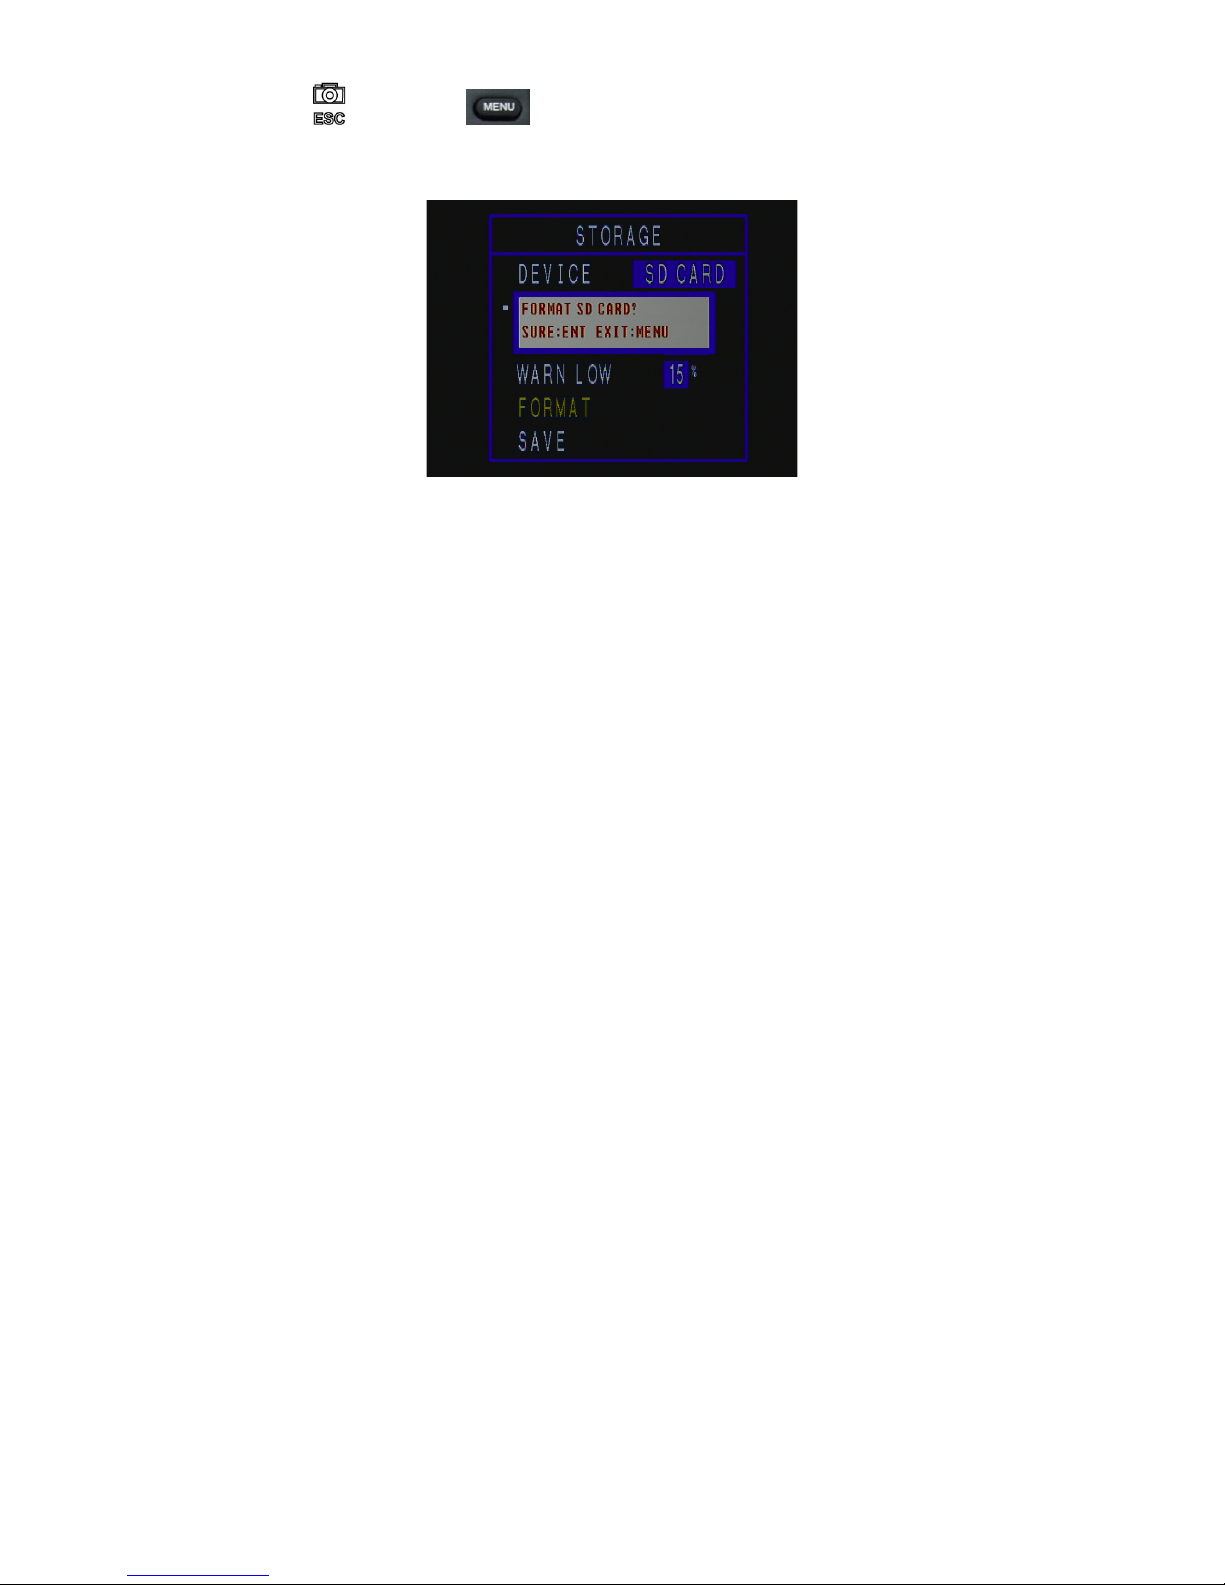
Press the button (or on the remote control) to cancel formatting your SDHC
memory card.
24
Page 25
OPERATIONS
The date of recording can be printed directly on the still images. This
The default
Snapshot
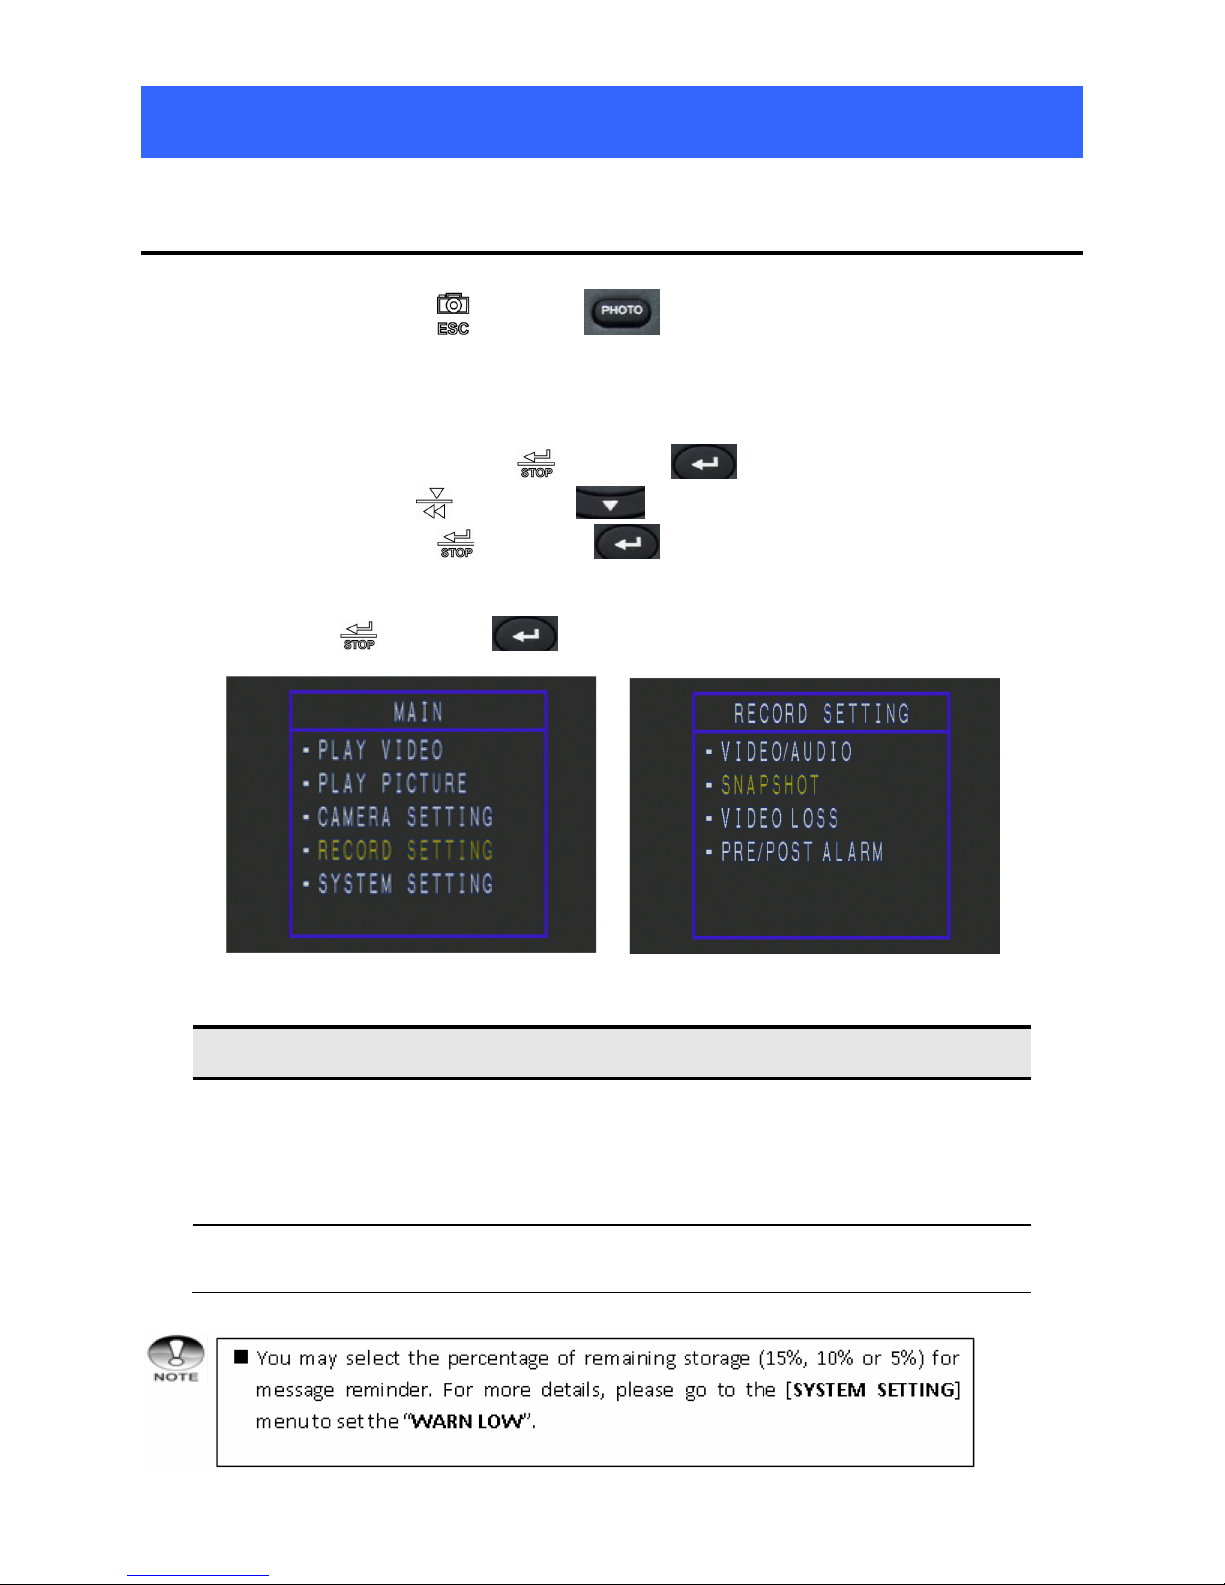
1. In preview mode, press the button (or on the remote control) for a snapshot.
2. For more details about settings of snapshots, refer to the following instructions to enter the
[RECORD SETTING] menu.
Step 1. In preview mode, press the
[MAIN] menu. Use the
SETTING], then press the
items.
Step 2. Press the
button (or on the remote control) to enter the [SNAPSHOT] menu.
button (or on the remote control) to enter the
button (or on the remote control) to select [RECORD
button (or on the remote control) to access in menu
Item Functional Description
DATE PRINT
function must be activated before the image is captured.
setting of Date Print is ON.
* ON / OFF
SAVE Save all the settings of each menu item.
25
Page 26
Play Picture
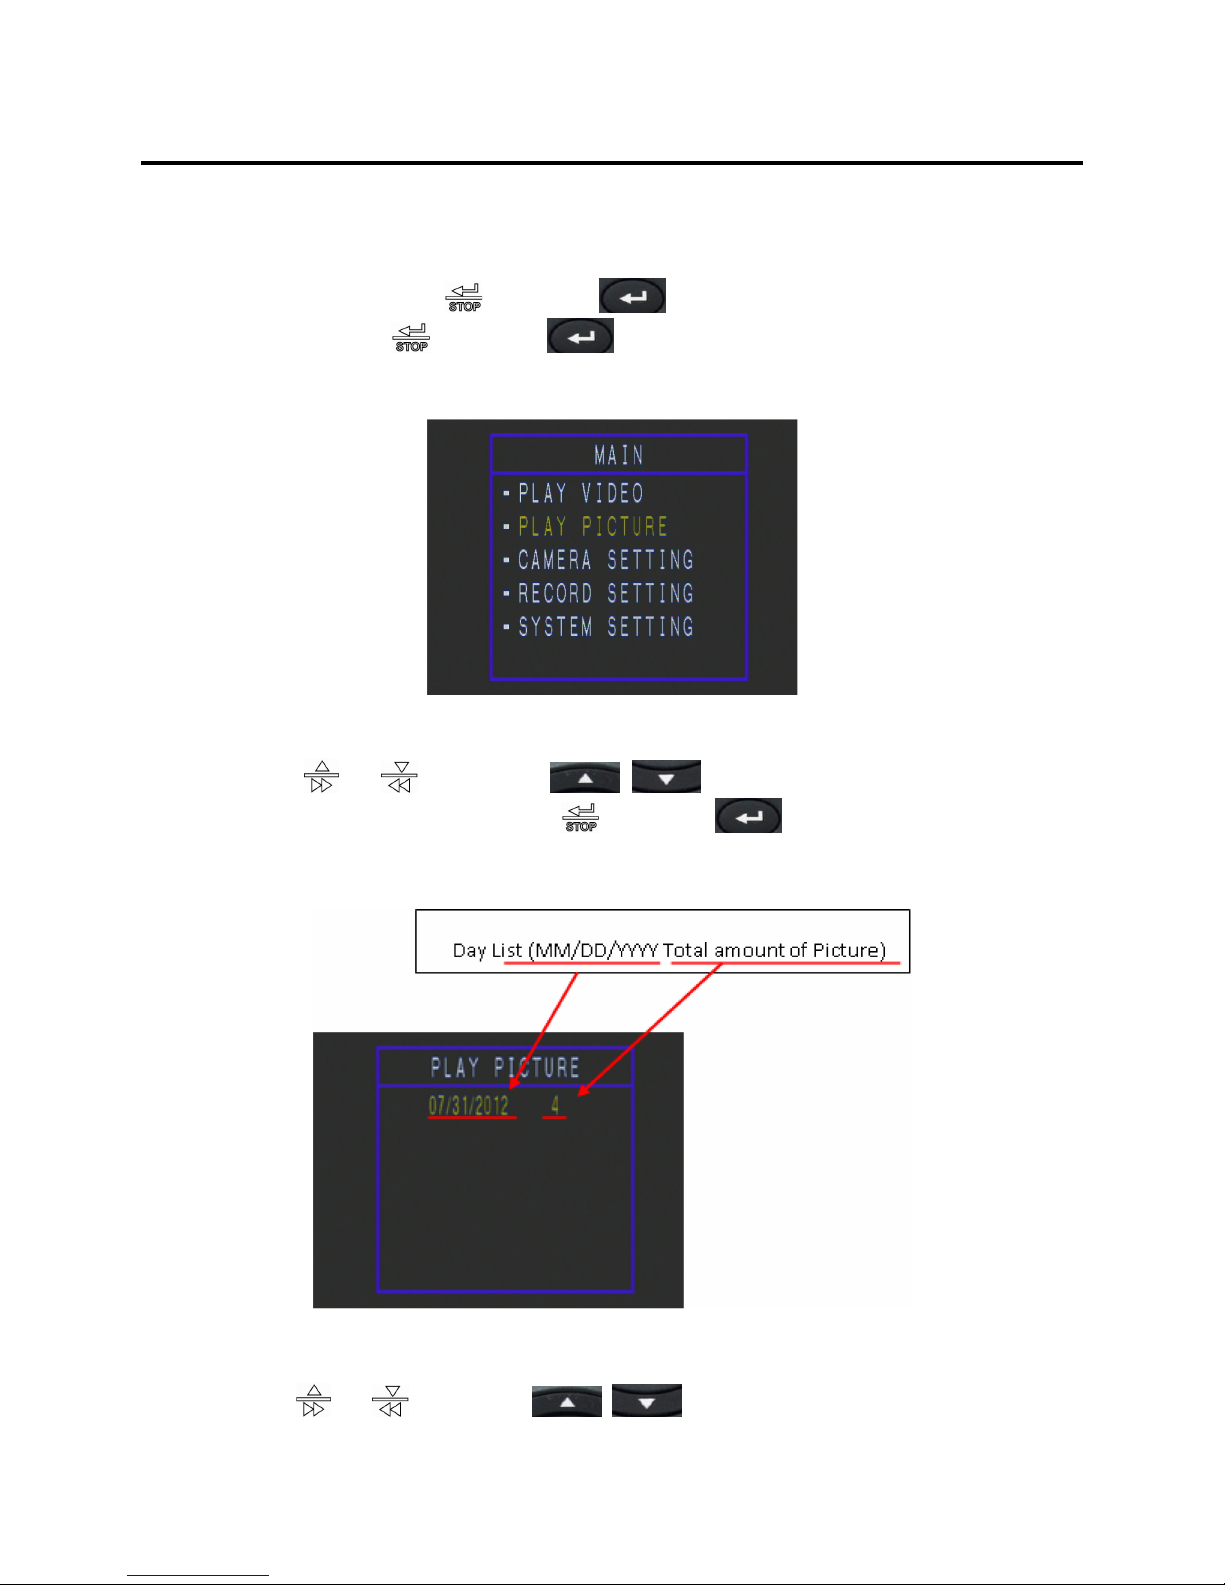
1. Press and hold the power button about 2 or 3 seconds until the LED indicator lights red and the
screen appears.
2. In preview mode, press the
menu, then press the
PICTURE] screen.
3. The date of captured images and the picture count is played.
Use the
picture to be played, then press the
the image.
or buttons (or on the remote control) to select the
button (or on the remote control) to enter the [MAIN]
button (or on the remote control) again to enter the [PL AY
button (or on the remote control) to view
4. The last recorded image appears on the LCD monitor.
Use the
image.
26
or buttons (or on the remote control) to view the desired
Page 27
Press the button (or on the remote control) to return to the previous menu.
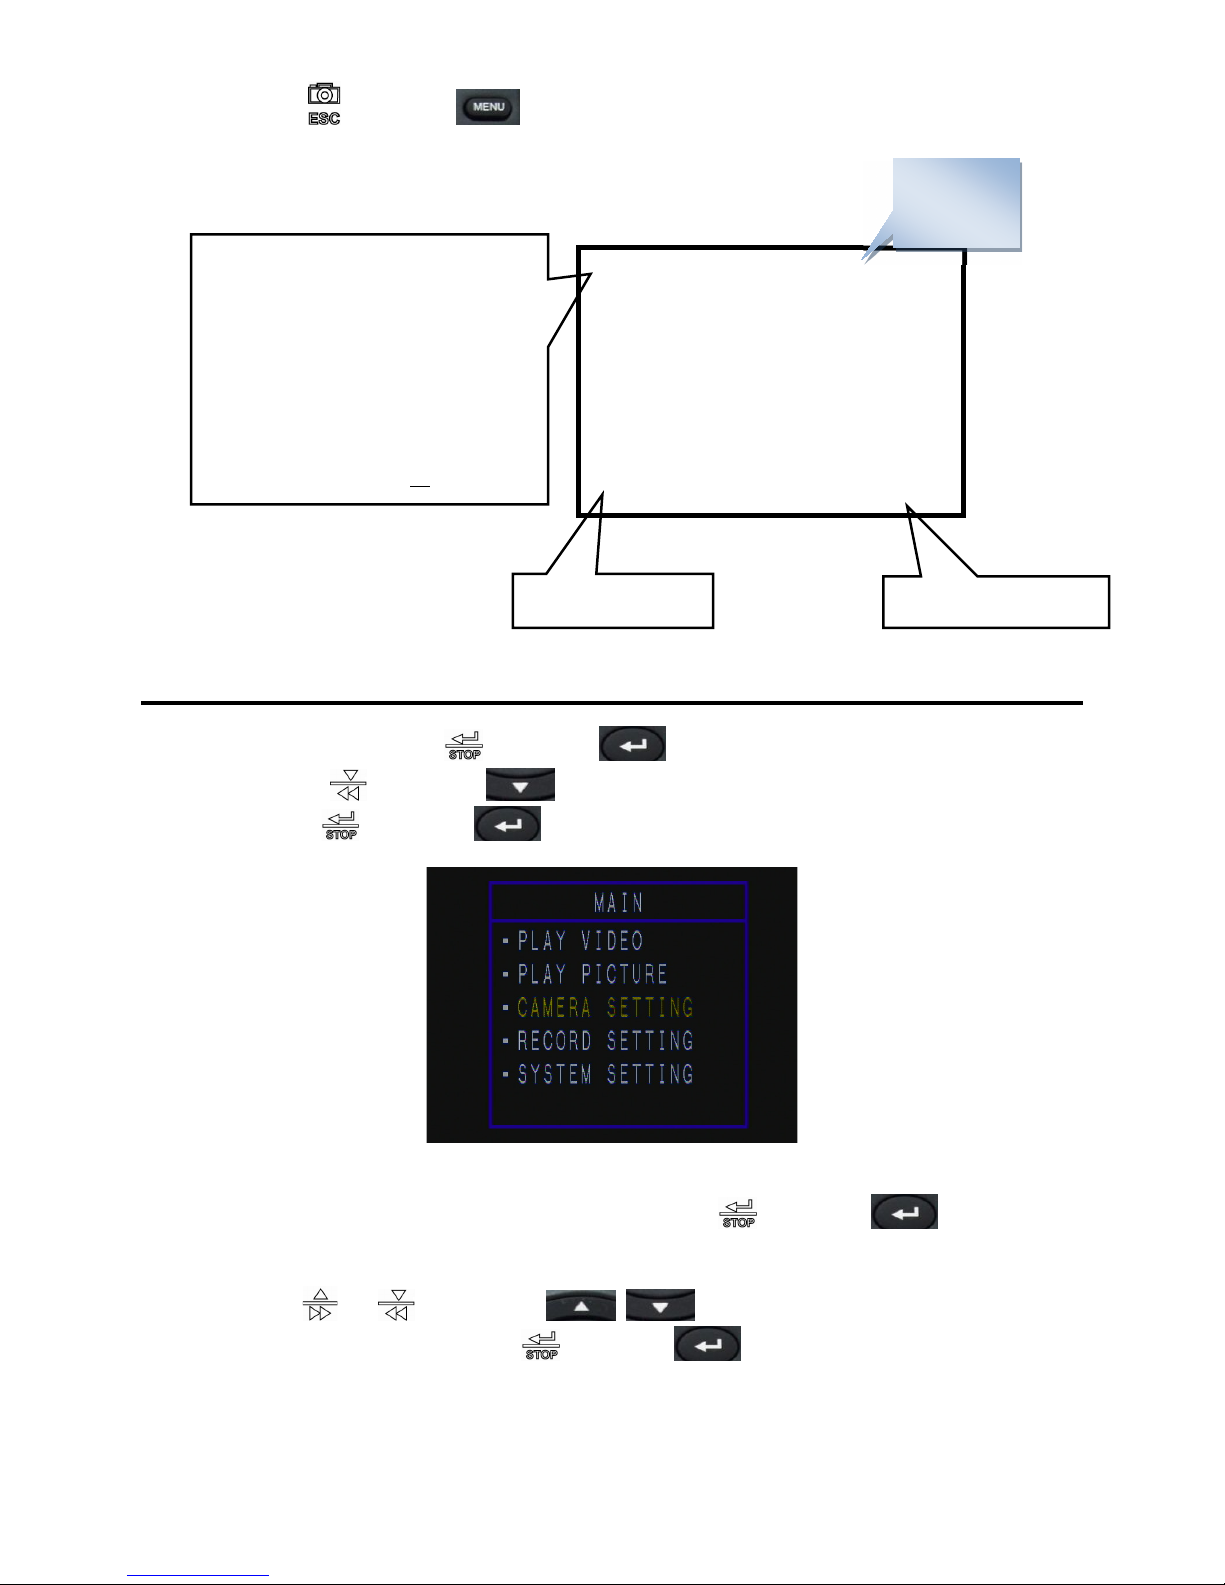
Content Storage Path:
\JPEG\YYMMDD\
File Naming:
A. the 1
st
picture in ss second --
hhmmss.JPG
B. the remaining pictures in ss
second—hhmmssxx.JPG
HHMMSS.JPG 736x480 SIZE: xxx K
MM/DD/YY MM/DD/YY
HH:MM:SS HH:MM:SS
Picture
captured
Date and time
DATE PRINTED
Camera Setting
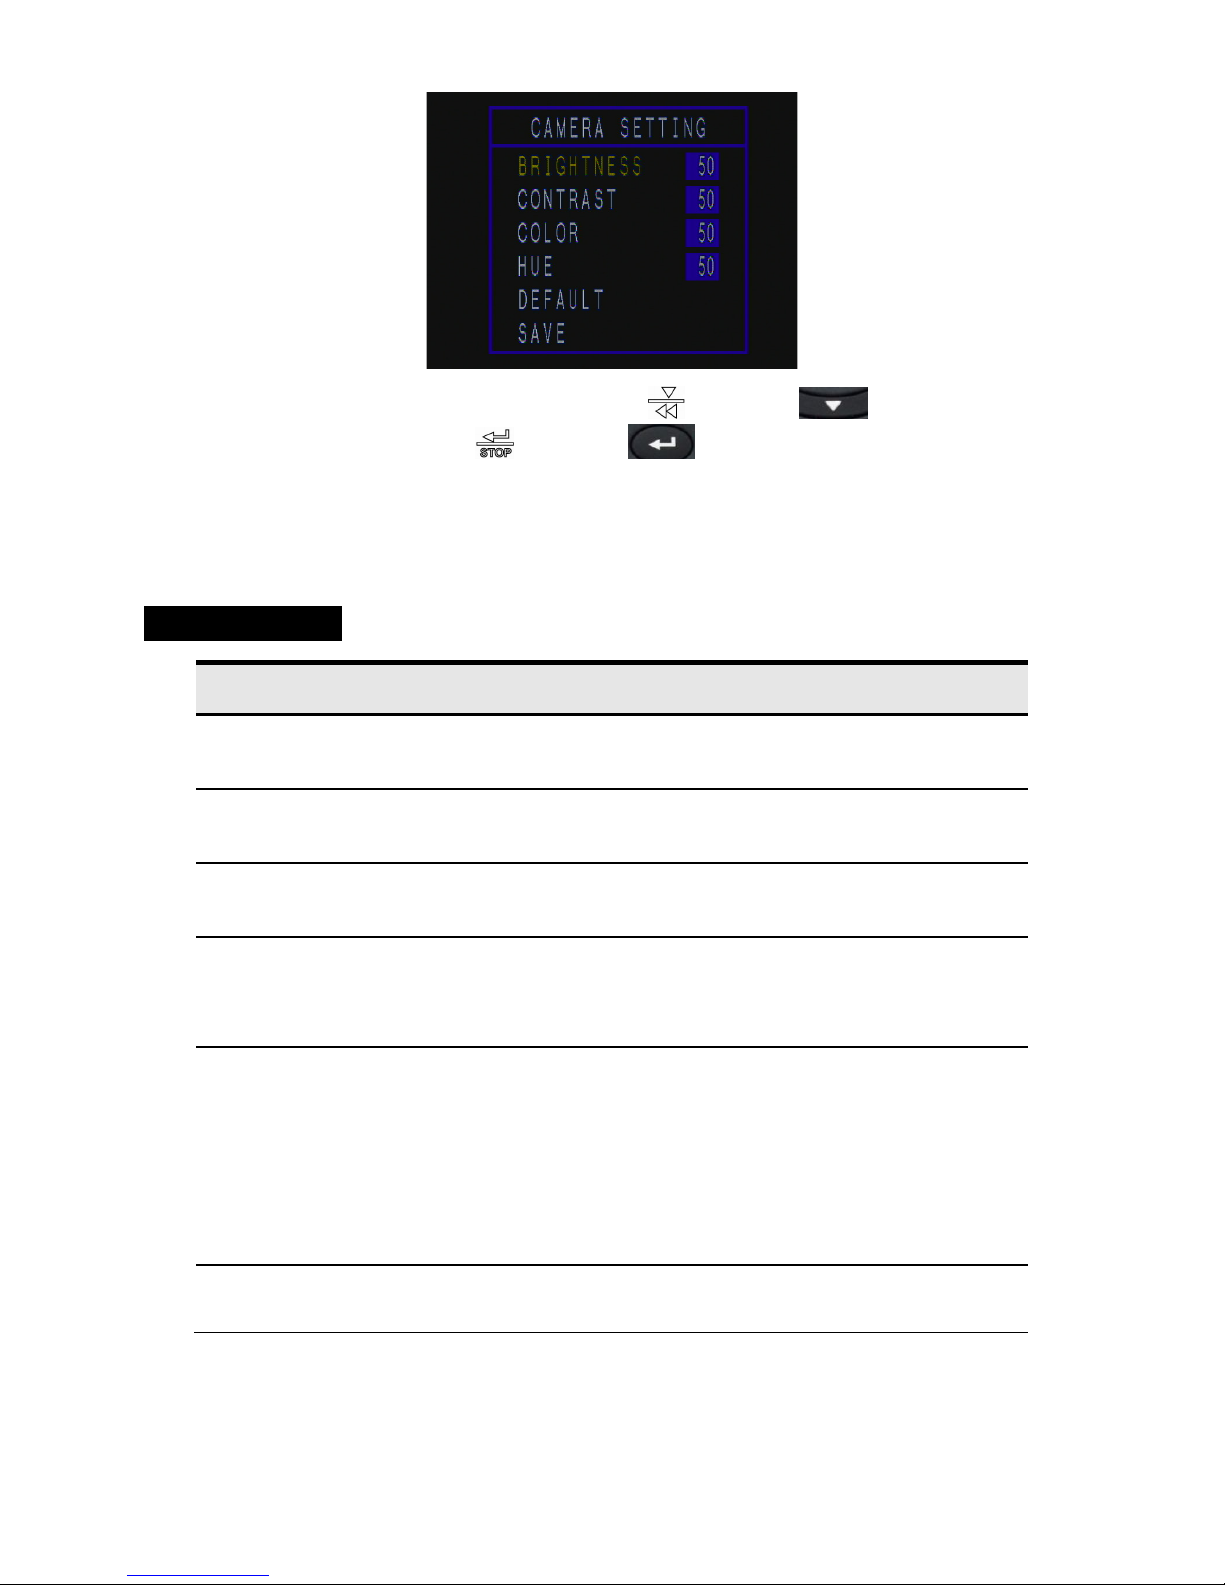
1. In preview mode, press the button (or on the remote control) to enter the [MAIN]
menu. Use the
then press the
button (or on the remote control) to select [CAMERA SETTING],
button (or on the remote control) to access in menu items.
2. Using the [BRIGHTNESS] setting as an example, press the
control) to proceed the BROGHTNESS parameter.
Use the
decrease volume, then press the
or buttons (or on the remote control) to increase or
button (or on the remote control) to confirm.
button (or on the remote
27
Page 28
The adjustment range is from
The default
3. After finished all the settings of each item, use the
to select [SAVE ], then press the
button (or on the remote control) to confirm.
button (or on the remote control)
The “SETUP SUCCESSFUL” message appears on the screen and you can immediately return to
the [MAIN] menu.
Menu Item List
Item Functional Description
BRIGHTNESS Sets the brightness of the LCD monitor.
0 – 100.
CONTRAST Measures the rate of change of brightness in an image. The
adjustment range is from 0 – 100.
COLOR Measures the accuracy with which the colors captured in the image
match the original scene. The adjustment range is from 0 – 100.
HUE A component that determines just what color you are using. Hue
measures the range of colors of the spectrum.
The adjustment range is from 0-100.
DE FAULT Returns all basic settings to the camera’s default settings.
configuration of CAMERA SETTING menu items are as shown below:
- Brightness: 50
- Contrast: 50
- Color: 50
- Hue: 50
SAVE Saves the settings of each menu item.
28
Page 29
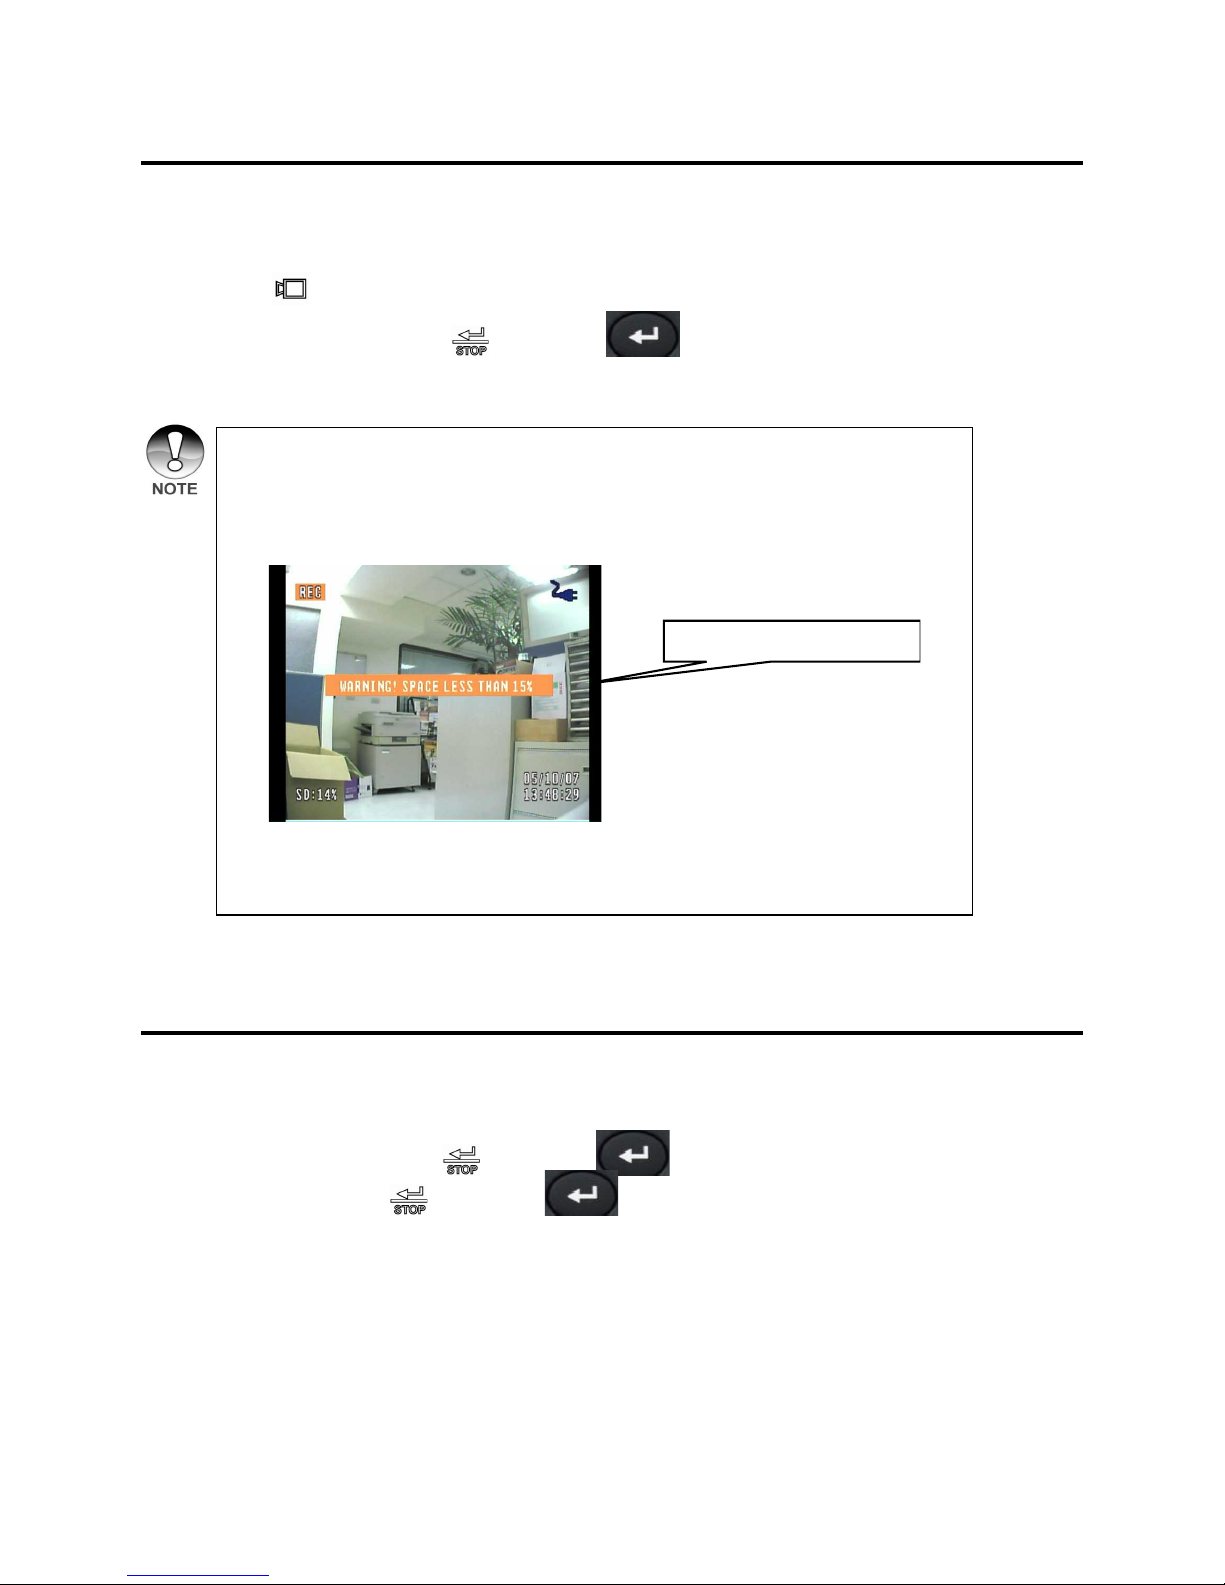
Record Video
Video clip from REC
1. Press and hold the power button about 2 or 3 seconds until the LED indicator lights red and the
screen appears.
2. Press the
3. To stop recording, press the
be saved.
button to start recording. The REC icon will be shown in the LCD display.
• You may select the percentage of remaining storage (15%, 10% or 5%)
for a reminder message. For more details, please go to the [SYSTEM
SETTING]->[STORAGE] menu to set the “WARN LOW” item.
• Deleting files (video clips or pictures) is not supported.
button (or on the remote control). The video file will
Playback Video Clip
1. Press and hold the power button about 2 or 3 seconds until the LED indicator lights red and the
screen appears.
2. In preview mode, press the
menu, then press the
VIDEO] screen.
button (or on the remote control) to enter the [MAIN]
button (or on the remote control) again to enter the [PL AY
29
Page 30
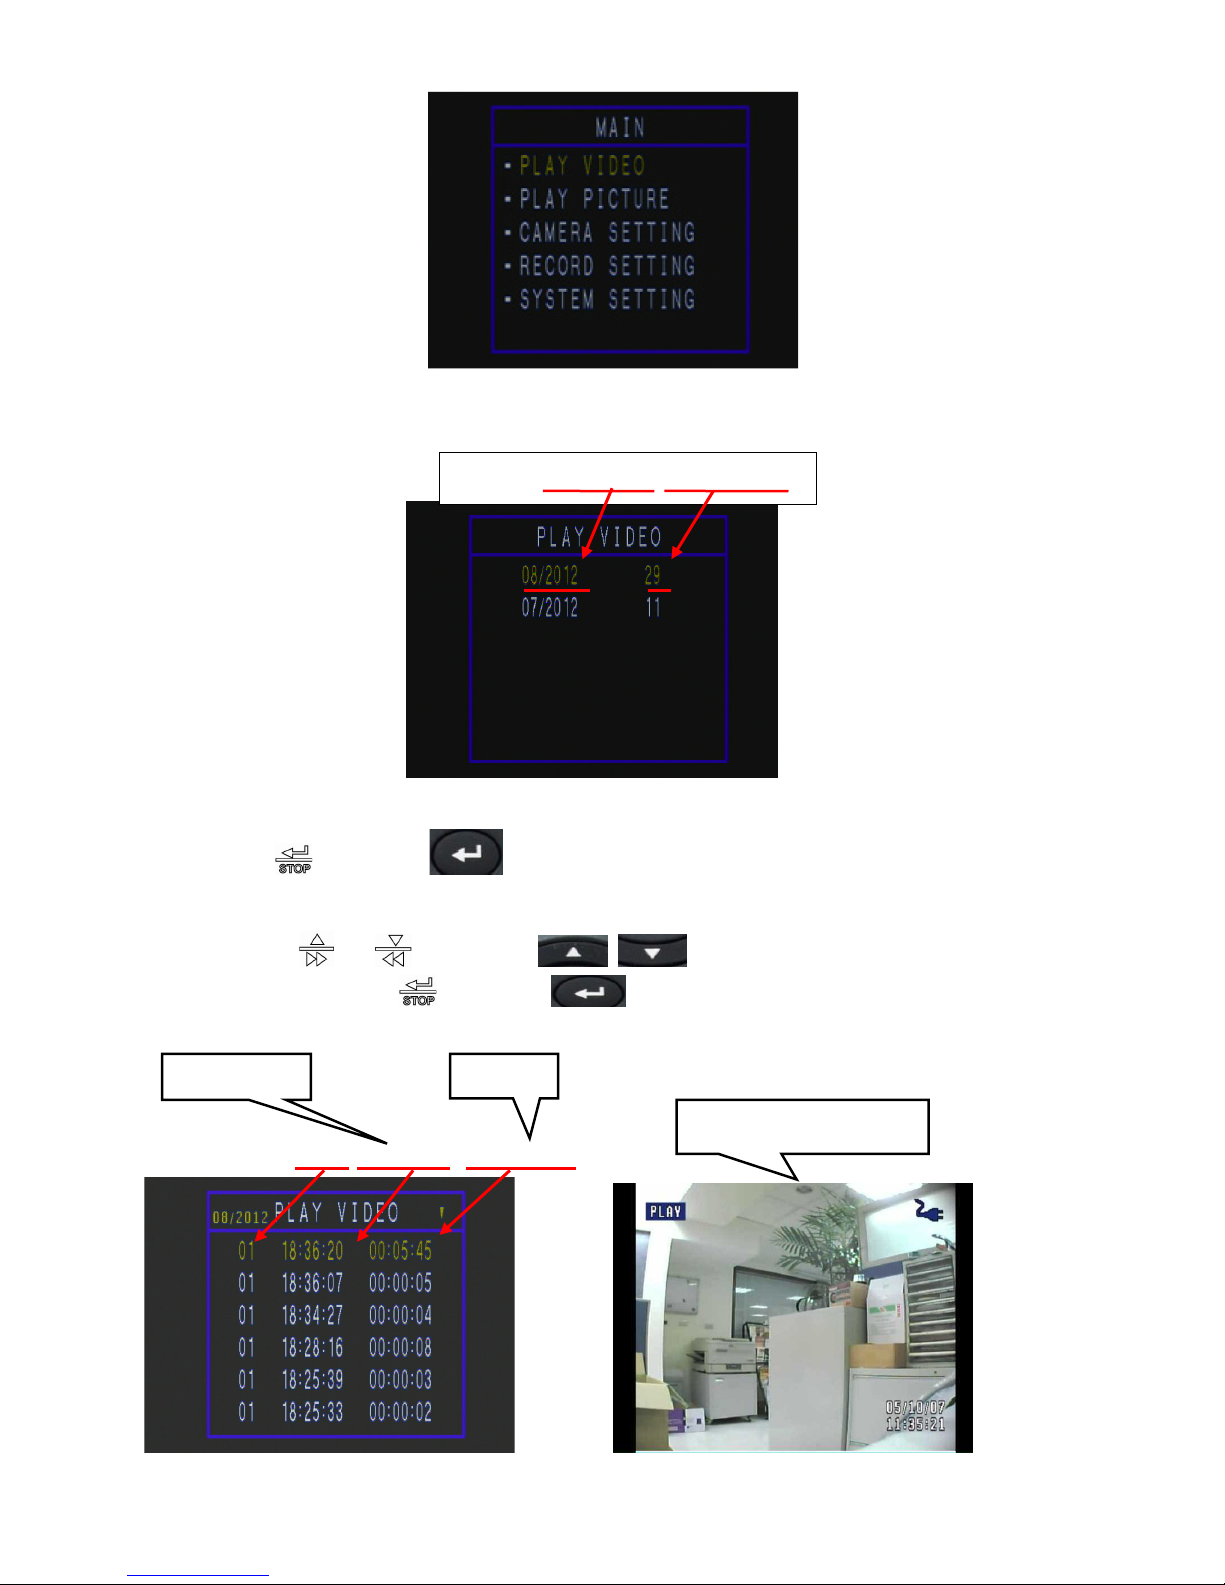
Start time
Duration
3. The number of video clips for each month when recordings were made are shown.
Month List (MM/YYYY Total Record)
4. Press the
button (or on the remote control) again to see the detailed information
of each record.
Use the
clip, then press the
or buttons (or on the remote control) to select a video
button (or on the remote control) to start video playback.
Record List (Day hh:mm:ss hh:mm:ss)
Video playback
30
Page 31
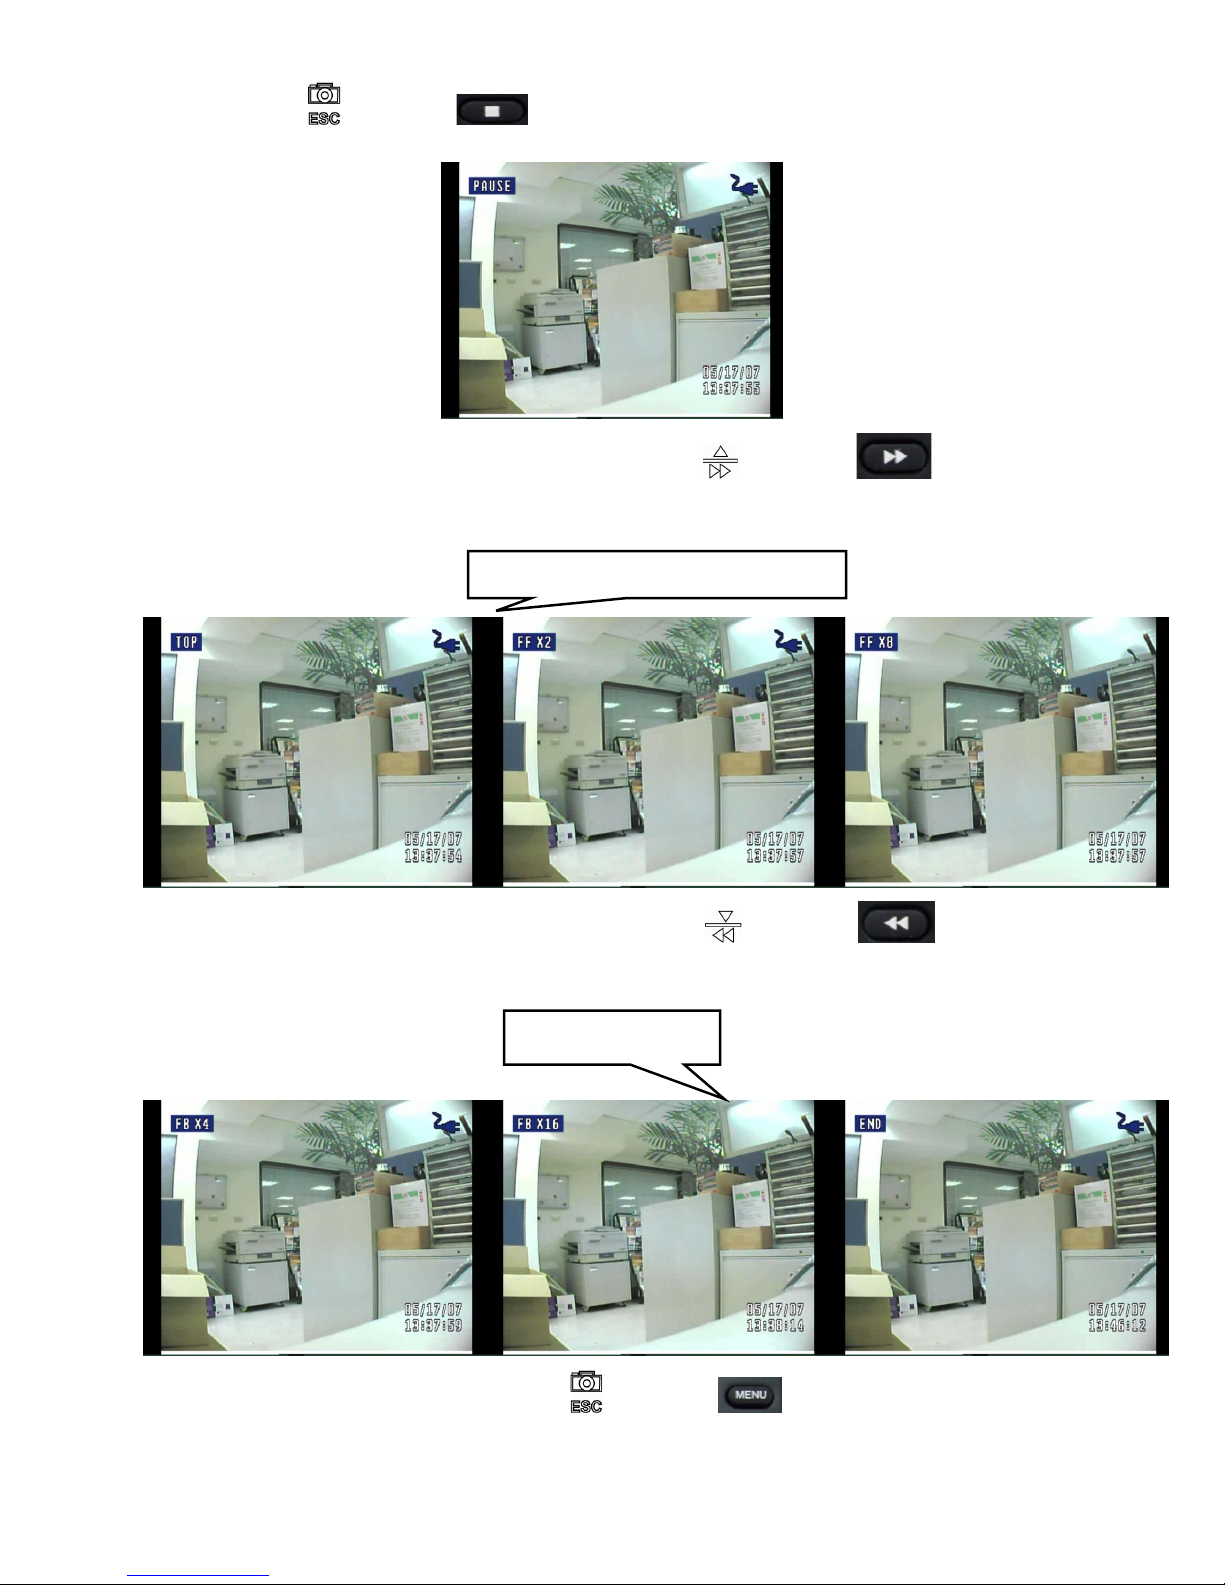
Press the button (or on the remote control) to cancel or stop video playback.
Video clip for, FF (x2/x4/x8/x16)
To play the video clip with fast forward, press the
control).
To play the video clip with fast backward, press the
control).
Video clip for FB
button (or on the remote
button (or on the remote
To return to the main menu, press the
button (or on the remote control).
31
Page 32
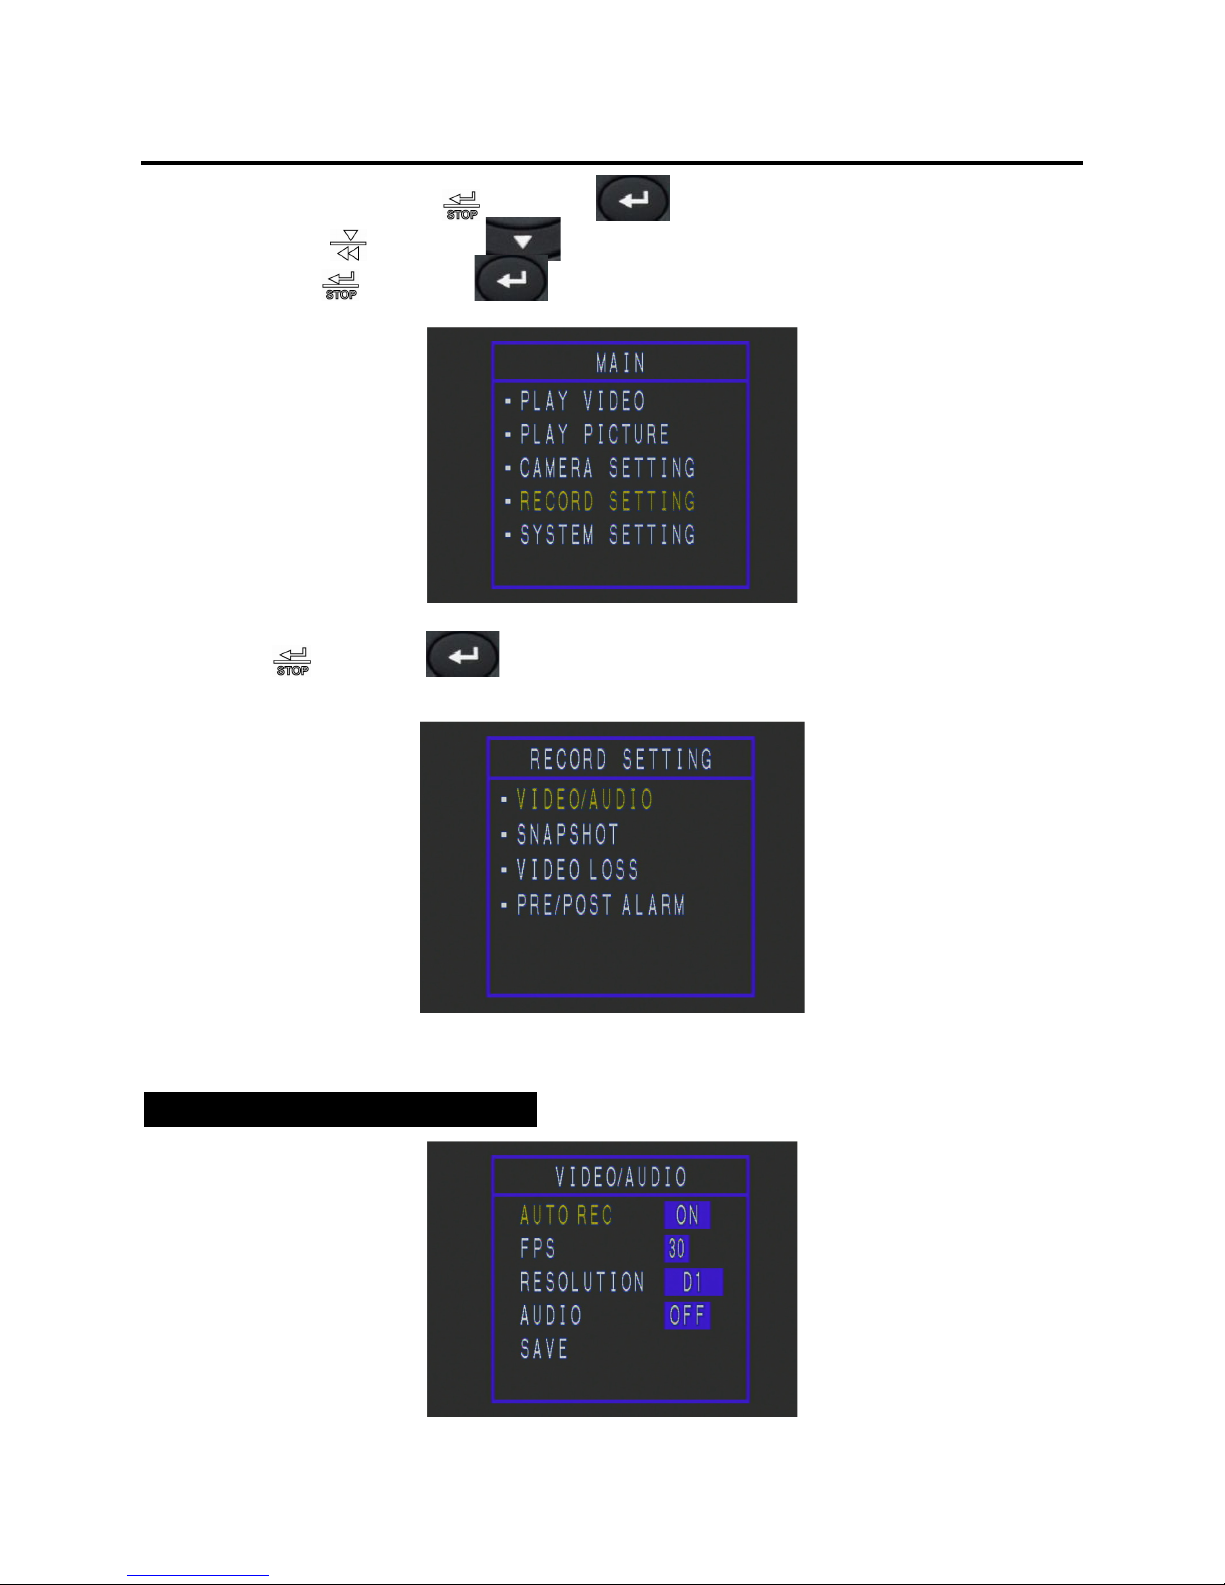
Record Setting
1. In preview mode, press the button (or on the remote control) to enter the [MAIN]
menu. Use the
then press the
2. Press the
button (or on the remote control) to select [RECORD SETTING],
button (or on the remote control) to access menu items.
button (or on the remote control) to enter the [VIDEO/AUDIO] menu.
Menu Item List - VIDEO/AUDIO
32
Page 33
Item Functional Description
hen video signal loss
AUTO REC
RESOLUTION Set the video/photo resolution. The default setting is D1.
AUDIO
SAVE Save all the settings of each menu item.
Support recording automatically when powered on. The default
setting is ON.
*ON / OFF
(Frames Per Second) Set the measurement of full-motion video
performance. The default setting is 30 (NTSC).
NTSC: 5 / 10 / 15 / 20 / 25 / 30
PAL: 5 / 10 / 15 / 20 / 25
Enable the audio with recording function. The default setting is OFF.
* ON / OFF
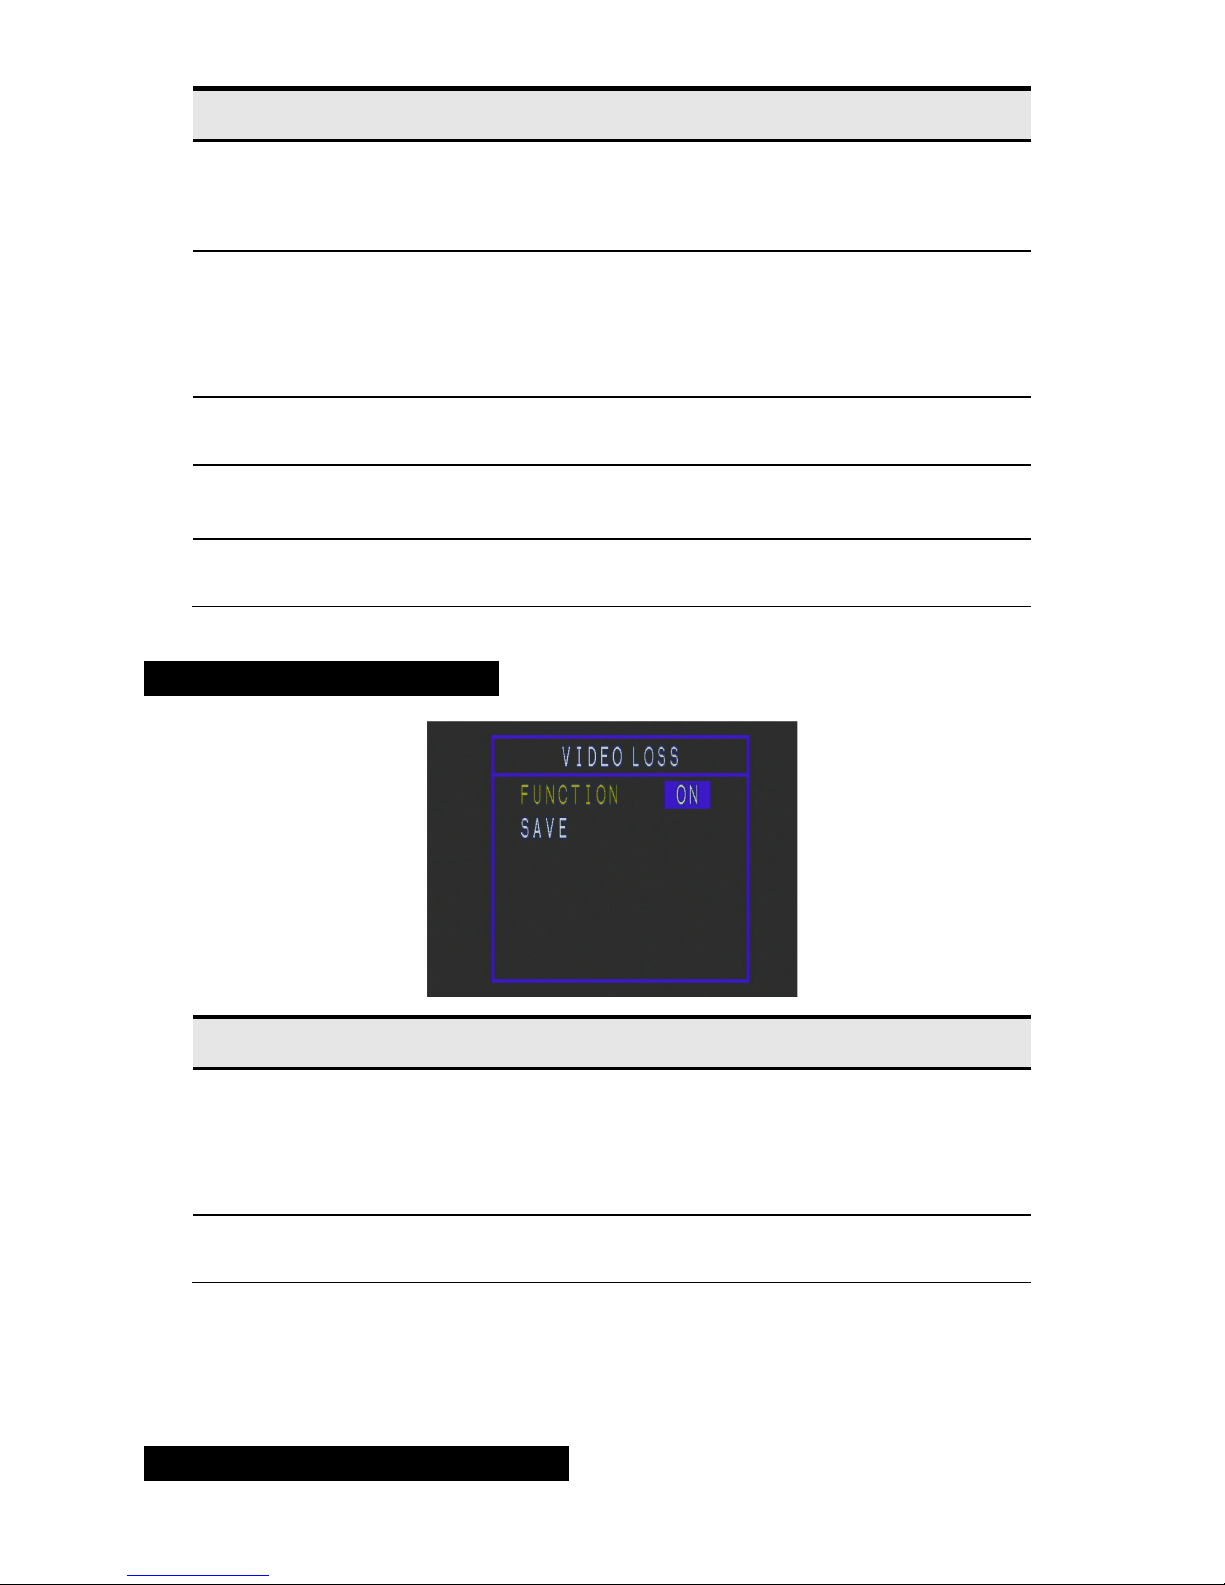
Menu Item List - VIDEO LOSS
Item Functional Description
FUNCTION Enable or disable the video loss function. W
occurs, the “VIDEO LOSS” message is shown if this function is
enabled. The default setting is ON.
* ON / OFF
SAVE Save all settings of each menu item.
Menu Item List - PRE/POST ALARM
33
Page 34
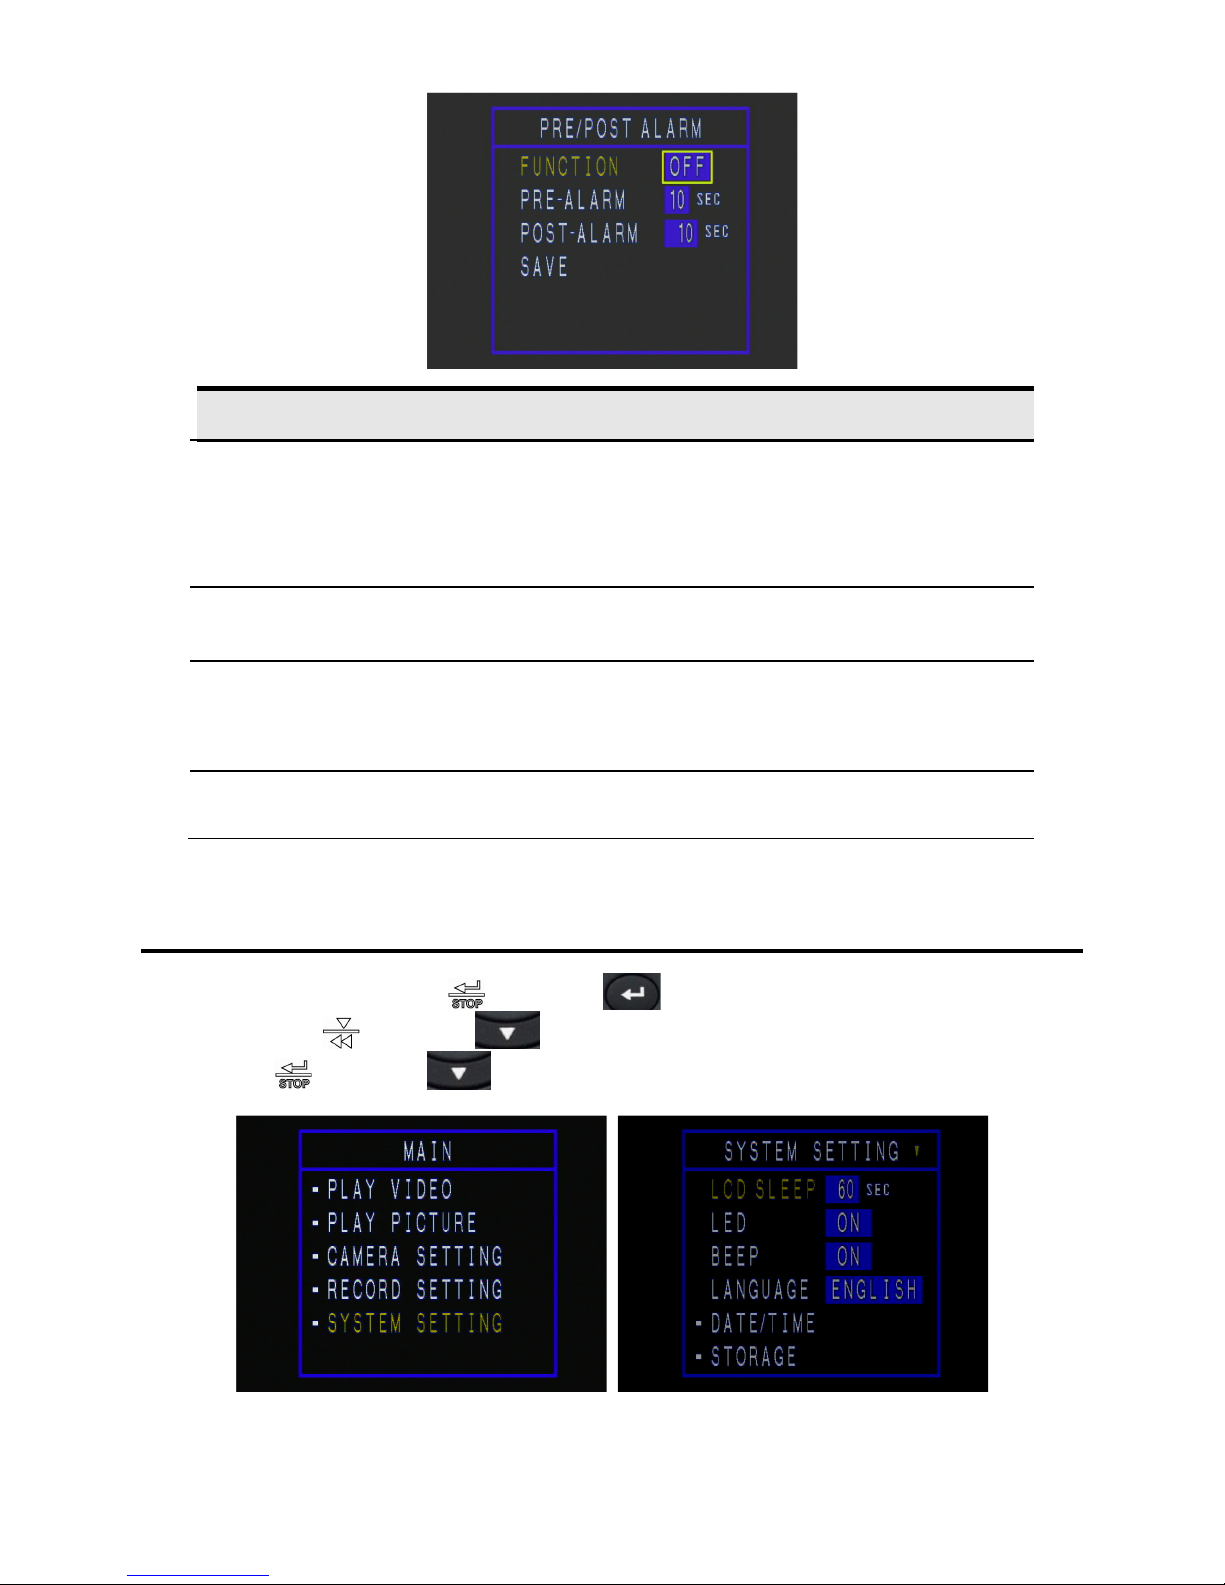
tem Functional Description
if
50 / 60 / 70 / 80 / 90 / 100 / 110 /
FUNCTION Enables or disables the pre/post alarm function.
When video signal loss occurs, the “VIDEO LOSS” message is shown
this function is enabled. The default setting is ON.
* ON / OFF
PRE-ALARM Set the required pre-alarm time.
* Pre-alarm time: 10/20/30/40/50/60 SEC
POST-ALARM Set the required post-alarm time.
* Post-alarm time: 10 / 20 / 30 / 40 /
120 SEC.
SAVE Saves all settings of each menu item.
System Setting
1. In preview mode, press the button (or on the remote control) to enter the [MAIN]
menu. Use the
press the
34
button (or on the remote control) to select [SYSTEM SETTING], then
button (or on the remote control) to access in menu items.
Page 35
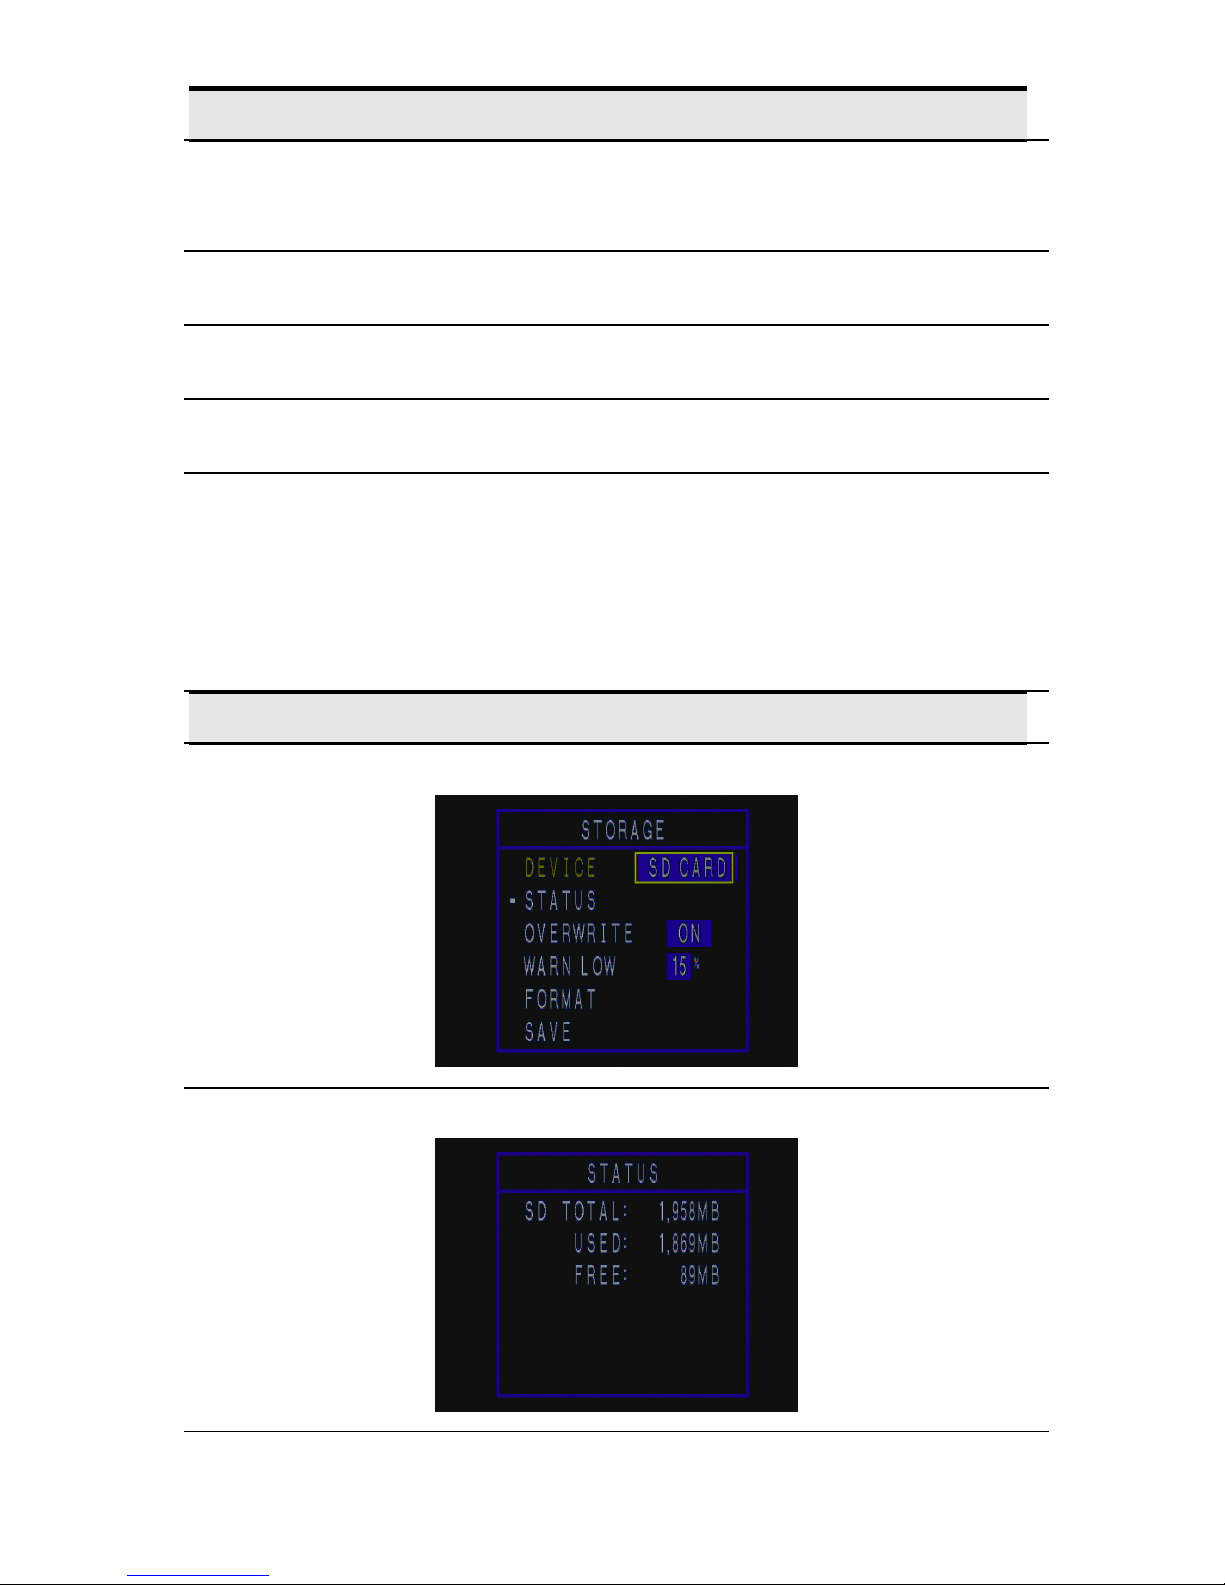
tem Functional Description
time is
Refer to section in this manual titled
STORAGE
LCD SLEEP For power saving, the LCD monitor will turn OFF when setting
up. The default is 60 SEC.
* 00 / 30 / 60 / 120 SEC
LED Set the LED indicators on / off. The default is ON.
* ON / OFF
BEEP For an audible indication when you press any button. The default is ON.
* ON / OFF
LANGUAGE Sets the language that is displayed on the LCD monitor.
* ENGLISH
DATE/TIME This sets the date and the time.
“Setting the Date and Time” for further details.
YY/MM/DD * DD/MM/YY * MM/DD/YY
tem Functional Description
DEVICE (SD CARD)
STAT US
35
Page 36
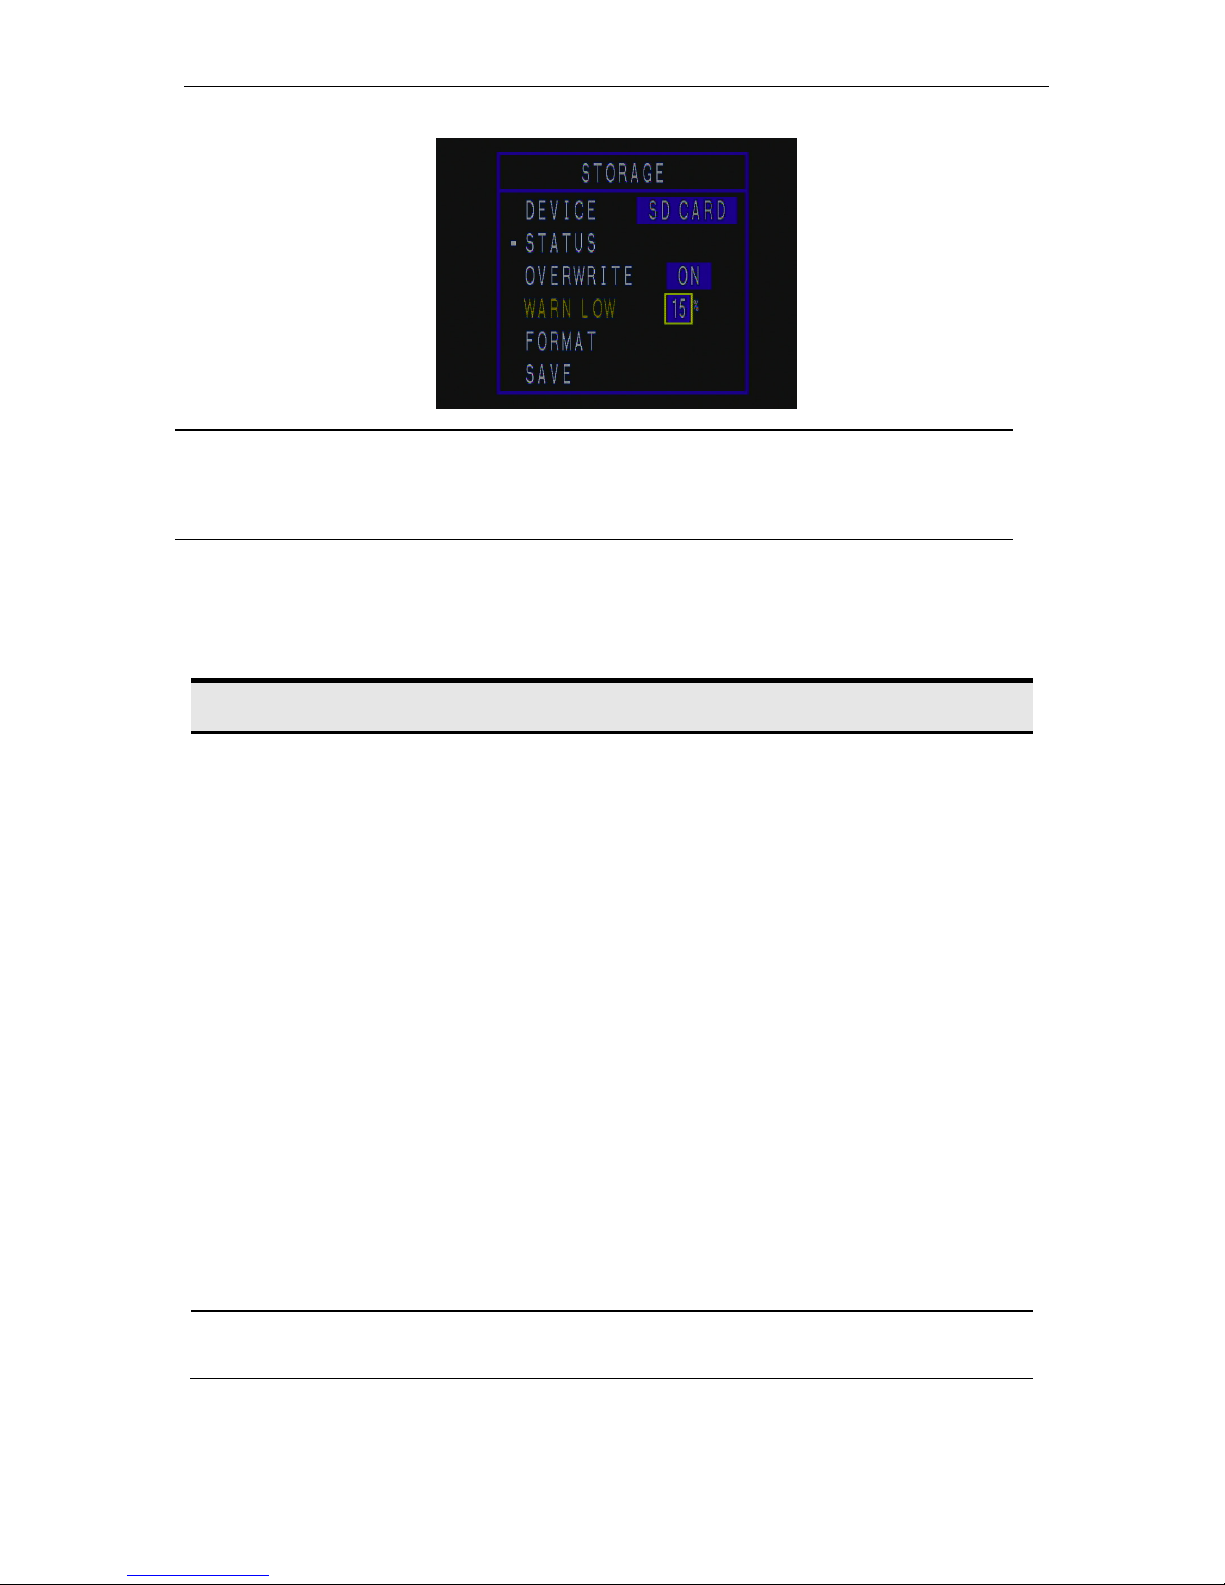
WARN LOW
images are
WARN LOW = 15。
FOR MAT
Erases all images and reformats the SDHC card. Protected
also erased. SD card cannot be formatted if it is write-protected.
tem Functional Description
Return all basic settings to the default setting of the MDVR81:
Camera (Brightness、Contrast、Color、Hue) = 50。
AUTO REC = ON。
FPS = 30。
RESOLUTION = D1。
AUDIO=OFF
VIDEO LOSS=ON
PRE/POST ALARM FUNCTION=OFF
PRE-ALARM=10
POST-ALARM=10
LCD SLEEP=60
LED=ON
BEEP=ON
LANGUAGE=ENGLISH
TIME ZOME:GMT = +08:00。
DATE FORMAT = MMDDYY。
STORAGE DEVICE = SD CARD
OVERWRITE = ON。
SAVE (Default Settings)
36
Page 37

TROUBLE SHOOTING
Q 1: Why can’t I turn on the MDVR81?
A 1: A possible reason is due to weak batteries (
power adapter is not connected. We recommend that you use the AC power adapter to fully
charge the battery, and properly connect the AC power adapter.
Q 2: No display appears in the LCD monitor when the power is on.
A 2: The possible reasons are as following below.
Weak batteries
The AV cable is plugged into the MDVR81.
The function of LCD button on the remote control has not been activated.
The LCD SLEEP in the [SYSTEM SETTING] menu is not set properly.
We recommend that you do the following solutions to resolve the problem.
Use the AC power adapter to fully charge the battery.
Unplug the AV cable, then confirm the LCD monitor is functional.
Set the LCD SLEEP to 00.
or appears in the display), or the AC
Q 3: Why can’t a video clip be played?
A 3: It may be because you did not insert the SDHC memory card. We recommend that you insert the
SDHC memory card with recorded video clips.
Q 4: Why does the video clip looks too bright or too dark?
A 4: It can be because the BRIGHTNESS in the CAMERA SETTING menu is not set properly. Adjust the
BRIGHTNESS setting.
Q 5: I cannot hear the sound at all. How can I do?
A 5: A possible reason is that the AUDIO of VIDEO/AUDIO in the [RECORD SETTING] menu is set to
OF F. Please ensure the AUDIO is set to ON.
Q 6: What should I do if the error message “SD CARD REMOVED” appears?
A 6: We suggest:
Ensure the SD card is installed properly.
Format the SD card inside the MDVR81, or with SD Formatter from SD Association, available at:
https://www.sdcard.org/downloads/formatter_3/
37
 Loading...